
In 2024, How to Add Text to Video

How to Add Text to Video
If you are making an instructional or explainer video, you will often find that you need to add text to various sections of the video. Depending on the tool you use, the process of adding text to a video can be simple or complicated.
In this article, we will share with you the different options you have when you want to add text elements to a video project.
Add Text to a Video Online
One of the easiest ways that you can add text to any video is to use a free online solution. There are many online tools to choose from but VEED is a free solution that is easy to use and offers a wide range of features to choose from.
Here’s how you can use VEED to add text to your video;
Step1Go to https://www.veed.io/ on any browser to access the video editing tool. Click on “Upload Your Video” to open a new project. In the new project screen that appears, tap on “Upload a file” to add your video.

Step2Once the video is open, click on the “Text” tab on the left and then select the type of text you want to add to the video.

Step3Type in your text and then use the options below the text box to choose the font style, size, and color of the text. You can also use the duration icons below the text to indicate where you want the text to appear during playback.

Step4When you’re happy with the changes, click on the “Export” button at the top to save the changes and download the video.
Add Text to Video on Computer
While online tools like VEED can come in handy when you want to make simple changes to a video, you will often find that they don’t have the necessary features to customize the text in various ways. For that, we recommend Wondershare Filmora, a desktop editing suite that has a lot of useful features.
Filmora combines its wealth of editing features and a simple user interface to make it one of the most effective video editors in the market. Here’s how you can add text to any video using Filmora.
Step1Download and install Wondershare Filmora onto your computer. Open the program and then click on the “Import” button to start. You can also just drag and drop the video to the main window to open it.
Step2Once the video is open in Filmora, you will need to drag it to the timeline panel before you can start to edit it.

Step3Click on the “Titles” tab at the top to open the text and title presets that you will need to add text to the document. Filmora offers more than 200 text effects to choose from. Just double-click on one of the presents to select it and then the preview window to see it in real-time.

Step4If you like the preset that you have selected, place the cursor on the position in the timeline where you would like to add the text and then drag and drop the title track above the video in the timeline.

Step5If you would like to change the duration of the text simply drag the edge of the timeline until you get the length that you desire. Filmora also allows you to edit and customize the text. To do that, double-click on the “Title” time frame to get some customization options.
Step6Once you are happy with all the changes you have made, click on “Export” and choose an output format to save and export your video.

Add text to Video on iPhone
One of the easiest ways to edit a video on an iPhone is to use iMovie. This simple and effective solution can help you edit videos on your iPhone in numerous ways including adding text and subtitles. The following are simple steps to help you use iMovie to add text to a video on an iPhone;
Step1Open the video clip that you would like to add text to. Once the video is open, click on the Text icon from the options at the bottom of the screen.
![]()
Step2Select the style you would like to use from the list of templates.

Step3A sample text will appear on the screen. Tap on it and then select “Edit” to enter the desired text. Tap “Done” once you are done typing.

Step4To move the text to the desired location, simply tap on it again and reposition it. You also have the option to increase or decrease the size of the text as desired using the pinch motion. If you want to change the color or font, tap on the “T” that will appear below the clip and choose “Aa” to change the font or the multicolored circle to change color.

You also have numerous other options in terms of effects including text-shadow. Just tap on the “three-dot icon” to access these features.
Add Text to Video on Android
The best way to add a video on Android devices is to use third-party apps. The good news is that there are several very useful video editing apps that you can use for this purpose. In this guide, we will show you how you can add text to a video on Android using two of the most effective solution.
Using the PowerDirector by Cyberlink
PowerDirector is a video editing app that allows you to edit various aspects of the video including adding text to the video. Available on the Google Play Store, this app has a wealth of additional features that include trimming, rotating clips, and even adjusting the color, brightness, and saturation.
Here’s how you can use PowerDirector to add text to your video;
Step1Install PowerDirector on your device. Open it and tap “New Project” at the top. Select an aspect ratio depending on the video project you are working on and enter a project name.

Step2Select the video that you would like to edit from the folders that show up on the screen. The video will be added to the main timeline of the project.
Step3Select the video layer and then tap on the layer mask from the left sidebar. Select the text tab at the top and then choose the text style that you want to add to the video. Tap on the “+” button inside the style to add the text style you have selected.

Step4Type in the text that you want to add to the video on the text box and then tap on the “T” icon at the top-right corner of the text box to customize the text.
You can use PowerDirector to change the font, color, and text size or even add effects like Text shadow.

Step5When you’re done editing the video, tap on the “Export” icon at the top-right corner of the screen and choose if you would like to save the video on the device or share it via a social media app.

Free Download For Win 7 or later(64-bit)
Free Download For macOS 10.14 or later
Free Download For macOS 10.14 or later
Confused as to How to Add Subtitles to a Video on iPhone? No Worries as We Bring You the Best Solution to Get the Task Done
Subtitles have become an integral part of the videos as they offer multiple benefits like reaching a wider audience, helpful for people with hearing disabilities, helping in watching videos by keeping audio off, and more. The high-end camera of the iPhone is capable of recording excellent quality videos, but these do not have subtitles.
So, if too you are searching for ways how to add subtitles to a video on your iPhone you have reached the right place. In this article, we will help you learn about the different tools and methods that allow adding subtitles to your iPhone videos.
Solution 1: Add Subtitles to Your Video with Preinstalled iMovie
For the iOS and Mac systems, iMovie is an excellent editing tool that also comes preinstalled on devices. Though iMovie does not support adding subtitles to videos on your iPhone a workaround is available where text can be added to be used as the subtitles.
Steps on how to add subtitles in iMovie on iPhone
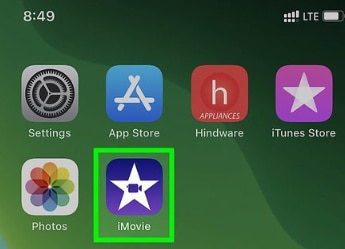
Step1 On your, iPhone open the iMovie app and then click on the Movie option and then on the + sign to browse and add the video to which you want to add the subtitles.
Step2 Next, move the video to the timeline and then stop at the video point where the subtitle has to be added.
Step3 Click on the T button and multiple styling and text options will appear.
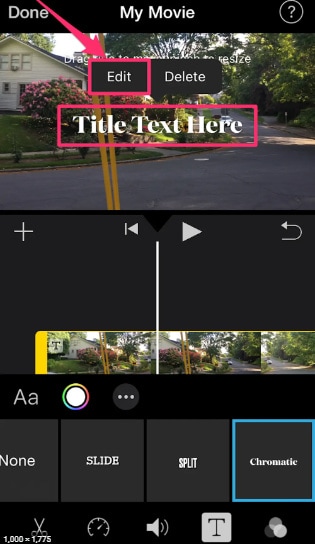
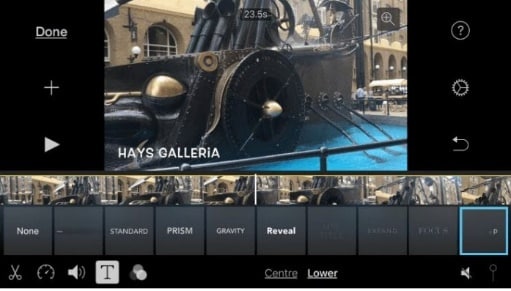
Step4 Choose the desired style and then the screen location – Center or Lower where you want to place the subtitle.
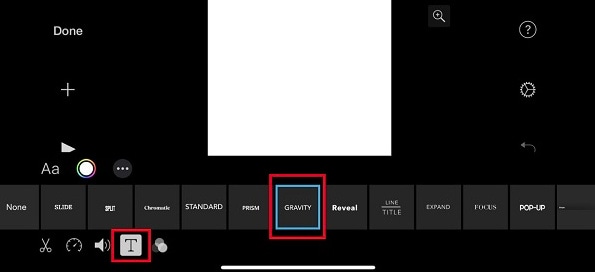
Step5 Play and check if the video is being added at the right place.
Step6 Finally, click on the Done button to save the added text as the subtitle to your video.
Pros
- Simple and quick solution
- No need for any third-party software installation
Cons
- Subtitles cannot be added directly
- No option for subtitle customization
Summary: For users who are looking for a simple and straightforward method, using iMovie to add text as subtitles are the best solution.
Solution 2: Using a Professional Video Editing App to Make & Add Subtitles for iPhone
An array of professional video editing apps for iPhone are available as well that can let you perform multiple tasks including subtitle and text editing to your videos. These apps can be simply downloaded on your device and can be used for the videos present on your phone. Shortlisted ones for your reference are enlisted below.
1. Filmora- Video Editor and Maker
Developed by Wondershare, this is an excellent app that can be used for all basic as well as advanced video editing requirements. Using the app, you can creatively edit your videos by trimming, adding text, adding transitions, adding filters, and more. Though there is no direct subtitle-adding feature in the app, you can add them as text.

Pros
- Simple to use app for all types of video editing tasks
- Add texts to your videos quickly and easily as subtitles
- Comes with multiple videos creating templates
Cons
- Subtitles cannot be embedded directly
- The advanced Pro version is paid
Summary: The app is just perfect for users are want to create interesting videos on their iPhone using multiple editing features.
**2. MixCaptions
This is a widely used iOS app to get and add subtitles to your videos. Additionally, you can even edit the video captions, display captions at your desired location, customize the caption text, and more.
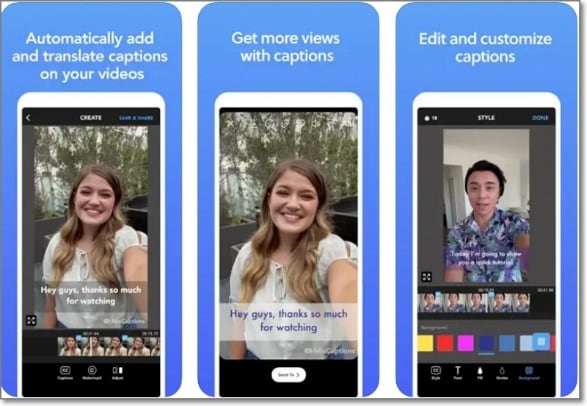
Pros
- Free to use simple app
- Allows to import SRT files, and edit the subtitle file
- Allows to automatically transcribe in 23 languages
Cons
- Free version processed files with a watermark
- Longer videos can be processed through pro paid version
Summary: To add as well as edit the subtitle files on your iPhone and other iOS devices, this is an excellent app to consider.
**3. Kaptioned
This is another popularly used app for auto-detecting, transcribing, and adding a subtitle to videos. The app makes use of AI for detecting the words automatically in the video and then adding subtitles to the same. An array of subtitle customization options is also supported by the app like changing the style and colors, the option to add subtitles in 2 languages, export subtitles in an SRT file, and more.
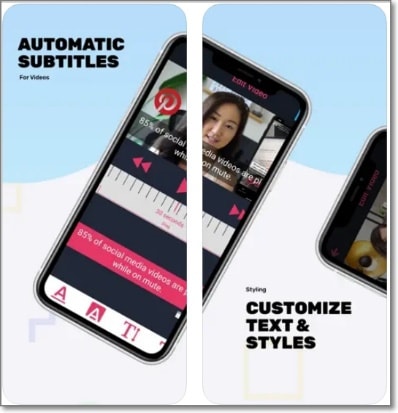
Pros
- Use AI to generate subtitles for the videos
- Allows editing and customizing subtitles in an array of ways
- Support to multi-language generated subtitles
Cons
- Videos processed through the free version have a watermark
- Users’ complaints of not-so-efficient customer service
Summary: When you want subtitles to be generated automatically for your videos and that too in multiple languages, this is the app to look forward to.
how to add subtitles to a video in iPhone with a video editing app
Here we take Filmora as an example to show you the concrete steps.
- Install and launch the app on your iPhone.
- Add the desired video to the app for which you wish to add the subtitles.
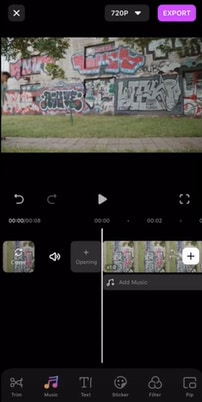
- Move to the video location where you want to add the subtitle.
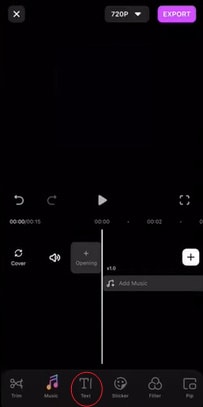
- Choose the option to add the text to your videos and then enter the desired text.
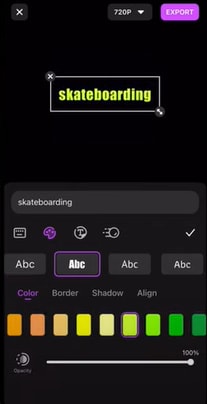
- When done, you can tap on Export to save the video with the text on your device.

Solution 3: Embed Closed Captions to a Video on iPhone with 3Play Media
For users who are looking for advanced features, 3Play Media is a great service to use. Using the program, subtitles to the videos can be encoded in more than 20 languages quickly and easily. The tool allows adding soft as well as hard subtitles to your video files. A wide range of additional features is supported by the software like adding real-time captions to the live streaming platforms, options for audio descriptions, features for translation and subtitling, and more.
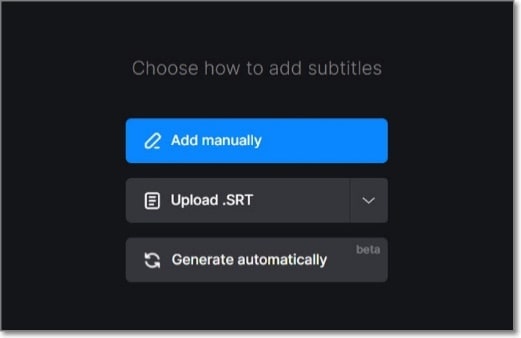
Steps how to add subtitles to video on your iPhone using 3Play Media
First of all, using the 3Play Media to create the closed caption for the iPhone video. It is recommended to use. scc format for the subtitle file.
Step1 You need to send the video to the software for transcription and captioning.
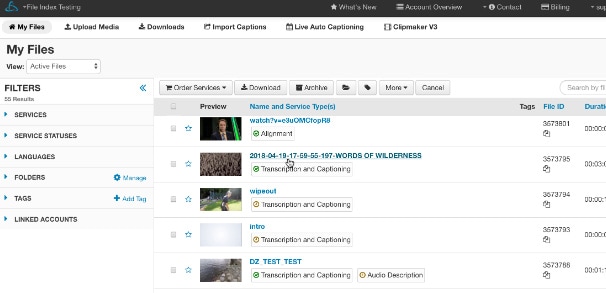
Step2 Once the closed caption file is ready, you next need to order the caption encoding service. On your 3Play Media tool go to My Files > Caption Encoding and then choose the type of encoding for your iPhone model.
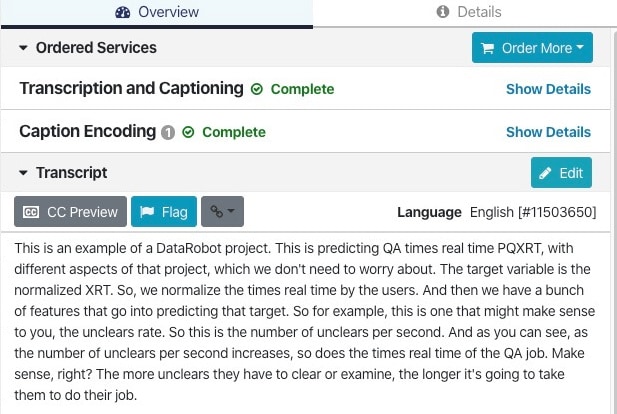
Step3 Next, follow the prompts as they appear and then place your order. In some time, the process will be completed and you will get the notification of the same on your email.
Download the video with the added subtitles.
Solution 4: Add Captions/Subtitles to a Video on iPhone with Wondershare Filmora
Another professional way to add subtitles to the videos on your iPhone is by using desktop software. You can transfer your desired videos to your Windows and Mac device and then using a versatile tool add the subtitles. One software that you can rely on for the task is Wondershare Filmora which is an advanced video editing tool supporting multiple functions including subtitle adding as well as editing.
Using the software, you can quickly import and add the local SRT subtitle files to your videos in all key formats and if needed, can also customize them using functions like editing time-code, changing subtitles, adding, merging subtitle strips, changing the style, and more.
Steps to add subtitles to iPhone videos using Wondershare Filmora
Free Download For Win 7 or later(64-bit)
Free Download For macOS 10.14 or later
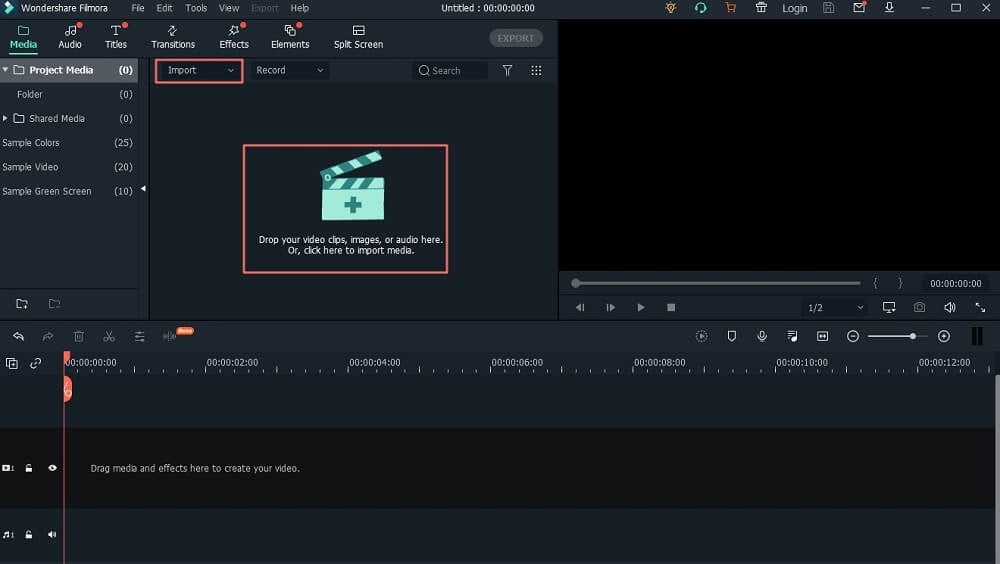
Step1 Launch the installed software on your system and then using the Media resource area, add the SRT file as well as the video to which it has to be added. Drag and drop the video and the SRT file to the timeline below.
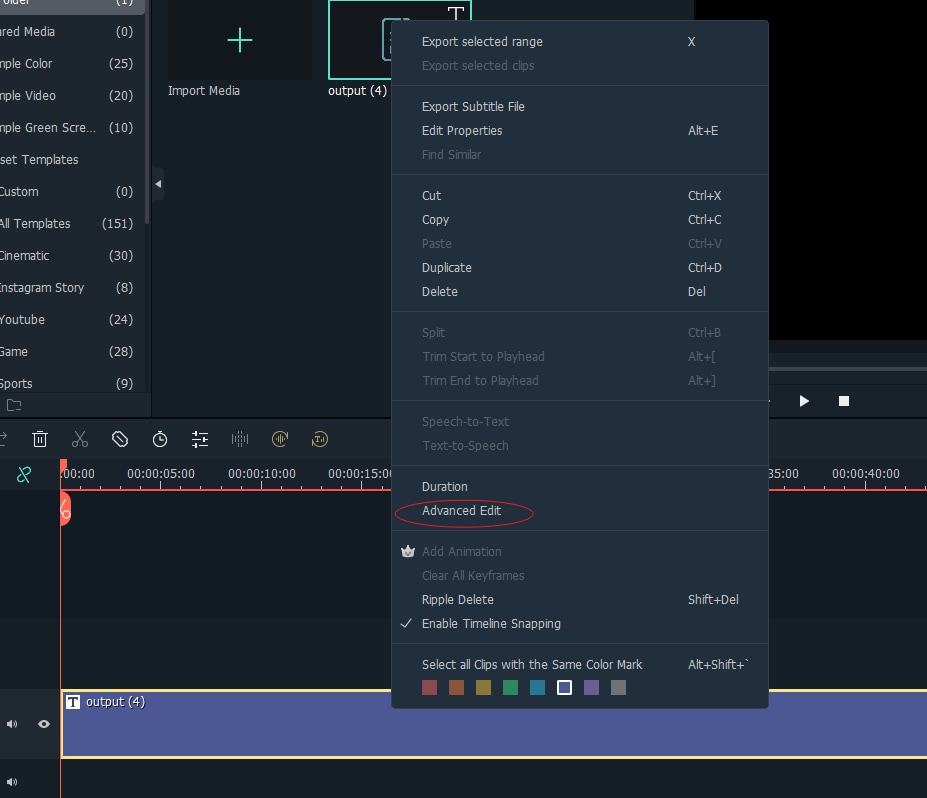
Step2 Next at the timeline, choose the Advanced Edit option or double-click on the chosen SRT file.
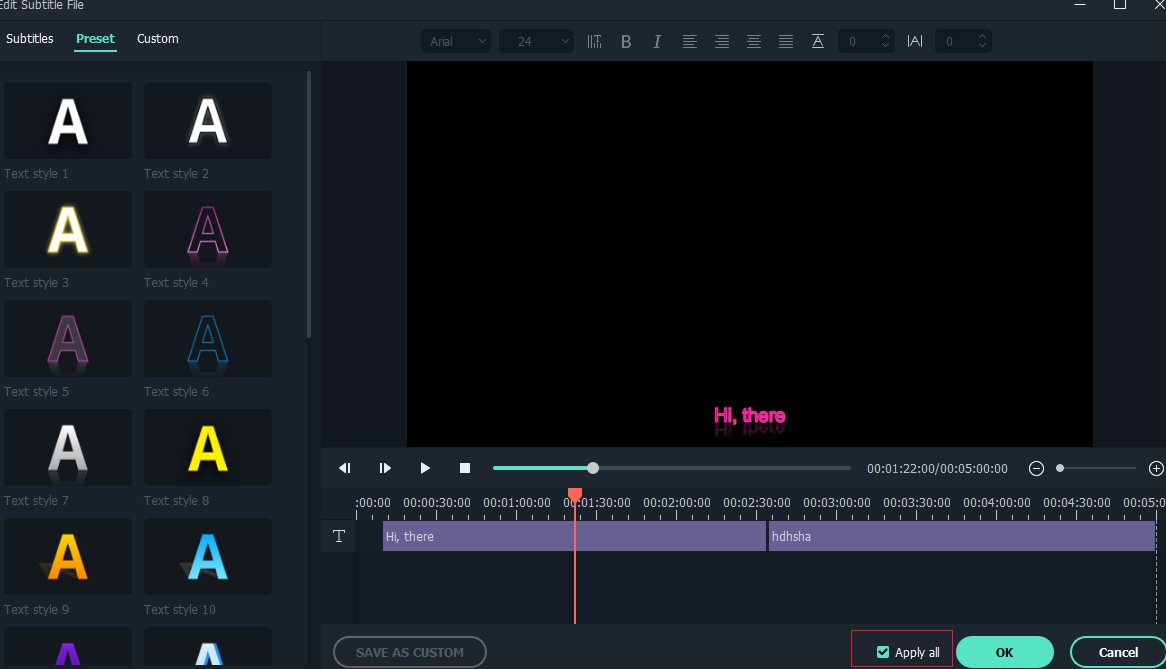
Step3 If needed, you can now customize the subtitle file by editing the time code, changing the subtitles, adding, merging or removing the subtitle strips, or by changing the subtitle styles as needed.
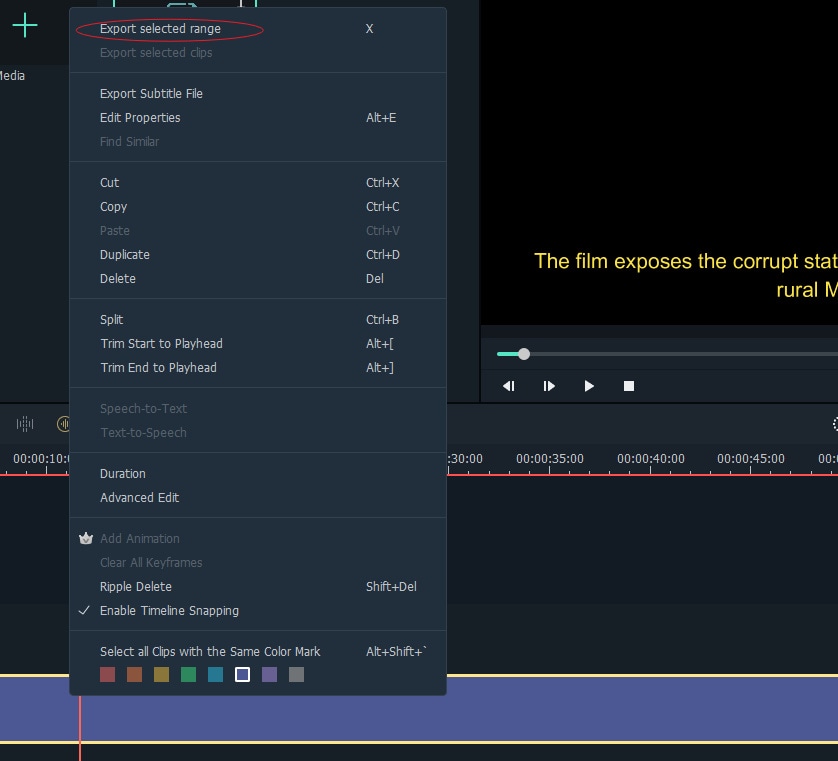
Step4 When done, check the preview of the video with the SRT file added and the n finally click on the Export button to save the video to your local system.
Final Words
Adding subtitles to your videos on iPhone will make your videos reach a wider target audience and make them more accessible in different situations. Different methods for adding these subtitles to your videos are mentioned in the above parts of the topic. Choose the best suitable one considering its features, pros, and cons.
Summary: For users who are looking for a simple and straightforward method, using iMovie to add text as subtitles are the best solution.
Solution 2: Using a Professional Video Editing App to Make & Add Subtitles for iPhone
An array of professional video editing apps for iPhone are available as well that can let you perform multiple tasks including subtitle and text editing to your videos. These apps can be simply downloaded on your device and can be used for the videos present on your phone. Shortlisted ones for your reference are enlisted below.
1. Filmora- Video Editor and Maker
Developed by Wondershare, this is an excellent app that can be used for all basic as well as advanced video editing requirements. Using the app, you can creatively edit your videos by trimming, adding text, adding transitions, adding filters, and more. Though there is no direct subtitle-adding feature in the app, you can add them as text.

Pros
- Simple to use app for all types of video editing tasks
- Add texts to your videos quickly and easily as subtitles
- Comes with multiple videos creating templates
Cons
- Subtitles cannot be embedded directly
- The advanced Pro version is paid
Summary: The app is just perfect for users are want to create interesting videos on their iPhone using multiple editing features.
**2. MixCaptions
This is a widely used iOS app to get and add subtitles to your videos. Additionally, you can even edit the video captions, display captions at your desired location, customize the caption text, and more.

Pros
- Free to use simple app
- Allows to import SRT files, and edit the subtitle file
- Allows to automatically transcribe in 23 languages
Cons
- Free version processed files with a watermark
- Longer videos can be processed through pro paid version
Summary: To add as well as edit the subtitle files on your iPhone and other iOS devices, this is an excellent app to consider.
**3. Kaptioned
This is another popularly used app for auto-detecting, transcribing, and adding a subtitle to videos. The app makes use of AI for detecting the words automatically in the video and then adding subtitles to the same. An array of subtitle customization options is also supported by the app like changing the style and colors, the option to add subtitles in 2 languages, export subtitles in an SRT file, and more.

Pros
- Use AI to generate subtitles for the videos
- Allows editing and customizing subtitles in an array of ways
- Support to multi-language generated subtitles
Cons
- Videos processed through the free version have a watermark
- Users’ complaints of not-so-efficient customer service
Summary: When you want subtitles to be generated automatically for your videos and that too in multiple languages, this is the app to look forward to.
how to add subtitles to a video in iPhone with a video editing app
Here we take Filmora as an example to show you the concrete steps.
- Install and launch the app on your iPhone.
- Add the desired video to the app for which you wish to add the subtitles.

- Move to the video location where you want to add the subtitle.

- Choose the option to add the text to your videos and then enter the desired text.

- When done, you can tap on Export to save the video with the text on your device.

Solution 3: Embed Closed Captions to a Video on iPhone with 3Play Media
For users who are looking for advanced features, 3Play Media is a great service to use. Using the program, subtitles to the videos can be encoded in more than 20 languages quickly and easily. The tool allows adding soft as well as hard subtitles to your video files. A wide range of additional features is supported by the software like adding real-time captions to the live streaming platforms, options for audio descriptions, features for translation and subtitling, and more.

Steps how to add subtitles to video on your iPhone using 3Play Media
First of all, using the 3Play Media to create the closed caption for the iPhone video. It is recommended to use. scc format for the subtitle file.
Step1 You need to send the video to the software for transcription and captioning.

Step2 Once the closed caption file is ready, you next need to order the caption encoding service. On your 3Play Media tool go to My Files > Caption Encoding and then choose the type of encoding for your iPhone model.

Step3 Next, follow the prompts as they appear and then place your order. In some time, the process will be completed and you will get the notification of the same on your email.
Download the video with the added subtitles.
Solution 4: Add Captions/Subtitles to a Video on iPhone with Wondershare Filmora
Another professional way to add subtitles to the videos on your iPhone is by using desktop software. You can transfer your desired videos to your Windows and Mac device and then using a versatile tool add the subtitles. One software that you can rely on for the task is Wondershare Filmora which is an advanced video editing tool supporting multiple functions including subtitle adding as well as editing.
Using the software, you can quickly import and add the local SRT subtitle files to your videos in all key formats and if needed, can also customize them using functions like editing time-code, changing subtitles, adding, merging subtitle strips, changing the style, and more.
Steps to add subtitles to iPhone videos using Wondershare Filmora
Free Download For Win 7 or later(64-bit)
Free Download For macOS 10.14 or later
Step1 Launch the installed software on your system and then using the Media resource area, add the SRT file as well as the video to which it has to be added. Drag and drop the video and the SRT file to the timeline below.

Step2 Next at the timeline, choose the Advanced Edit option or double-click on the chosen SRT file.

Step3 If needed, you can now customize the subtitle file by editing the time code, changing the subtitles, adding, merging or removing the subtitle strips, or by changing the subtitle styles as needed.

Step4 When done, check the preview of the video with the SRT file added and the n finally click on the Export button to save the video to your local system.

Final Words
Adding subtitles to your videos on iPhone will make your videos reach a wider target audience and make them more accessible in different situations. Different methods for adding these subtitles to your videos are mentioned in the above parts of the topic. Choose the best suitable one considering its features, pros, and cons.
Special Animated Transition Tutorial【SUPER EASY】
Preparation
What you need to prepare:
- A computer (Windows or macOS)
- Your video materials.
- Filmora video editor
Step 1
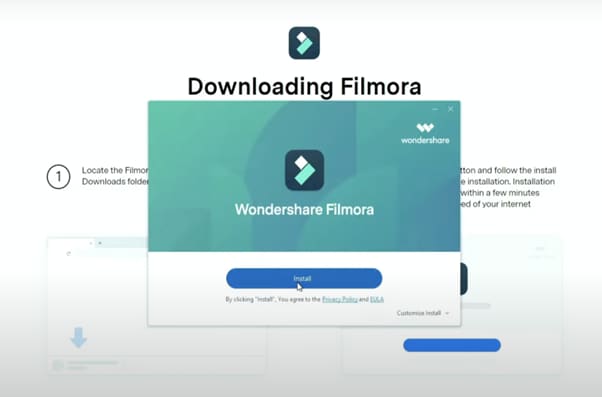
First off, download the Filmora video editor . After it downloads, click install and follow the provided steps.
Step 2
After installing, the editor will start automatically. When it does, click on the “New Project” button to finally open the editor.

Step 3
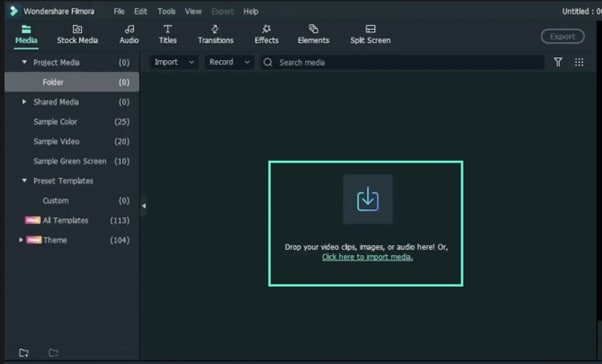
From the upper-left side of the screen, click the highlighted text to import media. This is where you insert your video files into the editor. Once the folder opens, select the videos you want to import and click “Open”.
Step 4
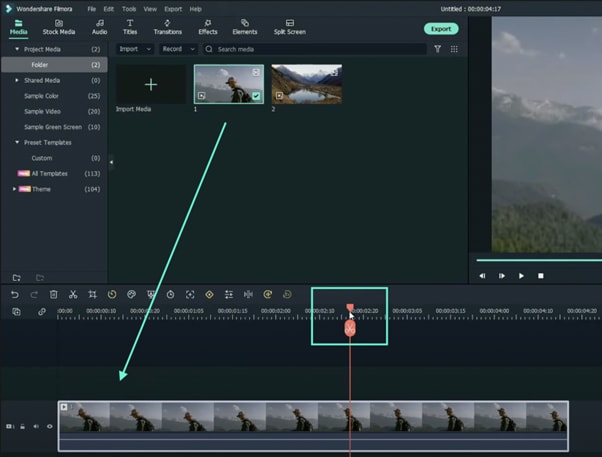
Drag your first clip to the timeline. Then, move the Playhead to where you want to start your transition.
Step 5
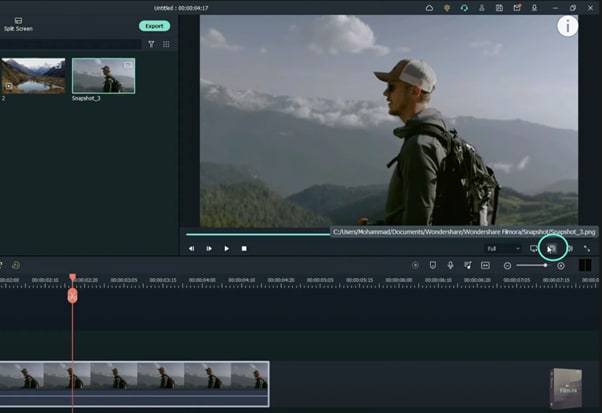
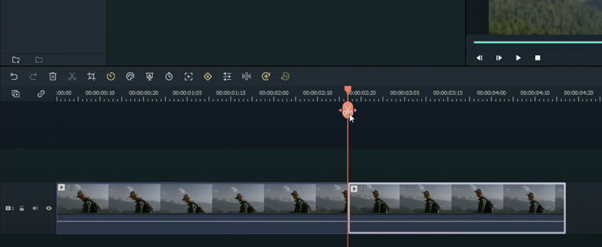
Take a snapshot of this frame.
Step 6
Split the footage and delete the part on the right side of the Playhead.
Step 7
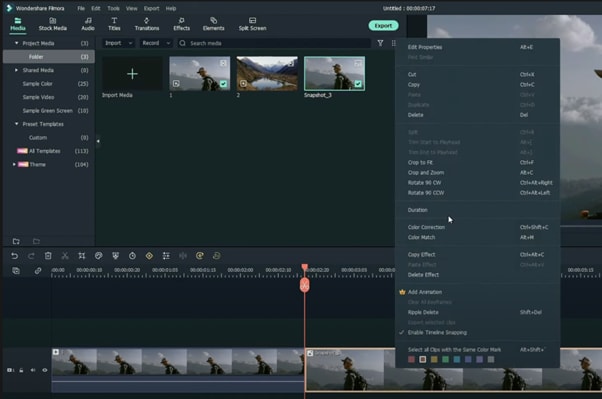
Without moving the Playhead, simply drag the snapshot you took earlier. Right-click on the snapshot in the timeline and click on “Duration”. Then, set the duration to 1 second. Finally, click “OK”.
Step 8
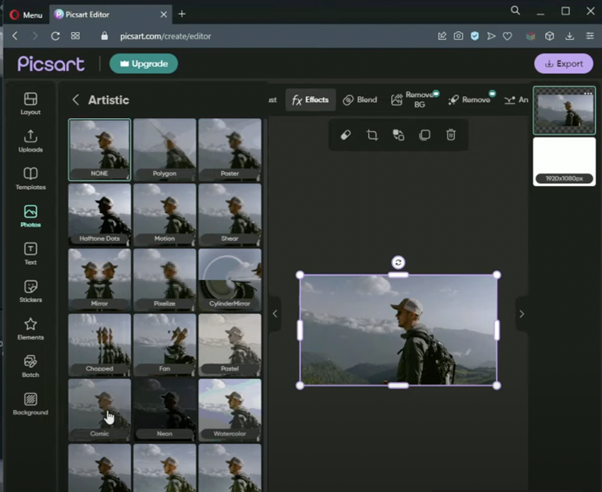
Open your browser and go to the Picsart photo effects editor . Upload the same snapshot we made in Filmora and apply the “Comic” preset on it. Then, download the photo and import it back into Filmora.
Step 9
Drag the snapshot with the Comic preset to the Timeline and set its duration to 1 second as well.
Step 10
Repeat the same process with the second clip. Take a snapshot, add the Comic effect, and import it back into Filmora. But this time, align the clips as follows: Add the snapshot with the comic preset first, then the snapshot without any effects, and then the video. It should look like this.

Step 11
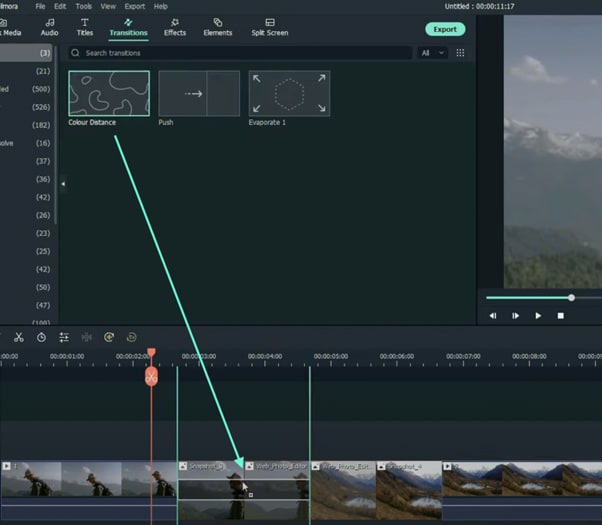
Go to the Transitions tab and drag the “Color Distance” transition between the first and second snapshot on your Timeline. Then, right-click on the transition box in the timeline and select “Edit Properties”. From there, change the duration of the transition to 1 second and click “OK”.
Step 12
Drag the “Push” transition between the next two snapshots. Set its duration to 1 second as well by right clicking the transition and going to “Edit Properties”.
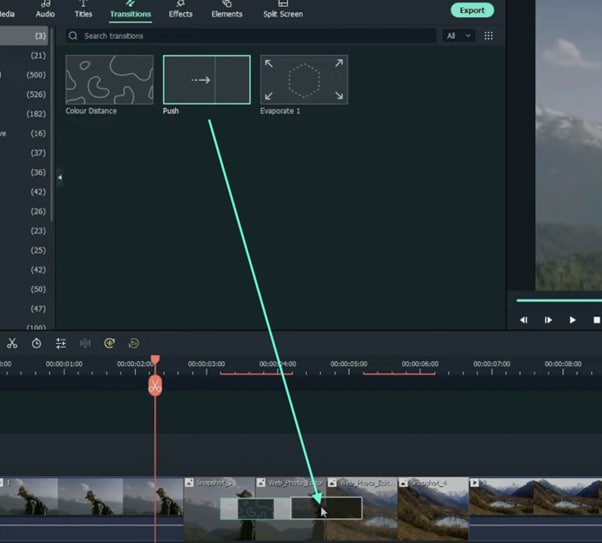
Step 13
Place the last transition between the last two snapshots in your timeline. This time, we’re going to use the “Evaporate” transition. Set its duration to 1 second as well.
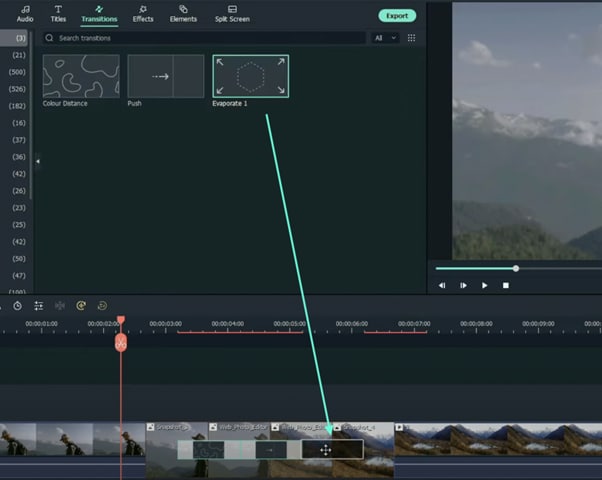
Step 14
The final step is to render the video. Click this button and you will finally be done.
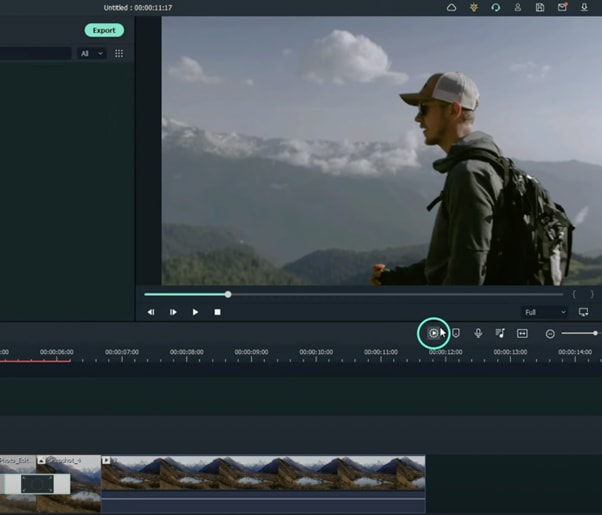
Summary
What you’ve learned:
- How to add any type of transition to video clips and images in Filmora
- How to take quick snapshots of any frame in Filmora
- A quick way to Render videos and watch the final preview
- Add custom effects to images
What you need to prepare:
- A computer (Windows or macOS)
- Your video materials.
- Filmora video editor
Step 1
First off, download the Filmora video editor . After it downloads, click install and follow the provided steps.

Step 2
After installing, the editor will start automatically. When it does, click on the “New Project” button to finally open the editor.

Step 3
From the upper-left side of the screen, click the highlighted text to import media. This is where you insert your video files into the editor. Once the folder opens, select the videos you want to import and click “Open”.

Step 4
Drag your first clip to the timeline. Then, move the Playhead to where you want to start your transition.

Step 5
Take a snapshot of this frame.

Step 6
Split the footage and delete the part on the right side of the Playhead.

Step 7
Without moving the Playhead, simply drag the snapshot you took earlier. Right-click on the snapshot in the timeline and click on “Duration”. Then, set the duration to 1 second. Finally, click “OK”.

Step 8
Open your browser and go to the Picsart photo effects editor . Upload the same snapshot we made in Filmora and apply the “Comic” preset on it. Then, download the photo and import it back into Filmora.

Step 9
Drag the snapshot with the Comic preset to the Timeline and set its duration to 1 second as well.
Step 10
Repeat the same process with the second clip. Take a snapshot, add the Comic effect, and import it back into Filmora. But this time, align the clips as follows: Add the snapshot with the comic preset first, then the snapshot without any effects, and then the video. It should look like this.

Step 11
Go to the Transitions tab and drag the “Color Distance” transition between the first and second snapshot on your Timeline. Then, right-click on the transition box in the timeline and select “Edit Properties”. From there, change the duration of the transition to 1 second and click “OK”.

Step 12
Drag the “Push” transition between the next two snapshots. Set its duration to 1 second as well by right clicking the transition and going to “Edit Properties”.

Step 13
Place the last transition between the last two snapshots in your timeline. This time, we’re going to use the “Evaporate” transition. Set its duration to 1 second as well.

Step 14
The final step is to render the video. Click this button and you will finally be done.

Summary
What you’ve learned:
- How to add any type of transition to video clips and images in Filmora
- How to take quick snapshots of any frame in Filmora
- A quick way to Render videos and watch the final preview
- Add custom effects to images
What you need to prepare:
- A computer (Windows or macOS)
- Your video materials.
- Filmora video editor
Step 1
First off, download the Filmora video editor . After it downloads, click install and follow the provided steps.

Step 2
After installing, the editor will start automatically. When it does, click on the “New Project” button to finally open the editor.

Step 3
From the upper-left side of the screen, click the highlighted text to import media. This is where you insert your video files into the editor. Once the folder opens, select the videos you want to import and click “Open”.

Step 4
Drag your first clip to the timeline. Then, move the Playhead to where you want to start your transition.

Step 5
Take a snapshot of this frame.

Step 6
Split the footage and delete the part on the right side of the Playhead.

Step 7
Without moving the Playhead, simply drag the snapshot you took earlier. Right-click on the snapshot in the timeline and click on “Duration”. Then, set the duration to 1 second. Finally, click “OK”.

Step 8
Open your browser and go to the Picsart photo effects editor . Upload the same snapshot we made in Filmora and apply the “Comic” preset on it. Then, download the photo and import it back into Filmora.

Step 9
Drag the snapshot with the Comic preset to the Timeline and set its duration to 1 second as well.
Step 10
Repeat the same process with the second clip. Take a snapshot, add the Comic effect, and import it back into Filmora. But this time, align the clips as follows: Add the snapshot with the comic preset first, then the snapshot without any effects, and then the video. It should look like this.

Step 11
Go to the Transitions tab and drag the “Color Distance” transition between the first and second snapshot on your Timeline. Then, right-click on the transition box in the timeline and select “Edit Properties”. From there, change the duration of the transition to 1 second and click “OK”.

Step 12
Drag the “Push” transition between the next two snapshots. Set its duration to 1 second as well by right clicking the transition and going to “Edit Properties”.

Step 13
Place the last transition between the last two snapshots in your timeline. This time, we’re going to use the “Evaporate” transition. Set its duration to 1 second as well.

Step 14
The final step is to render the video. Click this button and you will finally be done.

Summary
What you’ve learned:
- How to add any type of transition to video clips and images in Filmora
- How to take quick snapshots of any frame in Filmora
- A quick way to Render videos and watch the final preview
- Add custom effects to images
What you need to prepare:
- A computer (Windows or macOS)
- Your video materials.
- Filmora video editor
Step 1
First off, download the Filmora video editor . After it downloads, click install and follow the provided steps.

Step 2
After installing, the editor will start automatically. When it does, click on the “New Project” button to finally open the editor.

Step 3
From the upper-left side of the screen, click the highlighted text to import media. This is where you insert your video files into the editor. Once the folder opens, select the videos you want to import and click “Open”.

Step 4
Drag your first clip to the timeline. Then, move the Playhead to where you want to start your transition.

Step 5
Take a snapshot of this frame.

Step 6
Split the footage and delete the part on the right side of the Playhead.

Step 7
Without moving the Playhead, simply drag the snapshot you took earlier. Right-click on the snapshot in the timeline and click on “Duration”. Then, set the duration to 1 second. Finally, click “OK”.

Step 8
Open your browser and go to the Picsart photo effects editor . Upload the same snapshot we made in Filmora and apply the “Comic” preset on it. Then, download the photo and import it back into Filmora.

Step 9
Drag the snapshot with the Comic preset to the Timeline and set its duration to 1 second as well.
Step 10
Repeat the same process with the second clip. Take a snapshot, add the Comic effect, and import it back into Filmora. But this time, align the clips as follows: Add the snapshot with the comic preset first, then the snapshot without any effects, and then the video. It should look like this.

Step 11
Go to the Transitions tab and drag the “Color Distance” transition between the first and second snapshot on your Timeline. Then, right-click on the transition box in the timeline and select “Edit Properties”. From there, change the duration of the transition to 1 second and click “OK”.

Step 12
Drag the “Push” transition between the next two snapshots. Set its duration to 1 second as well by right clicking the transition and going to “Edit Properties”.

Step 13
Place the last transition between the last two snapshots in your timeline. This time, we’re going to use the “Evaporate” transition. Set its duration to 1 second as well.

Step 14
The final step is to render the video. Click this button and you will finally be done.

Summary
What you’ve learned:
- How to add any type of transition to video clips and images in Filmora
- How to take quick snapshots of any frame in Filmora
- A quick way to Render videos and watch the final preview
- Add custom effects to images
How to Add Customized Transitions to OBS
OBS Studio is an open-source video editor that is widely popular for live streaming on online platforms. Even though OBS is a completely free application, its features are comparable to any premium video editor. We always look for available transition effects in a video editor and OBS takes it to the next level by allowing users to add custom transitions.
Among custom transitions, Stinger transitions have gained a lot of traction from the users. Stinger transitions are made popular by sports channels who use Stinger frequently whenever there is a change in the scene. We will illustrate how to add custom transitions in OBS and apply Stinger transitions in your video.
Part 1. What is Stinger in OBS
Stinger is a special type of customized animated video transition effect that is available in the latest version of OBS Studio. It is a combination of a transparent video animation and a cut transition. Stinger begins with the transparent video animation that grows into full-screen overlay, and it is followed by the cut transition. After the cut transition, you place the next scene or video clip. You will notice Stinger transition whenever sports channels show an instant replay during a live match.
The transparent video animation starts on top of the current video you are editing. When the animation expands and covers up the entire screen, you place the cut transition, and thereafter, you place the next video clip or scene as per your requirement. Some customized stinger effect also includes audio effects along with video effect.
Part 2. How to add stinger transitions to OBS
The Stinger transition is available on OBS Studio and Streamlabs, and both of them are open-source and free applications. Before you add stinger transition, you should have a video animation ready that you will play on top of the current video followed by the cut transition effect. You can download several stinger video animations from the internet and include any of them in OBS while adding stinger transition. Here are the steps on how to add a custom transition to OBS.
Step1 Go to Scene Transitions section and click on Effects option to open the drop-down menu.
Step2 From the drop-down menu, click on “Add: Stinger” option.

Step3 Give a name to the Stinger transition and click Ok button.

Step4 You will see Properties window now. Click on Browser button against Video file and select the transparent video animation file that you want to play on top of the current video before applying the cut transition effect.

Step5 For Transition Point Type, select Time(milliseconds) option. In the Transition Point field, add the duration of the transparent video animation so that the transition to the next scene takes place immediately after the video animation gets completed.

Step6 If your video animation has audio, go to Audio Monitoring and select Monitor and Output option from the dropdown. For Audio Fade Style, you can select Crossfade option for better output.

Step7 Scroll down and click on Preview Transition button to check if the stinger transition is taking place as expected. You can adjust the transition point and other parameters to get it perfect.

Step8 Finally, click on Ok button and play the video to check out the stinger transition on the big screen.
The steps on how to add a custom transition to Streamlabs OBS are almost similar, and therefore, you can add stinger transition using Streamlabs comfortably.
Part 3. OBS Alternative to Add Transitions
There is no denying the fact that OBS Studio has a complicated user interface. That is why most amateur video editors find OBS Studio difficult to learn quickly even though there is no dearth of features. Apart from add custom transition OBS, there are very limited effects available on OBS Studio. That is why many users look for an OBS alternative to add transitions to their videos.
We recommend Wondershare Filmora as the best alternative to OBS Studio when it comes to adding transition effects. That is because Filmora is a professional video editor with a wide range of effects. Most importantly, Filmora is widely loved by amateurs and professionals for its intuitive user interface. Here are the steps on how to add transitions to your video in Filmora.
Free Download For Win 7 or later(64-bit)
Free Download For macOS 10.14 or later
Step1 Download and install Filmora as per your operating system. Open Filmora and click on New Project option.

Step2 Import or drop your video clips under Project Media folder. Then drag and drop them on Timeline and place them sequentially as appropriate.

Step3 Go to Transitions tab located at the top of the application screen. You will see different categories of transitions on the left side.

Step4 Check them out and once you have selected one to apply, drag and drop it in between the video clips.

Step5 Play the video and click on Export button to save the video.
Part 4: Related FAQs about OBS Transitions
How do I add a transition overlay in OBS?
You need to go to Scene Transition tab and select any transition overlay effect that is available. Thereafter, you can change the settings and parameters to customize the transition effect as per your requirements. Apart from the built-in transitions, you can download and add plugins for more transitions.
Can you have different scene transitions in OBS?
Yes, you can have different scene transitions in OBS Studio. You can add them directly from Scene Transition tab one by one as per your requirements. You can add them in between scenes so that the transition effects play when you switch between scenes.
How do I download transitions in OBS?
Go to the OBS Forums from where you get to download transitions for OBS Studio. Click on Download button and download plugin installer as per your operating system. Double-click the installer file to install it on your computer. Go to OBS Studio and go to Scene Transition to use the installed transition.
Free Download For macOS 10.14 or later
Step1 Download and install Filmora as per your operating system. Open Filmora and click on New Project option.

Step2 Import or drop your video clips under Project Media folder. Then drag and drop them on Timeline and place them sequentially as appropriate.

Step3 Go to Transitions tab located at the top of the application screen. You will see different categories of transitions on the left side.

Step4 Check them out and once you have selected one to apply, drag and drop it in between the video clips.

Step5 Play the video and click on Export button to save the video.
Part 4: Related FAQs about OBS Transitions
How do I add a transition overlay in OBS?
You need to go to Scene Transition tab and select any transition overlay effect that is available. Thereafter, you can change the settings and parameters to customize the transition effect as per your requirements. Apart from the built-in transitions, you can download and add plugins for more transitions.
Can you have different scene transitions in OBS?
Yes, you can have different scene transitions in OBS Studio. You can add them directly from Scene Transition tab one by one as per your requirements. You can add them in between scenes so that the transition effects play when you switch between scenes.
How do I download transitions in OBS?
Go to the OBS Forums from where you get to download transitions for OBS Studio. Click on Download button and download plugin installer as per your operating system. Double-click the installer file to install it on your computer. Go to OBS Studio and go to Scene Transition to use the installed transition.
Also read:
- [Updated] Capture Mastery Top Picks of Free PC/Mac Desktop Recorders
- [Updated] Chuckle-Champions Twitter’s Comedy Corner for 2024
- [Updated] High-End Downloads Best 10 Apps for Extracting Vimeo Videos for 2024
- [Updated] In 2024, Overcome Sound Absence on Tweeted Film Rolls
- 2024 Approved Top LUTs for Sony HLG
- 2024 Approved Vintage Film Effect 1920S - How to Make
- Battling Bugs in Gears Ⅴ? Master These Techniques to Stop Game Crashes Forever!
- Cookiebot: Your Key to Advanced Website Personalization and Targeting
- Download and Install Dell G15 Graphics Driver on Windows
- If You Want to Prompt Your eCommerce Business in Facebook, Then Using Facebook Video Ads Is One of the Effective Methods. This Post Will Show You How to Edit Videos for Facebook Advertisement for 2024
- Master Bengali Daily: Quick Lessons in 10 Minutes!
- New In 2024, How To Fade Audio In Kinemaster
- New In 2024, How to Slow Down a Video on iPhone and Android The Easy Way
- New The Power of Music in Videos (+Filmora Editing Tricks)
- Process of Screen Sharing Vivo V29 to PC- Detailed Steps | Dr.fone
- Solution for Qualcomm Atheros: Enabling Bluetooth Driver Performance in Windows Press Release
- The Ultimate Choice of Lenses for Industry's Finest 4K Vision for 2024
- Updated In 2024, Learn the Step-by-Step Process of Slowing Down Time-Lapse Videos on Your iPhone
- Updated Step by Step to Split Clips in VLC for 2024
- Title: In 2024, How to Add Text to Video
- Author: Morgan
- Created at : 2024-10-03 20:52:59
- Updated at : 2024-10-06 06:06:06
- Link: https://ai-video-editing.techidaily.com/in-2024-how-to-add-text-to-video/
- License: This work is licensed under CC BY-NC-SA 4.0.