
In 2024, How to Create an Alternate Reality Effect

How to Create an Alternate Reality Effect
Ditch boring one-dimensional videos and create a mesmerizing video with this alternative reality effect you can easily create using Wondershare Filmora.
This cool effect enables you to show a dream-like scene where two mirrored footages appear within the same frame using the Masking feature. But why stop there?
Keep reading to find out how you can use this style of effect to spice up your daily vlog bumper intro or even for your upcoming sci-fi content.

Preparing the footage
There are not many restrictions on preparing the footage for this effect. However, depending on the results you’re aiming for, you might need to consider a few things.
First, a wider view and some camera panning, or tilting will deliver a better result as it provides angle variations. This will later enhance the dynamic of the scene, making it feels even more uncanny.
Then, while you’re at it, you need to also figure out the purpose of the video itself. If you want to upload it to certain platforms where vertical videos are more popular, you will want to work on that as well. When you’re shooting your footage, make sure that you’re taking it at the correct angle that would fit the ratio you’re aiming for.
Last but not least, consider the length of the footage. If you’re planning to make a bumper video, you might want a quick yet comprehensive shot of the objects you want to highlight. You can always trim and adjust the timing later, but it is better to also plan it early.
Editing the video
If you have your footage or stock video ready, then you can start editing. Follow this simple step-by-step guide to create your own alternate reality using Filmora .
Free Download For Win 7 or later(64-bit)
Free Download For macOS 10.14 or later
Step 1: Drag and drop the video footage into the timeline - this will be the bottom part of the scene. Go to Effect > Utility > Image Mask. Drag and drop it onto the video footage.

Step 2: Adjust the mask by double-clicking the video footage. Go to Setting > Mask Setting and choose any shape you like. Set the feather number to 100.

Step 3: Scroll up the Setting > Transform. Adjust the position of the video footage on the x and y-axis to ensure that the mask shows the bottom of the landscape view. Click Ok.

Step 4: Drag and drop the same video footage onto the timeline next to the first video footage. Place an Image Mask as well on this footage. This will be the upper part of the scene.

Step 5: Double-click the second footage to open the Setting menu on the top left. Choose Transform > Vertical Flip.

Step 6: Scroll down the Setting menu to find the mask settings. Choose an opposing mask shape for this second footage then set the feather number to 100 as well.

Step 7: Adjust the video footage position by dragging the second footage to the second video track and aligning it with the first video footage.

Step 8: Double-click to open the Setting > Transform, then, adjust the x and y-axis numbers to ensure that the mask reveals only the top half of the landscape. Click Ok.

You can recheck the preview at this stage and just save it as it is if you’re already satisfied with the result. However, if you want a more dynamic alternate reality scene, continue reading to see advanced tips you can follow to make your video looks even more otherworldly.
Enhancing the effect with rotation keyframes
If you’re using stock videos or encountering limitations when making your footage, chances are your alternate reality is not looking as dynamic as you want it to be. Go all out by adding the rotation keyframes to the video footage so that the alternate reality looks more unreal.
Step 1: Double-click the video footage on the first video track to open the Animation Settings > Customize.

Step 2: Move the playhead to the beginning of the first video footage and add a keyframe by clicking on the Add button. Set the rotation of this keyframe at 0 and the scale at 100.

Step 3: Now move the playhead to the end of the video footage and add another keyframe. This time, set the rotation to 20 and adjust the scale number to 115.

Step 4: Do Steps 1 to 3 to the second video footage. Don’t forget to preview the result to see if both footages are rotated properly.

Your alternate reality is now more dynamic with more movement. You can also add more filters or effects to further enhance the sci-fi ambiance. Once you’re satisfied, you can export the file to a format that is compatible with your destination platform.
Conclusion
Wondershare Filmora aims to empower your inner video creator with its robust yet easy-to-use editing suite. You can easily mimic the scenes from the latest blockbuster superhero movies with some simple clicks.
Not only it offers a strapping video editing menu with simple visual effects plug-ins and beginner-friendly smart templates, but you can also access its rich royalty-free stock media library. You can operate the program on both Windows and Mac. Install the program and let it do wonders to your content.
Free Download For macOS 10.14 or later
Step 1: Drag and drop the video footage into the timeline - this will be the bottom part of the scene. Go to Effect > Utility > Image Mask. Drag and drop it onto the video footage.

Step 2: Adjust the mask by double-clicking the video footage. Go to Setting > Mask Setting and choose any shape you like. Set the feather number to 100.

Step 3: Scroll up the Setting > Transform. Adjust the position of the video footage on the x and y-axis to ensure that the mask shows the bottom of the landscape view. Click Ok.

Step 4: Drag and drop the same video footage onto the timeline next to the first video footage. Place an Image Mask as well on this footage. This will be the upper part of the scene.

Step 5: Double-click the second footage to open the Setting menu on the top left. Choose Transform > Vertical Flip.

Step 6: Scroll down the Setting menu to find the mask settings. Choose an opposing mask shape for this second footage then set the feather number to 100 as well.

Step 7: Adjust the video footage position by dragging the second footage to the second video track and aligning it with the first video footage.

Step 8: Double-click to open the Setting > Transform, then, adjust the x and y-axis numbers to ensure that the mask reveals only the top half of the landscape. Click Ok.

You can recheck the preview at this stage and just save it as it is if you’re already satisfied with the result. However, if you want a more dynamic alternate reality scene, continue reading to see advanced tips you can follow to make your video looks even more otherworldly.
Enhancing the effect with rotation keyframes
If you’re using stock videos or encountering limitations when making your footage, chances are your alternate reality is not looking as dynamic as you want it to be. Go all out by adding the rotation keyframes to the video footage so that the alternate reality looks more unreal.
Step 1: Double-click the video footage on the first video track to open the Animation Settings > Customize.

Step 2: Move the playhead to the beginning of the first video footage and add a keyframe by clicking on the Add button. Set the rotation of this keyframe at 0 and the scale at 100.

Step 3: Now move the playhead to the end of the video footage and add another keyframe. This time, set the rotation to 20 and adjust the scale number to 115.

Step 4: Do Steps 1 to 3 to the second video footage. Don’t forget to preview the result to see if both footages are rotated properly.

Your alternate reality is now more dynamic with more movement. You can also add more filters or effects to further enhance the sci-fi ambiance. Once you’re satisfied, you can export the file to a format that is compatible with your destination platform.
Conclusion
Wondershare Filmora aims to empower your inner video creator with its robust yet easy-to-use editing suite. You can easily mimic the scenes from the latest blockbuster superhero movies with some simple clicks.
Not only it offers a strapping video editing menu with simple visual effects plug-ins and beginner-friendly smart templates, but you can also access its rich royalty-free stock media library. You can operate the program on both Windows and Mac. Install the program and let it do wonders to your content.
Unlock Your Video Editing Potential With Wondershare Filmora
Are you looking to make a cool, fun video for a special occasion? Look no further than Wondershare Filmora.
With a range of video editing tools and effects, you can easily create stunning visuals and captivating stories. Whether you are making a video for a special occasion or a social media post, Filmora has the features to help you create the perfect video.
In this article, we will discuss the benefits of using Filmora and look further into some of its main features such as split screens, LUTs, keyframes, and more. So, let your creative juices flow and start making awesome videos with Wondershare Filmora today!
Why Choose Wondershare Filmora?
Wondershare Filmora is one of the most affordable video editors available in the market, with features that are usually very expensive to use. This tool is not only available for desktops but also for mobiles. So, you can also create content on the go!

Free Download For Win 7 or later(64-bit)
Free Download For macOS 10.14 or later
Let’s dig a little deeper to see how Filmora can benefit you.
Benefits of Using Filmora
Filmora, as compared to its contestants, has much more to offer. From a range of tools and effects to an easy-to-use interface to affordability, Filmora has it all!
1.Variety of Video Editing Tools and Effects
Wondershare Filmora has a variety of video editing tools and effects. Some of the advanced editing features to spice up your videos are available such as cropping, trimming, and adjusting the audio, as well as adding motion graphics, motion tracking, and more.
Furthermore, users can also access a library of royalty-free video clips, overlays, and sound effects to add the perfect touch to their videos.
2.Easy-to-Use Interface
Whether you are a beginner or a pro, Filmora’s easy-to-use interface will be your favorite! It is simple, plain, and easy to understand.
With its intuitive interface, you can also quickly and easily customize your videos with an array of special effects, including transitions, text, and music.
3.Affordable
Last but not least, the greatest catch of Wondershare Filmora is its affordability. With the wide variety of features that it offers, it has reasonable prices to offer.
With packages starting at just $49.99 per year to $79.99 perpetual, you can avail a multitude of features that update regularly and with every new version of Filmora. With these packages, you can get around 1GB of Filmora cloud storage.
So, what are you waiting for? Download Filmora now. And don’t worry; we have got you covered with some great tips to begin your Filmora journey.
Some Stunning Features in Filmora
Although Filmora is easy to use, and you can explore it on your own, it never hurts to know a few features before you dive in.
1.Split Screen Presets
Starting with split screens that are a great way of enhancing your videos. You can show multiple videos side by side, which gives a very chic look to your overall video. Here’s how to do it in Filmora.
Free Download For Win 7 or later(64-bit)
Free Download For macOS 10.14 or later
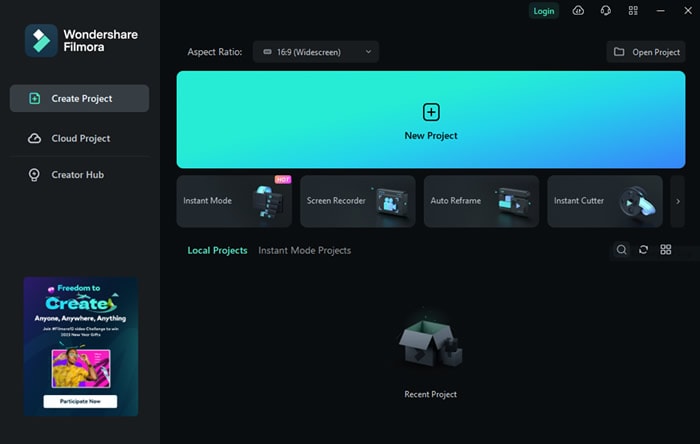
Step1Start a new project
Launch Filmora and click on “New Project.”
Step2Choose a split screen preset
On the top, go to “Templates” and then “Split Screen.”
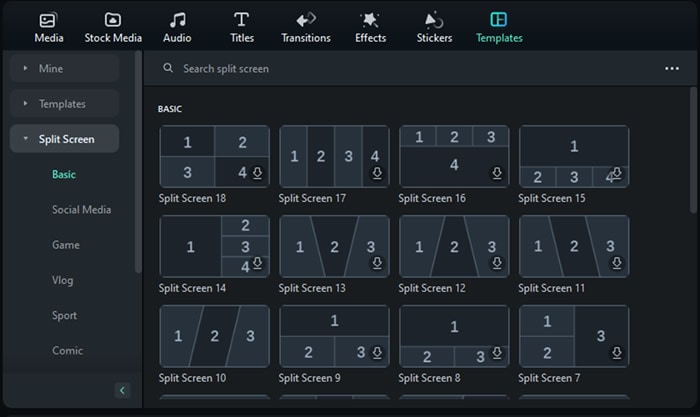
Choose the preset that you need. You can also preview the layout.
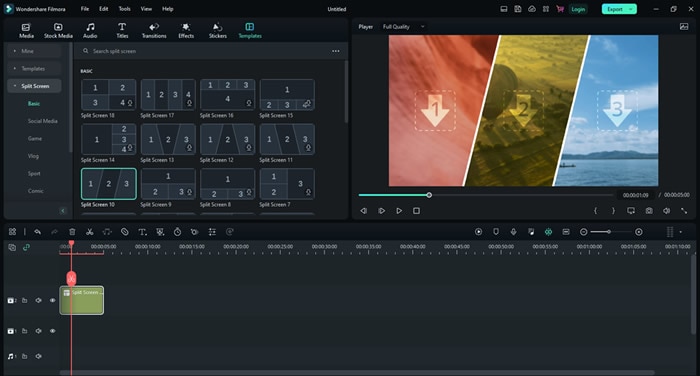
Step3Add to timeline
Add the chosen preset to the timeline track.
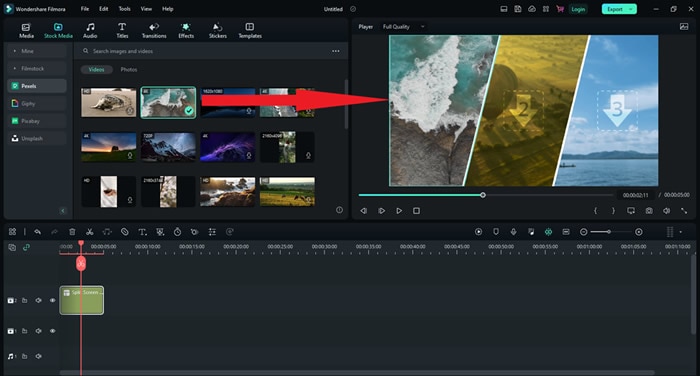
Step4Add videos to the layout
Import media from your library or use stock media to add videos to your layout. Drag and drop your media on the layout.
Step5Edit the split screen
Once you have all the videos added to the layout, double-click on the split screen in the timeline panel. The edit options will appear on the left.
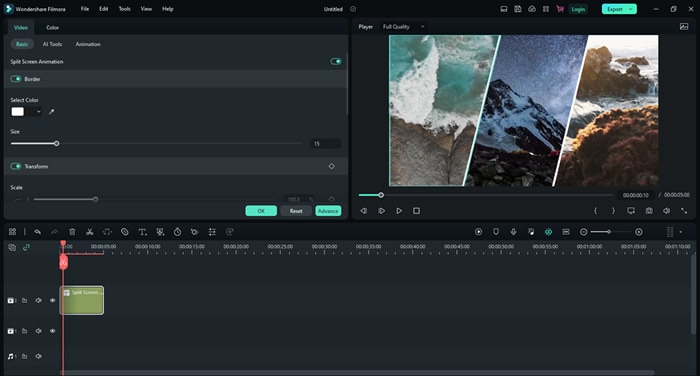
Choose how you want to edit your video and then save it.
2.Filters and LUTs
Another cool feature that Filmora offers is Filters and LUTs. In order to do so, follow these simple steps.
Free Download For Win 7 or later(64-bit)
Free Download For macOS 10.14 or later
Step1Add media
Import all the video or audio files that you want to edit to the media section.
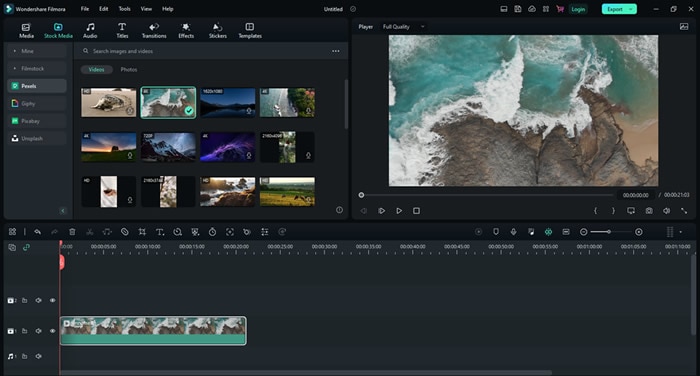
Step2Go to “Filter & LUT”
Under the “Effects” tab, go to “Filter & LUT.” Choose the LUT that you want to add to your video.
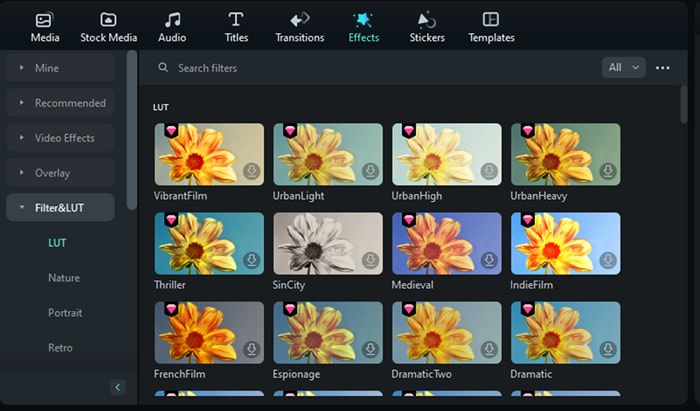
Step3Add the LUT to your video
Add the LUT to your timeline by drag-n-drop.
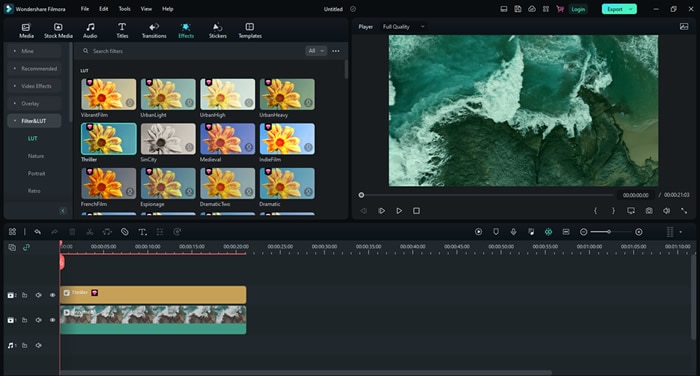
Drag it to adjust it according to your video. In order to adjust the strength of the LUT, double-click on it.
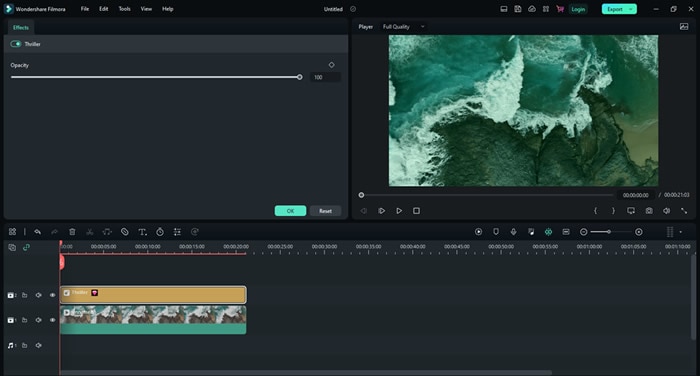
You can adjust the opacity of the LUT according to your preference. You can make it as soft or as strong as you want.
3.Animated Keyframes
Moving on, another one of the cool Filmora features is keyframing. Filmora allows you to add animated keyframes in your videos to add moving text or such effects. Follow the steps below to do so.
Free Download For Win 7 or later(64-bit)
Free Download For macOS 10.14 or later
Step1Add videos to the timeline
Add a video to your timeline and double-click on it to open up the editing options. Go to the “Animation” tab.
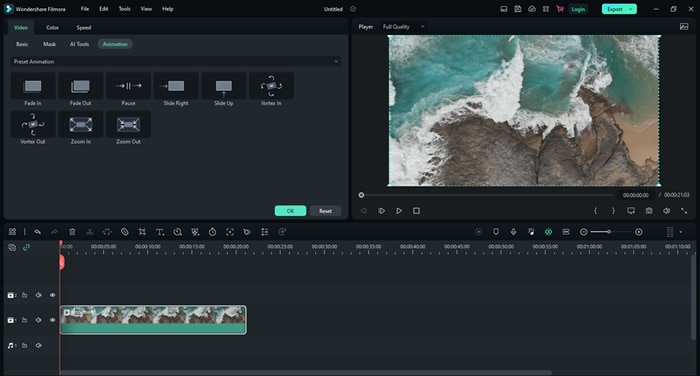
Here, you have different preset animations that you can use for your video.
Step2Add a keyframe
Add your chosen preset and hit play. You will see how that keyframe works. You can also add multiple keyframes to your video to make it look cooler.
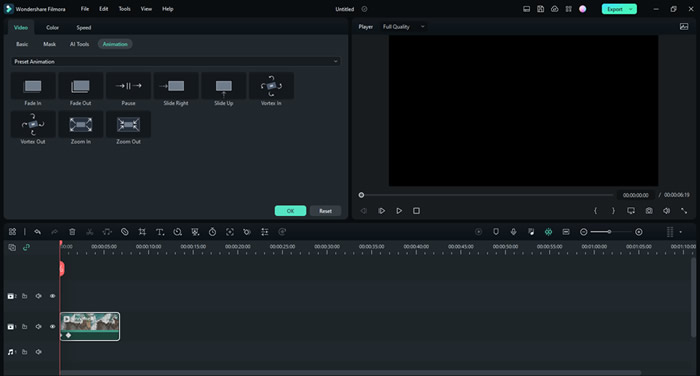
Once you play the video, it will look like this.
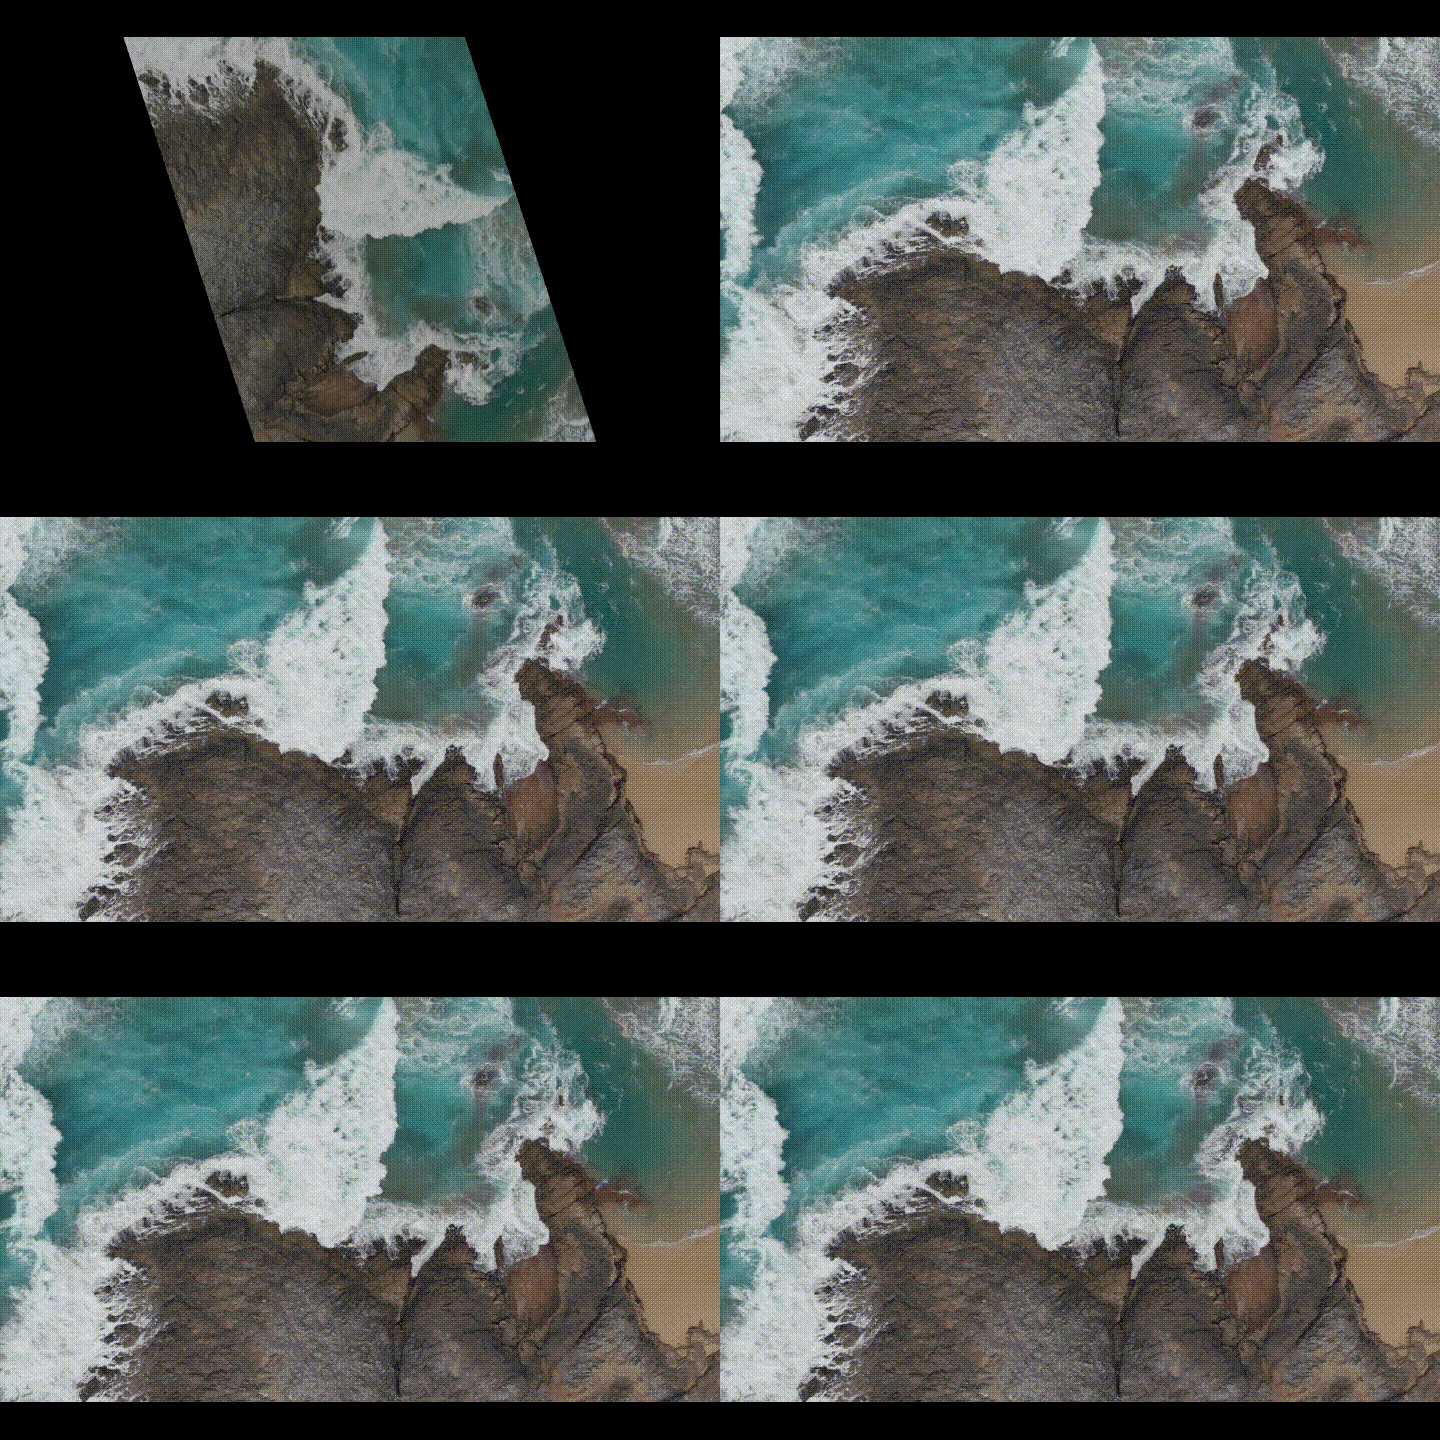
This is an easy way of making intros or outros of your videos.
4.Detach Audio
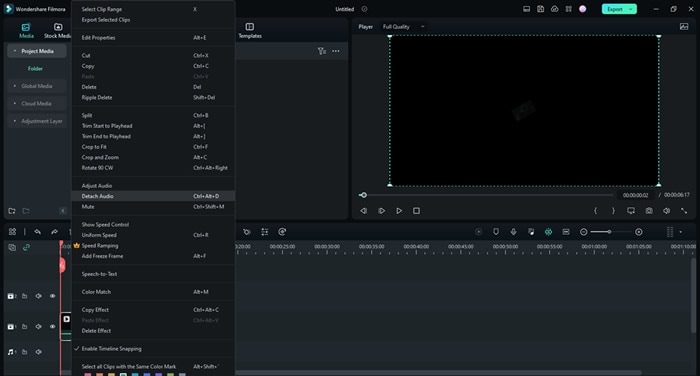
Suppose you have a video where you like the audio and want to use it for another video. How would you separate the audio? This is where the Detach Audio feature comes in.
Free Download For Win 7 or later(64-bit)
Free Download For macOS 10.14 or later
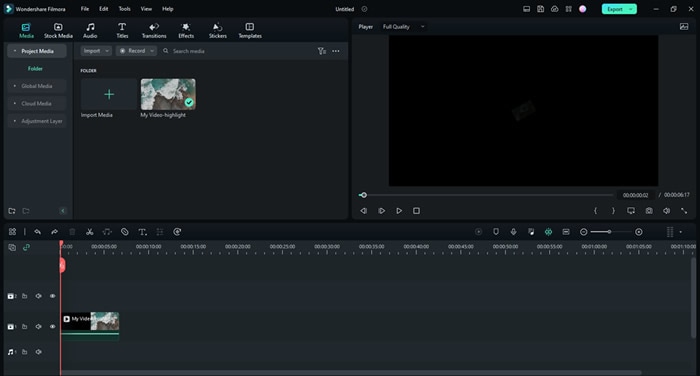
Step1Add video to the timeline
Drag and drop the video on the timeline.
Step2Detach audio
To separate the audio, right-click on the video and choose “Detach Audio.” The audio track will appear separately in the timeline. You can then use it as you wish.
5.Blur Effects
Next up, we have the feature of blurring your video or the background in your video. To do so, follow these simple steps.
Free Download For Win 7 or later(64-bit)
Free Download For macOS 10.14 or later
Step1Go to the effects tab
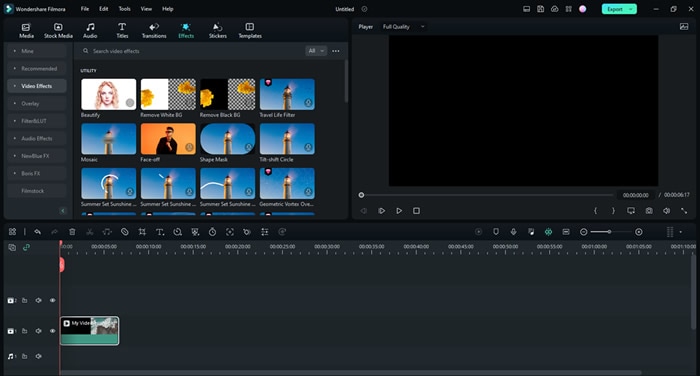
After adding the video to your timeline, go to the Effects tab on top.
Step2Search for blur effects
In the search bar, type “blur.” You will see several blur effects. Choose any effect and see a preview of it.

Step3Add effects to videos
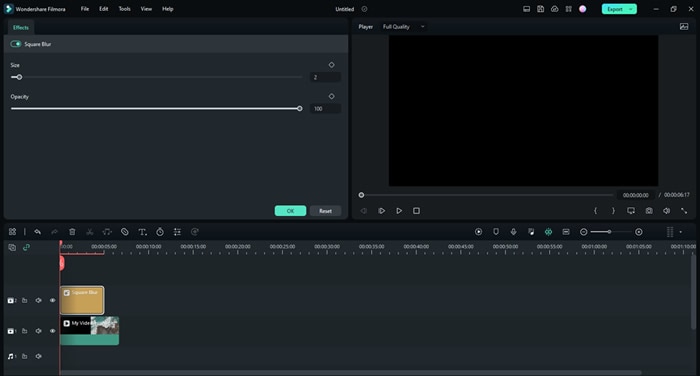
Add the chosen effect to your video. Then adjust its position accordingly. Double-click on the blur effect in the timeline panel to change its size and opacity.
These are some of the most amazing features that we have listed here. FYI, this is just the brink of the iceberg. There is a whole lot more that Filmora has to offer.
Final Words
If you’re looking for a simple and intuitive video editing platform to help you create stunning videos, look no further than Filmora. It is packed with powerful features that let you turn your raw footage into captivating movies in no time.
With its user-friendly design, you can easily access all the tools you need to make amazing videos, no matter your skill level. Try Filmora today and create unforgettable videos that will leave viewers in awe.
Free Download For macOS 10.14 or later
Let’s dig a little deeper to see how Filmora can benefit you.
Benefits of Using Filmora
Filmora, as compared to its contestants, has much more to offer. From a range of tools and effects to an easy-to-use interface to affordability, Filmora has it all!
1.Variety of Video Editing Tools and Effects
Wondershare Filmora has a variety of video editing tools and effects. Some of the advanced editing features to spice up your videos are available such as cropping, trimming, and adjusting the audio, as well as adding motion graphics, motion tracking, and more.
Furthermore, users can also access a library of royalty-free video clips, overlays, and sound effects to add the perfect touch to their videos.
2.Easy-to-Use Interface
Whether you are a beginner or a pro, Filmora’s easy-to-use interface will be your favorite! It is simple, plain, and easy to understand.
With its intuitive interface, you can also quickly and easily customize your videos with an array of special effects, including transitions, text, and music.
3.Affordable
Last but not least, the greatest catch of Wondershare Filmora is its affordability. With the wide variety of features that it offers, it has reasonable prices to offer.
With packages starting at just $49.99 per year to $79.99 perpetual, you can avail a multitude of features that update regularly and with every new version of Filmora. With these packages, you can get around 1GB of Filmora cloud storage.
So, what are you waiting for? Download Filmora now. And don’t worry; we have got you covered with some great tips to begin your Filmora journey.
Some Stunning Features in Filmora
Although Filmora is easy to use, and you can explore it on your own, it never hurts to know a few features before you dive in.
1.Split Screen Presets
Starting with split screens that are a great way of enhancing your videos. You can show multiple videos side by side, which gives a very chic look to your overall video. Here’s how to do it in Filmora.
Free Download For Win 7 or later(64-bit)
Free Download For macOS 10.14 or later
Step1Start a new project
Launch Filmora and click on “New Project.”

Step2Choose a split screen preset
On the top, go to “Templates” and then “Split Screen.”

Choose the preset that you need. You can also preview the layout.
Step3Add to timeline
Add the chosen preset to the timeline track.

Step4Add videos to the layout
Import media from your library or use stock media to add videos to your layout. Drag and drop your media on the layout.

Step5Edit the split screen
Once you have all the videos added to the layout, double-click on the split screen in the timeline panel. The edit options will appear on the left.

Choose how you want to edit your video and then save it.
2.Filters and LUTs
Another cool feature that Filmora offers is Filters and LUTs. In order to do so, follow these simple steps.
Free Download For Win 7 or later(64-bit)
Free Download For macOS 10.14 or later
Step1Add media
Import all the video or audio files that you want to edit to the media section.

Step2Go to “Filter & LUT”
Under the “Effects” tab, go to “Filter & LUT.” Choose the LUT that you want to add to your video.

Step3Add the LUT to your video
Add the LUT to your timeline by drag-n-drop.

Drag it to adjust it according to your video. In order to adjust the strength of the LUT, double-click on it.

You can adjust the opacity of the LUT according to your preference. You can make it as soft or as strong as you want.
3.Animated Keyframes
Moving on, another one of the cool Filmora features is keyframing. Filmora allows you to add animated keyframes in your videos to add moving text or such effects. Follow the steps below to do so.
Free Download For Win 7 or later(64-bit)
Free Download For macOS 10.14 or later
Step1Add videos to the timeline
Add a video to your timeline and double-click on it to open up the editing options. Go to the “Animation” tab.

Here, you have different preset animations that you can use for your video.
Step2Add a keyframe
Add your chosen preset and hit play. You will see how that keyframe works. You can also add multiple keyframes to your video to make it look cooler.

Once you play the video, it will look like this.

This is an easy way of making intros or outros of your videos.
4.Detach Audio
Suppose you have a video where you like the audio and want to use it for another video. How would you separate the audio? This is where the Detach Audio feature comes in.
Free Download For Win 7 or later(64-bit)
Free Download For macOS 10.14 or later
Step1Add video to the timeline
Drag and drop the video on the timeline.

Step2Detach audio
To separate the audio, right-click on the video and choose “Detach Audio.” The audio track will appear separately in the timeline. You can then use it as you wish.

5.Blur Effects
Next up, we have the feature of blurring your video or the background in your video. To do so, follow these simple steps.
Free Download For Win 7 or later(64-bit)
Free Download For macOS 10.14 or later
Step1Go to the effects tab
After adding the video to your timeline, go to the Effects tab on top.

Step2Search for blur effects
In the search bar, type “blur.” You will see several blur effects. Choose any effect and see a preview of it.

Step3Add effects to videos
Add the chosen effect to your video. Then adjust its position accordingly. Double-click on the blur effect in the timeline panel to change its size and opacity.

These are some of the most amazing features that we have listed here. FYI, this is just the brink of the iceberg. There is a whole lot more that Filmora has to offer.
Final Words
If you’re looking for a simple and intuitive video editing platform to help you create stunning videos, look no further than Filmora. It is packed with powerful features that let you turn your raw footage into captivating movies in no time.
With its user-friendly design, you can easily access all the tools you need to make amazing videos, no matter your skill level. Try Filmora today and create unforgettable videos that will leave viewers in awe.
How To Use Slow Zoom Effect in Your Video?
A raw video without any effect will fall flat on its face when it comes to engagement and watch time. Nobody likes watching videos without effects as there is no entertainment value, and the video is not soothing and pleasing to the eyes. That is why effects in videos are extremely important especially when it is a video you are posting on social media to get everyone’s attention. You should definitely consider adding slow zoom effect in your video to make it stand out.
The slow zoom effect is one of the most common but widely loved video effects that work for any video. Human eyes love when there is slow motion effect of panning and zooming into the central or specific portion of a video. The slow zoom in effect is extremely popular among TikTok videos. We will illustrate how to apply slow zoom effect to your video on your smartphone as well as on your computer.
Part 1. How to create slow zoom-in effect in Filmora
If you want to add slow zoom to any recorded video on your computer, you will need a dedicated video editor. There are many popular video editors available where slow zoom effect is not available. We recommend Wondershare Filmora which is a professional video editor that is available for Windows and Mac users. You will need to combine slow motion and keyframe to achieve the desired slow zoom effect. Here are the steps on how to create slow zoom in effect for your videos.
Free Download For Win 7 or later(64-bit)
Free Download For macOS 10.14 or later
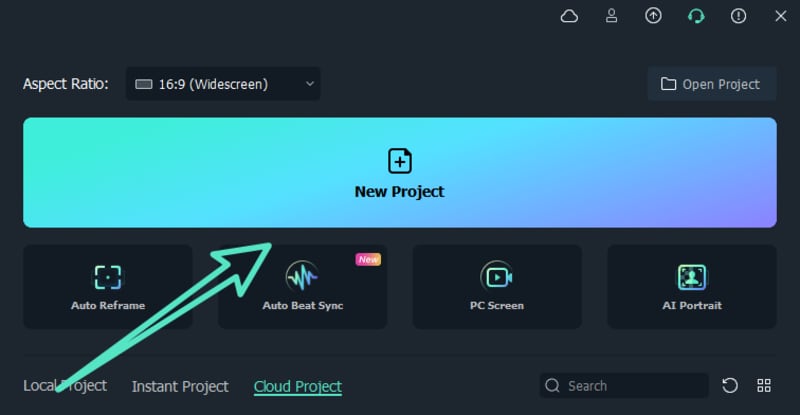
Step1 Download and install Wondershare Filmora . Launch the application and click on New Project option from the welcome screen.
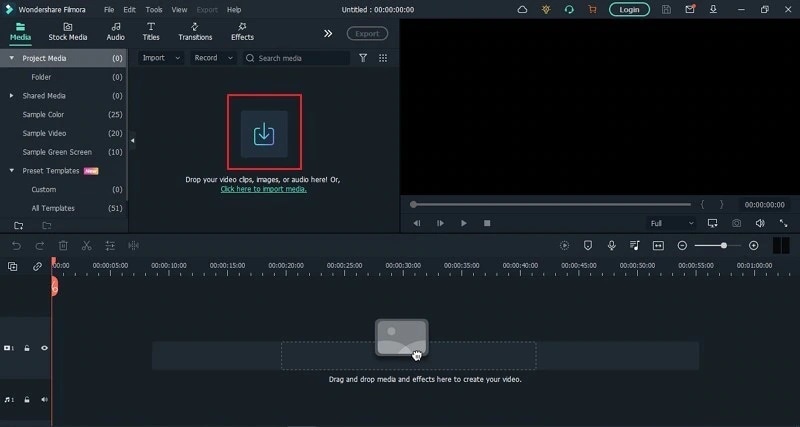
Step2 Drag and drop your video in Project Media folder. Thereafter, drag and drop the video into the Timeline.
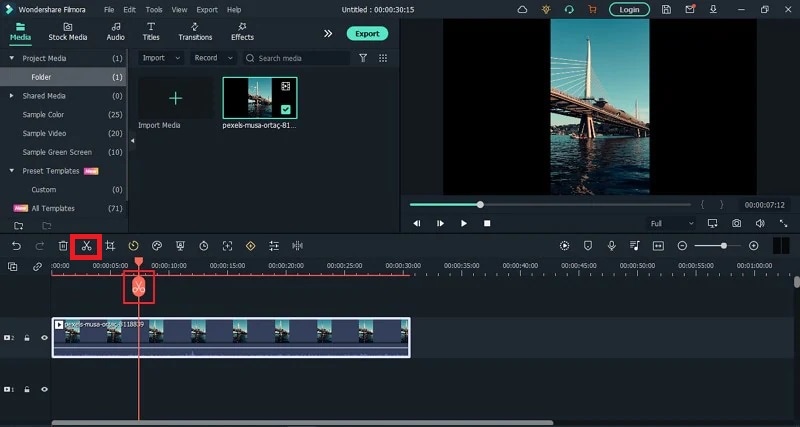
Step3 Put the red header on the beginning part of the clip that you want to cut off and click on Cut(Scissor) icon. Then put the red header on the end part of the clip and click on Cut icon again. You should now have the separated clip for applying slow zoom effect.
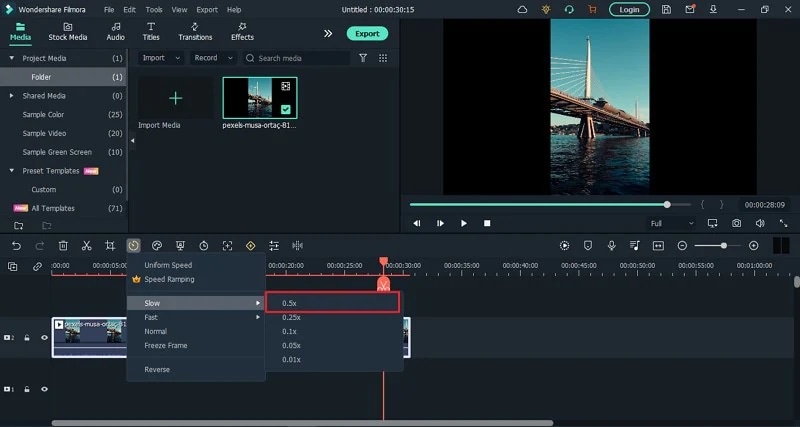
Step4 Select the separated clip and click on Speed icon. Go to Slow option and select the speed according to the slowness of zooming you want.
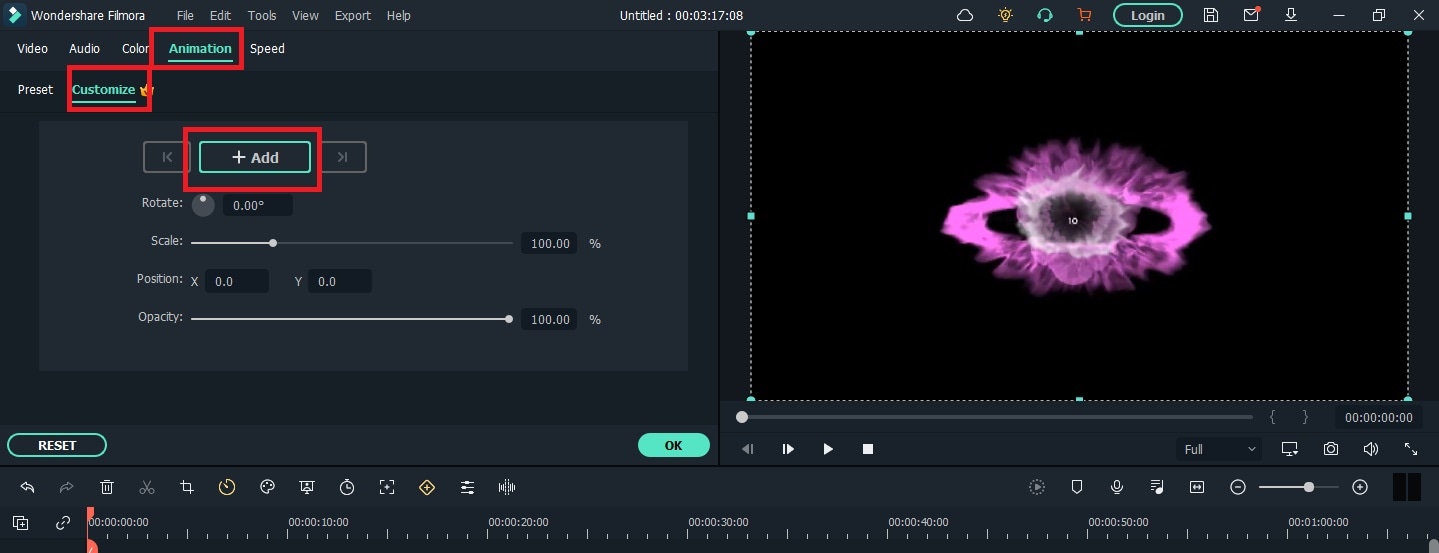
Step5 Now you have to add multiple keyframes so that the slow zoom effect is smooth and soothing. Right-click on the clip, go to Animation and click on Add Animation. Go to Animation tab and then to Customization section.
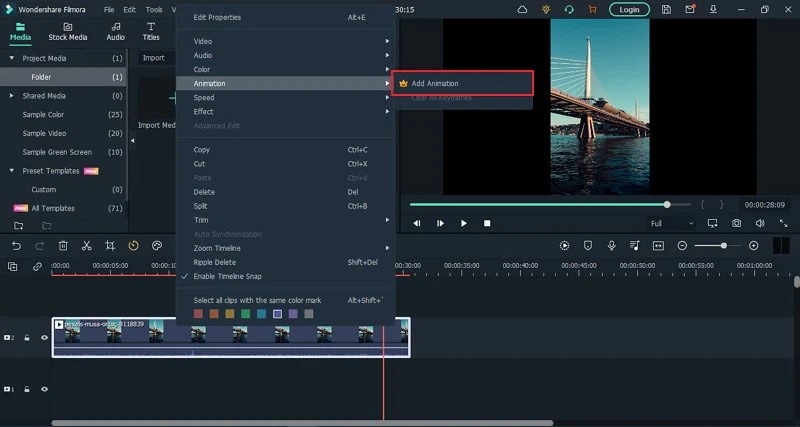
Move the red header to the point where you want a keyframe and click on Add option. Similarly, move the red header slightly farther and add another keyframe. Keep adding like that till you reach the end point.
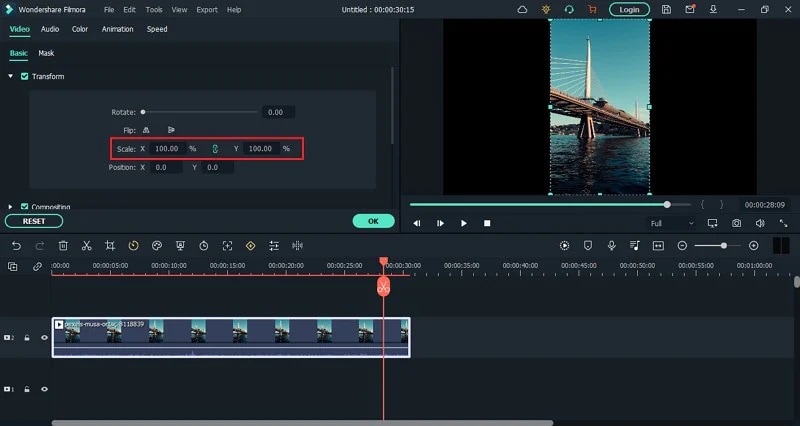
Step6 Double-click on the clip and go to Video> Basic> Transform. Select keyframes and slowly increase the scale slider for each keyframe to apply the zoom effect. Therefore, for every keyframe, zooming will increase gradually and you have already applied slow speed for complete slow zoom effect.
Part 2. How to do the slow zoom in effect on TikTok?
TikTok is one of the most popular short-video sharing platforms among teenagers and young adults. The slow zoom effect has been popularized by TikTokers as they use the effect quite regularly. Naturally, adding slow zoom in effect on your video on TikTok is the easiest. Here are the steps to follow one by one.
Step1 Launch TikTok app and you can shoot your video directly from TikTok. If you have already recorded the video, tap on “+” icon located at the bottom of the app screen and select the video.
Step2 After adding the video, go to Effects> Time. Under Time section, tap on “Slo-Mo” option to add slow-motion effect on your video.
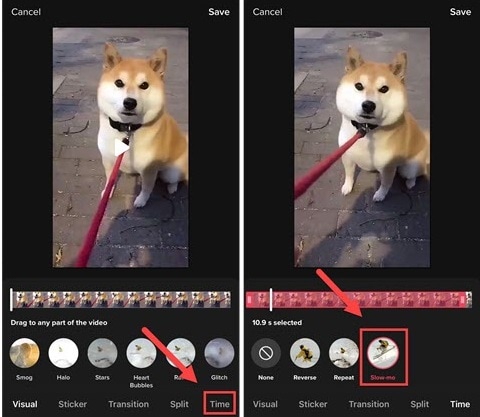
Step3 Go to Visuals and you will find Zoom option. Place the header on the part of the video where you want to place the slow zoom effect. Thereafter, tap and hold Zoom effect so that the effect applies on the video clip. Release the effect where the desired section is covered.
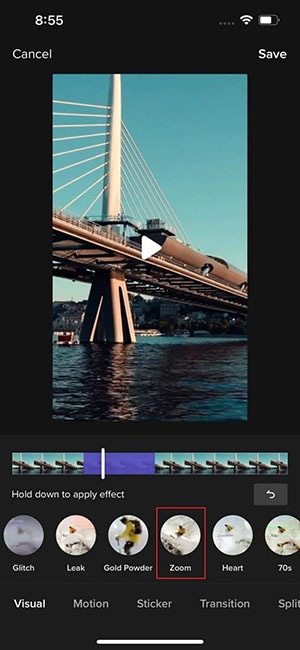
Step4 Tap on Save option and play the video to see slow zoom effect. Tap on Next button and you can share the video on social media platforms as well.

There is another way you can apply slow zoom effect on TikTok. Here are the steps to find and apply slow zoom effect.
Step1 Launch TikTok app and tap on Discover option located at the bottom.

Step2 On the next screen, type “Slow Zoom” on the search bar and tap on Search option.
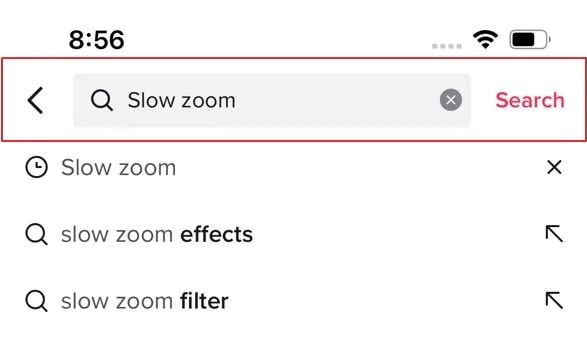
Step3 Now you will see the videos where different TikTok users have already applied slow zoom effect. Tap on Effects Slow Motion to apply the same effect to your video.

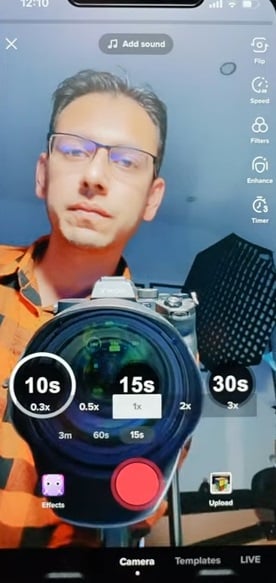
Step4 On the next screen, tap on Try This Effect button. You can select the duration of the zooming of the video you are about to shoot as well the zooming magnification.
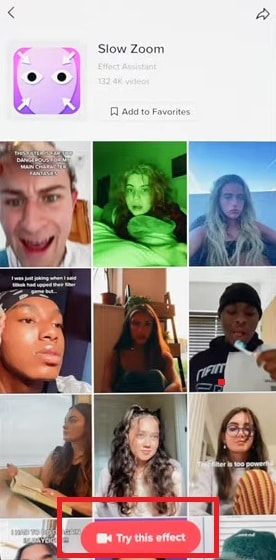
Step5 Finally, tap on Record button to capture your video and apply slow zoom effect on the video automatically.
Conclusion
The slow zoom effect is one of the most viral and trending video effects on social media platforms. If you want to add slow zoom effect to your video for a certain portion, you can do the same from your smartphone as well as computer. For Windows and Mac users, we recommend you use Wondershare Filmora .
Free Download For macOS 10.14 or later
Step1 Download and install Wondershare Filmora . Launch the application and click on New Project option from the welcome screen.

Step2 Drag and drop your video in Project Media folder. Thereafter, drag and drop the video into the Timeline.

Step3 Put the red header on the beginning part of the clip that you want to cut off and click on Cut(Scissor) icon. Then put the red header on the end part of the clip and click on Cut icon again. You should now have the separated clip for applying slow zoom effect.

Step4 Select the separated clip and click on Speed icon. Go to Slow option and select the speed according to the slowness of zooming you want.

Step5 Now you have to add multiple keyframes so that the slow zoom effect is smooth and soothing. Right-click on the clip, go to Animation and click on Add Animation. Go to Animation tab and then to Customization section.

Move the red header to the point where you want a keyframe and click on Add option. Similarly, move the red header slightly farther and add another keyframe. Keep adding like that till you reach the end point.

Step6 Double-click on the clip and go to Video> Basic> Transform. Select keyframes and slowly increase the scale slider for each keyframe to apply the zoom effect. Therefore, for every keyframe, zooming will increase gradually and you have already applied slow speed for complete slow zoom effect.

Part 2. How to do the slow zoom in effect on TikTok?
TikTok is one of the most popular short-video sharing platforms among teenagers and young adults. The slow zoom effect has been popularized by TikTokers as they use the effect quite regularly. Naturally, adding slow zoom in effect on your video on TikTok is the easiest. Here are the steps to follow one by one.
Step1 Launch TikTok app and you can shoot your video directly from TikTok. If you have already recorded the video, tap on “+” icon located at the bottom of the app screen and select the video.
Step2 After adding the video, go to Effects> Time. Under Time section, tap on “Slo-Mo” option to add slow-motion effect on your video.

Step3 Go to Visuals and you will find Zoom option. Place the header on the part of the video where you want to place the slow zoom effect. Thereafter, tap and hold Zoom effect so that the effect applies on the video clip. Release the effect where the desired section is covered.

Step4 Tap on Save option and play the video to see slow zoom effect. Tap on Next button and you can share the video on social media platforms as well.

There is another way you can apply slow zoom effect on TikTok. Here are the steps to find and apply slow zoom effect.
Step1 Launch TikTok app and tap on Discover option located at the bottom.

Step2 On the next screen, type “Slow Zoom” on the search bar and tap on Search option.

Step3 Now you will see the videos where different TikTok users have already applied slow zoom effect. Tap on Effects Slow Motion to apply the same effect to your video.

Step4 On the next screen, tap on Try This Effect button. You can select the duration of the zooming of the video you are about to shoot as well the zooming magnification.

Step5 Finally, tap on Record button to capture your video and apply slow zoom effect on the video automatically.

Conclusion
The slow zoom effect is one of the most viral and trending video effects on social media platforms. If you want to add slow zoom effect to your video for a certain portion, you can do the same from your smartphone as well as computer. For Windows and Mac users, we recommend you use Wondershare Filmora .
2 Effective Ways to Add Text Behind Objects
Adding text behind objects in your videos can be a great way to start your videos. For example, you can do so to create an attractive intro or startup a video. So, if you hope to make a video like a pro, let’s learn how to add text behind objects in your videos by Filmora.

Part 1. What Are The Benefits of Adding Text Behind Objects in Videos?
Your videos must maintain quality to create content worthy of a huge audience. You may have a YouTube channel or be starting down the road. Then you must give this a try because
Give a cool look
Adding text behind an object in a video looks cool! Now, your object could be a silhouette of a person or a huge skyscraper. You can add a text tile behind the object, creating the illusion. Due to this, the text will be flying in real-time.
Show creativity
Blasting your channel with innovative and creative content is the key to building a big audience. But, of course, you can always opt for many ways to create a video showing your creativity. One of those ways is to add text behind your object.
You can create an attractive intro by adding text behind objects that captivate the viewer. It ensures that your subscribers stay tuned to your channel and your content.
Build up a solid audience
Every day can be a real struggle if you are a daily content creator on YouTube. The audience demands good content. But your daily videos can get boring if you do not use new methods to edit your videos.
You can add text behind videos to spice up your intros and hook your daily audience even more. That will show the audience that you are genuinely putting in the effort.
Part 2. What Will You Need To Add Text Behind Videos?
Now there are a few things that you will need to add text behind videos. First, take a look at the basic priorities to perform this feature.
1. A Static Object Video
Adding text behind an object can be tricky if the object isn’t static. For example, the effect will be ruined if an object moves around a lot in a video.
Our goal is to create a smooth text behind the video effect. And this can only be achieved if the target object remains static in the video and does not move about its position.
2. A Video Editing Software - Wondershare Filmora
Once you select a video source, you aim to add it to a video editor. For this purpose, Wondershare Filmora would be your best choice. Wondershare Filmora allows you to create innovative and attractive videos.
Free Download For Win 7 or later(64-bit)
Free Download For macOS 10.14 or later
It has a very engaging system UI, allowing even beginner users to get their hands on it instantly. You will learn how to add text behind your videos with a few simple steps.

Now that you know the requirements for the video, let’s move on to the step-by-step guide to add text to your video.
Part 3. Step-by-Step Guide To Add Text Behind Videos
We look at two examples of how to add text behind videos in Wondershare Filmora.
- A static video with an object that can be easily masked out.
- A video with high contrast and a clean background.
Add Text behind a Static Video
First, we will go with adding text behind a static object. For this, scroll more to get the step-by-step process.
Step1 Download Wondershare Filmora
If you are a beginner just starting in the video editing business, Wondershare Filmora is the best choice. Follow the steps below to download the free version of Wondershare Filmora:
- First, download the Wondershare Filmora on your PC or Mac.
- Open the setup and install the Wondershare Filmora.
After downloading the Wondershare Filmora software, let’s edit the video. Scroll below to learn how to start the editing process!
Step2 Add the Video to the Timeline
We will first look at the static video example. For this, follow the below instructions:
- You have to start by importing your video in the import library.
- From the import library, you can click on the video and drag it down below to the timeline.

![]()
Note: Adding video to the timelines will allow you to create a workspace to edit your video.
Now let’s move on to how we will add the text tile to our video.
Step3 Add the Text Tile
It is time to add the text tile you will animate behind the object. To do that, follow the steps mentioned as such.:
- Go to the Titles icon on the bar above the import library.
- A drop-down option will be available on the left side.
- Scroll down to the Plain text.
- Here, you can see many text tiles to add to your video.
- You can choose anyone you like.
- The most commonly used tile is the Basic 6.
- When you add the text tile to the timeline, you must ensure that the text is of equal length to the video.
- To do that, drag the right corner of the text tile and drag it to the right to match the length of the video.

Step4 Edit the Text Tile
After you have added the text tile you desire, you need to type in the text. For this article, we will keep it simple. We will be typing a simple statement such as “Hello, World.“
- Double-click the Text tile to open the settings menu.
- After the settings menu is opened, type in the text box on the import window.
You will notice changes on the main window that your text has changed.

- After the text appears, you can make the font look as desired.
- Look above the text window, and you will see the type of text font selected.
- Click on the drop-down option and choose whatever you like.
Let’s move on to animate the text tile.
Step5 Animate the text tile
After adding text, it is time to animate it. This animation will decide how your text will appear behind the target object.
- First, you must open the text settings by double-clicking on the text tile in the timeline.
- In the settings opened in the import window, you will have to click on the animation tab in the upper left corner, aside from the Preset
- Now scroll down to where you will see the Right Roll
- Click on Right Roll and then click on the OK in the bottom right corner of the import window.

![]()
Note: You may notice now that the text appears in front of our object. Don’t worry now! We are getting there. With a few simple steps, we will see the results.
Now let us move on to the more significant part of the editing, masking the object. Again, look ahead to see how you can mask the object!
Step6 Mask the Object
To mask our object, we will need to be technical. We will begin by adding the same footage of the static object on our timeline. Follow the steps mentioned below:
- Drag and drop the static object footage above the timeline text. Make sure the text stays in the middle of the sandwich.

- We will hide the video in the first track to simplify things. In addition, this will make our editing easier.
- We will have to look in the effects library to insert the masking effect.
- You can see the Effects icon on the bar at the top.
- Click on the Effects.
- You will see the search bar at the top of the import window.
- In the search bar, type in Image mask.
- Drag the Image mask effect on the video above the text tile.
Now the masking effect has been added. But we would have to adjust so that it stays upon our object.
- Double-click on the video and the settings option will open up.
- Go into the Effects
![]()
Note: You must select your target object’s mask shape exactly as its shape.
- We have to mask out a building, so that we will need a vertical rectangle.

- After you have selected the shape of your object, we will need to convert it to the object’s size so that it only masks the building.
- To do that, scroll down below the import window to the settings.
- Here you can see the X, Y, and width settings.
- First, move the width bar so that it matches the width of the building.

- Now drag the X bar until the mask is confined to the building. You would have created the mask only limited to the building.

- Once you complete this step, click OK in the bottom right corner.
- Now un-hide the original video that you imported in the beginning.
Finally, play the video in the main play window from the beginning.

You have successfully created a text behind the object effect. Now that you know how to add text behind static objects let us move to learn how to add text to a video that has high contrast and a clean background.
Add text behind a high contrast and clean background
Besides the text can be added behind a static object, it can also be added to a clean background with high contrast. But how is it? Let’s dive into it.
Step1 Import the video into the timeline
- Import the video from the location in your PC media.
- When imported, drag and drop it onto the timeline.

Step2 Add the text tile
To add the text to your video, follow the steps mentioned below.
- Click on the titles icon on the bar above the import window.
- On the left drop-down option, scroll down to the titles.
- Select the Plain text option.
- You will notice that multiple options will pop up in the import window.
- Select the text title that suits you best.
- After you have selected the text style, drag and drop it down above your video in the timeline.

- Our next step would be to add the text.
- Double-click on the text tile. Doing so will open the settings menu in the import window.
- Type in the text that you want. For reference, we will keep it simple such as, “Hello world.”
- You can also adjust the font of your text.
- Above the type box, a drop-down option will show you the range of fonts available.
- Select the font you desire.

Now that you have added the text, it is time to animate it.
Step3 Take a snapshot
After typing in the text, you will notice in the main play window that your text still appears in front of your object. Therefore, we want to take it behind the object. To do so, first, you will need to take a snapshot.
Follow the steps mentioned to take a snapshot:
- Hide the main video. You can see the Eye icon aside from your main video in the edit column on the left side of the timeline.
- Click on the Eye icon to hide the main video.
- In the main play window, you will notice that the screen turns black, which leaves only the text on the screen.

- In the main play screen, you can notice a small camera icon.
- This camera icon is used to take snapshots of your screen.
- Click on the camera icon to take a snapshot of your screen.
- Your snapshot will now be saved in the main import window.

Now that we have taken a snapshot, we will need to import it into the timeline. Scroll below for more.
Step4 Add the snapshot
After taking it, your goal is to import it into the timeline. To perform this action, perform the following steps:
- Before adding the snapshot to the timeline, we must delete the main text tile.
- Then drag and drop the snapshot from the import library into the timeline above the video.
- Make sure that the snapshot is aligned well with the length of the video.
- If it is longer than the video, drag it from the right to match the length of the video.
- If its length is smaller than the video, drag it to the right to increase its length.

After adding the snapshot, we will have to change its blending mode.
Step5 Change the blending of the snapshot
To create the effect of your text behind the video, you must alter the main text’s blending mode. In this case, it will be the snapshot we took.
![]()
Note: Changing the blending mode of the snapshot will allow it to blend with the transparent background and will create the effect of the text behind the object in the video.
Follow the steps mentioned below to change the blending of the snapshot:
- Double-click the snapshot.
- If you select the compositing tab, the blending options will pop up.
- From default, it would be set to Normal. Click on the Normal
- It will show a drop-down option.
- Scroll down below until you can see an option labeled Then click on Overlay.

- And press OK in the bottom right corner to confirm your changes.
The text can be blended with the background.
- Click on the Eye icon to un-hide the video from the timeline.
- Now play the video from the start from the main play screen to see the final changes.

Congratulations! The above steps allow you to add text behind objects in your videos.
Conclusion
Modern media is full of creative content. And if you are a content creator that wants to make it through the world of YouTube and video creating, you need to be the best. You can only be the best at what you do if you keep pushing the boundaries of your creativity.
Adding text behind objects could be the first step in making your intros shine with creativity and innovation. It allows you to maintain and build your viewing audience. The more the audience, the more your content gets watched 
It has a very engaging system UI, allowing even beginner users to get their hands on it instantly. You will learn how to add text behind your videos with a few simple steps.

Now that you know the requirements for the video, let’s move on to the step-by-step guide to add text to your video.
Part 3. Step-by-Step Guide To Add Text Behind Videos
We look at two examples of how to add text behind videos in Wondershare Filmora.
- A static video with an object that can be easily masked out.
- A video with high contrast and a clean background.
Add Text behind a Static Video
First, we will go with adding text behind a static object. For this, scroll more to get the step-by-step process.
Step1 Download Wondershare Filmora
If you are a beginner just starting in the video editing business, Wondershare Filmora is the best choice. Follow the steps below to download the free version of Wondershare Filmora:
- First, download the Wondershare Filmora on your PC or Mac.
- Open the setup and install the Wondershare Filmora.
After downloading the Wondershare Filmora software, let’s edit the video. Scroll below to learn how to start the editing process!
Step2 Add the Video to the Timeline
We will first look at the static video example. For this, follow the below instructions:
- You have to start by importing your video in the import library.
- From the import library, you can click on the video and drag it down below to the timeline.

![]()
Note: Adding video to the timelines will allow you to create a workspace to edit your video.
Now let’s move on to how we will add the text tile to our video.
Step3 Add the Text Tile
It is time to add the text tile you will animate behind the object. To do that, follow the steps mentioned as such.:
- Go to the Titles icon on the bar above the import library.
- A drop-down option will be available on the left side.
- Scroll down to the Plain text.
- Here, you can see many text tiles to add to your video.
- You can choose anyone you like.
- The most commonly used tile is the Basic 6.
- When you add the text tile to the timeline, you must ensure that the text is of equal length to the video.
- To do that, drag the right corner of the text tile and drag it to the right to match the length of the video.

Step4 Edit the Text Tile
After you have added the text tile you desire, you need to type in the text. For this article, we will keep it simple. We will be typing a simple statement such as “Hello, World.“
- Double-click the Text tile to open the settings menu.
- After the settings menu is opened, type in the text box on the import window.
You will notice changes on the main window that your text has changed.

- After the text appears, you can make the font look as desired.
- Look above the text window, and you will see the type of text font selected.
- Click on the drop-down option and choose whatever you like.
Let’s move on to animate the text tile.
Step5 Animate the text tile
After adding text, it is time to animate it. This animation will decide how your text will appear behind the target object.
- First, you must open the text settings by double-clicking on the text tile in the timeline.
- In the settings opened in the import window, you will have to click on the animation tab in the upper left corner, aside from the Preset
- Now scroll down to where you will see the Right Roll
- Click on Right Roll and then click on the OK in the bottom right corner of the import window.

![]()
Note: You may notice now that the text appears in front of our object. Don’t worry now! We are getting there. With a few simple steps, we will see the results.
Now let us move on to the more significant part of the editing, masking the object. Again, look ahead to see how you can mask the object!
Step6 Mask the Object
To mask our object, we will need to be technical. We will begin by adding the same footage of the static object on our timeline. Follow the steps mentioned below:
- Drag and drop the static object footage above the timeline text. Make sure the text stays in the middle of the sandwich.

- We will hide the video in the first track to simplify things. In addition, this will make our editing easier.
- We will have to look in the effects library to insert the masking effect.
- You can see the Effects icon on the bar at the top.
- Click on the Effects.
- You will see the search bar at the top of the import window.
- In the search bar, type in Image mask.
- Drag the Image mask effect on the video above the text tile.
Now the masking effect has been added. But we would have to adjust so that it stays upon our object.
- Double-click on the video and the settings option will open up.
- Go into the Effects
![]()
Note: You must select your target object’s mask shape exactly as its shape.
- We have to mask out a building, so that we will need a vertical rectangle.

- After you have selected the shape of your object, we will need to convert it to the object’s size so that it only masks the building.
- To do that, scroll down below the import window to the settings.
- Here you can see the X, Y, and width settings.
- First, move the width bar so that it matches the width of the building.

- Now drag the X bar until the mask is confined to the building. You would have created the mask only limited to the building.

- Once you complete this step, click OK in the bottom right corner.
- Now un-hide the original video that you imported in the beginning.
Finally, play the video in the main play window from the beginning.

You have successfully created a text behind the object effect. Now that you know how to add text behind static objects let us move to learn how to add text to a video that has high contrast and a clean background.
Add text behind a high contrast and clean background
Besides the text can be added behind a static object, it can also be added to a clean background with high contrast. But how is it? Let’s dive into it.
Step1 Import the video into the timeline
- Import the video from the location in your PC media.
- When imported, drag and drop it onto the timeline.

Step2 Add the text tile
To add the text to your video, follow the steps mentioned below.
- Click on the titles icon on the bar above the import window.
- On the left drop-down option, scroll down to the titles.
- Select the Plain text option.
- You will notice that multiple options will pop up in the import window.
- Select the text title that suits you best.
- After you have selected the text style, drag and drop it down above your video in the timeline.

- Our next step would be to add the text.
- Double-click on the text tile. Doing so will open the settings menu in the import window.
- Type in the text that you want. For reference, we will keep it simple such as, “Hello world.”
- You can also adjust the font of your text.
- Above the type box, a drop-down option will show you the range of fonts available.
- Select the font you desire.

Now that you have added the text, it is time to animate it.
Step3 Take a snapshot
After typing in the text, you will notice in the main play window that your text still appears in front of your object. Therefore, we want to take it behind the object. To do so, first, you will need to take a snapshot.
Follow the steps mentioned to take a snapshot:
- Hide the main video. You can see the Eye icon aside from your main video in the edit column on the left side of the timeline.
- Click on the Eye icon to hide the main video.
- In the main play window, you will notice that the screen turns black, which leaves only the text on the screen.

- In the main play screen, you can notice a small camera icon.
- This camera icon is used to take snapshots of your screen.
- Click on the camera icon to take a snapshot of your screen.
- Your snapshot will now be saved in the main import window.

Now that we have taken a snapshot, we will need to import it into the timeline. Scroll below for more.
Step4 Add the snapshot
After taking it, your goal is to import it into the timeline. To perform this action, perform the following steps:
- Before adding the snapshot to the timeline, we must delete the main text tile.
- Then drag and drop the snapshot from the import library into the timeline above the video.
- Make sure that the snapshot is aligned well with the length of the video.
- If it is longer than the video, drag it from the right to match the length of the video.
- If its length is smaller than the video, drag it to the right to increase its length.

After adding the snapshot, we will have to change its blending mode.
Step5 Change the blending of the snapshot
To create the effect of your text behind the video, you must alter the main text’s blending mode. In this case, it will be the snapshot we took.
![]()
Note: Changing the blending mode of the snapshot will allow it to blend with the transparent background and will create the effect of the text behind the object in the video.
Follow the steps mentioned below to change the blending of the snapshot:
- Double-click the snapshot.
- If you select the compositing tab, the blending options will pop up.
- From default, it would be set to Normal. Click on the Normal
- It will show a drop-down option.
- Scroll down below until you can see an option labeled Then click on Overlay.

- And press OK in the bottom right corner to confirm your changes.
The text can be blended with the background.
- Click on the Eye icon to un-hide the video from the timeline.
- Now play the video from the start from the main play screen to see the final changes.

Congratulations! The above steps allow you to add text behind objects in your videos.
Conclusion
Modern media is full of creative content. And if you are a content creator that wants to make it through the world of YouTube and video creating, you need to be the best. You can only be the best at what you do if you keep pushing the boundaries of your creativity.
Adding text behind objects could be the first step in making your intros shine with creativity and innovation. It allows you to maintain and build your viewing audience. The more the audience, the more your content gets watched!
Also read:
- Updated 2024 Approved How to Make Fortnite Thumbnail with Motion Blur?
- 2024 Approved How to Loop Video in Canva
- Updated 12 Best Marketing Slideshow Templates
- Updated How to Create a Light Sweep (Shine) Effect
- Updated In 2024, Best Filmic Pro LUTs For Video Editing
- Updated The Ultimate Guide to Make a Text Collage
- New Transform Your Videos Into 90S VHS Nostalgia for Free! Learn Where to Get Overlays and Use Filmoras Built-In Presets. Dive Into the Retro Realm Now for 2024
- Updated 2024 Approved This Article Will Show You How to Clone Yourslef in Videos with Filmora
- Updated In 2024, How to Use LUTS to Color Grade on Your iPhone
- Updated In 2024, Complete Guide to Make an Intro Video
- In 2024, Wondershare Filmora Has Introduced a New Feature - AI Portrait Effect that You Can Use to Remove Background From Various Videos and Images. Explore the Uses, Benefits, and Real-Life Scenarios of This Feature in a Comprehensive Guide
- In 2024, Add Motion Blur in After Effects
- In 2024, Ways to Make Sure Your Recording Slideshow in Powerpoint Is Not Wrong
- Find Out What Ray Tracing Is in After Effects, How It Works, and Learn About Ray-Traced 3D Settings with Simple Instructions for 2024
- 2024 Approved How to Make A Slideshow Video (+Filmora Techniques)
- New Are You Ready to Learn About Something Free yet Amazing? We Are Talking About All Format Video Players for PC that You Should Know , Lets Begin for 2024
- New The Complete Guide to GIF for Discord Profile for 2024
- TikTok Velocity Dance Tutorial| Filmora
- In 2024, Do You Seek to Blur Out Your Video and Photo to Display some Motion Blur? This Article Provides a List of the Best Motion Blur Apps for Videos and Photos
- In 2024, Steps to Create Green Screen Videos in After Effects
- 2024 Approved 33 Best Video Splitter Recommended
- The Ultimate Guide to Countdown Animation in Videos
- Updated 2024 Approved How to Remove or Mute Audio in Video with Android Phones?
- Best Online GIF to Image (PNG/JPG) Converters for 2024
- Do You Find Choosing a Good LUT to Color-Correct Your Media Files Difficult? Discover some of the Best Professional LUTs From 3D LUT Creator to Download for 2024
- New 2024 Approved How to Make Split Screen Videos in Filmora
- 10 Best Meme Text to Speech Tools Windows, Mac, Android, iPhone&Online
- Updated 2024 Approved Unleash the Power of Video Slow Motion with Wondershare Filmora. Find Out How to Create Slow Motion Video with the Effective Speed Ramping Feature on Filmora
- New 2024 Approved 10 Best Old Film Overlays to Make Your Videos Look Vintage
- In 2024, Tips That Show Anybody How To Make Youtube Slideshow – Guaranteed
- In 2024, How to Trim/Crop Video in Microsoft Powerpoint
- Do You Want to Get Green Screen Effects on Your Video without Green Screen Setup in Your Background? Learn How to Get Virtual Green Screen Background and Shoot Videos Like a Pro for 2024
- Updated Create Perfect Slow Motion Videos With The Best CapCut Templates for 2024
- Your Recorded Video Footage Has some Visible Grains Making Your Video Noisy and Thus Hampering the Overall Viewing Experience. No Worries, as There AI Video Denoiser and Other Software Available to Correct the Issue for 2024
- New In 2024, 10 Innovative AR Teaching Examples to Tell You What Is AR in Teaching
- Updated This Article Will Help You Understand How to Create Video Contents that Convert Sales
- In 2024, Have You Ever Watched a Movie Where You Felt the Filmmakers Left You Hanging? Yea, Thats What Freeze Frame Does. Here We Will Enlighten You on What It Is, Freeze Frame Examples Where It Has Been Helpful to Drive Our Point Home
- New How to Use Twixtor Effect to Add Slow-Motion Effect to Video?
- New 2024 Approved How to Zoom in Discord
- New How to Convert Time-Lapse to Normal Video
- How To Quickly Create A Screen Print Effect In Photoshop Detailed Gui for 2024
- Updated What You Should Know About Speech-to-Text Technology for 2024
- How to Use LUTs in VN Editor – Complete Guide and Best LUTs Download for 2024
- How to Create Chroma Key Written Text Effects in Filmora for 2024
- New How Can You Make a Slideshow Look Aesthetic? Follow the Given Discussion to Learn About Creating an Aesthetic Slideshow All by Yourself for 2024
- New In 2024, Want to Make a Fun and Cinematic Video with an Introductory Text Title? Learn the Stages of Editing with Filmora for This Effect Here
- In 2024, How to Remove an AirTag from Your Apple ID Account From Apple iPhone XS Max?
- How to Transfer Photos from Infinix Note 30 VIP to Laptop Without USB | Dr.fone
- How to Easily Hard reset my Oppo Reno 10 Pro+ 5G | Dr.fone
- In 2024, Top 9 Samsung Galaxy XCover 6 Pro Tactical Edition Monitoring Apps for Parental Controls | Dr.fone
- In 2024, How to Mirror Apple iPhone SE (2020) to Other iPhone? | Dr.fone
- How to Mirror Realme GT 5 Pro to Mac? | Dr.fone
- How do you play HEVC/H.265 files on Xiaomi Redmi 13C?
- How To Change Your Apple ID on Apple iPhone XS Max With or Without Password | Dr.fone
- In 2024, How to Transfer from Apple iPhone 6s Plus to iPhone 8/X/11 | Dr.fone
- How do I reset my Samsung Galaxy S23 Ultra Phone without technical knowledge? | Dr.fone
- 2024 Approved Tips on How to Learn Graphics Animation
- In 2024, Simple and Effective Ways to Change Your Country on YouTube App Of your Realme 12 Pro 5G | Dr.fone
- Gmail Not Working on Nokia C300 7 Common Problems & Fixes | Dr.fone
- In 2024, How to Get and Use Pokemon Go Promo Codes On Apple iPhone 11 Pro Max | Dr.fone
- The Best Android SIM Unlock Code Generators Unlock Your Oppo Reno 11F 5G Phone Hassle-Free
- Complete guide for recovering pictures files on Spark Go (2024).
- Android Safe Mode - How to Turn off Safe Mode on Infinix Hot 30i? | Dr.fone
- How to Change Your Location on Apple iPhone 7 | Dr.fone
- Updated How To Convert Video Voice to Text Online for Free?
- How to Change Lock Screen Wallpaper on Nubia Red Magic 8S Pro+
- How To Change Realme V30 Lock Screen Password?
- How To Enable USB Debugging on a Locked Xiaomi Phone
- New SRT Subtitle Translation Tools and Techniques for 2024
- How to Transfer Photos from Xiaomi Redmi 13C to New Android? | Dr.fone
- New Adobe Animate Text Effects Skills That You Need to Know for 2024
- How To Bypass FRP on Motorola Moto G04
- In 2024, Top 15 Augmented Reality Games Like Pokémon GO To Play On Oppo A1x 5G | Dr.fone
- In 2024, Step-by-Step Tutorial How To Bypass Oppo A59 5G FRP
- In 2024, Why Your WhatsApp Location is Not Updating and How to Fix On Vivo T2 5G | Dr.fone
- Why does the pokemon go battle league not available On Honor X50 | Dr.fone
- CatchEmAll Celebrate National Pokémon Day with Virtual Location On Realme GT Neo 5 SE | Dr.fone
- How to Mirror Your Xiaomi Redmi Note 13 Pro+ 5G Screen to PC with Chromecast | Dr.fone
- Recover your music after Honor Magic 6 Lite has been deleted
- In 2024, Easy Guide How To Bypass Xiaomi Redmi Note 13 Pro 5G FRP Android 10/11/12/13
- Hassle-Free Ways to Remove FRP Lock on OnePlus Phones with/without a PC
- In 2024, Set Your Preferred Job Location on LinkedIn App of your Samsung Galaxy A34 5G | Dr.fone
- In 2024, Is Your iPhone 7 Plus in Security Lockout? Proper Ways To Unlock | Dr.fone
- How do I reset my Itel A60s Phone without technical knowledge? | Dr.fone
- Title: In 2024, How to Create an Alternate Reality Effect
- Author: Morgan
- Created at : 2024-07-01 13:02:27
- Updated at : 2024-07-02 13:02:27
- Link: https://ai-video-editing.techidaily.com/in-2024-how-to-create-an-alternate-reality-effect/
- License: This work is licensed under CC BY-NC-SA 4.0.

