:max_bytes(150000):strip_icc():format(webp)/GettyImages-1164718779-aa87dac78cd44ad7b71e76c27adc7e9a.jpg)
In 2024, How to Create Vintage Film Effect 1920S

How to Create Vintage Film Effect 1920S
Do you want to roll back the hands of time and shoot a film like you were in WWI or Charlie Chaplin’s era? That’s what a vintage film effect is all about. In other words, this video effect will give your videos an old-film look and feel. So, without wasting time, let’s learn how to convert a normal video into a film shot in the 1920s with Wondershare Filmora.
Preparation
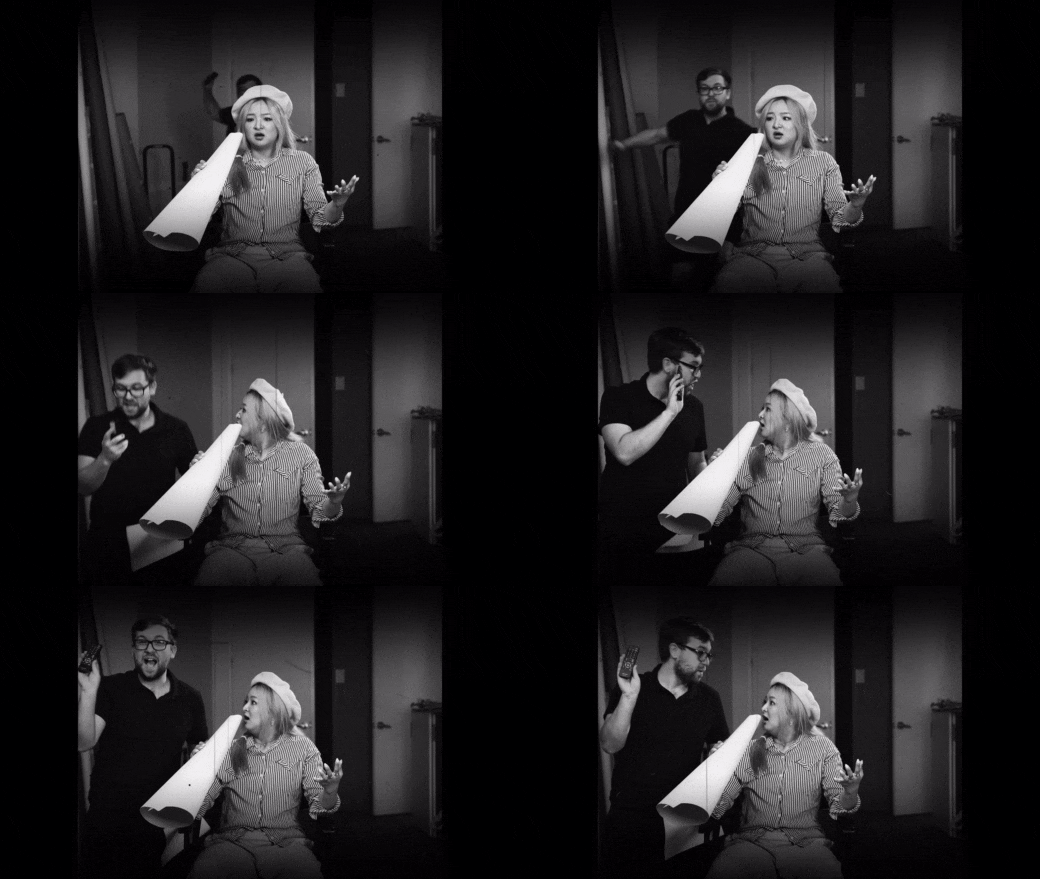
In this tutorial, you don’t need a lot of creativity to create a vintage film, as Wondershare Filmora will be doing the heavy lifting. Just shoot an action video like chasing each other around, chatting with friends, running away from something, or doing anything else. Let’s learn how to do that below!
Free Download For Win 7 or later(64-bit)
Free Download For macOS 10.14 or later
Step1 Add a video you want to edit
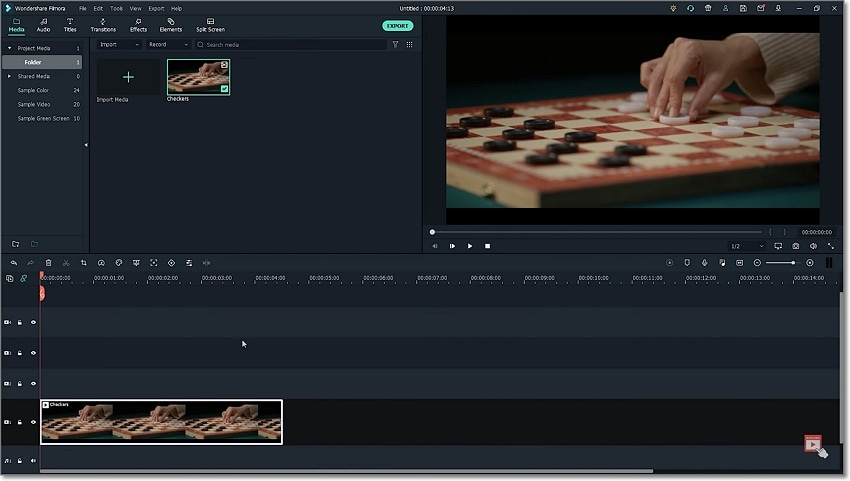
Upload your video on Filmora, then move it to the editing timeline by dragging it. This should take a second or two.
Step2 Add a crop effect
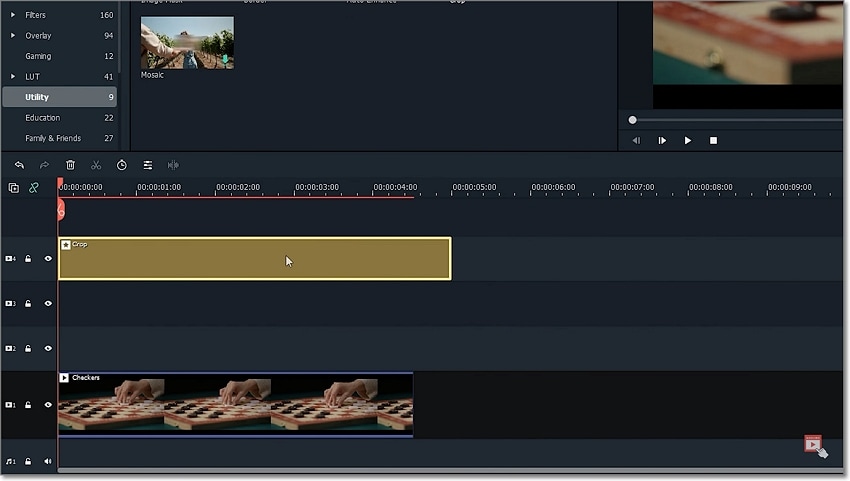
After successfully adding your video to the timeline, tap the Effect tab on top of the screen and click Utility. Then, choose the Crop effect and add a few tracks above the video clip.
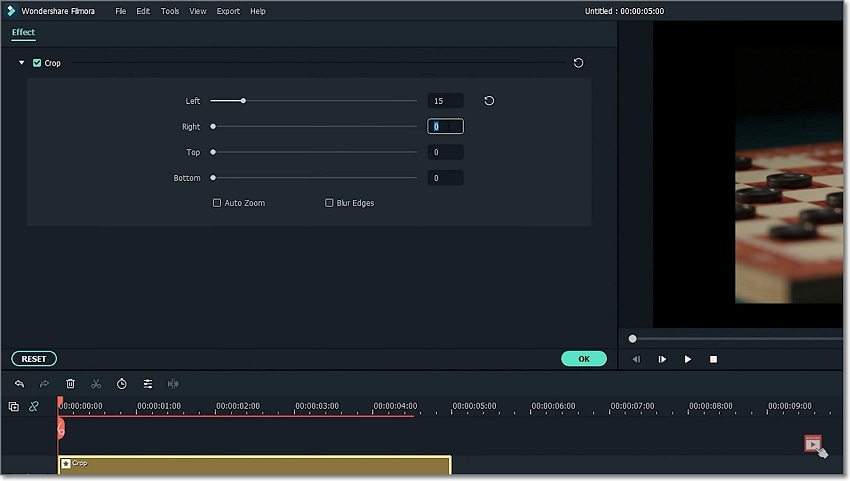
Next, double-tap the Crop effect on the editing timeline to open the effect editing tools. Now change the crop amount to 15 to add a vintage feel to your video. Just enter 15 on the Left and Right boxes.
Step3 Add the Dirty Film and Silent Film effects
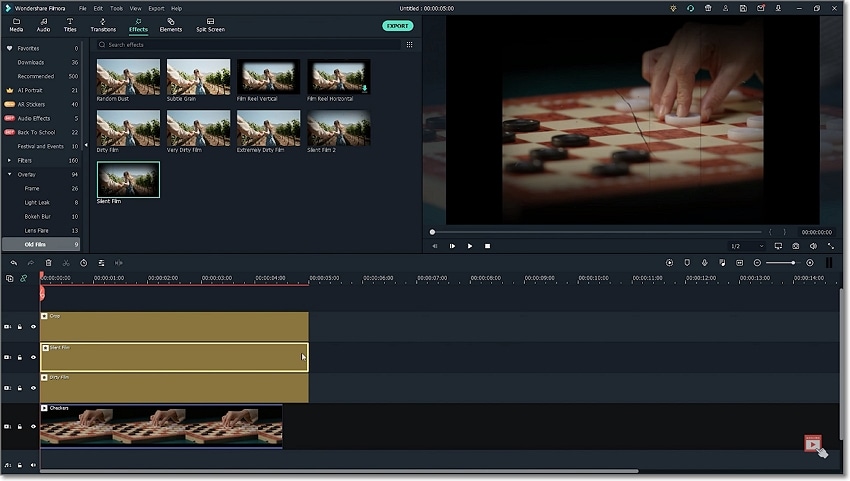
Tap the Effect tab, then open the Overlay drop-down menu. Then, choose the Old Film category before adding a Dirty Film effect above the clip. To apply a more vintage feel to your video, add a Silent Film effect to the track above the Dirty Film effect.
Step4 Add a black & white effect to your video

Up to this point, your film should now start having a more vintage feel. But to make it look even older, double-click the video clip and tap the Color tab. After that, open the 3D LUT arrow and choose the B&W Film option. Now play the video and enjoy.
Summary
See, you don’t need to break a sweat to add a vintage feel to your funny video. With Filmora, you’ll access multiple tools and effects to create an old-looking film with just a single click. And don’t forget to play around with other Filmora overlays and effects to bring out the inner video editor in you. Thanks for reading!
Free Download For macOS 10.14 or later
Step1 Add a video you want to edit

Upload your video on Filmora, then move it to the editing timeline by dragging it. This should take a second or two.
Step2 Add a crop effect

After successfully adding your video to the timeline, tap the Effect tab on top of the screen and click Utility. Then, choose the Crop effect and add a few tracks above the video clip.

Next, double-tap the Crop effect on the editing timeline to open the effect editing tools. Now change the crop amount to 15 to add a vintage feel to your video. Just enter 15 on the Left and Right boxes.
Step3 Add the Dirty Film and Silent Film effects

Tap the Effect tab, then open the Overlay drop-down menu. Then, choose the Old Film category before adding a Dirty Film effect above the clip. To apply a more vintage feel to your video, add a Silent Film effect to the track above the Dirty Film effect.
Step4 Add a black & white effect to your video

Up to this point, your film should now start having a more vintage feel. But to make it look even older, double-click the video clip and tap the Color tab. After that, open the 3D LUT arrow and choose the B&W Film option. Now play the video and enjoy.
Summary
See, you don’t need to break a sweat to add a vintage feel to your funny video. With Filmora, you’ll access multiple tools and effects to create an old-looking film with just a single click. And don’t forget to play around with other Filmora overlays and effects to bring out the inner video editor in you. Thanks for reading!
Free Download For macOS 10.14 or later
Step1 Add a video you want to edit

Upload your video on Filmora, then move it to the editing timeline by dragging it. This should take a second or two.
Step2 Add a crop effect

After successfully adding your video to the timeline, tap the Effect tab on top of the screen and click Utility. Then, choose the Crop effect and add a few tracks above the video clip.

Next, double-tap the Crop effect on the editing timeline to open the effect editing tools. Now change the crop amount to 15 to add a vintage feel to your video. Just enter 15 on the Left and Right boxes.
Step3 Add the Dirty Film and Silent Film effects

Tap the Effect tab, then open the Overlay drop-down menu. Then, choose the Old Film category before adding a Dirty Film effect above the clip. To apply a more vintage feel to your video, add a Silent Film effect to the track above the Dirty Film effect.
Step4 Add a black & white effect to your video

Up to this point, your film should now start having a more vintage feel. But to make it look even older, double-click the video clip and tap the Color tab. After that, open the 3D LUT arrow and choose the B&W Film option. Now play the video and enjoy.
Summary
See, you don’t need to break a sweat to add a vintage feel to your funny video. With Filmora, you’ll access multiple tools and effects to create an old-looking film with just a single click. And don’t forget to play around with other Filmora overlays and effects to bring out the inner video editor in you. Thanks for reading!
Free Download For macOS 10.14 or later
Step1 Add a video you want to edit

Upload your video on Filmora, then move it to the editing timeline by dragging it. This should take a second or two.
Step2 Add a crop effect

After successfully adding your video to the timeline, tap the Effect tab on top of the screen and click Utility. Then, choose the Crop effect and add a few tracks above the video clip.

Next, double-tap the Crop effect on the editing timeline to open the effect editing tools. Now change the crop amount to 15 to add a vintage feel to your video. Just enter 15 on the Left and Right boxes.
Step3 Add the Dirty Film and Silent Film effects

Tap the Effect tab, then open the Overlay drop-down menu. Then, choose the Old Film category before adding a Dirty Film effect above the clip. To apply a more vintage feel to your video, add a Silent Film effect to the track above the Dirty Film effect.
Step4 Add a black & white effect to your video

Up to this point, your film should now start having a more vintage feel. But to make it look even older, double-click the video clip and tap the Color tab. After that, open the 3D LUT arrow and choose the B&W Film option. Now play the video and enjoy.
Summary
See, you don’t need to break a sweat to add a vintage feel to your funny video. With Filmora, you’ll access multiple tools and effects to create an old-looking film with just a single click. And don’t forget to play around with other Filmora overlays and effects to bring out the inner video editor in you. Thanks for reading!
Let’s Introduce the Top 5 Applications to Add a Song to a Video for Free with some Amazing Sound and Visual Effects
Versatile Video Editor - Wondershare Filmora
Are you interested in video editing? Do you want to create some awesome videos with lots of sounds and visual effects? If you are interested in all these things, you should be focused on choosing a good video editing tool. For example, if you search for the best app to add a song to a video, you will get hundreds of options immediately. But, the most significant factor is which one is the best application to consider.
Before choosing an application or finalizing the decision, you should focus on multiple aspects, such as which device you want to use, what kind of features you like, what purpose you want to serve, etc. In this blog, you will get introduced to one of the best video applications for mobile platforms, both iOS and Android. For creating this list, we conduct proper research and analysis.
In this article
01 [Tops Mobile Applications For Adding Song To Video](#Part 1)
02 [How To Add Song In Video App?](#Part 2)
Part 1 Tops Mobile Applications For Adding Song To Video
Filmora
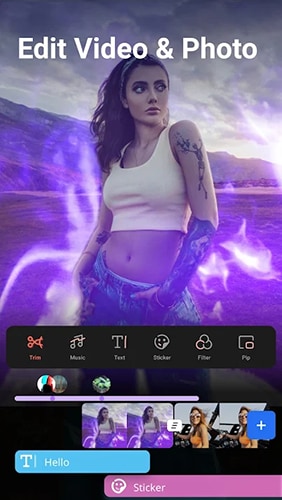
Filmora is the best video editing application that can help you create videos as per your requirements and explore creativity as you want. The platform provides top-notch services with more than 1000 music options, 5000 stickers, emojis, text, filters, backgrounds, etc. These things will help you gain lots of benefits and create a perfect video that can impress the audience with ease.
The application has multiple features to facilitate the client’s different requirements. The most important thing about Filmora is that it provides only 100% free services. You don’t need to spend a penny on video editing and related factors.
VivaVideo
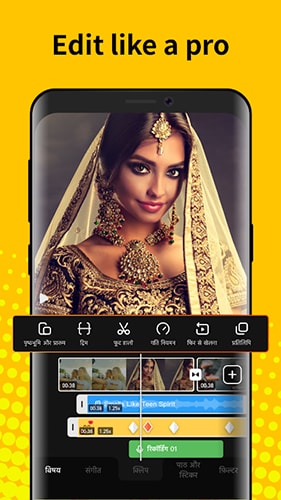
VivaVideo is also a free video editor. It can be used for different purposes, such as – video editing, video merger, video joiner, video splitter & cutter, video maker with song, video speed control, video creator app, add music to video, adding text & stickers to video, video effect editors, video sound effects, and download & edited share results. You can easily do all these things by considering the option of VivaVideo.
When it comes to downloading the video, you will get multiple options. You can download videos up to 4K optical resolution quality. The users can also share videos directly to other platforms, such as – Instagram, YouTube, Twitter, WhatsApp, etc. For availing of top-notch services with all features, you can take its subscription.
Magisto

If you are looking for a video editor with some modern features, you can go with the option of Magisto. It will help you edit videos as you want by adding multiple visual and musical effects. If you want to create a video using different types of photographs, you can also consider its option. You can create image slide show-based videos by adding music in the background. The most important thing about this particular video editor is that it has a user-friendly interface to proceed. The process of using the application is easy and simpler as compared to some other options.
You can also choose Magisto for some other activities, such as – creating photo collages, video collages, featuring good background music, etc.
InShot
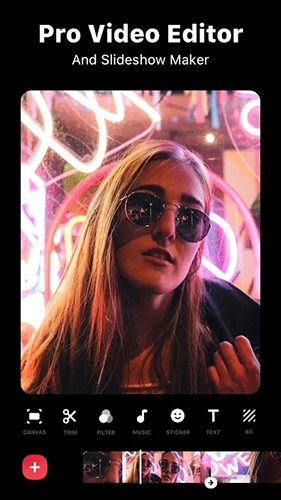
Many individuals are looking for a tool that can help them remove original sound or music from a video and replace it with an impressive one. A video is highly dependent on the background music or sound effects. By using InShot, it can become more accessible for everyone to proceed as they want. Inshot also has a music library that provides you access to multiple audio files and tracks for making your video much better. You can also use it for conversion procedures, such as – video to audio.
Video Editor – Glitch Video Effects

It is an influential video editor with several benefits. The application is created by adding a user-friendly and easy-to-use interface that can help you get desired results after following a minor and essential procedure. Using the application, you can quickly get work done on adding a song to a video with some fantastic effects. You can also use external audio files from the device to merge with the video.
These are some significant options regarding a good add song to the video app. You can pick one as per your preference and suitability. By paying attention to the following details, you can gather details about one of the best applications and how to use it.
Part 2 How To Add Song In Video App?
When adding a song to a video, everyone does not have complete technical knowledge. Due to it, people are looking for the best options by which they can make it possible easily and experience multiple benefits. Here, we are going to share a complete guide regarding one of the best video editing apps for mobile devices i.e. Filmora.
Step-By-Step Procedure
Step1 Video Selection

Firstly, you should proceed by choosing the video you want to edit. For such a task, you should access the Filmora application. In the first interaction, you can see the CREATE NEW VIDEO button on the interface. You should click the button and select the desired video from the device. After choosing the video, you should click the ADD button.
Step2 Add Audio To Video

When the video is selected and added to the application, you should proceed with editing functionalities. Here, you should try to add audio to the videos. Here, you can see the option of MUSIC in the right toolbar. You can get an interface for choosing a song or audio file you want to add to the video by clicking such a button. The users will also get an option to listen to audio carefully to figure out the lyrics and outputs to make sure it is perfect for the video. After testing and confirming the audio, you should proceed further.
Step3 Export

After adding the audio and merging it with video, you should preview it once and then proceed by saving the changes. Now, you should focus on exporting the final files. While exporting files, you should be focused on some basic settings as well, such as – choosing the video format, etc.
Additional Tip: Add Song To Video On PC
In case you are looking for the best options that can be useful in making lots of things easier while editing a video, you should choose a good platform. Filmora is a good application for such a purpose, but you may lack some important features due to its accessibility on mobile devices. Here, please consider the option of a PC to proceed with all these things.
When considering PC options, you will not find a better video editor than Filmora. It is one of the best video editors. It provides multiple features and facilities to edit and process a video file. Filmora also has an extensive music library that allows you to access numerous audio files without any problem. You will get various visual effects to feature in the video and make it impressive and effective. In case you face any problem or confusion while using the application, you can access the official sources and easily go through the textual guides.
Wondershare Filmora
Get started easily with Filmora’s powerful performance, intuitive interface, and countless effects!
Try It Free Try It Free Try It Free Learn More >

Conclusion
Final Words
All these details will help you understand lots of things about the procedures and methods of adding a song to a video. In case you still have any confusion or problem regarding how to add songs in a video app procedure, you can check some tutorials or guides on the internet. It can be useful in understanding things more perfectly and getting proper clarity about everything. Having proper knowledge of using a video editing application can help you get quality results in the form of an impressive video as well.
Are you interested in video editing? Do you want to create some awesome videos with lots of sounds and visual effects? If you are interested in all these things, you should be focused on choosing a good video editing tool. For example, if you search for the best app to add a song to a video, you will get hundreds of options immediately. But, the most significant factor is which one is the best application to consider.
Before choosing an application or finalizing the decision, you should focus on multiple aspects, such as which device you want to use, what kind of features you like, what purpose you want to serve, etc. In this blog, you will get introduced to one of the best video applications for mobile platforms, both iOS and Android. For creating this list, we conduct proper research and analysis.
In this article
01 [Tops Mobile Applications For Adding Song To Video](#Part 1)
02 [How To Add Song In Video App?](#Part 2)
Part 1 Tops Mobile Applications For Adding Song To Video
Filmora

Filmora is the best video editing application that can help you create videos as per your requirements and explore creativity as you want. The platform provides top-notch services with more than 1000 music options, 5000 stickers, emojis, text, filters, backgrounds, etc. These things will help you gain lots of benefits and create a perfect video that can impress the audience with ease.
The application has multiple features to facilitate the client’s different requirements. The most important thing about Filmora is that it provides only 100% free services. You don’t need to spend a penny on video editing and related factors.
VivaVideo

VivaVideo is also a free video editor. It can be used for different purposes, such as – video editing, video merger, video joiner, video splitter & cutter, video maker with song, video speed control, video creator app, add music to video, adding text & stickers to video, video effect editors, video sound effects, and download & edited share results. You can easily do all these things by considering the option of VivaVideo.
When it comes to downloading the video, you will get multiple options. You can download videos up to 4K optical resolution quality. The users can also share videos directly to other platforms, such as – Instagram, YouTube, Twitter, WhatsApp, etc. For availing of top-notch services with all features, you can take its subscription.
Magisto

If you are looking for a video editor with some modern features, you can go with the option of Magisto. It will help you edit videos as you want by adding multiple visual and musical effects. If you want to create a video using different types of photographs, you can also consider its option. You can create image slide show-based videos by adding music in the background. The most important thing about this particular video editor is that it has a user-friendly interface to proceed. The process of using the application is easy and simpler as compared to some other options.
You can also choose Magisto for some other activities, such as – creating photo collages, video collages, featuring good background music, etc.
InShot

Many individuals are looking for a tool that can help them remove original sound or music from a video and replace it with an impressive one. A video is highly dependent on the background music or sound effects. By using InShot, it can become more accessible for everyone to proceed as they want. Inshot also has a music library that provides you access to multiple audio files and tracks for making your video much better. You can also use it for conversion procedures, such as – video to audio.
Video Editor – Glitch Video Effects

It is an influential video editor with several benefits. The application is created by adding a user-friendly and easy-to-use interface that can help you get desired results after following a minor and essential procedure. Using the application, you can quickly get work done on adding a song to a video with some fantastic effects. You can also use external audio files from the device to merge with the video.
These are some significant options regarding a good add song to the video app. You can pick one as per your preference and suitability. By paying attention to the following details, you can gather details about one of the best applications and how to use it.
Part 2 How To Add Song In Video App?
When adding a song to a video, everyone does not have complete technical knowledge. Due to it, people are looking for the best options by which they can make it possible easily and experience multiple benefits. Here, we are going to share a complete guide regarding one of the best video editing apps for mobile devices i.e. Filmora.
Step-By-Step Procedure
Step1 Video Selection

Firstly, you should proceed by choosing the video you want to edit. For such a task, you should access the Filmora application. In the first interaction, you can see the CREATE NEW VIDEO button on the interface. You should click the button and select the desired video from the device. After choosing the video, you should click the ADD button.
Step2 Add Audio To Video

When the video is selected and added to the application, you should proceed with editing functionalities. Here, you should try to add audio to the videos. Here, you can see the option of MUSIC in the right toolbar. You can get an interface for choosing a song or audio file you want to add to the video by clicking such a button. The users will also get an option to listen to audio carefully to figure out the lyrics and outputs to make sure it is perfect for the video. After testing and confirming the audio, you should proceed further.
Step3 Export

After adding the audio and merging it with video, you should preview it once and then proceed by saving the changes. Now, you should focus on exporting the final files. While exporting files, you should be focused on some basic settings as well, such as – choosing the video format, etc.
Additional Tip: Add Song To Video On PC
In case you are looking for the best options that can be useful in making lots of things easier while editing a video, you should choose a good platform. Filmora is a good application for such a purpose, but you may lack some important features due to its accessibility on mobile devices. Here, please consider the option of a PC to proceed with all these things.
When considering PC options, you will not find a better video editor than Filmora. It is one of the best video editors. It provides multiple features and facilities to edit and process a video file. Filmora also has an extensive music library that allows you to access numerous audio files without any problem. You will get various visual effects to feature in the video and make it impressive and effective. In case you face any problem or confusion while using the application, you can access the official sources and easily go through the textual guides.
Wondershare Filmora
Get started easily with Filmora’s powerful performance, intuitive interface, and countless effects!
Try It Free Try It Free Try It Free Learn More >

Conclusion
Final Words
All these details will help you understand lots of things about the procedures and methods of adding a song to a video. In case you still have any confusion or problem regarding how to add songs in a video app procedure, you can check some tutorials or guides on the internet. It can be useful in understanding things more perfectly and getting proper clarity about everything. Having proper knowledge of using a video editing application can help you get quality results in the form of an impressive video as well.
Are you interested in video editing? Do you want to create some awesome videos with lots of sounds and visual effects? If you are interested in all these things, you should be focused on choosing a good video editing tool. For example, if you search for the best app to add a song to a video, you will get hundreds of options immediately. But, the most significant factor is which one is the best application to consider.
Before choosing an application or finalizing the decision, you should focus on multiple aspects, such as which device you want to use, what kind of features you like, what purpose you want to serve, etc. In this blog, you will get introduced to one of the best video applications for mobile platforms, both iOS and Android. For creating this list, we conduct proper research and analysis.
In this article
01 [Tops Mobile Applications For Adding Song To Video](#Part 1)
02 [How To Add Song In Video App?](#Part 2)
Part 1 Tops Mobile Applications For Adding Song To Video
Filmora

Filmora is the best video editing application that can help you create videos as per your requirements and explore creativity as you want. The platform provides top-notch services with more than 1000 music options, 5000 stickers, emojis, text, filters, backgrounds, etc. These things will help you gain lots of benefits and create a perfect video that can impress the audience with ease.
The application has multiple features to facilitate the client’s different requirements. The most important thing about Filmora is that it provides only 100% free services. You don’t need to spend a penny on video editing and related factors.
VivaVideo

VivaVideo is also a free video editor. It can be used for different purposes, such as – video editing, video merger, video joiner, video splitter & cutter, video maker with song, video speed control, video creator app, add music to video, adding text & stickers to video, video effect editors, video sound effects, and download & edited share results. You can easily do all these things by considering the option of VivaVideo.
When it comes to downloading the video, you will get multiple options. You can download videos up to 4K optical resolution quality. The users can also share videos directly to other platforms, such as – Instagram, YouTube, Twitter, WhatsApp, etc. For availing of top-notch services with all features, you can take its subscription.
Magisto

If you are looking for a video editor with some modern features, you can go with the option of Magisto. It will help you edit videos as you want by adding multiple visual and musical effects. If you want to create a video using different types of photographs, you can also consider its option. You can create image slide show-based videos by adding music in the background. The most important thing about this particular video editor is that it has a user-friendly interface to proceed. The process of using the application is easy and simpler as compared to some other options.
You can also choose Magisto for some other activities, such as – creating photo collages, video collages, featuring good background music, etc.
InShot

Many individuals are looking for a tool that can help them remove original sound or music from a video and replace it with an impressive one. A video is highly dependent on the background music or sound effects. By using InShot, it can become more accessible for everyone to proceed as they want. Inshot also has a music library that provides you access to multiple audio files and tracks for making your video much better. You can also use it for conversion procedures, such as – video to audio.
Video Editor – Glitch Video Effects

It is an influential video editor with several benefits. The application is created by adding a user-friendly and easy-to-use interface that can help you get desired results after following a minor and essential procedure. Using the application, you can quickly get work done on adding a song to a video with some fantastic effects. You can also use external audio files from the device to merge with the video.
These are some significant options regarding a good add song to the video app. You can pick one as per your preference and suitability. By paying attention to the following details, you can gather details about one of the best applications and how to use it.
Part 2 How To Add Song In Video App?
When adding a song to a video, everyone does not have complete technical knowledge. Due to it, people are looking for the best options by which they can make it possible easily and experience multiple benefits. Here, we are going to share a complete guide regarding one of the best video editing apps for mobile devices i.e. Filmora.
Step-By-Step Procedure
Step1 Video Selection

Firstly, you should proceed by choosing the video you want to edit. For such a task, you should access the Filmora application. In the first interaction, you can see the CREATE NEW VIDEO button on the interface. You should click the button and select the desired video from the device. After choosing the video, you should click the ADD button.
Step2 Add Audio To Video

When the video is selected and added to the application, you should proceed with editing functionalities. Here, you should try to add audio to the videos. Here, you can see the option of MUSIC in the right toolbar. You can get an interface for choosing a song or audio file you want to add to the video by clicking such a button. The users will also get an option to listen to audio carefully to figure out the lyrics and outputs to make sure it is perfect for the video. After testing and confirming the audio, you should proceed further.
Step3 Export

After adding the audio and merging it with video, you should preview it once and then proceed by saving the changes. Now, you should focus on exporting the final files. While exporting files, you should be focused on some basic settings as well, such as – choosing the video format, etc.
Additional Tip: Add Song To Video On PC
In case you are looking for the best options that can be useful in making lots of things easier while editing a video, you should choose a good platform. Filmora is a good application for such a purpose, but you may lack some important features due to its accessibility on mobile devices. Here, please consider the option of a PC to proceed with all these things.
When considering PC options, you will not find a better video editor than Filmora. It is one of the best video editors. It provides multiple features and facilities to edit and process a video file. Filmora also has an extensive music library that allows you to access numerous audio files without any problem. You will get various visual effects to feature in the video and make it impressive and effective. In case you face any problem or confusion while using the application, you can access the official sources and easily go through the textual guides.
Wondershare Filmora
Get started easily with Filmora’s powerful performance, intuitive interface, and countless effects!
Try It Free Try It Free Try It Free Learn More >

Conclusion
Final Words
All these details will help you understand lots of things about the procedures and methods of adding a song to a video. In case you still have any confusion or problem regarding how to add songs in a video app procedure, you can check some tutorials or guides on the internet. It can be useful in understanding things more perfectly and getting proper clarity about everything. Having proper knowledge of using a video editing application can help you get quality results in the form of an impressive video as well.
Are you interested in video editing? Do you want to create some awesome videos with lots of sounds and visual effects? If you are interested in all these things, you should be focused on choosing a good video editing tool. For example, if you search for the best app to add a song to a video, you will get hundreds of options immediately. But, the most significant factor is which one is the best application to consider.
Before choosing an application or finalizing the decision, you should focus on multiple aspects, such as which device you want to use, what kind of features you like, what purpose you want to serve, etc. In this blog, you will get introduced to one of the best video applications for mobile platforms, both iOS and Android. For creating this list, we conduct proper research and analysis.
In this article
01 [Tops Mobile Applications For Adding Song To Video](#Part 1)
02 [How To Add Song In Video App?](#Part 2)
Part 1 Tops Mobile Applications For Adding Song To Video
Filmora

Filmora is the best video editing application that can help you create videos as per your requirements and explore creativity as you want. The platform provides top-notch services with more than 1000 music options, 5000 stickers, emojis, text, filters, backgrounds, etc. These things will help you gain lots of benefits and create a perfect video that can impress the audience with ease.
The application has multiple features to facilitate the client’s different requirements. The most important thing about Filmora is that it provides only 100% free services. You don’t need to spend a penny on video editing and related factors.
VivaVideo

VivaVideo is also a free video editor. It can be used for different purposes, such as – video editing, video merger, video joiner, video splitter & cutter, video maker with song, video speed control, video creator app, add music to video, adding text & stickers to video, video effect editors, video sound effects, and download & edited share results. You can easily do all these things by considering the option of VivaVideo.
When it comes to downloading the video, you will get multiple options. You can download videos up to 4K optical resolution quality. The users can also share videos directly to other platforms, such as – Instagram, YouTube, Twitter, WhatsApp, etc. For availing of top-notch services with all features, you can take its subscription.
Magisto

If you are looking for a video editor with some modern features, you can go with the option of Magisto. It will help you edit videos as you want by adding multiple visual and musical effects. If you want to create a video using different types of photographs, you can also consider its option. You can create image slide show-based videos by adding music in the background. The most important thing about this particular video editor is that it has a user-friendly interface to proceed. The process of using the application is easy and simpler as compared to some other options.
You can also choose Magisto for some other activities, such as – creating photo collages, video collages, featuring good background music, etc.
InShot

Many individuals are looking for a tool that can help them remove original sound or music from a video and replace it with an impressive one. A video is highly dependent on the background music or sound effects. By using InShot, it can become more accessible for everyone to proceed as they want. Inshot also has a music library that provides you access to multiple audio files and tracks for making your video much better. You can also use it for conversion procedures, such as – video to audio.
Video Editor – Glitch Video Effects

It is an influential video editor with several benefits. The application is created by adding a user-friendly and easy-to-use interface that can help you get desired results after following a minor and essential procedure. Using the application, you can quickly get work done on adding a song to a video with some fantastic effects. You can also use external audio files from the device to merge with the video.
These are some significant options regarding a good add song to the video app. You can pick one as per your preference and suitability. By paying attention to the following details, you can gather details about one of the best applications and how to use it.
Part 2 How To Add Song In Video App?
When adding a song to a video, everyone does not have complete technical knowledge. Due to it, people are looking for the best options by which they can make it possible easily and experience multiple benefits. Here, we are going to share a complete guide regarding one of the best video editing apps for mobile devices i.e. Filmora.
Step-By-Step Procedure
Step1 Video Selection

Firstly, you should proceed by choosing the video you want to edit. For such a task, you should access the Filmora application. In the first interaction, you can see the CREATE NEW VIDEO button on the interface. You should click the button and select the desired video from the device. After choosing the video, you should click the ADD button.
Step2 Add Audio To Video

When the video is selected and added to the application, you should proceed with editing functionalities. Here, you should try to add audio to the videos. Here, you can see the option of MUSIC in the right toolbar. You can get an interface for choosing a song or audio file you want to add to the video by clicking such a button. The users will also get an option to listen to audio carefully to figure out the lyrics and outputs to make sure it is perfect for the video. After testing and confirming the audio, you should proceed further.
Step3 Export

After adding the audio and merging it with video, you should preview it once and then proceed by saving the changes. Now, you should focus on exporting the final files. While exporting files, you should be focused on some basic settings as well, such as – choosing the video format, etc.
Additional Tip: Add Song To Video On PC
In case you are looking for the best options that can be useful in making lots of things easier while editing a video, you should choose a good platform. Filmora is a good application for such a purpose, but you may lack some important features due to its accessibility on mobile devices. Here, please consider the option of a PC to proceed with all these things.
When considering PC options, you will not find a better video editor than Filmora. It is one of the best video editors. It provides multiple features and facilities to edit and process a video file. Filmora also has an extensive music library that allows you to access numerous audio files without any problem. You will get various visual effects to feature in the video and make it impressive and effective. In case you face any problem or confusion while using the application, you can access the official sources and easily go through the textual guides.
Wondershare Filmora
Get started easily with Filmora’s powerful performance, intuitive interface, and countless effects!
Try It Free Try It Free Try It Free Learn More >

Conclusion
Final Words
All these details will help you understand lots of things about the procedures and methods of adding a song to a video. In case you still have any confusion or problem regarding how to add songs in a video app procedure, you can check some tutorials or guides on the internet. It can be useful in understanding things more perfectly and getting proper clarity about everything. Having proper knowledge of using a video editing application can help you get quality results in the form of an impressive video as well.
How to Use LUTs in Premiere Pro
Create High-Quality Video - Wondershare Filmora
An easy and powerful YouTube video editor
Numerous video and audio effects to choose from
Detailed tutorials provided by the official channel
Do you wonder how some pictures or videos look so stunning? As you keep reading you will discover the secrets of achieving similar quality for your content. You need a video or photo-editing software such as Adobe Premiere Pro and LUTS. Premier Pro luts are file types that you use to make color corrections to your content. They are available in different formats, each with varying capabilities. Below is everything you need to improve your editing skills using Adobe’s software and premiere luts.

In this article
01 How does Premiere Pro Classify LUTS?
02 How to use Luts in Adobe Premiere Pro?
03 How to save and export your LUTS?
How does Premiere Pro Classify LUTS?
A premiere pro lut can fall into two categories depending on its core function. These are:
• Looks
These are premiere luts you use to make changes to your video or photo’s appearance and color scheme. They are available as presets under the Lumetri Color Panel and offer quick fixes to your content.
• Input Lut
You use these premiere pro luts to interpret log footage. Additionally, they are the first step of your color correcting process and work best on DSLR footage. However, keep reading to discover how to use luts in Adobe Premiere Pro.
How to use Luts in Adobe Premiere Pro?
Now that you are aware of how the program classifies the Luts, here is how you can correct your footage.
1. Get the latest version of the program
You can purchase and download the program from your region’s Adobe Website. The program is available for both macOS and Windows. However, it is quite heavy on the system. According to reports, the below requirements are sufficient.
- You need a processer with 8 cores and clock speeds upwards of 3.2GHz.
- 16 GB of Ram is ideal for macOS. However, you do require upwards of 32GB if you are running Windows.
- Graphics cards from Nvidia and AMD are best if you also want to improve the program’s performance. You request one that can handle the Adobe Premiere Pro from your supplier.
- Furthermore, invest in a high-capacity storage device to save your projects since some outputs can be very large after color correction. The program allows you to render 4K files which are the largest.
- Finally, the above requirements are sufficient to run the following versions OF Adobe Premiere Pro:
i. Adobe Premiere Pro 22.2
ii. Adobe Premiere Pro 22.1.2
iii. Adobe Premiere Pro 22.1.1
iv. Adobe Premiere Pro 22.0
2. Select the video you want and put it on the timeline

3. Premiere luts are accessible from two sections of the program
Input luts are available under the Basic Correction tab from the Lumetri Panel as above.
Alternatively, you can get them by accessing the Basic Correction tab from the Lumetri Section of the Effects Control Panel.
4. Then, open the Input LUT dropdown menu and choose the premiere lut you want
Adobe Premiere Pro has preset input LUTs. However, you can also add your own by clicking browse. Doing so opens your computer’s File Explorer and you can locate your custom premiere luts. The software applies the premiere lut, after which you can use the tools to make adjustments.
Additionally, Adobe Premiere Pro allows you to install custom LUT files to use. Below is the process for macOS users.
- Create these target directories in your Adobe Premiere Installation files. • For shared devices
/Library/Application Support/Adobe/Common/LUTs/Creative
/Library/Application Support/Adobe/Common/LUTs/Technical
• You need to create these files if you have administrator access.
/Users//Library/Application Support/Adobe/Common/LUTs/Creative
/Users//Library/Application Support/Adobe/Common/LUTs/Technical - Copy your custom LUT files to each of the folders.
- These will be available in your Lumetri Panel next time you launch Adobe Premiere Pro.
The process is the same for Windows Users. However, the target directories are different.
- For shared devices:
C:\ Program Files\ Adobe\Common\LUTs\Creative
C:\ Program Files\ Adobe\Common\LUTs\Creative - You need to create these files if you have administrator access.
C:\Users\yourusername\AppData\Roaming\Adobe\Common\LUTs\Creative
C:\Users\yourusername\AppData\Roaming\Adobe\Common\LUTs\Technical
Adobe Premiere Pro accepts .look and .cube file types, allowing you more creative freedom. Additionally, you can save and export any custom premiere luts to use in other projects. The next section offers a step-by-step guide on how to do that.
Finally, Looks allow you to make quick adjustments to your videos using the presets available on the Lumetri Panel. You can access these from the Effects Panel. Furthermore, it also allows you to preview the result. The intensity of the look can vary depending on where the slider is on the effects panel.
How to save and export your LUTS?
Most filmmakers prefer to save their premier luts for later use. Here is how to do it:
- Follow the above process through to step 5.
- Once you finish your editing, click on the Lumetri Pop Up menu and choose Save Preset.
- Fill the respective fields with your custom information and click OK. The program will then save the clip to the location you specify.
- You can save custom luts in the following ways:
Scale only applies the new lut to the video. As such, all other luts you use are deleted. Therefore, if your video is one hour, your custom settings will run through the clip’s entire length.
Anchor To In Point only saves the section of the clip where your custom settings are active. Additionally, the software will add all pre-existing luts to the section without scaling. - Additionally, you can repeat the process and export your LUTs in the following formats:
.look exports the LUT as an Adobe Premiere Pro file to a location on your device.
.cube saves the Lumetri preset you can use on other color grading software. For example, you can use your .cube custom lut with Filmora.

For Win 7 or later (64-bit)
For macOS 10.12 or later
Finally, the above procedures only apply to certain versions of Adobe Premiere Pro. They may differ across devices. This is because Adobe releases new updates regularly to fix bugs and offer new functionality. So, keep checking regularly for any changes.
Conclusion
●Adobe Premiere Pro offers you fun luts to enhance the quality of your video. Additionally, the option to render videos in 4K quality allows you to output creations of the highest quality. Additionally, the option to save and export your LUTS to use with other programs like Filmora, means there is no limit to what you can create. Here is a link to some LUTs you can try on your next edit.
Do you wonder how some pictures or videos look so stunning? As you keep reading you will discover the secrets of achieving similar quality for your content. You need a video or photo-editing software such as Adobe Premiere Pro and LUTS. Premier Pro luts are file types that you use to make color corrections to your content. They are available in different formats, each with varying capabilities. Below is everything you need to improve your editing skills using Adobe’s software and premiere luts.

In this article
01 How does Premiere Pro Classify LUTS?
02 How to use Luts in Adobe Premiere Pro?
03 How to save and export your LUTS?
How does Premiere Pro Classify LUTS?
A premiere pro lut can fall into two categories depending on its core function. These are:
• Looks
These are premiere luts you use to make changes to your video or photo’s appearance and color scheme. They are available as presets under the Lumetri Color Panel and offer quick fixes to your content.
• Input Lut
You use these premiere pro luts to interpret log footage. Additionally, they are the first step of your color correcting process and work best on DSLR footage. However, keep reading to discover how to use luts in Adobe Premiere Pro.
How to use Luts in Adobe Premiere Pro?
Now that you are aware of how the program classifies the Luts, here is how you can correct your footage.
1. Get the latest version of the program
You can purchase and download the program from your region’s Adobe Website. The program is available for both macOS and Windows. However, it is quite heavy on the system. According to reports, the below requirements are sufficient.
- You need a processer with 8 cores and clock speeds upwards of 3.2GHz.
- 16 GB of Ram is ideal for macOS. However, you do require upwards of 32GB if you are running Windows.
- Graphics cards from Nvidia and AMD are best if you also want to improve the program’s performance. You request one that can handle the Adobe Premiere Pro from your supplier.
- Furthermore, invest in a high-capacity storage device to save your projects since some outputs can be very large after color correction. The program allows you to render 4K files which are the largest.
- Finally, the above requirements are sufficient to run the following versions OF Adobe Premiere Pro:
i. Adobe Premiere Pro 22.2
ii. Adobe Premiere Pro 22.1.2
iii. Adobe Premiere Pro 22.1.1
iv. Adobe Premiere Pro 22.0
2. Select the video you want and put it on the timeline

3. Premiere luts are accessible from two sections of the program
Input luts are available under the Basic Correction tab from the Lumetri Panel as above.
Alternatively, you can get them by accessing the Basic Correction tab from the Lumetri Section of the Effects Control Panel.
4. Then, open the Input LUT dropdown menu and choose the premiere lut you want
Adobe Premiere Pro has preset input LUTs. However, you can also add your own by clicking browse. Doing so opens your computer’s File Explorer and you can locate your custom premiere luts. The software applies the premiere lut, after which you can use the tools to make adjustments.
Additionally, Adobe Premiere Pro allows you to install custom LUT files to use. Below is the process for macOS users.
- Create these target directories in your Adobe Premiere Installation files. • For shared devices
/Library/Application Support/Adobe/Common/LUTs/Creative
/Library/Application Support/Adobe/Common/LUTs/Technical
• You need to create these files if you have administrator access.
/Users//Library/Application Support/Adobe/Common/LUTs/Creative
/Users//Library/Application Support/Adobe/Common/LUTs/Technical - Copy your custom LUT files to each of the folders.
- These will be available in your Lumetri Panel next time you launch Adobe Premiere Pro.
The process is the same for Windows Users. However, the target directories are different.
- For shared devices:
C:\ Program Files\ Adobe\Common\LUTs\Creative
C:\ Program Files\ Adobe\Common\LUTs\Creative - You need to create these files if you have administrator access.
C:\Users\yourusername\AppData\Roaming\Adobe\Common\LUTs\Creative
C:\Users\yourusername\AppData\Roaming\Adobe\Common\LUTs\Technical
Adobe Premiere Pro accepts .look and .cube file types, allowing you more creative freedom. Additionally, you can save and export any custom premiere luts to use in other projects. The next section offers a step-by-step guide on how to do that.
Finally, Looks allow you to make quick adjustments to your videos using the presets available on the Lumetri Panel. You can access these from the Effects Panel. Furthermore, it also allows you to preview the result. The intensity of the look can vary depending on where the slider is on the effects panel.
How to save and export your LUTS?
Most filmmakers prefer to save their premier luts for later use. Here is how to do it:
- Follow the above process through to step 5.
- Once you finish your editing, click on the Lumetri Pop Up menu and choose Save Preset.
- Fill the respective fields with your custom information and click OK. The program will then save the clip to the location you specify.
- You can save custom luts in the following ways:
Scale only applies the new lut to the video. As such, all other luts you use are deleted. Therefore, if your video is one hour, your custom settings will run through the clip’s entire length.
Anchor To In Point only saves the section of the clip where your custom settings are active. Additionally, the software will add all pre-existing luts to the section without scaling. - Additionally, you can repeat the process and export your LUTs in the following formats:
.look exports the LUT as an Adobe Premiere Pro file to a location on your device.
.cube saves the Lumetri preset you can use on other color grading software. For example, you can use your .cube custom lut with Filmora.

For Win 7 or later (64-bit)
For macOS 10.12 or later
Finally, the above procedures only apply to certain versions of Adobe Premiere Pro. They may differ across devices. This is because Adobe releases new updates regularly to fix bugs and offer new functionality. So, keep checking regularly for any changes.
Conclusion
●Adobe Premiere Pro offers you fun luts to enhance the quality of your video. Additionally, the option to render videos in 4K quality allows you to output creations of the highest quality. Additionally, the option to save and export your LUTS to use with other programs like Filmora, means there is no limit to what you can create. Here is a link to some LUTs you can try on your next edit.
Do you wonder how some pictures or videos look so stunning? As you keep reading you will discover the secrets of achieving similar quality for your content. You need a video or photo-editing software such as Adobe Premiere Pro and LUTS. Premier Pro luts are file types that you use to make color corrections to your content. They are available in different formats, each with varying capabilities. Below is everything you need to improve your editing skills using Adobe’s software and premiere luts.

In this article
01 How does Premiere Pro Classify LUTS?
02 How to use Luts in Adobe Premiere Pro?
03 How to save and export your LUTS?
How does Premiere Pro Classify LUTS?
A premiere pro lut can fall into two categories depending on its core function. These are:
• Looks
These are premiere luts you use to make changes to your video or photo’s appearance and color scheme. They are available as presets under the Lumetri Color Panel and offer quick fixes to your content.
• Input Lut
You use these premiere pro luts to interpret log footage. Additionally, they are the first step of your color correcting process and work best on DSLR footage. However, keep reading to discover how to use luts in Adobe Premiere Pro.
How to use Luts in Adobe Premiere Pro?
Now that you are aware of how the program classifies the Luts, here is how you can correct your footage.
1. Get the latest version of the program
You can purchase and download the program from your region’s Adobe Website. The program is available for both macOS and Windows. However, it is quite heavy on the system. According to reports, the below requirements are sufficient.
- You need a processer with 8 cores and clock speeds upwards of 3.2GHz.
- 16 GB of Ram is ideal for macOS. However, you do require upwards of 32GB if you are running Windows.
- Graphics cards from Nvidia and AMD are best if you also want to improve the program’s performance. You request one that can handle the Adobe Premiere Pro from your supplier.
- Furthermore, invest in a high-capacity storage device to save your projects since some outputs can be very large after color correction. The program allows you to render 4K files which are the largest.
- Finally, the above requirements are sufficient to run the following versions OF Adobe Premiere Pro:
i. Adobe Premiere Pro 22.2
ii. Adobe Premiere Pro 22.1.2
iii. Adobe Premiere Pro 22.1.1
iv. Adobe Premiere Pro 22.0
2. Select the video you want and put it on the timeline

3. Premiere luts are accessible from two sections of the program
Input luts are available under the Basic Correction tab from the Lumetri Panel as above.
Alternatively, you can get them by accessing the Basic Correction tab from the Lumetri Section of the Effects Control Panel.
4. Then, open the Input LUT dropdown menu and choose the premiere lut you want
Adobe Premiere Pro has preset input LUTs. However, you can also add your own by clicking browse. Doing so opens your computer’s File Explorer and you can locate your custom premiere luts. The software applies the premiere lut, after which you can use the tools to make adjustments.
Additionally, Adobe Premiere Pro allows you to install custom LUT files to use. Below is the process for macOS users.
- Create these target directories in your Adobe Premiere Installation files. • For shared devices
/Library/Application Support/Adobe/Common/LUTs/Creative
/Library/Application Support/Adobe/Common/LUTs/Technical
• You need to create these files if you have administrator access.
/Users//Library/Application Support/Adobe/Common/LUTs/Creative
/Users//Library/Application Support/Adobe/Common/LUTs/Technical - Copy your custom LUT files to each of the folders.
- These will be available in your Lumetri Panel next time you launch Adobe Premiere Pro.
The process is the same for Windows Users. However, the target directories are different.
- For shared devices:
C:\ Program Files\ Adobe\Common\LUTs\Creative
C:\ Program Files\ Adobe\Common\LUTs\Creative - You need to create these files if you have administrator access.
C:\Users\yourusername\AppData\Roaming\Adobe\Common\LUTs\Creative
C:\Users\yourusername\AppData\Roaming\Adobe\Common\LUTs\Technical
Adobe Premiere Pro accepts .look and .cube file types, allowing you more creative freedom. Additionally, you can save and export any custom premiere luts to use in other projects. The next section offers a step-by-step guide on how to do that.
Finally, Looks allow you to make quick adjustments to your videos using the presets available on the Lumetri Panel. You can access these from the Effects Panel. Furthermore, it also allows you to preview the result. The intensity of the look can vary depending on where the slider is on the effects panel.
How to save and export your LUTS?
Most filmmakers prefer to save their premier luts for later use. Here is how to do it:
- Follow the above process through to step 5.
- Once you finish your editing, click on the Lumetri Pop Up menu and choose Save Preset.
- Fill the respective fields with your custom information and click OK. The program will then save the clip to the location you specify.
- You can save custom luts in the following ways:
Scale only applies the new lut to the video. As such, all other luts you use are deleted. Therefore, if your video is one hour, your custom settings will run through the clip’s entire length.
Anchor To In Point only saves the section of the clip where your custom settings are active. Additionally, the software will add all pre-existing luts to the section without scaling. - Additionally, you can repeat the process and export your LUTs in the following formats:
.look exports the LUT as an Adobe Premiere Pro file to a location on your device.
.cube saves the Lumetri preset you can use on other color grading software. For example, you can use your .cube custom lut with Filmora.

For Win 7 or later (64-bit)
For macOS 10.12 or later
Finally, the above procedures only apply to certain versions of Adobe Premiere Pro. They may differ across devices. This is because Adobe releases new updates regularly to fix bugs and offer new functionality. So, keep checking regularly for any changes.
Conclusion
●Adobe Premiere Pro offers you fun luts to enhance the quality of your video. Additionally, the option to render videos in 4K quality allows you to output creations of the highest quality. Additionally, the option to save and export your LUTS to use with other programs like Filmora, means there is no limit to what you can create. Here is a link to some LUTs you can try on your next edit.
Do you wonder how some pictures or videos look so stunning? As you keep reading you will discover the secrets of achieving similar quality for your content. You need a video or photo-editing software such as Adobe Premiere Pro and LUTS. Premier Pro luts are file types that you use to make color corrections to your content. They are available in different formats, each with varying capabilities. Below is everything you need to improve your editing skills using Adobe’s software and premiere luts.

In this article
01 How does Premiere Pro Classify LUTS?
02 How to use Luts in Adobe Premiere Pro?
03 How to save and export your LUTS?
How does Premiere Pro Classify LUTS?
A premiere pro lut can fall into two categories depending on its core function. These are:
• Looks
These are premiere luts you use to make changes to your video or photo’s appearance and color scheme. They are available as presets under the Lumetri Color Panel and offer quick fixes to your content.
• Input Lut
You use these premiere pro luts to interpret log footage. Additionally, they are the first step of your color correcting process and work best on DSLR footage. However, keep reading to discover how to use luts in Adobe Premiere Pro.
How to use Luts in Adobe Premiere Pro?
Now that you are aware of how the program classifies the Luts, here is how you can correct your footage.
1. Get the latest version of the program
You can purchase and download the program from your region’s Adobe Website. The program is available for both macOS and Windows. However, it is quite heavy on the system. According to reports, the below requirements are sufficient.
- You need a processer with 8 cores and clock speeds upwards of 3.2GHz.
- 16 GB of Ram is ideal for macOS. However, you do require upwards of 32GB if you are running Windows.
- Graphics cards from Nvidia and AMD are best if you also want to improve the program’s performance. You request one that can handle the Adobe Premiere Pro from your supplier.
- Furthermore, invest in a high-capacity storage device to save your projects since some outputs can be very large after color correction. The program allows you to render 4K files which are the largest.
- Finally, the above requirements are sufficient to run the following versions OF Adobe Premiere Pro:
i. Adobe Premiere Pro 22.2
ii. Adobe Premiere Pro 22.1.2
iii. Adobe Premiere Pro 22.1.1
iv. Adobe Premiere Pro 22.0
2. Select the video you want and put it on the timeline

3. Premiere luts are accessible from two sections of the program
Input luts are available under the Basic Correction tab from the Lumetri Panel as above.
Alternatively, you can get them by accessing the Basic Correction tab from the Lumetri Section of the Effects Control Panel.
4. Then, open the Input LUT dropdown menu and choose the premiere lut you want
Adobe Premiere Pro has preset input LUTs. However, you can also add your own by clicking browse. Doing so opens your computer’s File Explorer and you can locate your custom premiere luts. The software applies the premiere lut, after which you can use the tools to make adjustments.
Additionally, Adobe Premiere Pro allows you to install custom LUT files to use. Below is the process for macOS users.
- Create these target directories in your Adobe Premiere Installation files. • For shared devices
/Library/Application Support/Adobe/Common/LUTs/Creative
/Library/Application Support/Adobe/Common/LUTs/Technical
• You need to create these files if you have administrator access.
/Users//Library/Application Support/Adobe/Common/LUTs/Creative
/Users//Library/Application Support/Adobe/Common/LUTs/Technical - Copy your custom LUT files to each of the folders.
- These will be available in your Lumetri Panel next time you launch Adobe Premiere Pro.
The process is the same for Windows Users. However, the target directories are different.
- For shared devices:
C:\ Program Files\ Adobe\Common\LUTs\Creative
C:\ Program Files\ Adobe\Common\LUTs\Creative - You need to create these files if you have administrator access.
C:\Users\yourusername\AppData\Roaming\Adobe\Common\LUTs\Creative
C:\Users\yourusername\AppData\Roaming\Adobe\Common\LUTs\Technical
Adobe Premiere Pro accepts .look and .cube file types, allowing you more creative freedom. Additionally, you can save and export any custom premiere luts to use in other projects. The next section offers a step-by-step guide on how to do that.
Finally, Looks allow you to make quick adjustments to your videos using the presets available on the Lumetri Panel. You can access these from the Effects Panel. Furthermore, it also allows you to preview the result. The intensity of the look can vary depending on where the slider is on the effects panel.
How to save and export your LUTS?
Most filmmakers prefer to save their premier luts for later use. Here is how to do it:
- Follow the above process through to step 5.
- Once you finish your editing, click on the Lumetri Pop Up menu and choose Save Preset.
- Fill the respective fields with your custom information and click OK. The program will then save the clip to the location you specify.
- You can save custom luts in the following ways:
Scale only applies the new lut to the video. As such, all other luts you use are deleted. Therefore, if your video is one hour, your custom settings will run through the clip’s entire length.
Anchor To In Point only saves the section of the clip where your custom settings are active. Additionally, the software will add all pre-existing luts to the section without scaling. - Additionally, you can repeat the process and export your LUTs in the following formats:
.look exports the LUT as an Adobe Premiere Pro file to a location on your device.
.cube saves the Lumetri preset you can use on other color grading software. For example, you can use your .cube custom lut with Filmora.

For Win 7 or later (64-bit)
For macOS 10.12 or later
Finally, the above procedures only apply to certain versions of Adobe Premiere Pro. They may differ across devices. This is because Adobe releases new updates regularly to fix bugs and offer new functionality. So, keep checking regularly for any changes.
Conclusion
●Adobe Premiere Pro offers you fun luts to enhance the quality of your video. Additionally, the option to render videos in 4K quality allows you to output creations of the highest quality. Additionally, the option to save and export your LUTS to use with other programs like Filmora, means there is no limit to what you can create. Here is a link to some LUTs you can try on your next edit.
If You Are a Teacher or People Who Want to Share Their Ideas via Vides, You Can Always Make It on Your Own. This Article Will Share You 7 Tips to Create an Educational Video Easily
For many teachers, online classes begin with a live recording of their lectures or lessons. Sending the recorded lectures to the students allows them to pause the video and rewatch it multiple times.
Recording lectures before class can assist lecturers in filling gaps that may arise due to your absence. You don’t have to worry about missing lessons if you’re going on vacation or to be sick for an extended time.

You can keep the class continuing even if you are absent by using pre-recorded lectures and sending the file to the class, so they know the lesson. With the help of an online lecture software or tool available on the internet, you can download it free.
These are the steps in creating an instructional video in your classes:
Know Your Target Audience
Before you record the video to present in your classes, you need to know your target audience. We all know that some teachers handle grade school, and some handle high school level. We need to discover what kind of knowledge or skills your students hope to gain in your class learning the topic you presented. Try to use your book, or maybe add some research and then use that information to help you discuss with your students.

Things you need to remember before you proceed to the next step:
- Who is your audience? We, educators, already know our audience. It depends on the school and what level we are going to handle. It’s either grade school level or high school level.
- What is your topic/s? There are a lot of topics and subjects in the field of teaching but try to pick only one topic or subject to present to your class. For example, Computer Subject because I’m a computer teacher. I will be using this subject or topic about computers to create my instructional video for the class.
- What is the learning objective or learning outcome of your video? The learning objective of your video is the outcome that captures precisely what knowledge, skills, and attitudes the students should be able to exhibit following the instructions.
- How will your video benefit your audience? The students will learn and understand the lesson you are discussing, helping them gain knowledge of that subject to answer all the assignments, quizzes, or maybe an activity you will give them.
Write a Script
Once you know your audience and have the topic you need, it’s time to write a script. Think about your plan for presenting your video in your classes.

- Here are a few more writing script tips to help you in your classes:
Go to the mirror and practice. This tip may help some teachers instead of calling their loved ones and getting feedback about the script they write.
- Explain what you’re doing and why you’re doing it. You are not only presenting the topic and explaining it but also showing the class what the topic is all about, which will be suitable for your students. Present some examples, pictures, or videos for them to know better what your discussion is all about.
- Knowing your script 100% is important. Make sure that you already know your script before you record. If you forget something or make a mistake, go back to the beginning and repeat it correctly. Remember as a teacher that we are not allowed to make mistakes in the eyes of the students. So, double-check everything before you record it and show it to the class.
Record the Narration
After writing your script, let’s try to record the narration. You don’t need any application software where you can record the narration. Simply using your mobile phone and having a good background is enough.

Using a microphone to record the narration is necessary. Getting those headphones with one connected microphone is good. Some of that has noise cancellation, providing a much better sound quality while recording and ensuring that your videos don’t contain background noise. Then, find a quiet place to record. Explain to your family members that no one will ever talk loud or shout while you are recording the narration.
Once you are ready to hit that record button, speak clearly. Nobody is perfect, so it’s ok if you make a mistake. You don’t need to start over, just pause and start again. You can remove the error or mistake by editing your finished product. Make sure your narration will be the same on the screen while recording your video.
Record and Edit your Video
The first thing you need to do in recording your video is to clean up your computer screen and close all the unnecessary applications. You need to turn off also the notifications that will pop up on your computer before you start recording. You can also add your recorded narration to your video.
Here are a few simple tips for editing your video:
- Add some interactive elements like motions to highlight key points of your video.
- Adding music to your video is optional but may elevate a decent video to the next level. Pick something cheery. You want your audience to feel good while learning.
The Video Duration
I’d say it’s one of the first things students look at before they click the ‘play’ button of the video. It will benefit both teacher and the students if the video is brief and direct to the point. Some students are more likely to want a short video, or maybe let’s focus on the time between 20 - 30 minutes video, where they can watch and learn on any platform, anytime. After that, you can add time by adding other pieces of information and giving activities and assignments.
Be Yourself
Be yourself, and don’t be afraid to make mistakes sometimes. Make sure that your personality shines throughout the video. Try to research how some teachers or maybe some speakers speak naturally and have a conversational manner with an enthusiastic tone.
When you are recording yourself talking, look right at the camera so students can feel eye contact with you, even if it is online. Sometimes we forget the words we need to say to the class, so try to prepare a note next to your webcam. The messages you prepare will help you don’t look away from the camera all the time. Don’t pretend to the class that you’re reading something, just talk naturally as you would in real classrooms.
Sharing your Video
Instead of sharing your recorded video with your students, you can also share it directly to online video platforms like YouTube, Facebook, and Vimeo or save the video as a local file to upload on a social media platform. They can go there and watch the video. You can also upload your file to the school learning management system like Google Classroom. Please take note of this; before sending the recorded video to your students, share it with first to a few people to get some video feedback about what you created. This might help you ensure that your message is clear and that your video accomplishes your goals for your students.
There’s a chance that your recorded video doesn’t meet your requirements or you are not satisfied with that for the first time. Don’t worry; try it again, even if you recorded it once or several times. You need to trust yourself by doing it because we are teachers; we are doing our best for the students to learn something from us.
Free Download For Win 7 or later(64-bit)
Free Download For macOS 10.14 or later
Free Download For macOS 10.14 or later
Also read:
- Updated 3 Ways To Stream And Record At The Same Time
- Updated 2024 Approved How to Loop a Video with iMovie on Mac and iPhone
- Updated Some Leading AI Tools to Replace Sky Backgrounds
- New 2024 Approved How to Use Lumetri Color in After Effects
- How to Use LUTs in Premiere Pro for 2024
- Do You Have a Sony Camera and Want to Try Different LUTs on Your Digital Content? Youre at the Right Place, as You Can Apply Sony HLG LUTs to Your Media for 2024
- Discover the Top Slow Motion Camera App to Use
- Updated Top List of Best VHS Video Effect Makers
- In 2024, 18 Video Editors Weve Tested Heres What We Learned
- New How to Spruce Up Your Telegram Profile for 2024
- 2024 Approved Ultimate Guide to Countdown Animation in Videos
- 2024 Approved HDR Photography How to Use HDR Mode on Your Android Devices
- Updated How To Edit Youtube Videos In Easy Steps for 2024
- New Using Adobe After Effects as a Pro-Level Editing Platforms Demands You to Add Expressions in After Effects. If Youre Looking for the Solutions on After Effects How to Add Expressions Then Weve Got You Covered. Learn More Here
- Unlock the Power of Shotcut The Ultimate Guide to Rotating Videos for 2024
- In 2024, Modern Silence Detection Tools Are Changing the Face of Video Editing. Use Them to Improve the Quality of Your Video Clips. Learn How These Tools Let You Detect Silence with Pinpoint Accuracy
- Updated How to Make an Intro Video Easy Solution
- Updated In 2024, How to Fade to Black Premiere Pro
- In 2024, 6 Ways to Mimic Professional Filming Gears
- New How to Rotate a Video in Windows 10
- Updated Want to Learn How to Crop or Trim Video in PowerPoint? We Have Got You Covered; We Have Given a Step-by-Step Guide that Will Allow You to Trim and Crop Videos Using This Presentation Program
- New How to Add Effects in Premiere Pro for 2024
- Updated Go Through This Guide on All Steps in Freezing Frame Sequences in Videos Using Filmora. Details Include Splitting the Clip, Reversing Speed, and More for 2024
- New How to Merge Audio and Video Using FFmpeg
- 2024 Approved Do You Wish to Create High-Quality Videos and Experience Effective Videos with Editing? No Problem at All because the Keyboard Shortcuts Listed Here Will Assist You
- Updated Best Software or Website to Convert Video Format
- Learn How to Merge Audio and Video Like a Pro with This Step-by-Step Guide to Using FFmpeg. Create Seamless Videos and Improve Your Video Production Skills for 2024
- Updated Camtasia Vs. Final Cut Pro
- In 2024, Ways to Make Sure Your Recording Slideshow in Powerpoint Is Not Wrong
- New Tips for Choosing Location & Scheduling Music Video for 2024
- New Are You Stuck with How to Use Discord GIF Ideally? Check that Out in This Article, as We Will Guide You on All You Need to Know About GIFs for Discord for 2024
- New 2024 Approved Learn Topaz Video Enhance AI Review and Achieve Powerful Video Conversion
- Updated Competitive Guide To Use Slow Motion in After Effects
- New 2024 Approved Ll About GIF Keyboard That You Want to Know
- In 2024, How to Add a Custom Transition to OBS
- Updated 2024 Approved Understanding More About CapCut Lenta Template and Slow-Motion Videos
- Updated In 2024, Bandicut Video Editor Review
- 3D Ray Traced Settings In After Effects A Comprehensive Guide
- New 2024 Approved Create Motion Effect with Path Blur In Photoshop
- Frame Rates, Speed, and Wondershare Filmora An Overview for 2024
- Updated In 2024, 3GP Video Format What Is 3GP Format And How To Open It?
- Updated In 2024, 2 Methods to Crop a Video Using After Effects
- Based on Preferences, You Can Adjust the Speed of YouTube Videos. Learn How to Produce a YouTube Slow-Motion Video in This Article
- New Thousands Already Know Ezgif and So Can You
- New The Article Introduces Three Recommended Apps to Download Royalty-Free Cinematic Music and Covers an Extensive Procedure to Create a Cinematic Travel Intro for a Travel Vlog
- Updated In 2024, What Are The Stages Of Film Production
- New A Full Review of Leeming LUT Pro for 2024
- New 2024 Approved What Are the Top 15 Slideshow Presentation Examples Your Audience Will
- How To Transfer WhatsApp From iPhone 13 to other iPhone 14 devices? | Dr.fone
- In 2024, How to Check Distance and Radius on Google Maps For your Vivo Y28 5G | Dr.fone
- In 2024, How To Use Allshare Cast To Turn On Screen Mirroring On ZTE Nubia Flip 5G | Dr.fone
- Poco Data Retrieval tool – restore lost data from Poco C51
- In 2024, 7 Top Ways To Resolve Apple ID Not Active Issue For Apple iPhone SE (2022) | Dr.fone
- In 2024, How to Access Your Apple iPhone 15 Plus When You Forget the Passcode?
- Did Your iPhone 13 Pro Max Passcode Change Itself? Unlock It Now
- The Best Android SIM Unlock Code Generators Unlock Your Samsung Galaxy F14 5G Phone Hassle-Free
- In 2024, Top Apps and Online Tools To Track Xiaomi Redmi Note 12 Pro 5G Phone With/Without IMEI Number
- Can I use iTools gpx file to catch the rare Pokemon On Oppo A59 5G | Dr.fone
- 3 Facts You Need to Know about Screen Mirroring Vivo X Fold 2 | Dr.fone
- 15 Best Strongest Pokémon To Use in Pokémon GO PvP Leagues For Honor Magic 5 Lite | Dr.fone
- In 2024, How to Transfer Contacts from Honor Magic 5 To Phone | Dr.fone
- In 2024, Downloading SamFw FRP Tool 3.0 for Oppo Find N3
- How to Reset Lava Yuva 3 Pro Without the Home Button | Dr.fone
- A Perfect Guide To Remove or Disable Google Smart Lock On Lava Yuva 3
- In 2024, 5 Ways to Transfer Music from OnePlus 11 5G to Other Android Devices Easily | Dr.fone
- In 2024, How to Send and Fake Live Location on Facebook Messenger Of your Motorola Moto G23 | Dr.fone
- Why is iPogo not working On Tecno Spark 20 Pro? Fixed | Dr.fone
- In 2024, How to Change Google Play Location On Honor X9b | Dr.fone
- In 2024, How to Spy on Text Messages from Computer & Vivo Y02T | Dr.fone
- Title: In 2024, How to Create Vintage Film Effect 1920S
- Author: Morgan
- Created at : 2024-05-19 05:12:17
- Updated at : 2024-05-20 05:12:17
- Link: https://ai-video-editing.techidaily.com/in-2024-how-to-create-vintage-film-effect-1920s/
- License: This work is licensed under CC BY-NC-SA 4.0.

