
:max_bytes(150000):strip_icc():format(webp)/GettyImages-1353420724-65161751b9924195880d3273e327cb54.jpg)
In 2024, How to Get Zoom on TV Easy Solutions
How to Get Zoom on TV [Easy Solutions]
The modern workforce needs adaptable alternatives to the conventional room-to-room conferencing. The latest integrated online collaboration platform is called Zoom. What’s more, now you can get Zoom on TV. Being one of the most well-known conferencing programs, it offers reliable and efficient hosting of online meetings. In a same vein, you may set up conference rooms, do video seminars, and use instant messaging to receive real-time communications. Moreover, can you get zoom on your tv? Then the answer is Yes! The ideal technique to expand a small conference is to mirror it on TV using Zoom meetings. Additionally, sharing across all platforms and devices is possible. Sharing HD video, audio, and material from your desktop and mobile devices to conference rooms and phone systems is simple, dependable, and safe with Zoom Meetings.
Zoom is one of the top videos calling applications available, however, in terms of functionality, dependability, and stability. Special features include screen sharing for multi-user annotation and local and cloud recording with transcription. With just a single click, you may share any file with supported and encrypted settings for increased security and communicate across all platforms. Zoom has now come to represent meetings for those who do their business remotely. For almost all platforms, including Android, iOS, macOS, Windows, Smart TVs, etc., the Zoom app is officially accessible. For the query how to get zoom on portal tv? you may activate Zoom screen casting whether you’re using a Windows 10 or a Mac laptop with the Chrome browser. This section will be useful to you if you want to benefit from Zoom on a TV. You may thus do so. Continue reading the article to learn more about how to get zoom on tv.
Part 1: Get Zoom on TV with HDMI Cable
Although Zoom provides companies and bigger organizations with a professional solution like Zoom Rooms, if you’re at home, you don’t need to put anything on your TV to use Zoom. You may start using Zoom right away by simply connecting your Zoom device to your TV. Connect your TV to your laptop’s HDMI port if it has one. Simple as that, however if the laptop doesn’t figure it out on its own you may need to explain what is going on with the second display. Although more reliable, connecting via cable means your source device is linked to the TV and you can’t go for a stroll. It also means you don’t have to worry about the wireless connection fading.
Steps to Get Zoom on TV with HDMI
Step1Connect the HDMI End to the TV and the Other End to Your Device
You may use this in its place if you don’t have an HDMI but do have a USB-C port. To connect to the HDMI cable coming into your TV, you’ll need a dongle, but you’ll need to make sure it’s compatible.
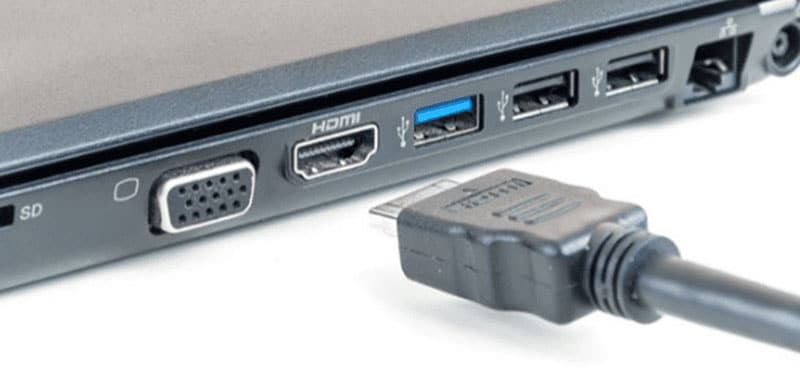
Step2Turn On your TV
Turn on your TV, then switch the video source to the HDMI port you just connected in your device to using the TV remote.
Step3Launch Zoom Meeting
Start or join a meeting by using the Zoom app on your smartphone (available for Android, iOS, Windows, and macOS).
Part 2: Use AirPlay to Connect Zoom to TV
Using AirPlay mirroring, MacOS or iOS devices may share content with Zoom rooms. On MacOS and iOS, Airplay is used to communicate between the Zoom client and the Zoom room. There may be a great potential for your own business requirements if you can figure out how to utilize Airplay to Zoom mirror your screen to your Apple TV. By default, AirPlay sends audio to the Apple TV. Depending on how loud your speakers are set to play and where your input device’s microphone is located, this may cause echoing and ever-louder feedback loops. Without further ado, let’s look at some of the important strategies you may use to maximize live screen streaming on your Apple TV device.
Steps to Use AirPlay to Connect Zoom to TV
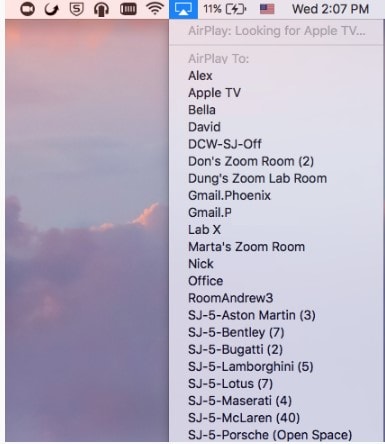
Step1Navigate to the Airplay Display in the Apple menu’s top right corner. Choose your Apple TV from the list of AirPlay Display options in the Displays preference pane. The “Show mirroring option in the menu bar when available” checkbox makes it easier to reach the AirPlay menu.

Step2Select Room Management > Zoom Rooms after logging into the Zoom online interface to manage your current Zoom Rooms. Then, modify the account settings and turn on Apple screen mirroring using the location hierarchy system.
Step3Turn on Apple Screen Mirroring by going to the Meetings tab. If this happens, you may need to activate it from the verification dialog box; otherwise, screen mirroring ought to start immediately on your device and let you see Zoom on your Apple TV. A shared password will be required of you.
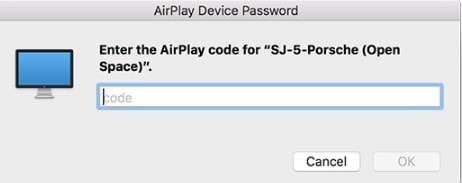
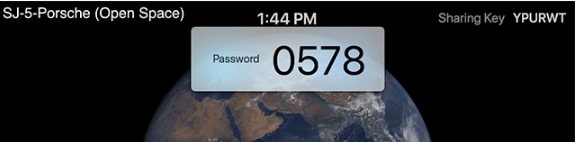
Step4Enter the passcode that is shown on the Zoom room’s screen. You may start using Airplay on your smartphone after enabling Apple screen mirroring.
Step5After that, turn off AirPlay Display by using the option in the preference pane or the system menu bar. To stop sharing, click Disconnect Airplay.
Part 3: Mirror Screen with Chromecast
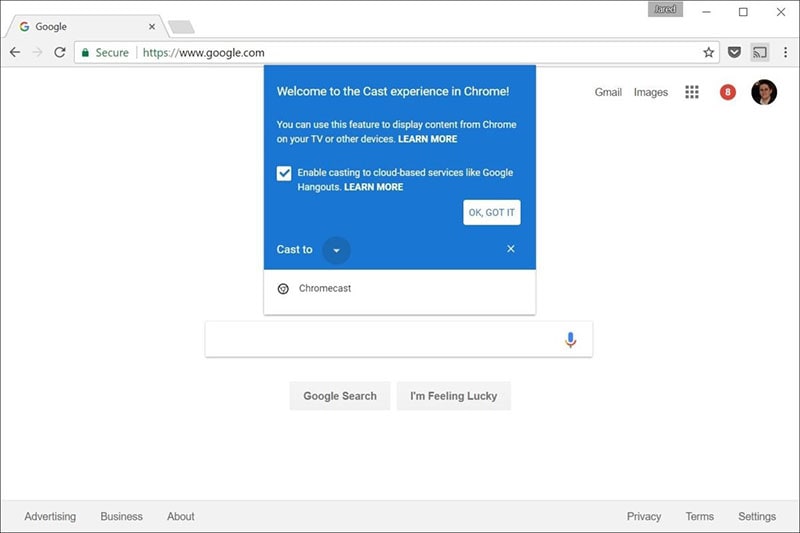
The Chromecast gadgets from Google are well constructed. They should be able to cast more than just standard streaming services to your TV, logically speaking. Using a Chromecast device is one of the simplest methods to cast a Zoom conference to your TV. They are affordable, and any Google browser and the Google Home app for your Android or iOS smartphone both contain the cast capability. Between a device, such as your phone or computer, and the television, Chromecast offers the perfect connection. Chromecast makes it easy to cast Zoom meetings, particularly conferences with many of participants, since it can virtually reflect everything on your phone, tablet, or computer screen to your TV. For meetings with bigger attendance, it is advantageous to be able to cast Zoom meetings to almost any device, even a smart TV, using Chromecast.
Steps to Mirror Screen with Chromecast
Step1Install the Chromecast
Connect your Google Chromecast to the same internet source as your casting device by plugging it in.
Step2Manage Cast Settings
Locate the casting option on your device and search for recipients. Get the Zoom Cloud Meetings app for iOS or Android. You’ll also need to download the third-party software if you use an iPad or iPhone. After that, sign up for a Zoom account and log in to get started.
Step3Start Mirroring Zoom
The screen of your phone will show up on your TV when you tap your Chromecast. The best view is obtained by turning your phone into landscape after opening Zoom as usual. Once you place a call from here, the video will cast to your TV. Go to the next screen and click Start Broadcasting. You may now start casting to your Chromecast device by opening the Zoom Cloud Meeting app.
You must download the third-party app if you use an iPhone or iPad. The Chromecast Streamer software will let you cast a Zoom meeting on your Chromecast device as Zoom doesn’t provide a casting option.
Conclusion
Zoom’s popularity has skyrocketed as a result of the Pandemic. Zoom has emerged as the preferred video conferencing solution as the bulk of the global workforce shifts to a “work from home” environment. Now that more individuals than ever before work from home, video conferencing has emerged as a vital tool for marketing and corporate communication. Mirroring Zoom meetings to TV has never been this simple. In light of this, we hope that this guide has helped you come up with some of the greatest ideas and approaches for your personal zoom sharing needs. We really hope that this information has been helpful to you if you’ve been interested in learning more about screen sharing your Zoom to TV. Thanks to these methods, you can now mirror any device platform on TV.
The modern workforce needs adaptable alternatives to the conventional room-to-room conferencing. The latest integrated online collaboration platform is called Zoom. What’s more, now you can get Zoom on TV. Being one of the most well-known conferencing programs, it offers reliable and efficient hosting of online meetings. In a same vein, you may set up conference rooms, do video seminars, and use instant messaging to receive real-time communications. Moreover, can you get zoom on your tv? Then the answer is Yes! The ideal technique to expand a small conference is to mirror it on TV using Zoom meetings. Additionally, sharing across all platforms and devices is possible. Sharing HD video, audio, and material from your desktop and mobile devices to conference rooms and phone systems is simple, dependable, and safe with Zoom Meetings.
Zoom is one of the top videos calling applications available, however, in terms of functionality, dependability, and stability. Special features include screen sharing for multi-user annotation and local and cloud recording with transcription. With just a single click, you may share any file with supported and encrypted settings for increased security and communicate across all platforms. Zoom has now come to represent meetings for those who do their business remotely. For almost all platforms, including Android, iOS, macOS, Windows, Smart TVs, etc., the Zoom app is officially accessible. For the query how to get zoom on portal tv? you may activate Zoom screen casting whether you’re using a Windows 10 or a Mac laptop with the Chrome browser. This section will be useful to you if you want to benefit from Zoom on a TV. You may thus do so. Continue reading the article to learn more about how to get zoom on tv.
Part 1: Get Zoom on TV with HDMI Cable
Although Zoom provides companies and bigger organizations with a professional solution like Zoom Rooms, if you’re at home, you don’t need to put anything on your TV to use Zoom. You may start using Zoom right away by simply connecting your Zoom device to your TV. Connect your TV to your laptop’s HDMI port if it has one. Simple as that, however if the laptop doesn’t figure it out on its own you may need to explain what is going on with the second display. Although more reliable, connecting via cable means your source device is linked to the TV and you can’t go for a stroll. It also means you don’t have to worry about the wireless connection fading.
Steps to Get Zoom on TV with HDMI
Step1Connect the HDMI End to the TV and the Other End to Your Device
You may use this in its place if you don’t have an HDMI but do have a USB-C port. To connect to the HDMI cable coming into your TV, you’ll need a dongle, but you’ll need to make sure it’s compatible.
Step2Turn On your TV
Turn on your TV, then switch the video source to the HDMI port you just connected in your device to using the TV remote.
Step3Launch Zoom Meeting
Start or join a meeting by using the Zoom app on your smartphone (available for Android, iOS, Windows, and macOS).
Part 2: Use AirPlay to Connect Zoom to TV
Using AirPlay mirroring, MacOS or iOS devices may share content with Zoom rooms. On MacOS and iOS, Airplay is used to communicate between the Zoom client and the Zoom room. There may be a great potential for your own business requirements if you can figure out how to utilize Airplay to Zoom mirror your screen to your Apple TV. By default, AirPlay sends audio to the Apple TV. Depending on how loud your speakers are set to play and where your input device’s microphone is located, this may cause echoing and ever-louder feedback loops. Without further ado, let’s look at some of the important strategies you may use to maximize live screen streaming on your Apple TV device.
Steps to Use AirPlay to Connect Zoom to TV
Step1Navigate to the Airplay Display in the Apple menu’s top right corner. Choose your Apple TV from the list of AirPlay Display options in the Displays preference pane. The “Show mirroring option in the menu bar when available” checkbox makes it easier to reach the AirPlay menu.
Step2Select Room Management > Zoom Rooms after logging into the Zoom online interface to manage your current Zoom Rooms. Then, modify the account settings and turn on Apple screen mirroring using the location hierarchy system.
Step3Turn on Apple Screen Mirroring by going to the Meetings tab. If this happens, you may need to activate it from the verification dialog box; otherwise, screen mirroring ought to start immediately on your device and let you see Zoom on your Apple TV. A shared password will be required of you.
Step4Enter the passcode that is shown on the Zoom room’s screen. You may start using Airplay on your smartphone after enabling Apple screen mirroring.
Step5After that, turn off AirPlay Display by using the option in the preference pane or the system menu bar. To stop sharing, click Disconnect Airplay.
Part 3: Mirror Screen with Chromecast
The Chromecast gadgets from Google are well constructed. They should be able to cast more than just standard streaming services to your TV, logically speaking. Using a Chromecast device is one of the simplest methods to cast a Zoom conference to your TV. They are affordable, and any Google browser and the Google Home app for your Android or iOS smartphone both contain the cast capability. Between a device, such as your phone or computer, and the television, Chromecast offers the perfect connection. Chromecast makes it easy to cast Zoom meetings, particularly conferences with many of participants, since it can virtually reflect everything on your phone, tablet, or computer screen to your TV. For meetings with bigger attendance, it is advantageous to be able to cast Zoom meetings to almost any device, even a smart TV, using Chromecast.
Steps to Mirror Screen with Chromecast
Step1Install the Chromecast
Connect your Google Chromecast to the same internet source as your casting device by plugging it in.
Step2Manage Cast Settings
Locate the casting option on your device and search for recipients. Get the Zoom Cloud Meetings app for iOS or Android. You’ll also need to download the third-party software if you use an iPad or iPhone. After that, sign up for a Zoom account and log in to get started.
Step3Start Mirroring Zoom
The screen of your phone will show up on your TV when you tap your Chromecast. The best view is obtained by turning your phone into landscape after opening Zoom as usual. Once you place a call from here, the video will cast to your TV. Go to the next screen and click Start Broadcasting. You may now start casting to your Chromecast device by opening the Zoom Cloud Meeting app.
You must download the third-party app if you use an iPhone or iPad. The Chromecast Streamer software will let you cast a Zoom meeting on your Chromecast device as Zoom doesn’t provide a casting option.
Conclusion
Zoom’s popularity has skyrocketed as a result of the Pandemic. Zoom has emerged as the preferred video conferencing solution as the bulk of the global workforce shifts to a “work from home” environment. Now that more individuals than ever before work from home, video conferencing has emerged as a vital tool for marketing and corporate communication. Mirroring Zoom meetings to TV has never been this simple. In light of this, we hope that this guide has helped you come up with some of the greatest ideas and approaches for your personal zoom sharing needs. We really hope that this information has been helpful to you if you’ve been interested in learning more about screen sharing your Zoom to TV. Thanks to these methods, you can now mirror any device platform on TV.
The Complete Guide to Converting GIF to SVG With Ease
The Complete Guide to Converting GIF to SVG With Ease
An easy yet powerful editor
Numerous effects to choose from
Detailed tutorials provided by the official channel
The Complete Guide to Converting GIF to SVG With Ease
Are you searching out methods to transform GIF to SVG? Then you are lucky to have found the right article. While Scalable Vector Graphics can help you scale a photograph to any length with very little distortion, editing and playing your animated SVGs documents on a few gadgets can cause compatibility issues. Moreover, SVGs aren’t well suited with all websites, so in case you need to apply it for your weblog or websites wherein they are now no longer supported, then you may want to transform it to an extra handy layout like GIF.
There is plenty of photograph conversion gear and online editors that can help you convert SVG to GIF. However, now no longer all GIF converters and editors are green and clean to apply. In this article, you’ll know about the top SVG to GIF converters that you may use to make GIF images and use them together along with your buddies quickly.
In this article
01 [8 Best Easy GIF to SVG Converters](#Part 1)
02 [5 Best SVG to GIF Converters](#Part 2)
Part 1 Best Easy GIF to SVG Converters
01INetTools.net
It is a very online animated GIF to SVG converter. You get the option to select and upload the GIF from your storage. After uploading, it instantly starts converting it to the SVG and shows you the results when finished. Now, the converted SVG file can be downloaded. This online converter supports multiple conversions such as uploading multiple GIF files at once and converting them to SVG simultaneously. Also, there is no maximum file size limit mentioned anywhere and the SVG has the same colors as the GIF.

02Aconvert.com
This is the next website you can use to convert GIF to SVG. Multiple input methods are supported by this website. You can upload GIF documents out of your nearby storage, Google Drive, Dropbox, or even fetch a GIF through pasting a URL to it. Apart from a couple of entering methods, this internet site offers you a choice to alternate the picture length for the SVG file. By allowing this option, you could set the scale for the SVG after which the conversion begins. This way, you could convert and resize the SVG in a single step and download the final output.

03PicSVG.com
This is another free website to convert SVG to GIF animation. This website converts JPG and PNG files to SVG along with GIFs. But unlike other websites, there is a size limitation on the input file. Here, you can convert GIFs up to 4 MB in size which seems decent enough as most of the GIFs are within 1 MB of size.

04Online-Convert.com
This is a free cloud converter platform that supports dozens of files types and can animate GIF to SVG. This supports batch conversions and lets you input files from many sources such as local storage, Dropbox, Google Drive, or via a URL. 100 MB is the maximum file size limit which is enough. After adding the GIF files, conversion can be started and you can get the SVGs in the output.
This website has lots of settings that will help you to customize to get the desired output. Along with all these options, you can also set the black and white threshold and speckles threshold for the final SVG output.

05Inkscape
Inkscape is a GIF to SVG converter software for Windows, Mac, and Linux. Primarily it is used for designing vector graphics. The format of the images can be changed easily as you get the “save as” feature in it. This feature helps you to easily convert GIFs and other images to SVG, PDF, PNG, PS, EPS, DXF, etc. The main advantage of this is that you can convert GIF to different kinds of SVG such as Plain SVG, Optimized SVG, Compressed SVG, etc.
Before converting GIF to SVG, you can edit GIF images using various tools. A lot of filters are provided too which you can apply to the input GIF image, such as bevel, blur, color, distort, pixel tools, etc.

06RealWorld Paint
It is a nice free GIF to SVG converter desktop software. In this, you can view, create, and edit graphics in various formats such as GIF, SVG, WEBP, PNG, JPG, etc. Its “save as” feature can also be used for converting images from one supported format to another.
A good number of image modification tools are also included in it such as resize, crop, rotate, watermarking, filters, and more. Additionally, you can also draw designs over the GIF image using its painting tools.

07ImBatch
It is a batch image processor using which can also convert SVG to GIF animation and vice versa. Bulkpictures are used for editing and converting. You can easily add several GIF images to it and convert them all to SVG format at once. Since it lets you edit images, you can modify input GIF files before converting them. A wide number of image formats are supported for batch processing such as camera raw images (DNG, CR2, SR2, NEF, ARW, ORF, etc.), JPG, PNG, BMP, TIFF, and many more.

08LibreOffice Draw
LibreOffice Draw is a free GIF to SVG converter software for your desktop. This software comes with the popular free open-source office software called LibreOffice. Many other office-related applications in this package include LibreOffice Writer, LibreOffice Calc, LibreOffice Impress, etc.
When using it, you can simply open a GIF image file in it and then save it in SVG vector format. You can easily edit the input GIF image before the conversion. For eating the image, you can use its drawing tools, transformation tools, text tools, formatting options, etc.

Part 2 Best SVG to GIF Converters
01CloudConvert
This is an easy-to-use online file conversion tool with a robust and scalable API. It is an all-in-one cloud-based converter and supports over 200 different file formats from vectors, audio, and video. With this tool, you can convert SVG to GIF in your browser and email it to yourself or transfer it to combined cloud services like Google Drive and Dropbox.CloudConvert’sfull version starts at $8. You can also use the free trial version to convert your files quickly.

02Convertio
Convertio is an easy file converter that offers both paid and free online versions to convert SVG to GIF animation. The software payment pricing system starts at $7.99and it also works with all file types. More than 300 different file format conversion is applicable and it allows you to upload your converted files to other applications such as Dropbox and Google Drive. 100MB is the maximum file memory size that you can upload to this tool.

03CoolUtils
It is a powerful desktop SVG to GIF converter that offers a variety of file conversion utilities such as an online file converter to convert your animate SVG to GIF. The tool’s interface is clear and easy to understand, supports a lot of file formats, has reactive support, and features powerful engines that help to process your files in one go.

04Wondershare Filmora
It is an easy-to-use and trendy video editing software that gives power to your story and gives amazing results, regardless of you are a beginner or an expert. Wondershare Filmora Video Editor helps you to get started with any new project by importing and editing your video, adding special effects and transitions, and sharing your final creation on social media, mobile devices, or DVDs.
It is an interactive platform and editing tool that is easy to navigate. It gives lots of values and makes the process of converting SVG to GIF easier and more interesting. Filmora is free to download software. After signing up for free, you can edit videos, GIFs, and images without any watermark. It also allows the editing of GIFs to include subtitles, text, or captions.
It is a very remarkable editing tool with a wide set of attractive features that can make your image highly customized. Filmore also allows you to extract still images from video without changing the resolution.

Wondershare Filmora - Best Video Editor for Mac/Windows
5,481,435 people have downloaded it.
Build unique custom animations without breaking a sweat.
Focus on creating epic stories and leave the details to Filmora’s auto features.
Start a creative adventure with drag & drop effects and endless possibilities.
Filmora simplifies advanced features to save you time and effort.
Filmora cuts out repetition so you can move on to your next creative breakthrough.
05GIMP
This is another free alternative to an SVG to GIF converter software for Windows, Linux, and Mac. It is a very well-known image editing software with diverse image manipulation and painting tools. By using it, the format of supported images can also be changed with the help of its export feature. Hence, you can also convert SVG to GIFin this software.
However, by default, this software does not support SVG as an output format. So, for converting GIF or any other image file to SVG, you need to install an additional plugin to it.

Part 1 Ending Thoughts
Since you are now reading the end of this article, we are hoping you now know everything about SVG to GIF converter and the best SVG and GIF converter and vice versa that you can turn to and quickly convert your image files and share them with your friends as well as the meaning of SVG.
The Complete Guide to Converting GIF to SVG With Ease
Are you searching out methods to transform GIF to SVG? Then you are lucky to have found the right article. While Scalable Vector Graphics can help you scale a photograph to any length with very little distortion, editing and playing your animated SVGs documents on a few gadgets can cause compatibility issues. Moreover, SVGs aren’t well suited with all websites, so in case you need to apply it for your weblog or websites wherein they are now no longer supported, then you may want to transform it to an extra handy layout like GIF.
There is plenty of photograph conversion gear and online editors that can help you convert SVG to GIF. However, now no longer all GIF converters and editors are green and clean to apply. In this article, you’ll know about the top SVG to GIF converters that you may use to make GIF images and use them together along with your buddies quickly.
In this article
01 [8 Best Easy GIF to SVG Converters](#Part 1)
02 [5 Best SVG to GIF Converters](#Part 2)
Part 1 Best Easy GIF to SVG Converters
01INetTools.net
It is a very online animated GIF to SVG converter. You get the option to select and upload the GIF from your storage. After uploading, it instantly starts converting it to the SVG and shows you the results when finished. Now, the converted SVG file can be downloaded. This online converter supports multiple conversions such as uploading multiple GIF files at once and converting them to SVG simultaneously. Also, there is no maximum file size limit mentioned anywhere and the SVG has the same colors as the GIF.
02Aconvert.com
This is the next website you can use to convert GIF to SVG. Multiple input methods are supported by this website. You can upload GIF documents out of your nearby storage, Google Drive, Dropbox, or even fetch a GIF through pasting a URL to it. Apart from a couple of entering methods, this internet site offers you a choice to alternate the picture length for the SVG file. By allowing this option, you could set the scale for the SVG after which the conversion begins. This way, you could convert and resize the SVG in a single step and download the final output.
03PicSVG.com
This is another free website to convert SVG to GIF animation. This website converts JPG and PNG files to SVG along with GIFs. But unlike other websites, there is a size limitation on the input file. Here, you can convert GIFs up to 4 MB in size which seems decent enough as most of the GIFs are within 1 MB of size.
04Online-Convert.com
This is a free cloud converter platform that supports dozens of files types and can animate GIF to SVG. This supports batch conversions and lets you input files from many sources such as local storage, Dropbox, Google Drive, or via a URL. 100 MB is the maximum file size limit which is enough. After adding the GIF files, conversion can be started and you can get the SVGs in the output.
This website has lots of settings that will help you to customize to get the desired output. Along with all these options, you can also set the black and white threshold and speckles threshold for the final SVG output.
05Inkscape
Inkscape is a GIF to SVG converter software for Windows, Mac, and Linux. Primarily it is used for designing vector graphics. The format of the images can be changed easily as you get the “save as” feature in it. This feature helps you to easily convert GIFs and other images to SVG, PDF, PNG, PS, EPS, DXF, etc. The main advantage of this is that you can convert GIF to different kinds of SVG such as Plain SVG, Optimized SVG, Compressed SVG, etc.
Before converting GIF to SVG, you can edit GIF images using various tools. A lot of filters are provided too which you can apply to the input GIF image, such as bevel, blur, color, distort, pixel tools, etc.
06RealWorld Paint
It is a nice free GIF to SVG converter desktop software. In this, you can view, create, and edit graphics in various formats such as GIF, SVG, WEBP, PNG, JPG, etc. Its “save as” feature can also be used for converting images from one supported format to another.
A good number of image modification tools are also included in it such as resize, crop, rotate, watermarking, filters, and more. Additionally, you can also draw designs over the GIF image using its painting tools.
07ImBatch
It is a batch image processor using which can also convert SVG to GIF animation and vice versa. Bulkpictures are used for editing and converting. You can easily add several GIF images to it and convert them all to SVG format at once. Since it lets you edit images, you can modify input GIF files before converting them. A wide number of image formats are supported for batch processing such as camera raw images (DNG, CR2, SR2, NEF, ARW, ORF, etc.), JPG, PNG, BMP, TIFF, and many more.
08LibreOffice Draw
LibreOffice Draw is a free GIF to SVG converter software for your desktop. This software comes with the popular free open-source office software called LibreOffice. Many other office-related applications in this package include LibreOffice Writer, LibreOffice Calc, LibreOffice Impress, etc.
When using it, you can simply open a GIF image file in it and then save it in SVG vector format. You can easily edit the input GIF image before the conversion. For eating the image, you can use its drawing tools, transformation tools, text tools, formatting options, etc.
Part 2 Best SVG to GIF Converters
01CloudConvert
This is an easy-to-use online file conversion tool with a robust and scalable API. It is an all-in-one cloud-based converter and supports over 200 different file formats from vectors, audio, and video. With this tool, you can convert SVG to GIF in your browser and email it to yourself or transfer it to combined cloud services like Google Drive and Dropbox.CloudConvert’sfull version starts at $8. You can also use the free trial version to convert your files quickly.
02Convertio
Convertio is an easy file converter that offers both paid and free online versions to convert SVG to GIF animation. The software payment pricing system starts at $7.99and it also works with all file types. More than 300 different file format conversion is applicable and it allows you to upload your converted files to other applications such as Dropbox and Google Drive. 100MB is the maximum file memory size that you can upload to this tool.
03CoolUtils
It is a powerful desktop SVG to GIF converter that offers a variety of file conversion utilities such as an online file converter to convert your animate SVG to GIF. The tool’s interface is clear and easy to understand, supports a lot of file formats, has reactive support, and features powerful engines that help to process your files in one go.
04Wondershare Filmora
It is an easy-to-use and trendy video editing software that gives power to your story and gives amazing results, regardless of you are a beginner or an expert. Wondershare Filmora Video Editor helps you to get started with any new project by importing and editing your video, adding special effects and transitions, and sharing your final creation on social media, mobile devices, or DVDs.
It is an interactive platform and editing tool that is easy to navigate. It gives lots of values and makes the process of converting SVG to GIF easier and more interesting. Filmora is free to download software. After signing up for free, you can edit videos, GIFs, and images without any watermark. It also allows the editing of GIFs to include subtitles, text, or captions.
It is a very remarkable editing tool with a wide set of attractive features that can make your image highly customized. Filmore also allows you to extract still images from video without changing the resolution.
Wondershare Filmora - Best Video Editor for Mac/Windows
5,481,435 people have downloaded it.
Build unique custom animations without breaking a sweat.
Focus on creating epic stories and leave the details to Filmora’s auto features.
Start a creative adventure with drag & drop effects and endless possibilities.
Filmora simplifies advanced features to save you time and effort.
Filmora cuts out repetition so you can move on to your next creative breakthrough.
05GIMP
This is another free alternative to an SVG to GIF converter software for Windows, Linux, and Mac. It is a very well-known image editing software with diverse image manipulation and painting tools. By using it, the format of supported images can also be changed with the help of its export feature. Hence, you can also convert SVG to GIFin this software.
However, by default, this software does not support SVG as an output format. So, for converting GIF or any other image file to SVG, you need to install an additional plugin to it.
Part 1 Ending Thoughts
Since you are now reading the end of this article, we are hoping you now know everything about SVG to GIF converter and the best SVG and GIF converter and vice versa that you can turn to and quickly convert your image files and share them with your friends as well as the meaning of SVG.
Efficient Ways to Change Slow Motion Video to Normal on iPhone
Slow-motion videos bring your videos to life by highlighting the emotions and details of a story. However, transforming a slow motion into a normal video has its benefits. For instance, you can make boomerangs or GIFs with normal videos. In addition, you can introduce limitless transitions and animations to them. Thus, are you also finding how to change slow-motion video to a normal iPhone?
This article is the perfect stop for you as it covers all your slow-motion queries from here. It will focus on how to unslow-mo a video on an iPhone and related tools. We will discuss the iPhone’s pre-built feature and some tools to achieve this. There will be a bonus tip on how to change slow-mo video to normal on iPhone.
Slow Motion Video Maker Slow your video’s speed with better control of your keyframes to create unique cinematic effects!
Make A Slow Motion Video Make A Slow Motion Video More Features

Part 1: Direct Method: Changing Slow Motion Video to Normal on iPhone
You might not be aware of this feature if you are a previous user or have just started using an iPhone. This is Apple’s built-in feature, found in iPhones and iPads. In this section, we have tailored a step-by-step guide to doing this. Here is a brief overview of how to convert a slow-motion video to a normal iPhone:
Step 1
Move to its bottom after opening the “Photos” application on your iPhone. From there, select the “Albums” option and scroll down to the “Slo-mo” option in “Media Types.”

Step 2
In the slow-mo section, find a video you want to reverse and select it to open. Navigate towards the top right corner of this video and click the “Edit” option.

Step 3
An editing panel will appear at the bottom of this video. If you’d notice, a vertical lined bar is under the video timeline. This indicates slow-mo duration, which you can change by repositioning sliders. Afterward, click the “Done” button at the right bottom of this screen to finalize.

Part 2: Top Applications That Can Be Used to Change Slow Motion Video to Normal
The iPhone’s built-in feature is equally effective for reversing a slow-mo back to normal. However, sometimes, one requires a tool for detailed editing. In such cases, we recommend you use a third party to help you achieve the desired results. We have assembled some tools on how to take slow-mo off a video on iPhone below:
- SpeedPro Slow Speed Video Edit
- Slow-Fast Motion Video Editor
- Slow Motion Video Fx Editor
- Reverse Cam – Slow Motion Video
- Slow Motion Video Editor
1. SpeedPro Slow Speed Video Edit
This is a versatile application designed explicitly to resolve the slow speed queries on iPhone. Users can effortlessly manipulate the speed of video during editing. The best part about this editor is that you can select a specific video section. It is up to you to reverse a complete slow-mo video or a part of it.

Key Features
- Facilitates both professionals and amateurs with its reachable user interface.
- After editing a video as super slow or super-fast, you can incorporate music.
- The application offers direct sharing options to vast applications like Instagram or YouTube.
2. Slow-Fast Motion Video Editor
If how to convert slow motion video to normal on an iPhone was a bet, this application would be worth your money. Many content creators have used it, and everyone has positively reviewed it. You can transform a slow-mo into a normal video using its speed option. The highest speed option is 2x, and the slowest speed option is 1/4th. There is no limitation on the video’s length or resolution for conversion.

Key Features
- You can apply different time transitions (fast or slow) to distinct video segments.
- The application doesn’t export with a Watermark addition to maintain professionalism.
- Upon converting a video or reversing it, you can adjust the audio pitch to align with it.
3. SloMo Slow Motion Video Editor
With technological advancements, the editing industry has taken up a notch. This application uses modern algorithms to create or reverse a slow with customizations. To reverse a slow-mo, you just need to upload it and increase the video’s speed. It offers three sorts of speed editing, including slow-mo, time-lapse, and stop-motion. The video speed is adjustable up to 240fps and 12x with quick processing.

Key Features
- With its independent frame manipulation, you can edit specific parts of a video.
- You can incorporate music behind your tracks out of 170+ pre-built music tracks.
- This iPhone editor retains the natural resolution of video to maintain its quality.
4. Reverse Cam – Slow Motion Video
Surfing through the internet to find how to unslow-mo a video on an iPhone? This application assists you in controlling or reversing video speed. You just need to import a previously created slow-mo into the application. In addition to reversing a video, you can also reverse audio tracks with it. There are multiple speed options like 0.25, 0.5x, and more.

Key Features
- After modifying the video speed, you can apply multiple effects to it.
- The application is compatible with iOS 9.0 or newer versions.
- It has a built-in library that users can use to save the edited videos and share them directly.
5. Slow Motion’ Video Editor
Solve all your queries related to how to change slo-mo video to normal on iPhone here. Designed to give your videos a perfect slow-motion or high-speed effect. To convert a slow-mo video into a normal one, it offers speed increase options. You can have complete control over your videos with this application.

Key Features
- It has an accessible and intuitive editing interface for user comprehension.
- It allows you to manipulate the speed of your video from 60 to 240 frames.
- It has multiple subscription options, weekly, monthly, or yearly, that you can avail accordingly.
Bonus Part: Speed Up Your iPhone Video on Desktop Using Wondershare Filmora
All these methods of transforming a slow-mo to normal are accurate and efficient. However, when it comes to perfection, one software stands tall than the others.Wondershare Filmora is a premium video editing software for precise editing. There are two methods of manipulating a slow-motion video to normal in it.
The speed ramping involves slow-mo reverse action from specific video frames. On the other hand, uniform speed modifies the complete video speed. You can add specific values for manipulating the frame rate or change the sliders. In addition, you can also add multiple effects to your video afterward. Moreover, you can also export the video in high resolution and desired format.
Free Download For Win 7 or later(64-bit)
Free Download For macOS 10.14 or later
Step-by-Step Guide to Shift Your Slow-Motion Video to Normal with Filmora
This segment involves a step-by-step guide to reverse a slow-mo. Let’s see how to change slo-mo video to normal on iPhone with Filmora below:
Step 1Import Media Files from iPhone
First, connect your iPhone to the source device you are using Filmora on. Once you have connected the devices, navigate towards the “Import” button. Expand this option, and from the dropdown menu, select “Import from a Camera or Phone.” Select the name of your iPhone in the “Import from” section and click “OK.” Once imported, place the clip in the timeline.

Step 2Access Uniform Speed Option
Then, select the clip in the timeline and navigate towards the settings panel. Afterward, go to the “Speed” tab under “Uniform Speed” set values. Drag the Speed slider towards the right to increase the video speed.

Step 3Export the Edited Video
Hit the “Play” button from the preview window to preview your video. Afterward, navigate towards the “Export” button at the top right corner. You can also set the framerate in the Export window according to preference. Further, hit the “Export” button in the Export window to save the file on the device.

Top Features to Note About Wondershare Filmora
There is more to Filmora than how to unslow-mo a video on an iPhone. The tool shows support with multiple devices like Windows, iOS, Linux, and more. Following are some of the top-notch AI features of Filmora:
1. AI Text-to-Video
Use this tool to craft creative and graphic-based videos along with voice integration. With its generative AI, it allows you to tailor videos in different contexts. It uses text-based instructions to analyze demands and follow them.
2. AI Text-Based Editing
Cutting and Trimming videos in a timeline might be difficult for some people. It requires proper skills; however, there is an alternate option. The text-based editing AI uses voice recognition to convert speech to text. Once the video has been converted, you can eliminate the parts you want.
3. AI Music Generator
If you want to generate music based on your video’s mood or context, use this AI. It asks for a few directions like theme, mood, and language to curate music. The song is efficient in what it is designed for and generates results in seconds.
4. AI Vocal Remover
Background noises always decline the quality of an audio track or overall video. With Filmora, you can separate vocals from background noise and delete the track. Both tracks are shown in the timeline and are easy to remove. Afterward, you can apply effects or introduce music before export.
Conclusion
After reaching a conclusion, one should have fully understood the merits of how to change slow-motion video to a normal iPhone. It provided insights into several useful applications for achieving this effect. Wondershare Filmora emerged as a worthy AI-driven desktop application tailored for crafting such videos. It is recommended to help you with your creative endeavors in this domain.
Make A Slow Motion Video Make A Slow Motion Video More Features
Part 1: Direct Method: Changing Slow Motion Video to Normal on iPhone
You might not be aware of this feature if you are a previous user or have just started using an iPhone. This is Apple’s built-in feature, found in iPhones and iPads. In this section, we have tailored a step-by-step guide to doing this. Here is a brief overview of how to convert a slow-motion video to a normal iPhone:
Step 1
Move to its bottom after opening the “Photos” application on your iPhone. From there, select the “Albums” option and scroll down to the “Slo-mo” option in “Media Types.”
Step 2
In the slow-mo section, find a video you want to reverse and select it to open. Navigate towards the top right corner of this video and click the “Edit” option.
Step 3
An editing panel will appear at the bottom of this video. If you’d notice, a vertical lined bar is under the video timeline. This indicates slow-mo duration, which you can change by repositioning sliders. Afterward, click the “Done” button at the right bottom of this screen to finalize.
Part 2: Top Applications That Can Be Used to Change Slow Motion Video to Normal
The iPhone’s built-in feature is equally effective for reversing a slow-mo back to normal. However, sometimes, one requires a tool for detailed editing. In such cases, we recommend you use a third party to help you achieve the desired results. We have assembled some tools on how to take slow-mo off a video on iPhone below:
- SpeedPro Slow Speed Video Edit
- Slow-Fast Motion Video Editor
- Slow Motion Video Fx Editor
- Reverse Cam – Slow Motion Video
- Slow Motion Video Editor
1. SpeedPro Slow Speed Video Edit
This is a versatile application designed explicitly to resolve the slow speed queries on iPhone. Users can effortlessly manipulate the speed of video during editing. The best part about this editor is that you can select a specific video section. It is up to you to reverse a complete slow-mo video or a part of it.
Key Features
- Facilitates both professionals and amateurs with its reachable user interface.
- After editing a video as super slow or super-fast, you can incorporate music.
- The application offers direct sharing options to vast applications like Instagram or YouTube.
2. Slow-Fast Motion Video Editor
If how to convert slow motion video to normal on an iPhone was a bet, this application would be worth your money. Many content creators have used it, and everyone has positively reviewed it. You can transform a slow-mo into a normal video using its speed option. The highest speed option is 2x, and the slowest speed option is 1/4th. There is no limitation on the video’s length or resolution for conversion.
Key Features
- You can apply different time transitions (fast or slow) to distinct video segments.
- The application doesn’t export with a Watermark addition to maintain professionalism.
- Upon converting a video or reversing it, you can adjust the audio pitch to align with it.
3. SloMo Slow Motion Video Editor
With technological advancements, the editing industry has taken up a notch. This application uses modern algorithms to create or reverse a slow with customizations. To reverse a slow-mo, you just need to upload it and increase the video’s speed. It offers three sorts of speed editing, including slow-mo, time-lapse, and stop-motion. The video speed is adjustable up to 240fps and 12x with quick processing.
Key Features
- With its independent frame manipulation, you can edit specific parts of a video.
- You can incorporate music behind your tracks out of 170+ pre-built music tracks.
- This iPhone editor retains the natural resolution of video to maintain its quality.
4. Reverse Cam – Slow Motion Video
Surfing through the internet to find how to unslow-mo a video on an iPhone? This application assists you in controlling or reversing video speed. You just need to import a previously created slow-mo into the application. In addition to reversing a video, you can also reverse audio tracks with it. There are multiple speed options like 0.25, 0.5x, and more.
Key Features
- After modifying the video speed, you can apply multiple effects to it.
- The application is compatible with iOS 9.0 or newer versions.
- It has a built-in library that users can use to save the edited videos and share them directly.
5. Slow Motion’ Video Editor
Solve all your queries related to how to change slo-mo video to normal on iPhone here. Designed to give your videos a perfect slow-motion or high-speed effect. To convert a slow-mo video into a normal one, it offers speed increase options. You can have complete control over your videos with this application.
Key Features
- It has an accessible and intuitive editing interface for user comprehension.
- It allows you to manipulate the speed of your video from 60 to 240 frames.
- It has multiple subscription options, weekly, monthly, or yearly, that you can avail accordingly.
Bonus Part: Speed Up Your iPhone Video on Desktop Using Wondershare Filmora
All these methods of transforming a slow-mo to normal are accurate and efficient. However, when it comes to perfection, one software stands tall than the others.Wondershare Filmora is a premium video editing software for precise editing. There are two methods of manipulating a slow-motion video to normal in it.
The speed ramping involves slow-mo reverse action from specific video frames. On the other hand, uniform speed modifies the complete video speed. You can add specific values for manipulating the frame rate or change the sliders. In addition, you can also add multiple effects to your video afterward. Moreover, you can also export the video in high resolution and desired format.
Free Download For Win 7 or later(64-bit)
Free Download For macOS 10.14 or later
Step-by-Step Guide to Shift Your Slow-Motion Video to Normal with Filmora
This segment involves a step-by-step guide to reverse a slow-mo. Let’s see how to change slo-mo video to normal on iPhone with Filmora below:
Step 1Import Media Files from iPhone
First, connect your iPhone to the source device you are using Filmora on. Once you have connected the devices, navigate towards the “Import” button. Expand this option, and from the dropdown menu, select “Import from a Camera or Phone.” Select the name of your iPhone in the “Import from” section and click “OK.” Once imported, place the clip in the timeline.
Step 2Access Uniform Speed Option
Then, select the clip in the timeline and navigate towards the settings panel. Afterward, go to the “Speed” tab under “Uniform Speed” set values. Drag the Speed slider towards the right to increase the video speed.
Step 3Export the Edited Video
Hit the “Play” button from the preview window to preview your video. Afterward, navigate towards the “Export” button at the top right corner. You can also set the framerate in the Export window according to preference. Further, hit the “Export” button in the Export window to save the file on the device.
Top Features to Note About Wondershare Filmora
There is more to Filmora than how to unslow-mo a video on an iPhone. The tool shows support with multiple devices like Windows, iOS, Linux, and more. Following are some of the top-notch AI features of Filmora:
1. AI Text-to-Video
Use this tool to craft creative and graphic-based videos along with voice integration. With its generative AI, it allows you to tailor videos in different contexts. It uses text-based instructions to analyze demands and follow them.
2. AI Text-Based Editing
Cutting and Trimming videos in a timeline might be difficult for some people. It requires proper skills; however, there is an alternate option. The text-based editing AI uses voice recognition to convert speech to text. Once the video has been converted, you can eliminate the parts you want.
3. AI Music Generator
If you want to generate music based on your video’s mood or context, use this AI. It asks for a few directions like theme, mood, and language to curate music. The song is efficient in what it is designed for and generates results in seconds.
4. AI Vocal Remover
Background noises always decline the quality of an audio track or overall video. With Filmora, you can separate vocals from background noise and delete the track. Both tracks are shown in the timeline and are easy to remove. Afterward, you can apply effects or introduce music before export.
Conclusion
After reaching a conclusion, one should have fully understood the merits of how to change slow-motion video to a normal iPhone. It provided insights into several useful applications for achieving this effect. Wondershare Filmora emerged as a worthy AI-driven desktop application tailored for crafting such videos. It is recommended to help you with your creative endeavors in this domain.
Best 8 Animated Video Makers
Animations can be a great way to get your work to stand out and the best animated video maker can help you get this effect very easily. Here, we will be helping you find the best way to create animated videos for your particular project.
It is important to point out that there are very many animation programs in the market and choosing the best one will depend on your needs, your style, the feature and tools you need, the cost of the program, and even the export options that each tool gives you.
Before we look at the best ways to create animated videos, let’s start by examining why you would need to use an animated video maker in the first place.
When to Use an Animated Video Maker
There are several reasons why you would want to create an animated video, rather than use traditional video solutions. The following are the most important from a digital marketing standpoint;
Improve Conversion and Sales
Animated videos are engaging enough to improve your conversion and sales. Studies have shown that an animated video can increase both conversion and sales by up to 80%. It may therefore be a good idea to use an animated explainer video to show your potential customers how to purchase a product or service on your website.
Increase Brand Awareness
Because they can be very entertaining and engaging, animated videos can also be a great way to increase brand awareness. And since they can be created very easily and cheaply, they can be a good way to reach potential customers.
Generate Online Leads
Because of the engaging nature of animated videos, you can use them to introduce yourself to potential customers and generate online leads. They have a very high conversion rate, as we have seen before, making them one of the best ways to reach people who would otherwise have never heard of you and your brand.
Explain Complex Processes
It can be very difficult to try to explain very complex ideas such as the mechanical aspect of a certain tool using words. But a well-crafted animated video gives you the chance to explain complex ideas in a fun and engaging way, making it easier for your customers to understand and engage with your brand.
Best Animated Video Makers
The following are the best animated video makers in the market to choose from;
1. Filmora
Created by Wondershare, one of the most popular software companies in the world, you can be certain that Filmora will deliver one of the best video creation and animation experiences you can find anywhere. It is a very easy-to-use, very effective way of creating animated videos that will intrigue your audiences and engage with them in ways traditional video cannot.

To accomplish this, Filmora has numerous features and effects that are not just meant to help you create the perfect video, but also make the process simple, allowing you to create stunning videos in just a few minutes.
For Win 7 or later (64-bit)
For macOS 10.12 or later
The following are some of the key features you can expect when using Filmora;
- Motion Tracking is a feature that you can use to attach an element to a moving object. The auto motion tracking feature ensures that the elements you attach move smoothly as the object moves.
- You can also use Filmora to customize an animation by adding keyframes to change various aspects including the positions, scale, rotations, and even the opacity of a clip.
- The color match feature allows you to match a selected clip’s color to a separate clip from another clip.
- The auto-ducking feature allows you to choose to fade away background music and make foreground narration or dialogue clearer.
- You can also add plain text to any section of the video
- The advanced title editing feature allows you to change the position, rotation, and scale of the video’s title while it is playing.
- You can also create and edit keyboard shortcut keys that you can then use to edit the video more easily.
2. Animaker
Price: Free with limited features. Paid plans from $10 a month
Best For: marketers, presenters, and freelancers
Link: https://www.animaker.com/
If you are looking for a simple way to create interactive presentations and videos, Animaker is a simple solution to choose. It is a particularly simple solution to use as it comes with numerous ways to create and edit the video, including a huge library of templates and elements that include illustrations, gestures, and characters.

The fact that you don’t have to create these animations from scratch makes it an ideal solution even if you have never used this kind of software before. It also comes with more than 200 music tracks and sound effects that you can add to the video.
Pros
- It can be used to create all kinds of animations for all kinds of use including business and personal uses
- It supports the creation of a variety of video styles
- It can be used to create whiteboard videos
- It has numerous animation options to choose from including illustrations, characters, and gestures
- It comes with a free plan
Cons
- You can only create 5 watermarked videos with the free plan
- It is only ideal for creating videos and not animated images
3. Visme
Price: Free plan with limited features. Paid plans start from $15 per month
Best For: Marketers, corporate teams, trainers, teachers, and personal use
Link: https://www.visme.co/
Visme is a cloud-based solution that can be used to create all sorts of animated media including animated videos, animated images, presentations, ads, banners, and more. It has numerous interactive features that are aimed at allowing you to create the perfect designs in a matter of minutes.

Since it is a cloud-based solution, you don’t need to download any software on your computer to use it. it also comes with thousands of premade templates and lots of stock-free images and videos that you can use to create your design.
Pros
- It is an all-in-one solution to create both animated images and videos
- It is a simple soliton even for beginner users
- You get thousands of different resources that can be used to create unique designs limited only by your imagination
- You don’t need to download any software to use it
Cons
- The numerous resources can make it a confusing solution for beginners
- The free plan is very limited
4. Adobe Animate
Price: Starts at $20.99 per month
Best For: Cartoon makers, YouTubers, and game designers
Link: https://www.adobe.com/africa/products/animate.html
Adobe Animate is an improvement on Adobe Flash Professional in every way. It is one of the best ways to create interactive graphics a 2D animations that can then be added to whatever project you are working on.

You can use the numerous tools in Adobe Animate to animate various aspects of your design including characters, shapes, avatars, and other assets. The animations can then be exported in various formats including Flash, HTML5, WebGL, SVG, and more.
Pros
- You have a lot of options when it comes to exporting and sharing the animations you create.
- It allows you to animate elements in numerous ways
- It has an extensive library of tools that can be used to create unique animations
Cons
- Like most Adobe tools, it can be very difficult to use, especially for beginner users
- There is no free trial version
5. Crello
Price: Free plan with limited features. Paid plan starts at $10 a month
Best For: Marketers, freelancers, and business owners
Link: https://create.vista.com/
Also known as VistaCreate, this is a simple solution for creating both animated videos and images. It makes this animation process quick and easy by providing you with a veritable library of templates and thousands of pre-animated characters and objects. It is therefore one of the best solutions to choose even if you don’t have the necessary technical skills to create a credible animated video.

One of the things VistaCreate can do so well is combining videos and animated GIFs with images to create short animated videos that you can share on social media.
Pros
- Create animated videos and export them in various formats, ideal for all devices
- It is one of the best ways to create animated social media posts
- It has a mobile app that allows you to create designs on your device
Cons
- The free version is very limited in creative assets and storage capacity
6. Biteable
Price: Free plan with limited features: Paid plans start from $49 a month
Best For: Marketers, Educators, and Trainers
Link: https://biteable.com/
Biteable is the best option when you want to create simple small animated videos that can be used as Ads or videos that you post to social media. It has numerous premade templates that make creating these simple videos a matter of simply editing one of the templates.

If you feel uninspired, it has thousands of stock footage clips and scenes that you can put together to create a complete. It also has collaborative features that can allow a team to work on the same project.
Pros
- It can be used to make all kinds of marketing videos
- It is an ideal choice for explainer and demo videos
- It provides a wealth of resources to create your videos including stock footage
- It has a free plan
Cons
- The free plan places a watermark on the video
- You can only export the videos in MP4 format.
- At $49 a month, it is a very expensive option.
7. PixTeller
Price: Basic free plan with no animation features. Paid plans start at $12 per month
Best For: Freelancers, marketers, and bloggers
Link: https://pixteller.com/
PixTeller is a great way to animate videos and images for both professional and personal use. if you don’t want the complications that come with a dedicated video editing software, PixTeller is a good option to consider as it is very simple to use.

You can use it to create simple animated short videos by setting frame-by-frame motions and then editing the attributes in each frame. Some of the attributes that you can use PixTeller to edit include colors, opacity, rotation, and more.
Pros
- Editing frame by frame on a timeline makes video creation very easy
- The free version has various editing features
- It can be used to create both animated videos and images
Cons
- It lacks the advanced editing features that you will find on some of the other options on this list
- You can only download the videos in MP4 format
- The free plan doesn’t have animation features
8. Blender
Price: Free
Best For: Scientists, Students, Engineers, Animators, and Artists
Link: https://www.blender.org/download/
If you want to create stunning animations for free, Blender is the open-source software to use. This free program allows users to use the command line to create, render and model 3D animations. It can be used on all platforms including Linux, Windows, and Mac.

Even though it is free, it comes with numerous features including the ability to draw and edit in 3D mode, advanced video editing in VFX, motion tracking, masking, and compositing. But because it uses command-line programming, it may not be an ideal solution for most users.
Pros
- It is a completely free solution
- It has pretty advanced animation and rendering features to create all kinds of videos
Cons
- It may not be the most ideal solution for beginner users even though there are hours of video tutorials to refer to.
Related FAQs
1. How Do I Turn my Video into Animation?
The best way to turn a video into animation is to use one of the animation software solutions that we have outlined above. Each tool has its features and you should choose one that has the necessary features to fit into your video project.
2. How Do I Make an Animated Video for Free?
The only way to make an animated video is to use animation software. And although most programs are not free, there are some open-source solutions like Blender that may be able to help you make an animated video for free.
3. How Do You Animate in PowerPoint?
PowerPoint allows you to add animation to objects and text. To do that, select the object or text that you want to animate and select “Animations.” From the options presented, select the animation that you would like to use and it will be added to the selected object or text. If you would like to add an effect, choose “Effect Options.”
For macOS 10.12 or later
The following are some of the key features you can expect when using Filmora;
- Motion Tracking is a feature that you can use to attach an element to a moving object. The auto motion tracking feature ensures that the elements you attach move smoothly as the object moves.
- You can also use Filmora to customize an animation by adding keyframes to change various aspects including the positions, scale, rotations, and even the opacity of a clip.
- The color match feature allows you to match a selected clip’s color to a separate clip from another clip.
- The auto-ducking feature allows you to choose to fade away background music and make foreground narration or dialogue clearer.
- You can also add plain text to any section of the video
- The advanced title editing feature allows you to change the position, rotation, and scale of the video’s title while it is playing.
- You can also create and edit keyboard shortcut keys that you can then use to edit the video more easily.
2. Animaker
Price: Free with limited features. Paid plans from $10 a month
Best For: marketers, presenters, and freelancers
Link: https://www.animaker.com/
If you are looking for a simple way to create interactive presentations and videos, Animaker is a simple solution to choose. It is a particularly simple solution to use as it comes with numerous ways to create and edit the video, including a huge library of templates and elements that include illustrations, gestures, and characters.
The fact that you don’t have to create these animations from scratch makes it an ideal solution even if you have never used this kind of software before. It also comes with more than 200 music tracks and sound effects that you can add to the video.
Pros
- It can be used to create all kinds of animations for all kinds of use including business and personal uses
- It supports the creation of a variety of video styles
- It can be used to create whiteboard videos
- It has numerous animation options to choose from including illustrations, characters, and gestures
- It comes with a free plan
Cons
- You can only create 5 watermarked videos with the free plan
- It is only ideal for creating videos and not animated images
3. Visme
Price: Free plan with limited features. Paid plans start from $15 per month
Best For: Marketers, corporate teams, trainers, teachers, and personal use
Link: https://www.visme.co/
Visme is a cloud-based solution that can be used to create all sorts of animated media including animated videos, animated images, presentations, ads, banners, and more. It has numerous interactive features that are aimed at allowing you to create the perfect designs in a matter of minutes.
Since it is a cloud-based solution, you don’t need to download any software on your computer to use it. it also comes with thousands of premade templates and lots of stock-free images and videos that you can use to create your design.
Pros
- It is an all-in-one solution to create both animated images and videos
- It is a simple soliton even for beginner users
- You get thousands of different resources that can be used to create unique designs limited only by your imagination
- You don’t need to download any software to use it
Cons
- The numerous resources can make it a confusing solution for beginners
- The free plan is very limited
4. Adobe Animate
Price: Starts at $20.99 per month
Best For: Cartoon makers, YouTubers, and game designers
Link: https://www.adobe.com/africa/products/animate.html
Adobe Animate is an improvement on Adobe Flash Professional in every way. It is one of the best ways to create interactive graphics a 2D animations that can then be added to whatever project you are working on.
You can use the numerous tools in Adobe Animate to animate various aspects of your design including characters, shapes, avatars, and other assets. The animations can then be exported in various formats including Flash, HTML5, WebGL, SVG, and more.
Pros
- You have a lot of options when it comes to exporting and sharing the animations you create.
- It allows you to animate elements in numerous ways
- It has an extensive library of tools that can be used to create unique animations
Cons
- Like most Adobe tools, it can be very difficult to use, especially for beginner users
- There is no free trial version
5. Crello
Price: Free plan with limited features. Paid plan starts at $10 a month
Best For: Marketers, freelancers, and business owners
Link: https://create.vista.com/
Also known as VistaCreate, this is a simple solution for creating both animated videos and images. It makes this animation process quick and easy by providing you with a veritable library of templates and thousands of pre-animated characters and objects. It is therefore one of the best solutions to choose even if you don’t have the necessary technical skills to create a credible animated video.
One of the things VistaCreate can do so well is combining videos and animated GIFs with images to create short animated videos that you can share on social media.
Pros
- Create animated videos and export them in various formats, ideal for all devices
- It is one of the best ways to create animated social media posts
- It has a mobile app that allows you to create designs on your device
Cons
- The free version is very limited in creative assets and storage capacity
6. Biteable
Price: Free plan with limited features: Paid plans start from $49 a month
Best For: Marketers, Educators, and Trainers
Link: https://biteable.com/
Biteable is the best option when you want to create simple small animated videos that can be used as Ads or videos that you post to social media. It has numerous premade templates that make creating these simple videos a matter of simply editing one of the templates.
If you feel uninspired, it has thousands of stock footage clips and scenes that you can put together to create a complete. It also has collaborative features that can allow a team to work on the same project.
Pros
- It can be used to make all kinds of marketing videos
- It is an ideal choice for explainer and demo videos
- It provides a wealth of resources to create your videos including stock footage
- It has a free plan
Cons
- The free plan places a watermark on the video
- You can only export the videos in MP4 format.
- At $49 a month, it is a very expensive option.
7. PixTeller
Price: Basic free plan with no animation features. Paid plans start at $12 per month
Best For: Freelancers, marketers, and bloggers
Link: https://pixteller.com/
PixTeller is a great way to animate videos and images for both professional and personal use. if you don’t want the complications that come with a dedicated video editing software, PixTeller is a good option to consider as it is very simple to use.
You can use it to create simple animated short videos by setting frame-by-frame motions and then editing the attributes in each frame. Some of the attributes that you can use PixTeller to edit include colors, opacity, rotation, and more.
Pros
- Editing frame by frame on a timeline makes video creation very easy
- The free version has various editing features
- It can be used to create both animated videos and images
Cons
- It lacks the advanced editing features that you will find on some of the other options on this list
- You can only download the videos in MP4 format
- The free plan doesn’t have animation features
8. Blender
Price: Free
Best For: Scientists, Students, Engineers, Animators, and Artists
Link: https://www.blender.org/download/
If you want to create stunning animations for free, Blender is the open-source software to use. This free program allows users to use the command line to create, render and model 3D animations. It can be used on all platforms including Linux, Windows, and Mac.
Even though it is free, it comes with numerous features including the ability to draw and edit in 3D mode, advanced video editing in VFX, motion tracking, masking, and compositing. But because it uses command-line programming, it may not be an ideal solution for most users.
Pros
- It is a completely free solution
- It has pretty advanced animation and rendering features to create all kinds of videos
Cons
- It may not be the most ideal solution for beginner users even though there are hours of video tutorials to refer to.
Related FAQs
1. How Do I Turn my Video into Animation?
The best way to turn a video into animation is to use one of the animation software solutions that we have outlined above. Each tool has its features and you should choose one that has the necessary features to fit into your video project.
2. How Do I Make an Animated Video for Free?
The only way to make an animated video is to use animation software. And although most programs are not free, there are some open-source solutions like Blender that may be able to help you make an animated video for free.
3. How Do You Animate in PowerPoint?
PowerPoint allows you to add animation to objects and text. To do that, select the object or text that you want to animate and select “Animations.” From the options presented, select the animation that you would like to use and it will be added to the selected object or text. If you would like to add an effect, choose “Effect Options.”
Also read:
- New You May Want to Change the Speed of Certain Portions of Your Video. This Article Enlightens You on How to Splice and Speed up the Video in Simple Ways for 2024
- Updated Before & After Editing Trick - Filmora
- New How Much Wedding Videographer Cost
- 2024 Approved Best 5 Solutions on How to Add Emojis to iPhone
- New 2024 Approved How to Zoom in on PowerPoint Easy Ways
- 2024 Approved 8 Apps to Custom GIF Stickers
- New If You Are a Beginner and Want to Familiarise Yourself with Steps and Terms Used in Video Editing, in This Article, We Will Go Through the Steps You Will Need to Cut Your Video File in Adobe Premiere Pro and Wondershare Filmora
- Updated 2024 Approved How to Make Falling Text Effect in Filmora?
- As Video Editing Has Become a Pillar Stone in Post-Production Work, You Might Need to Upgrade Your Knowledge About It. In This Article, You Will Learn How to Rotate the Video
- New Why Vimeo Slideshow Maker Become Popular for 2024
- The Best Way To Color Grading & Color Correction in Filmora for 2024
- Updated Premiere Pro Tutorial How To Change Video Frame Rate
- How to Put a Background on A Green Screen for 2024
- New Best Way to Freeze-Frame in Final Cut Pro
- New Are You Working on Editing a Video and Youd Like to Add Text to It? Learn the Various Ways that You Can Add Text to a Video
- New How to Change Video Thumbnail in Google Drive
- New Mastering DaVinci Resolve Scopes A Comprehensive Guide for 2024
- Updated 2024 Approved Unleash the Power of Video Slow Motion with Wondershare Filmora. Find Out How to Create Slow Motion Video with the Effective Speed Ramping Feature on Filmora
- In 2024, In This Article, We Shall Take a Look at the Various Steps of Making a Photo Collage in Microsoft Word, and Also at Other Details of the Process, Which Might Be Relevant
- New Phone Aspect Ratio Vertical Definition, Types and Tips for 2024
- Wondering How to Rotate a Video in Windows at Any Desired Angle and Save It Permanently? Find Out All the Different Ways to Rotate Videos Temporarily as Well as Permanently
- Updated 2024 Approved How to Turn Text Into a Podcast
- Updated Discover How to Create Professional Foggy Text Reflection Effects in the Filmora Video Editor
- New Convert Slow Motion Videos to Regular Videos in Your iOS Device |A How for 2024
- Updated In 2024, How to Loop Videos with iMovie
- 2024 Approved TikTok Velocity Dance Tutorial| Filmora
- New In 2024, Are You Looking to Remove Echo in Premiere Pro? Please Look at Our Guide for Advice and Suggestions on Getting the Best Possible Outcomes
- New 10 Best Camera for YouTube Beginners for 2024
- In 2024, | How to Livestream Zoom on Facebook?
- Updated How to Cut Videos on Mac without Using FFmpeg for 2024
- In 2024, Replacing the Sky in Adobe After Effects An Extensive Guide
- Updated In 2024, Want to Apply a Filter on Your Video Using Your iPhone or Mac? Here Are the Simple Steps to Put Add Filters on iMovie. Find Out a Better iMovie Alternative with More Filters
- Which 10 Best Video Editing Online Makers Is Worth Your Attention?
- Updated 2024 Approved 3 Ways To Stream And Record At The Same Time
- New Video Course and Online Learning Are Very Popular Nowadays. Here We Are Going to Recommend some of the Best Video Websites for Teachers to Use
- New 5 Methods to Make a Fake Facetime Call Video
- 2024 Approved Splice Video Editor Online - Get Your Videos Splice
- How to Get the Most Out of KineMaster Video Templates
- Updated In 2024, Splice Video Editor Online - Get Your Videos Splice
- 2024 Approved Top LUTs for Sony HLG
- New Looking for the Best Quiz-Making Tools? Read Our Full Review to Find Out the 10 Best Video Quiz Makers Available for 2024
- 2024 Approved How to Get Motion Blur in Roblox?
- Updated How to Make GIF With Transparent Background?
- 2024 Approved Wondershare Filmora Tutorial | Using The AI Auto Reframe Feature
- Updated Are You Surfing for some Way to Make Your Animated Emoji Discord Using Videos, GIFs, Images, or Text? Read Through This Article as Well Guide You Through the Process for 2024
- 2024 Approved Top 10 Best Slideshow Makers with Music
- 2024 Approved Kdenlive Is a Free, Open-Source Video Editing Software Application. Kdenlive Is a Powerful Video Editor that Can Be Used to Create Professional-Quality Videos
- 7 Fixes for Unfortunately, Phone Has Stopped on Nokia C110 | Dr.fone
- Complete Guide to Hard Reset Your Itel P55+ | Dr.fone
- What are Location Permissions Life360 On Honor X9a? | Dr.fone
- Fix Vivo X Flip Android System Webview Crash 2024 Issue | Dr.fone
- How do I reset my Asus ROG Phone 7 Ultimate Phone without technical knowledge? | Dr.fone
- 3 Easy Solutions to Hard Reset Xiaomi Redmi 12 | Dr.fone
- Looking For A Location Changer On Vivo S18e? Look No Further | Dr.fone
- In 2024, How to Remove a Previously Synced Google Account from Your Samsung Galaxy A05s
- How To Activate and Use Life360 Ghost Mode On Xiaomi Redmi Note 12R | Dr.fone
- In 2024, How to Transfer Data from Apple iPhone X to ZTE Phones | Dr.fone
- Full Guide to Catch 100 IV Pokémon Using a Map On Xiaomi Redmi A2+ | Dr.fone
- In 2024, How to Change Location on TikTok to See More Content On your Lava Yuva 2 Pro | Dr.fone
- In 2024, Trouble with iPhone 15 Plus Swipe-Up? Try These 11 Solutions
- How to Share/Fake Location on WhatsApp for Motorola Moto G23 | Dr.fone
- How to Factory Reset Nubia Red Magic 8S Pro in 5 Easy Ways | Dr.fone
- Top 5 Tracking Apps to Track Oppo Reno 8T without Them Knowing | Dr.fone
- How to Promote TikTok Videos for 2024
- In 2024, Top 5 Oppo Find X7 Bypass FRP Tools for PC That Actually Work
- How to Unlock Xiaomi Redmi Note 12R Phone Pattern Lock without Factory Reset
- Dose Life360 Notify Me When Someone Checks My Location On Realme C53? | Dr.fone
- In 2024, How to Screen Mirroring Xiaomi 13T to PC? | Dr.fone
- iPhone 8 Data Recovery – An Infographic to Conquer iPhone Data Loss | Stellar
- In 2024, How To Remove Phone Number From Your Apple ID on Your Apple iPhone 13?
- Make Your Pictures Speak Online With the Best Tools Recommended for 2024
- In 2024, How to Mirror Apple iPhone SE to iPad? | Dr.fone
- In 2024, Will Pokémon Go Ban the Account if You Use PGSharp On OnePlus Nord N30 SE | Dr.fone
- In 2024, How To Unlock Cricket Apple iPhone 6 Plus for Free
- In 2024, A Comprehensive Guide to Mastering iPogo for Pokémon GO On Apple iPhone 12 mini | Dr.fone
- How To Unlock a Samsung Galaxy XCover 6 Pro Tactical Edition Easily?
- 10 Easy-to-Use FRP Bypass Tools for Unlocking Google Accounts On Samsung Galaxy A15 4G
- 5 Ways to Reset Oppo Reno 11F 5G Without Volume Buttons | Dr.fone
- How and Where to Find a Shiny Stone Pokémon For Asus ROG Phone 7 Ultimate? | Dr.fone
- A Step-by-Step Guide on Using ADB and Fastboot to Remove FRP Lock on your Lava Storm 5G
- 5 Solutions For Oppo A58 4G Unlock Without Password
- Oppo Messages Recovery - Recover Deleted Messages from Oppo
- Does PokeGo++ still work on Apple iPhone 8/iPad? | Dr.fone
- Undelete lost data from Note 30i
- How to Reset Realme GT Neo 5 without Losing Data | Dr.fone
- 11 Ways to Fix it When My Sony Xperia 5 V Wont Charge | Dr.fone
- Remove Google FRP lock on Lava Blaze 2 5G
- In 2024, Ultimate Guide from Samsung Galaxy F14 5G FRP Bypass
- Does PokeGo++ still work on Apple iPhone 14 Plus/iPad? | Dr.fone
- Best Anti Tracker Software For Honor Magic 6 | Dr.fone
- In 2024, How To Fix Apple ID Verification Code Not Working On iPhone 15 Pro Max
- Does Airplane Mode Turn off GPS Location On Motorola Edge 40 Neo? | Dr.fone
- The Easy Way to Remove an Apple ID from Your MacBook For your Apple iPhone 6 Plus
- Why Your WhatsApp Location is Not Updating and How to Fix On Honor Magic 6 | Dr.fone
- Title: In 2024, How to Get Zoom on TV Easy Solutions
- Author: Morgan
- Created at : 2024-05-19 05:12:18
- Updated at : 2024-05-20 05:12:18
- Link: https://ai-video-editing.techidaily.com/in-2024-how-to-get-zoom-on-tv-easy-solutions/
- License: This work is licensed under CC BY-NC-SA 4.0.
