
In 2024, How To Make Ninja Jump Effect

How To Make Ninja Jump Effect
Superpower scenes derived from movies are trending these days. Everyone wants to add these superpower effects to their clips. We have covered several of these tutorials, and here we are with a new one; the Super/Ninja Jump effect.
This effect is for the quick movement of a subject from one position to another. Naruto is the prime example where ninjas are made to move around by this effect. Anime creators use this ninja effect a lot.
This article includes tutorials on what to shoot and how to add the Super Jump effect using Wondershare Filmora . The use of tools like masking, time ramping, keyframing, and the new version addition, the Boris FX Pack, makes it super easy to get a perfect super jump effect.
Shots Required For Super Jump Effect
You can use either a mobile phone or a camera for shooting, but you have to keep these things in mind:
Keep the following important tips in mind while shooting clips using your phone or camera.
● Use Wide-Angle
Always use the wide-angle view to ensure everything is in focus with a good depth of field.
● The Camera Should Be Steady
Make sure that the phone or camera is on a steady surface to avoid any turbulence or frame shifting.
● Sufficient Light
Make sure there is sufficient light and ambiance. Once you have set your camera, these are the three shots you have to take:
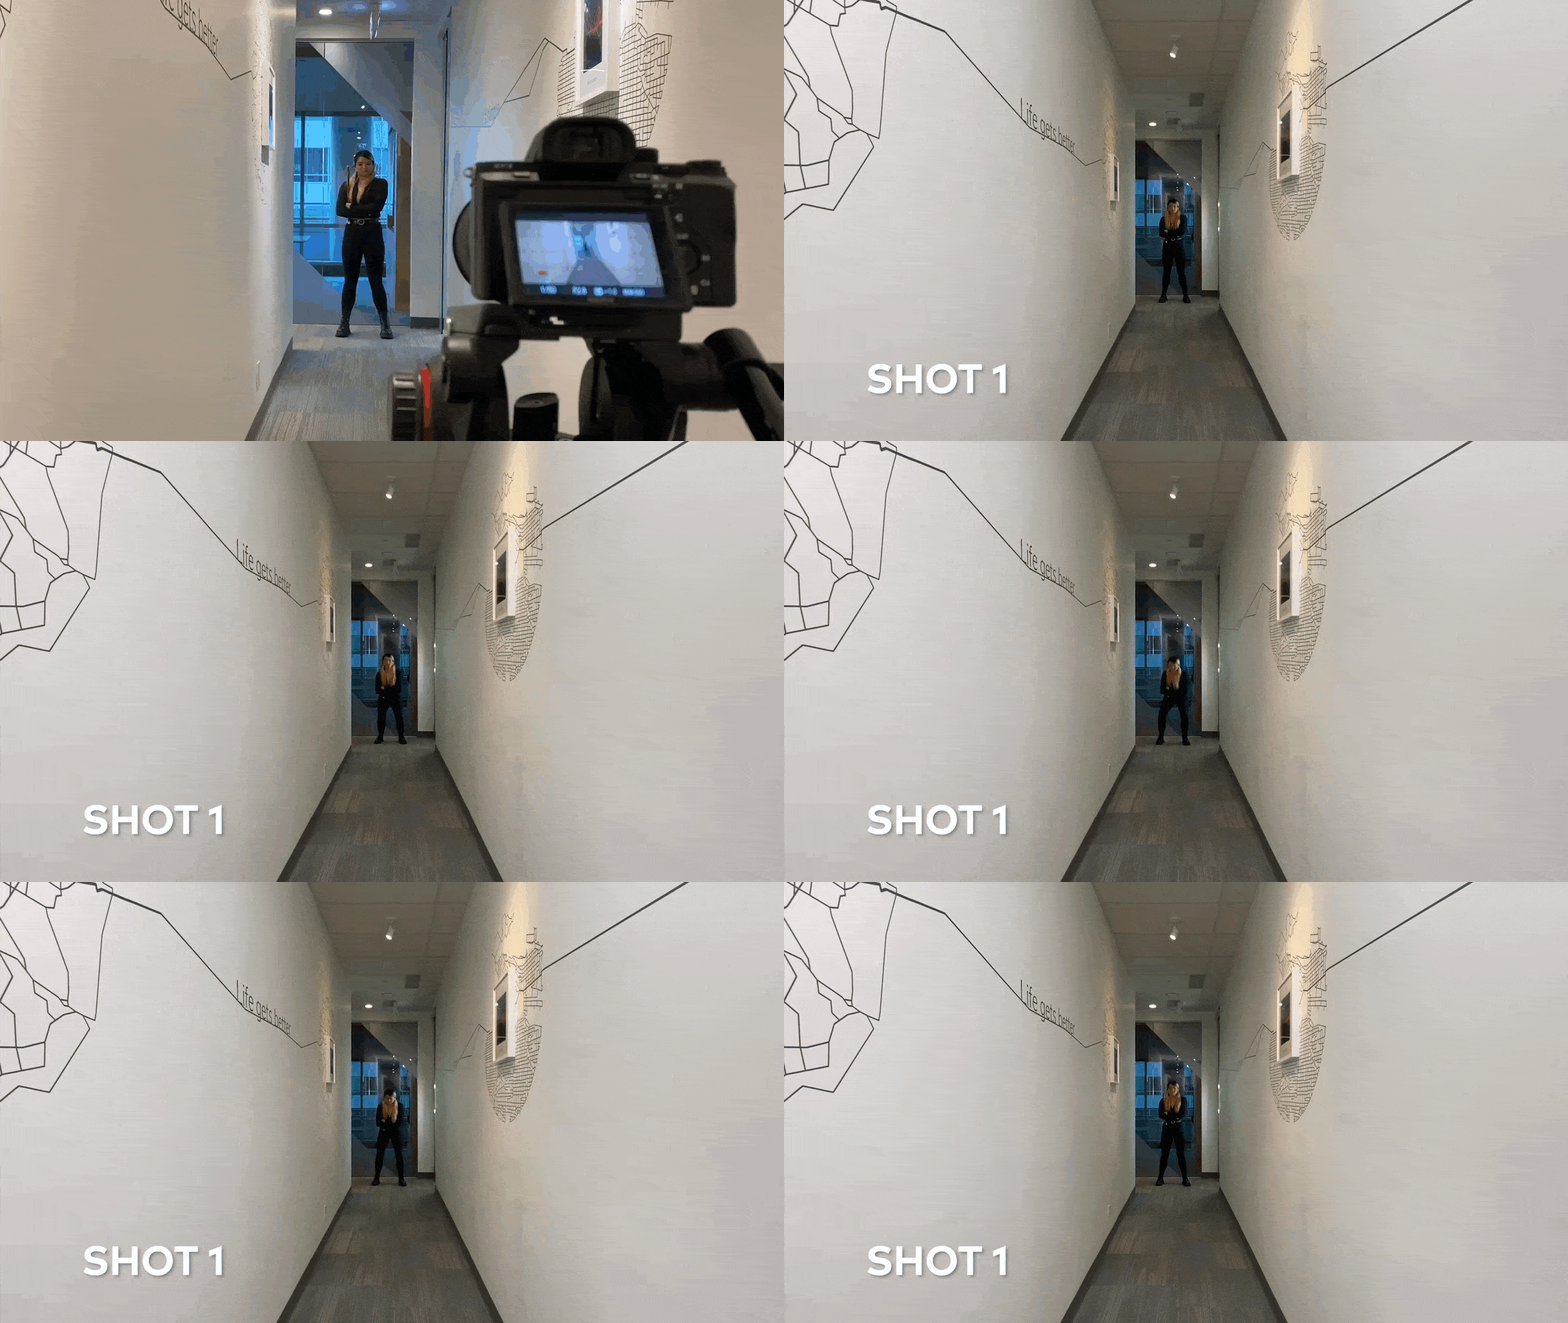
Shot 1: Jump Into the Air at a Distance
The subject will jump into the air at a distance from the camera. He should jump as high as he can, folding his legs so his body is in a ball position while in the air. The distance should be proper—not very far away.
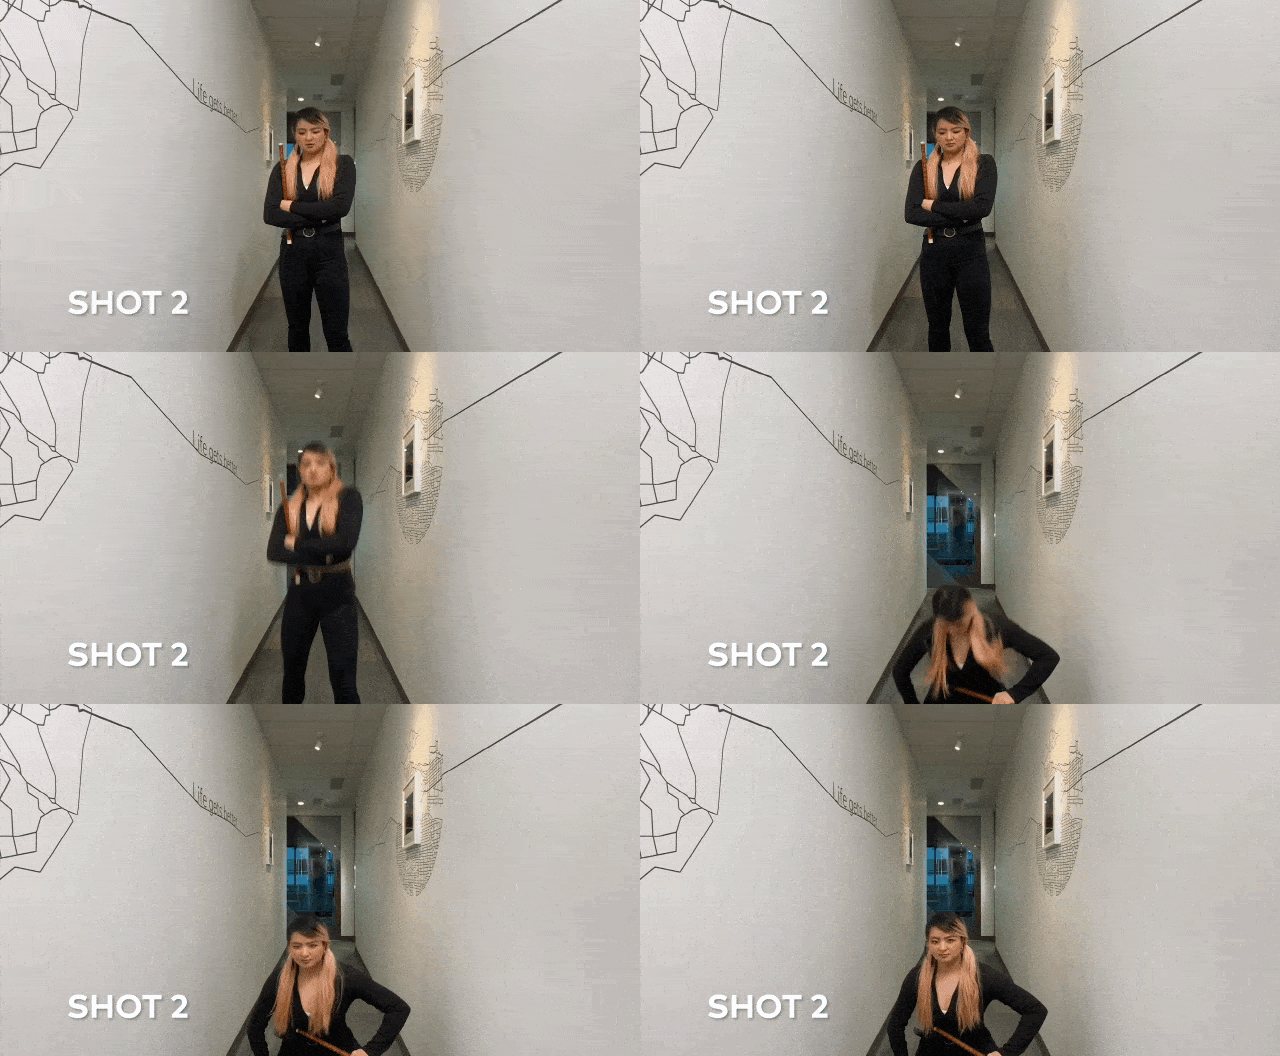
Shot 2: Jump and Act Like You Are Landing
The subject should jump and act like he is landing on the floor. This shot has to be taken directly in front of the camera.
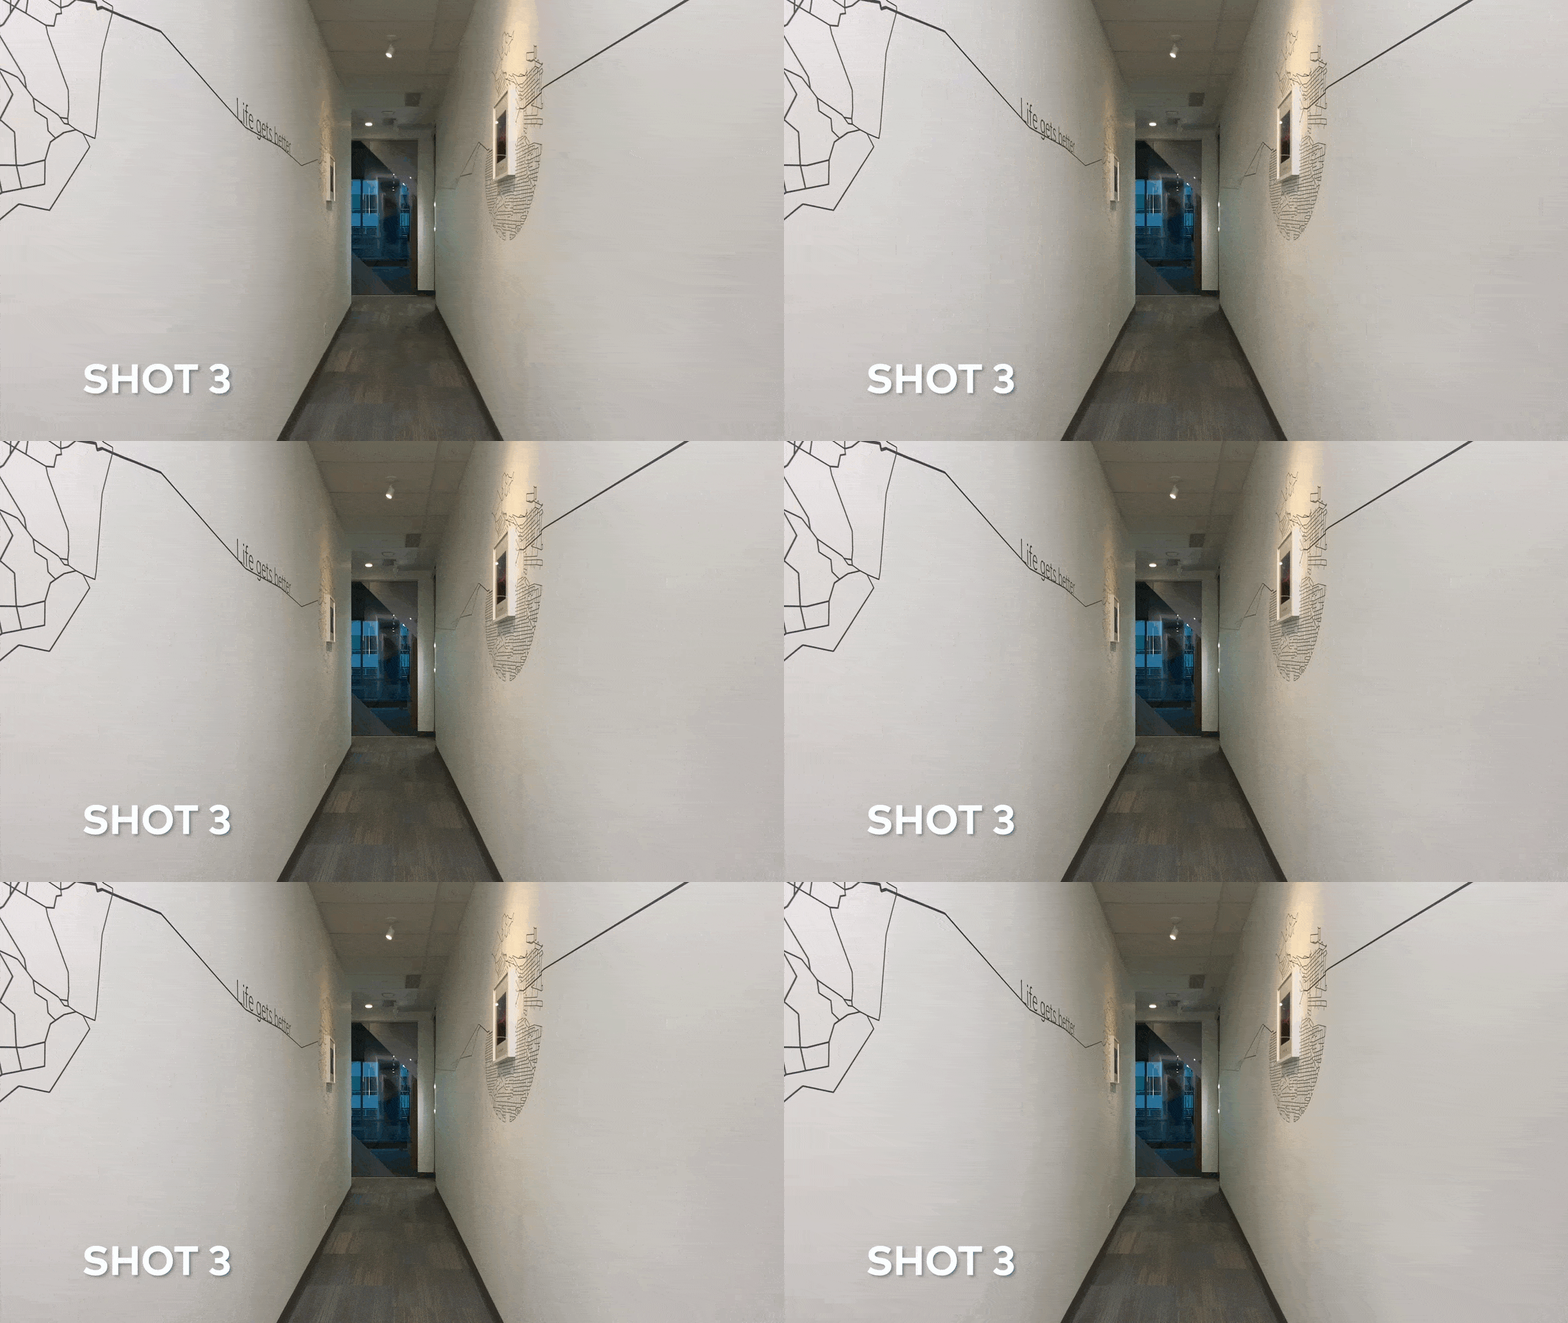
Shot 3: Empty Background Clip
This is an empty background clip. This clip includes only background settings without the subject. We need this clip to make layers while editing.
How To Edit These Clips On Filmora?
Once the shots have been taken, we move towards editing these clips, and for this purpose, we are using Filmora. Here is a step-by-step guide for editing these shots.
Steps To Edit These Clips
The tools we are going to use in this editing are masking, time ramping, speed ramping, keyframing, the Boris FX effect, and many more.
Open Wondershare Filmora and Add Video Tracks
Steps
Step1 Select the empty background clip (shot 3) and place it on the first video track timeline.
Step2 Now place the jumping clip (shot 4) on the top.
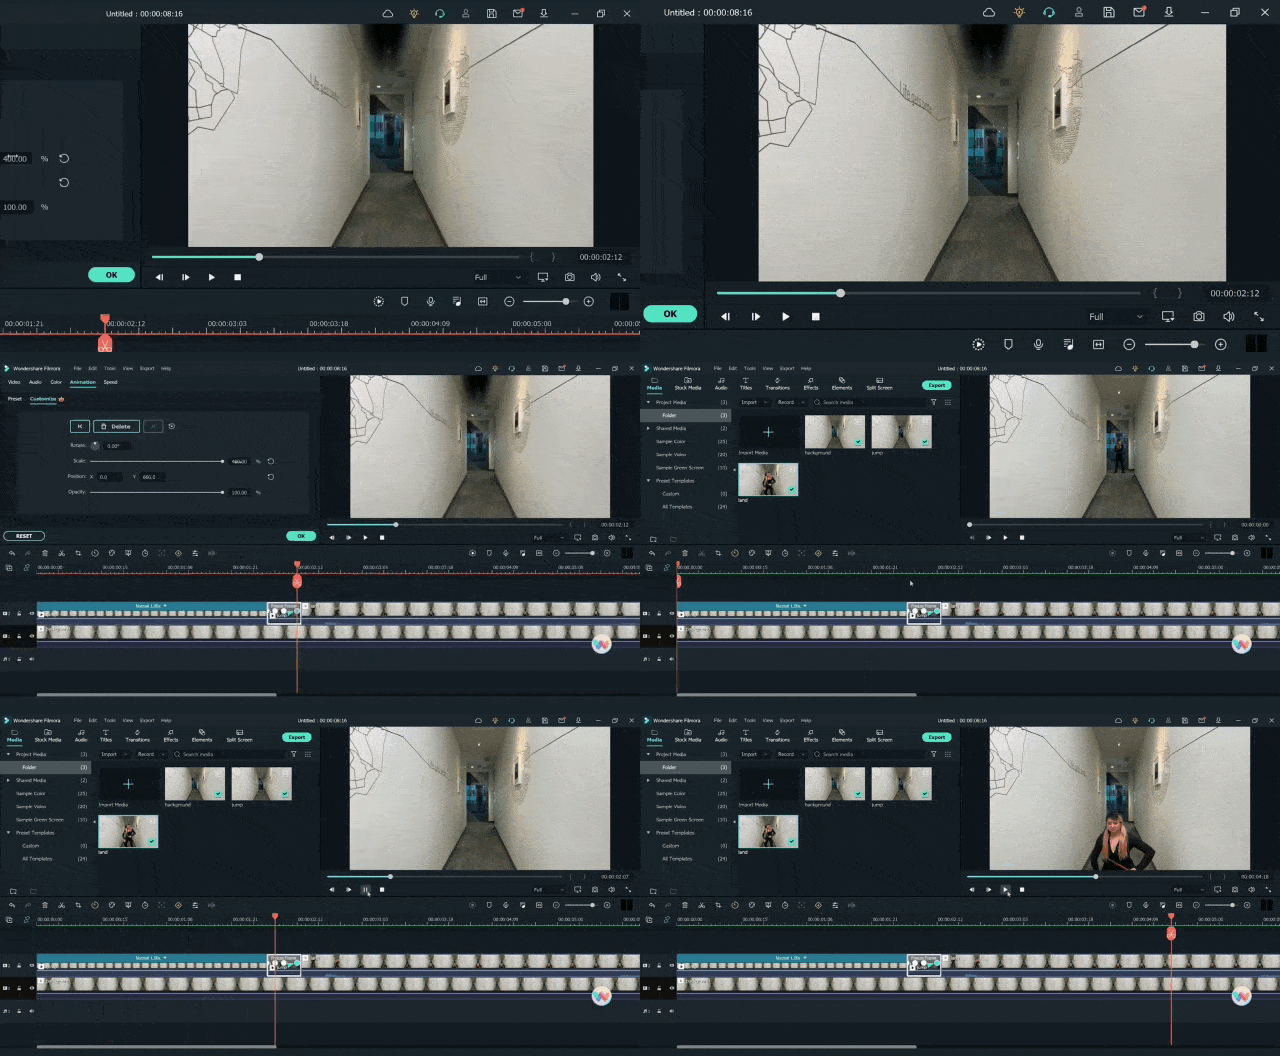
Adding a Freeze Frame
A freeze frame is a type of still image that is created by simply freezing the action. Most of the time, this is used in the last shot of a movie to capture a moment in time. Here are the steps to adding a free frame.
Steps
Step1 Move the playhead up to the point where the subject’s body appears smallest.
Step2 Add a freeze frame at this point by right-clicking on the playhead and selecting the speed option.
Step3 Make a cut at the start of the freeze frame, keep it for 8 frames and delete the rest.
Masking of the Video Clips
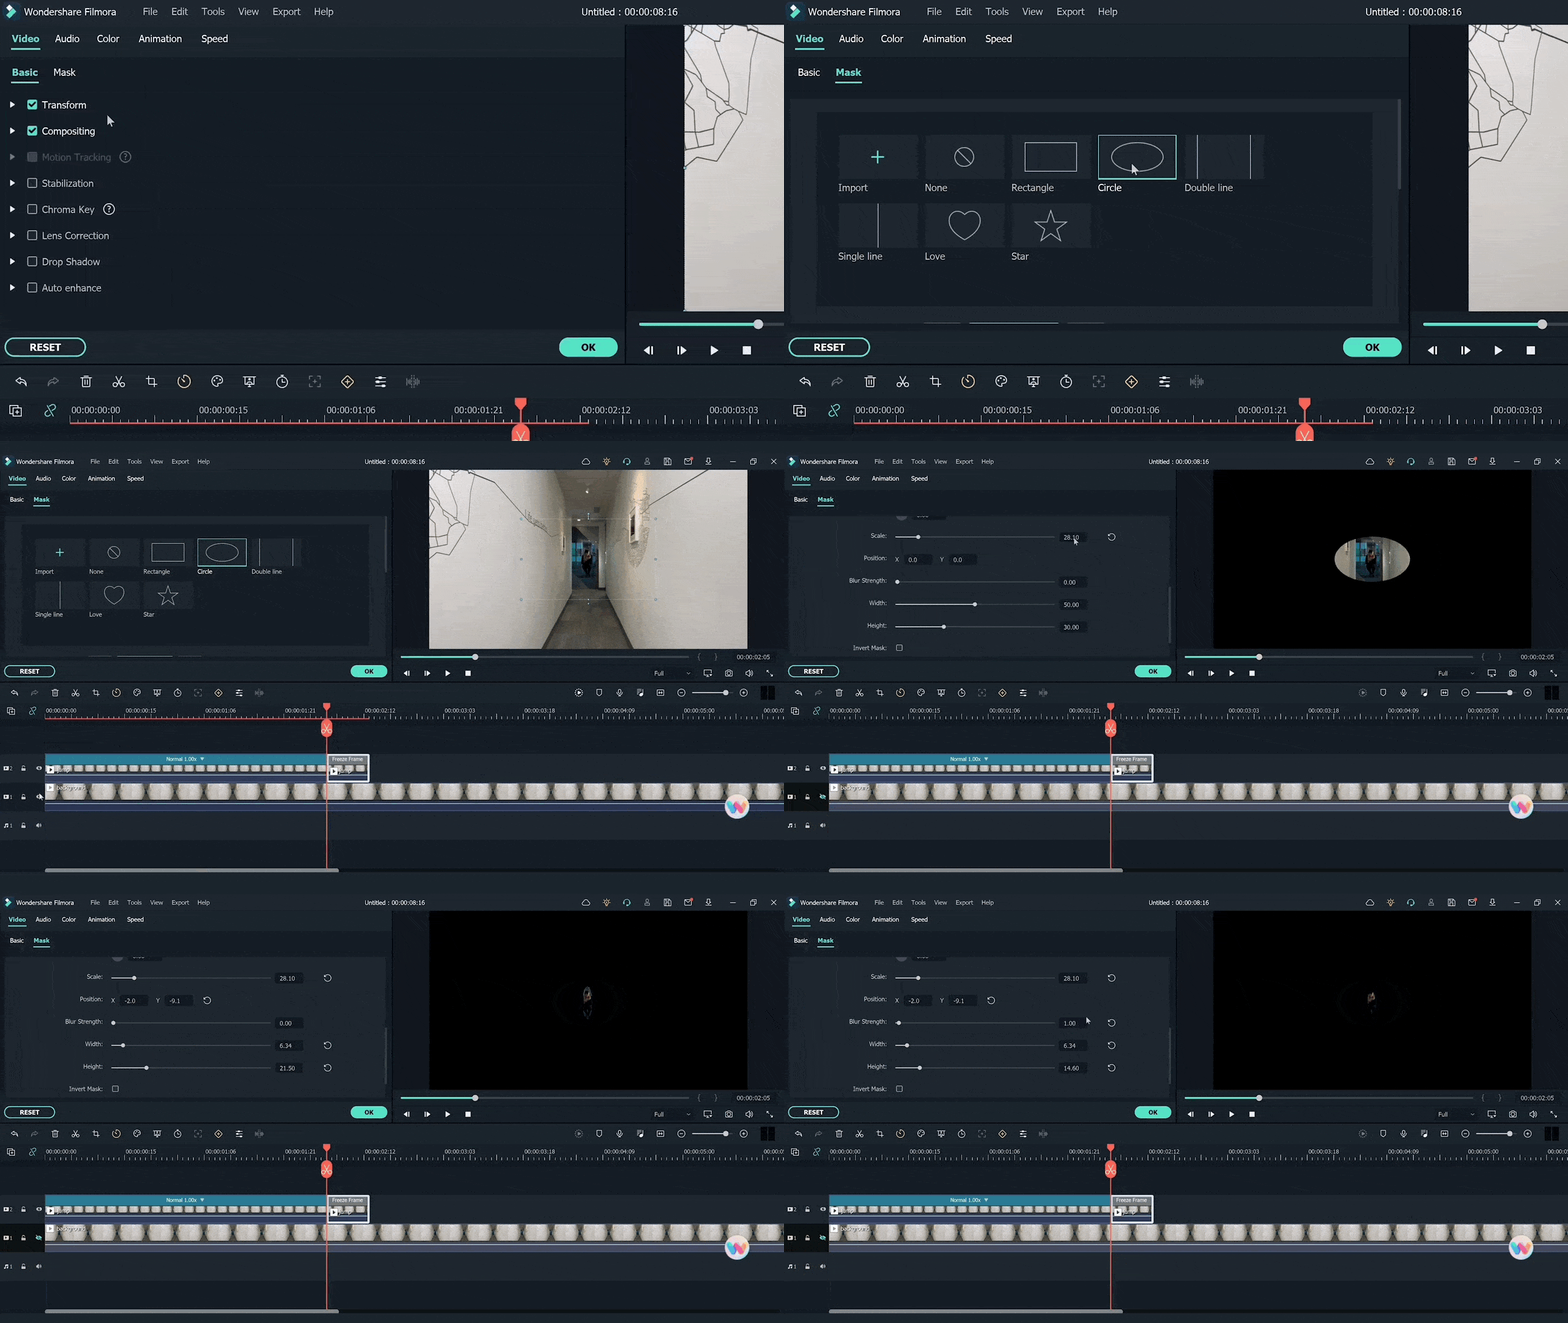
Masking is a tool in editing software that allows you to hide, duplicate, show, or adjust footage by selecting a specific section of the video or using video overlays. The steps for adding the masking effect are given below:
Steps
Step1 Now click on the clip view to open the “settings” window.
Step2 Click on the “mask” section and select the circle mask and create the mask of the jumping subject.
Step3 Hide the first track clip so that mask can be viewed better and edited effectively.
Step4 Adjust the scale, position, and shape of the mask and make the edges smoother to match the object.
Boris Fx Effect
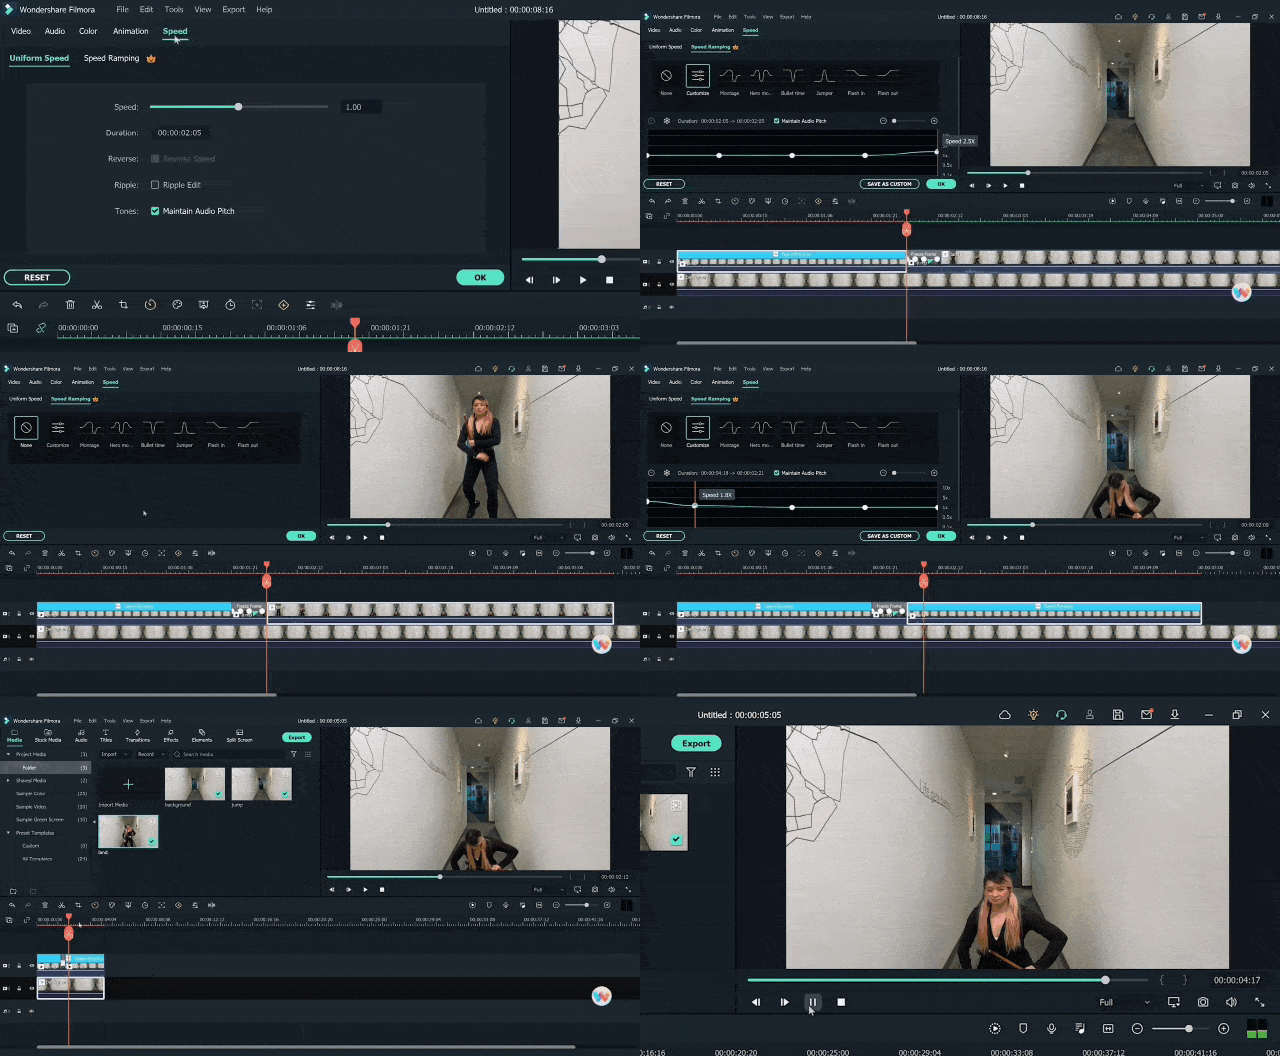
Boris FX is a video editing and visual effects software. Filmora supports six continuum units-professional quality effects plugins from award-winning developer Boris FX.
To add these effects to your videos, follow the steps below:
Steps
Step1 Go to the “effects” window and open the Boris FX effects.
Step2 Select the directional blur from the bcc blur category.
Step3 Drag the effect to the freeze frame.
Step4 Now clicking on freeze frame, its settings will open.
Step5 Adjust the degree and angle of blur to get a perfect mask object. Turn ON the first video track.
Step6 Add the landing clip (shot 2) on top of the first video track after the freezing frame.
Step7 Find the point where the subject starts to descend toward the floor. Cut the clip here and delete the previous part.
Step8 Move the clip next to the freeze frame clip.
Keyframing
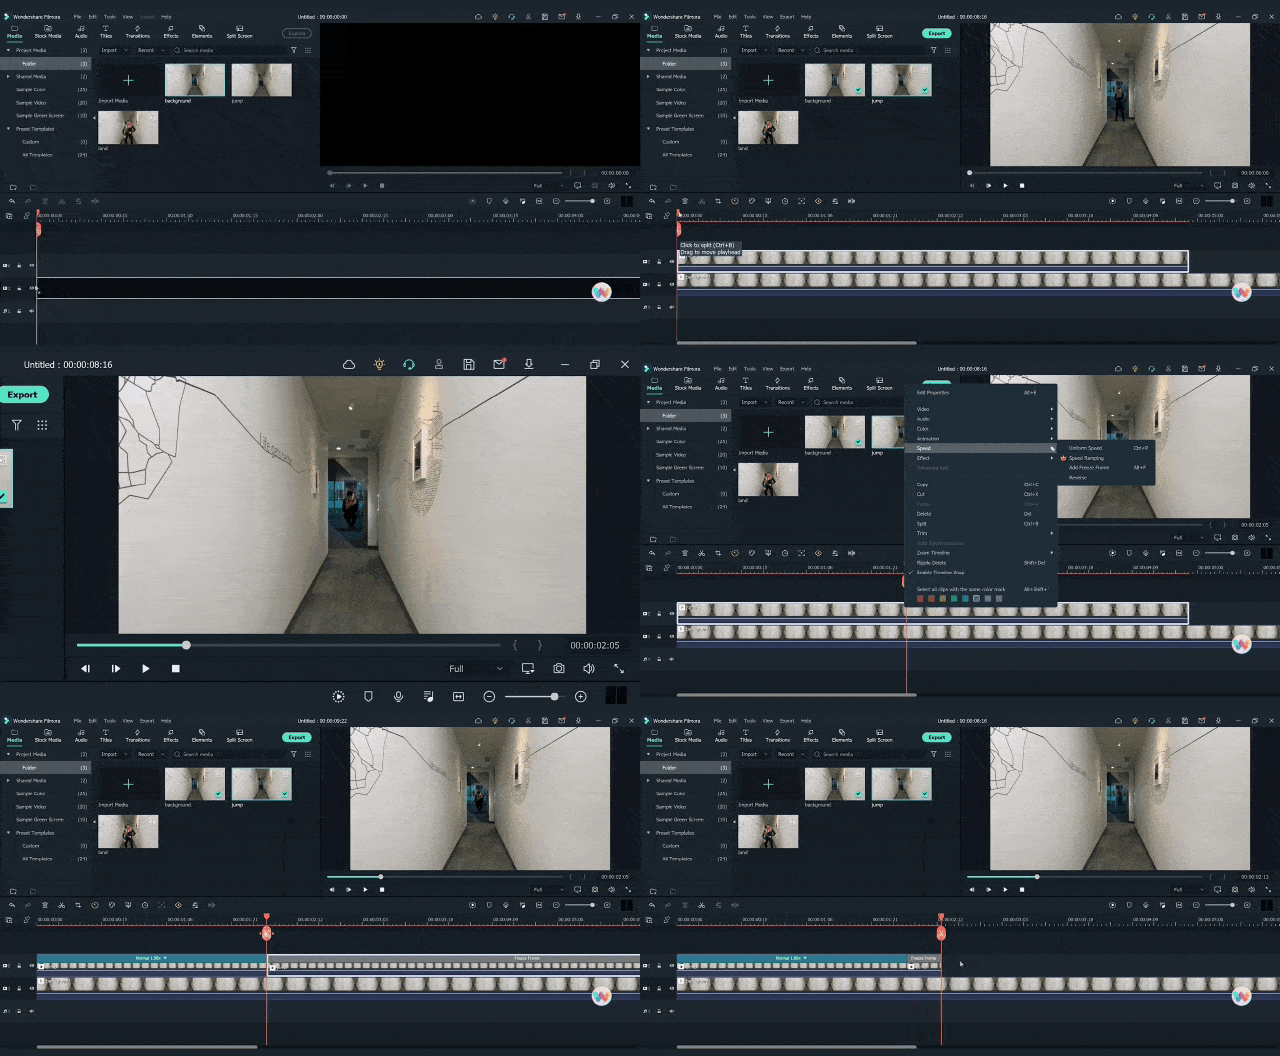
Now we have to add animation in the freezing frame so that the masked shadow can be shown moving from the back towards the front, a speedy moving shadow. This is probably the most crucial step in editing.
Steps
Step1 Click on the freezing frame, and in the settings window, open “animation.”
Step2 Click on the customized option. Add the first keyframe at the start of the clip.
Step3 Now move two frames and add another keyframe with the position of the masked shadow as it is moving out of frame.
Step4 Now move two frames keeping the settings the same.
Step5 Add another keyframe at the end with your masked shadow appearing half from the top of the frame.
This step is a bit tricky to understand, but the most important. Once it is done, your animation will give the impression of an object moving like a flash from the back to the front of view.
Speed Ramping
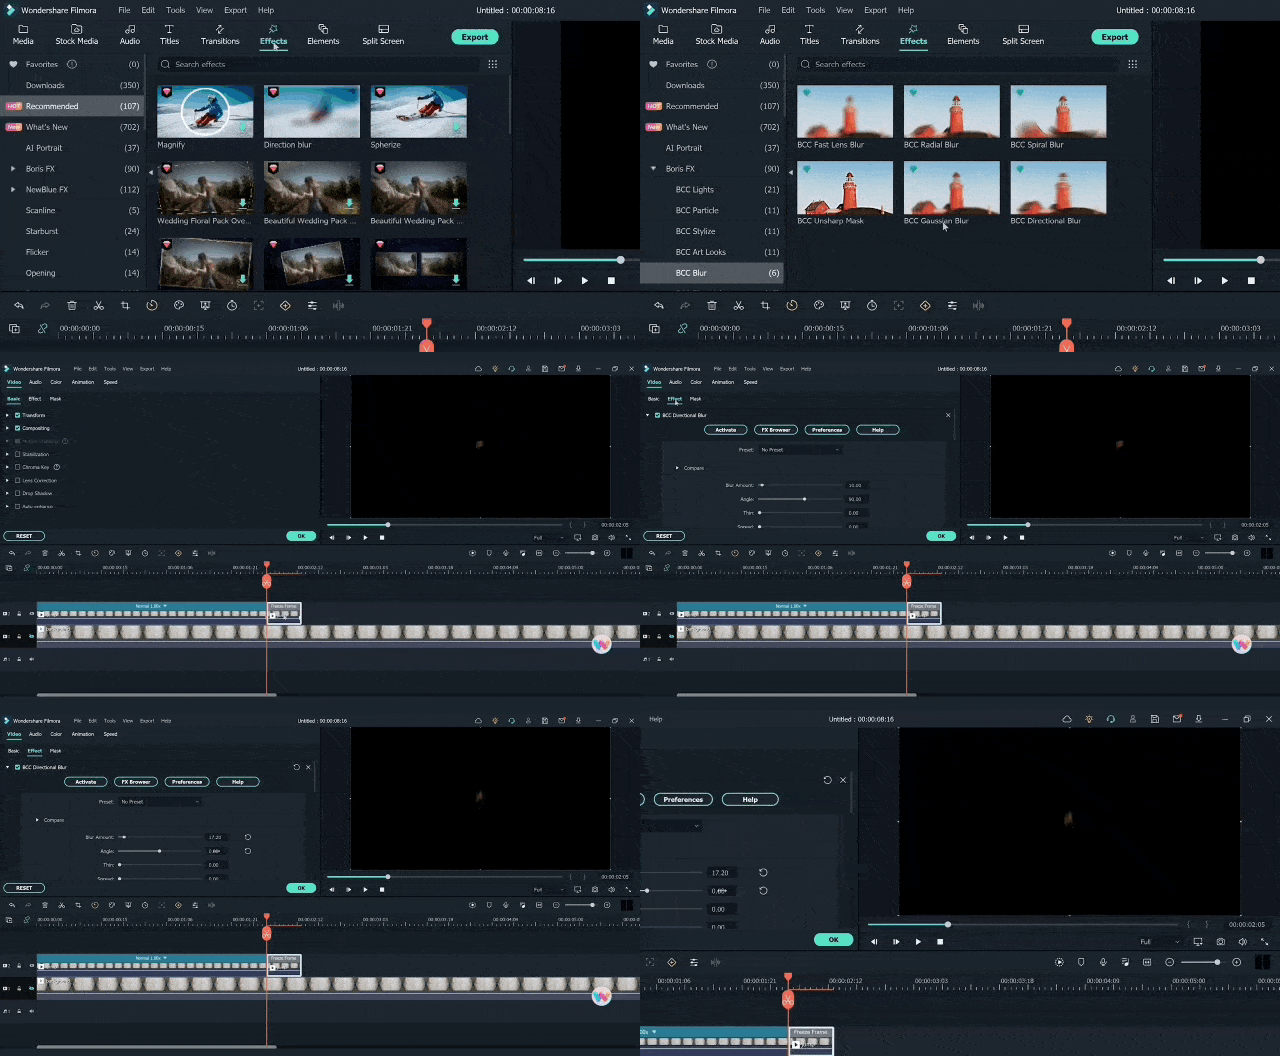
Once the keyframing is done, your super jump effect is roughly ready. All you have to do now is synchronize the speed of jumping, moving shadow, and landing. Here we will use the “speed ramping” tool.
Steps
Step1 Click on the clip, and in the settings window, choose “speed.”
Step2 Click on customize and increase the speed of any frame or clip.
Step3 Move the play head on the frame that you intend to increase the speed of, and move the frame on the speed window to speed up that part.
Once you have done speed ramping on both clips, your editing is done. Now play the video and see how the clip looks and if your super jump effect is remarkable or not.
Final Words
Make sure you follow all these steps in the correct order. You can get Filmora from the Filmora website, but its cracked versions are also available. While editing, try to make the transitions and clips as smooth and synchronized as you can. Also, if you find this article helpful, do not forget to share these tips with your friends.
Free Download For Win 7 or later(64-bit)
Free Download For macOS 10.14 or later
Free Download For macOS 10.14 or later
How to Select and Use The Best BRAW LUTs
Good content plays a huge role in this digital age, and making one has many different ingredients. LUTs are one of those secret ingredients that can take your content to new heights. They are essentially pre-defined color grading presets you can apply to your media files. Furthermore, these LUTs act as a guiding map to maintain your video’s color and tone.
In addition, there are many more in the world of LUTs, such as BRAW LUTs. BRAW (Blackmagic RAW) is a popular raw video format with excellent media quality. Such LUTs are specifically used to optimize and improve the colors of any BRAW footage. Moreover, their utility goes beyond just one software. There are many platforms to use these LUTs, such as Premiere Pro and Wondershare Filmora .
Add LUTs on Video For Win 7 or later(64-bit)
Add LUTs on Video For macOS 10.14 or later
Part 1: How to Apply BRAW LUTs on Premiere Pro?
If you want to apply BRAW LUTs Premier Pro to your videos, follow these steps. These simple steps will guide you on how to apply your LUTs using Premier Pro.
Step 1: Import and Set up Your Video
Open Premiere Pro and locate the “File” menu. Choose the “Import” option from the menu and select your files to import. Find your imported video in the “Project” panel and drag it into the timeline. In this way, your files will be imported.

Step 2: Adjust Blackmagic RAW Settings
Lead into the “Source” section and look for the “Effect Controls” tab. Inside the Effects Control tab, locate the Blackmagic RAW tab. Underneath the Blackmagic RAW tab, change the “Decode Using” settings to “Clip.” Furthermore, adjust the “Gamma” settings to “Blackmagic Design Extended Video.”

Step 3: Apply the LUT to Your Video Clips
To apply the LUT to all your video clips, right-click on the “Blackmagic RAW” tab. Click on the “Copy” option from the menu that appears. Now, select all your clips in the “Project” panel by holding the SHIFT key while clicking on each clip. Right-click on the selected clips and choose the “Paste” option to apply the LUT. Your Blackmagic LUT will now be applied to all the selected video files. After completing your edits save your file.

Empower your videos with a new mood using different LUTs. Filmora now offers 100+ top-quality 3D LUTs cover a broad range of scenarios. Transform your videos with Filmora’s powerful 3D LUTs.
Apply LUT on Videos Apply LUT on Videos Learn More

Part 2: Selecting the Best BRAW LUTs: A Look into The Details
Do you have so many BRAW to Rec709 LUTs options to choose from? You don’t need to waste your time in selecting a good one. Here is a list of some of the best BRAW LUTs that you can download.
1. Blackmagic BaseLUTs for BRAW – Gen 5 & Gen 4 Film
The Blackmagic BaseLUTs for BRAW – Gen 5 & Gen 4 Film powerful pack consists of two different Blackmagic LUTs. These LUTs are designed to enhance your video in remarkable ways. Furthermore, you can expect exceptional retention in the highlights. Additionally, these LUTs offer well-balanced saturation levels for your videos.

2. Cinematic BRAW BMPCC LUTs Gen5
Cinematic BRAW BMPCC LUTs Gen5 is a powerful set of seven different cinematic LUTs. With this pack of BRAW LUTs, you can take your video to the next level. It makes your videos feel larger than life with this LUT pack. Additionally, this pack brings cinematic flair and vibrant colors to create an epic visual experience. Besides this, each LUT comes with its unique color grading.

3. Blackmagic Braw Vivid LUTs
Blackmagic BRAW Vivid LUTs is a great pack to make your videos and images look professional. These LUTs work by exposing your images, revealing hidden details and textures. Furthermore, it increases saturation to make your videos pop. Besides this, it also highlights the red and green channels to make your media look more natural and prominent.

4. S20-F87 BRAW FILM
Experience the magic of the S20-F87 BRAW FILM LUT. Using this LUT pack, you can unlock a world of visual possibilities. Moreover, you can improve your videos’ overall look and feel with their soft, warm green tones. This LUT is designed to create a cinematic atmosphere and a professional look. Using this pack, you can impress your viewers with movie-like color grading.

5. Cine Vintage Nature LUT 22
Cine Vintage Nature LUT 22 is a remarkable LUT pack that transports your video back in time. It creates an old vintage look with a cinematic touch. With this pack, you can transform your modern videos into classic Hollywood movies. It beautifully enhances your videos’ colors, tones, and textures to add depth and emotion. Similarly, using this pack, you can recreate old-school cinematic videos.

6. JM- 15+ PREMIUM BMPCC BRAW LUTS
JM-15+ Premium BMPCC BRAW LUTs are the key to unlocking a cinematic feel in your videos. These powerful LUTs highlight colors, creating a cinematic experience. It is a pack of 15 premium cinematic-style LUTs. Additionally, you can darken colors, giving your videos a rich and dramatic look. Furthermore, these LUTs add depth and dimension to your videos by enhancing shadows and textures.

Part 3: An Alternative to Apply 3D LUTs to Videos: Wondershare Filmora
Wondershare Filmora is what you’re looking for if you want a professional video editing tool. It is an all-in-one video editing tool. From basic editing options to high-end professional video editing features, Filmora has it. You can make basic color corrections and adjustments with this tool. However, Filmora also offers more creative editing options for your videos.
Add LUTs on Video For Win 7 or later(64-bit)
Add LUTs on Video For macOS 10.14 or later
Moreover, this tool has recently been updated and has many more options. With this LUT tool, you can apply different LUTs to enhance the mood of your videos. Apart from this, it has a library of 200+ LUTs to download. This extensive library allows you to choose different color grading presets according to your mood. Furthermore, its library also has other free media assets, ranging from over 10 billion.

Conclusion
LUTs are incredible tools to transform your ordinary content into something extraordinary. You can unleash your creativity with professional-looking content. Many LUTs, particularly BRAW LUTs, can be applied to your Blackmagic RAW footage. Take your videos to new heights with these tools by applying them using your favorite editing tools.
Add LUTs on Video For macOS 10.14 or later
Part 1: How to Apply BRAW LUTs on Premiere Pro?
If you want to apply BRAW LUTs Premier Pro to your videos, follow these steps. These simple steps will guide you on how to apply your LUTs using Premier Pro.
Step 1: Import and Set up Your Video
Open Premiere Pro and locate the “File” menu. Choose the “Import” option from the menu and select your files to import. Find your imported video in the “Project” panel and drag it into the timeline. In this way, your files will be imported.

Step 2: Adjust Blackmagic RAW Settings
Lead into the “Source” section and look for the “Effect Controls” tab. Inside the Effects Control tab, locate the Blackmagic RAW tab. Underneath the Blackmagic RAW tab, change the “Decode Using” settings to “Clip.” Furthermore, adjust the “Gamma” settings to “Blackmagic Design Extended Video.”

Step 3: Apply the LUT to Your Video Clips
To apply the LUT to all your video clips, right-click on the “Blackmagic RAW” tab. Click on the “Copy” option from the menu that appears. Now, select all your clips in the “Project” panel by holding the SHIFT key while clicking on each clip. Right-click on the selected clips and choose the “Paste” option to apply the LUT. Your Blackmagic LUT will now be applied to all the selected video files. After completing your edits save your file.

Empower your videos with a new mood using different LUTs. Filmora now offers 100+ top-quality 3D LUTs cover a broad range of scenarios. Transform your videos with Filmora’s powerful 3D LUTs.
Apply LUT on Videos Apply LUT on Videos Learn More

Part 2: Selecting the Best BRAW LUTs: A Look into The Details
Do you have so many BRAW to Rec709 LUTs options to choose from? You don’t need to waste your time in selecting a good one. Here is a list of some of the best BRAW LUTs that you can download.
1. Blackmagic BaseLUTs for BRAW – Gen 5 & Gen 4 Film
The Blackmagic BaseLUTs for BRAW – Gen 5 & Gen 4 Film powerful pack consists of two different Blackmagic LUTs. These LUTs are designed to enhance your video in remarkable ways. Furthermore, you can expect exceptional retention in the highlights. Additionally, these LUTs offer well-balanced saturation levels for your videos.

2. Cinematic BRAW BMPCC LUTs Gen5
Cinematic BRAW BMPCC LUTs Gen5 is a powerful set of seven different cinematic LUTs. With this pack of BRAW LUTs, you can take your video to the next level. It makes your videos feel larger than life with this LUT pack. Additionally, this pack brings cinematic flair and vibrant colors to create an epic visual experience. Besides this, each LUT comes with its unique color grading.

3. Blackmagic Braw Vivid LUTs
Blackmagic BRAW Vivid LUTs is a great pack to make your videos and images look professional. These LUTs work by exposing your images, revealing hidden details and textures. Furthermore, it increases saturation to make your videos pop. Besides this, it also highlights the red and green channels to make your media look more natural and prominent.

4. S20-F87 BRAW FILM
Experience the magic of the S20-F87 BRAW FILM LUT. Using this LUT pack, you can unlock a world of visual possibilities. Moreover, you can improve your videos’ overall look and feel with their soft, warm green tones. This LUT is designed to create a cinematic atmosphere and a professional look. Using this pack, you can impress your viewers with movie-like color grading.

5. Cine Vintage Nature LUT 22
Cine Vintage Nature LUT 22 is a remarkable LUT pack that transports your video back in time. It creates an old vintage look with a cinematic touch. With this pack, you can transform your modern videos into classic Hollywood movies. It beautifully enhances your videos’ colors, tones, and textures to add depth and emotion. Similarly, using this pack, you can recreate old-school cinematic videos.

6. JM- 15+ PREMIUM BMPCC BRAW LUTS
JM-15+ Premium BMPCC BRAW LUTs are the key to unlocking a cinematic feel in your videos. These powerful LUTs highlight colors, creating a cinematic experience. It is a pack of 15 premium cinematic-style LUTs. Additionally, you can darken colors, giving your videos a rich and dramatic look. Furthermore, these LUTs add depth and dimension to your videos by enhancing shadows and textures.

Part 3: An Alternative to Apply 3D LUTs to Videos: Wondershare Filmora
Wondershare Filmora is what you’re looking for if you want a professional video editing tool. It is an all-in-one video editing tool. From basic editing options to high-end professional video editing features, Filmora has it. You can make basic color corrections and adjustments with this tool. However, Filmora also offers more creative editing options for your videos.
Add LUTs on Video For Win 7 or later(64-bit)
Add LUTs on Video For macOS 10.14 or later
Moreover, this tool has recently been updated and has many more options. With this LUT tool, you can apply different LUTs to enhance the mood of your videos. Apart from this, it has a library of 200+ LUTs to download. This extensive library allows you to choose different color grading presets according to your mood. Furthermore, its library also has other free media assets, ranging from over 10 billion.

Conclusion
LUTs are incredible tools to transform your ordinary content into something extraordinary. You can unleash your creativity with professional-looking content. Many LUTs, particularly BRAW LUTs, can be applied to your Blackmagic RAW footage. Take your videos to new heights with these tools by applying them using your favorite editing tools.
Exploring Tools to Integrate Special Mask Effects Into Your Content. Read the Following Article to Master some Tools Experts in Mask Tracking
Mask tracking refers to editing a specific part of a video without overlapping. Masking helps with creative transitions and background removal with ease. The integration of AI technology in masking tools has made masking more accessible. They help with masking an object or landscape with precision.
In addition, you can correct the colors of a specific part through a motion tracking mask. In this article, we’ll discuss masker tracking using three different software. Two of those software are renowned for their professionalism and precision. We’ll discuss masking in Adobe After Effects , Adobe Premiere Pro , and an alternative.
AI Smart Masking Spice up your video content with the endless possibilities of AI masking functions!
Free Download Free Download Learn More

Part 1: Working Out the Comprehensive Methods to Perform Mask Tracking on Adobe After Effects
Adobe After Effects is a powerful tool for mask tracking and other functions. The interface of this tool tailors your content to your needs with precision. The process of masking is convenient and accessible and provides accurate results. Its advanced masking options, like filling up the mask, add a realistic touch. Before learning about masking in After Effects, let’s discuss some of its features:
- Text Animations: Animating your text in Adobe After Effects is a comprehensive experience. It is because the software has amazing text fonts and animation options. You can also set the appearance settings like opacity, color, and more text. In addition, the software has pre-installed effects and presets to ease the process.
- VFX/Visual Effects: Elevate your images and videos using Adobe’s amazing visual elements. It can eliminate mistakes, and results are so promising that they become invisible. You can use the mask tracking effect to hide and fill objects. In addition, you can turn your transitions into high-resolution 3D or 4D videos.
- Motion Graphics: It moves anything with its motion graphics functionality and advanced keyframing. Along with animating text, the feature allows you to move the logos. You can move a logo on any background from top to bottom or left to right. With its flickering and wiggling effects, make animations without keyframing.
- Rotoscoping: This After Effects function eliminates using green screens in your videos. Using the pen tool, you can merge a different object in a different footage. Afterward, you can polish the mask by resizing and adjusting opacity values.
- Motion Tracking: Elevate the graphics of your videos using the motion tracking feature. This function connects any image with an object’s motion. Therefore, your images become animated and add a creative element to the content. Its cloud collaboration with other software allows users to download assets.
Step-by-Step Procedure for Masking in Adobe After Effects
Now that you know the After Effects masker line tracking feature, let’s move forward. Read the following guide to learn more about masking:
Step 1
After importing your clip into the timeline, select it in the timeline panel. Navigate towards the upper toolbar and select the “Pen Tool” option. Afterward, create a mask around the object that you want to remove.
![]()
Step 2
You’ll see a mask around the object, and the rest of the screen will disappear. Navigate to the timeline panel, expand the video track options, and select “Mask.” Click the “Mask” navigation arrow and select “None.”
![]()
Step 3
Click the “Mask” button and select the “Track Mask” option. A mask tracker window will appear on the right side; expand the “Method” option. Following that, select the type of masking you want, like “Position.” Play the video from beginning to end for motion detection. Afterward, change the “Mask” mode to “Add” to apply masking.
![]()
Step 4
Afterward, change the Mask mode to “Subtract” from the timeline. Now, navigate towards the topmost toolbar and expand the “Window” tab. From the expansion menu, click the “Content-Aware Fill” option.
![]()
Step 5
Move towards the “Mask” option, expand “Mask Path,” and change the values below. Now, go to the right side, increase “Alpha Expansion,” and click “Generate Fill Layer.” Once the mask tracking completes, download your video.
![]()
Part 2: Providing a Detailed Guide on How to Do Mask Tracking with Adobe Premiere Pro
Adobe Premiere Pro is one of the industry’s leading tools for editing videos. It offers a wide range of features and built-in effects to elevate content. The software offers precise editing capabilities for mask tracking and other enhancements. In addition, it has many visual, video, and audio effects and presets to apply. Let’s discuss some key features of this tool that make it worthy of being top:
- Motion Graphics Templates: With its seamless After Effect collaboration, it offers built-in templates. These templates include multiple text, shapes, and graphics. You can also customize these templates as per content relevancy and taste.
- Edit Audio: Premiere Pro has multiple audio editing options to maintain audio quality. The tool allows you to decrease the volume of one track while increasing others. In addition, you can make audio adjustments that fit a sound.
- Color Correction: Enhance the graphical element in your videos using this feature. It offers both color correction and enhancing capabilities. You can employ this color correction if you have overexposed or underexposed videos.
- Movie and Film Editing: A professional editor offers applications in the media industry. The Premiere Pro offers seamless collaboration with all video and audio formats. In addition, it can import files from all sources like DSLRs and more.
- Speech to Text: It doesn’t just limit you to video editing but also offers transcript creation. The software analyzes your footage’s audio and creates transcripts. Afterward, you can use them as subtitles and captions.
Step-by-Step Procedure for Masking in Premiere Pro
After introducing mask tracking in Adobe Premiere Pro, let’s progress further. Continue reading the following guide to gain a deeper understanding of masking:
Step 1
After importing your video in the timeline, select it and navigate towards the toolbar. In the “Edit > Effect” section, select “Lumetri Color” under “Video Effects.” Then, select the mask option under Lumetri colors and set it on the screen.
![]()
Step 2
Then, apply the color correction options on the masked areas.
![]()
Step 3
Select “Mask Path” under the Mask section and play it upon color correcting. This will start the mask tracking throughout the clip. The color corrections will be applied to the masked area throughout the video.
![]()
Part 3: Make Mask Tracking Easy with Wondershare Filmora: Working Out the Details
The above-mentioned mask tracking software is professional but is difficult to comprehend. This software is not compatible in terms of convenience. This was when users needed software with easy access and an editing interface. Wondershare Filmora performs diverse creation and editing tasks with expertise. The software assists in diverse audio, video, and text-editing tasks.
The AI-backed algorithms have made achieving perfection in your editing task seamless. In Filmora’s new V13 upgrade, it has introduced an AI masking feature. This feature offers to mask character or subject and auto-analyzes the selected area. In addition, for manual motion tracking masks, users can also resize the mask brush.
Step-by-Step Guide to AI Masking in Filmora
To understand this mask tracking feature better, we have assembled the steps of it. In the following guide, you will learn about accessing and applying this tool:
Step 1Place Media to the Timeline
Upon entering Filmora, click the “New Project” button and access its editing interface. Go to the Project Media section and click the “Import” button. Afterward, import your file and bring it to the timeline using your cursor.
![]()
Step 2Access and Employ AI Masking
Select the video in the timeline and navigate towards the right-side settings panel. In the “Video” tab, you’ll find the “Mask” section. Under this section, select the “AI Mask” option and scroll down to adjust its settings. Expand the “AI Mask” section, and choose the options you want masking for. Once you see the masked results on the preview screen, adjust the other settings below.
![]()
Step 3Save the Settings and Export
Afterward, click the “Save as custom” button to save these settings as a preset for later use. Further, make other adjustments and click on the “Export” button to finalize.
![]()
Free Download For Win 7 or later(64-bit)
Free Download For macOS 10.14 or later
Additional Editing Features of Wondershare Filmora
Along with masker line tracking, there are other video editing and AI features of Filmora. Keep reading the below section to know more about them:
1. AI Text-to-Video
Turn your words into graphics using this generative AI of Filmora. It transforms your textual directions into videos, along with images and voices. Using this AI will save you the effort of creating or hiring a professional.
2. AI Copilot Editing
Why spend hours exploring Filmora’s interface when you can have your guide? The AI Copilot acts like your personal chatbot assistant. You can converse with it like regular people, and it will show you directions on the feature. In addition, it features buttons to employ a specific effect or function.
3. Screen Recorder
Are you a creator who uploads video tutorials and educational videos? You can use Filmora’s screen recorder to create content in a seamless manner. It offers microphone recording and webcam recording for maximum interactivity. In addition, you can adjust custom screen resolution settings and more.
4. Video Background Remover
Leave the effort of adding a green screen in your background during video creation. Filmora’s AI technology can remove video backgrounds without any flaws. Users can replace the background with solid colors, gradients, and more afterward.
5. Silence Detection
Those long or short pauses during video recording are annoying for your audience. They decline the quality of the video and ultimately decline audience engagement. To remove such pauses, use Filmora silence detection AI to auto-eliminate them.
Free Download For Win 7 or later(64-bit)
Free Download For macOS 10.14 or later
Conclusion
In this article, users have gained insights into top mask tracking software. Along with their applications, the article discussed how to access and apply masking. However, masking in the first two tools can be difficult for some people. Hence, we introduced Wondershare Filmora as an easy desktop alternative. If you want to employ an easy motion tracking mask, use this versatile software.
Free Download Free Download Learn More

Part 1: Working Out the Comprehensive Methods to Perform Mask Tracking on Adobe After Effects
Adobe After Effects is a powerful tool for mask tracking and other functions. The interface of this tool tailors your content to your needs with precision. The process of masking is convenient and accessible and provides accurate results. Its advanced masking options, like filling up the mask, add a realistic touch. Before learning about masking in After Effects, let’s discuss some of its features:
- Text Animations: Animating your text in Adobe After Effects is a comprehensive experience. It is because the software has amazing text fonts and animation options. You can also set the appearance settings like opacity, color, and more text. In addition, the software has pre-installed effects and presets to ease the process.
- VFX/Visual Effects: Elevate your images and videos using Adobe’s amazing visual elements. It can eliminate mistakes, and results are so promising that they become invisible. You can use the mask tracking effect to hide and fill objects. In addition, you can turn your transitions into high-resolution 3D or 4D videos.
- Motion Graphics: It moves anything with its motion graphics functionality and advanced keyframing. Along with animating text, the feature allows you to move the logos. You can move a logo on any background from top to bottom or left to right. With its flickering and wiggling effects, make animations without keyframing.
- Rotoscoping: This After Effects function eliminates using green screens in your videos. Using the pen tool, you can merge a different object in a different footage. Afterward, you can polish the mask by resizing and adjusting opacity values.
- Motion Tracking: Elevate the graphics of your videos using the motion tracking feature. This function connects any image with an object’s motion. Therefore, your images become animated and add a creative element to the content. Its cloud collaboration with other software allows users to download assets.
Step-by-Step Procedure for Masking in Adobe After Effects
Now that you know the After Effects masker line tracking feature, let’s move forward. Read the following guide to learn more about masking:
Step 1
After importing your clip into the timeline, select it in the timeline panel. Navigate towards the upper toolbar and select the “Pen Tool” option. Afterward, create a mask around the object that you want to remove.
![]()
Step 2
You’ll see a mask around the object, and the rest of the screen will disappear. Navigate to the timeline panel, expand the video track options, and select “Mask.” Click the “Mask” navigation arrow and select “None.”
![]()
Step 3
Click the “Mask” button and select the “Track Mask” option. A mask tracker window will appear on the right side; expand the “Method” option. Following that, select the type of masking you want, like “Position.” Play the video from beginning to end for motion detection. Afterward, change the “Mask” mode to “Add” to apply masking.
![]()
Step 4
Afterward, change the Mask mode to “Subtract” from the timeline. Now, navigate towards the topmost toolbar and expand the “Window” tab. From the expansion menu, click the “Content-Aware Fill” option.
![]()
Step 5
Move towards the “Mask” option, expand “Mask Path,” and change the values below. Now, go to the right side, increase “Alpha Expansion,” and click “Generate Fill Layer.” Once the mask tracking completes, download your video.
![]()
Part 2: Providing a Detailed Guide on How to Do Mask Tracking with Adobe Premiere Pro
Adobe Premiere Pro is one of the industry’s leading tools for editing videos. It offers a wide range of features and built-in effects to elevate content. The software offers precise editing capabilities for mask tracking and other enhancements. In addition, it has many visual, video, and audio effects and presets to apply. Let’s discuss some key features of this tool that make it worthy of being top:
- Motion Graphics Templates: With its seamless After Effect collaboration, it offers built-in templates. These templates include multiple text, shapes, and graphics. You can also customize these templates as per content relevancy and taste.
- Edit Audio: Premiere Pro has multiple audio editing options to maintain audio quality. The tool allows you to decrease the volume of one track while increasing others. In addition, you can make audio adjustments that fit a sound.
- Color Correction: Enhance the graphical element in your videos using this feature. It offers both color correction and enhancing capabilities. You can employ this color correction if you have overexposed or underexposed videos.
- Movie and Film Editing: A professional editor offers applications in the media industry. The Premiere Pro offers seamless collaboration with all video and audio formats. In addition, it can import files from all sources like DSLRs and more.
- Speech to Text: It doesn’t just limit you to video editing but also offers transcript creation. The software analyzes your footage’s audio and creates transcripts. Afterward, you can use them as subtitles and captions.
Step-by-Step Procedure for Masking in Premiere Pro
After introducing mask tracking in Adobe Premiere Pro, let’s progress further. Continue reading the following guide to gain a deeper understanding of masking:
Step 1
After importing your video in the timeline, select it and navigate towards the toolbar. In the “Edit > Effect” section, select “Lumetri Color” under “Video Effects.” Then, select the mask option under Lumetri colors and set it on the screen.
![]()
Step 2
Then, apply the color correction options on the masked areas.
![]()
Step 3
Select “Mask Path” under the Mask section and play it upon color correcting. This will start the mask tracking throughout the clip. The color corrections will be applied to the masked area throughout the video.
![]()
Part 3: Make Mask Tracking Easy with Wondershare Filmora: Working Out the Details
The above-mentioned mask tracking software is professional but is difficult to comprehend. This software is not compatible in terms of convenience. This was when users needed software with easy access and an editing interface. Wondershare Filmora performs diverse creation and editing tasks with expertise. The software assists in diverse audio, video, and text-editing tasks.
The AI-backed algorithms have made achieving perfection in your editing task seamless. In Filmora’s new V13 upgrade, it has introduced an AI masking feature. This feature offers to mask character or subject and auto-analyzes the selected area. In addition, for manual motion tracking masks, users can also resize the mask brush.
Step-by-Step Guide to AI Masking in Filmora
To understand this mask tracking feature better, we have assembled the steps of it. In the following guide, you will learn about accessing and applying this tool:
Step 1Place Media to the Timeline
Upon entering Filmora, click the “New Project” button and access its editing interface. Go to the Project Media section and click the “Import” button. Afterward, import your file and bring it to the timeline using your cursor.
![]()
Step 2Access and Employ AI Masking
Select the video in the timeline and navigate towards the right-side settings panel. In the “Video” tab, you’ll find the “Mask” section. Under this section, select the “AI Mask” option and scroll down to adjust its settings. Expand the “AI Mask” section, and choose the options you want masking for. Once you see the masked results on the preview screen, adjust the other settings below.
![]()
Step 3Save the Settings and Export
Afterward, click the “Save as custom” button to save these settings as a preset for later use. Further, make other adjustments and click on the “Export” button to finalize.
![]()
Free Download For Win 7 or later(64-bit)
Free Download For macOS 10.14 or later
Additional Editing Features of Wondershare Filmora
Along with masker line tracking, there are other video editing and AI features of Filmora. Keep reading the below section to know more about them:
1. AI Text-to-Video
Turn your words into graphics using this generative AI of Filmora. It transforms your textual directions into videos, along with images and voices. Using this AI will save you the effort of creating or hiring a professional.
2. AI Copilot Editing
Why spend hours exploring Filmora’s interface when you can have your guide? The AI Copilot acts like your personal chatbot assistant. You can converse with it like regular people, and it will show you directions on the feature. In addition, it features buttons to employ a specific effect or function.
3. Screen Recorder
Are you a creator who uploads video tutorials and educational videos? You can use Filmora’s screen recorder to create content in a seamless manner. It offers microphone recording and webcam recording for maximum interactivity. In addition, you can adjust custom screen resolution settings and more.
4. Video Background Remover
Leave the effort of adding a green screen in your background during video creation. Filmora’s AI technology can remove video backgrounds without any flaws. Users can replace the background with solid colors, gradients, and more afterward.
5. Silence Detection
Those long or short pauses during video recording are annoying for your audience. They decline the quality of the video and ultimately decline audience engagement. To remove such pauses, use Filmora silence detection AI to auto-eliminate them.
Free Download For Win 7 or later(64-bit)
Free Download For macOS 10.14 or later
Conclusion
In this article, users have gained insights into top mask tracking software. Along with their applications, the article discussed how to access and apply masking. However, masking in the first two tools can be difficult for some people. Hence, we introduced Wondershare Filmora as an easy desktop alternative. If you want to employ an easy motion tracking mask, use this versatile software.
Best Ideas on Using Filmora Green Screen
Green screener chroma key is commonly used in film, tv shows, and social media videos nowadays. This article will show you how to light film and edit a green screen. Additionally, you can have some fun ideas with a chroma key. Therefore, keep reading this article to know all the information.
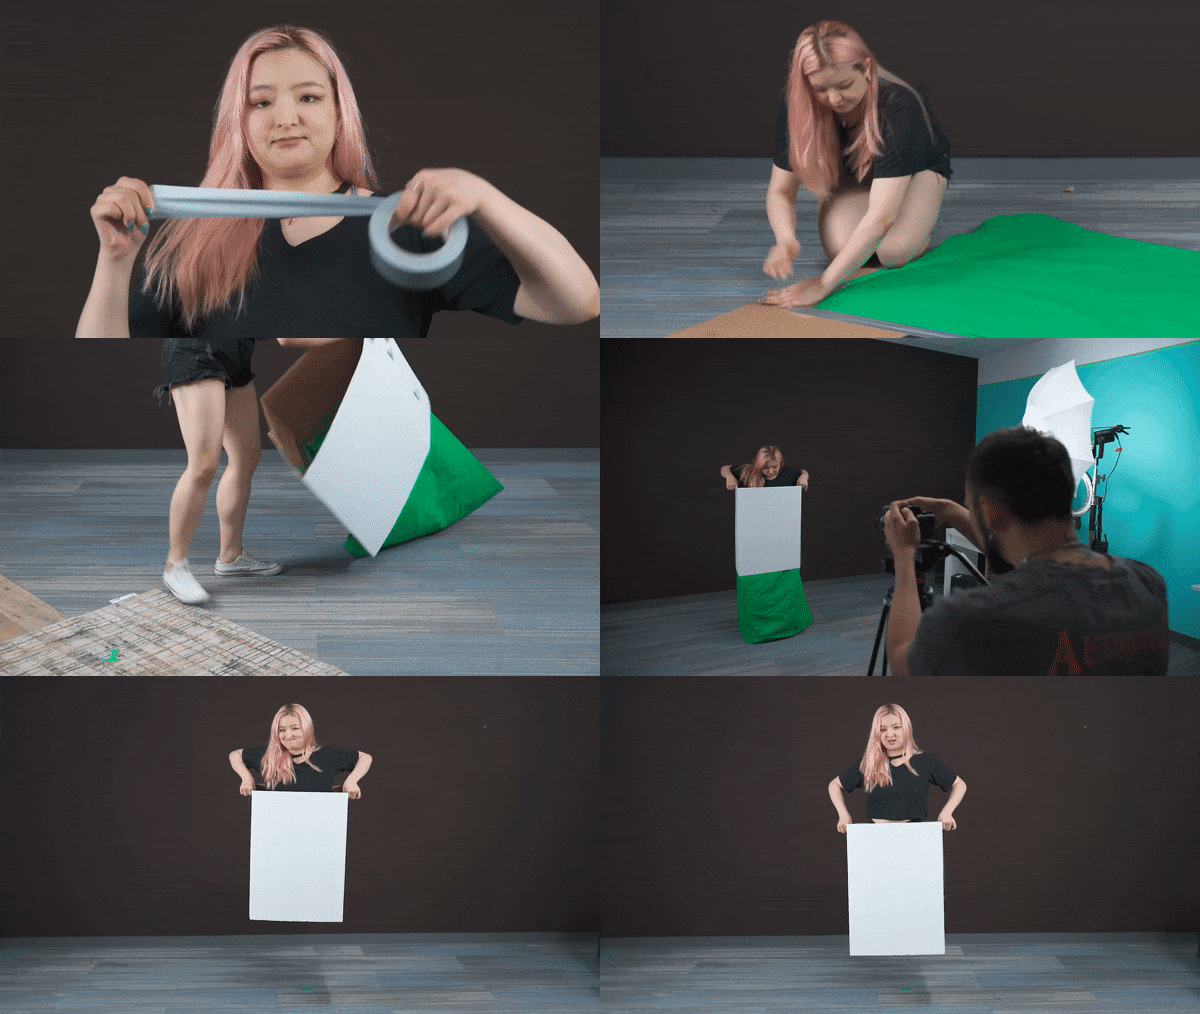
Part 1: Cool Ideas to Use Green Screen
1. The Magic Box
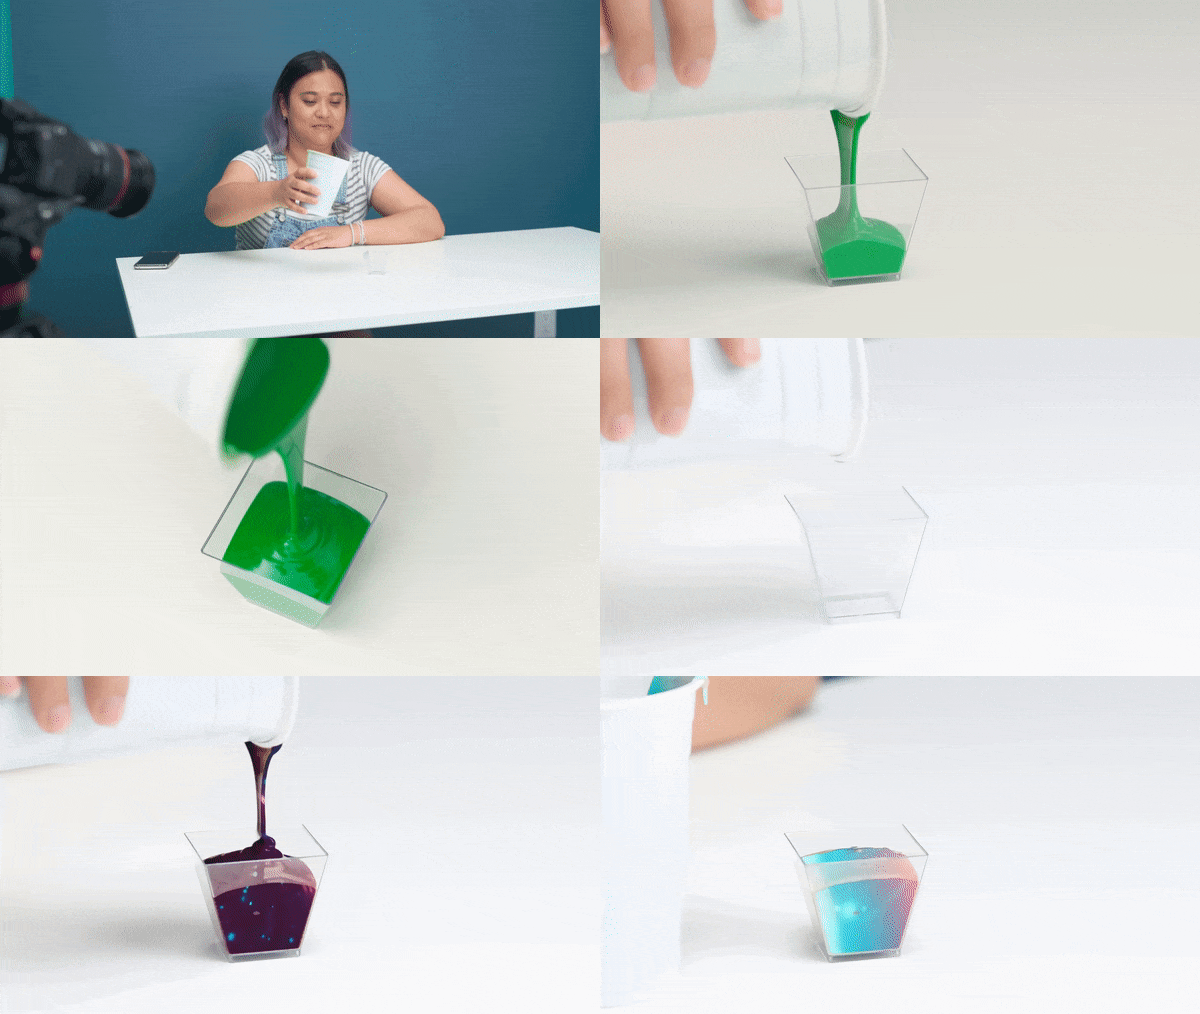
2. Liquid Transformation
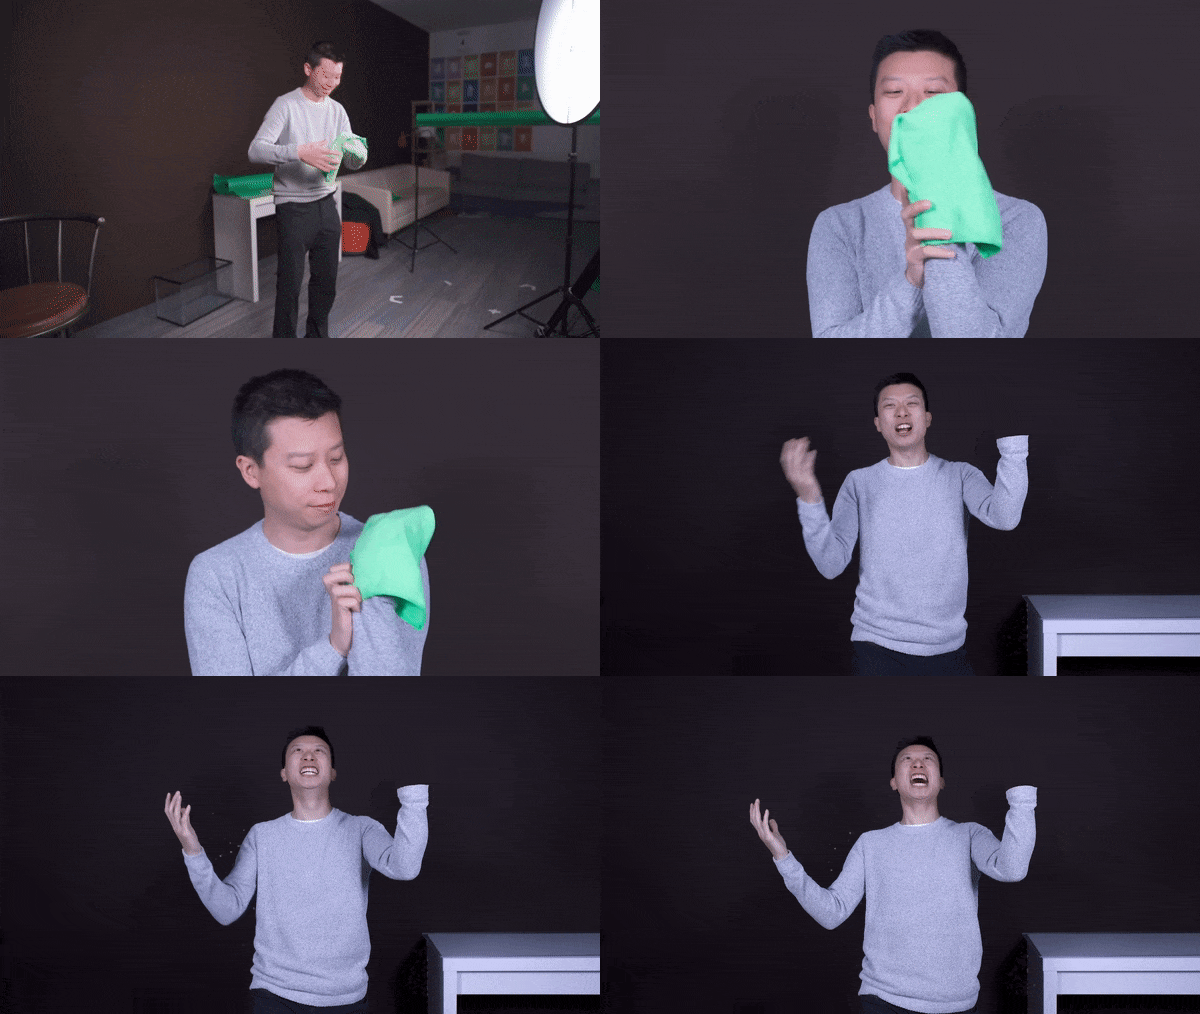
3. Key Out a Body Part
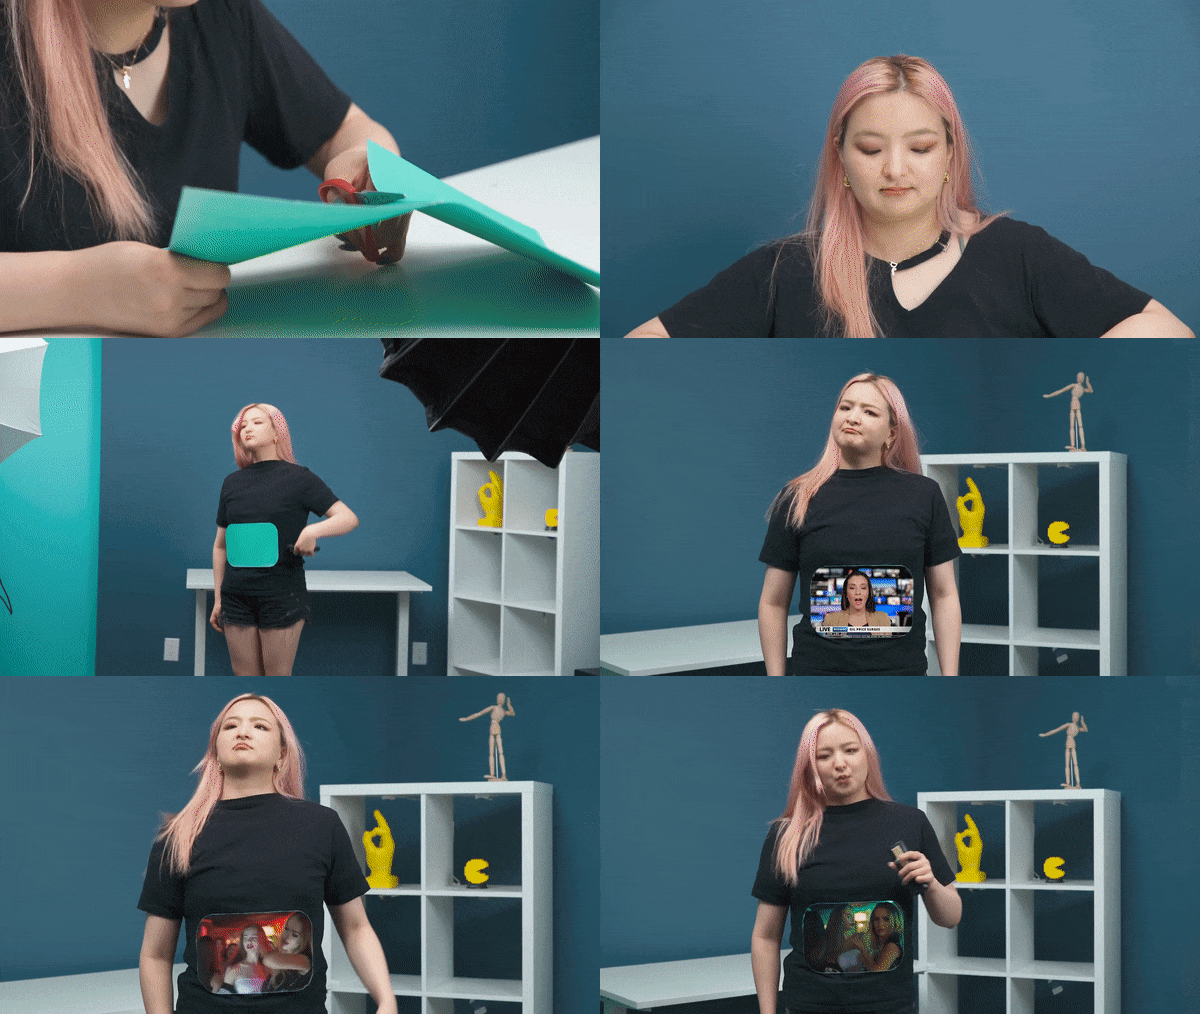
4. T-shirt TV Screen
Part 2: Setting Up The Green Screen
Filming with the green screen is getting easier and easier. Anyone can do it, but before you get started, we will share some do’s and don’ts to help you get the best results.
In fact, there are many ways to set up a green screen, but the most cost-efficient way is with a green screen fabric. If you are using a green fabric as a DIY green screen, make sure you steam or iron it out, whether taping it to a wall or hanging it off the rack. Keep in mind the green screen should not leave any wrinkles.
It is because wrinkles will make lighting the green screen a nightmare, and uneven lighting will leave you with shadows and disappointing results. It would help if you also pulled the green screen tight to get a seamless background. The better you do with the setup, the easier it will be the key it out later
Part 3: Lighting a Green Screen
It doesn’t matter how nice your green screen is. You won’t get good results if you don’t light it properly. When you light a green screen, be aware of these things.
- Make sure there are at least six feet of space between you and your green screen; therefore, you’re not casting a shadow that cannot be keyed out later.
- Remember, any shadow on the green screen is bad. The lighting on the screen should be flat, even, and one-dimensional meaning. Please don’t place the screen leaning at an angle since they’ll make it harder to light evenly.
- Do light yourself and your background separately. It will ensure your subject wouldn’t bleed into the green, which will create a halo around them.
- After you key out the green screen and lighting, your subjects should emulate the lighting from your final footage. For example, if you know sunlight is coming from the left light, your subject is from the left direction as well.
Part 4. Keying out your green screen
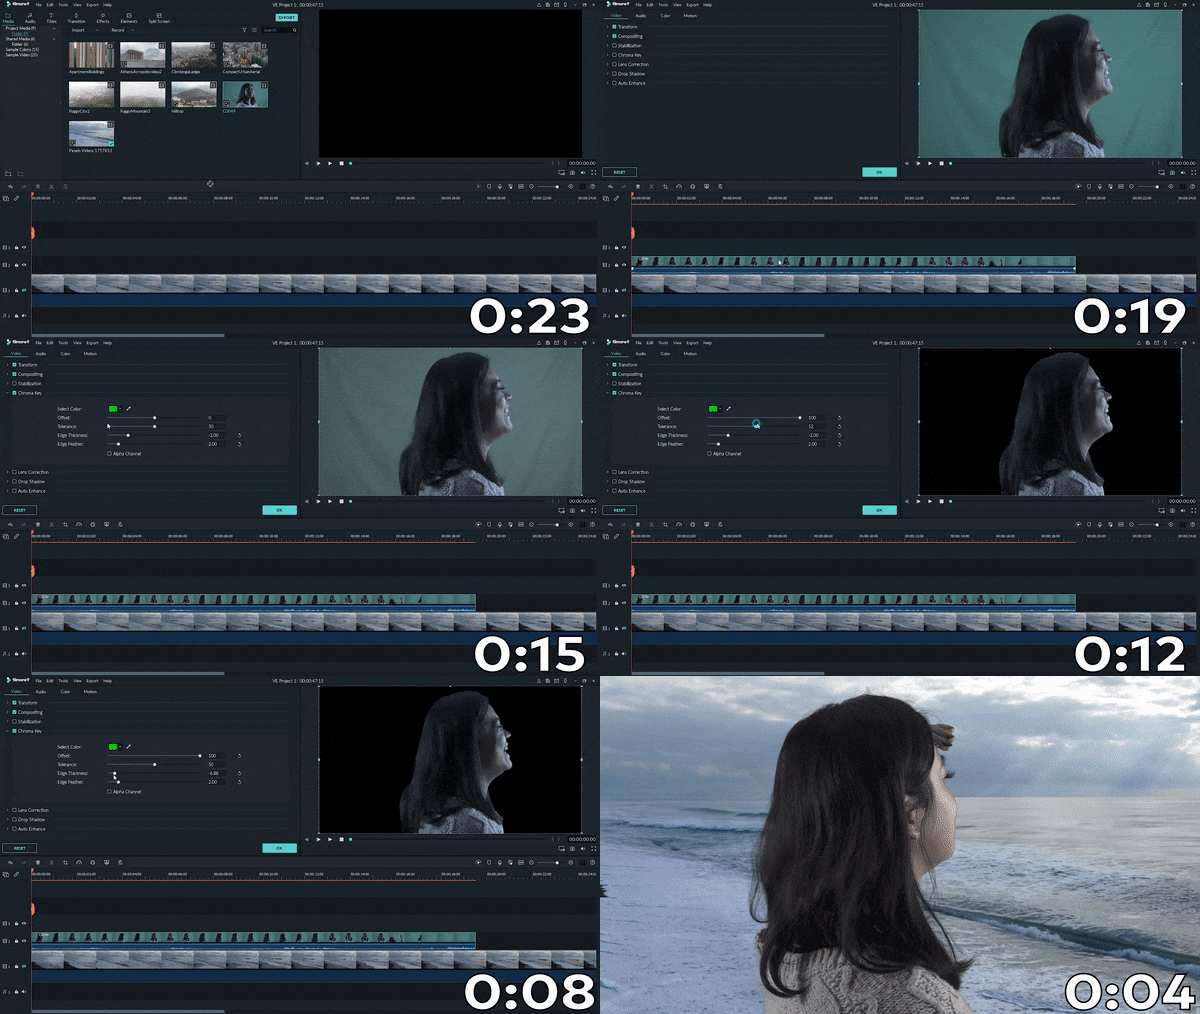
Once your footage is good, go into Filmora and import it into your timeline, then double-click it to find the chroma key menu. However, don’t stop there. Clicking the chroma key button is not enough to guarantee perfectly keyed footage, so play around with the offset tolerance edge thickness and edge feather. Lastly, adjust it to make sure your edit looks as good as possible.
Free Download For Win 7 or later(64-bit)
Free Download For macOS 10.14 or later
Summary
Aside from a video background, there are many things you can use chrome key effects on. For example, you can make liquid transformation, you can make a magic box, etc. In the meantime, it doesn’t matter how good your green screen, it won’t have a good results if are not light it properly. You can use Filmora to keying out your green screen. It just take a few clicks to be able keying out your green screen by following the tutorial above.
Free Download For macOS 10.14 or later

Summary
Aside from a video background, there are many things you can use chrome key effects on. For example, you can make liquid transformation, you can make a magic box, etc. In the meantime, it doesn’t matter how good your green screen, it won’t have a good results if are not light it properly. You can use Filmora to keying out your green screen. It just take a few clicks to be able keying out your green screen by following the tutorial above.
Also read:
- 2024 Approved Comprehensively Understanding Recmeister's Screen Recording Strengths
- Best Ways on How to Unlock/Bypass/Swipe/Remove Realme GT Neo 5 Fingerprint Lock
- Best Websites For Downloading Skype Ringtone for 2024
- iCloud Unlocker Download Unlock iCloud Lock for your iPhone XS Max
- In 2024, Video Freedom Top 8 Tools Transforming YouTube Into Avis
- In-Depth Asus ROG AC5300 Network Adapter Analysis - A Perfect Choice for Gamers and Tech Experts
- Insight Into T-Series Profit From YouTube Platforms for 2024
- Integrated Marketing Campaigns for Brand and Video Platforms for 2024
- New 2024 Approved Do You Want to Experiment with Various Sky Backgrounds for Your Footage? Learn About Sky Replacement After Effects in This Article with a Step-by-Step Guide
- New 2024 Approved Knowing All Ways To Slow Down Video With Adobe Premiere Pro
- New 2024 Approved Learn How to Make a Gaming Montage - Guide & Tips
- New In 2024, How to Put a Background on A Green Screen
- New In 2024, Mask Tracking Is Believed to Be a Helpful Procedure for Marking Proper Areas in Videos. Learn How to Perform Premiere Pro Mask Tracking in This Guide
- New In 2024, The Art of Fashioning Slow Motions Has Remained Popular Ever Since. Read This Article to Learn How to Do Slow-Mo in CapCut and Other Powerful Tools
- Updated 2024 Approved Do You Want to Add a Slow-Mo Effect in Your Videos? In This Guide, We Will Discuss How to Add Slow-Motion Effects in the Videos with After Effects in an Efficient Way
- Updated Edit Like a Pro 64-Bit Video Editor for Windows 8 and Up for 2024
- Title: In 2024, How To Make Ninja Jump Effect
- Author: Morgan
- Created at : 2024-10-03 02:43:53
- Updated at : 2024-10-05 21:02:09
- Link: https://ai-video-editing.techidaily.com/in-2024-how-to-make-ninja-jump-effect/
- License: This work is licensed under CC BY-NC-SA 4.0.

