
In 2024, How to Remove Background From a Video in Premier Pro

How to Remove Background From a Video in Premier Pro
Adobe Premiere Pro is one of the leading video editing software. You can use to create or remove a video’s background. Advanced Chroma Key features such as Color Key and Ultra Key make it possible to produce background-free content quickly.
Although both Keys work similarly, many users prefer to use the Ultra key for a better result in the video. This article will explain how to remove video background in Premiere Pro if you are a newbie.
Let’s get right to it and start the tutorial!
How to Use Premiere Pro to Remove Video Background?
Adobe Premiere Pro can remove video backgrounds quickly using the Ultra Key feature with the following steps:
Step1 In the first step, launch a browser, and download the appropriate Adobe Premiere Pro version for your Windows PC or Mac . Next, install the software on your system and launch it from your Desktop or Dock.
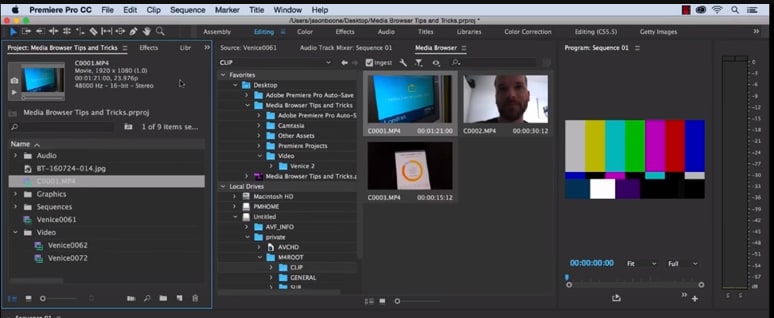
Step2 Now, use the Media Browser panel in the software to browse the video clips you want to import into the software. Next, right-click on your selected video file in which you want to remove the background and choose the “Import” option.
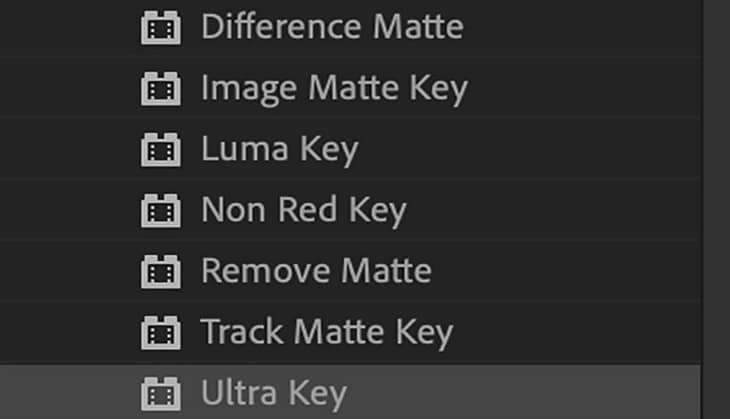
Step3 Click the “Effects” tab in the software panel and select Video Effects. Here, you will see the “Keying” option; select the Ultra Key, press and hold it to grab the key, and place it on your video clip.
![]()
Note: You can also search for the Ultra Key in the Adobe Premiere Pro search bar. Drag it to the video clip containing a background you want to remove.
Step4 As soon as you drop the Ultra Key to your footage, an Effects Control panel will pop up. Next, use the eyedropper tool in the Effects Control panel. Finally, select the background color on your video that you want to remove.
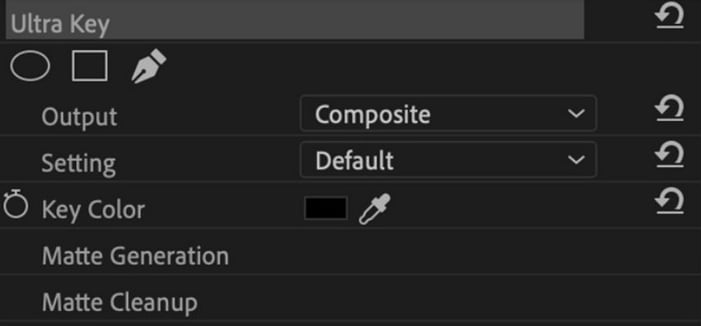
Step5 In the next step, click the drop-down menu next to the “Output” option, and select “Alpha Channel” from the list. This will reveal the details of your video and the edits. Also, click the “Setting” drop-down menu and select the Relaxed, Aggressive, or Custom option for the video effect.

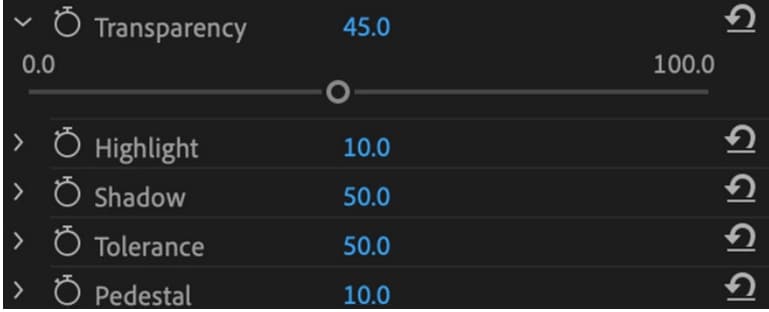
Step6 Select the “Matte Generation“ below Key Color. Try different levels for Highlight, Shadow, Tolerance, Transparency, Pedestal, and other settings to further clean the matte for a premium effect.
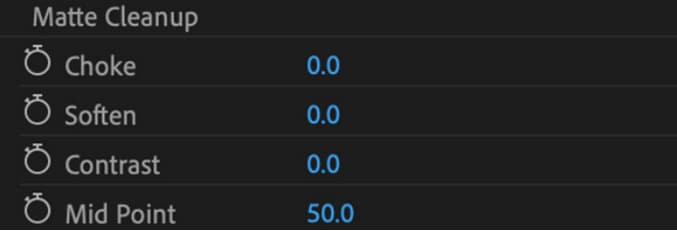
Step7 In this step,choose the “Matte Cleanup” option to expand its settings and clean up the edges of your clip. You will see various options here, but the most important one is “Choke.” It will shrink the object’s borders and “Soften” to add fuzz.
If you see a background color spill on your video after playing with the above settings, click “Spill Suppression” beneath Matte Cleanup to expand its options and choose the desired settings to resolve this issue.
That’s about it! You have successfully removed the video background in Premiere Pro.
Step8 In the last step, you need to save, render, and export your video with the removed background. To do this, click the “File” option on the Premiere Pro Media Browser, and choose “Export” to explore the “Media” menu.
Choose the format in the Export Settings, as it is compatible with most devices. Next, choose a valid Preset and resolution, and click “Export” to begin the rendering process. Finally, save your edited background video again, and export the video to the desired destination.
Is There Any Best Alternative to Remove Video’s Background?
Although Adobe Premiere Pro is an excellent choice, the software can be a little overzealous for beginners. But don’t fret; there is an alternative for newbie to remove the video background.
Many video content creators recommended Wondershare Filmora as a user-friendly video editing software. This software loads with customization options and compact feature, including the Human Segmentation effect. With it, you can isolate objects from the background of a video without a green screen.
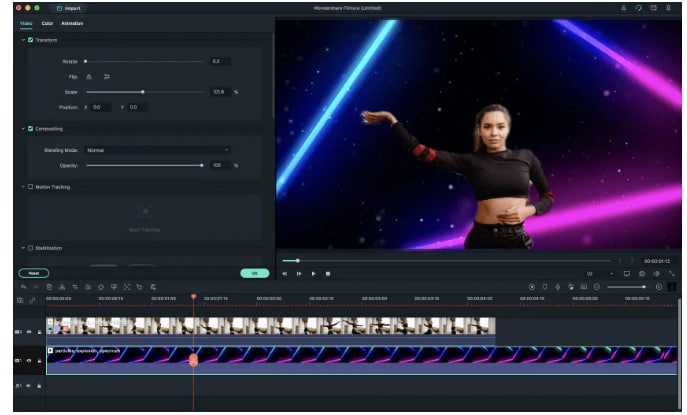
Let’s take a quick look at Filmora video editing marvel features:
- Comes with a free trial and is priced to meet most video designers’ production needs.
- Remove the video background with four quick steps.
- View the foreground of your video in real-time after background removal.
- Numerous customization options to add a different background or an image to the original content.
- Add the removed background as an overlay on top of another clip.
- Drag and drop a video clip to another track in the timeline for cutting, trimming, and elimination purposes.
- Using the “Human Segregation effect” in the AI Portrait on any imported video is simple.
- See objects isolated from the background in the Preview mode, which allows you to adjust the edges, feathers, and thickness accordingly.
- Easy export options supporting various compatible formats.
Additionally, we have provided you with a video tutorial about How to Remove and Change Video Background Without Green Screen with Filmora:
Free Download For Win 7 or later(64-bit)
Free Download For macOS 10.14 or later
Conclusion
This comprehensive guide explains how to remove the video background in Premier Pro using the Ultra key instead of the Color Key.
We have also discussed an excellent alternative to Premier Pro that can eliminate any background in your video content within minutes.
This article helped solve your queries. As a result, you can now create quality video content for your audience without paying thousands of dollars to professional video editors to do the background removal for you.
Step4 As soon as you drop the Ultra Key to your footage, an Effects Control panel will pop up. Next, use the eyedropper tool in the Effects Control panel. Finally, select the background color on your video that you want to remove.

Step5 In the next step, click the drop-down menu next to the “Output” option, and select “Alpha Channel” from the list. This will reveal the details of your video and the edits. Also, click the “Setting” drop-down menu and select the Relaxed, Aggressive, or Custom option for the video effect.

Step6 Select the “Matte Generation“ below Key Color. Try different levels for Highlight, Shadow, Tolerance, Transparency, Pedestal, and other settings to further clean the matte for a premium effect.

Step7 In this step,choose the “Matte Cleanup” option to expand its settings and clean up the edges of your clip. You will see various options here, but the most important one is “Choke.” It will shrink the object’s borders and “Soften” to add fuzz.

If you see a background color spill on your video after playing with the above settings, click “Spill Suppression” beneath Matte Cleanup to expand its options and choose the desired settings to resolve this issue.
That’s about it! You have successfully removed the video background in Premiere Pro.
Step8 In the last step, you need to save, render, and export your video with the removed background. To do this, click the “File” option on the Premiere Pro Media Browser, and choose “Export” to explore the “Media” menu.
Choose the format in the Export Settings, as it is compatible with most devices. Next, choose a valid Preset and resolution, and click “Export” to begin the rendering process. Finally, save your edited background video again, and export the video to the desired destination.
Is There Any Best Alternative to Remove Video’s Background?
Although Adobe Premiere Pro is an excellent choice, the software can be a little overzealous for beginners. But don’t fret; there is an alternative for newbie to remove the video background.
Many video content creators recommended Wondershare Filmora as a user-friendly video editing software. This software loads with customization options and compact feature, including the Human Segmentation effect. With it, you can isolate objects from the background of a video without a green screen.

Let’s take a quick look at Filmora video editing marvel features:
- Comes with a free trial and is priced to meet most video designers’ production needs.
- Remove the video background with four quick steps.
- View the foreground of your video in real-time after background removal.
- Numerous customization options to add a different background or an image to the original content.
- Add the removed background as an overlay on top of another clip.
- Drag and drop a video clip to another track in the timeline for cutting, trimming, and elimination purposes.
- Using the “Human Segregation effect” in the AI Portrait on any imported video is simple.
- See objects isolated from the background in the Preview mode, which allows you to adjust the edges, feathers, and thickness accordingly.
- Easy export options supporting various compatible formats.
Additionally, we have provided you with a video tutorial about How to Remove and Change Video Background Without Green Screen with Filmora:
Free Download For Win 7 or later(64-bit)
Free Download For macOS 10.14 or later
Conclusion
This comprehensive guide explains how to remove the video background in Premier Pro using the Ultra key instead of the Color Key.
We have also discussed an excellent alternative to Premier Pro that can eliminate any background in your video content within minutes.
This article helped solve your queries. As a result, you can now create quality video content for your audience without paying thousands of dollars to professional video editors to do the background removal for you.
How to Be a Good Podcast Host (2024 Updated)
You may be a blogger who has the habit of writing long articles. Or you may be a YouTuber with a hi-fi channel with many subscribers, but a podcast is a different thing in general.
This article will look at how to prepare, call guests, warm them up, and give practical ideas about how to host a podcast. Let’s start the article by learning how to get prepared to host a podcast.
#1 Get prepared to host a podcast
A good podcast host always gets prepared, sets up his goals, and gets easy tips to set apart from everyone in the marketplace. For this, you have to follow the below instructions and tips:
1. A proper pre-interview process
Before starting the podcast, the host should have quality and organic content. The content is related to the guest or any foremost personality related to the topic.
The host should be confident and relaxed to kill the anxiety process. If the host has low confidence, he may suffer from nervousness. This will kill the authenticity.
2. Share questions with the audience
A good understanding of how to pan out a situation makes you a good host. You must share the question on and off during podcasts to build engaging criteria with the audience.
You don’t need to sound the script on the screen like a robot. Scripts can be helpful but only if read in a conversational mood.
3. Find the right location
A good location means good conversation. A proper set prepared for the guest and the podcast will help you boost your conversation skills and get yourself and the guest into the mood of your show.
Before the show, you can change the settings or have a monotone set that fits every mood.
#2 Warm up the audience
Warming up is a necessary part of the show. A warmup works just like gas in a car before a long drive. You have to do this by asking any question or by telling them an inspirational or motivational story.
A good host must realize that a warm show has a high chance of becoming viral, and you won’t get that if the guest is nervous, tired, or not in the mood.
Tip 1. Setting the mood
Your goal is to set the mood of the audience according to the topic. Warming up the audience before getting to the guest.
You have to set the tone according to the topic of your podcast to warm them up. In this way, you need to make the connection between the guest, you, and your voice.
Tip 2. Build an emotional connection
Building an emotional connection helps to engage the audience till the end of the show. To make this possible, you can share a funny story with them or about a recent event or any recent incident.
Tip 3. Polls and questionnaires
Modern media has connected everything through the internet. You need to interact with the audience by asking questions from them and giving them a chance to answer them by live calling or on social media.
You can also do this on Instagram polls or by posting a story and asking them to select an upcoming topic for the podcast. Introducing this concept will boost your podcast views and help you engage more followers on your other social media platforms.
#3 Try to be authenticity
You need to have authenticity if you want your podcast to be successful. An authentic show attracts a larger audience, while a show whose mood resembles a person with a multiple personality disorder will throw off the whole vibe of the podcast. And the listeners will eventually press back buttons to escape the colossal wreck.
Tips to have authentic content
- Your topic may be emotional, happy, or of any other information.
- A good host needs to have the skills of a good actor to convey the emotions that the audience will perceive more efficiently.
- An idea of how the audience will perceive you and how to make your voice tone with emotions on podcasts.
- Don’t go for a more serious tone.
Things to Avoid
- What you should opt away from is, faking
- Don’t try to get excited about something that you’re not.
- Do not pretend to care about something when you do not.
- The fakeness will only result in the downfall of your podcast, as the listeners will eventually grow tired and leave.
- You must act well and sell yourself more efficiently to develop that trust with the audience.
The more the audience trusts you, the more authentic you seem.
#4 Storytelling
Tales are as old as time. As time moves on, more and more stories pile up. Your podcast has the potential to be the best if you know how to utilize those storytelling skills of yours. It’s never about information alone!
You may have a bland topic to discuss or a guest who is tough to break character. These are the situations where your charm and concern will play their part. So you also want to learn how to make your podcasts enjoyable through stories? Then check out the short tips below:
How to add stories to your podcasts
- First, you should have the skill to read the room and the mood.
- If you start telling a story about yourself that has no relation to the topic whatsoever will only lead to the guest being annoyed.
- You may have called the guest for a reason. This reason should tally with your topic as it will make you ask about their experience.
- Asking the right questions is important.
- You’d better not begin with leading statements such as, “Obi-wan Kenobi is a good TV show.” the guest may simply reply, “I do not care.”
- You should approach with question statements such as, “Did you know that your son is a big fan of the Obi-wan Kenobi TV show.” These are indulging questions to help your audience be more involved in your podcasts.
The audience and the guest will also develop an interest in the conversation that will lead to a successful show for the day.
#5 Transcribe your episodes
A good podcast also looks to give you quality content for each episode. You may call on guests upon guests and promote your podcasts in many ways. One of the ways you can also allow your podcasts to be recognized more is by the use of transcribing.
What is transcribing?
Transcribing means converting the speech in the audio of your podcasts to a text format. Your podcast may raise some eyes if the content is desirable to the audience.
It may happen your podcast gets around a person whose brother suffers from hearing loss. By a transcription, you offer a chance to let them involved in your podcast. You can accomplish this feat in one of two ways.
- Either use an AI-powered audio editing program, like Wondershare Filmora , to get you through the speech-to-text transcription by default or a more auto way.
- Convert your text into audio, but this article will not look at it.
Free Download For Win 7 or later(64-bit)
Free Download For macOS 10.14 or later
Our main focus would be manually converting speech to text using a human transcriber. And we will be doing so by using the Wondershare Filmora app.
Transcribing podcasts with Wondershare Filmora
Filmora is an all-in-one video editing tool. In the following steps, we will learn the step-by-step process of transcribing podcast by using Wondershare Filmora.
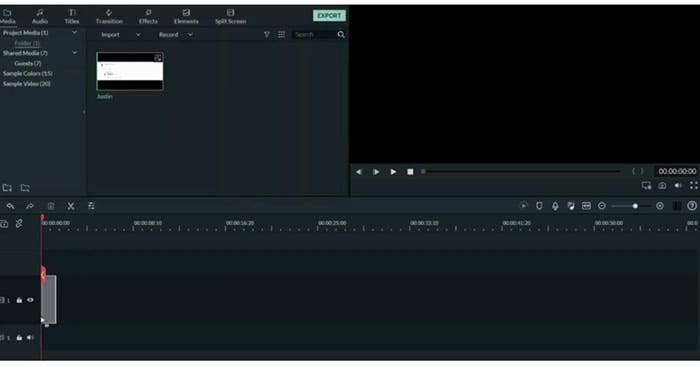
Step1Add audio files or footage
- First of all, drag the imported audio files or footage into the timeline.
Step2Add subtitles
To show the transcription of the podcast’s audio, you have to add sbtitles for better understanding. For this, perform these steps:
- Select the tile icon on the bar above.
- In the window that pops up, select your favorite subtitle format.
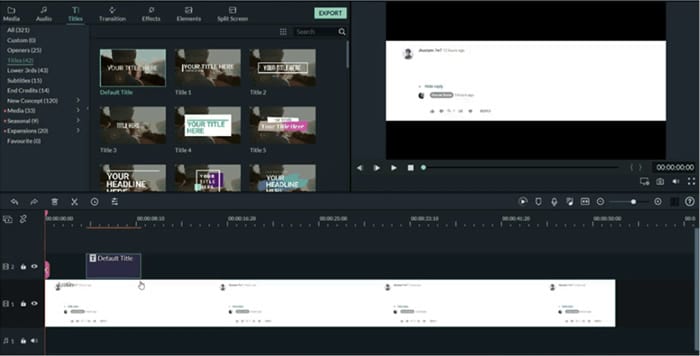
Step3Adjust the size
For better playout and matching the audio with subtitles, you have to adjust the size of the video as:
- Add a subtitle tile above the video.
- Then adjust the size of the video.
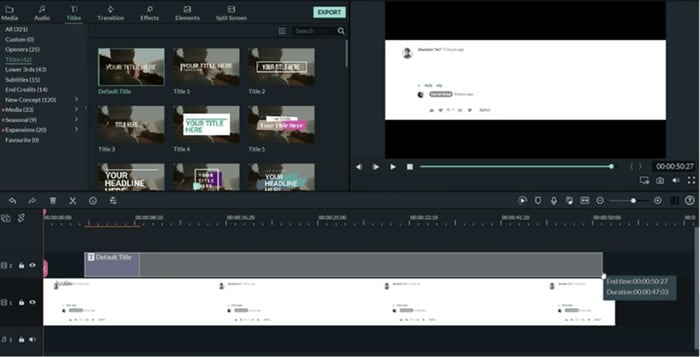
Step4Convert speech into text
- At last, type the speech into text in the subtitle box.
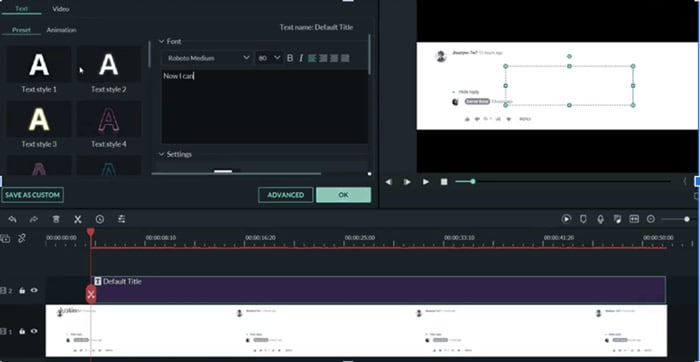
In this way, you have created speech-to-text using a human transcriber rather than an AI. Doing this will ensure no mistakes are recorded and make it even more efficient.
#6 Put yourself in audiences’ shoes
And if you feel like the general audience would want to make sense of a particular statement, ask the guest about it. This is what differentiates a good host from a bad one! A general understanding of the audience’s point of view would always allow you to process your podcast accordingly.
- You should understand the general sentiments of the audience.
- When you feel a particular subject will attract more audience, do the process accordingly.
- Maybe they like how you process a story and evaluate it. Do that!
All qualities of a good podcast are there, and it’s your job to identify them and make the most of them.
#7 Understand why the guest is here
You are the host of the podcast. Your job is to be sincere with the guest. Moreover, useful information or a valued thought might be a reason why the guest has come to your show. Understand that reason and try to make the most of it.
- The guest might have heard about your podcast, or they could be a constant
- Your approach to the guest should tally with the topic of the podcast.
- The guest might be going through a tough time that makes them a suitable guest for that particular episode.
- Or it could be that your podcast attracted them, and now they want to use your interview to promote a book or any other service they think is best.
- As a host, you should allow the guest to have some control over the podcast.
- Develop a sense of trust between the host and the guest.
- The more you allow the guest to speak freely about themselves, the more they will feel interested in your podcast.
Your goal should be to captivate the guest as much as you can. If the guest is entertained, the more chances are that they will recommend you to other guests. An experience gone wrong will be bad for the podcast.
#8 Invite the right guest
A podcast can be an excellent tool for attracting the audience to your content. And as podcast hosts guests, your first step is finding the right guests for your audience.
Is it necessary to search for a host before calling? Yes! It’s quite a complicated and sensitive step to call out guests. A guest is the only one who can make or break the Podcast show. It’s important to study the nature of guests too. Because a guest is also considered as a co-host of the show.
If a guest is bored and doesn’t take much interest, then there are 100% chance that the show will fail. To find who is more compatible, we have to take assistance from a tool.
You can do this by plugging your podcast into a tool like Sparktoro. Sparktoro allows you to see what your audience is engaging with. It could be other platforms of podcasts such as youtube or other social media platforms.
For example, If we search for “the art of product podcast” on the Sparktoro website. It will direct us to demographic data, providing information about the content the audience is interacting with.
- It will show different hashtags and frequently used phrases.
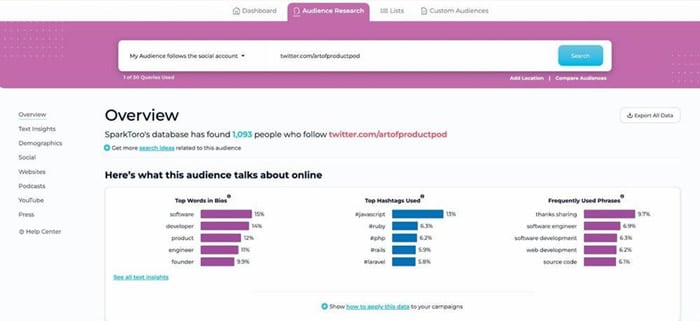
- Here you can see the top words in bios, hashtags, and frequent phrases.
- On the left window, you can search for other related podcasts your viewers are watching.

- Similarly, you can also use the YouTube option to look at what kind of content your audience watches on youtube.
Following the above methods could give you 50-100 potential clients. Your main goal will be creating a list allowing you to call guests on your show. You can divide the list according to the priorities.
- Close friends: the ones who are going to be available whenever you call upon them.
- The probable list: the ones who would most probably agree to come on your podcast.
- The premium list: these guests will resemble a dream list of guests you want to call on your podcast.
Start by writing emails and promoting content that will attract these guests. Your chances are increased by how much you polish your podcast into creating premium content. The more premium the content is, the more premium your chances are of inviting those dream guests.
The Bottom Line
Podcasts are tricky to promote. Many other alternatives are available in the market that provides a more Visual representation. And it’s no lie; an audience like to sit and watch rather than sit and listen.
Following the steps, tips, and tricks mentioned above, you can build a strong base for being a good podcast host. Although it will take time to set off on your dreams, consistency and determination will eventually bear fruit.
Free Download For macOS 10.14 or later
Our main focus would be manually converting speech to text using a human transcriber. And we will be doing so by using the Wondershare Filmora app.
Transcribing podcasts with Wondershare Filmora
Filmora is an all-in-one video editing tool. In the following steps, we will learn the step-by-step process of transcribing podcast by using Wondershare Filmora.
Step1Add audio files or footage
- First of all, drag the imported audio files or footage into the timeline.

Step2Add subtitles
To show the transcription of the podcast’s audio, you have to add sbtitles for better understanding. For this, perform these steps:
- Select the tile icon on the bar above.
- In the window that pops up, select your favorite subtitle format.

Step3Adjust the size
For better playout and matching the audio with subtitles, you have to adjust the size of the video as:
- Add a subtitle tile above the video.
- Then adjust the size of the video.

Step4Convert speech into text
- At last, type the speech into text in the subtitle box.

In this way, you have created speech-to-text using a human transcriber rather than an AI. Doing this will ensure no mistakes are recorded and make it even more efficient.
#6 Put yourself in audiences’ shoes
And if you feel like the general audience would want to make sense of a particular statement, ask the guest about it. This is what differentiates a good host from a bad one! A general understanding of the audience’s point of view would always allow you to process your podcast accordingly.
- You should understand the general sentiments of the audience.
- When you feel a particular subject will attract more audience, do the process accordingly.
- Maybe they like how you process a story and evaluate it. Do that!
All qualities of a good podcast are there, and it’s your job to identify them and make the most of them.
#7 Understand why the guest is here
You are the host of the podcast. Your job is to be sincere with the guest. Moreover, useful information or a valued thought might be a reason why the guest has come to your show. Understand that reason and try to make the most of it.
- The guest might have heard about your podcast, or they could be a constant
- Your approach to the guest should tally with the topic of the podcast.
- The guest might be going through a tough time that makes them a suitable guest for that particular episode.
- Or it could be that your podcast attracted them, and now they want to use your interview to promote a book or any other service they think is best.
- As a host, you should allow the guest to have some control over the podcast.
- Develop a sense of trust between the host and the guest.
- The more you allow the guest to speak freely about themselves, the more they will feel interested in your podcast.
Your goal should be to captivate the guest as much as you can. If the guest is entertained, the more chances are that they will recommend you to other guests. An experience gone wrong will be bad for the podcast.
#8 Invite the right guest
A podcast can be an excellent tool for attracting the audience to your content. And as podcast hosts guests, your first step is finding the right guests for your audience.
Is it necessary to search for a host before calling? Yes! It’s quite a complicated and sensitive step to call out guests. A guest is the only one who can make or break the Podcast show. It’s important to study the nature of guests too. Because a guest is also considered as a co-host of the show.
If a guest is bored and doesn’t take much interest, then there are 100% chance that the show will fail. To find who is more compatible, we have to take assistance from a tool.
You can do this by plugging your podcast into a tool like Sparktoro. Sparktoro allows you to see what your audience is engaging with. It could be other platforms of podcasts such as youtube or other social media platforms.
For example, If we search for “the art of product podcast” on the Sparktoro website. It will direct us to demographic data, providing information about the content the audience is interacting with.
- It will show different hashtags and frequently used phrases.

- Here you can see the top words in bios, hashtags, and frequent phrases.
- On the left window, you can search for other related podcasts your viewers are watching.

- Similarly, you can also use the YouTube option to look at what kind of content your audience watches on youtube.
Following the above methods could give you 50-100 potential clients. Your main goal will be creating a list allowing you to call guests on your show. You can divide the list according to the priorities.
- Close friends: the ones who are going to be available whenever you call upon them.
- The probable list: the ones who would most probably agree to come on your podcast.
- The premium list: these guests will resemble a dream list of guests you want to call on your podcast.
Start by writing emails and promoting content that will attract these guests. Your chances are increased by how much you polish your podcast into creating premium content. The more premium the content is, the more premium your chances are of inviting those dream guests.
The Bottom Line
Podcasts are tricky to promote. Many other alternatives are available in the market that provides a more Visual representation. And it’s no lie; an audience like to sit and watch rather than sit and listen.
Following the steps, tips, and tricks mentioned above, you can build a strong base for being a good podcast host. Although it will take time to set off on your dreams, consistency and determination will eventually bear fruit.
How to Add Text to Video
If you are making an instructional or explainer video, you will often find that you need to add text to various sections of the video. Depending on the tool you use, the process of adding text to a video can be simple or complicated.
In this article, we will share with you the different options you have when you want to add text elements to a video project.
Add Text to a Video Online
One of the easiest ways that you can add text to any video is to use a free online solution. There are many online tools to choose from but VEED is a free solution that is easy to use and offers a wide range of features to choose from.
Here’s how you can use VEED to add text to your video;
Step1Go to https://www.veed.io/ on any browser to access the video editing tool. Click on “Upload Your Video” to open a new project. In the new project screen that appears, tap on “Upload a file” to add your video.

Step2Once the video is open, click on the “Text” tab on the left and then select the type of text you want to add to the video.

Step3Type in your text and then use the options below the text box to choose the font style, size, and color of the text. You can also use the duration icons below the text to indicate where you want the text to appear during playback.

Step4When you’re happy with the changes, click on the “Export” button at the top to save the changes and download the video.
Add Text to Video on Computer
While online tools like VEED can come in handy when you want to make simple changes to a video, you will often find that they don’t have the necessary features to customize the text in various ways. For that, we recommend Wondershare Filmora, a desktop editing suite that has a lot of useful features.
Filmora combines its wealth of editing features and a simple user interface to make it one of the most effective video editors in the market. Here’s how you can add text to any video using Filmora.
Step1Download and install Wondershare Filmora onto your computer. Open the program and then click on the “Import” button to start. You can also just drag and drop the video to the main window to open it.
Step2Once the video is open in Filmora, you will need to drag it to the timeline panel before you can start to edit it.

Step3Click on the “Titles” tab at the top to open the text and title presets that you will need to add text to the document. Filmora offers more than 200 text effects to choose from. Just double-click on one of the presents to select it and then the preview window to see it in real-time.

Step4If you like the preset that you have selected, place the cursor on the position in the timeline where you would like to add the text and then drag and drop the title track above the video in the timeline.

Step5If you would like to change the duration of the text simply drag the edge of the timeline until you get the length that you desire. Filmora also allows you to edit and customize the text. To do that, double-click on the “Title” time frame to get some customization options.
Step6Once you are happy with all the changes you have made, click on “Export” and choose an output format to save and export your video.

Add text to Video on iPhone
One of the easiest ways to edit a video on an iPhone is to use iMovie. This simple and effective solution can help you edit videos on your iPhone in numerous ways including adding text and subtitles. The following are simple steps to help you use iMovie to add text to a video on an iPhone;
Step1Open the video clip that you would like to add text to. Once the video is open, click on the Text icon from the options at the bottom of the screen.
![]()
Step2Select the style you would like to use from the list of templates.

Step3A sample text will appear on the screen. Tap on it and then select “Edit” to enter the desired text. Tap “Done” once you are done typing.

Step4To move the text to the desired location, simply tap on it again and reposition it. You also have the option to increase or decrease the size of the text as desired using the pinch motion. If you want to change the color or font, tap on the “T” that will appear below the clip and choose “Aa” to change the font or the multicolored circle to change color.

You also have numerous other options in terms of effects including text-shadow. Just tap on the “three-dot icon” to access these features.
Add Text to Video on Android
The best way to add a video on Android devices is to use third-party apps. The good news is that there are several very useful video editing apps that you can use for this purpose. In this guide, we will show you how you can add text to a video on Android using two of the most effective solution.
Using the PowerDirector by Cyberlink
PowerDirector is a video editing app that allows you to edit various aspects of the video including adding text to the video. Available on the Google Play Store, this app has a wealth of additional features that include trimming, rotating clips, and even adjusting the color, brightness, and saturation.
Here’s how you can use PowerDirector to add text to your video;
Step1Install PowerDirector on your device. Open it and tap “New Project” at the top. Select an aspect ratio depending on the video project you are working on and enter a project name.

Step2Select the video that you would like to edit from the folders that show up on the screen. The video will be added to the main timeline of the project.
Step3Select the video layer and then tap on the layer mask from the left sidebar. Select the text tab at the top and then choose the text style that you want to add to the video. Tap on the “+” button inside the style to add the text style you have selected.

Step4Type in the text that you want to add to the video on the text box and then tap on the “T” icon at the top-right corner of the text box to customize the text.
You can use PowerDirector to change the font, color, and text size or even add effects like Text shadow.

Step5When you’re done editing the video, tap on the “Export” icon at the top-right corner of the screen and choose if you would like to save the video on the device or share it via a social media app.

Free Download For Win 7 or later(64-bit)
Free Download For macOS 10.14 or later
Free Download For macOS 10.14 or later
Keyframes Interval: Everything You Need To Know | Filmora
Many people may not understand what the Keyframe Interval stands for. However, it is a simple concept for video editors where the encoding settings determine the frequency at which the whole picture is transmitted.
The Keyframe Interval is responsible for how often a keyframe is generated within the video. A keyframe, also known as an i-frame, is a single frame that contains all of the necessary information for displaying a video. If the Keyframe Interval is set too high, it could lead to visible compression without compromising the quality of a video.
Keyframe Interval is essential in video streaming and recording, but it can be confusing. In this guide, we’ll help you understand this concept to enable you to create better animations.
Part 1. What Is Keyframe Interval
Keyframe Intervals, also known as “Keyframe Frequency” in Adobe Flash Media Live Encoder (FMLE) and vMix or “GOP size” by some encoders, is the frequency at which keyframes are generated in an animated sequence. This is an important parameter to consider when creating animations, as it can impact the animation’s file size, quality, and smoothness.
Keyframe Intervals are the distance in time between two keyframes. For example, if an animation is set to every 2 seconds interval and the frame rate is 30 per second, it means that every 60 frames, a keyframe is created.

Part 2. How Does Keyframe Interval Work?
Keyframes are important in video and animation because they mark specific points in time that can be used to create a smooth and consistent transition between different states or images. The Keyframe Interval is the amount of time that passes between two keyframes.
In order to create a smooth and consistent transition, the Keyframe Interval must be carefully calculated. In a 60-frame-per-second video, a keyframe is recorded every 5 or 300 frames. Delta frames are “difference” frames that provide an incremental change from the previous frame.
Keyframes are different from delta frames in that a higher keyframe value results in a clearer video with fewer transmission artifacts and vice versa.
The Keyframe Interval can be adjusted to create a faster or slower transition between two keyframes. A shorter Keyframe Interval will create a faster transition, while a longer one will create a slower transition.
For example, if you want your transition to look smoother, use a longer interval, like two seconds. Conversely, a zoom effect over a 0.2-second interval will be quicker.
Part 3. A concept closely connected to Keyframe Interval - Bitrates
The relationship between keyframes and bitrates is important to understand when creating video content. Keyframes are the frames in a video that are used to define the start and end points of an encoding process. The bitrate measures how much information is being transferred in a given time from one place to another.
When encoding video, keyframes are used to establish a consistent quality throughout the video. The bitrate is then used to determine how much information can be transferred without affecting the quality of the video. Thus, the higher the video’s bitrate, the better the quality.
Your mileage may vary regarding this explanation, as different encoders manage bitrates and keyframes in different ways.
For example, if you’re using an encoder like Wirecast, you might notice that broadcasting in a still background with someone talking results in a higher quality video as compared to a moving background. This can be reproduced using the same average bitrate and Keyframe Interval between them.
This happens because the delta frames have to share a lot more information to share in each frame in the video with a moving background. When you have an encoder like Wirecast, it’s working to keep your stream at an average bitrate. This can result in reduced quality if there is a lot of extra information in the delta frames.
Part 4. What You Need To Know To Set A Right Keyframe Interval
After understanding the important concepts in video editing, let’s see how to set the keyframe level in our videos appropriately.
Most streaming services will automatically set it for you based on your stream’s frame rate and bitrate. However, if you want to set the keyframe gap manually, there are a few things you need to keep in mind.
- Set the frame interval at 2 seconds. Do not increase it from 4 seconds.
- Disable the “auto” keyframe feature.
- To allow for b-frames, use an encoding profile higher than baseline and use IDR-based keyframes.
Part 5. How To Change The Keyframe Interval On OBS Studio
Above is the basic knowledge of the keyframe interval. Then, how to apply it to your real video-editing work? In this part, we will choose OBS to show you the application process.
OBS Studio is a powerful yet free and open-source screen recorder and live streaming tool for Windows, macOS, and Linux. One of the most useful features of OBS Studio is its ability to change the keyframe interval on the fly without having to restart your recording or stream.
The process for changing the it in OBS Studio has been made more efficient since the classic version. However, some users may have trouble locating the new setting.
Here’s how to change the it on OBS Studio:
Step1 Launch the OBS Studio on your PC or laptop.

Step2 From the bottom right of the screen, open the “Settings” menu.

Step3 On the Settings Window, click “Output” and configure the output mode to “Advanced.”

Step4 Finally, edit the Keyframe Interval, set it to 2 seconds, and click “OK” to save your changes.

Part 6. Will Keyframe Interval Affect Your Video’s Quality?
When you try to set the keyframe gap by yourself, you may feel confused about the difference a higher or lower interval make to your video. Then, wil-l or how it affects your video’s performance?
In a stream, it determines the balance between smoothness and picture quality. A keyframe is a point that determines how often the entire frame is sent, as opposed to just the differences from the previous frame.
Therefore, if you set the Keyframe Interval higher, your video will be more stable with fewer artifacts but requires more bandwidth and processing power. Conversely, a lower Keyframe Interval value causes more artifacts but is less resource intensive.
A lower Keyframe Interval value will result in lower video quality, while a higher keyframe value will result in higher video quality. However, the optimal Keyframe Interval value can vary depending on the specific case.
For instance, you don’t need a higher Keyframe Interval for streaming a live video, but you have to use a higher Key Interval value for recording.
Video- What is the Maximum Bitrate & Keyframe Interval for OBS
The Bottom Line
In this article, we’ve explored Keyframe Interval, how it works, and the relationship between keyframes and bitrates. We also provided guidance on setting the Keyframe Interval correctly and changing it on OBS Studio.
Hopefully, the information provided in this guide was helpful, and you now have a better understanding of Keyframe Intervals.
Free Download For Win 7 or later(64-bit)
Free Download For macOS 10.14 or later
Also read:
- [Updated] 2024 Approved Get Your Digital Dough Worthy With These 50 No-Cost YouTube Promo Tools
- 2024 Approved Understanding MacOS Big Sur Minimum Requirements
- Achieve More: Chrome's Top 8 Productivity Enhancers Powered by AI
- ClipCreatorAssessment – Full Dissection for 2024
- Factory Reset iPhone 14 Pro | Dr.fone
- Master the Art of Fixing Busted MP4s: Essential Tools and Strategies for MPEG Video Restoration
- Navigating the Landscape of Digital Grading Tools for 2024
- New In 2024, Discover the Essential Steps for Editing a Music Video in This Guide. Learn About Aspect Ratio and the First Cut Process to Create a Visually Captivating Video
- New The Availability of the Slow-Motion Feature on the iPhone Is Often Debated. This Article Will Guide You on How to Slow Down a Video on iPhone for 2024
- New Top 10 Video Editing Online Makers Is Worth Your Attention for 2024
- The Ultimate Guide to the Premier Dog Cam Experience – Furbo at Its Best
- Top 5 Android Games for True PS2 Virtual Gaming Adventures
- Updated 2024 Approved Clearly, the Efectum App Download without a Watermark Option Is on Android Phones. Thus, Read This Review on the Efectum App and Find Replacements for Good
- Updated How to Use Kahoot! On Zoom for 2024
- Updated In 2024, Are You Looking for a Voice Changer to Make Your Gaming Experience More Fun? Here Is a List of the Top 6 Best Alternatives of Clownfish Voice Changers to Use
- Title: In 2024, How to Remove Background From a Video in Premier Pro
- Author: Morgan
- Created at : 2024-10-01 00:58:35
- Updated at : 2024-10-06 04:56:22
- Link: https://ai-video-editing.techidaily.com/in-2024-how-to-remove-background-from-a-video-in-premier-pro/
- License: This work is licensed under CC BY-NC-SA 4.0.