
:max_bytes(150000):strip_icc():format(webp)/streamfreesportsonline-5b1994178023b900364a81e5.jpg)
In 2024, If You Do Not Know How to QuickTime Trim Video Clips, You Are in the Right Place. We Have Provided Information that Will Help You Trim Videos with This Application and Make Them Engaging for Viewers
If You Do Not Know How to QuickTime Trim Video Clips, You Are in the Right Place. We Have Provided Information that Will Help You Trim Videos with This Application and Make Them Engaging for Viewers
Create High-Quality Video - Wondershare Filmora
An easy and powerful YouTube video editor
Numerous video and audio effects to choose from
Detailed tutorials provided by the official channel
You have to trim videos to capture your viewer’s attention because the average attention span of human beings is eight seconds. As such, viewers will click away or keep on scrolling if the first few seconds of your video are in complete silence or a blank screen. Luckily, there is a simple way that Mac users can use to trim videos: QuickTime Player. This guide will give you the low-down on how to trim video in Quicktime to remove unwanted portions.
In this article
02 How to Trim a Video in Quicktime Player
03 Tips & Tricks to Use QuickTime Player
What Is QuickTime Player?
Developed by Apple, QuickTime Player is a software application designed to play, edit, record, and share video and audio files on your Mac. It was created in 1991, and QuickTime X is the latest Mac version available for users of Mac OS X Snow Leopard to macOS Mojave.
QuickTime Player is supported by MovieWorks, PowerPoint, HyperCard, Director, and other standard multimedia authoring apps. One of the exciting features that QuickTime brings to the internet is that it enables video streaming over networks.
In 2016, Apple ended support for the QuickTime Windows version. In 12018, they ceased support for QuickTime 7 version on macOS.
When it comes to OS X Lion, QTKit (the underlying QuickTime media) was deplored in favor of AVFoundation, which was the newer graphics framework and discontinued as of macOS Catalina.
How to Trim a Video in Quicktime Player
Trimming video is a breeze when you are using QuickTime. Follow the steps below to learn how to trim Quicktime video clips.
- Launch QuickTime Player on your Mac. You can find this application by using a Spotlight search. Alternatively, open the Finder app in your Dock and choose the Applications option from the left-hand side menu. You’ll then find QuickTime in the right-hand side menu.
- Once QuickTime has launched, hit the File tab, then click Open File.

- Select the video you would to trim.
- Navigate to the Edit tab on the top menu with your video open.
- Select Trim in the dropdown menu. Alternatively, use the keyboard shortcut command + T.

- You’ll see a yellow trimming bar around the length of the video at the bottom.

- To QuickTime trim video, drag the handles, and the app will remove everything outside the yellow bars.
- Once you have trimmed your video, click the Trim option on the right side of your screen.
- The play icon allows you to preview your video anytime you want during the editing process.
- Click File then Save to save your trimmed video.

- Name your trimmed video, and then select the location you want to save it. Click Save to complete this action.
Tips & Tricks to Use QuickTime Player
Now that you know how to QuickTime trim video, we have provided some helpful tips and tricks for those using this application.
How to Split and Combine Videos
QuickTime player allows you to split and combine two or more video clips. Follow the steps below to learn how to split and combine your videos.
- Open your file.
- Then, press Command-E or select View > Show Clips.
- Drag the Playhead to the area where you would like the video to split.
- Press Command-Y or select Edit > Split Clip. Both clips will be highlighted yellow.
- You can now insert another video clip or re-arrange the video clips by dragging them to the right or left.
- If you split the video clips thrice, you can select the one in the middle, where a yellow outline will appear around it, and then zap it by hitting Delete on your keyboard.

- To combine your video clips, open one of the clips and select Edit > Add Clip to End.
- Double click the video clip you would like to tack on in the Open dialog box.
- You can also drag the icons of video clips from the Finder and drop them into a video window. The application will add the clips to the end of your existing video. Repeat this process to combine several video clips.
- The second video can appear in the middle of your first one. All you have to do is split the video clip, then click on the clip that will appear before the area where the new video is supposed to go.
- Now, select Edit > Insert Clip After Selection.
- A dialog box will appear; double-click the video file you would like to bring in.
- Alternatively, drag a video from the Finder and take it into the gap between the two clips.

How to Record Audio and Videos
You can record a video using a USB webcam or Mac’s built-in camera. What’s more? You can record audio with the built-in microphone on your Mac, a musical instrument connected via a USB cable, or an external mic. Or maybe you would like to record something that’s happening on your screen, QuickTime Player can also do this. Follow the steps below to record audio and video with QuickTime.
- Select File > New Screen Recording, New Audio Recording, or New Movie Recording.
- The last two options need you to choose quality and an input source. You’ll then have to hit the red Record Button. The first option will summon a pane that features the record button and some audio options.
- Drag to specify an area you want to record or click once to record the whole screen.
- Once you have finished, hit the Record button again. A black screen will appear in your menu bar when you’re recording your screen.
- The file will open in QuickTime Player when you stop recording.
- To save it, choose File > Save.
How to Export and Share Videos
QuickTime allows you to export optimized content so that you can view it on other Apple devices, including Apple TV, iPod Touch, and iPhone. With that in mind, let’s look at how you can export and share your video once you have finished editing it.
- Select File > Export; you’ll get a roundup of resolution options (1080p, 720p, and 480p), settings for Apple TV and iOS devices, and an option for only exporting audio.
- If you go with the iTunes option, you’ll see the same Apple TV and iOS devices optimized settings; however, the video file will be sent to your iTunes library.
- • To export your video and share with other users, select File > Share, and the resulting menu will include AirDrop, Messages, Mail, and the social media sharing platforms YouTube, Flickr, Facebook, and Vimeo.

- Choose the option you want, and QuickTime will optimize your video for the service or program you have selected.
- To save the changes you have made to your video file, select File > Close. Name your edited video in the box that will appear, then click Save.
Flip or Rotate a Clip
QuickTime Player also allows you to rotate or flip clips and videos with a single click. Following these step to flip or rotate your video clip.
- Navigate to the Edit tab.
- Select the direction that you want your video to turn. The available options are Flip Vertical, Flip Horizontal, Rotate Right and Rotate Left.
You can apply the changes to your entire video or one of the clips if you had divided the video file.
Present or Record your iPad or iPhone Screen
QuickTime can record or show a live view of what is happening on your iPhone or iPad. If you are using Mac for a presentation, you can show the screen of your iOS devices centered within your Mac’s screen. You only need to follow the steps below:
- Use a USB cable to attach either your iPad or iPhone to your Mac.
- Open QuickTime, then click File > New Movie Recording.
- Now, you need to point the cursor at the QuickTime Player window for the record button to appear.
- Go to the menu next to the record button and pick your iOS device from the list of cameras.
- You’re now ready to enjoy the largest version of your iPhone or iPad with your audience.
- Click Record to record the action.
Conclusion
● Video editing is an essential part of creating video content that attracts viewers. QuickTime trim video allows you to remove unwanted scenes to make it engaging. Your viewers will get hooked on your videos if you trim boring sections, blank screens, and areas with silence. Once you master the art of cutting, your viewer retention and engagement will sky-rocket.
● Don’t forget to use the tips and tricks we have provided to get the most out of this application. You can export videos to various formats, such as FLC animations and image sequences, as well as AVI and DV Streams. You can also split and combine videos, present or record your iOS device screen, record audio and video, and much more.
You have to trim videos to capture your viewer’s attention because the average attention span of human beings is eight seconds. As such, viewers will click away or keep on scrolling if the first few seconds of your video are in complete silence or a blank screen. Luckily, there is a simple way that Mac users can use to trim videos: QuickTime Player. This guide will give you the low-down on how to trim video in Quicktime to remove unwanted portions.
In this article
02 How to Trim a Video in Quicktime Player
03 Tips & Tricks to Use QuickTime Player
What Is QuickTime Player?
Developed by Apple, QuickTime Player is a software application designed to play, edit, record, and share video and audio files on your Mac. It was created in 1991, and QuickTime X is the latest Mac version available for users of Mac OS X Snow Leopard to macOS Mojave.
QuickTime Player is supported by MovieWorks, PowerPoint, HyperCard, Director, and other standard multimedia authoring apps. One of the exciting features that QuickTime brings to the internet is that it enables video streaming over networks.
In 2016, Apple ended support for the QuickTime Windows version. In 12018, they ceased support for QuickTime 7 version on macOS.
When it comes to OS X Lion, QTKit (the underlying QuickTime media) was deplored in favor of AVFoundation, which was the newer graphics framework and discontinued as of macOS Catalina.
How to Trim a Video in Quicktime Player
Trimming video is a breeze when you are using QuickTime. Follow the steps below to learn how to trim Quicktime video clips.
- Launch QuickTime Player on your Mac. You can find this application by using a Spotlight search. Alternatively, open the Finder app in your Dock and choose the Applications option from the left-hand side menu. You’ll then find QuickTime in the right-hand side menu.
- Once QuickTime has launched, hit the File tab, then click Open File.
- Select the video you would to trim.
- Navigate to the Edit tab on the top menu with your video open.
- Select Trim in the dropdown menu. Alternatively, use the keyboard shortcut command + T.
- You’ll see a yellow trimming bar around the length of the video at the bottom.
- To QuickTime trim video, drag the handles, and the app will remove everything outside the yellow bars.
- Once you have trimmed your video, click the Trim option on the right side of your screen.
- The play icon allows you to preview your video anytime you want during the editing process.
- Click File then Save to save your trimmed video.
- Name your trimmed video, and then select the location you want to save it. Click Save to complete this action.
Tips & Tricks to Use QuickTime Player
Now that you know how to QuickTime trim video, we have provided some helpful tips and tricks for those using this application.
How to Split and Combine Videos
QuickTime player allows you to split and combine two or more video clips. Follow the steps below to learn how to split and combine your videos.
- Open your file.
- Then, press Command-E or select View > Show Clips.
- Drag the Playhead to the area where you would like the video to split.
- Press Command-Y or select Edit > Split Clip. Both clips will be highlighted yellow.
- You can now insert another video clip or re-arrange the video clips by dragging them to the right or left.
- If you split the video clips thrice, you can select the one in the middle, where a yellow outline will appear around it, and then zap it by hitting Delete on your keyboard.
- To combine your video clips, open one of the clips and select Edit > Add Clip to End.
- Double click the video clip you would like to tack on in the Open dialog box.
- You can also drag the icons of video clips from the Finder and drop them into a video window. The application will add the clips to the end of your existing video. Repeat this process to combine several video clips.
- The second video can appear in the middle of your first one. All you have to do is split the video clip, then click on the clip that will appear before the area where the new video is supposed to go.
- Now, select Edit > Insert Clip After Selection.
- A dialog box will appear; double-click the video file you would like to bring in.
- Alternatively, drag a video from the Finder and take it into the gap between the two clips.
How to Record Audio and Videos
You can record a video using a USB webcam or Mac’s built-in camera. What’s more? You can record audio with the built-in microphone on your Mac, a musical instrument connected via a USB cable, or an external mic. Or maybe you would like to record something that’s happening on your screen, QuickTime Player can also do this. Follow the steps below to record audio and video with QuickTime.
- Select File > New Screen Recording, New Audio Recording, or New Movie Recording.
- The last two options need you to choose quality and an input source. You’ll then have to hit the red Record Button. The first option will summon a pane that features the record button and some audio options.
- Drag to specify an area you want to record or click once to record the whole screen.
- Once you have finished, hit the Record button again. A black screen will appear in your menu bar when you’re recording your screen.
- The file will open in QuickTime Player when you stop recording.
- To save it, choose File > Save.
How to Export and Share Videos
QuickTime allows you to export optimized content so that you can view it on other Apple devices, including Apple TV, iPod Touch, and iPhone. With that in mind, let’s look at how you can export and share your video once you have finished editing it.
- Select File > Export; you’ll get a roundup of resolution options (1080p, 720p, and 480p), settings for Apple TV and iOS devices, and an option for only exporting audio.
- If you go with the iTunes option, you’ll see the same Apple TV and iOS devices optimized settings; however, the video file will be sent to your iTunes library.
- • To export your video and share with other users, select File > Share, and the resulting menu will include AirDrop, Messages, Mail, and the social media sharing platforms YouTube, Flickr, Facebook, and Vimeo.
- Choose the option you want, and QuickTime will optimize your video for the service or program you have selected.
- To save the changes you have made to your video file, select File > Close. Name your edited video in the box that will appear, then click Save.
Flip or Rotate a Clip
QuickTime Player also allows you to rotate or flip clips and videos with a single click. Following these step to flip or rotate your video clip.
- Navigate to the Edit tab.
- Select the direction that you want your video to turn. The available options are Flip Vertical, Flip Horizontal, Rotate Right and Rotate Left.
You can apply the changes to your entire video or one of the clips if you had divided the video file.
Present or Record your iPad or iPhone Screen
QuickTime can record or show a live view of what is happening on your iPhone or iPad. If you are using Mac for a presentation, you can show the screen of your iOS devices centered within your Mac’s screen. You only need to follow the steps below:
- Use a USB cable to attach either your iPad or iPhone to your Mac.
- Open QuickTime, then click File > New Movie Recording.
- Now, you need to point the cursor at the QuickTime Player window for the record button to appear.
- Go to the menu next to the record button and pick your iOS device from the list of cameras.
- You’re now ready to enjoy the largest version of your iPhone or iPad with your audience.
- Click Record to record the action.
Conclusion
● Video editing is an essential part of creating video content that attracts viewers. QuickTime trim video allows you to remove unwanted scenes to make it engaging. Your viewers will get hooked on your videos if you trim boring sections, blank screens, and areas with silence. Once you master the art of cutting, your viewer retention and engagement will sky-rocket.
● Don’t forget to use the tips and tricks we have provided to get the most out of this application. You can export videos to various formats, such as FLC animations and image sequences, as well as AVI and DV Streams. You can also split and combine videos, present or record your iOS device screen, record audio and video, and much more.
Find The Best Free Canon LUTs
LUTs (look-up tables) enhance color grading within photos and videos. After all, they are special editing tools for upscaling visual content. There are different types of LUTs with unique characteristics and styling. One of these categories is Canon cinematic LUTs, an exceptional 3D LUT preset. In this article, you’ll find information about Canon LUTs with the best recommendations.
- Part 2: Top-Best Free Canon LUTs To Consider in 2024
- Part 3: Using The Most Effective LUTs in Wondershare Filmora
Part 1: What are 3D LUTs?
LUTs are important editing tools for upgrading color schemas of visual content. The 3D LUTs are special LUT presets used in color correction and enhancement. 3D LUT is a mathematical table that maps input and output colors. It helps adjust the color tones, textures, and intensity in an optimized way. So, while selecting any 3D LUT filter, it’s applied in a calculated way.
The 3D LUT is equipped with three-dimensional visual art that determines brightness, hue, and saturation. It has depicted its use cases in industries like gaming and film production. Thus, they play a crucial role in matching color content from different cameras. This develops more consistency with customized looks and appealing visualization.
Part 2: Top-Best Free Canon LUTs To Consider in 2024
The Internet is overloaded with amazing download Canon LUTs. Meanwhile, choosing the right LUTs for your task can be difficult. Don’t worry; you will find the list of best Canon LUTs here:
1.Cinema Canon C-Log3
Take your video concept to the next level with cinema Canon C-Log3 LUT. In this LUT pack, you will find 25 Cinema Rec 709 and 25 Cinema C-Log3 LUTs. If you’ve videos, clips, presentations, or social videos, this LUT pack is ideal. Such LUTs are very easy to use. You only need to drag or import them into your videos.

2. City Building
Transform your city building with this free Canon LUT pack. There are exciting LUT preset filters for providing new looks into tall building structures. The combination of weather, greenery, traffic, and buildings demands upgraded looks, for which such LUTs are ideal. With special color orientation, this LUTs pack will optimize color schemes within the city.

3. Canon C-Log Blockbuster
Add special blockbusting looks to your important video clips. With the Canon C-Log Blockbuster LUTs pack, upgrade your videos with a cinematic touch. There are 20 Blockbuster C-Log LUTs that will extend the color grading of your videos. This also improves the quality of your clips, bringing more engagement. Thus, you can make your documentaries and social clips more enchanting.

4. Slight Warmth
Blend unique sunlight touch to your outdoor visual media with these free Canon LUTs. It helps you improve the standards of your images and videos with evening sunshine. Your important outdoor moments will become captured in attractive visual media with pleasing tranquility. The available LUT filter possesses a warm color gradient to initiate creativity.

5. Film Canon C-Log2
Using the film Canon C-Log2 pack, you will find amazing LUT color presets. You can use these LUT filters within your documented or personal clips and movies. Find some prominent LUTs, including the 22 Canon C-Log2 and 22 Rec 709 LUTs in the pack. All these LUTs are special and unique, with extensive color gradients. You can import the preset file or drag it into the video for magical effects.

6. Sun Flare
Are your captured images or recorded videos in a dull location? There is an option to transform quality using this sun flare Canon LUT. With its bright color presets, this LUT can correct colors within dull visual content. This way, the color schemes would be upgraded with more light and brightness. So, don’t worry, even if your picture is captured within a dull environment.

7. Vintage
You need not have any darker blueish effects on your outdoor visual media anymore. With vintage Canon LUT download, enhance color grading in an optimized way. The vintage LUT is backed with special color, tone, and style. When you apply these LUTs to your photo or video, the quality will improve. You will witness color enhancement in a quick time.

8. Blue Skies
The sky is blue as the water. Thus, if your visual content has natural landmarks, provide blue touch. After all, blueish effects will enlighten your visual content in an appealing way. With next-level color grading, you will feel special emotions and feelings vibes. The LUTs are easy to use and integrate into your images or videos.

9. Filmic Style
Blend extraordinary filmy looks into your graphical media with Filmic Style Canon LUT. This LUT is special because it leverages top-level color grading with resolution enhancements. The colors of your visual content will rise, and quality will also improve. So if you’re inspired by the cinematic display, this LUT provides optimized colors.

10. City Film
An aerial picture of your city determines its beauty. But the sandy or dusty atmosphere can ruin picture quality. Using this Canon LUT, you can upscale your city picture. There are unique color gradients that eliminate dust for clarity within the image. Meanwhile, with the correct color combination, you’ll see a clean environment overall.

11. Dusty Light
Sometimes interior images look more attractive in dusty lighting. This LUT pack comes with diverse filter presets that add brownish dusty looks. Thus, your visual content will be enhanced with optimized resolutions within dusty lighting. The Canon LUT will adjust the color schemes within your visual content. Hence, you will have a visually appealing image with outstanding dusty contrast.

12. Tinted Shades
Make your outings more attractive with stylish tints. By using this free Canon LUT, you can add faded tints to your images or videos. Meanwhile, the tinted shades will provide impressive looks within a dull atmosphere. For outdoor photography, this LUT is ideal because of its dark hues and saturated colors. The filter combines a range of color tools for the best output.

13. W&B
Black and white is a vintage color combination that is beyond levels. With this LUTs pack, you can improvise your visual content with a W&B touch. This means LUTs will replace color gradients with stylish black-and-white displays. Meanwhile, the LUT will adjust hue, saturation, contrast, and brightness. As a final result, you will receive attractive W&B content.

14. Pink Grade
Red-brownish mountains look impressive in their original colors. A pink-grade LUT filter can bring originality to your captured videos or photos. This way, the LUT will accurately apply pink color grading with consistency. The mountain which you captured will start looking great again. Pink color schemes are also more attractive when it comes to outdoor visual content.

15. Landscape
Landscapes look great in their clean yet natural colors. But if your photography or videography goes wrong, landscapes may look poor. In this scenario, using a landscape Canon LUT is a great thing to have. After all, the LUT has useful color preset filters that will provide refreshing looks. The greenery will be restored, and the blue sky will be back.

16. Landscape
The bright yet exceptional blue color of the sea is always mind-blowing. If you want to use the blueish sea filter effect, download this Canon cinematic LUTs. There are special filter effects that will enhance resoLUTions and optimize color schemas. The colors are transformed while keeping blueish sea effects in the process. The end result is always amazing, with naturally appealing graphics.

Part 3: Using The Most Effective LUTs in Wondershare Filmora
In this digital age, the use of technology is revolutionizing video editing. An example is 3D Canon LUTs for upscaling and enhancing visual colors in media. The Canon LUTs are special because of their improvised color grading and schemas. Using Wondershare Filmora , you can download Canon LUTs within a range of filter presets. There are, in total, 200+ LUT filter presets to fulfill your video editing needs within this video editor by default.
In contrast, you can use Wondershare Filmora for other video editing tasks as well. You can edit your video, add music tracks, or correct background noises. You can also add different effects, stickers, and transitions. Let’s discover more useful features of Filmora.

Top Features of Wondershare Filmora
- Stock Media: Filmora has the availability of 10 billion+ free stock media. So you if don’t have your pictures and videos, stock media can provide them. There are different categories of unique visual media.
- Extended Plug-ins: For a better editing experience, you can add countless filter plug-ins. This includes NewBlue, BorisFX, and many others. With plug-ins, you can add a more extensive color enhancement.
- Motion Tracking: The presence of motion tracking allows tracking of object movement in the video. Thus, you can pin media files, text, or graphics to that motion. Your content will look visually appealing with the use of this specific feature.
- Speed Ramping: Using Filmora, you can change the speed of your video through speed ramping. The speed could be changed uniformly or speedily. It depends on your video requirements.
Empower your videos with a new mood using different LUTs. Filmora now offers 100+ top-quality 3D LUTs cover a broad range of scenarios. Transform your videos with Filmora’s powerful 3D LUTs.
Apply LUT on Videos Apply LUT on Videos Learn More


Conclusion
Like other LUTs, Canon LUTs are also special and unique in their kind. They provide 3D cinematic looks with visually attractive color corrections. Meanwhile, in this article, you found the best Canon LUTs for editing visual media. You also learned about Wondershare Filmora, the best video editing and enhancement tool. The provided details of this video editing tool will make it easy for you to adapt to the 200+ available presets on the platform.
Part 1: What are 3D LUTs?
LUTs are important editing tools for upgrading color schemas of visual content. The 3D LUTs are special LUT presets used in color correction and enhancement. 3D LUT is a mathematical table that maps input and output colors. It helps adjust the color tones, textures, and intensity in an optimized way. So, while selecting any 3D LUT filter, it’s applied in a calculated way.
The 3D LUT is equipped with three-dimensional visual art that determines brightness, hue, and saturation. It has depicted its use cases in industries like gaming and film production. Thus, they play a crucial role in matching color content from different cameras. This develops more consistency with customized looks and appealing visualization.
Part 2: Top-Best Free Canon LUTs To Consider in 2024
The Internet is overloaded with amazing download Canon LUTs. Meanwhile, choosing the right LUTs for your task can be difficult. Don’t worry; you will find the list of best Canon LUTs here:
1.Cinema Canon C-Log3
Take your video concept to the next level with cinema Canon C-Log3 LUT. In this LUT pack, you will find 25 Cinema Rec 709 and 25 Cinema C-Log3 LUTs. If you’ve videos, clips, presentations, or social videos, this LUT pack is ideal. Such LUTs are very easy to use. You only need to drag or import them into your videos.
2. City Building
Transform your city building with this free Canon LUT pack. There are exciting LUT preset filters for providing new looks into tall building structures. The combination of weather, greenery, traffic, and buildings demands upgraded looks, for which such LUTs are ideal. With special color orientation, this LUTs pack will optimize color schemes within the city.
3. Canon C-Log Blockbuster
Add special blockbusting looks to your important video clips. With the Canon C-Log Blockbuster LUTs pack, upgrade your videos with a cinematic touch. There are 20 Blockbuster C-Log LUTs that will extend the color grading of your videos. This also improves the quality of your clips, bringing more engagement. Thus, you can make your documentaries and social clips more enchanting.
4. Slight Warmth
Blend unique sunlight touch to your outdoor visual media with these free Canon LUTs. It helps you improve the standards of your images and videos with evening sunshine. Your important outdoor moments will become captured in attractive visual media with pleasing tranquility. The available LUT filter possesses a warm color gradient to initiate creativity.
5. Film Canon C-Log2
Using the film Canon C-Log2 pack, you will find amazing LUT color presets. You can use these LUT filters within your documented or personal clips and movies. Find some prominent LUTs, including the 22 Canon C-Log2 and 22 Rec 709 LUTs in the pack. All these LUTs are special and unique, with extensive color gradients. You can import the preset file or drag it into the video for magical effects.
6. Sun Flare
Are your captured images or recorded videos in a dull location? There is an option to transform quality using this sun flare Canon LUT. With its bright color presets, this LUT can correct colors within dull visual content. This way, the color schemes would be upgraded with more light and brightness. So, don’t worry, even if your picture is captured within a dull environment.
7. Vintage
You need not have any darker blueish effects on your outdoor visual media anymore. With vintage Canon LUT download, enhance color grading in an optimized way. The vintage LUT is backed with special color, tone, and style. When you apply these LUTs to your photo or video, the quality will improve. You will witness color enhancement in a quick time.
8. Blue Skies
The sky is blue as the water. Thus, if your visual content has natural landmarks, provide blue touch. After all, blueish effects will enlighten your visual content in an appealing way. With next-level color grading, you will feel special emotions and feelings vibes. The LUTs are easy to use and integrate into your images or videos.
9. Filmic Style
Blend extraordinary filmy looks into your graphical media with Filmic Style Canon LUT. This LUT is special because it leverages top-level color grading with resolution enhancements. The colors of your visual content will rise, and quality will also improve. So if you’re inspired by the cinematic display, this LUT provides optimized colors.
10. City Film
An aerial picture of your city determines its beauty. But the sandy or dusty atmosphere can ruin picture quality. Using this Canon LUT, you can upscale your city picture. There are unique color gradients that eliminate dust for clarity within the image. Meanwhile, with the correct color combination, you’ll see a clean environment overall.
11. Dusty Light
Sometimes interior images look more attractive in dusty lighting. This LUT pack comes with diverse filter presets that add brownish dusty looks. Thus, your visual content will be enhanced with optimized resolutions within dusty lighting. The Canon LUT will adjust the color schemes within your visual content. Hence, you will have a visually appealing image with outstanding dusty contrast.
12. Tinted Shades
Make your outings more attractive with stylish tints. By using this free Canon LUT, you can add faded tints to your images or videos. Meanwhile, the tinted shades will provide impressive looks within a dull atmosphere. For outdoor photography, this LUT is ideal because of its dark hues and saturated colors. The filter combines a range of color tools for the best output.
13. W&B
Black and white is a vintage color combination that is beyond levels. With this LUTs pack, you can improvise your visual content with a W&B touch. This means LUTs will replace color gradients with stylish black-and-white displays. Meanwhile, the LUT will adjust hue, saturation, contrast, and brightness. As a final result, you will receive attractive W&B content.
14. Pink Grade
Red-brownish mountains look impressive in their original colors. A pink-grade LUT filter can bring originality to your captured videos or photos. This way, the LUT will accurately apply pink color grading with consistency. The mountain which you captured will start looking great again. Pink color schemes are also more attractive when it comes to outdoor visual content.
15. Landscape
Landscapes look great in their clean yet natural colors. But if your photography or videography goes wrong, landscapes may look poor. In this scenario, using a landscape Canon LUT is a great thing to have. After all, the LUT has useful color preset filters that will provide refreshing looks. The greenery will be restored, and the blue sky will be back.
16. Landscape
The bright yet exceptional blue color of the sea is always mind-blowing. If you want to use the blueish sea filter effect, download this Canon cinematic LUTs. There are special filter effects that will enhance resoLUTions and optimize color schemas. The colors are transformed while keeping blueish sea effects in the process. The end result is always amazing, with naturally appealing graphics.
Part 3: Using The Most Effective LUTs in Wondershare Filmora
In this digital age, the use of technology is revolutionizing video editing. An example is 3D Canon LUTs for upscaling and enhancing visual colors in media. The Canon LUTs are special because of their improvised color grading and schemas. Using Wondershare Filmora , you can download Canon LUTs within a range of filter presets. There are, in total, 200+ LUT filter presets to fulfill your video editing needs within this video editor by default.
In contrast, you can use Wondershare Filmora for other video editing tasks as well. You can edit your video, add music tracks, or correct background noises. You can also add different effects, stickers, and transitions. Let’s discover more useful features of Filmora.
Top Features of Wondershare Filmora
- Stock Media: Filmora has the availability of 10 billion+ free stock media. So you if don’t have your pictures and videos, stock media can provide them. There are different categories of unique visual media.
- Extended Plug-ins: For a better editing experience, you can add countless filter plug-ins. This includes NewBlue, BorisFX, and many others. With plug-ins, you can add a more extensive color enhancement.
- Motion Tracking: The presence of motion tracking allows tracking of object movement in the video. Thus, you can pin media files, text, or graphics to that motion. Your content will look visually appealing with the use of this specific feature.
- Speed Ramping: Using Filmora, you can change the speed of your video through speed ramping. The speed could be changed uniformly or speedily. It depends on your video requirements.
Empower your videos with a new mood using different LUTs. Filmora now offers 100+ top-quality 3D LUTs cover a broad range of scenarios. Transform your videos with Filmora’s powerful 3D LUTs.
Apply LUT on Videos Apply LUT on Videos Learn More
Conclusion
Like other LUTs, Canon LUTs are also special and unique in their kind. They provide 3D cinematic looks with visually attractive color corrections. Meanwhile, in this article, you found the best Canon LUTs for editing visual media. You also learned about Wondershare Filmora, the best video editing and enhancement tool. The provided details of this video editing tool will make it easy for you to adapt to the 200+ available presets on the platform.
Detailed Tutorial to Crop a Video Using Openshot?
OPENSHOT is a free and open source video editing software that can be used to create or edit videos for various purposes. It provides the users with some special features like easy trimming, splitting and merging of clips, etc. By using Openshot, you can easily crop your short video (a clip) and also resize it.
OpenShot is freely available for Windows, Mac, and Linux platforms. You can download the software from Openshot official web page given below.
To install the program follow the steps mentioned below:
OpenShot can be downloaded from the website <www.openshot.org>. After opening your browser, you have to select your operating system (Windows, Mac, or Linux).
Now you have to choose the correct download link for your computer. You can find 32 bit and 64-bit Openshot software there.
Once you have downloaded this software, then open it using a double click on its icon.
then a dialog box will open up on your screen, asking you to choose the language. You can select any of them based on your requirements.
Now another dialog box will appear on your screen asking you to give the location where you want to install this software. To install it in the default location, simply click on the “Next” button.
Now Openshot is successfully installed on your computer.
Openshot provides some special features like easy trimming, splitting and merging of clips, etc. You can easily cut or crop a part of your video by using its editing tools such as Crop (To remove unwanted black borders), Trim (To remove the unwanted front and end parts of your video clip).
Step-by-step on how to crop videos using Openshot?
To crop your short video (a clip) and also resize it, follow the steps given below:
Step 1: Open OpenShot Video Editor. Go to Applications> Education> OpenShot Video Editor.
Step 2: Import your video in Openshot. Under the “Project files” tab, you can either right click on your mouse and an Import Files command will show up, click it and choose the video that you want to import.

Step 3: Then, go to the “Effects” tab.

Step 4: From the list of options, you have to choose “Crop” option and drag it to the clip that you want to crop.

Step 5: After dragging it, you will see a letter ‘C’ on the clip which means crop. Right click on it and you will see few selections. Select ‘Properties’.

Step 6: Under ‘Properties’, you will see a ‘Selection’ drop down. Choose ‘Crop’. You can utilize it to adjust to your preferred video size, a video preview will show on the right side of the screen.

Step 7: You can also use the crop frame that will appear on your screen with some handles around it. You can drag these handles from four corners to resize the frame according to the content you want to crop.

Step 8: Once you have cropped your video, then go to the “File” tab in the uppermost part of the editor and select the “Save as” option and save your file.

In conclusion, follow the steps given above to crop your video, resize it and save your work.
There is a better way to do it which using Filmora. It is an online video editing software that allows its users to create videos for various purposes. It provides the users with some special features like easy trimming, splitting and merging of clips, etc. By using Filmora, you can easily crop your short video (a clip) and also resize it.
An easier way to crop video using Filmora
Wondershare Filmora Video Editor is a software created for use on Windows, designed to edit videos. It has many of the features of Adobe Premiere, but it is free.
It supports the following formats: AVI, MP4, WMV, MKV, MOV, FLV and 3GP.
Wondershare Filmora is different than most video editors in that it does not use timelines. Instead, the user edits clips in a storyboard and adds effects and titles to them. It also has an Audio Visualization feature that plays back music in your collection and shows what you’re listening to in real time. There is no voice-over tool and it is not possible to add an audio track.
Wondershare Filmora has a very large number of effects, all editable via keyframes. These include simple motion graphics such as fades and dissolves, but it also includes advanced options like motion blur and chroma-key. There are free downloadable effects, which are created by users.
Wondershare Filmora supports text editing and there is a large library of free fonts available for download on its website. It does not support green-screening/chroma-keying. This can be done in post production via Adobe Premiere or other software.
It also has the ability to add a number of different titles, which can be stacked and moved around in 3D space.
Wondershare Filmora allows you to import photos for use in slideshows and effects. Every clip or image can have its own effect applied to it if desired.
After editing, the project is rendered in real time with no waiting. You can also choose to render only part of the video by selecting the time range.
One final bonus is Wondershare Filmora’s media library, which allows users to add files from their computer and sort them by category. This makes finding your desired video a much easier task.
This software has a very simple interface that is easy to navigate, even for beginners. The design of the program makes it intuitive enough that you can start editing videos right away without having to go through tutorials. It is easy to create the desired effects and titles that you need for your video with just a few clicks. Its editing tools are powerful enough for professional use while still being easy to learn.
The one downside is that Wondershare Filmora does not support 4K resolution—the maximum output size is 1080p.
For Win 7 or later (64-bit)
For macOS 10.14 or later
Step-by-step on how to crop videos using Filmora?
To crop your short video (a clip) and also resize it, follow the steps given below:
Step 1: Open Filmora video editor. Go to the ‘Home’ menu and click on ‘Open Project’ or go to File > Open Project. Now, select your *.AVI or *.MP4 file.

Step 2: Click Alt + C in your keyboard. A small pop-out will show, it is for the command Crop and Zoom.

Step 3: Drag the corners of the frame to resize the size of your video or adjust position by dragging the handles. You can crop off anything outside this frame and hit “OK”.

Step 4: Adjust the crop and zoom as you like and finally, click on ‘Save Project As’ to export your video.

You can download Filmora free video editor from the official website easily. Just visit the behind-the-link and click on ‘Download’ to get the installer file. Once you have downloaded it, you need to install Filmora software on your computer to start using it.
Step 3: Then, go to the “Effects” tab.
Step 4: From the list of options, you have to choose “Crop” option and drag it to the clip that you want to crop.
Step 5: After dragging it, you will see a letter ‘C’ on the clip which means crop. Right click on it and you will see few selections. Select ‘Properties’.
Step 6: Under ‘Properties’, you will see a ‘Selection’ drop down. Choose ‘Crop’. You can utilize it to adjust to your preferred video size, a video preview will show on the right side of the screen.
Step 7: You can also use the crop frame that will appear on your screen with some handles around it. You can drag these handles from four corners to resize the frame according to the content you want to crop.
Step 8: Once you have cropped your video, then go to the “File” tab in the uppermost part of the editor and select the “Save as” option and save your file.
In conclusion, follow the steps given above to crop your video, resize it and save your work.
There is a better way to do it which using Filmora. It is an online video editing software that allows its users to create videos for various purposes. It provides the users with some special features like easy trimming, splitting and merging of clips, etc. By using Filmora, you can easily crop your short video (a clip) and also resize it.
An easier way to crop video using Filmora
Wondershare Filmora Video Editor is a software created for use on Windows, designed to edit videos. It has many of the features of Adobe Premiere, but it is free.
It supports the following formats: AVI, MP4, WMV, MKV, MOV, FLV and 3GP.
Wondershare Filmora is different than most video editors in that it does not use timelines. Instead, the user edits clips in a storyboard and adds effects and titles to them. It also has an Audio Visualization feature that plays back music in your collection and shows what you’re listening to in real time. There is no voice-over tool and it is not possible to add an audio track.
Wondershare Filmora has a very large number of effects, all editable via keyframes. These include simple motion graphics such as fades and dissolves, but it also includes advanced options like motion blur and chroma-key. There are free downloadable effects, which are created by users.
Wondershare Filmora supports text editing and there is a large library of free fonts available for download on its website. It does not support green-screening/chroma-keying. This can be done in post production via Adobe Premiere or other software.
It also has the ability to add a number of different titles, which can be stacked and moved around in 3D space.
Wondershare Filmora allows you to import photos for use in slideshows and effects. Every clip or image can have its own effect applied to it if desired.
After editing, the project is rendered in real time with no waiting. You can also choose to render only part of the video by selecting the time range.
One final bonus is Wondershare Filmora’s media library, which allows users to add files from their computer and sort them by category. This makes finding your desired video a much easier task.
This software has a very simple interface that is easy to navigate, even for beginners. The design of the program makes it intuitive enough that you can start editing videos right away without having to go through tutorials. It is easy to create the desired effects and titles that you need for your video with just a few clicks. Its editing tools are powerful enough for professional use while still being easy to learn.
The one downside is that Wondershare Filmora does not support 4K resolution—the maximum output size is 1080p.
For Win 7 or later (64-bit)
For macOS 10.14 or later
Step-by-step on how to crop videos using Filmora?
To crop your short video (a clip) and also resize it, follow the steps given below:
Step 1: Open Filmora video editor. Go to the ‘Home’ menu and click on ‘Open Project’ or go to File > Open Project. Now, select your *.AVI or *.MP4 file.
Step 2: Click Alt + C in your keyboard. A small pop-out will show, it is for the command Crop and Zoom.
Step 3: Drag the corners of the frame to resize the size of your video or adjust position by dragging the handles. You can crop off anything outside this frame and hit “OK”.
Step 4: Adjust the crop and zoom as you like and finally, click on ‘Save Project As’ to export your video.
You can download Filmora free video editor from the official website easily. Just visit the behind-the-link and click on ‘Download’ to get the installer file. Once you have downloaded it, you need to install Filmora software on your computer to start using it.
What Are the Best 10 GIF Creator?
What are the 10 Best GIF Creator?
An easy yet powerful editor
Numerous effects to choose from
Detailed tutorials provided by the official channel
Stay tuned to find the most affordable GIF creator solutions.
In this article
01 [Why Gifs Are Essential for Every Marketer?](#Part 1)
02 [How to Make Your Own GIF?](#Part 2)
03 [What Are 10 Best GIF Creator to Find Brilliant Pre-made Gifs?](#Part 3)
Part 1 Why Gifs Are Essential for Every Marketer?
Everyone around you today is accustomed with the fact that GIFs are an interesting and impactful means of content sharing. These 3-5 second snippets are highly preferred and convenient ways to deliver information that is precise, clear and to the point. When it comes to time frames, short and quick GIFs are obvious choices over lengthy videos. Additionally, GIFs are eye-catchy and keep you captivated to see though the entire content within seconds, contradictory to those monotonous and often dull videos that sound more like a long, boring lecture.
These are an effective media tool that is not limited to sharing information that is chiefly entertainment based or fun centered. You can use them to deliver important content that addresses a specific purpose or audience. Owing to this, GIFs have become an essential marketing utility, here’s why:
● Improve Product Branding:
GIFs can serve as impressive branding tools for your products in the market. Markets today are considerably impacted by the ‘What You See is What You Buy’ concept, which puts forward the need to lay added stress on effective branding.
GIFs are ready to sort this out with their exciting range of features. From video editing choices to sound and color customization, GIFs are loaded with everything you need to improvise your product branding. All you have to do is explore your creativity to make the most of the GIF branding choices.
● Explain it Better
On a preference poll, most of us would shift to ‘watch’ over ‘read’ for a comprehensive understanding. An attractive motion visual is an even better treat. GIFs are pivotal in making viewers relate to the concept and message behind your product in a more enhanced manner.
Additionally, these are a continent means to introduce emotional mobility among your target audience with depictive emojis. You can use GIFs to develop effective content approaches to make the audience connect with your product viability, both practically band emotionally.
● Increase Visitor Attraction
Today’s changing times have brought about a rapid outlook towards everything. All of us are bounded by time constraints and when browsing the web, the prime need is to look for quick and accurate solutions to everything concerned.
Short and exact information delivery of GIFs is something that would keep visitors glued to your site because they will be assured of getting exactly what they search for and that too in an interesting and entertaining way.
Part 2 How to Make Your Own GIF?
Now that you are familiar with the creative marketing credibility of GIFs, you might naturally feel motivated towards creating a GIF of your own. In case you are, see through the following section of this article to find out interesting ways of creating interesting and catchy GIFs, either for impressive product marketing or just to make your social media posts leave your community peers in awe!
Looking for the best GIF creator solutions on the web, you can rely on GIPHY, one of the most preferred and convenient databases to create GIFs quickly. This is a smartphone compatible tool and works well with almost any device. Follow the steps given below to make GIFs with this tool:
Step 1:
Download and install the GIPHY app in your device.
Step 2:
Click on ‘Create’ in the app’s welcome screen. This will change (+) icon at the top-right corner to the ‘Camera’ symbol. You can also navigate to the ‘Profile’ at the bottom-right and tap the (+) or ‘Camera’ icon in the app’s account page.
Step 3:
Click on ‘Allow Camera Access’. You will receive two successive prompt messages from the app. Click on ‘Allow’ to grant access permissions to your device media. When you are done, click on ‘I Agree’.
Step 4:
GIFHY uses your device’s front camera for GIF creation. However, if you need to go for a camera switch, click on the ‘Camera’ sign at the bottom-right.
Step 5:
Choose a desired filter and effect for your GIF with a left or right swipe on the live feed toolbar. The app has 11 amazing and realistic effects, including VHS Static, 3D Glasses, etc.
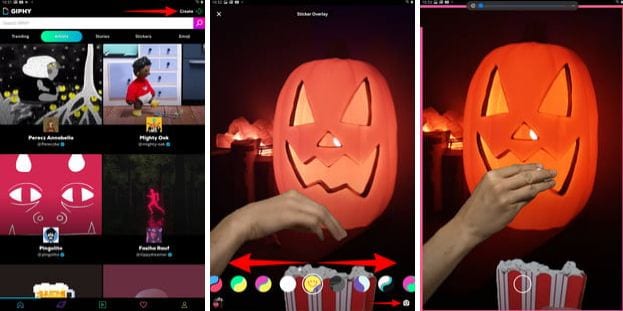
Step 6:
You can take up either of the following:
Press either of the ‘Filter’ or ‘Effect’ buttons to take static shots to create GIF from images, or press and hold the same to create animated GIF. For simply using effects, tap the white button.
In case you choose to create a motion GIF, the app forms a ‘visual timer’ around the editor screen. The motion recording stops once the line is in sync with the screen edges.
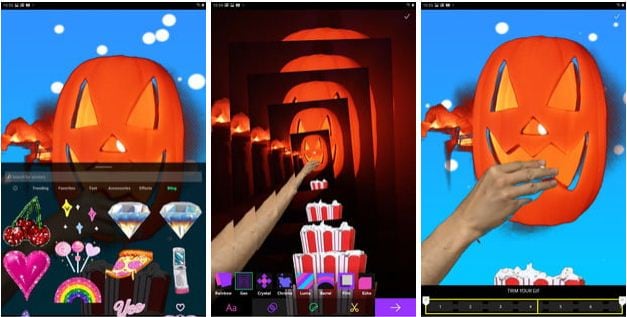
Step 7:
Having captured your perfect shot, you have the liberty to merge it with an image or video. However, do consider the following options to add some more elements to your capture: You can add relatable text in 9 color choices.
● Enhance your graphic presentation with 8 amazing effects like, ‘rainbow overlays’, BW film grains, etc.
● Choose from a never ending list of suitable stickers to add the feel through connect to your GIFs.
● Trim your animated GIFs to the ‘just perfect’ portion by adjusting the editing markers.
Relax; that’s no rocket science. Just tap on the respective buttons and there you go!

Step 8:
Set your GIF in a desired size frame by choosing the ‘Crop’ tool from the top-right corner of the editing screen. You are given a size flexibility of 1:1, 3:2, 16:9, 4:5 and 9:16.

Step 9:
Once you are satisfied with your creation, tap the ‘Right Arrow’ icon. In the interface that follows, add suitable share tags to the GIF.
Step 10:
Tap ‘Share GIF’ to post your creation on social media platforms or share it through popular IM apps. To save your initially captured clip, click on ‘Save Video’ or tap ‘Save GIF’ to save your creation in your smartphone’s memory.
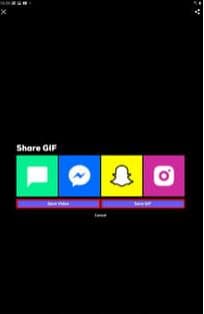
Part 1 What Are 10 Best GIF Creator to Find Brilliant Pre-made Gifs?
Having talked about GIF creation on the go, let’s take a dive into the best GIF creator solutions that are a storehouse of exciting pre-made GIFs. When browsing the web for an affordable GIF maker tool, you land across a pool of choices. Read through the further sections of this article to find out what’s best for you.
Described below are 10 best alternatives to get amazing pre-made GIFs:
● Wondershare Filmora Video Editor
This one is a popular, preferred and top rated application where you get to choose from an exciting range of pre-made GIFs under a variety of specific categories. All you need to do is, visit the app’s official site, browse to your favorite GIF category and select a desired GIF. Follow a few app instructions to save your selection and that’s it! Your selected GIF reaches your device memory within seconds.

Wondershare Filmora - Best Video Editor for Mac/Windows
5,481,435 people have downloaded it.
Build unique custom animations without breaking a sweat.
Focus on creating epic stories and leave the details to Filmora’s auto features.
Start a creative adventure with drag & drop effects and endless possibilities.
Filmora simplifies advanced features to save you time and effort.
Filmora cuts out repetition so you can move on to your next creative breakthrough.
Key Features
● This app is available to you absolutely free of cost.
● Has an intelligent and user cohesive interface.
● Loaded with tons of brilliant GIFs to choose from.
● The app supports GIF customization.
● GIFHY
Launched in 2013, this one is probably the best GIF maker and downloader tool available on the web today. It is a free tool, packed with enormous varieties of GIFs to choose from. What’s more interesting about the app is that you are free to play with your editing creativity to enhance your downloaded GIFs in the GIPHY editor.
Key Features
● It comes with an easy to use, convenient interface.
● You can edit downloaded GIFs with hundreds of effects and filters.
● The app provides you a direct sharing platform, allowing you to post GIFs to various social media platforms and also go for sharing via Instant Messaging applications.
● This is a fast processing tool that allows you to escape the notch of annoying and delayed download processes.
● Tenor
You can conveniently regard this one as the closest competitor to the GIPHY GIF creator and downloader tool. Needless to say, both are quite similar to each other in interface and usage respects. However, focusing on search results for a common keyword, you find diverse variations to your obvious surprise.
Key Features
● This is a free to use, interactive interface tool.
● It introduces a GIF Keyboard that allows you to search the most specific and relatable GIFs.
● It ensures a speedy and high quality GIF download.
● You can explore your editing skills to your heart’s content to improvise the downloaded GIFs with this tool.
● This tool gives you the liberty to directly share GIFs across different platforms.
If you like to spend ample time on choosing what’s perfect for you, refer this online tool for your GIF download solutions. It caters to your love of diversity with the most deep rooted and broad GIF range. However, this one comes with a little messy interface, demanding some patience from you to get to the right thing.
Key Features
● This tool provides you with almost all possible choices for a GIF category.
● It is available to you free of cost
● The tool site is loaded with rich and quality GIF content.
● This one is a direct save and export tool for your downloaded GIFs.
● Gfycat
You can prefer this one as a GIF hosting tool. Developed with a view to launch a common medium for GIF and HTML contents, this app ensures in-time and hassle free downloads and delivery. Though lacking a refined search bar, this tool promises you of excellence in content quality.
Key Features
● This comes to you as one of the most reliable GIF hosting tools.
● It is a free and quick content delivery tool.
● You are allowed to select the most suitable one from a variety of playback choices.
● This tool also gives you the flexibility of direct media sharing.
● GIFbin
If you are hung-over decade old nostalgia and the fever doesn’t seem to go away, you can check this site for some really satisfying retro and other similar content. This would definitely make you take a toll back to the times when MSN and Limewire were unparalleled market leaders in content sharing.
Key Features
● GIFbin is a storehouse of the best animated GIFs, that is on a continuous update to facilitate fresh and quality based content, every time you visit the site.
● It has an advanced, API enabled search mechanism.
● It boasts of having the handiest and convenient user interface.
● If you prefer GIFs of the comic genre, this tool is heaven for you.
● Imgflip
This is another GIF download site, commonly preferred for comedy and fun oriented content. Using this site, you can download and create a variety of GIF based memes that have the potential to flood your social media posts with likes and comments. This one is a complete GIF basket, suited to vast content varieties and user preferences. You will find the site’s official watermark on all its contents.
Key Features
● The site stands among the most preferred GIF-meme creation and sharing platforms.
● The tool is packed with loads of quality content under specific categories
● You can improvise the dimensions of your editing skills to modify downloaded GIFs.
● This site has a default media export feature that you can use to share your GIFs on social media.
● Imgur
Launched in 2009, this is among the most visited GIF sites, originally created for sharing meme based contents on social media. Its extensive search filters are dedicated to fetch the exact GIFs and memes you are looking for. If you are tired of browsing sites for particular content requirements, your search spree will definitely end here.
Key Features
● The site is known for its extensive and diversified content quality.
● It is a free, convenient and dependable GIF download tool.
● Imgur is highly preferred for content export across various media platforms.
● It is equipped with an advanced and updated search filter that assures you of getting fresh and top quality GIFs on almost every possible keyword.
● Tumblr
Claiming a launch date of 13 years back, this is quite a good GIF download option. You can find excellent quality GIF content on the site, particularly in the comic genre. Though not as popular as its online counterparts today, the site definitely enjoyed commendable visitor preferences at the time of its launch. You can certainly visit this site for a filling entertainment dose.
Key Features
● Tumblr is a free download site with a user friendly interface.
● The site is loaded with notable content varieties.
● You can go for direct media sharing through this site.
● Its comic GIFs are quite hilarious.
● Know Your Meme
This site uses the Wiki software to stock an inventory of classic GIFs and memes. Using this database for GIF downloads means that you don’t need to compromise on content and image quality. The site contents are periodically updated to ensure that visitors are not exposed to stale and outdated content.
Key Features
● The site offers fresh content having catchy and latest GIFs.
● This is a complete storehouse of GIFs and memes that can definitely keep you rolling.
● The site comes as a free tool and gas a user cohesive interface
● It hast the most efficient search filters that are regularly improvised to ensure quality content delivery.
● Key Takeaways from This Episode →
● GIFs are an effective and captivating means of quality content sharing and message delivery. Take them as a hilarious entertainment source or use them to enhance your marketing policies, GIFs can do it all.
● Influenced by the user credibility of GIFs, there are loads of GIF creator and download tools available online; among which Filmora by Wondershare is the current market leader. You can use this app to explore your GIF editing skills or download and share latest GIFs across media sharing platforms.
Stay tuned to find the most affordable GIF creator solutions.
In this article
01 [Why Gifs Are Essential for Every Marketer?](#Part 1)
02 [How to Make Your Own GIF?](#Part 2)
03 [What Are 10 Best GIF Creator to Find Brilliant Pre-made Gifs?](#Part 3)
Part 1 Why Gifs Are Essential for Every Marketer?
Everyone around you today is accustomed with the fact that GIFs are an interesting and impactful means of content sharing. These 3-5 second snippets are highly preferred and convenient ways to deliver information that is precise, clear and to the point. When it comes to time frames, short and quick GIFs are obvious choices over lengthy videos. Additionally, GIFs are eye-catchy and keep you captivated to see though the entire content within seconds, contradictory to those monotonous and often dull videos that sound more like a long, boring lecture.
These are an effective media tool that is not limited to sharing information that is chiefly entertainment based or fun centered. You can use them to deliver important content that addresses a specific purpose or audience. Owing to this, GIFs have become an essential marketing utility, here’s why:
● Improve Product Branding:
GIFs can serve as impressive branding tools for your products in the market. Markets today are considerably impacted by the ‘What You See is What You Buy’ concept, which puts forward the need to lay added stress on effective branding.
GIFs are ready to sort this out with their exciting range of features. From video editing choices to sound and color customization, GIFs are loaded with everything you need to improvise your product branding. All you have to do is explore your creativity to make the most of the GIF branding choices.
● Explain it Better
On a preference poll, most of us would shift to ‘watch’ over ‘read’ for a comprehensive understanding. An attractive motion visual is an even better treat. GIFs are pivotal in making viewers relate to the concept and message behind your product in a more enhanced manner.
Additionally, these are a continent means to introduce emotional mobility among your target audience with depictive emojis. You can use GIFs to develop effective content approaches to make the audience connect with your product viability, both practically band emotionally.
● Increase Visitor Attraction
Today’s changing times have brought about a rapid outlook towards everything. All of us are bounded by time constraints and when browsing the web, the prime need is to look for quick and accurate solutions to everything concerned.
Short and exact information delivery of GIFs is something that would keep visitors glued to your site because they will be assured of getting exactly what they search for and that too in an interesting and entertaining way.
Part 2 How to Make Your Own GIF?
Now that you are familiar with the creative marketing credibility of GIFs, you might naturally feel motivated towards creating a GIF of your own. In case you are, see through the following section of this article to find out interesting ways of creating interesting and catchy GIFs, either for impressive product marketing or just to make your social media posts leave your community peers in awe!
Looking for the best GIF creator solutions on the web, you can rely on GIPHY, one of the most preferred and convenient databases to create GIFs quickly. This is a smartphone compatible tool and works well with almost any device. Follow the steps given below to make GIFs with this tool:
Step 1:
Download and install the GIPHY app in your device.
Step 2:
Click on ‘Create’ in the app’s welcome screen. This will change (+) icon at the top-right corner to the ‘Camera’ symbol. You can also navigate to the ‘Profile’ at the bottom-right and tap the (+) or ‘Camera’ icon in the app’s account page.
Step 3:
Click on ‘Allow Camera Access’. You will receive two successive prompt messages from the app. Click on ‘Allow’ to grant access permissions to your device media. When you are done, click on ‘I Agree’.
Step 4:
GIFHY uses your device’s front camera for GIF creation. However, if you need to go for a camera switch, click on the ‘Camera’ sign at the bottom-right.
Step 5:
Choose a desired filter and effect for your GIF with a left or right swipe on the live feed toolbar. The app has 11 amazing and realistic effects, including VHS Static, 3D Glasses, etc.
Step 6:
You can take up either of the following:
Press either of the ‘Filter’ or ‘Effect’ buttons to take static shots to create GIF from images, or press and hold the same to create animated GIF. For simply using effects, tap the white button.
In case you choose to create a motion GIF, the app forms a ‘visual timer’ around the editor screen. The motion recording stops once the line is in sync with the screen edges.
Step 7:
Having captured your perfect shot, you have the liberty to merge it with an image or video. However, do consider the following options to add some more elements to your capture: You can add relatable text in 9 color choices.
● Enhance your graphic presentation with 8 amazing effects like, ‘rainbow overlays’, BW film grains, etc.
● Choose from a never ending list of suitable stickers to add the feel through connect to your GIFs.
● Trim your animated GIFs to the ‘just perfect’ portion by adjusting the editing markers.
Relax; that’s no rocket science. Just tap on the respective buttons and there you go!
Step 8:
Set your GIF in a desired size frame by choosing the ‘Crop’ tool from the top-right corner of the editing screen. You are given a size flexibility of 1:1, 3:2, 16:9, 4:5 and 9:16.
Step 9:
Once you are satisfied with your creation, tap the ‘Right Arrow’ icon. In the interface that follows, add suitable share tags to the GIF.
Step 10:
Tap ‘Share GIF’ to post your creation on social media platforms or share it through popular IM apps. To save your initially captured clip, click on ‘Save Video’ or tap ‘Save GIF’ to save your creation in your smartphone’s memory.
Part 1 What Are 10 Best GIF Creator to Find Brilliant Pre-made Gifs?
Having talked about GIF creation on the go, let’s take a dive into the best GIF creator solutions that are a storehouse of exciting pre-made GIFs. When browsing the web for an affordable GIF maker tool, you land across a pool of choices. Read through the further sections of this article to find out what’s best for you.
Described below are 10 best alternatives to get amazing pre-made GIFs:
● Wondershare Filmora Video Editor
This one is a popular, preferred and top rated application where you get to choose from an exciting range of pre-made GIFs under a variety of specific categories. All you need to do is, visit the app’s official site, browse to your favorite GIF category and select a desired GIF. Follow a few app instructions to save your selection and that’s it! Your selected GIF reaches your device memory within seconds.
Wondershare Filmora - Best Video Editor for Mac/Windows
5,481,435 people have downloaded it.
Build unique custom animations without breaking a sweat.
Focus on creating epic stories and leave the details to Filmora’s auto features.
Start a creative adventure with drag & drop effects and endless possibilities.
Filmora simplifies advanced features to save you time and effort.
Filmora cuts out repetition so you can move on to your next creative breakthrough.
Key Features
● This app is available to you absolutely free of cost.
● Has an intelligent and user cohesive interface.
● Loaded with tons of brilliant GIFs to choose from.
● The app supports GIF customization.
● GIFHY
Launched in 2013, this one is probably the best GIF maker and downloader tool available on the web today. It is a free tool, packed with enormous varieties of GIFs to choose from. What’s more interesting about the app is that you are free to play with your editing creativity to enhance your downloaded GIFs in the GIPHY editor.
Key Features
● It comes with an easy to use, convenient interface.
● You can edit downloaded GIFs with hundreds of effects and filters.
● The app provides you a direct sharing platform, allowing you to post GIFs to various social media platforms and also go for sharing via Instant Messaging applications.
● This is a fast processing tool that allows you to escape the notch of annoying and delayed download processes.
● Tenor
You can conveniently regard this one as the closest competitor to the GIPHY GIF creator and downloader tool. Needless to say, both are quite similar to each other in interface and usage respects. However, focusing on search results for a common keyword, you find diverse variations to your obvious surprise.
Key Features
● This is a free to use, interactive interface tool.
● It introduces a GIF Keyboard that allows you to search the most specific and relatable GIFs.
● It ensures a speedy and high quality GIF download.
● You can explore your editing skills to your heart’s content to improvise the downloaded GIFs with this tool.
● This tool gives you the liberty to directly share GIFs across different platforms.
If you like to spend ample time on choosing what’s perfect for you, refer this online tool for your GIF download solutions. It caters to your love of diversity with the most deep rooted and broad GIF range. However, this one comes with a little messy interface, demanding some patience from you to get to the right thing.
Key Features
● This tool provides you with almost all possible choices for a GIF category.
● It is available to you free of cost
● The tool site is loaded with rich and quality GIF content.
● This one is a direct save and export tool for your downloaded GIFs.
● Gfycat
You can prefer this one as a GIF hosting tool. Developed with a view to launch a common medium for GIF and HTML contents, this app ensures in-time and hassle free downloads and delivery. Though lacking a refined search bar, this tool promises you of excellence in content quality.
Key Features
● This comes to you as one of the most reliable GIF hosting tools.
● It is a free and quick content delivery tool.
● You are allowed to select the most suitable one from a variety of playback choices.
● This tool also gives you the flexibility of direct media sharing.
● GIFbin
If you are hung-over decade old nostalgia and the fever doesn’t seem to go away, you can check this site for some really satisfying retro and other similar content. This would definitely make you take a toll back to the times when MSN and Limewire were unparalleled market leaders in content sharing.
Key Features
● GIFbin is a storehouse of the best animated GIFs, that is on a continuous update to facilitate fresh and quality based content, every time you visit the site.
● It has an advanced, API enabled search mechanism.
● It boasts of having the handiest and convenient user interface.
● If you prefer GIFs of the comic genre, this tool is heaven for you.
● Imgflip
This is another GIF download site, commonly preferred for comedy and fun oriented content. Using this site, you can download and create a variety of GIF based memes that have the potential to flood your social media posts with likes and comments. This one is a complete GIF basket, suited to vast content varieties and user preferences. You will find the site’s official watermark on all its contents.
Key Features
● The site stands among the most preferred GIF-meme creation and sharing platforms.
● The tool is packed with loads of quality content under specific categories
● You can improvise the dimensions of your editing skills to modify downloaded GIFs.
● This site has a default media export feature that you can use to share your GIFs on social media.
● Imgur
Launched in 2009, this is among the most visited GIF sites, originally created for sharing meme based contents on social media. Its extensive search filters are dedicated to fetch the exact GIFs and memes you are looking for. If you are tired of browsing sites for particular content requirements, your search spree will definitely end here.
Key Features
● The site is known for its extensive and diversified content quality.
● It is a free, convenient and dependable GIF download tool.
● Imgur is highly preferred for content export across various media platforms.
● It is equipped with an advanced and updated search filter that assures you of getting fresh and top quality GIFs on almost every possible keyword.
● Tumblr
Claiming a launch date of 13 years back, this is quite a good GIF download option. You can find excellent quality GIF content on the site, particularly in the comic genre. Though not as popular as its online counterparts today, the site definitely enjoyed commendable visitor preferences at the time of its launch. You can certainly visit this site for a filling entertainment dose.
Key Features
● Tumblr is a free download site with a user friendly interface.
● The site is loaded with notable content varieties.
● You can go for direct media sharing through this site.
● Its comic GIFs are quite hilarious.
● Know Your Meme
This site uses the Wiki software to stock an inventory of classic GIFs and memes. Using this database for GIF downloads means that you don’t need to compromise on content and image quality. The site contents are periodically updated to ensure that visitors are not exposed to stale and outdated content.
Key Features
● The site offers fresh content having catchy and latest GIFs.
● This is a complete storehouse of GIFs and memes that can definitely keep you rolling.
● The site comes as a free tool and gas a user cohesive interface
● It hast the most efficient search filters that are regularly improvised to ensure quality content delivery.
● Key Takeaways from This Episode →
● GIFs are an effective and captivating means of quality content sharing and message delivery. Take them as a hilarious entertainment source or use them to enhance your marketing policies, GIFs can do it all.
● Influenced by the user credibility of GIFs, there are loads of GIF creator and download tools available online; among which Filmora by Wondershare is the current market leader. You can use this app to explore your GIF editing skills or download and share latest GIFs across media sharing platforms.
Also read:
- New You Can Splice Video on the iPhone Using Various Applications. This Article Will Guide You Through the Steps Necessary to Splice Your Videos
- 2024 Approved Know How You Can Get some Cool Discord Animated Icons Through some Simple Steps. Presenting the Latest Tool to Get Animated PFP and Logos Instantly for Discord
- New How to Use OBS Chroma Key With/Without Green Screen Easy Solutions
- MP3 Cutter Download for 2024
- Updated 2 Methods to Cut Video in VLC on Windows for 2024
- New In 2024, Best 12 Sony Vegas Slideshow Templates for Free Download
- 2024 Approved A Complete Overview of VSCO Video Editor
- New Top 8 Memoji Makers to Make a Memoji on PC, Android, and iPhone for 2024
- How Do You Create In-Camera Transitions in Your Videos? A Complete Guide for Beginners to Create These Transitions Using Their Camera at Home for 2024
- Updated Instagram Doesnt Offer Native Support for GIF Files. So, in This Post, Well Learn How to Convert a GIF to a Video for Instagram Using Multiple Methods.
- Updated Ideas That Will Help You Out in Converting AVI to GIF for 2024
- Updated In 2024, Keyframes Interval Everything You Need To Know | Filmora
- New In 2024, Blender Tips - How to Make Blender Render Transparent Background
- How to Turn On/Off Motion Blur in Fortnite for 2024 Is It Good for Fortnite?
- Updated In 2024, Know How to Create OBS Slideshow. Creating OBS Slideshow in Simple Steps; Application for Creating OBS Slideshow. Make OBS Slideshow Online
- Do You Want to Use the Best LUTs for Your Media Content but Need Help Finding Them? Here Is the Overview of the Best Free LUTs for You to Use for 2024
- Updated How to Add Camera Shake to Video in Adobe After Effects for 2024
- The After-Effects Match Colour Feature Bestows Numerous Benefits. Thus, in the Following Discussion, We Will Discuss This Feature and an Equally Proficient Efficient Alternative Tool for Colour Matching
- Updated How to Create Vintage Film Effect 1920S
- Discover the Ultimate LUTs for Wondershare Filmora Uncover the Answer
- Updated Looking for the Simple Steps to Add Transition Effects in Your Video? We Will Illustrate How to Add Transition in Filmora and Mention Tips and Tricks for Video Transition Effects
- In 2024, Do You Want to Know How to Convert YouTube SBV Subtitles to SRT Format? Here Is an Ultimate Guide About It
- Can You Enhance Your Drone Footage with Cinematic Drone LUTs? This Article Discusses Top Drone LUTs Recommendations to Simplify Video Editing
- New 2024 Approved Top 8 AR Apps for Android and iOS | Help You See the World of AR
- In 2024, Steps to Create Green Screen Videos in After Effects
- Updated How to Make Tutorial Video with Filmora for 2024
- New Mix and Match The Ultimate List of 8 Video and Photo Merging Tools for 2024
- New In 2024, Whats The Best Laptops For Video Editing
- Master Premiere Pro Custom Sequence Presets for 2024
- New Find The Best LUTs for Lightroom for 2024
- Updated 2024 Approved How to Brighten a Video in Windows 10 | Step-By-Step Guide
- Best Ways to Merge FLV Files Windows, Mac,Android, iPhone & Online for 2024
- Are You Looking to Make Subscribe Channel Graphics? Here Is a Complete Guide on How to Make One on Your Own
- Updated Learn How to Trim/Crop Video in Microsoft PowerPoint for 2024
- Do You Want to Use a Video Editor for Your iOS Device? This Article Introduces LumaFusion, a Perfect Multi-Track Video Editor Designed to Cater to Your Needs
- Updated 2024 Approved Guide Adding Audio in Wondershare Filmora
- Learn How Video Montages Were Used over Film History with Examples and the Types of Videos for Shorter Montages. Plus, Learn About the Best Software for It
- Some Facts About GIF Background You Didnt Know
- In 2024, Using This Article as a Reference, the Users Would Create a Café Meal Intro and YouTube End Screen While Knowing Multiple Ways to Download Cooking Background Music
- New 2024 Approved Hard to Remove Black Background in After Effects? Heres the Best Way to Deal With It
- New In 2024, General Knowledge About MP4 Format and Best MP4 Video Editor
- 15 Best Free Cinematic LUTs for Your Film for 2024
- New Stunning Glitch Effect and Its Creation Guideline for Premiere Pro for 2024
- Deleting White Background in Photoshop Is Hard? No
- New In 2024, 2 Methods to Cut Video in VLC on Windows
- Updated 2024 Approved S-Log Is a Gamma Curve Optimized for Digital Cameras to Maximize the Image Sensors Performance. Although These Videos May Look Flat and Washed Out, They Contain Lots of Color Information
- New 2024 Approved AVI Editors for Windows 11/10/8.1/8/7 Easily Edit AVI Files on PC
- 2024 Approved Splitting the Clips in Adobe After Effects Step by Step
- Oppo A1 5G Screen Unresponsive? Heres How to Fix It | Dr.fone
- 5 Ways to Track Lava Storm 5G without App | Dr.fone
- In 2024, Mastering Lock Screen Settings How to Enable and Disable on Vivo S17
- How to Mirror Realme C67 4G to Mac? | Dr.fone
- In 2024, How to Unlock Samsung Galaxy A34 5G Phone Password Without Factory Reset?
- Overview of the Best Xiaomi Civi 3 Screen Mirroring App | Dr.fone
- In 2024, 15 Best Strongest Pokémon To Use in Pokémon GO PvP Leagues For Oppo F23 5G | Dr.fone
- How to restore wiped videos on Realme 10T 5G
- In 2024, Universal Unlock Pattern for Realme GT Neo 5 SE
- In 2024, How to Unlock Itel P55 Pattern Lock if Forgotten? 6 Ways
- Full Guide to Catch 100 IV Pokémon Using a Map On Lava Yuva 3 | Dr.fone
- How to Change Lock Screen Wallpaper on Realme 11 Pro+
- In 2024, A Guide Nokia C32 Wireless and Wired Screen Mirroring | Dr.fone
- Complete Guide to Hard Reset Your Oppo Reno 10 Pro 5G | Dr.fone
- Best Android Data Recovery - Retrieve Lost Pictures from Hot 40i.
- In 2024, The Ultimate Guide How to Bypass Swipe Screen to Unlock on Vivo Y27 4G Device
- In 2024, Where Is the Best Place to Catch Dratini On Motorola Moto G13 | Dr.fone
- In 2024, Does Airplane Mode Turn off GPS Location On Oppo F23 5G? | Dr.fone
- Motorola Bypass Tools to Bypass Lock Screen(Motorola Edge 2023)
- How To Remove Flashlight From Apple iPhone 13 Pro Lock Screen | Dr.fone
- How To Change Oppo A79 5G Lock Screen Password?
- How to Unlock Realme V30 Phone without Google Account?
- AddROM Bypass An Android Tool to Unlock FRP Lock Screen For your Vivo Y100i
- Easy Guide How To Bypass Vivo Y100 5G FRP Android 10/11/12/13
- How to Change Your OnePlus Nord N30 SE Location on life360 Without Anyone Knowing? | Dr.fone
- In 2024, Top 10 Best Spy Watches For your Realme V30T | Dr.fone
- In 2024, CatchEmAll Celebrate National Pokémon Day with Virtual Location On Lava Yuva 3 | Dr.fone
- Which is the Best Fake GPS Joystick App On Itel A60? | Dr.fone
- In 2024, Can You Unlock iPhone 11 Pro After Forgetting the Passcode? | Dr.fone
- Unlocking Made Easy The Best 10 Apps for Unlocking Your Xiaomi Redmi 13C Device
- Forgot iPhone SE (2020) Password? – Here are the Best Solutions | Stellar
- The Most Useful Tips for Pokemon Go Ultra League On Vivo Y27 4G | Dr.fone
- How to Share/Fake Location on WhatsApp for HTC U23 Pro | Dr.fone
- In 2024, Unlock Your Vivo X90Ss Potential The Top 20 Lock Screen Apps You Need to Try
- Title: In 2024, If You Do Not Know How to QuickTime Trim Video Clips, You Are in the Right Place. We Have Provided Information that Will Help You Trim Videos with This Application and Make Them Engaging for Viewers
- Author: Morgan
- Created at : 2024-05-19 05:12:37
- Updated at : 2024-05-20 05:12:37
- Link: https://ai-video-editing.techidaily.com/in-2024-if-you-do-not-know-how-to-quicktime-trim-video-clips-you-are-in-the-right-place-we-have-provided-information-that-will-help-you-trim-videos-with-thi/
- License: This work is licensed under CC BY-NC-SA 4.0.
