
In 2024, Introduction to LUTs Their Overview and Benefits
An Introduction to LUTs | Their Overview and Benefits
In video editing, you mainly face problems related to color grading and lower attractiveness of video. To cater to these issues, you can use the LUTs because they can upscale the performance of your video in no time. Yet, if you are not familiar with the concept of LUTs, this article is for you. Here, we will discuss the meaning of having LUTs in editing and other metrics of this exceptional element.
By the end of this article, you will also discover a tool that will help you with LUTs video editing. Thus, let’s get below to learn more about LUTs.
Part 1: What Do You Know About LUTs?
LUTs are data files that stand for Look-Up Tables. These are used in video editing because they have mathematical algorithms that can color-transform both videos and photos. LUTs can also upscale the contrast and color grading of simple videos and make them color-friendly. If you are a filmmaker or a videographer, you should be familiar with the concept of LUTs.

LUTs video editing also ensures that white balance and all the color metrics in your videos are consistent so they can be used for professional purposes. Moreover, you can also implement your creativity in the video with them. There are several formats of LUTs, such as 3DL, CUBE, DAT, CSP, and more, that you can discover in various editing tools. You can find them across several platforms, such as Adobe Photoshop, DaVinci Resolve, and more.
Empower your videos with a new mood using different LUTs. Filmora now offers 100+ top-quality 3D LUTs cover a broad range of scenarios. Transform your videos with Filmora’s powerful 3D LUTs.
Apply LUT on Videos Apply LUT on Videos Learn More


Part 2: What Are the Different Types of LUTs Available for Utility?
To fully understand LUT editing, you need to be aware of the types of LUTs. In this section, we will discuss the types of LUTs. Have a look below to find out more about them:
Technical LUTs
You can use technical LUTs for postproduction editing. It can help with gamma correction, white balance adjustments, and color grading. Moreover, the main purpose of using this LUT is to ensure consistency in the videos.
Creative LUTs
If you are an artist and want to work on art photos and videos, you can use creative LUTs. With this, you can adjust colors and contrast to customize the outlook of your media. Moreover, it can also create cozy and environment-friendly looks in your videos.
Camera Specific LUTs
As the name indicates, you can use camera-specific LUTs to work with different camera brands. The camera can lead to several color dysfunctionality, but you can correct them with camera-specific LUTs. It never compromises the quality of the video, so you can use it without any issues.
Display LUTs
If you wish to customize the colors of videos or photos for a specific display device, this is your best option. It can modify the video as per the computer or television specifications. Above all, you can match the output look of your video with your intentional look with this.
Input LUTs
With this, you can manage the colors of your video from the beginning. It can help you to apply a consistent starting point to your video in an optimized manner.
Part 3: Why Are LUTs Beneficial in the Current Video Editing Fraternity?
There are several reasons that show that LUTs are beneficial for the current video editing fraternity. While you have learned some important points explaining what are LUTs, here are some of the reasons explaining their importance:
Improved Color Grading
By using LUTs, you can apply predesigned colors to the videos and photos. It can save you both time and effort and fasten the procedure of working. Thus, if you are working on tight deadlines, this can be your savior.
Highest Consistency
If you don’t have consistency in your videos, no one will watch them for a long time. To solve this issue, you can use LUTs because they can add a sense of consistency to any type of video.
Creativity Ratio
There is a wide array of creative options in LUTs. From adding vibrant colors to modifying styles, LUTs can help you with everything. Thus, it is an optimized solution to add creativity to videos.
Compatibility of LUTs
LUTs are compatible with a considerable number of video editing software. So, you can also streamline your workflow efficiency with the help of LUTs while editing your favorite videos.
Part 4: What Do You Believe About The Future of LUTs in the Video Industry?
In this digital world, you need to work with the most modernized solutions to solve your digital problems. We all make videos and photos, but bad colors can degrade their performance and attractiveness. For this reason, you can use LUTs editing. However, to import or apply LUTs, you need to know the best video editing platform.
The best and most optimized platform that can be used for this purpose is Wondershare Filmora . With this tool, you can apply LUTs to the videos and can also preview them before actually downloading the video. Other than this, it also has an effect mask by which you can apply special effect filters to the videos. It also offers video cover and export process optimization.
Add LUTs on Video For Win 7 or later(64-bit)
Add LUTs on Video For macOS 10.14 or later

Key Features of Wondershare Filmora
Wondershare Filmora has built much in LUTs video editing over time. From changing its existence from a category to a dedicated section, Filmora has come a long way. Find out some important features about Filmora and its exceptional functionality:
- With Filmora, you can optimize the cache file management along with using the feedback channels.
- You can make the interface adjustments and can also customize the intensity of LUTs from 0 to 100%.
- There are several adjustment filters in it, and you can also work on several types of videos with it, including travel and more.
Conclusion
In the following article, you have learned what are LUTs in video editing. From the definition to the compatible video editing software, you can find everything about LUTs above. Moreover, there are several types of LUTs, and you can use them as per your need. If you are looking for a platform to apply LUTs to the video, the answer is Wondershare Filmora.
Apply LUT on Videos Apply LUT on Videos Learn More
Part 2: What Are the Different Types of LUTs Available for Utility?
To fully understand LUT editing, you need to be aware of the types of LUTs. In this section, we will discuss the types of LUTs. Have a look below to find out more about them:
Technical LUTs
You can use technical LUTs for postproduction editing. It can help with gamma correction, white balance adjustments, and color grading. Moreover, the main purpose of using this LUT is to ensure consistency in the videos.
Creative LUTs
If you are an artist and want to work on art photos and videos, you can use creative LUTs. With this, you can adjust colors and contrast to customize the outlook of your media. Moreover, it can also create cozy and environment-friendly looks in your videos.
Camera Specific LUTs
As the name indicates, you can use camera-specific LUTs to work with different camera brands. The camera can lead to several color dysfunctionality, but you can correct them with camera-specific LUTs. It never compromises the quality of the video, so you can use it without any issues.
Display LUTs
If you wish to customize the colors of videos or photos for a specific display device, this is your best option. It can modify the video as per the computer or television specifications. Above all, you can match the output look of your video with your intentional look with this.
Input LUTs
With this, you can manage the colors of your video from the beginning. It can help you to apply a consistent starting point to your video in an optimized manner.
Part 3: Why Are LUTs Beneficial in the Current Video Editing Fraternity?
There are several reasons that show that LUTs are beneficial for the current video editing fraternity. While you have learned some important points explaining what are LUTs, here are some of the reasons explaining their importance:
Improved Color Grading
By using LUTs, you can apply predesigned colors to the videos and photos. It can save you both time and effort and fasten the procedure of working. Thus, if you are working on tight deadlines, this can be your savior.
Highest Consistency
If you don’t have consistency in your videos, no one will watch them for a long time. To solve this issue, you can use LUTs because they can add a sense of consistency to any type of video.
Creativity Ratio
There is a wide array of creative options in LUTs. From adding vibrant colors to modifying styles, LUTs can help you with everything. Thus, it is an optimized solution to add creativity to videos.
Compatibility of LUTs
LUTs are compatible with a considerable number of video editing software. So, you can also streamline your workflow efficiency with the help of LUTs while editing your favorite videos.
Part 4: What Do You Believe About The Future of LUTs in the Video Industry?
In this digital world, you need to work with the most modernized solutions to solve your digital problems. We all make videos and photos, but bad colors can degrade their performance and attractiveness. For this reason, you can use LUTs editing. However, to import or apply LUTs, you need to know the best video editing platform.
The best and most optimized platform that can be used for this purpose is Wondershare Filmora . With this tool, you can apply LUTs to the videos and can also preview them before actually downloading the video. Other than this, it also has an effect mask by which you can apply special effect filters to the videos. It also offers video cover and export process optimization.
Add LUTs on Video For Win 7 or later(64-bit)
Add LUTs on Video For macOS 10.14 or later
Key Features of Wondershare Filmora
Wondershare Filmora has built much in LUTs video editing over time. From changing its existence from a category to a dedicated section, Filmora has come a long way. Find out some important features about Filmora and its exceptional functionality:
- With Filmora, you can optimize the cache file management along with using the feedback channels.
- You can make the interface adjustments and can also customize the intensity of LUTs from 0 to 100%.
- There are several adjustment filters in it, and you can also work on several types of videos with it, including travel and more.
Conclusion
In the following article, you have learned what are LUTs in video editing. From the definition to the compatible video editing software, you can find everything about LUTs above. Moreover, there are several types of LUTs, and you can use them as per your need. If you are looking for a platform to apply LUTs to the video, the answer is Wondershare Filmora.
Kdenlive Video Editor Review
When you look for an open source video editor online, you will come across several popular video editors. One of them has to be Kdenlive video editor that is available free and compatible across all desktop operating systems. The video editor claims to be suitable for beginners as well as for professional video editors.
Starting from multi-track video editing and support for different file formats to loads to effects and flexible interface, Kdenlive video editor seems to be truly powerful. But is it comparable to premium video editors and is it suitable for standard and advanced video editing? Read our Kdenlive tutorial and review for everything you need to know.
Part 1. Key Features of Kdenlive
If you need to edit videos occasionally, a free video editor is what you will be looking for. Unfortunately, most free videos have very basic video editing tools and they are suitable for editing personal videos only. On the contrary, Kdenlive comes with all the standard as well as some advanced video editing features. Here are all the key features of Kdenlive video editor that you should be aware of.
Multi-track editing – Kdenlive comes with a versatile timeline where you can have multiple tracks consisting of video clips, audio files and different effects and objects. You can lock the tracks as well as mute them so that you can experiment as you edit your video.
Effects and Transitions – Even though limited, there are eye-catching effects and transitions available. You can also go for color correction as well as minor adjustments in your audio. Besides, the titler lets you create amazing 2D texts and titles.
Proxy Editing – Kdenlive uses proxy editing technique to lower the resolution of high-resolution videos while you edit them. This takes away the pressure on the CPU resources, but when it renders, the original resolution gets restored back. That is why Kdenlive has been effective in low-end computers as well.
Flexible User Interface – Kdenlive comes with a customizable user interface. This means you can arrange the layouts of your workflow as per your requirements. Besides, there are configurable keyboard shortcuts. There are also different themes available for the user interface.
Keyframing – One of the advanced features of Kdenlive is that you can keyframe any effect. This means you can change the parameters of the effects with time using curves. Besides, the software supports green screen effect.
Miscellaneous – The software supports almost all types of audio and video file formats. There is an option for automatic backup which is highly useful in any video editing software. The software also supports online resources and add-ons.
Part 2. Basic Editing with Kdenlive
Kdenlive is available for free and you should definitely try it out. Thereafter, you decide whether it is perfect for you or not. After Kdenlive download, here are all the steps for basic video editing with Kdenlive.
Import a clip:
Step 1: Launch Kdenlive on your computer and make sure you have the video clip ready on your hard drive.
Step 2: Go to Project menu option. Click on “Add Clip or Folder” option. You can include all the video clips on any folder.

Step 3: The imported clips will then have to be dragged and dropped on the timeline from Project Bin.
Trim and Export:
Step 1: Import the video clip on Kdenlive and drag and drop the clip on the timeline.
Step 2: Put the timeline cursor over the point on the video clip from where you want to trim it.

Step 3: Click on Scissor icon to start trimming. Thereafter, move the red timeline cursor to the point where you want the trimming to end.
![]()
Add multiple tracks:
There is enough number of tracks already available on Kdenlive timeline. However, when you are editing a large video project, you may need more tracks that already present.
Step 1: Go to Timeline menu option.
Step 2: Go to Tracks> Inset Track option.

Step 3: Enter a name for the track and select the type of track and click on Ok button.

Adjust brightness and contrast:
Step 1: Go to Effects> Color and Image Correction.

Step 2: Drag and drop Brightness or Contrast directly on the video clip.
Step 3: Click on Brightness that you just placed on the video clip and adjust the parameter from its slider.

Speed up or slow down:
Step 1: Right-click on the video clip that is on the timeline and click on Change Speed option.

Step 2: Adjust the slider to increase or decrease video clip speed and click on Ok button.

Part 3. Advanced Editing with Kdenlive
Now that we have discussed the basic editing Kdenlive tutorial, let us focus on a couple of useful advanced editing features of Kdenlive.
Use green screen effects:
You must have the video clip with green screen background on the timeline. Below the green screen clip should be the background image with which you want to replace the green screen background.
Step 1: Go to Effect> Alpha, Mask and Keying option.
Step 2: Drag and drop “Chroma Key : Advanced” on the video clip where there is a green screen.

Step 3: Click on video clip and adjust the parameters to soften the edges and make it as natural as possible.

**Add audio:
Adding audio files and music files to the video is as easy as adding video clips. You should have your audio file ready on your hard drive.
Step 1: Go to Project menu option. Click on “Add Clip or Folder” option. Select the audio file or folder from your hard drive.

Step 2: The imported audio files will have to be dragged and dropped on the timeline from Project Bin.

Part 4. Best Kdenlive Alternative to Edit Videos
Kdenlive has several drawbacks that prevent it from becoming the best video editor. Even though the features are sufficient for beginners, it is not suitable for professional editing. There is a lack of advanced options such as motion tracking or faster video production. Besides, the effects are very limited in number and so are the text and audio effects. That is why we recommend Wondershare Filmora as the best alternative to Kdenlive Mac and Windows.
Filmora is a premium video editor with video capturing feature. You can record your screen and webcam video. There is no dearth of effects, filters, elements and royalty-free media files. The user interface is cleaner and hence, it is suitable for both beginners and professionals. Here are the key features of Filmora.

For Win 7 or later (64-bit)
For macOS 10.12 or later
- 4K video editing and exporting without lag.
- Noise removal, color tuning, and video stabilization.
- Standard editing like trim, crop, split, join, rotate etc.
- Advanced text styles, audio mixing options, and audio equalizers.
- Wide range of stock media files. Supports different file formats.
- Capture screen and webcam video with internal and external audio.
Frequently Asked Questions
**Is Kdenlive a good editor?
Kdenlive is a good editor if you are getting started in video editing or you are editing your video for personal usage. However, for professional and even social media videos, a premium video editor will be better. We recommend Filmora over Kdenlive because Kdenlive lacks advanced video editing options.
**Does Kdenlive cost money?
Kdenlive Windows, Mac, and Linux are available free of cost as it belongs to the open-source software category. There is also no premium version available, and hence, all the features are unlocked in the free version.
**What can you do with Kdenlive?
You can trim your video, add music, add effects, adjust speed, correct colors, and add green screen effect. Besides, you can add multiple video clips and audio files to the timeline. There are options for keyframable effects as well.
Top 7 Easy Ways to Convert a Video to a GIF Online
Looking for the best video to gif online conversion tools? No worries, as we have done all the research work and have shortlisted the best tools that can assist you with the task. GIF is short and cute animated files that help in interestingly conveying a message. These short-animated visuals help in reaching and creating an impact on the target audience. So, if you have some videos, GIF animations can be created from them using a good converter tool which can be an online program or system software.
Online programs are preferred by the users owing to their simple and hassle-free use, support for basic features, and cost-saving options. So, here in this topic, we will discuss the top and easy ways to convert video to GIF online.

Part 1: Top 7 Easy Ways to Convert a Video to a GIF Online
Several online tools can be used for converting a video file into GIF, but all do not stand up to the tall claims it makes. So, if you are in search of an easy yet effective tool, shortlisted below are the top 7 tools for video into GIF online conversion.
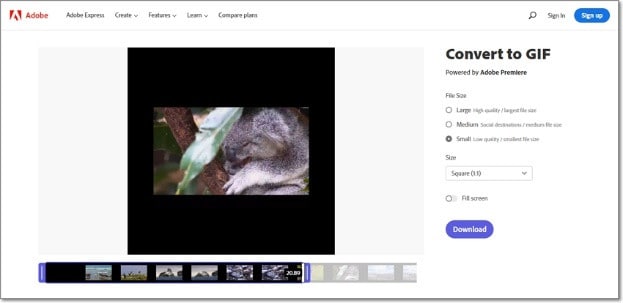
1. Adobe Express
Powered by Adobe Premiere, this is an excellent online tool that allows converting videos in all key formats in GIF format. The free version allows adding videos for up to 1 hour and the processed files can be downloaded to the local system.
Key features
- Video files in all key formats can be converted to GIF.
- Allows selecting the aspect ratio and the file size of the target file.
- This video to GIF converter online tool support drag and drop feature.
- Allows trimming the video so that the file portion can be selected.
Pros:
- Simple and clean interface.
- Quick file processing.
- Allows selecting aspect ratio and file size.
Cons:
- Only one file at a time can be processed.
- Only desktop files can be added.
- To download the file, you need to free sign-up.
User Review:
A good online multi-platform service that works with interesting features. -TechRadar
This is one of the best programs that comes packed with wide range of features that can assist you in getting the target customized files.
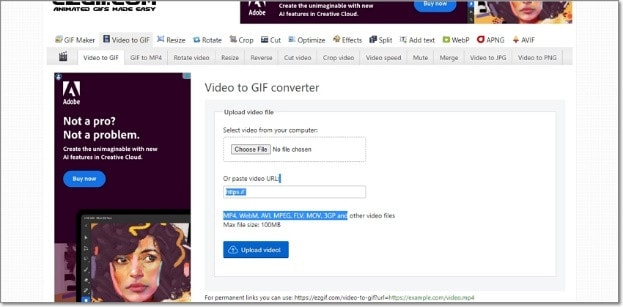
2. Ezgif
Using this browser-based tool, local as well as online videos in key formats can be converted to GIFs. The interface is simple where you just need to add the file and the conversion will be done automatically.
Key features
- GIF can be created from the local and online video files in all key formats.
- Choose the video part for creating the GIF file else by default, the first 5 seconds of the video are used.
Pros:
- All popular video formats like MP4, MPEG, FLV, MOV, and others are supported for conversion to GIF.
- Local, as well as file links in case of online files, can be added.
- Allows selecting the video part for which the GIF has to be created.
- Allows choosing the frame rate, and the size of the video.
This online GIF converter has an option to set static background.
Cons:
- File size limitation of 100 MB.
- Internet dependency.
User Review
“A website with many important and good tools that facilitates making your task easier. You get all features in one place. -Sasa011, Mywot.
This simple online tool is a pocket friendly option for converting your videos into GIF with added option for editing them. Supporting all key formats, the program supports additional tools as well.
3. Img2Go
Your videos on the system, cloud storage, as well as using URLs can be added to this online tool for conversion to GIF format. The look and the quality of GIFs can be adjusted by making changes in the file parameters.

Key features
- Convert all key video files like MP4, MOV, MPEG, and others to GIF.
- Customize the GIF look by editing the file size and applying the color filter.
- This online video to GIF converter allows to choose to enhance, sharpen, equalize, and edit files in other ways.
- Files to be converted can be added from the desktop, Google Drive, Dropbox, as well as URL.
- Processed files can be saved to the cloud storage in addition to the local system.
Pros:
- Multiple sources to add the video file.
- Customize the file parameters and enhance its look.
- Converted file is downloaded automatically to the local system.
Cons:
- Free version allows converting only 3 files at a time.
- Dependency on internet connectivity.
User review:
“This is the best online converter app I have discovered. It is really easy and fast to use. I absolutely recommend it and it really works.”-Maria Ancil, ChromeStats
When you need to convert only a few files at a time in a hassle-free manner consider this simple online tool. After the conversion is done, you would not have any hassles of file downloading as it is automatically saved to the system.
4. CloudConvert
Convert your videos in MP4, FLV, WebM, and other key formats to GIF using this browser-based tool that is simple and free to use. Multiple file parameters can be changed using the tool to get the desired file.

Key Features:
- Allows converting all key video formats.
- Files to be converted can be added from the desktop, URL, Dropbox, Google Drive, and OneDrive.
- Allows adjusting the fit, codec, resolution, aspect ratio, and fps.
- Option to trim the file and also add a watermark.
Pros:
- Files to be converted can be added from multiple sources.
- All key video formats supported.
- Option to control the video size, quality, and aspect ratio.
Cons:
- Free version allows only 25 conversions per day.
- Converted files need to be downloaded.
User Review
“Instant way of converting small-sized files online in many different formats.”
-Sushil, SoftwareAdvice
When conversion of cloud-based files is needed, this works a good online tool that also allows you to edit and change the key file parameters.
5. io
This is a free browser-based tool that allows creating of animated GIF files from videos. There are several video editing options also supported by the tool like split, cut, adding text, and more. You can even add a YouTube video or its link to create a GIF.

Key features:
- Free online tool for creating a GIF file.
- Support all key video formats like MP4, MOV, FLV, and others.
- Local, YouTube as well as videos from Dropbox can be added.
- Option to record the video and create its GIF.
- ‘Allows choosing the size, duration, background color, and several other file parameters.
Pros:
- Videos from multiple sources can be added.
- YouTube videos can also be converted to GIFs.
- Option to record the video and create its GIF.
- Support multiple video editing options.
Cons:
- Slow processing speed.
- Files processed through the free version have a watermark.
- Free version allows processing files under 10 minutes and of 250Mb in size.
User Review:
“It is just a perfect tool and easy to use. It supports a wide variety of media files.” - Koi, Trustpilot.
Option to convert the YouTube videos as well as the recorded videos make this tool different from the others. All popular file formats are supported and you can even customize and change the file parameters as per your requirements.
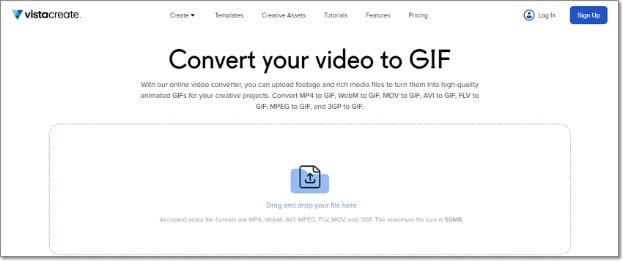
6. VistaCreate
This is another simple-to-use tool that allows converting all key video formats to a GIF file. The program allows setting various parameters as needed.
Key Features
- Convert MP4, WebM, AVI, MPEG, FLV, MOV, and 3GP to GIF.
- Support Drag and Drop feature.
- Videos up to 50MB can be processed.
- Allows choosing the video start and the end time for which GIF is to be created. If no time is selected, the first 5 seconds of the video are used.
Pros:
- Simple user interface.
- Allows selecting the video part for which GIF is to be created.
- Choose the frame rate and the speed.
Cons:
- Limited format support.
- Free version has a limitation of 50Mb file size.
- Processing speed is slow.
User Review:
“It is a simple and fast online tool that works. The program allows creating eye-catchy visuals and is free to use.”-Kshitij T, G2. Com
Simple to use, this online tool is apt when you need selected parts of the video for creating a GIF. Though it is compatible with a few selected formats, the process of conversion is simple.
7. XConvert
This online tool support conversion of wide range of file types and formats including videos to GIF. The supported video formats are MP4, WebM, MOV, and MKV. The tool also allows changing the target file parameters.

Key Features
- Free to use online tool with a simple interface.
- Allows converting MO4, MOV, WebM, and MKV videos to GIF.
- Frame Rate and resolution of the target GIF file can be selected.
- Allows adding local as well as files saved to the cloud storage.
Pros:
- Add videos from the desktop, Google Drive, and Dropbox.
- Choose the desired frame rate and resolution.
- Option to save the processed file to the system or Dropbox. Option to get the converted file download link.
Cons:
- Limited file support.
- Converted files need to be downloaded.
- Internet dependency.
User Review:
Portable, nice UI, cross-platform tool and has a lot of actions and run fast. -Roflpancake, Alternativeto
When simple conversion with basic file editing is needed, consider this online tool for your task. In addition to the local system, you can even save the files to your cloud storage.
Part 2: Comparison Table of the Best Video to GIF Converters
The table below compares the above 7 listed tools based on the formats supports, speed of file processing, and the watermark on the processed files.
| Features/Tool | Supported Format | Free Version with watermark or not | Speed of conversion |
|---|---|---|---|
| Adobe Express | All key video formats | No watermark | 2 (Fast) |
| Ezgif | All key formats including MP4, MPEG, FLV, MOV, and others. | No watermark. | 4 (Slow) |
| Img2Go | MP4, FLV, MOV, and all key video formats. | No Watermark | 2 (Fast) |
| CloudConvert | All popular video formats including MP4, MOV, FLV, MPEG, and more. | No Watermark | 2(Fast) |
| Veed.io | All key formats | Yes, free version has a watermark. | 5 (very Slow) |
| VistaCreate | MP4, WebM, AVI, MPEG, FLV, MOV, and 3GP. | No watermark | 5 (Very Slow) |
| XConvert | MP4, WebM, MOV, MKV. | No watermark | 3 (Average) |
Part 3: Best Solution to Convert Video to GIF on Windows/Mac
To convert videos to GIF on your Windows and Mac without worrying about any limitations or internet dependency, desktop software works as the best option. If you too have been looking for one such desktop program, we recommend Filmora Video Editor as the best choice. Though the software is used majorly for advanced video editing options, it is capable of performing a variety of other tasks as well including video to GIF conversion. The software allows file conversion through its export feature.
For Win 7 or later (64-bit)
For macOS 10.14 or later
Key Features
- Almost all video formats like MOV, MP4, MKV, FLV, and others can be converted to GIF.
- High-quality conversion at a fast speed.
- Support batch processing so that multiple files can be processed at a time.
- Allows editing and customizing videos using the built-in features of the software like effects, subtitles, crop, cut, and more.
Pros:
- The interface is simple which makes the software suitable even for beginners.
- Almost all popular video formats are supported.
- High-quality conversion in a hassle-free manner.
- Windows and Mac support.
Cons:
- Being a desktop software, it needs download and installation.
- Need to purchase the software subscription.
Steps to convert videos to GIF using Wondershare Filmora
Step 1. Launch the installed software on your system and the main interface select Create Project > New Project.

Step 2. Click on Import Media Files Here option under the Media tab to browse and add the local video file. Multiple files for batch processing can be added here.

Step 3. After the files are added, now it’s time to move them to the time and for this, you can simply drag and drop them to the bottom. Now at the timeline, using the built-in editing features, customization can be done as required.

Step 4. Finally, tap on the Export button and then choose GIF as the desired target format and also the location to save the converted files.

Conclusion
If one of the above-listed online tools serves your videos for GIF conversion purposes, it’s great. If not, you can use the Wondershare Filmora software. Once downloaded, the software can be used for several editing and other video-related tasks.
For macOS 10.14 or later
Key Features
- Almost all video formats like MOV, MP4, MKV, FLV, and others can be converted to GIF.
- High-quality conversion at a fast speed.
- Support batch processing so that multiple files can be processed at a time.
- Allows editing and customizing videos using the built-in features of the software like effects, subtitles, crop, cut, and more.
Pros:
- The interface is simple which makes the software suitable even for beginners.
- Almost all popular video formats are supported.
- High-quality conversion in a hassle-free manner.
- Windows and Mac support.
Cons:
- Being a desktop software, it needs download and installation.
- Need to purchase the software subscription.
Steps to convert videos to GIF using Wondershare Filmora
Step 1. Launch the installed software on your system and the main interface select Create Project > New Project.
Step 2. Click on Import Media Files Here option under the Media tab to browse and add the local video file. Multiple files for batch processing can be added here.
Step 3. After the files are added, now it’s time to move them to the time and for this, you can simply drag and drop them to the bottom. Now at the timeline, using the built-in editing features, customization can be done as required.
Step 4. Finally, tap on the Export button and then choose GIF as the desired target format and also the location to save the converted files.
Conclusion
If one of the above-listed online tools serves your videos for GIF conversion purposes, it’s great. If not, you can use the Wondershare Filmora software. Once downloaded, the software can be used for several editing and other video-related tasks.
How to Put a Filter on a Video in iMovie
There are times when you record a video and find out that the light and color in the video have been up to the mark. The light could be too bright or too dark while there could be some color overlays in certain portion as well as the entire frame of the video. Thanks to the video editing apps, you can correct any lighting and coloration issues with different filters available to apply to your video.
If you are using iPhone or Mac, you can use Apple’s iMovie app easily. Therefore, you should know how to add filters on iMovie to get the desired output. iMovie app is available for both iPhone and iPad users as well as Mac users. You do not need prior experience in video editing to add filter to your videos to enhance and improve them. We will illustrate the steps on how to add filters in iMovie as well as suggest a better iMovie alternative.
Part 1. How to add filters on iMovie iPhone
If you have an iPhone, you are more likely to record a video with your iPhone. This is because the camera quality of iPhones is extremely good and there are various modes available for capturing different types of videos like slow-motion and time-lapse. Once you capture a video with your iPhone, you can edit the video and add filters to enhance the video quality using iMovie app available for iPhone.
You have to install iMovie app from App Store as it does not come pre-install. If you already have it installed, make sure you update it to the latest version to get all the filters. Here are the steps how to put a filter on a video in iMovie app.
Step1 Open iMovie app on your iPhone. Tap on Create Project option and tap on Movie on the next screen.

Step2 Select the video from your iPhone that you want to edit and add filters. After your selection, tap on Create Movie option located at the bottom.

Step3 Your selected video will now be available on the Timeline where you can edit your video. Tap on Filters icon located at the bottom-right corner.

Step4 You will see all the different filters available on iMovie app. You can also find a slider above each selected filter. You can adjust the filter to increase or decrease the filter intensity.

Step5 Tap on Play icon to check how the filter is looking on your video. Once you are satisfied, tap on Done option located at the top-left corner.

Step6 Tap on Share icon at the bottom and then tap on Save Video option to save the modified video on your iPhone.

Part 2. How to add filters on Mac iMovie
If you are someone who regularly makes videos for social media account or video streaming channel, you are more likely to record your video using a video camera and transfer the recorded video to you Mac for editing purposes. iMovie comes pre-installed on Mac, and therefore, once you have transferred the video, you can get started with editing and adding filters immediately. Here are the steps on how to add filters to iMovie on your Mac.
Step1 Launch iMovie from Applications folder. Click on Create New option to start a new Project.

Step2 Drag and drop the target video from Photos app to Desktop. Thereafter, drag and drop the video file from Desktop to the Timeline of iMovie project.
Step3 Click on the video clip on the Timeline and click on Crop Filter and Audio Effects icon above the Viewer.

Step4 Click on Clip Filter option and you will see different filters in a window to the left. Place the mouse pointer over the filters, and you will see the filter in the Viewer.

Step5 Once you are satisfied with a filter, click on that filter to apply it to the video clip.
Part 3. iMovie Alternative to add filters on Computer
There are several reasons iMovie filters may not always serve your purpose. For example, there is no way on how to add face filters on iMovie. The collection of filters is rather limited. If you are not satisfied with the filters available on iMovie, there are several iMovie alternatives available. We recommend Wondershare Filmora due to its vast collection of filters of all categories to enhance your video to the next level. Here are steps on how to add filters to your video using Filmora on your computer.
Free Download For Win 7 or later(64-bit)
Free Download For macOS 10.14 or later
Step1 Download and install Wondershare Filmora and it is available for Mac as well as Windows users. Open Filmora and click New Project.
Step2 Drag and drop video clips under Project Media folder. Thereafter, drag and drop video clips to Timeline.

Step3 Go to Effects from the top panel and click on Filters from the left panel. You will see all the different categories of filters.

Step4 Select any filter and drag and drop it on Timeline. You can stretch the duration of the filter as per your requirements.
You can also check Overlay> Utility option from the left panel to add face filters to your video in the same manner. If you want to save the modified video, click on Export button.
Conclusion
If you are an iPhone user or a Mac user, you can add filters to your video using iMovie app. You have to install iMovie app on your iPhone, but iMovie comes pre-installed on Mac. But there are limited filters available on iMovie and there is a lack of face filters which are trending in today’s viral videos. That is why we recommend Wondershare Filmora where there is a wide range of filters available to apply to your video conveniently as per your requirements.
Free Download For macOS 10.14 or later
Step1 Download and install Wondershare Filmora and it is available for Mac as well as Windows users. Open Filmora and click New Project.
Step2 Drag and drop video clips under Project Media folder. Thereafter, drag and drop video clips to Timeline.
Step3 Go to Effects from the top panel and click on Filters from the left panel. You will see all the different categories of filters.
Step4 Select any filter and drag and drop it on Timeline. You can stretch the duration of the filter as per your requirements.
You can also check Overlay> Utility option from the left panel to add face filters to your video in the same manner. If you want to save the modified video, click on Export button.
Conclusion
If you are an iPhone user or a Mac user, you can add filters to your video using iMovie app. You have to install iMovie app on your iPhone, but iMovie comes pre-installed on Mac. But there are limited filters available on iMovie and there is a lack of face filters which are trending in today’s viral videos. That is why we recommend Wondershare Filmora where there is a wide range of filters available to apply to your video conveniently as per your requirements.
Also read:
- [Updated] Content Creation in Today’s Revenue Landscape
- [Updated] In 2024, Slide Show Software Selection From IX-IOS13
- $300 Rifts as Key to Unlocking Post-Hack Credentials
- 2024 Approved Everlasting Visual Capture Services
- 2024 Approved Mastering the Art of Attracting More YouTube Viewers
- 2024 Approved Optimizing Your Podcast's iTunes Placement
- In 2024, Optimal Video Balance Top Stabilizer Brands
- New 2024 Approved Looking Forward to Complement Your Weekend Evenings with a Fantasy Tour to the Anime World? Stay Here to Pick the Most Appealing Alternative From the Best and Timeless Anime Creations
- New Want to Find a Good Camera for YouTube? This Article Brings You some of the Best Options of Different Varieties for Your Channel for 2024
- New Wondering How to Create a Stunning Intro Video with KineMaster? Here Are the Simple Steps to Use KineMaster to Design Your Intro Video in Simple Steps for 2024
- Updated 2024 Approved Learning How to Slow Down a Video on iPhone Properly
- Updated 2024 Approved Timeline Template Is a Visual Representation Showing the Passage of Time. It Includes Text, Diagrams, Images and Icons. They Are Perfect for Telling Stories, Events Etc
- Updated In 2024, Are You Eager to Know How to Create an Adjustment Layer in Premiere Pro? This Article Will Highlight the Significance of Adding an Adjustment Layer in Premiere Pro
- Title: In 2024, Introduction to LUTs Their Overview and Benefits
- Author: Morgan
- Created at : 2024-10-02 23:19:19
- Updated at : 2024-10-06 05:16:25
- Link: https://ai-video-editing.techidaily.com/in-2024-introduction-to-luts-their-overview-and-benefits/
- License: This work is licensed under CC BY-NC-SA 4.0.