
:max_bytes(150000):strip_icc():format(webp)/superbowl_dmytroAksonov_Getty-5a775189119fa8003752b313.jpg)
In 2024, Know How to Make a Video Background Transparent? Export Transparent Background Video After Adding Effects. Steps to Remove White Background From Video
Know How to Make a Video Background Transparent? Export Transparent Background Video After Adding Effects. Steps to Remove White Background From Video
End This Problem! Make Transparent Background Video Today
An easy yet powerful editor
Numerous effects to choose from
Detailed tutorials provided by the official channel
How to export transparent video premiere? Making video transparent background online. Steps to remove white background from video.

Have you ever wondered why most shooting of videos are done in white or transparent background? The reasons are that they are simple and easy to shoot. There are various options to add some effects to the videos by removing the white background. New and attractive background can be added with some effects at less cost and time. So, there are various applications which facilitate making video background transparent as well as video without background. So, let’s see some of them along with the steps.
In this article
01 [How to Export Transparent Background Videos in After Effects?](#Part 1)
02 [How to Export Transparent Background Videos in Premiere Pro?](#Part 2)
03 [How to Export Transparent Background Videos in Vsdc](#Part 3)
04 [Best 5 Tool to Make Video Transparent Background Online](#Part 4)
Part 1 How to Export Transparent Background Videos in After Effects?

Working with transparent background is easy and the reason is the flexibility of using a white background and exporting it to other videos. So, let’s learn how to export transparent background videos in After Effects step by step:
● Before exporting the video with transparent background, chose composition. It can be timeline or project panel.
● After this selection, go to application window. Click at composition menu and elect Add to Render Queue.
● You can see that Render Queue window will open with composition in the queue.
● Go to settings and select as required
● Take the cursor on the left side of window and go to the drop down menu. You will find the Output Module settings window.
● Go to format and select QuickTime, the industry standard.
● Staying at Output Module settings window, under Video Output, click Channels
● Select RGB + Alpha
● Click OK
This way you can also export transparent background after effects in After effects. You can easily export your video after effects file with variable alpha layers. With layering you can add variations in the videos through various layering effects. It can used to design a project with better results.
Part 2 How to Export Transparent Background Videos in Premiere Pro?
Sometimes a Transparent Background Video needs some cool effects for some projects. This can be done by exporting a video file in Premiere Pro. The steps to be followed for exporting a transparent background video are as follows:
● Load your video in Premiere Pro with transparent background. Do all the necessary editing so that the overlay is obtained for production.
● When the video is ready, move to the setting part. Here go to file menu and open export setting. Click on media.
● After this, there is need to configure the export setting particularly for transparent background. Just few setting more are required to ensure that the transparent background video or projects are exported well.
● In order to ensure that a video format supports transparency, do the required settings. Go to export format at the right of the window. Set it to Quick time. It is always good to export by using Quick time. However if you don’t need to export using Quick time and need MOV format, you can still do that. You can use the software Adobe Premiere Pro to import the other type of files also.
● Get alpha channel enabled. When the video format is all done, get to same column and you will find ‘Effects’, Video and audio tab. You can get some unique setting through this to export the videos of Premiere Pro.
● Go to “Video Codec” settings and elect the “None” options. This gives the best result outcome for transparent backgrounds. Particularly for transparent video overlay free and animations. For example YouTube subscribe button video animation.
● To enable alpha channel, go to the “Basic Video Settings” options. Get to the “depth” option. Here you can enable the alpha channel in the export settings. After doing that the alpha channel will permit to export transparent video backgrounds.
● Clicking on the button with the” + alpha” option inside the “Depth” setting. This will enable the alpha setting.
● Also check “Render at Maximum Depth”. This will help in obtaining a max depth which will give transparent video smoother and better results. They are good for higher quality videos.
● When all configurations is done, Proceed to export the video. The file from Adobe Premiere Pro gave you can be used. The process can be followed to export the other files also.
Part 3 How to Export Transparent Background Videos in Vsdc
No background video is very difficult to handle as people face trouble to export them due to their formats. Some formats do not support transparency. MOV and Gifs formats are good for transparent background. Vsdc can be used to make video background transparent as well as remove white background video. Following steps should be followed to export transparent background video in Vsdc:
● Open VSDC and go to start screen and click the Import content button. Select the green screen video from PC.
● Go to Project’s settings window and search for Opacity and kept it zero and click Finish.
● Then go to Video effects menu. Move to Transparency and then Background remover. Click Ok.
● The green light borders can be changed through Properties window
● When all things are ready open the Export project tab. From “Media devices” select PC.
● From “Output video formats”, choose MOV.
● Go to preview window and look for “Edit profile” button. Click and change the codec of the video.
● Go to Video settings menu, opt for Video codec >> PNG lossless.
● Lastly click on Apply profile
This way you can have a video after effects export with transparent background. This is just simple to export a video with a transparent background. It can be further used in various applications to create great effects.
Part 4 Best 5 Tool to Make Video Transparent Background Online
Various software offer number of fantastic tools for making video background transparent online. It can export a video by making series of pictures or videos more attractive and memorable.
Some of the tools or the makers to make Transparent Background Video are as under:
01Canva
The online version of canva can be used to edit images and videos. This is one of the widest tools chosen by the users in making and editing videos and images. The best thing is that it can be easily installed at PC and phones. It just needs Javascript in your browser. Transparent background option can be chosen to change the background of the image and make it visually attractive. It has convenient controls that change the background into transparent one easily.
02Online PNG Tools
If you are looking for a tool that can make your video background transparent in just few clicks, then Online PNG tools is the best option. You can upload many files and it allows you to turn them into transparent backgrounds. It is good when a user desire to turn a background easily and the level of perfection required is not much high. It is fast, free and easy to use which makes it an affordable tool.
03LunaPic
It is a free online picture and video editing tool that can effortlessly help in importing, adding effects and customization. Its edit option allows the users to upload the picture and perform the task to turn a background of picture or video transparent. In just few simple steps the required changes can be made. The best thing with this tool is that the output result does not affect the quality. One can also personalize the pictures which has high standards.
04Microsoft Paint
This is from Microsoft and the most widely used tool for pictures and video creation, editing and adding effects. Its drawing and editing tools make it first preference for every beginner and a professional. One can easily turn a picture background transparent through following few steps through ‘Select’ option. Go to ‘Transparent Selection’ from the list and turn an image background transparent. It can also go smooth with other applications to have transparent video format.
05Photoshop
When you are looking for a tool that can work with Windows, Android and iOS for adding transparent background online, then Photoshop shall be a good option. It can add some great effects in flawless manner in very less time. It works excellently on various elements such as brightness, transparent background and customization of pictures. This is a good platform to add visualization to images. One can add transparent background by going to background option.
These are some of the tools that can be used to make transparent background. If you need something like Pro, then you can try Filmora from Wondershare.
Filmora can be defined in number of ways. It is software, an application and a platform that provides an opportunity to a person to expand his creativity with some good picture and video editing tools. The green screen feature makes any background transparent. Variety of sound, text, video effects and animations help the users to make their projects better and presentable.
Wondershare Filmora Video Editor is a free tool that works on Artificial Intelligence. It detects the background and does editing on the same. It can remove the backgrounds from different kinds of images, videos, and presentations. This tool is great for those who need to bring some fantastic changes on the background of the images with no more hassle. It has advantage over the other tools as it works precisely on backgrounds and make sure that no details are disturbed from the original subject.
For Win 7 or later (64-bit)
For macOS 10.12 or later
● Ending Thoughts →
● The background on any image or video plays an important role in creating a visual impact. A background should be such that it may not be difficult to a creator to utilize the original picture, video or subject for its other projects. Hence in order to use them in other themes, exporting of transparent background should be easy. This can be done through various software or applications.
● Various platforms can be used to know the steps of exporting transparent background of images or videos. The selection shall be based on the degree of perfection, affordability, ease of use and volume of work. The various applications that offer exporting transparent background videos are After Effects; Premiere Pro, Vsdc and many more.
● The various tools for making transparent backgrounds are Online PNG Tools, Canva, Photoshop, MS paint, LunaPic and Filmora. Filmora is one of the most popular platforms that have different image and video editing tools. One can easily create, edit and export transparent backgrounds of images and videos through Filmora.
How to export transparent video premiere? Making video transparent background online. Steps to remove white background from video.
Have you ever wondered why most shooting of videos are done in white or transparent background? The reasons are that they are simple and easy to shoot. There are various options to add some effects to the videos by removing the white background. New and attractive background can be added with some effects at less cost and time. So, there are various applications which facilitate making video background transparent as well as video without background. So, let’s see some of them along with the steps.
In this article
01 [How to Export Transparent Background Videos in After Effects?](#Part 1)
02 [How to Export Transparent Background Videos in Premiere Pro?](#Part 2)
03 [How to Export Transparent Background Videos in Vsdc](#Part 3)
04 [Best 5 Tool to Make Video Transparent Background Online](#Part 4)
Part 1 How to Export Transparent Background Videos in After Effects?
Working with transparent background is easy and the reason is the flexibility of using a white background and exporting it to other videos. So, let’s learn how to export transparent background videos in After Effects step by step:
● Before exporting the video with transparent background, chose composition. It can be timeline or project panel.
● After this selection, go to application window. Click at composition menu and elect Add to Render Queue.
● You can see that Render Queue window will open with composition in the queue.
● Go to settings and select as required
● Take the cursor on the left side of window and go to the drop down menu. You will find the Output Module settings window.
● Go to format and select QuickTime, the industry standard.
● Staying at Output Module settings window, under Video Output, click Channels
● Select RGB + Alpha
● Click OK
This way you can also export transparent background after effects in After effects. You can easily export your video after effects file with variable alpha layers. With layering you can add variations in the videos through various layering effects. It can used to design a project with better results.
Part 2 How to Export Transparent Background Videos in Premiere Pro?
Sometimes a Transparent Background Video needs some cool effects for some projects. This can be done by exporting a video file in Premiere Pro. The steps to be followed for exporting a transparent background video are as follows:
● Load your video in Premiere Pro with transparent background. Do all the necessary editing so that the overlay is obtained for production.
● When the video is ready, move to the setting part. Here go to file menu and open export setting. Click on media.
● After this, there is need to configure the export setting particularly for transparent background. Just few setting more are required to ensure that the transparent background video or projects are exported well.
● In order to ensure that a video format supports transparency, do the required settings. Go to export format at the right of the window. Set it to Quick time. It is always good to export by using Quick time. However if you don’t need to export using Quick time and need MOV format, you can still do that. You can use the software Adobe Premiere Pro to import the other type of files also.
● Get alpha channel enabled. When the video format is all done, get to same column and you will find ‘Effects’, Video and audio tab. You can get some unique setting through this to export the videos of Premiere Pro.
● Go to “Video Codec” settings and elect the “None” options. This gives the best result outcome for transparent backgrounds. Particularly for transparent video overlay free and animations. For example YouTube subscribe button video animation.
● To enable alpha channel, go to the “Basic Video Settings” options. Get to the “depth” option. Here you can enable the alpha channel in the export settings. After doing that the alpha channel will permit to export transparent video backgrounds.
● Clicking on the button with the” + alpha” option inside the “Depth” setting. This will enable the alpha setting.
● Also check “Render at Maximum Depth”. This will help in obtaining a max depth which will give transparent video smoother and better results. They are good for higher quality videos.
● When all configurations is done, Proceed to export the video. The file from Adobe Premiere Pro gave you can be used. The process can be followed to export the other files also.
Part 3 How to Export Transparent Background Videos in Vsdc
No background video is very difficult to handle as people face trouble to export them due to their formats. Some formats do not support transparency. MOV and Gifs formats are good for transparent background. Vsdc can be used to make video background transparent as well as remove white background video. Following steps should be followed to export transparent background video in Vsdc:
● Open VSDC and go to start screen and click the Import content button. Select the green screen video from PC.
● Go to Project’s settings window and search for Opacity and kept it zero and click Finish.
● Then go to Video effects menu. Move to Transparency and then Background remover. Click Ok.
● The green light borders can be changed through Properties window
● When all things are ready open the Export project tab. From “Media devices” select PC.
● From “Output video formats”, choose MOV.
● Go to preview window and look for “Edit profile” button. Click and change the codec of the video.
● Go to Video settings menu, opt for Video codec >> PNG lossless.
● Lastly click on Apply profile
This way you can have a video after effects export with transparent background. This is just simple to export a video with a transparent background. It can be further used in various applications to create great effects.
Part 4 Best 5 Tool to Make Video Transparent Background Online
Various software offer number of fantastic tools for making video background transparent online. It can export a video by making series of pictures or videos more attractive and memorable.
Some of the tools or the makers to make Transparent Background Video are as under:
01Canva
The online version of canva can be used to edit images and videos. This is one of the widest tools chosen by the users in making and editing videos and images. The best thing is that it can be easily installed at PC and phones. It just needs Javascript in your browser. Transparent background option can be chosen to change the background of the image and make it visually attractive. It has convenient controls that change the background into transparent one easily.
02Online PNG Tools
If you are looking for a tool that can make your video background transparent in just few clicks, then Online PNG tools is the best option. You can upload many files and it allows you to turn them into transparent backgrounds. It is good when a user desire to turn a background easily and the level of perfection required is not much high. It is fast, free and easy to use which makes it an affordable tool.
03LunaPic
It is a free online picture and video editing tool that can effortlessly help in importing, adding effects and customization. Its edit option allows the users to upload the picture and perform the task to turn a background of picture or video transparent. In just few simple steps the required changes can be made. The best thing with this tool is that the output result does not affect the quality. One can also personalize the pictures which has high standards.
04Microsoft Paint
This is from Microsoft and the most widely used tool for pictures and video creation, editing and adding effects. Its drawing and editing tools make it first preference for every beginner and a professional. One can easily turn a picture background transparent through following few steps through ‘Select’ option. Go to ‘Transparent Selection’ from the list and turn an image background transparent. It can also go smooth with other applications to have transparent video format.
05Photoshop
When you are looking for a tool that can work with Windows, Android and iOS for adding transparent background online, then Photoshop shall be a good option. It can add some great effects in flawless manner in very less time. It works excellently on various elements such as brightness, transparent background and customization of pictures. This is a good platform to add visualization to images. One can add transparent background by going to background option.
These are some of the tools that can be used to make transparent background. If you need something like Pro, then you can try Filmora from Wondershare.
Filmora can be defined in number of ways. It is software, an application and a platform that provides an opportunity to a person to expand his creativity with some good picture and video editing tools. The green screen feature makes any background transparent. Variety of sound, text, video effects and animations help the users to make their projects better and presentable.
Wondershare Filmora Video Editor is a free tool that works on Artificial Intelligence. It detects the background and does editing on the same. It can remove the backgrounds from different kinds of images, videos, and presentations. This tool is great for those who need to bring some fantastic changes on the background of the images with no more hassle. It has advantage over the other tools as it works precisely on backgrounds and make sure that no details are disturbed from the original subject.
For Win 7 or later (64-bit)
For macOS 10.12 or later
● Ending Thoughts →
● The background on any image or video plays an important role in creating a visual impact. A background should be such that it may not be difficult to a creator to utilize the original picture, video or subject for its other projects. Hence in order to use them in other themes, exporting of transparent background should be easy. This can be done through various software or applications.
● Various platforms can be used to know the steps of exporting transparent background of images or videos. The selection shall be based on the degree of perfection, affordability, ease of use and volume of work. The various applications that offer exporting transparent background videos are After Effects; Premiere Pro, Vsdc and many more.
● The various tools for making transparent backgrounds are Online PNG Tools, Canva, Photoshop, MS paint, LunaPic and Filmora. Filmora is one of the most popular platforms that have different image and video editing tools. One can easily create, edit and export transparent backgrounds of images and videos through Filmora.
Best Free LUTs To Use in Shotcut
In this content-driven age, people love to express their emotions through high-quality videos and photos. You can also share your experiences of a trip with other people in the form of videos. Yet to make that video higher quality and engaging, you need vibrant colors. There is no better way to make videos more captivating than to use Shotcut LUTs.
Here on these pages, you will find detailed information about LUTs for Shotcut. Other than we will also guide you about applying LUTs on the videos without any complications.
Part 1: What Do You Know About LUTs in General? What are Their Use Cases
LUTs are the shorter term for Lookup Tables and are used for image processing and video editing. LUTs are mathematical algorithms or tables that can set the color values of the media content to make it more engaging. There are diversified ways through which you can control and customize several metrics of your videos, such as color, brightness, and more.
In addition, LUTs offer a wide array of formats, including 1D, 3D and other LUTs. If you are working on a professional-grade video, you can use the 3D LUTs. However, the 1D LUTs have enough capabilities to make your videos more engaging. You can also use DaVinci Resolve, Shotcut, Adobe Photoshop, or other software to apply LUTs to the videos.
Use Cases of the LUTs
Here are several cases in which you can use the Shotcut LUTs:
- Color Grading and Film Emulation: With LUTs, you can emulate the look of any video in a limited time. Above all, LUTs can also help in color grading, enhancing the video’s overall look. Other than this, you can also control the color metrics, which can lead to a customized look of shots.
- Cinematic Looks and Correction: By using the latest LUTs, you can employ a natural cinematic look in the videos. Above all, they also have the capability to add an aesthetic look to the videos, which can create consistency. Moreover, you can also fix the color problems with LUTs.
- Color Processing and VFX: Along with adding visual effects in videos, you can also streamline your workflow efficiency with it. Moreover, you can also discriminate the color processing and fix all the color issues.
- Calibration and Stimulation: To ensure accurate color representation, you need to adjust the colors and gamma response. Luckily, LUTs can help you to do this without issue. You can also utilize it to enhance important scenes and conditions.
Empower your videos with a new mood using different LUTs. Filmora now offers 100+ top-quality 3D LUTs cover a broad range of scenarios. Transform your videos with Filmora’s powerful 3D LUTs.
Apply LUT on Videos Apply LUT on Videos Learn More


Part 2: Finding the Best LUTs for Using in Shotcut
If you are new in the field of video editing, you must be looking for LUTs that can enhance your Shotcut videos. You can put your concerns to rest as we are going to introduce the LUTs Shotcut in this section. By using the LUTs discussed here, you can upgrade the coloring metrics of your videos in no time:
1. Cinematic LUTs
If you need to make the videos more captivating and attractive, cinematic LUT is the option of recommendation. With these LUTs, you can add stunning effects to the videos. Moreover, it is equipped with modernized colors, so you don’t have to worry about making extra efforts to make your video rank. The dimensions of this LUT are 1920x1080 (HD), so you can make videos of higher quality.

2. Indie Film LUTs
With Indie Film LUTs, you can add the filmy touch to simple videos. It can also be used to convert low-quality videos into the highest-quality films. This adds to you make your videos blockbuster and has optimized file size capability. Furthermore, it can work on video captured with any camera, so there is no restriction on device compatibility.

3. Moody LUTs Pack
Moody LUTs can add the most savage feelings in your simplest videos and photos. It not only changes the colors in the video but also presents the video with a moody feel. Moreover, you can use this LUT for both personal and professional use. It also enhances the details in the videos, which makes the characters more notable.

4. Urban LUTs
If you are an age-town girl in the city and want to present your videos in city style, Urban LUTs can aid you. It can add a realistic look to the videos and work with RAW and LOG. It can also give an aesthetic look to the videos and add consistency. You can also use it for inspiration and references.

5. Portrait LUTs
If you love to create portrait-oriented videos, these LUTs can help you a lot. You can implement your creativity and imagination into the videos and present it to the audience. Above all, it can work with several video editing software, which also makes it a better choice. It also has the capability to add a filmy, lush, grainy, and warm look to the videos.

6. Luxury Grey LUTs
As the name indicates, you can give the most luxurious outlook to the video with it. This LUT can also work on any video without facing any restrictions. Moreover, it is perfect for promoting a product to gain more marketing value. You can add it to marketing ads for several products, such as watches, glasses, and more.

7. Nature LUTs
When working with landscapes or nature videos, sunlight or other lightening issues can impact the video quality. To cater to this, you can take assistance from Nature LUTs. It can add nutty, alive, bamboo, hazel, or many other effects to the videos. The quality of this LUT is also a term to discuss, which plays an essential role in making it unique.

8. Bright Food LUTs for Photo & Video
Food bloggers can never be satisfied with the quality of their food videos. Thus, you can rest easy because this LUT can handle the quality issues of your videos. You can use it to make the food look more delightful and tasty in the videos. It can also be used to add the Bon Appetite effects, which can escalate the engagement ratio of the videos.

Part 3: How to Apply LUTs in Shotcut: A Guide
Is your video extra bright, and now you wish to optimize its color quality? Worry no more because you can take assistance from free LUTs Shotcut to get through this. However, many of you don’t know the procedure to apply LUTs to the videos with Shotcut.
The instructions given below are specifically designed to help you with applying LUTs on video. Follow the steps here to get the work done:
Step 1: First and foremost, find the LUTs that suit the theme of the videos and download it. Following this, go to “Downloads” and right-click “LUTs Files.” Hit the “Extract Here” option to extract the LUTs.

Step 2: Open Shotcut on your computer and import the video. Once the video is opened with Shotcut, click on the “Add a Filter” icon and select “LUT (3D)” while you are in the “Videos” section. Again, select “LUT (3D)” and tap on the “Open” button.

Step 3: To proceed, select the “LUT” from the prompt window and click “Open.” Once the LUT is added, mark the “Checkbox” to enable it. You can also notice the difference in the video before and after adding the LUTs. If you are working on multiple small clips and wish to apply the same LUT on them, select the “Copy” icon.
After this, tap on the clip and select the “Paste” icon. Again, mark the “Checkbox” to apply LUT on the entire video. In case you want to apply the different LUT, choose the clip in “Timeline” and again follow the above procedure to add LUTs.

Conclusion
To sum up everything, you can use the Shotcut LUTs to escalate the quality of your video in no time. Moreover, it can also fix all the color grading issues from the videos and photos. You can also use them for professional purposes, as the LUTs never impact the overlays and content of the video.
There are uncountable LUTs on the web, and you can find some of the commonly used ones above. Moreover, the procedure to apply LUTs to the videos using Shotcut is also discussed above for your ease. You can follow the steps above to maximize your video’s attractiveness in no time.
You can try another video editor - Filmora to add LUTs on videos.
Add LUTs on Video For Win 7 or later(64-bit)
Add LUTs on Video For macOS 10.14 or later
Apply LUT on Videos Apply LUT on Videos Learn More
Part 2: Finding the Best LUTs for Using in Shotcut
If you are new in the field of video editing, you must be looking for LUTs that can enhance your Shotcut videos. You can put your concerns to rest as we are going to introduce the LUTs Shotcut in this section. By using the LUTs discussed here, you can upgrade the coloring metrics of your videos in no time:
1. Cinematic LUTs
If you need to make the videos more captivating and attractive, cinematic LUT is the option of recommendation. With these LUTs, you can add stunning effects to the videos. Moreover, it is equipped with modernized colors, so you don’t have to worry about making extra efforts to make your video rank. The dimensions of this LUT are 1920x1080 (HD), so you can make videos of higher quality.
2. Indie Film LUTs
With Indie Film LUTs, you can add the filmy touch to simple videos. It can also be used to convert low-quality videos into the highest-quality films. This adds to you make your videos blockbuster and has optimized file size capability. Furthermore, it can work on video captured with any camera, so there is no restriction on device compatibility.
3. Moody LUTs Pack
Moody LUTs can add the most savage feelings in your simplest videos and photos. It not only changes the colors in the video but also presents the video with a moody feel. Moreover, you can use this LUT for both personal and professional use. It also enhances the details in the videos, which makes the characters more notable.
4. Urban LUTs
If you are an age-town girl in the city and want to present your videos in city style, Urban LUTs can aid you. It can add a realistic look to the videos and work with RAW and LOG. It can also give an aesthetic look to the videos and add consistency. You can also use it for inspiration and references.
5. Portrait LUTs
If you love to create portrait-oriented videos, these LUTs can help you a lot. You can implement your creativity and imagination into the videos and present it to the audience. Above all, it can work with several video editing software, which also makes it a better choice. It also has the capability to add a filmy, lush, grainy, and warm look to the videos.
6. Luxury Grey LUTs
As the name indicates, you can give the most luxurious outlook to the video with it. This LUT can also work on any video without facing any restrictions. Moreover, it is perfect for promoting a product to gain more marketing value. You can add it to marketing ads for several products, such as watches, glasses, and more.
7. Nature LUTs
When working with landscapes or nature videos, sunlight or other lightening issues can impact the video quality. To cater to this, you can take assistance from Nature LUTs. It can add nutty, alive, bamboo, hazel, or many other effects to the videos. The quality of this LUT is also a term to discuss, which plays an essential role in making it unique.
8. Bright Food LUTs for Photo & Video
Food bloggers can never be satisfied with the quality of their food videos. Thus, you can rest easy because this LUT can handle the quality issues of your videos. You can use it to make the food look more delightful and tasty in the videos. It can also be used to add the Bon Appetite effects, which can escalate the engagement ratio of the videos.
Part 3: How to Apply LUTs in Shotcut: A Guide
Is your video extra bright, and now you wish to optimize its color quality? Worry no more because you can take assistance from free LUTs Shotcut to get through this. However, many of you don’t know the procedure to apply LUTs to the videos with Shotcut.
The instructions given below are specifically designed to help you with applying LUTs on video. Follow the steps here to get the work done:
Step 1: First and foremost, find the LUTs that suit the theme of the videos and download it. Following this, go to “Downloads” and right-click “LUTs Files.” Hit the “Extract Here” option to extract the LUTs.
Step 2: Open Shotcut on your computer and import the video. Once the video is opened with Shotcut, click on the “Add a Filter” icon and select “LUT (3D)” while you are in the “Videos” section. Again, select “LUT (3D)” and tap on the “Open” button.
Step 3: To proceed, select the “LUT” from the prompt window and click “Open.” Once the LUT is added, mark the “Checkbox” to enable it. You can also notice the difference in the video before and after adding the LUTs. If you are working on multiple small clips and wish to apply the same LUT on them, select the “Copy” icon.
After this, tap on the clip and select the “Paste” icon. Again, mark the “Checkbox” to apply LUT on the entire video. In case you want to apply the different LUT, choose the clip in “Timeline” and again follow the above procedure to add LUTs.
Conclusion
To sum up everything, you can use the Shotcut LUTs to escalate the quality of your video in no time. Moreover, it can also fix all the color grading issues from the videos and photos. You can also use them for professional purposes, as the LUTs never impact the overlays and content of the video.
There are uncountable LUTs on the web, and you can find some of the commonly used ones above. Moreover, the procedure to apply LUTs to the videos using Shotcut is also discussed above for your ease. You can follow the steps above to maximize your video’s attractiveness in no time.
You can try another video editor - Filmora to add LUTs on videos.
Add LUTs on Video For Win 7 or later(64-bit)
Add LUTs on Video For macOS 10.14 or later
How To Add Text In After Effects
In almost every video you come across, you will see text added to the video in different parts. There are various reasons why adding text to videos becomes a necessity. First of all, you can highlight the underlying message or key points in your video. Along with audio and video, the viewers will have another cue point in the form of text that they can retain in their memory for longer. You add animated texts to video to make the video interesting to watch and break the monotony of visual cues only.
Besides, you may have to want credits and add intro as well as outro to your video where adding text is almost a necessity. Text can help your viewer get the context of your video and make sense of the content. After Effects is a popular video editor thanks to its visual effects, text animation animations, and instant video enhancement tools. We will illustrate the different ways of adding text in After Effects in simple steps.
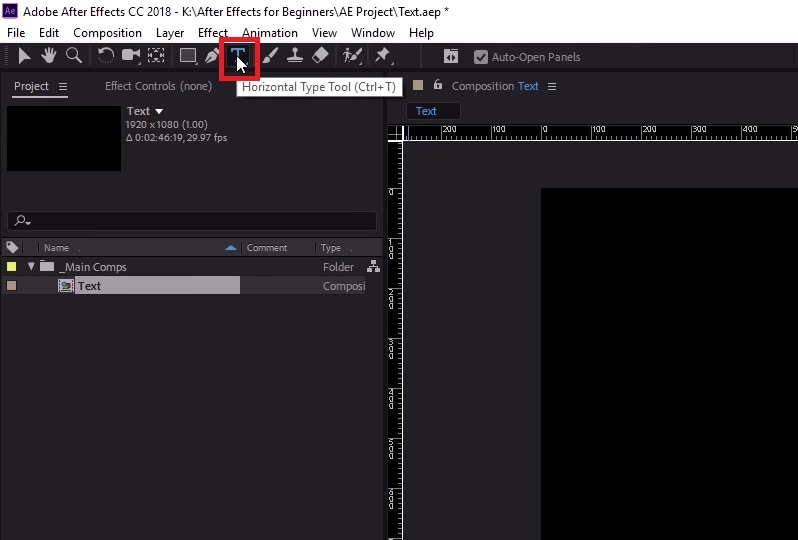
Part 1. Add Text in After Effects with Horizontal Type Tool
Once you have imported your video clip into the Timeline, there are several ways you can add text to your video. First of all, you can right-click on the Timeline and select New> Text to create an empty text layer and add any text you want. Similarly, you can go to Layer> New> Text option to do the same. But the easiest way of adding text in After Effects is by using Horizontal Type Tool. Here are the steps on how you can add text in AE with the type tool.
Step1Once you have imported your video into the Timeline, click on Horizontal Type Tool located in the top bar to add any text. You can press Ctrl+T(Windows) or Command+H(Mac) to get it instantly.
Step2Click on the video where you want to place the text and type your desired text there. After you are done adding your text, press Enter key in Num pad to exit out of the text field in the video.
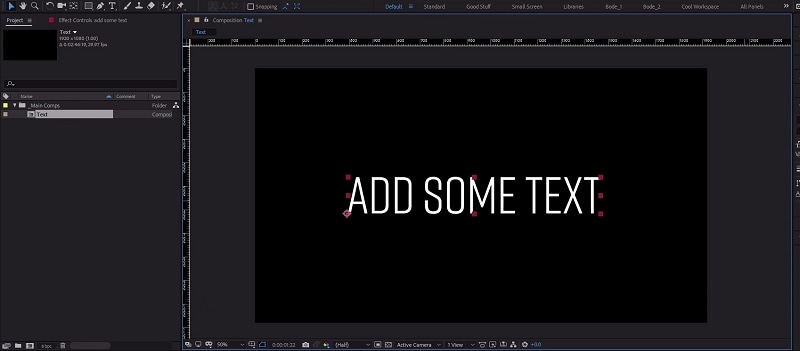
Step3This will automatically create a text layer on Timeline. You can now move the text and place it anywhere you want. You can also modify the text style and add animation which we will illustrate in the next section.
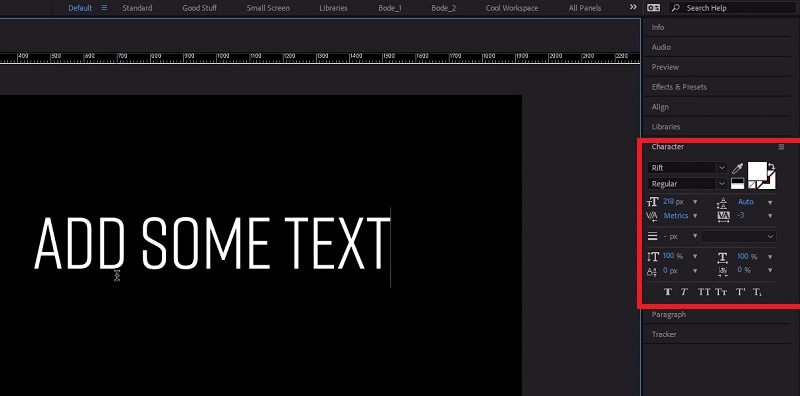
Part 2. Use the Character Panel to Edit Text in AE
When you select Type tool and add your desired text, you get a default style for the text. It is most likely that you have to modify the text style such as changing color, font, and size to fit in your video seamlessly. That is when you have to visit the Character Panel. Character Panel is where you get to edit the font of the text you have typed, increase or decrease the font size, change the font color, and much more. Apart from that, you can increase the spacing between lines when your text is a paragraph instead of a few words. Here are the steps to use Character Panel to edit text in AE.
Step1Once you have typed your text using Horizontal Type tool on the video, click on the text.
Step2Go to Character panel located in the right side of the screen. If it is minimized, click on the panel to expand it.
Step3The first option in the panel is the font of the text. By the side of the font is the text color. You can use the color picker tool to choose any color as per your preference.
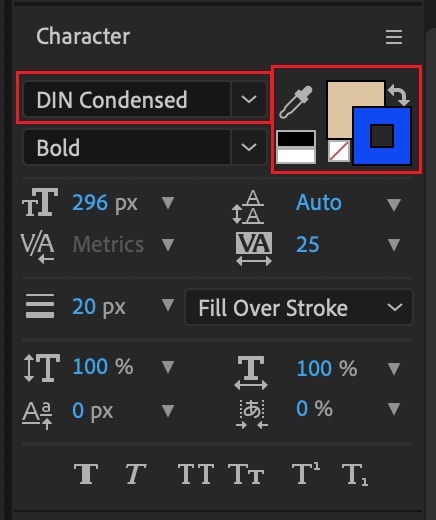
Step4Below the font, you can select the font style such as regular, bold, italics, and likewise. The subsequent part is to change the font size and adjust vertical spacing between lines and horizontal spacing between characters.
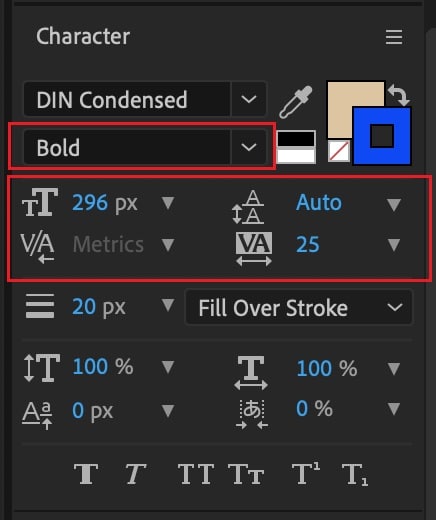
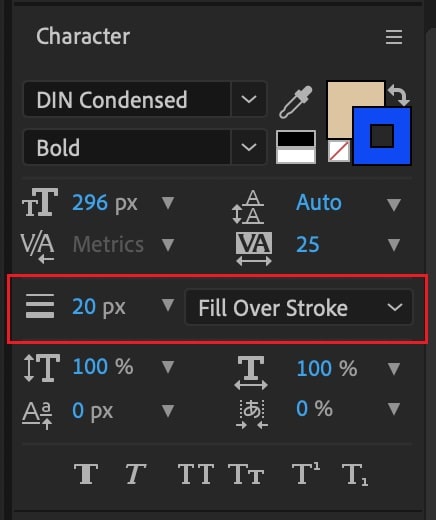
Step5The next section deals with Stroke option as well as fill the text option. You can fill the background of the text with any desired color.
Part 3. Add Animated Text to Video with Animation Presets
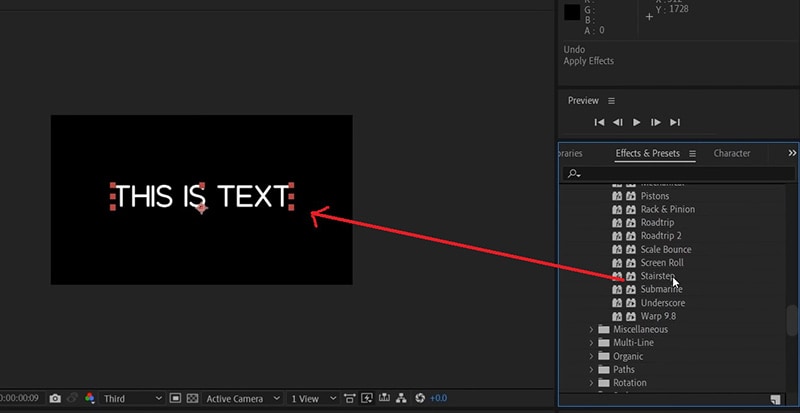
Now that you have added a static text and set the text format as per your preference, it is time to animate the text. A static text in a video does not look appealing, and animated texts make the video eye-catching instantly. You can use text animation presets in After Effects to add animated text to video. Here are the steps to add animated text to video with animation presets and effects.
Step1Click on the text on your video that you want to animate. Go to Effects and Presets panel located on the right side.
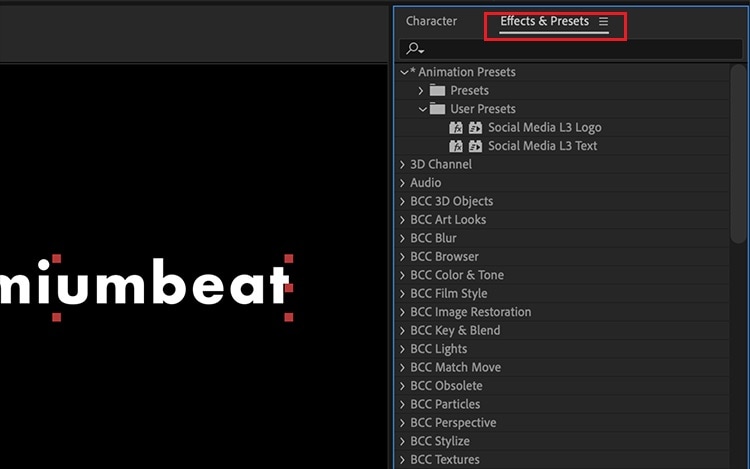
Step2Under Effects and Presets panel, Click on Text option. This will open all the different categories of animation presets available that you can apply to the text on your video.
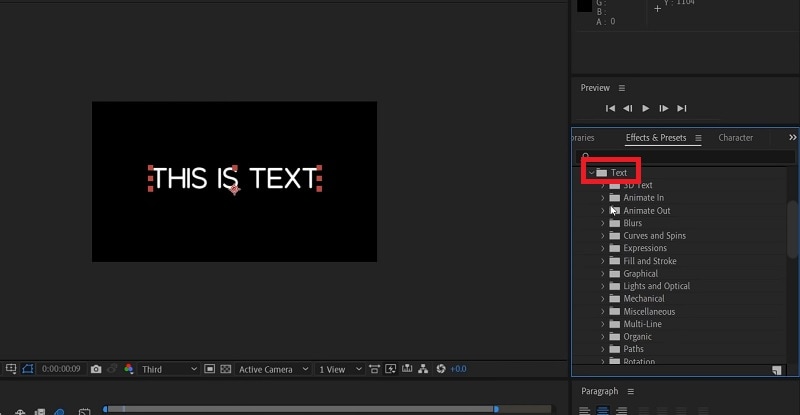
Step3Select any desired animation that you want to apply to the text and drag and drop the animation on the text in the composition window. Play the video and watch the applied animation on the text.
Part 4. Alternative Way to Add Text to Videos
If you are not comfortable with After Effects as a video editor, we recommend Wondershare as the best AE alternative. This is because the user interface of Filmora is super simple and there are loads of text effects and animations available to enhance your video content. Filmora is a professional video editor that is extremely popular among amateur and professional video editors. The application is available for both Windows and Mac users. Here are the steps for adding animated text to video using Filmora.
Step1Install Wondershare Filmora on your computer and launch the application. Click on New Project option on the welcome screen. Otherwise, you can go to File> New Project option.

Step2Go to File> Import Media> Import Media Files to import your video file. You can also drop the video file directly into Project Media folder.

Step3Drag and drop the video file from Project Media folder into the Timeline. If you have multiple video clips, you need to arrange them sequentially on the Timeline.
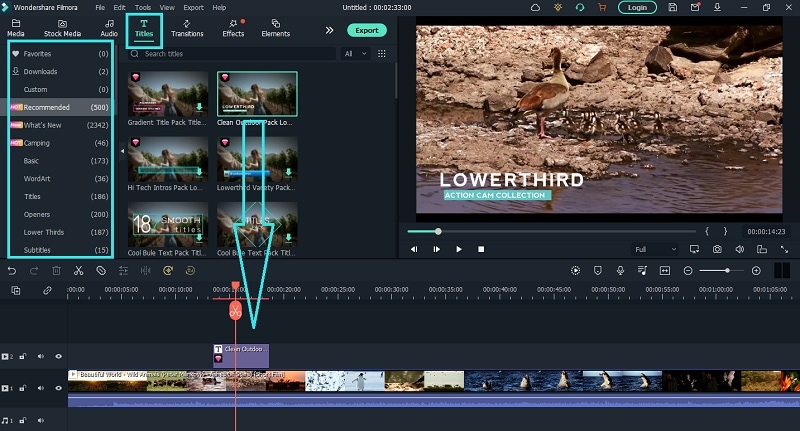
Step4To add text to your video, go to Titles located at the top bar. Check the left panel where you can see different categories of text effects. Select any desired text effect and drop into the Timeline. Make sure that the text layer is above the video layer on Timeline. You can shift the text layer on Timeline to place it where you want it to appear. You can also stretch the duration of the text effect as per your requirements.
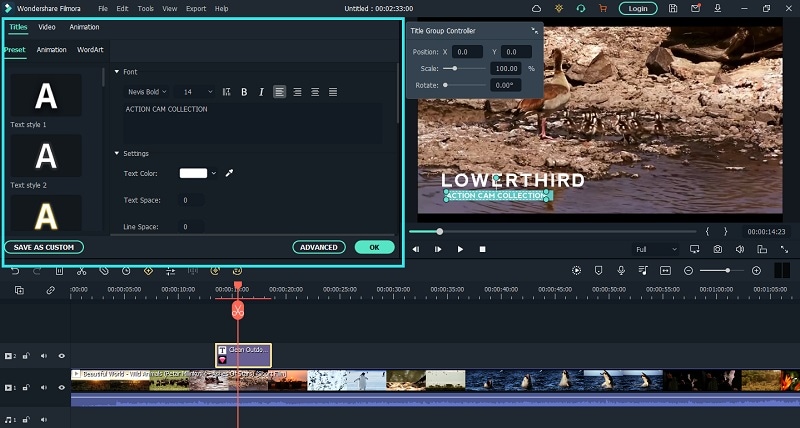
Step5You can edit the text effect by double clicking on the text layer on Timeline. Under Preset tab, you can change the text, font type and size, text color and much more. For further customization, you can click on Advanced button. At last, click on OK button to save the edits done.
The Bottom Line
If you want to add animated text to photo and video, After Effects is a great editor you can use. We have illustrated how you can add text and customize the text and finally, animate it as per your preference. However, if you are looking for AE alternative, we recommend Wondershare Filmora where you can add text to video instantly and choose from a wide range of text effects and animations.
Free Download For Win 7 or later(64-bit)
Free Download For macOS 10.14 or later
Understanding The Best Tools for Changing Sky Background
Sky replacement apps have become popular among content creators and social media influencers. Posting natural-looking pictures in front of the sky has become the new aesthetic of 2024, like the clean girl makeup. Many people try to get a flawless shot of themselves in front of the sky. But it’s hard to get the perfect and aesthetically pleasing photos and videos because of the background objects and extra bright or dull sky lightning.
This article will tell you about sky change apps and which apps you should consider. Read the article if you want to create an aesthetic sky picture using a replace sky app.
Sky Replacement A cross-platform works like magic for background removal or sky replacement photos!
Free Download Free Download Learn More
Part 1: Finding The Best iOS Apps to Change Sky Background in Media
Sky replacement apps are a fantastic way to give your pictures an entirely new viewpoint. Here are some of the top sky-changing applications for iOS:
- Background Changer & Eraser
- Bazaart: Design, Photo & Video
- Easy Photo Background Editor
- Superimpose+: Background Eraser
- Background Eraser: BG Remover
1. Background Changer & Eraser
Background Changer & Eraser is your go-to editor if you want to alter the backdrop, create incredible effects and overlays, apply filters, and modify the lighting in your pictures. Everyone who wishes to have gorgeous photos like those edited by a pro can do so with only one click using the one-click background changer and photo editing solution.

Pros
- Erases even the smallest part of a snapshot, easily trims out objects and fixes faults.
- With the extensive selection of overlays, including sparkles, lens flare, and glitter, you can add a little glitz to your photos.
Cons
- The app tends to become glitchy when you keep using it.
2. Bazaart: Design, Photo & Video
Bazaart is a one-stop app for all your design needs that combines the functions of a picture editor, video editor, and design studio. You can create stop motion films, GIFs, stickers, AI art, Reels, stories, logos, posters, flyers, memes, profile pictures, and product photography. Bazaart can assist with anything from digital marketing to social media posting to online sales.

Pros
- The app lets you personalize images and videos by changing exposure, color, highlights, and blur to enhance the media.
- You can add as many as 100 pictures and five video layers; each layer can be edited separately.
Cons
- The tool doesn’t cut out the edges so smoothly. The small leaves or messy hair are not fully cropped out.
3. Easy Photo Background Editor
With the Easy Photo Background Editor, you can share your photos with others by altering their backgrounds like a pro. This image and video sky change app can create beautiful and artistic photos and videos. Thanks to the app’s fantastic capabilities, users can quickly and effortlessly switch out their backgrounds with various high-quality, free HD backdrops available within the app.

Pros
- You can efficiently change the background of your media and adjust it with the foreground.
- The app has a collection of backgrounds you can choose and add if you don’t have one.
Cons
- The undo button can take a long time to react, which is risky, and you may need to edit your photos again.
4. Superimpose+: Background Eraser
Superimpose+: Background Eraser is an automatic sky replacement tool. People, animals, vehicles, and other objects can all be removed with a single tap. It doesn’t leave a watermark behind, so your photos and videos don’t get ruined. It lets you overlay numerous images and eliminate photo backgrounds within seconds. It also includes simple, automatic, and manual options for removing backgrounds.

Pros
- The app offers batch processing so that you can add multiple photos and videos and edit them.
- The app replaces or removes your background precisely with a single click.
Cons
- Too many advertisements are shown when editing the media files, which can be annoying.
5. Background Eraser: BG Remover
The background eraser app can quickly remove photos and let your imagination go wild. It is an AI-powered backdrop removal but can also do manual editing. You can add colorful background replacements and immediately share your photos with your viewers. It is one of the best weather apps to replace the dark sky when you are working on an iOS device.

Pros
- You can replace the sky background of your picture with a solid color or gradient shade.
- The auto background accurately recognizes the object and separates the background from it.
Cons
- The tool provides very limited editing options in the free version.
Part 2: Finding The Best Android Apps to Change Sky Background in Media
If you’re an Android user looking for a weather app to replace the dark sky, this is your lucky day. This part is dedicated to telling you about the apps you can use to replace the sky:
- Photo Background Change Editor
- Background Eraser Photo Editor
- PhotoRoom AI Photo Editor
- Photo Editor – Lumii
- Canva
1. Photo Background Change Editor
With the help of the Background Eraser and Changer, you can automatically crop images, eliminate backgrounds, and produce transparent PNG stamps that are precise to each pixel. With just one touch, the app can identify and eliminate your photo’s background, allowing you to swap out dull backdrops for an infinite number of 4K/HD backgrounds that will elevate your images.

Pros
- The tool offers 100+ background templates. You can choose solid colors, gradients, or images as backdrops.
- You can edit the sky in the background and enhance its look to match the picture.
Cons
- It removes the background with finger smearing, making it hard to remove the backdrop precisely.
2. Background Eraser Photo Editor
The app can cut out pictures automatically and is dedicated to becoming your only photo backdrop eraser and switcher. With over 10 million users, Background Eraser Photo Editor is an incredibly user-friendly tool for changing and editing photos’ backgrounds. Additionally, it has a library of more than 200 images, including sky pictures, which makes it a great dark sky app replacement tool.

Pros
- The app provides high-quality results by using AI-powered background remover.
- You can directly export and share your creation to popular social media platforms.
Cons
- The tool can only be used to remove the background of the images. You need a different tool for video background removal.
3. PhotoRoom AI Photo Editor
With PhotoRoom, you can manage your business from your phone by editing, designing, and optimizing high-quality visual content all in one app. You can apply presets, cut out or remove photo backgrounds, and produce content. You no longer need to be an expert photographer or designer because PhotoRoom lets you quickly convert your images into high-quality content.

Pros
- The app magically removes the unwanted objects from the background by brushing the magic re-toucher.
- It is a great app to change the sky You can replace it with another sky image from the app’s library.
Cons
- The quality of the images decreases, and the background looks glitchy and blurry due to that.
4. Photo Editor – Lumii
Lumii is a potent photo editor pro that offers trendy picture filters. It’s a great photo editing app that lets you alter photographs with over 100 gorgeous preset filters. Whether you are a beginner or an expert in photo editing and background removal, you can generate images that satisfy your aesthetic requirements using expert editing tools like BG Cutout, HSL, Curve, and Doodle.

Pros
- AI enhancement tools can automatically enhance the look of your picture and blend the object with the background.
- AI cutout isolates the object from the background with jaw-dropping accuracy.
Cons
- You must watch several advertisements if you want to access the pre-made filters in the app.
5. Canva
Canva is a free graphic design program that combines a photo editor, logo creator, and video editor all in one place. You can access the potent magic AI tools and use editable templates to create gorgeous pictures, videos, social network posts, and collages. The logo creator develops your brand or hones your graphic design talents. Moreover, you can use the Canva app to change the sky in photos and videos.

Pros
- The app offers efficient and professional editing and background removal for photos and videos.
- It has millions of photos, video templates, and fun elements to add to your media.
Cons
- It takes up huge space in your phone and provides limited features on the mobile app.
Bonus Part: A Perfect Background Changing Application For PC: Wondershare Filmora
Many professional users prefer editing their media through a PC as it is much easier, and computer editing software offers many more features. But most professional apps cost too much, and paying for them every month is hard. In this confusing situation, only one app comes to mind that can save us from all these troubles and give high-quality results: Wondershare Filmora .
The tool offers many royalty-free editing services that you can use to change the landscape of your video. It is the app that changes the sky and replaces the background of your media with perfection. You can enhance and upscale your video with this pro app and impress your viewers.
Free Download For Win 7 or later(64-bit)
Free Download For macOS 10.14 or later
Other Features of Wondershare Filmora to Look Out For
Wondershare Filmora has many amazing functions. Following are a few of its features that can assist you in creating wonderful content:
- AI Text-to-Video: This feature uses AI algorithms to examine data, including text, photographs, and videos. It then applies machine learning and computer vision techniques to produce a video.

- AI Smart Cutout: Filmora’s AI Smart Cutout makes identifying and removing any undesired backdrop or item from your videos and photos simple. It marks and cuts the object precisely using AI services.

- Instant Mode: Making a video with an Instant Mode doesn’t require any editing experience. Filmora will instantly create a video by adding the media you wish to display.

- AI Vocal Remover: With sophisticated algorithms, Filmora’s AI Vocal Remover can effectively remove vocals from background music without sacrificing a noticeable amount of audio quality.

- Background Remover: You can extract your object or eliminate the background from films using Filmora’s cutting-edge AI technology. Just import a photograph or a movie, and the AI will take care of the rest.

Steps To Change Background Using AI Portrait in Filmora
Wondershare Filmora provides a great replacement for the dark sky and keeps the quality of the media intact. Look at the easy guideline below to remove and replace the sky background.
Step 1: Bring In Media to Filmora
Open Filmora on your computer and click “New Project.” Now import the media whose background you want to change. After that, bring in the new background. Now, drag and drop the media and background into the editing timeline.

Step 2: Replace Background Using AI Portrait
Select the media that needs background changing. On the right side of the screen, you will see an editing option; click on “AI Tools” from the top right of the screen. Now go down and enable “AI Portrait.” Once you do it, the background of your media file will automatically change.

Step 3: Preview and Save
You can check to see if it is everything you were hoping for. After that, click “Export” from the top right of the screen and save the video on your computer.

Free Download For Win 7 or later(64-bit)
Free Download For macOS 10.14 or later
Conclusion
Changing the sky background can lift the tone of your image and video. Sky photos are the main element of the ‘soft girl aesthetic’ era. As a content creator, you must always search for a reliable editor to remove background and change your photos and videos.
This article introduces the best apps to replace dark sky in Android and iOS. You will also find a bonus part that can change your content editing journey.
Free Download Free Download Learn More
Part 1: Finding The Best iOS Apps to Change Sky Background in Media
Sky replacement apps are a fantastic way to give your pictures an entirely new viewpoint. Here are some of the top sky-changing applications for iOS:
- Background Changer & Eraser
- Bazaart: Design, Photo & Video
- Easy Photo Background Editor
- Superimpose+: Background Eraser
- Background Eraser: BG Remover
1. Background Changer & Eraser
Background Changer & Eraser is your go-to editor if you want to alter the backdrop, create incredible effects and overlays, apply filters, and modify the lighting in your pictures. Everyone who wishes to have gorgeous photos like those edited by a pro can do so with only one click using the one-click background changer and photo editing solution.
Pros
- Erases even the smallest part of a snapshot, easily trims out objects and fixes faults.
- With the extensive selection of overlays, including sparkles, lens flare, and glitter, you can add a little glitz to your photos.
Cons
- The app tends to become glitchy when you keep using it.
2. Bazaart: Design, Photo & Video
Bazaart is a one-stop app for all your design needs that combines the functions of a picture editor, video editor, and design studio. You can create stop motion films, GIFs, stickers, AI art, Reels, stories, logos, posters, flyers, memes, profile pictures, and product photography. Bazaart can assist with anything from digital marketing to social media posting to online sales.
Pros
- The app lets you personalize images and videos by changing exposure, color, highlights, and blur to enhance the media.
- You can add as many as 100 pictures and five video layers; each layer can be edited separately.
Cons
- The tool doesn’t cut out the edges so smoothly. The small leaves or messy hair are not fully cropped out.
3. Easy Photo Background Editor
With the Easy Photo Background Editor, you can share your photos with others by altering their backgrounds like a pro. This image and video sky change app can create beautiful and artistic photos and videos. Thanks to the app’s fantastic capabilities, users can quickly and effortlessly switch out their backgrounds with various high-quality, free HD backdrops available within the app.
Pros
- You can efficiently change the background of your media and adjust it with the foreground.
- The app has a collection of backgrounds you can choose and add if you don’t have one.
Cons
- The undo button can take a long time to react, which is risky, and you may need to edit your photos again.
4. Superimpose+: Background Eraser
Superimpose+: Background Eraser is an automatic sky replacement tool. People, animals, vehicles, and other objects can all be removed with a single tap. It doesn’t leave a watermark behind, so your photos and videos don’t get ruined. It lets you overlay numerous images and eliminate photo backgrounds within seconds. It also includes simple, automatic, and manual options for removing backgrounds.
Pros
- The app offers batch processing so that you can add multiple photos and videos and edit them.
- The app replaces or removes your background precisely with a single click.
Cons
- Too many advertisements are shown when editing the media files, which can be annoying.
5. Background Eraser: BG Remover
The background eraser app can quickly remove photos and let your imagination go wild. It is an AI-powered backdrop removal but can also do manual editing. You can add colorful background replacements and immediately share your photos with your viewers. It is one of the best weather apps to replace the dark sky when you are working on an iOS device.
Pros
- You can replace the sky background of your picture with a solid color or gradient shade.
- The auto background accurately recognizes the object and separates the background from it.
Cons
- The tool provides very limited editing options in the free version.
Part 2: Finding The Best Android Apps to Change Sky Background in Media
If you’re an Android user looking for a weather app to replace the dark sky, this is your lucky day. This part is dedicated to telling you about the apps you can use to replace the sky:
- Photo Background Change Editor
- Background Eraser Photo Editor
- PhotoRoom AI Photo Editor
- Photo Editor – Lumii
- Canva
1. Photo Background Change Editor
With the help of the Background Eraser and Changer, you can automatically crop images, eliminate backgrounds, and produce transparent PNG stamps that are precise to each pixel. With just one touch, the app can identify and eliminate your photo’s background, allowing you to swap out dull backdrops for an infinite number of 4K/HD backgrounds that will elevate your images.
Pros
- The tool offers 100+ background templates. You can choose solid colors, gradients, or images as backdrops.
- You can edit the sky in the background and enhance its look to match the picture.
Cons
- It removes the background with finger smearing, making it hard to remove the backdrop precisely.
2. Background Eraser Photo Editor
The app can cut out pictures automatically and is dedicated to becoming your only photo backdrop eraser and switcher. With over 10 million users, Background Eraser Photo Editor is an incredibly user-friendly tool for changing and editing photos’ backgrounds. Additionally, it has a library of more than 200 images, including sky pictures, which makes it a great dark sky app replacement tool.
Pros
- The app provides high-quality results by using AI-powered background remover.
- You can directly export and share your creation to popular social media platforms.
Cons
- The tool can only be used to remove the background of the images. You need a different tool for video background removal.
3. PhotoRoom AI Photo Editor
With PhotoRoom, you can manage your business from your phone by editing, designing, and optimizing high-quality visual content all in one app. You can apply presets, cut out or remove photo backgrounds, and produce content. You no longer need to be an expert photographer or designer because PhotoRoom lets you quickly convert your images into high-quality content.
Pros
- The app magically removes the unwanted objects from the background by brushing the magic re-toucher.
- It is a great app to change the sky You can replace it with another sky image from the app’s library.
Cons
- The quality of the images decreases, and the background looks glitchy and blurry due to that.
4. Photo Editor – Lumii
Lumii is a potent photo editor pro that offers trendy picture filters. It’s a great photo editing app that lets you alter photographs with over 100 gorgeous preset filters. Whether you are a beginner or an expert in photo editing and background removal, you can generate images that satisfy your aesthetic requirements using expert editing tools like BG Cutout, HSL, Curve, and Doodle.
Pros
- AI enhancement tools can automatically enhance the look of your picture and blend the object with the background.
- AI cutout isolates the object from the background with jaw-dropping accuracy.
Cons
- You must watch several advertisements if you want to access the pre-made filters in the app.
5. Canva
Canva is a free graphic design program that combines a photo editor, logo creator, and video editor all in one place. You can access the potent magic AI tools and use editable templates to create gorgeous pictures, videos, social network posts, and collages. The logo creator develops your brand or hones your graphic design talents. Moreover, you can use the Canva app to change the sky in photos and videos.
Pros
- The app offers efficient and professional editing and background removal for photos and videos.
- It has millions of photos, video templates, and fun elements to add to your media.
Cons
- It takes up huge space in your phone and provides limited features on the mobile app.
Bonus Part: A Perfect Background Changing Application For PC: Wondershare Filmora
Many professional users prefer editing their media through a PC as it is much easier, and computer editing software offers many more features. But most professional apps cost too much, and paying for them every month is hard. In this confusing situation, only one app comes to mind that can save us from all these troubles and give high-quality results: Wondershare Filmora .
The tool offers many royalty-free editing services that you can use to change the landscape of your video. It is the app that changes the sky and replaces the background of your media with perfection. You can enhance and upscale your video with this pro app and impress your viewers.
Free Download For Win 7 or later(64-bit)
Free Download For macOS 10.14 or later
Other Features of Wondershare Filmora to Look Out For
Wondershare Filmora has many amazing functions. Following are a few of its features that can assist you in creating wonderful content:
- AI Text-to-Video: This feature uses AI algorithms to examine data, including text, photographs, and videos. It then applies machine learning and computer vision techniques to produce a video.
- AI Smart Cutout: Filmora’s AI Smart Cutout makes identifying and removing any undesired backdrop or item from your videos and photos simple. It marks and cuts the object precisely using AI services.
- Instant Mode: Making a video with an Instant Mode doesn’t require any editing experience. Filmora will instantly create a video by adding the media you wish to display.
- AI Vocal Remover: With sophisticated algorithms, Filmora’s AI Vocal Remover can effectively remove vocals from background music without sacrificing a noticeable amount of audio quality.
- Background Remover: You can extract your object or eliminate the background from films using Filmora’s cutting-edge AI technology. Just import a photograph or a movie, and the AI will take care of the rest.
Steps To Change Background Using AI Portrait in Filmora
Wondershare Filmora provides a great replacement for the dark sky and keeps the quality of the media intact. Look at the easy guideline below to remove and replace the sky background.
Step 1: Bring In Media to Filmora
Open Filmora on your computer and click “New Project.” Now import the media whose background you want to change. After that, bring in the new background. Now, drag and drop the media and background into the editing timeline.
Step 2: Replace Background Using AI Portrait
Select the media that needs background changing. On the right side of the screen, you will see an editing option; click on “AI Tools” from the top right of the screen. Now go down and enable “AI Portrait.” Once you do it, the background of your media file will automatically change.
Step 3: Preview and Save
You can check to see if it is everything you were hoping for. After that, click “Export” from the top right of the screen and save the video on your computer.
Free Download For Win 7 or later(64-bit)
Free Download For macOS 10.14 or later
Conclusion
Changing the sky background can lift the tone of your image and video. Sky photos are the main element of the ‘soft girl aesthetic’ era. As a content creator, you must always search for a reliable editor to remove background and change your photos and videos.
This article introduces the best apps to replace dark sky in Android and iOS. You will also find a bonus part that can change your content editing journey.
Also read:
- Updated 2024 Approved Do You Want to Add Voiceovers to Your Video Project? Wondershare Filmora Is an Amazing Tool that Lets You Add Audio Files, Including Voiceovers
- Updated 2024 Approved This Article Introduces How Sheila Become a Youtuber and How She Started Video Editing
- New Create Your Face Zoom TikTok Now
- In 2024, An Ultimate Guide to Flexclip Online Trimmer
- Updated In 2024, The Complete Guide to Making Fortnite Montage
- New Tips That Show Anybody How To Create Youtube Slideshow – Guaranteed for 2024
- New In 2024, Top 22 Free Video Editing Software
- New How To Mirror a Video Clip in Premiere Pro for 2024
- New Learn How to Make a Gaming Montage - Guide & Tips
- New Are You Looking for Top AI Video Recognition Software to Choose From? Please Stay on This Article as We Look at the Current Top AI-Based Video Tools for 2024
- Updated 2024 Approved Easy Guide to Use a Stabilization Tool in Filmora
- Updated Using This Article as a Reference, the Users Would Create a Café Meal Intro and YouTube End Screen While Knowing Multiple Ways to Download Cooking Background Music for 2024
- New Start Making Procreate GIFs and Take Your Editing Creativity to the Next Level
- In 2024, You Can Learn How to Color Grade Your Picture in Lightroom Effectively. By Understanding the Process of Color Grading in Lightroom, You Can Create Unique Works, and Improve Your Abilities
- Updated Ideas That Will Help You Out in Converting AVI to GIF for 2024
- Looking for the Best Websites for 3D Text PNG? Weve Covered You with Our Top 8 Picks for Your Upcoming Work
- 2024 Approved How to Create a Custom Slide Show in PowerPoint
- Creating Testimonial Videos For Health And Wellness Business Industry
- Updated Discover How to Change Sky Background with The Best Applications? A Review
- 2024 Approved 6 Instant Ways to Create Windows 10 Slideshow
- 2024 Approved MAGIX Vegas Pro Review A Professional Video Editing Software
- Change Aspect Ratio of Video for 2024
- New Have You Ever Heard Hyperlapse and Tume Lapse Videos? Do You Know the Differences Between Them? This Article Will Introduce the Concepts, Features and Differnces of Them for 2024
- In 2024, Adding Slow Motion in DaVinci Resolve A Comprehensive Overview
- New 2024 Approved Detailed Steps to Add Border to Video Using Premiere Pro
- Updated 7 Best Green Screen Software for Beginners on Mac
- In 2024, 10 Best Audio Visualizers Windows, Mac, Android, iPhone & Online
- New In 2024, This Article Discusses What Is Vegas Pro, How to Download, Install and Use It, and Its Key Features. It Further Discusses Its Alternative for Editing Your Videos and More. Check Out Now
- 2024 Approved Top 10 Voice Over Generators Windows, Mac, Android, iPhone, and Onli
- With an SRT Editor Online, You Can Synchronize the Subtitles with the Video, Change the Font, and Make Them More Readable. Read on to Know Your Options for 2024
- 2024 Approved How Can You Deny These Top 10 Free Speech to Text Software
- Updated In 2024, Are You Surfing for some Way to Make Your Animated Emoji Discord Using Videos, GIFs, Images, or Text? Read Through This Article as Well Guide You Through the Process
- New Best PDF to GIF Converters for 2024
- Calls on Infinix Hot 40i Go Straight to Voicemail? 12 Fixes | Dr.fone
- In 2024, Step-by-Step Tutorial How To Bypass OnePlus Ace 2 Pro FRP
- In 2024, How to Watch Hulu Outside US On Infinix Hot 40 Pro | Dr.fone
- How To Transfer Data From iPhone 7 To Other iPhone 14 Pro devices? | Dr.fone
- Ultimate Guide to Catch the Regional-Located Pokemon For Xiaomi Redmi A2 | Dr.fone
- Unlock android phone if you don't have X50i+ fingerprint
- In 2024, Best Anti Tracker Software For Apple iPhone 14 Plus | Dr.fone
- 6 Proven Ways to Unlock Honor Magic 6 Phone When You Forget the Password
- In 2024, How To Pause Life360 Location Sharing For Sony Xperia 5 V | Dr.fone
- In 2024, Full Guide to Bypass Motorola Moto E13 FRP
- In 2024, How to Change Location on TikTok to See More Content On your Infinix Hot 40i | Dr.fone
- In 2024, The Top 10 Apple iPhone 11 Pro Max Emualtors for Windows, Mac and Android | Dr.fone
- How to Change Your Location on Apple iPhone 11 | Dr.fone
- How to Track Oppo Find N3 by Phone Number | Dr.fone
- In 2024, Dose Life360 Notify Me When Someone Checks My Location On Vivo Y78 5G? | Dr.fone
- In 2024, 5 Ways to Move Contacts From Asus ROG Phone 8 to iPhone (13/14/15) | Dr.fone
- iSpoofer is not working On Oppo A78? Fixed | Dr.fone
- 3 Facts You Need to Know about Screen Mirroring Xiaomi Redmi A2 | Dr.fone
- How To Reset Your Apple iPhone 7 Without iTunes? | Dr.fone
- How To Transfer WhatsApp From Apple iPhone X to other iPhone 13 devices? | Dr.fone
- Best Oppo Find N3 Pattern Lock Removal Tools Remove Android Pattern Lock Without Losing Data
- How to Transfer Photos from Oppo A58 4G to Laptop Without USB | Dr.fone
- Is your Vivo Y100A working too slow? Heres how you can hard reset it | Dr.fone
- Repair Office 2010 Files (Word, Excel and PowerPoint)on Windows
- Title: In 2024, Know How to Make a Video Background Transparent? Export Transparent Background Video After Adding Effects. Steps to Remove White Background From Video
- Author: Morgan
- Created at : 2024-05-19 05:12:38
- Updated at : 2024-05-20 05:12:38
- Link: https://ai-video-editing.techidaily.com/in-2024-know-how-to-make-a-video-background-transparent-export-transparent-background-video-after-adding-effects-steps-to-remove-white-background-from-video/
- License: This work is licensed under CC BY-NC-SA 4.0.
