
:max_bytes(150000):strip_icc():format(webp)/GettyImages-753288077-5bb0f9b2cff47e00261aa8fc.jpg)
In 2024, Learn How to Create a Unique Repeated Text Animation in the Filmora Video Editor. Follow the Simple Step-by-Step Instructions
Learn How to Create a Unique Repeated Text Animation in the Filmora Video Editor. Follow the Simple Step-by-Step Instructions
Preparation
What you need to prepare:
- A computer (Windows or macOS)
- Your video materials.
- Filmora video editor
Step 1
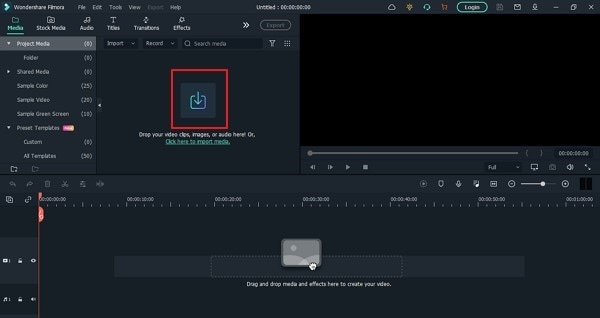
Download Filmora . Let it install and wait for it to run. Then, click on “New Project”. Now, you’re ready to edit!
Step 2
First, go to Titles and drag the Default Title to the Timeline.

Step 3
Now, double-click on the Default Title clip. Here, change its font to any bold font. Increase the text size to 120. Type in your text in the box. Scroll a bit down and change the Text Spacing to 8. Click OK.

Step 4
Take a Snapshot of this Default Title.

Step 5
Double-click on the Default Title clip once again. This time, click on its Advanced settings. Here, turn OFF Text Fill → turn ON Outline → change the Outline color to White → reduce Thickness to 1. Click OK. Now, take another Snapshot.

Step 6
Delete the Default Title clip from the Timeline. Now, drag the Outline snapshot that we just created to the Timeline. Open the Crop tool → change the Ratio to Custom → replace “1080” with “540”. Lastly, move the highlighted crop section to the top. Click OK.

Step 7
Double-click on the Snapshot to open its settings panel. Go to the Animation tab. Here, change the value of the Y-axis to “275”**.** Click OK. Now, take a Snapshot.

Step 8
Next, click on the Crop tool again and simply move the highlighted crop section to the bottom part of the screen. Click OK. Then, double-click on the snapshot clip in the Timeline and change the value of the Y-axis from “275” to “-275”**.** Click OK. Take a Snapshot again.
Step 9
Import a background image to My Media. Drag the background image to the Timeline. Double-click on it and drag the Scale bar until the background image covers the whole screen. Click OK. You should cut the background clip to make it 3 seconds long as well.

Step 10
Lock this track in the Timeline by pressing the highlighted button on the left. Then, go to “Track Manager” and add 6 new Tracks to the Timeline. Click OK.

Step 11
Drag the first Snapshot we made before to Track 6. Cut it so it’s 3 seconds long. Then, Lock the Track.

Step 12
Set the Playhead at the 15th frame on the Timeline. Then, drag the Upward Outline snapshot to this point. Double-click on it and change the Y-axis value to “**-4%**”. Then, reduce the Opacity to 0%. Now, move the Playhead 5 frames further. Next, increase the Opacity to 100% and increase the Y-axis value to around “105”. Don’t click OK yet.
Step 13
Move the Playhead to 1 minute and 5 seconds on the Timeline. Add a keyframe by clicking on the “+Add” button. Then, move the Playhead 5 frames forward. Here, change the Zoom Level to 25%.

Step 14
Double-click on the clip in Track 5. Drag the text like in the image below. Then, delete the part of the clip on the right side after 1 minute and 15 seconds.

Step 15
Hide the clips on Track 6 and Track 1 by clicking the “eye” icons next to them. Then, take a Snapshot. Now, drag this Snapshot right next to the clip on Track 5.

Step 16
Move the Playhead 3 frames forward from the starting point of the clip you just added. Unhide Track 6. Double-click on the clip on the right side of Track 5 and click on “+Add”. Move the Playhead 5 seconds forward and adjust the Upward Outline to fit the text.

Step 17
Move the Playhead 5 frames forward again. Drag the Y-axis value to the left until the outline clip overlaps the main text. Then, reduce the Opacity to 0%. Move the Playhead to 2 minutes and 10 seconds. Cut the Track and delete the clip on the right side. Lastly, Lock Track 5.

Step 18
Drag the Downward Outline snapshot to Track 4. Then, repeat the same process as in Step 16 and Step 17.
Step 19
Drag the Upward Outline snapshot to Track 3 at the 17th frame. Double-click on it and change the Opacity to 0%.

Step 20
Now, move 5 frames forward and increase the Opacity back to 100%. Then, drag the Y-axis value to the right until the screen looks like this.

Step 21
Move the Playhead to 1 minute and 5 seconds. Click on “+Add” to add a keyframe. Then, move the Playhead 5 frames forward. Double-click on the clip and stretch it from side to side to match something like this.

Step 22
Move the Playhead to 1 minute and 16 seconds. Split the clip and delete the part on the right side. Hide Track 4, 5, and 6. Then, take a Snapshot. Drag this Snapshot next to the clip on Track 3. Place the Playhead on 1 minute and 18 seconds. Then, unhide Track 4, 5, and 6.
Step 23
Double-click on the clip on the right side of Track 3. Add a keyframe by pressing “+Add”. Move the Playhead to 1 minute and 23 seconds. Now, resize the clip back to its original size by moving the rectangle left and right. Right now, it should look like this.

Step 24
Move the Playhead 5 frames forward. Drag the Y-axis value to the left until the screen looks like this.

Step 25
Move the Playhead 5 frames forward again. Drag the value of the Y-axis to the left until the screen looks like this. Then, change the Opacity to 0%. Finally, split the clip at 2 minutes and 10 seconds. Delete the part on the right side. Lock Track 3.

Step 26
Next, drag the Downward Snapshot on Track 2 and follow the same process as in Steps 19 through 25.
Step 27
Unhide the Background clip at the bottom of the Timeline. Then, Unlock Track 6. Split the clip on Track 6 at the 15th frame.

Step 28
Move the Playhead at the beginning of the Timeline. Click on the first part of the clip on Track 6. Add a keyframe. Drag the X-axis value to the right until the word disappears out of the screen. Like this. 👇Then, move the Playhead to the 6th frame and Reset the X-axis value to 0.0.

Step 29
Take the Playhead to 2 minutes and 10 seconds. Split it. Now, move the Playhead to 2 minutes and 19 seconds and add a keyframe. Lastly, take the Playhead to the very end of the clip and drag the text to the right side until it’s out of the screen once again.

Step 30
Go to the Effects tab. Select Glitch from the panel on the left. Then, apply “Glitch Dispersion” and “Glitch Stripe 2” to the clips at the start and at the end.

Step 31
Finally, Render the video to watch the final preview. And, you’re done! Congratulations on creating a repeated text animation in Filmora.

Summary
What you’ve learned:
- How to create text animations in Filmora
- Applying animation effects
- Make advanced edits on Titles in Filmora
- Hide and lock Tracks and Clips in Filmora
What you need to prepare:
- A computer (Windows or macOS)
- Your video materials.
- Filmora video editor
Step 1
Download Filmora . Let it install and wait for it to run. Then, click on “New Project”. Now, you’re ready to edit!
Step 2
First, go to Titles and drag the Default Title to the Timeline.
Step 3
Now, double-click on the Default Title clip. Here, change its font to any bold font. Increase the text size to 120. Type in your text in the box. Scroll a bit down and change the Text Spacing to 8. Click OK.
Step 4
Take a Snapshot of this Default Title.
Step 5
Double-click on the Default Title clip once again. This time, click on its Advanced settings. Here, turn OFF Text Fill → turn ON Outline → change the Outline color to White → reduce Thickness to 1. Click OK. Now, take another Snapshot.
Step 6
Delete the Default Title clip from the Timeline. Now, drag the Outline snapshot that we just created to the Timeline. Open the Crop tool → change the Ratio to Custom → replace “1080” with “540”. Lastly, move the highlighted crop section to the top. Click OK.
Step 7
Double-click on the Snapshot to open its settings panel. Go to the Animation tab. Here, change the value of the Y-axis to “275”**.** Click OK. Now, take a Snapshot.
Step 8
Next, click on the Crop tool again and simply move the highlighted crop section to the bottom part of the screen. Click OK. Then, double-click on the snapshot clip in the Timeline and change the value of the Y-axis from “275” to “-275”**.** Click OK. Take a Snapshot again.
Step 9
Import a background image to My Media. Drag the background image to the Timeline. Double-click on it and drag the Scale bar until the background image covers the whole screen. Click OK. You should cut the background clip to make it 3 seconds long as well.
Step 10
Lock this track in the Timeline by pressing the highlighted button on the left. Then, go to “Track Manager” and add 6 new Tracks to the Timeline. Click OK.
Step 11
Drag the first Snapshot we made before to Track 6. Cut it so it’s 3 seconds long. Then, Lock the Track.
Step 12
Set the Playhead at the 15th frame on the Timeline. Then, drag the Upward Outline snapshot to this point. Double-click on it and change the Y-axis value to “**-4%**”. Then, reduce the Opacity to 0%. Now, move the Playhead 5 frames further. Next, increase the Opacity to 100% and increase the Y-axis value to around “105”. Don’t click OK yet.
Step 13
Move the Playhead to 1 minute and 5 seconds on the Timeline. Add a keyframe by clicking on the “+Add” button. Then, move the Playhead 5 frames forward. Here, change the Zoom Level to 25%.
Step 14
Double-click on the clip in Track 5. Drag the text like in the image below. Then, delete the part of the clip on the right side after 1 minute and 15 seconds.
Step 15
Hide the clips on Track 6 and Track 1 by clicking the “eye” icons next to them. Then, take a Snapshot. Now, drag this Snapshot right next to the clip on Track 5.
Step 16
Move the Playhead 3 frames forward from the starting point of the clip you just added. Unhide Track 6. Double-click on the clip on the right side of Track 5 and click on “+Add”. Move the Playhead 5 seconds forward and adjust the Upward Outline to fit the text.
Step 17
Move the Playhead 5 frames forward again. Drag the Y-axis value to the left until the outline clip overlaps the main text. Then, reduce the Opacity to 0%. Move the Playhead to 2 minutes and 10 seconds. Cut the Track and delete the clip on the right side. Lastly, Lock Track 5.
Step 18
Drag the Downward Outline snapshot to Track 4. Then, repeat the same process as in Step 16 and Step 17.
Step 19
Drag the Upward Outline snapshot to Track 3 at the 17th frame. Double-click on it and change the Opacity to 0%.
Step 20
Now, move 5 frames forward and increase the Opacity back to 100%. Then, drag the Y-axis value to the right until the screen looks like this.
Step 21
Move the Playhead to 1 minute and 5 seconds. Click on “+Add” to add a keyframe. Then, move the Playhead 5 frames forward. Double-click on the clip and stretch it from side to side to match something like this.
Step 22
Move the Playhead to 1 minute and 16 seconds. Split the clip and delete the part on the right side. Hide Track 4, 5, and 6. Then, take a Snapshot. Drag this Snapshot next to the clip on Track 3. Place the Playhead on 1 minute and 18 seconds. Then, unhide Track 4, 5, and 6.
Step 23
Double-click on the clip on the right side of Track 3. Add a keyframe by pressing “+Add”. Move the Playhead to 1 minute and 23 seconds. Now, resize the clip back to its original size by moving the rectangle left and right. Right now, it should look like this.
Step 24
Move the Playhead 5 frames forward. Drag the Y-axis value to the left until the screen looks like this.
Step 25
Move the Playhead 5 frames forward again. Drag the value of the Y-axis to the left until the screen looks like this. Then, change the Opacity to 0%. Finally, split the clip at 2 minutes and 10 seconds. Delete the part on the right side. Lock Track 3.
Step 26
Next, drag the Downward Snapshot on Track 2 and follow the same process as in Steps 19 through 25.
Step 27
Unhide the Background clip at the bottom of the Timeline. Then, Unlock Track 6. Split the clip on Track 6 at the 15th frame.
Step 28
Move the Playhead at the beginning of the Timeline. Click on the first part of the clip on Track 6. Add a keyframe. Drag the X-axis value to the right until the word disappears out of the screen. Like this. 👇Then, move the Playhead to the 6th frame and Reset the X-axis value to 0.0.
Step 29
Take the Playhead to 2 minutes and 10 seconds. Split it. Now, move the Playhead to 2 minutes and 19 seconds and add a keyframe. Lastly, take the Playhead to the very end of the clip and drag the text to the right side until it’s out of the screen once again.
Step 30
Go to the Effects tab. Select Glitch from the panel on the left. Then, apply “Glitch Dispersion” and “Glitch Stripe 2” to the clips at the start and at the end.
Step 31
Finally, Render the video to watch the final preview. And, you’re done! Congratulations on creating a repeated text animation in Filmora.
Summary
What you’ve learned:
- How to create text animations in Filmora
- Applying animation effects
- Make advanced edits on Titles in Filmora
- Hide and lock Tracks and Clips in Filmora
Want to Make a Funny Vlog on TikTok? Trying to Find the Right Topic for It? This Article Presents some Impressive Options for Making a Funny Vlog for TikTok
TikTok has been among the few social media platforms that have gained an exponential following in a truly short time. Regardless of this stunted digital environment, the platform made its statement of becoming part of the all-time greats.
TikTok became known as a short-video platform that influenced the making of funny vlogs. If you are interested in making a funny vlog, you are at the right place.
In this article
01 Ideas for Creating A Funny Vlog for TikTok
02 5 Popular Funny Vloggers on TikTok
Part 1: Ideas for Creating A Funny Vlog for TikTok
When creating a funny vlog across TikTok, there are numerous ideas that one can think of. However, since TikTok videos are of small lengths, achieving diversity is difficult yet possible. You’ll surely get your break if you understand the following ideas for creating a funny vlog.

React to Other Videos
While it may seem the most mainstream style of creating funny content across TikTok, it is also the most effective way of making people laugh while watching your video. This will also bring recurring viewers across your channel.
Display Failure Videos
It is always great to see people trying and doing something funny across the video. Failure videos are believed to be the other way of creating content for a funny vlog on your TikTok, which shall make people laugh hard.
Use Goofy and Peculiar Voices
Unrealistic and weird voices can make your short video seem funny. If you consider talking about something in a silly voice, it will make people burst out of laughter.
Trolling Family Members
One of the best ways to make something good out of TikTok is creating candid moments. This can always be done if you troll or prank your family members out of nowhere. Just keep reminding that you have to ensure no one gets injured due to it.
Impersonations
Making impersonated videos of major celebrities is another way of showing funny content to the viewers on TikTok. If you consider some funny examples for this, it will surely bring you effective results.
Make Puns and Funny Statements
Another great way to create a funny vlog for your TikTok is to be good at making puns. This is purely hilarious content and needs someone to be highly great in it.
Physical Challenges
This can be a bit risky, but it can become quite fun to make and show to the world if executed with care. However, this can be conducted individually or in a group of people, as you find it appropriate.
Use Effects of TikTok
TikTok makes sure to provide something funny in effects to its users. The use of effects for TikTok is an excellent technique to make funny vlogs; however, it can get funny if the elements used across it have a dubious meaning.
Run Everything in Reverse
One of the most straightforward techniques to make a funny vlog is to run everything in reverse order. The simplest thing of a video becomes the funniest to watch.
Part 2: 5 Popular Funny Vloggers on TikTok
This part will provide some popular examples of TikTokers who have made a considerate performance in providing funny content to people across the platform.
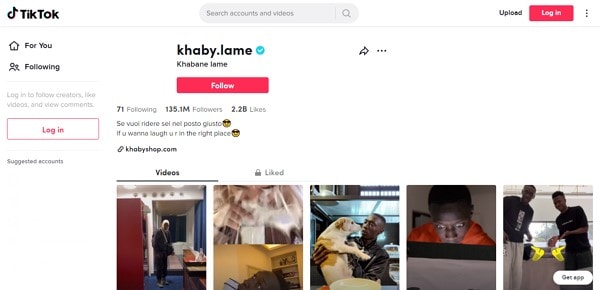
Khaby Lame
This is, without a doubt, the first-choice in TikTok accounts that would always come while relating to funny content. Khaby started his journey as a TikToker with a remarkably simple motive of pointing out the simplicity in different tasks, which were displayed to be difficult. Although it sounds pretty basic, the technique taken by Khaby has been so considerate it brought him millions of followers for creating funny content.
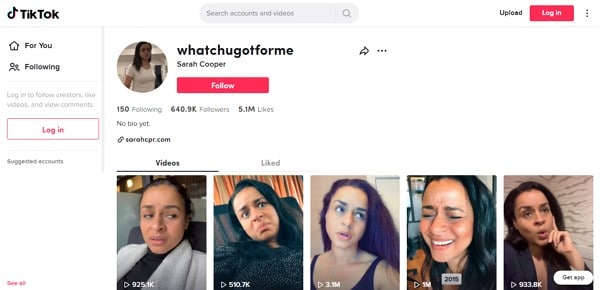
Sarah Cooper
Want to see a great impersonation of Donald Trump? It is undoubtedly great to see every time. With Sarah Cooper, it just becomes an entirely different story. Her impersonation has been so perfect that she has been referred to as one of the best funny vloggers on TikTok. Her likes across the platform may not be that great, but she has shown some stature in presenting funny content in a great way.
Dobre Twins
This twin duo is known across many social media platforms for its funny content. As the twins started using TikTok, they started creating good funny vlogs, which gained quite the traction for them. Their unique ideas to present different things have presented the following worth 23 million likes across TikTok, which is quite commendable. However, Lucas and Marcus are only known to operate this TikTok account.

Image alt: dobre twins funny tiktoker
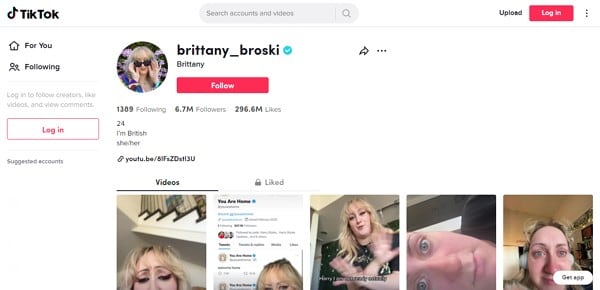
Brittany Broski
Quite a few TikTokers actually make funny videos with impressive comedy. Brittany Broski is a celebrity in this genre, where she has taken great use of her comedy skills to present great vlogs with different and unique topics. Her take on comedy is entirely different, which makes her funny vlog unique and better than others.
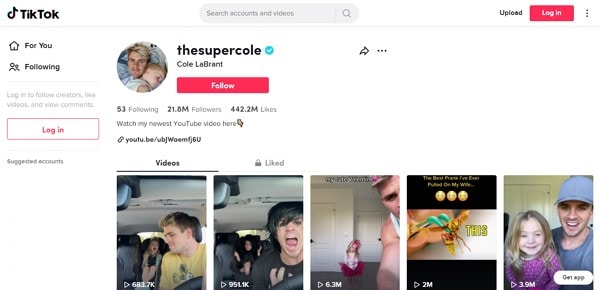
Cole LeBrant
This TikToker makes a good collection of funny vlogs across his account with his family. The variety and variability in his videos make him a different version of fun compared to other TikTokers. He has built a great reach across the account, which makes him an impressive choice.
Part 3: How to Make a Funny Vlog?
Funny vlogs are a fabulous way to interact with people of different tastes. It can be something that cherishes the moods of the viewers, regardless of their current emotions. To make this happen, you need a good platform that helps you create a video for your viewers to watch. Wondershare Filmora fulfills the needs of a video editor by providing you with the perfect options while editing the video for TikTok.
For Win 7 or later (64-bit)
For macOS 10.12 or later
If you are looking forward to understanding how to create a funny vlog for your TikTok using Filmora, you need to follow a set of simple steps. These are shown as follows:
Step 1: Launch and Import Video
To start, you need to have Wondershare Filmora installed across your device. Launch the tool and click on “New Project” to start from scratch. Once the screen opens up, you need to click on the “Arrow Head” icon across the ‘Media’ Tab to import the audio you wish to amend for TikTok.
Step 2: Perform Basic Editing
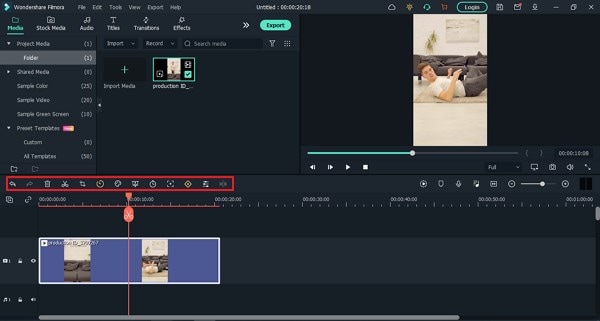
Wondershare Filmora provides users with multiple options for editing their files. At first, drag the file onto the timeline. Following this, you can merge different videos or enhance the video by trimming it. Along with that, you can also consider splitting the image or changing its playback speed for different results.
Step 3: Add Effects and Transitions
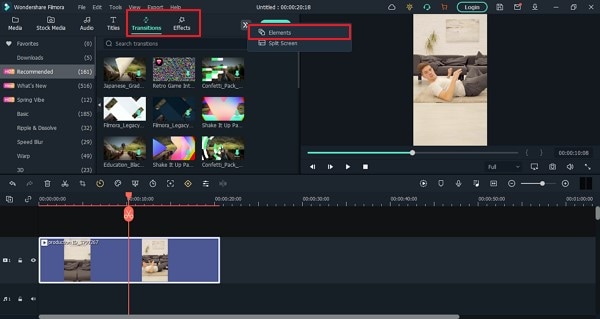
After you are done with some basic editing, you can add different effects from the “Effects” section. To make the video look exclusive, you can also include “Transitions” across it. Use the “Elements” tab to include stickers and emojis to enhance your TikTok video.
Step 4: Manage the Audio
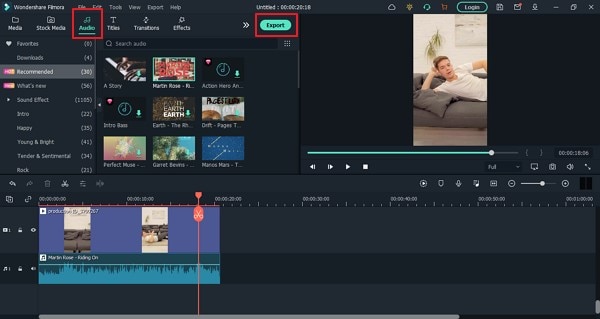
For managing the audio of your video, you can make several changes across it. You can detach audio and change the audio with another soundtrack. Filmora also allows you to add audio from the “Audio” section, which contains royalty-free music to add. Once you are done, click on the “Export” button to set the settings of the video before exporting it back onto the device.
Closing Words
This article has presented some of the finest tips that can be utilized for creating funny vlogs on your TikTok. If you coherently use these tips, you can get significant results across your account in the name of the followers. Along with that, you can also use Filmora for making the best funny vlog with different editing tools.
Wondershare Filmora
Get started easily with Filmora’s powerful performance, intuitive interface, and countless effects!
Try It Free Try It Free Try It Free Learn More >

02 5 Popular Funny Vloggers on TikTok
Part 1: Ideas for Creating A Funny Vlog for TikTok
When creating a funny vlog across TikTok, there are numerous ideas that one can think of. However, since TikTok videos are of small lengths, achieving diversity is difficult yet possible. You’ll surely get your break if you understand the following ideas for creating a funny vlog.
React to Other Videos
While it may seem the most mainstream style of creating funny content across TikTok, it is also the most effective way of making people laugh while watching your video. This will also bring recurring viewers across your channel.
Display Failure Videos
It is always great to see people trying and doing something funny across the video. Failure videos are believed to be the other way of creating content for a funny vlog on your TikTok, which shall make people laugh hard.
Use Goofy and Peculiar Voices
Unrealistic and weird voices can make your short video seem funny. If you consider talking about something in a silly voice, it will make people burst out of laughter.
Trolling Family Members
One of the best ways to make something good out of TikTok is creating candid moments. This can always be done if you troll or prank your family members out of nowhere. Just keep reminding that you have to ensure no one gets injured due to it.
Impersonations
Making impersonated videos of major celebrities is another way of showing funny content to the viewers on TikTok. If you consider some funny examples for this, it will surely bring you effective results.
Make Puns and Funny Statements
Another great way to create a funny vlog for your TikTok is to be good at making puns. This is purely hilarious content and needs someone to be highly great in it.
Physical Challenges
This can be a bit risky, but it can become quite fun to make and show to the world if executed with care. However, this can be conducted individually or in a group of people, as you find it appropriate.
Use Effects of TikTok
TikTok makes sure to provide something funny in effects to its users. The use of effects for TikTok is an excellent technique to make funny vlogs; however, it can get funny if the elements used across it have a dubious meaning.
Run Everything in Reverse
One of the most straightforward techniques to make a funny vlog is to run everything in reverse order. The simplest thing of a video becomes the funniest to watch.
Part 2: 5 Popular Funny Vloggers on TikTok
This part will provide some popular examples of TikTokers who have made a considerate performance in providing funny content to people across the platform.
Khaby Lame
This is, without a doubt, the first-choice in TikTok accounts that would always come while relating to funny content. Khaby started his journey as a TikToker with a remarkably simple motive of pointing out the simplicity in different tasks, which were displayed to be difficult. Although it sounds pretty basic, the technique taken by Khaby has been so considerate it brought him millions of followers for creating funny content.
Sarah Cooper
Want to see a great impersonation of Donald Trump? It is undoubtedly great to see every time. With Sarah Cooper, it just becomes an entirely different story. Her impersonation has been so perfect that she has been referred to as one of the best funny vloggers on TikTok. Her likes across the platform may not be that great, but she has shown some stature in presenting funny content in a great way.
Dobre Twins
This twin duo is known across many social media platforms for its funny content. As the twins started using TikTok, they started creating good funny vlogs, which gained quite the traction for them. Their unique ideas to present different things have presented the following worth 23 million likes across TikTok, which is quite commendable. However, Lucas and Marcus are only known to operate this TikTok account.
Image alt: dobre twins funny tiktoker
Brittany Broski
Quite a few TikTokers actually make funny videos with impressive comedy. Brittany Broski is a celebrity in this genre, where she has taken great use of her comedy skills to present great vlogs with different and unique topics. Her take on comedy is entirely different, which makes her funny vlog unique and better than others.
Cole LeBrant
This TikToker makes a good collection of funny vlogs across his account with his family. The variety and variability in his videos make him a different version of fun compared to other TikTokers. He has built a great reach across the account, which makes him an impressive choice.
Part 3: How to Make a Funny Vlog?
Funny vlogs are a fabulous way to interact with people of different tastes. It can be something that cherishes the moods of the viewers, regardless of their current emotions. To make this happen, you need a good platform that helps you create a video for your viewers to watch. Wondershare Filmora fulfills the needs of a video editor by providing you with the perfect options while editing the video for TikTok.
For Win 7 or later (64-bit)
For macOS 10.12 or later
If you are looking forward to understanding how to create a funny vlog for your TikTok using Filmora, you need to follow a set of simple steps. These are shown as follows:
Step 1: Launch and Import Video
To start, you need to have Wondershare Filmora installed across your device. Launch the tool and click on “New Project” to start from scratch. Once the screen opens up, you need to click on the “Arrow Head” icon across the ‘Media’ Tab to import the audio you wish to amend for TikTok.
Step 2: Perform Basic Editing
Wondershare Filmora provides users with multiple options for editing their files. At first, drag the file onto the timeline. Following this, you can merge different videos or enhance the video by trimming it. Along with that, you can also consider splitting the image or changing its playback speed for different results.
Step 3: Add Effects and Transitions
After you are done with some basic editing, you can add different effects from the “Effects” section. To make the video look exclusive, you can also include “Transitions” across it. Use the “Elements” tab to include stickers and emojis to enhance your TikTok video.
Step 4: Manage the Audio
For managing the audio of your video, you can make several changes across it. You can detach audio and change the audio with another soundtrack. Filmora also allows you to add audio from the “Audio” section, which contains royalty-free music to add. Once you are done, click on the “Export” button to set the settings of the video before exporting it back onto the device.
Closing Words
This article has presented some of the finest tips that can be utilized for creating funny vlogs on your TikTok. If you coherently use these tips, you can get significant results across your account in the name of the followers. Along with that, you can also use Filmora for making the best funny vlog with different editing tools.
Wondershare Filmora
Get started easily with Filmora’s powerful performance, intuitive interface, and countless effects!
Try It Free Try It Free Try It Free Learn More >
You Can Match Paint Colors From Pictures for Your Wall, as Well as for Your Videos. And to Know How to Do Both, We Have Laid Down the Following Discussion
How to Do Perfect Match Paint 100% the Easy Way
An easy yet powerful editor
Numerous effects to choose from
Detailed tutorials provided by the official channel
You always have to be highly precise and appropriate when choosing the color for your wall. If you are not accurate enough, you might not choose the right shade, which would never look good on your walls. But, to help you match the paint colors perfectly, we have discussed three methods.
And lastly, we have also introduced a video editing tool Perfect Match Paint that will help you match the color in your videos as well. So, you can have the perfect desired color on your walls and also in your videos!
In this article
01 [How to Match Paint Color Without a Sample](#Part 1)
02 [Need to Color Match in Video? There’s an App for That…](#Part 2)
Part 1 How to Match Paint Color Without a Sample
We will be discussing three methods in which you will get the perfect answer to the question of how can I match my paint color perfectly. So, let us jump right into the first method without further delay.
01Method 1 Perfect Match Paint without a sample
The following steps will help you attain Perfect Match Paint without the necessity of a sample.
Step Clean the print area
The first and the most essential step is to make the area where you will be painting clean and tidy. As time passes, fingerprints, marks, dust, and many other things accumulate and make the area dirty. And if you do not clean the same, then the paint you do on it becomes much darker, dull, and gives a shabby outlook.
Use a damp sponge, and if possible, it is better to use soap on the sponge. And most importantly, you will have to let the area dry out completely before you put it on to test the paint. Moreover, the new paint adheres much better than before when you clean the area.

Step Scraping off
The next step requires you to use a utility knife. And with that utility knife, you will have to scrap an inch or 2.5 cm of your wall paint. It is because, when you have a sample, you can easily bring that to the store for paint matching near me. Use a plastic bag to secure the sample price. It will prevent the paint of the sample to smudge or getting any marks or destruction.
And after you find paint colors that match the ones you need, try to dab a little of that paint on the sample. As a result, you will precisely know how perfectly the new shade of paint matches with the new one. It ensures optimum precision and can be the best way to match paint.

Step Bring the object if possible
The best way to maintain absolute precision in the match is by bringing an object to the store. You can also opt for a car paint match near me. If you bring the object with the color for matching, it ensures perfect matching and 10precision. Nowadays, the technology is highly advanced and will help you obtain the best paint match.
02Method 2 Using a sample
Since we have discussed the steps for matching paint without the sample, you must know how to match color with the help of samples. So, here are the steps for doing so.
Step 1: Click a Picture of the original hue
This step is necessary for better precision and matching the color as perfectly as possible. Clock a picture of the original color sample. The color in the photo might not be absolutely precise. But it can help to a large extent to match the color as perfectly as possible. You can easily take the sample to any renowned color matching store, like, dupli color paint match and have the perfect color matching done.
And it is better to not one picture or from just one angel. It will be best to take numerous snaps and that too, from different angles, sides and lighting conditions. It will help you get the original color shades in different angles, shades and lights, and it increases the possibility of matching the color as impeccably as possible.
Step 2: Bring home more than one sample
You will see numerous samples of paints that you feel will match the color you brought from your home as a sample of the original color. You might not be sure which sample perfectly matches the original sample color at that exact moment. However, if you find a sample that seems t match perfectly, you must not make your decision right at that moment. Because in the store, the lighting, angles, and many other factors play a hugely influential role in enhancing the shades of the sample colors.
So, the color you see in the store often does not remain the same in natural light settings; it might get a bit darker or lighter. So, it is always better to bring home those samples that you feel match the original shade of the sample you brought. This increases the possibility of being the most precise and impeccable in matching the colors.

Step 3: stick the sample and compare.
This is the final step for matching the colors of paint with the help of a sample. After bringing home the samples that you found similar to the original sample, tape them to the wall. Take a sample at a time and use a tap to place them on the wall. You can also tape all the samples side by side, leaving enough gap between them.
It helps better compare and matches the sample’s colors and the wall. A common thing that occurs is that in the daytime, you find one color matching perfectly, whereas, in the nighttime, some other sample color is matching perfectly. In such an instance, it is best to ask the store if they can give you the shade by mixing both the colors: the color that perfectly matched with the sample in the daytime and the color that perfectly matched with the sample in the time.

Step 4: Paint the samples on the wall
It is an optional step, and you can opt for this step if you are not getting a hundred per cent confidence in choosing the correct color. Try to paint the colors of the samples that you are finding similar to the wall. Since the wall already has the original color, when you paint the sample colors on it, the sample colors clearly distinguish which samples match more impeccably with the actual color.

03Method 3 with the help of apps
Since the technology has advanced in the most progressive way possible, you can easily match the paint colors through an application. So now, we will be listing down the steps that will help you match the paints with the help of mobile applications. The steps are given as follows.
Step 1 Install the application
You will find numerous mobile applications meant for matching paint colors. Opt for the ones you find the best and most efficient. Download it and install it on your phone. If you have used a renowned brand for painting, you can use their application. For example, you can use Asian paints color matching if you have used their brand of paints before.

Step 2 Scan the shade
Now, even the original paint shade. There are factors such as lighting, angel and shadow that you must remover to consider while you scan the color of the original sample.

Step 3 Paint the sample
To be most precise and sure, paint the sample of the paint you have chosen. It will be a way of double-checking your division and ensuring a perfect paint match.

Step 4 Use a color scanner
It is another optional step, but there will be absolutely no doubt in the precision of paint matching if you use it. You can either borrow or buy a paint scanner. If you are not planning to paint again soon, it is best to borrow the paint scanner.

Part 2 Need to Color Match in Video? There’s an App for That
Right now, we talked about mobile apps that can help you match paint colors for your walls. Well, you can ever match colors in the videos that you capture! Yes, that is possible in the highest quality and most effortlessly. And color match paint from photos can be likely through the best video editing tool- Wondershare Filmora Video Editor . More precisely, it has numerous features; one among them is the “Color Match: a feature which makes this possible.
The “Color Match” feature of Filmora allows you to extract a clip from the video where you want to match the colors and then carries out the process most effortlessly. You can apply any color you wish to within a few minutes.
For Win 7 or later (64-bit)
For macOS 10.12 or later
You can use this incredible tool on any device, and it will work equally proficiently and help you create fantastic videos!
● Key Takeaways from This Episode →
● How to match paint colors without samples
● Two more methods of matching paint colors
● We introduced Filmora and its feature of “Color Match” that can help you match the colors of your videos most profoundly.
You always have to be highly precise and appropriate when choosing the color for your wall. If you are not accurate enough, you might not choose the right shade, which would never look good on your walls. But, to help you match the paint colors perfectly, we have discussed three methods.
And lastly, we have also introduced a video editing tool Perfect Match Paint that will help you match the color in your videos as well. So, you can have the perfect desired color on your walls and also in your videos!
In this article
01 [How to Match Paint Color Without a Sample](#Part 1)
02 [Need to Color Match in Video? There’s an App for That…](#Part 2)
Part 1 How to Match Paint Color Without a Sample
We will be discussing three methods in which you will get the perfect answer to the question of how can I match my paint color perfectly. So, let us jump right into the first method without further delay.
01Method 1 Perfect Match Paint without a sample
The following steps will help you attain Perfect Match Paint without the necessity of a sample.
Step Clean the print area
The first and the most essential step is to make the area where you will be painting clean and tidy. As time passes, fingerprints, marks, dust, and many other things accumulate and make the area dirty. And if you do not clean the same, then the paint you do on it becomes much darker, dull, and gives a shabby outlook.
Use a damp sponge, and if possible, it is better to use soap on the sponge. And most importantly, you will have to let the area dry out completely before you put it on to test the paint. Moreover, the new paint adheres much better than before when you clean the area.
Step Scraping off
The next step requires you to use a utility knife. And with that utility knife, you will have to scrap an inch or 2.5 cm of your wall paint. It is because, when you have a sample, you can easily bring that to the store for paint matching near me. Use a plastic bag to secure the sample price. It will prevent the paint of the sample to smudge or getting any marks or destruction.
And after you find paint colors that match the ones you need, try to dab a little of that paint on the sample. As a result, you will precisely know how perfectly the new shade of paint matches with the new one. It ensures optimum precision and can be the best way to match paint.
Step Bring the object if possible
The best way to maintain absolute precision in the match is by bringing an object to the store. You can also opt for a car paint match near me. If you bring the object with the color for matching, it ensures perfect matching and 10precision. Nowadays, the technology is highly advanced and will help you obtain the best paint match.
02Method 2 Using a sample
Since we have discussed the steps for matching paint without the sample, you must know how to match color with the help of samples. So, here are the steps for doing so.
Step 1: Click a Picture of the original hue
This step is necessary for better precision and matching the color as perfectly as possible. Clock a picture of the original color sample. The color in the photo might not be absolutely precise. But it can help to a large extent to match the color as perfectly as possible. You can easily take the sample to any renowned color matching store, like, dupli color paint match and have the perfect color matching done.
And it is better to not one picture or from just one angel. It will be best to take numerous snaps and that too, from different angles, sides and lighting conditions. It will help you get the original color shades in different angles, shades and lights, and it increases the possibility of matching the color as impeccably as possible.
Step 2: Bring home more than one sample
You will see numerous samples of paints that you feel will match the color you brought from your home as a sample of the original color. You might not be sure which sample perfectly matches the original sample color at that exact moment. However, if you find a sample that seems t match perfectly, you must not make your decision right at that moment. Because in the store, the lighting, angles, and many other factors play a hugely influential role in enhancing the shades of the sample colors.
So, the color you see in the store often does not remain the same in natural light settings; it might get a bit darker or lighter. So, it is always better to bring home those samples that you feel match the original shade of the sample you brought. This increases the possibility of being the most precise and impeccable in matching the colors.
Step 3: stick the sample and compare.
This is the final step for matching the colors of paint with the help of a sample. After bringing home the samples that you found similar to the original sample, tape them to the wall. Take a sample at a time and use a tap to place them on the wall. You can also tape all the samples side by side, leaving enough gap between them.
It helps better compare and matches the sample’s colors and the wall. A common thing that occurs is that in the daytime, you find one color matching perfectly, whereas, in the nighttime, some other sample color is matching perfectly. In such an instance, it is best to ask the store if they can give you the shade by mixing both the colors: the color that perfectly matched with the sample in the daytime and the color that perfectly matched with the sample in the time.
Step 4: Paint the samples on the wall
It is an optional step, and you can opt for this step if you are not getting a hundred per cent confidence in choosing the correct color. Try to paint the colors of the samples that you are finding similar to the wall. Since the wall already has the original color, when you paint the sample colors on it, the sample colors clearly distinguish which samples match more impeccably with the actual color.
03Method 3 with the help of apps
Since the technology has advanced in the most progressive way possible, you can easily match the paint colors through an application. So now, we will be listing down the steps that will help you match the paints with the help of mobile applications. The steps are given as follows.
Step 1 Install the application
You will find numerous mobile applications meant for matching paint colors. Opt for the ones you find the best and most efficient. Download it and install it on your phone. If you have used a renowned brand for painting, you can use their application. For example, you can use Asian paints color matching if you have used their brand of paints before.
Step 2 Scan the shade
Now, even the original paint shade. There are factors such as lighting, angel and shadow that you must remover to consider while you scan the color of the original sample.
Step 3 Paint the sample
To be most precise and sure, paint the sample of the paint you have chosen. It will be a way of double-checking your division and ensuring a perfect paint match.
Step 4 Use a color scanner
It is another optional step, but there will be absolutely no doubt in the precision of paint matching if you use it. You can either borrow or buy a paint scanner. If you are not planning to paint again soon, it is best to borrow the paint scanner.
Part 2 Need to Color Match in Video? There’s an App for That
Right now, we talked about mobile apps that can help you match paint colors for your walls. Well, you can ever match colors in the videos that you capture! Yes, that is possible in the highest quality and most effortlessly. And color match paint from photos can be likely through the best video editing tool- Wondershare Filmora Video Editor . More precisely, it has numerous features; one among them is the “Color Match: a feature which makes this possible.
The “Color Match” feature of Filmora allows you to extract a clip from the video where you want to match the colors and then carries out the process most effortlessly. You can apply any color you wish to within a few minutes.
For Win 7 or later (64-bit)
For macOS 10.12 or later
You can use this incredible tool on any device, and it will work equally proficiently and help you create fantastic videos!
● Key Takeaways from This Episode →
● How to match paint colors without samples
● Two more methods of matching paint colors
● We introduced Filmora and its feature of “Color Match” that can help you match the colors of your videos most profoundly.
How To Create Quiz Videos: Detailed Guide
Quiz videos are becoming popular on YouTube but creating good content takes work. You’ll have to spend time on it, find the right questions and spend resources on powerful video editing software. In this guide, we’ll show you what a quiz video is, its advantages, and how you can use Filmora to make interactive video quizzes.
So, what are you waiting for? Read on to learn how to create quiz videos for Youtube!
Part 1. What Is A Quiz Video?
A quiz video is a type of content that provides viewers with a series of questions that are typically about a particular topic or subject matter and may also provide additional information about the topic. You can use the video for various purposes, including educational, entertainment, and marketing.

To make an appealing video quiz, you have to look at it from various angles, such as its purpose, type, and relevancy.
Moreover, a well-made quiz video will demand the viewer’s attention and encourage them to take action without being intrusive or annoying. One of the best ways is to provide visual captions that can explain the point being made in an engaging, fast-paced, and entertaining way.
Part 2. What Are The Advantages Of A Quiz And How To Use It?
Quizzing is a great way to engage your audience and encourage them to interact with your content. They can be used to create thought-provoking content, impart knowledge, and improve learning outcomes.
When used correctly, a quiz can be a powerful learning tool. But how do you use it effectively? And what are some of the advantages?
To answer these questions, we’ve provided some advantages of creating video quizzes and some scenarios where you can use them.
Advantages
Here are some advantages of video quizzes:
Draw Attention
A quiz can draw the viewer’s attention to the topic under discussion. Specifically, if you are a teacher, you can use GK question videos in your classroom to emphasize the content you are teaching and can better assess your students’ knowledge.
Increase Interactivity
Quizzes are a great way to increase engagement and interaction with your audience. By incorporating video into your questions, you can add an element of excitement and increase the likelihood that people will want to participate.

A Good Way To Introduce A Topic
Quizzes are an excellent way to introduce a new topic or subject matter. They can help you provide context and background information to help people understand the concepts you’re trying to teach or introduce.
Increase One’s Impressions Of Your Content
By adding a quiz, you can increase the time that someone spends on your page or channel as they work to answer the questions. This is valuable because it allows you to introduce a new topic in a fun and interactive way, along with getting more impressions on your content.
Scene
Here are some scenes where you can use the quizzes:
Educational
You can use quizzes in any educational setting, such as a classroom, online course, or YouTube video, to provide knowledge to others and assess their understanding.
Speech
Quizzes can also be used in speeches to add interest and engagement. For instance, a motivational speaker can play a quiz during their talks to the audience to help them understand his point better and get their response.
Presentation
Adding a fun quiz to your presentation can help to break the monotony and keep your audience engaged throughout the session.
Social media
Quizzes can aid in generating engagement on your social media page. For example, you can use them to drive traffic to your website or blog or simply to get people talking about your brand.
Part 3. How To Make An Interactive Quiz Video In Filmora?
Suppose the above advantages have compelled you to create an interactive quiz video to engage your audience and get them involved in your content. In that case, you can use Filmora software which makes it easy to make quiz videos with its built-in interactive video editing tools.
Here’s how you can make an interactive quiz video using Filmora :
Free Download For Win 7 or later(64-bit)
Free Download For macOS 10.14 or later
Step1 Upload Your Materials
In the first step, it is essential that you complete in-depth research and find reliable information for your quiz video. Afterward, go to the Filmora website and download the software that is compatible with your system. Install the program on your PC/laptop and launch it.
On the homepage, select the “Create New Project” option, and choose “Click here to upload a media file” to upload your video. Alternatively, you can drag and drop the background video from your system to the Filmora interface.
Finally, drag and drop the background video into the timeline.

Step2 Make An Intro
Now, start by creating an introduction. You can do this by opening the “Media” tab, selecting a template, and dropping it in the timeline once it is downloaded.
Then, go to the “Titles” tab, choose a text style you like, and drop it in the timeline. Finally, align both the template and your video file.
To add text to your intro, click on the text track in the timeline. Enter the intro text, ideally the quiz topic, then customize the text color and style as desired. The Advanced option also lets you animate your text. Save the changes by clicking “OK.”
Step3 Add A Quiz To The Timeline
Next, add the GK questions and answers to your video using the “Titles” tab. You should adjust the display time and text on the timeline as needed.

Step4 Increase Interactivity In Your Quiz Video
To make your video more engaging, go to the “Transition” tab and add an interesting transition effect. You can also add effects or countdown elements between questions or reveal the answer.
Step5 Repeat The Process And Export Your Final Video
After completing the previous steps, you can now create the entire quiz video by repeating the above steps.
Once you are done, click the “Play” icon to preview your work, and select the “Export” icon to either save the clip to your device or upload it directly to your YouTube channel.
Conclusion
In this detailed guide, we’ve explored what a video quiz is, its advantages, and scenes where you can use them. We’ve also walked you through the step-by-step process of making an interactive video quiz using the Wondershare Filmora software.
Hopefully, you’ve enjoyed reading this article and can now create quiz videos for your presentation, classroom, or YouTube videos.
Free Download For macOS 10.14 or later
Step1 Upload Your Materials
In the first step, it is essential that you complete in-depth research and find reliable information for your quiz video. Afterward, go to the Filmora website and download the software that is compatible with your system. Install the program on your PC/laptop and launch it.
On the homepage, select the “Create New Project” option, and choose “Click here to upload a media file” to upload your video. Alternatively, you can drag and drop the background video from your system to the Filmora interface.
Finally, drag and drop the background video into the timeline.
Step2 Make An Intro
Now, start by creating an introduction. You can do this by opening the “Media” tab, selecting a template, and dropping it in the timeline once it is downloaded.
Then, go to the “Titles” tab, choose a text style you like, and drop it in the timeline. Finally, align both the template and your video file.
To add text to your intro, click on the text track in the timeline. Enter the intro text, ideally the quiz topic, then customize the text color and style as desired. The Advanced option also lets you animate your text. Save the changes by clicking “OK.”
Step3 Add A Quiz To The Timeline
Next, add the GK questions and answers to your video using the “Titles” tab. You should adjust the display time and text on the timeline as needed.
Step4 Increase Interactivity In Your Quiz Video
To make your video more engaging, go to the “Transition” tab and add an interesting transition effect. You can also add effects or countdown elements between questions or reveal the answer.
Step5 Repeat The Process And Export Your Final Video
After completing the previous steps, you can now create the entire quiz video by repeating the above steps.
Once you are done, click the “Play” icon to preview your work, and select the “Export” icon to either save the clip to your device or upload it directly to your YouTube channel.
Conclusion
In this detailed guide, we’ve explored what a video quiz is, its advantages, and scenes where you can use them. We’ve also walked you through the step-by-step process of making an interactive video quiz using the Wondershare Filmora software.
Hopefully, you’ve enjoyed reading this article and can now create quiz videos for your presentation, classroom, or YouTube videos.
Also read:
- Updated In 2024, Are You Aware that AV1 Has the Potential to Change the Way We Watch Videos Online? Read on to Learn More About AV1 and How It Could Impact Your Life
- Ultimate Guidelines to Help You Use VLC Media Player Better
- Updated 2024 Approved This Well-Written Article Will Share a Descriptive Method on How to Stream Zoom to YouTube Quickly. By Doing so, You Can Share Your Zoom Session Live with Your YouTube Audience Effortlessly
- In 2024, What Are the 10 Best GIF Creator?
- Fascinated About Exploring Your Graphic Creativity by Experimenting with Designing Slideshow Presentations on a Variety of Software Programs? Stay Here to Get the Know-How of Using Clideo for 2024
- Easy Guide to Apply Slow Zoom Effects to Videos for 2024
- 2024 Approved VSCO Slow Motion
- In 2024, Multi Object Tracking The Ultimate Guide
- Updated What You Should Know About Speech-to-Text Technology for 2024
- Blender Is a 3D Animation Software that Can Be Used to Create Stunning 3D Models and Videos for 2024
- Updated The Top Tools for Converting Slides to Digital - 2024 Review
- Updated 2024 Approved How to Make Double Exposure Effect in Filmora
- Updated List of Whatsapp Video Format That You May Need to Know
- New 2024 Approved Free
- New In 2024, Difference Between Time Lapse and Hyperlapse
- Updated Complete Tutorial to Make an Impressive Countdown Timer Video
- New Learn How to Create Animated Titles and Text in the Filmora Video Editor. This Is a Simple Step-by-Step Tutorial for Any Skill Level for 2024
- New 2024 Approved Here Are the Steps to Crop a Video in Sony Vegas Pro Step 1 Click on Import and Import the Video to Be Edited. Click on It and Drag-Drop to Timeline
- Updated 2024 Approved 3D Ray Traced Settings In After Effects
- Updated Are You Searching for Professional Subtitle Apps? Read This Article to Explore Various Compatible Subtitle Apps that You Can Run on Multiple Platforms
- Updated Blender - A Video Editor for Every Professional
- Updated Useful Tips for Tiktok Video Aspect Ratio Included
- In 2024, Best GIF to AVI Converters (Online + Software Solutions)
- New In 2024, 4 Ways to Add White Border to Video on Mobile and Desktop
- Do You Use Premiere Pro and Want to Learn How to Change a Videos Frame Rate Using the Tool? Here Are the Steps that You Need to Follow for 2024
- Easily Cut Large Video Faster on Mac
- New 2024 Approved Some Top Methods to Create AI Slow Motion Videos
- New In 2024, Converting VTT to SRT, or in Other Words, Converting a Document File Format Web to Subtitles File with the SRT Format Can Be a Cumbersome Process for Many. It Becomes Difficult when You Are New to This and Dont Have Prior Guidance
- In 2024, How to Create a Light Sweep (Shine) Effect
- New In 2024, How to Color Correct in OBS
- Camtasia Review – Is It The Best Video Editor?
- New In 2024, How to Create Vintage Film Effect 1920S
- 2024 Approved Kdenlive Is a Free, Open-Source Video Editing Software Application. Kdenlive Is a Powerful Video Editor that Can Be Used to Create Professional-Quality Videos
- 2024 Approved Do You Know How Boring a Video Can Be with Silent Moments? Some Tools with Silent Detection Features Help You Delete Those Moments
- Updated Are You Looking for Dark LUTs Premiere Pro Free? This Article Discusses the Dark Moody LUTs with Top Recommendations for Beginning Visual Editing
- New Camtasia Review – Is It The Best Video Editor for 2024
- New 10 Top Suggestions for AI Video Interviews
- How to Make an Adobe Slideshow the Easy Way for 2024
- Updated In 2024, 9 Best Sparkle Effects Photo and Video Editors You Should Know
- New In 2024, Simple Step by Step Tutorial on Creating a Lightroom Collage
- New How To Quickly Create A Screen Print Effect In Photoshop Detailed Guide for 2024
- Updated Step by Step to Crop a Video Using Lightworks
- New Want to Make an Epic CSGO Montage? You Are in the Right Place. This In-Depth Guide Will Explain How You Can Make an Attention-Grabbing Gaming Montage
- SRT Not Displaying How to Open and Use SRT File in VLC, In 2024
- Updated How to Overlay Video in Premiere Pro
- How to Manually Install a Hardware Driver on Windows 10 & 7
- 7 Solutions to Fix Error Code 963 on Google Play Of OnePlus Ace 3 | Dr.fone
- 6 Ways to Change Spotify Location On Your Realme 10T 5G | Dr.fone
- How to Mirror Your Samsung Galaxy Z Flip 5 Screen to PC with Chromecast | Dr.fone
- Forgot iPhone Passcode Again? Unlock iPhone XS Without Passcode Now | Dr.fone
- In 2024, Top 15 Augmented Reality Games Like Pokémon GO To Play On Nokia C110 | Dr.fone
- How to Change Netflix Location to Get More Country Version On Vivo T2 5G | Dr.fone
- 9 Quick Fixes to Unfortunately TouchWiz has stopped Of Oppo A38 | Dr.fone
- In 2024, How to Unlock Verizon Apple iPhone 6s Plus
- How to Reset Oppo A1 5G Without the Home Button | Dr.fone
- How to Unlock iPhone 12 mini Passcode without Computer?
- How to Watch Hulu Outside US On Vivo Y27 4G | Dr.fone
- In 2024, Easiest Guide How to Clone Sony Xperia 5 V Phone? | Dr.fone
- How Do You Get Sun Stone Evolutions in Pokémon For Vivo Y28 5G? | Dr.fone
- Title: In 2024, Learn How to Create a Unique Repeated Text Animation in the Filmora Video Editor. Follow the Simple Step-by-Step Instructions
- Author: Morgan
- Created at : 2024-05-19 05:12:39
- Updated at : 2024-05-20 05:12:39
- Link: https://ai-video-editing.techidaily.com/in-2024-learn-how-to-create-a-unique-repeated-text-animation-in-the-filmora-video-editor-follow-the-simple-step-by-step-instructions/
- License: This work is licensed under CC BY-NC-SA 4.0.
