
In 2024, Repeated Text Animation Tutorial

Repeated Text Animation Tutorial
Preparation
What you need to prepare:
- A computer (Windows or macOS)
- Your video materials.
- Filmora video editor
Step 1
Download Filmora . Let it install and wait for it to run. Then, click on “New Project”. Now, you’re ready to edit!
Step 2
First, go to Titles and drag the Default Title to the Timeline.

Step 3
Now, double-click on the Default Title clip. Here, change its font to any bold font. Increase the text size to 120. Type in your text in the box. Scroll a bit down and change the Text Spacing to 8. Click OK.

Step 4
Take a Snapshot of this Default Title.

Step 5
Double-click on the Default Title clip once again. This time, click on its Advanced settings. Here, turn OFF Text Fill → turn ON Outline → change the Outline color to White → reduce Thickness to 1. Click OK. Now, take another Snapshot.

Step 6
Delete the Default Title clip from the Timeline. Now, drag the Outline snapshot that we just created to the Timeline. Open the Crop tool → change the Ratio to Custom → replace “1080” with “540”. Lastly, move the highlighted crop section to the top. Click OK.

Step 7
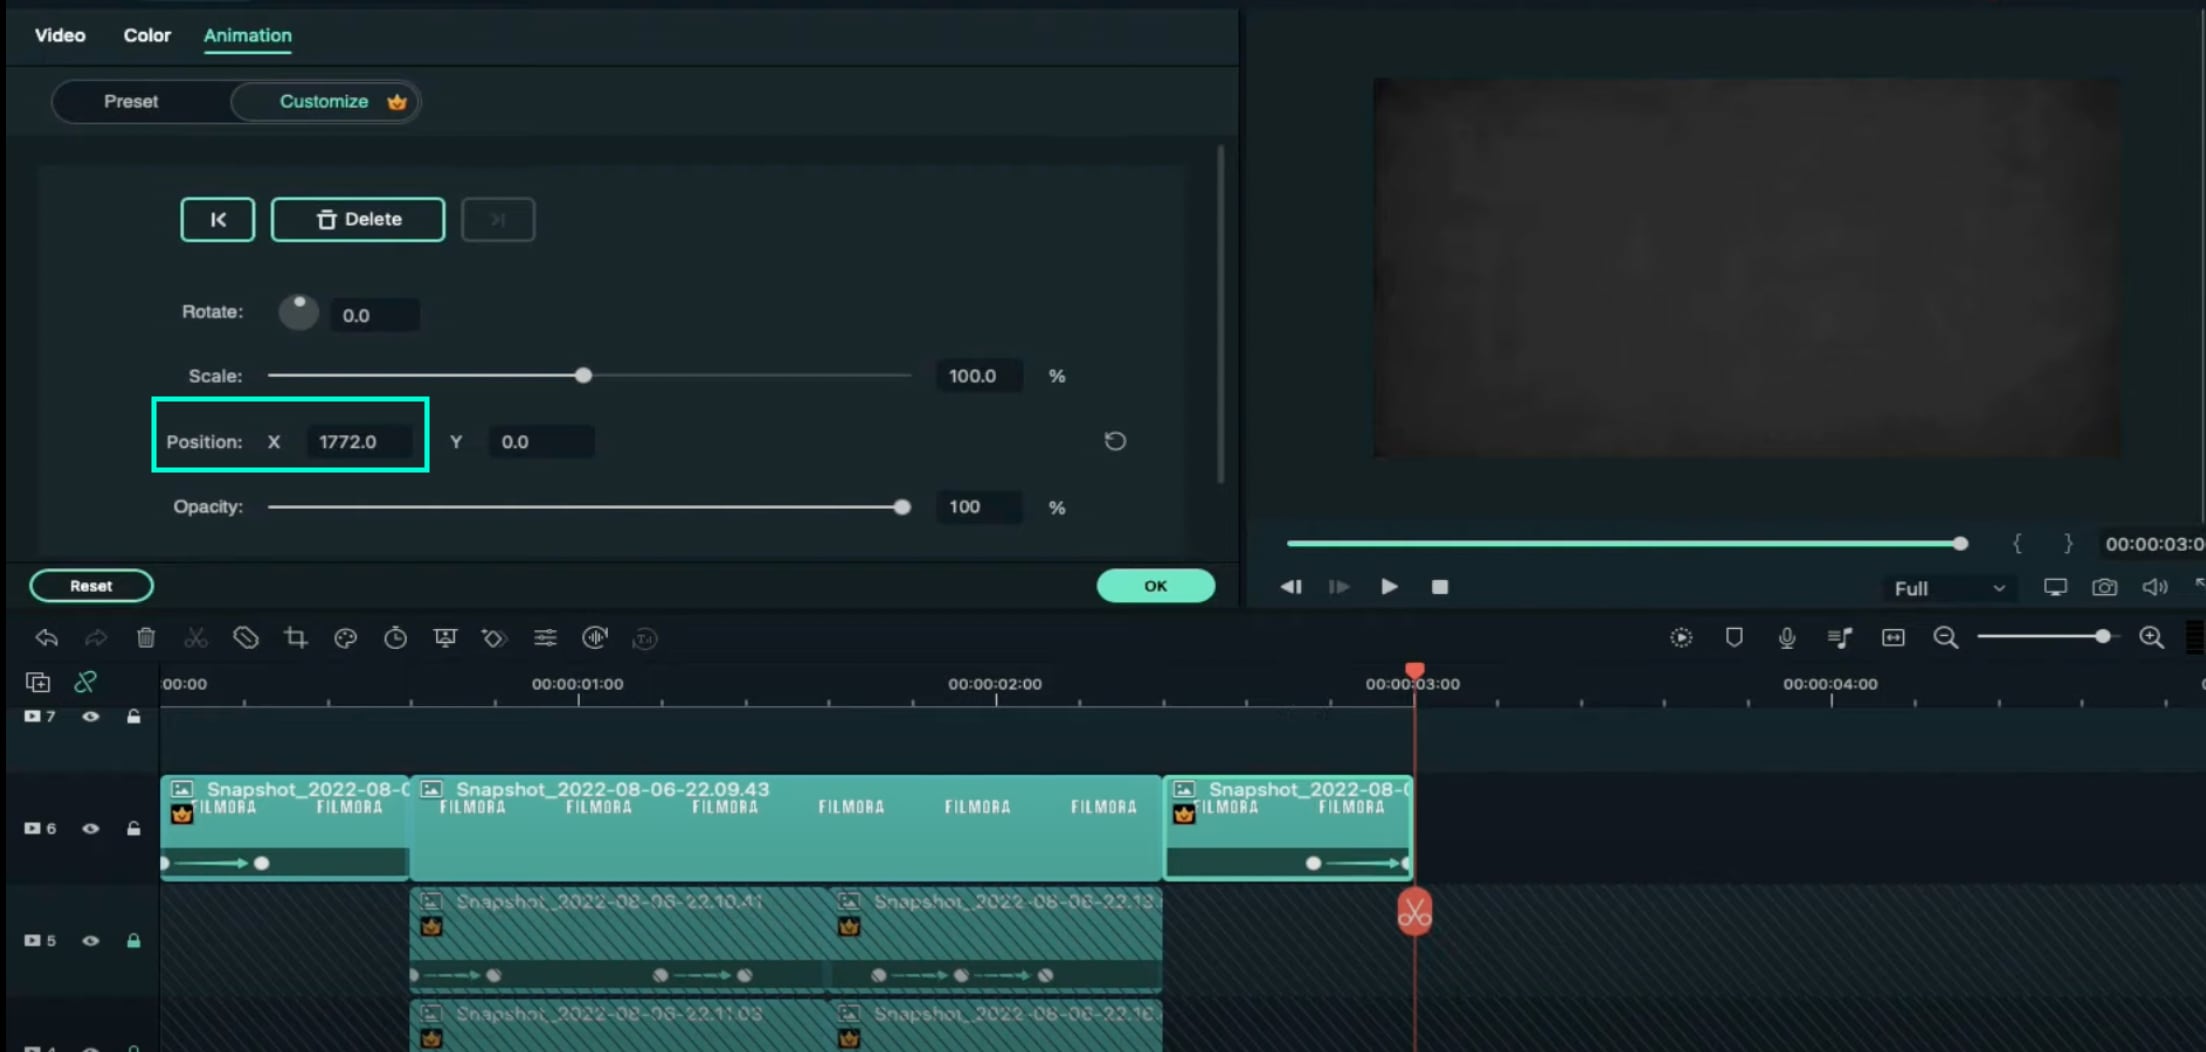
Double-click on the Snapshot to open its settings panel. Go to the Animation tab. Here, change the value of the Y-axis to “275”**.** Click OK. Now, take a Snapshot.

Step 8
Next, click on the Crop tool again and simply move the highlighted crop section to the bottom part of the screen. Click OK. Then, double-click on the snapshot clip in the Timeline and change the value of the Y-axis from “275” to “-275”**.** Click OK. Take a Snapshot again.
Step 9
Import a background image to My Media. Drag the background image to the Timeline. Double-click on it and drag the Scale bar until the background image covers the whole screen. Click OK. You should cut the background clip to make it 3 seconds long as well.

Step 10
Lock this track in the Timeline by pressing the highlighted button on the left. Then, go to “Track Manager” and add 6 new Tracks to the Timeline. Click OK.

Step 11
Drag the first Snapshot we made before to Track 6. Cut it so it’s 3 seconds long. Then, Lock the Track.

Step 12
Set the Playhead at the 15th frame on the Timeline. Then, drag the Upward Outline snapshot to this point. Double-click on it and change the Y-axis value to “**-4%**”. Then, reduce the Opacity to 0%. Now, move the Playhead 5 frames further. Next, increase the Opacity to 100% and increase the Y-axis value to around “105”. Don’t click OK yet.
Step 13
Move the Playhead to 1 minute and 5 seconds on the Timeline. Add a keyframe by clicking on the “+Add” button. Then, move the Playhead 5 frames forward. Here, change the Zoom Level to 25%.

Step 14
Double-click on the clip in Track 5. Drag the text like in the image below. Then, delete the part of the clip on the right side after 1 minute and 15 seconds.

Step 15
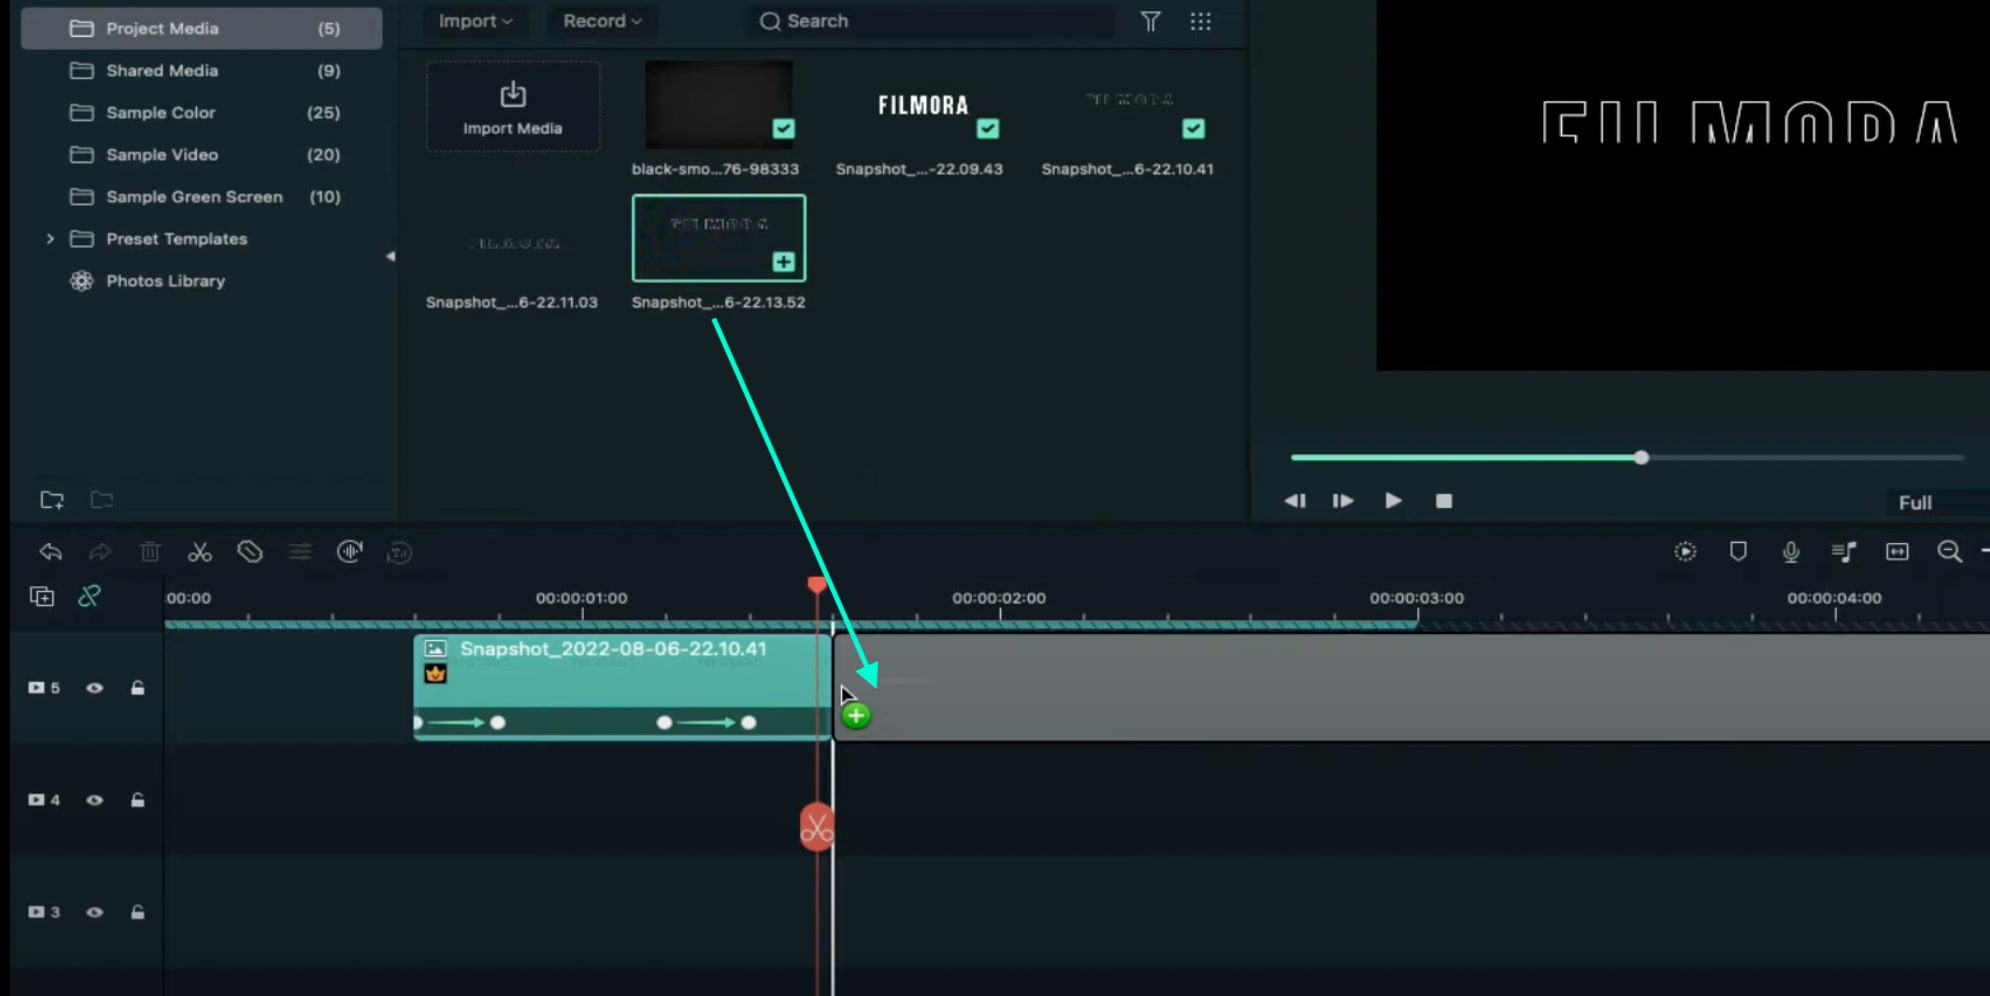
Hide the clips on Track 6 and Track 1 by clicking the “eye” icons next to them. Then, take a Snapshot. Now, drag this Snapshot right next to the clip on Track 5.
Step 16
Move the Playhead 3 frames forward from the starting point of the clip you just added. Unhide Track 6. Double-click on the clip on the right side of Track 5 and click on “+Add”. Move the Playhead 5 seconds forward and adjust the Upward Outline to fit the text.

Step 17
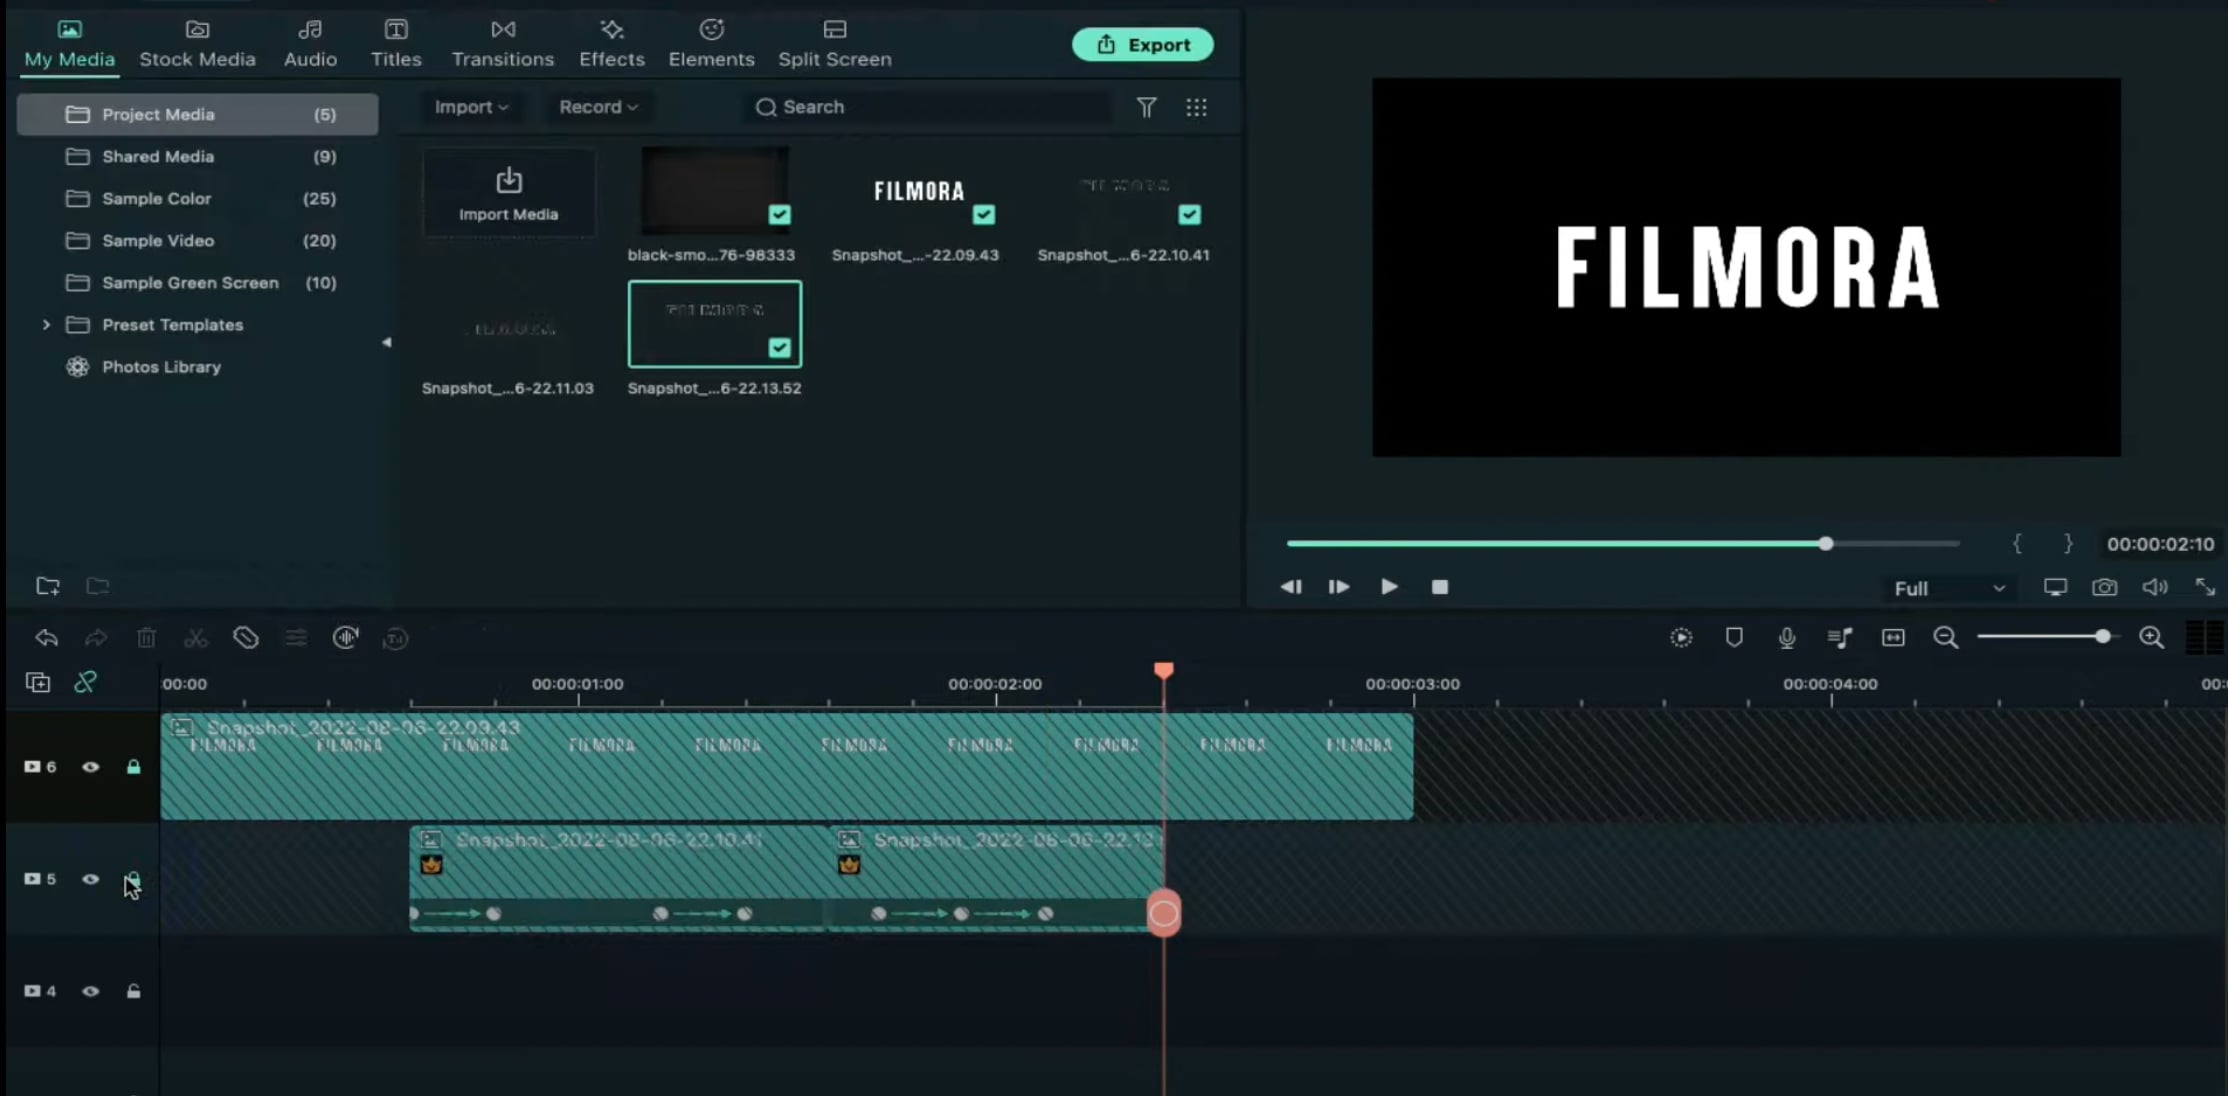
Move the Playhead 5 frames forward again. Drag the Y-axis value to the left until the outline clip overlaps the main text. Then, reduce the Opacity to 0%. Move the Playhead to 2 minutes and 10 seconds. Cut the Track and delete the clip on the right side. Lastly, Lock Track 5.
Step 18
Drag the Downward Outline snapshot to Track 4. Then, repeat the same process as in Step 16 and Step 17.
Step 19
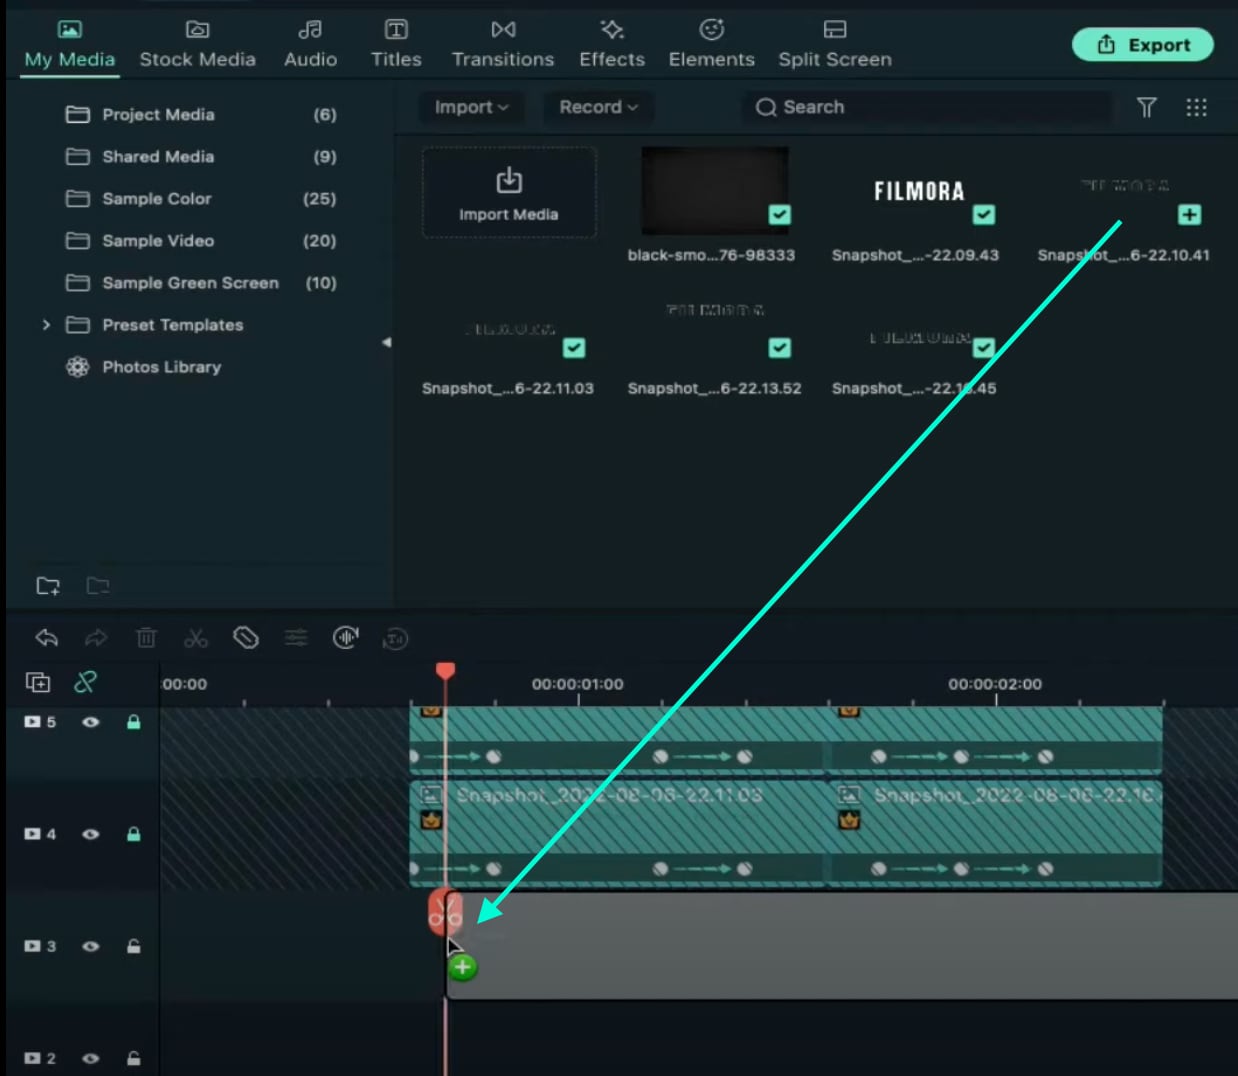
Drag the Upward Outline snapshot to Track 3 at the 17th frame. Double-click on it and change the Opacity to 0%.
Step 20
Now, move 5 frames forward and increase the Opacity back to 100%. Then, drag the Y-axis value to the right until the screen looks like this.

Step 21
Move the Playhead to 1 minute and 5 seconds. Click on “+Add” to add a keyframe. Then, move the Playhead 5 frames forward. Double-click on the clip and stretch it from side to side to match something like this.

Step 22
Move the Playhead to 1 minute and 16 seconds. Split the clip and delete the part on the right side. Hide Track 4, 5, and 6. Then, take a Snapshot. Drag this Snapshot next to the clip on Track 3. Place the Playhead on 1 minute and 18 seconds. Then, unhide Track 4, 5, and 6.
Step 23
Double-click on the clip on the right side of Track 3. Add a keyframe by pressing “+Add”. Move the Playhead to 1 minute and 23 seconds. Now, resize the clip back to its original size by moving the rectangle left and right. Right now, it should look like this.

Step 24
Move the Playhead 5 frames forward. Drag the Y-axis value to the left until the screen looks like this.

Step 25
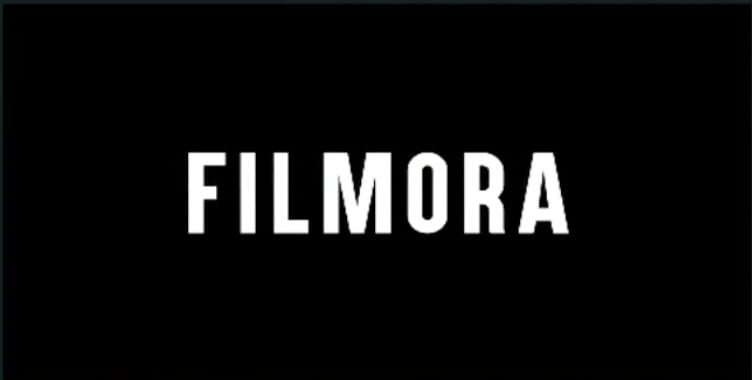
Move the Playhead 5 frames forward again. Drag the value of the Y-axis to the left until the screen looks like this. Then, change the Opacity to 0%. Finally, split the clip at 2 minutes and 10 seconds. Delete the part on the right side. Lock Track 3.
Step 26
Next, drag the Downward Snapshot on Track 2 and follow the same process as in Steps 19 through 25.
Step 27
Unhide the Background clip at the bottom of the Timeline. Then, Unlock Track 6. Split the clip on Track 6 at the 15th frame.

Step 28
Move the Playhead at the beginning of the Timeline. Click on the first part of the clip on Track 6. Add a keyframe. Drag the X-axis value to the right until the word disappears out of the screen. Like this. 👇Then, move the Playhead to the 6th frame and Reset the X-axis value to 0.0.

Step 29
Take the Playhead to 2 minutes and 10 seconds. Split it. Now, move the Playhead to 2 minutes and 19 seconds and add a keyframe. Lastly, take the Playhead to the very end of the clip and drag the text to the right side until it’s out of the screen once again.
Step 30
Go to the Effects tab. Select Glitch from the panel on the left. Then, apply “Glitch Dispersion” and “Glitch Stripe 2” to the clips at the start and at the end.

Step 31
Finally, Render the video to watch the final preview. And, you’re done! Congratulations on creating a repeated text animation in Filmora.

Summary
What you’ve learned:
- How to create text animations in Filmora
- Applying animation effects
- Make advanced edits on Titles in Filmora
- Hide and lock Tracks and Clips in Filmora
What you need to prepare:
- A computer (Windows or macOS)
- Your video materials.
- Filmora video editor
Step 1
Download Filmora . Let it install and wait for it to run. Then, click on “New Project”. Now, you’re ready to edit!
Step 2
First, go to Titles and drag the Default Title to the Timeline.

Step 3
Now, double-click on the Default Title clip. Here, change its font to any bold font. Increase the text size to 120. Type in your text in the box. Scroll a bit down and change the Text Spacing to 8. Click OK.

Step 4
Take a Snapshot of this Default Title.

Step 5
Double-click on the Default Title clip once again. This time, click on its Advanced settings. Here, turn OFF Text Fill → turn ON Outline → change the Outline color to White → reduce Thickness to 1. Click OK. Now, take another Snapshot.

Step 6
Delete the Default Title clip from the Timeline. Now, drag the Outline snapshot that we just created to the Timeline. Open the Crop tool → change the Ratio to Custom → replace “1080” with “540”. Lastly, move the highlighted crop section to the top. Click OK.

Step 7
Double-click on the Snapshot to open its settings panel. Go to the Animation tab. Here, change the value of the Y-axis to “275”**.** Click OK. Now, take a Snapshot.

Step 8
Next, click on the Crop tool again and simply move the highlighted crop section to the bottom part of the screen. Click OK. Then, double-click on the snapshot clip in the Timeline and change the value of the Y-axis from “275” to “-275”**.** Click OK. Take a Snapshot again.
Step 9
Import a background image to My Media. Drag the background image to the Timeline. Double-click on it and drag the Scale bar until the background image covers the whole screen. Click OK. You should cut the background clip to make it 3 seconds long as well.

Step 10
Lock this track in the Timeline by pressing the highlighted button on the left. Then, go to “Track Manager” and add 6 new Tracks to the Timeline. Click OK.

Step 11
Drag the first Snapshot we made before to Track 6. Cut it so it’s 3 seconds long. Then, Lock the Track.

Step 12
Set the Playhead at the 15th frame on the Timeline. Then, drag the Upward Outline snapshot to this point. Double-click on it and change the Y-axis value to “**-4%**”. Then, reduce the Opacity to 0%. Now, move the Playhead 5 frames further. Next, increase the Opacity to 100% and increase the Y-axis value to around “105”. Don’t click OK yet.
Step 13
Move the Playhead to 1 minute and 5 seconds on the Timeline. Add a keyframe by clicking on the “+Add” button. Then, move the Playhead 5 frames forward. Here, change the Zoom Level to 25%.

Step 14
Double-click on the clip in Track 5. Drag the text like in the image below. Then, delete the part of the clip on the right side after 1 minute and 15 seconds.

Step 15
Hide the clips on Track 6 and Track 1 by clicking the “eye” icons next to them. Then, take a Snapshot. Now, drag this Snapshot right next to the clip on Track 5.

Step 16
Move the Playhead 3 frames forward from the starting point of the clip you just added. Unhide Track 6. Double-click on the clip on the right side of Track 5 and click on “+Add”. Move the Playhead 5 seconds forward and adjust the Upward Outline to fit the text.

Step 17
Move the Playhead 5 frames forward again. Drag the Y-axis value to the left until the outline clip overlaps the main text. Then, reduce the Opacity to 0%. Move the Playhead to 2 minutes and 10 seconds. Cut the Track and delete the clip on the right side. Lastly, Lock Track 5.

Step 18
Drag the Downward Outline snapshot to Track 4. Then, repeat the same process as in Step 16 and Step 17.
Step 19
Drag the Upward Outline snapshot to Track 3 at the 17th frame. Double-click on it and change the Opacity to 0%.

Step 20
Now, move 5 frames forward and increase the Opacity back to 100%. Then, drag the Y-axis value to the right until the screen looks like this.

Step 21
Move the Playhead to 1 minute and 5 seconds. Click on “+Add” to add a keyframe. Then, move the Playhead 5 frames forward. Double-click on the clip and stretch it from side to side to match something like this.

Step 22
Move the Playhead to 1 minute and 16 seconds. Split the clip and delete the part on the right side. Hide Track 4, 5, and 6. Then, take a Snapshot. Drag this Snapshot next to the clip on Track 3. Place the Playhead on 1 minute and 18 seconds. Then, unhide Track 4, 5, and 6.
Step 23
Double-click on the clip on the right side of Track 3. Add a keyframe by pressing “+Add”. Move the Playhead to 1 minute and 23 seconds. Now, resize the clip back to its original size by moving the rectangle left and right. Right now, it should look like this.

Step 24
Move the Playhead 5 frames forward. Drag the Y-axis value to the left until the screen looks like this.

Step 25
Move the Playhead 5 frames forward again. Drag the value of the Y-axis to the left until the screen looks like this. Then, change the Opacity to 0%. Finally, split the clip at 2 minutes and 10 seconds. Delete the part on the right side. Lock Track 3.

Step 26
Next, drag the Downward Snapshot on Track 2 and follow the same process as in Steps 19 through 25.
Step 27
Unhide the Background clip at the bottom of the Timeline. Then, Unlock Track 6. Split the clip on Track 6 at the 15th frame.

Step 28
Move the Playhead at the beginning of the Timeline. Click on the first part of the clip on Track 6. Add a keyframe. Drag the X-axis value to the right until the word disappears out of the screen. Like this. 👇Then, move the Playhead to the 6th frame and Reset the X-axis value to 0.0.

Step 29
Take the Playhead to 2 minutes and 10 seconds. Split it. Now, move the Playhead to 2 minutes and 19 seconds and add a keyframe. Lastly, take the Playhead to the very end of the clip and drag the text to the right side until it’s out of the screen once again.

Step 30
Go to the Effects tab. Select Glitch from the panel on the left. Then, apply “Glitch Dispersion” and “Glitch Stripe 2” to the clips at the start and at the end.

Step 31
Finally, Render the video to watch the final preview. And, you’re done! Congratulations on creating a repeated text animation in Filmora.

Summary
What you’ve learned:
- How to create text animations in Filmora
- Applying animation effects
- Make advanced edits on Titles in Filmora
- Hide and lock Tracks and Clips in Filmora
What you need to prepare:
- A computer (Windows or macOS)
- Your video materials.
- Filmora video editor
Step 1
Download Filmora . Let it install and wait for it to run. Then, click on “New Project”. Now, you’re ready to edit!
Step 2
First, go to Titles and drag the Default Title to the Timeline.

Step 3
Now, double-click on the Default Title clip. Here, change its font to any bold font. Increase the text size to 120. Type in your text in the box. Scroll a bit down and change the Text Spacing to 8. Click OK.

Step 4
Take a Snapshot of this Default Title.

Step 5
Double-click on the Default Title clip once again. This time, click on its Advanced settings. Here, turn OFF Text Fill → turn ON Outline → change the Outline color to White → reduce Thickness to 1. Click OK. Now, take another Snapshot.

Step 6
Delete the Default Title clip from the Timeline. Now, drag the Outline snapshot that we just created to the Timeline. Open the Crop tool → change the Ratio to Custom → replace “1080” with “540”. Lastly, move the highlighted crop section to the top. Click OK.

Step 7
Double-click on the Snapshot to open its settings panel. Go to the Animation tab. Here, change the value of the Y-axis to “275”**.** Click OK. Now, take a Snapshot.

Step 8
Next, click on the Crop tool again and simply move the highlighted crop section to the bottom part of the screen. Click OK. Then, double-click on the snapshot clip in the Timeline and change the value of the Y-axis from “275” to “-275”**.** Click OK. Take a Snapshot again.
Step 9
Import a background image to My Media. Drag the background image to the Timeline. Double-click on it and drag the Scale bar until the background image covers the whole screen. Click OK. You should cut the background clip to make it 3 seconds long as well.

Step 10
Lock this track in the Timeline by pressing the highlighted button on the left. Then, go to “Track Manager” and add 6 new Tracks to the Timeline. Click OK.

Step 11
Drag the first Snapshot we made before to Track 6. Cut it so it’s 3 seconds long. Then, Lock the Track.

Step 12
Set the Playhead at the 15th frame on the Timeline. Then, drag the Upward Outline snapshot to this point. Double-click on it and change the Y-axis value to “**-4%**”. Then, reduce the Opacity to 0%. Now, move the Playhead 5 frames further. Next, increase the Opacity to 100% and increase the Y-axis value to around “105”. Don’t click OK yet.
Step 13
Move the Playhead to 1 minute and 5 seconds on the Timeline. Add a keyframe by clicking on the “+Add” button. Then, move the Playhead 5 frames forward. Here, change the Zoom Level to 25%.

Step 14
Double-click on the clip in Track 5. Drag the text like in the image below. Then, delete the part of the clip on the right side after 1 minute and 15 seconds.

Step 15
Hide the clips on Track 6 and Track 1 by clicking the “eye” icons next to them. Then, take a Snapshot. Now, drag this Snapshot right next to the clip on Track 5.

Step 16
Move the Playhead 3 frames forward from the starting point of the clip you just added. Unhide Track 6. Double-click on the clip on the right side of Track 5 and click on “+Add”. Move the Playhead 5 seconds forward and adjust the Upward Outline to fit the text.

Step 17
Move the Playhead 5 frames forward again. Drag the Y-axis value to the left until the outline clip overlaps the main text. Then, reduce the Opacity to 0%. Move the Playhead to 2 minutes and 10 seconds. Cut the Track and delete the clip on the right side. Lastly, Lock Track 5.

Step 18
Drag the Downward Outline snapshot to Track 4. Then, repeat the same process as in Step 16 and Step 17.
Step 19
Drag the Upward Outline snapshot to Track 3 at the 17th frame. Double-click on it and change the Opacity to 0%.

Step 20
Now, move 5 frames forward and increase the Opacity back to 100%. Then, drag the Y-axis value to the right until the screen looks like this.

Step 21
Move the Playhead to 1 minute and 5 seconds. Click on “+Add” to add a keyframe. Then, move the Playhead 5 frames forward. Double-click on the clip and stretch it from side to side to match something like this.

Step 22
Move the Playhead to 1 minute and 16 seconds. Split the clip and delete the part on the right side. Hide Track 4, 5, and 6. Then, take a Snapshot. Drag this Snapshot next to the clip on Track 3. Place the Playhead on 1 minute and 18 seconds. Then, unhide Track 4, 5, and 6.
Step 23
Double-click on the clip on the right side of Track 3. Add a keyframe by pressing “+Add”. Move the Playhead to 1 minute and 23 seconds. Now, resize the clip back to its original size by moving the rectangle left and right. Right now, it should look like this.

Step 24
Move the Playhead 5 frames forward. Drag the Y-axis value to the left until the screen looks like this.

Step 25
Move the Playhead 5 frames forward again. Drag the value of the Y-axis to the left until the screen looks like this. Then, change the Opacity to 0%. Finally, split the clip at 2 minutes and 10 seconds. Delete the part on the right side. Lock Track 3.

Step 26
Next, drag the Downward Snapshot on Track 2 and follow the same process as in Steps 19 through 25.
Step 27
Unhide the Background clip at the bottom of the Timeline. Then, Unlock Track 6. Split the clip on Track 6 at the 15th frame.

Step 28
Move the Playhead at the beginning of the Timeline. Click on the first part of the clip on Track 6. Add a keyframe. Drag the X-axis value to the right until the word disappears out of the screen. Like this. 👇Then, move the Playhead to the 6th frame and Reset the X-axis value to 0.0.

Step 29
Take the Playhead to 2 minutes and 10 seconds. Split it. Now, move the Playhead to 2 minutes and 19 seconds and add a keyframe. Lastly, take the Playhead to the very end of the clip and drag the text to the right side until it’s out of the screen once again.

Step 30
Go to the Effects tab. Select Glitch from the panel on the left. Then, apply “Glitch Dispersion” and “Glitch Stripe 2” to the clips at the start and at the end.

Step 31
Finally, Render the video to watch the final preview. And, you’re done! Congratulations on creating a repeated text animation in Filmora.

Summary
What you’ve learned:
- How to create text animations in Filmora
- Applying animation effects
- Make advanced edits on Titles in Filmora
- Hide and lock Tracks and Clips in Filmora
What you need to prepare:
- A computer (Windows or macOS)
- Your video materials.
- Filmora video editor
Step 1
Download Filmora . Let it install and wait for it to run. Then, click on “New Project”. Now, you’re ready to edit!
Step 2
First, go to Titles and drag the Default Title to the Timeline.

Step 3
Now, double-click on the Default Title clip. Here, change its font to any bold font. Increase the text size to 120. Type in your text in the box. Scroll a bit down and change the Text Spacing to 8. Click OK.

Step 4
Take a Snapshot of this Default Title.

Step 5
Double-click on the Default Title clip once again. This time, click on its Advanced settings. Here, turn OFF Text Fill → turn ON Outline → change the Outline color to White → reduce Thickness to 1. Click OK. Now, take another Snapshot.

Step 6
Delete the Default Title clip from the Timeline. Now, drag the Outline snapshot that we just created to the Timeline. Open the Crop tool → change the Ratio to Custom → replace “1080” with “540”. Lastly, move the highlighted crop section to the top. Click OK.

Step 7
Double-click on the Snapshot to open its settings panel. Go to the Animation tab. Here, change the value of the Y-axis to “275”**.** Click OK. Now, take a Snapshot.

Step 8
Next, click on the Crop tool again and simply move the highlighted crop section to the bottom part of the screen. Click OK. Then, double-click on the snapshot clip in the Timeline and change the value of the Y-axis from “275” to “-275”**.** Click OK. Take a Snapshot again.
Step 9
Import a background image to My Media. Drag the background image to the Timeline. Double-click on it and drag the Scale bar until the background image covers the whole screen. Click OK. You should cut the background clip to make it 3 seconds long as well.

Step 10
Lock this track in the Timeline by pressing the highlighted button on the left. Then, go to “Track Manager” and add 6 new Tracks to the Timeline. Click OK.

Step 11
Drag the first Snapshot we made before to Track 6. Cut it so it’s 3 seconds long. Then, Lock the Track.

Step 12
Set the Playhead at the 15th frame on the Timeline. Then, drag the Upward Outline snapshot to this point. Double-click on it and change the Y-axis value to “**-4%**”. Then, reduce the Opacity to 0%. Now, move the Playhead 5 frames further. Next, increase the Opacity to 100% and increase the Y-axis value to around “105”. Don’t click OK yet.
Step 13
Move the Playhead to 1 minute and 5 seconds on the Timeline. Add a keyframe by clicking on the “+Add” button. Then, move the Playhead 5 frames forward. Here, change the Zoom Level to 25%.

Step 14
Double-click on the clip in Track 5. Drag the text like in the image below. Then, delete the part of the clip on the right side after 1 minute and 15 seconds.

Step 15
Hide the clips on Track 6 and Track 1 by clicking the “eye” icons next to them. Then, take a Snapshot. Now, drag this Snapshot right next to the clip on Track 5.

Step 16
Move the Playhead 3 frames forward from the starting point of the clip you just added. Unhide Track 6. Double-click on the clip on the right side of Track 5 and click on “+Add”. Move the Playhead 5 seconds forward and adjust the Upward Outline to fit the text.

Step 17
Move the Playhead 5 frames forward again. Drag the Y-axis value to the left until the outline clip overlaps the main text. Then, reduce the Opacity to 0%. Move the Playhead to 2 minutes and 10 seconds. Cut the Track and delete the clip on the right side. Lastly, Lock Track 5.

Step 18
Drag the Downward Outline snapshot to Track 4. Then, repeat the same process as in Step 16 and Step 17.
Step 19
Drag the Upward Outline snapshot to Track 3 at the 17th frame. Double-click on it and change the Opacity to 0%.

Step 20
Now, move 5 frames forward and increase the Opacity back to 100%. Then, drag the Y-axis value to the right until the screen looks like this.

Step 21
Move the Playhead to 1 minute and 5 seconds. Click on “+Add” to add a keyframe. Then, move the Playhead 5 frames forward. Double-click on the clip and stretch it from side to side to match something like this.

Step 22
Move the Playhead to 1 minute and 16 seconds. Split the clip and delete the part on the right side. Hide Track 4, 5, and 6. Then, take a Snapshot. Drag this Snapshot next to the clip on Track 3. Place the Playhead on 1 minute and 18 seconds. Then, unhide Track 4, 5, and 6.
Step 23
Double-click on the clip on the right side of Track 3. Add a keyframe by pressing “+Add”. Move the Playhead to 1 minute and 23 seconds. Now, resize the clip back to its original size by moving the rectangle left and right. Right now, it should look like this.

Step 24
Move the Playhead 5 frames forward. Drag the Y-axis value to the left until the screen looks like this.

Step 25
Move the Playhead 5 frames forward again. Drag the value of the Y-axis to the left until the screen looks like this. Then, change the Opacity to 0%. Finally, split the clip at 2 minutes and 10 seconds. Delete the part on the right side. Lock Track 3.

Step 26
Next, drag the Downward Snapshot on Track 2 and follow the same process as in Steps 19 through 25.
Step 27
Unhide the Background clip at the bottom of the Timeline. Then, Unlock Track 6. Split the clip on Track 6 at the 15th frame.

Step 28
Move the Playhead at the beginning of the Timeline. Click on the first part of the clip on Track 6. Add a keyframe. Drag the X-axis value to the right until the word disappears out of the screen. Like this. 👇Then, move the Playhead to the 6th frame and Reset the X-axis value to 0.0.

Step 29
Take the Playhead to 2 minutes and 10 seconds. Split it. Now, move the Playhead to 2 minutes and 19 seconds and add a keyframe. Lastly, take the Playhead to the very end of the clip and drag the text to the right side until it’s out of the screen once again.

Step 30
Go to the Effects tab. Select Glitch from the panel on the left. Then, apply “Glitch Dispersion” and “Glitch Stripe 2” to the clips at the start and at the end.

Step 31
Finally, Render the video to watch the final preview. And, you’re done! Congratulations on creating a repeated text animation in Filmora.

Summary
What you’ve learned:
- How to create text animations in Filmora
- Applying animation effects
- Make advanced edits on Titles in Filmora
- Hide and lock Tracks and Clips in Filmora
Understanding The Best Tools for Changing Sky Background
Sky replacement apps have become popular among content creators and social media influencers. Posting natural-looking pictures in front of the sky has become the new aesthetic of 2024, like the clean girl makeup. Many people try to get a flawless shot of themselves in front of the sky. But it’s hard to get the perfect and aesthetically pleasing photos and videos because of the background objects and extra bright or dull sky lightning.
This article will tell you about sky change apps and which apps you should consider. Read the article if you want to create an aesthetic sky picture using a replace sky app.
Sky Replacement A cross-platform works like magic for background removal or sky replacement photos!
Free Download Free Download Learn More

Part 1: Finding The Best iOS Apps to Change Sky Background in Media
Sky replacement apps are a fantastic way to give your pictures an entirely new viewpoint. Here are some of the top sky-changing applications for iOS:
- Background Changer & Eraser
- Bazaart: Design, Photo & Video
- Easy Photo Background Editor
- Superimpose+: Background Eraser
- Background Eraser: BG Remover
1. Background Changer & Eraser
Background Changer & Eraser is your go-to editor if you want to alter the backdrop, create incredible effects and overlays, apply filters, and modify the lighting in your pictures. Everyone who wishes to have gorgeous photos like those edited by a pro can do so with only one click using the one-click background changer and photo editing solution.

Pros
- Erases even the smallest part of a snapshot, easily trims out objects and fixes faults.
- With the extensive selection of overlays, including sparkles, lens flare, and glitter, you can add a little glitz to your photos.
Cons
- The app tends to become glitchy when you keep using it.
2. Bazaart: Design, Photo & Video
Bazaart is a one-stop app for all your design needs that combines the functions of a picture editor, video editor, and design studio. You can create stop motion films, GIFs, stickers, AI art, Reels, stories, logos, posters, flyers, memes, profile pictures, and product photography. Bazaart can assist with anything from digital marketing to social media posting to online sales.

Pros
- The app lets you personalize images and videos by changing exposure, color, highlights, and blur to enhance the media.
- You can add as many as 100 pictures and five video layers; each layer can be edited separately.
Cons
- The tool doesn’t cut out the edges so smoothly. The small leaves or messy hair are not fully cropped out.
3. Easy Photo Background Editor
With the Easy Photo Background Editor, you can share your photos with others by altering their backgrounds like a pro. This image and video sky change app can create beautiful and artistic photos and videos. Thanks to the app’s fantastic capabilities, users can quickly and effortlessly switch out their backgrounds with various high-quality, free HD backdrops available within the app.

Pros
- You can efficiently change the background of your media and adjust it with the foreground.
- The app has a collection of backgrounds you can choose and add if you don’t have one.
Cons
- The undo button can take a long time to react, which is risky, and you may need to edit your photos again.
4. Superimpose+: Background Eraser
Superimpose+: Background Eraser is an automatic sky replacement tool. People, animals, vehicles, and other objects can all be removed with a single tap. It doesn’t leave a watermark behind, so your photos and videos don’t get ruined. It lets you overlay numerous images and eliminate photo backgrounds within seconds. It also includes simple, automatic, and manual options for removing backgrounds.

Pros
- The app offers batch processing so that you can add multiple photos and videos and edit them.
- The app replaces or removes your background precisely with a single click.
Cons
- Too many advertisements are shown when editing the media files, which can be annoying.
5. Background Eraser: BG Remover
The background eraser app can quickly remove photos and let your imagination go wild. It is an AI-powered backdrop removal but can also do manual editing. You can add colorful background replacements and immediately share your photos with your viewers. It is one of the best weather apps to replace the dark sky when you are working on an iOS device.

Pros
- You can replace the sky background of your picture with a solid color or gradient shade.
- The auto background accurately recognizes the object and separates the background from it.
Cons
- The tool provides very limited editing options in the free version.
Part 2: Finding The Best Android Apps to Change Sky Background in Media
If you’re an Android user looking for a weather app to replace the dark sky, this is your lucky day. This part is dedicated to telling you about the apps you can use to replace the sky:
- Photo Background Change Editor
- Background Eraser Photo Editor
- PhotoRoom AI Photo Editor
- Photo Editor – Lumii
- Canva
1. Photo Background Change Editor
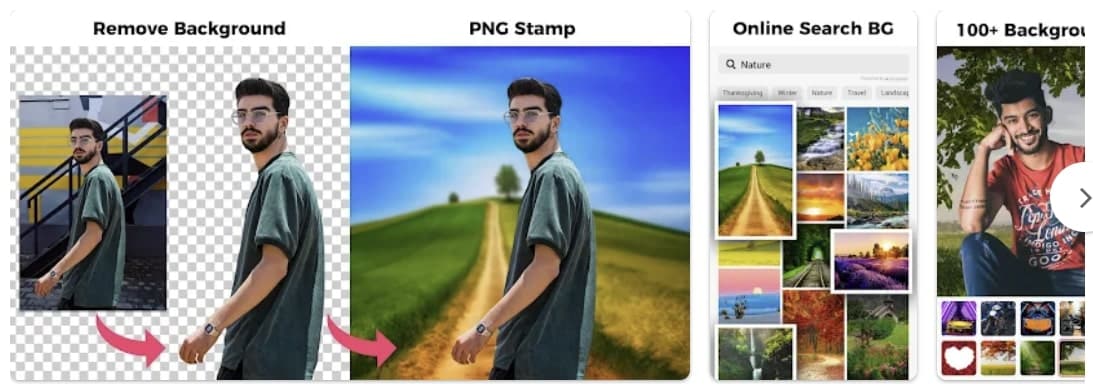
With the help of the Background Eraser and Changer, you can automatically crop images, eliminate backgrounds, and produce transparent PNG stamps that are precise to each pixel. With just one touch, the app can identify and eliminate your photo’s background, allowing you to swap out dull backdrops for an infinite number of 4K/HD backgrounds that will elevate your images.

Pros
- The tool offers 100+ background templates. You can choose solid colors, gradients, or images as backdrops.
- You can edit the sky in the background and enhance its look to match the picture.
Cons
- It removes the background with finger smearing, making it hard to remove the backdrop precisely.
2. Background Eraser Photo Editor
The app can cut out pictures automatically and is dedicated to becoming your only photo backdrop eraser and switcher. With over 10 million users, Background Eraser Photo Editor is an incredibly user-friendly tool for changing and editing photos’ backgrounds. Additionally, it has a library of more than 200 images, including sky pictures, which makes it a great dark sky app replacement tool.
Pros
- The app provides high-quality results by using AI-powered background remover.
- You can directly export and share your creation to popular social media platforms.
Cons
- The tool can only be used to remove the background of the images. You need a different tool for video background removal.
3. PhotoRoom AI Photo Editor
With PhotoRoom, you can manage your business from your phone by editing, designing, and optimizing high-quality visual content all in one app. You can apply presets, cut out or remove photo backgrounds, and produce content. You no longer need to be an expert photographer or designer because PhotoRoom lets you quickly convert your images into high-quality content.

Pros
- The app magically removes the unwanted objects from the background by brushing the magic re-toucher.
- It is a great app to change the sky You can replace it with another sky image from the app’s library.
Cons
- The quality of the images decreases, and the background looks glitchy and blurry due to that.
4. Photo Editor – Lumii
Lumii is a potent photo editor pro that offers trendy picture filters. It’s a great photo editing app that lets you alter photographs with over 100 gorgeous preset filters. Whether you are a beginner or an expert in photo editing and background removal, you can generate images that satisfy your aesthetic requirements using expert editing tools like BG Cutout, HSL, Curve, and Doodle.

Pros
- AI enhancement tools can automatically enhance the look of your picture and blend the object with the background.
- AI cutout isolates the object from the background with jaw-dropping accuracy.
Cons
- You must watch several advertisements if you want to access the pre-made filters in the app.
5. Canva
Canva is a free graphic design program that combines a photo editor, logo creator, and video editor all in one place. You can access the potent magic AI tools and use editable templates to create gorgeous pictures, videos, social network posts, and collages. The logo creator develops your brand or hones your graphic design talents. Moreover, you can use the Canva app to change the sky in photos and videos.

Pros
- The app offers efficient and professional editing and background removal for photos and videos.
- It has millions of photos, video templates, and fun elements to add to your media.
Cons
- It takes up huge space in your phone and provides limited features on the mobile app.
Bonus Part: A Perfect Background Changing Application For PC: Wondershare Filmora
Many professional users prefer editing their media through a PC as it is much easier, and computer editing software offers many more features. But most professional apps cost too much, and paying for them every month is hard. In this confusing situation, only one app comes to mind that can save us from all these troubles and give high-quality results: Wondershare Filmora .
The tool offers many royalty-free editing services that you can use to change the landscape of your video. It is the app that changes the sky and replaces the background of your media with perfection. You can enhance and upscale your video with this pro app and impress your viewers.
Free Download For Win 7 or later(64-bit)
Free Download For macOS 10.14 or later
Other Features of Wondershare Filmora to Look Out For
Wondershare Filmora has many amazing functions. Following are a few of its features that can assist you in creating wonderful content:
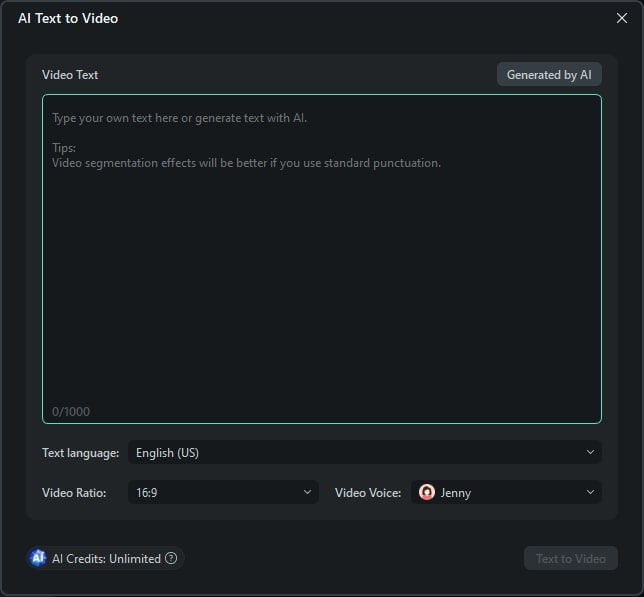
- AI Text-to-Video: This feature uses AI algorithms to examine data, including text, photographs, and videos. It then applies machine learning and computer vision techniques to produce a video.
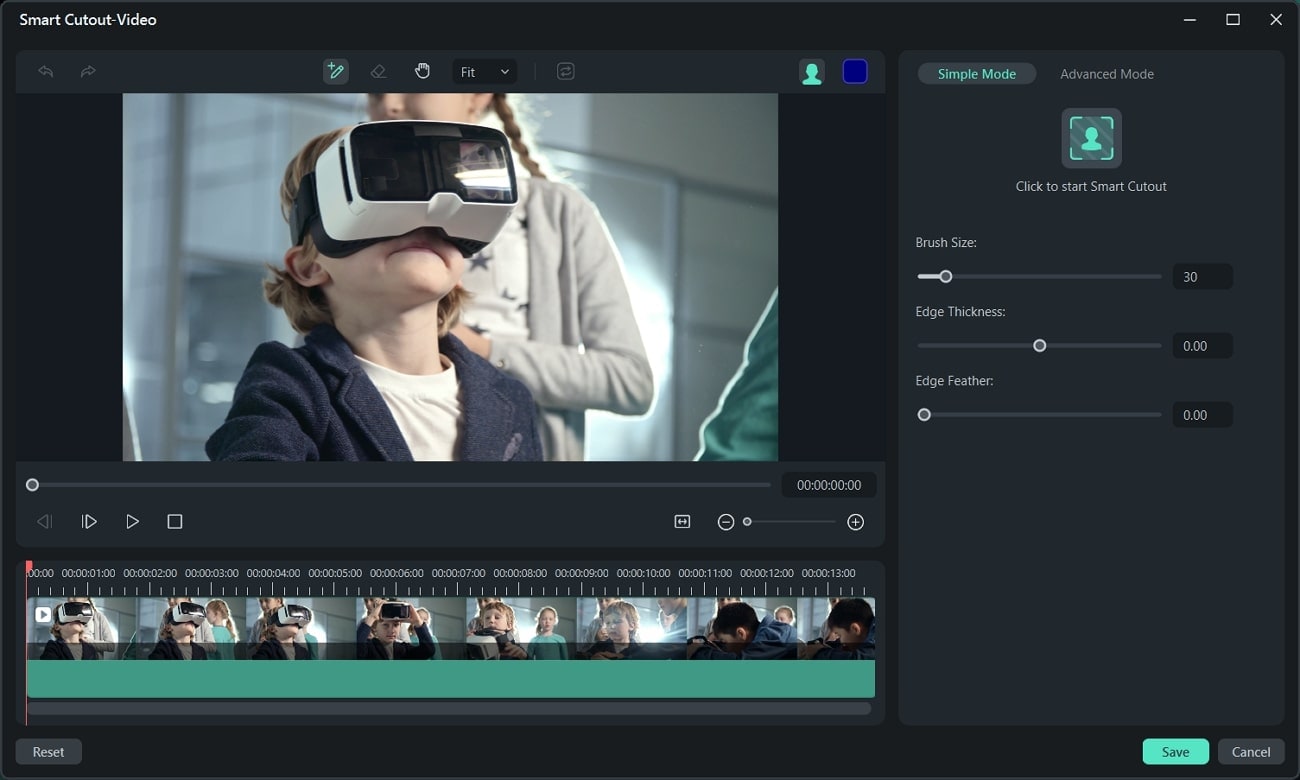
- AI Smart Cutout: Filmora’s AI Smart Cutout makes identifying and removing any undesired backdrop or item from your videos and photos simple. It marks and cuts the object precisely using AI services.
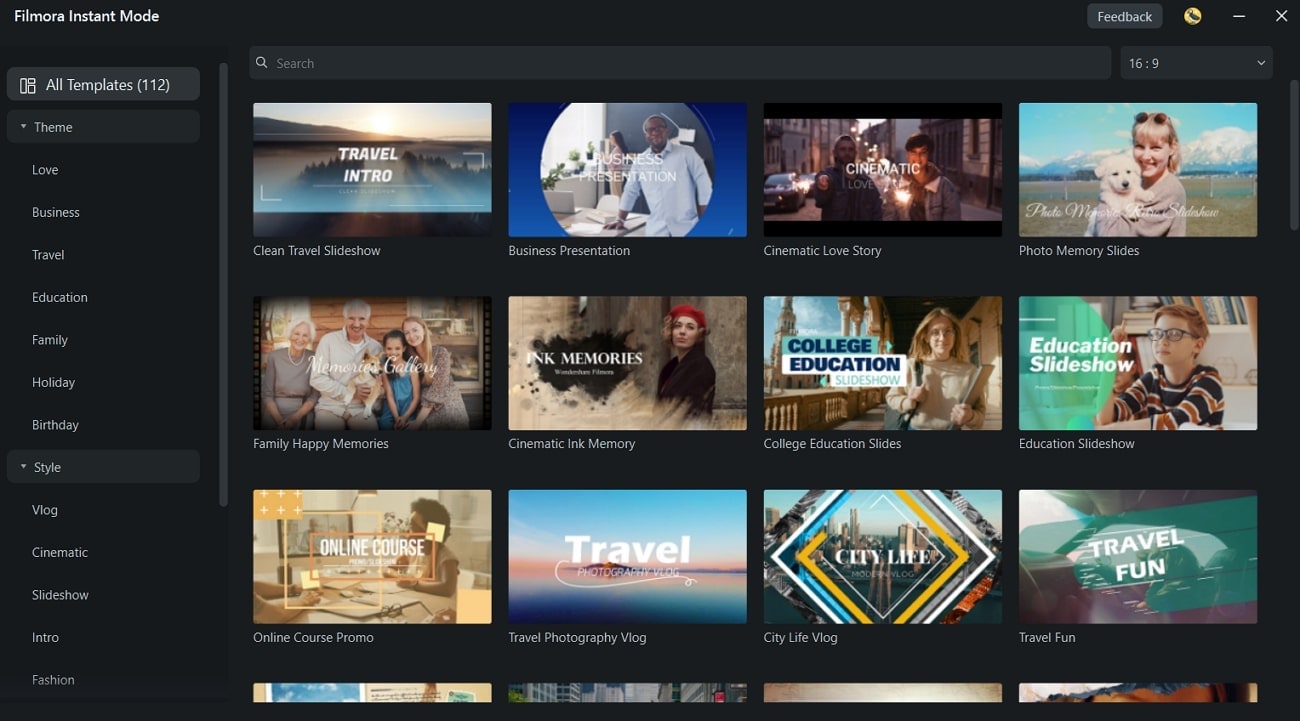
- Instant Mode: Making a video with an Instant Mode doesn’t require any editing experience. Filmora will instantly create a video by adding the media you wish to display.
- AI Vocal Remover: With sophisticated algorithms, Filmora’s AI Vocal Remover can effectively remove vocals from background music without sacrificing a noticeable amount of audio quality.

- Background Remover: You can extract your object or eliminate the background from films using Filmora’s cutting-edge AI technology. Just import a photograph or a movie, and the AI will take care of the rest.
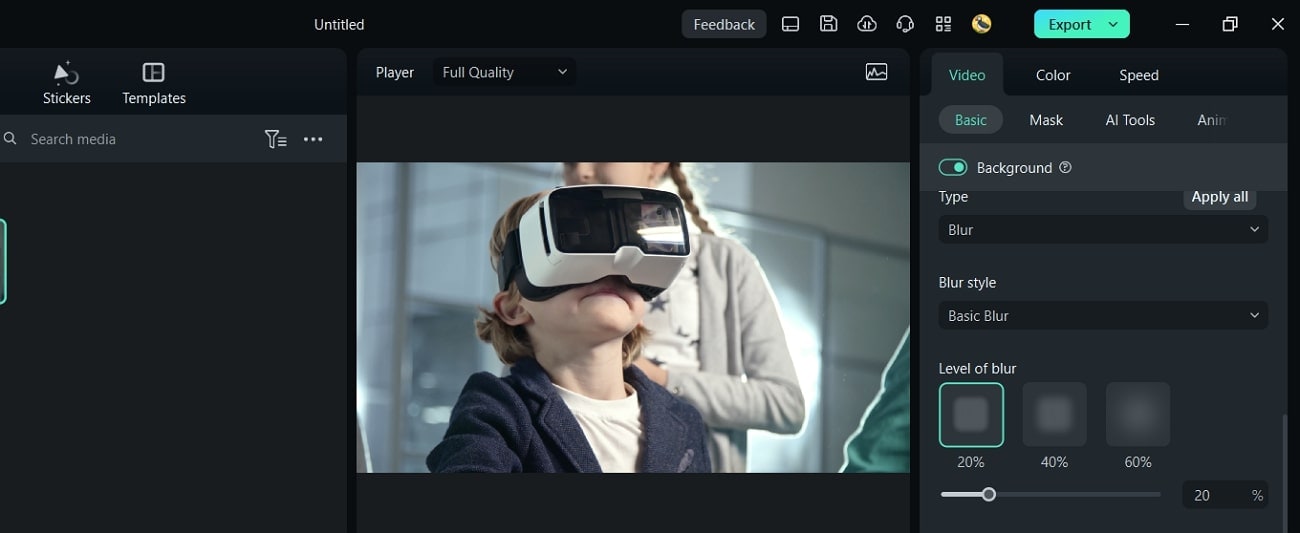
Steps To Change Background Using AI Portrait in Filmora
Wondershare Filmora provides a great replacement for the dark sky and keeps the quality of the media intact. Look at the easy guideline below to remove and replace the sky background.
Step 1: Bring In Media to Filmora
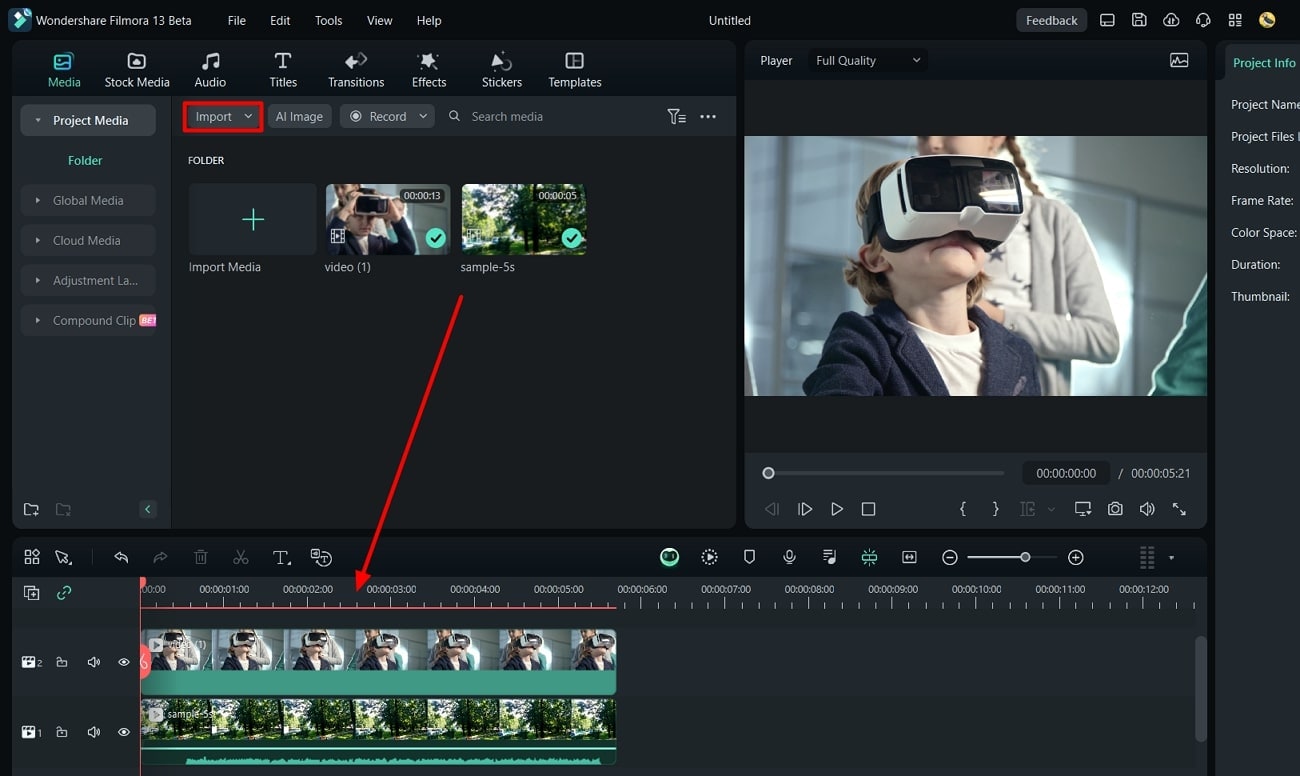
Open Filmora on your computer and click “New Project.” Now import the media whose background you want to change. After that, bring in the new background. Now, drag and drop the media and background into the editing timeline.
Step 2: Replace Background Using AI Portrait
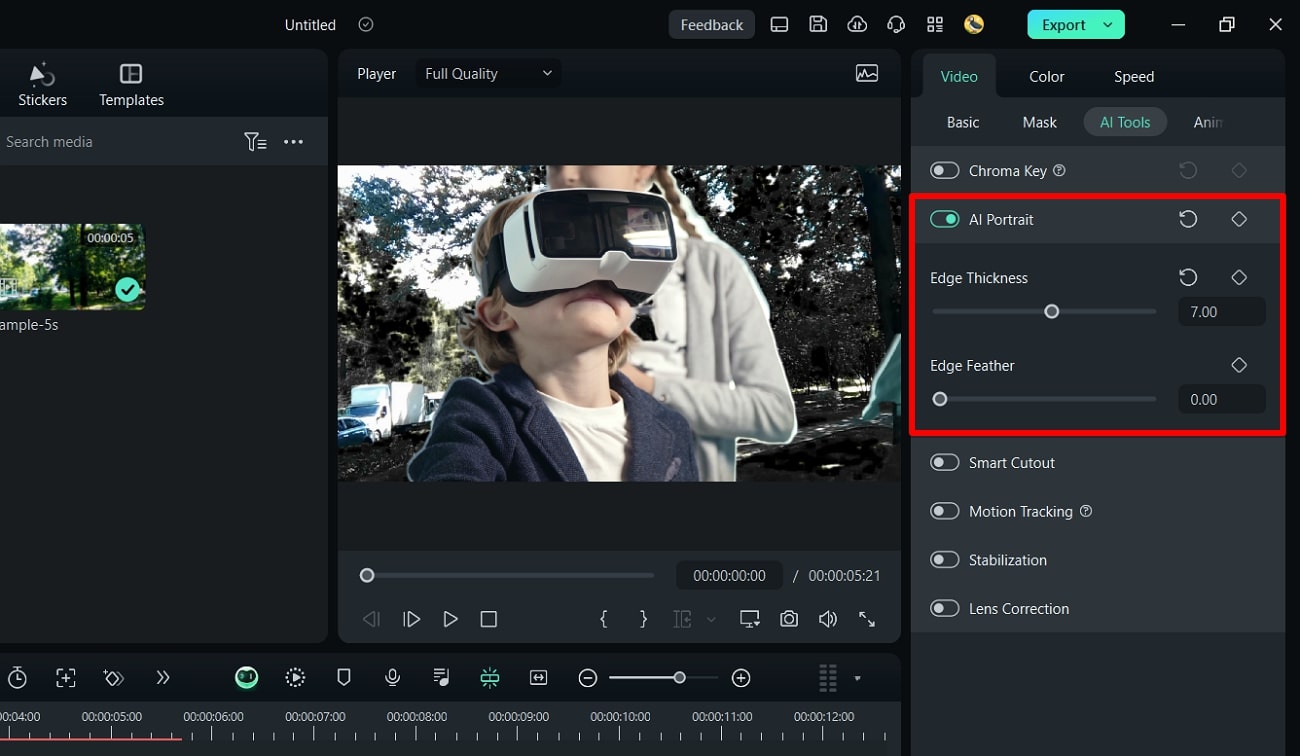
Select the media that needs background changing. On the right side of the screen, you will see an editing option; click on “AI Tools” from the top right of the screen. Now go down and enable “AI Portrait.” Once you do it, the background of your media file will automatically change.
Step 3: Preview and Save
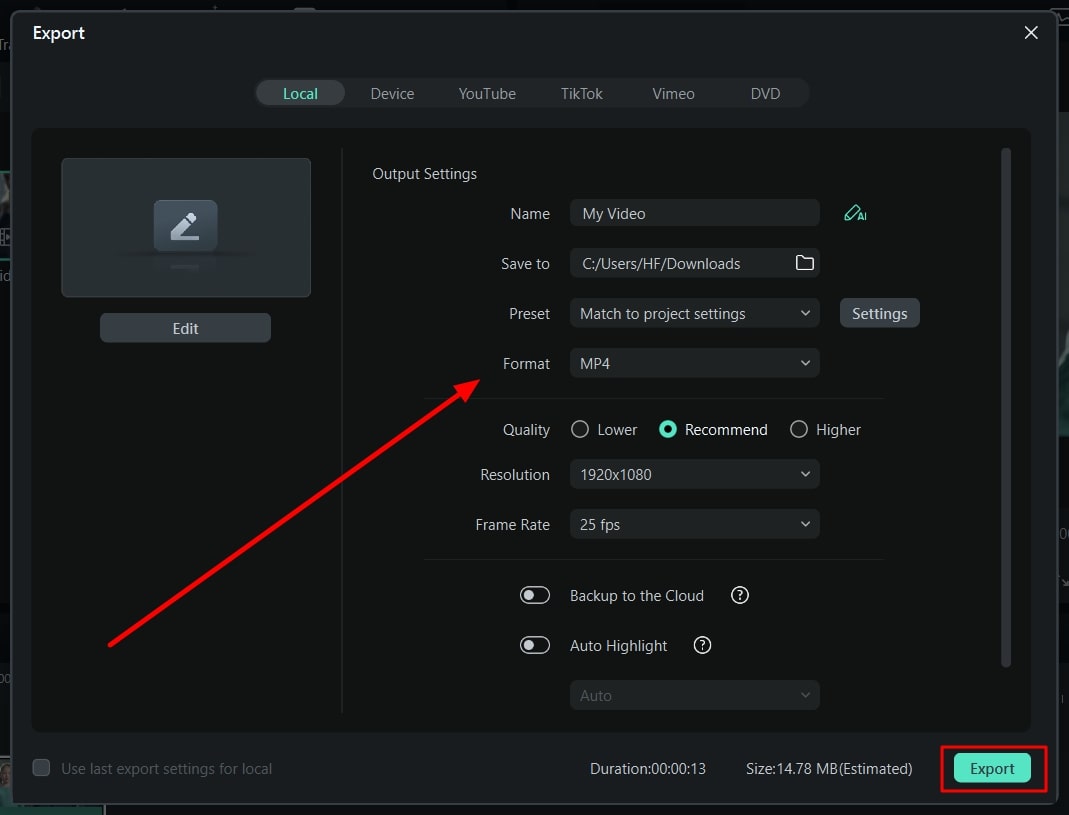
You can check to see if it is everything you were hoping for. After that, click “Export” from the top right of the screen and save the video on your computer.
Free Download For Win 7 or later(64-bit)
Free Download For macOS 10.14 or later
Conclusion
Changing the sky background can lift the tone of your image and video. Sky photos are the main element of the ‘soft girl aesthetic’ era. As a content creator, you must always search for a reliable editor to remove background and change your photos and videos.
This article introduces the best apps to replace dark sky in Android and iOS. You will also find a bonus part that can change your content editing journey.
Free Download Free Download Learn More

Part 1: Finding The Best iOS Apps to Change Sky Background in Media
Sky replacement apps are a fantastic way to give your pictures an entirely new viewpoint. Here are some of the top sky-changing applications for iOS:
- Background Changer & Eraser
- Bazaart: Design, Photo & Video
- Easy Photo Background Editor
- Superimpose+: Background Eraser
- Background Eraser: BG Remover
1. Background Changer & Eraser
Background Changer & Eraser is your go-to editor if you want to alter the backdrop, create incredible effects and overlays, apply filters, and modify the lighting in your pictures. Everyone who wishes to have gorgeous photos like those edited by a pro can do so with only one click using the one-click background changer and photo editing solution.

Pros
- Erases even the smallest part of a snapshot, easily trims out objects and fixes faults.
- With the extensive selection of overlays, including sparkles, lens flare, and glitter, you can add a little glitz to your photos.
Cons
- The app tends to become glitchy when you keep using it.
2. Bazaart: Design, Photo & Video
Bazaart is a one-stop app for all your design needs that combines the functions of a picture editor, video editor, and design studio. You can create stop motion films, GIFs, stickers, AI art, Reels, stories, logos, posters, flyers, memes, profile pictures, and product photography. Bazaart can assist with anything from digital marketing to social media posting to online sales.

Pros
- The app lets you personalize images and videos by changing exposure, color, highlights, and blur to enhance the media.
- You can add as many as 100 pictures and five video layers; each layer can be edited separately.
Cons
- The tool doesn’t cut out the edges so smoothly. The small leaves or messy hair are not fully cropped out.
3. Easy Photo Background Editor
With the Easy Photo Background Editor, you can share your photos with others by altering their backgrounds like a pro. This image and video sky change app can create beautiful and artistic photos and videos. Thanks to the app’s fantastic capabilities, users can quickly and effortlessly switch out their backgrounds with various high-quality, free HD backdrops available within the app.

Pros
- You can efficiently change the background of your media and adjust it with the foreground.
- The app has a collection of backgrounds you can choose and add if you don’t have one.
Cons
- The undo button can take a long time to react, which is risky, and you may need to edit your photos again.
4. Superimpose+: Background Eraser
Superimpose+: Background Eraser is an automatic sky replacement tool. People, animals, vehicles, and other objects can all be removed with a single tap. It doesn’t leave a watermark behind, so your photos and videos don’t get ruined. It lets you overlay numerous images and eliminate photo backgrounds within seconds. It also includes simple, automatic, and manual options for removing backgrounds.

Pros
- The app offers batch processing so that you can add multiple photos and videos and edit them.
- The app replaces or removes your background precisely with a single click.
Cons
- Too many advertisements are shown when editing the media files, which can be annoying.
5. Background Eraser: BG Remover
The background eraser app can quickly remove photos and let your imagination go wild. It is an AI-powered backdrop removal but can also do manual editing. You can add colorful background replacements and immediately share your photos with your viewers. It is one of the best weather apps to replace the dark sky when you are working on an iOS device.

Pros
- You can replace the sky background of your picture with a solid color or gradient shade.
- The auto background accurately recognizes the object and separates the background from it.
Cons
- The tool provides very limited editing options in the free version.
Part 2: Finding The Best Android Apps to Change Sky Background in Media
If you’re an Android user looking for a weather app to replace the dark sky, this is your lucky day. This part is dedicated to telling you about the apps you can use to replace the sky:
- Photo Background Change Editor
- Background Eraser Photo Editor
- PhotoRoom AI Photo Editor
- Photo Editor – Lumii
- Canva
1. Photo Background Change Editor
With the help of the Background Eraser and Changer, you can automatically crop images, eliminate backgrounds, and produce transparent PNG stamps that are precise to each pixel. With just one touch, the app can identify and eliminate your photo’s background, allowing you to swap out dull backdrops for an infinite number of 4K/HD backgrounds that will elevate your images.

Pros
- The tool offers 100+ background templates. You can choose solid colors, gradients, or images as backdrops.
- You can edit the sky in the background and enhance its look to match the picture.
Cons
- It removes the background with finger smearing, making it hard to remove the backdrop precisely.
2. Background Eraser Photo Editor
The app can cut out pictures automatically and is dedicated to becoming your only photo backdrop eraser and switcher. With over 10 million users, Background Eraser Photo Editor is an incredibly user-friendly tool for changing and editing photos’ backgrounds. Additionally, it has a library of more than 200 images, including sky pictures, which makes it a great dark sky app replacement tool.

Pros
- The app provides high-quality results by using AI-powered background remover.
- You can directly export and share your creation to popular social media platforms.
Cons
- The tool can only be used to remove the background of the images. You need a different tool for video background removal.
3. PhotoRoom AI Photo Editor
With PhotoRoom, you can manage your business from your phone by editing, designing, and optimizing high-quality visual content all in one app. You can apply presets, cut out or remove photo backgrounds, and produce content. You no longer need to be an expert photographer or designer because PhotoRoom lets you quickly convert your images into high-quality content.

Pros
- The app magically removes the unwanted objects from the background by brushing the magic re-toucher.
- It is a great app to change the sky You can replace it with another sky image from the app’s library.
Cons
- The quality of the images decreases, and the background looks glitchy and blurry due to that.
4. Photo Editor – Lumii
Lumii is a potent photo editor pro that offers trendy picture filters. It’s a great photo editing app that lets you alter photographs with over 100 gorgeous preset filters. Whether you are a beginner or an expert in photo editing and background removal, you can generate images that satisfy your aesthetic requirements using expert editing tools like BG Cutout, HSL, Curve, and Doodle.

Pros
- AI enhancement tools can automatically enhance the look of your picture and blend the object with the background.
- AI cutout isolates the object from the background with jaw-dropping accuracy.
Cons
- You must watch several advertisements if you want to access the pre-made filters in the app.
5. Canva
Canva is a free graphic design program that combines a photo editor, logo creator, and video editor all in one place. You can access the potent magic AI tools and use editable templates to create gorgeous pictures, videos, social network posts, and collages. The logo creator develops your brand or hones your graphic design talents. Moreover, you can use the Canva app to change the sky in photos and videos.

Pros
- The app offers efficient and professional editing and background removal for photos and videos.
- It has millions of photos, video templates, and fun elements to add to your media.
Cons
- It takes up huge space in your phone and provides limited features on the mobile app.
Bonus Part: A Perfect Background Changing Application For PC: Wondershare Filmora
Many professional users prefer editing their media through a PC as it is much easier, and computer editing software offers many more features. But most professional apps cost too much, and paying for them every month is hard. In this confusing situation, only one app comes to mind that can save us from all these troubles and give high-quality results: Wondershare Filmora .
The tool offers many royalty-free editing services that you can use to change the landscape of your video. It is the app that changes the sky and replaces the background of your media with perfection. You can enhance and upscale your video with this pro app and impress your viewers.
Free Download For Win 7 or later(64-bit)
Free Download For macOS 10.14 or later
Other Features of Wondershare Filmora to Look Out For
Wondershare Filmora has many amazing functions. Following are a few of its features that can assist you in creating wonderful content:
- AI Text-to-Video: This feature uses AI algorithms to examine data, including text, photographs, and videos. It then applies machine learning and computer vision techniques to produce a video.

- AI Smart Cutout: Filmora’s AI Smart Cutout makes identifying and removing any undesired backdrop or item from your videos and photos simple. It marks and cuts the object precisely using AI services.

- Instant Mode: Making a video with an Instant Mode doesn’t require any editing experience. Filmora will instantly create a video by adding the media you wish to display.

- AI Vocal Remover: With sophisticated algorithms, Filmora’s AI Vocal Remover can effectively remove vocals from background music without sacrificing a noticeable amount of audio quality.

- Background Remover: You can extract your object or eliminate the background from films using Filmora’s cutting-edge AI technology. Just import a photograph or a movie, and the AI will take care of the rest.

Steps To Change Background Using AI Portrait in Filmora
Wondershare Filmora provides a great replacement for the dark sky and keeps the quality of the media intact. Look at the easy guideline below to remove and replace the sky background.
Step 1: Bring In Media to Filmora
Open Filmora on your computer and click “New Project.” Now import the media whose background you want to change. After that, bring in the new background. Now, drag and drop the media and background into the editing timeline.

Step 2: Replace Background Using AI Portrait
Select the media that needs background changing. On the right side of the screen, you will see an editing option; click on “AI Tools” from the top right of the screen. Now go down and enable “AI Portrait.” Once you do it, the background of your media file will automatically change.

Step 3: Preview and Save
You can check to see if it is everything you were hoping for. After that, click “Export” from the top right of the screen and save the video on your computer.

Free Download For Win 7 or later(64-bit)
Free Download For macOS 10.14 or later
Conclusion
Changing the sky background can lift the tone of your image and video. Sky photos are the main element of the ‘soft girl aesthetic’ era. As a content creator, you must always search for a reliable editor to remove background and change your photos and videos.
This article introduces the best apps to replace dark sky in Android and iOS. You will also find a bonus part that can change your content editing journey.
Split a Video in the Lightworks [Step by Step]
Lightworks is among the best programs for editing the videos available for the Windows and Mac operating systems with no watermark. Through the accessible version of Lightworks, it is easy to export the videos into the MP4 format along with the resolution of 720p. There are different tools available in Lightworks so you can make videos for your YouTube channels, Vimeo, film making projects and different social media platforms.
Lightworks has become famous because it has been used for editing the popular movies of Hollywood. Along with the videos, it is straightforward to enhance the images by blending the colours. This article has a detailed description of how you can split the videos in Lightworks including the the discussion of splitting the Wondershare Filmora as an alternative. It is also a suitable choice.
How can you split the video clips in Lightworks?
Lightworks is software based on the cloud that consists of particular functionalities. It only includes editing and trimming, cutting, and splitting your video clips according to your requirements. Following are the easy-to-follow steps for splitting the clips in Lightworks:
Part1 - Splitting of one clip:
Step 1: The first step is importing the video into the timeline. It is simply through dragging the file on which you have to work.
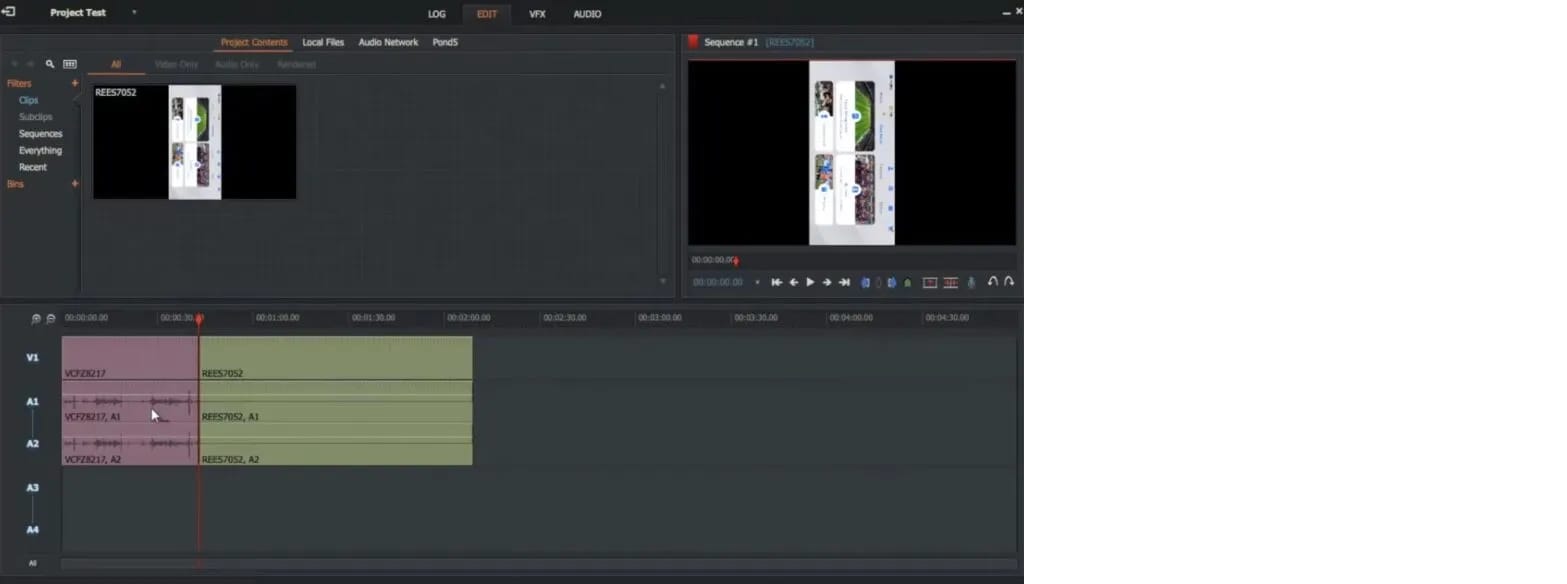
Step 2: When the uploading is complete, you can cut and split the clips depending on your needs. Now, keep moving the play head in the specific direction from where you have to cut the clips—Press “C” on your keyboard.

Step 3: After getting the split clip, you can delete the remaining part that is not in use. For this, selecting the particular part is necessary and selecting the option of “Delete”. Even, you can press the “delete” key on your keyboard.
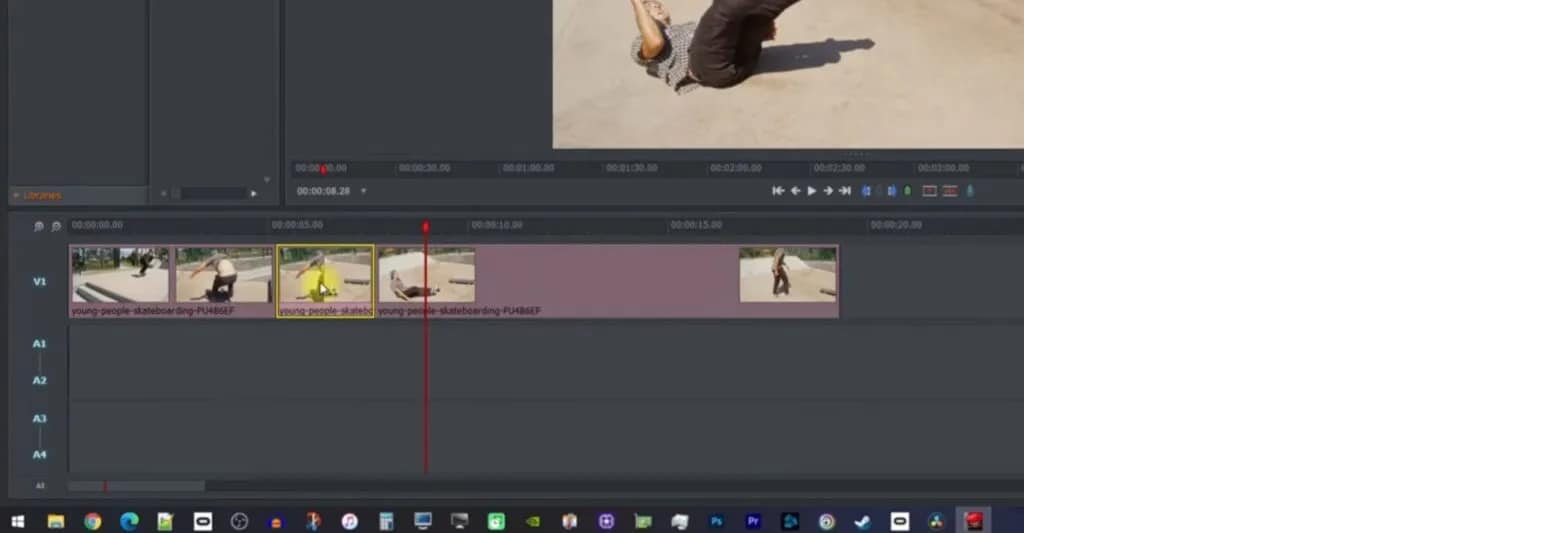
Step 4: When your video is ready, simply export the video by clicking right on the option of “All”. On the left lower side of the timeline, it is now clicked on “Export”.


Part 2- trimming of the clips in Lightworks
To trim the video clips in Lightworks, you require to hover the mouse towards the last of the video clip. Keep moving until and unless that part of the clip gets highlighted. After this step, start dragging till the previous where you want it.


An easier way to split the video clip
Even though Lightworks is a wonderful software for editing videos and images, its interface is easy to handle. But it is not supportive of different formats and 4K videos. For a few features, you might need the paid version of Lightworks. The most acquired solution to resolve this issue is Filmora Video Editor . It is freely available, and use all the tools according to your needs. That’s why it is gaining popularity, and users are increasing day by day. The latest versions of the Wondershare Filmora are available to enhance user experiences. You can export the outcome with ease from the tools.
For Win 7 or later (64-bit)
For macOS 10.14 or later
Features:
- Availability of drag and drag feature
- Can preview the functionalities you apply
- Easy to customize the images and videos
- Involvement of the animation
- Huge library available for the effects of visual and audio
- Splitting and merging the clips
Wondershare Filmora always offers to split the clips from the creative techniques. This tool is extremely useful, particularly when creating commentaries, tutorials, or interviews. The exact footage has to be on the timeline. All the options are on the main panel. Add anything you like, such as animation, text, images, or other media, to make an outstanding outcome. These are very easy to understand, so go through the following steps for splitting the video clips. Two ways are trimming and splitting the clips in Wondershare Filmora.
First method: splitting on the timeline
Step 1. Selection of the clip in the timeline that you want to split. Your play head should be precisely at this particular place from where you need the splitting.

Step 2. When your play head is on the correct point of the timeline, right-click on the clip for opening the menu. Select the option of “Split” or click on the scissor icon in red colour.
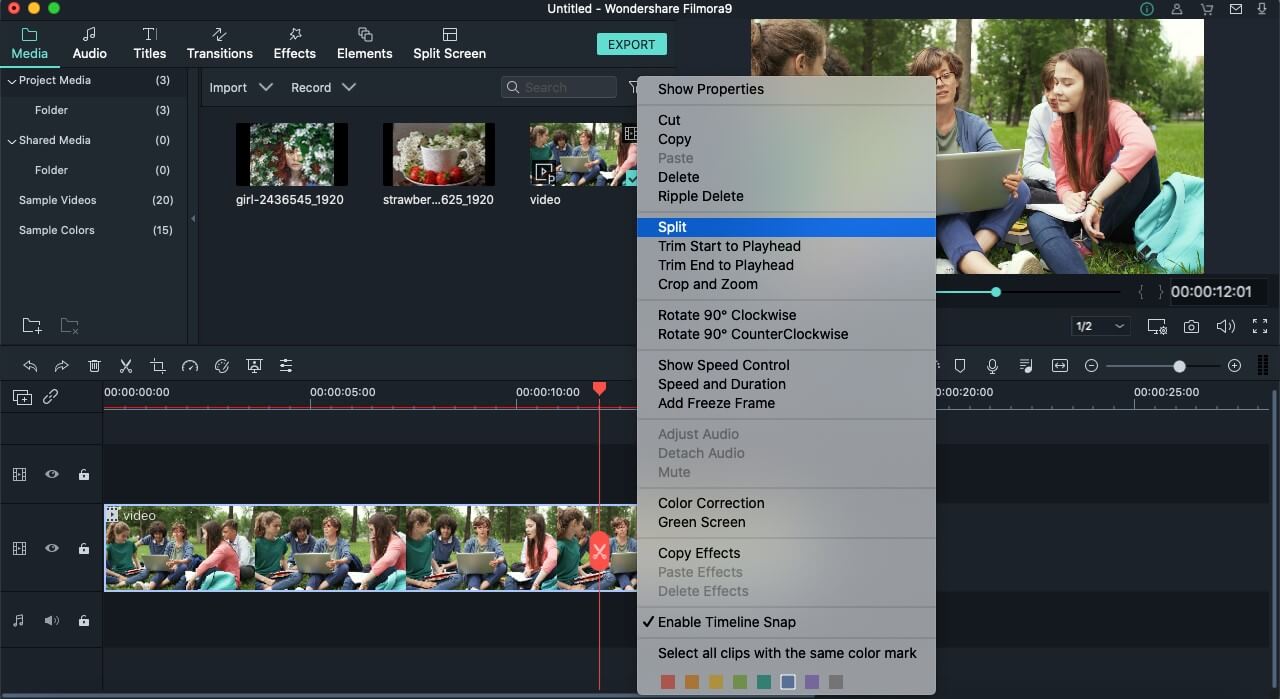
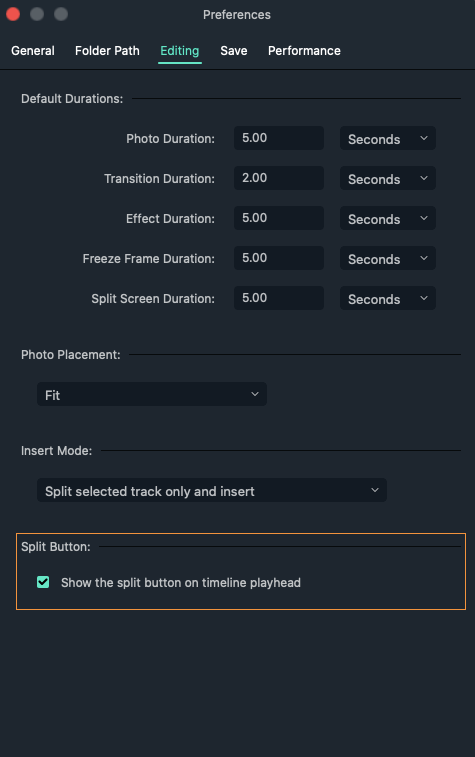
There is also a possibility of hiding the red icon of the scissor present. You can do it by tapping on the options of Wondershare Filmora. Then go to Preferencesàediting. Now uncheck the button of Split.
Second method: detection of the scene
If there are different shots in your clips or separation in the scenes, you can use the tool of “scene detection” in the Wondershare Filmora.
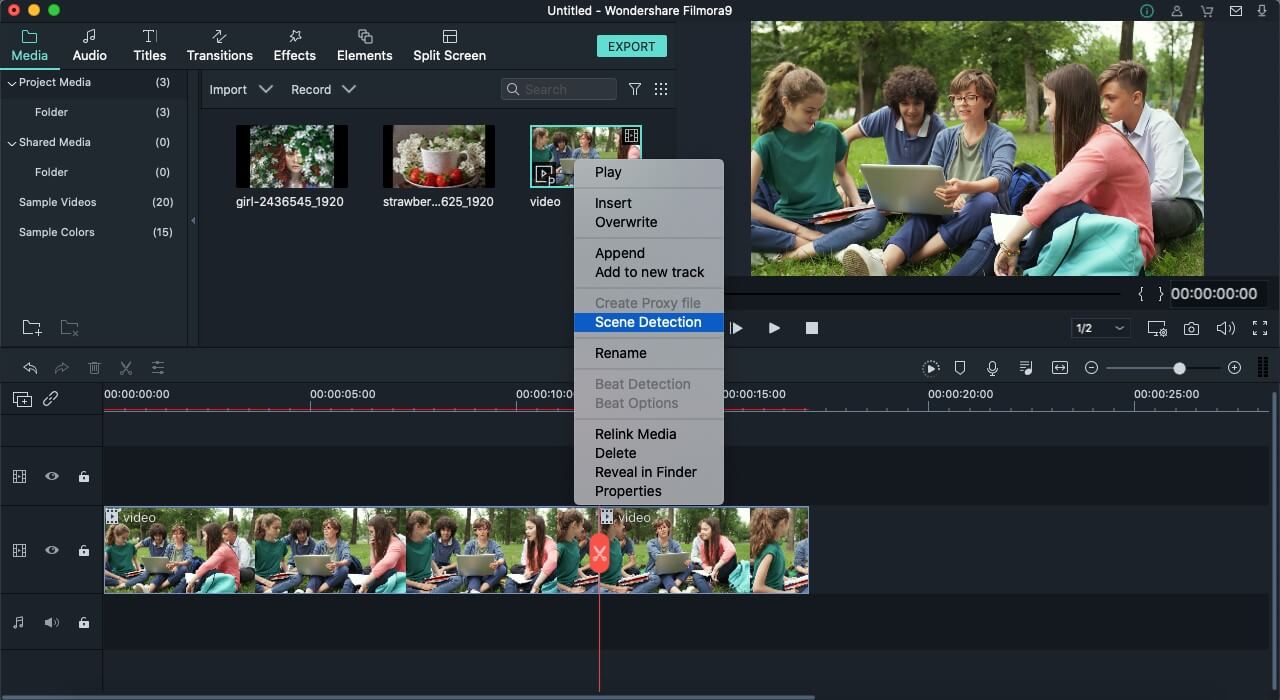
Step 1. Select your video clip from the media library that you want to split. After right-clicking on it, select the option of “Scene detection” from the menu.
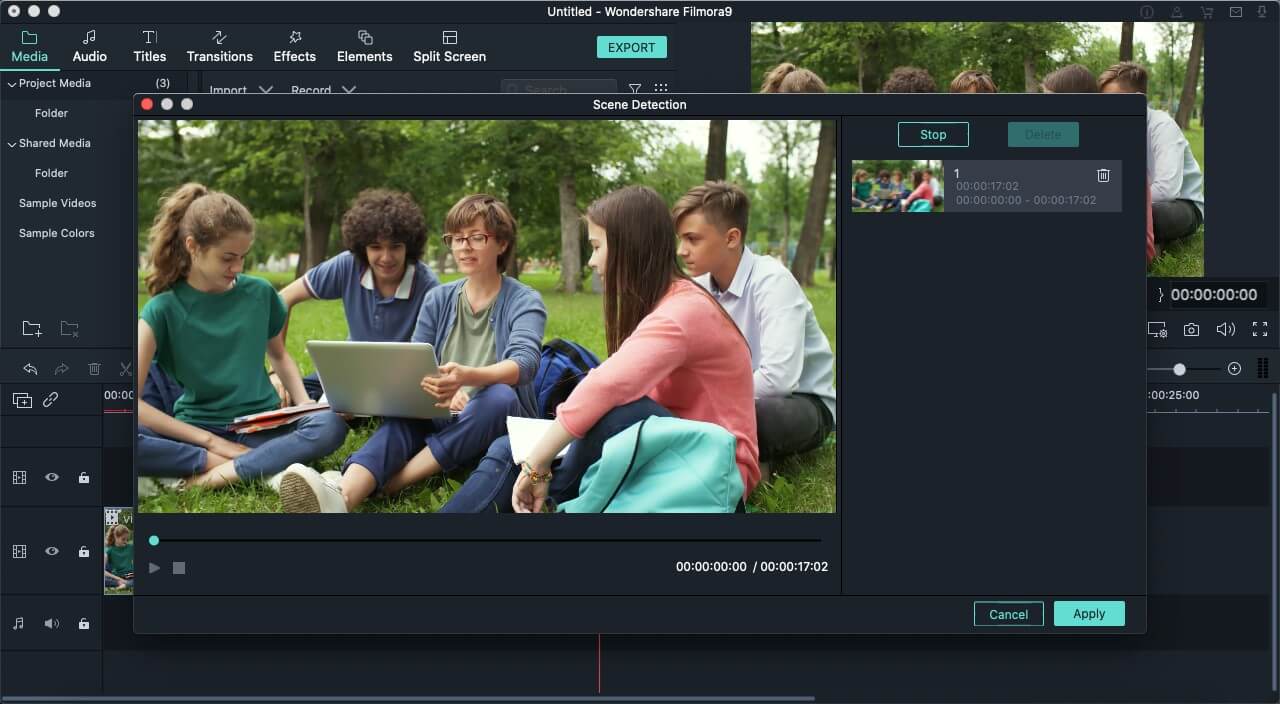
Step 2. The new window of the scene detection appears and then click on “Detect”. Depending on the transitions of the video clips, it is divided into different parts.
There are hundreds of editing software present in the marketplace, but Wondershare Filmora’s success rate is the highest. It is just because of its simplicity and advanced tools that fulfil the users’ needs. The whole interface is hassle-free and clean no matter which operating system you use. It is also helpful in saving your time in terms of applying the settings of colour correction on more than one clip at all at once.
Exploration of the transition effects with the filters allows motion elements in your images and videos. Even you can split the screens to present your videos in a different style. Must discover the Wondershare Filmora whether you are using it casually or professionally. Keep going with the flow and go through the available guidelines. You will definitely consider Wondershare Filmora the best software for your managing and editing tasks.
Step 2: When the uploading is complete, you can cut and split the clips depending on your needs. Now, keep moving the play head in the specific direction from where you have to cut the clips—Press “C” on your keyboard.

Step 3: After getting the split clip, you can delete the remaining part that is not in use. For this, selecting the particular part is necessary and selecting the option of “Delete”. Even, you can press the “delete” key on your keyboard.

Step 4: When your video is ready, simply export the video by clicking right on the option of “All”. On the left lower side of the timeline, it is now clicked on “Export”.


Part 2- trimming of the clips in Lightworks
To trim the video clips in Lightworks, you require to hover the mouse towards the last of the video clip. Keep moving until and unless that part of the clip gets highlighted. After this step, start dragging till the previous where you want it.


An easier way to split the video clip
Even though Lightworks is a wonderful software for editing videos and images, its interface is easy to handle. But it is not supportive of different formats and 4K videos. For a few features, you might need the paid version of Lightworks. The most acquired solution to resolve this issue is Filmora Video Editor . It is freely available, and use all the tools according to your needs. That’s why it is gaining popularity, and users are increasing day by day. The latest versions of the Wondershare Filmora are available to enhance user experiences. You can export the outcome with ease from the tools.
For Win 7 or later (64-bit)
For macOS 10.14 or later
Features:
- Availability of drag and drag feature
- Can preview the functionalities you apply
- Easy to customize the images and videos
- Involvement of the animation
- Huge library available for the effects of visual and audio
- Splitting and merging the clips
Wondershare Filmora always offers to split the clips from the creative techniques. This tool is extremely useful, particularly when creating commentaries, tutorials, or interviews. The exact footage has to be on the timeline. All the options are on the main panel. Add anything you like, such as animation, text, images, or other media, to make an outstanding outcome. These are very easy to understand, so go through the following steps for splitting the video clips. Two ways are trimming and splitting the clips in Wondershare Filmora.
First method: splitting on the timeline
Step 1. Selection of the clip in the timeline that you want to split. Your play head should be precisely at this particular place from where you need the splitting.

Step 2. When your play head is on the correct point of the timeline, right-click on the clip for opening the menu. Select the option of “Split” or click on the scissor icon in red colour.

There is also a possibility of hiding the red icon of the scissor present. You can do it by tapping on the options of Wondershare Filmora. Then go to Preferencesàediting. Now uncheck the button of Split.

Second method: detection of the scene
If there are different shots in your clips or separation in the scenes, you can use the tool of “scene detection” in the Wondershare Filmora.
Step 1. Select your video clip from the media library that you want to split. After right-clicking on it, select the option of “Scene detection” from the menu.

Step 2. The new window of the scene detection appears and then click on “Detect”. Depending on the transitions of the video clips, it is divided into different parts.

There are hundreds of editing software present in the marketplace, but Wondershare Filmora’s success rate is the highest. It is just because of its simplicity and advanced tools that fulfil the users’ needs. The whole interface is hassle-free and clean no matter which operating system you use. It is also helpful in saving your time in terms of applying the settings of colour correction on more than one clip at all at once.
Exploration of the transition effects with the filters allows motion elements in your images and videos. Even you can split the screens to present your videos in a different style. Must discover the Wondershare Filmora whether you are using it casually or professionally. Keep going with the flow and go through the available guidelines. You will definitely consider Wondershare Filmora the best software for your managing and editing tasks.
Step 2: When the uploading is complete, you can cut and split the clips depending on your needs. Now, keep moving the play head in the specific direction from where you have to cut the clips—Press “C” on your keyboard.

Step 3: After getting the split clip, you can delete the remaining part that is not in use. For this, selecting the particular part is necessary and selecting the option of “Delete”. Even, you can press the “delete” key on your keyboard.

Step 4: When your video is ready, simply export the video by clicking right on the option of “All”. On the left lower side of the timeline, it is now clicked on “Export”.


Part 2- trimming of the clips in Lightworks
To trim the video clips in Lightworks, you require to hover the mouse towards the last of the video clip. Keep moving until and unless that part of the clip gets highlighted. After this step, start dragging till the previous where you want it.


An easier way to split the video clip
Even though Lightworks is a wonderful software for editing videos and images, its interface is easy to handle. But it is not supportive of different formats and 4K videos. For a few features, you might need the paid version of Lightworks. The most acquired solution to resolve this issue is Filmora Video Editor . It is freely available, and use all the tools according to your needs. That’s why it is gaining popularity, and users are increasing day by day. The latest versions of the Wondershare Filmora are available to enhance user experiences. You can export the outcome with ease from the tools.
For Win 7 or later (64-bit)
For macOS 10.14 or later
Features:
- Availability of drag and drag feature
- Can preview the functionalities you apply
- Easy to customize the images and videos
- Involvement of the animation
- Huge library available for the effects of visual and audio
- Splitting and merging the clips
Wondershare Filmora always offers to split the clips from the creative techniques. This tool is extremely useful, particularly when creating commentaries, tutorials, or interviews. The exact footage has to be on the timeline. All the options are on the main panel. Add anything you like, such as animation, text, images, or other media, to make an outstanding outcome. These are very easy to understand, so go through the following steps for splitting the video clips. Two ways are trimming and splitting the clips in Wondershare Filmora.
First method: splitting on the timeline
Step 1. Selection of the clip in the timeline that you want to split. Your play head should be precisely at this particular place from where you need the splitting.

Step 2. When your play head is on the correct point of the timeline, right-click on the clip for opening the menu. Select the option of “Split” or click on the scissor icon in red colour.

There is also a possibility of hiding the red icon of the scissor present. You can do it by tapping on the options of Wondershare Filmora. Then go to Preferencesàediting. Now uncheck the button of Split.

Second method: detection of the scene
If there are different shots in your clips or separation in the scenes, you can use the tool of “scene detection” in the Wondershare Filmora.
Step 1. Select your video clip from the media library that you want to split. After right-clicking on it, select the option of “Scene detection” from the menu.

Step 2. The new window of the scene detection appears and then click on “Detect”. Depending on the transitions of the video clips, it is divided into different parts.

There are hundreds of editing software present in the marketplace, but Wondershare Filmora’s success rate is the highest. It is just because of its simplicity and advanced tools that fulfil the users’ needs. The whole interface is hassle-free and clean no matter which operating system you use. It is also helpful in saving your time in terms of applying the settings of colour correction on more than one clip at all at once.
Exploration of the transition effects with the filters allows motion elements in your images and videos. Even you can split the screens to present your videos in a different style. Must discover the Wondershare Filmora whether you are using it casually or professionally. Keep going with the flow and go through the available guidelines. You will definitely consider Wondershare Filmora the best software for your managing and editing tasks.
Step 2: When the uploading is complete, you can cut and split the clips depending on your needs. Now, keep moving the play head in the specific direction from where you have to cut the clips—Press “C” on your keyboard.

Step 3: After getting the split clip, you can delete the remaining part that is not in use. For this, selecting the particular part is necessary and selecting the option of “Delete”. Even, you can press the “delete” key on your keyboard.

Step 4: When your video is ready, simply export the video by clicking right on the option of “All”. On the left lower side of the timeline, it is now clicked on “Export”.


Part 2- trimming of the clips in Lightworks
To trim the video clips in Lightworks, you require to hover the mouse towards the last of the video clip. Keep moving until and unless that part of the clip gets highlighted. After this step, start dragging till the previous where you want it.


An easier way to split the video clip
Even though Lightworks is a wonderful software for editing videos and images, its interface is easy to handle. But it is not supportive of different formats and 4K videos. For a few features, you might need the paid version of Lightworks. The most acquired solution to resolve this issue is Filmora Video Editor . It is freely available, and use all the tools according to your needs. That’s why it is gaining popularity, and users are increasing day by day. The latest versions of the Wondershare Filmora are available to enhance user experiences. You can export the outcome with ease from the tools.
For Win 7 or later (64-bit)
For macOS 10.14 or later
Features:
- Availability of drag and drag feature
- Can preview the functionalities you apply
- Easy to customize the images and videos
- Involvement of the animation
- Huge library available for the effects of visual and audio
- Splitting and merging the clips
Wondershare Filmora always offers to split the clips from the creative techniques. This tool is extremely useful, particularly when creating commentaries, tutorials, or interviews. The exact footage has to be on the timeline. All the options are on the main panel. Add anything you like, such as animation, text, images, or other media, to make an outstanding outcome. These are very easy to understand, so go through the following steps for splitting the video clips. Two ways are trimming and splitting the clips in Wondershare Filmora.
First method: splitting on the timeline
Step 1. Selection of the clip in the timeline that you want to split. Your play head should be precisely at this particular place from where you need the splitting.

Step 2. When your play head is on the correct point of the timeline, right-click on the clip for opening the menu. Select the option of “Split” or click on the scissor icon in red colour.

There is also a possibility of hiding the red icon of the scissor present. You can do it by tapping on the options of Wondershare Filmora. Then go to Preferencesàediting. Now uncheck the button of Split.

Second method: detection of the scene
If there are different shots in your clips or separation in the scenes, you can use the tool of “scene detection” in the Wondershare Filmora.
Step 1. Select your video clip from the media library that you want to split. After right-clicking on it, select the option of “Scene detection” from the menu.

Step 2. The new window of the scene detection appears and then click on “Detect”. Depending on the transitions of the video clips, it is divided into different parts.

There are hundreds of editing software present in the marketplace, but Wondershare Filmora’s success rate is the highest. It is just because of its simplicity and advanced tools that fulfil the users’ needs. The whole interface is hassle-free and clean no matter which operating system you use. It is also helpful in saving your time in terms of applying the settings of colour correction on more than one clip at all at once.
Exploration of the transition effects with the filters allows motion elements in your images and videos. Even you can split the screens to present your videos in a different style. Must discover the Wondershare Filmora whether you are using it casually or professionally. Keep going with the flow and go through the available guidelines. You will definitely consider Wondershare Filmora the best software for your managing and editing tasks.
MP3 Cutter Download for Computer and Mobile
MP3 cutter download is one of the most reliable tools for editing of music files in a fast and friendly way. MP3 cutter free download at the same time supports merging and cutting audio files like WAV, ACC, MP3 AC3, OPUS, OGG, among others. Cutter MP3 free download application is designed in a way to make editing of music so enjoyable, easy and fun. The application is usually free, it supports the split of large music files into shorter ones, the app can also be used to split a whole album to receive the original tracks without. MP3 cutter download is also used to support trimming by silent detection.
MP3 Cutter download is a free app for Android users available in the Audio File Players line of apps, part of Audio & Multimedia. The company that develops MP3 Cutter is called accountlab. The most current version released by the developer is 1.0. To upload MP3 Cutter on your Android operating system device, just click on the green Continue To App button to begin the installation process of this MP3 cutter application. The MP3 cutter download app has been listed on their website since 2021-10-21 and has had 1639 downloads. The app is made in such a way that it pre-checks a files safety before the download. Though for personal protection reasons, its recommended that one should scan the downloaded app using an antivirus before using the app. In some instances, there is a possibility of your antivirus detecting the MP3 cutter as malware, there is a contact page where one can connect to customer care for help.
1. MP3 Cutter Download for Windows
MP3 Cutter is a Windows desktop application that enables the user to cut and split a large MP3 or video to tiny audio pieces. While using the MP3 Cutter download for windows, you are capable of cutting and splitting a number of formats besides the MP3 like WAV, AMR, WMA, WMV, MPG4, AVI, MP4, 3GP, FLAC WMV, MOV and many more formats audio and video formats. The layout of bits generated from the audio data is called the audio coding format. A format can be compressed or depressed using an MP3 cutter for windows or any other right program. In some cases, the data can be a raw bit-stream in the audio coding format. However, it’s normally embedded in an audio data format with a specified storage layer. If you intend to cut such a file, you should do so without messing up the quality of the entire file. That’s exactly what MP3 Cutter download for windows does.
There are several reasons where someone would want to cut an MP3 file or a video file. For example, you may be having some nice audio tune or a video track that you may like to have as a ringtone, using an MP3 cutter for windows will enable you to extract the part you like most. The cut tune can be used for your morning alarm, SMS notification or ringtone. You can also use the cut a MP3 file for fixing files or broken and damaged songs. For example, you may have recorded a song from the radio then you realize there is a part that was not clearly captured or an information you don’t want, you’ll use MP3 cutter download to reorganize the music. Cutter download for MP3 allows you to manipulate your audio files without the degradation in their quality.
How to use Free MP3 Cutter Joiner
Step 1: Addition of a File
On the app’s interface, click the “Add “ button to enable you to import files. The chosen file will play automatically.
Step 2: Setting of a Start Point and End Point
By left clicking to drag the red line to quickly locate, then click on the button to set start point and end point
Tip: You can use the format hh:mm:ss.fff to directly input start point and end point in the blank edit control.
Step 3: Start Cuttting
You will simply click on the ‘CUT’ button to start cutting the file needed.
How to Join MP3 with Using Free MP3 Cutter Joiner
Step 1: Add File
You will be asked to click “Add “ button so as to enable you to import multi files.
Step 2: Click “Setting” button to set audio quality, channels, sample rate
Step 3: Start Join
Go to the button written join and click “Join” button to start the joining process.
2. MP3 Cutter Download for Android
MP3 Cutter download for Android is meant to help you to easily mix music, trim music, merge music and preciously clip out the wanted part of music and set it as a unique ringtone for every on the android device. Cutter MP3 download for android can be applied in the customization of your own alarm tone and other notifications. It also supports bitrate & volume adjustment to create the highest quality melody for you. Steps to follow while using MP3 Cutter Download for Android:
1. Make a choice of the music clip you want to cut from your phone/ SD card
2. Secondly make a selection of the length of music that you want to cut or trim
3. Edit and tag for the clip(Title, Format, Bitrate, Volume etc)
4. And lastly save as the cut music as a ringtone/Alarm/Notification or Share as desired
3. MP3 Cutter Download for iPhone
Are you looking for an app to make a ringtone on your iPhone device? MP3 cutter for iPhone is the best choice for you to make personalized ringtones, it supports aiff, m4a, mp3 and wav formats. A user can use this app to edit a recorded and it also supports trimming. Free MP3 cutter download for iPhone supports mp3, wav, aiff, m4a and other types of music formats. Mp3 download for iPhone is also referred to as music editor, ringtone cutter, alarm tone maker or notification tone creator in other instances.
MP3 download cutter for Iphone is the best application for cutting music. The cut mp3, m4a, and ringtone application will help you cut that favorite part of an audio tune or a music file. You can use the cut music as ringtone, notification tone or a music song and alarm tone. The cut pieces can be shared with friendly since the cut results are easily manageable.
Instead of buying or endlessly searching the web for a ringtone, you can rather easily make the desired ringtone yourself using the files already stored in your phone even those audios from a video. Our Online MP3 Cutter download for iPhone allows making custom ringtones from your favorite song, voice memo or video, it can then be exported in several formats. It can be used on iPhone and Android phones, Windows or Mac computers.
Below are the steps to follow while using an audio cutter for iPhone.
Step 1: Selecting a file
Open MP3 Cutter download for iPhone tool first. Then select the file you want to work with by clicking on “Choose file”. If you want to select it from Dropbox or Google Drive account where the file exists, tap on the small arrow.
If using a computer, you will just need to drag and drop the file onto the page.
Once you have selected your file, a progress bar will appear to show you the status of the upload. The speed of the upload will definitely depend on the file size or the available internet speed. It will be slower if the file is large or if the internet speed is slow.
Step 2: Editing the audio
As the representation of the audio bar appears, you can slide it to the left or to the right to choose the exact location to start cutting and where to end the ringtone clip. There is an additional feature that allows you to enter time stamps manually. The application also gives you an option of checking if you want to add a “Fade in” or “Fade out” effects.
When you are through with cropping the audio, you can decide on what file format to export. The app supports popular audio codecs such as MP3, AIFF, OGG and WAV. An Android device is capable of accepting a varied number of sound formats, but while exporting a file format, it is advisable to stick to OGG or MP3 formats.
After selecting the desired option, select “Cut” at the right bottom of the page.
Step 3: Preview and download your ringtone
The speed of processing an audio will be directly affected by the file size and the internet speed. After you shall have successfully completed the download, you can press on play button to preview or hear the audio file.
The completed file can be saved in downloads or it can alternatively be added to the Dropbox or sent to Google drive.
If you need tweaking or wants to edit a piece of audio, you’ll get back to the tool.
4. MP3 Cutter for Mac
Whether you are running a podcast or you are a musician who aspires to share audio files through Spotify, SoundCloud, YouTube, or any other platform and or a smartphone app, you need to do some editing to your MP3 files before the final product is ready. Having access to a reliable and feature-rich MP3 cutter for Mac enables you to edit the audio file in a manner that helps you in delivering the exceptional listening experience your audience expects.
It is the reason why it is important to wisely pick your MP3 cutter wisely while considering a variety of other factors. Some of these factors are reliability, cost, performance and ease of use.
Wondershare Filmora
It is feature-rich audio as well as a video editor that allows beginners to edit their audio and video files quickly and easily. It has been specially designed for audio editing amateurs with a simple and user-friendly layout that ensures there is an easy learning curve. With the help of Filmora, you can record your music and voice using a built-in feature and also use it to trim, merge, split, and cut your MP3 files.
Apart from that, you can also make necessary adjustments to volume, pitch, and speed ensuring that your audio has the clarity you need. You can use Filmora for personal use as well to create customized ringtones by cutting songs and add special sound effects to your presentation.
For Win 7 or later (64-bit)
For macOS 10.12 or later
Import audio file to Filmora. You can also import a video and then detach the MP3 file from it.

Right click on the audio and you’ll see a list out editing options, such as cut, reverse, speed change etc.
For macOS 10.12 or later
Import audio file to Filmora. You can also import a video and then detach the MP3 file from it.

Right click on the audio and you’ll see a list out editing options, such as cut, reverse, speed change etc.
For macOS 10.12 or later
Import audio file to Filmora. You can also import a video and then detach the MP3 file from it.

Right click on the audio and you’ll see a list out editing options, such as cut, reverse, speed change etc.
For macOS 10.12 or later
Import audio file to Filmora. You can also import a video and then detach the MP3 file from it.

Right click on the audio and you’ll see a list out editing options, such as cut, reverse, speed change etc.
Also read:
- In 2024, Free Ways To Split Video For Whatsapp Status On All Platforms
- Best 5 Tips to Freeze-Frame in After Effects for 2024
- New 2024 Approved How to Edit FLV Video Files with FLV Editor Windows, Mac,Android, iPhone & Online
- New In 2024, How to Make Coin Magic With Filmora
- 2024 Approved How To Make A Video Longer
- Want to Sync Separate Audio with Video? Check Out This Guide to Do It in the Simplest Way Using the Video Editor - Wondershare Filmora
- New 2024 Approved How to Zoom in Discord
- Updated In 2024, Heres All About GIF Keyboard Youll Ever Want to Know
- In 2024, 3D Ray Traced Settings In After Effects
- 2024 Approved Perfect Moody LUTs for VN Editor An Overview
- Updated Finding the Best Voice Changers for WhatsApp Free and Paid
- New 2024 Approved Best Android Apps For Creating Slow Motion Videos
- Updated 2024 Approved Know How to Create OBS Slideshow. Creating OBS Slideshow in Simple Steps; Application for Creating OBS Slideshow. Make OBS Slideshow Online
- New How to Add Text in Adobe Rush
- Updated In 2024, Applying and Creating Gif Background on Your Devices and Presentations Is Not Hard. Read Below to Learn How to Apply a GIF Background on All Devices
- Updated 2024 Approved Here Is a Step-by-Step Guide to Color Correct and Color Grade a Video Professionally with Wondershare Filmora. Lets Get Going
- In the Realm of Creating Graphic Presentation, People Also Ask About Designing Professionally Sound Slideshow Word Presentations. Heres How You Can Go About the Process
- Discover How to Create Professional Foggy Text Reflection Effects in the Filmora Video Editor
- 10 Recommended Websites to Discover Awesome Premiere Pro Video Templates for 2024
- Updated | Change Speed of a Video on iPhone for 2024
- New How Can You Make a Slideshow Look Aesthetic? Follow the Given Discussion to Learn About Creating an Aesthetic Slideshow All by Yourself
- Updated In 2024, How to Turn On/Off Motion Blur in Fortnite? Is It Good for Fortnite?
- Updated In 2024, 3 Actionable Ways to Create Countdown Animation for Videos
- In 2024, How To Slow Down GIF Building an Understanding
- Updated In 2024, Do You Want to Add Subtitles to Your Videos Efficiently? This Article Will Introduce an Online Subtitle Editor that Will Help You to Create Subtitles for Your Video
- Learn How to Extract Sound From Video Using the Different Online and Software Tools. Details About Their Features, Pros/Cons, and More Are Given
- New How to Comment on YouTube Live Chat for 2024
- 2024 Approved Create an Awesome Logo Reveal with Logo Intro Templates
- Updated So, without Further Dilly-Dallying, Lets Learn How to Create a Retro 1950-Style Video with This Simple Filmora Tutorial
- Updated In 2024, Learn How to Make Modern TikTok Velocity Dance Videos in Filmora Just Like the Ones You See on TikTok and Instagram Reels
- New | Live Stream on YouTube Using Zoom for 2024
- Do You Know How to Create Video Loops on PowerPoint? If Not Then Read This Article to Learn More Details
- In 2024, How to Splice Videos Together on iPhone
- New How to Record Super Slow Motion Videos on Your Phone?
- Updated 2024 Approved Denoise a Video in Adobe Premiere Pro – Audio and Video Noise Removal
- New In 2024, Top 5 Best Video Denoisers
- New An Ultimate Guide on the Significance of Music in Videos and How to Choose the Right Music for Your Videos with Wondershare Filmora for 2024
- New How Long Does It Take To Edit Videos for 2024
- Updated Learn Topaz Video Enhance AI Review and Achieve Powerful Video Conversion for 2024
- 2024 Approved How to Create Loop Videos with Filmora
- Updated Deep Learning of AI Video Recognition - Guide
- In 2024, What Slideshow Templates Teach You About Aesthetic
- Updated Want to Speed up Your Video to Shorten Its Duration and Make It More Entertaining? Here Is How to Speed up Videos in Final Cut Pro. Get a Better Alternative to FCP to Speed up Videos
- Updated 2024 Approved How to Create a Clideo Slideshow
- Updated Applying and Creating Gif Background on Your Devices and Presentations Is Not Hard. Read Below to Learn How to Apply a GIF Background on All Devices for 2024
- Updated In 2024, Steps to Denoise in Final Cut Pro – Reduce Video and Audio Noise
- New In 2024, How to Create Vintage Film Effect 1920S
- Updated 2024 Approved How to Resize FLV Video EfficientlyWindows, Mac, Android, iPhone &
- Updated How to Add Echo Effect to Video
- New Troubleshoot Snapchat Camera Zoomed in Issue
- How to Bypass FRP on Tecno Phantom V Flip?
- 11 Best Location Changers for Xiaomi Civi 3 | Dr.fone
- How to Screen Mirroring Samsung Galaxy S24+ to PC? | Dr.fone
- In 2024, Forgot Locked iPhone 15 Pro Max Password? Learn the Best Methods To Unlock | Dr.fone
- How to Reset a Tecno Pova 5 Phone That Is Locked | Dr.fone
- Tutorial to Change Vivo V30 IMEI without Root A Comprehensive Guide
- In 2024, Fake Android Location without Rooting For Your Vivo V29 Pro | Dr.fone
- In 2024, How to Unlock Infinix Note 30i Phone without Google Account?
- Android Unlock Code Sim Unlock Your Gionee F3 Pro Phone and Remove Locked Screen
- How To Unlock Cricket Apple iPhone 6s Plus for Free
- New In 2024, 18 Best Tools and Services to Create Animated Videos for Your Business
- Title: In 2024, Repeated Text Animation Tutorial
- Author: Morgan
- Created at : 2024-06-15 18:56:43
- Updated at : 2024-06-16 18:56:43
- Link: https://ai-video-editing.techidaily.com/in-2024-repeated-text-animation-tutorial/
- License: This work is licensed under CC BY-NC-SA 4.0.

