
In 2024, Tips to Make Cinematic Color Grading
Tips to Make Cinematic Color Grading
New modern color grading software allows you to do point-and-click color grading right in your browser. Color changes are as easy and intuitive as painting or sketching.
You can choose from many different look presets and movie emulations based on Hollywood movies plus real-time previews of your favorite LUTs with this software.
Part 1. What is Cinematic Color Grading?
The cinematic look is all the rage these days and aims to mimic images captured on real film rather than digitally created. To achieve this effect, film directors use various means from lighting to cinematic color gradation. The latter is a powerful tool for bringing a cool or warm tone to a video and providing smooth color transitions to fall on an image that doesn’t look too real but feels emotional.
This kind of post-production processing, which produces beautiful results when used by color magicians, requires a deep understanding of colors and their effect on our psyche and even physiology. It’s not enough to watch a color grading video and use a LUT to get where you want. You should at the very least have an understanding of:
- Color wheel
- Color quality
- Color harmony and discord
- Warm and cool colors
- Color context
Part 2. Tips to make cinematic color grading
Here are three helpful tips to create cinematic-looking images in DaVinci Resolve.
In my 10-year career as a colorist, I’ve worked on every type of content imaginable: short, long, commercial, educational, episodic—you name it. And while each of these formats requires its approach, the one constant that spans them all is the client’s desire for a cinematic look.
Virtually all of us aspire to more cinematic color, but we often come up short—in part because the term itself has become too broad to effectively target. To focus on the goal, I like to think of “cinematic” as “an image whose key visual properties are consistent with those of printed film.”
The print film was the primary medium through which we consumed cinematic images for the first century of filmmaking and is therefore at the very heart of cinematic aesthetics. In this video, I’ll show you my top three secrets to achieving this aesthetic quickly and consistently in Davinci Resolve.
Tips1: Create Color Density
The first secret to film color is to create color density. Another key aesthetic property of film images is that colors can be either highly saturated or highly luminescent but cannot be both.
We can mimic this visual characteristic by identifying strongly saturated colors in our image and using the Hue vs. Lum to reduce their brightness. This simple technique is especially effective on pure primary colors (red, green, and blue).
Tips2: Separation Beats Saturation
The second secret to film color is prioritizing separation over saturation. When you feel like an image lacks overall color or pop, it’s all too easy to reach for the saturation knob, but that’s not a very cinematic solution.
Instead, try using split toning—pushing cool colors into shadows and warm colors into highlights—to increase tonal separation and add depth to an image. This characteristic is present in virtually every film print and is deeply evocative when applied correctly.
Tips3: Strong Contrast is Your Friend
The third secret of film colors is a strong contrast. This is not always easy, as a higher contrast look inherently requires more precision with exposure placement. Too often we pump up some contrast, end up with an image that looks blown out or too crisp, and then immediately back away from editing.
However, if you stick with high contrast long enough to improve your exposure, you’ll get a very different result and be well on your way to a more cinematic image.
Part 3. How to add color cinematic grading by using Filmora?
New modern color grading software allows you to do point-and-click color grading right in your browser. Color changes are as easy and intuitive as painting or sketching.
You can choose from many different look presets and movie emulations based on Hollywood movies plus real-time previews of your favorite LUTs with this software.
Wondershare Filmora is an option if you want to easily change the colors of your projects. You may just double-click the media after dragging it onto the editing timeline to change the contrast, saturation, brightness, and hue.
Despite its speed, it also allows you to merge, edit audio, divide, rotate, and apply as many cool video effects as you like.
Step1Add the media
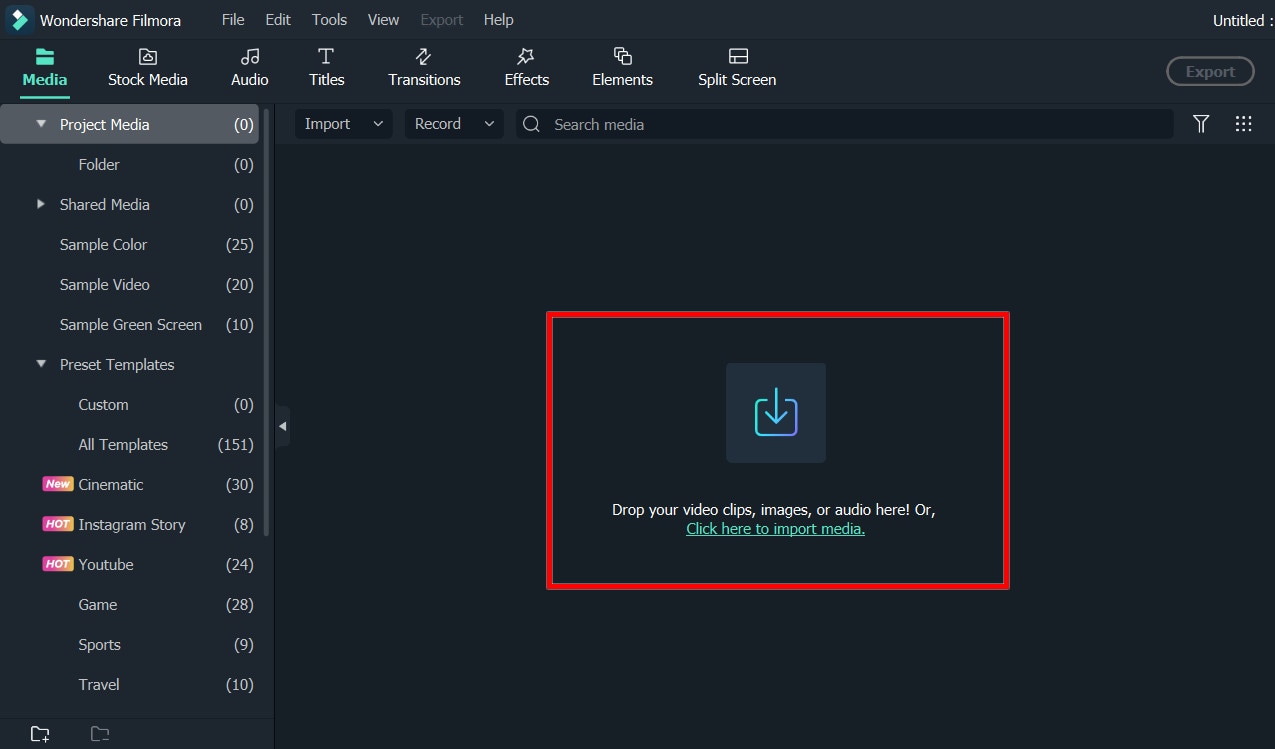
After installing Wondershare Filmora, click the New Project and Import button to easily find and load your videos.
Step2Correct the color [Basic and Advanced]
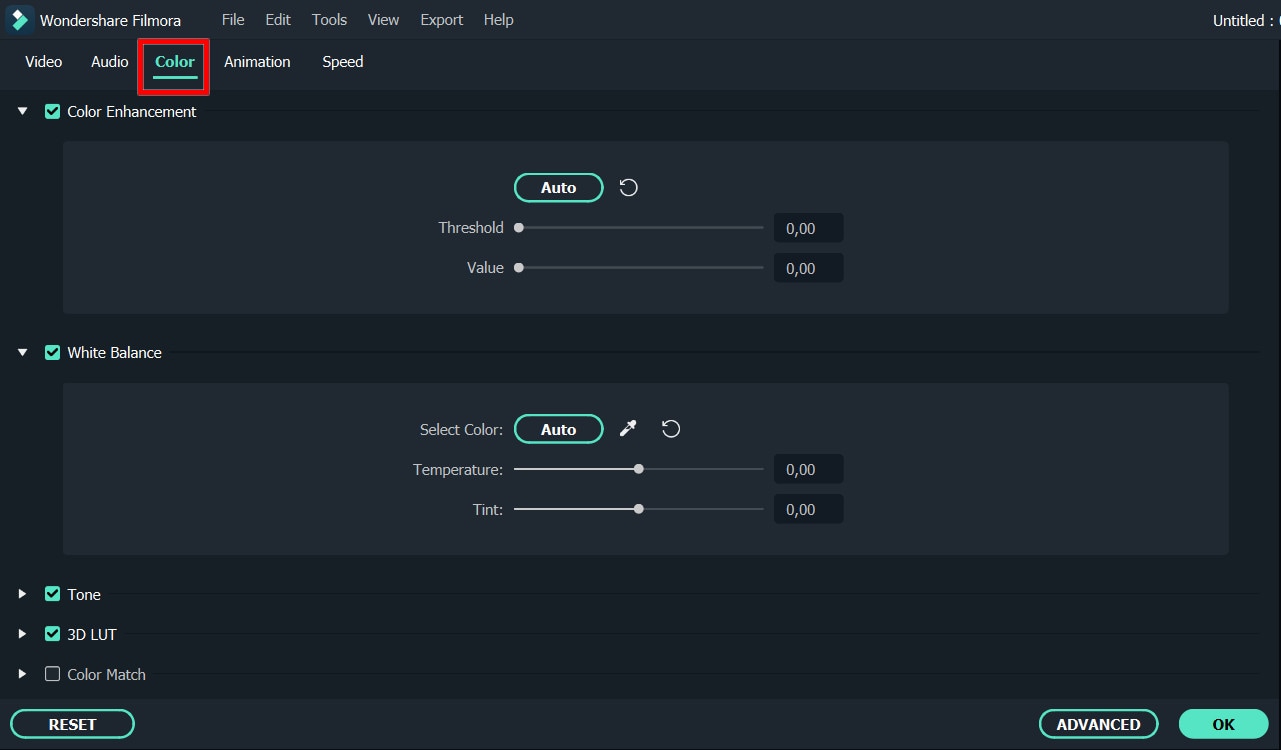
In the timeline, double-click the video editing window. Select the “Color” panel and make adjustments.
- Contrast: By adjusting this setting, you can control the brightness and color in different parts of the image.
- Saturation: This setting highlights the gray part of the video to a shade. You can adjust it to make the colors of the entire video image appear more saturated or more subdued.
- Brightness: You can change this setting to adjust the overall darkness and lightness of your project.
- Hue: Hue is generally the lightness of a color. Let’s say that when red is saturated with white, it creates a shade of pink.
- 3D LUT: 3D lookup tables provide your media with Hollywood movie color sets like the 007 series, Batman, Harry Porter, etc.
Hover over the indicator to adjust the color correction settings. Then left click on it and move the slider. The corresponding value stabilizes after releasing the mouse button.
With Filmora, you also have access to advanced color correction. Click the Advanced Color Tuning icon to enter the appropriate window where you can fine-tune the color or use preset templates.
The Preferences tab has a variety of templates, including Movie, Normal, 3D LUT, and Vignette. In the Edit tab, you can adjust color temperature, white balance, hue, 3D LUT, color, HSL, light, vignette, etc.
Step3Preview and save the new video
When you are satisfied with your creation, click “Export”. Then click the Settings button and save the new videos in different formats in the Format tab. You can also export the video directly to Vimeo or YouTube or burn it to DVD for better preservation.
Filmora’s color correction tools will make your videos look natural, more attractive, more vibrant, consistent, and professional.
Color Correction Presets
Color correction presets help your video achieve an enhanced cinematic look. Adjust gives you control over fine-tuning the colors in your shots. You can make various adjustments such as color temperature and exposure.
In the “Effects > LUT” tab, you’ll see an extensive selection of preset color settings. These include Vignettes, Movie Looks Like Old Movies, and Cinematic 3D LUT effects such as Harry Potter, Game of Thrones, House of Cards, and Mission Impossible.
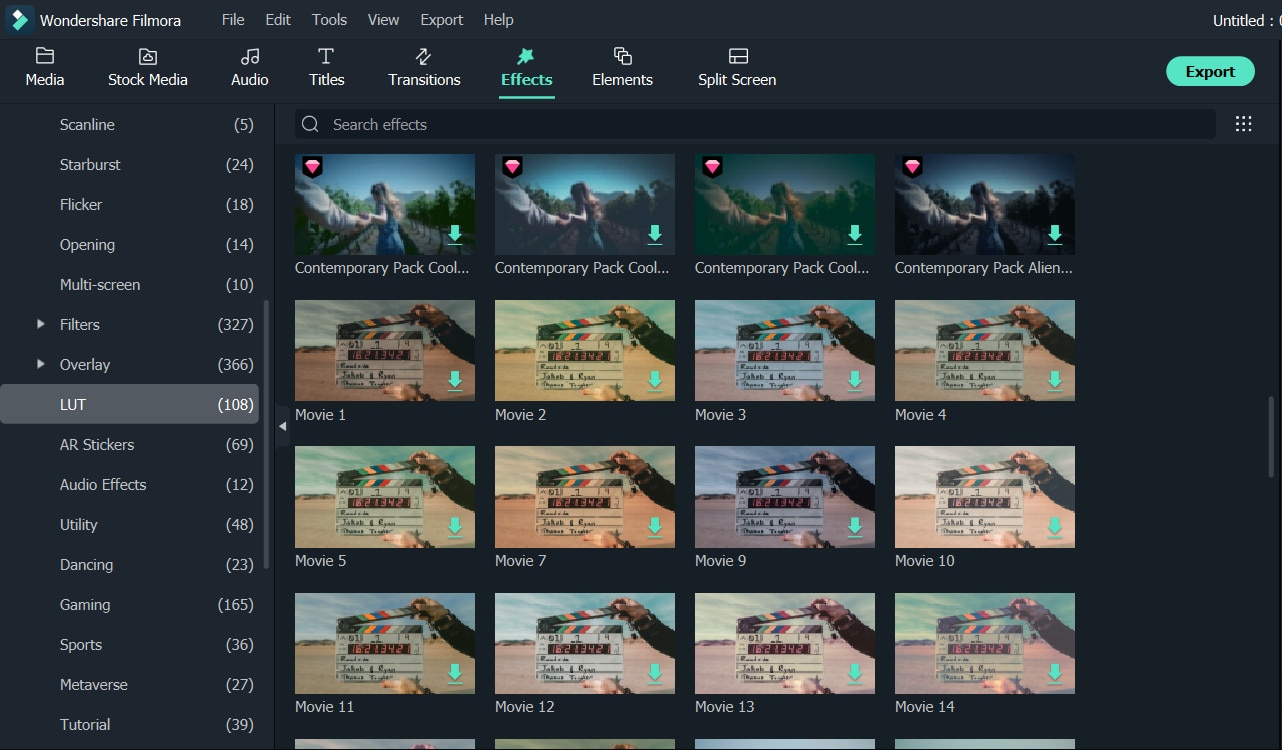
Filmora’s Color Correction Advanced Tool also categorizes your presets. Click on All Presents to see six categories: Favorites, Custom, 3D Lut, Common, Film, and Vignette.
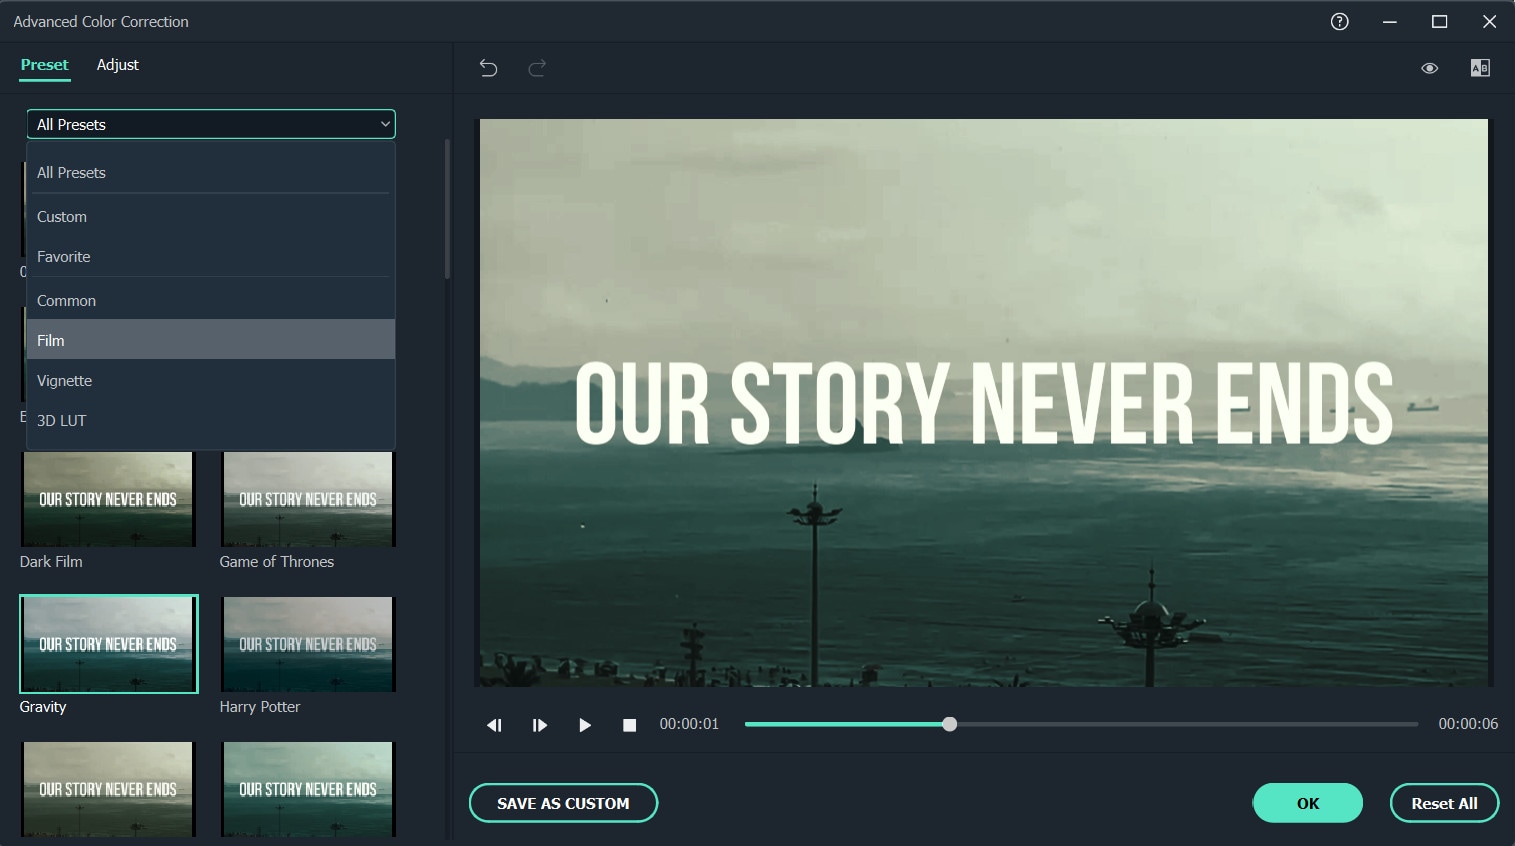
Double-click a preset to apply it to your video. You can see how it looks in the Advanced Color Correction preview window. If you are satisfied with the results, click OK.
Conclusion
Above are the steps to give your video a cinematic look using Wondershare Filmora, hope this helps if you are wondering how to do it. As we can see above, using Filmora video editor will make you more creative in making videos with a suitable emotional tone.
Free Download For Win 7 or later(64-bit)
Free Download For macOS 10.14 or later
How to Add Adjustment Layer (Clip) in DaVinci Resolve?
DaVinci Resolve is one of the popular video editors comprising many advanced features. This tool allows you to conduct 3D video editing and adjust color grading properties. You can also access its audio library to find out suitable music clips. Moreover, you can add transitions and animations to your videos for more enhancements.
While executing video editing, many people add an adjustment layer (clip) in DaVinci Resolve for convenience. By reading this article, you can discover the DaVinci Resolve adjustment layer and an easy method to add it during video editing.

Part 1: What is the Adjustment Layer (clip) in DaVinci Resolve?
Do you know the benefits of adding an adjustment layer (clip) in DaVinci Resolve? The adjustment layer (clip) in DaVinci Resolve gives you more control and flexibility during video editing. By adding this particular layer above your other clips, you can apply tons of effects to them.
Due to this ease, you don’t have to apply the same effect to multiple clips. Thus, it saves your time and manual effort on DaVinci Resolve. One of the main advantages of adding an adjustment layer (clip) is that it does not modify the original pixels of the video. You can also rename the adjustment layers (clips) in DaVinci Resolve according to your desire.
Hence, adjustment layers in any video editor like DaVinci Resolve provide a non-destructive way to edit and apply effects to the video.

Part 2: How to Add an Adjustment Layer (clip) in DaVinci Resolve?
Are you keen to know how to add an adjustment layer in DaVinci Resolve? By reading this section, you can find easy instructions to apply the adjustment layer (clip) in DaVinci Resolve without hassle.
Step1 To add an adjustment layer in DaVinci Resolve, head to the “Effects Library.” From there, click on “Toolbox” and select “Effects.”

Step2 From the Effects section, you will have to search for the “Adjustment Clip.” Drag and drop the adjustment clip and apply it above the layers that you want to edit.

Step3 Now extend the adjustment clip according to the layers. Once done, you can apply effects and transitions to the adjustment clip to add modifications.

Part 3: Three Ways to Use Adjustment Layers in DaVinci Resolve
Do you want to know how to use the DaVinci Resolve adjustment layer? Read this part of the article to discover how to use the adjustment layer (clip) in DaVinci Resolve.
1. Zoom in
Do you want to give the zoom-in element in your video to emphasize your subject? The zoom-in effect is created to focus on the subject to engage the viewers. On DaVinci Resolve, you can create the zoom-in effect using the adjustment layer (clip). To do so, you can read and follow the below instructions:
Step1 First, add the adjustment layer to your timeline by heading to Effects Library and then Toolbox. Make sure to apply the adjustment layer above your talking head on the timeline.
Step2 Now click on “Inspector” from the top right corner and enhance the “Zoom” value according to your desire. Once done, you can play the video to check the results.


2. Color Grading
Color grading can change the perspective of your video clip. Do you want to give your video an aesthetic, gloomy, or colorful vibe? Change the color grading properties using the adjustment layer (clip) in DaVinci Resolve. To use an adjustment layer for color grading, we have jotted down the simple steps below:
Step1 Drag and drop your clip above on the timeline. Once you are done, head to the “Color Page” given below.
Step2 On the Color page, go to “Library” from the right side and select the effect called “Color Space Transform” from the Resolve FX Color section. After applying this effect, you can enhance the visual appearance of your video.

3. Shake Transition
The shake transition adds a dramatic feel to your video to hook up the audience. If you have recorded a music video, you can add a shake transition to make it more captivating. To add this particular transition to your video, we will use the adjustment layer in DaVinci Resolve to produce accurate results.
Step1 Add the adjustment layer to your timeline. Trim it according to the specific part of your clip where you want to create the shake transition effect.
Step2 Now, from the left side, select “Open FX” library and search “Camera shake” effect. Apply it to the adjustment layer and navigate to the “Effects” tab from the top right corner. From there, increase the values of motion scale, speed scale, and motion blur. You can also make further changes in the “Shake Levels” section.

Step3 Afterward, scroll to the bottom and change the Border Type to “Reflect.” Now head back to the Open FX library and select the “Flicker Addition” effect. Apply this particular effect to the adjustment layer. From the “Effects” tab on the right side, select “Flicker Gain” as your flicker type. You can also go to the “Video” tab to enhance the zoom and position value.
Step4 You can also select different composite modes. You can also duplicate the adjustment clip and alter the composite mode of the second clip. Once done, decrease the opacity of the second clip. Now copy and place the adjustment clips on your timeline according to your desire.

Bonus Tips: Use Adjustment Layers in the Best Alternative to DaVinci Resolve
If you are not satisfied with the results of the DaVinci Resolve adjustment layer, you can try Wondershare Filmora . This professional software can prove to be the best alternative to DaVinci Resolve due to its numerous key features. You can find this tool on every major platform, such as iOS, Android, Windows, and Mac. This tool has a clean and friendly user interface so that you can enjoy editing and modifying your videos.
Free Download For Win 7 or later(64-bit)
Free Download For macOS 10.14 or later
You can also use adjustment layers to edit with great ease on this compatible video editor. Moreover, you can find multiple trending effects in its library that can help you to enhance your video clips. To add an adjustment layer in Filmora, you can follow the below steps.
Step1 Start with New Project
Once done with launching Filmora, hit the “New Project” button and upload the desired video. Drag and drop the added video to the timeline to proceed further.

Step2 Add the Adjustment Layer
Go to the “Media” tab and locate the option “Adjustment Layer.” Once done, drag and drop the adjustment layer to the timeline and double-click on it to change its settings.

Step3 Manage the Adjustment Layer Settings
From the opened settings, you can alter the blending mode according to your choice. You can also change opacity and position for more adjustments. Also, you can apply various presets to add a cinematic look. Moreover, you can apply different borders across your video clip for a more enhanced look.

Conclusion
DaVinci Resolve is one of the most famous video editors among professionals. If you want to become an expert in using DaVinci Resolve, you must know how to add an adjustment layer (clip) to this tool. For your help, this article has provided complete guidelines on how to add an adjustment layer in DaVinci Resolve.
Moreover, we have also highlighted a better option than DaVinci Resolve, known as Wondershare Filmora. Using this software, you can apply the adjustment layers to your video to generate more precise and accurate results.
Free Download For macOS 10.14 or later
You can also use adjustment layers to edit with great ease on this compatible video editor. Moreover, you can find multiple trending effects in its library that can help you to enhance your video clips. To add an adjustment layer in Filmora, you can follow the below steps.
Step1 Start with New Project
Once done with launching Filmora, hit the “New Project” button and upload the desired video. Drag and drop the added video to the timeline to proceed further.
Step2 Add the Adjustment Layer
Go to the “Media” tab and locate the option “Adjustment Layer.” Once done, drag and drop the adjustment layer to the timeline and double-click on it to change its settings.
Step3 Manage the Adjustment Layer Settings
From the opened settings, you can alter the blending mode according to your choice. You can also change opacity and position for more adjustments. Also, you can apply various presets to add a cinematic look. Moreover, you can apply different borders across your video clip for a more enhanced look.
Conclusion
DaVinci Resolve is one of the most famous video editors among professionals. If you want to become an expert in using DaVinci Resolve, you must know how to add an adjustment layer (clip) to this tool. For your help, this article has provided complete guidelines on how to add an adjustment layer in DaVinci Resolve.
Moreover, we have also highlighted a better option than DaVinci Resolve, known as Wondershare Filmora. Using this software, you can apply the adjustment layers to your video to generate more precise and accurate results.
Brighten a Video in Windows 10 Easily When Video Clips You Recorded on Your Windows 10 Computer or Those Downloaded From YouTube Are Too Dark or Too Bright, You Can Easily Adjust the Color Levels in a Few Clicks
Create High-Quality Video - Wondershare Filmora
An easy and powerful YouTube video editor
Numerous video and audio effects to choose from
Detailed tutorials provided by the official channel
Have you ever had a video with good audio but poor visual quality? Maybe it was a recorded talk, and the presenter was sitting in front of a poorly lit screen, or it might as well be your own home video. There are many reasons why your video could look dark and unappealing. Brightening a video is a great way to remove your editing mistakes and add some artistic flair to your videos. Some editing software has this option built-in, but if you use Windows 10 to edit, it’s hard to find out how to brighten a video in Windows 10 without the help of additional software.
We sometimes know video quality can affect the way content is perceived. That can be particularly frustrating, especially with all the hi-res content online now. Are you in a situation where you need to brighten up a video that has been recorded in low light? If so, look no further. It’s now a breeze to adjust the brightness of your videos on Windows 10. This article will show you how to brighten a video windows 10.
In this article
01 Does Windows 10 have built-in video editing software?
02 3 Simple Methods to Brighten a Video on iPhone
03 Adjust your video brightness and more using Filmora on PC/Mac
Does Windows 10 have built-in video editing software?
The answer is yes. Windows 10 has an easy-to-use video editing app. This is handy for simple home video editing, but it doesn’t work well for professional movie making. Windows Movie Maker was how we edited video in the old days of Windows XP and Vista. Today, Movie Maker is still available on Windows 10, but the new video editor is built-in to the operating system.
You can use it to trim videos or create your own home movies and slideshows. You can even have it create videos automatically by taking photos as you go. Forget about buying expensive editing software. With Windows 10, you have a free video editor built into the operating system where you can trim videos, create home movies, and even create automatic montages. You’ll be surprised at what you can do without ever leaving the Windows 10 Photos app.
Some people say that windows video editor has a very simple interface and it only has very basic features. In this case, having something is more important than not having anything at all. Also, you should keep in mind that not everyone needs a fully-fledged video editor . Some people have to do just basic tasks like trimming a video and increasing the brightness of a video. It is not feasible for them to purchase expensive video editing software for that purpose. So the Windows 10 video editor is the best in this case.
How To Brighten A Video In Windows 10 Easily
This article will discuss two different methods using which you can easily brighten your videos in Windows 10. So, without wasting any more time, let’s get started.
1. Using Filmora to brighten a video in Windows 10
You may think that all video editing software is created equal, but that’s where you’re wrong. The best video editor for your needs is drastically different depending on what you want to do with the end product. Some people want a quick way to make a trailer or showcase their products, and others want to put together an amateur movie.
Filmora is one of the best video editing software for Windows that can improve or fix your dark videos. Filmora is an all-in-one video editor for Windows and Mac. With Filmora, you can easily edit videos and make simple videos with transitions and effects, and you can give any video a professional touch. It’s a great piece of software that works incredibly smoothly. Filmora is an attractive and easy-to-use application that will give your video the final polish it needs. If you’ve ever had a video that looked too dark to use, there are ways to fix it aside from taking an entirely new video.
If you’ve ever had a video that looked too dark to use, then you can easily brighten it up using Filmora. Just follow the steps given below:
Step 1
First of all, make sure that you have installed the latest version of Filmora on your computer. If you haven’t already installed it, then you can download it easily from the official website of Wondershare.
Step 2
Upon starting Wondershare Filmora, click the “Import” button. The import media item window will open and show you all the files on your computer. The program will now display a thumbnail of your selected video in its media area. Drag the video from the media library and drop it into the Filmora timeline.

Step 3
You will see the editing interface when you double-click the video in the Timeline. You can switch between the Video, Audio, Color, and Motion tabs from here. You can change how the clip looks with the Rotate, Flip, Scale, and Position settings in the Video tab. When you select the Color tab, you will be presented with the White Balance, Tone, and 3D LUT options.

Step 4
You can increase the brightness of the video by dragging the Brightness slider in the Tone option to the right. Click the spacebar to play the video to see the real-time result. The video will appear brighter as a result of your operation. Repeat the previous step if the video remains dark. You will see a brighter video each time you increase its brightness and contrast.

Step 5
Click “Export” to save the result when you’re satisfied with it. You can export videos in any popular format from the “Format” tab, including AVI, FLV, MKV, MP4, M4V, PSP, 3GP, MOV, and more. The video can be viewed on mobile devices such as an iPhone, iPad, or iPod by clicking “Device” and choosing a device. You can burn DVDs as well as upload videos directly to YouTube and Vimeo.
For Win 7 or later (64-bit)
For macOS 10.12 or later
2. Using Windows Video Editor to brighten a video
Windows video editor is an easy-to-use tool in which you can do basic video editing. This simple tool can easily cut, trim, and merge different video clips. The best thing about windows video editor is that it comes as built-in software in windows ten, so you won’t need to download any additional programs and plugins. Suppose you are just a beginner, and you need to perform basic video editing functions. In that case, you can easily use this app without worrying about purchasing expensive video editing programs. To increase the brightness of a video in the windows video editor, follow the steps given below:
Step 1
Go to the search section of windows 10 present right after the start menu icon and type “video editor.” Click the search icon and then open the video editor app.

Step 2
A new interface will appear on your screen. Just click on the new project button to start a new project. From the project library, click on the add new project button and select the video from your computer that you want to edit.

Step 3
Click on the video icon in the project library and then click on the “add to storyboard” button. It will open all the editing options for the video.

Step 4
From the menu present at the bottom of the screen, click on the filters option, and it will open a lot of filters on your screen. Click on the filters one by one and check which filter brightens your video.

Step 5
Once you have added the filter, click on the done button and export the video by clicking on the finish button. You can also select your desired resolution in which you want to export your video.

Conclusion
● As you can see, it’s very easy to brighten a video on Windows 10. You have many options depending on what you want to do with your videos after editing them. The point is that you no longer need complex video editing software to get the job done because there are many other options available to help you achieve your desired look and feel. We have described two different methods in this article. Give one a try if you feel like your videos could use a brighter touch.
Have you ever had a video with good audio but poor visual quality? Maybe it was a recorded talk, and the presenter was sitting in front of a poorly lit screen, or it might as well be your own home video. There are many reasons why your video could look dark and unappealing. Brightening a video is a great way to remove your editing mistakes and add some artistic flair to your videos. Some editing software has this option built-in, but if you use Windows 10 to edit, it’s hard to find out how to brighten a video in Windows 10 without the help of additional software.
We sometimes know video quality can affect the way content is perceived. That can be particularly frustrating, especially with all the hi-res content online now. Are you in a situation where you need to brighten up a video that has been recorded in low light? If so, look no further. It’s now a breeze to adjust the brightness of your videos on Windows 10. This article will show you how to brighten a video windows 10.
In this article
01 Does Windows 10 have built-in video editing software?
02 3 Simple Methods to Brighten a Video on iPhone
03 Adjust your video brightness and more using Filmora on PC/Mac
Does Windows 10 have built-in video editing software?
The answer is yes. Windows 10 has an easy-to-use video editing app. This is handy for simple home video editing, but it doesn’t work well for professional movie making. Windows Movie Maker was how we edited video in the old days of Windows XP and Vista. Today, Movie Maker is still available on Windows 10, but the new video editor is built-in to the operating system.
You can use it to trim videos or create your own home movies and slideshows. You can even have it create videos automatically by taking photos as you go. Forget about buying expensive editing software. With Windows 10, you have a free video editor built into the operating system where you can trim videos, create home movies, and even create automatic montages. You’ll be surprised at what you can do without ever leaving the Windows 10 Photos app.
Some people say that windows video editor has a very simple interface and it only has very basic features. In this case, having something is more important than not having anything at all. Also, you should keep in mind that not everyone needs a fully-fledged video editor . Some people have to do just basic tasks like trimming a video and increasing the brightness of a video. It is not feasible for them to purchase expensive video editing software for that purpose. So the Windows 10 video editor is the best in this case.
How To Brighten A Video In Windows 10 Easily
This article will discuss two different methods using which you can easily brighten your videos in Windows 10. So, without wasting any more time, let’s get started.
1. Using Filmora to brighten a video in Windows 10
You may think that all video editing software is created equal, but that’s where you’re wrong. The best video editor for your needs is drastically different depending on what you want to do with the end product. Some people want a quick way to make a trailer or showcase their products, and others want to put together an amateur movie.
Filmora is one of the best video editing software for Windows that can improve or fix your dark videos. Filmora is an all-in-one video editor for Windows and Mac. With Filmora, you can easily edit videos and make simple videos with transitions and effects, and you can give any video a professional touch. It’s a great piece of software that works incredibly smoothly. Filmora is an attractive and easy-to-use application that will give your video the final polish it needs. If you’ve ever had a video that looked too dark to use, there are ways to fix it aside from taking an entirely new video.
If you’ve ever had a video that looked too dark to use, then you can easily brighten it up using Filmora. Just follow the steps given below:
Step 1
First of all, make sure that you have installed the latest version of Filmora on your computer. If you haven’t already installed it, then you can download it easily from the official website of Wondershare.
Step 2
Upon starting Wondershare Filmora, click the “Import” button. The import media item window will open and show you all the files on your computer. The program will now display a thumbnail of your selected video in its media area. Drag the video from the media library and drop it into the Filmora timeline.
Step 3
You will see the editing interface when you double-click the video in the Timeline. You can switch between the Video, Audio, Color, and Motion tabs from here. You can change how the clip looks with the Rotate, Flip, Scale, and Position settings in the Video tab. When you select the Color tab, you will be presented with the White Balance, Tone, and 3D LUT options.
Step 4
You can increase the brightness of the video by dragging the Brightness slider in the Tone option to the right. Click the spacebar to play the video to see the real-time result. The video will appear brighter as a result of your operation. Repeat the previous step if the video remains dark. You will see a brighter video each time you increase its brightness and contrast.
Step 5
Click “Export” to save the result when you’re satisfied with it. You can export videos in any popular format from the “Format” tab, including AVI, FLV, MKV, MP4, M4V, PSP, 3GP, MOV, and more. The video can be viewed on mobile devices such as an iPhone, iPad, or iPod by clicking “Device” and choosing a device. You can burn DVDs as well as upload videos directly to YouTube and Vimeo.
For Win 7 or later (64-bit)
For macOS 10.12 or later
2. Using Windows Video Editor to brighten a video
Windows video editor is an easy-to-use tool in which you can do basic video editing. This simple tool can easily cut, trim, and merge different video clips. The best thing about windows video editor is that it comes as built-in software in windows ten, so you won’t need to download any additional programs and plugins. Suppose you are just a beginner, and you need to perform basic video editing functions. In that case, you can easily use this app without worrying about purchasing expensive video editing programs. To increase the brightness of a video in the windows video editor, follow the steps given below:
Step 1
Go to the search section of windows 10 present right after the start menu icon and type “video editor.” Click the search icon and then open the video editor app.
Step 2
A new interface will appear on your screen. Just click on the new project button to start a new project. From the project library, click on the add new project button and select the video from your computer that you want to edit.
Step 3
Click on the video icon in the project library and then click on the “add to storyboard” button. It will open all the editing options for the video.
Step 4
From the menu present at the bottom of the screen, click on the filters option, and it will open a lot of filters on your screen. Click on the filters one by one and check which filter brightens your video.
Step 5
Once you have added the filter, click on the done button and export the video by clicking on the finish button. You can also select your desired resolution in which you want to export your video.
Conclusion
● As you can see, it’s very easy to brighten a video on Windows 10. You have many options depending on what you want to do with your videos after editing them. The point is that you no longer need complex video editing software to get the job done because there are many other options available to help you achieve your desired look and feel. We have described two different methods in this article. Give one a try if you feel like your videos could use a brighter touch.
Also read:
- [Updated] Elevating Shorts Visibility A Thumbnail Transformation Journey for 2024
- [Updated] Mastering Batch Background Erasure in Affinity Photo
- 2024 Approved Mastering Sony Vegas YouTube Video Editing Basics
- AddROM Bypass An Android Tool to Unlock FRP Lock Screen For your Infinix Note 30
- Best Clickbait Title Generator
- Enhancing Win Ratio: Valorant Optimization Guide
- Expert Tips on How to Upgrade Your Intel iMac System
- IPhone Camera Not Working? 7 Common Issues and How to Fix Them
- Maximizing Audience Reach Prime Dissemination Days for 2024
- Navigating Multi-Stream Video in Edge for 2024
- New Are You Trying to Make Slow-Mo Videos on Instagram? In This Article, We Will Discuss Top-Rated Ways to Produce Perfect Slow-Motion Videos for Instagram for 2024
- New In 2024, Did You Know Cameras Have a Built-In Feature to Shoot Slow-Motion Clips? This Article Is About Using Sony S&Q to Capture Slow-Motion Scenes
- New In 2024, So, without Wasting Time, Let Me Show You How to Mask a Video in Wondershare Filmora. Lets Get Started
- New In 2024, Stunning Glitch Effect and Its Creation Guideline for Premiere Pro
- Updated 2024 Approved Replace Sky Background in Video Figuring Out the Best Options
- Updated 2024 Approved Use Your Social Media App and Make Slow-Motion Videos by Reading This Guide. Besides Learning Slow-Motion Snapchat, Get Useful Apps Serving the Same Purposes
- Updated In 2024, Do You Want to Make Your Photos and Videos Look Different From Others? There Are Many Lightroom LUTs Free, and They Make Your Media Content Stand Out From Others
- Updated In 2024, Exploring Tools to Integrate Special Mask Effects Into Your Content. Read the Following Article to Master some Tools Experts in Mask Tracking
- Updated Learn How to Make a Gaming Montage - Guide & Tips for 2024
- Title: In 2024, Tips to Make Cinematic Color Grading
- Author: Morgan
- Created at : 2024-10-01 02:02:13
- Updated at : 2024-10-06 04:11:07
- Link: https://ai-video-editing.techidaily.com/in-2024-tips-to-make-cinematic-color-grading/
- License: This work is licensed under CC BY-NC-SA 4.0.