
:max_bytes(150000):strip_icc():format(webp)/kids-ipad-580f65635f9b58564cc0fc91-5c5cbb6ac9e77c0001d92aa4.jpg)
In 2024, Want to Add Freeze Frame Effect to Your Video on Your Device? Here Are the Steps to Add Freeze Frame on PC, Mac, Smartphone as Well as Online From Any Device
Want to Add Freeze Frame Effect to Your Video on Your Device? Here Are the Steps to Add Freeze Frame on PC, Mac, Smartphone as Well as Online From Any Device
Adding effects is an essential part of video editing to make a regular video look extraordinary. There are literally unlimited video effects available in popular video editors. You need to apply a video effect as per the trend and requirements of your video. Freeze frame effect has become extremely popular among video creators in today’s world of social media. Use freeze frame effect to freeze a specific scene in your video so that you can draw the attention of your viewers to that particular moment.
For example, in a match highlight video, you freeze the frame moment before a goal to show the positioning of the players or strikers. Owing to the popularity of freeze frame effect, you will find the video effect in almost all popular video editor apps for computers and smartphones. In fact, even popular online video editors have included the effect in their video effects. We will illustrate how to add freeze frame effect to your video on any device.
Part 1. How to Add Freeze Frame Video Effect on PC
If you are a computer user and you are looking for a video editor to add freeze frame effect to your video, we recommend Wondershare Filmora. Filmora is extremely popular among video creators for its wide range of video effects as well as its intuitive user interface. Adding freeze frame effect is super easy in Filmora and here are the steps to follow.
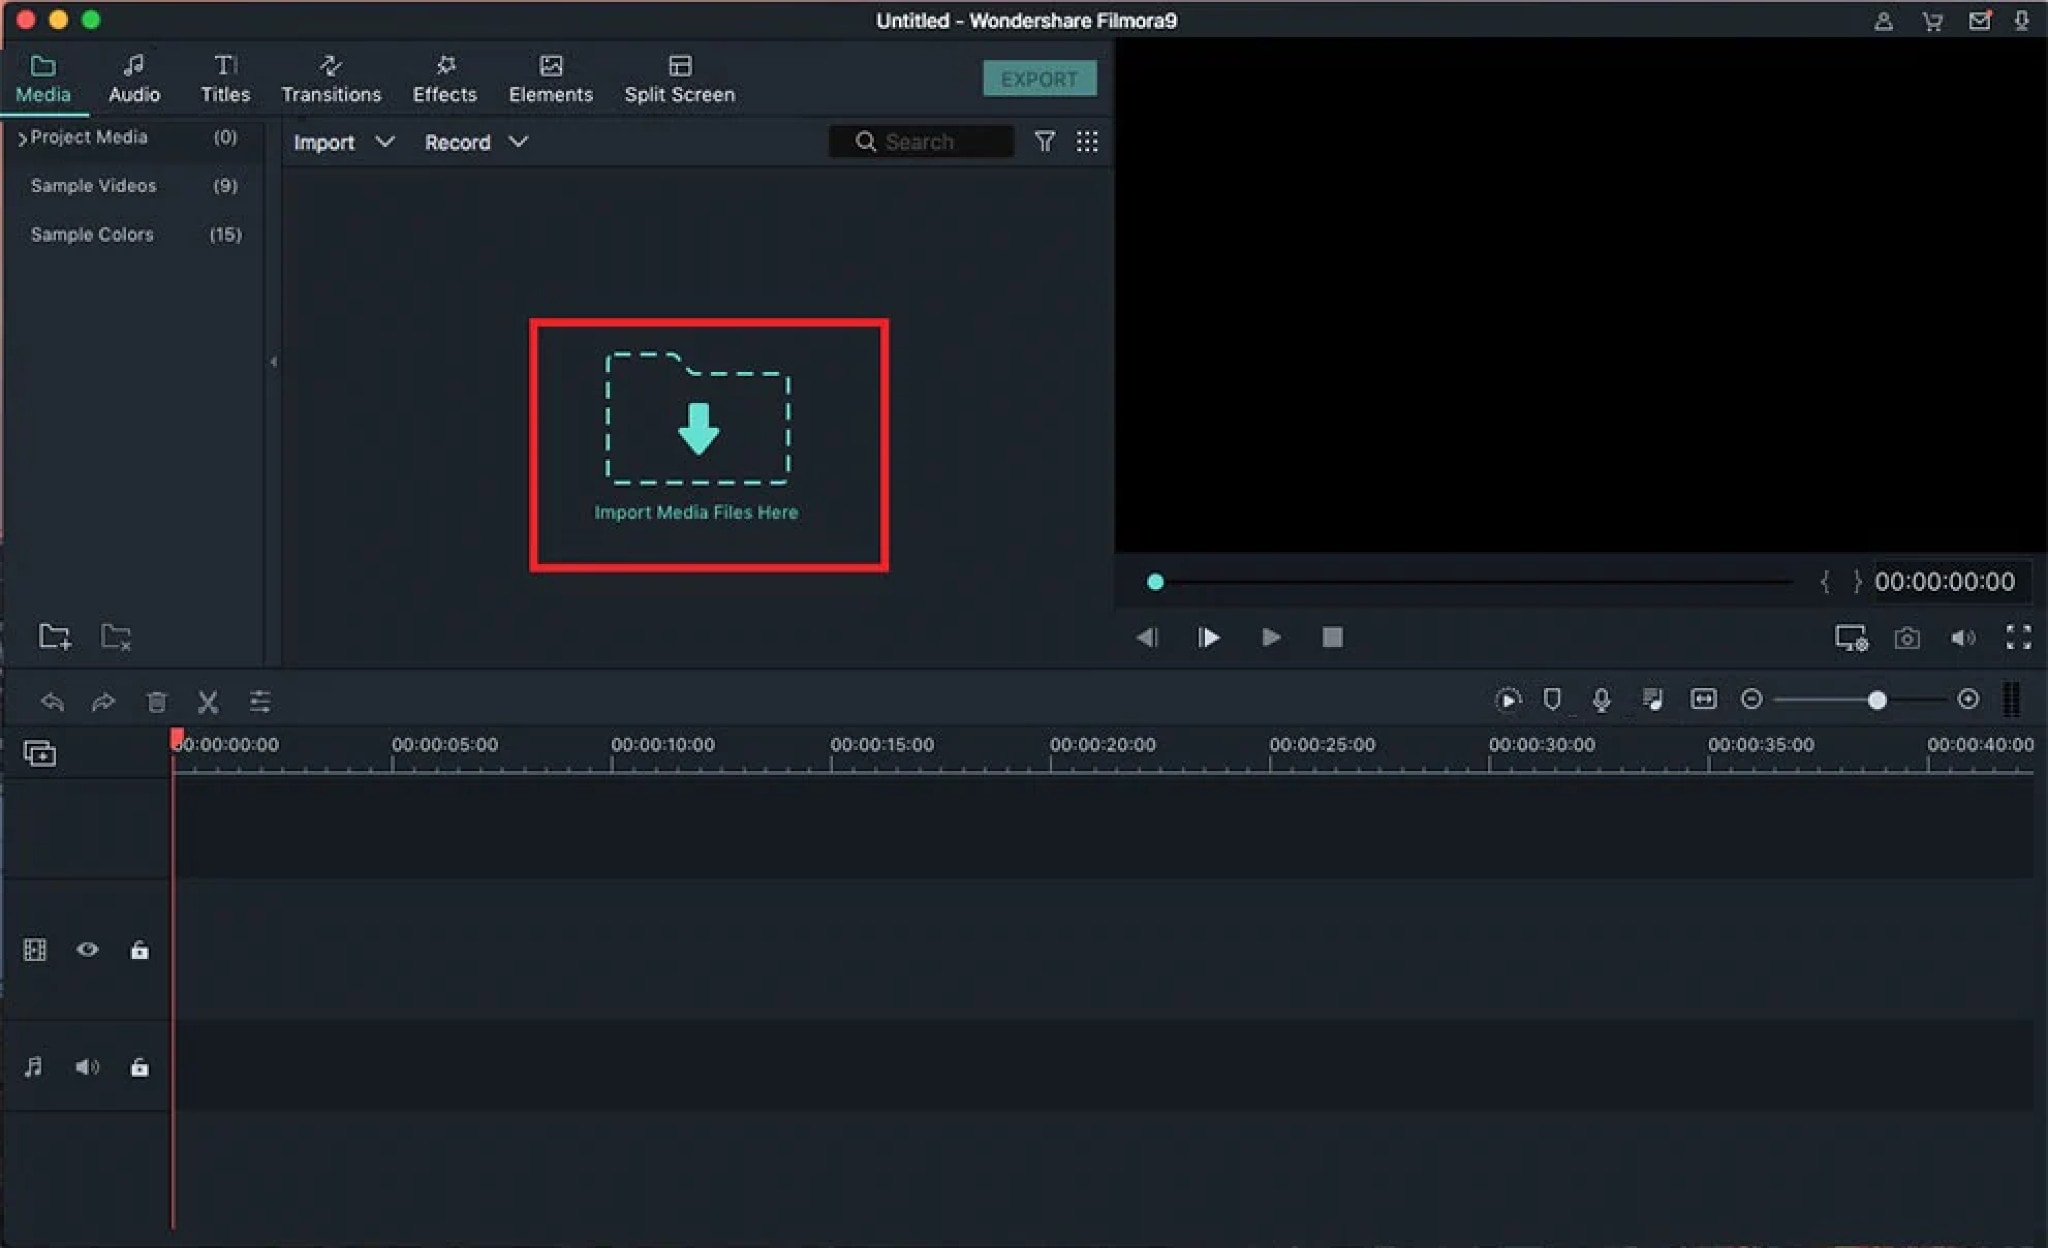
Step1Download and install Filmora for Windows PC. Launch Filmora and click on New Project button.
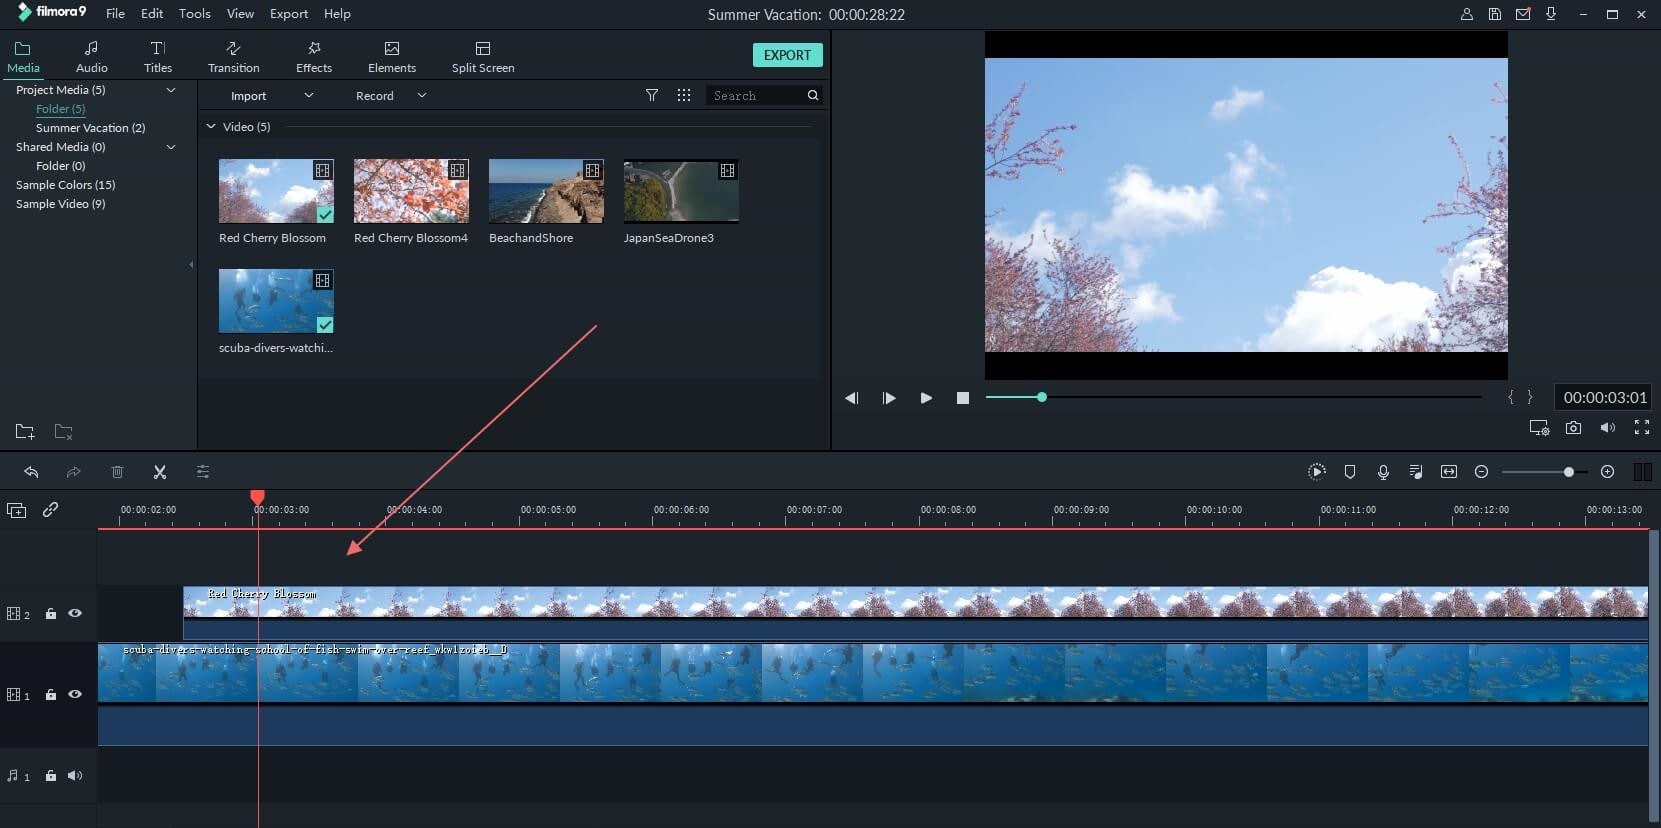
Step2Import your video clip under Project Media and then drop it into Timeline.
Step3Play the video and pause it where you want to freeze frame. Click on Snapshot icon to take photo of the frame. You will find the photo you have taken just now under Media library. In the meantime, you should split the video clip where you paused it to make space for the still image to get added and stay frozen.
Drag and drop the image on Timeline and stretch it to the duration up to which you want the frame to stay frozen. This image should be on top of the video clip in Timeline. You should place the image exactly where you paused the video.
Step4Double-click on the image in Timeline and adjust parameters as required. Play the video to notice the freeze frame effect. Click on Export button to save the video.
Part 2. How to Add Freeze Frame Video Effect on Mac
If you are a Mac user, the best video editor you can use to edit your video is Final Cut Pro. FCP is widely used by professional video creators and editors to edit their videos as per requirements. There are different categories of video effects available on FCP including freeze frame effect. Make sure your video is recorded with high frame rate and resolution for better outcomes. Here are the steps on how to add freeze frame in Final Cut Pro.
Step1Launch Final Cut Pro on your Mac. Go to File> Import> Files and select your video clip from the storage device. Drag it into the Timeline.

Step2Grab and move the Playhead to the point where you want to freeze the frame. Click on the video clip in the Timeline.

Step3Go to Edit menu and click on Add Freeze Frame. This will split your video clip and add frozen frame where you have placed the Playhead.

The default duration of the frozen freeze is four seconds. You can stretch it as per your requirements.
Just for information, both Windows and Mac users can also Premiere Pro add freeze frame effect if they already have Premiere Pro installed on their computers. The freeze frame feature in Premiere Pro is referred to as Add Frame Hold effect.
Part 3. How to Add Freeze Frame Video Effects Online
If you do not want to download and install a dedicated video editor on your computer, you can apply freeze frame effect to your video online as well. This will save your space as well as put less pressure on your CPU resource. We recommend Kapwing online video editor to use freeze frame effect on the go from any device directly from web browser. Here are the steps to add freeze frame effect to your video online.
Step1Open web browser on your device and visit “kapwing.com/tools/freeze-frame”. Click on Choose a video button.

Step2Drop your video file into Timeline and click on the video clip. Move the Playhead to the point where you want to add freeze frame effect.

Step3Go to Timing tab located in the top-right corner. Click on Freeze Frame button to add still image of the scene in the video. You can click multiple times to add more still images of the same scene. The more still images, the greater its duration will be.

Step4Play the video and you can have multiple freeze frame effects in the video clip.
This is undoubtedly the easiest way to add freeze frame effects for beginners.
Part 4. How to Add Freeze Frame Video Effects on Mobile
If you are using an Android smartphone or iPhone, you can apply freeze frame effect directly on your mobile instantly. In today’s world, people capture videos through their smartphones thanks to high-quality phone camera. You can use CapCut video editor app on both Android and iOS devices to add freeze frame effects. Here are the steps you need to follow.
Step1Install CapCut app on your phone. Launch the app and tap on New Project.

Step2Go to Albums and select the video to which you want to add the frame freeze effect.

Step3Put the Playhead to the point where you want to add the effect. Tap on Edit option.

Step4Search for Freeze option located at the bottom and tap on it to insert still image of the scene in Timeline.

Step5You can drag the duration of the frame freeze effect as per your requirement.
The Bottom Line
Adding freeze frame to your videos before and during impactful moments can enhance your video content. We have illustrated how to add a freeze frame in Final Cut Pro for Mac users. You can also add it to your video online using Kapwing video editor. You can use CapCut app to use the effect in your video on your smartphone. We recommend Filmora to add the effect quickly and conveniently on your PC.
Free Download For Win 7 or later(64-bit)
Free Download For macOS 10.14 or later
Free Download For macOS 10.14 or later
How to Cut Videos on Mac without Using FFmpeg?
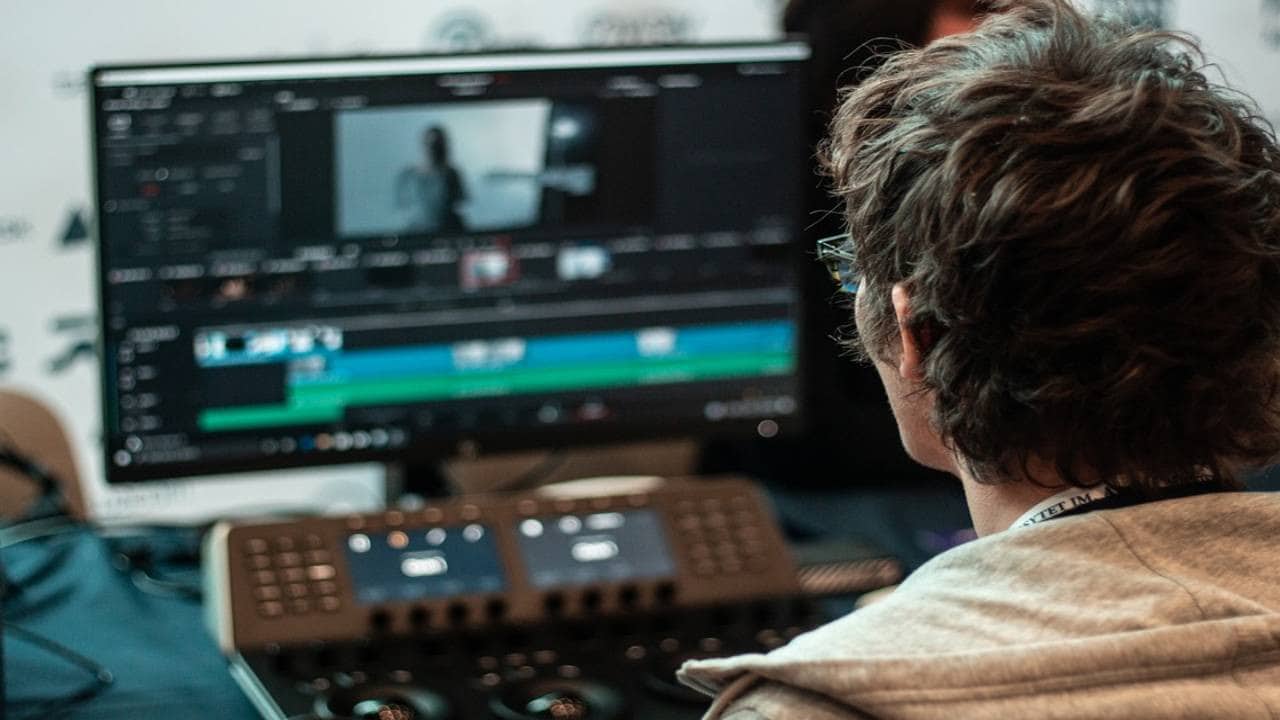
Tiktok, Instagram reels, and Ads are well-known short video platforms that are popular due to their ease of use. Making film collections for entertainment purposes is a popular trend. As the previous user mentioned, sometimes all you want is a section of your movie, which can be the highlight or any other part you want to keep. Long videos are no longer a problem with such a video cutter for Mac. If that’s what you’re looking for, you might want to look into some of the software that’s available here.
HOW TO CUT VIDEO ON MAC WITHOUT USING FFMPEG?
What are FFmpeg and its cons for cut videos?
Without transcoding the media, FFmpeg can cut, trim, and extract videos. This is an excellent method for preserving original quality and avoiding generation loss.
Because of how keyframes work, it is impossible to cut at an exact point in time using FFmpeg without transcoding the video. As a result, you’re left with a cut at the nearest keyframe.
BEST FREE FFMPEG ALTERNATIVE TO CUT VIDEO ON MAC

FILMORA VIDEO EDITOR
Supported OS: Windows and Mac
Filmora Video Editor is another well-known video editor that is widely used for video editing. It was released two decades ago to provide low-cost video editing software. Aside from video cutting and joining, it has some great features such as adding filters, titles, texts, and so on. You can also record your voice or live music, mix audio and video tracks, and do other things. It is simple to use and is available for both Mac and Windows users.
Filmora includes an instant cutter tool that can be used throughout clip import and is designed for use with large amounts of high-resolution content. As the names indicate, it is very simple and serves only one purpose. You can drag multiple clips onto its window, but only if the Merge sub-mode is enabled. Trim mode is only for trimming the ends of a single clip, and its interface only displays one clip in the left-size source tray. You can Add Segments, which creates a new clip based on your trimmed original, but you can’t split a clip explicitly.
For Win 7 or later (64-bit)
For macOS 10.14 or later
Features:
- All editing tools and features are well-displayed in the main windows, which can be found and used easily;
- Very easy to cut or trim video files just with a few clicks;
- Lots of filters, overlays, motion graphics, titles, and more special effects can be added to the video.
- More features like Picture in Picture and Green Screen and Split Screen can be used to make videos more unique.
Pros:
- Intuitive Interface
- Easy To Use
- Great Features
- Affordable Perpetual License
- Great Final Video Results
- Faster Renders And Previews
- Supports Screen Capturing
- Support Wide Range Of File Formats
- User Support Is Good
Cons:
- Lacks Advanced Feature
- Free Version Has Watermark
- Not Available For Linux And Phones
- Pricing Is Expensive
- Software Lagging
Steps On How To Cut Video On Mac Using Filmora Video Editor
Step 1: Import Video Files
You will begin by importing the video files into the project window of your program through dragging and dropping.
Step 2: Add Video To The Timeline
Drag and dropping are the easiest way to add the video to the timeline.
Step 3: Cut Video
If you want to trim the video, just move the cursor at the beginning or end of the video. When the cursor becomes a cross, move it forward or backward. Trimming only allows you to cut the beginning or end of a video.
If you need to cut a section of a video, you should follow do this: move the cursor at the beginning of the video section you want to cut, then click the scissors icon > Next, move the cursor to the end of the video section you want to cut and click scissors icon > Right-click on the video section you want to cut and click “Delete“.
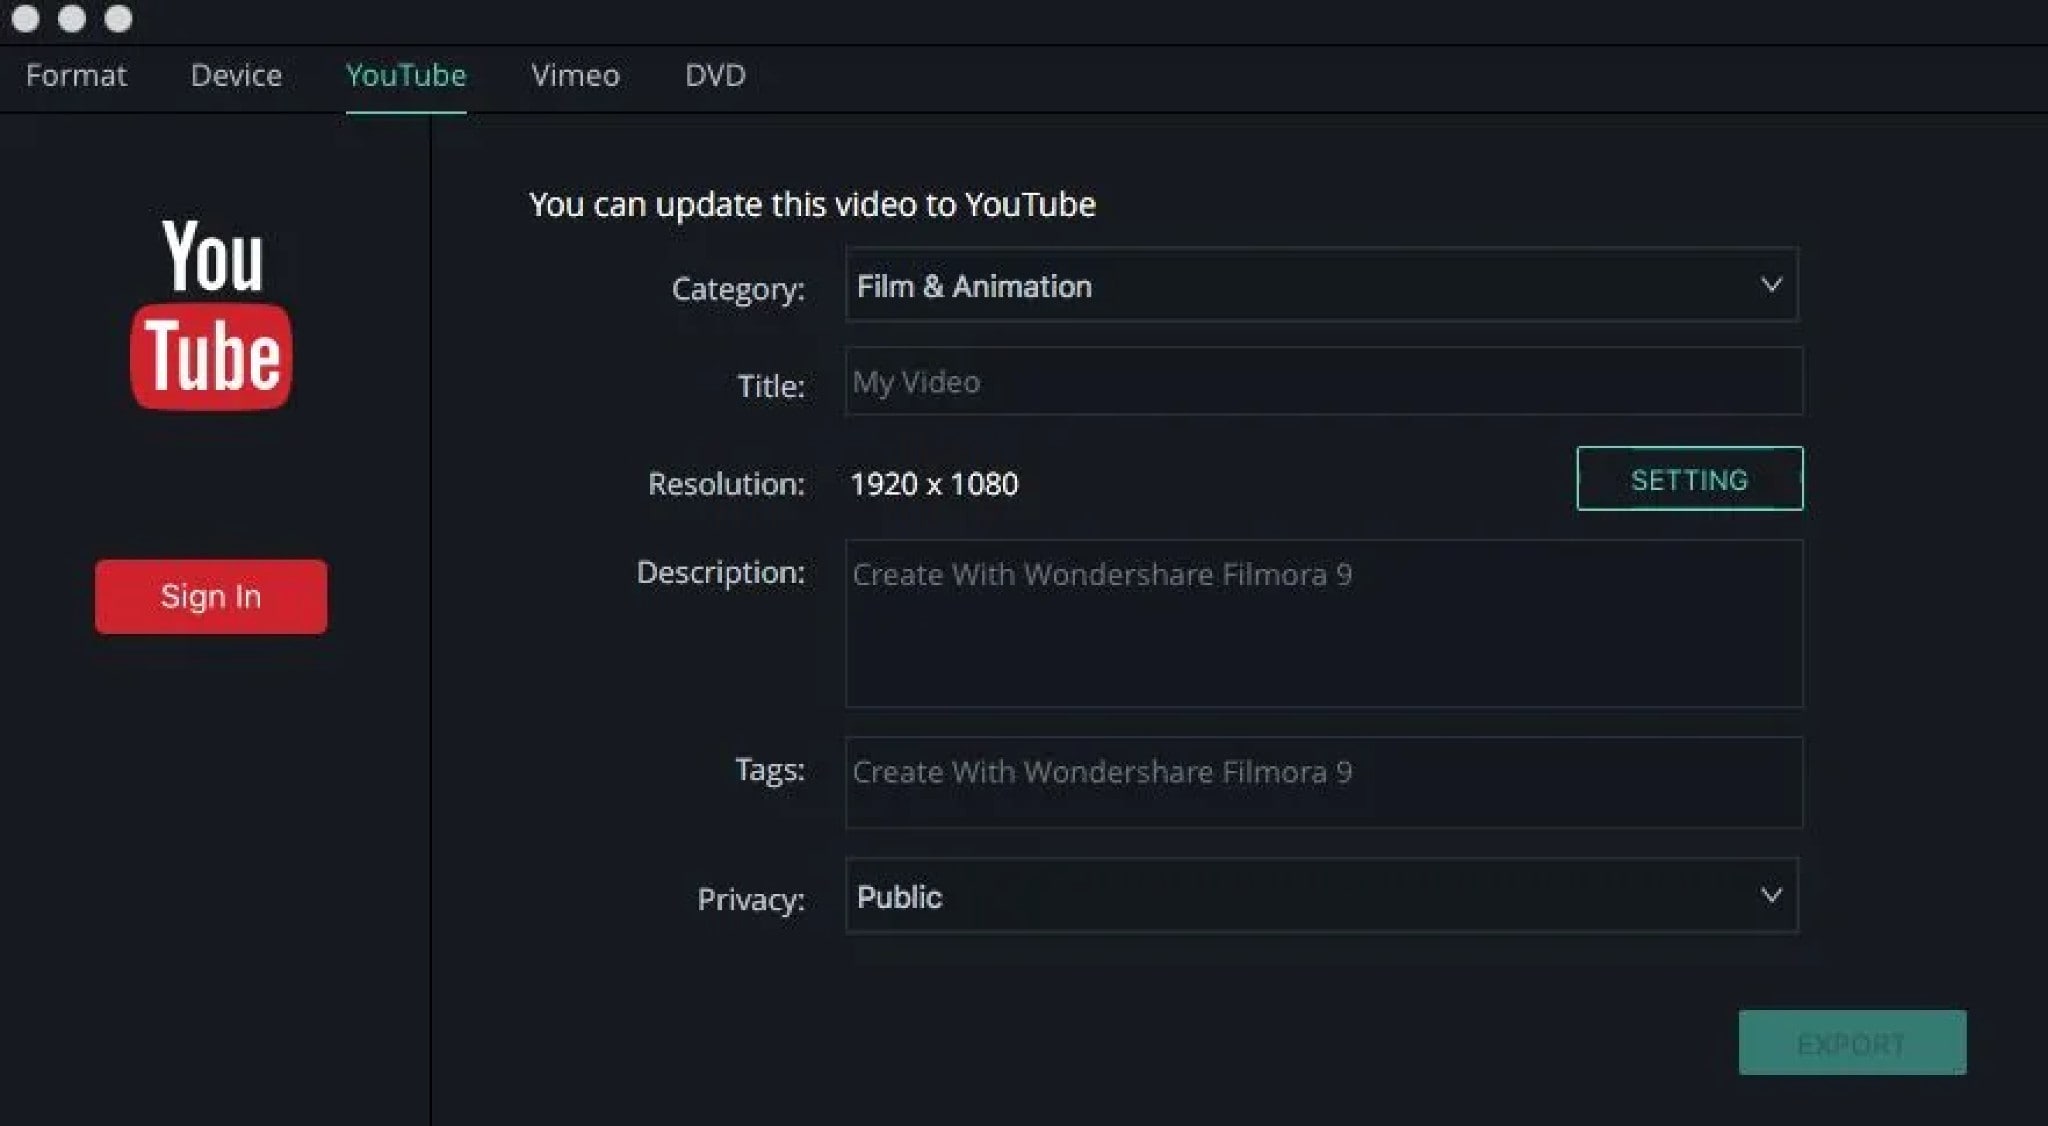
Step 4: Export the Video
To export your video, click the “export” button and choose the local tab. After selecting the output device and format, just click “Create” to save it.
HANDBRAKE
Supported OS: Linux, Windows, and Mac
HandBrake is a multithreaded video transcoder that is unfastened and open source. It can compress and convert nearly any virtual media layout to another. HandBrake is able to rip encrypted DVDs the usage of libdvdcss (libdvdcss is covered with the VLC media participant on macOS and AnyDVD/DVD forty three on Windows).
This software program additionally enables batch processing, which converts a couple of video files at the same time. Additionally, a plethora of presets are available to guide you to the preferred output without having to tinker with a plethora of options.
Handbrake is a powerful and excellent video converter for Windows, Mac, and Linux that should not be overlooked. It provides all of the necessary features in a simple tool that gives the user complete control over the output. Before we get into the specifics, here’s a rundown of Handbrake’s advantages and disadvantages.
Features:
- Support of chapter selections
- Support of subtitles
- Integrated bitrate calculator
- Picture deinterlacing, cropping, and scaling
- Live Video Preview
Pros:
- HandBrake has a very simple layout which makes the video converter very easy to use, even for those who are converting videos for the first time.
- The live preview helps.
- The fact that the software is free and has device presets for iOS and Android certainly makes HandBrake a welcome video converter.
- The queuing tray for batch conversions is particularly nice.
- People who convert a lot of videos will find it very helpful.
Cons:
- On the flip side, the settings are not always easy to deal with.
- It takes a lot of time and then there are errors. The latest version fixes some old bugs but there are hiccups.
- The live preview is for up to four minutes of a video.
- It is futile for very long videos.
- The settings interface and that of the live preview could be better.
- The open-source software also doesn’t support all video formats.
- Given the diversity of devices and the multitude of formats in use today, HandBrake needs more compatibility.
Steps On How To Compress Video Using Handbrake
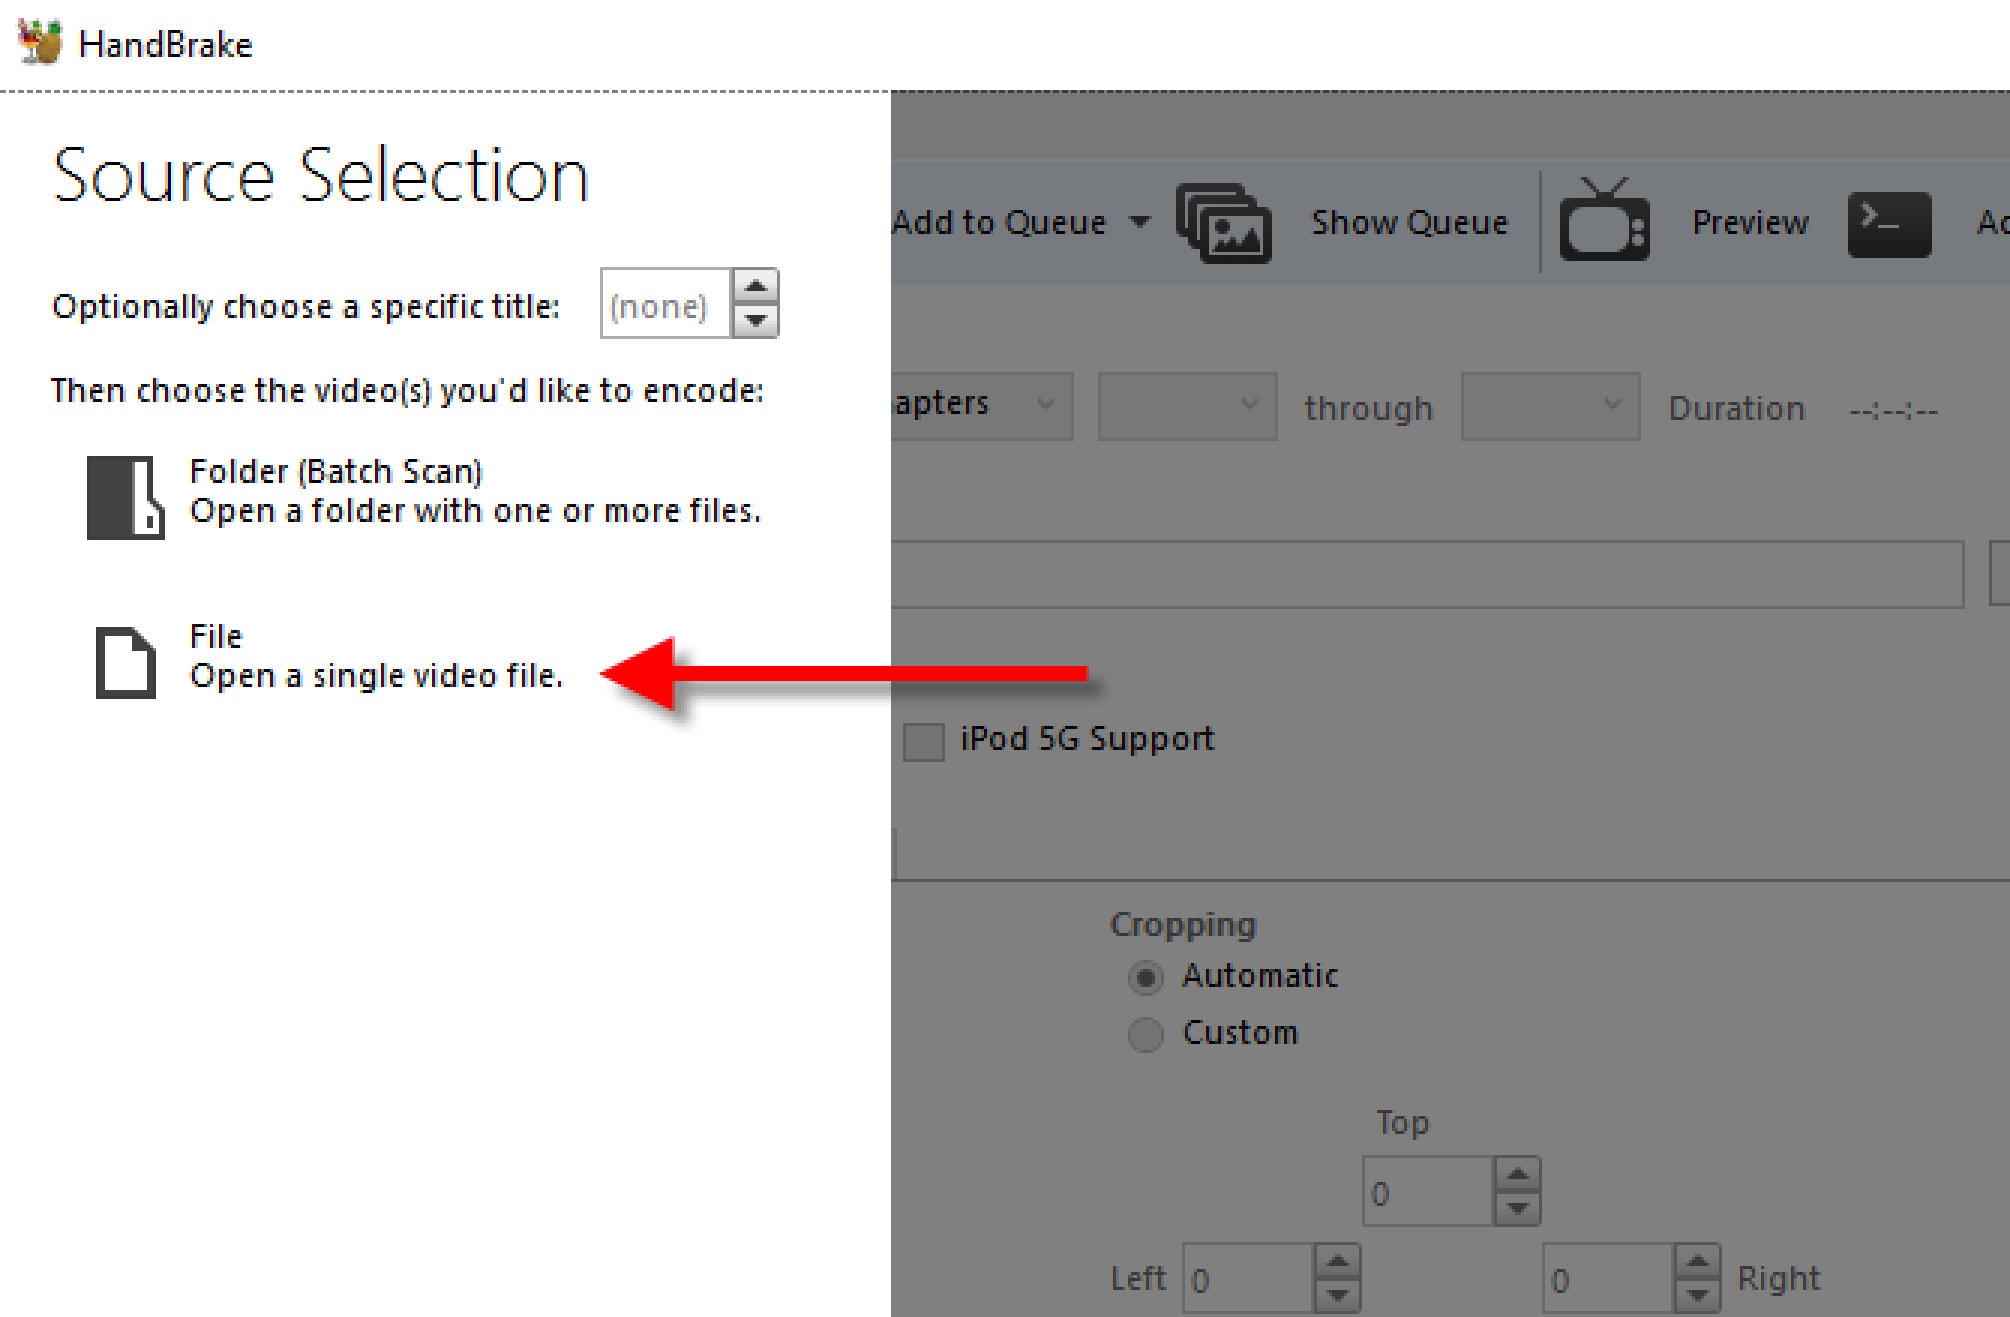
- After you download and install Handbrake, open the app. On the left side, under ‘Source Selection’, click ‘File’. Select the file from the folder and then click ‘open’.
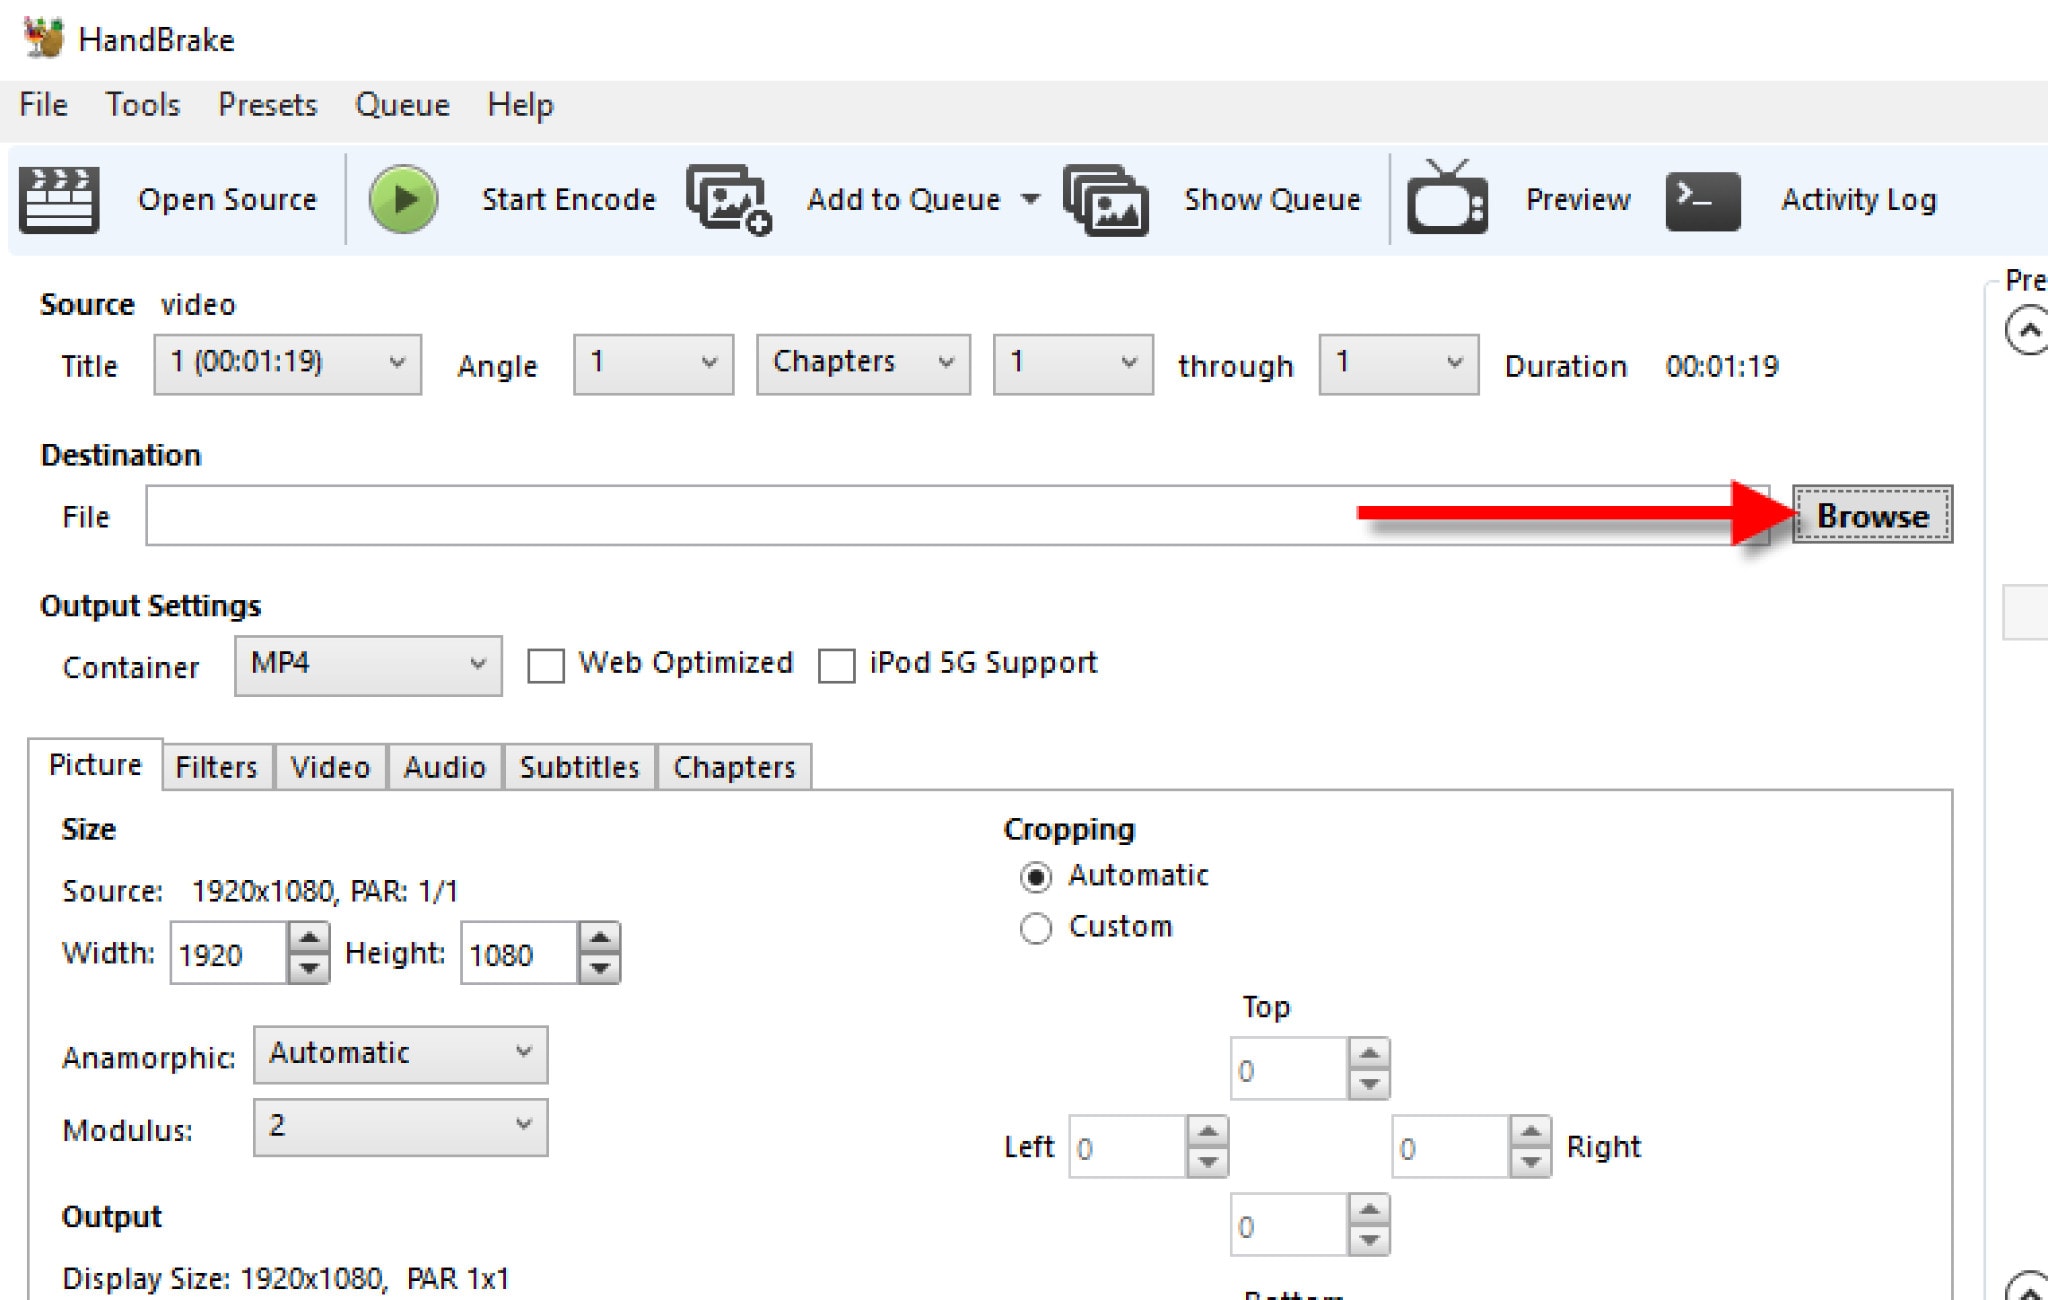
- Choose where you want the compressed video to be saved by clicking ‘Browse’.
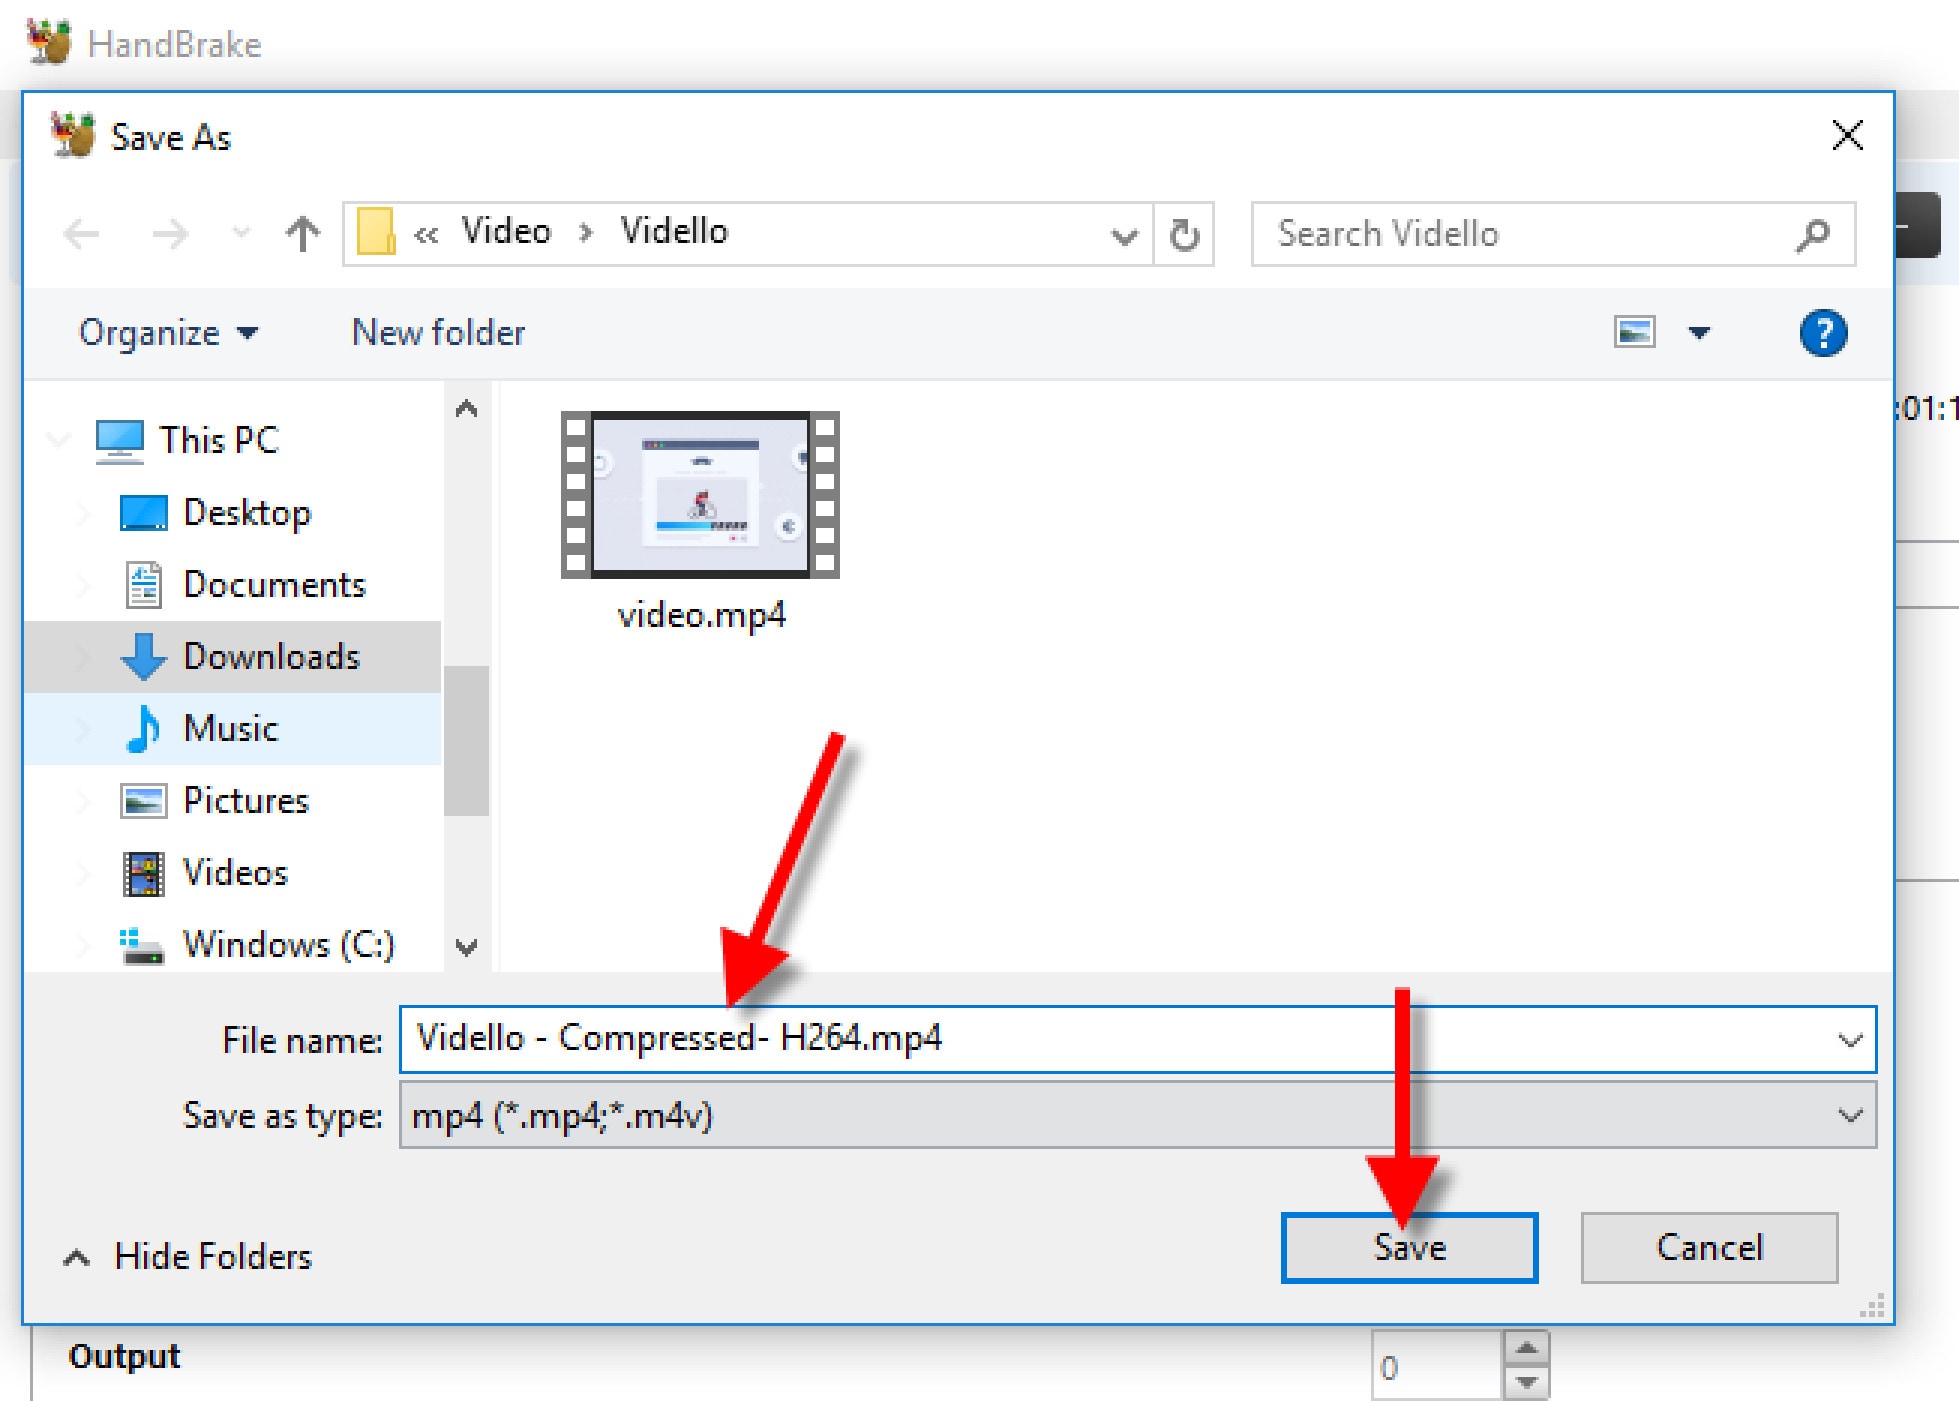
- Enter a name for the video, and click ‘Save’.
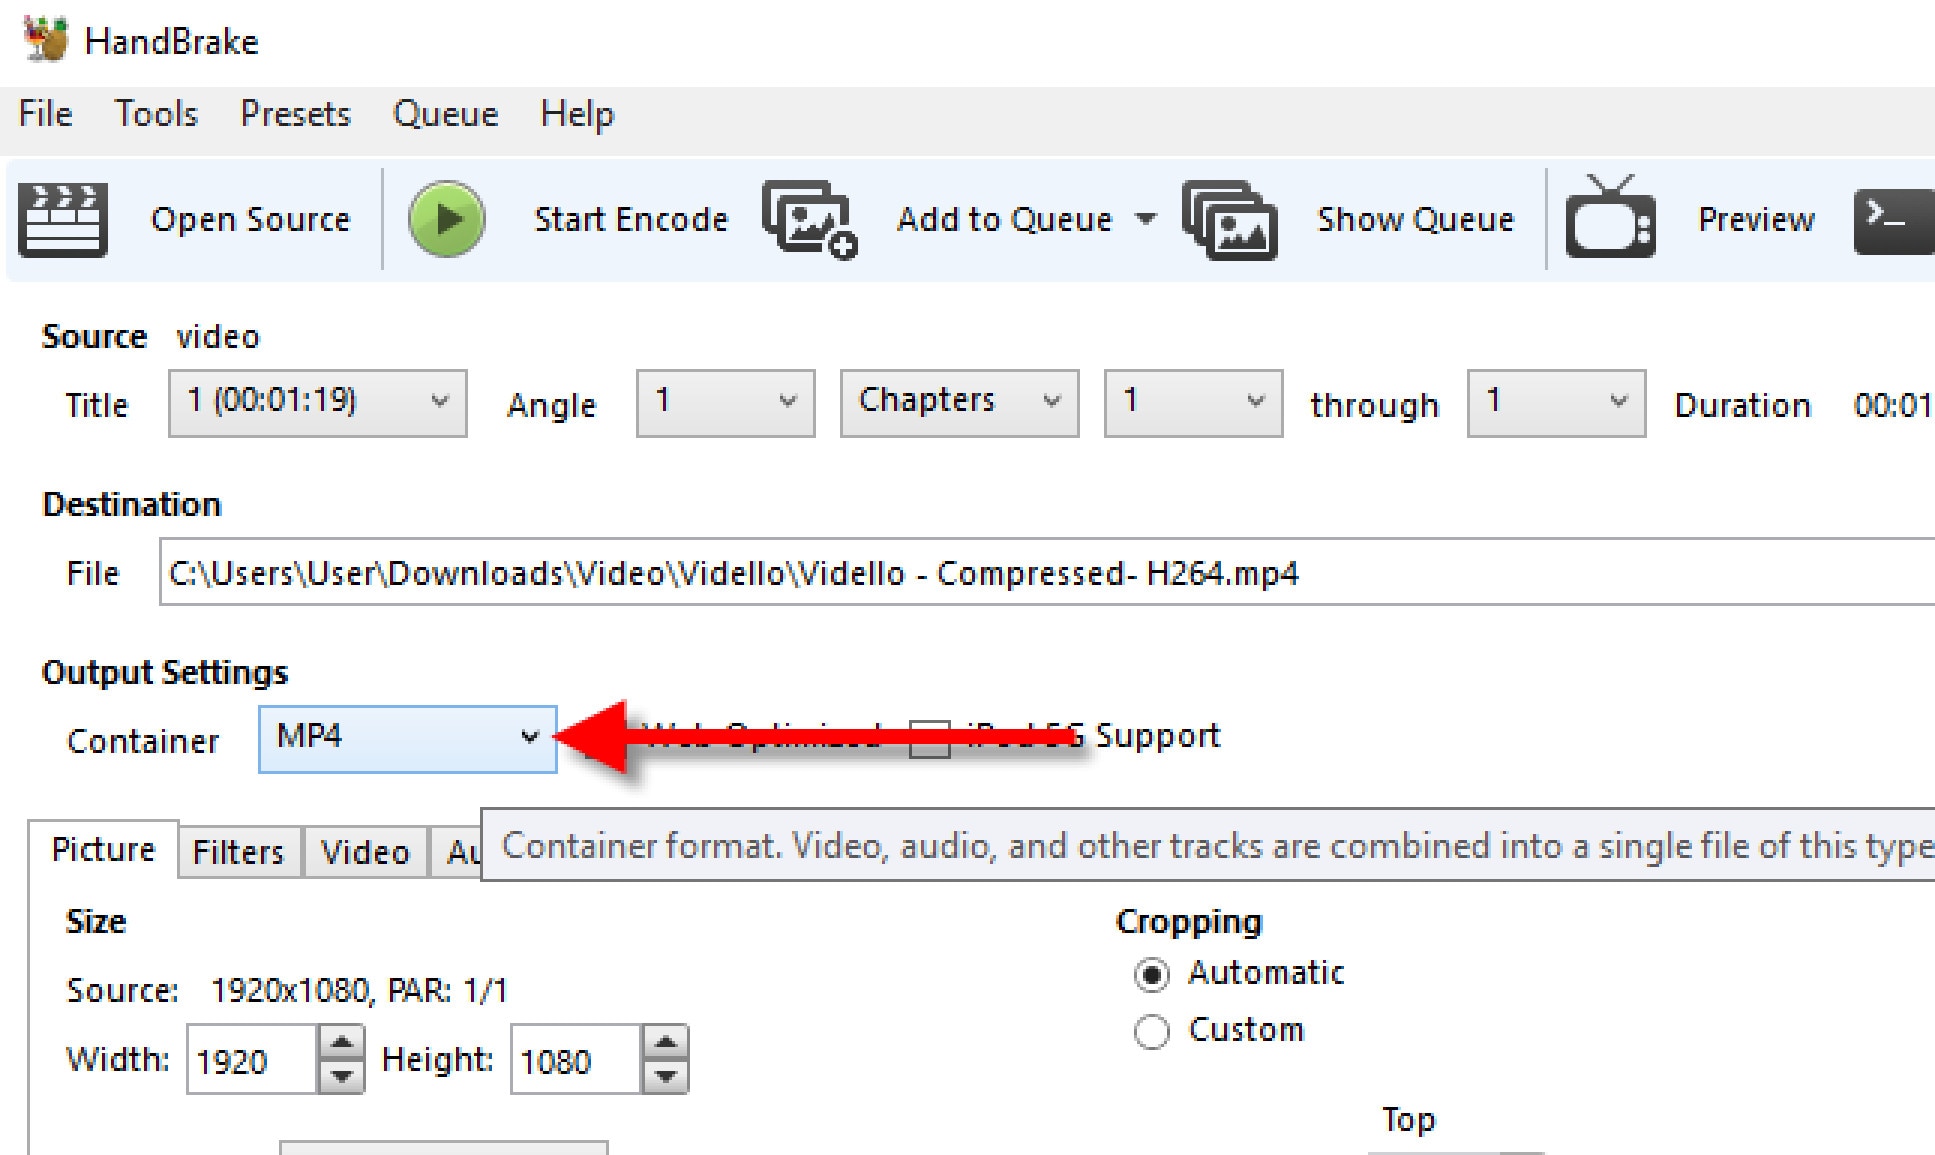
- Under ‘Output Settings’, choose MP4 for ‘Container’.
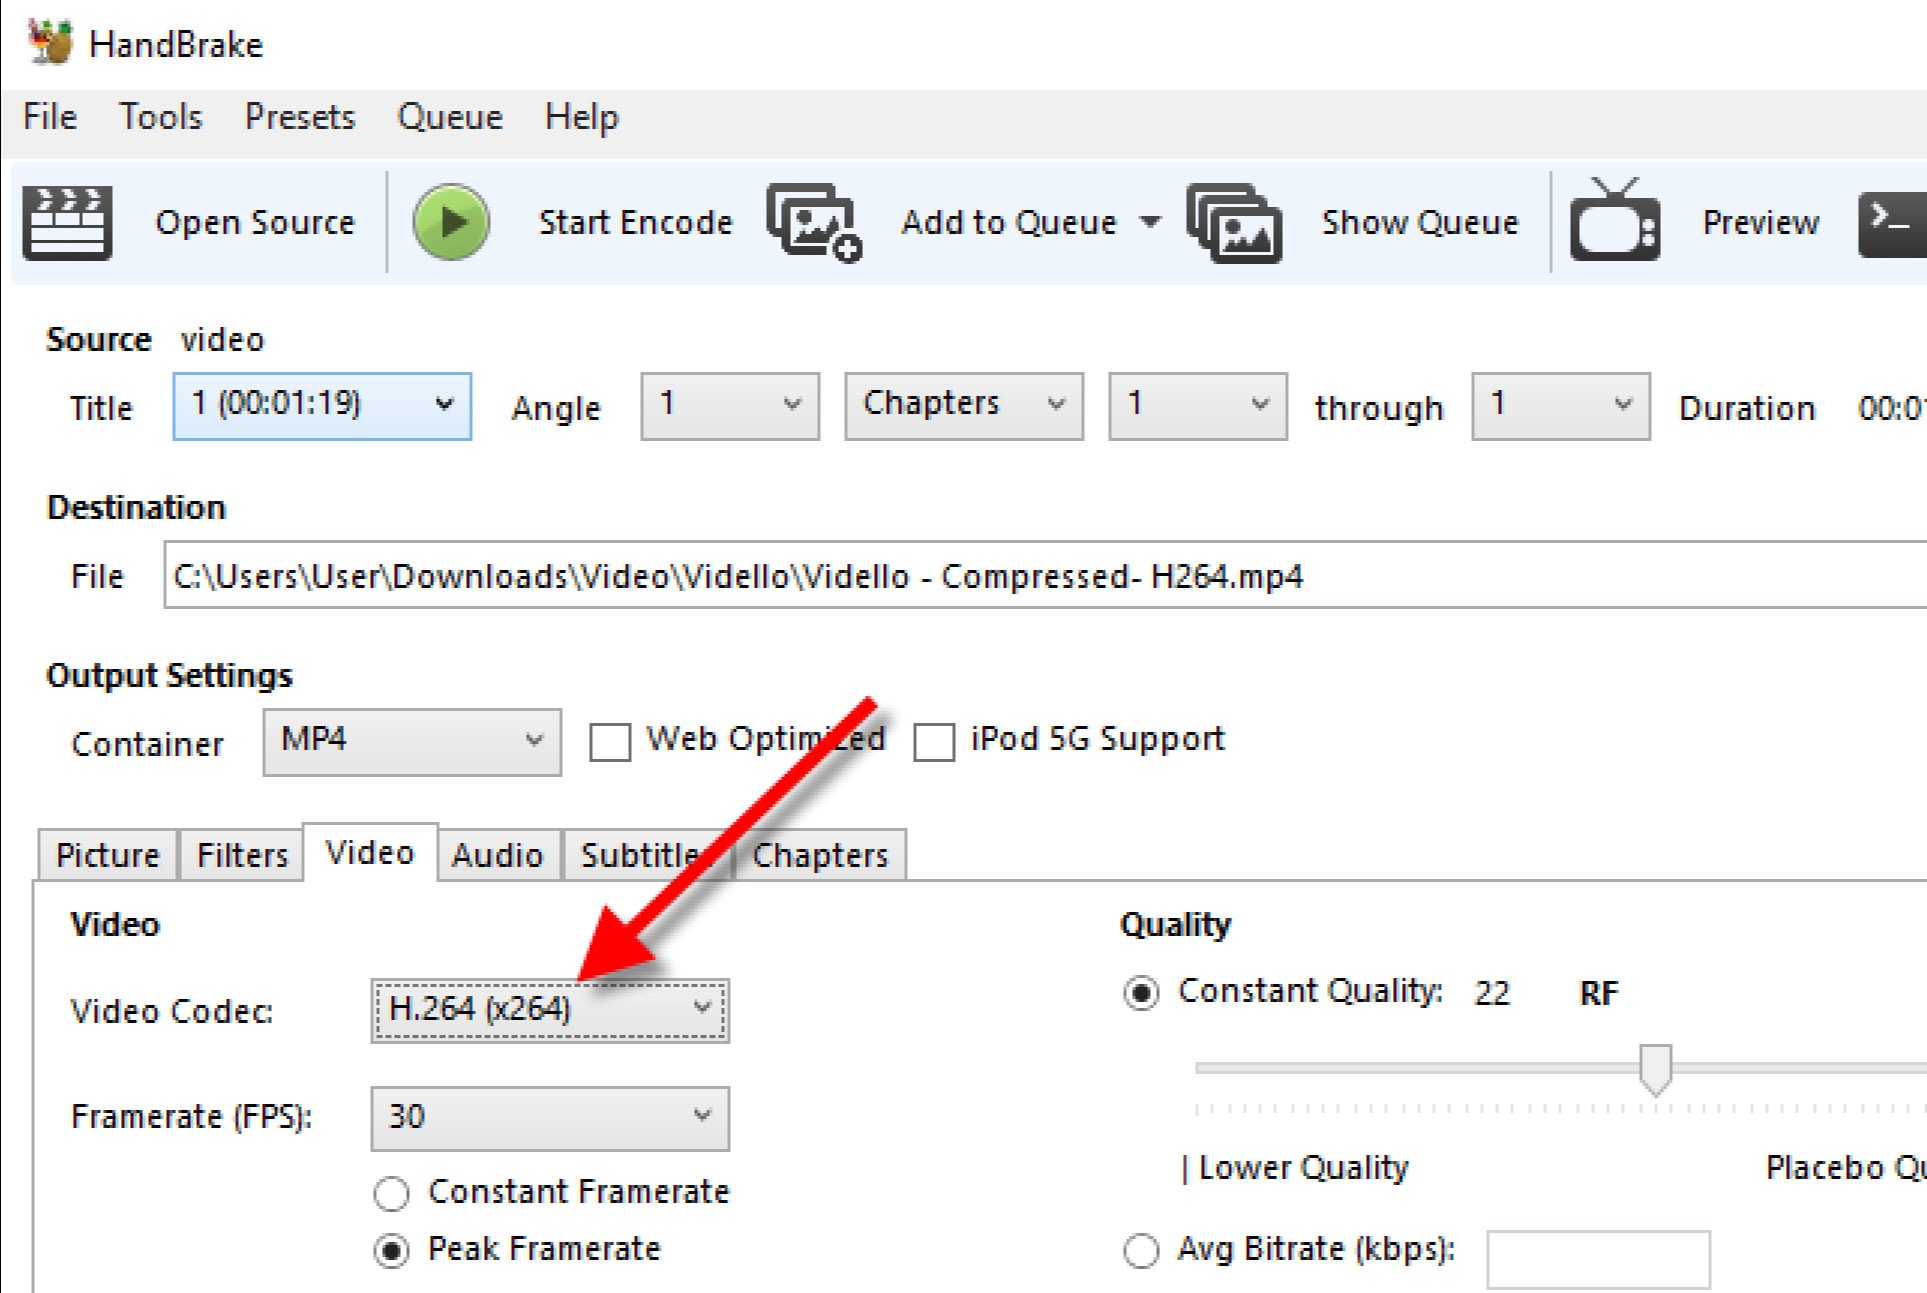
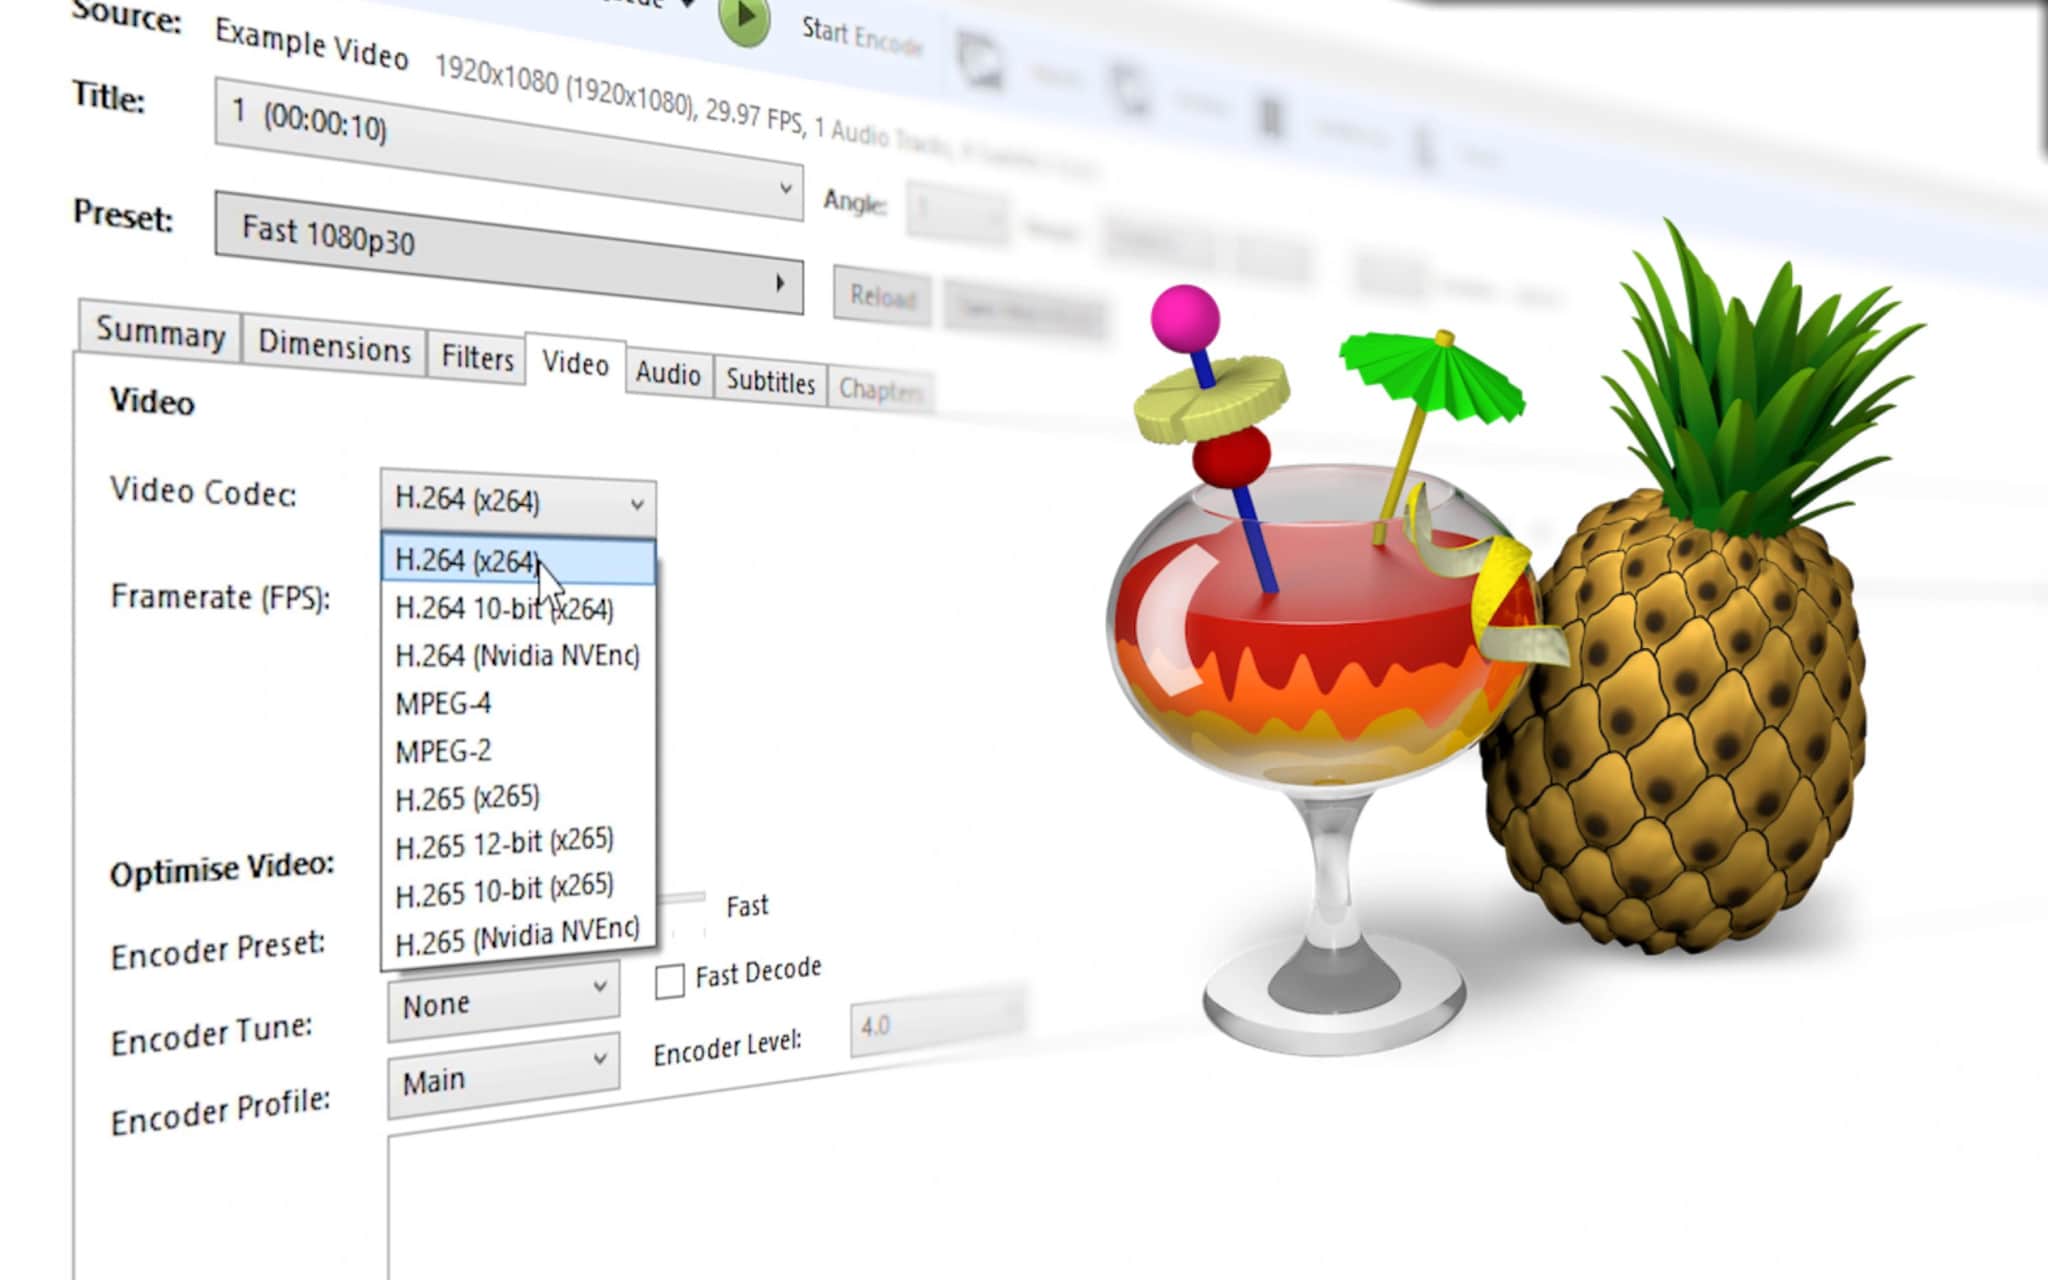
- Click the ‘Video’ tab, under it, is the ‘Video Codec’, choose (x264).
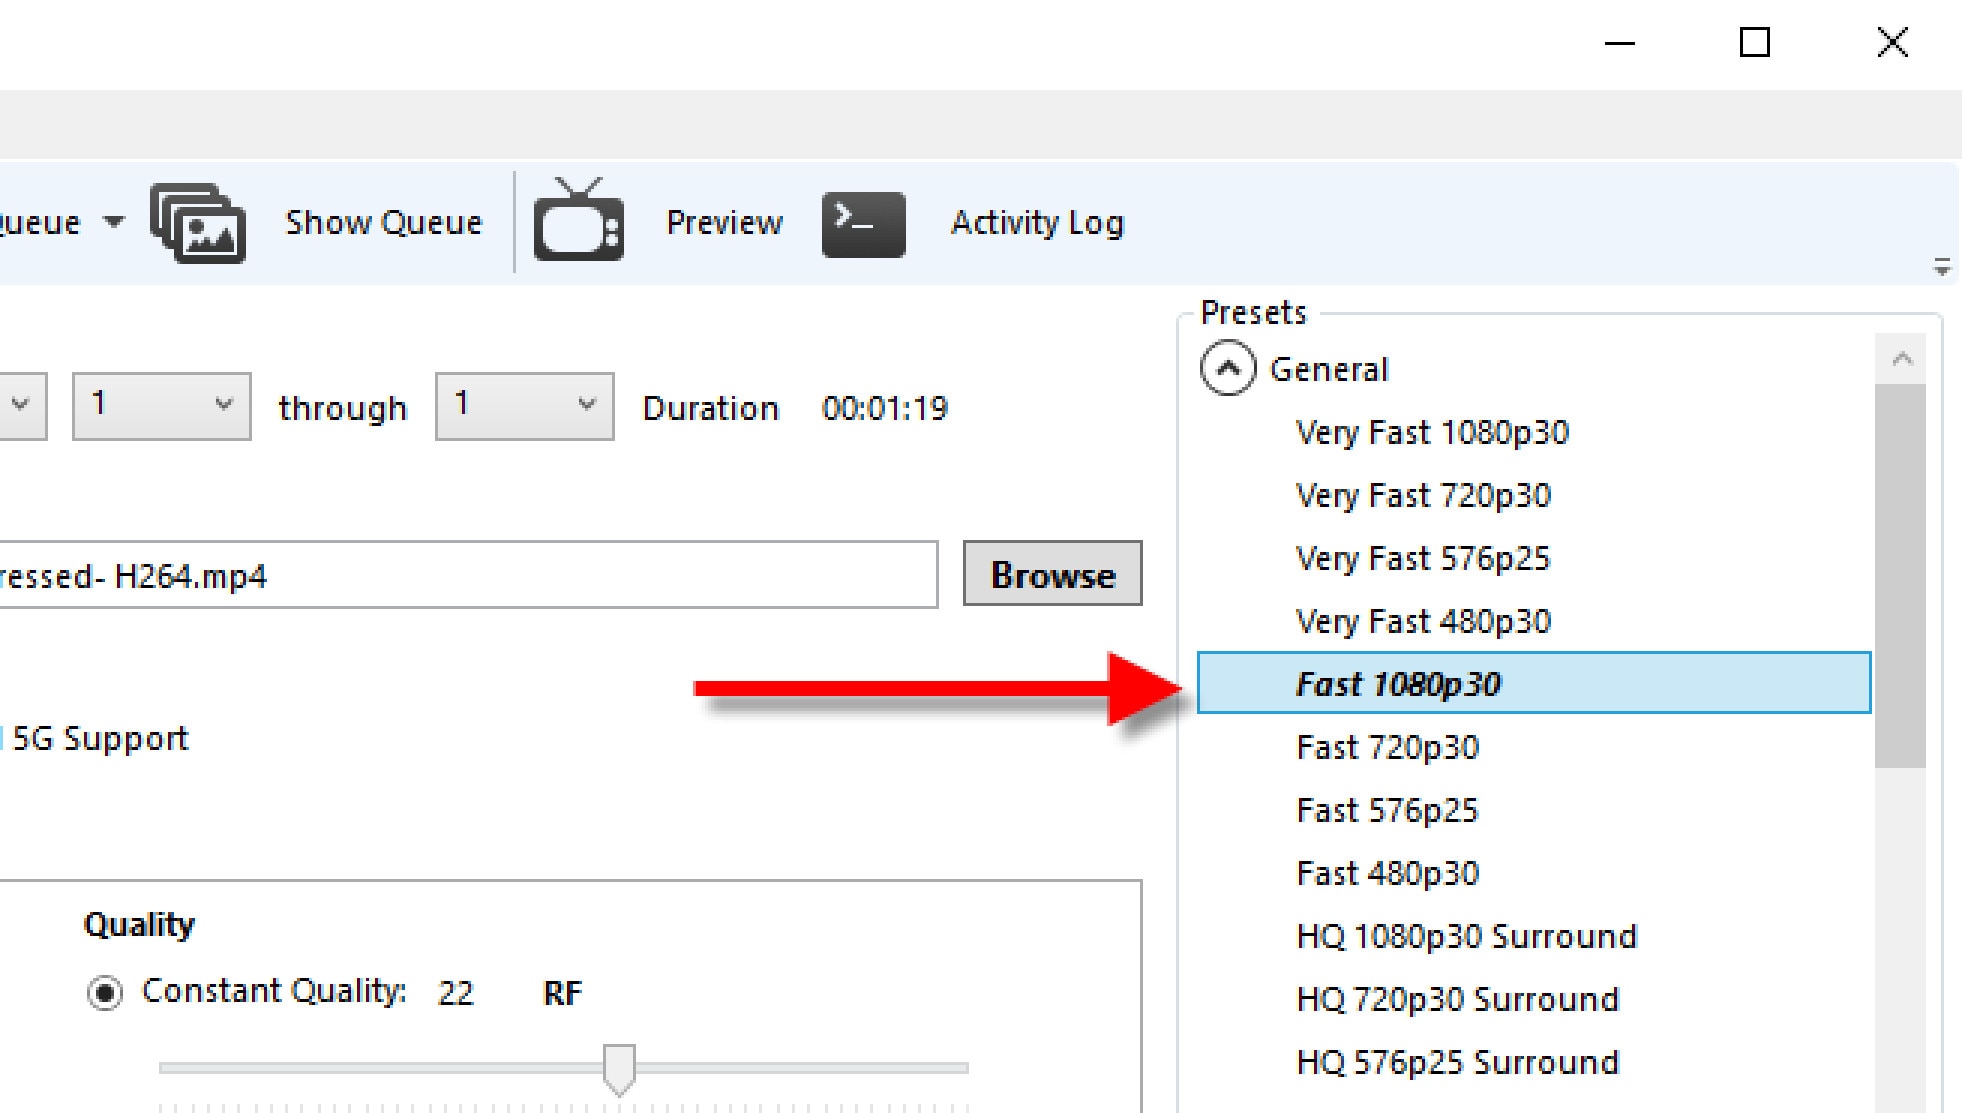
- Select a Preset from the ‘Preset Drawer’. We recommend you choose Fast1030p 30 for high quality.
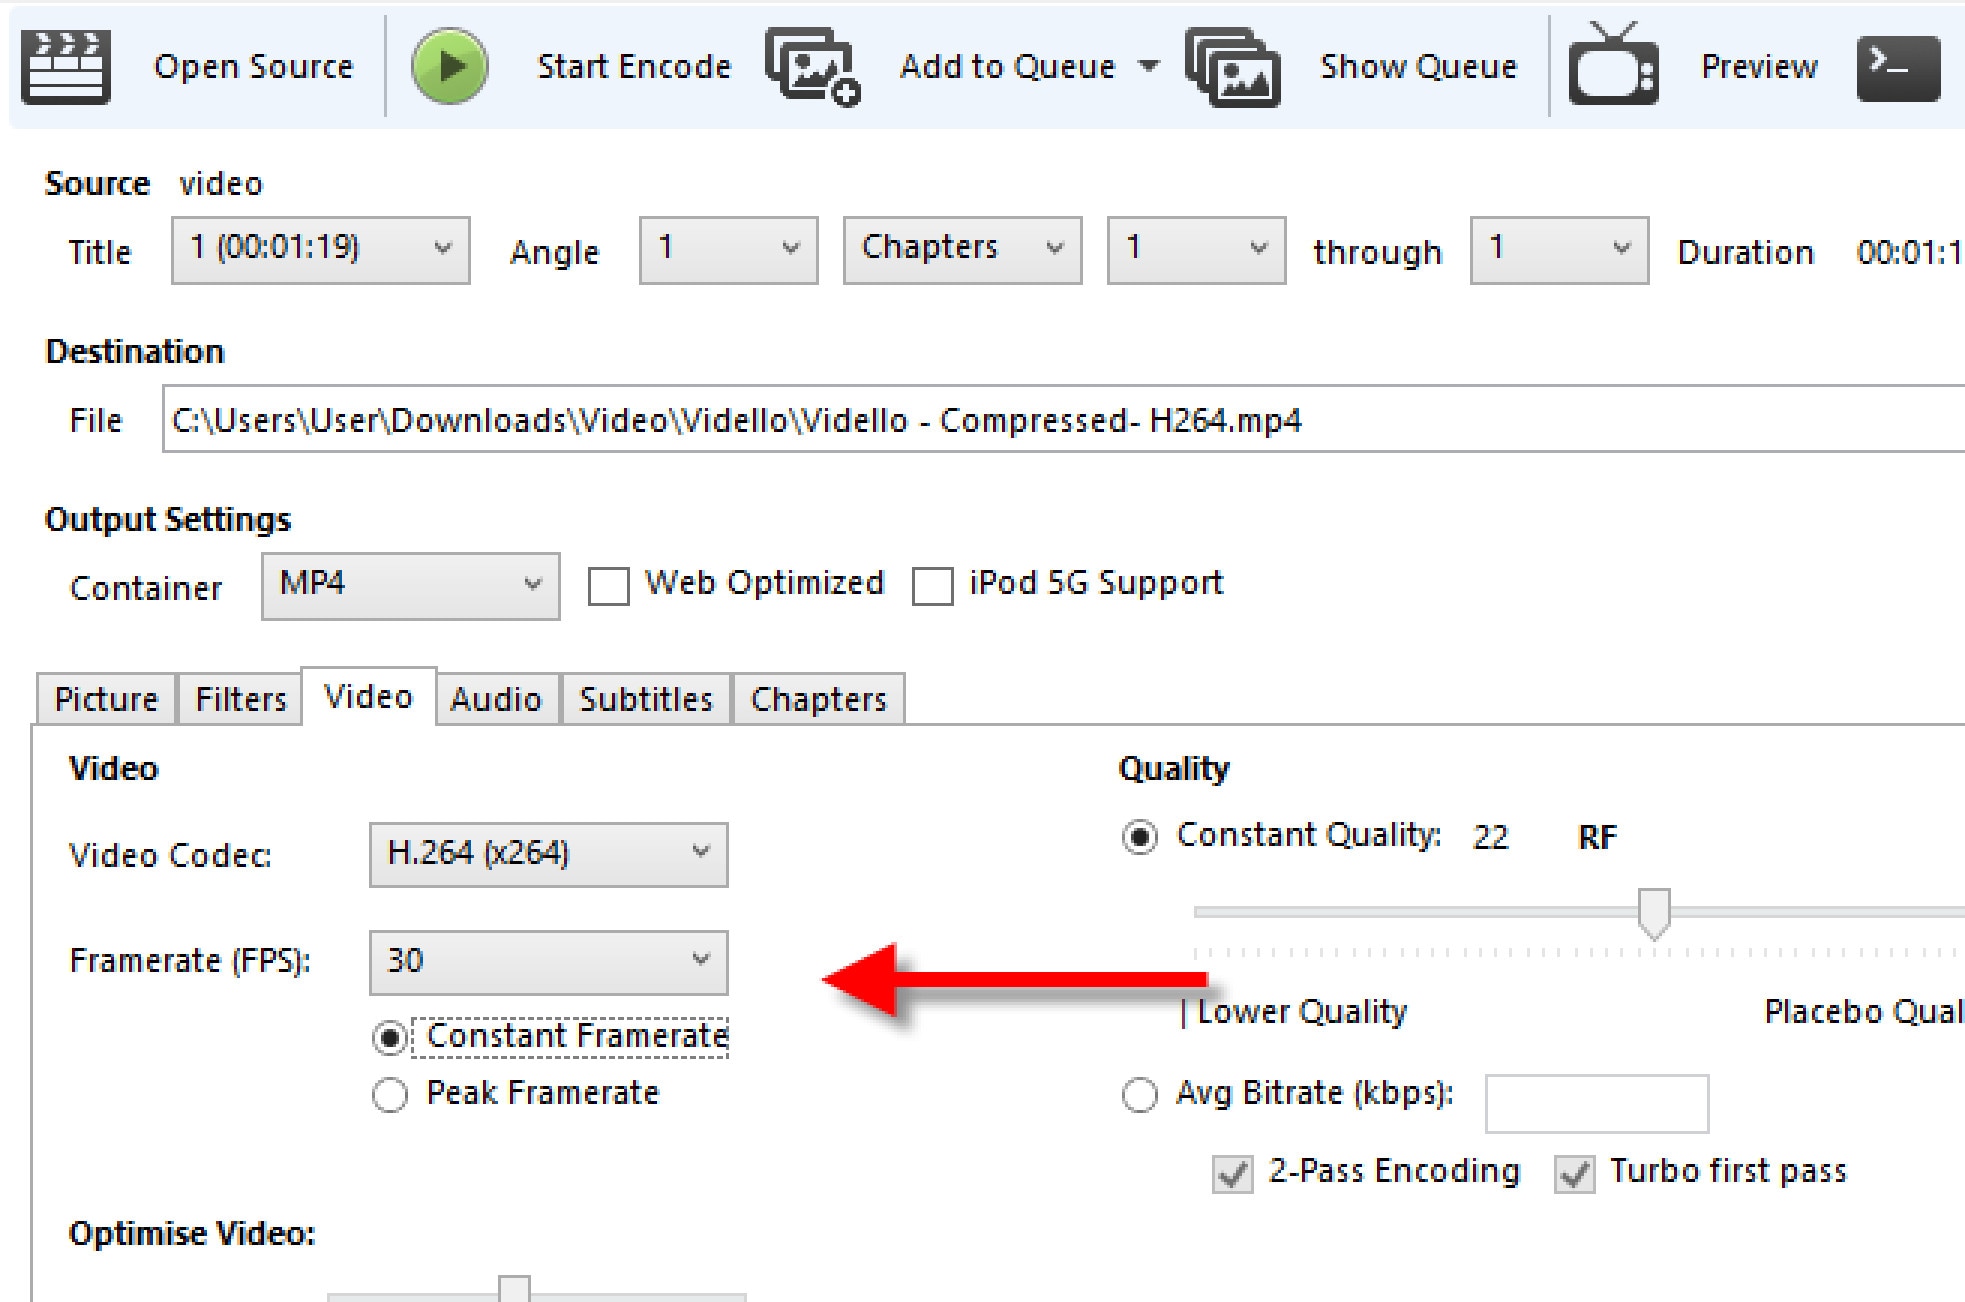
- Choose the ‘framerate’, depending on your source video i.e. NTSC (29.97fps), then make it 30fps by choosing 30. Also, tick the ‘Constant Framerate’ to ensure better compatibility.
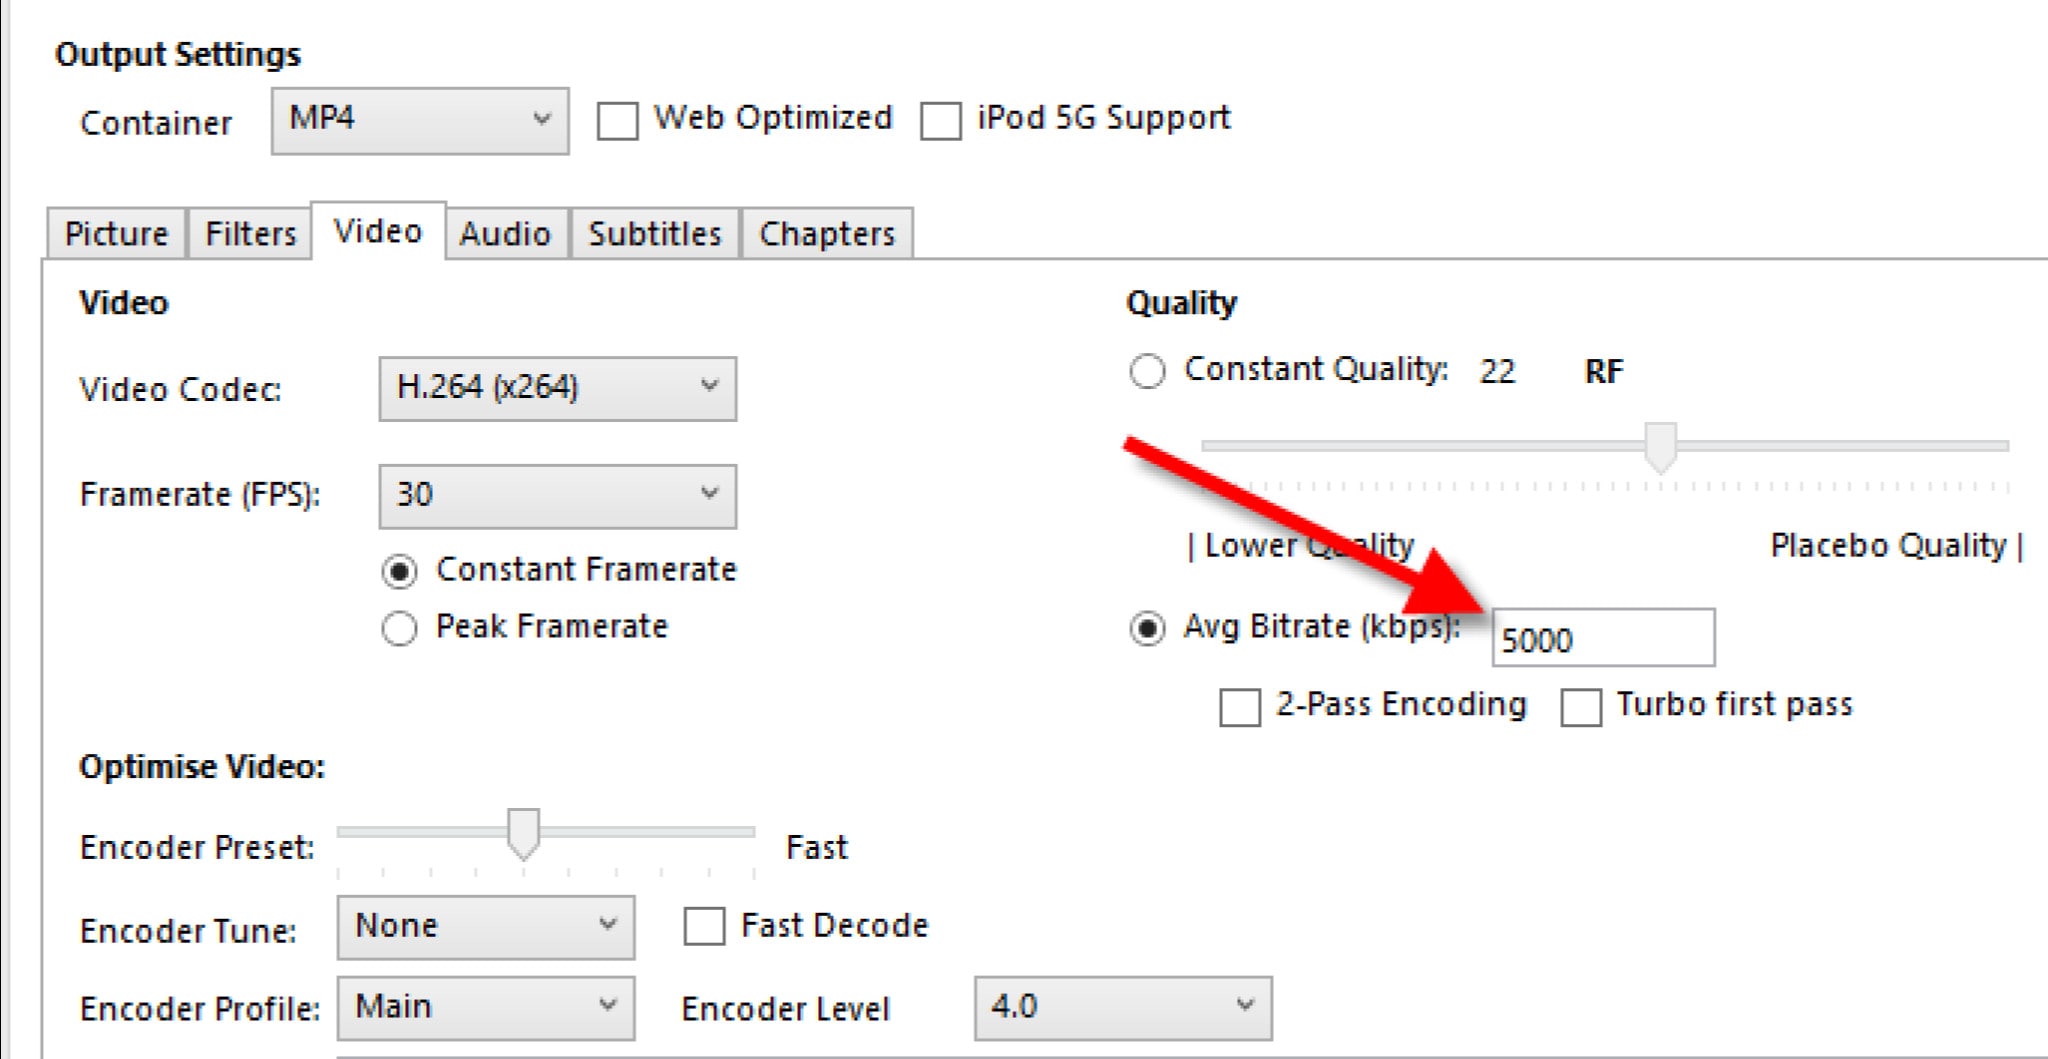
- Enter an ‘Average Bitrate (kbps)’ for the video between 5,000-10,000 (take note: higher bitrate has higher quality video but will take longer to upload and download).
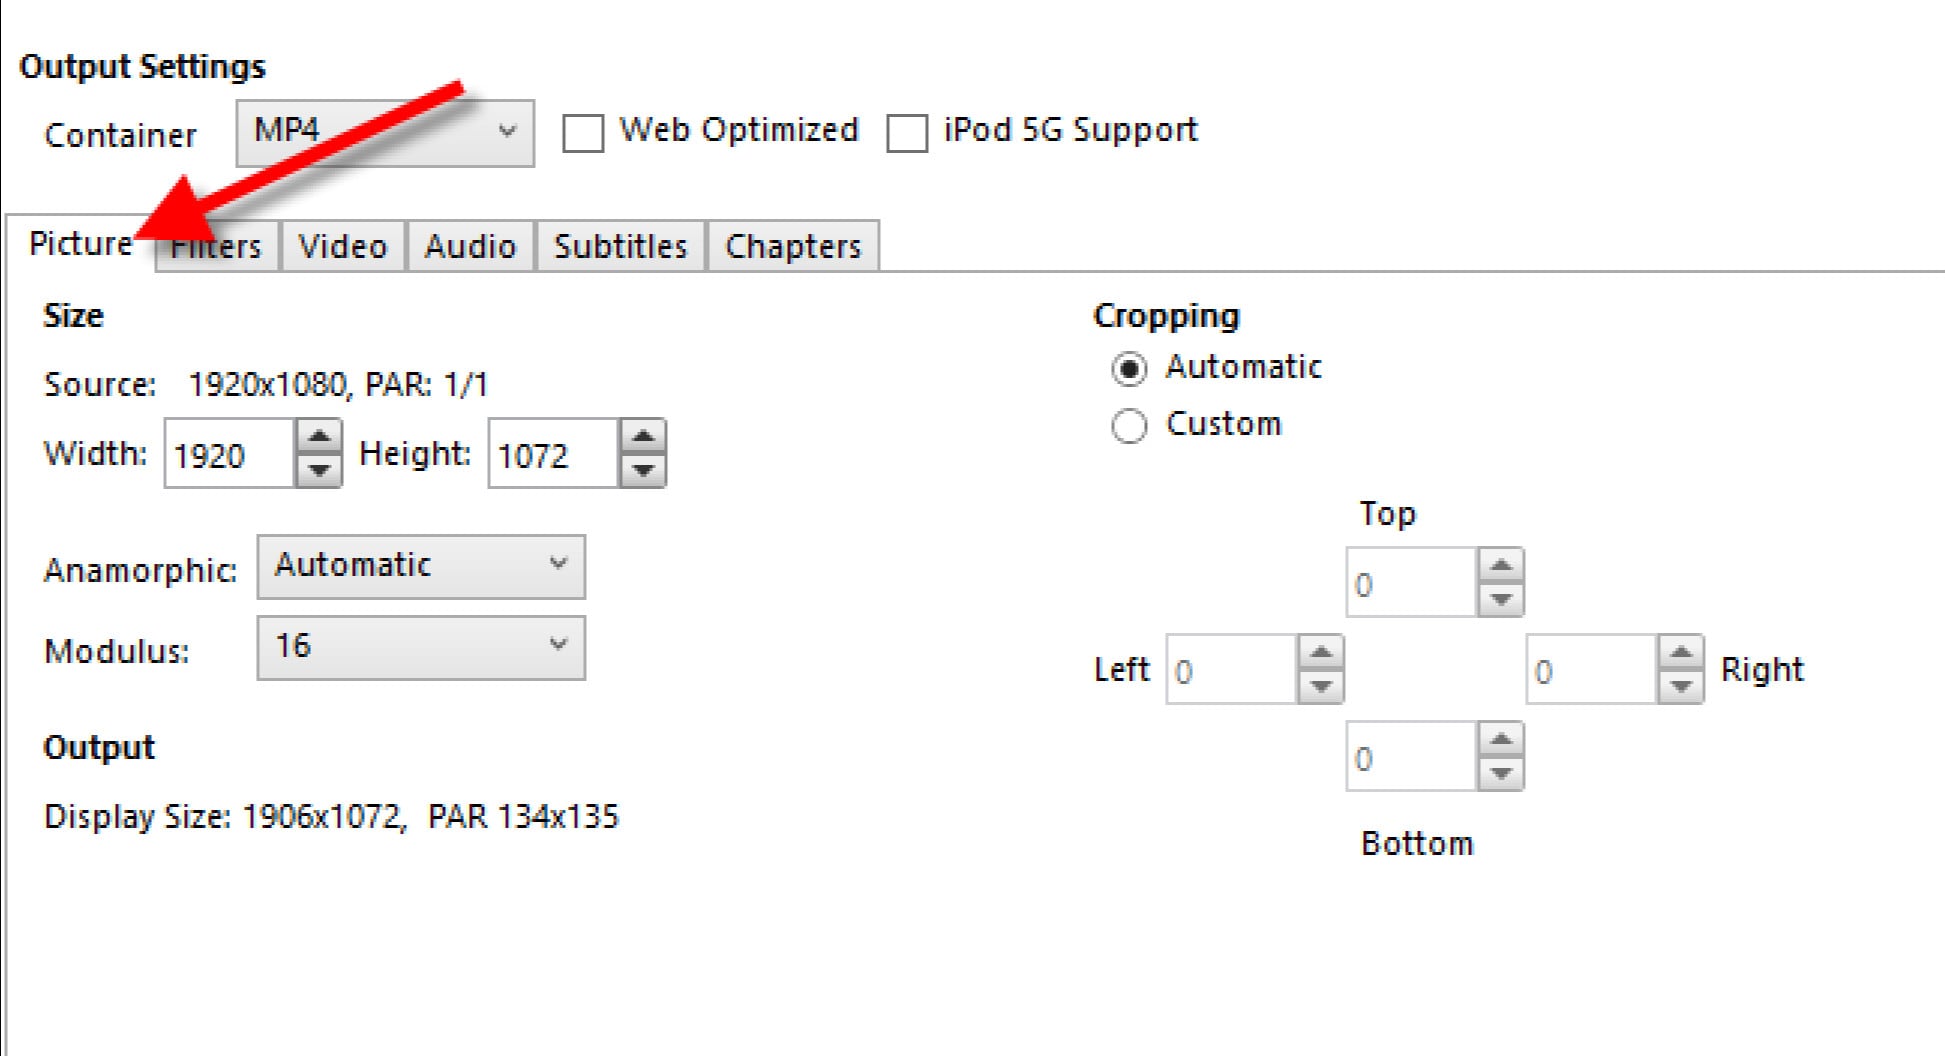
- Click the ‘Picture’ tab if you want to change the video frame size or resolution.
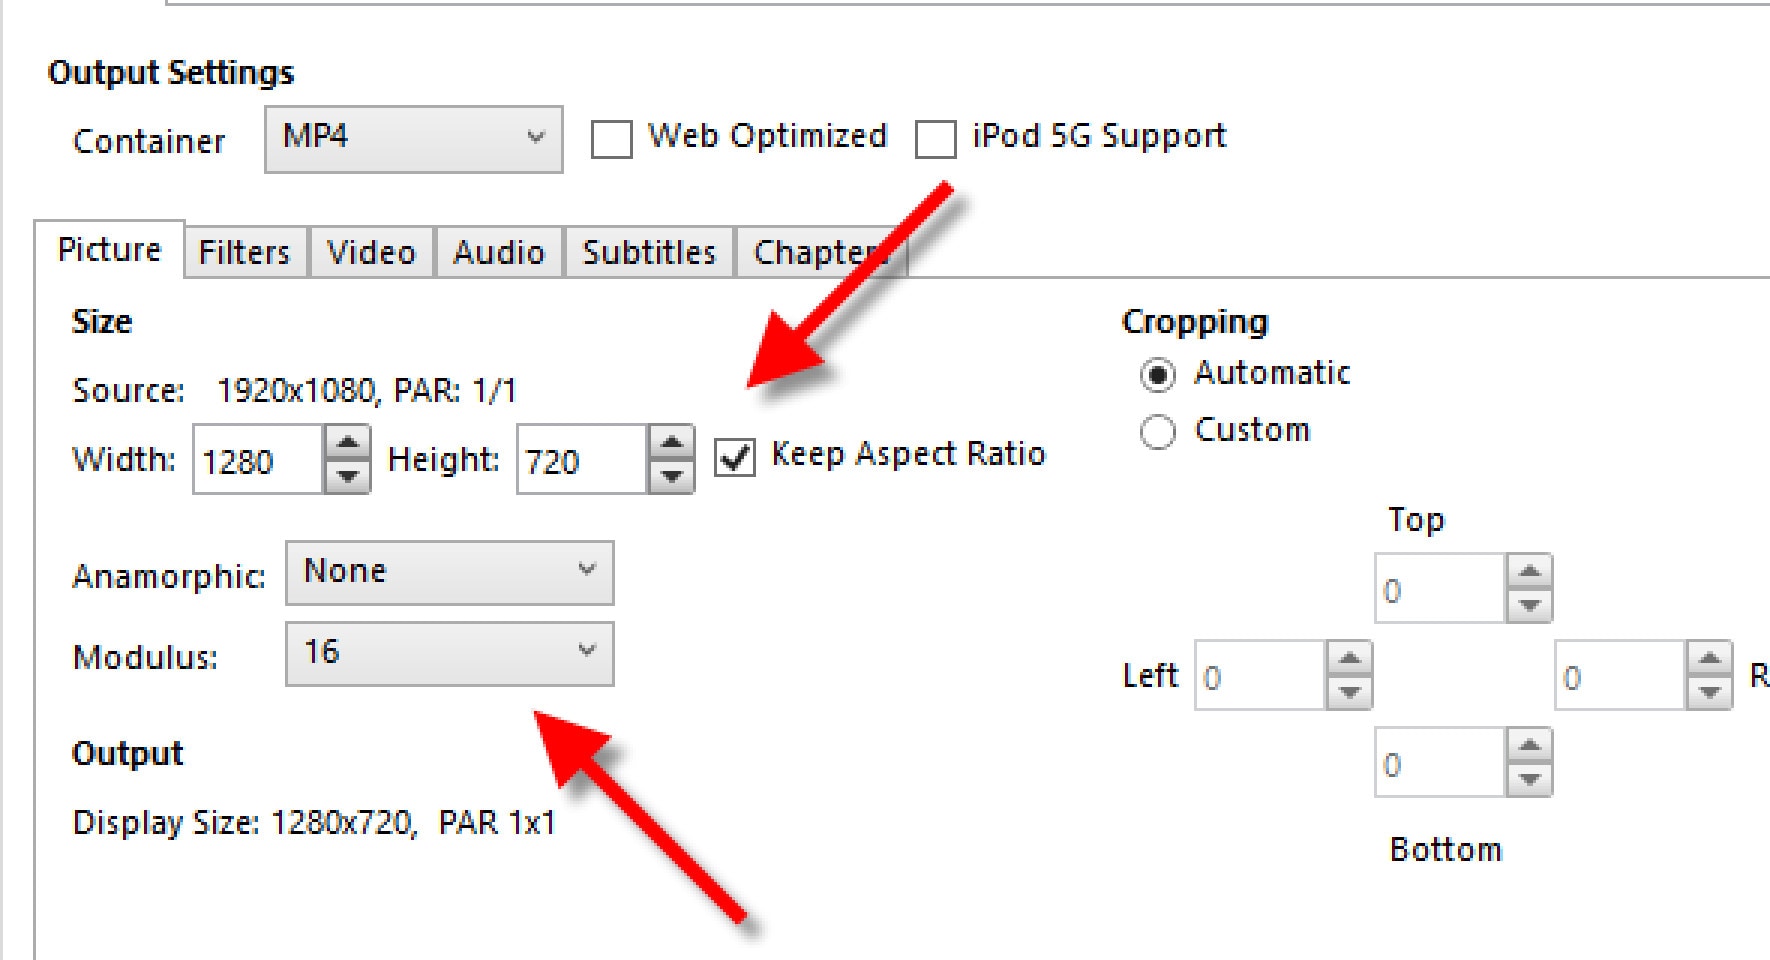

Change ‘Anamorphic’ to ‘None’, and ‘Modulus’ to ‘16’. And tick ‘Keep Aspect Ratio’. Use the arrow down on Width to change from 1920 (full HD) down to 1280.
Select the ‘Audio’ tab and choose 48 for the Samplerate. Choose Stereo for Mixdown. Choose 320 for your audio Bitrate.
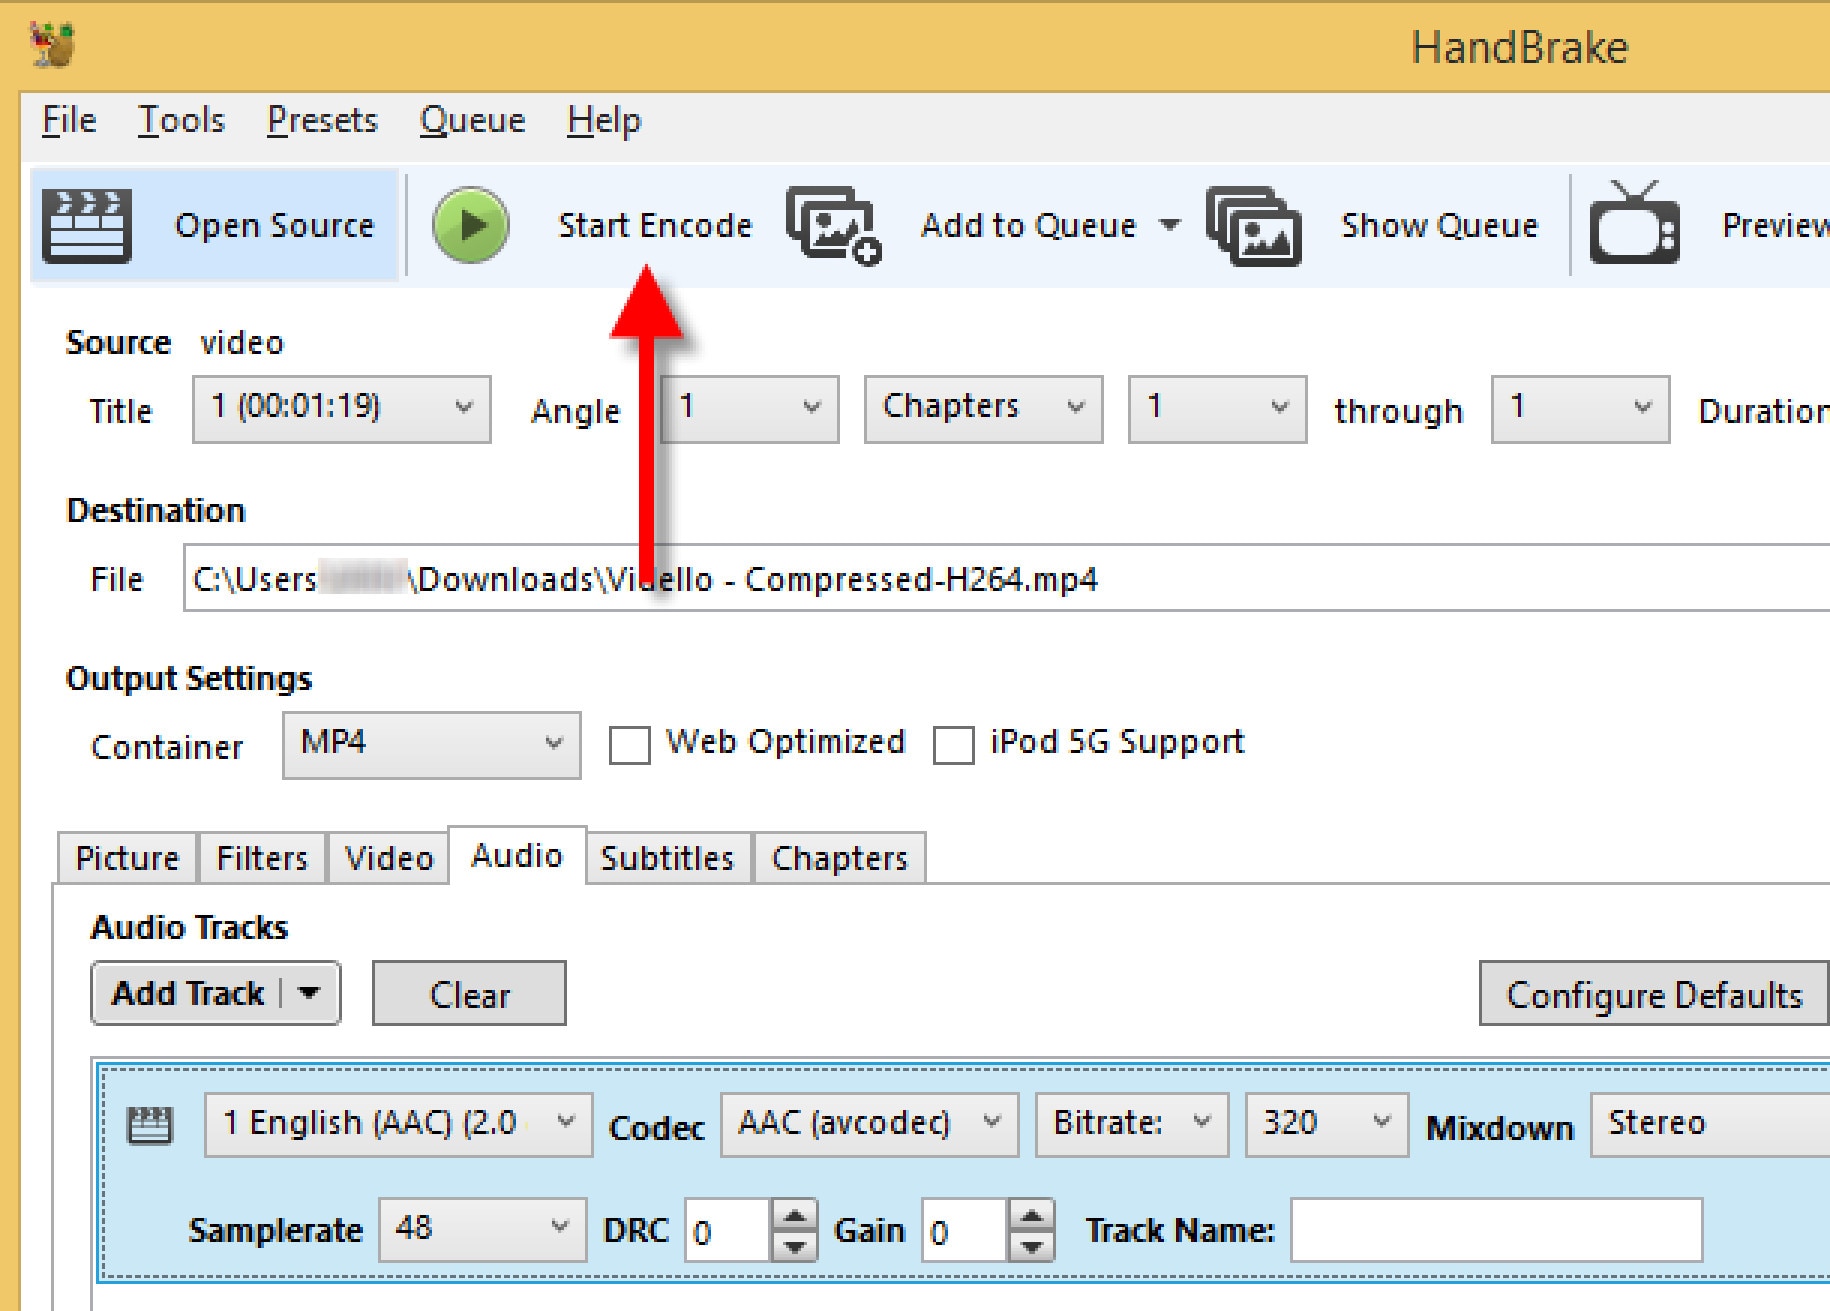
- Hit the ‘Start Encode’ button and wait until the video has finished compressing. Handbrake will let you know when it has finished.
SHUTTER ENCODER
Supported OS: Mac, Linux, and Windows
Shutter Encoder offers a complimentary codec and conversion tool for everyone that was created in collaboration with video editors.
Convert your videos, images, and audio files to OP-Atom format, which is compatible with Avid Media Composer and Pro Tools. Encode your files, replace audio, burn to DVD, analyze audio volume, download web videos, and create your own timelapse.
Analyze audio loudness, replace audio, author DVDs and Blu-rays, create image sequences, download web videos, and more. Everything is done as simply and efficiently as possible
Shutter Encoder makes use of Java as well as other tools such as 7za, VLC, FFmpeg, ExifTool, MKVMerge (part of MKVToolNix), MediaInfo, DVDAuthor, youtube-dl, and others.
Shutter Encoder offers advanced users the option to tailor the conversion individually. You can, for example, manually change the bitrate of audio and video, but you can also set a file size limit and perform the conversion based on that. Further work techniques, such as the ability to enable hardware of the computer itself and complete the conversion according to a predefined profile, are available in a separate box.
Features:
- Without conversion: Cut without re-encoding, Replace audio, Rewrap, Conform, Merge, Subtitling (create subtitles for a video), Video inserts
- Sound conversion: WAV, AIFF, FLAC, MP3, AC3, OPUS, OGG
- Editing codecs: DNxHD, DNxHR, Apple ProRes, QT Animation, Uncompressed YUV
- Output codecs: , DV PAL, XDCAM HD422, AVC-Intra 100, XAVC, HAP, , VP9, AV1, OGV, MJPEG, Xvid, WMV, MPEG
- Archiving codec: FFV1
- Image creation: JPEG, PNG, TIF, TGA, DPX, BPM, ICO, WEBP
- Burn & Rip: DVD, Blu-ray, DVD RIP
- Analysis: Loudness & True Peak, Audio normalization, Cut detection, Black detection
- Download web videos using youtube-dl
Pros:
- Conversion according to profiles
- Extensive advanced options
- Built-in editing capabilities
Cons:
- Limited preview capability
Steps On How To Use Shutter Encoder
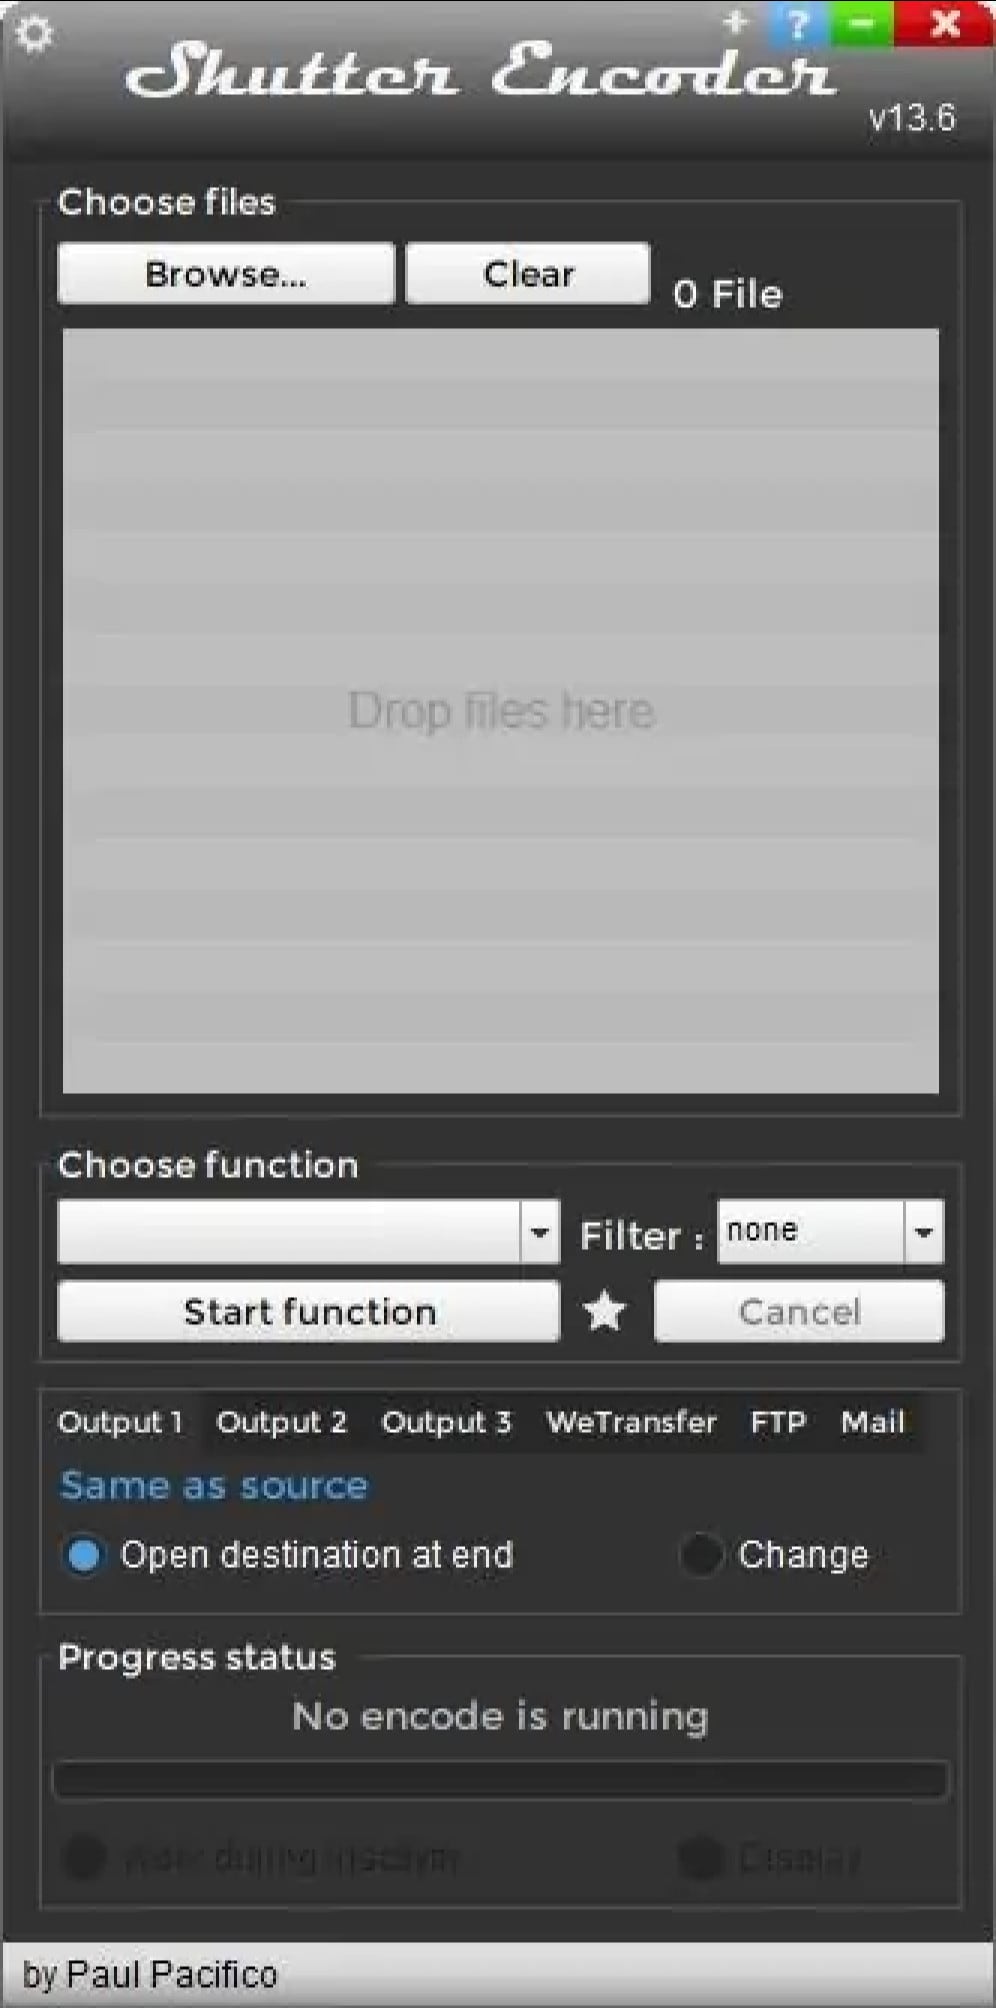
- To start, drag the video from your file manager and drop it onto the Shutter Encoder window, or use the ‘Browse’ button available in the upper left-hand side corner of the window to add a video.
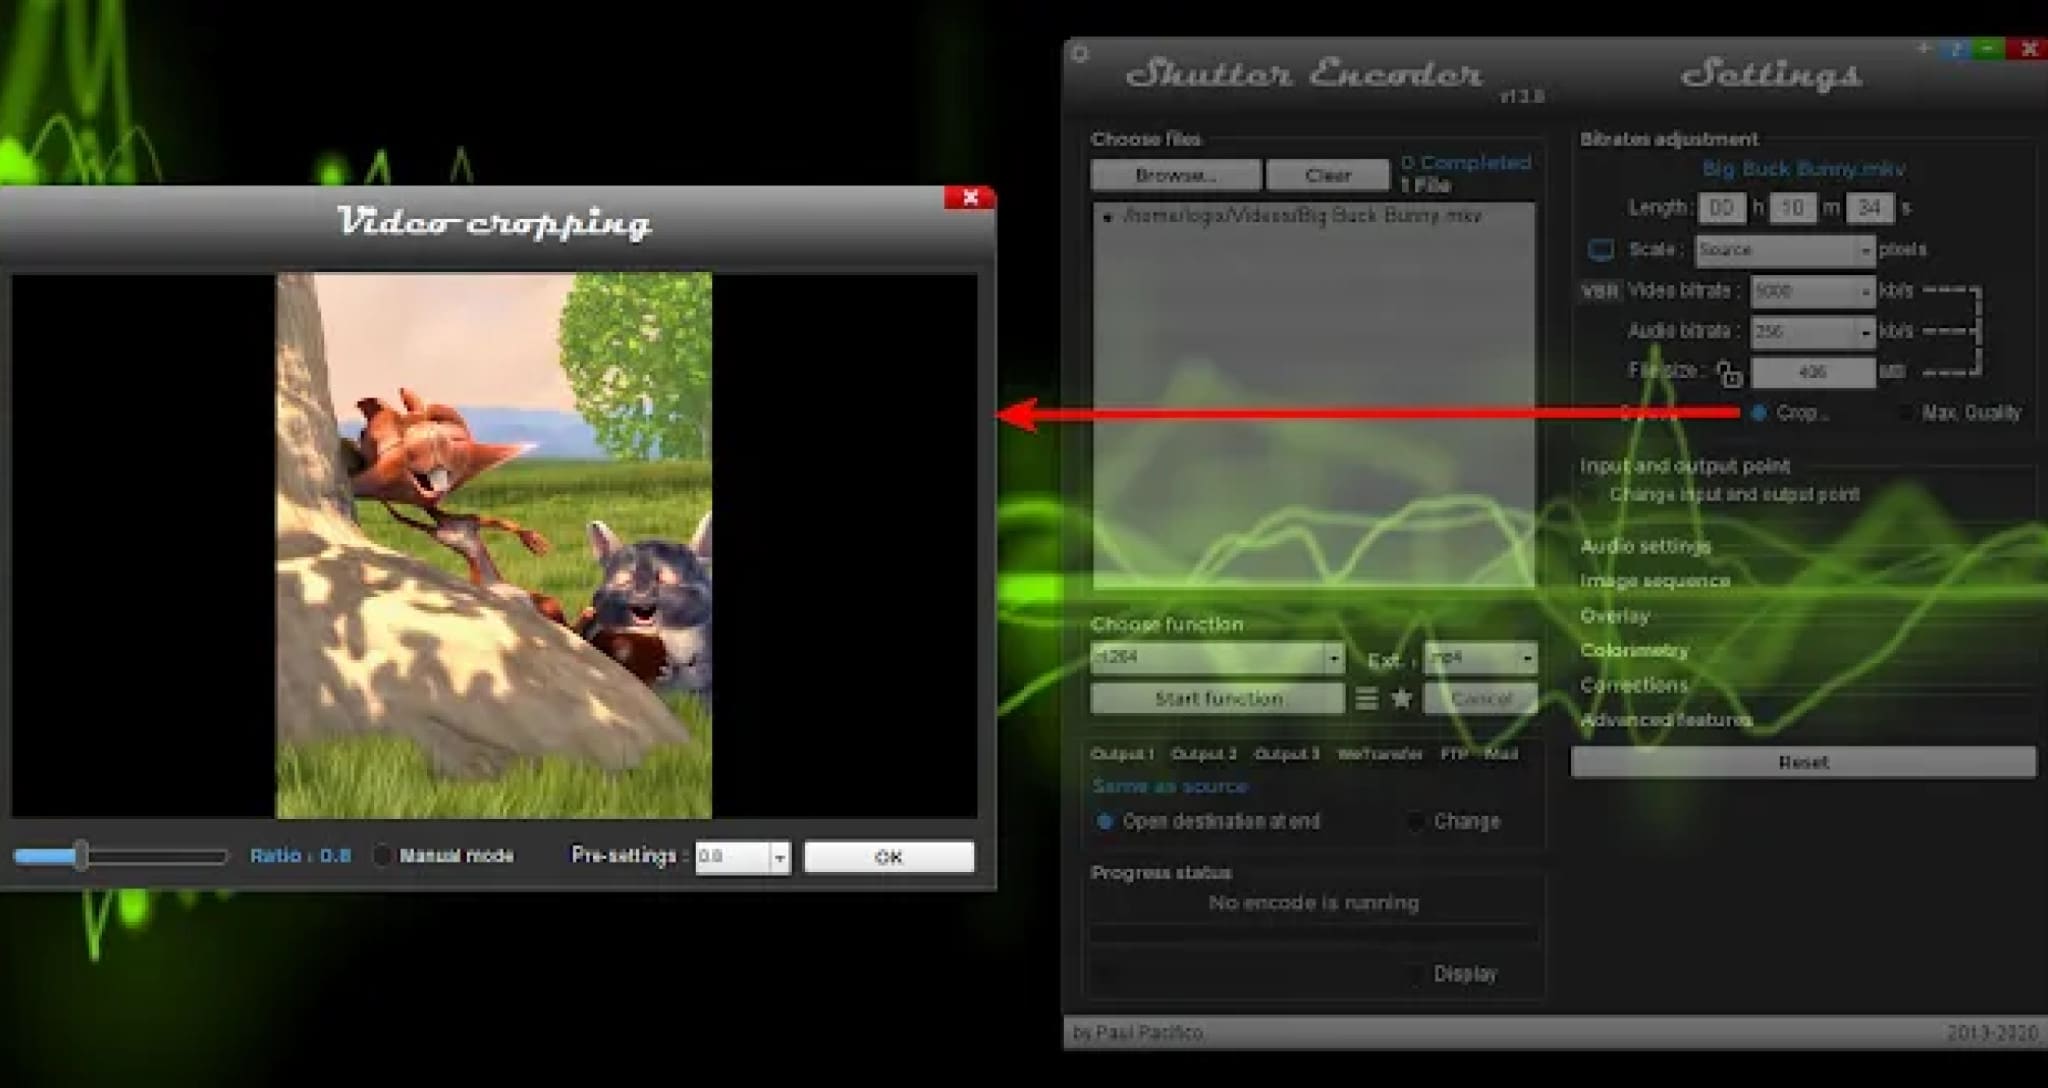
- Next, from the ‘Choose function’ drop-down menu, scroll to (it’s the first under Output codecs). You will now see some new options in a new panel that appears on the right-hand side of the Shutter Encoder window. From there, if you want to crop the video, click the Crop checkbox:
A new window will pop up where you can use your mouse to crop the video to the desired size. If you want to change it to a predefined, fixed-size ratio value, uncheck the ‘Manual mode’ box, and you’ll be able to choose a ratio from the ‘Pre-settings’ drop-down.
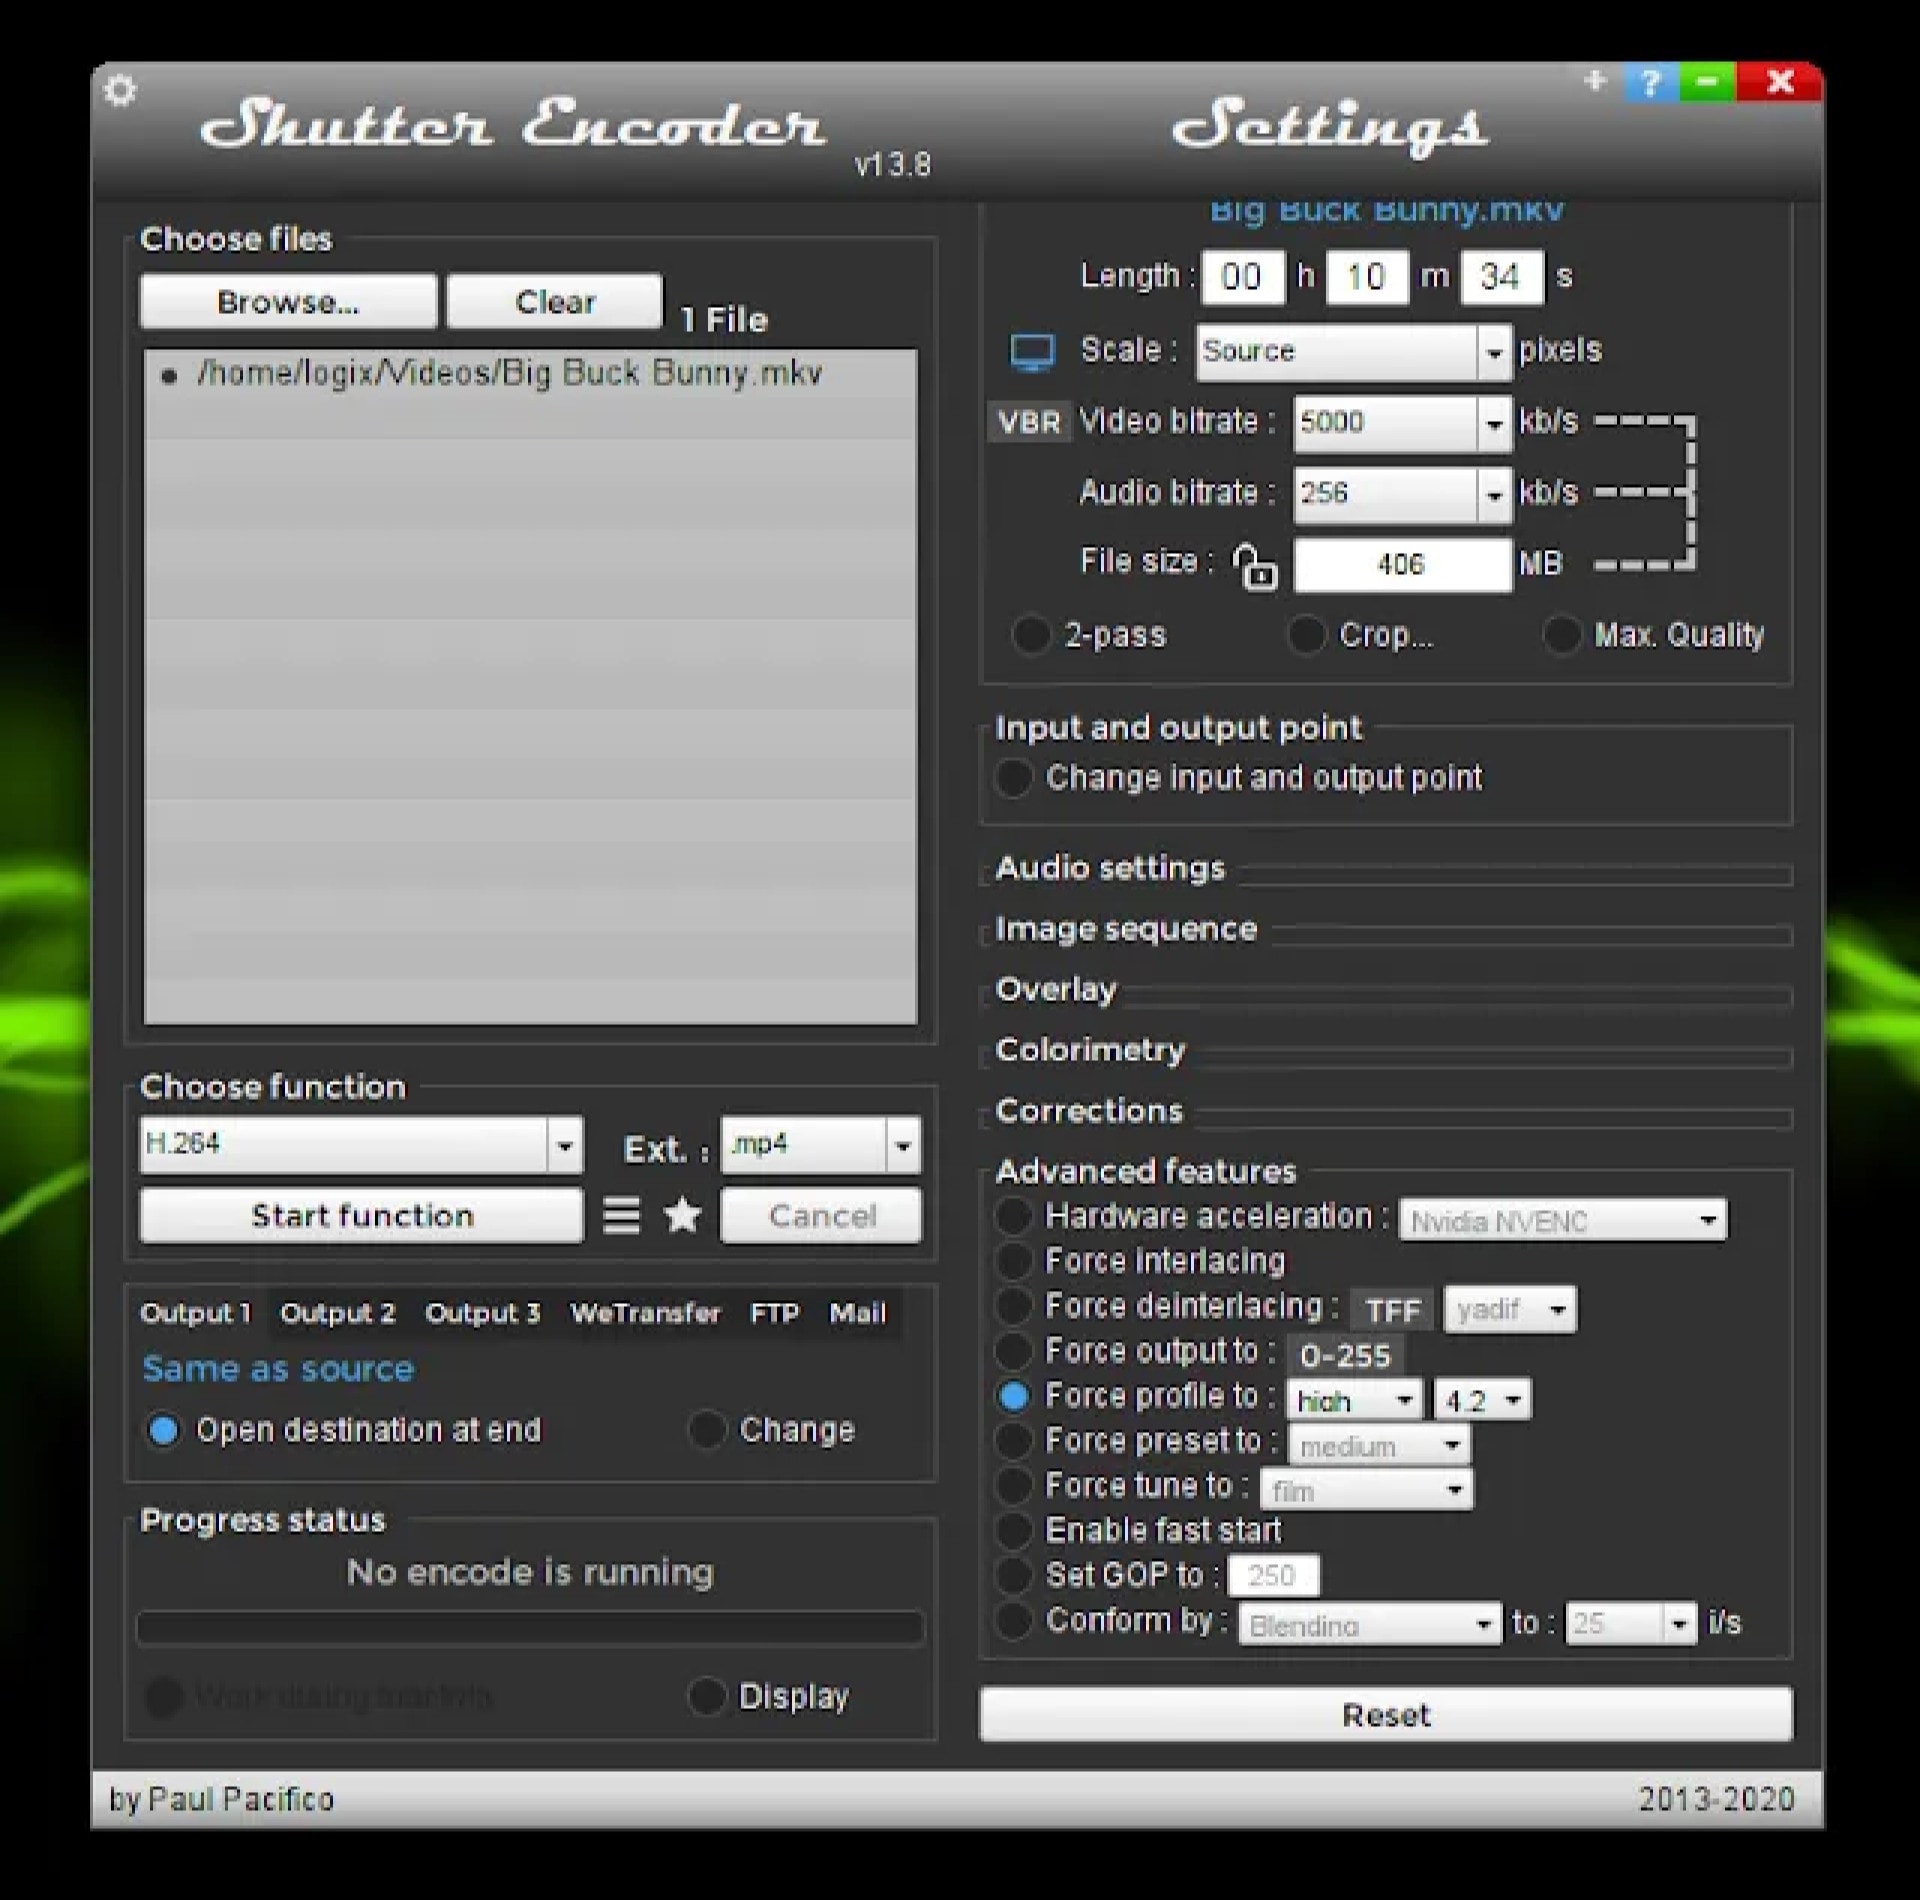
Next, if you want to change the profile, expand the ‘Advanced features’ item in the Shutter Encoder sidebar, check the box for the Force profile option, then change the profile to what you want to use:
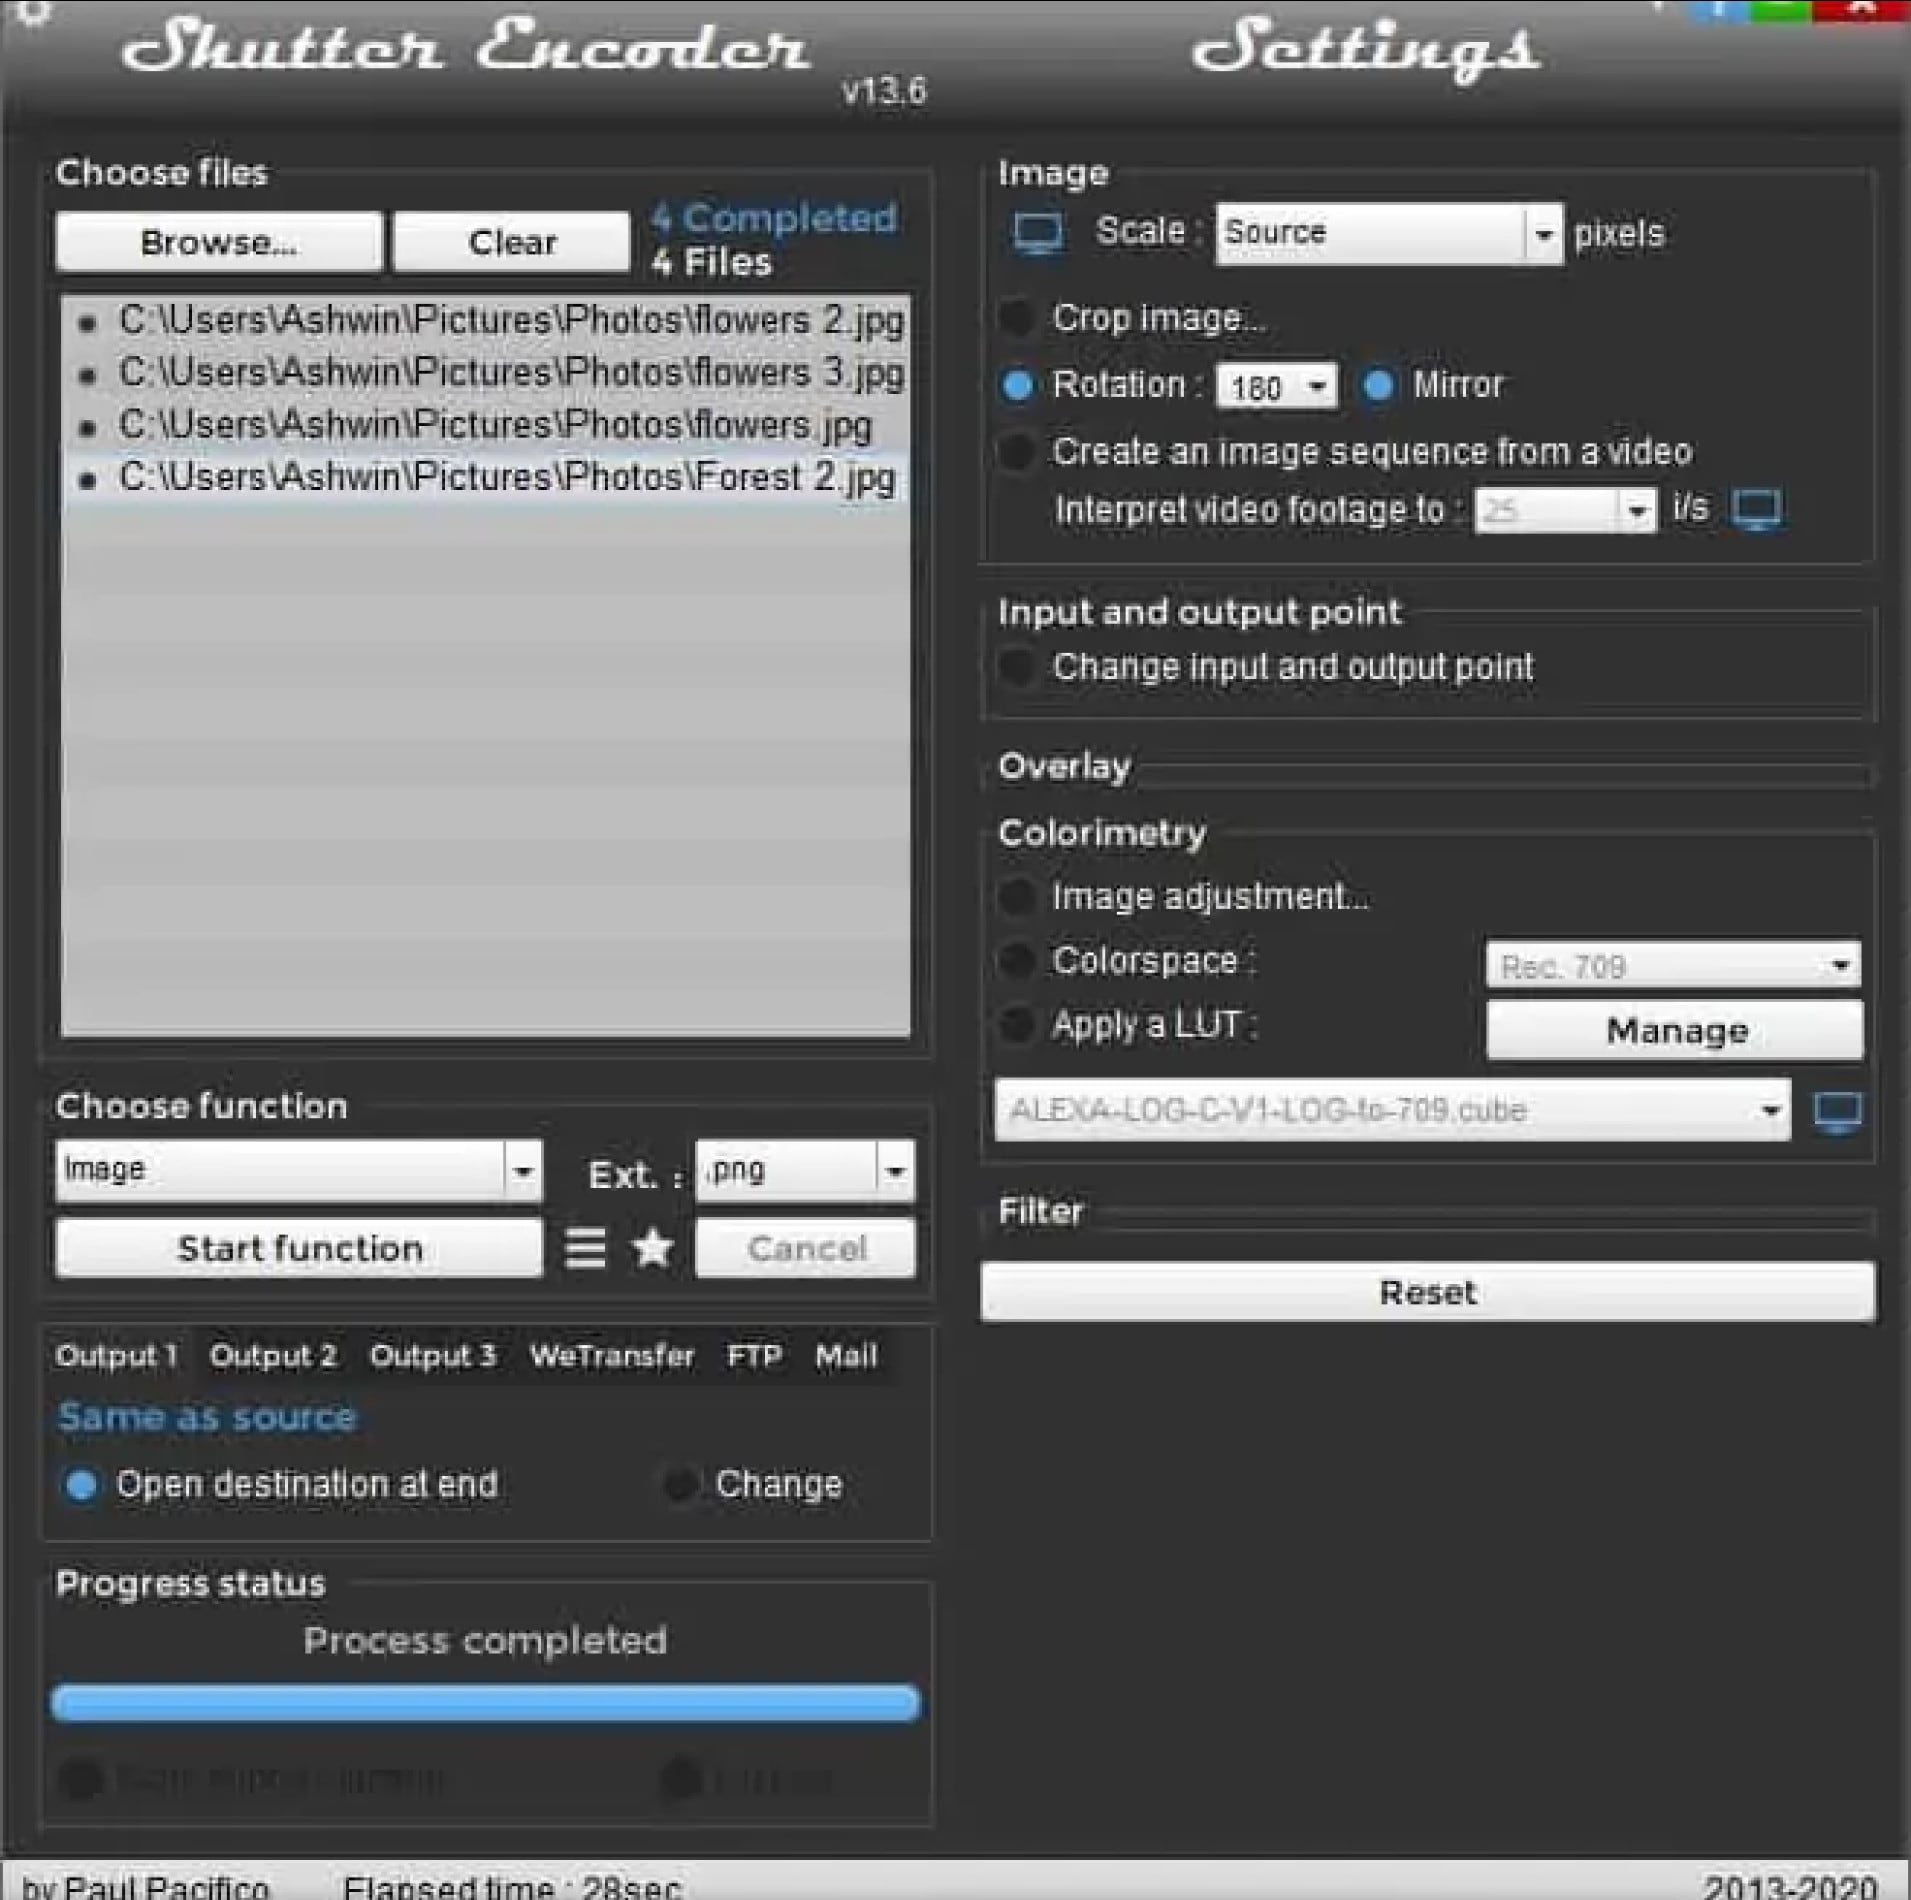
- When you’re done with the video adjustments you want to make, click the ‘Start function’ button, and Shutter Encoder will begin encoding your new video.
AVIDEMUX
Supported OS: Linux, BSD, Mac OS X, and Microsoft Windows
Avidemux offers three fundamental operations: cutting, encoding, and filtering. Cutting allows users to copy, paste, save, or delete a specific part of a video and is incredibly beneficial when users are only interested in a small portion of a video or want to remove commercials from a TV show that they have recorded.
Encoding, on the other contrary, is the way of transforming a video to various formats so that it can be played on different players. Users of Avidemux can use this feature on videos they want to use for business or archive for personal use. They could also use this to convert a video that they intend to post online.
Users can also use Avidemux to filter their videos, which include incorporating subtitles and color profiles, deinterlacing, resizing and sharpening the image of a video, and increasing or decreasing the overall volume of the audio.
Meanwhile, Avidemux has task automation features that make video processing and editing quick and painless. A feature called Joblist allows users to organize their projects in a queue so that they can access their files from a single location. They can use this queue to handle videos in bulk as well.
Features:
- Multiple Formats
- Video Filters
- Advanced Interlacing
- Full Editing Control
- Simple Interface
- Open Source
Pros:
- Covers standard formats.
- All essential features are present.
- Surprisingly advanced filtering, processing, editing, and filtering controls.
- The interface is easy to learn.
- Open-source
Cons:
- The interface is very legacy and needs remodeling
- No longer updated
- No support
Steps On How To Cut Videos On Avidemux:
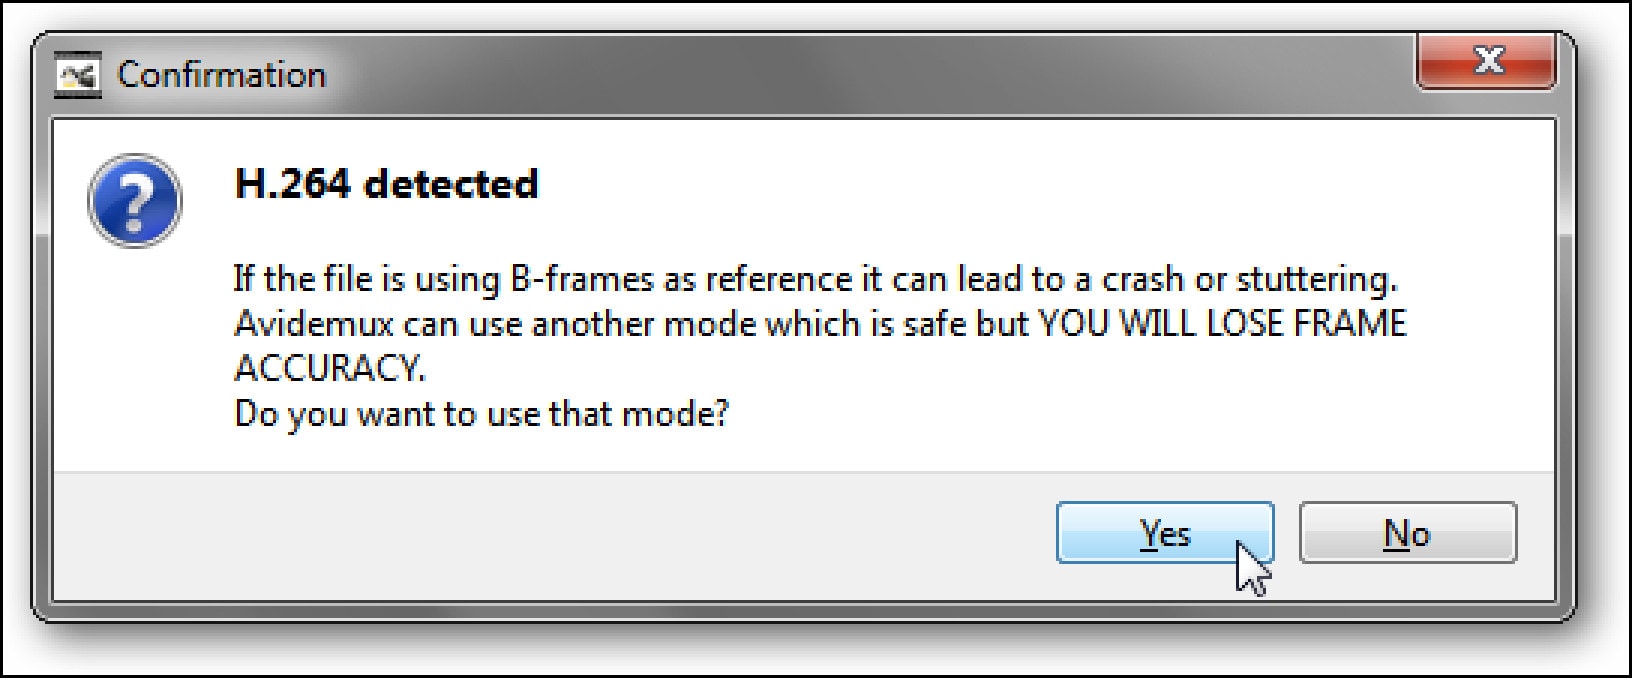
- Open up Avidemux, and load the video file that you want to work with. If you get a prompt like this one: we recommend clicking Yes to use the safer mode.


Find the portion of the video that you’d like to isolate. Get as close as you can to the start of the clip you want to cut.
You want it to read I; if it isn’t framed type I, then use the single left and right arrow buttons to go forward or backward one frame until you find an appropriate I frame.
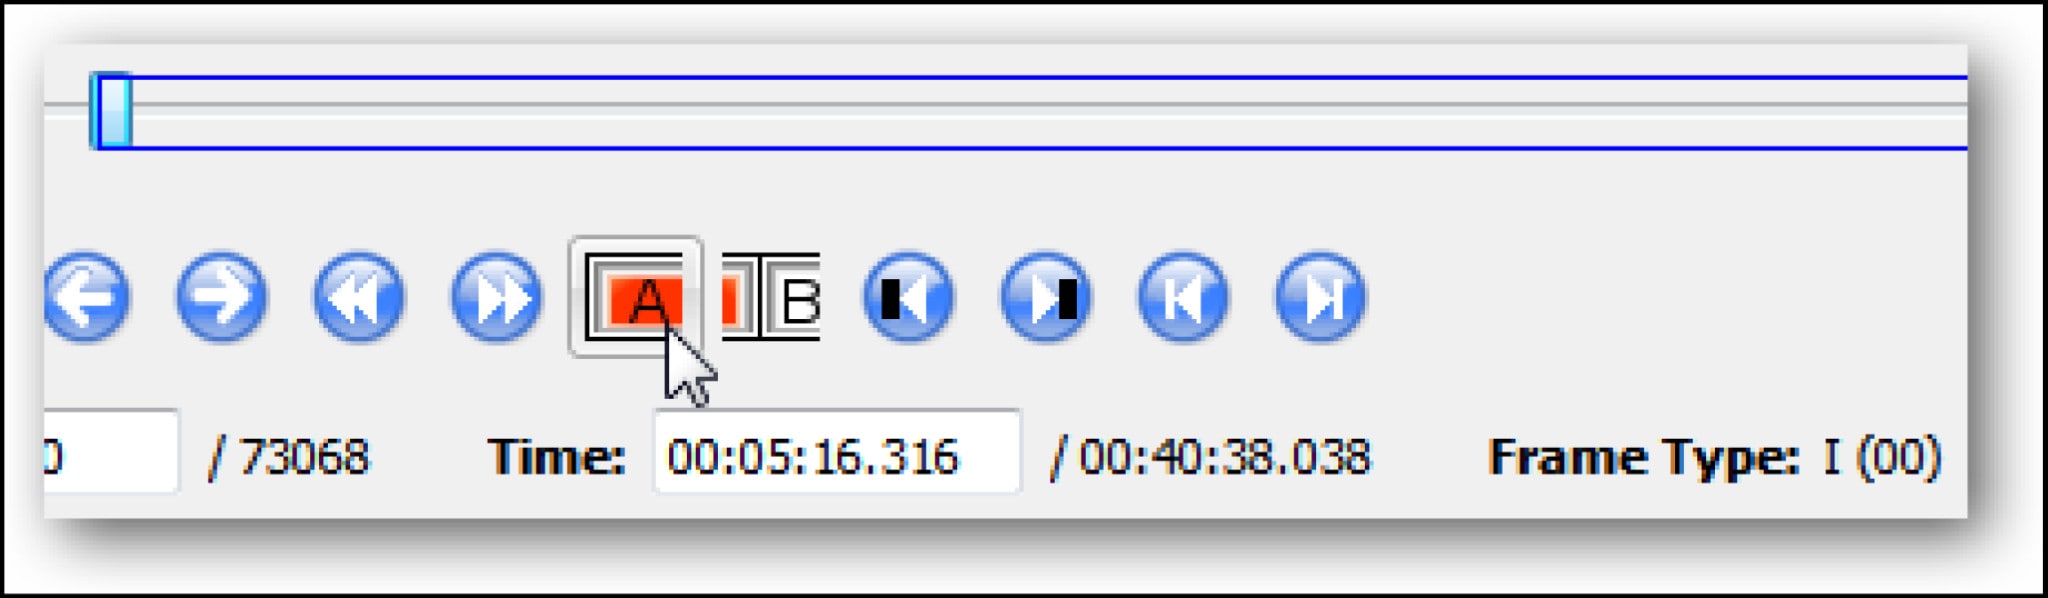
- Once you’ve found the right starting frame, click the button with the A over a red bar. This will set the start of the clip.
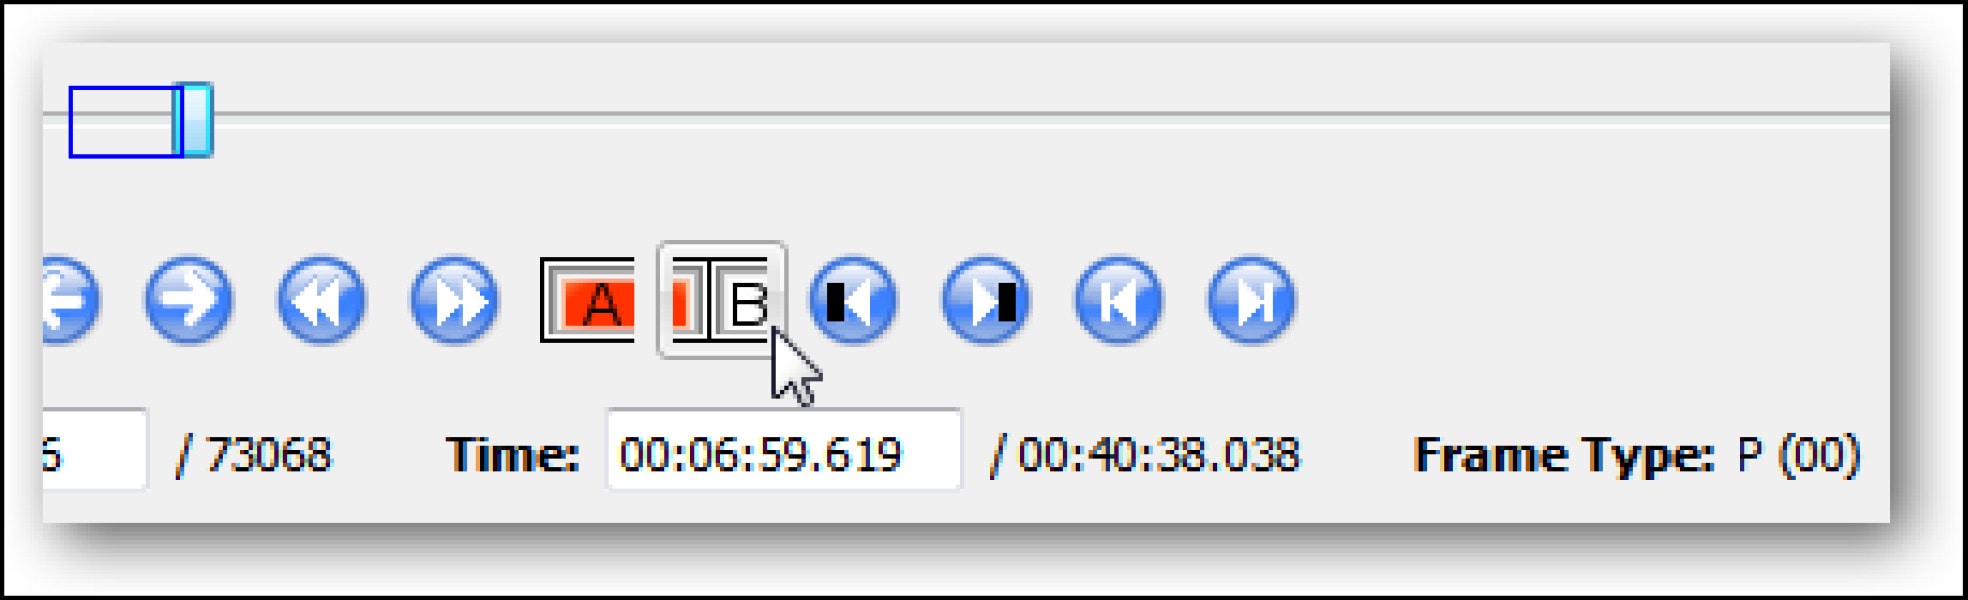
- Advance to where you want your clip to end. Click on the button with a B when you’ve found the appropriate frame. This frame can be of any type.
- You can now save the clip, either by going to File –> Save –> Save Video, or by pressing Ctrl+S. Give the file a name, and Avidemux will prepare your clip.
BEST PAID FFMPEG ALTERNATIVE TO CUT VIDEO ON MAC
JOYOSHARE MEDIA CUTTER
Supported OS: Mac and Windows
The best video cutting tool is Joyoshare Media Cutter for Windows (or Mac). As a professional video trimmer, it allows you to cut your media files at a 60X faster rate, allowing you to clip a 60-minute video or audio file in just one minute. The interface design is also simple and clean, allowing you to do it quickly.
Another noteworthy feature is the ability to easily cut and merge both video and audio without sacrificing quality. The cropper supports a variety of video and audio formats, including AVI, MP4, MPEG, VOB, WMV, ASF, RM, RMVB, 3GP, MP3, WMA, M4R, and others, allowing you to save the file in any format and on any device, including Apple.
More notably, this is a capable all-in-one video cutter. In addition to cutting videos and audio, it can convert all popular video formats, extract audio from video files, and merge video and audio files from the same source into a new one.
Features:
Convert to Any File Format
Merge Video and Audio Files into Multiple Formats
Improved Accuracy & Efficiency in Cutting Videos
60X Fast Conversion
Pros:
- Offers an easy way to cut, merge, and convert video files
- Blazing fast video-cutting and file-conversion speed
- Supports multiple audio and video file formats
Cons:
- Can only merge videos from the same source. That means you can’t use the program to merge separate videos from your gallery.
- The program doesn’t offer an easy way to remove an unwanted part of a video if it’s in the middle of the video. The only way to do that is by cutting the section before and after the video, then merging them into one.
Steps:
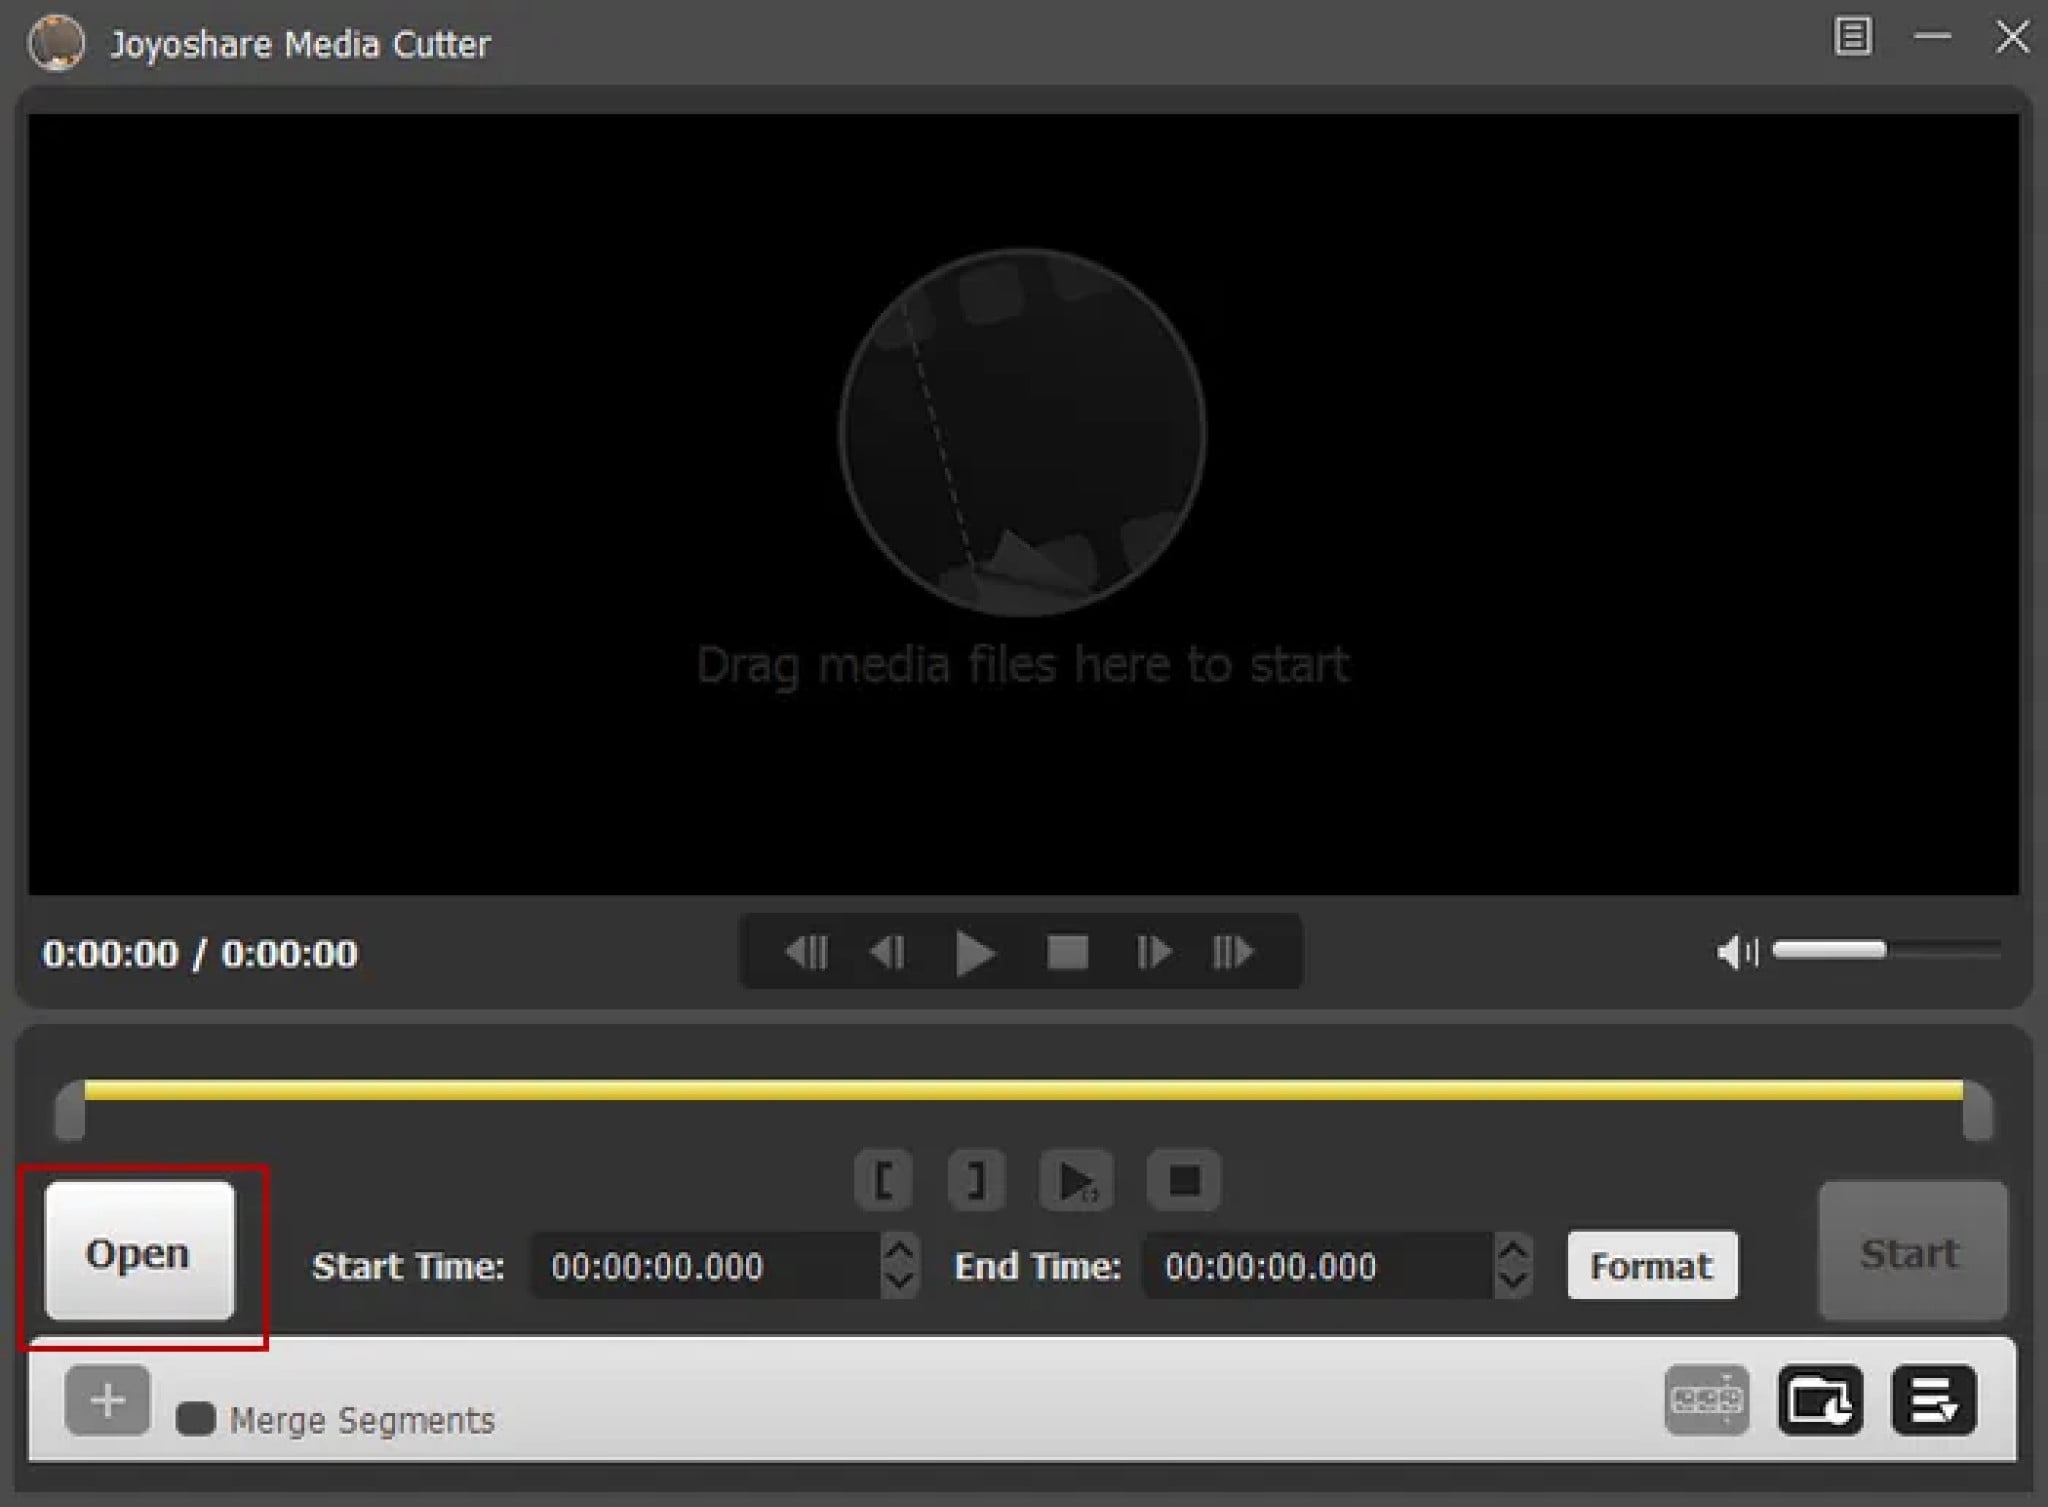
Step 1: Adding Video
To add a video, click the “Open” button. Locate the video you want to trim from your collection and open it. Alternatively, you can use the drag-and-drop feature.
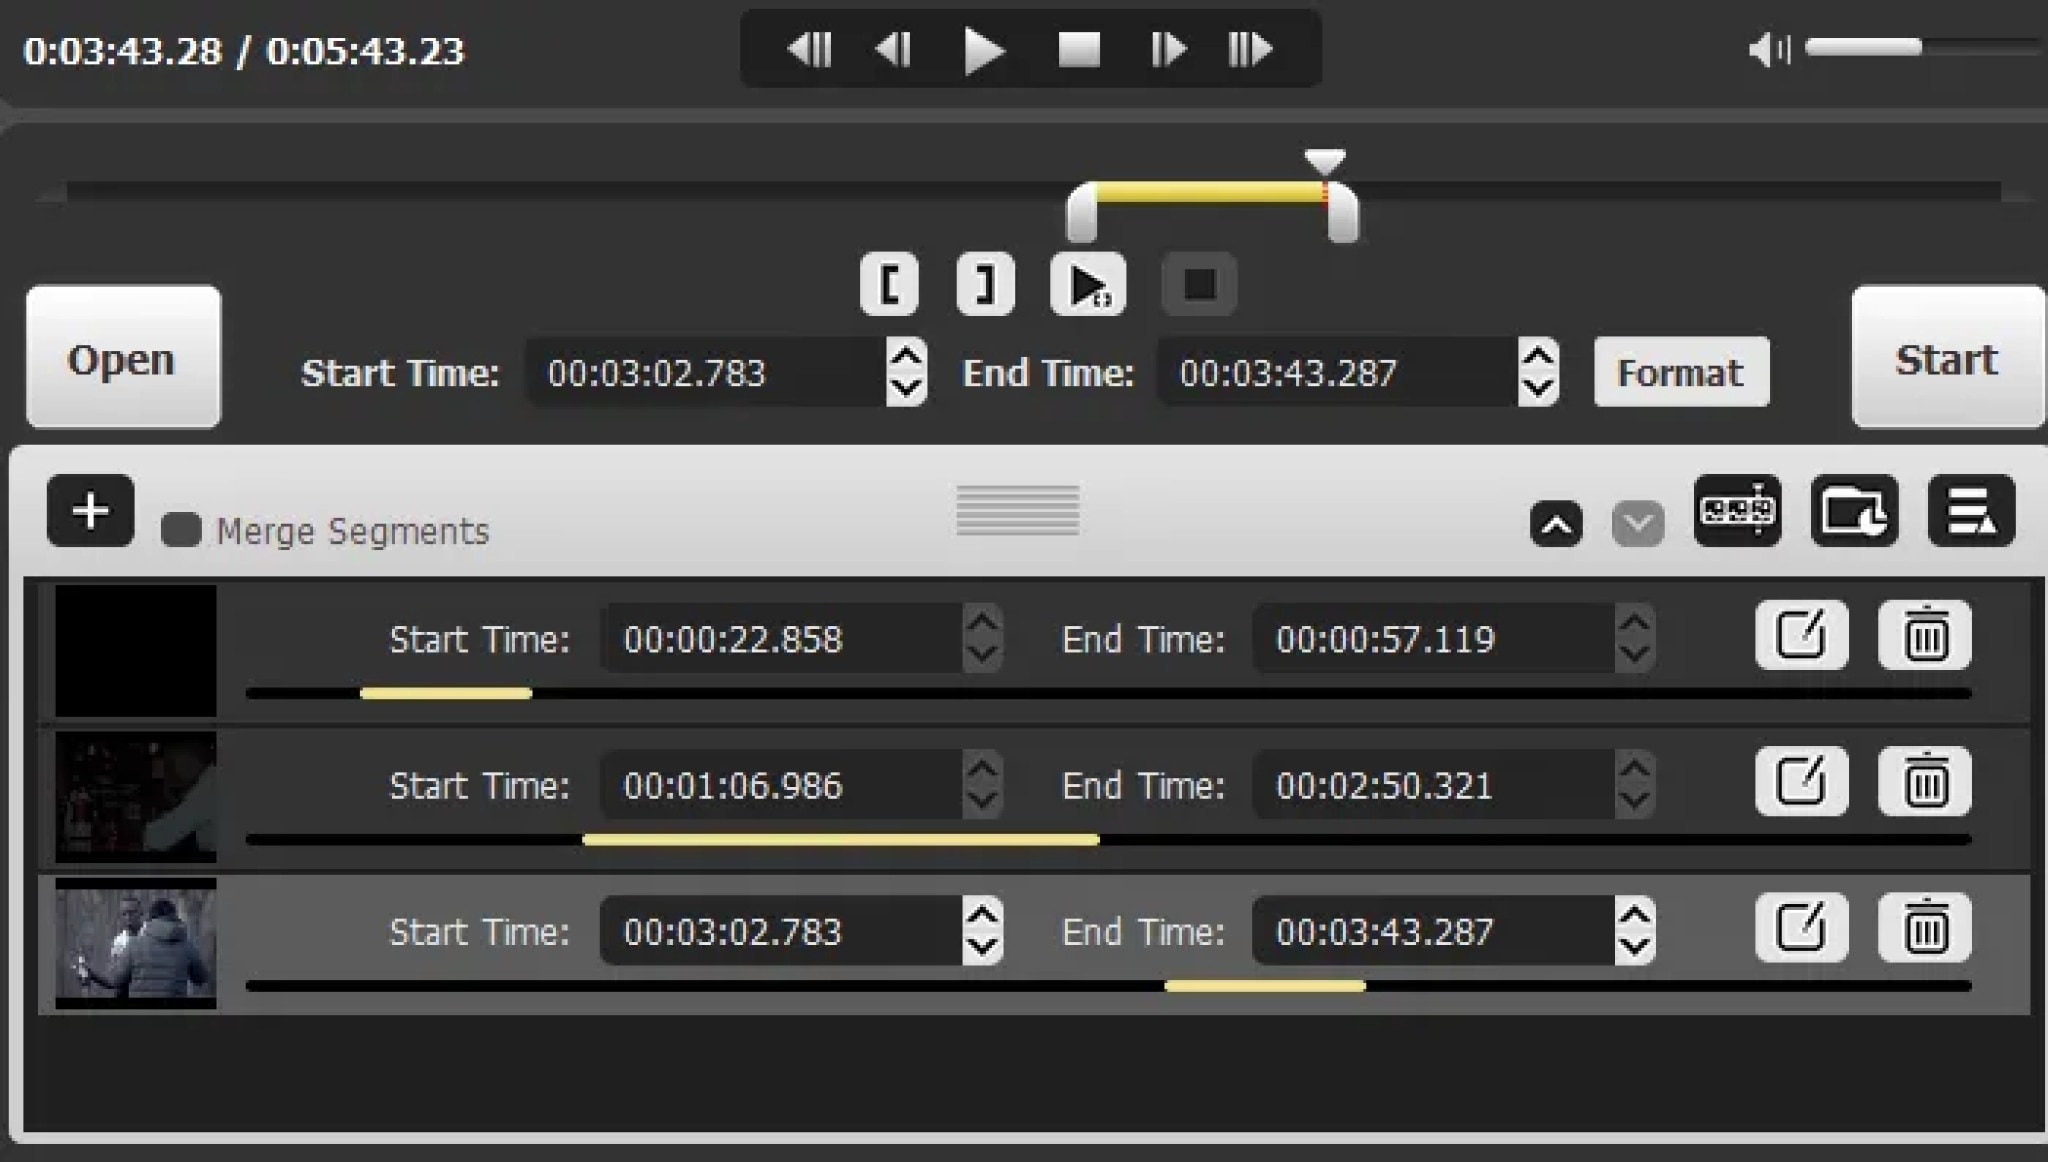
Step 2: Select the Segment to Be Trimmed
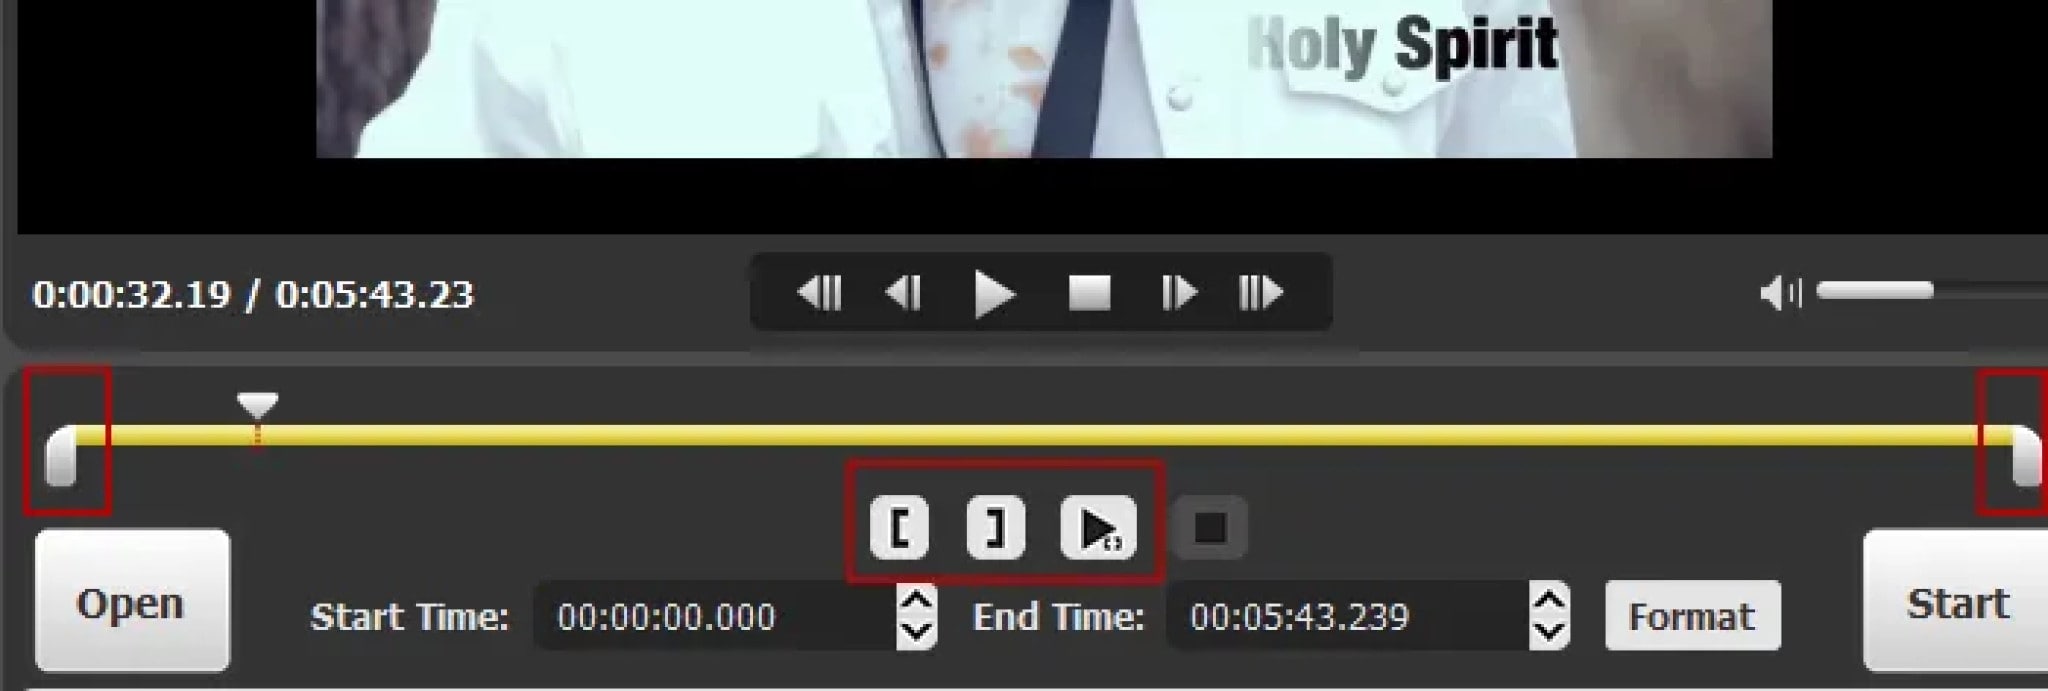
At the bottom of the Joyoshare video window, you’ll be able to see a time slider through which you can skip to your desired timeframe. Move the slider handles attached to the yellow timeline bar to set the starting and ending points of your video.
Once you’ve set your desired starting point, click on the “[” button to highlight the starting segment, then move the right-hand slider to select the ending point, and click the ] button to set the end segment.
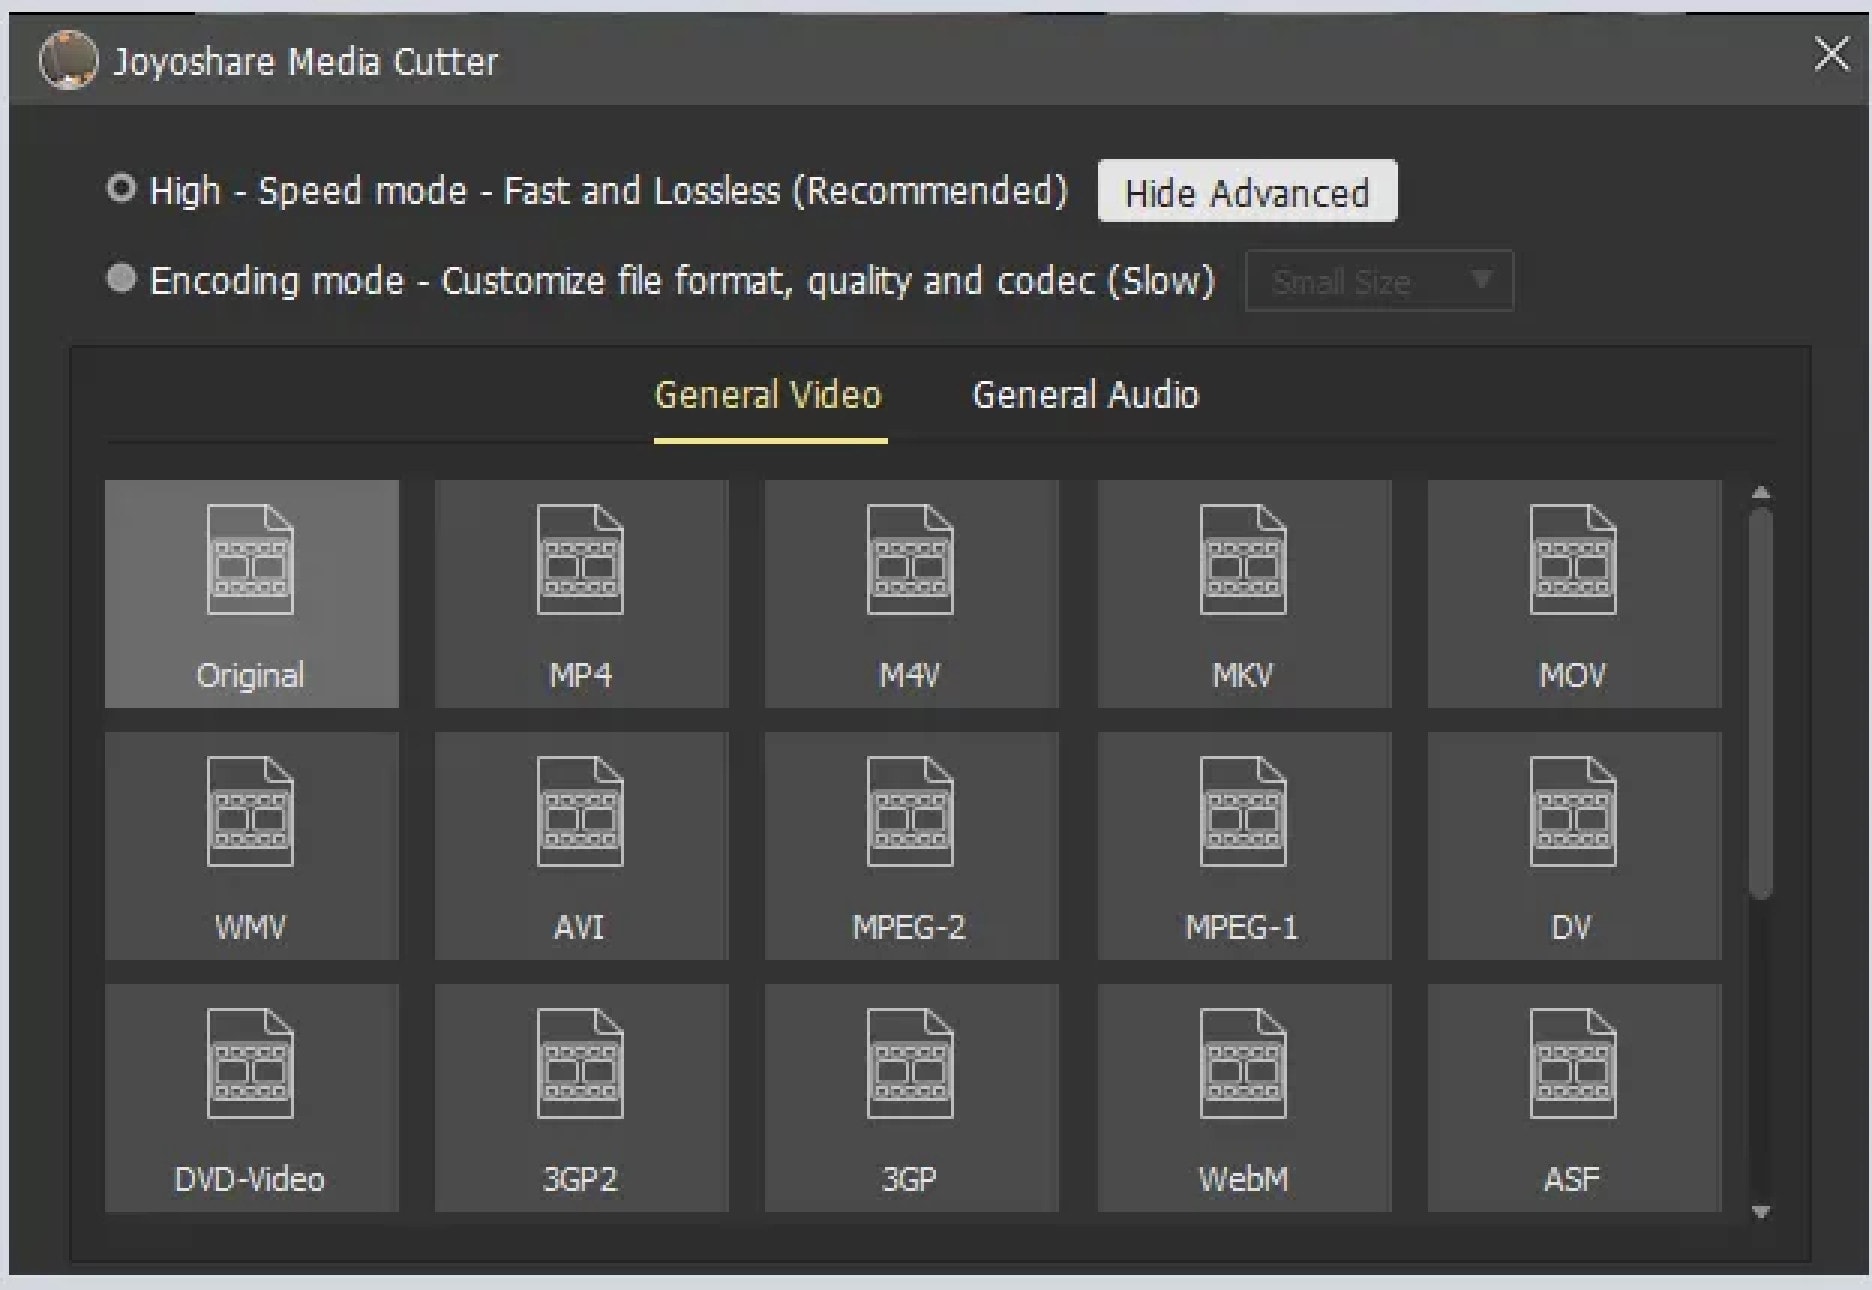
Step 3: Choose Your Desired Output Format and Destination Folder
Click the “Format” button, and a new window will pop up where you’ll be able to choose your preferred output format.
Step 4: Trim the Video
Click the “Start” button to begin trimming the segment. Wait for a minute for the program to finalize trimming the segment, then click the save button. That’s it! You’ve successfully trimmed your first video.
If you wish to cut and merge several segments, click the “+” icon at the bottom of the segments tab, then follow the above procedure to create several segments.
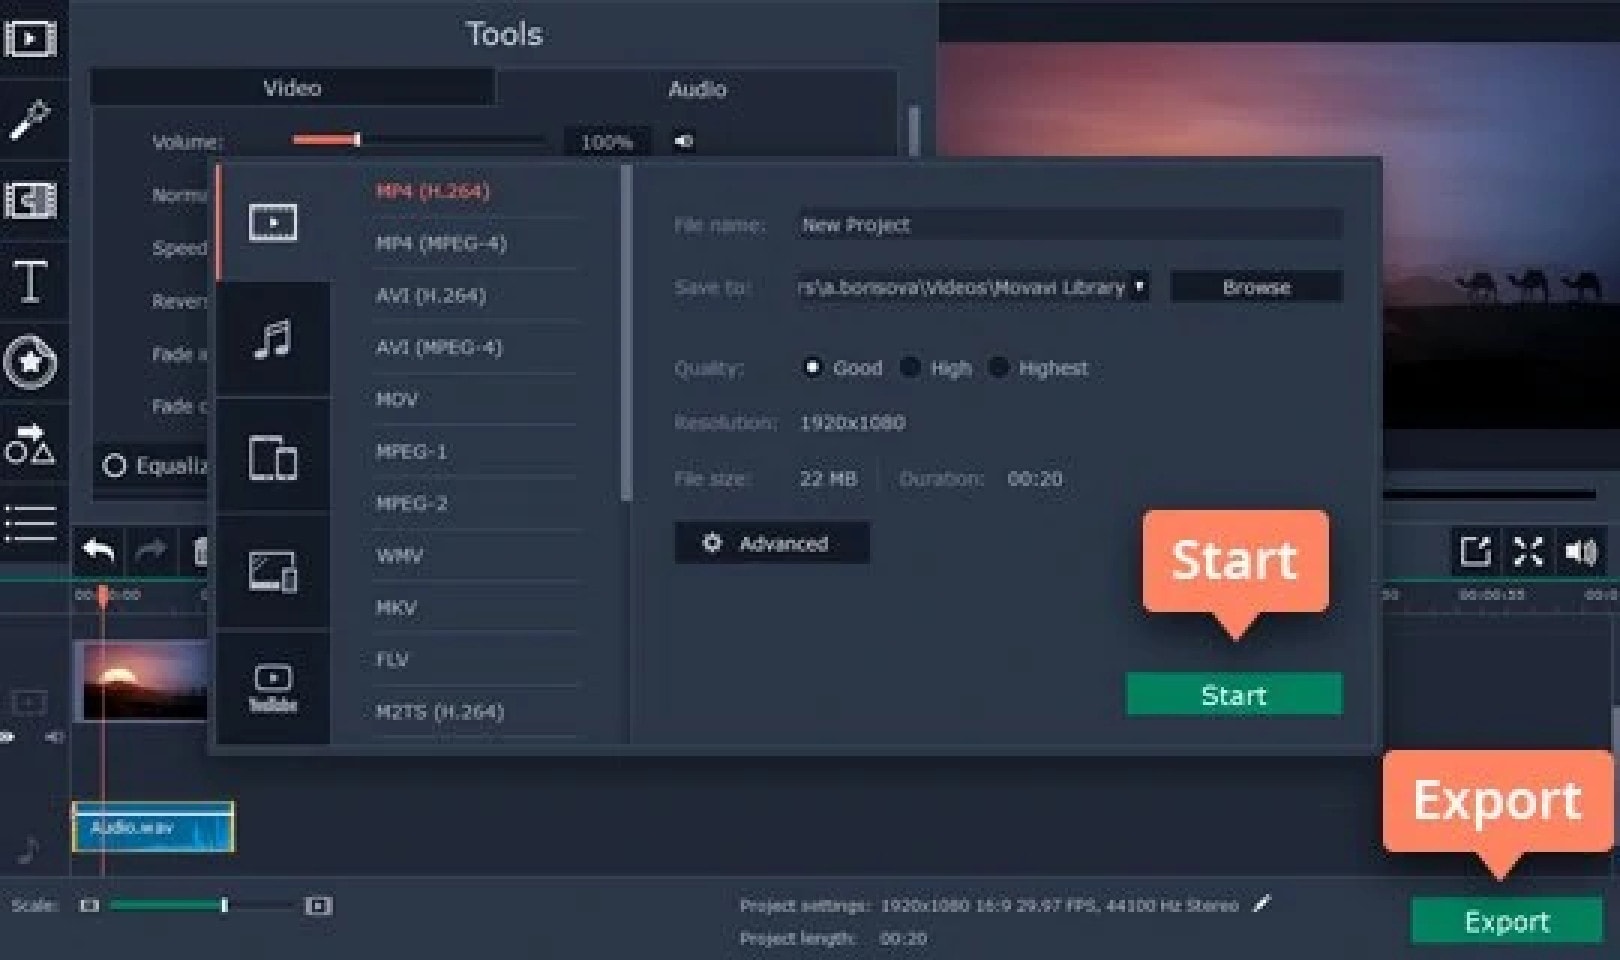
MOVAVI VIDEO EDITOR
Supported OS: Mac and Windows
Movavi Video Editor for Mac and Windows is a simple-to-use yet effective video editor and cutter. Aside from cutting and joining short videos, it can apply various video effects, add music and titles, and so on to make your movie more visually appealing. The video cutter tool has an easy-to-use interface and outstanding instructional videos, so you can get started quickly.
Movavi comes with a bunch of video editing controls into a straightforward, user-friendly interface. PiP, chroma-key, titling, basic keyframing, and even motion tracking are included. It isn’t as feature-rich or as fast as most of the competition, but it allows you to easily create visually appealing work.
The tool is not free, but it does offer a limited-time free trial to users. However, it is a little irritating when the ad appears after you install and launch the trial version.
Features:
- Media Library
- Templates
- Upload video or audio file
- Video and image management
- Title Editor
- Trim & Slice
- Video Effect
- Slow Motion & Time Effect
- Social Sharing
- Brand Overlay
- Text Overlay
- Audio Tools
- Speed Adjustment
- Split / Merge
- Video Stabilization
Pros:
- Easy-to-understand user interface
- Transitions with sound
- Motion tracking and picture-in-picture tools
- Chroma keying
- Quick movie-creation tool
Cons:
- Lacks advanced trim modes and clip pre-trimming
- Rendering on the slow side
- Not compatible with Apple Silicon M1
Steps:
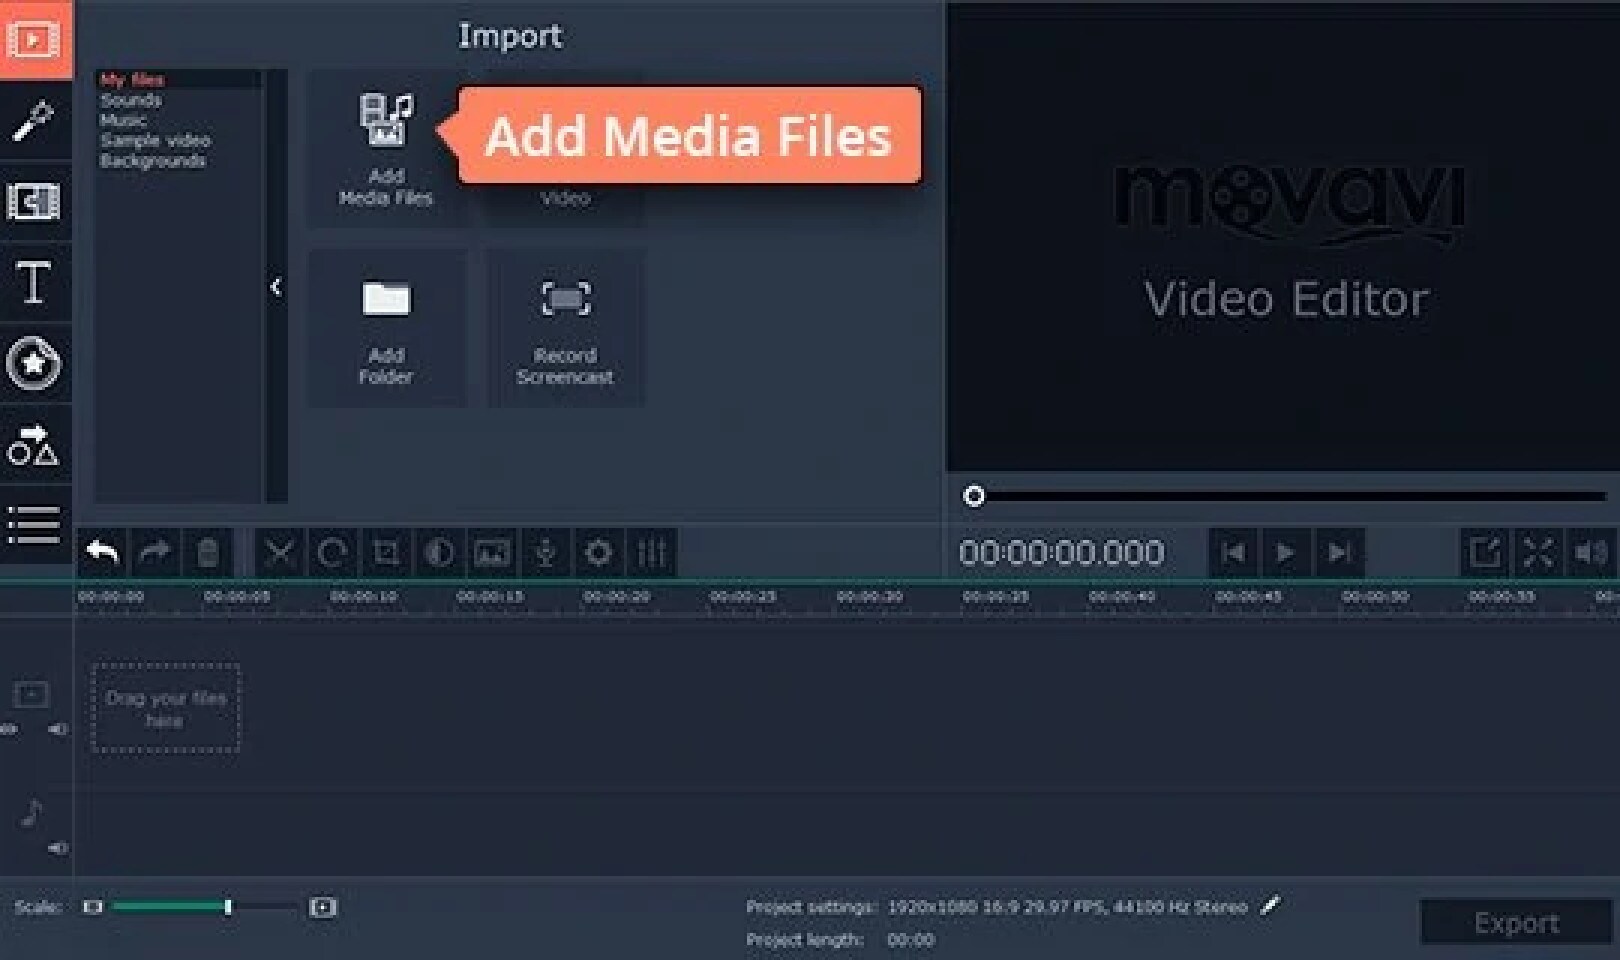
- Add Video Files
Launch Movavi’s MP4 trimmer, click the Add Media Files button, and upload the MP4 files you want to work with. The videos you’ve added will appear on the Timeline in the lower part of the program window.
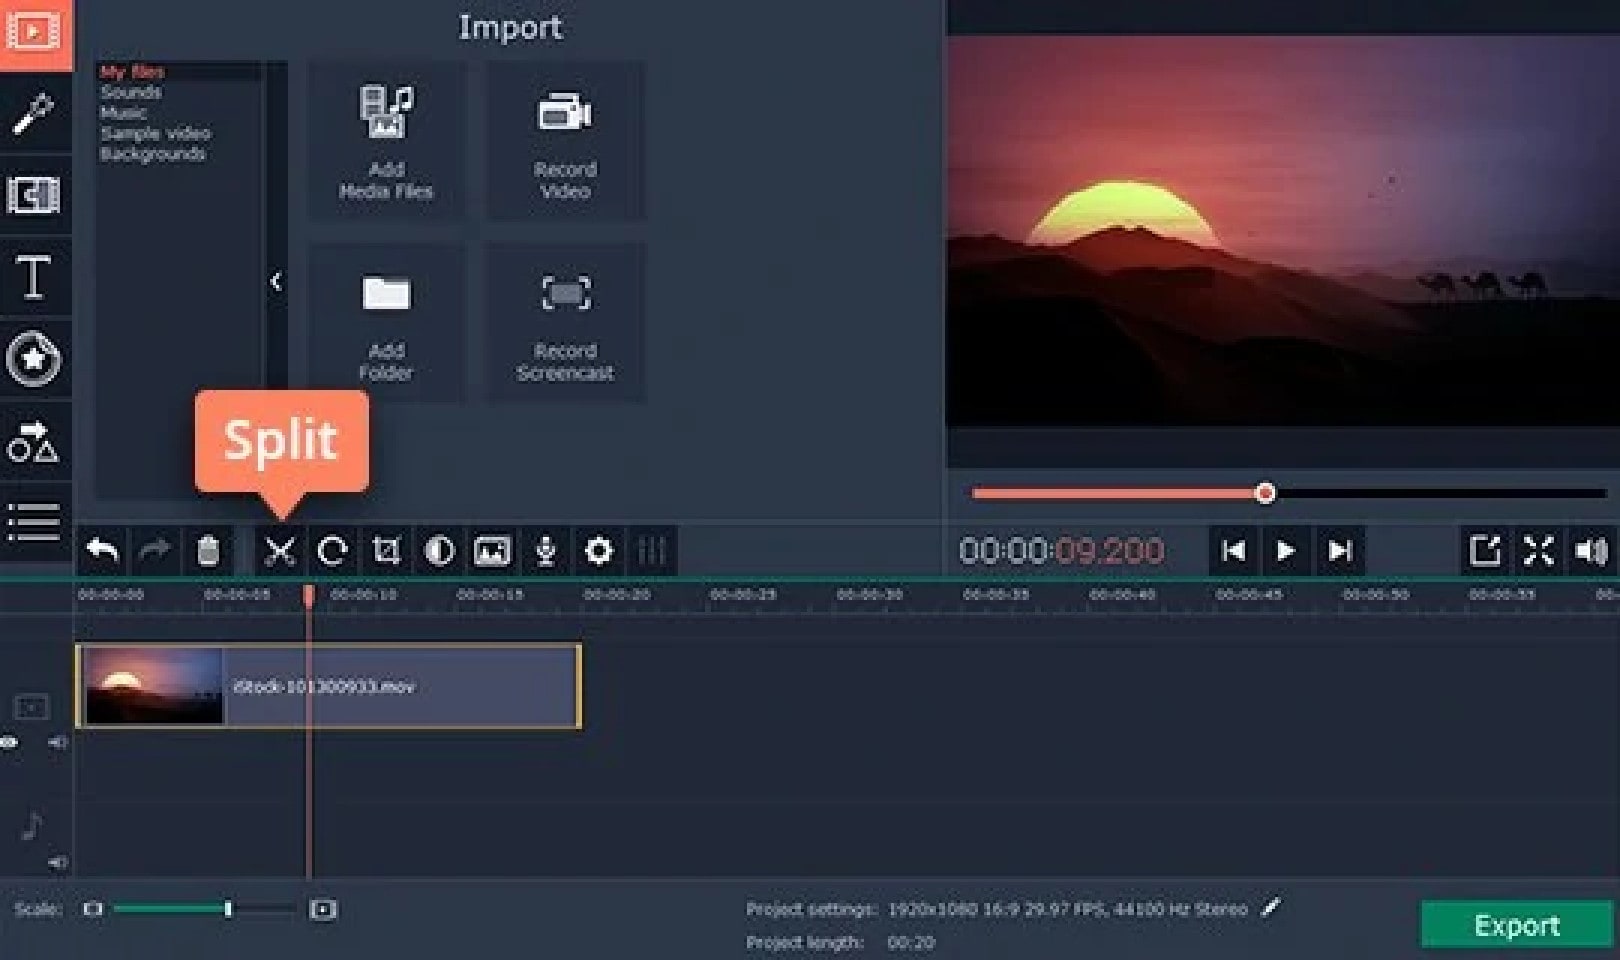
- Cut And Trim Your Videos

So how to cut MP4 video with Movavi Video Editor Plus? If you want to snip a video into two or more parts, click the file on the Timeline and move the red marker to the place where you want to make the first cut. Then click the Split button with the scissors icon or hit Ctrl+B. Repeat the process as many times as you need.
If you want to trim your video clip, select the file on the Timeline and then just pull the edge of the clip to shorten it as shown in the picture.
- Save The Result
All that’s left to do is save your edited video. Click the Export button, choose the appropriate video format, and hit Start.
XILISOFT VIDEO CUTTER

Supported OS: Mac and Windows
Xilisoft Video Cutter is an effective programming cutter that lets you choose and cut your preferred segments in a single file as well as cut out the segments you don’t like. It is compatible with almost all popular video formats, including VCD, AVI, MPEG, MP4, WMV, 3GP, /MPEG-4 AVC, /PSP AVC, MOV, ASF, and others. It enables you to precisely set the start and end points.
While the software cannot cut segments from multiple input files at the same time, it can cut your selected source video into the number of clips you require in a single step. Xilisoft Video Cutter goes beyond standard cutting or slicing by allowing you to convert your video input files to a variety of well-known codecs. It is possible to convert the entire source file or just a specific segment, but this requires removing those unnecessary parts that frequently cause problems (TV advertisements, trailers, etc.).
Features:
Easily Cut Video Clips
Multi-trim Video to Whole
Output Clips to Multiple Formats
Instant Preview
Clear Timeline
Advanced Editing
1-2-3 Interface
Multilingual Interface
Pros:
Supports all of the most widely used video file formats
Converts your videos between formats
Simple cutting interface
Allows for multiple cuttings from a single source file
Cons:
Does not support batch processing
Steps On How To Cut Your Favored Segments:
- Add Source Video File

Click the “Open“ button on the main interface, and select a video file in the pop-up window.
- Set Clip Segments
Click “Play” and click the “Set Start Point” and “Set End Point” buttons successively during playing the video to set the start point and endpoint of the clip.
You can also set several segments. Click the “Show Advanced Mode” button and click the “New Clip” button in advanced mode to set the start and endpoints of the segments. Repeat the above steps to set several segments.
Tip: To delete a segment, please choose the segment in the segment list, and click the “Delete Clip” button on the toolbar; to adjust the segment order, please choose the segment and click the “Move Up” or “Move Down” button to adjust its order.
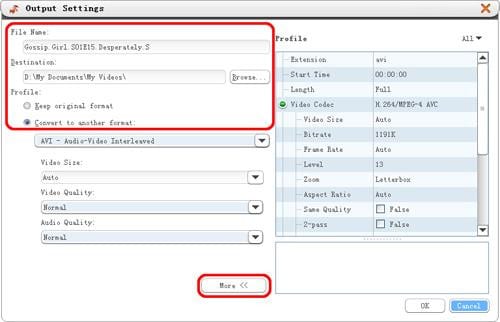
- Output Settings
Click the “Cut” button at the bottom of the window to open the “Output Settings” window.
- Start Cutting
Click the “OK” button to start video cutting. During cutting, you can check the cutting status by dragging the process bar or canceling the cutting. Tip: After cutting is done, click the “Open Output Folder” button to open the destination folder to check the clippings. Click the “Done” button to go back to the main window.
WHICH SHOULD I CHOOSE: FREE OR PAID VIDEO CUTTER ON MAC?
Whether you choose Free or Paid Video Cutter, it still depends on your edit and navigation if the project will succeed like what you’re anticipating. Beginners in the industry can go for Free Video Cutters to practice the craft without worrying about the monthly subscription.
However, if you’re a professional, I highly suggest that you choose Paid Video Cutter to lessen the hassle and create amazing output.
FAQS ABOUT CUTTING VIDEOS
- How can I cut a video without losing quality?
Trimming VLC through LosslessCut
LosslessCut is an open-source video cutter that runs on Windows, Linux, and Mac. Like Filmora, this software also allows you to cut videos without re-encoding, so there is no loss of quality.
- Who is the best video cutter?
Filmora is one of the best video cutter software that allows you to change the aesthetic of your video with one click. It comes with a wide range of video effects that enable you to make clips look good. Features: This tool provides fast editing processing and adjustable preview quality.
- Why does trimming videos reduce quality?
In most cases, trimming only causes a minor loss of video quality. And there is no clear causal relationship between trimming and losing video quality. The main factors that influence video quality are Resolution, Bitrate, and Frame size.
If you are longing to pick up the best video cutter for Mac, you are supposed to evaluate it from different aspects, like operating interface, cutting features, output quality, post-processing ability, etc. Frankly speaking, there is no fixed answer. Everything depends on your actual requirements. If you want to cut videos on Mac with the forthright method, iMovie can be your top priority. If you prefer top-leading editing features, Blender is competitive enough for you.
Conclusion:
There you have it! Here is the alternative software to cut/shorten your video without using FFmpeg. All these editors cater to different needs, so be sure to try them out, understand your requirements, and use the right one for your project!
FILMORA VIDEO EDITOR
Supported OS: Windows and Mac
Filmora Video Editor is another well-known video editor that is widely used for video editing. It was released two decades ago to provide low-cost video editing software. Aside from video cutting and joining, it has some great features such as adding filters, titles, texts, and so on. You can also record your voice or live music, mix audio and video tracks, and do other things. It is simple to use and is available for both Mac and Windows users.
Filmora includes an instant cutter tool that can be used throughout clip import and is designed for use with large amounts of high-resolution content. As the names indicate, it is very simple and serves only one purpose. You can drag multiple clips onto its window, but only if the Merge sub-mode is enabled. Trim mode is only for trimming the ends of a single clip, and its interface only displays one clip in the left-size source tray. You can Add Segments, which creates a new clip based on your trimmed original, but you can’t split a clip explicitly.
For Win 7 or later (64-bit)
For macOS 10.14 or later
Features:
- All editing tools and features are well-displayed in the main windows, which can be found and used easily;
- Very easy to cut or trim video files just with a few clicks;
- Lots of filters, overlays, motion graphics, titles, and more special effects can be added to the video.
- More features like Picture in Picture and Green Screen and Split Screen can be used to make videos more unique.
Pros:
- Intuitive Interface
- Easy To Use
- Great Features
- Affordable Perpetual License
- Great Final Video Results
- Faster Renders And Previews
- Supports Screen Capturing
- Support Wide Range Of File Formats
- User Support Is Good
Cons:
- Lacks Advanced Feature
- Free Version Has Watermark
- Not Available For Linux And Phones
- Pricing Is Expensive
- Software Lagging
Steps On How To Cut Video On Mac Using Filmora Video Editor
Step 1: Import Video Files
You will begin by importing the video files into the project window of your program through dragging and dropping.
Step 2: Add Video To The Timeline
Drag and dropping are the easiest way to add the video to the timeline.
Step 3: Cut Video
If you want to trim the video, just move the cursor at the beginning or end of the video. When the cursor becomes a cross, move it forward or backward. Trimming only allows you to cut the beginning or end of a video.
If you need to cut a section of a video, you should follow do this: move the cursor at the beginning of the video section you want to cut, then click the scissors icon > Next, move the cursor to the end of the video section you want to cut and click scissors icon > Right-click on the video section you want to cut and click “Delete“.
Step 4: Export the Video
To export your video, click the “export” button and choose the local tab. After selecting the output device and format, just click “Create” to save it.
HANDBRAKE
Supported OS: Linux, Windows, and Mac
HandBrake is a multithreaded video transcoder that is unfastened and open source. It can compress and convert nearly any virtual media layout to another. HandBrake is able to rip encrypted DVDs the usage of libdvdcss (libdvdcss is covered with the VLC media participant on macOS and AnyDVD/DVD forty three on Windows).
This software program additionally enables batch processing, which converts a couple of video files at the same time. Additionally, a plethora of presets are available to guide you to the preferred output without having to tinker with a plethora of options.
Handbrake is a powerful and excellent video converter for Windows, Mac, and Linux that should not be overlooked. It provides all of the necessary features in a simple tool that gives the user complete control over the output. Before we get into the specifics, here’s a rundown of Handbrake’s advantages and disadvantages.
Features:
- Support of chapter selections
- Support of subtitles
- Integrated bitrate calculator
- Picture deinterlacing, cropping, and scaling
- Live Video Preview
Pros:
- HandBrake has a very simple layout which makes the video converter very easy to use, even for those who are converting videos for the first time.
- The live preview helps.
- The fact that the software is free and has device presets for iOS and Android certainly makes HandBrake a welcome video converter.
- The queuing tray for batch conversions is particularly nice.
- People who convert a lot of videos will find it very helpful.
Cons:
- On the flip side, the settings are not always easy to deal with.
- It takes a lot of time and then there are errors. The latest version fixes some old bugs but there are hiccups.
- The live preview is for up to four minutes of a video.
- It is futile for very long videos.
- The settings interface and that of the live preview could be better.
- The open-source software also doesn’t support all video formats.
- Given the diversity of devices and the multitude of formats in use today, HandBrake needs more compatibility.
Steps On How To Compress Video Using Handbrake
- After you download and install Handbrake, open the app. On the left side, under ‘Source Selection’, click ‘File’. Select the file from the folder and then click ‘open’.
- Choose where you want the compressed video to be saved by clicking ‘Browse’.
- Enter a name for the video, and click ‘Save’.
- Under ‘Output Settings’, choose MP4 for ‘Container’.
- Click the ‘Video’ tab, under it, is the ‘Video Codec’, choose (x264).
- Select a Preset from the ‘Preset Drawer’. We recommend you choose Fast1030p 30 for high quality.
- Choose the ‘framerate’, depending on your source video i.e. NTSC (29.97fps), then make it 30fps by choosing 30. Also, tick the ‘Constant Framerate’ to ensure better compatibility.
- Enter an ‘Average Bitrate (kbps)’ for the video between 5,000-10,000 (take note: higher bitrate has higher quality video but will take longer to upload and download).
- Click the ‘Picture’ tab if you want to change the video frame size or resolution.
Change ‘Anamorphic’ to ‘None’, and ‘Modulus’ to ‘16’. And tick ‘Keep Aspect Ratio’. Use the arrow down on Width to change from 1920 (full HD) down to 1280.
Select the ‘Audio’ tab and choose 48 for the Samplerate. Choose Stereo for Mixdown. Choose 320 for your audio Bitrate.
- Hit the ‘Start Encode’ button and wait until the video has finished compressing. Handbrake will let you know when it has finished.
SHUTTER ENCODER
Supported OS: Mac, Linux, and Windows
Shutter Encoder offers a complimentary codec and conversion tool for everyone that was created in collaboration with video editors.
Convert your videos, images, and audio files to OP-Atom format, which is compatible with Avid Media Composer and Pro Tools. Encode your files, replace audio, burn to DVD, analyze audio volume, download web videos, and create your own timelapse.
Analyze audio loudness, replace audio, author DVDs and Blu-rays, create image sequences, download web videos, and more. Everything is done as simply and efficiently as possible
Shutter Encoder makes use of Java as well as other tools such as 7za, VLC, FFmpeg, ExifTool, MKVMerge (part of MKVToolNix), MediaInfo, DVDAuthor, youtube-dl, and others.
Shutter Encoder offers advanced users the option to tailor the conversion individually. You can, for example, manually change the bitrate of audio and video, but you can also set a file size limit and perform the conversion based on that. Further work techniques, such as the ability to enable hardware of the computer itself and complete the conversion according to a predefined profile, are available in a separate box.
Features:
- Without conversion: Cut without re-encoding, Replace audio, Rewrap, Conform, Merge, Subtitling (create subtitles for a video), Video inserts
- Sound conversion: WAV, AIFF, FLAC, MP3, AC3, OPUS, OGG
- Editing codecs: DNxHD, DNxHR, Apple ProRes, QT Animation, Uncompressed YUV
- Output codecs: , DV PAL, XDCAM HD422, AVC-Intra 100, XAVC, HAP, , VP9, AV1, OGV, MJPEG, Xvid, WMV, MPEG
- Archiving codec: FFV1
- Image creation: JPEG, PNG, TIF, TGA, DPX, BPM, ICO, WEBP
- Burn & Rip: DVD, Blu-ray, DVD RIP
- Analysis: Loudness & True Peak, Audio normalization, Cut detection, Black detection
- Download web videos using youtube-dl
Pros:
- Conversion according to profiles
- Extensive advanced options
- Built-in editing capabilities
Cons:
- Limited preview capability
Steps On How To Use Shutter Encoder
- To start, drag the video from your file manager and drop it onto the Shutter Encoder window, or use the ‘Browse’ button available in the upper left-hand side corner of the window to add a video.
- Next, from the ‘Choose function’ drop-down menu, scroll to (it’s the first under Output codecs). You will now see some new options in a new panel that appears on the right-hand side of the Shutter Encoder window. From there, if you want to crop the video, click the Crop checkbox:
A new window will pop up where you can use your mouse to crop the video to the desired size. If you want to change it to a predefined, fixed-size ratio value, uncheck the ‘Manual mode’ box, and you’ll be able to choose a ratio from the ‘Pre-settings’ drop-down.
Next, if you want to change the profile, expand the ‘Advanced features’ item in the Shutter Encoder sidebar, check the box for the Force profile option, then change the profile to what you want to use:
- When you’re done with the video adjustments you want to make, click the ‘Start function’ button, and Shutter Encoder will begin encoding your new video.
AVIDEMUX
Supported OS: Linux, BSD, Mac OS X, and Microsoft Windows
Avidemux offers three fundamental operations: cutting, encoding, and filtering. Cutting allows users to copy, paste, save, or delete a specific part of a video and is incredibly beneficial when users are only interested in a small portion of a video or want to remove commercials from a TV show that they have recorded.
Encoding, on the other contrary, is the way of transforming a video to various formats so that it can be played on different players. Users of Avidemux can use this feature on videos they want to use for business or archive for personal use. They could also use this to convert a video that they intend to post online.
Users can also use Avidemux to filter their videos, which include incorporating subtitles and color profiles, deinterlacing, resizing and sharpening the image of a video, and increasing or decreasing the overall volume of the audio.
Meanwhile, Avidemux has task automation features that make video processing and editing quick and painless. A feature called Joblist allows users to organize their projects in a queue so that they can access their files from a single location. They can use this queue to handle videos in bulk as well.
Features:
- Multiple Formats
- Video Filters
- Advanced Interlacing
- Full Editing Control
- Simple Interface
- Open Source
Pros:
- Covers standard formats.
- All essential features are present.
- Surprisingly advanced filtering, processing, editing, and filtering controls.
- The interface is easy to learn.
- Open-source
Cons:
- The interface is very legacy and needs remodeling
- No longer updated
- No support
Steps On How To Cut Videos On Avidemux:
- Open up Avidemux, and load the video file that you want to work with. If you get a prompt like this one: we recommend clicking Yes to use the safer mode.
Find the portion of the video that you’d like to isolate. Get as close as you can to the start of the clip you want to cut.
You want it to read I; if it isn’t framed type I, then use the single left and right arrow buttons to go forward or backward one frame until you find an appropriate I frame.
- Once you’ve found the right starting frame, click the button with the A over a red bar. This will set the start of the clip.
- Advance to where you want your clip to end. Click on the button with a B when you’ve found the appropriate frame. This frame can be of any type.
- You can now save the clip, either by going to File –> Save –> Save Video, or by pressing Ctrl+S. Give the file a name, and Avidemux will prepare your clip.
BEST PAID FFMPEG ALTERNATIVE TO CUT VIDEO ON MAC
JOYOSHARE MEDIA CUTTER
Supported OS: Mac and Windows
The best video cutting tool is Joyoshare Media Cutter for Windows (or Mac). As a professional video trimmer, it allows you to cut your media files at a 60X faster rate, allowing you to clip a 60-minute video or audio file in just one minute. The interface design is also simple and clean, allowing you to do it quickly.
Another noteworthy feature is the ability to easily cut and merge both video and audio without sacrificing quality. The cropper supports a variety of video and audio formats, including AVI, MP4, MPEG, VOB, WMV, ASF, RM, RMVB, 3GP, MP3, WMA, M4R, and others, allowing you to save the file in any format and on any device, including Apple.
More notably, this is a capable all-in-one video cutter. In addition to cutting videos and audio, it can convert all popular video formats, extract audio from video files, and merge video and audio files from the same source into a new one.
Features:
Convert to Any File Format
Merge Video and Audio Files into Multiple Formats
Improved Accuracy & Efficiency in Cutting Videos
60X Fast Conversion
Pros:
- Offers an easy way to cut, merge, and convert video files
- Blazing fast video-cutting and file-conversion speed
- Supports multiple audio and video file formats
Cons:
- Can only merge videos from the same source. That means you can’t use the program to merge separate videos from your gallery.
- The program doesn’t offer an easy way to remove an unwanted part of a video if it’s in the middle of the video. The only way to do that is by cutting the section before and after the video, then merging them into one.
Steps:
Step 1: Adding Video
To add a video, click the “Open” button. Locate the video you want to trim from your collection and open it. Alternatively, you can use the drag-and-drop feature.
Step 2: Select the Segment to Be Trimmed
At the bottom of the Joyoshare video window, you’ll be able to see a time slider through which you can skip to your desired timeframe. Move the slider handles attached to the yellow timeline bar to set the starting and ending points of your video.
Once you’ve set your desired starting point, click on the “[” button to highlight the starting segment, then move the right-hand slider to select the ending point, and click the ] button to set the end segment.
Step 3: Choose Your Desired Output Format and Destination Folder
Click the “Format” button, and a new window will pop up where you’ll be able to choose your preferred output format.
Step 4: Trim the Video
Click the “Start” button to begin trimming the segment. Wait for a minute for the program to finalize trimming the segment, then click the save button. That’s it! You’ve successfully trimmed your first video.
If you wish to cut and merge several segments, click the “+” icon at the bottom of the segments tab, then follow the above procedure to create several segments.
MOVAVI VIDEO EDITOR
Supported OS: Mac and Windows
Movavi Video Editor for Mac and Windows is a simple-to-use yet effective video editor and cutter. Aside from cutting and joining short videos, it can apply various video effects, add music and titles, and so on to make your movie more visually appealing. The video cutter tool has an easy-to-use interface and outstanding instructional videos, so you can get started quickly.
Movavi comes with a bunch of video editing controls into a straightforward, user-friendly interface. PiP, chroma-key, titling, basic keyframing, and even motion tracking are included. It isn’t as feature-rich or as fast as most of the competition, but it allows you to easily create visually appealing work.
The tool is not free, but it does offer a limited-time free trial to users. However, it is a little irritating when the ad appears after you install and launch the trial version.
Features:
- Media Library
- Templates
- Upload video or audio file
- Video and image management
- Title Editor
- Trim & Slice
- Video Effect
- Slow Motion & Time Effect
- Social Sharing
- Brand Overlay
- Text Overlay
- Audio Tools
- Speed Adjustment
- Split / Merge
- Video Stabilization
Pros:
- Easy-to-understand user interface
- Transitions with sound
- Motion tracking and picture-in-picture tools
- Chroma keying
- Quick movie-creation tool
Cons:
- Lacks advanced trim modes and clip pre-trimming
- Rendering on the slow side
- Not compatible with Apple Silicon M1
Steps:
- Add Video Files
Launch Movavi’s MP4 trimmer, click the Add Media Files button, and upload the MP4 files you want to work with. The videos you’ve added will appear on the Timeline in the lower part of the program window.
- Cut And Trim Your Videos
So how to cut MP4 video with Movavi Video Editor Plus? If you want to snip a video into two or more parts, click the file on the Timeline and move the red marker to the place where you want to make the first cut. Then click the Split button with the scissors icon or hit Ctrl+B. Repeat the process as many times as you need.
If you want to trim your video clip, select the file on the Timeline and then just pull the edge of the clip to shorten it as shown in the picture.
- Save The Result
All that’s left to do is save your edited video. Click the Export button, choose the appropriate video format, and hit Start.
XILISOFT VIDEO CUTTER
Supported OS: Mac and Windows
Xilisoft Video Cutter is an effective programming cutter that lets you choose and cut your preferred segments in a single file as well as cut out the segments you don’t like. It is compatible with almost all popular video formats, including VCD, AVI, MPEG, MP4, WMV, 3GP, /MPEG-4 AVC, /PSP AVC, MOV, ASF, and others. It enables you to precisely set the start and end points.
While the software cannot cut segments from multiple input files at the same time, it can cut your selected source video into the number of clips you require in a single step. Xilisoft Video Cutter goes beyond standard cutting or slicing by allowing you to convert your video input files to a variety of well-known codecs. It is possible to convert the entire source file or just a specific segment, but this requires removing those unnecessary parts that frequently cause problems (TV advertisements, trailers, etc.).
Features:
Easily Cut Video Clips
Multi-trim Video to Whole
Output Clips to Multiple Formats
Instant Preview
Clear Timeline
Advanced Editing
1-2-3 Interface
Multilingual Interface
Pros:
Supports all of the most widely used video file formats
Converts your videos between formats
Simple cutting interface
Allows for multiple cuttings from a single source file
Cons:
Does not support batch processing
Steps On How To Cut Your Favored Segments:
- Add Source Video File
Click the “Open“ button on the main interface, and select a video file in the pop-up window.
- Set Clip Segments
Click “Play” and click the “Set Start Point” and “Set End Point” buttons successively during playing the video to set the start point and endpoint of the clip.
You can also set several segments. Click the “Show Advanced Mode” button and click the “New Clip” button in advanced mode to set the start and endpoints of the segments. Repeat the above steps to set several segments.
Tip: To delete a segment, please choose the segment in the segment list, and click the “Delete Clip” button on the toolbar; to adjust the segment order, please choose the segment and click the “Move Up” or “Move Down” button to adjust its order.
- Output Settings
Click the “Cut” button at the bottom of the window to open the “Output Settings” window.
- Start Cutting
Click the “OK” button to start video cutting. During cutting, you can check the cutting status by dragging the process bar or canceling the cutting. Tip: After cutting is done, click the “Open Output Folder” button to open the destination folder to check the clippings. Click the “Done” button to go back to the main window.
WHICH SHOULD I CHOOSE: FREE OR PAID VIDEO CUTTER ON MAC?
Whether you choose Free or Paid Video Cutter, it still depends on your edit and navigation if the project will succeed like what you’re anticipating. Beginners in the industry can go for Free Video Cutters to practice the craft without worrying about the monthly subscription.
However, if you’re a professional, I highly suggest that you choose Paid Video Cutter to lessen the hassle and create amazing output.
FAQS ABOUT CUTTING VIDEOS
- How can I cut a video without losing quality?
Trimming VLC through LosslessCut
LosslessCut is an open-source video cutter that runs on Windows, Linux, and Mac. Like Filmora, this software also allows you to cut videos without re-encoding, so there is no loss of quality.
- Who is the best video cutter?
Filmora is one of the best video cutter software that allows you to change the aesthetic of your video with one click. It comes with a wide range of video effects that enable you to make clips look good. Features: This tool provides fast editing processing and adjustable preview quality.
- Why does trimming videos reduce quality?
In most cases, trimming only causes a minor loss of video quality. And there is no clear causal relationship between trimming and losing video quality. The main factors that influence video quality are Resolution, Bitrate, and Frame size.
If you are longing to pick up the best video cutter for Mac, you are supposed to evaluate it from different aspects, like operating interface, cutting features, output quality, post-processing ability, etc. Frankly speaking, there is no fixed answer. Everything depends on your actual requirements. If you want to cut videos on Mac with the forthright method, iMovie can be your top priority. If you prefer top-leading editing features, Blender is competitive enough for you.
Conclusion:
There you have it! Here is the alternative software to cut/shorten your video without using FFmpeg. All these editors cater to different needs, so be sure to try them out, understand your requirements, and use the right one for your project!
How to Easily Convert SRT to VTT
While there are numerous subtitle formats, two of the most commonly used formats are SRT and Web VTT. SRT is also known as SubRip. The format got its name from a DVD ripping software that extracted subtitles from DVDs.
Web VTT stands for Web Video Text Track. Web VTT is a W3C standard that allows you to display the text in sync with the HTML 5
Both of them are quite similar; however, slight differences might make you choose one over the other.
- What Does It Look Like
- Timecode Format
- Metadata
- Basic Text Formats (Bold, Italic, Underline)
- Advanced Styling Fonts
- Support Changing The Position Of Subtitles
- Summary
- How to Convert SRT to VTT Manually
- Video Guide Tutorial to easily Convert SRT to VTT with Subtitle Edit
- Pro Tip: The Best Way to Edit the Styling of Your SRT file and Merge Subtitles with Videos
Is Web VTT the Same as SRT?
While SRT is a popular text file used for captions, Web VTT is not far behind. Web VTT is similar to SRT but includes more styling options and editing. Web VTT works exceptionally well with media players but might not work efficiently on social media platforms.
Besides that, it also contains metadata making it more robust than SRT. But this is not all that is different between SRT and Web VTT. Let’s dive into the details of how both are different even though they are sometimes used interchangeably:
What Does It Look Like
Mostly, SRT and Web VTT files are similar, so one can easily be converted to another or edited. A Web VTT file starts with Web VTT at the top and the file’s title next to it. An SRT file does not have any of that. Then the caption sequences are separated with blank lines in Web VTT files. The SRT file is messy, with captions not separated by lines but all clustered together.

| Features/Subtitle Formats | SRT | VTT |
|---|---|---|
| Timesconde Format | Hours:minutes: seconds. milliseconds | minutes: seconds. milliseconds |
| Metadata | No | Yes |
| Title | No | Yes |
| A Numbering of The Subtitle Lines | Yes | No |
| Basic Text Formats | Not supported | Yes |
| Advanced Styling Fonts | Simple | More robust styling including bold, italics, etc |
| Support Changing the position of subtitles | No | Yes |
Timecode Format
The timecode format for an SRT file begins with hours:minutes: seconds. milliseconds. On the other hand, the timecode format for a Web VTT file is minutes: seconds. milliseconds. This difference in timecode is extremely important to keep in mind while manually editing SRT or Web VTT files.
Metadata
A web VTT file includes metadata, unlike an SRT file. This means that a web VTT file includes extra information like author, title, and additional comments.
Basic Text Formats (Bold, Italic, Underline)
Web VTT is equipped with basic styling formats like bold italic and underline, which makes it more robust than SRT. Its styling formats are supported by all browsers. On the other hand, SRT files do not support any styling.
Advanced Styling Fonts
Web VTT supports a more robust format that includes whistles and bells, distinguishing it from the simpler SRT format. This adds a very nice touch, especially if the text file is for a tv episode.
Support Changing The Position Of Subtitles
Along with all its other fantastic features, Web VTT files also allow you to change the position of the subtitles easily. SRT files do not give you the liberty to do that.
Summary
So, in short, Web VTT is more user friendly offering a lot more than what a simple SRT file may offer. Apart from differences in styling, time, and text formats, Web VTT files are incredibly easier to read and edit. You can also add comments which will remain hidden from the display.
How to Generate VTT Subtitles from SRT using an Online subtitle converter
If you want a quick solution to convert SRT files to Web VTT, then there are a lot of converters available online that will convert your SRT file in seconds, however long it many be. Some notable converters online are given below. Depending on their features and results, you can use the one that suits you the most.
Go Transcript

Go Transcript is an excellent online service that is mainly known for providing transcriptions for audio and videos. Their human transcribers provide transcriptions with almost 100% accuracy, even when the voices are heavily accented.
Apart from that, GoTranscript allows you to convert files into 15 different text formats including csv, srt, vtt, sbv and rt. The website is extremely easy to navigate, and you can upload your file and convert it within minutes.
Pros
- Mobile app is available for use
- Easy to navigate interface
- Free conversions to different file types
Cons
- Lots of extra costs if purchasing premium services
- Web editor is not very great
Veed.io
Veed.io is another excellent website for converting SRT files to Web VTT format. The website has a very intuitive interface with everything in front of you. By clicking on the upload button, you can upload your file and convert it. Other than that, you can also download closed captions from the Veed.io website, as it allows you to transcribe audios and edit videos.

Pros
- Easy to Use
- Can be easily integrated with Youtube
- Can download closed captions and use them for other purposes
Cons
- No mobile app is available
Subtitle Edit
Subtitle Edit is also an online SRT to Web VTT convertor that has an extremely user-friendly interface. Subtitle edit is free of any ads or distractions, allowing you to work on your file with your complete focus. Subtitle Edit also provides transcription and video editing services along with free file conversions.

Pros
- User-friendly
- No clutter or distractions
Cons
- Only creates and edits SRT files
- Expensive premium services
How to Convert SRT to Web VTT using GoTranscript
As mentioned above, GoTranscript is extremely easy to navigate and allows you to quickly convert your files from one format to the other. Here is a detailed process that shows how you can convert your SRT file to Web VTT in GoTranscript.
To convert an SRT file to Web VTT using GoTranscript, follow the steps below:
- Open the Gotranscriptsubtitle converter in your browser.
- Now press the Upload button to upload the file to the website.

- From the second section, select the file format you want to convert it in. Since you want to convert it to Web VTT format, select “.”

- Lastly, click on Convert to convert your file. Once your file is converted, press download to download the file.
Now the file will be downloaded to your computer and you can use it as you desire.
Online converters are an extremely easy way to convert your SRT files to Web VTT. However, sometimes you might want to manually edit them if you are not satisfied with the results of the online converter.
How to Convert SRT to VTT Manually?
Both SRT and Web VTT files are easily editable in Notepad or TextEdit if you are using Mac, so you can manually change both of them there when needed. SRT and Web VTT files are mostly the same, with just a few distinguishable differences.
By understanding those differences between them, you can easily convert an SRT file to Web VTT or a Web VTT file to SRT. Here is how you can convert an SRT to VTT manually:
Step-by-step guidelines to Convert SRT to VTT Manually
Open in Notepad:
- In order to convert SRT files into VTT manually, search the SRT file in file explorer and open it in Notepad.
Edit the File and save:
- When you open the file, you will see that all the text is quite close together with no black lines to separate sequences. If the file is small, putting blank lines in between would not be too difficult. However, it can be quite a time taking process if the file is large.

- To do it manually, you can add spaces between sequences.
- Replace all the periods with commas. Press Crtl+H on your keyboard to open the replace toolbar and select replace all to replace all periods with commas.
- The next step is adding WebVTT to the top of the file. You can also add a comment or title for the file right next to it.

- Lastly, remove 1 from the start of each time code. For example, if the time code is “100:00:11.580,” write “00:00:11.580”.

Change the extension from SRT to VVT:
- Now save all the changes, rename it by replacing the suffix “SRT ‘’ with “VVT .’’
If you do not see the extension in the name of the file,
- Go to the top menu in Windows Explorer
- Go to view
- Click on the check box for “File name extensions”

Now you can easily change the extension from SRT to VVT.

The manual process is not too difficult. It can be extremely time taking to change each time code and adding blank lines in between. However, this is an easy fix when you cannot access a converter.
Video Guide Tutorial to easily Convert SRT to VTT with Subtitle Edit
Here is a video tutorial to guide you to convert SRT to VTT:
How to Easily Convert SRT to VTT and VTT to SRT
Pro Tip: The Best Way to Edit the Styling of Your SRT file and Merge Subtitles with Videos
While we have discussed most of the solutions with you, the easiest and the best solution is saved for the last. You must be aware of Wondershare Filmora , but did you know that you can easily edit your SRT file there and merge the subtitles with your video! Filmora offers you to edit SRT files and conveniently arrange the captions however you want.
Wondershare Filmora
Filmora is truly a work of art that allows beginners and professionals to create and edit world class videos. With an easy to navigate interface, you can find everything within seconds, even if you are a novice at video editing.

Filmora is especiially useful in creating YouTube videos, instagram reels, or TikToks that will wow your audience. With such an incredible video editing tool at your hand, all you need to worry about is good content, and Filmora will enhance the rest of the things with its spectacular video editing.
For that part, Filmora offers a range of tools, effects, stickers, and transitions that will give you a professional quality video.
You can also add subtitles, text, or animations to your videos.
As this article focuses on editing your SRT file in Filmora, we will dive directly into that. Here is how you can edit your SRT file in Filmora:
Step-by-step guidelines
Free Download For Win 7 or later(64-bit)
Free Download For macOS 10.14 or later
- Open Wondershare Fimora on your PC. If you do not have the Filmora app on your PC, you can download it from here .
- The first step is uploading the SRT file directly into the media resource area. You can directly import the file using the import media files option.

- The next step is editing the file. Drag the SRT file to the timeline and right click on it. Now, select Advanced Edit. You can also double click on the SRT file in the timeline to open Advanced Edit options.

There will be multiple options for you to edit your SRT file in Filmora including:
- Edit Time Code: Here, you can edit the time code and change the placement of your captions depending on when you want them to appear.
- Change Subtitles: You can add new subtitles, remove any or edit a few to make them more accurate.
- Subtitle Style: This option allows you to edit the font and size of your captions. You can change the style to fit your video.
- Merge Subtitles: This option allows you to merge subtitles.

- Once you are done editing the SRT file, right click on the file and click on the Export Subtitle file.

By following the simple steps above you can edit your SRT file conveniently in no time.
Final Words
So, here is all you need to know about converting an SRT file to Web VTT. Hopefully, you will find these methods helpful and easy to convert SRT files to Web VTT on daily basis. Don’t forget to give Filmora a try! Editing your SRT file in Filmora is effortless with all the advanced tools available. You can edit your videos and captions and then download them to your computer in no time.
- Go Transcript
- Veed.io
- Subtitle Edit
- How to Convert SRT to Web VTT usingGoTranscript
- How to Convert SRT to VTT Manually
- Video Guide Tutorial to easily Convert SRT to VTT with Subtitle Edit
- Pro Tip: The Best Way to Edit the Styling of Your SRT file and Merge Subtitles with Videos
Is Web VTT the Same as SRT?
While SRT is a popular text file used for captions, Web VTT is not far behind. Web VTT is similar to SRT but includes more styling options and editing. Web VTT works exceptionally well with media players but might not work efficiently on social media platforms.
Besides that, it also contains metadata making it more robust than SRT. But this is not all that is different between SRT and Web VTT. Let’s dive into the details of how both are different even though they are sometimes used interchangeably:
What Does It Look Like
Mostly, SRT and Web VTT files are similar, so one can easily be converted to another or edited. A Web VTT file starts with Web VTT at the top and the file’s title next to it. An SRT file does not have any of that. Then the caption sequences are separated with blank lines in Web VTT files. The SRT file is messy, with captions not separated by lines but all clustered together.
| Features/Subtitle Formats | SRT | VTT |
|---|---|---|
| Timesconde Format | Hours:minutes: seconds. milliseconds | minutes: seconds. milliseconds |
| Metadata | No | Yes |
| Title | No | Yes |
| A Numbering of The Subtitle Lines | Yes | No |
| Basic Text Formats | Not supported | Yes |
| Advanced Styling Fonts | Simple | More robust styling including bold, italics, etc |
| Support Changing the position of subtitles | No | Yes |
Timecode Format
The timecode format for an SRT file begins with hours:minutes: seconds. milliseconds. On the other hand, the timecode format for a Web VTT file is minutes: seconds. milliseconds. This difference in timecode is extremely important to keep in mind while manually editing SRT or Web VTT files.
Metadata
A web VTT file includes metadata, unlike an SRT file. This means that a web VTT file includes extra information like author, title, and additional comments.
Basic Text Formats (Bold, Italic, Underline)
Web VTT is equipped with basic styling formats like bold italic and underline, which makes it more robust than SRT. Its styling formats are supported by all browsers. On the other hand, SRT files do not support any styling.
Advanced Styling Fonts
Web VTT supports a more robust format that includes whistles and bells, distinguishing it from the simpler SRT format. This adds a very nice touch, especially if the text file is for a tv episode.
Support Changing The Position Of Subtitles
Along with all its other fantastic features, Web VTT files also allow you to change the position of the subtitles easily. SRT files do not give you the liberty to do that.
Summary
So, in short, Web VTT is more user friendly offering a lot more than what a simple SRT file may offer. Apart from differences in styling, time, and text formats, Web VTT files are incredibly easier to read and edit. You can also add comments which will remain hidden from the display.
How to Generate VTT Subtitles from SRT using an Online subtitle converter
If you want a quick solution to convert SRT files to Web VTT, then there are a lot of converters available online that will convert your SRT file in seconds, however long it many be. Some notable converters online are given below. Depending on their features and results, you can use the one that suits you the most.
Go Transcript
Go Transcript is an excellent online service that is mainly known for providing transcriptions for audio and videos. Their human transcribers provide transcriptions with almost 100% accuracy, even when the voices are heavily accented.
Apart from that, GoTranscript allows you to convert files into 15 different text formats including csv, srt, vtt, sbv and rt. The website is extremely easy to navigate, and you can upload your file and convert it within minutes.
Pros
- Mobile app is available for use
- Easy to navigate interface
- Free conversions to different file types
Cons
- Lots of extra costs if purchasing premium services
- Web editor is not very great
Veed.io
Veed.io is another excellent website for converting SRT files to Web VTT format. The website has a very intuitive interface with everything in front of you. By clicking on the upload button, you can upload your file and convert it. Other than that, you can also download closed captions from the Veed.io website, as it allows you to transcribe audios and edit videos.
Pros
- Easy to Use
- Can be easily integrated with Youtube
- Can download closed captions and use them for other purposes
Cons
- No mobile app is available
Subtitle Edit
Subtitle Edit is also an online SRT to Web VTT convertor that has an extremely user-friendly interface. Subtitle edit is free of any ads or distractions, allowing you to work on your file with your complete focus. Subtitle Edit also provides transcription and video editing services along with free file conversions.
Pros
- User-friendly
- No clutter or distractions
Cons
- Only creates and edits SRT files
- Expensive premium services
How to Convert SRT to Web VTT using GoTranscript
As mentioned above, GoTranscript is extremely easy to navigate and allows you to quickly convert your files from one format to the other. Here is a detailed process that shows how you can convert your SRT file to Web VTT in GoTranscript.
To convert an SRT file to Web VTT using GoTranscript, follow the steps below:
- Open the Gotranscriptsubtitle converter in your browser.
- Now press the Upload button to upload the file to the website.
- From the second section, select the file format you want to convert it in. Since you want to convert it to Web VTT format, select “.”
- Lastly, click on Convert to convert your file. Once your file is converted, press download to download the file.
Now the file will be downloaded to your computer and you can use it as you desire.
Online converters are an extremely easy way to convert your SRT files to Web VTT. However, sometimes you might want to manually edit them if you are not satisfied with the results of the online converter.
How to Convert SRT to VTT Manually?
Both SRT and Web VTT files are easily editable in Notepad or TextEdit if you are using Mac, so you can manually change both of them there when needed. SRT and Web VTT files are mostly the same, with just a few distinguishable differences.
By understanding those differences between them, you can easily convert an SRT file to Web VTT or a Web VTT file to SRT. Here is how you can convert an SRT to VTT manually:
Step-by-step guidelines to Convert SRT to VTT Manually
Open in Notepad:
- In order to convert SRT files into VTT manually, search the SRT file in file explorer and open it in Notepad.
Edit the File and save:
- When you open the file, you will see that all the text is quite close together with no black lines to separate sequences. If the file is small, putting blank lines in between would not be too difficult. However, it can be quite a time taking process if the file is large.
- To do it manually, you can add spaces between sequences.
- Replace all the periods with commas. Press Crtl+H on your keyboard to open the replace toolbar and select replace all to replace all periods with commas.
- The next step is adding WebVTT to the top of the file. You can also add a comment or title for the file right next to it.
- Lastly, remove 1 from the start of each time code. For example, if the time code is “100:00:11.580,” write “00:00:11.580”.
Change the extension from SRT to VVT:
- Now save all the changes, rename it by replacing the suffix “SRT ‘’ with “VVT .’’
If you do not see the extension in the name of the file,
- Go to the top menu in Windows Explorer
- Go to view
- Click on the check box for “File name extensions”
Now you can easily change the extension from SRT to VVT.
The manual process is not too difficult. It can be extremely time taking to change each time code and adding blank lines in between. However, this is an easy fix when you cannot access a converter.
Video Guide Tutorial to easily Convert SRT to VTT with Subtitle Edit
Here is a video tutorial to guide you to convert SRT to VTT:
How to Easily Convert SRT to VTT and VTT to SRT
Pro Tip: The Best Way to Edit the Styling of Your SRT file and Merge Subtitles with Videos
While we have discussed most of the solutions with you, the easiest and the best solution is saved for the last. You must be aware of Wondershare Filmora , but did you know that you can easily edit your SRT file there and merge the subtitles with your video! Filmora offers you to edit SRT files and conveniently arrange the captions however you want.
Wondershare Filmora
Filmora is truly a work of art that allows beginners and professionals to create and edit world class videos. With an easy to navigate interface, you can find everything within seconds, even if you are a novice at video editing.
Filmora is especiially useful in creating YouTube videos, instagram reels, or TikToks that will wow your audience. With such an incredible video editing tool at your hand, all you need to worry about is good content, and Filmora will enhance the rest of the things with its spectacular video editing.
For that part, Filmora offers a range of tools, effects, stickers, and transitions that will give you a professional quality video.
You can also add subtitles, text, or animations to your videos.
As this article focuses on editing your SRT file in Filmora, we will dive directly into that. Here is how you can edit your SRT file in Filmora:
Step-by-step guidelines
Free Download For Win 7 or later(64-bit)
Free Download For macOS 10.14 or later
- Open Wondershare Fimora on your PC. If you do not have the Filmora app on your PC, you can download it from here .
- The first step is uploading the SRT file directly into the media resource area. You can directly import the file using the import media files option.
- The next step is editing the file. Drag the SRT file to the timeline and right click on it. Now, select Advanced Edit. You can also double click on the SRT file in the timeline to open Advanced Edit options.
There will be multiple options for you to edit your SRT file in Filmora including:
- Edit Time Code: Here, you can edit the time code and change the placement of your captions depending on when you want them to appear.
- Change Subtitles: You can add new subtitles, remove any or edit a few to make them more accurate.
- Subtitle Style: This option allows you to edit the font and size of your captions. You can change the style to fit your video.
- Merge Subtitles: This option allows you to merge subtitles.
- Once you are done editing the SRT file, right click on the file and click on the Export Subtitle file.
By following the simple steps above you can edit your SRT file conveniently in no time.
Final Words
So, here is all you need to know about converting an SRT file to Web VTT. Hopefully, you will find these methods helpful and easy to convert SRT files to Web VTT on daily basis. Don’t forget to give Filmora a try! Editing your SRT file in Filmora is effortless with all the advanced tools available. You can edit your videos and captions and then download them to your computer in no time.
How to Create a DIY Green Screen Video Effect?
No matter how big the budget of a Hollywood movie is, at the end of the day, it has to rely on the humble green screens for special video effects. The stunning studios from where your favorite YouTubers and gamers stream their videos are graphical video effects created through green screens. Even the studios that you see on TV channels are a graphical creation of green screens. You must be wondering how they could achieve such awesome graphics with a simple green screen.
All you need is a good-quality green fabric, a professional video editing software, and a camera. You may not believe it, but that is all you need for creating DIY green screen video effect. You do not have to be a professional video editor to edit the green screen on your videos and add any special video effect. In this article, you will learn how to create your own DIY green backdrop.
What Is Green Screen Technique?
A green screen is nothing but a green fabric. In a video, a green screen is placed in the background behind the subject. In the editing phase of the video, the green screen is replaced with any background image or video effect that stays intact in the video as long as possible. In short, the green screen technique involves superimposing photos and videos on the green screen in a video.
Starting from the video game industry, movie industry to video streaming and TV channels, the green screen technique is used everywhere. The stunning graphical component of these industries is totally dependent on the green screen technique. In fact, DIY green screen for zoom meetings and video conferencing is widely used. Along with that, YouTubers and Twitch streamers use DIY green screen for streaming live.
Technically speaking, instead of a green screen, you can use any other color of screen. However, green screens are widely used, and it has become a norm. The main point to remember when using a green screen is that nothing else should have green color such as the dresses the subject is wearing. Therefore, in technical terms, the green screen is referred to as Chroma Key, and you will find Chroma Key option instead of green screen in most video editors.
Why Use Green Screen Technique?
The main reason why the green screen technique is used in movie and video making is that the video editor can replace the entire background at once instead of replacing the background frame by frame. Once you replace a green screen with an image or video effect, it stays the same throughout the video as long as required.
Therefore, the video editor can save a lot of time in editing and the editing stays uniform throughout which gives a realistic effect. If the green screen technique is not used and editing is done frame by frame of a video, there could be a manual error, inconsistent, and graphical glitches.
You can replace green screens with anything you want. It could be a still image of a beautiful studio with 3D effect like you see in case of YouTubers and gamers. It could be a moving, real-life landscape on any place in the world instead of a beautiful background picture. Similarly, it could be replaced by video effects such as explosions, stadiums full of people, battlefields, and likewise. At times, it could be live animations as you see on TV channels.
How To Create DIY Green Screen Stand Setup and Add Green Screen Effect?
If you want to have a green screen setup for your video, you need to have the following things ready.
- A green cloth that is large enough to cover the entire background.
- A video editing software to replace green screen in your video with anything.
- External light for more video clarity and a good camera with mic.
Step 1: Setup DIY Green Backdrop
Your green fabric should be soft and bright. If you are going to be the subject of the video, make sure you are not wearing anything green. Moreover, do not keep any object within the video frame that is green in color. If there are too many green objects, you can use a blue screen.
When it comes to hanging the green cloth in the background, people find it very difficult. If your video frame is going to be a close-up to the subject, you can use a green screen panel to hang green cloth. A green screen panel generally has a collapsible structure for easy storage and transportation.
Otherwise, you need to install hooks in the wall if you are planning to replace the green screen with a studio-like scene so that the entire background of the video frame stays covered with green screen. You should opt for multiple green screens and stitch them together to cover the background completely.
Step 2: Setup Camera and Light
Whether you are shooting with a DSLR camera or smartphone camera or webcam, make sure you are shooting at least HD video quality so that the editing could be great. Lights are important when you are using green screen though they are not a necessity. The video quality and brightness get enhanced with lights. Diffused lights work the best and the background should be well-lit.
Most importantly, you have to place the lights in such a way that your body arms should not be casting any shadow on the green screen. You can either stand very close to the green screen or away from the green screen so that your shadow does not go till the green screen. Instead of starting to shoot the video from the very beginning, you should capture for a few seconds and make sure everything is perfect including the camera angle.
Step 3: Get The Best Video Editor For Green Screen Effect
There are various video editors available, but not all of them are suitable for green screen effect. We recommend Wondershare Filmora as the best video editor to apply green screen effects on your video while editing. The reason behind the recommendation is that the steps to replace the green screen with any image or video are super simple and anyone can do it. There is no need to be a professional video editor.
Wondershare Filmora also lets you capture video through webcam and you can also capture your screen. It is perfect for recording gameplay as well as your reaction and commentary. Similarly, you can record demonstrations, tutorial videos, as well as video conferences. You can apply green screen effects to your recorded video instantly and publish on different platforms. In fact, you can adjust all the parameters such as color scheme, audio ducking, keyframing, motion tracking and much more to enhance the video output quality.
Conclusion
Making videos with DIY green screen stand is no more an esoteric concept. You can set it up anywhere and start shooting video. The magic begins in the post-production stage where you can use Wondershare Filmora to replace the green screen with video effects that will blow the mind of your viewers and followers. Filmora has intuitive options and controls through which you can apply green screen effect in simple steps.
Also read:
- Updated Best 8 AR Apps for Android and iOS | Help You See the World of AR for 2024
- New In 2024, 10 Catchy Pixel Art Wallpapers and How to Custom Your Own with Ease
- In 2024, Through Speed Ramping, Create a Smooth Transition in Slow-Motion Videos. Follow This Guide and Learn About Premiere Pro Slow Motion and a Better Alternative
- New In 2024, Are You a Newbie Across YouTube? Want to Know Who the Best Vloggers Are? This Article Provides You with the Best Vloggers on YouTube
- Updated 2024 Approved How To Make a Photo Collage in Microsoft Word
- The Article Shall Offer an Overview to Create a Promising Sports Intro and Edit a YouTube Outro for a Sports Channel. There Will Also Be Three Recommended Apps to Download Background Music for Exercise
- 2024 Approved Explore Our Comprehensive Guide to the 10 Best Cameras . Unlock the World of Advanced Technology Perfect for Capturing Slow-Motion Footage in Various Scenarios
- Updated 2024 Approved When the Talk Is About an Effective Slideshow Design, People Also Ask of Creating a Quick Windows 10 Slideshow. Keep Reading to Know About the Quickest Ways of Setting the Issue Straight
- A Complete Overview of VSCO Video Editor for 2024
- Updated Looking for the Simple Steps to Add a Filter to Your Video in Premiere Pro? Here Are the Complete Steps Along with the List of Free Premiere Filter Presets to Use
- In 2024, Are You Curious About the Functionality of LUTs in LumaFusion? This Article Will Satisfy Your Queries with Ease
- How to Put a Background on A Green Screen for 2024
- How to Make Video Fade to Black in Movie Maker Easily
- New The Craziest 10 AI Editors Youve Seen
- New In 2024, Easy Ways to Make Procreate GIFs
- New Camtasia Review – Is It The Best Video Editor for 2024
- 2024 Approved Whats The Best Laptops For Video Editing
- 2024 Approved Are You Looking to Make Subscribe Channel Graphics? Here Is a Complete Guide on How to Make One on Your Own
- Updated This Article Shares Valuable Insight Into the Best Brand Story Videos. Also, It Highlights the Importance of a Video Maker in Your Brand Story Video Ad-Making Process and Why Filmora Should Be Your Go-To Choice
- Updated Wondering How to Rotate a Video in Windows at Any Desired Angle and Save It Permanently? Find Out All the Different Ways to Rotate Videos Temporarily as Well as Permanently
- New How Much Wedding Videographer Cost for 2024
- New In This Article We Will Be Covering the Most Important Topics You Have to Remember when Becoming a Successful YouTube-Star for 2024
- Updated In 2024, Fixing The Slow Playback Issues in DaVinci Resolve
- New Confused About Which GoPro Should You Use? This Article Introduces and Provides a Detailed Overview of the Best GoPro for YouTubers You Can Find in the Market for Vlogging
- SRT Not Displaying How to Open and Use SRT File in VLC?
- New There Are Several Video Players that You Can Use to Watch Videos on Your PC. To Have a Better Experience Viewing Videos and Enhancing Them Across a Similar Platform, You Can Try Out VLC Media Player for PC for 2024
- New As an Online Marketer, It Is Important to Know the Algorithm of YouTube Platform. Ill Share You the History of Algorithm of YouTube and the New Changes in This Year for 2024
- 2024 Approved Quick Answer Why Did Filmora AI Portrait Attract People?
- Updated 2024 Approved Steps to Create Green Screen Videos in After Effects
- New How To Quickly Create A Screen Print Effect In Photoshop Detailed Gui
- Updated 2024 Approved How to Convert a GIF to a Video for Instagram
- Updated In 2024, 3 Best Motion Blur Plugins for Adobe After Effects
- New Want to Save Your Edited Video File in MP4 Format in Windows Movie Maker? Here Are the Simple Steps Along with a Better Alternative for 2024
- Updated What Slideshow Templates Teach You About Aesthetic
- New How to Make Discord Emoji GIF for 2024
- Updated In 2024, Slow Down Videos on Instagram With Perfection A Guide
- New Want to Learn How to Make Gaming Montage Videos? You Have Come to the Right Place. This Guide Will Teach You All You Need to Know to Create Montages of Video Games and Share Them with Other Players
- 8 Quick Fixes Unfortunately, Snapchat has Stopped on Oppo A1 5G | Dr.fone
- Read This Guide to Find a Reliable Alternative to Fake GPS On Oppo A58 4G | Dr.fone
- In 2024, How To Use Special Features - Virtual Location On Apple iPhone SE? | Dr.fone
- In 2024, The Best iSpoofer Alternative to Try On Oppo Reno 10 Pro 5G | Dr.fone
- In 2024, Detailed Review of doctorSIM Unlock Service For iPhone 13 Pro
- In 2024, How to Screen Mirroring Vivo Y17s? | Dr.fone
- Does Motorola Moto G84 5G Have Find My Friends? | Dr.fone
- In 2024, 5 Most Effective Methods to Unlock Apple iPhone XS Max in Lost Mode
- Best Pokemons for PVP Matches in Pokemon Go For OnePlus 11R | Dr.fone
- Step-by-Step Tutorial How To Bypass OnePlus Nord 3 5G FRP
- Complete Guide to Hard Reset Your Oppo Reno 11 5G | Dr.fone
- A Perfect Guide To Remove or Disable Google Smart Lock On Poco C50
- Updated In 2024, Translate Videos with Subtitle Cat Your Essential Guide
- New Best YouTube Video Into Text Converters for 2024
- Top 5 Car Locator Apps for Xiaomi Redmi Note 12T Pro | Dr.fone
- In 2024, Is GSM Flasher ADB Legit? Full Review To Bypass Your Samsung Galaxy S24 Phone FRP Lock
- Update your hardware drivers with Device Manager in Windows 11/10/7
- How to Send and Fake Live Location on Facebook Messenger Of your Oppo Reno 11F 5G | Dr.fone
- Thinking About Changing Your Netflix Region Without a VPN On Xiaomi Redmi 12? | Dr.fone
- What is the best Pokemon for pokemon pvp ranking On Motorola Moto E13? | Dr.fone
- 3uTools Virtual Location Not Working On Vivo S17? Fix Now | Dr.fone
- Everything You Need to Know about Lock Screen Settings on your Xiaomi Redmi K70 Pro
- Title: In 2024, Want to Add Freeze Frame Effect to Your Video on Your Device? Here Are the Steps to Add Freeze Frame on PC, Mac, Smartphone as Well as Online From Any Device
- Author: Morgan
- Created at : 2024-05-19 05:12:44
- Updated at : 2024-05-20 05:12:44
- Link: https://ai-video-editing.techidaily.com/in-2024-want-to-add-freeze-frame-effect-to-your-video-on-your-device-here-are-the-steps-to-add-freeze-frame-on-pc-mac-smartphone-as-well-as-online-from-any-/
- License: This work is licensed under CC BY-NC-SA 4.0.
