:max_bytes(150000):strip_icc():format(webp)/GettyImages-1250476440-2ff779100e984029aa752236f9791b11.jpg)
Kdenlive Video Editor Review for 2024

Kdenlive Video Editor Review
When you look for an open source video editor online, you will come across several popular video editors. One of them has to be Kdenlive video editor that is available free and compatible across all desktop operating systems. The video editor claims to be suitable for beginners as well as for professional video editors.
Starting from multi-track video editing and support for different file formats to loads to effects and flexible interface, Kdenlive video editor seems to be truly powerful. But is it comparable to premium video editors and is it suitable for standard and advanced video editing? Read our Kdenlive tutorial and review for everything you need to know.
Part 1. Key Features of Kdenlive
If you need to edit videos occasionally, a free video editor is what you will be looking for. Unfortunately, most free videos have very basic video editing tools and they are suitable for editing personal videos only. On the contrary, Kdenlive comes with all the standard as well as some advanced video editing features. Here are all the key features of Kdenlive video editor that you should be aware of.
Multi-track editing – Kdenlive comes with a versatile timeline where you can have multiple tracks consisting of video clips, audio files and different effects and objects. You can lock the tracks as well as mute them so that you can experiment as you edit your video.
Effects and Transitions – Even though limited, there are eye-catching effects and transitions available. You can also go for color correction as well as minor adjustments in your audio. Besides, the titler lets you create amazing 2D texts and titles.
Proxy Editing – Kdenlive uses proxy editing technique to lower the resolution of high-resolution videos while you edit them. This takes away the pressure on the CPU resources, but when it renders, the original resolution gets restored back. That is why Kdenlive has been effective in low-end computers as well.
Flexible User Interface – Kdenlive comes with a customizable user interface. This means you can arrange the layouts of your workflow as per your requirements. Besides, there are configurable keyboard shortcuts. There are also different themes available for the user interface.
Keyframing – One of the advanced features of Kdenlive is that you can keyframe any effect. This means you can change the parameters of the effects with time using curves. Besides, the software supports green screen effect.
Miscellaneous – The software supports almost all types of audio and video file formats. There is an option for automatic backup which is highly useful in any video editing software. The software also supports online resources and add-ons.
Part 2. Basic Editing with Kdenlive
Kdenlive is available for free and you should definitely try it out. Thereafter, you decide whether it is perfect for you or not. After Kdenlive download, here are all the steps for basic video editing with Kdenlive.
Import a clip:
Step 1: Launch Kdenlive on your computer and make sure you have the video clip ready on your hard drive.
Step 2: Go to Project menu option. Click on “Add Clip or Folder” option. You can include all the video clips on any folder.
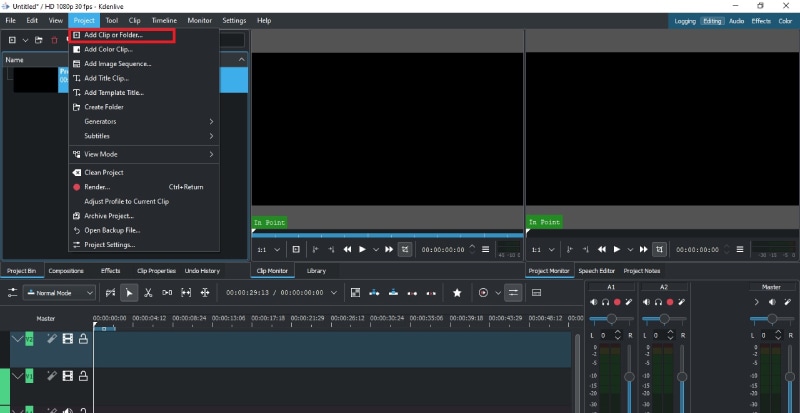
Step 3: The imported clips will then have to be dragged and dropped on the timeline from Project Bin.
Trim and Export:
Step 1: Import the video clip on Kdenlive and drag and drop the clip on the timeline.
Step 2: Put the timeline cursor over the point on the video clip from where you want to trim it.
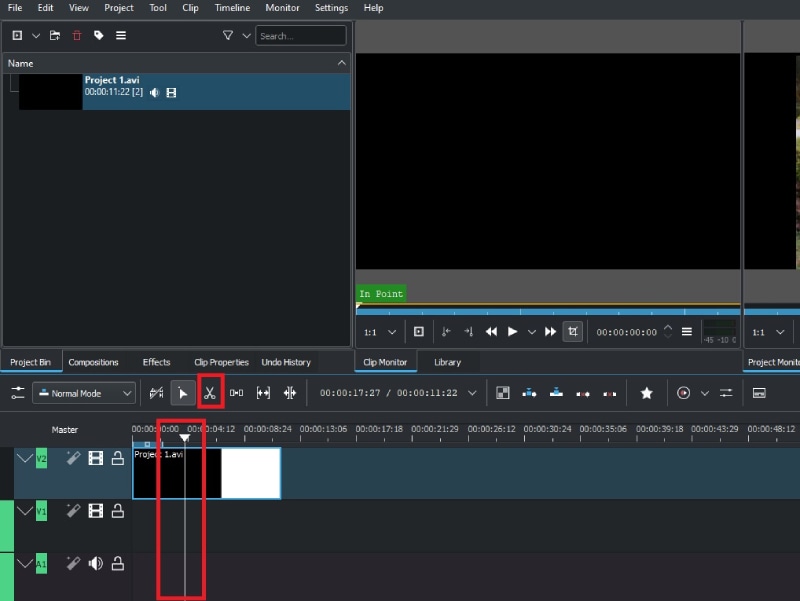
Step 3: Click on Scissor icon to start trimming. Thereafter, move the red timeline cursor to the point where you want the trimming to end.
![]()
Add multiple tracks:
There is enough number of tracks already available on Kdenlive timeline. However, when you are editing a large video project, you may need more tracks that already present.
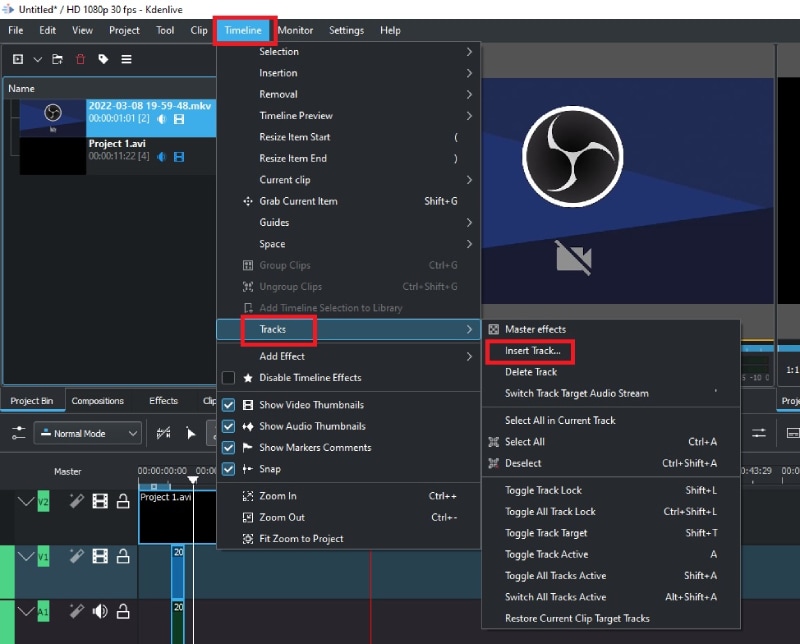
Step 1: Go to Timeline menu option.
Step 2: Go to Tracks> Inset Track option.
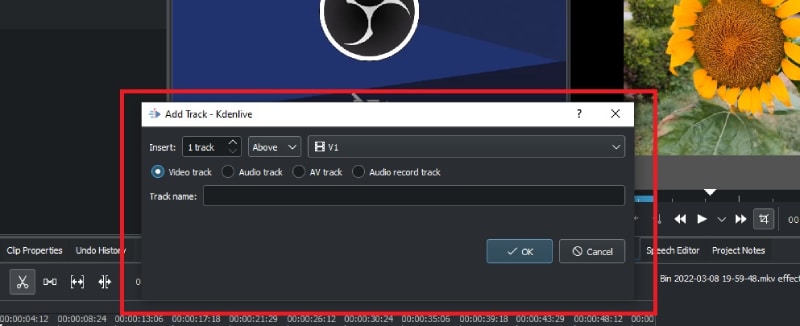
Step 3: Enter a name for the track and select the type of track and click on Ok button.
Adjust brightness and contrast:
Step 1: Go to Effects> Color and Image Correction.
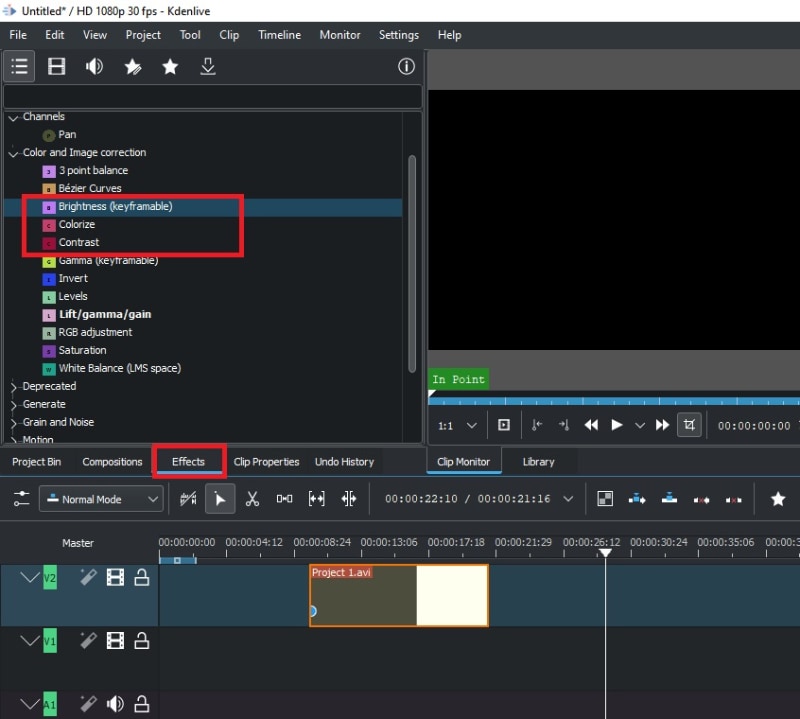
Step 2: Drag and drop Brightness or Contrast directly on the video clip.
Step 3: Click on Brightness that you just placed on the video clip and adjust the parameter from its slider.
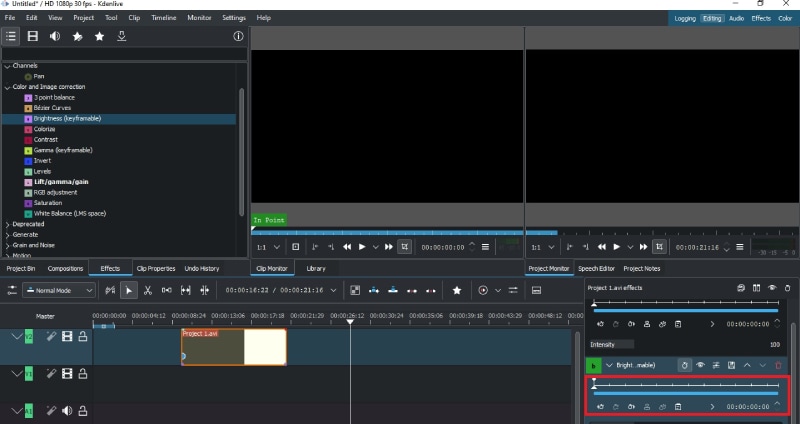
Speed up or slow down:
Step 1: Right-click on the video clip that is on the timeline and click on Change Speed option.
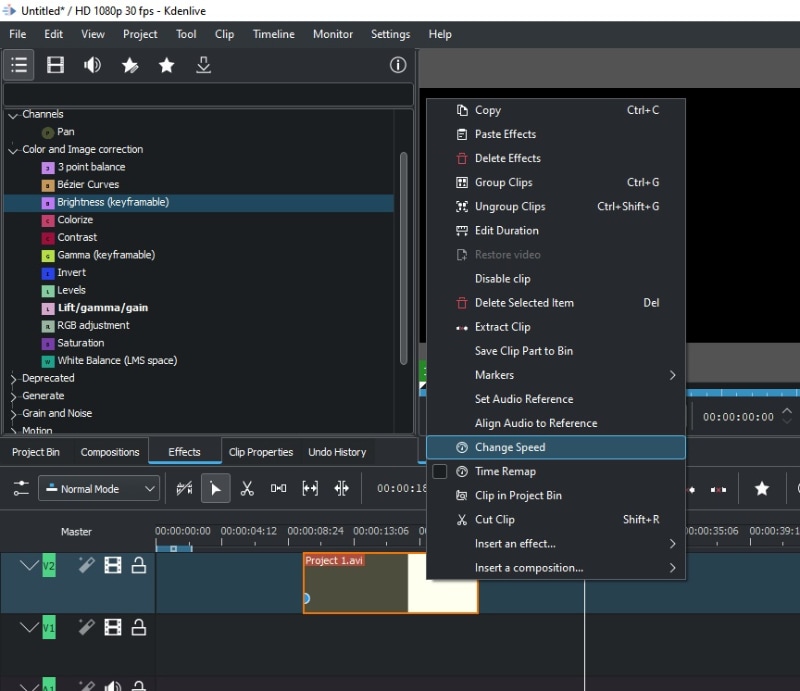
Step 2: Adjust the slider to increase or decrease video clip speed and click on Ok button.

Part 3. Advanced Editing with Kdenlive
Now that we have discussed the basic editing Kdenlive tutorial, let us focus on a couple of useful advanced editing features of Kdenlive.
Use green screen effects:
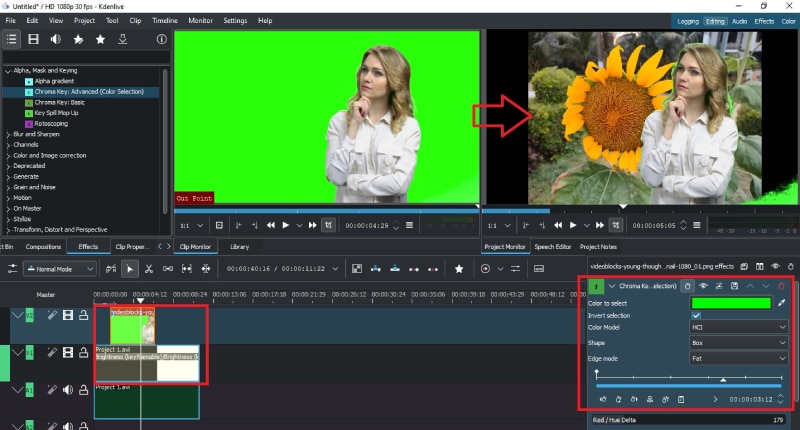
You must have the video clip with green screen background on the timeline. Below the green screen clip should be the background image with which you want to replace the green screen background.
Step 1: Go to Effect> Alpha, Mask and Keying option.
Step 2: Drag and drop “Chroma Key : Advanced” on the video clip where there is a green screen.
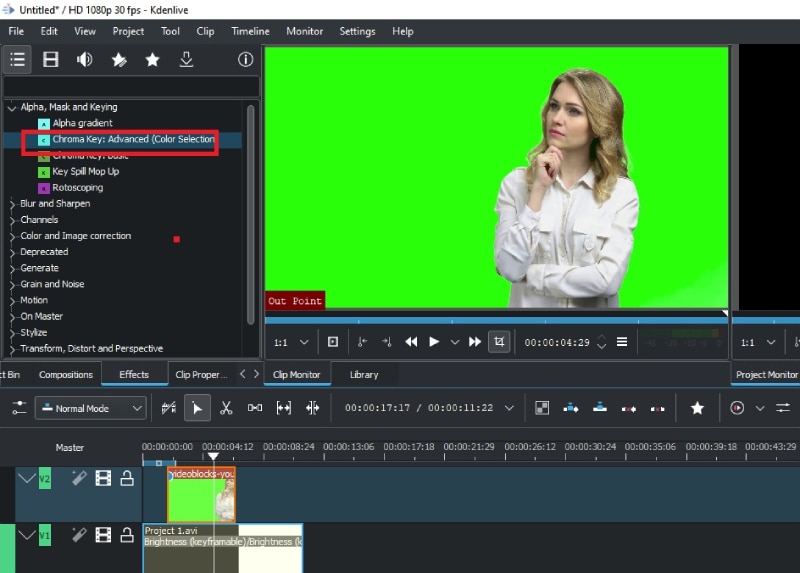
Step 3: Click on video clip and adjust the parameters to soften the edges and make it as natural as possible.
**Add audio:
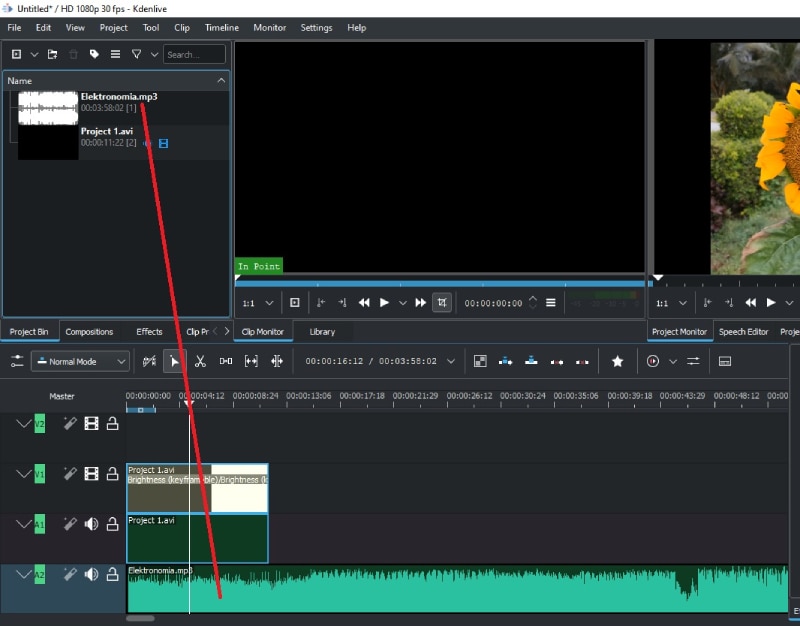
Adding audio files and music files to the video is as easy as adding video clips. You should have your audio file ready on your hard drive.
Step 1: Go to Project menu option. Click on “Add Clip or Folder” option. Select the audio file or folder from your hard drive.

Step 2: The imported audio files will have to be dragged and dropped on the timeline from Project Bin.
Part 4. Best Kdenlive Alternative to Edit Videos
Kdenlive has several drawbacks that prevent it from becoming the best video editor. Even though the features are sufficient for beginners, it is not suitable for professional editing. There is a lack of advanced options such as motion tracking or faster video production. Besides, the effects are very limited in number and so are the text and audio effects. That is why we recommend Wondershare Filmora as the best alternative to Kdenlive Mac and Windows.
Filmora is a premium video editor with video capturing feature. You can record your screen and webcam video. There is no dearth of effects, filters, elements and royalty-free media files. The user interface is cleaner and hence, it is suitable for both beginners and professionals. Here are the key features of Filmora.

For Win 7 or later (64-bit)
For macOS 10.12 or later
- 4K video editing and exporting without lag.
- Noise removal, color tuning, and video stabilization.
- Standard editing like trim, crop, split, join, rotate etc.
- Advanced text styles, audio mixing options, and audio equalizers.
- Wide range of stock media files. Supports different file formats.
- Capture screen and webcam video with internal and external audio.
Frequently Asked Questions
**Is Kdenlive a good editor?
Kdenlive is a good editor if you are getting started in video editing or you are editing your video for personal usage. However, for professional and even social media videos, a premium video editor will be better. We recommend Filmora over Kdenlive because Kdenlive lacks advanced video editing options.
**Does Kdenlive cost money?
Kdenlive Windows, Mac, and Linux are available free of cost as it belongs to the open-source software category. There is also no premium version available, and hence, all the features are unlocked in the free version.
**What can you do with Kdenlive?
You can trim your video, add music, add effects, adjust speed, correct colors, and add green screen effect. Besides, you can add multiple video clips and audio files to the timeline. There are options for keyframable effects as well.
Adding Shake Effects to Your Video With Alight Motion
Are you looking to add some dynamic effects to your videos? Have you ever wanted to create footage that feels like shaking but didn’t know how to do it? Well, you’re in luck! This guide will show you how to use Alight Motion, a video editing app, to add shake effects to your videos.
Whether you’re a professional videographer or a hobbyist, this guide will take you step-by-step through adding shake effects with Alight Motion. With its easy-to-use interface and powerful features, Alight Motion makes it simple to take your videos to the next level. So, let’s get started and shake things up!

Overview of Alight Motion
Alight Motion is a powerful video editing app that allows users to create dynamic and engaging videos. It offers many features, including motion graphics, visual effects, and animation tools. With Alight Motion, you can easily add shake effects to your videos and other dynamic effects such as panning, zooming, and rotation.
One of the great things about Alight Motion is its user-friendly interface. The app is designed to be intuitive and easy to use, making it accessible to users of all skill levels.
Alight Motion has everything you need to create high-quality, cinematic footage, whether you’re a professional videographer or just getting started with video editing. So, if you want to take your videos to the next level, give Alight Motion a try!
How To Add Shake Effects to Your Video in Alight Motion?
By following these simple steps, you’ll be able to create footage that feels like shaking, adding a sense of dynamic movement to your videos. Shake effects can be a great addition to any video if you want to create a dramatic effect or add visual interest to your footage. So, let’s learn how to add shake effects to your videos in Alight Motion.
Step1 Open the Alight Motion app and tap “New Project.”
Step2 Import your video clip.
Step3 Adjust the length of your clip, then tap “Add Effect.”

Step4 Search for the video effect. In this case, search “Tiles.”
Step5 Adjust the video using the effect settings.
Step6 Search for the blur effect. In this case, search “Motion Blur.”
Step7 Search for the shake effect. In this case, search “Auto-Shake.”
Step8 Adjust the speed, magnitude, and other elements and effects of the video clip.
Step9 Preview the video and tap “Save.”
[Bonus] Filmora for Mobile – Best Alternative to Alight Motion
Filmora for mobile is a powerful video editing app that can be an alternative to Alight Motion. It has a user-friendly interface and offers a wide range of features that allow users to create professional-looking videos easily. Some of the key features of Filmora for mobile include:
Free Download For Win 7 or later(64-bit)
Free Download For macOS 10.14 or later
- Motion graphics and visual effects: Filmora for mobile has a wide range of motion graphics and visual effects that you can use to enhance your videos, including shake effects.
- Video trimming, merging, and splitting: The app allows you to trim, merge and split your videos to create the perfect footage.
- Music and audio editing: Filmora for mobile has a built-in music library and audio editing tools that you can use to add music and sound effects to your videos.
- Text and title overlays: You can add text and title overlays to your videos to create captions, subtitles, and more.
- Speed control: Adjust the speed of your videos to create fast-paced or slow-motion footage.
With Filmora for mobile, you can easily create high-quality, professional-looking videos with shake effects and all the other features that Alight Motion offers. The app has a simple and intuitive interface that makes it easy for users of all skill levels to create stunning videos.
Effects in Filmora for Mobile
Filmora for mobile offers a wide variety of effects that you can use to enhance your videos and make them stand out. The shaking effect is one popular effect that adds a sense of movement and drama to your footage. With Filmora, you can easily adjust the intensity of the shake effect to create a subtle or more pronounced effect.
Another great effect that Filmora for mobile offers is the split-screen effect. This allows you to split your screen into multiple sections and play different videos or images in each section. This can be useful for creating a sense of simultaneity and storytelling.
Additionally, Filmora for mobile offers a wide variety of transition effects that you can use to transition between different clips in your video smoothly. These effects include wipes, fades, and more. With these effects, you can take your videos to the next level.
How To Add Shake Effects in Filmora for Mobile
Shake effects can be a great addition to any video if you want to create a dramatic effect or add visual interest to your footage. By following the simple steps outlined in this guide, you’ll be able to add shake effects to your videos in Filmora for mobile and take your videos to the next level. So, let’s get started and learn how to add shake effects in Filmora for mobile.
Step1 Open the Filmora mobile app and tap “More.”
Step2 Select the effect in the list of effects loaded.
Step3 Click the “Use“ button to make the effect present in your clip.
Step4 Select the video clip from your device that you want to edit.
Step5 Select the shake effect you want to use and tap the check icon.
Step6 Adjust the duration of the effect to your desired length.
Step7 Tap the “Export“ button to save your video.
After following the steps outlined in this guide, you can easily add shake effects to your videos in Filmora for mobile. However, if you’re still having trouble, we recommend watching the following video for more detailed instructions:
Which Is Better? Alight Motion or Filmora for Mobile?
It ultimately depends on your specific needs and preferences when deciding between Alight Motion and Filmora for mobile. Both apps are powerful video editing tools that offer many features and effects but have their strengths and weaknesses.
| | Alight Motion | Filmora | |
| —————————- | ————————————————————————————————— | ——————————————————– |
| Operating System | Android and iOS | Android and iOS |
| App Store Rating | 4.4 out of 5 | 4.7 out of 5 |
| Google Play Store Rating | 3.6 out of 5 | 4.7 out of 5 |
| Pricing | Free with In-app Purchases | Free with In-app Purchases |
| Number of Shake Effects | 100+ shake effects | 8 different camera shake |
Alight Motion is a powerful video editing app that offers many features and effects, including 100+ shake effects. The app is available for Android and iOS and has received a 4.4 out of 5 rating on the App Store and a 3.6 out of 5 rating on the Google Play Store. Alight Motion is free to download and use, but some features and effects may require in-app purchases.
One of the standout features of Alight Motion is its motion graphics and visual effects capabilities. The app has a wide range of shake effects that you can use to add a sense of movement and drama to your footage.
Alight Motion is suitable for professional videographers who want to create high-quality and professional-looking videos. The app is also great for those who want to create videos for social media platforms, especially those who want to create dynamic and visually engaging videos.
On the other hand, Filmora for mobile is also a powerful video editing app that offers a wide range of features and effects, including 8 different camera shake effects.
The app is available for Android and iOS and has received a 4.7 out of 5 rating on the App Store and a 4.7 out of 5 rating on the Google Play Store. Filmora is free to download and use, but some features and effects may require in-app purchases.
The shake effect feature in Filmora for mobile is simple and allows you to add a subtle or more pronounced shake effect to your footage. Additionally, Filmora for mobile offers a wide range of other effects, including visual effects, transition effects, and color correction tools, that you can use to enhance your videos.
Filmora for mobile is suitable as a user-friendly and easy-to-use video editing app. The app is perfect for hobbyists, YouTubers, or social media content creators who want to create high-quality videos with various effects. It’s also great for those seeking a mobile-based alternative to desktop video editing software.
People Also Ask
Here are some questions that people commonly ask concerning the topic of adding shake effects to videos using Alight Motion.
Q1. How Do You Add Effects to Alight Motion?
To add effects to Alight Motion, you can follow these steps:
Step1 Open the Alight Motion app and create a new project or open an existing one.
Step2 Select the layer to which you want to add the effect, then tap on the “Effects“ button.
Step3 Browse the available effects and tap on the desired effect to apply it to the selected layer.
Step4 You can add multiple layers to your video.
Q2. How Many Effects Are in Alight Motion?
As of now, Alight Motion offers 100+ effects that you can use to enhance your videos and make them stand out. These effects include a wide range of motion graphics, visual effects, and animation tools. Some of the effects available in Alight Motion include shaking effects, panning, zooming, rotation, color correction, and many more.
The app is regularly updated, so the number of effects available may increase over time. The wide range of effects gives you the power to create dynamic and visually engaging videos. With Alight Motion, the possibilities are endless.
Q3. Is 8GB RAM Enough for Alight Motion?
8GB of RAM is generally enough for running Alight Motion, although the app’s recommended minimum is 2GB of RAM. Having more RAM would allow for smoother performance and the ability to handle larger and more complex projects. However, with 8GB of RAM, you should still be able to run Alight Motion without any major issues.
Conclusion
Alight Motion and Filmora for mobile are powerful video editing apps that offer a wide range of features and effects. Each app has its strengths and weaknesses, and it ultimately depends on your specific needs and preferences.
Alight Motion offers more shake effects, while Filmora for mobile offers more simplicity. Both apps can be used to create high-quality and professional-looking videos. It’s recommended to try both apps and see which one works best for you.
[Tutorial] How To Add Motion Blur in Blender?
Motion blur effect, as a terminology, holds great significance in multiple industrial uses. From filmmaking to basic photography, the motion blur effect is consumed as a reality-setting standard, which defines its significance. Many platforms are providing this effect to enhance the creativity of their users. Blender is also known among these software providing such services while designing animations.
We will target a comprehensive guide on adding motion blur in Blender using the right way. Therefore, if you seek the appropriate way of adding motion blur in Blender, the following description is for you.
Part 1: What is Blender?
As we start our discussion, we will review Blender as a free and open-source software. Following this, we will continue realizing the benefits of adding motion blur through Blender:
Introduction to Blender
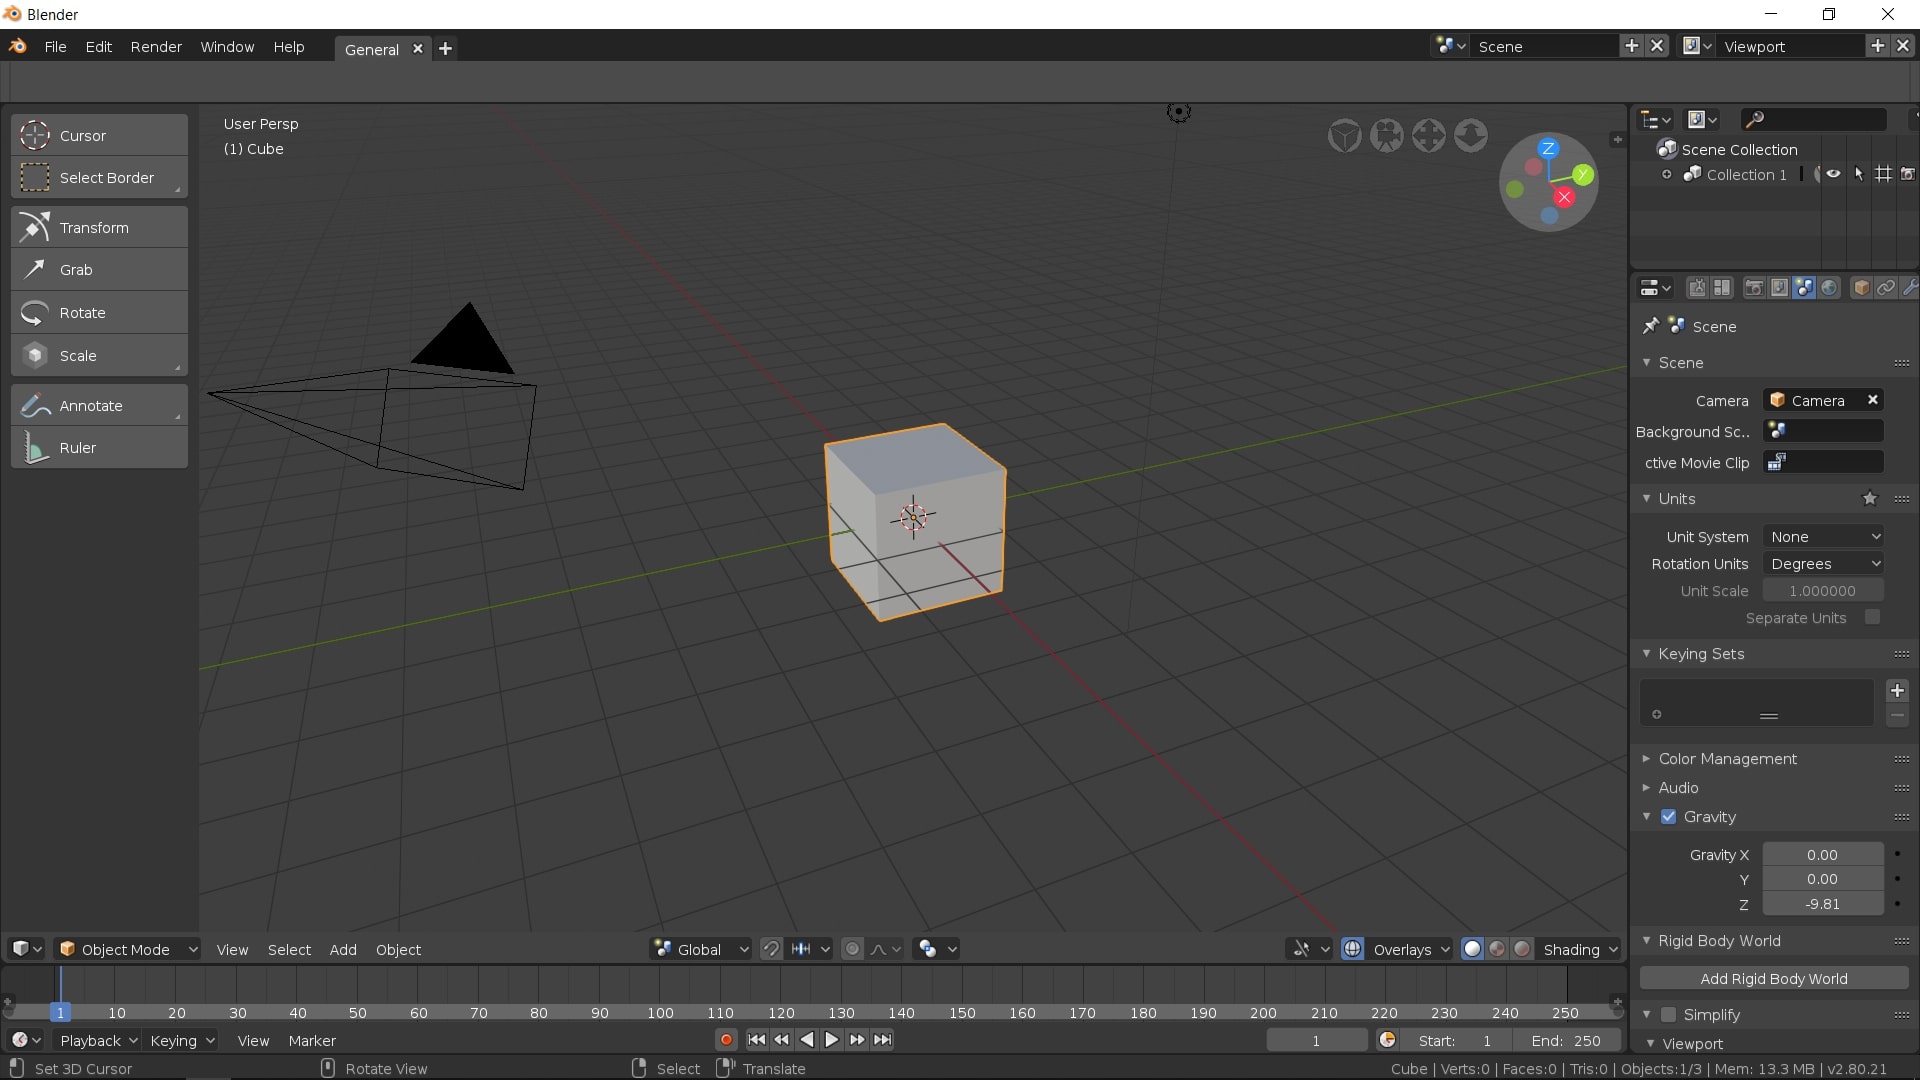
For those unaware of Blender, it is an open-source, free creativity software. You can find it as the perfect designing platform for your 3D content. This software has made itself accessible to the market with ease. This has made it quite famous among professionals, and is recommended for its high-quality, feature-rich design. From modeling to sculpting, Blender provides some great options to work with.
If you are up for editing some videos through Blender, it offers a great course of features, including motion blur. This Blender motion blur tutorial intends to bring you a similar insight into this great software. This will help you know the procedure of executing such facets to perfection.
Benefits of Using Motion Blur Effect
There are many benefits of using the motion blur effect in creative work. The following points are the highlights and benefits of adding the motion blur effect:
· Perfect For Idolizing Speed
The use of the motion blur effect is the best way to show the speed of the object. Using such effects gives the viewer an experience of the swiftness that is contained in the object.
· Resolves Flickering
Rather than trying out fast motion, you can add such effects to your 3D content to enhance the motion blur. This also helps get over problems, including strobing and flickering clips.
· Attenuates Real-Effect
One great thing about our human eye is its ability to bring motion blur in fast-moving objects. Since this is a real-life experience, the motion blur effect highlights this particular effect and brings the edited content closer to reality.
Part 2: How Do You Motion Blur An Object in Blender?
As stated before, Blender can be a great option for adding motion blur to objects. Many properties are involved in setting up the motion blur effect on an object. It includes defining the position, shutter, separation, and several other parameters. In this part, we will be looking for a guide on how to add motion blur in Blender:
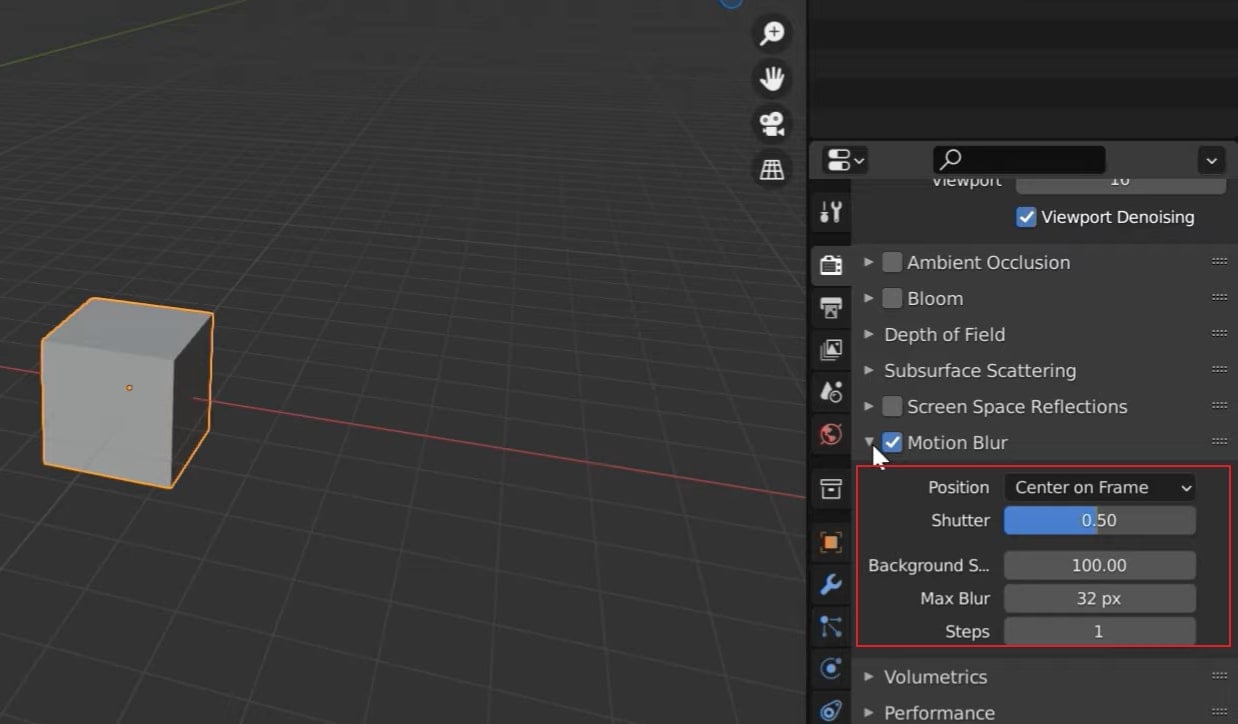
Step1 With the video opened on Blender, proceed to the “Render Properties.” Look to enable “Motion Blur” from the available options. Click on the arrowhead adjacent to it to access its advanced blur options.
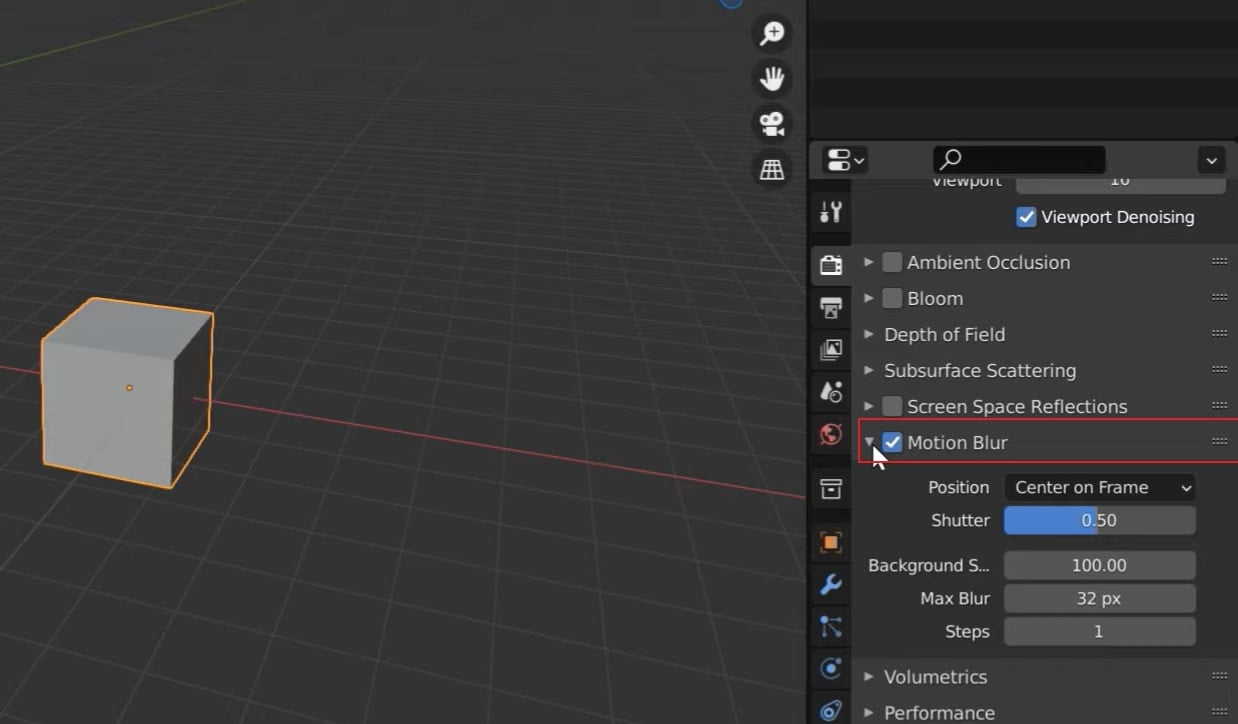
Step2 Start by setting its “Position” in the start, center, or end, according to the requirements. For those who are not sure of it, they can use “Center on Frame.” If the objects rapidly move in the video, reduce the “Shutter” value or vice versa.
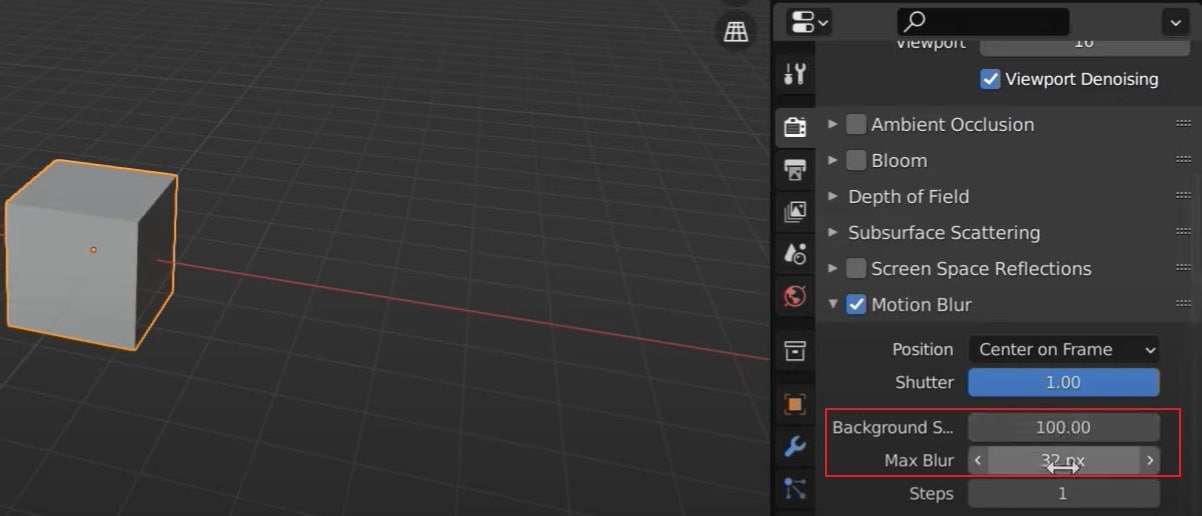
Step3 Following this, define the “Background Separation” according to how you require the foreground and background. Next, you will have to increase or decrease the “Max Blur” pixels to define the blur intensity in the video.
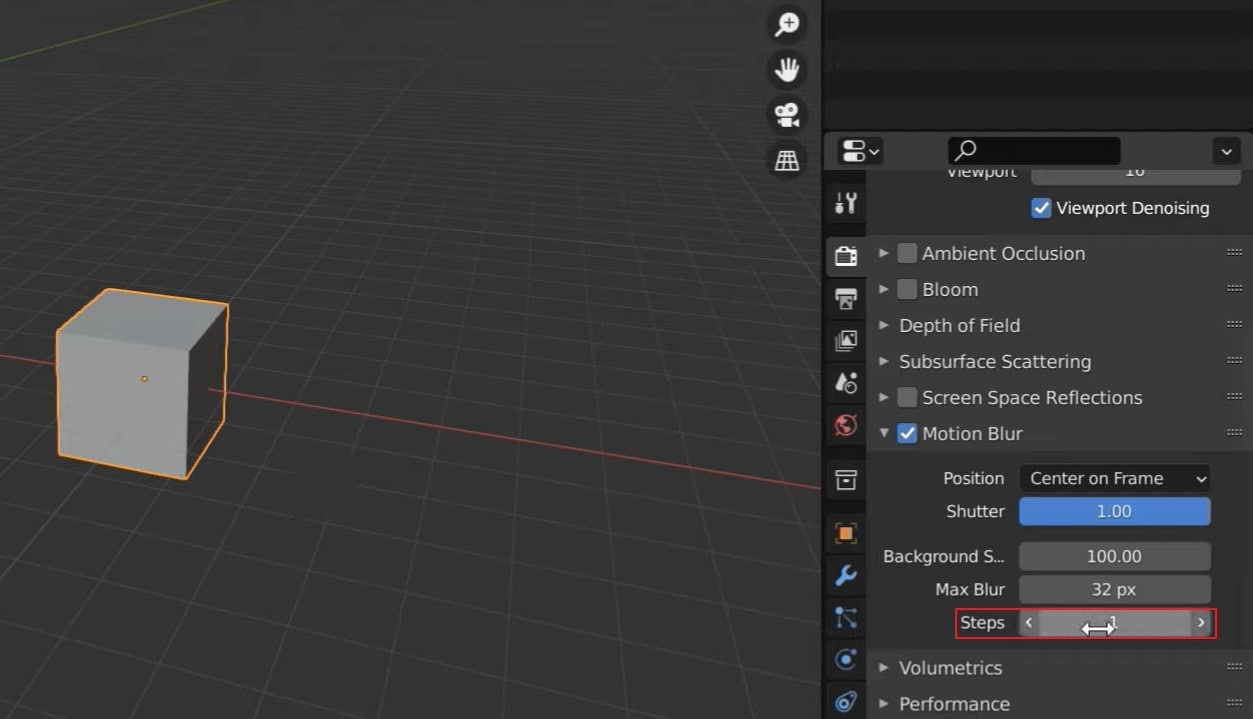
Step4 For objects with complex topology, you might have to increase the “Steps,” hence the “Shutter” time. For simple objects, the value remains unity. To apply the motion blur effect, use the F12 key for rendering the video.
Bonus Tips – Add Motion Blur to Animated Video with Filmora
Blender can become challenging to use, a no-go for basic video editors. This requires a simpler video editor that can help them add motion blurs. For applying this to a video, Wondershare Filmora is a great option. This video editor is known for its easy-going, conclusive, and diversifying features.
Free Download For Win 7 or later(64-bit)
Free Download For macOS 10.14 or later
Wondershare Filmora can be a real deal for users who are looking for high-quality video editing. A simple interface gives a perfect option to bring creativity to your work. If you wish to know more about Filmora, the following features will help you out:
- You can try out the Instant Mode offered on Filmora for creating videos in minutes.
- You can adjust the video speed to get better control of the keyframes. With the help of this feature, you can easily create cinematic effects.
- It also includes the feature of motion tracking to intensify your video creation.
- Filmora’s ability to blend in effects in the videos is one of its major highlights. There are multiple modes available in Filmora to make things interesting.
- Its AI Portrait mode helps identify humans in the video and helps them enhance their parameters.
How to Add Motion Blur to Animated Video with Wondershare Filmora
Since you are looking forward to a method explaining how to add motion blur to videos with Filmora, the following step-by-step guide is for you:
Step1 Launch Filmora and Import Animated Video
You must launch Wondershare Filmora after installing it successfully on your computer. Click the “Create New Project” button to lead to a new project screen. Here, tap on the “Folder” icon to import the animated video that is to be edited.

Step2 Split the Video to Set Platform for Adding the Effect
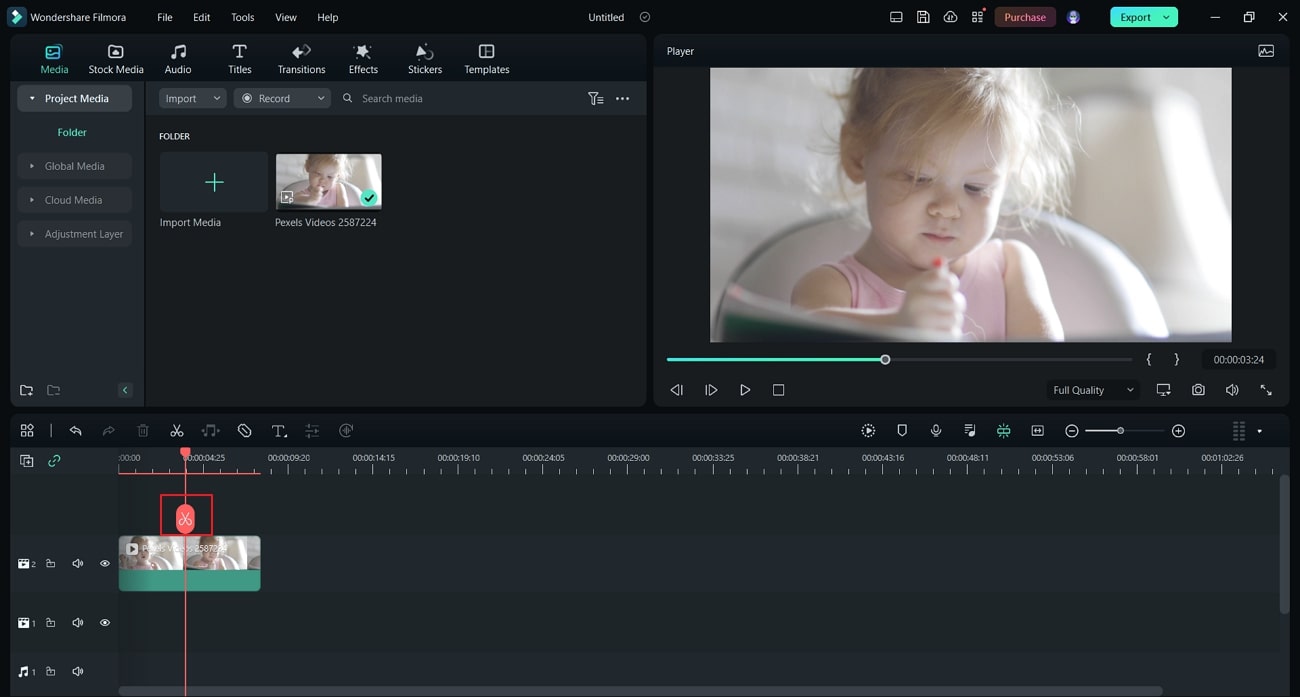
Once uploaded, drag and drop it on the timeline. Use the play head and adjust it to the point where you want to start the motion blur. Click the “Scissor” icon to split the clip from the specific point.
Step3 Look for the Blur Effect and Add
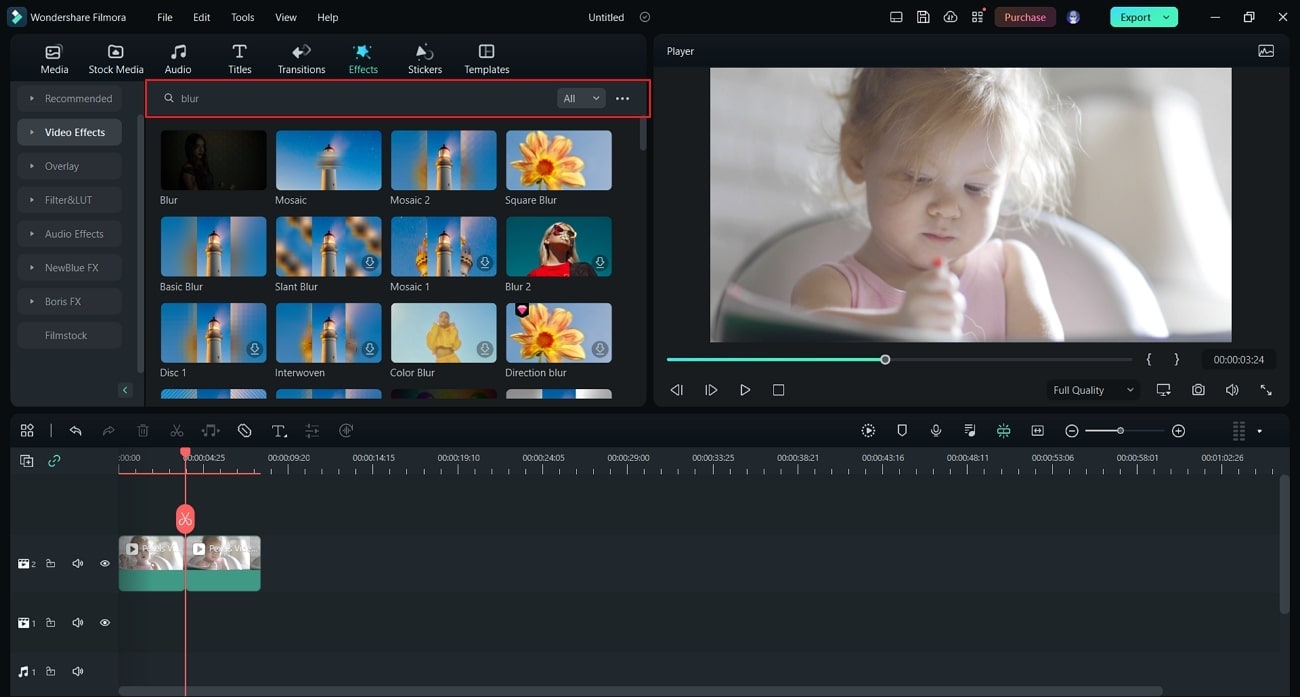
Move to the “Effects” tab from the top and look for “Video Effects” from the left section. Afterward, type “Blur” in the search bar of the effects. You will be led to a list of different blur options, which you can pick and add to the part of the video that was split.
Step4 Include Transition for Smoothness and Export Video
After adjusting the parameters, find the “Dissolve” transition from the “Transition” tab for smoothening the effect. Once done, you can export the edited clip by clicking the “Export” button and setting the parameters.

FAQ
What does motion blur do in Blender?
There are two different techniques adopted in the Blender motion blur effect. The first is recognized as the “Sample Motion Blur” technique, an advanced, slower, and controlled way of adding motion blur. The other technique, known as “Vector Blur,” is faster but has drawbacks, which do not look professional.
Conclusion
With that, a complete guide on how to add motion blur in Blender has been presented and explained. The provided technique will help you include the motion blur effect to perfection. For a more straightforward and quicker procedure, Wondershare Filmora gives a perfect experience of adding motion blur in animated videos. The article helps guide you toward selecting the best option in the market.
Free Download For macOS 10.14 or later
Wondershare Filmora can be a real deal for users who are looking for high-quality video editing. A simple interface gives a perfect option to bring creativity to your work. If you wish to know more about Filmora, the following features will help you out:
- You can try out the Instant Mode offered on Filmora for creating videos in minutes.
- You can adjust the video speed to get better control of the keyframes. With the help of this feature, you can easily create cinematic effects.
- It also includes the feature of motion tracking to intensify your video creation.
- Filmora’s ability to blend in effects in the videos is one of its major highlights. There are multiple modes available in Filmora to make things interesting.
- Its AI Portrait mode helps identify humans in the video and helps them enhance their parameters.
How to Add Motion Blur to Animated Video with Wondershare Filmora
Since you are looking forward to a method explaining how to add motion blur to videos with Filmora, the following step-by-step guide is for you:
Step1 Launch Filmora and Import Animated Video
You must launch Wondershare Filmora after installing it successfully on your computer. Click the “Create New Project” button to lead to a new project screen. Here, tap on the “Folder” icon to import the animated video that is to be edited.

Step2 Split the Video to Set Platform for Adding the Effect
Once uploaded, drag and drop it on the timeline. Use the play head and adjust it to the point where you want to start the motion blur. Click the “Scissor” icon to split the clip from the specific point.

Step3 Look for the Blur Effect and Add
Move to the “Effects” tab from the top and look for “Video Effects” from the left section. Afterward, type “Blur” in the search bar of the effects. You will be led to a list of different blur options, which you can pick and add to the part of the video that was split.

Step4 Include Transition for Smoothness and Export Video
After adjusting the parameters, find the “Dissolve” transition from the “Transition” tab for smoothening the effect. Once done, you can export the edited clip by clicking the “Export” button and setting the parameters.

FAQ
What does motion blur do in Blender?
There are two different techniques adopted in the Blender motion blur effect. The first is recognized as the “Sample Motion Blur” technique, an advanced, slower, and controlled way of adding motion blur. The other technique, known as “Vector Blur,” is faster but has drawbacks, which do not look professional.
Conclusion
With that, a complete guide on how to add motion blur in Blender has been presented and explained. The provided technique will help you include the motion blur effect to perfection. For a more straightforward and quicker procedure, Wondershare Filmora gives a perfect experience of adding motion blur in animated videos. The article helps guide you toward selecting the best option in the market.
Top LUTs for Sony HLG
Social media platforms have undoubtedly become a dominant force in our lives. Similarly, color grading our photos and videos are also in high demand due to social media. Furthermore, HLG is a popular high-dynamic range (HDR) standard with significant traction. Many social media platforms like Instagram and YouTube increasingly support HDR content.
Additionally, to achieve consistent and desirable results in color grading, you can use LUTs. Various LUTs are available, each offering distinct color tones and schemes. Similarly, for HLG color grading, Sony HLG LUTs have become widely popular. These LUTs are designed to optimize the color reproduction and dynamic range of Sony cameras shooting in HLG mode.
Part 1: How Are LUTs Used in Cinematography?
In cinematography, LUTs are essential to adjust the color and tone of digital images after filming. They help cinematographers and editors to achieve specific looks and maintain consistency. Here’s how LUTs are typically used in cinematography:
- Correcting Colors: LUTs fix any color imbalances in any video or photo. Moreover, it ensures that the colors look accurate and natural.
- Creating a Style: Cinematographers use LUTs to establish a particular mood and feel for a film. Furthermore, LUTs can completely change your content’s overall color and tone in a unique style.
- Matching Different Cameras: When using multiple cameras, each camera may capture colors differently. However, LUTs can be applied for consistent color grading throughout your video.
- Adjusting Lighting Conditions: LUTs are helpful when shooting scenes under different lighting conditions. In addition, they maintain consistent color and contrast throughout your project.
- Recreating Film Looks: LUTs can imitate the color characteristics of specific film stocks. It helps the filmmakers to achieve a desired look similar to classic films. It is especially useful when shooting digitally but aiming for a film-like appearance.
- Previewing the Final Look: You can see the real-time view of your color grading using LUTs. It helps you make important creative decisions and to maintain visual consistency throughout.
Empower your videos with a new mood using different LUTs. Filmora now offers 800+ top-quality 3D LUTs cover a broad range of scenarios. Transform your videos with Filmora’s powerful 3D LUTs.
Apply LUT on Videos Apply LUT on Videos Learn More

Part 2: 5 Top LUTs Available for Sony HLG to Download
If you feel like searching for good LUTs for your Sony camera’s footage, don’t worry. Here is a list of some of the best Song HLG LUTs, each with a unique tone and feel. You can choose any LUT that matches your style and preference.
1. Cinematic HLG2 LUTs
It is a pack of cinematic-style Sony HLG2 LUTs. This pack is for those seeking a dramatic and moody style. It adds a film noir-inspired touch to your videos. Moreover, this pack offers 5 cinematic LUTs, each with unique color grading. Additionally, it creates a professional look with high contrast and desaturated colors. Furthermore, one of its LUT gives a bluish tone to create a Winter ambiance.

2. HLG Cinematic LUT Pack
The HLG Cinematic LUT Pack is a collection of 19 unique cinematic Look-Up Tables. Each LUT in the pack offers a different color scheme, tone, and style. Additionally, it provides multiple options to give your media the perfect cinematic feel. You can choose from different options and select the LUT which matches your style and mood.

3. HLG3 & HLG2 creative correction LUT
This LUT pack is all about bold and vibrant colors that grab attention. It is one of the best Sony HLG3 to Rec709 LUT packs available. It enhances the saturation and contrast of your videos and images. Furthermore, this pack makes colors appear vivid and eye-catching. Additionally, it adds a punch to your digital media content with more vibrant and bright colors.

4. HLG Normalized LUT Pack
The HLG Normalized LUT Pack offers a refreshing and calming color scheme. It gives your videos cool-toned hues, giving a serene and calm feel. This pack has 80 different styles of LUTs, each with a unique color composition. Furthermore, this pack is ideal for capturing scenic landscapes, beach views, or other relaxing scenes. It gives your visuals a cool and crisp look by highlighting the shades of blue and green.

5. HLG LUT Pack
This pack for Sony HLG offers a dreamy and soft color scheme. It softens the colors and adds a subtle pastel touch to your footage. Moreover, it creates a dreamier and fantasy-like color scheme. This LUT has over 10 different LUTs that you can use for your videos and images. With this LUT pack, you can add a touch of magic to give your videos a soft and dream-like feel.

Part 3: Wondershare Filmora: A Great Option for Applying LUTs
Wondershare Filmora is a versatile tool that offers impressive color grading capabilities. This tool allows you to enhance your content by improving its color composition. With Filmora, you have the ability to import and apply LUTs to your videos. Moreover, this tool goes a step further by offering a vast library of over 800+ LUTs that you can use. These LUTs offer a wide range of color grading options for you.
Add LUTs on Video For Win 7 or later(64-bit)
Add LUTs on Video For macOS 10.14 or later
Additionally, it allows you to customize the strength of your applied LUTs. That being said, you can even import your Sony HLG to Rec709 LUTs. Filmora isn’t just limited to color grading; it is a complete video editing software. You can add captivating texts, filters, effects, transitions, and more to your content. Last but not least, you can even access over 10 billion free media assets for your edits.

Key Features:
- You can make your audio as much professional as your videos. With its AI Denoiser, your audio will be distortion free. It will remove all the background noises and distortion from your audio.
- Moreover, if you want to change the background of your video without a green screen, you can. It has an AI Cutout tool, which selects your subject to change its background.
- Furthermore, make engaging short reels with Filmora. Don’t frustrate your audience with long and boring videos. Trim your videos, remove pauses and silent moments with Silence Detection, and make good reels.
Conclusion
In conclusion, color grading has become increasingly significant in social media. It can capture attention, convey emotions, and enhance the look of our content. Furthermore, HLG, with its HDR capabilities, offers a more immersive viewing experience. LUTs, including the popular Sony HLG LUTs, also provide a practical and efficient way to color grade your media files.
You can also try Filmora video editor to apply luts on videos.
Add LUTs on Video For Win 7 or later(64-bit)
Add LUTs on Video For macOS 10.14 or later
Apply LUT on Videos Apply LUT on Videos Learn More

Part 2: 5 Top LUTs Available for Sony HLG to Download
If you feel like searching for good LUTs for your Sony camera’s footage, don’t worry. Here is a list of some of the best Song HLG LUTs, each with a unique tone and feel. You can choose any LUT that matches your style and preference.
1. Cinematic HLG2 LUTs
It is a pack of cinematic-style Sony HLG2 LUTs. This pack is for those seeking a dramatic and moody style. It adds a film noir-inspired touch to your videos. Moreover, this pack offers 5 cinematic LUTs, each with unique color grading. Additionally, it creates a professional look with high contrast and desaturated colors. Furthermore, one of its LUT gives a bluish tone to create a Winter ambiance.

2. HLG Cinematic LUT Pack
The HLG Cinematic LUT Pack is a collection of 19 unique cinematic Look-Up Tables. Each LUT in the pack offers a different color scheme, tone, and style. Additionally, it provides multiple options to give your media the perfect cinematic feel. You can choose from different options and select the LUT which matches your style and mood.

3. HLG3 & HLG2 creative correction LUT
This LUT pack is all about bold and vibrant colors that grab attention. It is one of the best Sony HLG3 to Rec709 LUT packs available. It enhances the saturation and contrast of your videos and images. Furthermore, this pack makes colors appear vivid and eye-catching. Additionally, it adds a punch to your digital media content with more vibrant and bright colors.

4. HLG Normalized LUT Pack
The HLG Normalized LUT Pack offers a refreshing and calming color scheme. It gives your videos cool-toned hues, giving a serene and calm feel. This pack has 80 different styles of LUTs, each with a unique color composition. Furthermore, this pack is ideal for capturing scenic landscapes, beach views, or other relaxing scenes. It gives your visuals a cool and crisp look by highlighting the shades of blue and green.

5. HLG LUT Pack
This pack for Sony HLG offers a dreamy and soft color scheme. It softens the colors and adds a subtle pastel touch to your footage. Moreover, it creates a dreamier and fantasy-like color scheme. This LUT has over 10 different LUTs that you can use for your videos and images. With this LUT pack, you can add a touch of magic to give your videos a soft and dream-like feel.

Part 3: Wondershare Filmora: A Great Option for Applying LUTs
Wondershare Filmora is a versatile tool that offers impressive color grading capabilities. This tool allows you to enhance your content by improving its color composition. With Filmora, you have the ability to import and apply LUTs to your videos. Moreover, this tool goes a step further by offering a vast library of over 800+ LUTs that you can use. These LUTs offer a wide range of color grading options for you.
Add LUTs on Video For Win 7 or later(64-bit)
Add LUTs on Video For macOS 10.14 or later
Additionally, it allows you to customize the strength of your applied LUTs. That being said, you can even import your Sony HLG to Rec709 LUTs. Filmora isn’t just limited to color grading; it is a complete video editing software. You can add captivating texts, filters, effects, transitions, and more to your content. Last but not least, you can even access over 10 billion free media assets for your edits.

Key Features:
- You can make your audio as much professional as your videos. With its AI Denoiser, your audio will be distortion free. It will remove all the background noises and distortion from your audio.
- Moreover, if you want to change the background of your video without a green screen, you can. It has an AI Cutout tool, which selects your subject to change its background.
- Furthermore, make engaging short reels with Filmora. Don’t frustrate your audience with long and boring videos. Trim your videos, remove pauses and silent moments with Silence Detection, and make good reels.
Conclusion
In conclusion, color grading has become increasingly significant in social media. It can capture attention, convey emotions, and enhance the look of our content. Furthermore, HLG, with its HDR capabilities, offers a more immersive viewing experience. LUTs, including the popular Sony HLG LUTs, also provide a practical and efficient way to color grade your media files.
You can also try Filmora video editor to apply luts on videos.
Add LUTs on Video For Win 7 or later(64-bit)
Add LUTs on Video For macOS 10.14 or later
Also read:
- New In 2024, Do You Want to Use a Professional Tool to Add Subtitles? Read This Article to Discover the Best Reliable Tool to Create Subtitles in Your Desired Manner
- Updated 2024 Approved Top 5 Free Online Video Filter Editors
- New In 2024, In This Article We Will Be Covering the Most Important Topics You Have to Remember when Becoming a Successful YouTube-Star
- In 2024, If You Are a Teacher or People Who Want to Share Their Ideas via Vides, You Can Always Make It on Your Own. This Article Will Share You 7 Tips to Create an Educational Video Easily
- Updated In 2024, How to Resize FLV Videos Efficiently Windows, Mac,Android, iPhone & Online
- New Basic Introduction for LumaFusion Color Grading
- New 2024 Approved Overview About Supported iPhone Video Formats and Best iPhone Video Editor & Converter
- New Do You Need to Create a Video for Your Business Online but Feel You Do Not Have the Skill and Time to Do That? Try Out These AI Video Generators that Will Work for You to Carry Out Tasks Effectively
- Updated End Your Struggles with Choppy Playback on DaVinci Resolve. Read This Guide to Find Effective Fixes and Reliable DaVinci Resolve Slow Playback Alternatives for 2024
- New Tutorial | How to Make a Smooth Speed Ramping in Premiere Pro, In 2024
- In 2024, Top 5 Online Video Converter for Instagram
- Updated In 2024, Get The Perfect Drone Footage With Free Drone LUTs
- Updated 2024 Approved If You Are Into GIFs and Want to Know a Great Extent of Information About It Then We Have Got You Covered in This Article. Here Is What We Have Learned so Far About It
- This Article Will Show You How to Make a Tattoo Disappear on Your Body Magically for 2024
- Updated 2024 Approved Learn the Step-by-Step Process of Slowing Down Time-Lapse Videos on Your iPhone
- New In 2024, Quick Solved How to Add Subtitles to a Video on iPhones
- 2024 Approved How to Do Motion Graphics in Filmora
- New 2024 Approved What Are The Stages Of Film Production - 2023
- New 2024 Approved Keyframes Interval Everything You Need To Know
- New In 2024, Change Aspect Ratio of Video
- Updated Camtasia Vs Captivate Which Is Better for 2024
- Have You Ever Created a Slow Motion Video on Your Phonr or Camera? This Article Will Show You some Knowledge About Slow Motion Photography
- Updated 4 Simple Methods for Making a High-Quality Recap Video for 2024
- In 2024, This Article Introduces How Sheila Become a Youtuber and How She Started Video Editing
- New How to Make Video Slow Motion, In 2024
- 2024 Approved Are You an Apple User Interested in Adding a Slow-Mo to Their Videos? This Article Features an Exceptional Procedure for Creating Slow-Mo in iMovie
- Updated 2024 Approved How to Use Frame Blending in Adobe Premiere Pro
- New How to Create a Makeup Video
- Updated Do You Want to Know About the DaVinci Resolve Adjustment Layer? Read This Article to Learn How to Use an Adjustment Layer (Clip) in DaVinci Resolve to Edit Videos for 2024
- Do You Want Your Video Footage to Resemble Kodak Films? You Can Get the Old Kodak Film Look by Searching for Kodak 2383 LUT Free Download on the Internet
- New Finest Approach to Slow Down a Video CapCut All-in-One Video Editor
- Updated In 2024, The Complete Guide to Converting GIF to SVG With Ease
- Updated Master Premiere Pro Custom Sequence Presets for 2024
- Updated In 2024, An Easy-to-Understand Guide on How to Loop a Video on Canva. This Article Is Sure to Help You if This Is Your First Time Attempting a Loop Video
- Updated In 2024, This Easy Hack Using Wondershare Filmora New Masking Feature Will Be a Great Addition to Your Next Horror Video Content
- 2024 Approved Dollar-Store DIY Hacks to Use for Filmmaking on a Budget
- Updated Find Out The Best Dark Moody LUTs During Editing
- In 2024, Want to Play a Video on Loop on Vimeo so that It Plays Again and Again? Here Are All the Different Ways to Loop a Video on Vimeo in Simple Steps
- Updated Exploring the Top Professional Tools to Perform Mask Tracking for 2024
- Updated Here Are a Number of Tools Used in the Market to Resize the Videos. We Are Going to Teach How to Resize the Video in Davinci Resolve and Fimora Wondershare. Once You Have Mastered How to Resize a Video, It Would Be as Simple as the Click for 2024
- New 2024 Approved You Can Use It to Fix Videos that Are Not Aligned Properly or that Have Been Filmed Upside Down. A Handbrake Is a Popular Tool because It Is Easy to Use and It Has a Variety of Features
- In 2024, This Article Describes Different Ways for Removing Gif Backgrounds, How We Can Use Them, and How This Way Differs From One Another
- How to Quickly Fix Bluetooth Not Working on OnePlus Nord N30 SE | Dr.fone
- How to Fix Error 495 While Download/Updating Android Apps On Infinix Hot 30i | Dr.fone
- In 2024, Here are Some Pro Tips for Pokemon Go PvP Battles On Realme 11 5G | Dr.fone
- Best OnePlus Nord CE 3 5G Pattern Lock Removal Tools Remove Android Pattern Lock Without Losing Data
- In 2024, 5 Ways to Move Contacts From Samsung Galaxy M34 to iPhone (13/14/15) | Dr.fone
- How To Transfer WhatsApp From iPhone XS to others devices? | Dr.fone
- In 2024, How to Transfer Apps from Realme C55 to Another | Dr.fone
- In 2024, Easy Ways to Manage Your Motorola Edge 40 Pro Location Settings | Dr.fone
- How to Detect and Stop mSpy from Spying on Your Apple iPhone 12 | Dr.fone
- In 2024, Universal Unlock Pattern for Xiaomi Redmi K70 Pro
- In 2024, Detailed guide of ispoofer for pogo installation On Oppo Find N3 | Dr.fone
- In 2024, How can I get more stardust in pokemon go On Apple iPhone 6s? | Dr.fone
- 5 Solutions For Realme Narzo 60 5G Unlock Without Password
- How to Track Vivo X90S by Phone Number | Dr.fone
- Fix the Error of Unfortunately the Process.com.android.phone Has Stopped on Poco M6 Pro 4G | Dr.fone
- Different Methods To Unlock Your iPhone 13
- In 2024, A Comprehensive Guide to iPhone SE (2022) Blacklist Removal Tips and Tools | Dr.fone
- In 2024, Universal Unlock Pattern for Infinix Hot 30i
- Unlock Your Xiaomi Redmi 13C Phone with Ease The 3 Best Lock Screen Removal Tools
- Delete Gmail Account With/Without Password On Xiaomi Redmi Note 13 Pro 5G
- In 2024, 8 Best Apps for Screen Mirroring Oppo A18 PC | Dr.fone
- How Can Nubia Z50 UltraMirror Share to PC? | Dr.fone
- In 2024, 8 Best Apps for Screen Mirroring Tecno Spark 10 4G PC | Dr.fone
- In 2024, How to Unlock Samsung Galaxy F34 5G Phone without Any Data Loss
- Why Does My OnePlus Ace 2 Pro Keep Turning Off By Itself? 6 Fixes Are Here | Dr.fone
- All About Factory Reset, What Is It and What It Does to Your Honor Magic 6? | Dr.fone
- How to Fix when Apple Account Locked From iPhone 15 Pro?
- Solutions to Spy on Realme 12 Pro+ 5G with and without jailbreak | Dr.fone
- New 2024 Approved Unlocking Global Audiences Top Video Language Converters
- How To Do Nubia Red Magic 9 Pro+ Screen Sharing | Dr.fone
- Title: Kdenlive Video Editor Review for 2024
- Author: Morgan
- Created at : 2024-05-19 05:12:21
- Updated at : 2024-05-20 05:12:21
- Link: https://ai-video-editing.techidaily.com/kdenlive-video-editor-review-for-2024/
- License: This work is licensed under CC BY-NC-SA 4.0.


