
Learn Eight Simple Steps that Will Allow You to Create a Stunning Text Reveal Animation in Filmora. Simple yet Very Professional

Learn Eight Simple Steps that Will Allow You to Create a Stunning Text Reveal Animation in Filmora. Simple yet Very Professional
Preparation
What you need to prepare:
- A computer (Windows or macOS)
- Your video materials.
- Filmora video editor
Step 1
Download the Filmora video editor and install it. Once it loads, click on “New Project”.
Step 2
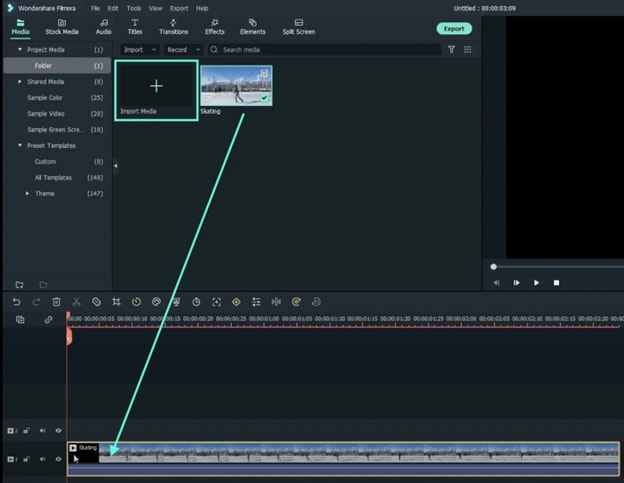
Import your footage by clicking on “Import Media”. Then, drag your clip to the Timeline to start editing it.
Step 3
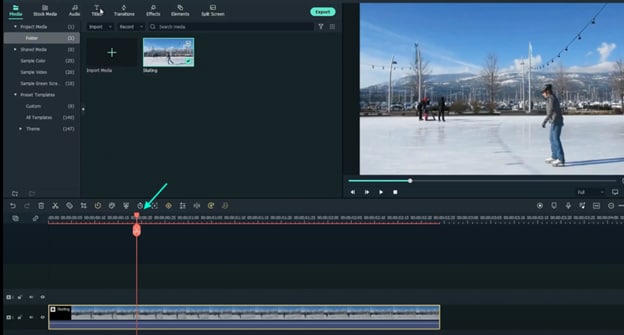
Review your video and place the Playhead at the point where you want the text reveal to begin.
Step 4
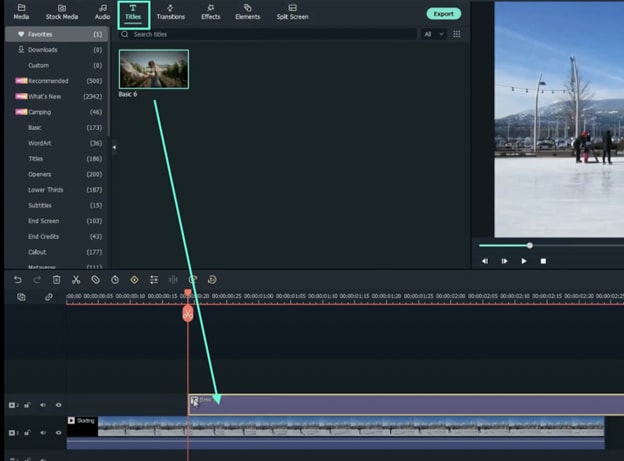
Go to the Titles tab and drag the Basic title to Track 2 on the Timeline. Then, right-click on the Title clip and go to Edit Properties. Here, type in your text and change the font to any bold one. You can also go to the WordArt tab to further customize your text. Click OK.
Step 5
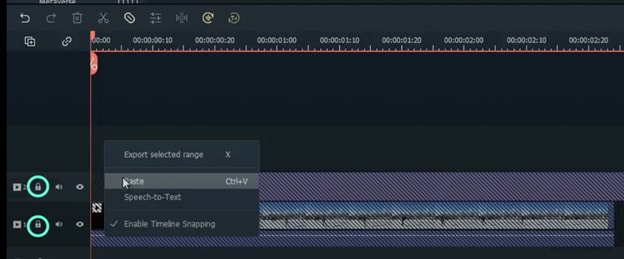
Now, move the text to fit the objects or people on your video perfectly. Copy the video clip on Track 1. Then, lock both Track 1 and Track 2 by pressing the key-lock button. Right-click anywhere above Track 2 and select Paste.
Step 6
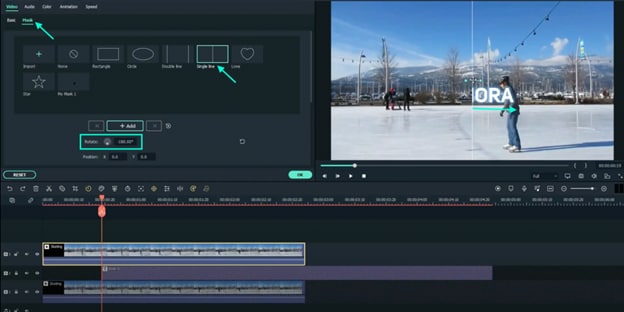
Move the Playhead to where the clip on Track 2 starts. Right-click on the clip in Track 3 → go to Edit Properties → select the Mask tab → click on Single Line. Then, adjust the Rotate value to “-180°”. Drag the slider on the screen to the right side until the text totally disappears next to your moving object. Now, scroll down from the panel on the left and change Blur Strength to 1%.
Step 7
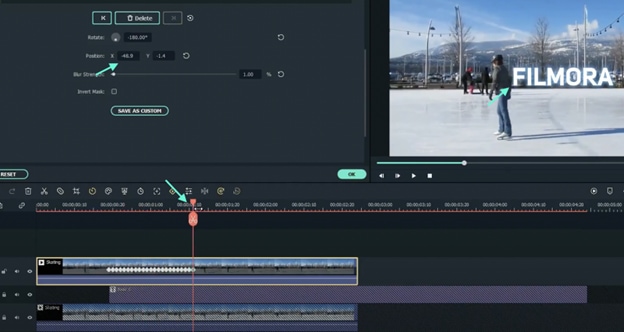
Next, add a keyframe by clicking on the “**+Add**” button. Move the Playhead one frame forward. Drag the X-axis to the left slowly to reveal a tiny portion of the text on the screen. Then, repeat this as many times as it takes until the full text is revealed, going one frame at a time.
Step 8
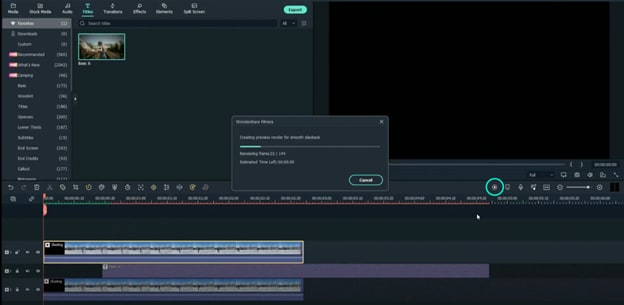
Finally, Render the video and watch the final preview. Congratulations, you’ve just successfully created a text reveal animation in FIlmora.
Summary
What you’ve learned:
- Animate text frame by frame in Filmora
- Edit the properties of clips in the video editor
- Add titles and manipulate clips on the Timeline
What you need to prepare:
- A computer (Windows or macOS)
- Your video materials.
- Filmora video editor
Step 1
Download the Filmora video editor and install it. Once it loads, click on “New Project”.
Step 2
Import your footage by clicking on “Import Media”. Then, drag your clip to the Timeline to start editing it.

Step 3
Review your video and place the Playhead at the point where you want the text reveal to begin.

Step 4
Go to the Titles tab and drag the Basic title to Track 2 on the Timeline. Then, right-click on the Title clip and go to Edit Properties. Here, type in your text and change the font to any bold one. You can also go to the WordArt tab to further customize your text. Click OK.

Step 5
Now, move the text to fit the objects or people on your video perfectly. Copy the video clip on Track 1. Then, lock both Track 1 and Track 2 by pressing the key-lock button. Right-click anywhere above Track 2 and select Paste.

Step 6
Move the Playhead to where the clip on Track 2 starts. Right-click on the clip in Track 3 → go to Edit Properties → select the Mask tab → click on Single Line. Then, adjust the Rotate value to “-180°”. Drag the slider on the screen to the right side until the text totally disappears next to your moving object. Now, scroll down from the panel on the left and change Blur Strength to 1%.

Step 7
Next, add a keyframe by clicking on the “**+Add**” button. Move the Playhead one frame forward. Drag the X-axis to the left slowly to reveal a tiny portion of the text on the screen. Then, repeat this as many times as it takes until the full text is revealed, going one frame at a time.

Step 8
Finally, Render the video and watch the final preview. Congratulations, you’ve just successfully created a text reveal animation in FIlmora.

Summary
What you’ve learned:
- Animate text frame by frame in Filmora
- Edit the properties of clips in the video editor
- Add titles and manipulate clips on the Timeline
What you need to prepare:
- A computer (Windows or macOS)
- Your video materials.
- Filmora video editor
Step 1
Download the Filmora video editor and install it. Once it loads, click on “New Project”.
Step 2
Import your footage by clicking on “Import Media”. Then, drag your clip to the Timeline to start editing it.

Step 3
Review your video and place the Playhead at the point where you want the text reveal to begin.

Step 4
Go to the Titles tab and drag the Basic title to Track 2 on the Timeline. Then, right-click on the Title clip and go to Edit Properties. Here, type in your text and change the font to any bold one. You can also go to the WordArt tab to further customize your text. Click OK.

Step 5
Now, move the text to fit the objects or people on your video perfectly. Copy the video clip on Track 1. Then, lock both Track 1 and Track 2 by pressing the key-lock button. Right-click anywhere above Track 2 and select Paste.

Step 6
Move the Playhead to where the clip on Track 2 starts. Right-click on the clip in Track 3 → go to Edit Properties → select the Mask tab → click on Single Line. Then, adjust the Rotate value to “-180°”. Drag the slider on the screen to the right side until the text totally disappears next to your moving object. Now, scroll down from the panel on the left and change Blur Strength to 1%.

Step 7
Next, add a keyframe by clicking on the “**+Add**” button. Move the Playhead one frame forward. Drag the X-axis to the left slowly to reveal a tiny portion of the text on the screen. Then, repeat this as many times as it takes until the full text is revealed, going one frame at a time.

Step 8
Finally, Render the video and watch the final preview. Congratulations, you’ve just successfully created a text reveal animation in FIlmora.

Summary
What you’ve learned:
- Animate text frame by frame in Filmora
- Edit the properties of clips in the video editor
- Add titles and manipulate clips on the Timeline
What you need to prepare:
- A computer (Windows or macOS)
- Your video materials.
- Filmora video editor
Step 1
Download the Filmora video editor and install it. Once it loads, click on “New Project”.
Step 2
Import your footage by clicking on “Import Media”. Then, drag your clip to the Timeline to start editing it.

Step 3
Review your video and place the Playhead at the point where you want the text reveal to begin.

Step 4
Go to the Titles tab and drag the Basic title to Track 2 on the Timeline. Then, right-click on the Title clip and go to Edit Properties. Here, type in your text and change the font to any bold one. You can also go to the WordArt tab to further customize your text. Click OK.

Step 5
Now, move the text to fit the objects or people on your video perfectly. Copy the video clip on Track 1. Then, lock both Track 1 and Track 2 by pressing the key-lock button. Right-click anywhere above Track 2 and select Paste.

Step 6
Move the Playhead to where the clip on Track 2 starts. Right-click on the clip in Track 3 → go to Edit Properties → select the Mask tab → click on Single Line. Then, adjust the Rotate value to “-180°”. Drag the slider on the screen to the right side until the text totally disappears next to your moving object. Now, scroll down from the panel on the left and change Blur Strength to 1%.

Step 7
Next, add a keyframe by clicking on the “**+Add**” button. Move the Playhead one frame forward. Drag the X-axis to the left slowly to reveal a tiny portion of the text on the screen. Then, repeat this as many times as it takes until the full text is revealed, going one frame at a time.

Step 8
Finally, Render the video and watch the final preview. Congratulations, you’ve just successfully created a text reveal animation in FIlmora.

Summary
What you’ve learned:
- Animate text frame by frame in Filmora
- Edit the properties of clips in the video editor
- Add titles and manipulate clips on the Timeline
How to Film Better in Public - 2024 Guide
Filming in public and different locations can add a new dimension to any video. The possibilities are limitless, from the hustle and bustle of a busy city street to the tranquil beauty of a remote beach.
Suppose you’re a new vlogger and want to capture the perfect scene in public. Then this blog is for you. It will explain various tips and tricks to help you create the best videos, regardless of location. So let’s start and learn more about how to film better in public!
Part 1. What Gear Will You Need to Record a Better Video in Public?
While recording in public, you want to avoid setting and holding unnecessary camera gear. That’s why you should keep your gear as low-key as possible. The essential shooting gears that you are going to need are as follows:
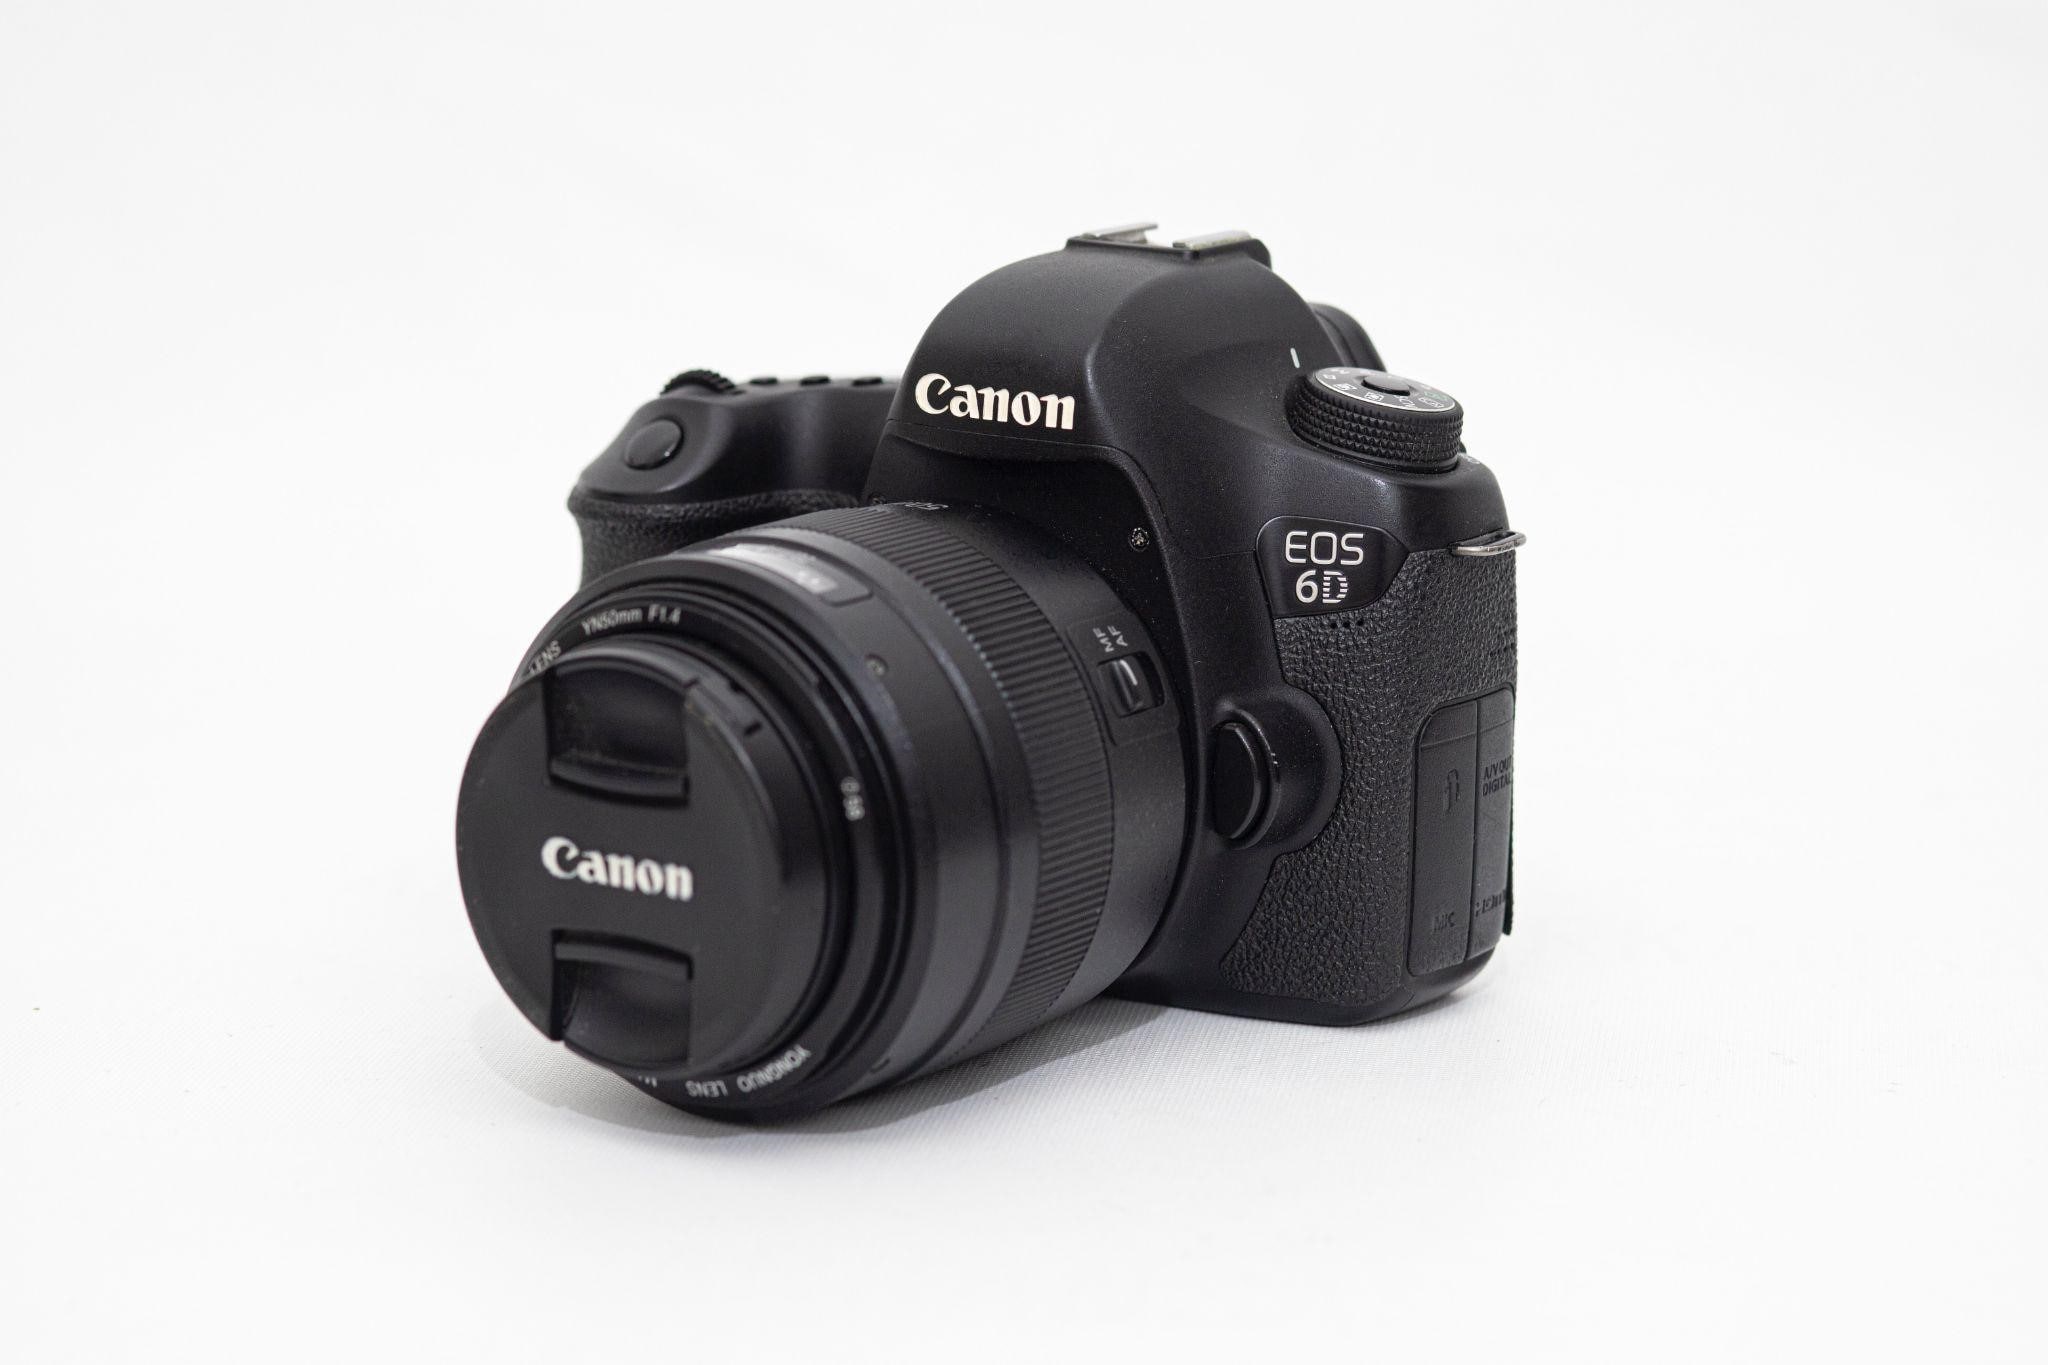
A Good Camera
A good camera is essential to record a video in public because it will provide quality footage. It will also allow you to capture more detail and create more engaging videos. But if you use a phone instead, make sure it is the latest iPhone or other with high pixels camera.
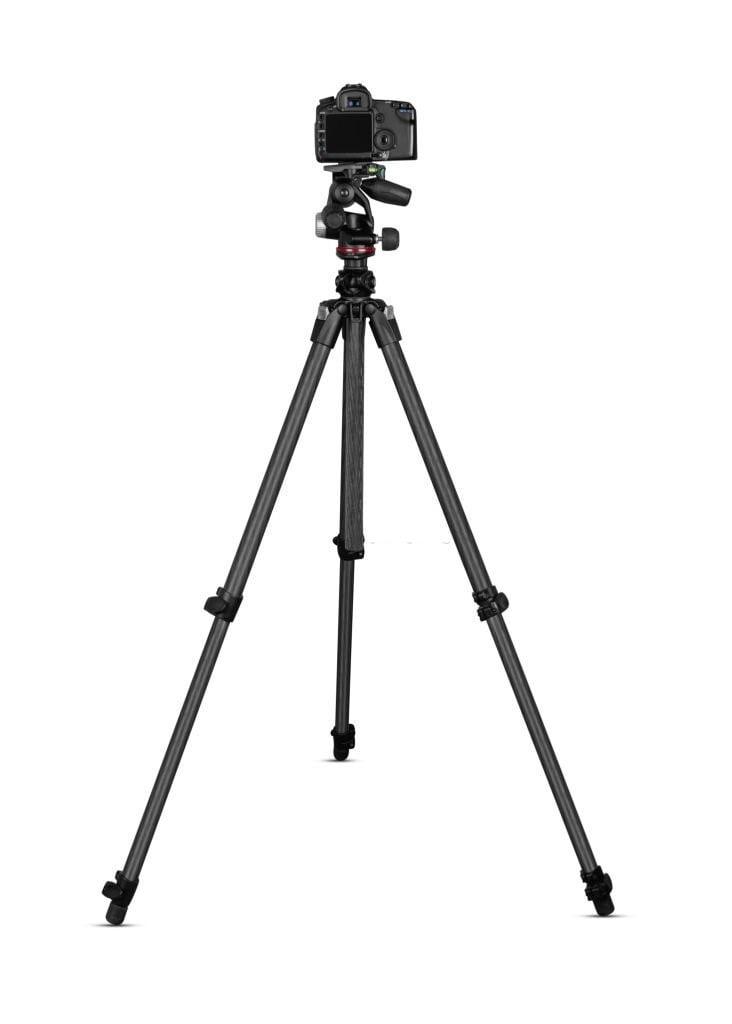
A Tripod
A tripod is essential when recording video in public to ensure that your shots are stable and steady. Without a tripod, your camera can shake and create a distorted, blurry image that can ruin a shot. So having a secure tripod will help you capture professional-looking footage.
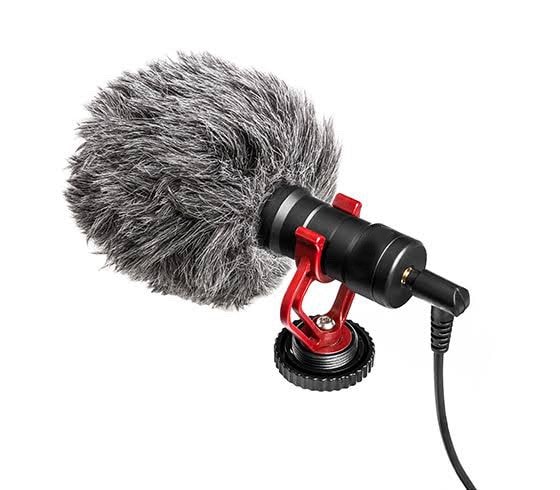
A Microphone
A microphone is essential for recording a video in public because it captures the sound in the environment, allowing the video to be recorded with better-quality audio. Without a microphone, the video would be recorded with distorted sound and would likely be challenging to understand.
Apart from the gear mentioned above, you can also bring an ND filter, extra batteries, and SD cards. Because If the battery runs out or the SD card becomes full, the video recording could be lost. The spare batteries and SD cards help to ensure that the video can be captured uninterrupted. Let’s see what we need further.
Part 2. What Do You Need to Accomplish With Your Video?
While recording a video in a busy location, you need to accomplish three things with your video to record it better. Which are as follows:
1. Clean Shots
When recording in a busy location, it is essential to try and capture clean shots. It can be done by using a wide-angle lens to get the full shot or zooming in to focus on a particular element.
2. Clean Audio
Getting a clean and clear sound when recording audio in a busy location is essential. A good quality microphone, an audio recorder, or external noise reduction can help minimize background noise and capture the desired audio.
3. Decent Lighting
In a busy location, decent lighting is as important as the other two factors. Look for natural light sources that can provide good light, even illumination. If these are unavailable, consider using portable lighting equipment or lamps to create a more flattering environment.
Now that we know what we need let’s see how to make a video.
Part 3. How to Get the Best Shot While Filming Outdoor?
Whether you are a vlogger, a YouTuber, or a student filmmaker, shooting a video in a busy area is always a challenge. You must be able to plan and execute your production in a way that minimizes disruption and produces quality footage. By following these instructions, we hope you can make a difference in a shot you record:
Step1 Scout the Location
Before recording, visit the location in advance to plan your shots. Take note of potential distractions or noise sources and plan your angles accordingly.

Step2 Choose the correct shooting time
The best time to record a video in a busy location is when the area is less crowded, such as early in the morning or late at night. Avoiding peak times and holidays is also a good idea.
Step3 Choose the right angle
Once you get to the location, you must find the right angle.
Select Background
Try to find a background that will best capture the atmosphere of the area and minimize any background noise.
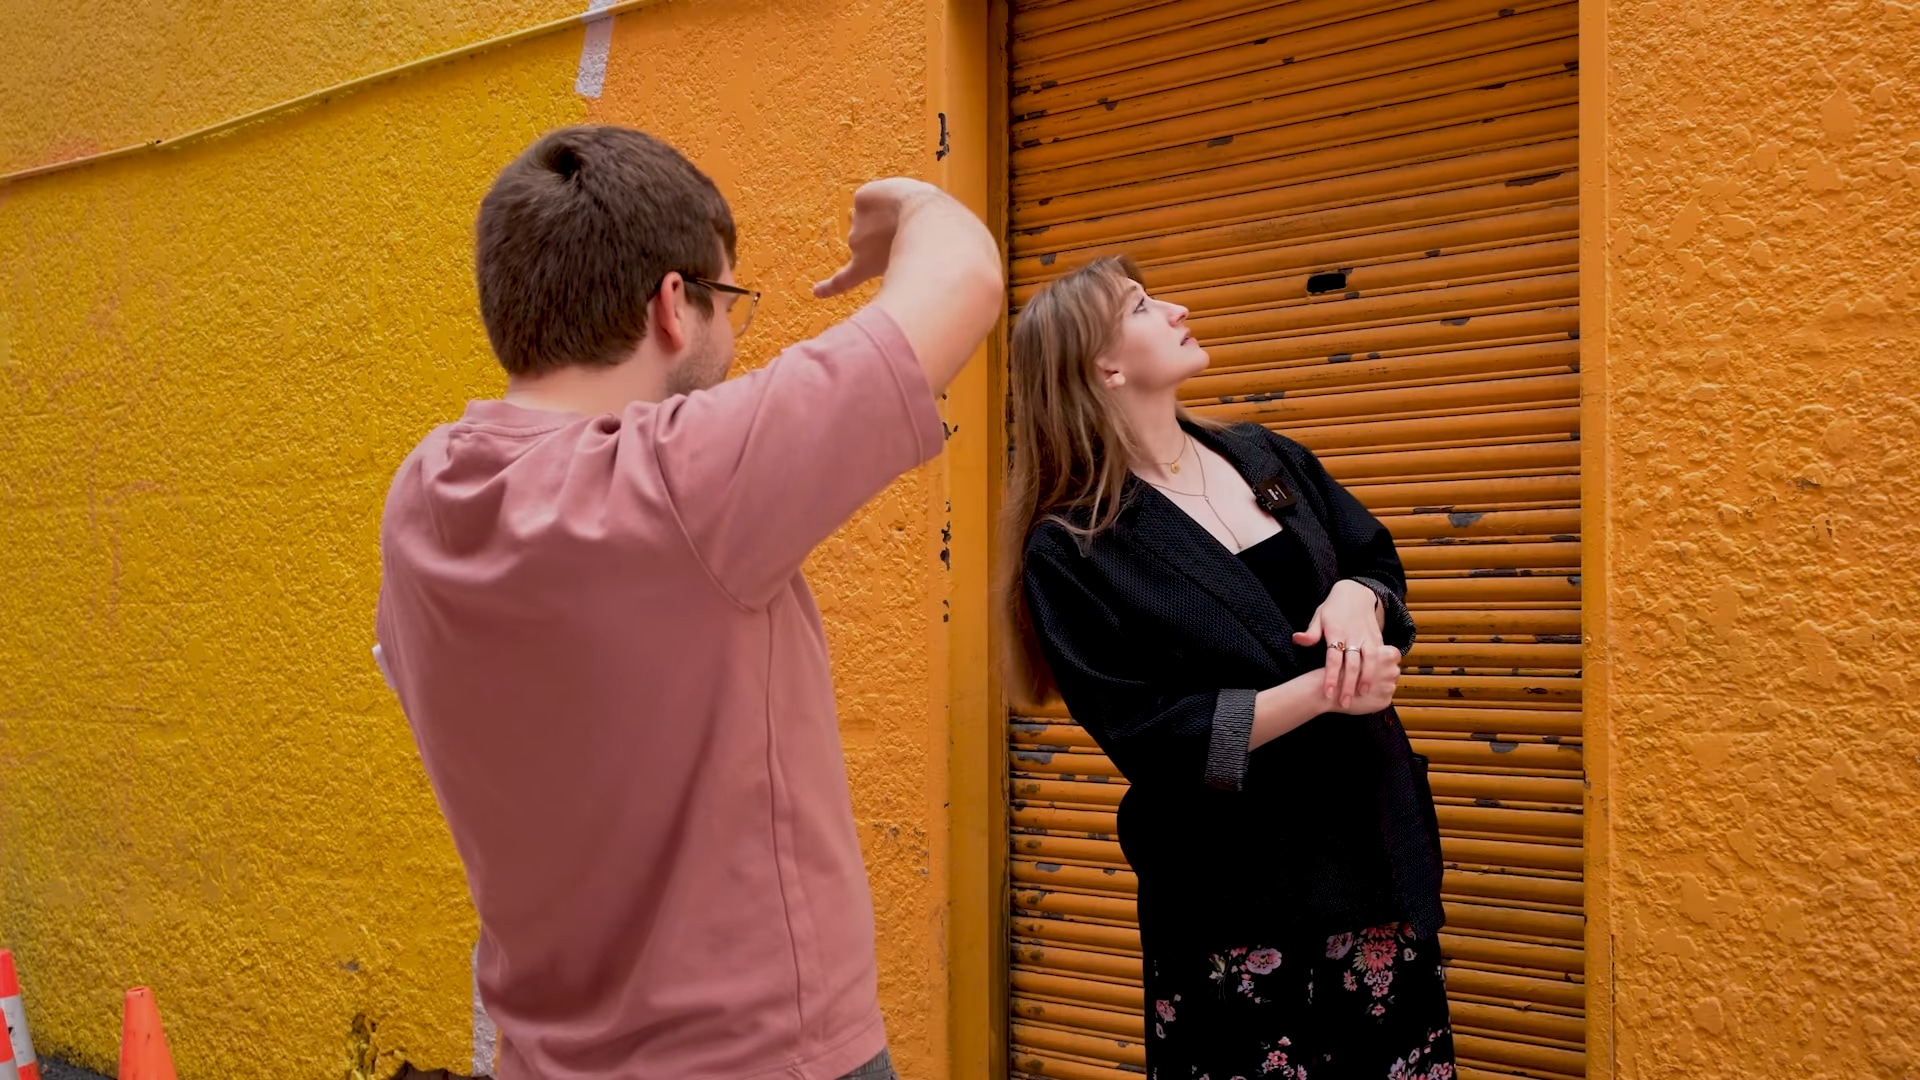
Set the frame
If your frame is too broad, you will face potential distractions that could interfere with your video, such as people walking in and out of the frame.

Set your position
Instead of getting closer to your talent, get further away and zoom in this way, you leave space for other people in the location, and you can still get your shot!

Try to get your shot and then get out quickly so you don’t bother other people trying to get their photos.
Part 4. Best Way to Record Audio While Filming Outdoor
Audio is essential to any video production, and recording audio while filming outdoor scenes can be challenging.
Outdoor environments come with more variables to consider, such as wind, traffic noise, and other background noise, that can make capturing clear audio more difficult. Even if you use a high-quality mic, you still have chances of interruption.
If you get any such variable in the video you recorded, you can re-record the audio with the help of Wondershare Filmora . Let’s see how you can do it:
Free Download For Win 7 or later(64-bit)
Free Download For macOS 10.14 or later
Step1 First, select the clip you want to re-record and then drag it onto the timeline.
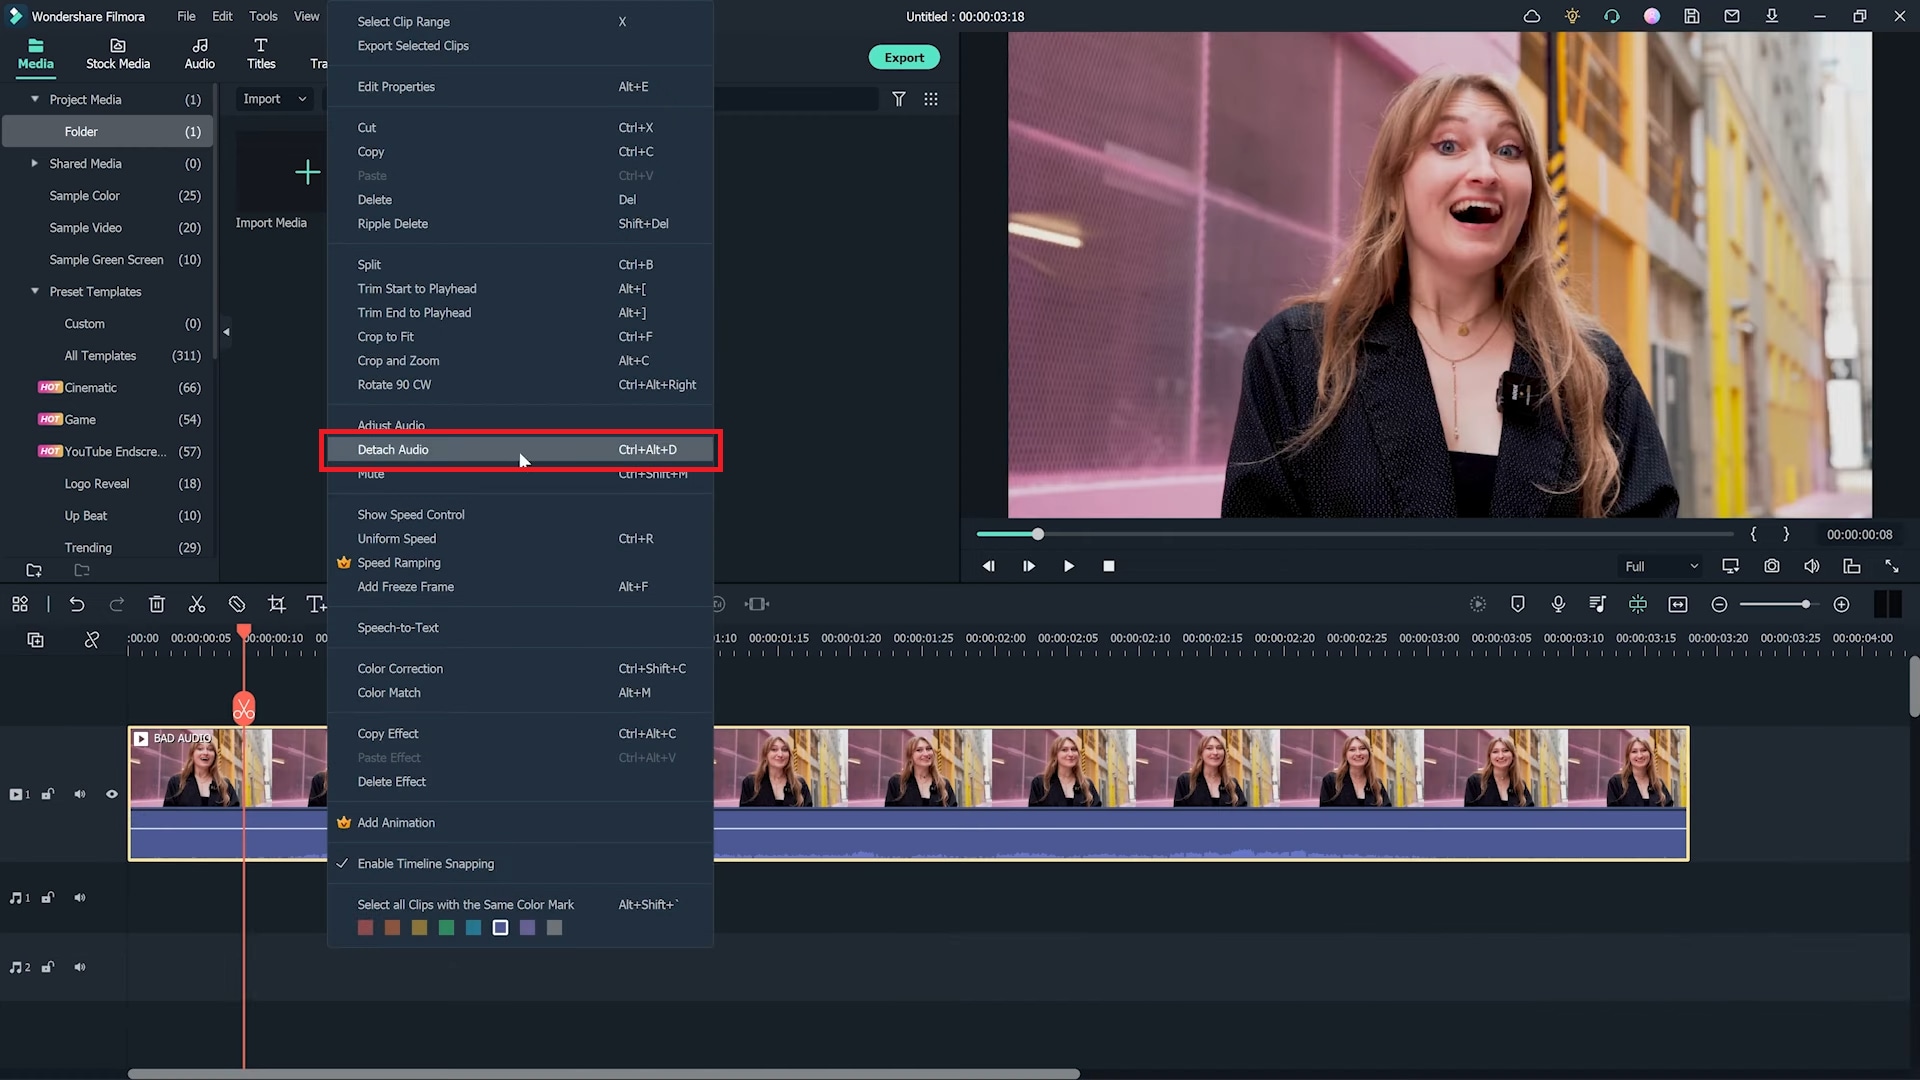
Step2 Right-click on the video you dragged and then click on the Detach Audio. After doing that, mute the lousy audio from the audio timeline.
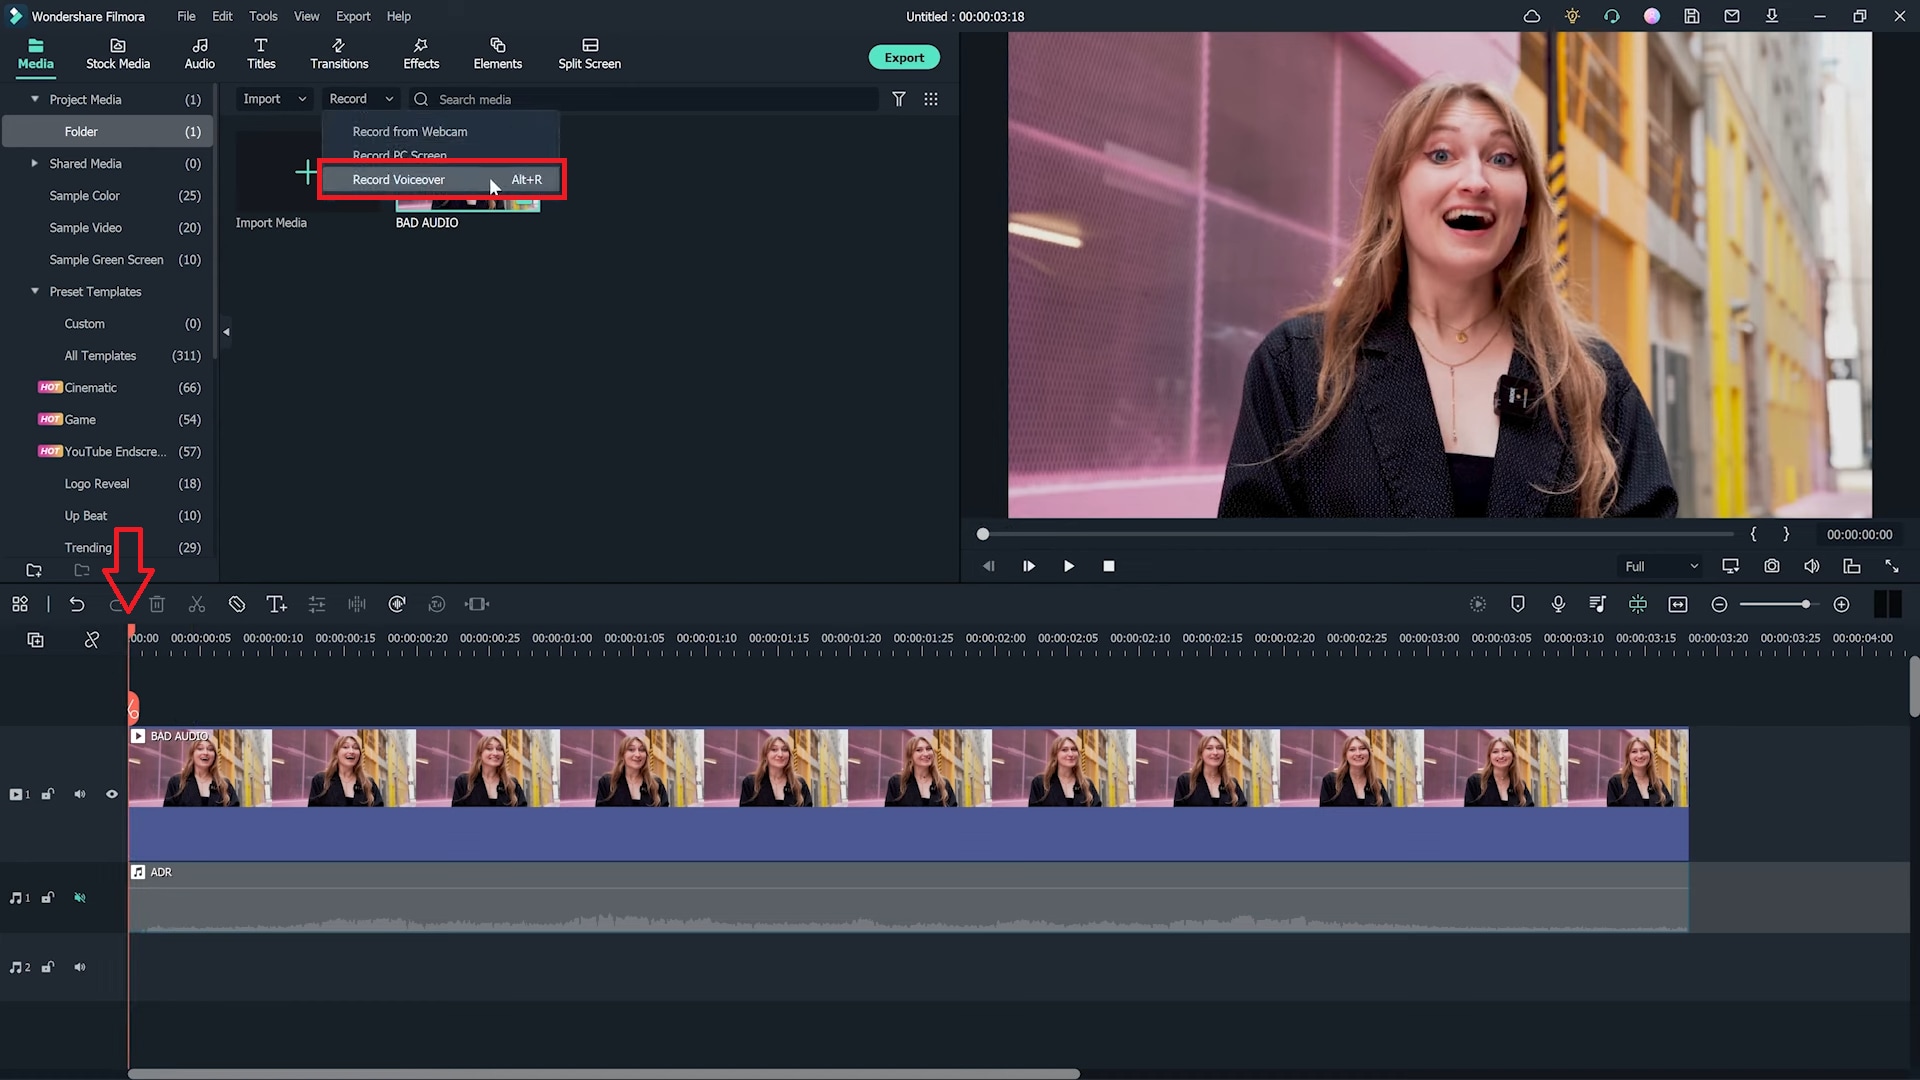
Step3 Place the playhead at the clip’s start, click Record just above the import media section, and then click Record Voiceover.
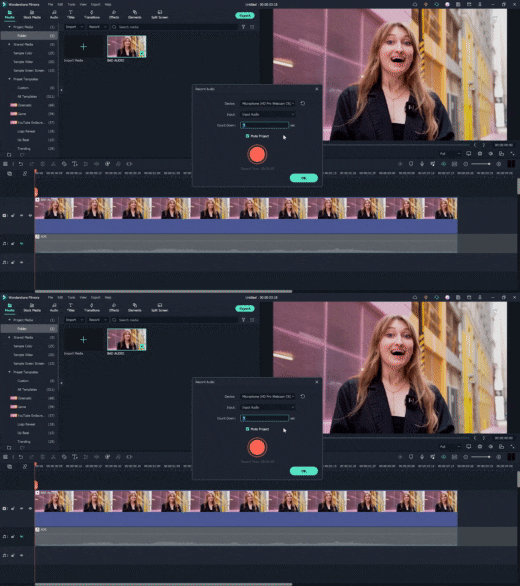
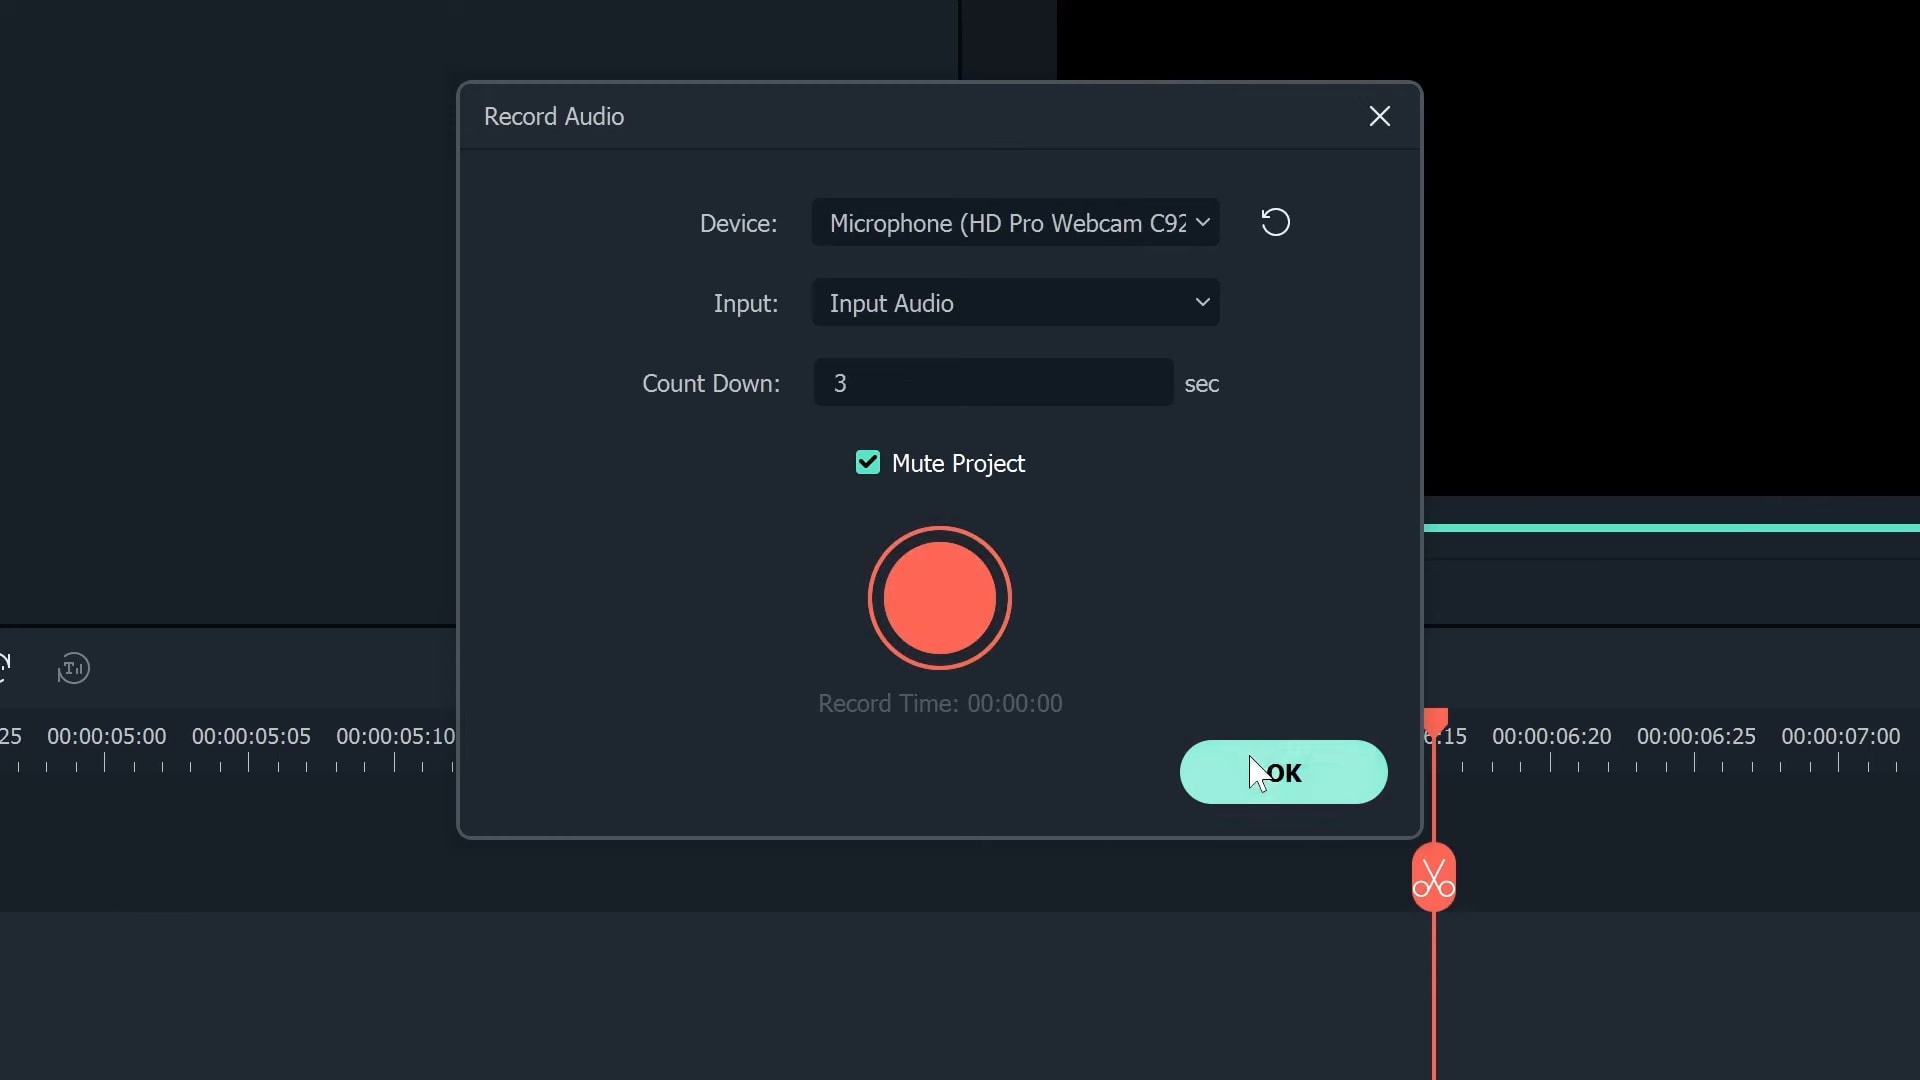
Step4 Now select a recording device and then select the time for the countdown. For example, a 3-minute timer would be perfect.
Step5 Click record and try to re-record your line and match it up the best you can. To get the sound and sync right, you might need to attempt a few times, but in the end, it will improve the quality of your video.
This technique is used in almost every film you see, especially action sequences that also have dialogue. You can also use this technique with the help of Filmora and enhance your video with better audio quality.
Conclusion
We hope this blog has given you some tips for how to film better in public. Filming in public can be intimidating, but you can shoot professional footage with the proper techniques.
From understanding the legalities of filming in public to learning to be discreet and respectful of your environment, you can ensure your filming experience is positive and successful.
With these tips and some practice, you’ll be on your way to shooting great videos in public!
Let us know your favorite film location in the comments below.
Free Download For macOS 10.14 or later
Step1 First, select the clip you want to re-record and then drag it onto the timeline.
Step2 Right-click on the video you dragged and then click on the Detach Audio. After doing that, mute the lousy audio from the audio timeline.

Step3 Place the playhead at the clip’s start, click Record just above the import media section, and then click Record Voiceover.

Step4 Now select a recording device and then select the time for the countdown. For example, a 3-minute timer would be perfect.

Step5 Click record and try to re-record your line and match it up the best you can. To get the sound and sync right, you might need to attempt a few times, but in the end, it will improve the quality of your video.

This technique is used in almost every film you see, especially action sequences that also have dialogue. You can also use this technique with the help of Filmora and enhance your video with better audio quality.
Conclusion
We hope this blog has given you some tips for how to film better in public. Filming in public can be intimidating, but you can shoot professional footage with the proper techniques.
From understanding the legalities of filming in public to learning to be discreet and respectful of your environment, you can ensure your filming experience is positive and successful.
With these tips and some practice, you’ll be on your way to shooting great videos in public!
Let us know your favorite film location in the comments below.
How To Create A Green Screen Video In After Effects
You’ll probably get the finest results in After Effects out of all the editing programs. Working with green screen footage in After Effects can be done in a variety of ways. Utilizing a built-in preset that combines three effects is advised by Adobe. Due to its ability to deliver speedy (and typically excellent) outcomes, this strategy is great for both beginners and specialists. We’ll demonstrate how to do easily for you.
Let’s start off!
1. Importing your footage
After you have imported your material into the After Effects project, you should next create a new composition using the footage. In the following stage, you have the option of either adding each plugin one at a time or doing it all at once. You may find them grouped together as Keylight, Key Cleaner, and Advanced Spill Suppressor in the Animation Presets box, which is located under the “Image Utilities” heading.
2. Remove the green color
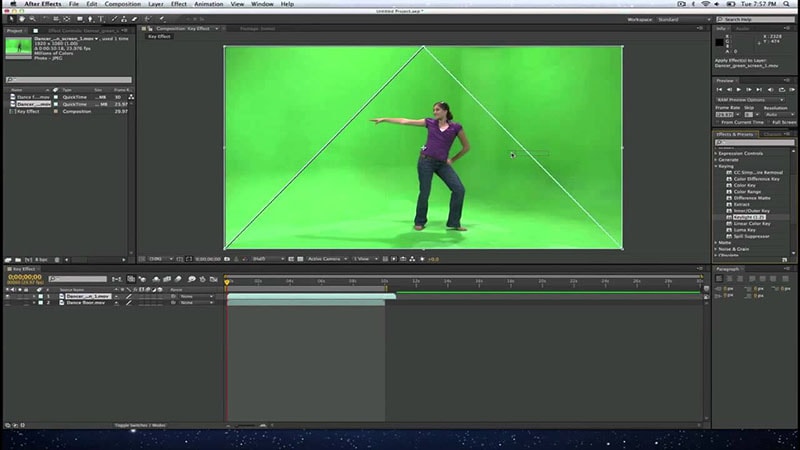
After Effects users can get rid of a green screen by going to the “Animation Presets” window, searching for the “Keylight” preset, dragging, and dropping it over the clip, and then shifting their focus to the “Effects Controls” window. Make sure the Screen Colour is set to the color of your screen’s background (which, in this case, is green). You may do this with the color selector.
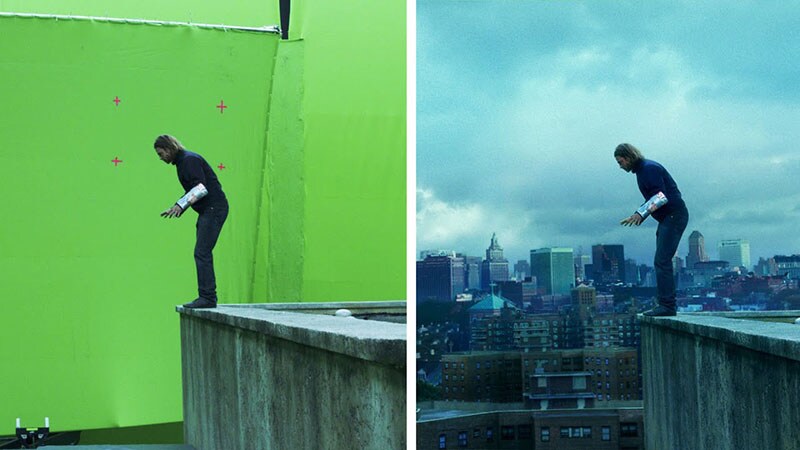
3. Clean up the shot
You have no doubt observed that some of the remaining parts do not have the correct keying installed in them. In order to get rid of them, you need to put the view into the Combined Matte mode and turn the Screen Gain up a notch.
Because everything that is not transparent is turned white by Combined Matte, any remaining debris can be seen very clearly after it has been applied. After you have finished cleaning the frame, you should change the view to Intermediate Result. Your footage may become contaminated with artifacts if the Final Result view is inadvertently switched on.
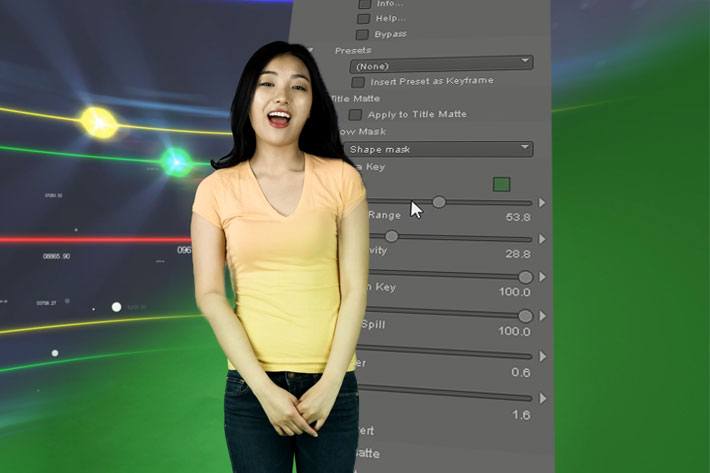
You can go to the “Screen Matte” area if you feel like the frame still needs more tweaking after you’ve applied the previous ones. You can accomplish that with the assistance of Clip Black and Clip White. Feel free to turn the Clip Black dial all the way to the right and turn the Clip White dial to the left. You can also adjust the other settings, if necessary, but based on my observations, everything should be working properly at this point.
The Bottom Line
After completing this lesson, you should have a better understanding of what a chroma key is, how to get rid of a green screen in After Effects, and how to adjust some settings if something goes wrong. Keep in mind that if the footage is not captured properly, you will not be able to successfully key out the green screen in the final video. Extra caution should be taken with the lights, and spills should be avoided at all costs!
Free Download For Win 7 or later(64-bit)
Free Download For macOS 10.14 or later
Free Download For macOS 10.14 or later
How to Concatenate Videos Using FFmpeg
Video editing is a crucial aspect of creating content for many people. Whether you’re a YouTuber, a marketer, or just someone who wants to share videos with friends and family, being able to edit and manipulate your videos is key. One of the most basic video editing tasks is concatenating videos, which combines multiple files to create one cohesive video.
FFmpeg is a powerful tool that allows you to do just that, and in this guide, we’ll walk you through the process of FFmpeg concatenate videos. Whether a beginner or an experienced video editor, this guide will provide you with all the information you need to seamlessly merge your videos. From installation to execution, we’ll cover it all so you can streamline your video editing process.
Overview and Installation of FFmpeg
FFmpeg is free, open-source project that allows you to record, convert, and stream digital audio and video. It is a command-line tool widely used in video editing and transcoding. FFmpeg can be used to concatenate videos and other tasks, such as adding subtitles, changing video resolution, and more. It is available for Windows, Mac, and Linux, making it a versatile and accessible tool for anyone to use.
Here’s how to install FFmpeg:
Step1 Log in to your Ubuntu server via SSH and update the package index.
$ sudo apt update
Step2 Install FFmpeg and all the required dependencies
$ sudo apt install ffmpeg
Step3 Verify the version of FFmpeg that you’ve installed.
$ ffmpeg -version
Prerequisite
Before we merge videos using FFmpeg, we must understand the various methods available to us. FFmpeg offers three ways to concatenate videos: a demuxer, a filter, or a protocol. However, each method has its own set of considerations, and the best method for you will depend on the properties of the videos you’re working with.
It’s crucial to ensure that all encoding-related properties align with your chosen method. This includes the timebase, height and width, codecs, and pixel format. Some methods require the videos you’re merging to have the same encoding, while others allow for different encodings. It’s essential to keep this in mind to ensure that the final video is seamless without any breaks. Remember that these prerequisites will help you have a smooth process.
Concatenate Videos With Same Codecs Using FFmpeg
If the videos you want to concatenate have the same codec, you can use the FFmpeg “concat” demuxer or protocol to join them together. This simple and efficient method doesn’t require re-encoding the videos, saving time and preserving the original quality. This section will review the steps to concatenate videos using the “concat” demuxer and “concat” protocols in FFmpeg.
Merge Videos With the “Concat” Demuxer
The concat demuxer in FFmpeg allows you to join together multiple video files with the same codecs by reading a list of file paths from a text file and demuxing them in sequence. Each video starts where the previous one finishes without needing to re-encode the videos. Here’s how to do it:
Step1 Create a .txt file and list the paths of the video files you want to merge.
Join_video.txt
file /Users/Video/input1.mp4
file /Users/Video/input2.mp4
![]()
Note: You can add more than two video files.
Step2 Run the FFmpeg command:
ffmpeg -f concat -safe 0 -i join_video.txt -c copy output_demuxer.mp4
![]()
Note: -safe 0 is added to accept any file name.
-c copy will copy all the streams.
As this method allows you to “stream copy” the files instead of re-encoding them, the concatenation is very fast. This can be a good option if you have videos with the same codecs and want to join them quickly without losing quality.
Join Videos With the “Concat” Protocol
The concat protocol in FFmpeg allows you to join together multiple video files in a specific format that supports file-level concatenation, such as MPEG-2 TS. However, it cannot be used for other video formats like MP4 and WEBM.
Here’s how to use the “concat protocol:
Step1 Run the FFmpeg command:
ffmpeg -i “concat:input1.ts|input2.ts” -c copy output_protocol.ts
![]()
Note: The concat protocol allows you to “stream copy” the files by adding the option -c copy.
Step2 Input the file name of the video using this code:
ffmpeg -i “concat:input1.mp4|input2.mp4” -c copy output_protocol.mp4
![]()
Note: If you try to use this method on video formats that are not supported, only the first input video will be saved in the output video. And the video ends after the first video.
Although this method is limited in terms of supported video formats, it’s very easy to use if you merge videos in the supported formats. It’s a single command in the terminal without needing a text file. Additionally, using the -c copy option makes it efficient as it doesn’t require re-encoding, saving time.
Concatenate MP4 Video Files of Different Codecs & Resolutions Using FFmpeg
If the videos you want to concatenate have different codecs or resolutions, you can still use FFmpeg to join them together. However, this method requires re-encoding the videos, which can take longer and may result in a loss of quality. This section will cover the steps to concatenate videos with different codecs or resolutions using FFmpeg.
Here’s how to do it:
Step1 Provide the names of the input files to FFmpeg.
ffmpeg -i file1.mp4 -i file2.mp4 -i file3.mp4 \
Step2 Use the filter_complex filtergraph parameter to instruct FFmpeg from where to take the audio and video.
-filter_complex “[0:v] [0:a] [1:v] [1:a] [2:v] [2:a]
![]()
Note: [0:v][0:a] means FFmpeg needs to take the video and audio from the 0th video (file1.mp4).
Step3 Tell FFmpeg to concatenate three files (n=3).
concat=n=3:v=1:a=1 [vv] [aa]“ \
![]()
Note: The v=1:a=1 implies one stream for the audio and one stream for the video.
Step4 Map these audio and video outputs to the final video container. This is done as follows:
-map “[vv]“ -map “[aa]“ mergedVideo.mp4
It is important to note that this method requires re-encoding the videos, which can take more time and may result in a loss of quality. However, it offers the flexibility of filtering the videos before concatenating them. The filter_complex method in FFmpeg allows you to concatenate videos of different codecs and resolutions. The final step is to map the audio and video outputs to the final video container. This can be done using the -map command.
Concatenate Videos With Multiple Audio Streams Using FFmpeg
Concatenating videos with multiple audio streams can be more complex than concatenating videos with a single audio stream. This section will cover the steps to concatenate videos with multiple audio streams using FFmpeg. We’ll be using the filter_complex method in FFmpeg, which allows you to manipulate and concatenate multiple audio and video streams in a single command. This method is more advanced but allows you to join videos with different audio streams and create a final video with multiple audio tracks.
Step1 Specify the input files and opening.mkv, episode.mkv, and ending.mkv:
$ ffmpeg -i opening.mkv -i episode.mkv -i ending.mkv -filter_complex
Step2 Use the filter_complex parameter in FFmpeg to specify the input streams for the video and audio.
[0:0] [0:1] [0:2] [1:0] [1:1] [1:2] [2:0] [2:1] [2:2]
![]()
Note: Single video stream ([0:0], [1:0], [2:0])
Dual audio streams ([0:1][0:2], [1:1][1:2], [2:1][2:2])
Step3 Use the concat filter to specify that you want to concatenate 3 files (n=3) with 1 video stream (v=1) and 2 audio streams (a=2). Specify the output streams as [v], [a1], [a2]:
concat=n=3:v=1:a=2 [v] [a1] [a2]
Step4 Use the -map option to map the output streams to the final video container:
-map ‘[v]‘ -map ‘[a1]‘ -map ‘[a2]‘ output.mkv
[Bonus] Join Videos Together With Filmora
While FFmpeg offers a wide range of options for joining videos together, it can have a steep learning curve for some users. An alternative method for joining videos is using Filmora. Wondershare Filmora is a user-friendly video editing software that allows you to easily join multiple videos. It’s a great option for users new to video editing or needing experience with command-line tools like FFmpeg.
Free Download For Win 7 or later(64-bit)
Free Download For macOS 10.14 or later
Filmora has a simple drag-and-drop interface, making adding, arranging, and editing videos and audio tracks easy. Additionally, it offers various features like split, trim, crop, merge, and more. It also has various effects, transitions, and animations to enhance the overall look of your video. With Filmora, you can create professional-looking videos with minimal effort.
How-to Steps
Here’s how to merge videos using Filmora:
Step1 Open Filmora and click “New Project.”

Step2 Go to “File“ > “Import Media“ > “Import Media Files“ to add your video files to the media library.

Step3 Drag and drop the files you want to merge from the media library to the timeline, and then you’ll get the merged video seamlessly.

Step4 Edit your video.

Step5 After editing, click the “Export“ tab to save your videos.

Conclusion
FFmpeg is a powerful tool that allows you to concatenate videos in various ways. Whether you’re working with videos of the same codecs and resolutions or videos with multiple audio streams, FFmpeg can handle it. However, for users new to video editing or needing experience with command-line tools, using Filmora can be a more user-friendly option. It offers a simple drag-and-drop interface and a variety of features and effects to enhance the overall look of your video.
Step2 Run the FFmpeg command:
ffmpeg -f concat -safe 0 -i join_video.txt -c copy output_demuxer.mp4
![]()
Note: -safe 0 is added to accept any file name.
-c copy will copy all the streams.
As this method allows you to “stream copy” the files instead of re-encoding them, the concatenation is very fast. This can be a good option if you have videos with the same codecs and want to join them quickly without losing quality.
Join Videos With the “Concat” Protocol
The concat protocol in FFmpeg allows you to join together multiple video files in a specific format that supports file-level concatenation, such as MPEG-2 TS. However, it cannot be used for other video formats like MP4 and WEBM.
Here’s how to use the “concat protocol:
Step1 Run the FFmpeg command:
ffmpeg -i “concat:input1.ts|input2.ts” -c copy output_protocol.ts
![]()
Note: The concat protocol allows you to “stream copy” the files by adding the option -c copy.
Step2 Input the file name of the video using this code:
ffmpeg -i “concat:input1.mp4|input2.mp4” -c copy output_protocol.mp4
![]()
Note: If you try to use this method on video formats that are not supported, only the first input video will be saved in the output video. And the video ends after the first video.
Although this method is limited in terms of supported video formats, it’s very easy to use if you merge videos in the supported formats. It’s a single command in the terminal without needing a text file. Additionally, using the -c copy option makes it efficient as it doesn’t require re-encoding, saving time.
Concatenate MP4 Video Files of Different Codecs & Resolutions Using FFmpeg
If the videos you want to concatenate have different codecs or resolutions, you can still use FFmpeg to join them together. However, this method requires re-encoding the videos, which can take longer and may result in a loss of quality. This section will cover the steps to concatenate videos with different codecs or resolutions using FFmpeg.
Here’s how to do it:
Step1 Provide the names of the input files to FFmpeg.
ffmpeg -i file1.mp4 -i file2.mp4 -i file3.mp4 \
Step2 Use the filter_complex filtergraph parameter to instruct FFmpeg from where to take the audio and video.
-filter_complex “[0:v] [0:a] [1:v] [1:a] [2:v] [2:a]
![]()
Note: [0:v][0:a] means FFmpeg needs to take the video and audio from the 0th video (file1.mp4).
Step3 Tell FFmpeg to concatenate three files (n=3).
concat=n=3:v=1:a=1 [vv] [aa]“ \
![]()
Note: The v=1:a=1 implies one stream for the audio and one stream for the video.
Step4 Map these audio and video outputs to the final video container. This is done as follows:
-map “[vv]“ -map “[aa]“ mergedVideo.mp4
It is important to note that this method requires re-encoding the videos, which can take more time and may result in a loss of quality. However, it offers the flexibility of filtering the videos before concatenating them. The filter_complex method in FFmpeg allows you to concatenate videos of different codecs and resolutions. The final step is to map the audio and video outputs to the final video container. This can be done using the -map command.
Concatenate Videos With Multiple Audio Streams Using FFmpeg
Concatenating videos with multiple audio streams can be more complex than concatenating videos with a single audio stream. This section will cover the steps to concatenate videos with multiple audio streams using FFmpeg. We’ll be using the filter_complex method in FFmpeg, which allows you to manipulate and concatenate multiple audio and video streams in a single command. This method is more advanced but allows you to join videos with different audio streams and create a final video with multiple audio tracks.
Step1 Specify the input files and opening.mkv, episode.mkv, and ending.mkv:
$ ffmpeg -i opening.mkv -i episode.mkv -i ending.mkv -filter_complex
Step2 Use the filter_complex parameter in FFmpeg to specify the input streams for the video and audio.
[0:0] [0:1] [0:2] [1:0] [1:1] [1:2] [2:0] [2:1] [2:2]
![]()
Note: Single video stream ([0:0], [1:0], [2:0])
Dual audio streams ([0:1][0:2], [1:1][1:2], [2:1][2:2])
Step3 Use the concat filter to specify that you want to concatenate 3 files (n=3) with 1 video stream (v=1) and 2 audio streams (a=2). Specify the output streams as [v], [a1], [a2]:
concat=n=3:v=1:a=2 [v] [a1] [a2]
Step4 Use the -map option to map the output streams to the final video container:
-map ‘[v]‘ -map ‘[a1]‘ -map ‘[a2]‘ output.mkv
[Bonus] Join Videos Together With Filmora
While FFmpeg offers a wide range of options for joining videos together, it can have a steep learning curve for some users. An alternative method for joining videos is using Filmora. Wondershare Filmora is a user-friendly video editing software that allows you to easily join multiple videos. It’s a great option for users new to video editing or needing experience with command-line tools like FFmpeg.
Free Download For Win 7 or later(64-bit)
Free Download For macOS 10.14 or later
Filmora has a simple drag-and-drop interface, making adding, arranging, and editing videos and audio tracks easy. Additionally, it offers various features like split, trim, crop, merge, and more. It also has various effects, transitions, and animations to enhance the overall look of your video. With Filmora, you can create professional-looking videos with minimal effort.
How-to Steps
Here’s how to merge videos using Filmora:
Step1 Open Filmora and click “New Project.”

Step2 Go to “File“ > “Import Media“ > “Import Media Files“ to add your video files to the media library.

Step3 Drag and drop the files you want to merge from the media library to the timeline, and then you’ll get the merged video seamlessly.

Step4 Edit your video.

Step5 After editing, click the “Export“ tab to save your videos.

Conclusion
FFmpeg is a powerful tool that allows you to concatenate videos in various ways. Whether you’re working with videos of the same codecs and resolutions or videos with multiple audio streams, FFmpeg can handle it. However, for users new to video editing or needing experience with command-line tools, using Filmora can be a more user-friendly option. It offers a simple drag-and-drop interface and a variety of features and effects to enhance the overall look of your video.
Also read:
- [Updated] 2024 Approved 12 Simple Tricks to Make Your YouTube Videos Go Viral
- [Updated] Frugal Flight Assemblies Budget-Friendly Drones Ranking
- 2024 Approved Create the Stranger Things Upside Down Effect Video
- 2024 Approved Easy Guide to Screenshots & Recordings with macOS
- 3D LUT Mobile App Review - A Composite Application for Editing Media for 2024
- How to Fade in Text in Adobe Premiere Pro
- In 2024, Cheapest Alternatives to Android's FaceTime
- In 2024, How to Fix My Honor 80 Pro Straight Screen Edition Location Is Wrong | Dr.fone
- In 2024, Want to Buy a Drone for Better Videography Creating? This Article Will Review 6 of the Best Drones on the Market for You to Consider
- New 2024 Approved 11 Tips to Make Product Ad Videos
- New Do You Want to Excel at Using Adobe Premiere Pro Software for Splitting Videos and Audio? Learn About Splitting a Video and Audio Using Different Tools and Add a New Skill to Your Skillset with a Step-by-Step Guide in This Article
- New Have You Ever Heard Hyperlapse and Tume Lapse Videos? Do You Know the Differences Between Them? This Article Will Introduce the Concepts, Features and Differnces of Them for 2024
- New Want to Apply a Filter on Your Video Using Your iPhone or Mac? Here Are the Simple Steps to Put Add Filters on iMovie. Find Out a Better iMovie Alternative with More Filters
- Solving the Issue: Troubleshooting Steam Game Crashes on Windows 11 Devices
- Stellar Media Fix: 0XC00D36C4 Problem
- Strategic Planning Aligning Research with Business Objectives for 2024
- The Powerhouse Analyzing the Performance of LG UD88-W HDTV
- Title: Learn Eight Simple Steps that Will Allow You to Create a Stunning Text Reveal Animation in Filmora. Simple yet Very Professional
- Author: Morgan
- Created at : 2024-10-05 03:54:33
- Updated at : 2024-10-05 16:26:25
- Link: https://ai-video-editing.techidaily.com/learn-eight-simple-steps-that-will-allow-you-to-create-a-stunning-text-reveal-animation-in-filmora-simple-yet-very-professional/
- License: This work is licensed under CC BY-NC-SA 4.0.
