:max_bytes(150000):strip_icc():format(webp)/GettyImages-839864362-59c51d1daf5d3a0010919ae9.jpg)
Learn How to Create Animated Titles and Text in the Filmora Video Editor. This Is a Simple Step-by-Step Tutorial for Any Skill Level

Learn How to Create Animated Titles and Text in the Filmora Video Editor. This Is a Simple Step-by-Step Tutorial for Any Skill Level
Preparation
What you need to prepare:
- A computer (Windows or macOS)
- Your video materials.
- Filmora video editor
Step 1
Download and install the Filmora video editor . Just click the link, hit “Download”, and it will start automatically. Then, open a New Project.
Step 2
Click on the “Titles” tab and drag a Default Title to Track 2 on your Timeline.

Step 3
Double-click on it and change the font to anything you like. Then, enter the text in the box in front of you. While you’re here, you can also edit the text spacing and other features.

Step 4
Now, take a snapshot of the text. Then, double-click on the default title again and change the text to a single letter I. Once again, take a snapshot of this text and then delete the default title from the timeline.

You should have two snapshots in My Media now. One of them should say “FILMORA” and one with the letter “I”.

Step 5
Drag the “FILMORA” snapshot to track 2 and the “I” snapshot to track 3. Then, click on the “Zoom” button and set this to 50%.

Step 6
Double-click on the “I” snapshot from the timeline. Then, input these settings when the window pops up. After that, drag the Playhead 1 second and 15 frames further down the timeline. Then, double-click on the “I” snapshot again, and change the Y-axis value to 0.

Step 7
Copy the “I” snapshot track from the timeline. Then, paste it on Track 4. Next, double-click on this one and change the X-axis position to whichever letter you want. In this case, it’s the letter “M”. As for the Y-Axis, you can change it any way that suits you.

Step 8
Copy this process as often and with as many letters as you want. Then, when you’re done, export the title animation to your computer.

Step 9
Open a new project in Filmora and import the title animation we just created.
Step 10
Drag the custom title animation to Track 2 and drag any video background you have on Track 1.

Step 11
Double-click on the title track, go to the Video tab, and select “Lighten” from the Blending Mode tab.

Step 12
Shift the title clip from Track 2 to Track 3. Then, go to the Effects tab and drag the Dark Film effect to Track 1 on the timeline.

Step 13
Search for the “Blur” effect in the Effects tab. Then, drag “Square Blur” to Track 2 in the timeline.

Step 14
Select the “Cinema” effect from the Effects tab and drag it to Track 4. Double-click on it and change the border height to 0.10.

Step 15
Now, all left is to render the clip and review the final result.

Summary
What you’ve learned:
- Create a professional-level animated text in Filmora in 15 simple steps
- How to add a video background and cinematic effects to your animated title
- Adjust the settings of clips in the Filmora timeline
What you need to prepare:
- A computer (Windows or macOS)
- Your video materials.
- Filmora video editor
Step 1
Download and install the Filmora video editor . Just click the link, hit “Download”, and it will start automatically. Then, open a New Project.
Step 2
Click on the “Titles” tab and drag a Default Title to Track 2 on your Timeline.

Step 3
Double-click on it and change the font to anything you like. Then, enter the text in the box in front of you. While you’re here, you can also edit the text spacing and other features.

Step 4
Now, take a snapshot of the text. Then, double-click on the default title again and change the text to a single letter I. Once again, take a snapshot of this text and then delete the default title from the timeline.

You should have two snapshots in My Media now. One of them should say “FILMORA” and one with the letter “I”.

Step 5
Drag the “FILMORA” snapshot to track 2 and the “I” snapshot to track 3. Then, click on the “Zoom” button and set this to 50%.

Step 6
Double-click on the “I” snapshot from the timeline. Then, input these settings when the window pops up. After that, drag the Playhead 1 second and 15 frames further down the timeline. Then, double-click on the “I” snapshot again, and change the Y-axis value to 0.

Step 7
Copy the “I” snapshot track from the timeline. Then, paste it on Track 4. Next, double-click on this one and change the X-axis position to whichever letter you want. In this case, it’s the letter “M”. As for the Y-Axis, you can change it any way that suits you.

Step 8
Copy this process as often and with as many letters as you want. Then, when you’re done, export the title animation to your computer.

Step 9
Open a new project in Filmora and import the title animation we just created.
Step 10
Drag the custom title animation to Track 2 and drag any video background you have on Track 1.

Step 11
Double-click on the title track, go to the Video tab, and select “Lighten” from the Blending Mode tab.

Step 12
Shift the title clip from Track 2 to Track 3. Then, go to the Effects tab and drag the Dark Film effect to Track 1 on the timeline.

Step 13
Search for the “Blur” effect in the Effects tab. Then, drag “Square Blur” to Track 2 in the timeline.

Step 14
Select the “Cinema” effect from the Effects tab and drag it to Track 4. Double-click on it and change the border height to 0.10.

Step 15
Now, all left is to render the clip and review the final result.

Summary
What you’ve learned:
- Create a professional-level animated text in Filmora in 15 simple steps
- How to add a video background and cinematic effects to your animated title
- Adjust the settings of clips in the Filmora timeline
What you need to prepare:
- A computer (Windows or macOS)
- Your video materials.
- Filmora video editor
Step 1
Download and install the Filmora video editor . Just click the link, hit “Download”, and it will start automatically. Then, open a New Project.
Step 2
Click on the “Titles” tab and drag a Default Title to Track 2 on your Timeline.

Step 3
Double-click on it and change the font to anything you like. Then, enter the text in the box in front of you. While you’re here, you can also edit the text spacing and other features.

Step 4
Now, take a snapshot of the text. Then, double-click on the default title again and change the text to a single letter I. Once again, take a snapshot of this text and then delete the default title from the timeline.

You should have two snapshots in My Media now. One of them should say “FILMORA” and one with the letter “I”.

Step 5
Drag the “FILMORA” snapshot to track 2 and the “I” snapshot to track 3. Then, click on the “Zoom” button and set this to 50%.

Step 6
Double-click on the “I” snapshot from the timeline. Then, input these settings when the window pops up. After that, drag the Playhead 1 second and 15 frames further down the timeline. Then, double-click on the “I” snapshot again, and change the Y-axis value to 0.

Step 7
Copy the “I” snapshot track from the timeline. Then, paste it on Track 4. Next, double-click on this one and change the X-axis position to whichever letter you want. In this case, it’s the letter “M”. As for the Y-Axis, you can change it any way that suits you.

Step 8
Copy this process as often and with as many letters as you want. Then, when you’re done, export the title animation to your computer.

Step 9
Open a new project in Filmora and import the title animation we just created.
Step 10
Drag the custom title animation to Track 2 and drag any video background you have on Track 1.

Step 11
Double-click on the title track, go to the Video tab, and select “Lighten” from the Blending Mode tab.

Step 12
Shift the title clip from Track 2 to Track 3. Then, go to the Effects tab and drag the Dark Film effect to Track 1 on the timeline.

Step 13
Search for the “Blur” effect in the Effects tab. Then, drag “Square Blur” to Track 2 in the timeline.

Step 14
Select the “Cinema” effect from the Effects tab and drag it to Track 4. Double-click on it and change the border height to 0.10.

Step 15
Now, all left is to render the clip and review the final result.

Summary
What you’ve learned:
- Create a professional-level animated text in Filmora in 15 simple steps
- How to add a video background and cinematic effects to your animated title
- Adjust the settings of clips in the Filmora timeline
What you need to prepare:
- A computer (Windows or macOS)
- Your video materials.
- Filmora video editor
Step 1
Download and install the Filmora video editor . Just click the link, hit “Download”, and it will start automatically. Then, open a New Project.
Step 2
Click on the “Titles” tab and drag a Default Title to Track 2 on your Timeline.

Step 3
Double-click on it and change the font to anything you like. Then, enter the text in the box in front of you. While you’re here, you can also edit the text spacing and other features.

Step 4
Now, take a snapshot of the text. Then, double-click on the default title again and change the text to a single letter I. Once again, take a snapshot of this text and then delete the default title from the timeline.

You should have two snapshots in My Media now. One of them should say “FILMORA” and one with the letter “I”.

Step 5
Drag the “FILMORA” snapshot to track 2 and the “I” snapshot to track 3. Then, click on the “Zoom” button and set this to 50%.

Step 6
Double-click on the “I” snapshot from the timeline. Then, input these settings when the window pops up. After that, drag the Playhead 1 second and 15 frames further down the timeline. Then, double-click on the “I” snapshot again, and change the Y-axis value to 0.

Step 7
Copy the “I” snapshot track from the timeline. Then, paste it on Track 4. Next, double-click on this one and change the X-axis position to whichever letter you want. In this case, it’s the letter “M”. As for the Y-Axis, you can change it any way that suits you.

Step 8
Copy this process as often and with as many letters as you want. Then, when you’re done, export the title animation to your computer.

Step 9
Open a new project in Filmora and import the title animation we just created.
Step 10
Drag the custom title animation to Track 2 and drag any video background you have on Track 1.

Step 11
Double-click on the title track, go to the Video tab, and select “Lighten” from the Blending Mode tab.

Step 12
Shift the title clip from Track 2 to Track 3. Then, go to the Effects tab and drag the Dark Film effect to Track 1 on the timeline.

Step 13
Search for the “Blur” effect in the Effects tab. Then, drag “Square Blur” to Track 2 in the timeline.

Step 14
Select the “Cinema” effect from the Effects tab and drag it to Track 4. Double-click on it and change the border height to 0.10.

Step 15
Now, all left is to render the clip and review the final result.

Summary
What you’ve learned:
- Create a professional-level animated text in Filmora in 15 simple steps
- How to add a video background and cinematic effects to your animated title
- Adjust the settings of clips in the Filmora timeline
Guiding Principles of Track Matte and Tracking in Adobe After Effects
The realm of video editing has seen significant progress in recent years. With premium tools such as Adobe After Effects, you can take your videos to the next level. However, not every tool is easy to navigate. Some features in popular video editing software can be hard to get around.
The following guide provides valuable insight on how to use Track Matte in After Effects. Explore the endless possibilities of Track Mattes After Effects and Mask Tracking in After Effects. Also, discover a simple alternative to make After Effects mask tracking easy.
AI Smart Masking Spice up your video content with the endless possibilities of AI masking functions!
Free Download Free Download Learn More

Part 1: How to Utilize Track Mattes in Adobe After Effects?
After Effects by Adobe is a software application dedicated to visual effects and motion graphics for videos. The tool is commonly used in the post-production process of videos. The wide toolset of After Effects can be useful in filmmaking, video gaming, and TV. After Effects offers everything you need to take your creative inspirations to the next level.
- Motion Graphics: After Effects lets users animate characters and backgrounds in videos. You can generate 3-dimensional models from 2D animations. After Effects also supports the animation of logos to bring your elements to life.
- Rotoscoping: You can remove elements or drop new ones in your video using After Effects. The Roto Brush Tool can easily separate the background and foreground. You can then replace unwanted objects and replace them with new elements.
- Motion Tracking: Tracking the movement of an object is quite simple in After Effects. You can pin any element to a moving object. The smooth dynamics can enhance the overall result of the footage.
- VFX and Special Effects: After Effects is the perfect tool to add special effects to your videos. Its VFX tool lets users add magic to the footage. You can make objects disappear, control the weather, stabilize your video, and more.
Using Track Mattes in After Effects
In Adobe After Effects, a track matte is a layer that defines the transparency of another layer. It acts as a stencil, determining which parts of the underlying layer are visible and which are transparent. Track mattes are used for creating various effects such as text animations, transitions, and seamlessly composing multiple layers. After Effects offers four Track Matte options:
![]()
- Alpha Matte: Alpha matte in After Effects allows white areas in the matte layer to become visible while black areas become transparent. Effectively, this helps the underlying layer to show through.
- Alpha Inverted Matte: In an alpha inverted matte, black areas in the matte layer are visible, and white areas are transparent. It reverses the transparency values to create unique effects.
- Luma Matte: A luma matte uses the brightness values of the matte layer to determine visibility. Bright areas in the matte layer are visible, while dark areas are transparent.
- Luma Inverted Matte: The luma inverted matte works opposite to the luma matte. The top layer’s dark areas are visible, while bright areas are transparent.
![]()
You can use any of the track mattes in After Effects according to your requirements. Following is a step-by-step guide on how to use track mattes:
Step 1
To apply a track matte to your video, you must work with two layers. The top layer acts as the alpha or the luminance layer. The bottom layer acts as the fill. Once you have identified the layers, you can proceed to the next step.
Step 2
Go to the “Modes” column and open the dropdown menu next to “Layer List.” Here, select the layer you wish to use as the track matte.
![]()
Step 3
You will see two toggle switches once you select your layer. You can use these switches and the available options to set the transparency for the Track Matte. You can add alpha matte in After Effects or other types from here.
![]()
Part 2: Performing Mask Tracking With Adobe After Effects: Reviewing the Steps
Another remarkable feature that After Effects offers is mask tracking. Using After Effects mask tracking, you can automatically animate a mask’s position, shape, or path. This is done to match the movement of an object in a video clip. You can now easily deal with complex or fast-moving footage with this feature. To use Track Mask in After Effects, you can follow these steps:
Step 1
Import the footage you wish to edit in After Effects. Select the clip you wish to track from the timeline. Then, select the “Pen” tool from the top toolbar or press G on your keyboard. Select the area around the object you wish to mask in the footage.
![]()
Step 2
Now, open the layer and right-click on the mask name to select “Track Mask.” This will open the mask tracker in the tracker panel at the right. Open the dropdown menu next to the “Method” option. Here, you can find a range of options for tracking methods. Choose the one according to your requirements. If the object isn’t moving much, you can choose a simple option such as “Position.”
![]()
Step 3
Tap the “Analyze Forward” icon and let the tracker analyze the frames in the clip. Once the process has finished, you can restart your clip and set “Mask Mode” from the timeline to “Subtract.” This will remove the selected object from the clip.
![]()
Step 4
To fill in the details, go to the “Window” menu from the top and select “Content Aware Fill.” Once you see the panel on the screen, set the “Alpha Extension” slider to a number of your choice and click on “Generate Fill Layer.”
![]()
Part 3: How to Make Masking Easy? Try Wondershare Filmora
Although After Effects is a great tool for professional-quality video editing, it is not everyone’s cup of tea. Features such as motion track masks in After Effects are challenging to navigate. Novice users can face trouble getting around the complex masking process in After Effects. For a simpler alternative, you can try Wondershare Filmora .
Filmora is the complete solution when it comes to video editing. The multi-platform tool offers a range of useful features for video and audio manipulation. With thousands of built-in templates and presets, Filmora can help users kick-start their creative journey. You can use this easy-to-use tool as the perfect alternative to After Effects mask tracking.
Free Download For Win 7 or later(64-bit)
Free Download For macOS 10.14 or later
Main Highlights of Wondershare Filmora
Filmora offers a comprehensive toolset to help users make the most of their media files. Some useful resources provided by Wondershare Filmora include:
- AI Text-Based Editing: Filmora allows users to convert audio from videos into editable text. This can help you easily modify your video content. The feature can be used for quick transcriptions, subtitles, and translations.
![]()
- Speed Ramping: Using Filmora, users can apply professional speed effects in footage. You can adjust your video speed and create unique cinematic effects in no time. Filmora also helps maintain the audio pitch to avoid abrupt changes.
![]()
- Compound Clip: Filmora can help users merge multiple clips into a single footage. You can obtain complete control over the integrated clip for editing. This can help users manage and adjust multiple clips easily.
![]()
- AI Vocal Remover: The Vocal Remover tool of Filmora offers AI power to separate vocals and music from any audio. You can get separate acapella and vocals for various purposes. From karaoke to creative dubs, everything is now possible with Filmora.
![]()
Using AI Smart Masking in Filmora – A Step-by-Step Guide
Filmora offers an AI-powered masking feature for users. This allows automatic recognition and selection of objects in videos. You can create seamless transitions, color-correct elements, remove background, and more. The tool can easily detect and separate objects, so you don’t have to put in manual effort. Here is the step-by-step guide for AI smart masking using Filmora:
Step 1: Import Footage in Filmora
Install and launch Wondershare Filmora on your device. From the homepage, tap “New Project” and go to the “File” tab from the top. Tap “Import Media” in the dropdown menu and insert your video clips into the timeline.
![]()
Step 2: Enable AI Mask
Select your clip in the timeline and go to the “Video” tab from the right panel. Select the “Mask” option and tap the “AI Mask” icon. Under the section, you can choose from options such as “Select Character” or “Smart Brush.” Select one according to your requirements and hit “Add Mask.”
![]()
Step 3: Adjust Mask Settings and Export File
After you apply the masking option, you can adjust other mask settings. Filmora allows users to set the expansion range, blur strength, opacity, and other aspects. Once satisfied with the results, tap the “Export” button from the top-right corner and choose a pathway to save your video.
![]()
Free Download For Win 7 or later(64-bit)
Free Download For macOS 10.14 or later
Conclusion
Adobe After Effects is an industry-standard tool for video editing and manipulation. Track Mattes and Track Masks in After Effects are valuable tools that can help elevate your video’s potential. For a simple and effective alternative, you can try Wondershare Filmora. The tool uses smart masking using AI to make the process easier.
Free Download Free Download Learn More

Part 1: How to Utilize Track Mattes in Adobe After Effects?
After Effects by Adobe is a software application dedicated to visual effects and motion graphics for videos. The tool is commonly used in the post-production process of videos. The wide toolset of After Effects can be useful in filmmaking, video gaming, and TV. After Effects offers everything you need to take your creative inspirations to the next level.
- Motion Graphics: After Effects lets users animate characters and backgrounds in videos. You can generate 3-dimensional models from 2D animations. After Effects also supports the animation of logos to bring your elements to life.
- Rotoscoping: You can remove elements or drop new ones in your video using After Effects. The Roto Brush Tool can easily separate the background and foreground. You can then replace unwanted objects and replace them with new elements.
- Motion Tracking: Tracking the movement of an object is quite simple in After Effects. You can pin any element to a moving object. The smooth dynamics can enhance the overall result of the footage.
- VFX and Special Effects: After Effects is the perfect tool to add special effects to your videos. Its VFX tool lets users add magic to the footage. You can make objects disappear, control the weather, stabilize your video, and more.
Using Track Mattes in After Effects
In Adobe After Effects, a track matte is a layer that defines the transparency of another layer. It acts as a stencil, determining which parts of the underlying layer are visible and which are transparent. Track mattes are used for creating various effects such as text animations, transitions, and seamlessly composing multiple layers. After Effects offers four Track Matte options:
![]()
- Alpha Matte: Alpha matte in After Effects allows white areas in the matte layer to become visible while black areas become transparent. Effectively, this helps the underlying layer to show through.
- Alpha Inverted Matte: In an alpha inverted matte, black areas in the matte layer are visible, and white areas are transparent. It reverses the transparency values to create unique effects.
- Luma Matte: A luma matte uses the brightness values of the matte layer to determine visibility. Bright areas in the matte layer are visible, while dark areas are transparent.
- Luma Inverted Matte: The luma inverted matte works opposite to the luma matte. The top layer’s dark areas are visible, while bright areas are transparent.
![]()
You can use any of the track mattes in After Effects according to your requirements. Following is a step-by-step guide on how to use track mattes:
Step 1
To apply a track matte to your video, you must work with two layers. The top layer acts as the alpha or the luminance layer. The bottom layer acts as the fill. Once you have identified the layers, you can proceed to the next step.
Step 2
Go to the “Modes” column and open the dropdown menu next to “Layer List.” Here, select the layer you wish to use as the track matte.
![]()
Step 3
You will see two toggle switches once you select your layer. You can use these switches and the available options to set the transparency for the Track Matte. You can add alpha matte in After Effects or other types from here.
![]()
Part 2: Performing Mask Tracking With Adobe After Effects: Reviewing the Steps
Another remarkable feature that After Effects offers is mask tracking. Using After Effects mask tracking, you can automatically animate a mask’s position, shape, or path. This is done to match the movement of an object in a video clip. You can now easily deal with complex or fast-moving footage with this feature. To use Track Mask in After Effects, you can follow these steps:
Step 1
Import the footage you wish to edit in After Effects. Select the clip you wish to track from the timeline. Then, select the “Pen” tool from the top toolbar or press G on your keyboard. Select the area around the object you wish to mask in the footage.
![]()
Step 2
Now, open the layer and right-click on the mask name to select “Track Mask.” This will open the mask tracker in the tracker panel at the right. Open the dropdown menu next to the “Method” option. Here, you can find a range of options for tracking methods. Choose the one according to your requirements. If the object isn’t moving much, you can choose a simple option such as “Position.”
![]()
Step 3
Tap the “Analyze Forward” icon and let the tracker analyze the frames in the clip. Once the process has finished, you can restart your clip and set “Mask Mode” from the timeline to “Subtract.” This will remove the selected object from the clip.
![]()
Step 4
To fill in the details, go to the “Window” menu from the top and select “Content Aware Fill.” Once you see the panel on the screen, set the “Alpha Extension” slider to a number of your choice and click on “Generate Fill Layer.”
![]()
Part 3: How to Make Masking Easy? Try Wondershare Filmora
Although After Effects is a great tool for professional-quality video editing, it is not everyone’s cup of tea. Features such as motion track masks in After Effects are challenging to navigate. Novice users can face trouble getting around the complex masking process in After Effects. For a simpler alternative, you can try Wondershare Filmora .
Filmora is the complete solution when it comes to video editing. The multi-platform tool offers a range of useful features for video and audio manipulation. With thousands of built-in templates and presets, Filmora can help users kick-start their creative journey. You can use this easy-to-use tool as the perfect alternative to After Effects mask tracking.
Free Download For Win 7 or later(64-bit)
Free Download For macOS 10.14 or later
Main Highlights of Wondershare Filmora
Filmora offers a comprehensive toolset to help users make the most of their media files. Some useful resources provided by Wondershare Filmora include:
- AI Text-Based Editing: Filmora allows users to convert audio from videos into editable text. This can help you easily modify your video content. The feature can be used for quick transcriptions, subtitles, and translations.
![]()
- Speed Ramping: Using Filmora, users can apply professional speed effects in footage. You can adjust your video speed and create unique cinematic effects in no time. Filmora also helps maintain the audio pitch to avoid abrupt changes.
![]()
- Compound Clip: Filmora can help users merge multiple clips into a single footage. You can obtain complete control over the integrated clip for editing. This can help users manage and adjust multiple clips easily.
![]()
- AI Vocal Remover: The Vocal Remover tool of Filmora offers AI power to separate vocals and music from any audio. You can get separate acapella and vocals for various purposes. From karaoke to creative dubs, everything is now possible with Filmora.
![]()
Using AI Smart Masking in Filmora – A Step-by-Step Guide
Filmora offers an AI-powered masking feature for users. This allows automatic recognition and selection of objects in videos. You can create seamless transitions, color-correct elements, remove background, and more. The tool can easily detect and separate objects, so you don’t have to put in manual effort. Here is the step-by-step guide for AI smart masking using Filmora:
Step 1: Import Footage in Filmora
Install and launch Wondershare Filmora on your device. From the homepage, tap “New Project” and go to the “File” tab from the top. Tap “Import Media” in the dropdown menu and insert your video clips into the timeline.
![]()
Step 2: Enable AI Mask
Select your clip in the timeline and go to the “Video” tab from the right panel. Select the “Mask” option and tap the “AI Mask” icon. Under the section, you can choose from options such as “Select Character” or “Smart Brush.” Select one according to your requirements and hit “Add Mask.”
![]()
Step 3: Adjust Mask Settings and Export File
After you apply the masking option, you can adjust other mask settings. Filmora allows users to set the expansion range, blur strength, opacity, and other aspects. Once satisfied with the results, tap the “Export” button from the top-right corner and choose a pathway to save your video.
![]()
Free Download For Win 7 or later(64-bit)
Free Download For macOS 10.14 or later
Conclusion
Adobe After Effects is an industry-standard tool for video editing and manipulation. Track Mattes and Track Masks in After Effects are valuable tools that can help elevate your video’s potential. For a simple and effective alternative, you can try Wondershare Filmora. The tool uses smart masking using AI to make the process easier.
[100% Workable] How to Mask Track with Adobe Premiere Pro
Mask tracking Premiere Pro is a technique that lets you apply effects to a precise frame area. In video editing, mask tracking is crucial because it lets you apply effects to areas of your footage rather than the full frame. This can assist you in producing videos that look more professional by emphasizing crucial details, obscuring delicate content, and using imaginative effects.
This article guides Premiere Pro mask tracking using the right tools and effects. Give it a read if you are interested in tracking mask Premiere.
AI Smart Masking Spice up your video content with the endless possibilities of AI masking functions!
Free Download Free Download Learn More

Part 1. What Do You Know About Mask Tracking in Videos?
Automatic tracking and following a certain object or area during a video clip is known as mask tracking. Usually, the “mask” depicts a designated zone of interest, such as a person’s face, an item, or any other area. Mask tracking is achieved using various methods and algorithms, including computer vision techniques such as optical flow, feature tracking, or machine learning.
The objective of the effect is to track the targeted item consistently over all video frames. Mask tracking Premiere Pro is a common special effect in video editing. It can add visual components, apply filters, or change the color and lighting inside the tracked region.
Part 2. How To Perform Mask Tracking with Adobe Premiere Pro
One of the most widely used industry standard programs for video editing is Adobe Premiere Pro . With the help of this tool, users can alter various aspects of photographs and films. It can tweak effects in nearly every frame according to user preferences using Premiere mask tracking. You will undoubtedly get remarkable outcomes from it in a short amount of time.
The tool is a video editing expert, so many professional video editors rely on it. It offers a huge range of editing features that get together to create an impactful and eye-catching video.
Marked Key Features of Adobe Premiere Pro
- Video Editing: You can combine audio and apply effects and transitions to your video content. The platform also helps you work with color or add animated titles to your videos.
- Text-Based Editing: Text-based editing creates a transcript and automatically highlights text to add clips to your timeline. It can edit and rearrange clips like a text document.
- Color Correction: With the help of AI, you can automatically balance your colors or modify the frame using expert color wheels and curve controls. It also assists in viewing your work using integrated video scopes.
- Audio Editing: With Adobe Premiere Pro, you can explore audio tracks, license them, and utilize AI to adapt them to your clips automatically.
Step-by-Step Guide to Perform Mask Tracking with Premiere Pro
Adobe Premiere mask tracking is one of the many remarkable features of the app. If you want to employ mask tracking in your videos using Adobe Premiere, look at the steps below:
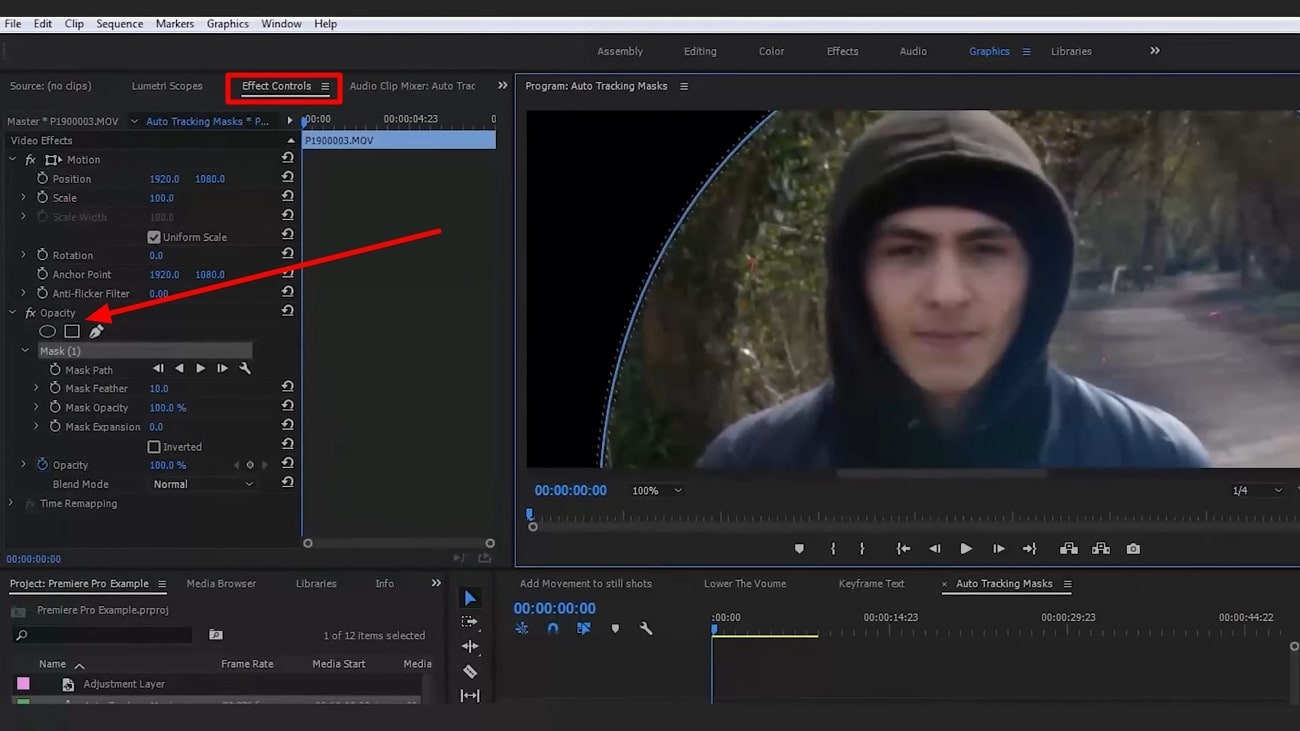
Step 1: To start off with the process, import the video onto the timeline that needs to be edited. Navigate to the top of the screen and select “Effect Controls” to proceed further. Select any specific shape present below the “Opacity” option on the left to add a mask to your clip.
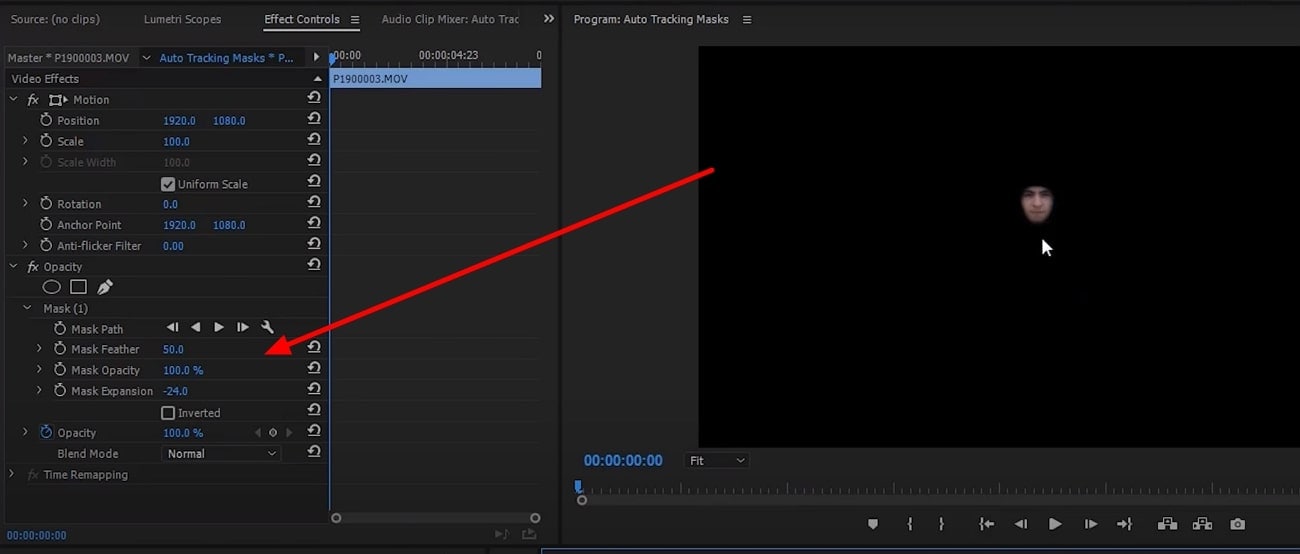
Step 2: Set the shape according to the person or object you will track by masking. Now, under the “Mask” option, you will see the “Mask Feather” option. Click on “Mask Feather” and adjust it so it won’t look too harsh on the edges.
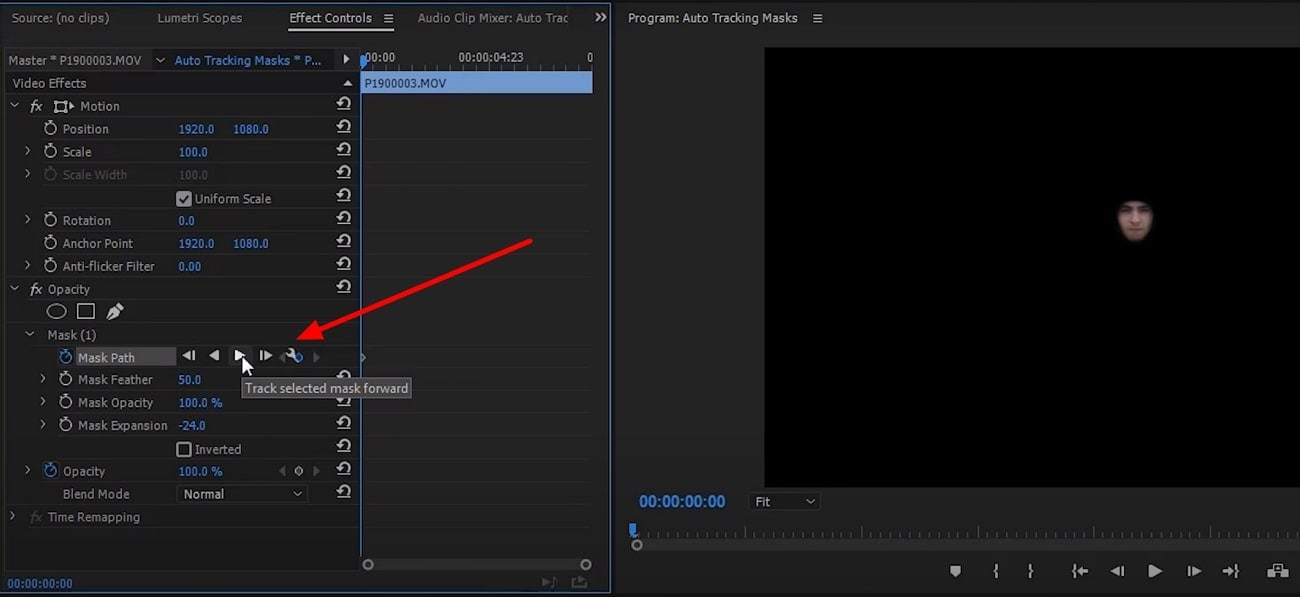
Step 4: Go to the beginning of the video you are editing, return to the editing section, and look for the “Mask Path” option. Now hit the “Track Selected Masked Forward” button and wait for the system to complete the Premiere Pro tracking mask process and save the video.
Part 3. Making Masking Easy with Wondershare Filmora: Reviewing the Details
Adobe Premiere Pro is an incredible tool, without a doubt. However, many users say that it needs to be simpler to use. You cannot generate a good video even after watching tutorials because it’s hard for an amateur to use Adobe Premiere Pro. Because of this, many users look for alternative options to add a premiere tracking mask and make other changes to their videos.
This part is all about the amazing alternative that you’re looking for. Wondershare Filmora is a video editing tool that provides professional quality content editing. The tool is so easy to use that you can start immediately with basic instructions. Its smart editing features, combined with a fast and intelligent system, make it a great choice for everyone.
Free Download For Win 7 or later(64-bit)
Free Download For macOS 10.14 or later
Key Features of Wondershare Filmora
- Compound Clip: This feature will arrange all your clips, combine them, and edit them as a single clip. This strong and intuitive feature improves and edits your video.

- AI Text-to-Video: You can convert text into engaging visual narratives and instantly turn text inputs into interesting videos. The feature makes ideas into stunning videos with ease.

- Speed Ramping: This feature produces distinctive cinematic effects by managing your keyframes and altering the speed of your film.
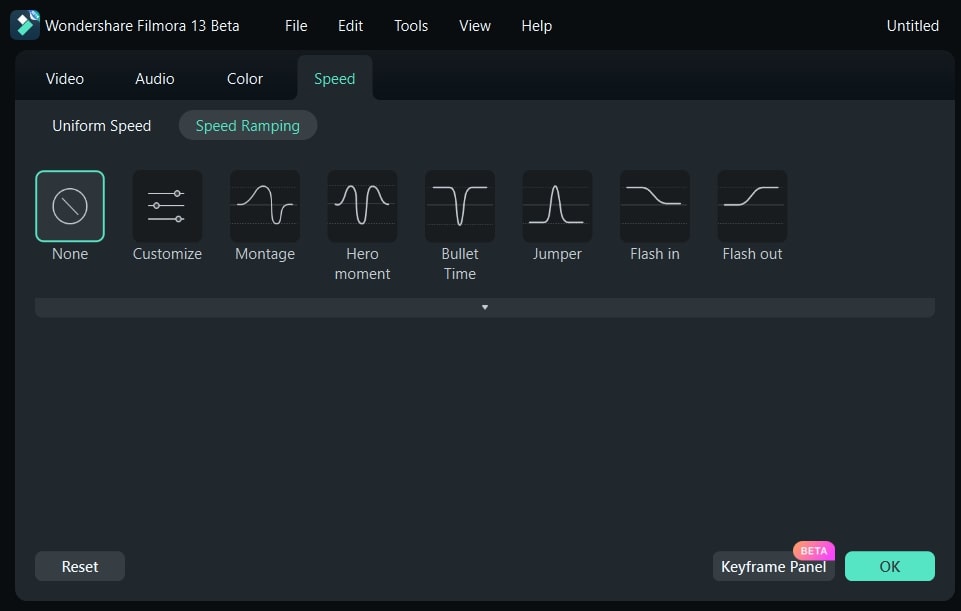
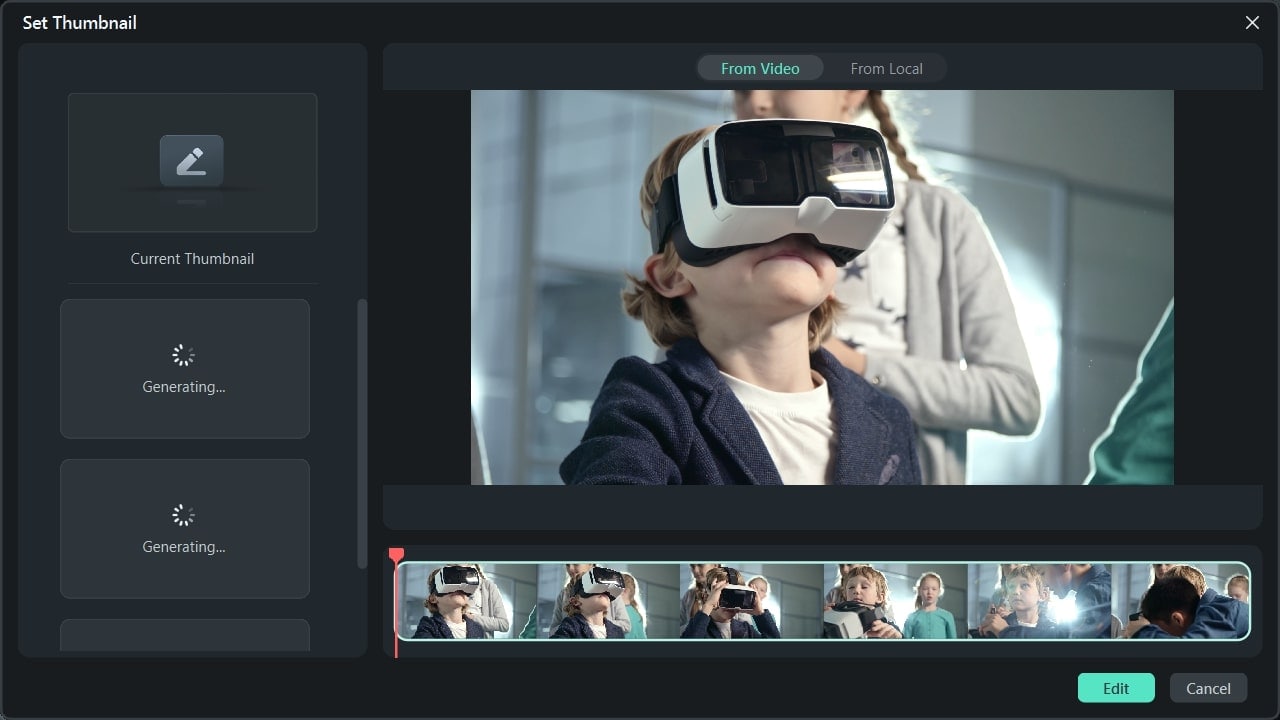
- AI Thumbnail Creator: The tool uses AI to create attractive, engaging thumbnails that get the viewers’ attention. You can use different presets to beautify your thumbnail.
Step-by-Step Guide on How to Perform AI Masking on Filmora
Wondershare Filmora Premiere Pro mask tracking is way easier and provides the same high-end results. Follow the steps below to do mask tracking using Filmora’s unique functions and procedures:
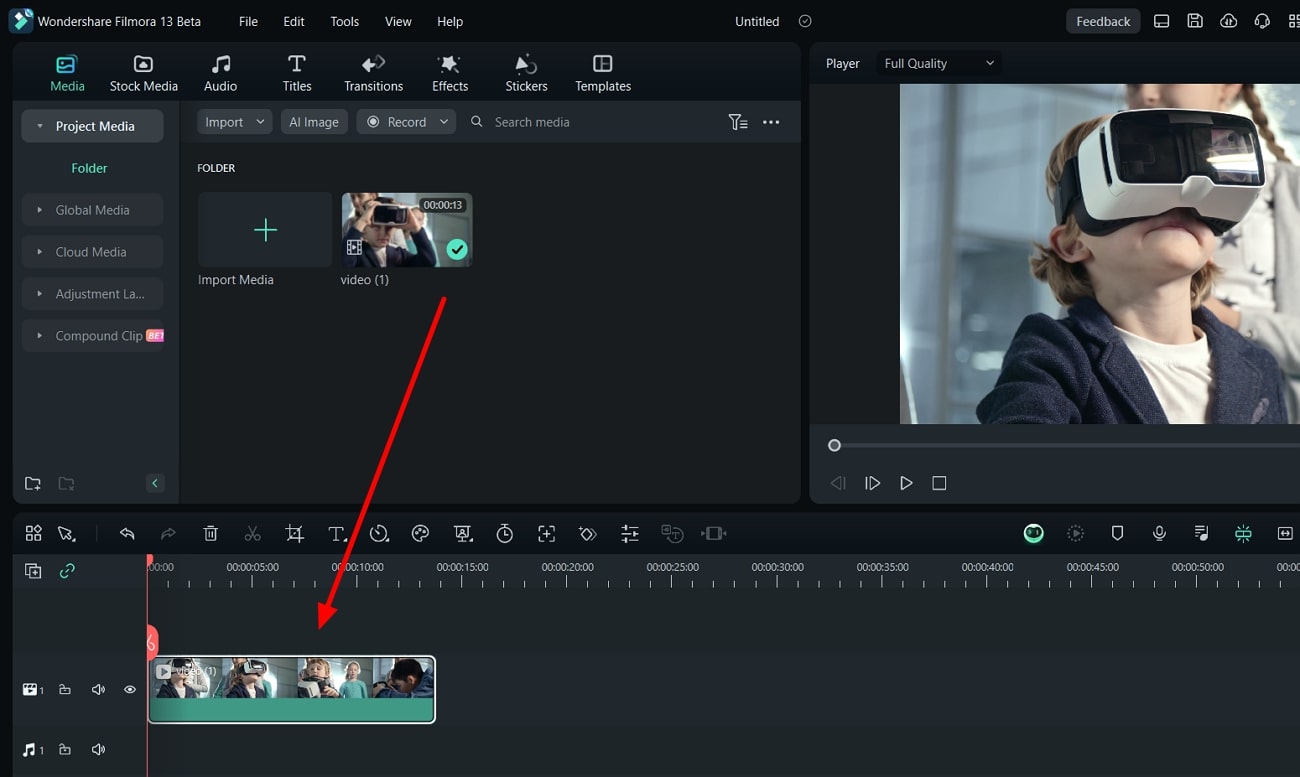
Step 1Add Video Content to Timeline in Filmora
Launch Wondershare Filmora on your computer and proceed by creating a “New Project.” As a new window opens, import your required video clips to the timeline. Double-click and proceed to their respective video settings.
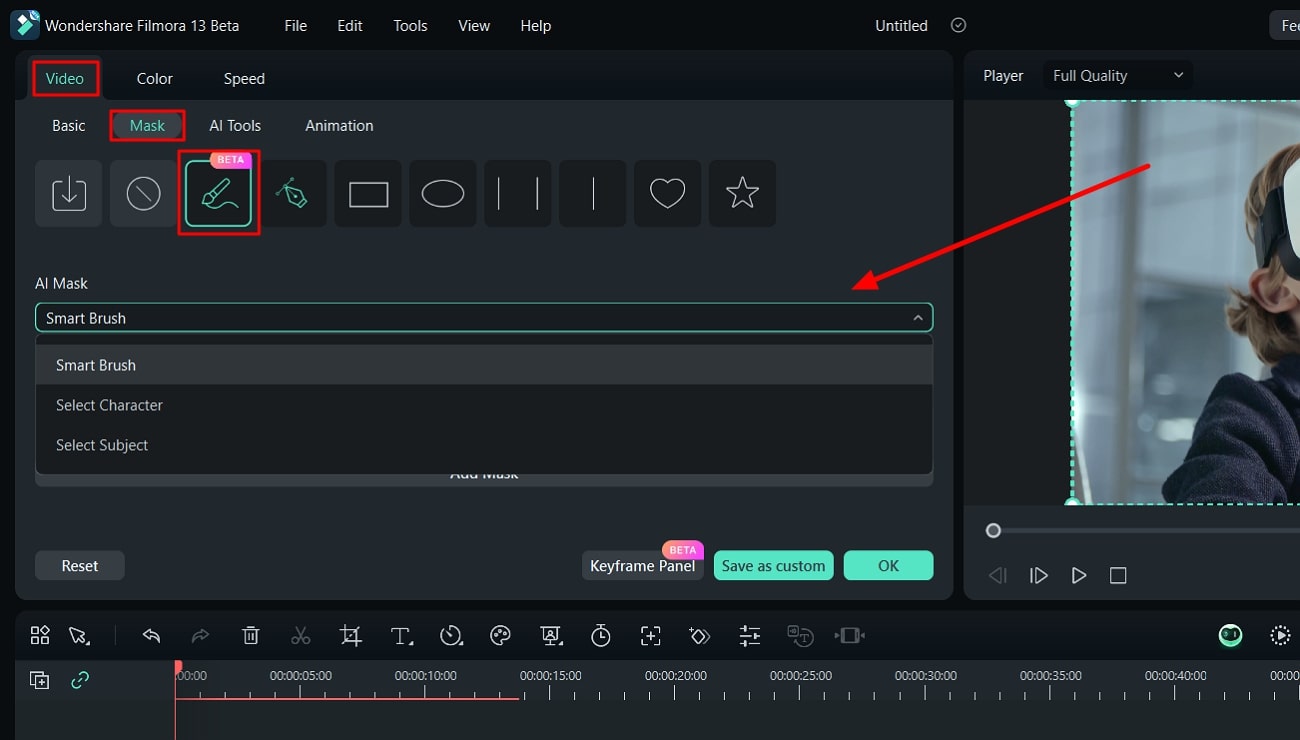
Step 2Use AI Masking Feature on Video
On double-clicking the video, proceed to the “Video” tab from the top and continue into the “Mask” section. Select the “AI Mask” option in the provided list to open further settings. Select any appropriate mode of AI Mask from the bottom options and set the respective parameters accordingly. You can either select “Smart Brush” or go for “Smart Character” or “Smart Subject.”
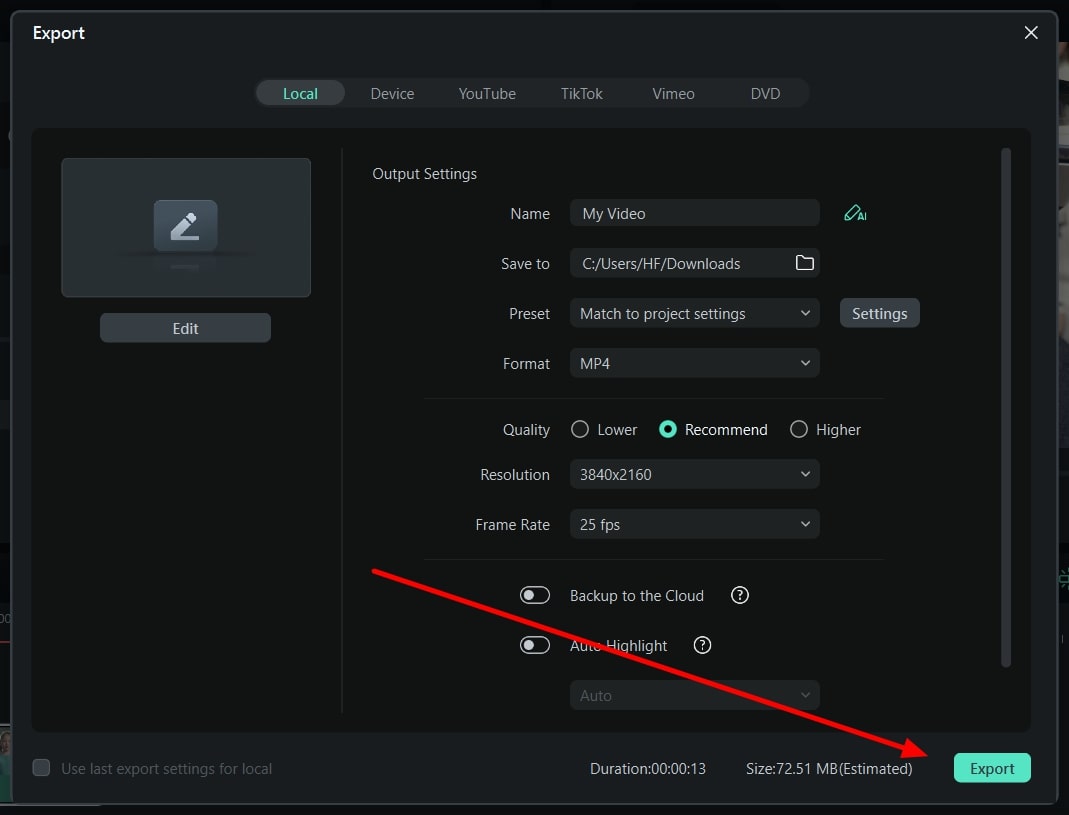
Step 3Save Final Video
On clicking “OK,” all changes are applied to the video. Continue to the “Export” button to save your edited video clip on your computer.
Free Download For Win 7 or later(64-bit)
Free Download For macOS 10.14 or later
Conclusion
Mask tracking is handy for adding effects to a moving object in your video. By tracking the movement, you can ensure the effect persists even as the object moves around the frame. Many professionals use it in their videos to edit and enhance a specific area in their clip. Check out this article if you also seek an app for Premiere mask tracking.
Free Download Free Download Learn More

Part 1. What Do You Know About Mask Tracking in Videos?
Automatic tracking and following a certain object or area during a video clip is known as mask tracking. Usually, the “mask” depicts a designated zone of interest, such as a person’s face, an item, or any other area. Mask tracking is achieved using various methods and algorithms, including computer vision techniques such as optical flow, feature tracking, or machine learning.
The objective of the effect is to track the targeted item consistently over all video frames. Mask tracking Premiere Pro is a common special effect in video editing. It can add visual components, apply filters, or change the color and lighting inside the tracked region.
Part 2. How To Perform Mask Tracking with Adobe Premiere Pro
One of the most widely used industry standard programs for video editing is Adobe Premiere Pro . With the help of this tool, users can alter various aspects of photographs and films. It can tweak effects in nearly every frame according to user preferences using Premiere mask tracking. You will undoubtedly get remarkable outcomes from it in a short amount of time.
The tool is a video editing expert, so many professional video editors rely on it. It offers a huge range of editing features that get together to create an impactful and eye-catching video.
Marked Key Features of Adobe Premiere Pro
- Video Editing: You can combine audio and apply effects and transitions to your video content. The platform also helps you work with color or add animated titles to your videos.
- Text-Based Editing: Text-based editing creates a transcript and automatically highlights text to add clips to your timeline. It can edit and rearrange clips like a text document.
- Color Correction: With the help of AI, you can automatically balance your colors or modify the frame using expert color wheels and curve controls. It also assists in viewing your work using integrated video scopes.
- Audio Editing: With Adobe Premiere Pro, you can explore audio tracks, license them, and utilize AI to adapt them to your clips automatically.
Step-by-Step Guide to Perform Mask Tracking with Premiere Pro
Adobe Premiere mask tracking is one of the many remarkable features of the app. If you want to employ mask tracking in your videos using Adobe Premiere, look at the steps below:
Step 1: To start off with the process, import the video onto the timeline that needs to be edited. Navigate to the top of the screen and select “Effect Controls” to proceed further. Select any specific shape present below the “Opacity” option on the left to add a mask to your clip.

Step 2: Set the shape according to the person or object you will track by masking. Now, under the “Mask” option, you will see the “Mask Feather” option. Click on “Mask Feather” and adjust it so it won’t look too harsh on the edges.

Step 4: Go to the beginning of the video you are editing, return to the editing section, and look for the “Mask Path” option. Now hit the “Track Selected Masked Forward” button and wait for the system to complete the Premiere Pro tracking mask process and save the video.

Part 3. Making Masking Easy with Wondershare Filmora: Reviewing the Details
Adobe Premiere Pro is an incredible tool, without a doubt. However, many users say that it needs to be simpler to use. You cannot generate a good video even after watching tutorials because it’s hard for an amateur to use Adobe Premiere Pro. Because of this, many users look for alternative options to add a premiere tracking mask and make other changes to their videos.
This part is all about the amazing alternative that you’re looking for. Wondershare Filmora is a video editing tool that provides professional quality content editing. The tool is so easy to use that you can start immediately with basic instructions. Its smart editing features, combined with a fast and intelligent system, make it a great choice for everyone.
Free Download For Win 7 or later(64-bit)
Free Download For macOS 10.14 or later
Key Features of Wondershare Filmora
- Compound Clip: This feature will arrange all your clips, combine them, and edit them as a single clip. This strong and intuitive feature improves and edits your video.

- AI Text-to-Video: You can convert text into engaging visual narratives and instantly turn text inputs into interesting videos. The feature makes ideas into stunning videos with ease.

- Speed Ramping: This feature produces distinctive cinematic effects by managing your keyframes and altering the speed of your film.

- AI Thumbnail Creator: The tool uses AI to create attractive, engaging thumbnails that get the viewers’ attention. You can use different presets to beautify your thumbnail.

Step-by-Step Guide on How to Perform AI Masking on Filmora
Wondershare Filmora Premiere Pro mask tracking is way easier and provides the same high-end results. Follow the steps below to do mask tracking using Filmora’s unique functions and procedures:
Step 1Add Video Content to Timeline in Filmora
Launch Wondershare Filmora on your computer and proceed by creating a “New Project.” As a new window opens, import your required video clips to the timeline. Double-click and proceed to their respective video settings.

Step 2Use AI Masking Feature on Video
On double-clicking the video, proceed to the “Video” tab from the top and continue into the “Mask” section. Select the “AI Mask” option in the provided list to open further settings. Select any appropriate mode of AI Mask from the bottom options and set the respective parameters accordingly. You can either select “Smart Brush” or go for “Smart Character” or “Smart Subject.”

Step 3Save Final Video
On clicking “OK,” all changes are applied to the video. Continue to the “Export” button to save your edited video clip on your computer.

Free Download For Win 7 or later(64-bit)
Free Download For macOS 10.14 or later
Conclusion
Mask tracking is handy for adding effects to a moving object in your video. By tracking the movement, you can ensure the effect persists even as the object moves around the frame. Many professionals use it in their videos to edit and enhance a specific area in their clip. Check out this article if you also seek an app for Premiere mask tracking.
Google Meet Green Screen
Google meet green screen is the latest addition to the virtual meeting app. It is a crucial feature as it allows users to maintain a semblance of privacy through virtual backgrounds. This video communication app has been a popular choice for classrooms and workplaces since the COVID 19 pandemic of 2019. Since then, Google meet has seen an increase of 3 million users per day since 2020.
The green screen for Google meet has come in handy for its millions of active users across the globe. It is an important feature that safeguards the privacy of its user in the cyber world. Google meet green screen allows you to alter the meeting’s background in real-time, similar to how movies employ the famous green curtain behind the performers during filming. You can use this feature to immediately insert a backdrop image of your choice by activating the green screen provided in the browser extension Visual Effects for Google Meet.
Uses of Google Meet Green Screen
The Google Meet Green Screen feature keeps things interesting in corporate meetings. It also allows users to hide their backgrounds which can often be a source of discomfort or vulnerability. The green screen for Google Meet is a handy feature as you can now attend meetings without worrying about the background.
Virtual Green Screens, Blur, Pixelate, Inverse, Contrast and More! This extension allows you to apply effects like Blur, Pixelate and Inverse to your camera live during Google Meets. And you can use the Virtual Green Screen feature to mask whatever you would not fancy appearing in your videos’ background.
Green screen from Google helps you limit distractions or make video calls more fun, you can now blur or replace your background or replace it with an image, an immersive background, or a video. You can also apply styles to customize your video with various light, color filters and stylized backgrounds.
How to Use Green Screen on Google Meet
With Google Meet Green Screen, you can create a virtual background by either uploading photographs from their PC or using the extension’s stock photos. You can utilize an office background as a backdrop for business meetings. Teachers can add a classroom background to their online classes. Parties and vacation backgrounds from other nations might be used for informal encounters with friends.
For a get-together with friends, users might choose a Hawaii theme or an office wall for business chats. You can create and save as many background photos as you want with Google Meet Green Screen. In addition to all of this, it offers a picture-in-picture (floating window) function that users can enable if desired.
How to use green screen for Google Meet: A guide
You can select a virtual background before beginning a meeting or during an ongoing video conversation. However, this feature is only available on the desktop currently. You can follow the steps given below to use the Green Screen for Google Meet.
Prior to a video call
- Go to Google Meet and select a meeting.
- Change the background of your self-view by clicking Change Background in the bottom right corner.
- Click Blur your background to totally blur your background.
- Click Somewhat blur your background to blur your background slightly.
- Click background to select a previously downloaded backdrop.
- Click Add to add your own image as a background.
- Click on Join Now.
During a video conference
- Click More at the bottom of the page.
- Select Change Background from the drop-down menu.
- Click Blur your background to totally blur your background.
- Click Somewhat blur your background to blur your background slightly.
- Click a background to select a previously downloaded backdrop.
- Click Add to add your own image as a background.
Extra Tips
How to Add Green Screen to Meeting Video
Prior to a video call
- Go to Google Meet and select a meeting.
- Change the background of your self-view by clicking Change Background in the bottom right corner. Click Blur your background to totally blur your background. …
- Click Add to add your own image as a background.
- Click on Join Now.
Filmora
If you’re just starting out with video editing, or just want a simple program that works, Wondershare Filmora might be what you’re looking for. It has the essential tools, and anyone can learn to use it easily.
Wondershare Filmora is the one of best video editing software with cool features that compares to other competing video editing Softwares. Many video editing programs claim to offer professional results; Filmora is one of a few consumer-level tools that actually delivers.
For Win 7 or later (64-bit)
For macOS 10.12 or later
Installation Steps
- Click the icon in the center of the Media Library to add files directly.
- Go File > Import Media > Import Media Files.
- Drag and drop to the Media Library directly.
While importing a media file, Wondershar Filmora may ask you if you wish to create a proxy file to accelerate the editing process. Select “Yes” to have a fast video editing experience.
You can also import video clips using your Touch Bar controls if your computer has Touch Bar.
Record a media file
Apart from the videos shot by your digital devices, you can also directly import media files by recording video from your webcam, capturing the computer screen, or recording a voice-over.
Record computer screen:
Click the “Record” option, and choose “Record PC Screen” to get the built-in Wondershare Screen Recorder. Hit the red button to get started. If you want to stop the recording, you can hit F9.
Record videos from webcam:
Also, click the “Record” option, and choose “Record from Webcam”. In the pop-up Video Recording window, click the red button to start recording and click it again to stop recording. Then click OK to save the recorded video file.
Record voice-over:
Choose “Record a voiceover” under the Record menu. It would be better to connect a microphone to your Mac for a better result. Hit the Record button, and it leaves you 3 seconds to get ready.
All the recorded media files will be saved into Media Library automatically and you can drag them to the Timeline for editing.
Conclusion
The zoom meeting green screen for Google background feature essentially allows users to display an image or a video in place of the actual background during video calls. The feature is especially helpful when you are video conferencing in a messy room. The feature is starting to gain popularity among users and is also available on WebEx for iOS. While Google Meet does not come with a built-in feature to blur or obscure the existing background while on camera, there are still ways you can do it. Luckily, there are a bunch of third-party tools that can build a virtual background for you without a green screen. One of the popular tools you can use is ChromaCam and can be configured in just a few minutes.
Also read:
- Updated 2024 Approved How to Make a Video by Mouse with Filmora
- Updated 2024 Approved How to Become a Youtuber
- Best Frame Rate for 4K Video for 2024
- In 2024, If You Are a Teacher or People Who Want to Share Their Ideas via Vides, You Can Always Make It on Your Own. This Article Will Share You 7 Tips to Create an Educational Video Easily
- New TikTok Slow Zoom | Create Your Slow Zoom TikTok in Minutes
- Updated 2024 Approved Step by Step to Rotate Videos Using Handbrake
- In 2024, Top Free Video Editing Software Enhance Your Content with These Essential Tools
- New In 2024, Learn About some of the Best Photo Collage with Music Tools
- New 2024 Approved How to Change Quicktime Player Speed on Mac?
- How to Make Coin Magic With Filmora
- New 2024 Approved Best Things People Know About Wedding Slideshow
- 2024 Approved Discover Vintage LUTs Premiere Pro Free and Paid Options Available
- 2024 Approved How to Make Video Slow Motion? Complete Guide
- A Comprehensive Review of LUTs Finding LUTs Made by Danny Gevirtz
- Updated Best Tools To Create Blend Image Collage for 2024
- New Best 10 iPad Slideshow Apps to Create a Slideshow
- What Are the 10 Best GIF Creator for 2024
- New Speed Control Is Frequently Used in Video Editing. By Speed up or Slow Down the Video Speed, You Can Achieve Different Visual Results. This Article Will Show You How to Control the Speed of a Video for 2024
- New In 2024, AI Has Influenced All Video Editors to Speed up Editing. This Article Discusses the Significance of AI Slow Motion and the Tools that Offer It
- Updated Learn How to Slow Down Time-Lapse Videos on Your iPhone to Make Detailed Slow-Motion Effects in Your Time-Lapse Captures
- New If Youre Considering Starting a Podcast Video Recording, You Need to Read This Article and Learn All You Need to Know About Making a Successful Podcast
- New In 2024, Best 8 Educational Video Websites for Teachers
- New Final Cut Pro for iPad- Is It Available for 2024
- New In 2024, Tutorial Guides for Video Maker with Song
- Updated 10 Amazing Anime Character Designs to Inspire You for 2024
- New If You Are a Beginner and Want to Familiarise Yourself with Steps and Terms Used in Video Editing, in This Article, We Will Go Through the Steps You Will Need to Cut Your Video File in Adobe Premiere Pro and Wondershare Filmora
- New Top LUTs for Sony HLG to Download for 2024
- Best AR Video Apps for 2024
- Troubleshoot Snapchat Camera Zoomed in Issue 4 Tips
- New 15 Amazing GIF Splitter Examples You Need to Bookmark
- New In 2024, Best iOS Slow Motion Apps To Work With
- Stop Worrying if Your Adobe Premiere Playback Slows Down. This Guide Will Show You the Best Solutions to Resolve This Issue and a Perfect Alternative
- New 2024 Approved Learn About How You Can Create a Smooth Speed Ramp with Premiere Pro. Also, Find Alternative Software “WonderShare Filmora” For the Same Purpose with a Much Easier User Interface
- Updated In 2024, Minecraft Pixel Art A Complete Guide for Die-Hard Fans
- New In 2024, How to Use LUTS to Color Grade on Your iPhone
- Updated How to Create Cooking Video Intro and End Screen for YouTube Channel for 2024
- How to Create Your Own LUTs for Your Video for 2024
- Updated Ways to Learn Discord Game Bots – Even if Youre Just Starting Out 20 for 2024
- Top 8 Augmented Reality Video Games
- Updated 2024 Approved Little Known Ways of Adding Emojis to Photos on iPhone & Android
- In 2024, Want to Make a Single Video From Different Clips? Follow These Ways to Learn About How to Merge Clips in DaVinci Resolve
- In 2024, Wondershare Filmora Has Introduced a New Feature - AI Portrait Effect that You Can Use to Remove Background From Various Videos and Images. Explore the Uses, Benefits, and Real-Life Scenarios of This Feature in a Comprehensive Guide
- Updated Slow Down or Speed Up Videos Easily on PC, Online, and Phone
- New 6 Top Online MP4 Croppers
- New In 2024, How To Remove Audio From Video
- Zoom In and Out on Discord (Desktop + App + Browser Solutions) for 2024
- Remove FRP Lock on Xiaomi Redmi Note 12R
- Protecting Your Privacy How To Remove Apple ID From Apple iPhone 6 Plus
- Is GSM Flasher ADB Legit? Full Review To Bypass Your Oppo Find X7 UltraFRP Lock
- In 2024, How to Unlock iPhone 7 Plus Passcode without Computer? | Dr.fone
- In 2024, Top IMEI Unlokers for Your OnePlus 12 Phone
- Ultimate guide to get the meltan box pokemon go For Realme 11 Pro+ | Dr.fone
- Authentication Error Occurred on Asus ROG Phone 8? Here Are 10 Proven Fixes | Dr.fone
- Three Ways to Sim Unlock Samsung Galaxy A24
- How Can I Catch the Regional Pokémon without Traveling On Xiaomi 13 Ultra | Dr.fone
- In 2024, The Best Methods to Unlock the iPhone Locked to Owner for iPhone XS
- How to Lock Apps on Poco M6 Pro 4G to Protect Your Individual Information
- 2024 Approved Best 10 Free Video Translators to Mitigate Translation Risks
- How to Mirror OnePlus Ace 2 Pro to Mac? | Dr.fone
- A Guide Poco M6 5G Wireless and Wired Screen Mirroring | Dr.fone
- How to Cast Xiaomi 13T Screen to PC Using WiFi | Dr.fone
- In 2024, Full Guide to Catch 100 IV Pokémon Using a Map On Realme Narzo 60x 5G | Dr.fone
- Fix the Error of Unfortunately the Process.com.android.phone Has Stopped on Motorola G54 5G | Dr.fone
- Title: Learn How to Create Animated Titles and Text in the Filmora Video Editor. This Is a Simple Step-by-Step Tutorial for Any Skill Level
- Author: Morgan
- Created at : 2024-05-19 05:11:42
- Updated at : 2024-05-20 05:11:42
- Link: https://ai-video-editing.techidaily.com/learn-how-to-create-animated-titles-and-text-in-the-filmora-video-editor-this-is-a-simple-step-by-step-tutorial-for-any-skill-level/
- License: This work is licensed under CC BY-NC-SA 4.0.

