
Learn How to Create Your Own Custom Animated Text Intro in the Filmora Video Editor. Follow a Few Simple Steps to Create Something that Looks Incredible
Learn How to Create Your Own Custom Animated Text Intro in the Filmora Video Editor. Follow a Few Simple Steps to Create Something that Looks Incredible
Preparation
What you need to prepare:
- A computer (Windows or macOS)
- Your video materials.
- Filmora video editor
Step 1
Download and Install the Filmora video editor . Then, click on New Project once the program starts.
Step 2
Go to Titles and drag the Default Title to the Timeline. Then, double-click on the Default Title clip to open its settings. Here, type in your text → change the text color to Black → click OK → take a snapshot.

Step 3
Double-click on the Default Title once more and simply change the text color to anything other than black this time. Then, click OK and take another snapshot. After this, delete the Default Title from the Timeline.
Step 4
Next, go to Sample Color and drag the White color to the Timeline. Increase the White Color clip’s duration to 10 seconds by dragging the tail of the clip to the right.

Step 5
For the next step, you need to download a simple Vignette png image . Then, import the Vignette image into Filmora. Go to My Media and click on Import Media. Import it and drag the image to the Timeline. Then, move that clip to Track 3.

Step 6
Drop the Black snapshot you took earlier to Track 2. Double-click on it, go to Animation, and apply these settings. After this, move the Playhead to the end of the clip and change the X-axis value to “-800”.

Step 7
Go to Effects and drag the Square Blur effect to Track 4 on the Timeline. Increase its duration to match the other clips. Then, click on the effect and change its Size bar value to 4. Click OK.

Step 8
Place the Playhead at the beginning of the clip. Go to My Media and drag the Black snapshot to Track 5. Double-click on it → go to Animation and change the settings to look like this. Then, move the Playhead to 9 seconds. Here, change the X-axis to “150” and the Scale to 75%.

Step 9
Now, place the Playhead at the starting point and drag the colored snapshot in Track 6. Double-click on it and change the Scale to 50%. Then, move the Playhead to 9 seconds again and change the Scale to 75%. Click OK.
Step 10
Go to Sample Color and drag “Gradient 4” to Track 7 on the Timeline. Double-click on it → go to the Video tab → change the Blending Mode to Overlay → decrease the Opacity to 25%. Click OK.

Step 11
Drag a Default Title to Track 8 and double-click on it to open its Advanced settings. From here, delete the yellow text clip located under the video. Then, insert a Line shape.

Step 12
Increase the Line’s length to be almost as long as the screen. Then adjust its position until half of the Line is visible on the screen. Like this.

Step 13
Copy this Default Title and paste it into Track 9. Open its Advanced settings and change the Line color to something different than the previous one. Then, move it to the other side of the screen, slightly above the previous line. Click OK.

Step 14
Now, select the Default Title on Track 9, double-click it, and go to the Animation tab. Move the Playhead at the starting point of the Timeline and add a keyframe. Then, move the Playhead to the end of the clip. Drag the X-axis position to the right until the Line shape moves all the way to the right side of the screen.
Do the same for the Default Title on Track 8. But this time, drag the X-axis position toward the other side. When you’re done, press OK.

Step 15
Go to the Effects tab → drag the Luma Sharp effect to Track 10. Click it and change its Intensity to 10.

Step 16
You’re all done. Click on the Render button to render all the clips and finally preview your creation. Congratulations on creating a text animation intro in Filmora.

Summary
What you’ve learned:
- Create a unique text animation intro in Filmora
- Animate text and titles
- How to add and animate different shapes in Filmora
- Edit the advanced settings of elements in the Filmora video editor
What you need to prepare:
- A computer (Windows or macOS)
- Your video materials.
- Filmora video editor
Step 1
Download and Install the Filmora video editor . Then, click on New Project once the program starts.
Step 2
Go to Titles and drag the Default Title to the Timeline. Then, double-click on the Default Title clip to open its settings. Here, type in your text → change the text color to Black → click OK → take a snapshot.
Step 3
Double-click on the Default Title once more and simply change the text color to anything other than black this time. Then, click OK and take another snapshot. After this, delete the Default Title from the Timeline.
Step 4
Next, go to Sample Color and drag the White color to the Timeline. Increase the White Color clip’s duration to 10 seconds by dragging the tail of the clip to the right.
Step 5
For the next step, you need to download a simple Vignette png image . Then, import the Vignette image into Filmora. Go to My Media and click on Import Media. Import it and drag the image to the Timeline. Then, move that clip to Track 3.
Step 6
Drop the Black snapshot you took earlier to Track 2. Double-click on it, go to Animation, and apply these settings. After this, move the Playhead to the end of the clip and change the X-axis value to “-800”.
Step 7
Go to Effects and drag the Square Blur effect to Track 4 on the Timeline. Increase its duration to match the other clips. Then, click on the effect and change its Size bar value to 4. Click OK.
Step 8
Place the Playhead at the beginning of the clip. Go to My Media and drag the Black snapshot to Track 5. Double-click on it → go to Animation and change the settings to look like this. Then, move the Playhead to 9 seconds. Here, change the X-axis to “150” and the Scale to 75%.
Step 9
Now, place the Playhead at the starting point and drag the colored snapshot in Track 6. Double-click on it and change the Scale to 50%. Then, move the Playhead to 9 seconds again and change the Scale to 75%. Click OK.
Step 10
Go to Sample Color and drag “Gradient 4” to Track 7 on the Timeline. Double-click on it → go to the Video tab → change the Blending Mode to Overlay → decrease the Opacity to 25%. Click OK.
Step 11
Drag a Default Title to Track 8 and double-click on it to open its Advanced settings. From here, delete the yellow text clip located under the video. Then, insert a Line shape.
Step 12
Increase the Line’s length to be almost as long as the screen. Then adjust its position until half of the Line is visible on the screen. Like this.
Step 13
Copy this Default Title and paste it into Track 9. Open its Advanced settings and change the Line color to something different than the previous one. Then, move it to the other side of the screen, slightly above the previous line. Click OK.
Step 14
Now, select the Default Title on Track 9, double-click it, and go to the Animation tab. Move the Playhead at the starting point of the Timeline and add a keyframe. Then, move the Playhead to the end of the clip. Drag the X-axis position to the right until the Line shape moves all the way to the right side of the screen.
Do the same for the Default Title on Track 8. But this time, drag the X-axis position toward the other side. When you’re done, press OK.
Step 15
Go to the Effects tab → drag the Luma Sharp effect to Track 10. Click it and change its Intensity to 10.
Step 16
You’re all done. Click on the Render button to render all the clips and finally preview your creation. Congratulations on creating a text animation intro in Filmora.
Summary
What you’ve learned:
- Create a unique text animation intro in Filmora
- Animate text and titles
- How to add and animate different shapes in Filmora
- Edit the advanced settings of elements in the Filmora video editor
Quickly Turn Any Video Into a Paper Rip Effect
Video editors use different effects to add creative flair to their projects. These effects can also create a transition between clips, make text or images stand out, or add movement to a static image.
One of the most fantastic effects is the paper rip effect. It can add a unique look to videos and a touch of creativity to any project. We will discuss the best software and techniques to achieve this effect quickly. So, let’s get started!
Part 1. What Is a Paper Rip Effect?
You must be wondering what is a paper rip effect in videos. It is a visual effect in which a piece of paper or other material appears torn apart or ripped. It is often used for transitions between shots or scenes in a video. Or, you can make the effect for your thumbnail.

Now, as we have seen what a paper rip effect looks like, isn’t it cool? So let’s see which software we need to make the magic happen.
Part 2. How to Make a Paper Rip Effect
We here take Wondershare Filmora as our editing tool to make the paper rip effect. It has many practical features allow you to customize your video with special effects, transitions, and more.
Free Download For Win 7 or later(64-bit)
Free Download For macOS 10.14 or later
- Over 1,000 video effects, transitions, titles, etc., to spice up high-quality videos.
- Support speech-to-text that allows smooth conversion of voiceover to text.
- Over 2,000+ audio resources range from music and audio effects, and much more.
- The shortcut key saves you time while editing videos.
Stepwise Guide to Make the Paper Rip Effect
Step1 Download Wondershare Filmora from the official website. If you have already downloaded the Wondershare Filmora. Open it, and let’s start editing the video.
Step2 First, we need to find a photo of a white paper that you can easily download from the internet and two videos in which you want to add this effect. Then import these three files to the media gallery.

Step3 Drag and drop Clip 1 onto the timeline and move the playhead to the last frame of the clip.

Alt text: Paper rip effect.
Step4 Now right-click on Clip 1 to open the menu and select Add Freeze Frame.

Step5 After adding a freeze frame, cut here.

Step6 Drag and drop the paper photo onto the second video track of the timeline, and make sure it starts at the cut on the first video track.

Step7 Double-click the paper picture on the timeline to open the settings window and then open the Compositing menu. Then Change the Blending Mode from Normal to Multiply.

In the preview window, we can see that the freeze frame has the paper texture now!

Step8 Now you can use the new feature of Filmora to export this small portion of the video. First, click and drag the playhead to the start of the freeze frame and press “I” on the keyboard to set the IN POINT, then move the playhead to the end of this freeze frame and press “O” on the keyboard to set the OUT POINT.

![]()
Note: If you have the latest version, Filmora will automatically set the OUT POINT on the timeline.
Step9 Then click Export and choose Create Video. Let’s name it freeze frame 1 and click on Export.

It will only export the selected part on the timeline. Once the exporting process is completed, Right-Click on the timeline and Cancel the selected range.

Step10 Import the Freeze Frame 1 to the media folder and replace the Freeze Frame + Paper Photo with this clip. Then adjust the length of this clip to 1 second.

Step11 Now let’s make the second part of the transition effect. You should drag and Drop Clip 2 onto the timeline and move the playhead to the clip’s first frame. Then Add a Freeze Frame; you can also do it by pressing the Alt+F keys. Now click and drag the playhead to the end of the freeze frame and make a Cut.

Step12 Drag and drop the paper photo onto the second video track of the timeline and make sure it starts at the beginning of the freeze frame on the first video track. And again, change the blending mode to Multiply as well.

Step13 Select the range you want to export by setting IN and OUT points as we did before. Press the I key on the keyboard to set the in point, drag the playhead to the out point, and press the O key.

Step14 This time use the shortcut Control + E to open the export window. Again, let’s name it freeze frame 2 and then export it.
Step15 You can use the keyboard shortcut Shift + X to cancel the selected range. Then import freeze frame 2 into the media folder and replace the freeze frame + paper photo. Adjust the length of this new clip to about 1 second.

Step16 Now you can add several Filmora transitions to finish the effect. Go to the Transitions window and find Evaporate 2.

Step17 Drag and drop it onto the cut between clip 1 and freeze frame 1 and the cut between clip 2 and freeze frame 2. You can also adjust the length of the transition.

Step18 Then, find Torned Paper Transition 4 in the Transitions window. Drag and drop it to the cut between freeze frame 1 and freeze frame 2. Then choose Prefix mode in the transition setting video. Adjust the length if needed.

Finally, it’s done. Let’s play the video and see how the paper effect and transitions enhanced the video.

Conclusion
We hope this post has helped you achieve the desired effect on your video. With Filmora’s intuitive user interface, you can customize your paper rip effect with text, images, and more to create a truly unique and eye-catching video. So get creative and start turning your videos into paper rip effects today!
Free Download For macOS 10.14 or later
- Over 1,000 video effects, transitions, titles, etc., to spice up high-quality videos.
- Support speech-to-text that allows smooth conversion of voiceover to text.
- Over 2,000+ audio resources range from music and audio effects, and much more.
- The shortcut key saves you time while editing videos.
Stepwise Guide to Make the Paper Rip Effect
Step1 Download Wondershare Filmora from the official website. If you have already downloaded the Wondershare Filmora. Open it, and let’s start editing the video.
Step2 First, we need to find a photo of a white paper that you can easily download from the internet and two videos in which you want to add this effect. Then import these three files to the media gallery.
Step3 Drag and drop Clip 1 onto the timeline and move the playhead to the last frame of the clip.
Alt text: Paper rip effect.
Step4 Now right-click on Clip 1 to open the menu and select Add Freeze Frame.
Step5 After adding a freeze frame, cut here.
Step6 Drag and drop the paper photo onto the second video track of the timeline, and make sure it starts at the cut on the first video track.
Step7 Double-click the paper picture on the timeline to open the settings window and then open the Compositing menu. Then Change the Blending Mode from Normal to Multiply.
In the preview window, we can see that the freeze frame has the paper texture now!
Step8 Now you can use the new feature of Filmora to export this small portion of the video. First, click and drag the playhead to the start of the freeze frame and press “I” on the keyboard to set the IN POINT, then move the playhead to the end of this freeze frame and press “O” on the keyboard to set the OUT POINT.
![]()
Note: If you have the latest version, Filmora will automatically set the OUT POINT on the timeline.
Step9 Then click Export and choose Create Video. Let’s name it freeze frame 1 and click on Export.
It will only export the selected part on the timeline. Once the exporting process is completed, Right-Click on the timeline and Cancel the selected range.
Step10 Import the Freeze Frame 1 to the media folder and replace the Freeze Frame + Paper Photo with this clip. Then adjust the length of this clip to 1 second.
Step11 Now let’s make the second part of the transition effect. You should drag and Drop Clip 2 onto the timeline and move the playhead to the clip’s first frame. Then Add a Freeze Frame; you can also do it by pressing the Alt+F keys. Now click and drag the playhead to the end of the freeze frame and make a Cut.
Step12 Drag and drop the paper photo onto the second video track of the timeline and make sure it starts at the beginning of the freeze frame on the first video track. And again, change the blending mode to Multiply as well.
Step13 Select the range you want to export by setting IN and OUT points as we did before. Press the I key on the keyboard to set the in point, drag the playhead to the out point, and press the O key.
Step14 This time use the shortcut Control + E to open the export window. Again, let’s name it freeze frame 2 and then export it.
Step15 You can use the keyboard shortcut Shift + X to cancel the selected range. Then import freeze frame 2 into the media folder and replace the freeze frame + paper photo. Adjust the length of this new clip to about 1 second.
Step16 Now you can add several Filmora transitions to finish the effect. Go to the Transitions window and find Evaporate 2.
Step17 Drag and drop it onto the cut between clip 1 and freeze frame 1 and the cut between clip 2 and freeze frame 2. You can also adjust the length of the transition.
Step18 Then, find Torned Paper Transition 4 in the Transitions window. Drag and drop it to the cut between freeze frame 1 and freeze frame 2. Then choose Prefix mode in the transition setting video. Adjust the length if needed.
Finally, it’s done. Let’s play the video and see how the paper effect and transitions enhanced the video.
Conclusion
We hope this post has helped you achieve the desired effect on your video. With Filmora’s intuitive user interface, you can customize your paper rip effect with text, images, and more to create a truly unique and eye-catching video. So get creative and start turning your videos into paper rip effects today!
Create Glitch Text Effect
Glitch text effect is a trending video effect whereby the texts get distorted for a few seconds. The effect is comparable to the glitch you face when your screen starts to malfunction, and the screen appears to be wavy and disoriented. A glitch text effect is better than a regular animated text effect as it helps to get the attention of the viewers immediately and get the message across clearly.
The glitch effect can be applied to the entire video as well as the text as per your preference. There are several video editors available where the glitch text effect comes pre-loaded. All you need to do is to apply it to the text and get it done in a few steps. We will illustrate how to add glitch text effect Premiere Pro. But we recommend Filmora for the best glitter text effect that you can add to your video instantly.
Part 1. Create Glitch Text in Video with Filmora
We have already stated that Wondershare Filmora is the best video editor for the best glitch text effect download and apply to your video in simple steps. Filmora is a premium video editor that is widely used by amateur and professional video editors. You can get all glitch text effect After Effects and add them to your video conveniently in comparison to After Effects.
As a matter of fact, there are literally unlimited video and text effects available, and you can find different types of glitch text effects to apply to your titles and texts. Filmora is available for both Windows and mac users. Here are the steps to create glitch text in video with Filmora.
Free Download For Win 7 or later(64-bit)
Free Download For macOS 10.14 or later
Step1 Download and install Filmora on your computer. Go to File> New Project from the menu bar to start video editing project.

Step2 Go to File> Import Media > Import Media Files to import the video clips where you want to add glitch text effect. Drop the clip into the Timeline to get started.

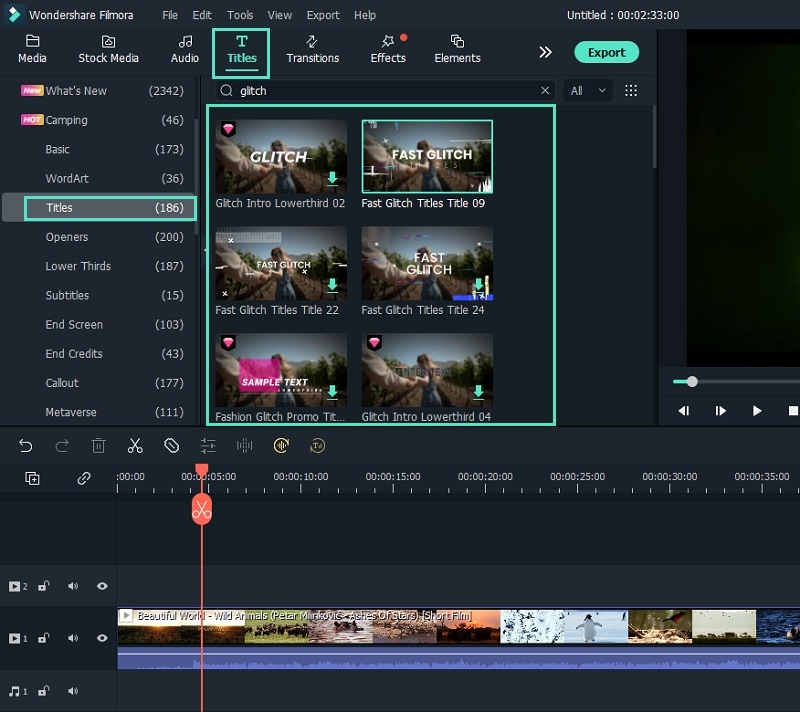
Step3 Go to Titles tab located at the top. From the left panel, click on Titles option. Search “glitch” in the search field and you will see all the glitch text effects that you can apply to the text in your video.
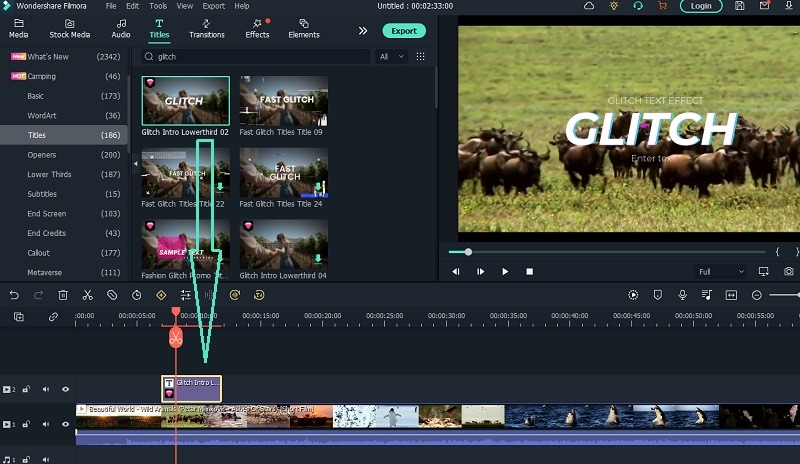
Step4 Select any glitch text effect and drop it into the Timeline above the video clip exactly where you want the text and the effect to appear.
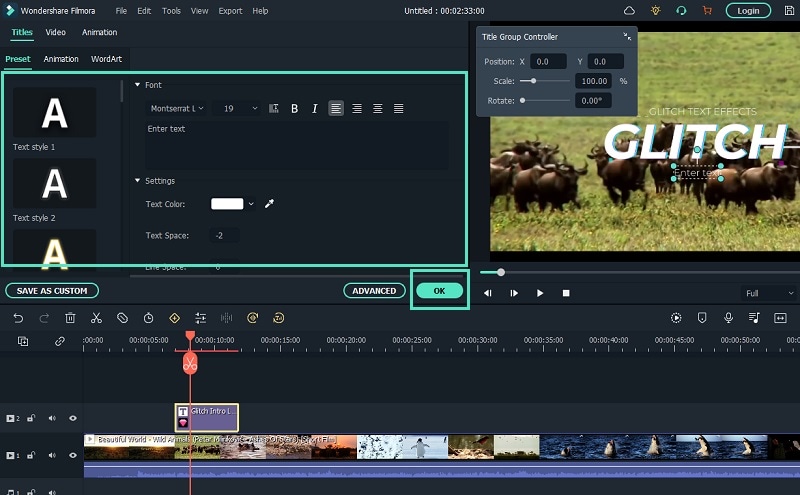
Step5 Double-click on the glitch text effect located on Timeline and edit the text, style, and other parameters as per your preference. Click on Ok and play the video to see your edited video with the glitch text effect.
Part 2. How to Make Glitch Text Effect with Premiere Pro
Adobe Premiere Pro is another renowned video editor where you can add glitch text effect to your video. Premiere Pro is strictly for professional video editors as the user interface is not as intuitive as Filmora . The learning curve is steep, and therefore, you need to go through the steps to add glitch text effect Premiere Pro. There are several glitch text effect presets available that you can apply to any text on your video to make them engaging. Here are the steps to make glitch text effect with Premiere Pro.
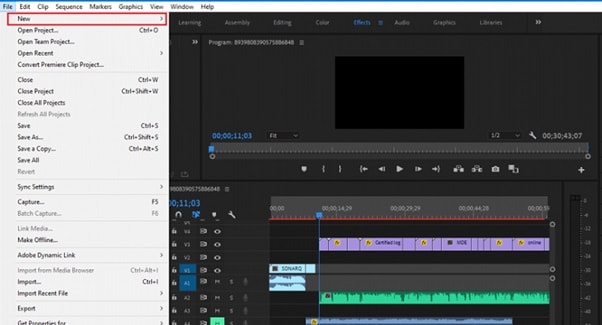
Step1 Launch Adobe Premiere Pro and go to New> Project to get started. Import your video and drop it into Timeline.
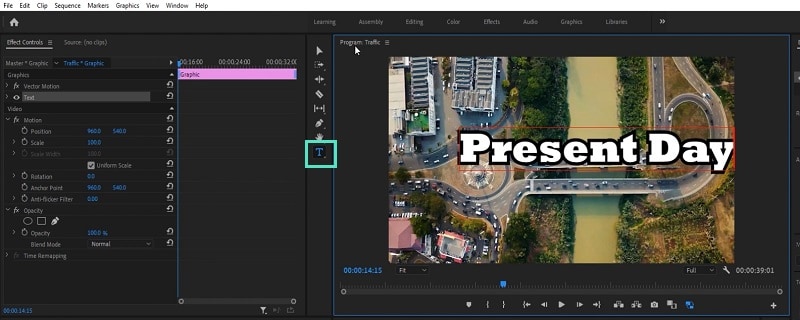
Step2 Use the Type tool to write any text on your video to add glitch text effect. You should have a text layer on Timeline.
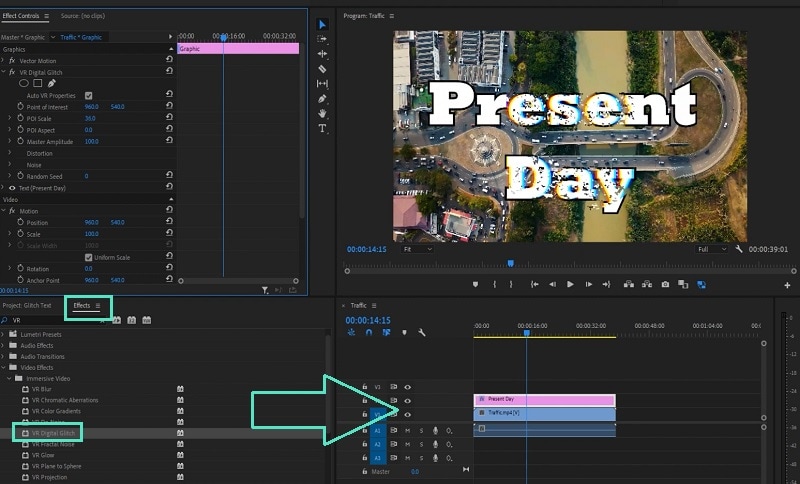
Step3 Go to Effects> Immersive Video> VR Digital Glitch option. Drag and drop the effect to text layer.
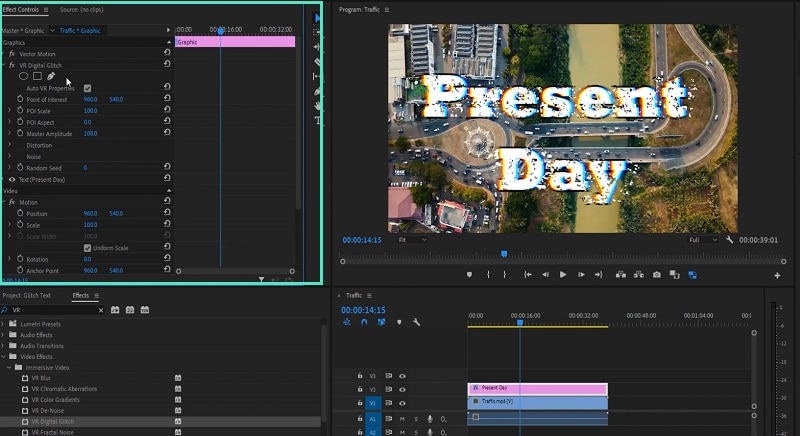
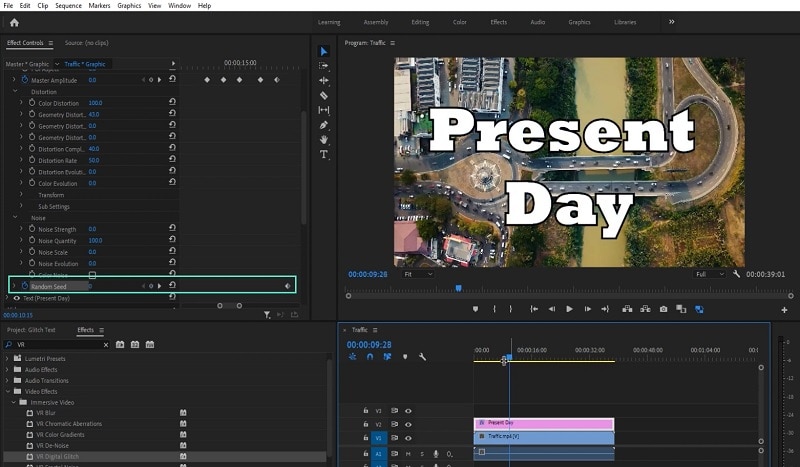
Step4 Under Effect Controls tab, you will find all the different parameters that you can adjust to get the glitch text effect perfectly.
Step5 Turn on Master Amplitude and add multiple keyframes as different points in the Timeline and change the distortion value to make the effect prominent.
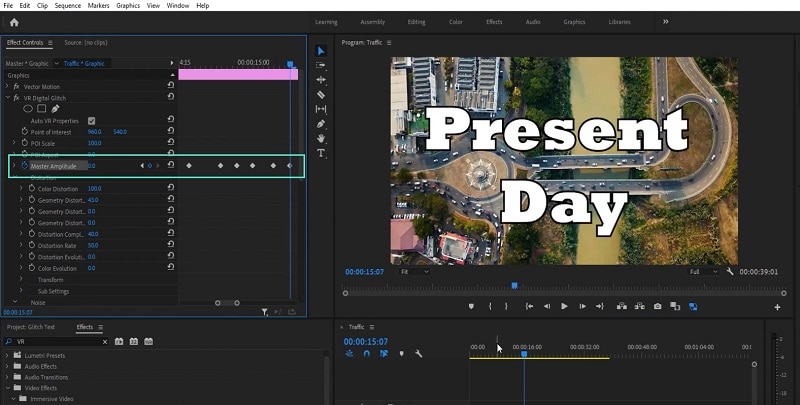
Step6 Go to the first keyframe and turn on Random Seed effect. Go to the last keyframe and turn on Random Seed effect and change the value to 75. Play the video to check the entire video with glitch text effect.
Part 3. Use VSDC Video Editor to Create Glitch Text
If you do not have any premium video editor on your computer and you do not want to purchase any premium video editor, you can still get glitter text effect free. You need to download and install VSDC free video editor on your computer. But the steps to create glitch text on VSDC video editor are slightly complicated as the user interface is not as intuitive as Filmora . Here are the steps to add free glitch text effect on your video.
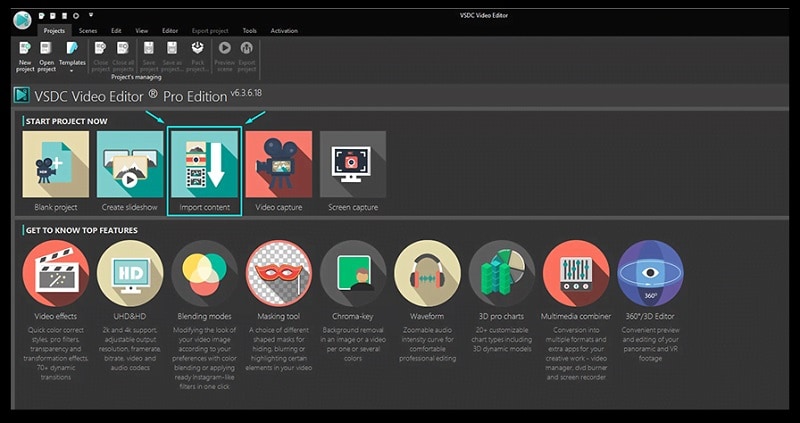
Step1 Download and install VSDC video editor. Launch the editor and click on New Project to get started. Import your video to your project where you want to add glitch text effect.
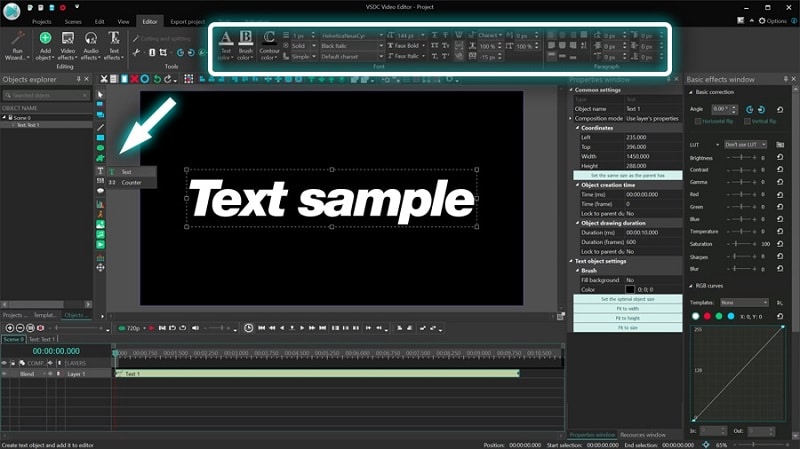
Step2 Use Type tool to write a text on the video. You can press Shift+T shortcut as well. After typing the text, adjust the text style as per your preference.
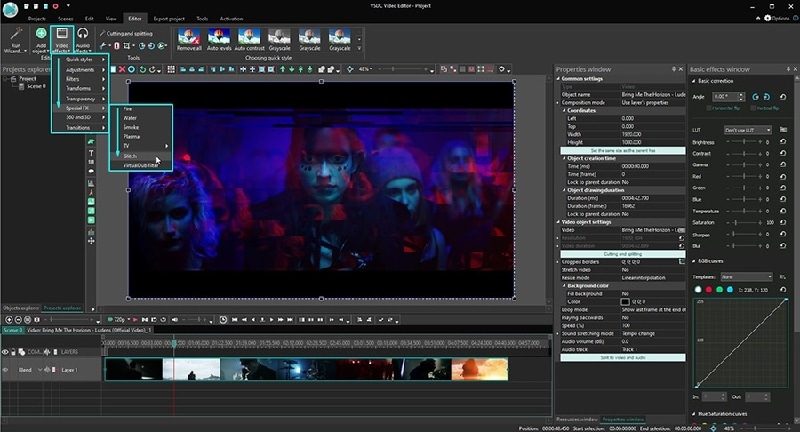
Step3 Double-click on the text layer on Timeline and go to Video Effects> Special FX and click on Glitch option.
Step4 A window will appear where you can set the starting point, duration, and different parameters. Click on Ok button.
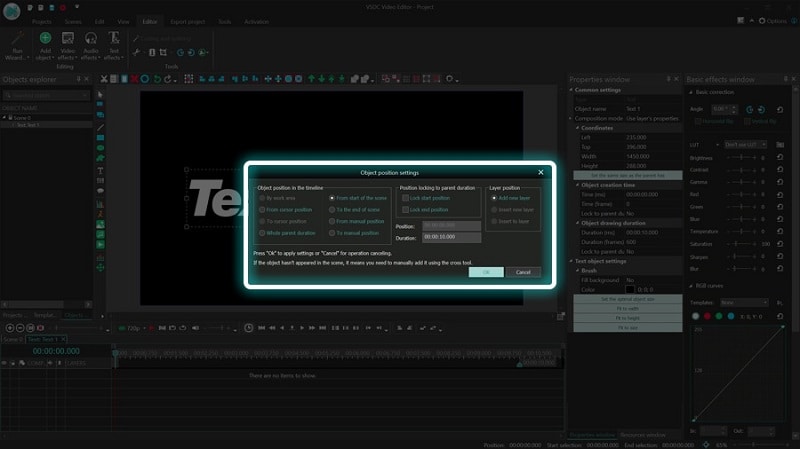
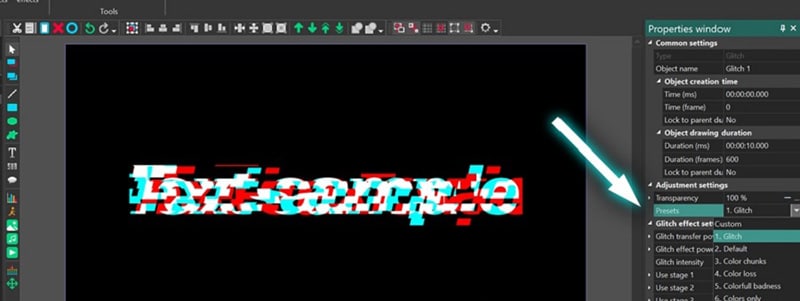
Step5 Go to Properties Windows and click on Presets to select different types of glitch text effects. You can also adjust the intensity of the text effects and other parameters as you feel.
Part 4. Related FAQs about Glitch Text
1. How do you animate glitch text?
If you want to animate glitch text for free, VSDC video editor is ideal as you can customize the effect on any text in simple steps. If you want to use a premium video editor, we recommend Filmora as there are various glitch text effects available to apply to any text on your video instantly.
2. How do you glitch text on video?
First, you have to import your video in your video editor. Type the desired text and set the style. Thereafter, go to glitch text effect presets available on the video editor and apply it to the text instantly. You can customize the glitch text effect as per your preference to make the animation more prominent.
3. How do you glitch text on Android?
You should first install Glitch Video Effect: Glitch FX app from Play Store. Edit your video on the app to add any text, and thereafter, add glitch text effect instantly. In fact, the glitch text effect is available in almost all popular video editor apps on Android due to the effect being trendy and viral.
Free Download For macOS 10.14 or later
Step1 Download and install Filmora on your computer. Go to File> New Project from the menu bar to start video editing project.
Step2 Go to File> Import Media > Import Media Files to import the video clips where you want to add glitch text effect. Drop the clip into the Timeline to get started.
Step3 Go to Titles tab located at the top. From the left panel, click on Titles option. Search “glitch” in the search field and you will see all the glitch text effects that you can apply to the text in your video.
Step4 Select any glitch text effect and drop it into the Timeline above the video clip exactly where you want the text and the effect to appear.
Step5 Double-click on the glitch text effect located on Timeline and edit the text, style, and other parameters as per your preference. Click on Ok and play the video to see your edited video with the glitch text effect.
Part 2. How to Make Glitch Text Effect with Premiere Pro
Adobe Premiere Pro is another renowned video editor where you can add glitch text effect to your video. Premiere Pro is strictly for professional video editors as the user interface is not as intuitive as Filmora . The learning curve is steep, and therefore, you need to go through the steps to add glitch text effect Premiere Pro. There are several glitch text effect presets available that you can apply to any text on your video to make them engaging. Here are the steps to make glitch text effect with Premiere Pro.
Step1 Launch Adobe Premiere Pro and go to New> Project to get started. Import your video and drop it into Timeline.
Step2 Use the Type tool to write any text on your video to add glitch text effect. You should have a text layer on Timeline.
Step3 Go to Effects> Immersive Video> VR Digital Glitch option. Drag and drop the effect to text layer.
Step4 Under Effect Controls tab, you will find all the different parameters that you can adjust to get the glitch text effect perfectly.
Step5 Turn on Master Amplitude and add multiple keyframes as different points in the Timeline and change the distortion value to make the effect prominent.
Step6 Go to the first keyframe and turn on Random Seed effect. Go to the last keyframe and turn on Random Seed effect and change the value to 75. Play the video to check the entire video with glitch text effect.
Part 3. Use VSDC Video Editor to Create Glitch Text
If you do not have any premium video editor on your computer and you do not want to purchase any premium video editor, you can still get glitter text effect free. You need to download and install VSDC free video editor on your computer. But the steps to create glitch text on VSDC video editor are slightly complicated as the user interface is not as intuitive as Filmora . Here are the steps to add free glitch text effect on your video.
Step1 Download and install VSDC video editor. Launch the editor and click on New Project to get started. Import your video to your project where you want to add glitch text effect.
Step2 Use Type tool to write a text on the video. You can press Shift+T shortcut as well. After typing the text, adjust the text style as per your preference.
Step3 Double-click on the text layer on Timeline and go to Video Effects> Special FX and click on Glitch option.
Step4 A window will appear where you can set the starting point, duration, and different parameters. Click on Ok button.
Step5 Go to Properties Windows and click on Presets to select different types of glitch text effects. You can also adjust the intensity of the text effects and other parameters as you feel.
Part 4. Related FAQs about Glitch Text
1. How do you animate glitch text?
If you want to animate glitch text for free, VSDC video editor is ideal as you can customize the effect on any text in simple steps. If you want to use a premium video editor, we recommend Filmora as there are various glitch text effects available to apply to any text on your video instantly.
2. How do you glitch text on video?
First, you have to import your video in your video editor. Type the desired text and set the style. Thereafter, go to glitch text effect presets available on the video editor and apply it to the text instantly. You can customize the glitch text effect as per your preference to make the animation more prominent.
3. How do you glitch text on Android?
You should first install Glitch Video Effect: Glitch FX app from Play Store. Edit your video on the app to add any text, and thereafter, add glitch text effect instantly. In fact, the glitch text effect is available in almost all popular video editor apps on Android due to the effect being trendy and viral.
5 Tips for Faster Editing in Filmora Video Editor
It’s an indisputable fact that editing is an essential aspect of video creation, and it’s what brings your initial idea to life. However, it can be very daunting and time-consuming, especially when working on a video project containing lots of footage.
In this post, we will walk you through the five best tips that can come in handy to operate fast and smoothly while editing videos of any size. All you just need is the Filmora video editor. You don’t even require technical knowledge.
1. Organize your Media
Since a video project usually has various elements, keeping track of them can take a lot of work. So, the first editing step should be to organize the files so that it is easy to follow them. To do that, you need to do the following;
Create a Folder for Each Media File in your Project
Creating folders involves sorting your video files into various categories, thus making it easy for you to look into specific files and find the missing ones quickly when you need them. For example, you can create a folder for A roll, B roll, Photos, Audio, Sound FX, Music, and Drone Footage. Follow the steps below to see how you can use Filmora to create a folder for each file in your video project;
Step1 Launch Filmora and click Create Project.

Step2 Navigate to the bottom left corner before the Timeline > click the Folder icon from there, as shown in the image below;

Step3 Click on the folder icon until you reach the total number of folders you need to categorize your video files.
Right-click on each folder and name it accordingly.

After you name each folder, use the Import button to upload each video files you need to edit your video.

![]()
Note: since the media files you import into your project get the name associated with the code given by the source, it becomes hard to capture a specific file while editing. You need to rename each of the elements you imported for easier access.
Step4 Rename all imported files. To rename your imported files, right-click on them to add a preferred name. Then, click Rename from the pop-up list to name the files.

2. The Use of Proxies
Another tip that enhances a quick editing process is the use of proxies. Proxies can be described as low-resolution versions of your video files. So, if you’re working on video files that drag back playback speed, like 4K footage, you can create a proxy to enable your PC to handle the file seamlessly.
A tool like Filmora editor can help create proxies of your video file flawlessly. You just have to follow the steps below;
Step1 Locate the large video file you imported to Filmora and right-click it. Then, select Create Proxy File.

Step2 You should see the proxy icon at the bottom right corner of your video once it completes. This takes only a few minutes.

Step3 Drag-n-drop the video to the timeline and perform the necessary editing. Afterward, use the Export button to save the file to your PC.

3. Keep Your Videos and Audio Tracks Organized
This is similar to our first tip, and fortunately, the Filmora video editor facilitates this kind of operation quickly and easily. It involves organizing video and audio clips in the timeline while editing. For instance, use video track #1 for graphics or text, #2 for your B roll, and #1 for the main footage taken.
You will also do the same for Audio, for instance, Audio track #1 for music, Audio track #2 for dialogues, and many more. This will allow you to edit various clips simultaneously, making the editing process faster and easier. Here are the steps to use this tip;
Step1 Click on the Add icon at the left side of the Timeline and select Add Video Track or Add Audio Track to add more timelines for your clips.

Step2 Drag-n-drop the video clips and audio clips to the relevant timeline.

4. Keyboard Shortcuts
These are commands on the keyboard of your pc that will enable you to edit your projects easily and quickly. Various options can be available by keying in specific orders rather than going through a long process using the mouse. This knowledge can be a real time-saver when handling projects. To get more enlightened on the setup in Filmora, follow the steps outlined below;
Step1 Open Filmora and click File from the top side.
Step2 Select Keyboard Shortcuts from the drop-down list.

Step3 The new pop-up window on your PC screen will display all shortcuts you can employ while using Filmora, and the interesting part is that you can customize the shortcut keys to your preference. Moreover, you can freely switch keyboard shortcuts between Filmora, Adobe Premiere Pro, and Final Cut Pro.

Step4 For clicking CTRL+ALT+N will allow you to create a new folder for your file.
5. Edit in Stages
Our final tip is to edit in stages. Yes, it is necessary to edit in stages when dealing with editing work. This helps to limit the time you spend on a project. In the beginning, you should do a rough cut. You can begin by editing the A roll at first and then move on to edit the B roll, moving on to the Sound FX, Music, Graphics, and Color Correction, and then reviewing the entire project before exporting it.
In case while editing the A roll, you find something that requires a quick fix in its audio, focus on it and, if possible, use a marker icon to describe it. This will help you not get confused once you get to the Audio stage. See the steps to use Filmora to do this below;
Step1 Firstly, focus on your video footage. Move them to the required timeline.

Step2 Next, move your B-roll to the relevant timeline. Then, apply the required editing.
Step3 Afterward, move drag-n-drop the audio clips to the timeline and apply the needed edits.

Repeat the process for different operations in stages until you finish.
Conclusion
The editing process is about having a free mind where creativity is the primary focus. When you can do that, you will be able to complete your projects in a short time and work on various tasks simultaneously. The tips discussed in this article will go a long way in helping you handle your projects using Filmora.
You can use Filmora to edit videos and other media files downloaded from YouTube, Vimeo, and many more video-sharing sites. Follow these tips and make editing your video projects quite easy and fast.
Free Download For Win 7 or later(64-bit)
Free Download For macOS 10.14 or later
Step4 Rename all imported files. To rename your imported files, right-click on them to add a preferred name. Then, click Rename from the pop-up list to name the files.
2. The Use of Proxies
Another tip that enhances a quick editing process is the use of proxies. Proxies can be described as low-resolution versions of your video files. So, if you’re working on video files that drag back playback speed, like 4K footage, you can create a proxy to enable your PC to handle the file seamlessly.
A tool like Filmora editor can help create proxies of your video file flawlessly. You just have to follow the steps below;
Step1 Locate the large video file you imported to Filmora and right-click it. Then, select Create Proxy File.
Step2 You should see the proxy icon at the bottom right corner of your video once it completes. This takes only a few minutes.
Step3 Drag-n-drop the video to the timeline and perform the necessary editing. Afterward, use the Export button to save the file to your PC.
3. Keep Your Videos and Audio Tracks Organized
This is similar to our first tip, and fortunately, the Filmora video editor facilitates this kind of operation quickly and easily. It involves organizing video and audio clips in the timeline while editing. For instance, use video track #1 for graphics or text, #2 for your B roll, and #1 for the main footage taken.
You will also do the same for Audio, for instance, Audio track #1 for music, Audio track #2 for dialogues, and many more. This will allow you to edit various clips simultaneously, making the editing process faster and easier. Here are the steps to use this tip;
Step1 Click on the Add icon at the left side of the Timeline and select Add Video Track or Add Audio Track to add more timelines for your clips.
Step2 Drag-n-drop the video clips and audio clips to the relevant timeline.
4. Keyboard Shortcuts
These are commands on the keyboard of your pc that will enable you to edit your projects easily and quickly. Various options can be available by keying in specific orders rather than going through a long process using the mouse. This knowledge can be a real time-saver when handling projects. To get more enlightened on the setup in Filmora, follow the steps outlined below;
Step1 Open Filmora and click File from the top side.
Step2 Select Keyboard Shortcuts from the drop-down list.
Step3 The new pop-up window on your PC screen will display all shortcuts you can employ while using Filmora, and the interesting part is that you can customize the shortcut keys to your preference. Moreover, you can freely switch keyboard shortcuts between Filmora, Adobe Premiere Pro, and Final Cut Pro.
Step4 For clicking CTRL+ALT+N will allow you to create a new folder for your file.
5. Edit in Stages
Our final tip is to edit in stages. Yes, it is necessary to edit in stages when dealing with editing work. This helps to limit the time you spend on a project. In the beginning, you should do a rough cut. You can begin by editing the A roll at first and then move on to edit the B roll, moving on to the Sound FX, Music, Graphics, and Color Correction, and then reviewing the entire project before exporting it.
In case while editing the A roll, you find something that requires a quick fix in its audio, focus on it and, if possible, use a marker icon to describe it. This will help you not get confused once you get to the Audio stage. See the steps to use Filmora to do this below;
Step1 Firstly, focus on your video footage. Move them to the required timeline.
Step2 Next, move your B-roll to the relevant timeline. Then, apply the required editing.
Step3 Afterward, move drag-n-drop the audio clips to the timeline and apply the needed edits.
Repeat the process for different operations in stages until you finish.
Conclusion
The editing process is about having a free mind where creativity is the primary focus. When you can do that, you will be able to complete your projects in a short time and work on various tasks simultaneously. The tips discussed in this article will go a long way in helping you handle your projects using Filmora.
You can use Filmora to edit videos and other media files downloaded from YouTube, Vimeo, and many more video-sharing sites. Follow these tips and make editing your video projects quite easy and fast.
Free Download For Win 7 or later(64-bit)
Free Download For macOS 10.14 or later
Also read:
- New In 2024, 6 Instant Ways to Make Windows 10 Slideshow
- In 2024, How to Create Datamoshing Effect to Your Footage in After Effects?
- Updated Are You Finding It Challenging to Upload and Create a Link for Your Video? Well, This Detailed Upload Video to Link Guide Will Help You with This. Check It Out Now for 2024
- Updated 100 Working Methods to Learn How to Rotate TikTok Video
- New Make Transparent Background Video Today
- New Videos Look Better when Edited Professionally. If Youre Looking to Edit Recorded Video with a Pro-Level Editing Then Weve Got You Covered. Learn About Editing Recorded Videos with the Best Toolkit Here
- Updated 2024 Approved Find Out How to Add Subtitles in the VLC Media Player on Your Windows and Mac System with Quick and Simple Instructions
- Updated How to Create a Bokeh Effect
- New 2024 Approved How to Color Grading in Final Cut Pro
- Updated LumaFusion – One of the Best Video Editors for iOS
- New 2024 Approved Know How to Create OBS Slideshow. Creating OBS Slideshow in Simple Steps; Application for Creating OBS Slideshow. Make OBS Slideshow Online
- New Best Dark Moody LUTs During Editing
- New How to Make a Super Easy Rotating Video Effect
- Updated Top 9 Best Solutions To Go For When Creating an AI Thumbnail
- Updated If You Are Experiencing a Color Distortion in Your Video, You Are in the Right Place. We Have Provided a Detailed Guide with Three Methods that Will Help You Correct This Issue
- How To Make Ninja Jump Effect with Filmora
- Updated In 2024, How to Create the Stranger Things Upside Down Effect
- Updated 12 Top Picks of Video Enhancer Software for 2024
- Comprehensive Guide to Add LUTs in Premiere Pro with Ease
- New Learn How to Perform Velocity Edits on Your PC for 2024
- 2024 Approved How to Add Customized Transitions to OBS
- In 2024, Camtasia Vs Captivate - Which to Choose?
- New 2024 Approved Want to Make a Fun and Cinematic Video with an Introductory Text Title? Learn the Stages of Editing with Filmora for This Effect Here
- 5 Ways to Make a Fake Facetime Call Video for 2024
- Updated In 2024, How To Add Scrolling Text Effect
- Protecting Your Privacy How To Remove Apple ID From iPhone 15 Pro
- CatchEmAll Celebrate National Pokémon Day with Virtual Location On Xiaomi Redmi Note 12 Pro 4G | Dr.fone
- In 2024, Here are Some Pro Tips for Pokemon Go PvP Battles On Realme 12 5G | Dr.fone
- How to Track Realme V30T Location without Installing Software? | Dr.fone
- Ways to stop parent tracking your Motorola Moto E13 | Dr.fone
- Remove FRP Lock on Infinix Note 30
- How to Reset Apple ID and Apple Password On iPhone 8
- Methods to Change GPS Location On Apple iPhone 6s Plus | Dr.fone
- How to Turn Off Find My Apple iPhone 12 when Phone is Broken?
- 7 Solutions to Fix Chrome Crashes or Wont Open on Nokia C22 | Dr.fone
- How to Unlock Vivo S17 Pro Phone without PIN
- Solved Warning Camera Failed on Infinix GT 10 Pro | Dr.fone
- In 2024, What You Want To Know About Two-Factor Authentication for iCloud On your iPhone 13 Pro Max
- In 2024, 3 Effective Methods to Fake GPS location on Android For your Honor Magic5 Ultimate | Dr.fone
- How to Access Your Apple iPhone 12 Pro When You Forget the Passcode? | Dr.fone
- Recommended Best Applications for Mirroring Your HTC U23 Screen | Dr.fone
- Can You Unlock Apple iPhone 12 mini After Forgetting the Passcode? | Dr.fone
- Best Pokemons for PVP Matches in Pokemon Go For Apple iPhone 15 Plus | Dr.fone
- How To Unlock iPhone 13 mini 3 Ways To Unlock
- Title: Learn How to Create Your Own Custom Animated Text Intro in the Filmora Video Editor. Follow a Few Simple Steps to Create Something that Looks Incredible
- Author: Morgan
- Created at : 2024-05-19 05:11:42
- Updated at : 2024-05-20 05:11:42
- Link: https://ai-video-editing.techidaily.com/learn-how-to-create-your-own-custom-animated-text-intro-in-the-filmora-video-editor-follow-a-few-simple-steps-to-create-something-that-looks-incredible/
- License: This work is licensed under CC BY-NC-SA 4.0.
