:max_bytes(150000):strip_icc():format(webp)/iOS-wwdc-7d655ca37a3b43b99fd9dac09bec13c4.jpg)
Learn How to Easily Concatenate Videos Using FFmpeg in This Step-by-Step Guide. From Installation to Execution, We Cover It All to Streamline Your Video Editing Process

Learn How to Easily Concatenate Videos Using FFmpeg in This Step-by-Step Guide. From Installation to Execution, We Cover It All to Streamline Your Video Editing Process
Video editing is a crucial aspect of creating content for many people. Whether you’re a YouTuber, a marketer, or just someone who wants to share videos with friends and family, being able to edit and manipulate your videos is key. One of the most basic video editing tasks is concatenating videos, which combines multiple files to create one cohesive video.
FFmpeg is a powerful tool that allows you to do just that, and in this guide, we’ll walk you through the process of FFmpeg concatenate videos. Whether a beginner or an experienced video editor, this guide will provide you with all the information you need to seamlessly merge your videos. From installation to execution, we’ll cover it all so you can streamline your video editing process.
Overview and Installation of FFmpeg
FFmpeg is free, open-source project that allows you to record, convert, and stream digital audio and video. It is a command-line tool widely used in video editing and transcoding. FFmpeg can be used to concatenate videos and other tasks, such as adding subtitles, changing video resolution, and more. It is available for Windows, Mac, and Linux, making it a versatile and accessible tool for anyone to use.
Here’s how to install FFmpeg:
Step1 Log in to your Ubuntu server via SSH and update the package index.
$ sudo apt update
Step2 Install FFmpeg and all the required dependencies
$ sudo apt install ffmpeg
Step3 Verify the version of FFmpeg that you’ve installed.
$ ffmpeg -version
Prerequisite
Before we merge videos using FFmpeg, we must understand the various methods available to us. FFmpeg offers three ways to concatenate videos: a demuxer, a filter, or a protocol. However, each method has its own set of considerations, and the best method for you will depend on the properties of the videos you’re working with.
It’s crucial to ensure that all encoding-related properties align with your chosen method. This includes the timebase, height and width, codecs, and pixel format. Some methods require the videos you’re merging to have the same encoding, while others allow for different encodings. It’s essential to keep this in mind to ensure that the final video is seamless without any breaks. Remember that these prerequisites will help you have a smooth process.
Concatenate Videos With Same Codecs Using FFmpeg
If the videos you want to concatenate have the same codec, you can use the FFmpeg “concat” demuxer or protocol to join them together. This simple and efficient method doesn’t require re-encoding the videos, saving time and preserving the original quality. This section will review the steps to concatenate videos using the “concat” demuxer and “concat” protocols in FFmpeg.
Merge Videos With the “Concat” Demuxer
The concat demuxer in FFmpeg allows you to join together multiple video files with the same codecs by reading a list of file paths from a text file and demuxing them in sequence. Each video starts where the previous one finishes without needing to re-encode the videos. Here’s how to do it:
Step1 Create a .txt file and list the paths of the video files you want to merge.
Join_video.txt
file /Users/Video/input1.mp4
file /Users/Video/input2.mp4
![]()
Note: You can add more than two video files.
Step2 Run the FFmpeg command:
ffmpeg -f concat -safe 0 -i join_video.txt -c copy output_demuxer.mp4
![]()
Note: -safe 0 is added to accept any file name.
-c copy will copy all the streams.
As this method allows you to “stream copy” the files instead of re-encoding them, the concatenation is very fast. This can be a good option if you have videos with the same codecs and want to join them quickly without losing quality.
Join Videos With the “Concat” Protocol
The concat protocol in FFmpeg allows you to join together multiple video files in a specific format that supports file-level concatenation, such as MPEG-2 TS. However, it cannot be used for other video formats like MP4 and WEBM.
Here’s how to use the “concat protocol:
Step1 Run the FFmpeg command:
ffmpeg -i “concat:input1.ts|input2.ts” -c copy output_protocol.ts
![]()
Note: The concat protocol allows you to “stream copy” the files by adding the option -c copy.
Step2 Input the file name of the video using this code:
ffmpeg -i “concat:input1.mp4|input2.mp4” -c copy output_protocol.mp4
![]()
Note: If you try to use this method on video formats that are not supported, only the first input video will be saved in the output video. And the video ends after the first video.
Although this method is limited in terms of supported video formats, it’s very easy to use if you merge videos in the supported formats. It’s a single command in the terminal without needing a text file. Additionally, using the -c copy option makes it efficient as it doesn’t require re-encoding, saving time.
Concatenate MP4 Video Files of Different Codecs & Resolutions Using FFmpeg
If the videos you want to concatenate have different codecs or resolutions, you can still use FFmpeg to join them together. However, this method requires re-encoding the videos, which can take longer and may result in a loss of quality. This section will cover the steps to concatenate videos with different codecs or resolutions using FFmpeg.
Here’s how to do it:
Step1 Provide the names of the input files to FFmpeg.
ffmpeg -i file1.mp4 -i file2.mp4 -i file3.mp4 \
Step2 Use the filter_complex filtergraph parameter to instruct FFmpeg from where to take the audio and video.
-filter_complex “[0:v] [0:a] [1:v] [1:a] [2:v] [2:a]
![]()
Note: [0:v][0:a] means FFmpeg needs to take the video and audio from the 0th video (file1.mp4).
Step3 Tell FFmpeg to concatenate three files (n=3).
concat=n=3:v=1:a=1 [vv] [aa]“ \
![]()
Note: The v=1:a=1 implies one stream for the audio and one stream for the video.
Step4 Map these audio and video outputs to the final video container. This is done as follows:
-map “[vv]“ -map “[aa]“ mergedVideo.mp4
It is important to note that this method requires re-encoding the videos, which can take more time and may result in a loss of quality. However, it offers the flexibility of filtering the videos before concatenating them. The filter_complex method in FFmpeg allows you to concatenate videos of different codecs and resolutions. The final step is to map the audio and video outputs to the final video container. This can be done using the -map command.
Concatenate Videos With Multiple Audio Streams Using FFmpeg
Concatenating videos with multiple audio streams can be more complex than concatenating videos with a single audio stream. This section will cover the steps to concatenate videos with multiple audio streams using FFmpeg. We’ll be using the filter_complex method in FFmpeg, which allows you to manipulate and concatenate multiple audio and video streams in a single command. This method is more advanced but allows you to join videos with different audio streams and create a final video with multiple audio tracks.
Step1 Specify the input files and opening.mkv, episode.mkv, and ending.mkv:
$ ffmpeg -i opening.mkv -i episode.mkv -i ending.mkv -filter_complex
Step2 Use the filter_complex parameter in FFmpeg to specify the input streams for the video and audio.
[0:0] [0:1] [0:2] [1:0] [1:1] [1:2] [2:0] [2:1] [2:2]
![]()
Note: Single video stream ([0:0], [1:0], [2:0])
Dual audio streams ([0:1][0:2], [1:1][1:2], [2:1][2:2])
Step3 Use the concat filter to specify that you want to concatenate 3 files (n=3) with 1 video stream (v=1) and 2 audio streams (a=2). Specify the output streams as [v], [a1], [a2]:
concat=n=3:v=1:a=2 [v] [a1] [a2]
Step4 Use the -map option to map the output streams to the final video container:
-map ‘[v]‘ -map ‘[a1]‘ -map ‘[a2]‘ output.mkv
[Bonus] Join Videos Together With Filmora
While FFmpeg offers a wide range of options for joining videos together, it can have a steep learning curve for some users. An alternative method for joining videos is using Filmora. Wondershare Filmora is a user-friendly video editing software that allows you to easily join multiple videos. It’s a great option for users new to video editing or needing experience with command-line tools like FFmpeg.
Free Download For Win 7 or later(64-bit)
Free Download For macOS 10.14 or later
Filmora has a simple drag-and-drop interface, making adding, arranging, and editing videos and audio tracks easy. Additionally, it offers various features like split, trim, crop, merge, and more. It also has various effects, transitions, and animations to enhance the overall look of your video. With Filmora, you can create professional-looking videos with minimal effort.
How-to Steps
Here’s how to merge videos using Filmora:
Step1 Open Filmora and click “New Project.”

Step2 Go to “File“ > “Import Media“ > “Import Media Files“ to add your video files to the media library.

Step3 Drag and drop the files you want to merge from the media library to the timeline, and then you’ll get the merged video seamlessly.

Step4 Edit your video.

Step5 After editing, click the “Export“ tab to save your videos.

Conclusion
FFmpeg is a powerful tool that allows you to concatenate videos in various ways. Whether you’re working with videos of the same codecs and resolutions or videos with multiple audio streams, FFmpeg can handle it. However, for users new to video editing or needing experience with command-line tools, using Filmora can be a more user-friendly option. It offers a simple drag-and-drop interface and a variety of features and effects to enhance the overall look of your video.
Step2 Run the FFmpeg command:
ffmpeg -f concat -safe 0 -i join_video.txt -c copy output_demuxer.mp4
![]()
Note: -safe 0 is added to accept any file name.
-c copy will copy all the streams.
As this method allows you to “stream copy” the files instead of re-encoding them, the concatenation is very fast. This can be a good option if you have videos with the same codecs and want to join them quickly without losing quality.
Join Videos With the “Concat” Protocol
The concat protocol in FFmpeg allows you to join together multiple video files in a specific format that supports file-level concatenation, such as MPEG-2 TS. However, it cannot be used for other video formats like MP4 and WEBM.
Here’s how to use the “concat protocol:
Step1 Run the FFmpeg command:
ffmpeg -i “concat:input1.ts|input2.ts” -c copy output_protocol.ts
![]()
Note: The concat protocol allows you to “stream copy” the files by adding the option -c copy.
Step2 Input the file name of the video using this code:
ffmpeg -i “concat:input1.mp4|input2.mp4” -c copy output_protocol.mp4
![]()
Note: If you try to use this method on video formats that are not supported, only the first input video will be saved in the output video. And the video ends after the first video.
Although this method is limited in terms of supported video formats, it’s very easy to use if you merge videos in the supported formats. It’s a single command in the terminal without needing a text file. Additionally, using the -c copy option makes it efficient as it doesn’t require re-encoding, saving time.
Concatenate MP4 Video Files of Different Codecs & Resolutions Using FFmpeg
If the videos you want to concatenate have different codecs or resolutions, you can still use FFmpeg to join them together. However, this method requires re-encoding the videos, which can take longer and may result in a loss of quality. This section will cover the steps to concatenate videos with different codecs or resolutions using FFmpeg.
Here’s how to do it:
Step1 Provide the names of the input files to FFmpeg.
ffmpeg -i file1.mp4 -i file2.mp4 -i file3.mp4 \
Step2 Use the filter_complex filtergraph parameter to instruct FFmpeg from where to take the audio and video.
-filter_complex “[0:v] [0:a] [1:v] [1:a] [2:v] [2:a]
![]()
Note: [0:v][0:a] means FFmpeg needs to take the video and audio from the 0th video (file1.mp4).
Step3 Tell FFmpeg to concatenate three files (n=3).
concat=n=3:v=1:a=1 [vv] [aa]“ \
![]()
Note: The v=1:a=1 implies one stream for the audio and one stream for the video.
Step4 Map these audio and video outputs to the final video container. This is done as follows:
-map “[vv]“ -map “[aa]“ mergedVideo.mp4
It is important to note that this method requires re-encoding the videos, which can take more time and may result in a loss of quality. However, it offers the flexibility of filtering the videos before concatenating them. The filter_complex method in FFmpeg allows you to concatenate videos of different codecs and resolutions. The final step is to map the audio and video outputs to the final video container. This can be done using the -map command.
Concatenate Videos With Multiple Audio Streams Using FFmpeg
Concatenating videos with multiple audio streams can be more complex than concatenating videos with a single audio stream. This section will cover the steps to concatenate videos with multiple audio streams using FFmpeg. We’ll be using the filter_complex method in FFmpeg, which allows you to manipulate and concatenate multiple audio and video streams in a single command. This method is more advanced but allows you to join videos with different audio streams and create a final video with multiple audio tracks.
Step1 Specify the input files and opening.mkv, episode.mkv, and ending.mkv:
$ ffmpeg -i opening.mkv -i episode.mkv -i ending.mkv -filter_complex
Step2 Use the filter_complex parameter in FFmpeg to specify the input streams for the video and audio.
[0:0] [0:1] [0:2] [1:0] [1:1] [1:2] [2:0] [2:1] [2:2]
![]()
Note: Single video stream ([0:0], [1:0], [2:0])
Dual audio streams ([0:1][0:2], [1:1][1:2], [2:1][2:2])
Step3 Use the concat filter to specify that you want to concatenate 3 files (n=3) with 1 video stream (v=1) and 2 audio streams (a=2). Specify the output streams as [v], [a1], [a2]:
concat=n=3:v=1:a=2 [v] [a1] [a2]
Step4 Use the -map option to map the output streams to the final video container:
-map ‘[v]‘ -map ‘[a1]‘ -map ‘[a2]‘ output.mkv
[Bonus] Join Videos Together With Filmora
While FFmpeg offers a wide range of options for joining videos together, it can have a steep learning curve for some users. An alternative method for joining videos is using Filmora. Wondershare Filmora is a user-friendly video editing software that allows you to easily join multiple videos. It’s a great option for users new to video editing or needing experience with command-line tools like FFmpeg.
Free Download For Win 7 or later(64-bit)
Free Download For macOS 10.14 or later
Filmora has a simple drag-and-drop interface, making adding, arranging, and editing videos and audio tracks easy. Additionally, it offers various features like split, trim, crop, merge, and more. It also has various effects, transitions, and animations to enhance the overall look of your video. With Filmora, you can create professional-looking videos with minimal effort.
How-to Steps
Here’s how to merge videos using Filmora:
Step1 Open Filmora and click “New Project.”

Step2 Go to “File“ > “Import Media“ > “Import Media Files“ to add your video files to the media library.

Step3 Drag and drop the files you want to merge from the media library to the timeline, and then you’ll get the merged video seamlessly.

Step4 Edit your video.

Step5 After editing, click the “Export“ tab to save your videos.

Conclusion
FFmpeg is a powerful tool that allows you to concatenate videos in various ways. Whether you’re working with videos of the same codecs and resolutions or videos with multiple audio streams, FFmpeg can handle it. However, for users new to video editing or needing experience with command-line tools, using Filmora can be a more user-friendly option. It offers a simple drag-and-drop interface and a variety of features and effects to enhance the overall look of your video.
How to Merge Audio and Video Using FFmpeg
Welcome to the world of video production! Whether you’re a beginner or an experienced video creator, one of the most important skills to master is merging audio and video seamlessly. In this article, we’ll focus on FFmpeg, a powerful command-line tool that can help you easily merge audio and video.
FFmpeg is open-source software that allows you to convert, edit, and stream multimedia files. It’s widely used by professionals and enthusiasts and has many capabilities, including merging audio and video files. This guide will walk you through merging audio and video using FFmpeg. So, whether you’re creating a YouTube video, a podcast, or a movie, you’ll have the skills to make it sound and look great.
Preparation
Are you ready to master the art of merging audio and video? Then let’s dive into the world of FFmpeg, a powerful and versatile tool that can help you achieve professional results.
With FFmpeg, you can record, convert, and stream audio and video files in any format, making it a complete and cross-platform solution. It’s also a great tool for decoding, encoding, transcoding, muxing, demuxing, streaming, filtering, and playing any media type.
But before we start merging video files using FFmpeg, it’s important to understand the basics of container formats and video codecs. These are the building blocks of your videos, and the specific types you’re working with will determine the method you’ll use to merge them. So, buckle up, and let’s get started!
How To Combine Video With Two Audio Using FFmpeg
Are you looking to add multiple audio tracks to your video? With FFmpeg, you can easily combine video with two audio streams. Whether creating a foreign-language version of your video or adding an alternate audio track, this method will help you achieve professional results. This section will guide you through combining video with two audio streams using FFmpeg’s command-line interface. So, let’s get started!
Mixing Two Audios Into a Video
Combining multiple audio tracks into one video can be done easily with FFmpeg’s command-line interface. In this example, we will combine two audio tracks into one video so that the voiceover will play over the background music. Here’s the step-by-step process:
Step1 Open your command prompt or terminal and navigate to the directory where your video and audio files are located.
Step2 Replace “video1.mp4“ and “audio1.mp3“ with the names of your actual video and audio files.
ffmpeg \
-i video1.mp4 -i audio1.mp3 \
Step3 The -c:v copy flag tells FFmpeg to copy the video stream from the source file without re-encoding it. This helps to speed up the process and avoid quality loss.
-c:v copy \
-filter_complex “ \
Step4 The command “amix=inputs=2:duration=longest“ tells amix to accept 2 inputs (0:a and 1:a) and combine them into an output stream called audio_out, with the duration of the longest input.
[0:a][1:a] amix=inputs=2:duration=longest [audio_out] \
Step5 Map the video stream (0:v) and the mixed audio stream (audio_out) into the final output video.
-map 0:v -map “[audio_out]“ \
Step6 The -y flag tells FFmpeg to overwrite the output file if it already exists.
-y output.mp4
Once complete, you’ll find the newly created video file with the mixed audio in the specified output location.
Mixing Two Audios Into a Video Adjusting Volume
We will be taking a step further and show you how to merge two audio tracks into a video while adjusting the volume of one of the audio tracks. This can be useful when you want to emphasize one audio track over the other, for example, to make the voiceover more prominent in a video.
And here’s the step-by-step process:
Step1 Start the command by specifying the input files.
ffmpeg \
-i video1.mp4 -i audio1.mp3 \
Step2 Use the filter_complex option to specify a filter graph.
-filter_complex “ \
[0:a] volume=0.5 [music];
Step3 Use the amix filter to take the “music“ stream and audio1.mp3 and mix them.
[music][1:a] amix=inputs=2:duration=longest [audio_out] \
“ \
Step4 Use the map option to specify which streams from the input files should be included in the output file.
-map 0:v -map “[audio_out]“ \
Step5 Specify the output file name as “output.mp4“ and the -y flag to overwrite the output file without asking for confirmation if it already exists.
-y output.mp4
Mixing Two Audios Into a Video With Delay
When creating videos, sometimes the audio needs to be synced with the video, or you want to add a delay to the audio track. Here’s how to add delay to an audio track using FFmpeg.
Step1 Use the adelay filter to add delay to the audio track.
[1:a] adelay=2100|2100 [voice];
Step2 Mix the delayed audio track with the original audio track
[0:a][voice] amix=inputs=2:duration=longest [audio_out]
Step3 Map the video and audio tracks to the output file
-map 0:v -map “[audio_out]“
Step4 Use the -y flag to overwrite the output file
-y output.mp4
The final command would look like this:
ffmpeg \
-i video1.mp4 -i audio1.mp3 \
-filter_complex “ \
[1:a] adelay=2100|2100 [voice]; \
[0:a][voice] amix=inputs=2:duration=longest [audio_out] \
“ \
-map 0:v -map “[audio_out]“ \
-y output.mp4
This command will delay the audio track by 2100 milliseconds and then mix it with the original audio track, resulting in a new video file with the delayed audio.
It May Interest You - Merge Audio and Video Files With Filmora
While FFmpeg is a powerful tool for merging audio and video files, its learning curve can be steep for some users. If you’re looking for an easier option, you may consider using video editing software like Filmora.
What Is Filmora?
Wondershare Filmora is a video editing software that allows users to create professional-looking videos easily. It offers a user-friendly interface, making it an excellent option for those needing a more extensive video editing experience.
Free Download For Win 7 or later(64-bit)
Free Download For macOS 10.14 or later
This software offers an intuitive interface and a wide range of features that make it easy to merge audio and video files, even for beginners. In addition, Filmora provides various options for editing and enhancing the audio and video files, giving you more control over the final output. Filmora is a great alternative to FFmpeg for those who want to merge audio and video files quickly and easily.
How To Combine Audio and Video Files Using Filmora
Filmora is a user-friendly video editing software that allows you to easily combine audio and video files to create a polished and professional final product. So here’s the step-by-step process of combining audio and video files using Filmora.
Step1 Import audio and video files into Filmora using drag-and-drop or the “Import Media“ button.

Step2 Place the media files in the timeline and align the video with the audio.

Step3 Replace the original audio by right-clicking the video, selecting “Detach Audio,” deleting the original audio, and replacing it with new audio.

Step4 Export the final video by selecting a format and clicking “Export,” or publish directly to YouTube or burn to DVD.

People Also Ask
Here are some frequently asked questions regarding the merging function of FFmpeg and other related topics:
Q1. How To Merge Image and Video in FFmpeg?
To merge an image and a video using FFmpeg, first, use the -loop option on the image to loop it for the duration of the video, then use the overlay filter to overlay the image on the video. The command would look like this:
ffmpeg -i video.mp4 -i image.jpg -filter_complex “[0:v][1:v] overlay=0:0” -pix_fmt yuv420p -c:a copy output.mp4
This command takes the input video and image, applies the overlay filter to overlay the image on the video starting at the top left corner (0:0), and outputs the result to output.mp4. The -pix_fmt yuv420p and -c:a copy options ensure compatibility with most devices.
Q2. Can I Merge 2 MP4 Files Into 1?
Yes, you can merge two MP4 files into one using Filmora. To do this, follow these steps:
Step1 Open Filmora and import the video files
Step2 Drag the videos to the timeline
Step3 Align the second video with the first without leaving any gaps
Step4 Click “Export“ and select desired settings
Step5 Click “Export“ again to save the combined video on your computer.
Q3. How Can I Merge the Video and Subtitle?
To merge video and subtitle in Filmora, follow these steps:
Step1 Open Filmora and import your SRT subtitle file.
Step2 Place the SRT file on the timeline and right-click on it. Select “Advanced Edit“ from the options.
Step3 Adjust the subtitle’s time code, text, color, font, and other settings. When finished, choose “Export Subtitle file“ to save the changes.
Still want to learn more tricks about adding subtitles to your video? Check out the video below:
Conclusion
Using FFmpeg and Filmora, you can easily combine video with audio, merge multiple video files, and add subtitles to your videos. Both tools offer different features and learning curves, so it’s important to understand what you need before choosing one. Filmora is a great option for beginners and those who want a user-friendly interface, while FFmpeg is a powerful command-line tool for advanced users.
- “-i INPUT_FILE.mp4“ flag specifies INPUT_FILE.mp4 as the input source.
- “-i AUDIO.wav,” tells FFmpeg to take AUDIO.wav as an input source.
- The “-c:v copy“ flag is a short form of “-codec:v copy,” which means to copy the video stream from the source files to the destination file.
- The “-c:a aac“ flag means selecting all the audio streams from the source files and then encoding them with the AAC encoder.
- “mp4“ specifies the name of the output file.
Step3 In case you don’t want any audio conversion, drop the aac part in the command and replace it with copy; the command would look like this:
ffmpeg -i INPUT_FILE.mp4 -i AUDIO.aac -c:v copy -c:a copy OUTPUT_FILE.mp4
-->
How To Combine Video With Two Audio Using FFmpeg
Are you looking to add multiple audio tracks to your video? With FFmpeg, you can easily combine video with two audio streams. Whether creating a foreign-language version of your video or adding an alternate audio track, this method will help you achieve professional results. This section will guide you through combining video with two audio streams using FFmpeg’s command-line interface. So, let’s get started!
Mixing Two Audios Into a Video
Combining multiple audio tracks into one video can be done easily with FFmpeg’s command-line interface. In this example, we will combine two audio tracks into one video so that the voiceover will play over the background music. Here’s the step-by-step process:
Step1 Open your command prompt or terminal and navigate to the directory where your video and audio files are located.
Step2 Replace “video1.mp4“ and “audio1.mp3“ with the names of your actual video and audio files.
ffmpeg \
-i video1.mp4 -i audio1.mp3 \
Step3 The -c:v copy flag tells FFmpeg to copy the video stream from the source file without re-encoding it. This helps to speed up the process and avoid quality loss.
-c:v copy \
-filter_complex “ \
Step4 The command “amix=inputs=2:duration=longest“ tells amix to accept 2 inputs (0:a and 1:a) and combine them into an output stream called audio_out, with the duration of the longest input.
[0:a][1:a] amix=inputs=2:duration=longest [audio_out] \
Step5 Map the video stream (0:v) and the mixed audio stream (audio_out) into the final output video.
-map 0:v -map “[audio_out]“ \
Step6 The -y flag tells FFmpeg to overwrite the output file if it already exists.
-y output.mp4
Once complete, you’ll find the newly created video file with the mixed audio in the specified output location.
Mixing Two Audios Into a Video Adjusting Volume
We will be taking a step further and show you how to merge two audio tracks into a video while adjusting the volume of one of the audio tracks. This can be useful when you want to emphasize one audio track over the other, for example, to make the voiceover more prominent in a video.
And here’s the step-by-step process:
Step1 Start the command by specifying the input files.
ffmpeg \
-i video1.mp4 -i audio1.mp3 \
Step2 Use the filter_complex option to specify a filter graph.
-filter_complex “ \
[0:a] volume=0.5 [music];
Step3 Use the amix filter to take the “music“ stream and audio1.mp3 and mix them.
[music][1:a] amix=inputs=2:duration=longest [audio_out] \
“ \
Step4 Use the map option to specify which streams from the input files should be included in the output file.
-map 0:v -map “[audio_out]“ \
Step5 Specify the output file name as “output.mp4“ and the -y flag to overwrite the output file without asking for confirmation if it already exists.
-y output.mp4
Mixing Two Audios Into a Video With Delay
When creating videos, sometimes the audio needs to be synced with the video, or you want to add a delay to the audio track. Here’s how to add delay to an audio track using FFmpeg.
Step1 Use the adelay filter to add delay to the audio track.
[1:a] adelay=2100|2100 [voice];
Step2 Mix the delayed audio track with the original audio track
[0:a][voice] amix=inputs=2:duration=longest [audio_out]
Step3 Map the video and audio tracks to the output file
-map 0:v -map “[audio_out]“
Step4 Use the -y flag to overwrite the output file
-y output.mp4
The final command would look like this:
ffmpeg \
-i video1.mp4 -i audio1.mp3 \
-filter_complex “ \
[1:a] adelay=2100|2100 [voice]; \
[0:a][voice] amix=inputs=2:duration=longest [audio_out] \
“ \
-map 0:v -map “[audio_out]“ \
-y output.mp4
This command will delay the audio track by 2100 milliseconds and then mix it with the original audio track, resulting in a new video file with the delayed audio.
It May Interest You - Merge Audio and Video Files With Filmora
While FFmpeg is a powerful tool for merging audio and video files, its learning curve can be steep for some users. If you’re looking for an easier option, you may consider using video editing software like Filmora.
What Is Filmora?
Wondershare Filmora is a video editing software that allows users to create professional-looking videos easily. It offers a user-friendly interface, making it an excellent option for those needing a more extensive video editing experience.
Free Download For Win 7 or later(64-bit)
Free Download For macOS 10.14 or later
This software offers an intuitive interface and a wide range of features that make it easy to merge audio and video files, even for beginners. In addition, Filmora provides various options for editing and enhancing the audio and video files, giving you more control over the final output. Filmora is a great alternative to FFmpeg for those who want to merge audio and video files quickly and easily.
How To Combine Audio and Video Files Using Filmora
Filmora is a user-friendly video editing software that allows you to easily combine audio and video files to create a polished and professional final product. So here’s the step-by-step process of combining audio and video files using Filmora.
Step1 Import audio and video files into Filmora using drag-and-drop or the “Import Media“ button.

Step2 Place the media files in the timeline and align the video with the audio.

Step3 Replace the original audio by right-clicking the video, selecting “Detach Audio,” deleting the original audio, and replacing it with new audio.

Step4 Export the final video by selecting a format and clicking “Export,” or publish directly to YouTube or burn to DVD.

People Also Ask
Here are some frequently asked questions regarding the merging function of FFmpeg and other related topics:
Q1. How To Merge Image and Video in FFmpeg?
To merge an image and a video using FFmpeg, first, use the -loop option on the image to loop it for the duration of the video, then use the overlay filter to overlay the image on the video. The command would look like this:
ffmpeg -i video.mp4 -i image.jpg -filter_complex “[0:v][1:v] overlay=0:0” -pix_fmt yuv420p -c:a copy output.mp4
This command takes the input video and image, applies the overlay filter to overlay the image on the video starting at the top left corner (0:0), and outputs the result to output.mp4. The -pix_fmt yuv420p and -c:a copy options ensure compatibility with most devices.
Q2. Can I Merge 2 MP4 Files Into 1?
Yes, you can merge two MP4 files into one using Filmora. To do this, follow these steps:
Step1 Open Filmora and import the video files
Step2 Drag the videos to the timeline
Step3 Align the second video with the first without leaving any gaps
Step4 Click “Export“ and select desired settings
Step5 Click “Export“ again to save the combined video on your computer.
Q3. How Can I Merge the Video and Subtitle?
To merge video and subtitle in Filmora, follow these steps:
Step1 Open Filmora and import your SRT subtitle file.
Step2 Place the SRT file on the timeline and right-click on it. Select “Advanced Edit“ from the options.
Step3 Adjust the subtitle’s time code, text, color, font, and other settings. When finished, choose “Export Subtitle file“ to save the changes.
Still want to learn more tricks about adding subtitles to your video? Check out the video below:
Conclusion
Using FFmpeg and Filmora, you can easily combine video with audio, merge multiple video files, and add subtitles to your videos. Both tools offer different features and learning curves, so it’s important to understand what you need before choosing one. Filmora is a great option for beginners and those who want a user-friendly interface, while FFmpeg is a powerful command-line tool for advanced users.
Color Match Game Top Tips for You
Color Match Game Top Tips for You
An easy yet powerful editor
Numerous effects to choose from
Detailed tutorials provided by the official channel
A child is like a soft, unmolded clay; how you shape them, they will acquire precisely those features. And so, it is necessary to introduce them to the different and crucial tasks and activities that are beneficial for them.
And one of the various tasks is the Color Match Game which helps them get introduced to and familiar with the different colors. Children need something fun and exciting every time, and so, when you make them learn the color through a game, they learn about the color with enthusiasm and will.
We have put forth the following discussion about this fun activity; including the name of the six best color matching games and the best tool for it as well. So, without any further delay, let us start with our discussion.
In this article
01 [Why is Learning about Colors Useful for Children?](#Part 1)
02 [Top 6 Color Match Games](#Part 2)
03 [Where to Experience Professional Color Match Function?](#Part 3)
Part 1 Why is Learning about Colors Useful for Children?
There is always a reason behind every beneficial or a ‘must-do’ task. So, there are reasons behind introducing your child and making them aware of colours as well. So, we will be starting our discussing by understanding and discussing why it is useful for the children to learn about different colours.

The following list points out the importance of learning colours for children.
● Integrates basic knowledge
Knowing about the different colours is the basic and the most initial information that every child must have. We need colours in every instance of our lives. Therefore, it is vital for the children to learn about them from the initial stages of their lives.
So, learning about the colours integrates the basic knowledge of colours in their minds which is to stay with them throughout their lives and utilize them as and when the necessity arises.
● Offers them a means for verbal communication
When a child learns about colours, they attain a way to describe the world around them. Therefore, it helps in enhancing their method of communication. As a result, it also nurtures and improves their verbal skills to a large extent.
When they know about the colours, it inaugurates a novel hallway of set communicating and knowing about the world around them.
● Offers a way of describing the world
For the children, this world is an absolutely new place. They have been introduced to this planet quite recently and are exploring and discovering the different aspects. And one of the major aspects of the world is its colour.
So, when they learn about colours, they tend to find a way to describe the environment. It gives them a better understanding of the world and their surrounding as they learn about the colours.
● Learning to classify and sort
When a child learns about colours, they tend to learn about sorting things and classifying the different objects based on colours. For example, they might be able to separate blue balloons from the red ones from a bunch of balloons in front of them.
Though it is based on colours, they learn the process of classification and sorting, which then gets applied to the other factors in life.
● Learning about safety and health through colours
The colour red is commonly associated with danger, and the colour danger is associated with safety. And this is generalized across almost all cultures. That is commonly reflected through the traffic lights, where we stop at red colour, get ready to move in the colour tallow and the green colour gives us the signal to move or the message of being out of danger.
Also, the colour blue indicates paleness or bruises in the skin. The colour red indicates rashes or blood. So, the knowledge of colour helps the children learn about safety and health.
● Learn about association
The above point of learning about health and safety with the help of colours includes learning another important aspect in life, which is association. If a child is unable to understand that the colour red is associated with danger, green is associated with safety and the like; then the knowledge will be of no use.
So, when the child learns about colours and connects them to the different safety and health measures, they automatically learn how to associate one thing with another. This process is crucial and will benefit them throughout their lives.
● Learn about letters
Eventually, as the child learns about colours, they would spell them as well. So, as a result, they will learn how to spell different colours. That will be a way to practice spelling, and this will result in them learning about letters and words a lot more efficiently and excitingly.
Part 2 Top 6 Color Match Games
Now that we have discussed about the importance and benefits of learning colors for the kids, it is important that we know about the top six such Color Match Games that will help your children learn about learn in the most exciting way.
Here is the list of the top 6 color matching games online.
01Blendoku
Blendoku is one of the simplest yet most exciting color games for your children. This color matching game was designed based on color principles. The children are provided with a grid and blocks of varied colors in the game. Their task is to put the color blocks in their appropriate location on the grid.
Here, your children have to study the shades of the colors and arrange the color blocks to show lighter shades to the darker shades. The game includes four levels, and you can play each of them whenever you want. The levels are simple, medium, hard and master level.

02Pigments
Pigments is an exciting game that involves creativity and skills as well. In this game, one needs to mix two primary colors to form a secondary color. And then, the secondary color they create is the color of the pigment they need to strike away.
For example, in the game, you can mix yellow and blue colors, which are primary colors, which will form the color blue, a secondary color. And then, you will have to stroke off the blue color. It gives your kids a chance to explore, be creative and learn the vast sphere of colors, hues and shades.

03Color Kids: Coloring Game
Color Kids: Coloring Game is the best coloring video game for kids. The concept of this game is simple. It requires your children to color the different shapes. The design of the game is simple and emphasizes the matching, tracing, and building skills essential for your kids.

04I Love Hue
I Love Hue is the prettiest color matching game online based on arranging the colour tiles based on their shades, similar to that of Blendoku. You get a specified time limit or a particular number of lives for the game.
So, along with the knowledge of colors, your kids can also gain time management from the very initial levels of their lives.

05Polyforge
Polyforge has a fantastic outlook, and it deals with it just colors but also geometrical shapes. Thus, one gets to know about the different hues and at the same time about the shapes as well. This game also acts as a way of bringing peace and relaxation. So, this color matching game is a multi-purpose game indeed!

06Kami
Kami is a Japanese art-styled, origami puzzle game involving colors. Here, adding to the unique art style of the game, there is soothing Japanese zen music that relaxes. The rule of the game is pretty simple. One has to turn the papers into the same color.

Part 3 Where to Experience Professional Color Match Function?
Did you know you too can play with colors, match them and create incredible videos? And that is possible through the most wonderful video editing tool- Wondershare Filmora Video Editor . Its “Color Match” feature enables you to color correct the videos effectively and here are the steps for it.
● Drag the photos or the videos you want to edit
● Choose the portion of the video you want to edit and select the “Color Match” feature
● Opt for a frame as a reference page and then click on the “Match” option.
● You can compare and edit the video’s color settings or the image after using the “Color Match” function and make your videos and photos the way you want!
For Win 7 or later (64-bit)
For macOS 10.12 or later
● Key Takeaways from This Episode →
● In the above discussion, we have enveloped the following topics.
● We discussed why it is necessary for the kids to be introduced to colors, why it is essential to learn about the use of colors, and how this knowledge will benefit them in their lives.
● Next, we discussed the top 6 color matching games online that are fun, exciting and interesting to play.
● Lastly, we introduced Filmora 1which can help you create beautiful videos and edit them in the most creative and colorful way you want through its color match function!
A child is like a soft, unmolded clay; how you shape them, they will acquire precisely those features. And so, it is necessary to introduce them to the different and crucial tasks and activities that are beneficial for them.
And one of the various tasks is the Color Match Game which helps them get introduced to and familiar with the different colors. Children need something fun and exciting every time, and so, when you make them learn the color through a game, they learn about the color with enthusiasm and will.
We have put forth the following discussion about this fun activity; including the name of the six best color matching games and the best tool for it as well. So, without any further delay, let us start with our discussion.
In this article
01 [Why is Learning about Colors Useful for Children?](#Part 1)
02 [Top 6 Color Match Games](#Part 2)
03 [Where to Experience Professional Color Match Function?](#Part 3)
Part 1 Why is Learning about Colors Useful for Children?
There is always a reason behind every beneficial or a ‘must-do’ task. So, there are reasons behind introducing your child and making them aware of colours as well. So, we will be starting our discussing by understanding and discussing why it is useful for the children to learn about different colours.

The following list points out the importance of learning colours for children.
● Integrates basic knowledge
Knowing about the different colours is the basic and the most initial information that every child must have. We need colours in every instance of our lives. Therefore, it is vital for the children to learn about them from the initial stages of their lives.
So, learning about the colours integrates the basic knowledge of colours in their minds which is to stay with them throughout their lives and utilize them as and when the necessity arises.
● Offers them a means for verbal communication
When a child learns about colours, they attain a way to describe the world around them. Therefore, it helps in enhancing their method of communication. As a result, it also nurtures and improves their verbal skills to a large extent.
When they know about the colours, it inaugurates a novel hallway of set communicating and knowing about the world around them.
● Offers a way of describing the world
For the children, this world is an absolutely new place. They have been introduced to this planet quite recently and are exploring and discovering the different aspects. And one of the major aspects of the world is its colour.
So, when they learn about colours, they tend to find a way to describe the environment. It gives them a better understanding of the world and their surrounding as they learn about the colours.
● Learning to classify and sort
When a child learns about colours, they tend to learn about sorting things and classifying the different objects based on colours. For example, they might be able to separate blue balloons from the red ones from a bunch of balloons in front of them.
Though it is based on colours, they learn the process of classification and sorting, which then gets applied to the other factors in life.
● Learning about safety and health through colours
The colour red is commonly associated with danger, and the colour danger is associated with safety. And this is generalized across almost all cultures. That is commonly reflected through the traffic lights, where we stop at red colour, get ready to move in the colour tallow and the green colour gives us the signal to move or the message of being out of danger.
Also, the colour blue indicates paleness or bruises in the skin. The colour red indicates rashes or blood. So, the knowledge of colour helps the children learn about safety and health.
● Learn about association
The above point of learning about health and safety with the help of colours includes learning another important aspect in life, which is association. If a child is unable to understand that the colour red is associated with danger, green is associated with safety and the like; then the knowledge will be of no use.
So, when the child learns about colours and connects them to the different safety and health measures, they automatically learn how to associate one thing with another. This process is crucial and will benefit them throughout their lives.
● Learn about letters
Eventually, as the child learns about colours, they would spell them as well. So, as a result, they will learn how to spell different colours. That will be a way to practice spelling, and this will result in them learning about letters and words a lot more efficiently and excitingly.
Part 2 Top 6 Color Match Games
Now that we have discussed about the importance and benefits of learning colors for the kids, it is important that we know about the top six such Color Match Games that will help your children learn about learn in the most exciting way.
Here is the list of the top 6 color matching games online.
01Blendoku
Blendoku is one of the simplest yet most exciting color games for your children. This color matching game was designed based on color principles. The children are provided with a grid and blocks of varied colors in the game. Their task is to put the color blocks in their appropriate location on the grid.
Here, your children have to study the shades of the colors and arrange the color blocks to show lighter shades to the darker shades. The game includes four levels, and you can play each of them whenever you want. The levels are simple, medium, hard and master level.

02Pigments
Pigments is an exciting game that involves creativity and skills as well. In this game, one needs to mix two primary colors to form a secondary color. And then, the secondary color they create is the color of the pigment they need to strike away.
For example, in the game, you can mix yellow and blue colors, which are primary colors, which will form the color blue, a secondary color. And then, you will have to stroke off the blue color. It gives your kids a chance to explore, be creative and learn the vast sphere of colors, hues and shades.

03Color Kids: Coloring Game
Color Kids: Coloring Game is the best coloring video game for kids. The concept of this game is simple. It requires your children to color the different shapes. The design of the game is simple and emphasizes the matching, tracing, and building skills essential for your kids.

04I Love Hue
I Love Hue is the prettiest color matching game online based on arranging the colour tiles based on their shades, similar to that of Blendoku. You get a specified time limit or a particular number of lives for the game.
So, along with the knowledge of colors, your kids can also gain time management from the very initial levels of their lives.

05Polyforge
Polyforge has a fantastic outlook, and it deals with it just colors but also geometrical shapes. Thus, one gets to know about the different hues and at the same time about the shapes as well. This game also acts as a way of bringing peace and relaxation. So, this color matching game is a multi-purpose game indeed!

06Kami
Kami is a Japanese art-styled, origami puzzle game involving colors. Here, adding to the unique art style of the game, there is soothing Japanese zen music that relaxes. The rule of the game is pretty simple. One has to turn the papers into the same color.

Part 3 Where to Experience Professional Color Match Function?
Did you know you too can play with colors, match them and create incredible videos? And that is possible through the most wonderful video editing tool- Wondershare Filmora Video Editor . Its “Color Match” feature enables you to color correct the videos effectively and here are the steps for it.
● Drag the photos or the videos you want to edit
● Choose the portion of the video you want to edit and select the “Color Match” feature
● Opt for a frame as a reference page and then click on the “Match” option.
● You can compare and edit the video’s color settings or the image after using the “Color Match” function and make your videos and photos the way you want!
For Win 7 or later (64-bit)
For macOS 10.12 or later
● Key Takeaways from This Episode →
● In the above discussion, we have enveloped the following topics.
● We discussed why it is necessary for the kids to be introduced to colors, why it is essential to learn about the use of colors, and how this knowledge will benefit them in their lives.
● Next, we discussed the top 6 color matching games online that are fun, exciting and interesting to play.
● Lastly, we introduced Filmora 1which can help you create beautiful videos and edit them in the most creative and colorful way you want through its color match function!
A child is like a soft, unmolded clay; how you shape them, they will acquire precisely those features. And so, it is necessary to introduce them to the different and crucial tasks and activities that are beneficial for them.
And one of the various tasks is the Color Match Game which helps them get introduced to and familiar with the different colors. Children need something fun and exciting every time, and so, when you make them learn the color through a game, they learn about the color with enthusiasm and will.
We have put forth the following discussion about this fun activity; including the name of the six best color matching games and the best tool for it as well. So, without any further delay, let us start with our discussion.
In this article
01 [Why is Learning about Colors Useful for Children?](#Part 1)
02 [Top 6 Color Match Games](#Part 2)
03 [Where to Experience Professional Color Match Function?](#Part 3)
Part 1 Why is Learning about Colors Useful for Children?
There is always a reason behind every beneficial or a ‘must-do’ task. So, there are reasons behind introducing your child and making them aware of colours as well. So, we will be starting our discussing by understanding and discussing why it is useful for the children to learn about different colours.

The following list points out the importance of learning colours for children.
● Integrates basic knowledge
Knowing about the different colours is the basic and the most initial information that every child must have. We need colours in every instance of our lives. Therefore, it is vital for the children to learn about them from the initial stages of their lives.
So, learning about the colours integrates the basic knowledge of colours in their minds which is to stay with them throughout their lives and utilize them as and when the necessity arises.
● Offers them a means for verbal communication
When a child learns about colours, they attain a way to describe the world around them. Therefore, it helps in enhancing their method of communication. As a result, it also nurtures and improves their verbal skills to a large extent.
When they know about the colours, it inaugurates a novel hallway of set communicating and knowing about the world around them.
● Offers a way of describing the world
For the children, this world is an absolutely new place. They have been introduced to this planet quite recently and are exploring and discovering the different aspects. And one of the major aspects of the world is its colour.
So, when they learn about colours, they tend to find a way to describe the environment. It gives them a better understanding of the world and their surrounding as they learn about the colours.
● Learning to classify and sort
When a child learns about colours, they tend to learn about sorting things and classifying the different objects based on colours. For example, they might be able to separate blue balloons from the red ones from a bunch of balloons in front of them.
Though it is based on colours, they learn the process of classification and sorting, which then gets applied to the other factors in life.
● Learning about safety and health through colours
The colour red is commonly associated with danger, and the colour danger is associated with safety. And this is generalized across almost all cultures. That is commonly reflected through the traffic lights, where we stop at red colour, get ready to move in the colour tallow and the green colour gives us the signal to move or the message of being out of danger.
Also, the colour blue indicates paleness or bruises in the skin. The colour red indicates rashes or blood. So, the knowledge of colour helps the children learn about safety and health.
● Learn about association
The above point of learning about health and safety with the help of colours includes learning another important aspect in life, which is association. If a child is unable to understand that the colour red is associated with danger, green is associated with safety and the like; then the knowledge will be of no use.
So, when the child learns about colours and connects them to the different safety and health measures, they automatically learn how to associate one thing with another. This process is crucial and will benefit them throughout their lives.
● Learn about letters
Eventually, as the child learns about colours, they would spell them as well. So, as a result, they will learn how to spell different colours. That will be a way to practice spelling, and this will result in them learning about letters and words a lot more efficiently and excitingly.
Part 2 Top 6 Color Match Games
Now that we have discussed about the importance and benefits of learning colors for the kids, it is important that we know about the top six such Color Match Games that will help your children learn about learn in the most exciting way.
Here is the list of the top 6 color matching games online.
01Blendoku
Blendoku is one of the simplest yet most exciting color games for your children. This color matching game was designed based on color principles. The children are provided with a grid and blocks of varied colors in the game. Their task is to put the color blocks in their appropriate location on the grid.
Here, your children have to study the shades of the colors and arrange the color blocks to show lighter shades to the darker shades. The game includes four levels, and you can play each of them whenever you want. The levels are simple, medium, hard and master level.

02Pigments
Pigments is an exciting game that involves creativity and skills as well. In this game, one needs to mix two primary colors to form a secondary color. And then, the secondary color they create is the color of the pigment they need to strike away.
For example, in the game, you can mix yellow and blue colors, which are primary colors, which will form the color blue, a secondary color. And then, you will have to stroke off the blue color. It gives your kids a chance to explore, be creative and learn the vast sphere of colors, hues and shades.

03Color Kids: Coloring Game
Color Kids: Coloring Game is the best coloring video game for kids. The concept of this game is simple. It requires your children to color the different shapes. The design of the game is simple and emphasizes the matching, tracing, and building skills essential for your kids.

04I Love Hue
I Love Hue is the prettiest color matching game online based on arranging the colour tiles based on their shades, similar to that of Blendoku. You get a specified time limit or a particular number of lives for the game.
So, along with the knowledge of colors, your kids can also gain time management from the very initial levels of their lives.

05Polyforge
Polyforge has a fantastic outlook, and it deals with it just colors but also geometrical shapes. Thus, one gets to know about the different hues and at the same time about the shapes as well. This game also acts as a way of bringing peace and relaxation. So, this color matching game is a multi-purpose game indeed!

06Kami
Kami is a Japanese art-styled, origami puzzle game involving colors. Here, adding to the unique art style of the game, there is soothing Japanese zen music that relaxes. The rule of the game is pretty simple. One has to turn the papers into the same color.

Part 3 Where to Experience Professional Color Match Function?
Did you know you too can play with colors, match them and create incredible videos? And that is possible through the most wonderful video editing tool- Wondershare Filmora Video Editor . Its “Color Match” feature enables you to color correct the videos effectively and here are the steps for it.
● Drag the photos or the videos you want to edit
● Choose the portion of the video you want to edit and select the “Color Match” feature
● Opt for a frame as a reference page and then click on the “Match” option.
● You can compare and edit the video’s color settings or the image after using the “Color Match” function and make your videos and photos the way you want!
For Win 7 or later (64-bit)
For macOS 10.12 or later
● Key Takeaways from This Episode →
● In the above discussion, we have enveloped the following topics.
● We discussed why it is necessary for the kids to be introduced to colors, why it is essential to learn about the use of colors, and how this knowledge will benefit them in their lives.
● Next, we discussed the top 6 color matching games online that are fun, exciting and interesting to play.
● Lastly, we introduced Filmora 1which can help you create beautiful videos and edit them in the most creative and colorful way you want through its color match function!
A child is like a soft, unmolded clay; how you shape them, they will acquire precisely those features. And so, it is necessary to introduce them to the different and crucial tasks and activities that are beneficial for them.
And one of the various tasks is the Color Match Game which helps them get introduced to and familiar with the different colors. Children need something fun and exciting every time, and so, when you make them learn the color through a game, they learn about the color with enthusiasm and will.
We have put forth the following discussion about this fun activity; including the name of the six best color matching games and the best tool for it as well. So, without any further delay, let us start with our discussion.
In this article
01 [Why is Learning about Colors Useful for Children?](#Part 1)
02 [Top 6 Color Match Games](#Part 2)
03 [Where to Experience Professional Color Match Function?](#Part 3)
Part 1 Why is Learning about Colors Useful for Children?
There is always a reason behind every beneficial or a ‘must-do’ task. So, there are reasons behind introducing your child and making them aware of colours as well. So, we will be starting our discussing by understanding and discussing why it is useful for the children to learn about different colours.

The following list points out the importance of learning colours for children.
● Integrates basic knowledge
Knowing about the different colours is the basic and the most initial information that every child must have. We need colours in every instance of our lives. Therefore, it is vital for the children to learn about them from the initial stages of their lives.
So, learning about the colours integrates the basic knowledge of colours in their minds which is to stay with them throughout their lives and utilize them as and when the necessity arises.
● Offers them a means for verbal communication
When a child learns about colours, they attain a way to describe the world around them. Therefore, it helps in enhancing their method of communication. As a result, it also nurtures and improves their verbal skills to a large extent.
When they know about the colours, it inaugurates a novel hallway of set communicating and knowing about the world around them.
● Offers a way of describing the world
For the children, this world is an absolutely new place. They have been introduced to this planet quite recently and are exploring and discovering the different aspects. And one of the major aspects of the world is its colour.
So, when they learn about colours, they tend to find a way to describe the environment. It gives them a better understanding of the world and their surrounding as they learn about the colours.
● Learning to classify and sort
When a child learns about colours, they tend to learn about sorting things and classifying the different objects based on colours. For example, they might be able to separate blue balloons from the red ones from a bunch of balloons in front of them.
Though it is based on colours, they learn the process of classification and sorting, which then gets applied to the other factors in life.
● Learning about safety and health through colours
The colour red is commonly associated with danger, and the colour danger is associated with safety. And this is generalized across almost all cultures. That is commonly reflected through the traffic lights, where we stop at red colour, get ready to move in the colour tallow and the green colour gives us the signal to move or the message of being out of danger.
Also, the colour blue indicates paleness or bruises in the skin. The colour red indicates rashes or blood. So, the knowledge of colour helps the children learn about safety and health.
● Learn about association
The above point of learning about health and safety with the help of colours includes learning another important aspect in life, which is association. If a child is unable to understand that the colour red is associated with danger, green is associated with safety and the like; then the knowledge will be of no use.
So, when the child learns about colours and connects them to the different safety and health measures, they automatically learn how to associate one thing with another. This process is crucial and will benefit them throughout their lives.
● Learn about letters
Eventually, as the child learns about colours, they would spell them as well. So, as a result, they will learn how to spell different colours. That will be a way to practice spelling, and this will result in them learning about letters and words a lot more efficiently and excitingly.
Part 2 Top 6 Color Match Games
Now that we have discussed about the importance and benefits of learning colors for the kids, it is important that we know about the top six such Color Match Games that will help your children learn about learn in the most exciting way.
Here is the list of the top 6 color matching games online.
01Blendoku
Blendoku is one of the simplest yet most exciting color games for your children. This color matching game was designed based on color principles. The children are provided with a grid and blocks of varied colors in the game. Their task is to put the color blocks in their appropriate location on the grid.
Here, your children have to study the shades of the colors and arrange the color blocks to show lighter shades to the darker shades. The game includes four levels, and you can play each of them whenever you want. The levels are simple, medium, hard and master level.

02Pigments
Pigments is an exciting game that involves creativity and skills as well. In this game, one needs to mix two primary colors to form a secondary color. And then, the secondary color they create is the color of the pigment they need to strike away.
For example, in the game, you can mix yellow and blue colors, which are primary colors, which will form the color blue, a secondary color. And then, you will have to stroke off the blue color. It gives your kids a chance to explore, be creative and learn the vast sphere of colors, hues and shades.

03Color Kids: Coloring Game
Color Kids: Coloring Game is the best coloring video game for kids. The concept of this game is simple. It requires your children to color the different shapes. The design of the game is simple and emphasizes the matching, tracing, and building skills essential for your kids.

04I Love Hue
I Love Hue is the prettiest color matching game online based on arranging the colour tiles based on their shades, similar to that of Blendoku. You get a specified time limit or a particular number of lives for the game.
So, along with the knowledge of colors, your kids can also gain time management from the very initial levels of their lives.

05Polyforge
Polyforge has a fantastic outlook, and it deals with it just colors but also geometrical shapes. Thus, one gets to know about the different hues and at the same time about the shapes as well. This game also acts as a way of bringing peace and relaxation. So, this color matching game is a multi-purpose game indeed!

06Kami
Kami is a Japanese art-styled, origami puzzle game involving colors. Here, adding to the unique art style of the game, there is soothing Japanese zen music that relaxes. The rule of the game is pretty simple. One has to turn the papers into the same color.

Part 3 Where to Experience Professional Color Match Function?
Did you know you too can play with colors, match them and create incredible videos? And that is possible through the most wonderful video editing tool- Wondershare Filmora Video Editor . Its “Color Match” feature enables you to color correct the videos effectively and here are the steps for it.
● Drag the photos or the videos you want to edit
● Choose the portion of the video you want to edit and select the “Color Match” feature
● Opt for a frame as a reference page and then click on the “Match” option.
● You can compare and edit the video’s color settings or the image after using the “Color Match” function and make your videos and photos the way you want!
For Win 7 or later (64-bit)
For macOS 10.12 or later
● Key Takeaways from This Episode →
● In the above discussion, we have enveloped the following topics.
● We discussed why it is necessary for the kids to be introduced to colors, why it is essential to learn about the use of colors, and how this knowledge will benefit them in their lives.
● Next, we discussed the top 6 color matching games online that are fun, exciting and interesting to play.
● Lastly, we introduced Filmora 1which can help you create beautiful videos and edit them in the most creative and colorful way you want through its color match function!
Top 5 Best Video Denoisers
We all know that our recorded videos are not always perfect – when we use a mobile phone or digital cameras to shoot, our clips may contain hiss, compression and particles. These are the impurities that make our videos look uncomfortable, but it’s not a final result impossible to altar – help can come in the form of several video denoise software.
Editing is the guarantor that makes sure we can do different operations and achieve our desired results – computer programs, tools, opportunities that give us a hand in this process are kind of endless.
So, sometimes it’s really difficult to choose among so many options that come into waves. And if we choose our preferred ways, some people might not agree with us. Even so that it is quite subjective, we can still explain which tools and software we like to modify our videos, and fight with the impurities they have.
It looks amateur if the video is grainy, even if it is night shooting. We can get rid of the noise when we add lights or shoot in well-lit places, but there are some situations we can just depend on the ISO. So, for these grainy videos, there is a thing called denoising – when you get rid of the grains and make your shots as clear as possible. There are different ways to do this, and that happens in different software as well. What are the 5 best video denoisers in 2024 for us to work with? That, as we have already mentioned, might be something very subjective, but here is our selection: Wondershare Filmora, Neat Video, Shotcut, Adobe Premiere Pro, and DaVinci Resolve
Wondershare Filmora X
Wondershare Filmora X offers to change our damaged scene into something more acceptable. How to operate it? - You need to go to the Effects panel and type: “Smart Denoise”. right-click on the video and choose Edit Properties.
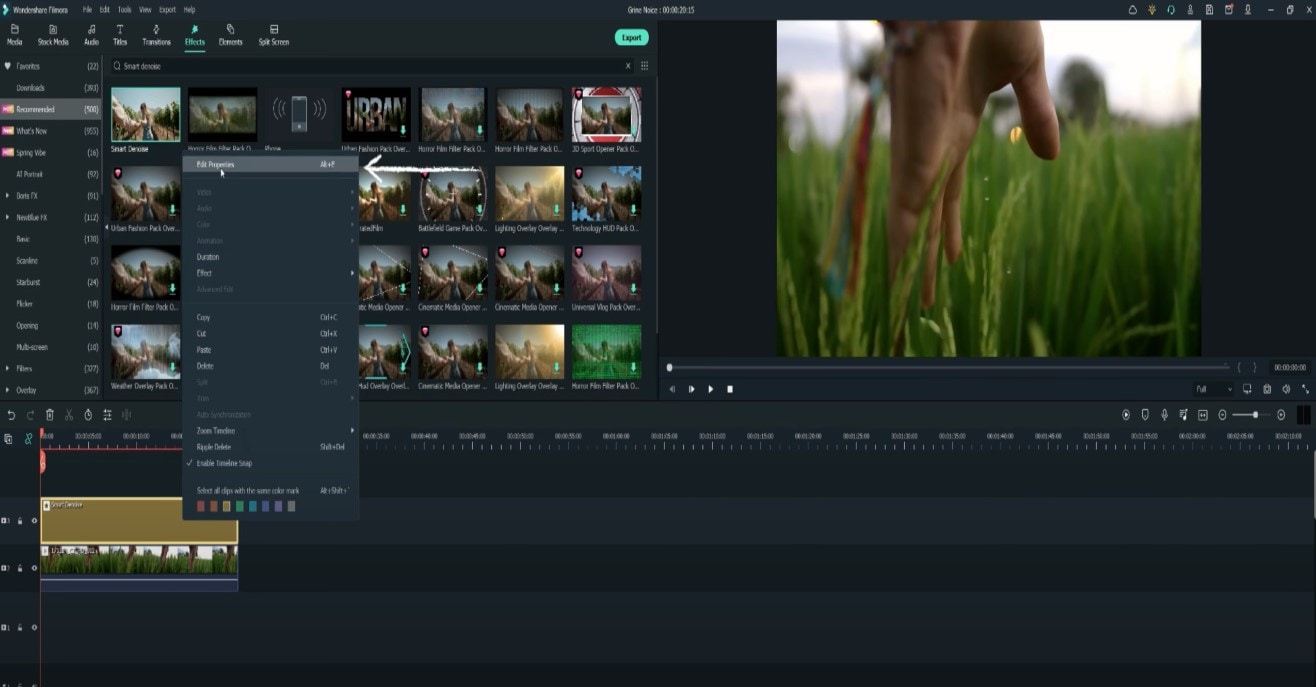
This ensures you see the Smart Denoise, where you can change opacity of the clip, threshold and radius.
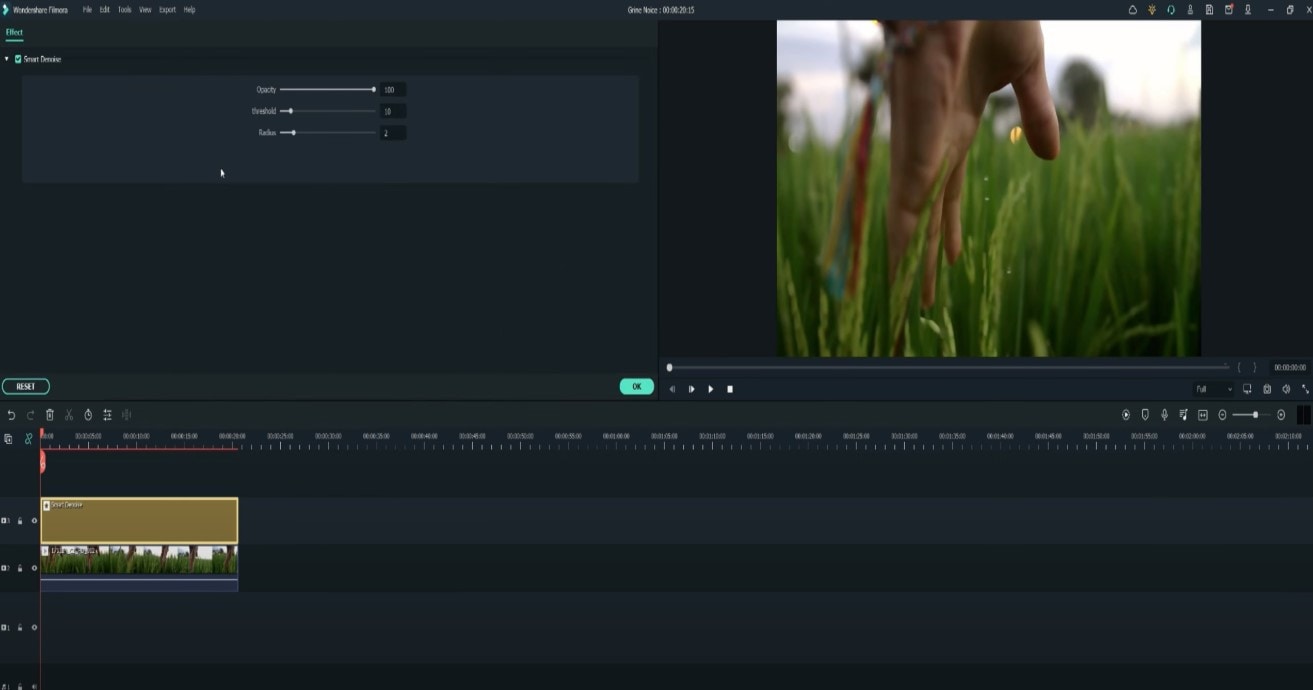
Reduce Opacity until you are satisfied with the result. The box next to Smart Denoise will show you the scene before and after the effect.
Bonus tip: Wondershare Filmora audio denoise
We already explained how video denoising works, and we will go on with our selection and explanatory article about the process, but, as we are on the Filmora topic, we might as well mention that denoising might mean another thing too – which, in this case, regards audio background noise. It means to remove unwanted hum from the audio in order for it to become more hearable. So, doing this in Wondershare Filmora works in a quite easy way. Use the guideline:
Drag and drop your video into the timeline. Right-click on the clip and hit Detach Audio, which will let you separate audio and video from one another and make sure you can work on them one by one.
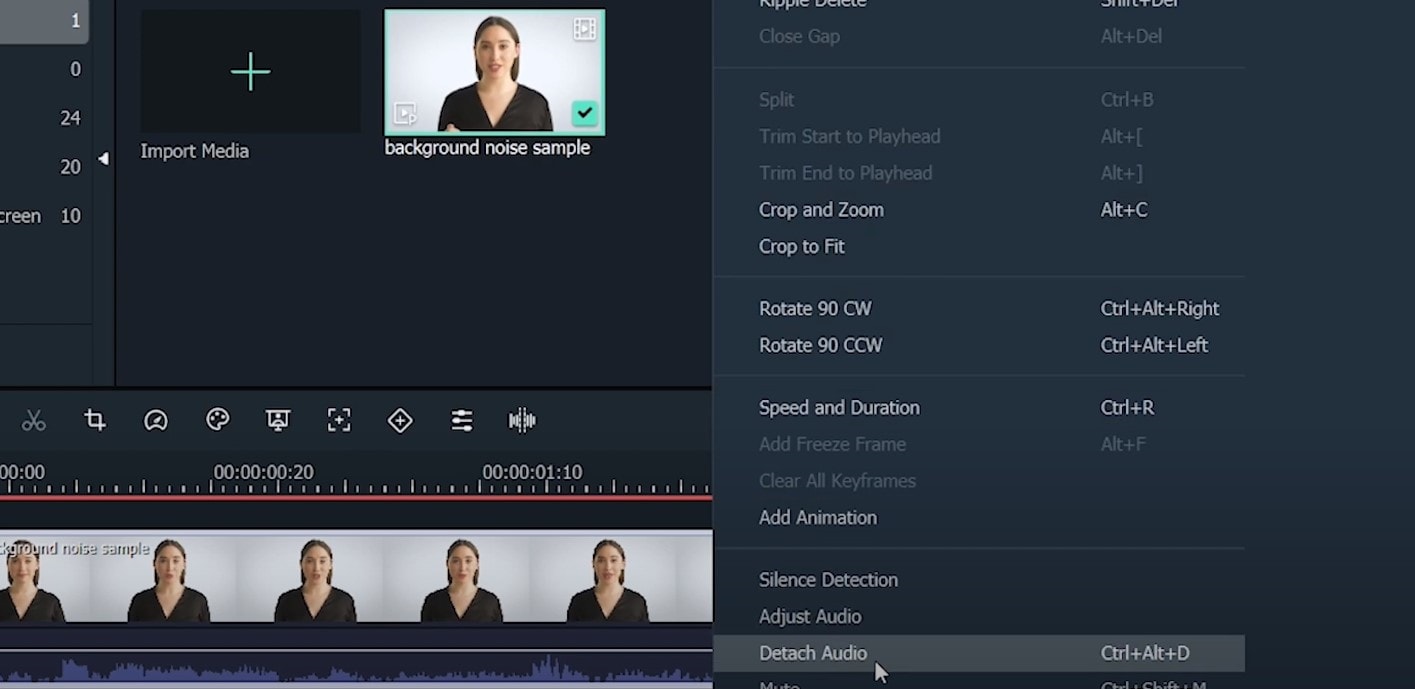
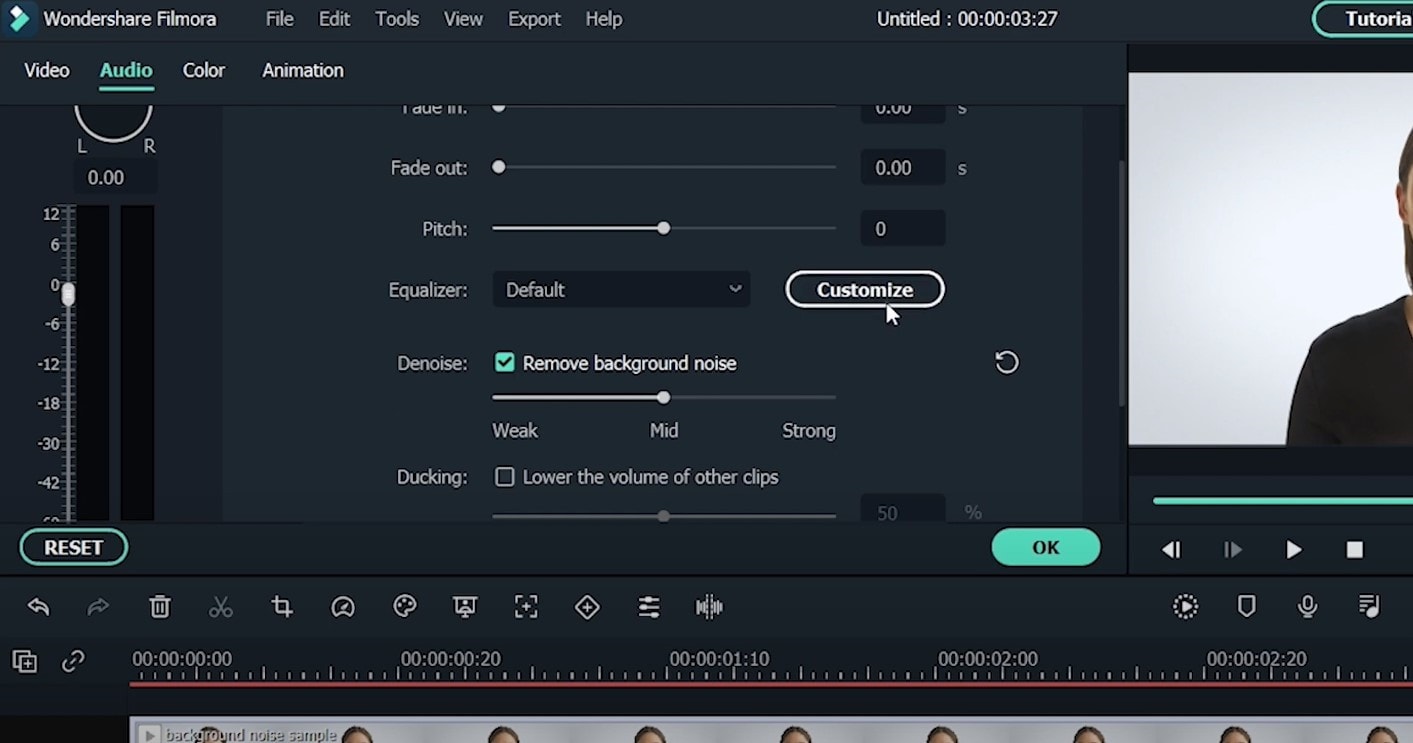
Double-click on the audio track and have access to the editing panel, where you can see Remove background noise – it is not needed to emphasize what this option does for you!
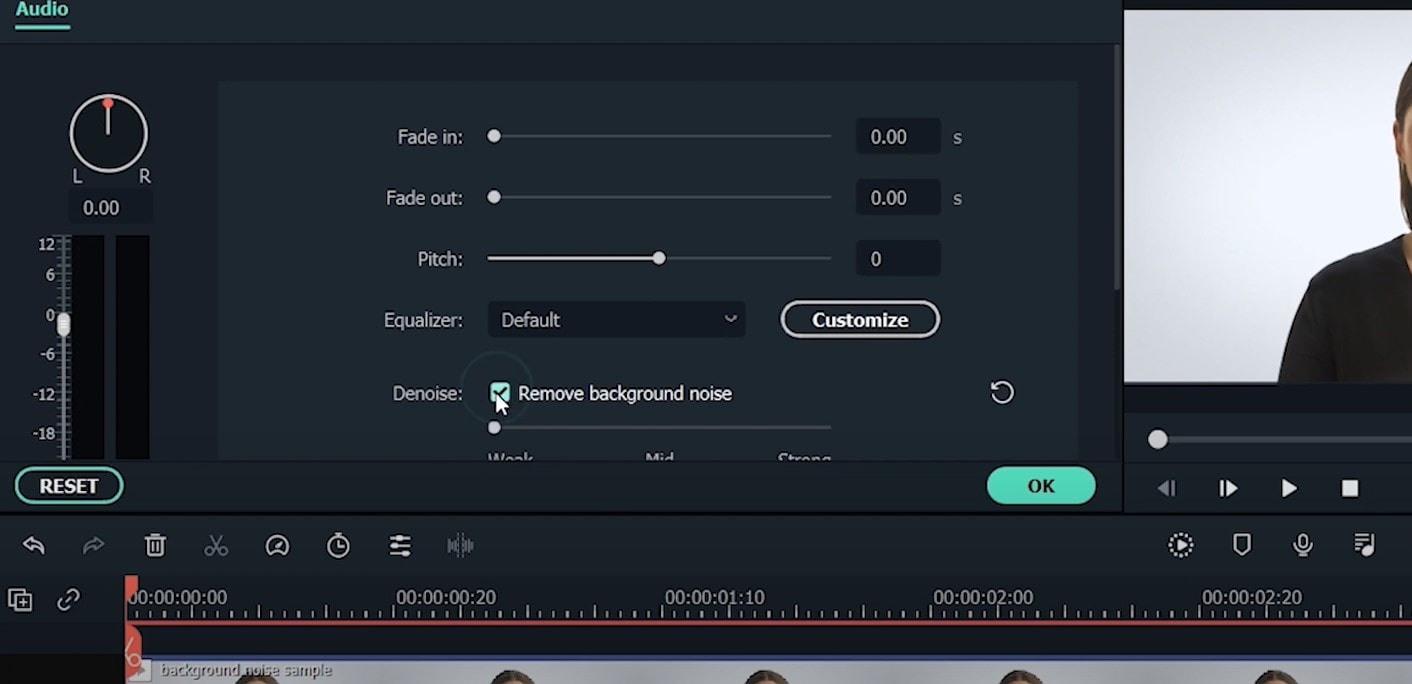
That’s it – you are done, but keep in mind that there is a second way to achieve the same result as well, but this in case you don’t want to detach the audio: Double-click on the video clip in the timeline, the editing panel opens, so switch to Audio. Checking the box next to Remove background noise will show that there are three levels – weak, mid, and strong, and of course, you can choose to your liking!
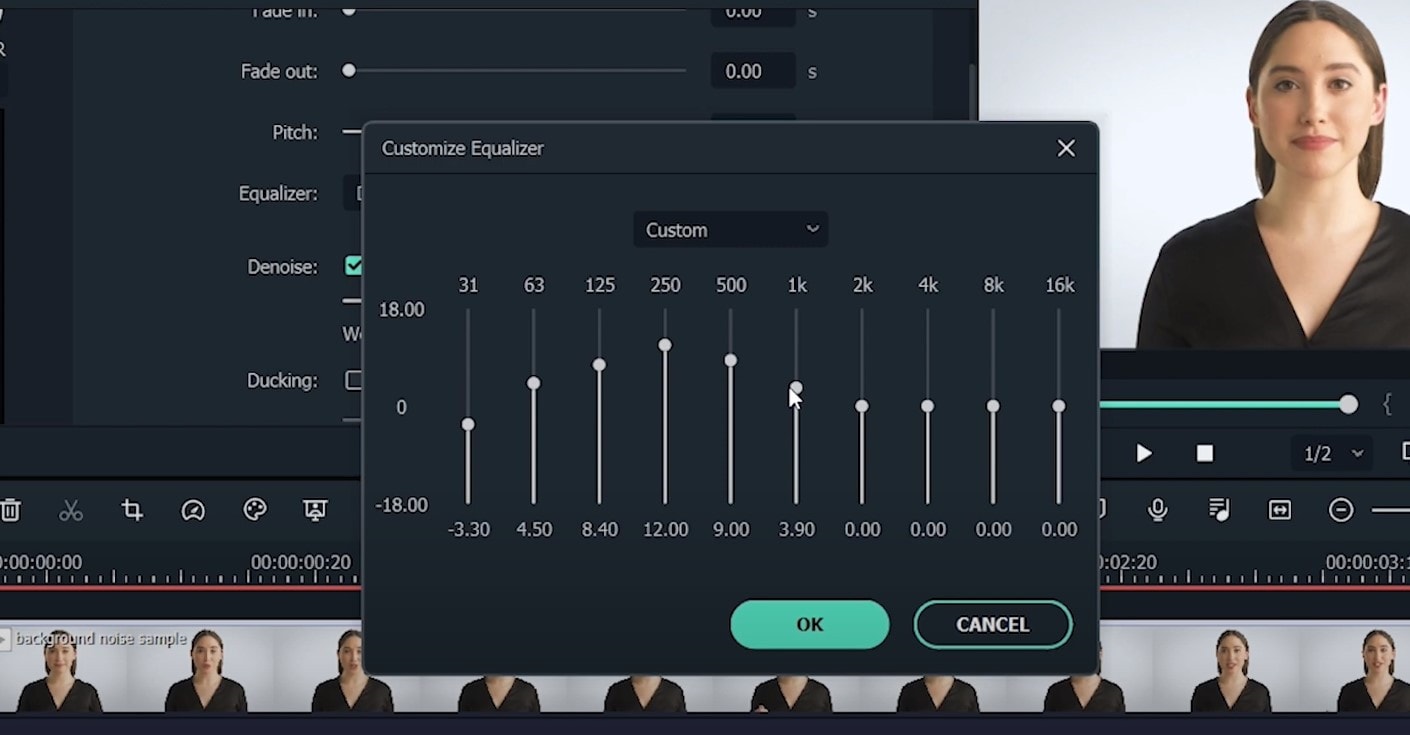
If the voice recording doesn’t sound natural anymore, you can do the following: Click on Customize and Customize Equalizer window will open.
On the left, you can see the low tunes, while the highs are on the right. Background noises are often on the left, so you can lower them to get rid of them, but in order to have a more natural sound, raise the middle ones a little – and you are done when you are content with the sound!
So, hmm… back to the original topic – denoising a video, shall we?..
Neat video
Neat Video kind of, speaks for itself… it is a powerful video editing tool suitable for Windows, macOS and Linux. It aims to reduce the digital noise, flicker, dust, scratches and other defects in the captured videos to improve the visual quality of the videos.
It is a plug-in for Premiere Pro, that does more or less what the product noise says: it makes grainy video look neater. It’s very easy to use and
How to do that in Neat Video? Here are the steps:
Find the clip you want to reduce the noise of and search for the neat video effect in the Effects Panel.
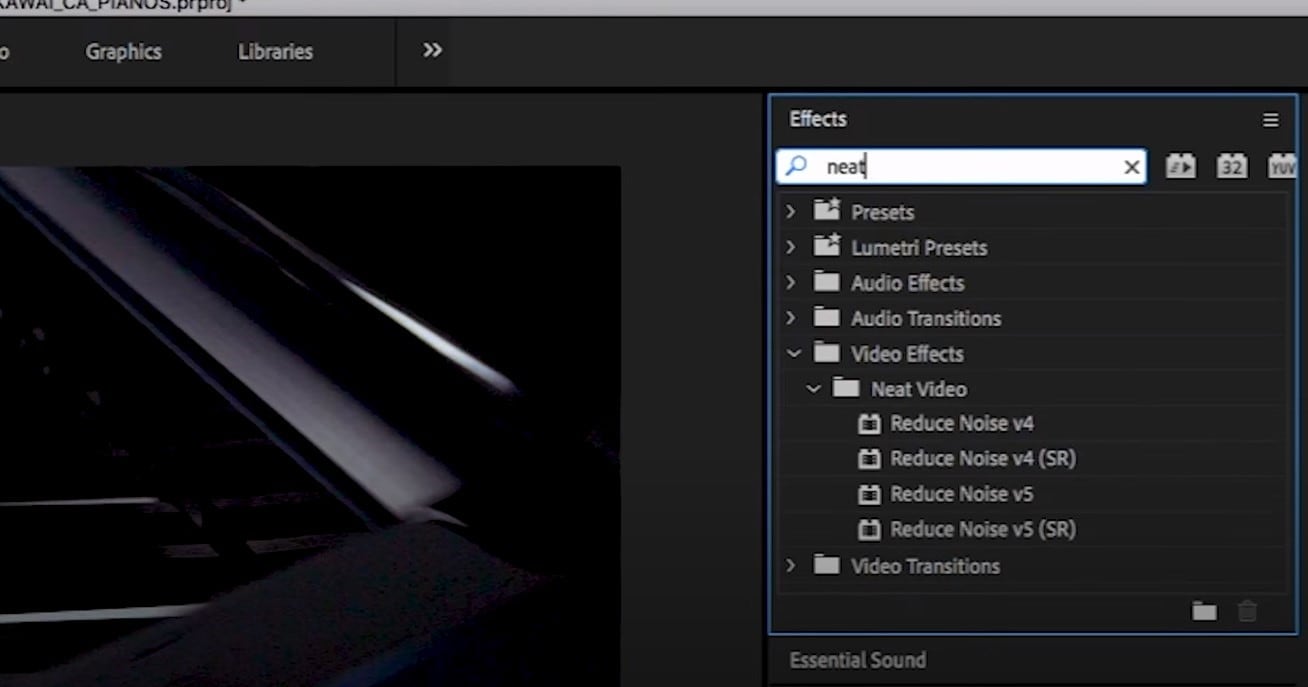
The video editors mostly use the SR version of it, because it seems faster and has kind of a better performance.
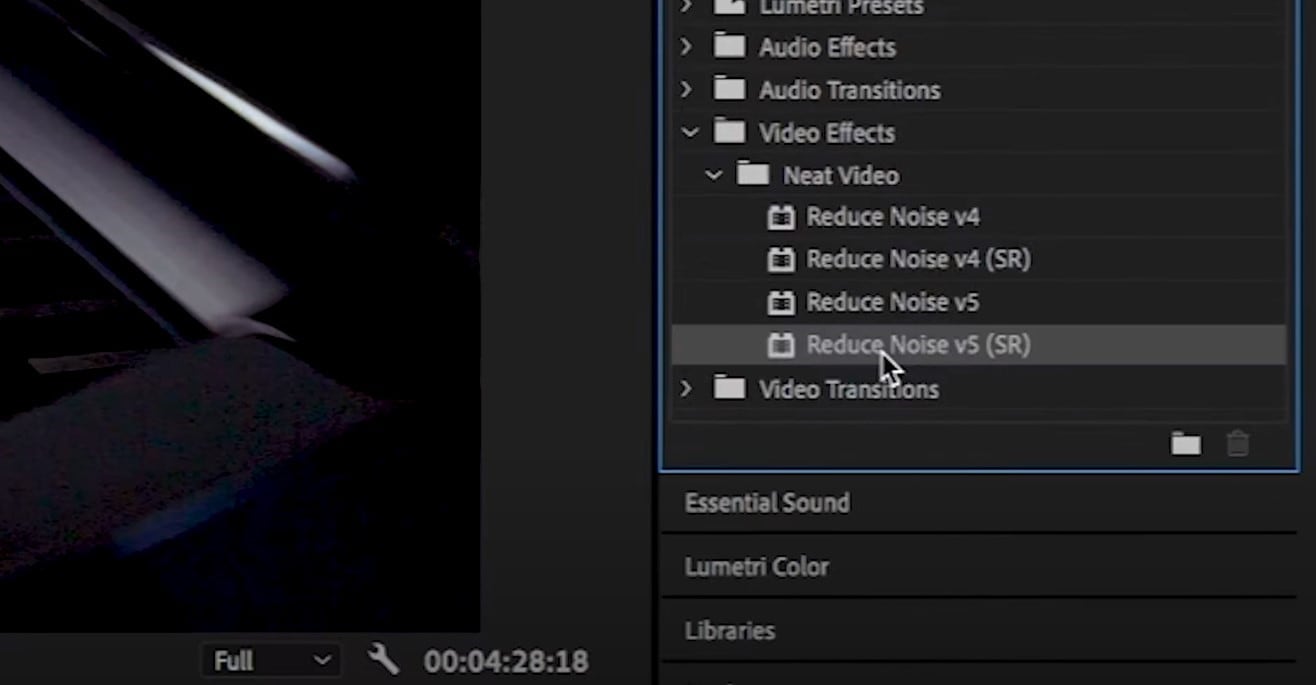
Then, you’ll have to drag the neat video plug-in to the clip to your choosing, take your attention to the Effect Controls panel on the left, and find: fx Reduce Noise v5 (SR) – press the button saying Prepare and this will open up the Build button as well, which wil open the Neat video effect window.
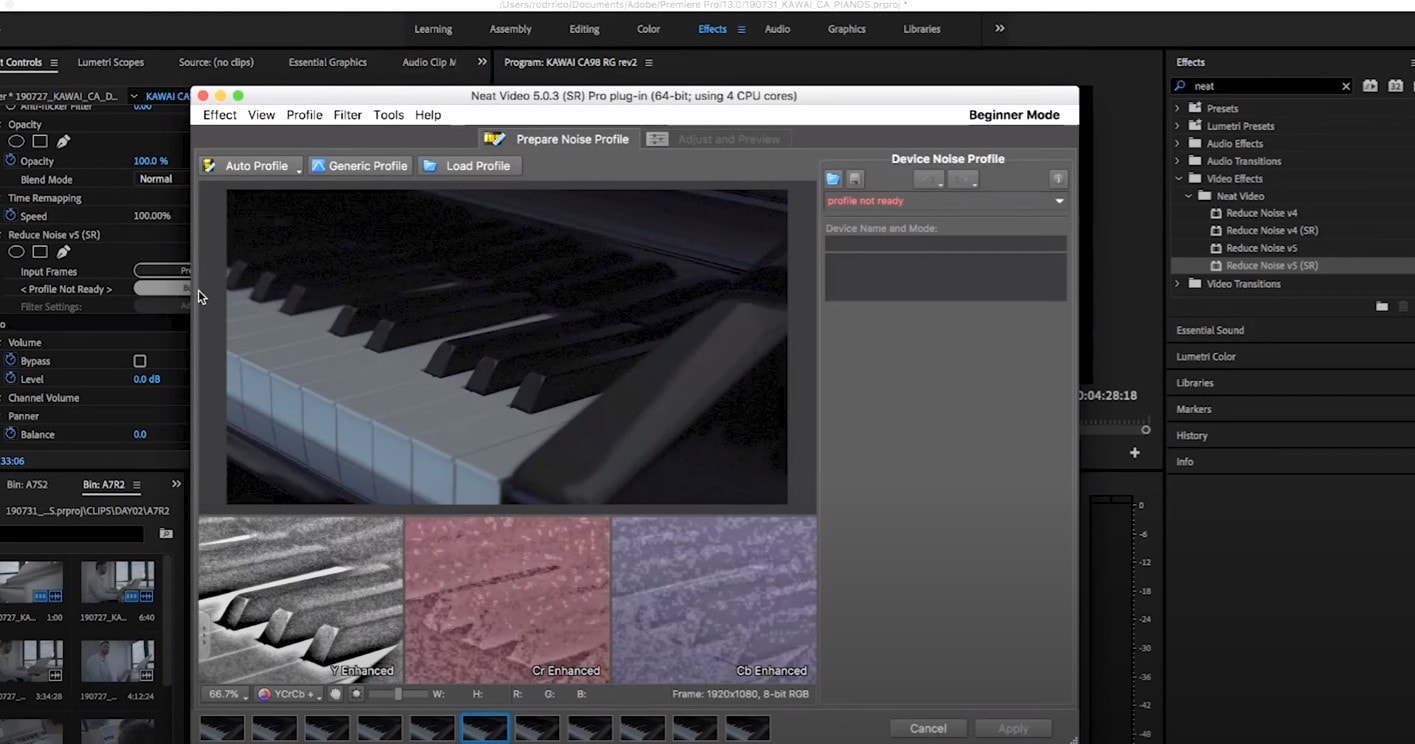
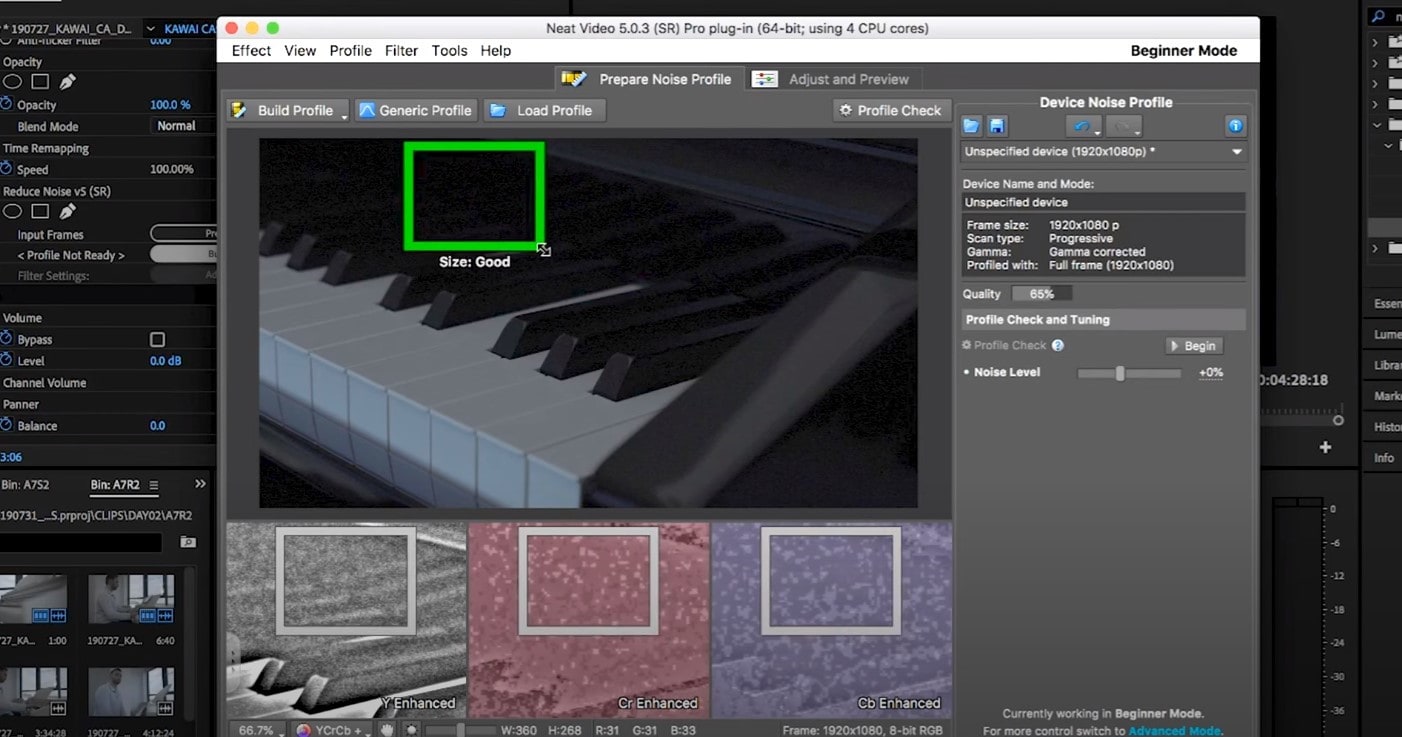
There, you’ll need to click on the Auto Profile. Selection window will appear, which you can move around the scene and resize, in order to select the noisy area of your footage. It is recommended to find the darkest or grainiest area there and select judging by this.
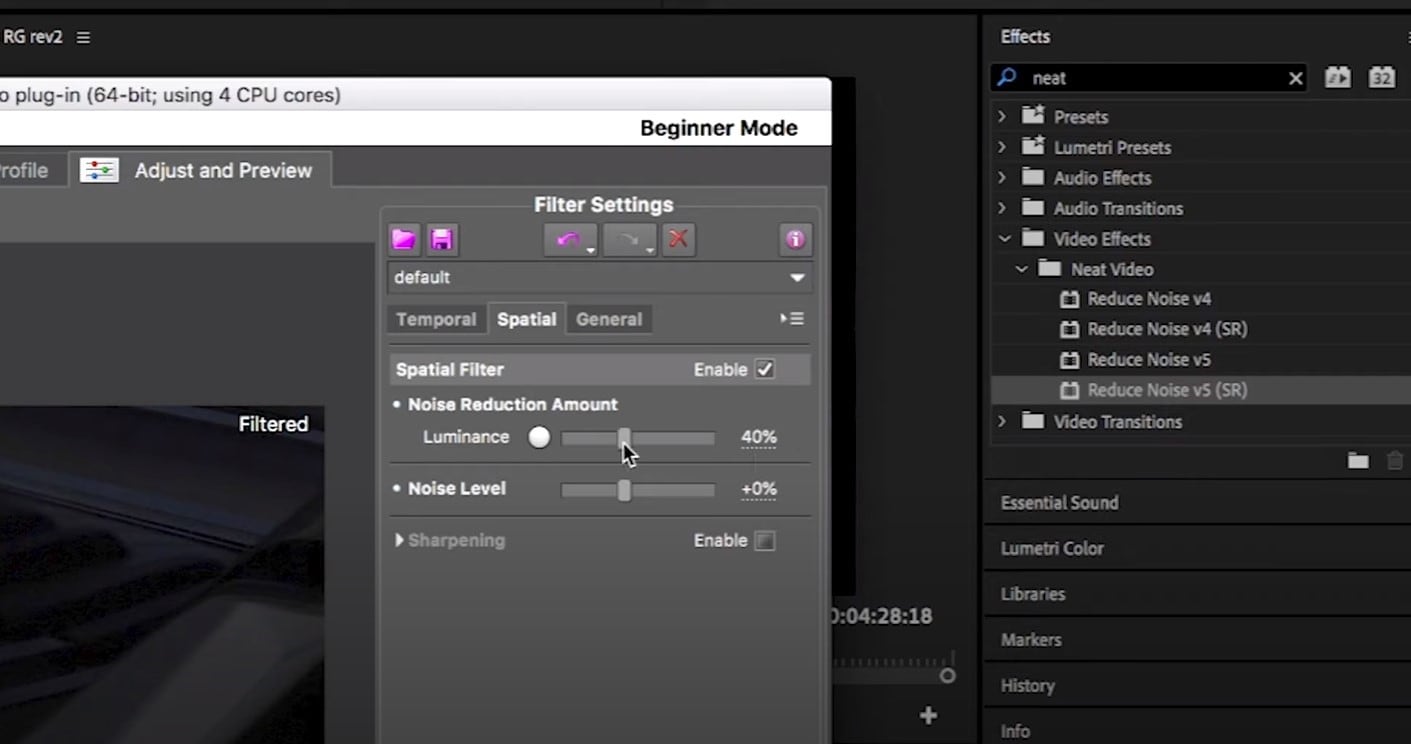
On the left side, you will find Filter Settings: under Spatial, you can play with the Noise Reduction Amount and Noise Level.
Then, you will hit Apply and – done, you can instantly see the results!
Shotcut
What about Shotcut? It is a free, open-source and cross-platform video denoiser for Windows operating system. It is also an outstanding video editor with trimming, splitting, color correction and other tools.
In order to reduce the noise there, do the following: first off, find filters, open that window and type in: Noise. This will open the options, and several of them are for noise reduction.
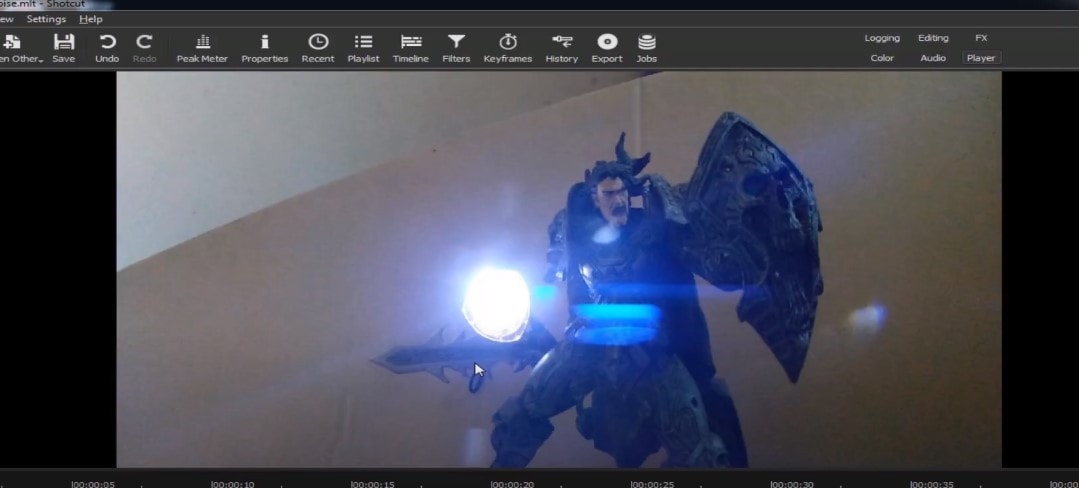
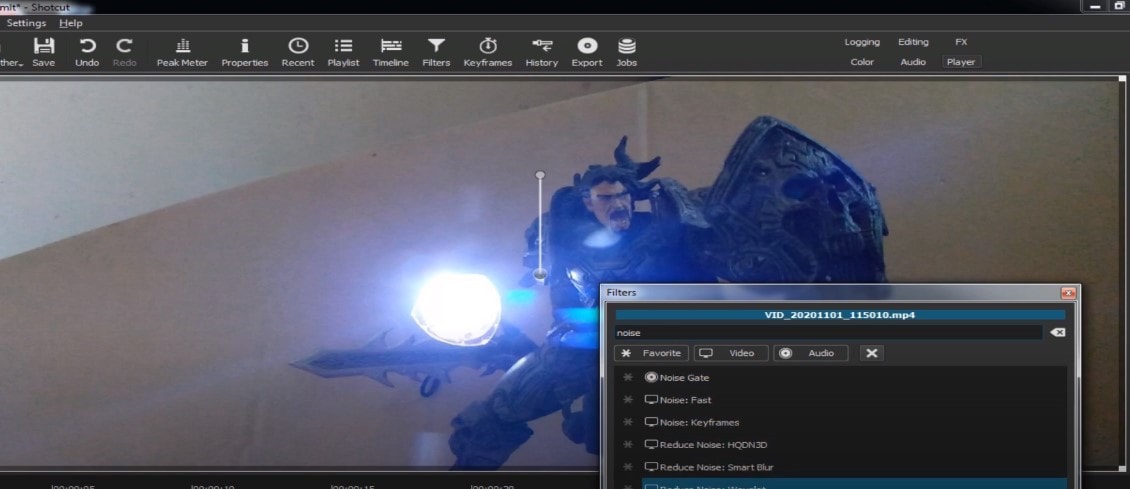
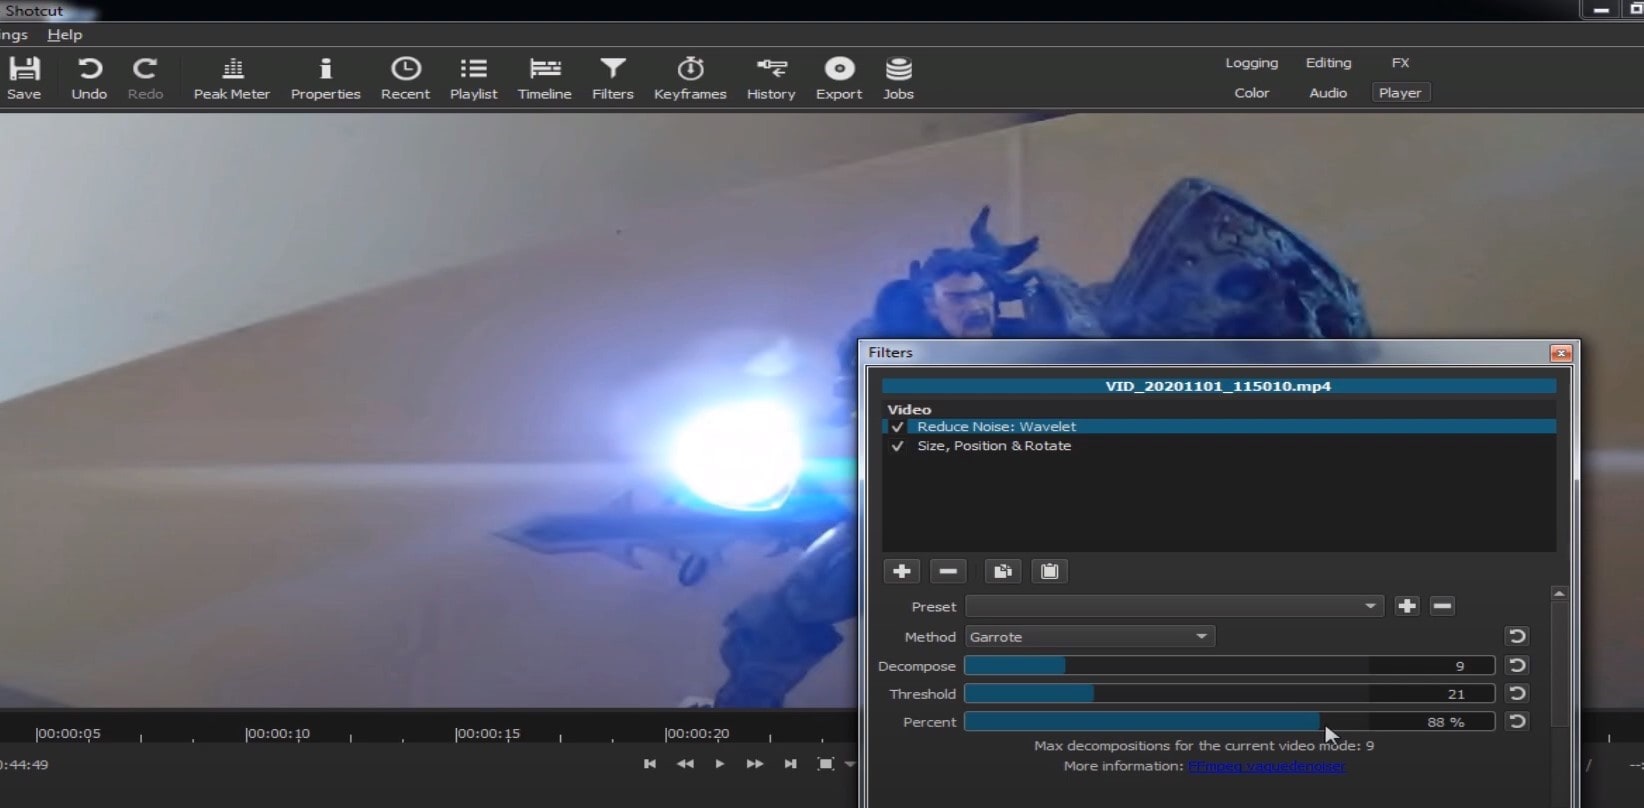
Choose Reduce Noise: Wavelet, add it to the Video and then feel free to modify the settings, such as: Decompose, Threshold, Percent. You can check and uncheck the effect in order to see the before-after difference. Then, click Apply button and it is ready to go!
Anyway, you can also try other similar effects such as Reduce Noise: HQDN3D and Reduce Noise: Smart Blur.
Adobe Premiere Pro
Even though we discussed video denoising in Adobe Premier Pro but with the help of a plug-in called Neat Video, reducing the noise in the video in this software can be achieved without the plug-in as well, through using effect which is called Median. And, Premiere Pro kind of deserves to be mentioned, so, let’s go for it!
Add the desired footage into the Timeline of Premiere Pro. Then, find the Effects Panel, where our wanted Median can be found –drag and drop the effect to the clip.
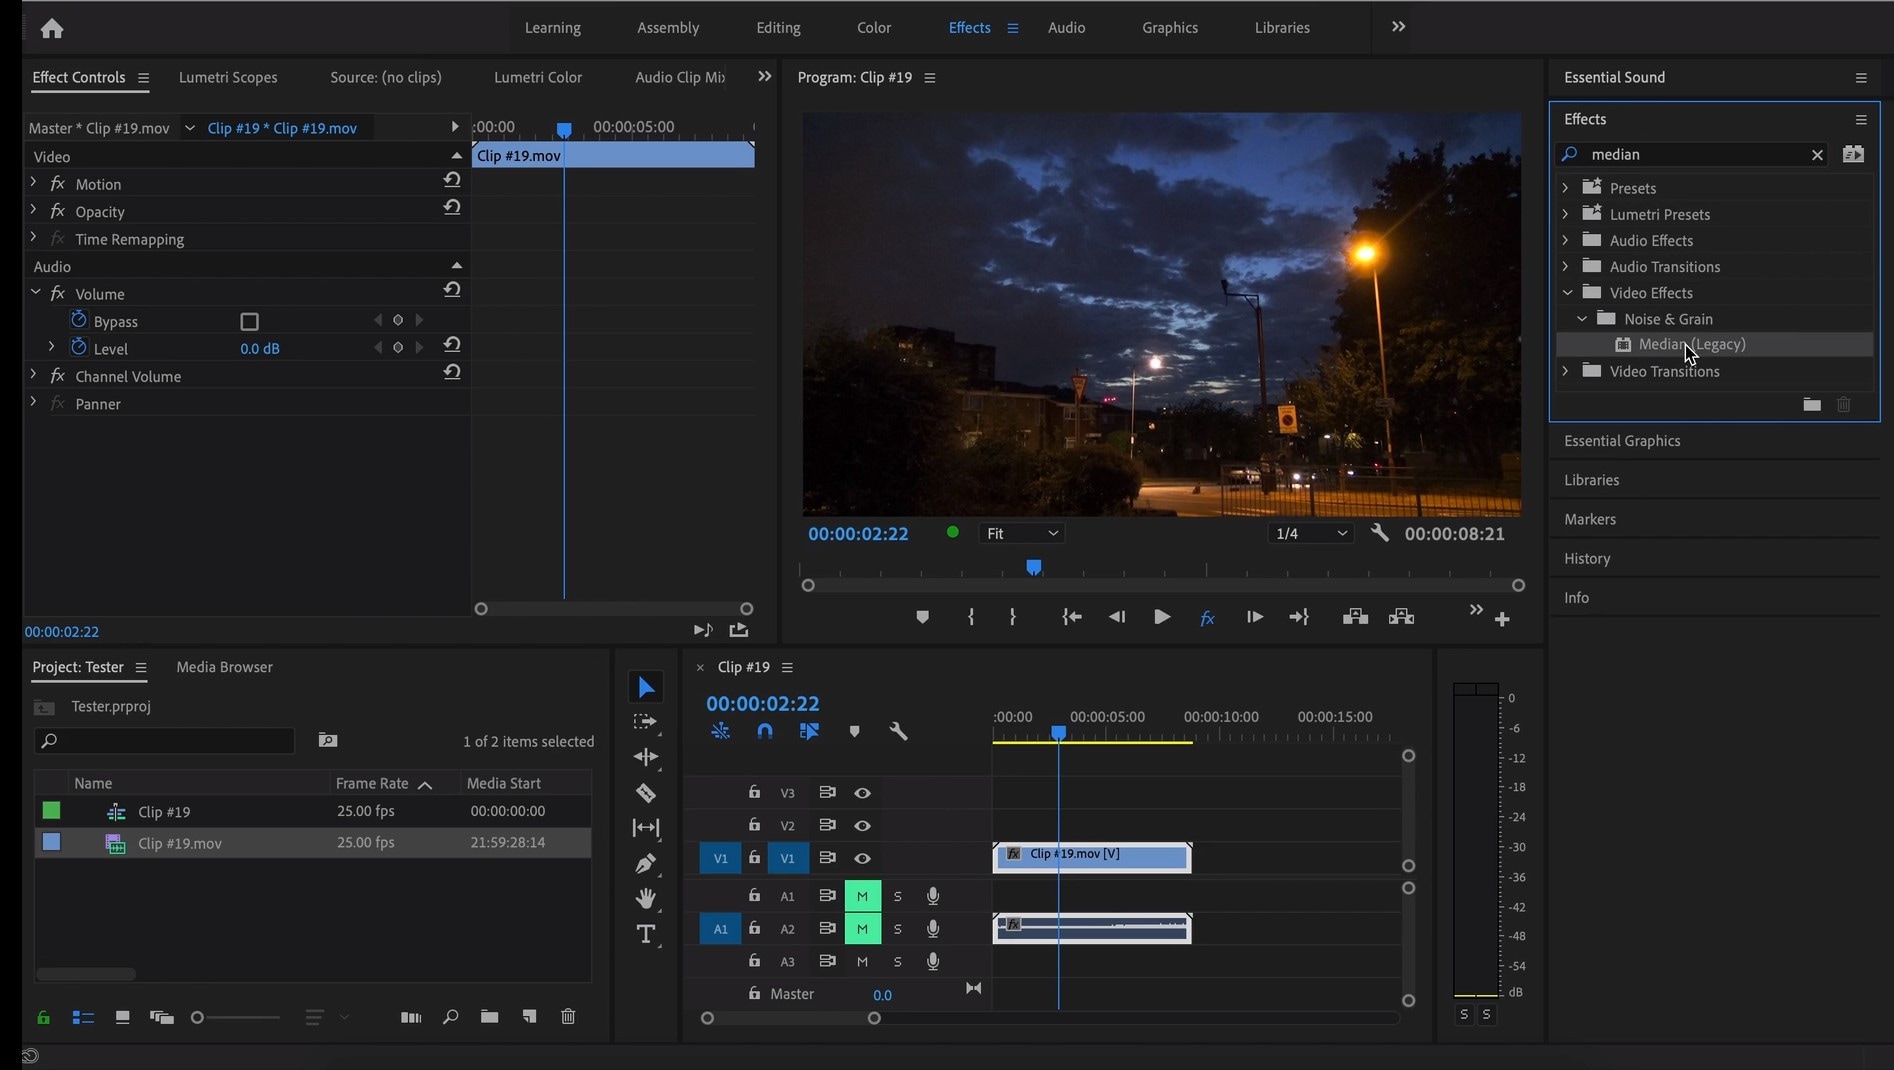
The Median should modify the grainiest parts of the whole clip, so in order to do this, we need to use masks. In the Effects Control panel, select the mask shape for the clip – the options are: rectangle, circle, or pen tool. With Pen tool, you move the Mask around the screen and resize it – the covered area will be affected.
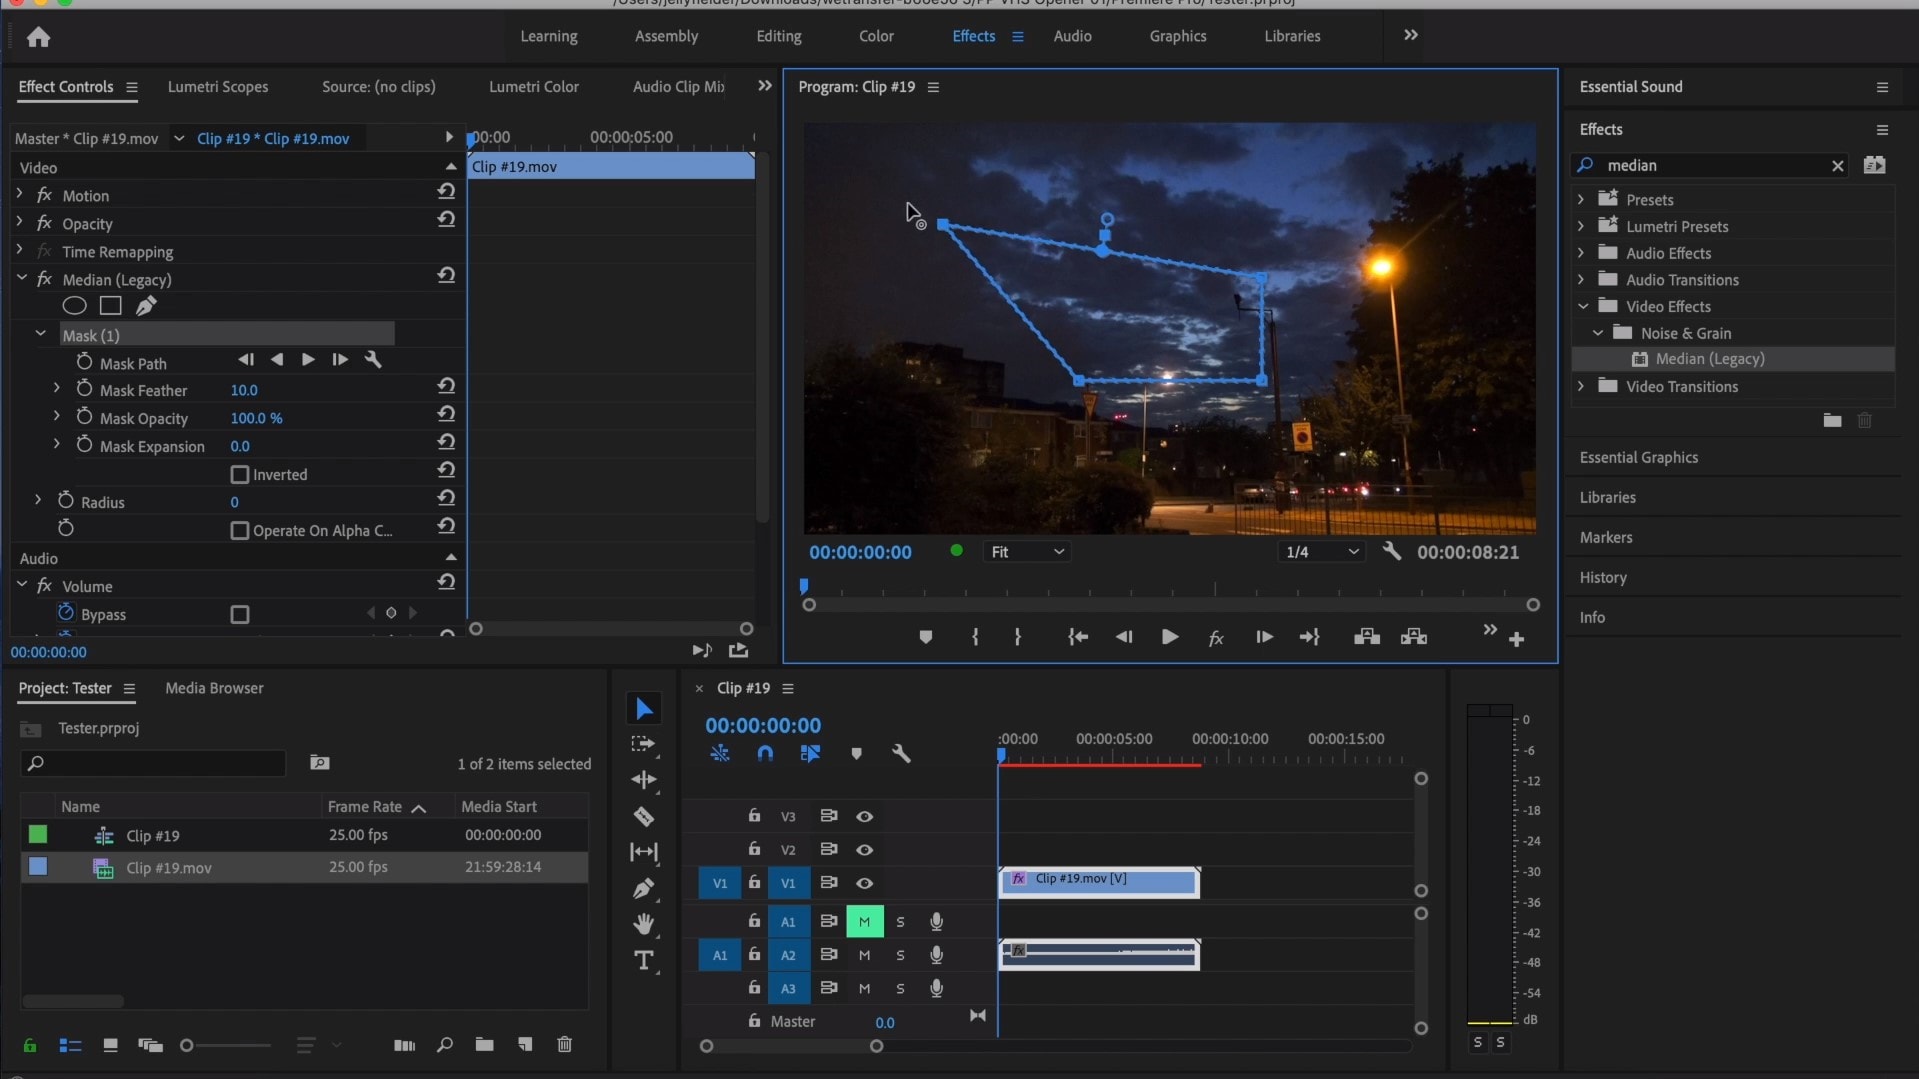
If you change Feather setting to 100, the effect will lose a sharp edge and instead, there will be a smooth border.
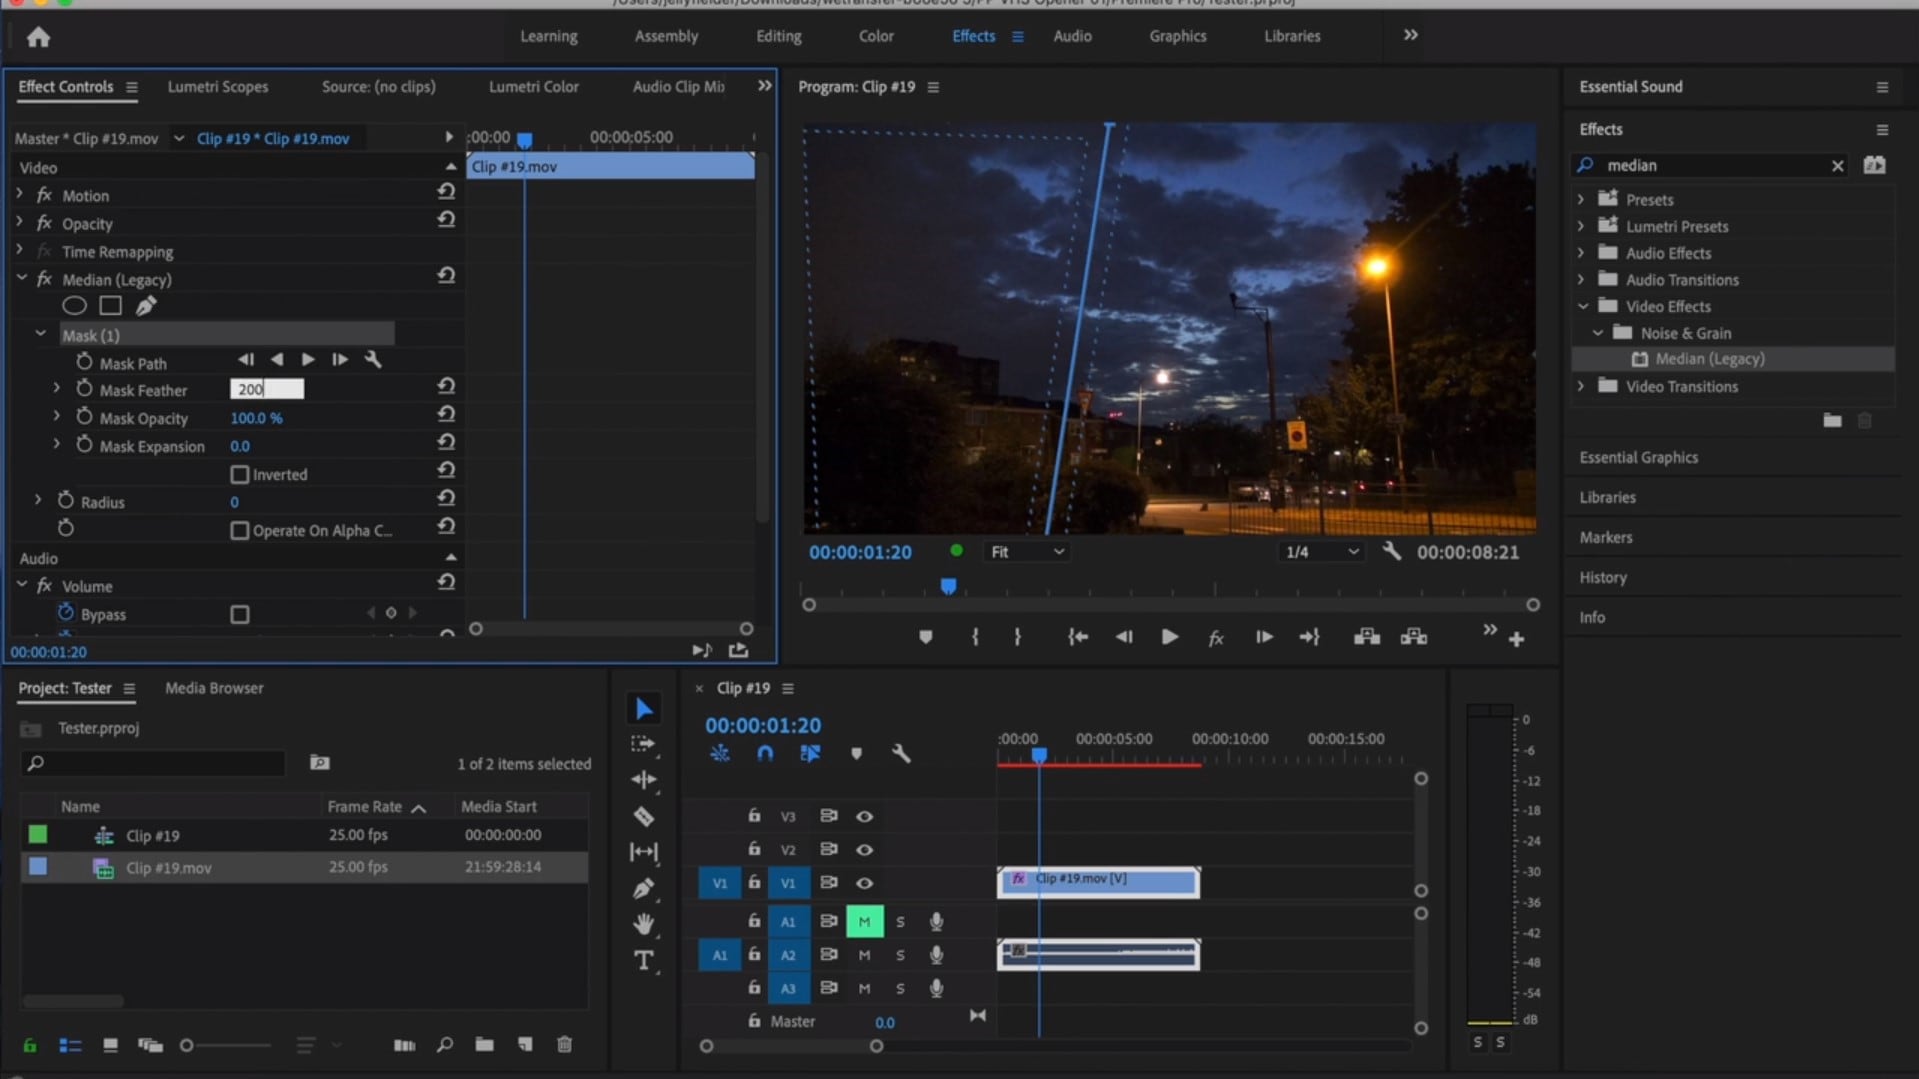
So, you might think it is needed to repeat these steps several time to create masks in different areas, in order to cover all of the grainy space of the scene.
And, at last, to reduce the noise, adjust the effect settings.
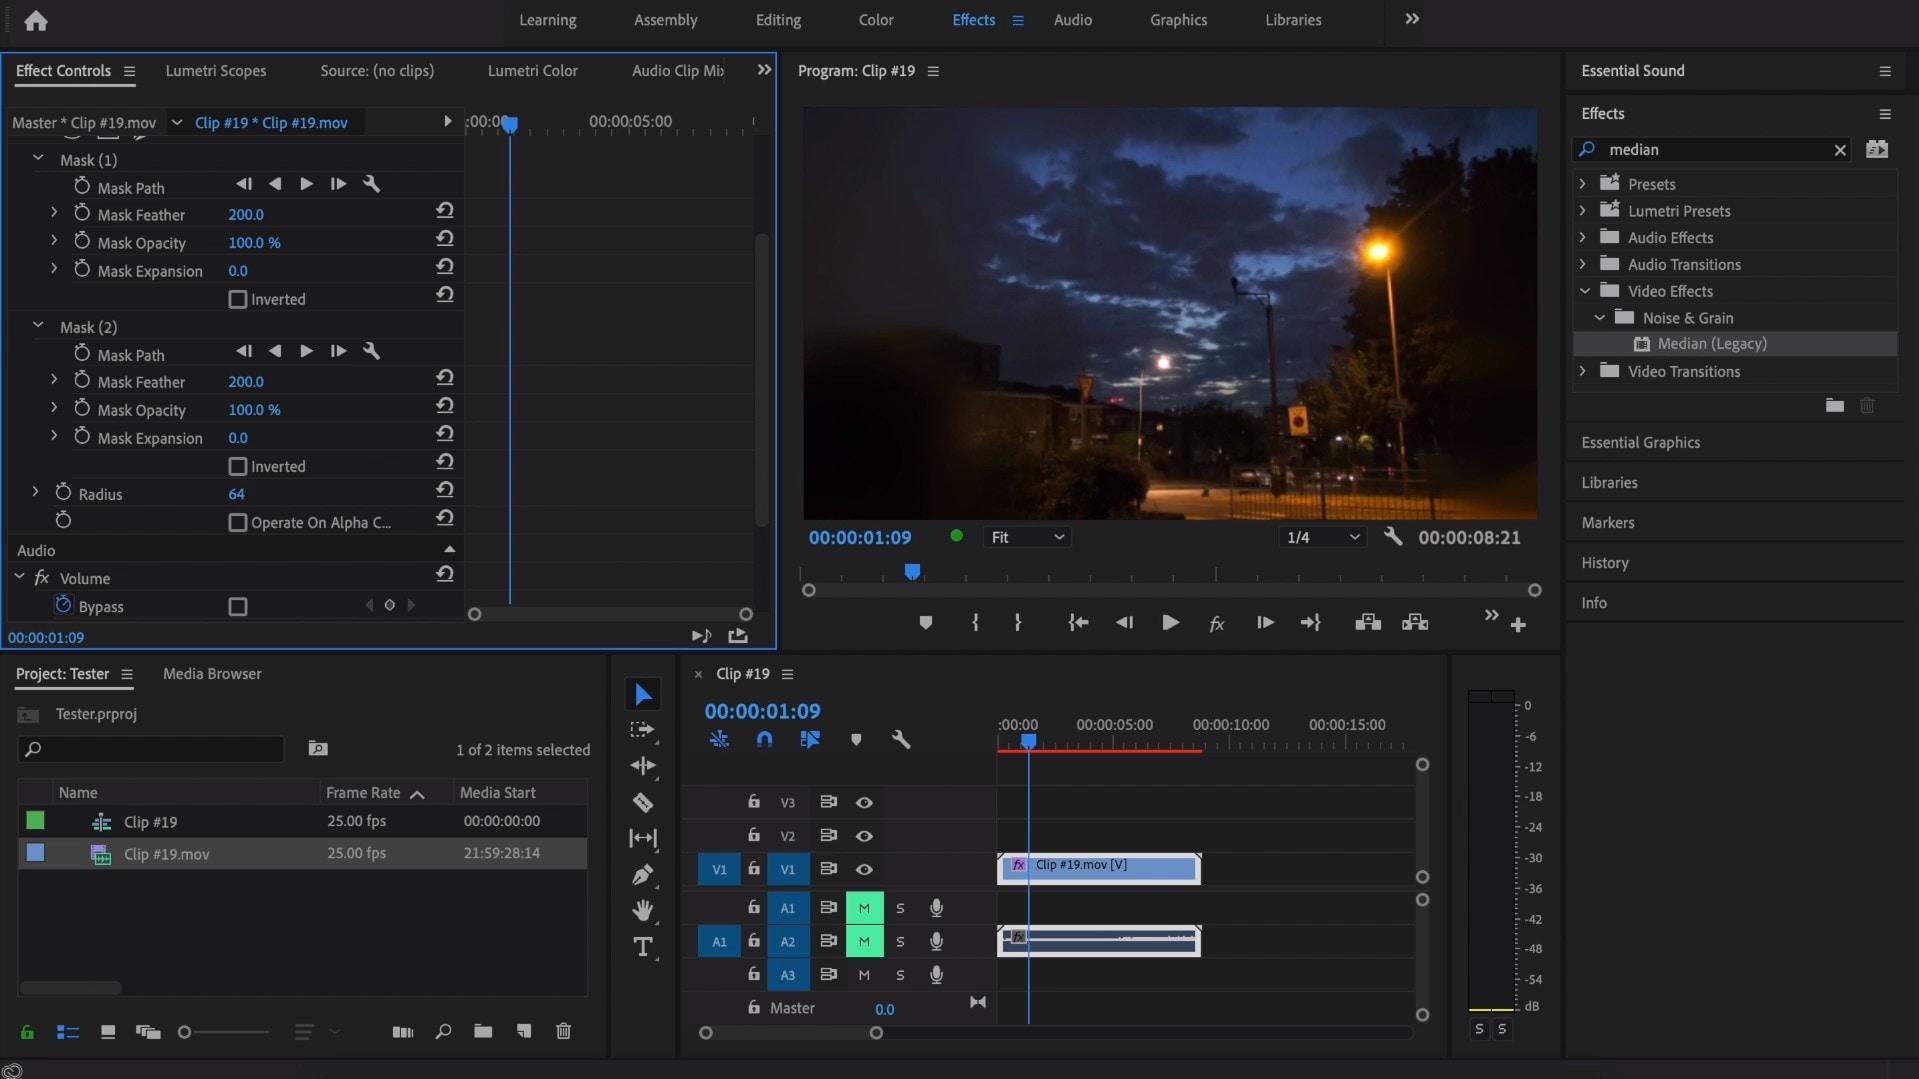
Actually, Median just blurs the grainy parts, without directly taking them away. Lastly, you can get to know the Radios settings, which will help you to achieve your most desired look!
Davinci Resolve
DaVinci Resolve is also worth mentioning in this list, in a way because it is also different from other video editors. Let’s see how it works and, meanwhile, differs:
Add the footage into the timeline. Find the fusion tab underneath the timeline panel.
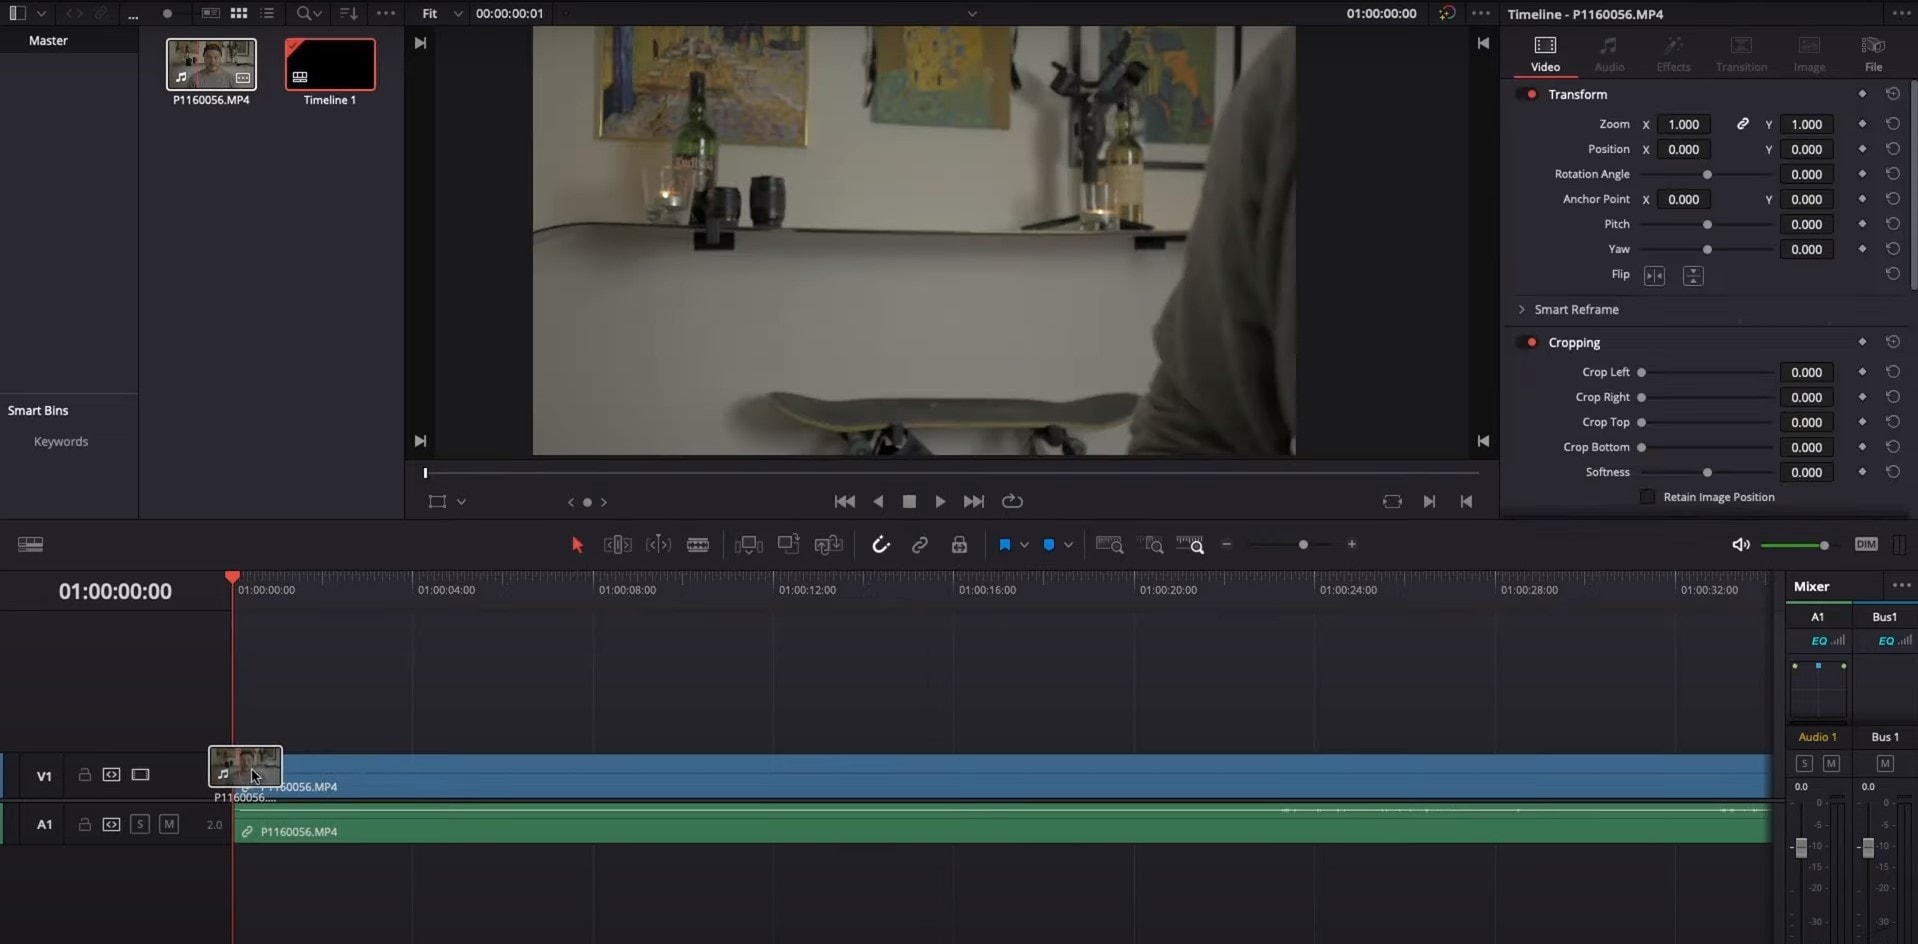
There, MediaIn1 and MediaOut1 will appear, and first, click on MediaIn1, - the scene will be shown in the first viewer – and MediaOut1 by default is appearing in the second. So, stay on MediaIn1, hit shift+spacebar, and find Remove Noise (RN). Click Add, which adds the Remove Noise1 node. On the top right corner there is an Inspector, which opens all the properties you can modify.

After going only into the second viewer, and in the top bar there is channel icons. Open it and click on red, but don’t get alarmed when your footage turns black and white – it’s just for a while. Go back to the Inspector, increase Softness Red and Detail Red.
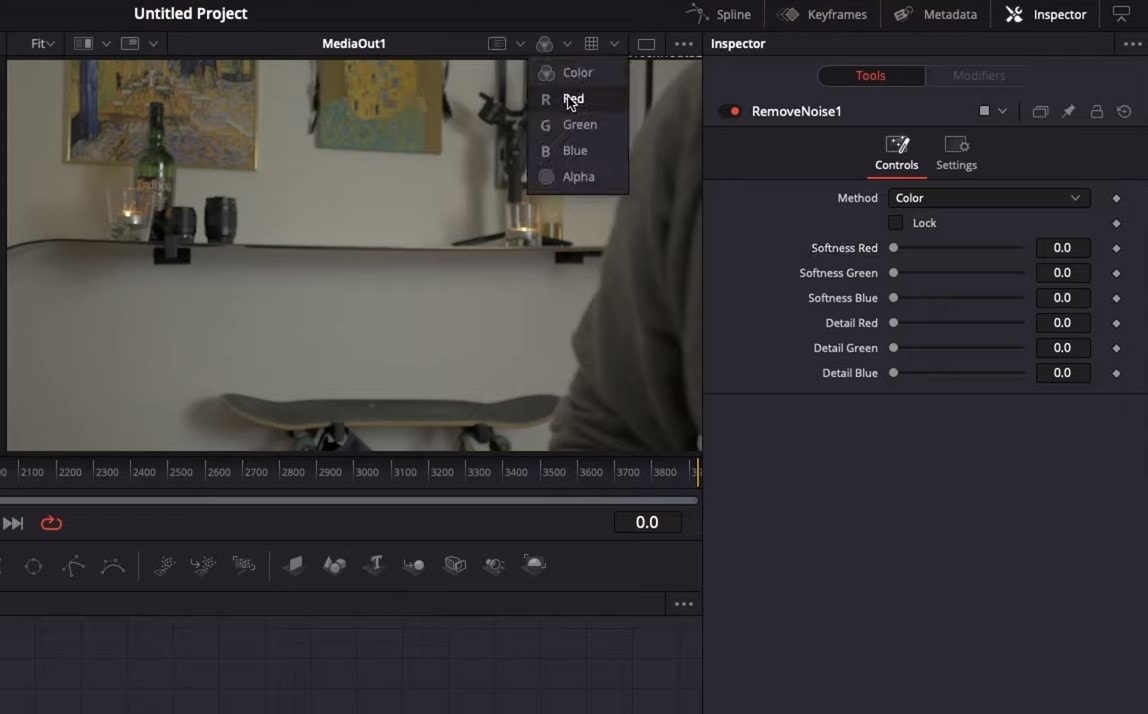
This step helps remove grain from the red channel. Then repeat the same for green and blue channels. After finishing go to the same channel button and set it to “back to color”. The clip will be colorized again and now be clearer, compared to the first viewer.
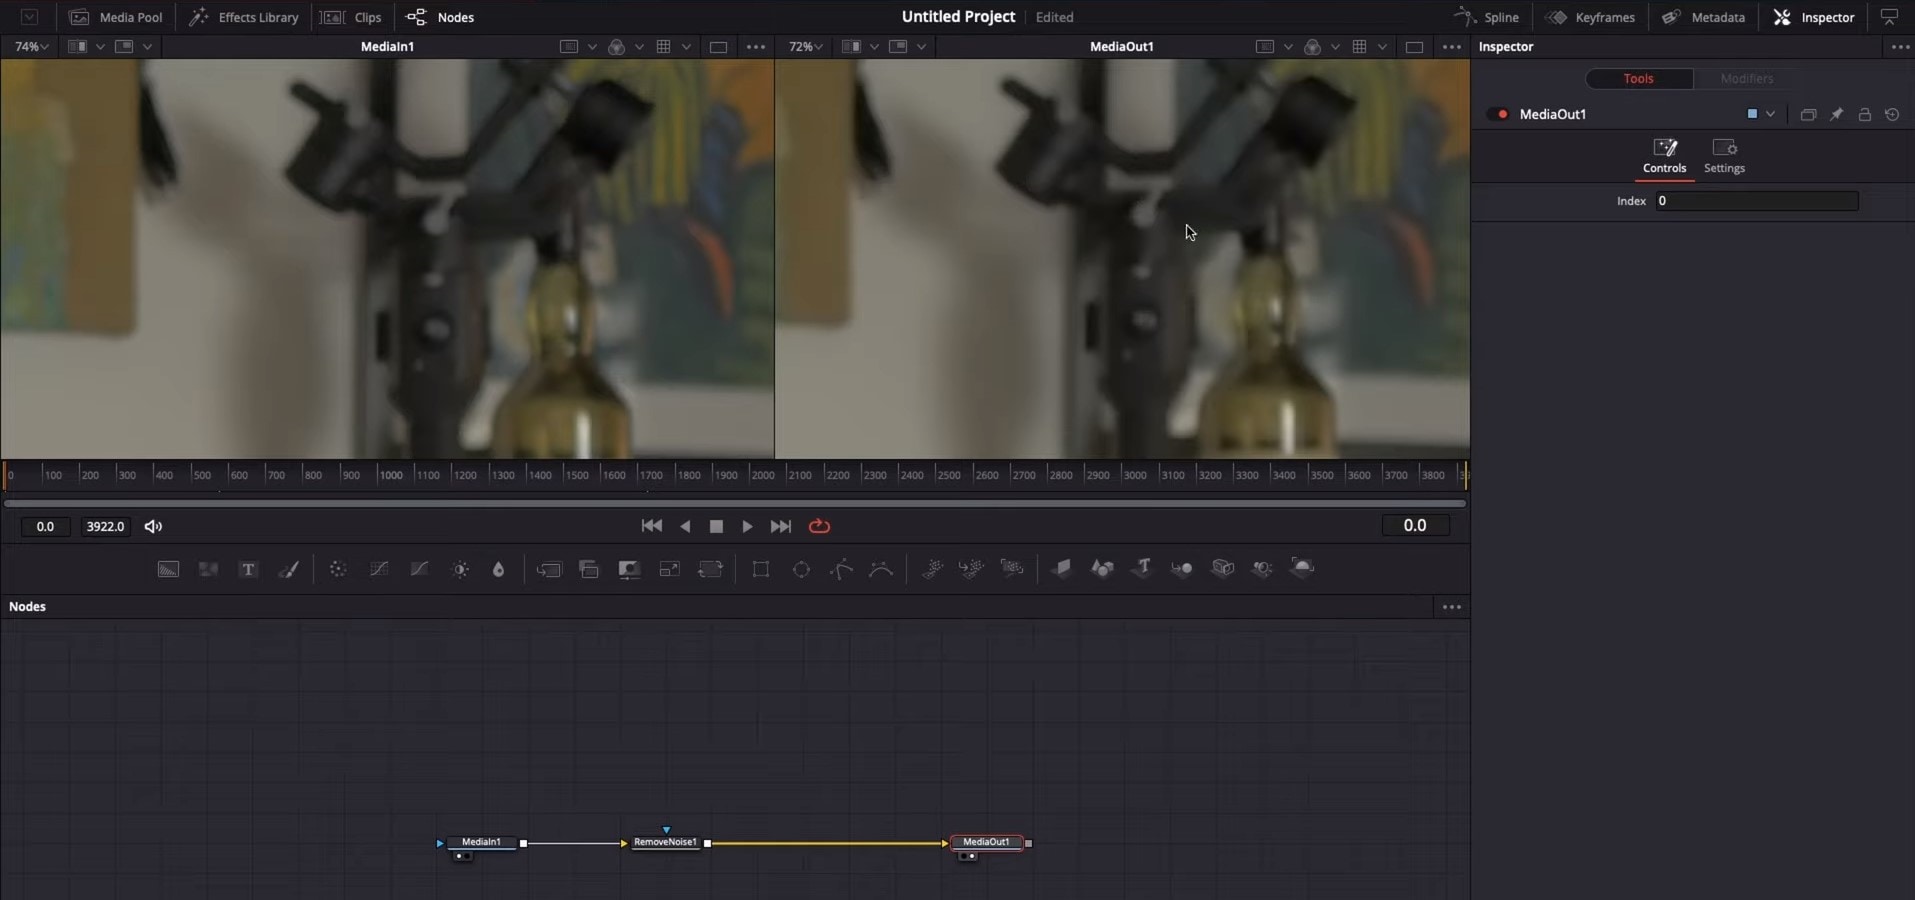
So, Evrika – we hot to know 5 best video denoisers in 2024, with the addition of audio background noise removal in Wondershare Filmora – hope you enjoyed it, and hope this will help you create better videos for yourself and your viewers!
This ensures you see the Smart Denoise, where you can change opacity of the clip, threshold and radius.

Reduce Opacity until you are satisfied with the result. The box next to Smart Denoise will show you the scene before and after the effect.
Bonus tip: Wondershare Filmora audio denoise
We already explained how video denoising works, and we will go on with our selection and explanatory article about the process, but, as we are on the Filmora topic, we might as well mention that denoising might mean another thing too – which, in this case, regards audio background noise. It means to remove unwanted hum from the audio in order for it to become more hearable. So, doing this in Wondershare Filmora works in a quite easy way. Use the guideline:
Drag and drop your video into the timeline. Right-click on the clip and hit Detach Audio, which will let you separate audio and video from one another and make sure you can work on them one by one.

Double-click on the audio track and have access to the editing panel, where you can see Remove background noise – it is not needed to emphasize what this option does for you!

That’s it – you are done, but keep in mind that there is a second way to achieve the same result as well, but this in case you don’t want to detach the audio: Double-click on the video clip in the timeline, the editing panel opens, so switch to Audio. Checking the box next to Remove background noise will show that there are three levels – weak, mid, and strong, and of course, you can choose to your liking!
If the voice recording doesn’t sound natural anymore, you can do the following: Click on Customize and Customize Equalizer window will open.

On the left, you can see the low tunes, while the highs are on the right. Background noises are often on the left, so you can lower them to get rid of them, but in order to have a more natural sound, raise the middle ones a little – and you are done when you are content with the sound!

So, hmm… back to the original topic – denoising a video, shall we?..
Neat video
Neat Video kind of, speaks for itself… it is a powerful video editing tool suitable for Windows, macOS and Linux. It aims to reduce the digital noise, flicker, dust, scratches and other defects in the captured videos to improve the visual quality of the videos.
It is a plug-in for Premiere Pro, that does more or less what the product noise says: it makes grainy video look neater. It’s very easy to use and
How to do that in Neat Video? Here are the steps:
Find the clip you want to reduce the noise of and search for the neat video effect in the Effects Panel.

The video editors mostly use the SR version of it, because it seems faster and has kind of a better performance.

Then, you’ll have to drag the neat video plug-in to the clip to your choosing, take your attention to the Effect Controls panel on the left, and find: fx Reduce Noise v5 (SR) – press the button saying Prepare and this will open up the Build button as well, which wil open the Neat video effect window.

There, you’ll need to click on the Auto Profile. Selection window will appear, which you can move around the scene and resize, in order to select the noisy area of your footage. It is recommended to find the darkest or grainiest area there and select judging by this.

On the left side, you will find Filter Settings: under Spatial, you can play with the Noise Reduction Amount and Noise Level.

Then, you will hit Apply and – done, you can instantly see the results!
Shotcut
What about Shotcut? It is a free, open-source and cross-platform video denoiser for Windows operating system. It is also an outstanding video editor with trimming, splitting, color correction and other tools.
In order to reduce the noise there, do the following: first off, find filters, open that window and type in: Noise. This will open the options, and several of them are for noise reduction.


Choose Reduce Noise: Wavelet, add it to the Video and then feel free to modify the settings, such as: Decompose, Threshold, Percent. You can check and uncheck the effect in order to see the before-after difference. Then, click Apply button and it is ready to go!
Anyway, you can also try other similar effects such as Reduce Noise: HQDN3D and Reduce Noise: Smart Blur.
Adobe Premiere Pro
Even though we discussed video denoising in Adobe Premier Pro but with the help of a plug-in called Neat Video, reducing the noise in the video in this software can be achieved without the plug-in as well, through using effect which is called Median. And, Premiere Pro kind of deserves to be mentioned, so, let’s go for it!
Add the desired footage into the Timeline of Premiere Pro. Then, find the Effects Panel, where our wanted Median can be found –drag and drop the effect to the clip.

The Median should modify the grainiest parts of the whole clip, so in order to do this, we need to use masks. In the Effects Control panel, select the mask shape for the clip – the options are: rectangle, circle, or pen tool. With Pen tool, you move the Mask around the screen and resize it – the covered area will be affected.

If you change Feather setting to 100, the effect will lose a sharp edge and instead, there will be a smooth border.

So, you might think it is needed to repeat these steps several time to create masks in different areas, in order to cover all of the grainy space of the scene.
And, at last, to reduce the noise, adjust the effect settings.

Actually, Median just blurs the grainy parts, without directly taking them away. Lastly, you can get to know the Radios settings, which will help you to achieve your most desired look!
Davinci Resolve
DaVinci Resolve is also worth mentioning in this list, in a way because it is also different from other video editors. Let’s see how it works and, meanwhile, differs:
Add the footage into the timeline. Find the fusion tab underneath the timeline panel.

There, MediaIn1 and MediaOut1 will appear, and first, click on MediaIn1, - the scene will be shown in the first viewer – and MediaOut1 by default is appearing in the second. So, stay on MediaIn1, hit shift+spacebar, and find Remove Noise (RN). Click Add, which adds the Remove Noise1 node. On the top right corner there is an Inspector, which opens all the properties you can modify.

After going only into the second viewer, and in the top bar there is channel icons. Open it and click on red, but don’t get alarmed when your footage turns black and white – it’s just for a while. Go back to the Inspector, increase Softness Red and Detail Red.

This step helps remove grain from the red channel. Then repeat the same for green and blue channels. After finishing go to the same channel button and set it to “back to color”. The clip will be colorized again and now be clearer, compared to the first viewer.

So, Evrika – we hot to know 5 best video denoisers in 2024, with the addition of audio background noise removal in Wondershare Filmora – hope you enjoyed it, and hope this will help you create better videos for yourself and your viewers!
This ensures you see the Smart Denoise, where you can change opacity of the clip, threshold and radius.

Reduce Opacity until you are satisfied with the result. The box next to Smart Denoise will show you the scene before and after the effect.
Bonus tip: Wondershare Filmora audio denoise
We already explained how video denoising works, and we will go on with our selection and explanatory article about the process, but, as we are on the Filmora topic, we might as well mention that denoising might mean another thing too – which, in this case, regards audio background noise. It means to remove unwanted hum from the audio in order for it to become more hearable. So, doing this in Wondershare Filmora works in a quite easy way. Use the guideline:
Drag and drop your video into the timeline. Right-click on the clip and hit Detach Audio, which will let you separate audio and video from one another and make sure you can work on them one by one.

Double-click on the audio track and have access to the editing panel, where you can see Remove background noise – it is not needed to emphasize what this option does for you!

That’s it – you are done, but keep in mind that there is a second way to achieve the same result as well, but this in case you don’t want to detach the audio: Double-click on the video clip in the timeline, the editing panel opens, so switch to Audio. Checking the box next to Remove background noise will show that there are three levels – weak, mid, and strong, and of course, you can choose to your liking!
If the voice recording doesn’t sound natural anymore, you can do the following: Click on Customize and Customize Equalizer window will open.

On the left, you can see the low tunes, while the highs are on the right. Background noises are often on the left, so you can lower them to get rid of them, but in order to have a more natural sound, raise the middle ones a little – and you are done when you are content with the sound!

So, hmm… back to the original topic – denoising a video, shall we?..
Neat video
Neat Video kind of, speaks for itself… it is a powerful video editing tool suitable for Windows, macOS and Linux. It aims to reduce the digital noise, flicker, dust, scratches and other defects in the captured videos to improve the visual quality of the videos.
It is a plug-in for Premiere Pro, that does more or less what the product noise says: it makes grainy video look neater. It’s very easy to use and
How to do that in Neat Video? Here are the steps:
Find the clip you want to reduce the noise of and search for the neat video effect in the Effects Panel.

The video editors mostly use the SR version of it, because it seems faster and has kind of a better performance.

Then, you’ll have to drag the neat video plug-in to the clip to your choosing, take your attention to the Effect Controls panel on the left, and find: fx Reduce Noise v5 (SR) – press the button saying Prepare and this will open up the Build button as well, which wil open the Neat video effect window.

There, you’ll need to click on the Auto Profile. Selection window will appear, which you can move around the scene and resize, in order to select the noisy area of your footage. It is recommended to find the darkest or grainiest area there and select judging by this.

On the left side, you will find Filter Settings: under Spatial, you can play with the Noise Reduction Amount and Noise Level.

Then, you will hit Apply and – done, you can instantly see the results!
Shotcut
What about Shotcut? It is a free, open-source and cross-platform video denoiser for Windows operating system. It is also an outstanding video editor with trimming, splitting, color correction and other tools.
In order to reduce the noise there, do the following: first off, find filters, open that window and type in: Noise. This will open the options, and several of them are for noise reduction.


Choose Reduce Noise: Wavelet, add it to the Video and then feel free to modify the settings, such as: Decompose, Threshold, Percent. You can check and uncheck the effect in order to see the before-after difference. Then, click Apply button and it is ready to go!
Anyway, you can also try other similar effects such as Reduce Noise: HQDN3D and Reduce Noise: Smart Blur.
Adobe Premiere Pro
Even though we discussed video denoising in Adobe Premier Pro but with the help of a plug-in called Neat Video, reducing the noise in the video in this software can be achieved without the plug-in as well, through using effect which is called Median. And, Premiere Pro kind of deserves to be mentioned, so, let’s go for it!
Add the desired footage into the Timeline of Premiere Pro. Then, find the Effects Panel, where our wanted Median can be found –drag and drop the effect to the clip.

The Median should modify the grainiest parts of the whole clip, so in order to do this, we need to use masks. In the Effects Control panel, select the mask shape for the clip – the options are: rectangle, circle, or pen tool. With Pen tool, you move the Mask around the screen and resize it – the covered area will be affected.

If you change Feather setting to 100, the effect will lose a sharp edge and instead, there will be a smooth border.

So, you might think it is needed to repeat these steps several time to create masks in different areas, in order to cover all of the grainy space of the scene.
And, at last, to reduce the noise, adjust the effect settings.

Actually, Median just blurs the grainy parts, without directly taking them away. Lastly, you can get to know the Radios settings, which will help you to achieve your most desired look!
Davinci Resolve
DaVinci Resolve is also worth mentioning in this list, in a way because it is also different from other video editors. Let’s see how it works and, meanwhile, differs:
Add the footage into the timeline. Find the fusion tab underneath the timeline panel.

There, MediaIn1 and MediaOut1 will appear, and first, click on MediaIn1, - the scene will be shown in the first viewer – and MediaOut1 by default is appearing in the second. So, stay on MediaIn1, hit shift+spacebar, and find Remove Noise (RN). Click Add, which adds the Remove Noise1 node. On the top right corner there is an Inspector, which opens all the properties you can modify.

After going only into the second viewer, and in the top bar there is channel icons. Open it and click on red, but don’t get alarmed when your footage turns black and white – it’s just for a while. Go back to the Inspector, increase Softness Red and Detail Red.

This step helps remove grain from the red channel. Then repeat the same for green and blue channels. After finishing go to the same channel button and set it to “back to color”. The clip will be colorized again and now be clearer, compared to the first viewer.

So, Evrika – we hot to know 5 best video denoisers in 2024, with the addition of audio background noise removal in Wondershare Filmora – hope you enjoyed it, and hope this will help you create better videos for yourself and your viewers!
This ensures you see the Smart Denoise, where you can change opacity of the clip, threshold and radius.

Reduce Opacity until you are satisfied with the result. The box next to Smart Denoise will show you the scene before and after the effect.
Bonus tip: Wondershare Filmora audio denoise
We already explained how video denoising works, and we will go on with our selection and explanatory article about the process, but, as we are on the Filmora topic, we might as well mention that denoising might mean another thing too – which, in this case, regards audio background noise. It means to remove unwanted hum from the audio in order for it to become more hearable. So, doing this in Wondershare Filmora works in a quite easy way. Use the guideline:
Drag and drop your video into the timeline. Right-click on the clip and hit Detach Audio, which will let you separate audio and video from one another and make sure you can work on them one by one.

Double-click on the audio track and have access to the editing panel, where you can see Remove background noise – it is not needed to emphasize what this option does for you!

That’s it – you are done, but keep in mind that there is a second way to achieve the same result as well, but this in case you don’t want to detach the audio: Double-click on the video clip in the timeline, the editing panel opens, so switch to Audio. Checking the box next to Remove background noise will show that there are three levels – weak, mid, and strong, and of course, you can choose to your liking!
If the voice recording doesn’t sound natural anymore, you can do the following: Click on Customize and Customize Equalizer window will open.

On the left, you can see the low tunes, while the highs are on the right. Background noises are often on the left, so you can lower them to get rid of them, but in order to have a more natural sound, raise the middle ones a little – and you are done when you are content with the sound!

So, hmm… back to the original topic – denoising a video, shall we?..
Neat video
Neat Video kind of, speaks for itself… it is a powerful video editing tool suitable for Windows, macOS and Linux. It aims to reduce the digital noise, flicker, dust, scratches and other defects in the captured videos to improve the visual quality of the videos.
It is a plug-in for Premiere Pro, that does more or less what the product noise says: it makes grainy video look neater. It’s very easy to use and
How to do that in Neat Video? Here are the steps:
Find the clip you want to reduce the noise of and search for the neat video effect in the Effects Panel.

The video editors mostly use the SR version of it, because it seems faster and has kind of a better performance.

Then, you’ll have to drag the neat video plug-in to the clip to your choosing, take your attention to the Effect Controls panel on the left, and find: fx Reduce Noise v5 (SR) – press the button saying Prepare and this will open up the Build button as well, which wil open the Neat video effect window.

There, you’ll need to click on the Auto Profile. Selection window will appear, which you can move around the scene and resize, in order to select the noisy area of your footage. It is recommended to find the darkest or grainiest area there and select judging by this.

On the left side, you will find Filter Settings: under Spatial, you can play with the Noise Reduction Amount and Noise Level.

Then, you will hit Apply and – done, you can instantly see the results!
Shotcut
What about Shotcut? It is a free, open-source and cross-platform video denoiser for Windows operating system. It is also an outstanding video editor with trimming, splitting, color correction and other tools.
In order to reduce the noise there, do the following: first off, find filters, open that window and type in: Noise. This will open the options, and several of them are for noise reduction.


Choose Reduce Noise: Wavelet, add it to the Video and then feel free to modify the settings, such as: Decompose, Threshold, Percent. You can check and uncheck the effect in order to see the before-after difference. Then, click Apply button and it is ready to go!
Anyway, you can also try other similar effects such as Reduce Noise: HQDN3D and Reduce Noise: Smart Blur.
Adobe Premiere Pro
Even though we discussed video denoising in Adobe Premier Pro but with the help of a plug-in called Neat Video, reducing the noise in the video in this software can be achieved without the plug-in as well, through using effect which is called Median. And, Premiere Pro kind of deserves to be mentioned, so, let’s go for it!
Add the desired footage into the Timeline of Premiere Pro. Then, find the Effects Panel, where our wanted Median can be found –drag and drop the effect to the clip.

The Median should modify the grainiest parts of the whole clip, so in order to do this, we need to use masks. In the Effects Control panel, select the mask shape for the clip – the options are: rectangle, circle, or pen tool. With Pen tool, you move the Mask around the screen and resize it – the covered area will be affected.

If you change Feather setting to 100, the effect will lose a sharp edge and instead, there will be a smooth border.

So, you might think it is needed to repeat these steps several time to create masks in different areas, in order to cover all of the grainy space of the scene.
And, at last, to reduce the noise, adjust the effect settings.

Actually, Median just blurs the grainy parts, without directly taking them away. Lastly, you can get to know the Radios settings, which will help you to achieve your most desired look!
Davinci Resolve
DaVinci Resolve is also worth mentioning in this list, in a way because it is also different from other video editors. Let’s see how it works and, meanwhile, differs:
Add the footage into the timeline. Find the fusion tab underneath the timeline panel.

There, MediaIn1 and MediaOut1 will appear, and first, click on MediaIn1, - the scene will be shown in the first viewer – and MediaOut1 by default is appearing in the second. So, stay on MediaIn1, hit shift+spacebar, and find Remove Noise (RN). Click Add, which adds the Remove Noise1 node. On the top right corner there is an Inspector, which opens all the properties you can modify.

After going only into the second viewer, and in the top bar there is channel icons. Open it and click on red, but don’t get alarmed when your footage turns black and white – it’s just for a while. Go back to the Inspector, increase Softness Red and Detail Red.

This step helps remove grain from the red channel. Then repeat the same for green and blue channels. After finishing go to the same channel button and set it to “back to color”. The clip will be colorized again and now be clearer, compared to the first viewer.

So, Evrika – we hot to know 5 best video denoisers in 2024, with the addition of audio background noise removal in Wondershare Filmora – hope you enjoyed it, and hope this will help you create better videos for yourself and your viewers!
Also read:
- New Add Camera Shake to Video in Adobe After Effects
- In 2024, How to Brighten a Video in Windows 10 | Step-By-Step Guide
- Updated In 2024, Video Inspiration for Birthday Slideshow
- DVD Slideshow Builder Review and Tutorial
- New In 2024, Convert Your Videos to 60 FPS Using These Excellent Tools
- Best Android Apps For Creating Slow Motion Videos for 2024
- Updated | Live Stream on YouTube Using Zoom for 2024
- 2024 Approved Looking for the Different Ar Video Effects to Include in Your Film? Check Out This Article for the Best 10 Augmented Reality Effects and the Fun Ar Effects in Filmora
- In 2024, Best 5 AI Music Video Examples and Makers to Make Them
- 2024 Approved How to Zoom Video in VLC Media Player
- New In 2024, Do You Want to Create Slow-Motion Videos? This Article Shows Methods to Create Slow-Mo Videos without Changing the Medias Quality
- Updated In 2024, How to Use Deep Fried Meme Maker
- Updated In 2024, How to Make Falling Text Effect in Filmora?
- Updated How to Make A Funny Vlog for TikTok?
- New In 2024, 4 Methods How To Make a Recap Video
- In 2024, Discover the Top 10 Video Editing Apps with Templates for Professional-Grade Results. Edit Like a Pro with These Tools
- New How to Set Up Twitch Green Screen
- New 2024 Approved How Can You DIY VHS Overlay in After Effects?
- New What Are the Best Video Background Changers Online?
- Updated 2024 Approved Learn to Splice Videos Together on iPhone
- New How to Stabilize Videos for Free with Google Photos App
- Updated 2024 Approved Learn More About the Video Editing Interface of Wondershare Filmora
- Updated 2024 Approved Best Tools To Create Blend Image Collage
- Discover the Best Game Recording Software for Your PC in This Developing Industry. Record Your Gameplay in Real Time and Enjoy the Benefits that Come with It
- New 2024 Approved How To Use Motion Blur On Video Star?
- New Best PDF to GIF Converters for 2024
- Can’t view HEVC H.265 content on Civi 3
- For People Wanting to Mock GPS on Oppo Reno 10 5G Devices | Dr.fone
- In 2024, Easy Guide How To Bypass Motorola Moto G14 FRP Android 10/11/12/13
- How Can Vivo V30 ProMirror Share to PC? | Dr.fone
- How to Track Apple iPhone 12 Pro Max Location without Installing Software? | Dr.fone
- How to Transfer Photos from Realme Narzo 60x 5G to Laptop Without USB | Dr.fone
- In 2024, A Step-by-Step Guide on Using ADB and Fastboot to Remove FRP Lock from your Motorola Moto G04
- Complete Guide on Unlocking iPhone 12 with a Broken Screen?
- 6 Ways to Change Spotify Location On Your Xiaomi Redmi Note 13 Pro+ 5G | Dr.fone
- 8 Solutions to Fix Find My Friends Location Not Available On Nokia C12 Pro | Dr.fone
- How to Fix Android.Process.Media Has Stopped on Itel P40 | Dr.fone
- In 2024, How to Unlock iCloud lock from your Apple iPhone 11 Pro and iPad?
- Top 5 Samsung Galaxy M34 Bypass FRP Tools for PC That Actually Work
- In 2024, Android to Apple How To Transfer Photos From Vivo Y100i to iPad Easily | Dr.fone
- The way to convert MTS for Edge 40
- Where Is the Best Place to Catch Dratini On Apple iPhone 13 Pro | Dr.fone
- In 2024, How to use Snapchat Location Spoofer to Protect Your Privacy On Motorola Moto G Stylus (2023)? | Dr.fone
- 10 Easy-to-Use FRP Bypass Tools for Unlocking Google Accounts On Itel A60
- How to Screen Share on Apple iPhone 15 Plus? | Dr.fone
- How to Remove MDM from iPhone 15 Pro Max without Apple ID?
- Title: Learn How to Easily Concatenate Videos Using FFmpeg in This Step-by-Step Guide. From Installation to Execution, We Cover It All to Streamline Your Video Editing Process
- Author: Morgan
- Created at : 2024-05-19 05:11:42
- Updated at : 2024-05-20 05:11:42
- Link: https://ai-video-editing.techidaily.com/learn-how-to-easily-concatenate-videos-using-ffmpeg-in-this-step-by-step-guide-from-installation-to-execution-we-cover-it-all-to-streamline-your-video-editi/
- License: This work is licensed under CC BY-NC-SA 4.0.


