
:max_bytes(150000):strip_icc():format(webp)/edit-tweet-after-publish-3476767-34af9aa3b62b4bf4b11891460076916b.png)
List of Supported Whatsapp Video Format You May Want to Know for 2024
List of Supported Whatsapp Video Format You May Want to Know
Among the different communication platforms, WhatsApp is very famous. The application lets you communicate with your loved ones living far away via messages, audio, and video calls. Unlike other platforms, WhatsApp has a lot of happy users.
With WhatsApp, you can not only communicate but also offers media file sharing. You can share your favorite meme, funny videos, and other things through WhatsApp. If you want to share a video but can’t, the WhatsApp video format is not supported. To learn about WhatsApp-supported video formats, keep reading the article.
In this article
01 Introduction About WhatsApp Supported Video Formats
02 Tips About How to Convert Video for WhatsApp
03 Tricks About How to Edit Video for WhatsApp
Part 1. Introduction About WhatsApp Supported Video Formats
Are you facing trouble with WhatsApp videos and sharing them? It might be because of the video format WhatsApp as WhatsApp supports certain video formats. You should have the video in the supported format for using videos on WhatsApp and sharing them.

WhatsApp supports a maximum file size of 16MB is approximately a video of 90 seconds to 3 minutes. Whereas if we talk about WhatsApp status, it allows 30 seconds duration for the video. WhatsApp supports and MPEG-4 codec for videos and audio, and AC3.
Moving on, the WhatsApp-supported video formats include MP4, MKV, AVI, MOV, and also 3GP. Do you want to know more about these formats? Let’s help you.
MP4
This is the most commonly used format for both video and audio files. Other than this, MP4 also stores data like subtitles, still images, etc. Interesting, it also allows streaming.
MKV
MKV is an open container, free format. The format can hold videos, pictures, audio, and also an unlimited number of subtitles. Additionally, the format is universally used to store multimedia content like your favorite TV show or movies.
AVI
Audio Video Interleave is another video format supported by WhatsApp. Do you know that the AVI format supports synchronous audio-with-video playback? The file format stores both video and audio data in a file container.
MOV
Apple developed a MOV file format that can hold a wide range of media content like your audio, video, and even text. It stores data in the same file but on different tracks. The file format is commonly used in video editing software.
3GP
3GP is Third Generation Partnership Project (3GPP), a multimedia container for multimedia services. The format works great on 3G mobile phones, but it can also be used on 2G and 4G phones. 3GP is also a video format supported by WhatsApp.
Part 2. Tips About How to Convert Video for WhatsApp
Now that you know about video formats supported by WhatsApp, shall we introduce tips to convert the file format? In case you have a video that is not supported by WhatsApp, the following section of this article will assist as we are about to introduce Wondershare UniConverter . The video converter software is GPU accelerated, and it promises to maintain the original video quality.
UniConverter offers 90x faster conversion speed. You can convert video from and to different formats and also for different devices. Moreover, with UniConverter, you can convert multiple media files at once. Do you know what else UniConverter has to offer? The software is not just a video converter; it’s much more than that; you can use its Background Remover, Subtitle Editor, Smart Trimmer, etc.
Apart from converting your videos to WhatsApp video format, with UniConverter, you can also convert them into various popular web formats like Facebook, Instagram, Vimeo, YouTube, Amazon, and also eBay. Do you know an exciting thing about UniConverter? Well, it also supports various 4K and 3D files. If you are impressed with UniConverter, let’s move on and share the steps to use the software:
Step 1: To start, launch Wondershare UniConverter on your device and make sure that you have selected the ‘Converter’ option from the left menu. After this, from the right window, import the video files that you plan to work with.

Step 2: Now, head to the bottom of the main screen and look for the ‘Output Format’ option. Open it and go to the ‘Video’ section. There, from the list of various file formats, select the supported video format for WhatsApp from the left and the right, select a resolution.

Step 3: UniConverter is famous for its speedy conversion; for this, hit on the ‘High-Speed Conversion’ from the top right corner. Next, select your desired location to save the file from the bottom by using the ‘File Location’ field. Once done, hit the ‘Convert’ button to get the video format converted.

Part 3. Tricks About How to Edit Video for WhatsApp
Do you plan to edit your WhatsApp videos? If you do, then we have a little treat for you; let us introduce Wondershare Filmora Video Editor . The software can change your editing game with its phenomenal features and amazing editing elements.
Do you want to know what features and elements we are talking about? Let’s tell you. Wondershare Filmora offers high-quality effects and transitions that can transform your video. Along with this, you get a wide variety of titles and other editing elements that could be used.
Filmora has a clean and straight interface; users can understand the software very quickly and work with it. Moreover, the video editor lets you select your preferred output format and then export the file. You get various cool features like green screen background, split-screen, join video, and a lot more.
For Win 7 or later (64-bit)
For macOS 10.12 or later
Interestingly, the software offers elements according to the latest trends and events around, like Christmas, Valentine’s, birthday, etc. Do you want to use Filmora to edit your WhatsApp video? For guidance, follow the steps shared below:
Step 1: For editing, launch Wondershare Filmora on your device and import the video file by heading to the ‘File’ tab. After that, hover on to the ‘Import Media’ option and select the ‘Import Media Files’ option.

Step 2: After locating your desired file, import it. Once successfully imported, then drag the file from the ‘Project Media’ section to the ‘Timeline’ so that you can start the editing.

Step 3: Let the fun begins! You can edit and transform your video file by adding various sound effects to it that Filmora offers you. Users can access the effects from the ‘Audio’ tab.

Step 4: Are you worried about titles? Don’t worry because Filmora offers a wide range of title templates that you can select from and customize too. Just head to the ‘Titles’ tab from the top menu bar and enjoy.

Step 5: What is editing without cool transitions and effects? Filmora comes with unique and distinct video effects and transitions that you can use by accessing the ‘Effects’ and ‘Transitions’ tabs.

Step 6: Once you are satisfied with all the editing, it’s time to export the video file. Hit on the ‘Export’ button and select WhatsApp-supported video format to save the file.

Wrapping Up
If you have been struggling with WhatsApp videos, this article is for you. We have discussed in detail WhatsApp-supported video formats. Not just this, we also talked about a video converter that could be used to convert video formats. Moreover, we shared a video editor to edit your WhatsApp videos. Are you ready for a bit of surprise?
Let’s talk about Wondershare Filmora Video Editor, the editing king to drastically change your videos and make them shine. The software is not an ordinary editor; it lets you trim, cut, join, split your video along with other editing options.
Do you know any good software for motion tracking? Wondershare Filmora offers many brilliant features like Key Framing, Silence Detection, Green Screen, Color Match, and whatnot. If you want to create exciting videos with exciting effects and features, then Filmora is a must-try.
Wondershare Filmora
Get started easily with Filmora’s powerful performance, intuitive interface, and countless effects!
Try It Free Try It Free Try It Free Learn More >

02 Tips About How to Convert Video for WhatsApp
03 Tricks About How to Edit Video for WhatsApp
Part 1. Introduction About WhatsApp Supported Video Formats
Are you facing trouble with WhatsApp videos and sharing them? It might be because of the video format WhatsApp as WhatsApp supports certain video formats. You should have the video in the supported format for using videos on WhatsApp and sharing them.
WhatsApp supports a maximum file size of 16MB is approximately a video of 90 seconds to 3 minutes. Whereas if we talk about WhatsApp status, it allows 30 seconds duration for the video. WhatsApp supports and MPEG-4 codec for videos and audio, and AC3.
Moving on, the WhatsApp-supported video formats include MP4, MKV, AVI, MOV, and also 3GP. Do you want to know more about these formats? Let’s help you.
MP4
This is the most commonly used format for both video and audio files. Other than this, MP4 also stores data like subtitles, still images, etc. Interesting, it also allows streaming.
MKV
MKV is an open container, free format. The format can hold videos, pictures, audio, and also an unlimited number of subtitles. Additionally, the format is universally used to store multimedia content like your favorite TV show or movies.
AVI
Audio Video Interleave is another video format supported by WhatsApp. Do you know that the AVI format supports synchronous audio-with-video playback? The file format stores both video and audio data in a file container.
MOV
Apple developed a MOV file format that can hold a wide range of media content like your audio, video, and even text. It stores data in the same file but on different tracks. The file format is commonly used in video editing software.
3GP
3GP is Third Generation Partnership Project (3GPP), a multimedia container for multimedia services. The format works great on 3G mobile phones, but it can also be used on 2G and 4G phones. 3GP is also a video format supported by WhatsApp.
Part 2. Tips About How to Convert Video for WhatsApp
Now that you know about video formats supported by WhatsApp, shall we introduce tips to convert the file format? In case you have a video that is not supported by WhatsApp, the following section of this article will assist as we are about to introduce Wondershare UniConverter . The video converter software is GPU accelerated, and it promises to maintain the original video quality.
UniConverter offers 90x faster conversion speed. You can convert video from and to different formats and also for different devices. Moreover, with UniConverter, you can convert multiple media files at once. Do you know what else UniConverter has to offer? The software is not just a video converter; it’s much more than that; you can use its Background Remover, Subtitle Editor, Smart Trimmer, etc.
Apart from converting your videos to WhatsApp video format, with UniConverter, you can also convert them into various popular web formats like Facebook, Instagram, Vimeo, YouTube, Amazon, and also eBay. Do you know an exciting thing about UniConverter? Well, it also supports various 4K and 3D files. If you are impressed with UniConverter, let’s move on and share the steps to use the software:
Step 1: To start, launch Wondershare UniConverter on your device and make sure that you have selected the ‘Converter’ option from the left menu. After this, from the right window, import the video files that you plan to work with.
Step 2: Now, head to the bottom of the main screen and look for the ‘Output Format’ option. Open it and go to the ‘Video’ section. There, from the list of various file formats, select the supported video format for WhatsApp from the left and the right, select a resolution.
Step 3: UniConverter is famous for its speedy conversion; for this, hit on the ‘High-Speed Conversion’ from the top right corner. Next, select your desired location to save the file from the bottom by using the ‘File Location’ field. Once done, hit the ‘Convert’ button to get the video format converted.
Part 3. Tricks About How to Edit Video for WhatsApp
Do you plan to edit your WhatsApp videos? If you do, then we have a little treat for you; let us introduce Wondershare Filmora Video Editor . The software can change your editing game with its phenomenal features and amazing editing elements.
Do you want to know what features and elements we are talking about? Let’s tell you. Wondershare Filmora offers high-quality effects and transitions that can transform your video. Along with this, you get a wide variety of titles and other editing elements that could be used.
Filmora has a clean and straight interface; users can understand the software very quickly and work with it. Moreover, the video editor lets you select your preferred output format and then export the file. You get various cool features like green screen background, split-screen, join video, and a lot more.
For Win 7 or later (64-bit)
For macOS 10.12 or later
Interestingly, the software offers elements according to the latest trends and events around, like Christmas, Valentine’s, birthday, etc. Do you want to use Filmora to edit your WhatsApp video? For guidance, follow the steps shared below:
Step 1: For editing, launch Wondershare Filmora on your device and import the video file by heading to the ‘File’ tab. After that, hover on to the ‘Import Media’ option and select the ‘Import Media Files’ option.
Step 2: After locating your desired file, import it. Once successfully imported, then drag the file from the ‘Project Media’ section to the ‘Timeline’ so that you can start the editing.
Step 3: Let the fun begins! You can edit and transform your video file by adding various sound effects to it that Filmora offers you. Users can access the effects from the ‘Audio’ tab.
Step 4: Are you worried about titles? Don’t worry because Filmora offers a wide range of title templates that you can select from and customize too. Just head to the ‘Titles’ tab from the top menu bar and enjoy.
Step 5: What is editing without cool transitions and effects? Filmora comes with unique and distinct video effects and transitions that you can use by accessing the ‘Effects’ and ‘Transitions’ tabs.
Step 6: Once you are satisfied with all the editing, it’s time to export the video file. Hit on the ‘Export’ button and select WhatsApp-supported video format to save the file.
Wrapping Up
If you have been struggling with WhatsApp videos, this article is for you. We have discussed in detail WhatsApp-supported video formats. Not just this, we also talked about a video converter that could be used to convert video formats. Moreover, we shared a video editor to edit your WhatsApp videos. Are you ready for a bit of surprise?
Let’s talk about Wondershare Filmora Video Editor, the editing king to drastically change your videos and make them shine. The software is not an ordinary editor; it lets you trim, cut, join, split your video along with other editing options.
Do you know any good software for motion tracking? Wondershare Filmora offers many brilliant features like Key Framing, Silence Detection, Green Screen, Color Match, and whatnot. If you want to create exciting videos with exciting effects and features, then Filmora is a must-try.
Wondershare Filmora
Get started easily with Filmora’s powerful performance, intuitive interface, and countless effects!
Try It Free Try It Free Try It Free Learn More >
Guide on VHS Technology and Its Influence on Video Editing
Videos are a person’s crucial and cherished memory, and no one wants to compromise their quality. People tend to rely on several effects to exceed the quality of the beloved videos. VHS is the most used effect, popular in professional and personal videos. It stands for “Video Home System” and is often integrated with noises, color bleeding, and smooth glitches.
With VHS-style videos, you can not only make videos more high-class but can also intuitively define their worth. If you are new to this field, you should get familiar with the VHS effects in video. This context will provide basic information about VHS tapes and how to add VHS effects to videos.
Part 1: What Is VHS Technology? An Overview of the 70s Sensation
From definition to usability, every piece of information plays an important role in your videography journey. Don’t worry if you don’t have video editing skills or know what VHS means. This section will provide you with reliable information about this:
What Do You Mean by VHS Technology?
VHS, also known as Video Home System, are the auditory artifacts and visual glitches you see in the pictures. It creates a sense of distortion in the video, making the viewer think the camera equipment is malfunctioning. From the 1980s to the 1990s, this effect gained considerable popularity among video creators and viewers.
In recent years, retro lovers have brought this intuitive effect again into a trend to create a perfect flashback scene. The nostalgic and vintage appeal of these effects is insane. VHS is not just one effect because it divides into further categories. You are also free to select the VHS effects according to the theme of your video and the scene you are going to create.
Key Aspects of The VHS Effects
Several key aspects are crucial to making high-quality VHS effects in the videos. You can see some of the key aspects listed and discussed here:
- **Tracking Lines of VHS:**The VHS tapes are integrated with magnetic strips to sort audio and video signals. However, over time, these tapes degraded, leading to glitches in playback with noticeable distortion.
- **Video Color Bleeding:**You must have noticed that color is bleeding in the VHS videos. In this, the colors in the videos are quite smudged and mixed. This together adds the unique yet smoother distortion in the videos.
- **Vintage and Glitching:**Vintage and glitches are essential to videos with VHS effects. This was initially caused by the limitations of playback equipment and signal interference. At this time, people add glitch VHS to the videos in a manual manner to add a sense of interference in the scene.
- **Noise and Jitters:**VHS tapes are known to be susceptible to wrappings and jitters. It causes a slightly unstable effect in the videos in the form of distorted objects. Moreover, the grainy and noisy appearance due to analog recording technology is also a part of this effect.

Add VHS Effect to Video
Simply add video effects on Video with Filmora Video Effect Editor ! Experience the magic of cool yet outstanding video effects, where your videos come to life in beautiful visuals.
Apply VHS Effect Apply VHS Effect Learn More >


Part 2: What are VHS Effects and What Is Its Use?
Now that you have learned what VHS technology is and what are its key aspects, you must be eager to learn about the VHS effects. Moreover, knowing the proper and effective usage of VHS effects is also an important thing. The below-given information will help you regarding this issue:
What are VHS Effects?
Video Home System, which is famous as VHS, is the type of effect that is used in videos to create manual distortion. It was initially developed by the Victor Company in Japan and was introduced in the 1970s. From then to now, VHS tapes gained reliable popularity across the world. The purpose of creating this effect was to give video recording capabilities to consumers.
In addition to this, the video format in which you can apply this effect was also recognized by potential marketers. The aim of creating this effect was to make affordable yet user-friendly videos. With the help of VHS effects, people could watch cinematic quality movies in their living rooms. The popularity of VHS never stops growing, and even now, video editors love to add this intuitive effect to their videos.
What is the Use of the VHS Effect?
You can use the VHS effects in several creative contexts to achieve artistic goals. Some of the uses of the VHS style are listed below for you:
Video Production
You are free to use the glitch VHS effect in filmmaking and video production projects. It is perfect for retro and vintage-themed movies. This effect also has the capability to add the old fashion sense to engage more users.
Motion and Designing Graphics
The VHS effects are also very helpful in graphic and motion designing. You can add eye-catching visual composition elements to every type of video. This may include scan lines, glitches, and, of course, distortion.
Social Media Content Creation
If you plan to share your past life with your followers, don’t forget to add the old life-themed VHS effects in the videos. This makes your video more retro-friendly and adds a sense of consistency to the videos.
Editing and Experimentations
Getting something new without losing the video quality is the dream of every video editor. The VHS effects can help you in making this dream come true. You can use this effect while editing your videos and can also use it as an experiment.

Part 3: Legacy and Influence of VHS in Video Making
The legacy and influence of this preliminary effect will continue to take hold in every age of digitalization. Here are some of the key points which will guide you about this to a further extent:
Democratization of VHS in Videos
You will never fail to see the pivotal role of VHS in democratizing video productions. It helps to make the video more accessible to a wider amount of audience. Before the introduction of VHS, video production was limited to professional studios. However, now every person can use this to make independent files and share their creativity with the world.
Editing Techniques and Influence
VHS has introduced a wide array of editing techniques and manuals to the users to manipulate video content. Moreover, the VHS editing system and techniques also encourage experimentation. You also get a sense of trying the latest editing skills. It is also known to explore and add a sense of storytelling through simple procedures.
Aesthetics and Pop Culture
In recent years, VHS has experienced several revivals of pop culture themes. It can add aesthetics and a sense of nostalgia to every type of video. You will also see VHS integrations on several music, ads, and events videos. You can also use this effect to preserve the digitalized content without extra effort.
Documentation and Accessibility
With the help of the VHS effect, you can formulate several types of documentation in lossless quality. It helps you to add retro appeal to all your formatted documentaries and make them easily accessible. Above all, you can also distribute the video content at an optimized speed without using any non-mainstream server.
Part 4: Wondershare Filmora: A Great Video Editor Influencing the Use of VHS Effects
You cannot apply the VHS effect to the videos without a reliable video editor. The most known and significant video editor that can help you apply the glitch VHS effect in videos is Filmora Video Editor . Using this premium-grade tool, you can create new projects at any time and customize its visual metrics.
Add VHS Effect For Win 7 or later(64-bit)
Add VHS Effect For macOS 10.14 or later
This premium-grade video editor understands the VHS definition and offers you a wide array of VHS effects. This includes VHS Distortion, VHS Static 1, Vintage Viewfinder, and more. You can drag any effect of your choice to the video in the timeline and apply it to the whole video or a personalized part of the video. One of the best things about Filmora is that it integrates versatile built-in templates. Through this, you can make videos without any issues.

Conclusion
To wrap things up, this discussion has guided you about VHS style and technology. Now, you know what VHS technology is, its key aspects, and what scenarios you can use it. Other than this, the legacy and influence of this effect are also mentioned above. For applying the VHS effects, you can use the industry standard video editor named Wondershare Filmora.
This video editor supports multiple VHS effects, and you can also customize its size and opacity. More valuable information about Filmora is listed above for you.
Add VHS Effect For Win 7 or later(64-bit)
Add VHS Effect For macOS 10.14 or later
Apply VHS Effect Apply VHS Effect Learn More >
Part 2: What are VHS Effects and What Is Its Use?
Now that you have learned what VHS technology is and what are its key aspects, you must be eager to learn about the VHS effects. Moreover, knowing the proper and effective usage of VHS effects is also an important thing. The below-given information will help you regarding this issue:
What are VHS Effects?
Video Home System, which is famous as VHS, is the type of effect that is used in videos to create manual distortion. It was initially developed by the Victor Company in Japan and was introduced in the 1970s. From then to now, VHS tapes gained reliable popularity across the world. The purpose of creating this effect was to give video recording capabilities to consumers.
In addition to this, the video format in which you can apply this effect was also recognized by potential marketers. The aim of creating this effect was to make affordable yet user-friendly videos. With the help of VHS effects, people could watch cinematic quality movies in their living rooms. The popularity of VHS never stops growing, and even now, video editors love to add this intuitive effect to their videos.
What is the Use of the VHS Effect?
You can use the VHS effects in several creative contexts to achieve artistic goals. Some of the uses of the VHS style are listed below for you:
Video Production
You are free to use the glitch VHS effect in filmmaking and video production projects. It is perfect for retro and vintage-themed movies. This effect also has the capability to add the old fashion sense to engage more users.
Motion and Designing Graphics
The VHS effects are also very helpful in graphic and motion designing. You can add eye-catching visual composition elements to every type of video. This may include scan lines, glitches, and, of course, distortion.
Social Media Content Creation
If you plan to share your past life with your followers, don’t forget to add the old life-themed VHS effects in the videos. This makes your video more retro-friendly and adds a sense of consistency to the videos.
Editing and Experimentations
Getting something new without losing the video quality is the dream of every video editor. The VHS effects can help you in making this dream come true. You can use this effect while editing your videos and can also use it as an experiment.
Part 3: Legacy and Influence of VHS in Video Making
The legacy and influence of this preliminary effect will continue to take hold in every age of digitalization. Here are some of the key points which will guide you about this to a further extent:
Democratization of VHS in Videos
You will never fail to see the pivotal role of VHS in democratizing video productions. It helps to make the video more accessible to a wider amount of audience. Before the introduction of VHS, video production was limited to professional studios. However, now every person can use this to make independent files and share their creativity with the world.
Editing Techniques and Influence
VHS has introduced a wide array of editing techniques and manuals to the users to manipulate video content. Moreover, the VHS editing system and techniques also encourage experimentation. You also get a sense of trying the latest editing skills. It is also known to explore and add a sense of storytelling through simple procedures.
Aesthetics and Pop Culture
In recent years, VHS has experienced several revivals of pop culture themes. It can add aesthetics and a sense of nostalgia to every type of video. You will also see VHS integrations on several music, ads, and events videos. You can also use this effect to preserve the digitalized content without extra effort.
Documentation and Accessibility
With the help of the VHS effect, you can formulate several types of documentation in lossless quality. It helps you to add retro appeal to all your formatted documentaries and make them easily accessible. Above all, you can also distribute the video content at an optimized speed without using any non-mainstream server.
Part 4: Wondershare Filmora: A Great Video Editor Influencing the Use of VHS Effects
You cannot apply the VHS effect to the videos without a reliable video editor. The most known and significant video editor that can help you apply the glitch VHS effect in videos is Filmora Video Editor . Using this premium-grade tool, you can create new projects at any time and customize its visual metrics.
Add VHS Effect For Win 7 or later(64-bit)
Add VHS Effect For macOS 10.14 or later
This premium-grade video editor understands the VHS definition and offers you a wide array of VHS effects. This includes VHS Distortion, VHS Static 1, Vintage Viewfinder, and more. You can drag any effect of your choice to the video in the timeline and apply it to the whole video or a personalized part of the video. One of the best things about Filmora is that it integrates versatile built-in templates. Through this, you can make videos without any issues.
Conclusion
To wrap things up, this discussion has guided you about VHS style and technology. Now, you know what VHS technology is, its key aspects, and what scenarios you can use it. Other than this, the legacy and influence of this effect are also mentioned above. For applying the VHS effects, you can use the industry standard video editor named Wondershare Filmora.
This video editor supports multiple VHS effects, and you can also customize its size and opacity. More valuable information about Filmora is listed above for you.
Add VHS Effect For Win 7 or later(64-bit)
Add VHS Effect For macOS 10.14 or later
Learning How to Create LUTs with LUTs Generator
Lookup Tables can make your videos and pictures look more attractive. LUTs are like filters that give your media files different styles and emotions. There are many presets available on the internet that you can download to use for your media content. Moreover, LUTs help you to quickly change the look and mood of your photos and videos.
You can find LUTs for free or buy them online; some editing software already has LUTs included. Nevertheless, you can create your own LUTs using different online and offline tools. If you can’t find any online LUT generator, search for LUT generator free download. You’ll get many options allowing you to generate LUTs offline.
- Part 2: How to Create LUTs Using LUT Generator Free Download?
- Part 3: How to Create Online LUTs Using Online LUT Creator?
- Bonus Part: Wondershare Filmora – The Perfect Tool to Use Your LUTs
Part 1: An Overview of LUT Generator - The Best Platform for Creating LUTs
LUT Generator is an excellent tool for creating color-grading picture and video presets. This powerful LUT generator-free tool is available on both Windows and Mac. Moreover, you can create LUTs from any photo and video editing application, including Lightroom and Camera Raw. Not only can you create your LUTs, but you can also download presets that are already available.
Furthermore, it offers over 290 cinematic styles LUTs and 50+ LUTs that are optimized for drones and GoPro videos. If you want a surreal look, you can also use 70+ Psychedelia LUTs. This tool allows you to apply third-party effects easily on your photos and videos. Moreover, you can even match the tone of clips from different cameras to give a uniform look.
Part 2: How to Create LUTs Using LUT Generator Free Download?
If you don’t want to apply online LUTs that are available, you can create your own. To do so, you have to download the LUT Generator tool and follow these simple steps to create LUTs.
Step1
To create a LUT of your liking, search for the LUT Generator free download on your browser and download the tool.
Step2
As you launch it, continue to select the “Generate a HALD” option. This option will let you generate a PNG HALD that you can use for color grading using editing software.
Step3
Open the generated PNG HALD into your preferred photo editing application. Apply the desired color correction on the PNG HALD. Save the modified PNG HALD without compression as PNG or at 100% quality in JPG format.
Step4
Click the “Convert to CUBE” button in the LUT Generator and select the modified PNG HALD you saved in the previous step.
Step5
In Preferences, choose the desired size of the 3D LUT as .CUBE format. You can choose between 25x25x25 or 64x64x64. After selecting your desired size, your customized LUT will be created in .CUBE format.

Part 3: How to Create Online LUTs Using Online LUT Creator?
There are two methods to create a LUT online and offline. Previously you’ve learned to generate LUTs using offline tools. However, you can also create LUTs online without installing any tool. This portion will teach you how to create online LUTs in this step-by-step guide.
Step1
Import your photo into Lightroom by dragging and dropping it. You can also import the file by clicking the “File” button and selecting “Import Photos and Video.” For best results, ensure that the photo you will edit is still.

Step2
Edit your photo inside the “Develop” module in Lightroom with your desired preference and style. Only apply changes affecting the colors, not adjustments like noise reduction, vignette, or grain.

Step3
Download the original PNG from <www.onlinelutcreator.com/lutcreator> . Import it into Lightroom as you did in the first step.

Step4
Right-click on your edited photo in the Develop module. Click “Develop Settings,” and select “Copy Settings.” After that, a new window will pop up; make sure you have the same things checked as in the screenshot.

Step5
Right-click the original downloaded PNG file in the Develop module. Go to “Develop Settings,” and choose “Paste Settings.” This will paste the settings from your edited photo onto the original PNG.

Step6
Now export the edited PNG by right-clicking on the PNG and selecting “Export.” In the Export popup menu, ensure you have the same settings as in the screenshot.

Step7
Go back to <www.onlinelutcreator.com/lutcreator> and upload the edited PNG. Generate your LUT and download it. You can now use this LUT to adjust the same color to other videos or photos.

Bonus Part: Wondershare Filmora – The Perfect Tool to Use Your LUTs
Wondershare Filmora is a powerful video editing tool that allows you to use your customized LUTs using this tool. With this tool, you can apply your custom LUTs. Moreover, you can choose from over 200+ pre-made LUTs in its library. Additionally, you can fine-tune your videos with various adjustment and correction options.
Furthermore, you can make changes frame-by-frame to your video footage. This tool also allows you to remove background noises with its AI feature. Moreover, this tool can automatically remove all your long pauses and awkward silence moments from your videos. However, to create a professional video with more options and control, it is a great tool to use.

Key Features To Keep Note of For Wondershare Filmora
- With Filmora, you can select any object or person and change its background. The AI Smart Cutout feature allows you to choose a person to change their background.
- Another fantastic feature is that it gives you access to 10 billion free media files. Moreover, you can select over 200 presets from its in-built for your videos.
- Wondershare Filmora has another unique feature, especially for vloggers and podcasters. With the Auto Ducking feature, music will fade when someone is speaking.
Empower your videos with a new mood using different LUTs. Filmora now offers 100+ top-quality 3D LUTs cover a broad range of scenarios. Transform your videos with Filmora’s powerful 3D LUTs.
Apply LUT on Videos Apply LUT on Videos Learn More
Conclusion
In conclusion, LUTs are essential in modern video and photo editing. They allow editors to apply different color adjustments to color-correct their digital media. There are many pre-made LUTs available online, covering various styles and moods. However, you can create your LUTs with LUT generator-free tools online and offline. You can apply these LUTs using tools like Wondershare Filmora.
- Part 3: How to Create Online LUTs Using Online LUT Creator?
- Bonus Part: Wondershare Filmora – The Perfect Tool to Use Your LUTs
Part 1: An Overview of LUT Generator - The Best Platform for Creating LUTs
LUT Generator is an excellent tool for creating color-grading picture and video presets. This powerful LUT generator-free tool is available on both Windows and Mac. Moreover, you can create LUTs from any photo and video editing application, including Lightroom and Camera Raw. Not only can you create your LUTs, but you can also download presets that are already available.
Furthermore, it offers over 290 cinematic styles LUTs and 50+ LUTs that are optimized for drones and GoPro videos. If you want a surreal look, you can also use 70+ Psychedelia LUTs. This tool allows you to apply third-party effects easily on your photos and videos. Moreover, you can even match the tone of clips from different cameras to give a uniform look.
Part 2: How to Create LUTs Using LUT Generator Free Download?
If you don’t want to apply online LUTs that are available, you can create your own. To do so, you have to download the LUT Generator tool and follow these simple steps to create LUTs.
Step1
To create a LUT of your liking, search for the LUT Generator free download on your browser and download the tool.
Step2
As you launch it, continue to select the “Generate a HALD” option. This option will let you generate a PNG HALD that you can use for color grading using editing software.
Step3
Open the generated PNG HALD into your preferred photo editing application. Apply the desired color correction on the PNG HALD. Save the modified PNG HALD without compression as PNG or at 100% quality in JPG format.
Step4
Click the “Convert to CUBE” button in the LUT Generator and select the modified PNG HALD you saved in the previous step.
Step5
In Preferences, choose the desired size of the 3D LUT as .CUBE format. You can choose between 25x25x25 or 64x64x64. After selecting your desired size, your customized LUT will be created in .CUBE format.
Part 3: How to Create Online LUTs Using Online LUT Creator?
There are two methods to create a LUT online and offline. Previously you’ve learned to generate LUTs using offline tools. However, you can also create LUTs online without installing any tool. This portion will teach you how to create online LUTs in this step-by-step guide.
Step1
Import your photo into Lightroom by dragging and dropping it. You can also import the file by clicking the “File” button and selecting “Import Photos and Video.” For best results, ensure that the photo you will edit is still.
Step2
Edit your photo inside the “Develop” module in Lightroom with your desired preference and style. Only apply changes affecting the colors, not adjustments like noise reduction, vignette, or grain.
Step3
Download the original PNG from <www.onlinelutcreator.com/lutcreator> . Import it into Lightroom as you did in the first step.
Step4
Right-click on your edited photo in the Develop module. Click “Develop Settings,” and select “Copy Settings.” After that, a new window will pop up; make sure you have the same things checked as in the screenshot.
Step5
Right-click the original downloaded PNG file in the Develop module. Go to “Develop Settings,” and choose “Paste Settings.” This will paste the settings from your edited photo onto the original PNG.
Step6
Now export the edited PNG by right-clicking on the PNG and selecting “Export.” In the Export popup menu, ensure you have the same settings as in the screenshot.
Step7
Go back to <www.onlinelutcreator.com/lutcreator> and upload the edited PNG. Generate your LUT and download it. You can now use this LUT to adjust the same color to other videos or photos.
Bonus Part: Wondershare Filmora – The Perfect Tool to Use Your LUTs
Wondershare Filmora is a powerful video editing tool that allows you to use your customized LUTs using this tool. With this tool, you can apply your custom LUTs. Moreover, you can choose from over 200+ pre-made LUTs in its library. Additionally, you can fine-tune your videos with various adjustment and correction options.
Furthermore, you can make changes frame-by-frame to your video footage. This tool also allows you to remove background noises with its AI feature. Moreover, this tool can automatically remove all your long pauses and awkward silence moments from your videos. However, to create a professional video with more options and control, it is a great tool to use.
Key Features To Keep Note of For Wondershare Filmora
- With Filmora, you can select any object or person and change its background. The AI Smart Cutout feature allows you to choose a person to change their background.
- Another fantastic feature is that it gives you access to 10 billion free media files. Moreover, you can select over 200 presets from its in-built for your videos.
- Wondershare Filmora has another unique feature, especially for vloggers and podcasters. With the Auto Ducking feature, music will fade when someone is speaking.
Empower your videos with a new mood using different LUTs. Filmora now offers 100+ top-quality 3D LUTs cover a broad range of scenarios. Transform your videos with Filmora’s powerful 3D LUTs.
Apply LUT on Videos Apply LUT on Videos Learn More
Conclusion
In conclusion, LUTs are essential in modern video and photo editing. They allow editors to apply different color adjustments to color-correct their digital media. There are many pre-made LUTs available online, covering various styles and moods. However, you can create your LUTs with LUT generator-free tools online and offline. You can apply these LUTs using tools like Wondershare Filmora.
Windows Movie Maker Review
Are you considering creating impressive movies from your video clips? Then you need to install this famous Windows movie maker tool to fulfill your job. This is expert video editing Microsoft software that you may use for free. This video editing tool by Windows has received massive recognition due to its simplicity. Also, it makes every task easy and quick, like combining video clips to form digital movies, including various effects, background music, transitions, and titles.
So, Windows Movie Maker is undoubtedly the ideal software for this job. Moreover, video editors using this app experience several attributes in their organization to finally emerge with the perfect videos, like audio options, animations, transitions overlays, and timeline narration. It has user-friendly features, which you’ll enjoy experimenting with. This software also has XML code allowing its end users to modify live effects and transitions or even prepare very new ones.
This brilliant tool can even do primary track editing, including fade-out and fade-in effects in your final audio tracks. Windows movie maker even allows you to post your final project effortlessly on various video sites and social media platforms. Here’s a complete guide:
1. Download and Install Windows Movie Maker
Windows movie maker was previously recognized in Windows 7 as Windows Live Movie Maker. So to experience the features of this software, first, you need to download and install this app which is available free of charge. The steps are as follows.
- Firstly, download the setup file of Windows Live Essentials.
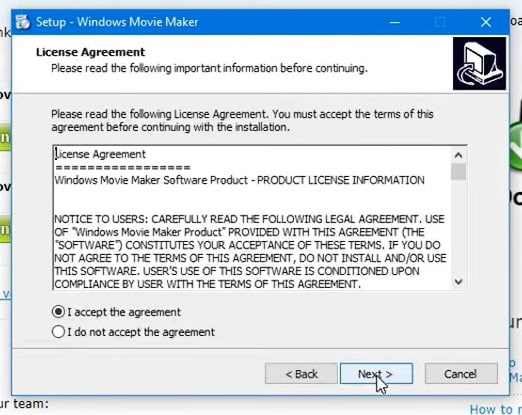
- You’ve to double-click on this setup file called windows-movie-maker.exe. Then tap on ‘Yes’ to permit the setup package to function.
- You’ll now be redirected to the installation window of Windows Essential. Next, you’ll see two options towards the web page’s top, and you’ll have to select the option ‘Install all of Windows Essentials (recommended)’ to continue with the installation process.
Windows Essentials comprise Microsoft OneDrive, Outlook Connector Pack, Movie Maker, Writer, Mail, Photo Gallery, and Messenger.
- Locate ‘View Details’ towards the left end of the page and tap on it. A progress and percentage bar will pop out along with the details regarding the program you’re installing.
- You need to wait a while to install Windows Movie Maker Software. Pause until the program completes its installation. After you find that the program title changes to another program such as Mail, you may proceed again.
- Now click on the Windows icon and then the ‘Start’ menu on the bottom left of your computer screen.
- Type and Search for ‘Windows Movie Maker, and you’ll find the newly downloaded app on the screen.
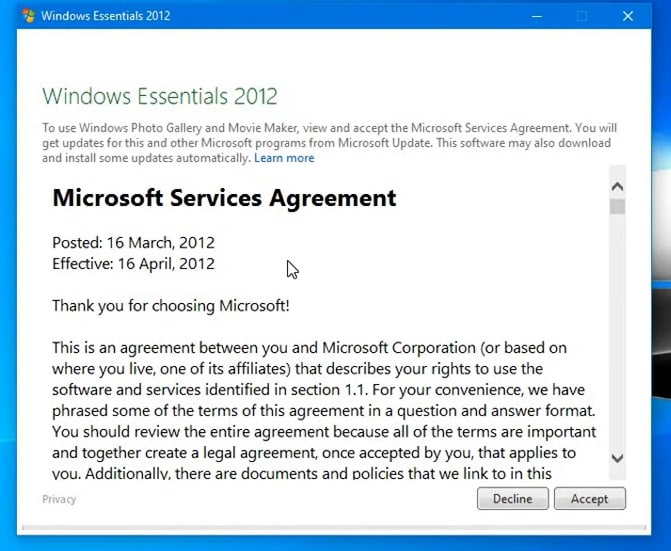
- Click on the icon with film reel, which is the Movie Maker app, and you’ll locate it above the Start menu. Next, you’ll be redirected to the terms of use of Windows Essentials for this Window to begin.
- Find the ‘Accept ‘ button towards the screen’s right-end corner and tap on it. Windows Movie Maker will now open.
- Next, tap on ‘Close’ when prompted with an error message from the installation windows.
You may now Enjoy Windows Movie Maker Live and begin making movies and videos using this software.
2. Interface
The user interface of Winona Movie Maker has three essential areas: the timeline and the storyboard, the panes and the toolbar, and the menu bar. This area covers…
- Timeline and storyboard: It offers a timeline and storyboard usage details for working with the current project clips.
- Panes: It offers details regarding Collections pane usage for viewing all your collections. Furthermore, it offers information regarding the Movie Task pane for all general tasks during movie making or project editing.
- Toolbar and Menubar: Here, you’ll get details regarding toolbar and menu commands usage for different tasks in this software.
3. Basic Editing
Adding clips to your timeline is the most straightforward method for creating digital movies using Movie Maker. Thereby, picking any one AutoMovie Themes out of those seven choices from default, sepia, black and white, pan and zoom, fade, cinematic, and contemporary.
You can enjoy the following choices for editing all your video clips:
- Creating clips: You may create new clips from different video clips after you’re done with capturing and importing in the Windows Movie Maker. You may create clips in the software anytime, according to your convenience.
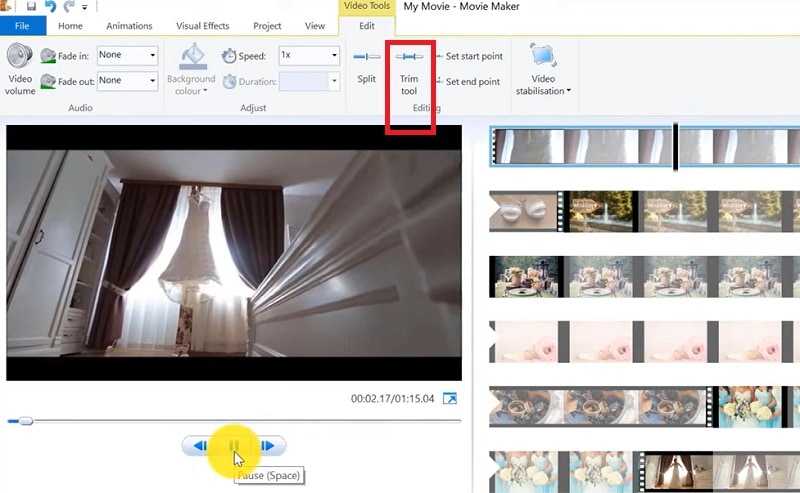
- Trimming any clip: You may hide any clip part you don’t wish to keep in the project. For instance, you may trim the clip’s end or beginning. Also, trimming doesn’t erase the details provided in their source material.
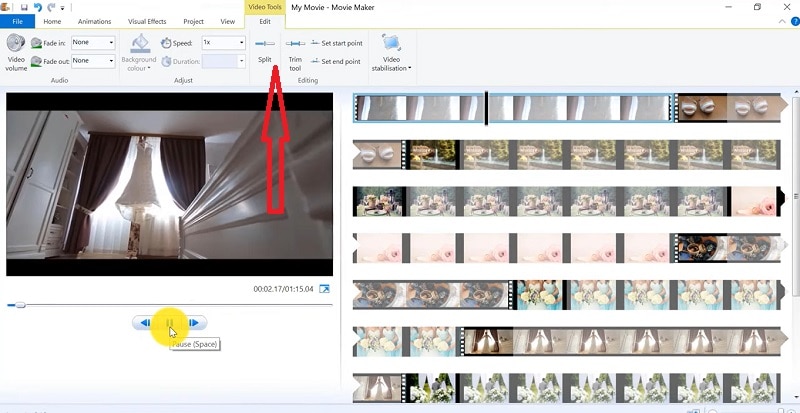
- Splitting Clips: Movie Maker allows you to split any video into two parts which can be helpful when you wish to add a video transition picture between the clips.
- Combining clips: Movie Maker allows you to merge two or multiple contiguous clips. Contiguous indicates that you need to record these clips together so that the beginning and end times are the same as the following video clip.
4. Add Video Effects
Video effects’ ascertain how any title, picture, or video clip displays in the final movie or project. Video effects permit you to include various effects in the movie and are added for the total time that the title, picture, or video clip displays.
Furthermore, you may add various other effects, which you’ll find in the folder of video effects in their Collections pane. You may maintain video effects when moving, copying, cutting, or splitting a picture or video clip.
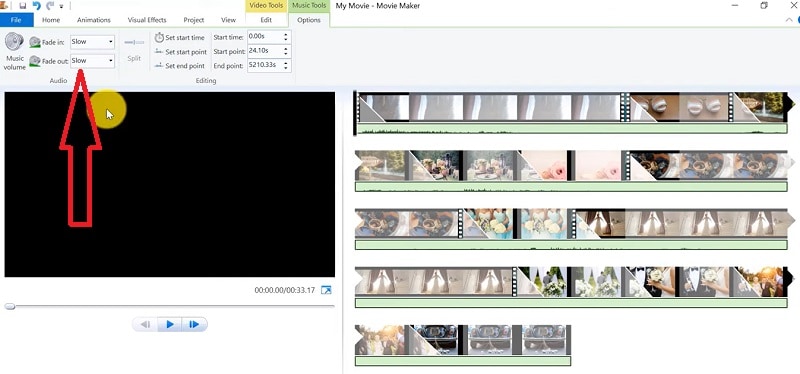
5. Audio Editing
Windows Movie Maker permits you to operate various audios in several ways. A few specific audio-related jobs you may execute in Windows Movie Live Maker comprise the following:
- Audio levels adjustment: You can adjust your audio level so that you can easily control the audio playback and balance after you have the audio that comes up on Music/ Audio and Audio tracks in your timeline.
- Timeline narration: You may include a voice narration for the picture or video clips, which will appear on the timeline’s video track. There’ll be an automated synchronization of the audio narration with your video, where the narration shall elaborate on the movie event or action when you play it.
- Audio Clips Volume adjustment: You may adjust the audio volume for the video clip’s audio portion or the clips containing only audio. This permits you to control the audio clip’s volume such that you can hear it based on the sound level you’ve set for your audio clip.
- Adding audio effects: You may add various audio effects like mute, fade out and fade in.
6. Share Files
Are you done with video project editing, and now you wish to share it? Windows Movie Maker offers you various choices for sharing straight away from their app, comprising:
- YouTube
- Vimeo
So with this power, you may guarantee to share the video’s correct aspect ratio and size version to any planned platform. Nevertheless, you don’t require signing in to your Microsoft account for sharing to the preferred platform, which may act as a hurdle for all its users who do not have Microsoft Office accounts.
7. Pros and Cons
The software’s advantages are its automated preview, simple controls, and user-friendliness. Additionally, the following are some clear advantages and disadvantages of using Windows Movie Maker:
Pros
- This app is perfect for all novices and is an ideal introduction as it utilizes several pro editing systems’ general workflow components like assembling timelines and importing. Its interface has easy navigation and is exceptionally intuitive for most new beginners as well.
- Windows Live MovieMaker is a video editing Microsoft application that arrives standard with all Windows computers. It is amongst the most favorite editing apps obtainable and exact, as other programs are user-friendly and fun. This software comes free with Vista, XP, and Windows Me and has effortless usage. Moreover, you may download additional video plugins, plus it won’t give you any chance to complain regarding its free software.
- This app is straightforward to learn, and you won’t require any experience in film editing for using Windows Media Player. You’ll explore more than 130 effects with accessible Fantastic credits, titles, and transitions. Next to this, you may drag and then drop the clip at any place in the timeline.
- Windows Movie Maker is an ideal app for image slide shows and was developed to create photo and home movie slide shows. It presents excellent fun transitions and themes; you may add music easily. This app provides excellent variety, being a free editing application. Furthermore, it offers transitions and striking effects to function with.
- Windows Live Movie Maker is free of cost for all Microsoft Windows users and is basically for clients having zero to minimum experience editing audio and videos. Moreover, it has many special effects you may use while creating videos. Also, you may frag and then place any picture or video anywhere you wish to see it.
- You can choose from several themes, enhancing your film with tools like contemporary themes, fade effects, and sepia toning choices. You have to click once, and then the users can choose and apply from the multiple effects collection.
Cons
- Windows Movie Maker contains unlimited audio and video tracks, yet it provides just one accessible one at a time. Hence, if you wish to include some other audio or music track, you may prepare the video, thereby sending it to the ultimate file.
- It isn’t uninstallable using any remove or add control panel. Also, it is impossible to do video overlaying.
- This app requires much patience because it is prone to crashes. Moreover, you’ll require enough time and effort to do video reversing. It often becomes frustrating for all advanced editors to cut clips into small parts and then add them back. Hence, Windows Movie maker isn’t good for professional video editors.
- Windows Live MovieMaker can crash and freeze and is known to suffer frequent crashes. Hence, ensure saving often and avoid creating complex videos. Also, you cannot perform complex editing and can now prepare single audio and video track.
8. Windows Movie Maker Alternative Software
Wondershare Filmora Video Editor is the best alternative for Windows Movie Live Maker and is a highly favored and most effective software program. You can download it for free, and it is adaptable with Windows 7 OS or above. This app is user-friendly but powerful and allows you to split, merge, crop, and trip various video clips with essential built-in video editing attributes.
Free Download For Win 7 or later(64-bit)
Free Download For macOS 10.14 or later
Additionally, you may get a few advanced properties like video stabilization, color correction, and green screen in Filmora effortlessly. You may even explore several fashionable and modern video effects such as music, text, and intros for topics like games, Education, Travel, Vlogger, Beauty, etc. Here is the comparison between the two software:
Filmora and Windows Movie Maker comparison
| Basis | Windows Movie Maker | Wondershare Filmora |
|---|---|---|
| Pricing | Free/ inexpensive | Quote basedAnnual SubscriptionOne-time paymentMonthly Payment |
| Interface | Pleasing interface | Auto movie options |
| Effects | Several overlays and effects | Special effects choices and transition overlays |
| Integration | YouTubeFacebookVimeoEmail | TwitterInstagramFacebookVimeoYouTube |
Conclusion
You may use Windows Movie Maker Live for capturing videos and audio to the computer using various video sources, including Web Cameras and Video Cameras, thereby using the recorded data in your new movies. You may import still pictures, video, and audio into this application to use in the movies you’re making. Moreover, after you’ve finished with video and audio content editing in this app, which may involve adding effects, video transitions, and titles, you may finally save the ultimate movie and then share and watch it with your family and friends.
Also read:
- Updated Convert Your Videos to 60 FPS Using These Excellent Tools for 2024
- Updated Do You Want to Crop a TikTok Video? In This Article, We Will Provide You with Detailed Steps Through Which You Can Discover How to Crop TikTok Videos Easily for 2024
- New In 2024, Top 12 Sony Vegas Slideshow Templates for Free Download
- Zoom In and Out on Discord (Desktop + App + Browser Solutions) for 2024
- New How to Make Random Letter Reveal Intro, In 2024
- 2024 Approved How to Create Video Contents That Convert Sales
- Updated In 2024, How to Make a Bokeh Effect
- Updated | How to Change Quicktime Player Speed on Mac for 2024
- Updated How to Make Vintage Film Effect 1950S
- 2024 Approved Create Risograph Effect In Photoshop A Beginners Guide
- Updated In 2024, How to Do Datamoshing Effect in After Effects?
- Updated 2024 Approved 3 Best Effects to Appear on Camera
- How to Make Split Screen Videos in Filmora for 2024
- Updated Tactics to Create Transparent Image in Minimal Steps for 2024
- Updated | How to Share YouTube Video on Zoom for 2024
- New How to Change Aspect Ratio in iMovie for 2024
- In This Article, You Will Learn Easy Ways to Edit Videos Using a Mouse in Wondershare Filmora. You Can Do Video Editing without a Keyboard After Reading This Article for 2024
- New Separate Audio From Video in DaVinci Resolve Step by Step for 2024
- In 2024, Looking Forward to Complement Your Weekend Evenings with a Fantasy Tour to the Anime World? Stay Here to Pick the Most Appealing Alternative From the Best and Timeless Anime Creations
- Updated 2024 Approved Slow Down Videos on Instagram With Perfection A Guide
- Updated How To Export Video in Filmora for 2024
- Updated 2024 Approved Take Your Video Editing to the Next Level with Video Scopes
- A Detailed Guide on Faking Your Location in Mozilla Firefox On Xiaomi 13 Ultra | Dr.fone
- In 2024, How does the stardust trade cost In pokemon go On Samsung Galaxy M14 4G? | Dr.fone
- In 2024, How To Change Your Apple iPhone 14 Plus Apple ID on MacBook
- In 2024, How To Unlock Vivo Y200e 5G Phone Without Password?
- Forgot iPhone 15 Pro Backup Password? Heres What to Do
- 3 Effective Ways to Unlock iCloud Account Without Password From Apple iPhone 6 Plus
- iSpoofer is not working On Apple iPhone 15 Pro? Fixed | Dr.fone
- How to Fix Errors were detected while saving PDF? | Stellar
- How to Transfer Videos from Motorola Razr 40 to iPad | Dr.fone
- How To Transfer WhatsApp From iPhone 12 Pro Max to other iPhone 13 Pro devices? | Dr.fone
- How to Successfully Bypass iCloud Activation Lock from iPhone 6 Plus
- In 2024, How To Unlock Realme Note 50 Phone Without Password?
- How Do I Stop Someone From Tracking My Realme Narzo 60 Pro 5G? | Dr.fone
- How Can I Create My Pokemon Overworld Maps On Apple iPhone 14 Pro? | Dr.fone
- In 2024, Recommended Best Applications for Mirroring Your Nokia 130 Music Screen | Dr.fone
- In 2024, Things You Must Know for Screen Mirroring Apple iPhone 8 | Dr.fone
- Thinking About Changing Your Netflix Region Without a VPN On OnePlus 12? | Dr.fone
- Title: List of Supported Whatsapp Video Format You May Want to Know for 2024
- Author: Morgan
- Created at : 2024-04-24 00:49:18
- Updated at : 2024-04-25 00:49:18
- Link: https://ai-video-editing.techidaily.com/list-of-supported-whatsapp-video-format-you-may-want-to-know-for-2024/
- License: This work is licensed under CC BY-NC-SA 4.0.
