:max_bytes(150000):strip_icc():format(webp)/photo-editor-working-on-computer-at-desk-in-office-946928370-5b85791746e0fb0025b40d84.jpg)
LumaFusion Color Grading Achieving It Through LUTs

LumaFusion Color Grading: Achieving It Through LUTs
LumaFusion is one of the best-known apps to enhance video quality without impacting the overlays. With this app, you can modify the video in several ways, such as applying LUTs to videos and synchronizing MultiCam clips. Yet, many users find it challenging to use LumaFusion to color grade the clips.
In this discussion, we will discuss color grading in LumaFusion and the procedure to use it. Moreover, we will also introduce an app that can streamline your workflow efficiency. The name of this app is Wondershare Filmora, and it will also help you to apply LUTs on computers.
Part 1: How Do LUTs Make Work Operation Easy?
Before getting into the free LUTs for LumaFusion, it is important to know the higher functionality of LUTs. If you are new to the field of video editing, you may have no idea how LUTs can improve your work operation. This section will help you to understand it without complications:
- Modern Styles and Looks: LUTs offers predefined and modernized styles and look that are created by specialists. As these LUTs have prebuilt color grading techniques along with file emulation, you can use them to increase the attractiveness of videos.
- Higher Workflow Efficiency: The prebuilt LUTs can make your work easier than ever. You can apply the LUTs to the videos in the simplest manner, along with saving time and effort.
- Compatibility of LUTs: There are no such device restrictions in LUTs, as you can use them on computers or mobile devices. Above all, LUTs are also compatible with several video editing software.
- Customization and Experimentation: While using the LUTs, you can customize them as per your needs without any problem. Other than this, you can also experiment the creativity and visual styles with LUTs.
Empower your videos with a new mood using different LUTs. Filmora now offers 100+ top-quality 3D LUTs cover a broad range of scenarios. Transform your videos with Filmora’s powerful 3D LUTs.
Apply LUT on Videos Apply LUT on Videos Learn More

Part 2: What Are the Potential Ways to Apply LUTs for LumaFusion?
There are considerable ways to apply LUTs in LumaFusion, but we plan to introduce the most straightforward ways. Don’t fret if you have no video editing skills. By following the below-given steps, you can experience the LumaFusion color grading:
Way 1: Apply LUTs Through Sharing
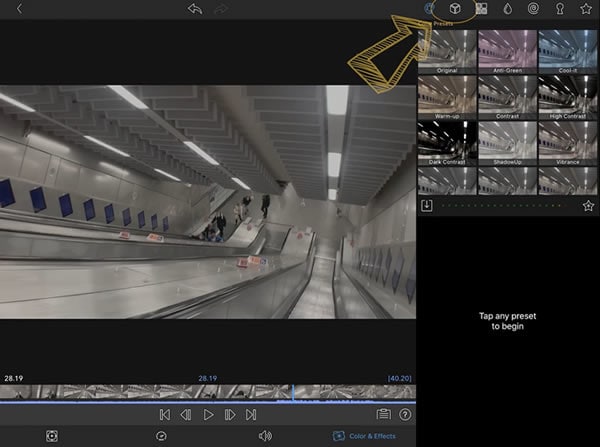
Step 1: Initially, import the video to LumaFusion and double-tap on a video in “Timeline.” Select the “Color and Effect” icon from the bottom and redirect to the “Cube” icon on the top.
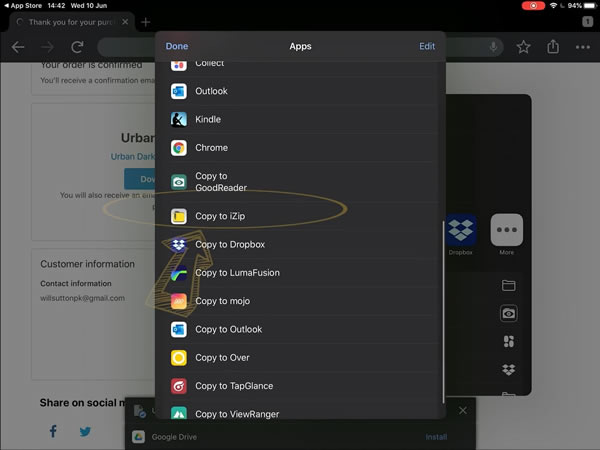
Step 2: Next, tap on the “Import” button, and once you are on the “Thank You” page, select the “Download Link” button. Following this, hit “Copy to ZIP,” and after this, the ZIP folders will be loaded in the app.
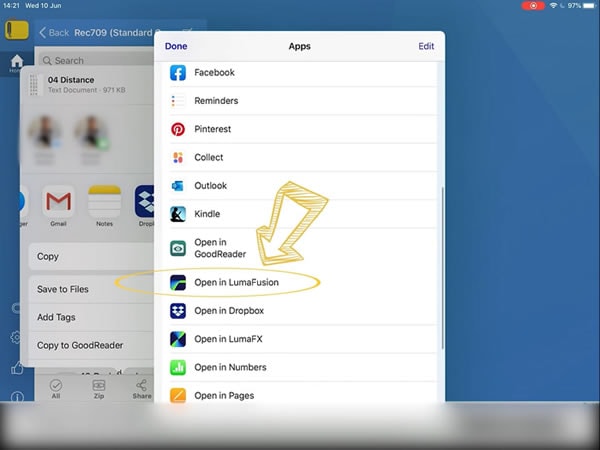
Step 3: To proceed, you have to “Unzip the Folder” and locate the LUTs of your choice. Once you find the LUT, press the “Share” icon and tap “Open in LumaFusion.” Following this, the LUT will be added in LumaFusion.
Way 2: Apply LUTs Through LUT Name
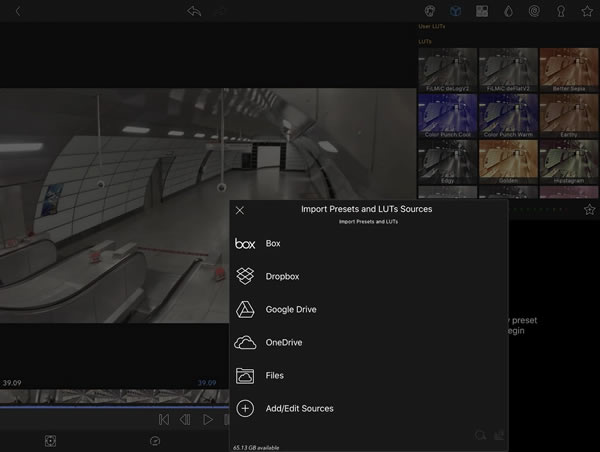
Step 1: Open the video with LumaFusion and select “Timeline.” Tap on the “Color and Effect” sign and select the “Import” button. Following this, you need to select a tool for importing LUTs from the options of Box, Dropbox, Google Drive, Files, or Add/Edit Source.
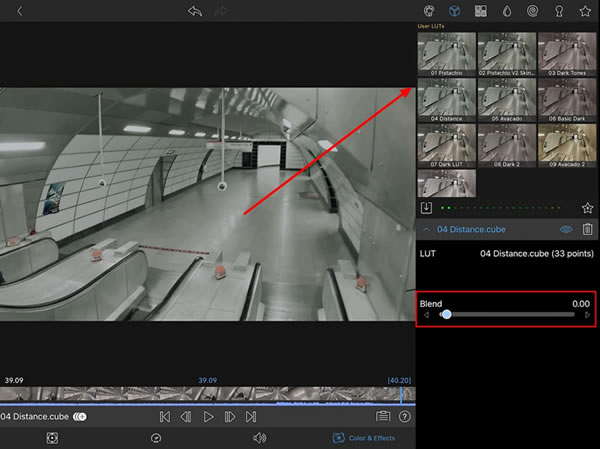
Step 2: After selecting the source, tap on “LUT name” to add it to LumaFusion. To proceed, press the “Share” button and wait a few moments. Once the LUT is added, you can manage its intensity from the “Blend” sliders.
Part 3: Some Best LUTs To Discover For Using in LumaFusion
Now that you know the higher functionality of LUTs and their application procedure, you must be wondering what LUTs are best for LumaFusion. There is no need to be anxious, as this part will introduce some of the free LUTs for LumaFusion. Look below to learn more about these exceptional video editing elements:
1. Color Grading Central Free LUTs
If you want to add the best color grading LumaFusion LUTs, you need to seek help from the color specialist. Thus, you can use the Color Grading free LUTs designed by CGC. Their site is enriched with high definition and optimized color combinate LUTs. You will never get disappointed by using these LUTs as they never impact the content of the videos.
2. Frank Glencairn Free LUT
If you are still a fan of vintage films in this modernized and vibrant-colored world, this LUT is for you. With this, you can add a fantastic and realistic vintage look to any video. Other than this, it is very popular among filmmakers for introducing a backstory scene in films. Not only professional, but you can also use it to give a retro look to your videos.
3. Reverse Tree Media Free LUTs
With this absolutely free LUT, you can upgrade the quality of your videos with little effort. It also has very modernized LUTs utility, such as the Black Bar layer. You can use this to enhance the video quality of several types of videos, such as TV series or movies. It is quite a perfect pick for sad or backstory scenes. In addition to this, it also has 8mm, 16mm, and 35mm overlays.
4. Kodachrome-K-Tone LUT
With the help of this LUT, you can feel yourself in the era of the early 90s. It has mass-marketed colors along with a subtractive method, which makes it a better option. Moreover, this LUT can also escalate the captivity of promotional videos. You can also use it for magazine photo editing. If you are working on a video captured in low light, this can also fix all the coloring issues for you.

5. SmallHD Free LUTs
Another frequently used LumaFusion LUTs is SmallHD-free LUTs which can maximize your video productivity effectively. It can enhance the classical appearance of the videos. You can use it for both pre and postproduction enhancements. These LUTs give you both dramatic and cinematic vibes. You can apply it to action, thriller, melodramatic or other videos.
Part 4: Wondershare Filmora: Apply LUTs Easily on the Computer
Wondershare Filmora is a tool that gives you freedom of creativity without any complications. With this tool, you can modify your videos in several ways on Mac, Windows, or mobile devices. Filmora also has versatile video editing software to help new video editors in their professional journey. The AI tools present in Filmora have stunning effects on every user, as they can make your work easier than ever.
Add LUTs on Video For Win 7 or later(64-bit)
Add LUTs on Video For macOS 10.14 or later
For example, by using its AI Image, you can turn simple words into images. You can also split the screen and manage the keyframes of your video. One of the best things about Filmora is it lets you edit videos with full customization.

Key Features of Wondershare Filmora
- If you want to track the moments of the objects in the video, the Motion Tracking feature of Filmora got you covered. You can also add Mosaic effects to moving characters or objects in a video.
- There are diversified preset templates in Filmora through which you can make the video with a few taps. You are also free to create your own video template and share it with the world.
- With Filmora, you can edit multiple videos at once, as it supports the batch edit feature. Moreover, you can also add adjustment layers in the video to make non-destructive edits.
Conclusion
As this article states, you can turn simple videos into attractive ones with color-grading LumaFusion LUTs. There are several things that define the higher functionality of LUTs, and you can see the points above. Moreover, the instructions to apply LUTs with LumaFusion are also discussed above for the ease of users.
There are two ways available to achieve color grading, out of which you can select any one of your preferences. The other tool that can help you to apply LUTs on the computer is Wondershare Filmora . You can learn more about this from the above discussion.
Add LUTs on Video For Win 7 or later(64-bit)
Add LUTs on Video For macOS 10.14 or later
Apply LUT on Videos Apply LUT on Videos Learn More

Part 2: What Are the Potential Ways to Apply LUTs for LumaFusion?
There are considerable ways to apply LUTs in LumaFusion, but we plan to introduce the most straightforward ways. Don’t fret if you have no video editing skills. By following the below-given steps, you can experience the LumaFusion color grading:
Way 1: Apply LUTs Through Sharing
Step 1: Initially, import the video to LumaFusion and double-tap on a video in “Timeline.” Select the “Color and Effect” icon from the bottom and redirect to the “Cube” icon on the top.

Step 2: Next, tap on the “Import” button, and once you are on the “Thank You” page, select the “Download Link” button. Following this, hit “Copy to ZIP,” and after this, the ZIP folders will be loaded in the app.

Step 3: To proceed, you have to “Unzip the Folder” and locate the LUTs of your choice. Once you find the LUT, press the “Share” icon and tap “Open in LumaFusion.” Following this, the LUT will be added in LumaFusion.

Way 2: Apply LUTs Through LUT Name
Step 1: Open the video with LumaFusion and select “Timeline.” Tap on the “Color and Effect” sign and select the “Import” button. Following this, you need to select a tool for importing LUTs from the options of Box, Dropbox, Google Drive, Files, or Add/Edit Source.

Step 2: After selecting the source, tap on “LUT name” to add it to LumaFusion. To proceed, press the “Share” button and wait a few moments. Once the LUT is added, you can manage its intensity from the “Blend” sliders.

Part 3: Some Best LUTs To Discover For Using in LumaFusion
Now that you know the higher functionality of LUTs and their application procedure, you must be wondering what LUTs are best for LumaFusion. There is no need to be anxious, as this part will introduce some of the free LUTs for LumaFusion. Look below to learn more about these exceptional video editing elements:
1. Color Grading Central Free LUTs
If you want to add the best color grading LumaFusion LUTs, you need to seek help from the color specialist. Thus, you can use the Color Grading free LUTs designed by CGC. Their site is enriched with high definition and optimized color combinate LUTs. You will never get disappointed by using these LUTs as they never impact the content of the videos.

2. Frank Glencairn Free LUT
If you are still a fan of vintage films in this modernized and vibrant-colored world, this LUT is for you. With this, you can add a fantastic and realistic vintage look to any video. Other than this, it is very popular among filmmakers for introducing a backstory scene in films. Not only professional, but you can also use it to give a retro look to your videos.

3. Reverse Tree Media Free LUTs
With this absolutely free LUT, you can upgrade the quality of your videos with little effort. It also has very modernized LUTs utility, such as the Black Bar layer. You can use this to enhance the video quality of several types of videos, such as TV series or movies. It is quite a perfect pick for sad or backstory scenes. In addition to this, it also has 8mm, 16mm, and 35mm overlays.

4. Kodachrome-K-Tone LUT
With the help of this LUT, you can feel yourself in the era of the early 90s. It has mass-marketed colors along with a subtractive method, which makes it a better option. Moreover, this LUT can also escalate the captivity of promotional videos. You can also use it for magazine photo editing. If you are working on a video captured in low light, this can also fix all the coloring issues for you.

5. SmallHD Free LUTs
Another frequently used LumaFusion LUTs is SmallHD-free LUTs which can maximize your video productivity effectively. It can enhance the classical appearance of the videos. You can use it for both pre and postproduction enhancements. These LUTs give you both dramatic and cinematic vibes. You can apply it to action, thriller, melodramatic or other videos.

Part 4: Wondershare Filmora: Apply LUTs Easily on the Computer
Wondershare Filmora is a tool that gives you freedom of creativity without any complications. With this tool, you can modify your videos in several ways on Mac, Windows, or mobile devices. Filmora also has versatile video editing software to help new video editors in their professional journey. The AI tools present in Filmora have stunning effects on every user, as they can make your work easier than ever.
Add LUTs on Video For Win 7 or later(64-bit)
Add LUTs on Video For macOS 10.14 or later
For example, by using its AI Image, you can turn simple words into images. You can also split the screen and manage the keyframes of your video. One of the best things about Filmora is it lets you edit videos with full customization.

Key Features of Wondershare Filmora
- If you want to track the moments of the objects in the video, the Motion Tracking feature of Filmora got you covered. You can also add Mosaic effects to moving characters or objects in a video.
- There are diversified preset templates in Filmora through which you can make the video with a few taps. You are also free to create your own video template and share it with the world.
- With Filmora, you can edit multiple videos at once, as it supports the batch edit feature. Moreover, you can also add adjustment layers in the video to make non-destructive edits.
Conclusion
As this article states, you can turn simple videos into attractive ones with color-grading LumaFusion LUTs. There are several things that define the higher functionality of LUTs, and you can see the points above. Moreover, the instructions to apply LUTs with LumaFusion are also discussed above for the ease of users.
There are two ways available to achieve color grading, out of which you can select any one of your preferences. The other tool that can help you to apply LUTs on the computer is Wondershare Filmora . You can learn more about this from the above discussion.
Add LUTs on Video For Win 7 or later(64-bit)
Add LUTs on Video For macOS 10.14 or later
Best AR Video Apps
Best AR Video App - Top 10 Picks
An easy yet powerful editor
Numerous effects to choose from
Detailed tutorials provided by the official channel
AR i.e. Augmented reality is a unique approach that is trendy for its variety of applications. It is a technology that provides the composite view to the user’s perception of real world images and videos.
It is a great development in the direction of technological advancement. AR is the concept that combines real-life objects with simulated 3D objects. Businesses use this approach to make their products more presentable and lively for the customers. Whereas, it is also very helpful for the users to experiment and have fun. With the evolution of this approach, now there are many applications available in the market that offers AR functionaltiy. Here, we are listing down the top 10 AR video apps which are worth using to experience something unique.
In this article
01 [What Is the Difference Between VR and AR?](#Part 1)
02 [10 Top AR Apps Worth Trying](#Part 2)
03 [What New AR Effects Could Be Found in Filmora](#Part 3)
Part 1 What Is the Difference Between VR and AR?
Both AR and VR use a distinctive approach and consider different use cases. They work on the concept of bringing a simulated environment to the user. Both VR i.e. the virtual reality and AR i.e. augmented reality are technologies used to replace or enhance the real-life environment with the simulated one. Virtual reality is the replacement of real-life environments with simulated ones. Whereas, Augmented reality is the procedure of augmenting the real-life environment with the addition of digital elements to a live view. This can be done by the camera on a smartphone.
The main aim of designing AR is to provide detailed information to the user about the real world. Its whole design is done by considering and adding the elements of the real world. Whereas, virtual reality is an entirely different simulation. It completely replaces the real-world environment with the virtual world.
Even Though both technologies are the simulation of the real world, they use different components of design and also have distinct targeted audiences. The concept behind VR is to distance the user from the real world as much as possible. Whereas, the concept of AR works with the real world to create a simulated environment.
The use of an eye-covering headset and headphones is very common to make an illusion of the real world, in the case of VR. Whereas, AR is usually accomplished with a smartphone or tablet screen. Here, the camera of the phone is focused at a point to capture the live-streaming of a moment on the screen. The captured data is then prepared by adding some useful information.
The applications of VR are architecture and retail, training, product design, etc. Whereas, the applications of AR are diagnostic data, navigation information, repair instructions, etc. The availability of ar video maker also eases the task of the industries for the mentioned purposes.
Part 2 10 Top AR Apps Worth Trying
Here, you can run down the list of top 10 augmented video apps which are best and are worth trying. This list is prepared based on user ratings, reviews, and experiences.
01IKEA Place
The Swedish furniture giant has made a great mark in the AR world with the development of a high-tech app. Ikea Place is a great app that lets the shoppers visualize the placements of products at home before buying. You just need to scan the floor from your mobile phone. Then, the easy drag and drop feature enables you to select the best match. The app makes the selection of furniture and home decors fun.

02YouCam Makeup
YouCam Makeup is an AR assisted app that provides a variety of filters for photos. It also acts as a fashion and makeup assistant. This app allows you to preview a variety of beauty products in real-time. Some top makeup brands such as Urban Decay, Maybelline, and Loreal offer their products in the app for the user to test. The app also has the features of sharing the look, following other users and shopping and reviewing featured products.

03GIPHY World
GIPHY World is a 3D coloring app. It lets the colored picture turn into 3D animated graphics. This app can also be used for social media marketing. With its use, you can make your product more appealing to the audience. The tool is just fun, as it lets you convert the images into a variety of other fun characters.

04Google Lens
Google Lens works on the concept of Google Goggles. It is a very useful AR app widely used by users for various purposes. With standard Google, you can search for anything only by typing in the search bar. But, this tool enables searching by opening the camera of a smartphone. You only need to focus the camera lens on the object or text. The app will then identify it and show the top results. It also shows the link to read details about your object or text. If you are searching for a product, then the tool will also help with the location to buy it.

05Augment
Augment is another best-rated AR video editor app. It secured top ratings just within a short period after launch. The app allows users to create videos by considering the characters of both real and fictional worlds. With this app, the users can use augmented reality for the placement of animated 3D models on the surroundings. It can be used by business owners to create appealing videos of their products.

06Roar
Roar is also a powerful AR weapon for business owners. It generates AR content in addition to video, audio, and 3D content. There are lots of options available for business owners to use this app: creating an AR-powered online store, incorporating AR into print ads, experiencing the most popular categories and products, etc. Also, the shoppers can experience the more detailed content about the product, with pricing, reviews, and also the option of purchasing.

07Amikasa
Amikasa is amongst the best home-furnishing AR apps accessible by iPhone users. Anyone can measure the land areas and create floor plans like professionals, with this app. Also, the professionals can use this tool to generate appealing floor and design plans. For this, they can use AR applications along with their measuring tools. The app has listed down the products from the whole web, rather than focusing on any single brand.

08Snapchat
Snapchat is one of the most popular Augmented reality social media apps. There are a variety of features available in the app which is winning millions of hearts all around the world. The app provides features in the form of lenses to add special effects, filters, and real-time transformations to the video messages. This tool also can be used by businesses for marketing purposes.

09Wanna Kicks
Wanna kicks is the perfect app for sneaker lovers. Online shopping is a more demanded and convenient option these days, but the app allows you to visualize the look of footwear before buying. You can visualize the look of footwear on the foot from any desired angle. You just need to focus the phone’s camera on your feet and use the drag and drop option to select from varied categories.

10Houzz
Houzz is also the best AR video creator in the home goods and furniture category. The app allows you to match the furniture with the layout of your house just by sitting at home. The feature, “View in My Room” lets the user place the products on the picture of shoppers’ homes with AR technology. You can also check the product’s look in different lighting.

Part 3 What New AR Effects Could Be Found in Filmora
Filmora is a wonderful AR video editing app that lets the user create appealing videos with less effort. The tool also has some useful AR features and effects which allow the user to give AR touch to their creation.
01Stock Media
A great addition to the Filmora 11 library is stock media. Stock media got integrated with GIPHY, Unsplash, and Pixabay. It is a unique and interesting feature available in Filmora. With this, you can get royalty-free images, GIFs, and videos inside the video editing tool only.
02AI Portrait
The AI portrait feature of Filmora 11 allows the user to remove the background around the human face. The feature also has several AR stickers such as Cute cat, Zombie teeth, etc and effects such as Human glitch, Human Pixelate, etc to play with.
03Auto Beat Sync
This brand new feature will allow you to sync your video with the rhythm and tempo automatically. You just need to upload a video and music, you wish to sync. Then, the app allows you to specify the video effect such as RGB, glow, video wall, blur, etc to be applied. Now, just click on the “Analyze” button to see the magic. The tool will run an algorithm to create an interesting video.
04Boris FX
Boris FX is a feature containing an array of advanced post-production effects. This feature is only available in some professional video editors like VEGAS Pro. Filmora is also proud to be on the list now. The Boris FX Continuum pack includes great post-production video effects such as Art Looks, Blur, Image Restoration, Lights, Stylize, Particles, etc. To use this high-end feature, you will need a paid version and a high-end workstation.
05NewBlue FX
NewBlue FX is also one of the powerful ar features of Filmora. It is a unique collection of Video Essentials, Video Filters, Video Elements, Video Stylizer, and Title Pro 7. This feature allows you to perform advanced titling, stylizing, color enhancement, composition, color correction, etc, professionally.
06Preset Templates
The Preset Templates feature of Filmora allows users to create professional-looking videos in just hours. This feature enables you to access preset templates such as “Business Outro”, “Game Endscreen”, “How to Paint Intro”, “Birthday Openers”, etc. To provide the desired modifications to your video, just drag and drop the templates and have fun.
Some of the new AR effects found in the latest version of Wondershare Filmora Video Editor are: WordArt Font, Modern Birthday Pack, Broken Effect Pack, 3D Like and Subscribe Sticker, Comic Texts Stickers, Vintage Memories, Hi-Tech Intros Pack, Abstract Bubble Intro, Smooth Big Titles, Cinematic Digital Slideshow, Cinematic Dissolve Effect, 3D Fun Emoji, Illustration VR World Pack, Makeups Pack, Trendy Gaming Endscreen Pack, Birthday Pack Vol 02, Blingbling Pack Vol 02, Raindrop Pack, Pixel Game Transition, The Awakening of Magic, Dynamic Lines Title Pack, Fancy Atmosphere Pack, Basic Sunshine Effects, Old Paper Opener, Qte Gaming Effects, Neon Titles Pack.
For Win 7 or later (64-bit)
For macOS 10.12 or later
● Ending Thoughts →
● Augmented reality is an approach that has never-ending scope. The concept is used in a variety of applications these days. And its applications and uses are increasing with each passing day.
● So, here we have shared the list of the best AR video apps. There are many more apps available. But, these are some highly popular applications for business, consumer as well as entertainment purposes.
● If you are also wishing to contribute a little to the world of AR with your unique creativity and skills, then you should try Filmora. The variety of newly added features allows you to create AR-enabled videos with so much ease.
AR i.e. Augmented reality is a unique approach that is trendy for its variety of applications. It is a technology that provides the composite view to the user’s perception of real world images and videos.
It is a great development in the direction of technological advancement. AR is the concept that combines real-life objects with simulated 3D objects. Businesses use this approach to make their products more presentable and lively for the customers. Whereas, it is also very helpful for the users to experiment and have fun. With the evolution of this approach, now there are many applications available in the market that offers AR functionaltiy. Here, we are listing down the top 10 AR video apps which are worth using to experience something unique.
In this article
01 [What Is the Difference Between VR and AR?](#Part 1)
02 [10 Top AR Apps Worth Trying](#Part 2)
03 [What New AR Effects Could Be Found in Filmora](#Part 3)
Part 1 What Is the Difference Between VR and AR?
Both AR and VR use a distinctive approach and consider different use cases. They work on the concept of bringing a simulated environment to the user. Both VR i.e. the virtual reality and AR i.e. augmented reality are technologies used to replace or enhance the real-life environment with the simulated one. Virtual reality is the replacement of real-life environments with simulated ones. Whereas, Augmented reality is the procedure of augmenting the real-life environment with the addition of digital elements to a live view. This can be done by the camera on a smartphone.
The main aim of designing AR is to provide detailed information to the user about the real world. Its whole design is done by considering and adding the elements of the real world. Whereas, virtual reality is an entirely different simulation. It completely replaces the real-world environment with the virtual world.
Even Though both technologies are the simulation of the real world, they use different components of design and also have distinct targeted audiences. The concept behind VR is to distance the user from the real world as much as possible. Whereas, the concept of AR works with the real world to create a simulated environment.
The use of an eye-covering headset and headphones is very common to make an illusion of the real world, in the case of VR. Whereas, AR is usually accomplished with a smartphone or tablet screen. Here, the camera of the phone is focused at a point to capture the live-streaming of a moment on the screen. The captured data is then prepared by adding some useful information.
The applications of VR are architecture and retail, training, product design, etc. Whereas, the applications of AR are diagnostic data, navigation information, repair instructions, etc. The availability of ar video maker also eases the task of the industries for the mentioned purposes.
Part 2 10 Top AR Apps Worth Trying
Here, you can run down the list of top 10 augmented video apps which are best and are worth trying. This list is prepared based on user ratings, reviews, and experiences.
01IKEA Place
The Swedish furniture giant has made a great mark in the AR world with the development of a high-tech app. Ikea Place is a great app that lets the shoppers visualize the placements of products at home before buying. You just need to scan the floor from your mobile phone. Then, the easy drag and drop feature enables you to select the best match. The app makes the selection of furniture and home decors fun.

02YouCam Makeup
YouCam Makeup is an AR assisted app that provides a variety of filters for photos. It also acts as a fashion and makeup assistant. This app allows you to preview a variety of beauty products in real-time. Some top makeup brands such as Urban Decay, Maybelline, and Loreal offer their products in the app for the user to test. The app also has the features of sharing the look, following other users and shopping and reviewing featured products.

03GIPHY World
GIPHY World is a 3D coloring app. It lets the colored picture turn into 3D animated graphics. This app can also be used for social media marketing. With its use, you can make your product more appealing to the audience. The tool is just fun, as it lets you convert the images into a variety of other fun characters.

04Google Lens
Google Lens works on the concept of Google Goggles. It is a very useful AR app widely used by users for various purposes. With standard Google, you can search for anything only by typing in the search bar. But, this tool enables searching by opening the camera of a smartphone. You only need to focus the camera lens on the object or text. The app will then identify it and show the top results. It also shows the link to read details about your object or text. If you are searching for a product, then the tool will also help with the location to buy it.

05Augment
Augment is another best-rated AR video editor app. It secured top ratings just within a short period after launch. The app allows users to create videos by considering the characters of both real and fictional worlds. With this app, the users can use augmented reality for the placement of animated 3D models on the surroundings. It can be used by business owners to create appealing videos of their products.

06Roar
Roar is also a powerful AR weapon for business owners. It generates AR content in addition to video, audio, and 3D content. There are lots of options available for business owners to use this app: creating an AR-powered online store, incorporating AR into print ads, experiencing the most popular categories and products, etc. Also, the shoppers can experience the more detailed content about the product, with pricing, reviews, and also the option of purchasing.

07Amikasa
Amikasa is amongst the best home-furnishing AR apps accessible by iPhone users. Anyone can measure the land areas and create floor plans like professionals, with this app. Also, the professionals can use this tool to generate appealing floor and design plans. For this, they can use AR applications along with their measuring tools. The app has listed down the products from the whole web, rather than focusing on any single brand.

08Snapchat
Snapchat is one of the most popular Augmented reality social media apps. There are a variety of features available in the app which is winning millions of hearts all around the world. The app provides features in the form of lenses to add special effects, filters, and real-time transformations to the video messages. This tool also can be used by businesses for marketing purposes.

09Wanna Kicks
Wanna kicks is the perfect app for sneaker lovers. Online shopping is a more demanded and convenient option these days, but the app allows you to visualize the look of footwear before buying. You can visualize the look of footwear on the foot from any desired angle. You just need to focus the phone’s camera on your feet and use the drag and drop option to select from varied categories.

10Houzz
Houzz is also the best AR video creator in the home goods and furniture category. The app allows you to match the furniture with the layout of your house just by sitting at home. The feature, “View in My Room” lets the user place the products on the picture of shoppers’ homes with AR technology. You can also check the product’s look in different lighting.

Part 3 What New AR Effects Could Be Found in Filmora
Filmora is a wonderful AR video editing app that lets the user create appealing videos with less effort. The tool also has some useful AR features and effects which allow the user to give AR touch to their creation.
01Stock Media
A great addition to the Filmora 11 library is stock media. Stock media got integrated with GIPHY, Unsplash, and Pixabay. It is a unique and interesting feature available in Filmora. With this, you can get royalty-free images, GIFs, and videos inside the video editing tool only.
02AI Portrait
The AI portrait feature of Filmora 11 allows the user to remove the background around the human face. The feature also has several AR stickers such as Cute cat, Zombie teeth, etc and effects such as Human glitch, Human Pixelate, etc to play with.
03Auto Beat Sync
This brand new feature will allow you to sync your video with the rhythm and tempo automatically. You just need to upload a video and music, you wish to sync. Then, the app allows you to specify the video effect such as RGB, glow, video wall, blur, etc to be applied. Now, just click on the “Analyze” button to see the magic. The tool will run an algorithm to create an interesting video.
04Boris FX
Boris FX is a feature containing an array of advanced post-production effects. This feature is only available in some professional video editors like VEGAS Pro. Filmora is also proud to be on the list now. The Boris FX Continuum pack includes great post-production video effects such as Art Looks, Blur, Image Restoration, Lights, Stylize, Particles, etc. To use this high-end feature, you will need a paid version and a high-end workstation.
05NewBlue FX
NewBlue FX is also one of the powerful ar features of Filmora. It is a unique collection of Video Essentials, Video Filters, Video Elements, Video Stylizer, and Title Pro 7. This feature allows you to perform advanced titling, stylizing, color enhancement, composition, color correction, etc, professionally.
06Preset Templates
The Preset Templates feature of Filmora allows users to create professional-looking videos in just hours. This feature enables you to access preset templates such as “Business Outro”, “Game Endscreen”, “How to Paint Intro”, “Birthday Openers”, etc. To provide the desired modifications to your video, just drag and drop the templates and have fun.
Some of the new AR effects found in the latest version of Wondershare Filmora Video Editor are: WordArt Font, Modern Birthday Pack, Broken Effect Pack, 3D Like and Subscribe Sticker, Comic Texts Stickers, Vintage Memories, Hi-Tech Intros Pack, Abstract Bubble Intro, Smooth Big Titles, Cinematic Digital Slideshow, Cinematic Dissolve Effect, 3D Fun Emoji, Illustration VR World Pack, Makeups Pack, Trendy Gaming Endscreen Pack, Birthday Pack Vol 02, Blingbling Pack Vol 02, Raindrop Pack, Pixel Game Transition, The Awakening of Magic, Dynamic Lines Title Pack, Fancy Atmosphere Pack, Basic Sunshine Effects, Old Paper Opener, Qte Gaming Effects, Neon Titles Pack.
For Win 7 or later (64-bit)
For macOS 10.12 or later
● Ending Thoughts →
● Augmented reality is an approach that has never-ending scope. The concept is used in a variety of applications these days. And its applications and uses are increasing with each passing day.
● So, here we have shared the list of the best AR video apps. There are many more apps available. But, these are some highly popular applications for business, consumer as well as entertainment purposes.
● If you are also wishing to contribute a little to the world of AR with your unique creativity and skills, then you should try Filmora. The variety of newly added features allows you to create AR-enabled videos with so much ease.
AR i.e. Augmented reality is a unique approach that is trendy for its variety of applications. It is a technology that provides the composite view to the user’s perception of real world images and videos.
It is a great development in the direction of technological advancement. AR is the concept that combines real-life objects with simulated 3D objects. Businesses use this approach to make their products more presentable and lively for the customers. Whereas, it is also very helpful for the users to experiment and have fun. With the evolution of this approach, now there are many applications available in the market that offers AR functionaltiy. Here, we are listing down the top 10 AR video apps which are worth using to experience something unique.
In this article
01 [What Is the Difference Between VR and AR?](#Part 1)
02 [10 Top AR Apps Worth Trying](#Part 2)
03 [What New AR Effects Could Be Found in Filmora](#Part 3)
Part 1 What Is the Difference Between VR and AR?
Both AR and VR use a distinctive approach and consider different use cases. They work on the concept of bringing a simulated environment to the user. Both VR i.e. the virtual reality and AR i.e. augmented reality are technologies used to replace or enhance the real-life environment with the simulated one. Virtual reality is the replacement of real-life environments with simulated ones. Whereas, Augmented reality is the procedure of augmenting the real-life environment with the addition of digital elements to a live view. This can be done by the camera on a smartphone.
The main aim of designing AR is to provide detailed information to the user about the real world. Its whole design is done by considering and adding the elements of the real world. Whereas, virtual reality is an entirely different simulation. It completely replaces the real-world environment with the virtual world.
Even Though both technologies are the simulation of the real world, they use different components of design and also have distinct targeted audiences. The concept behind VR is to distance the user from the real world as much as possible. Whereas, the concept of AR works with the real world to create a simulated environment.
The use of an eye-covering headset and headphones is very common to make an illusion of the real world, in the case of VR. Whereas, AR is usually accomplished with a smartphone or tablet screen. Here, the camera of the phone is focused at a point to capture the live-streaming of a moment on the screen. The captured data is then prepared by adding some useful information.
The applications of VR are architecture and retail, training, product design, etc. Whereas, the applications of AR are diagnostic data, navigation information, repair instructions, etc. The availability of ar video maker also eases the task of the industries for the mentioned purposes.
Part 2 10 Top AR Apps Worth Trying
Here, you can run down the list of top 10 augmented video apps which are best and are worth trying. This list is prepared based on user ratings, reviews, and experiences.
01IKEA Place
The Swedish furniture giant has made a great mark in the AR world with the development of a high-tech app. Ikea Place is a great app that lets the shoppers visualize the placements of products at home before buying. You just need to scan the floor from your mobile phone. Then, the easy drag and drop feature enables you to select the best match. The app makes the selection of furniture and home decors fun.

02YouCam Makeup
YouCam Makeup is an AR assisted app that provides a variety of filters for photos. It also acts as a fashion and makeup assistant. This app allows you to preview a variety of beauty products in real-time. Some top makeup brands such as Urban Decay, Maybelline, and Loreal offer their products in the app for the user to test. The app also has the features of sharing the look, following other users and shopping and reviewing featured products.

03GIPHY World
GIPHY World is a 3D coloring app. It lets the colored picture turn into 3D animated graphics. This app can also be used for social media marketing. With its use, you can make your product more appealing to the audience. The tool is just fun, as it lets you convert the images into a variety of other fun characters.

04Google Lens
Google Lens works on the concept of Google Goggles. It is a very useful AR app widely used by users for various purposes. With standard Google, you can search for anything only by typing in the search bar. But, this tool enables searching by opening the camera of a smartphone. You only need to focus the camera lens on the object or text. The app will then identify it and show the top results. It also shows the link to read details about your object or text. If you are searching for a product, then the tool will also help with the location to buy it.

05Augment
Augment is another best-rated AR video editor app. It secured top ratings just within a short period after launch. The app allows users to create videos by considering the characters of both real and fictional worlds. With this app, the users can use augmented reality for the placement of animated 3D models on the surroundings. It can be used by business owners to create appealing videos of their products.

06Roar
Roar is also a powerful AR weapon for business owners. It generates AR content in addition to video, audio, and 3D content. There are lots of options available for business owners to use this app: creating an AR-powered online store, incorporating AR into print ads, experiencing the most popular categories and products, etc. Also, the shoppers can experience the more detailed content about the product, with pricing, reviews, and also the option of purchasing.

07Amikasa
Amikasa is amongst the best home-furnishing AR apps accessible by iPhone users. Anyone can measure the land areas and create floor plans like professionals, with this app. Also, the professionals can use this tool to generate appealing floor and design plans. For this, they can use AR applications along with their measuring tools. The app has listed down the products from the whole web, rather than focusing on any single brand.

08Snapchat
Snapchat is one of the most popular Augmented reality social media apps. There are a variety of features available in the app which is winning millions of hearts all around the world. The app provides features in the form of lenses to add special effects, filters, and real-time transformations to the video messages. This tool also can be used by businesses for marketing purposes.

09Wanna Kicks
Wanna kicks is the perfect app for sneaker lovers. Online shopping is a more demanded and convenient option these days, but the app allows you to visualize the look of footwear before buying. You can visualize the look of footwear on the foot from any desired angle. You just need to focus the phone’s camera on your feet and use the drag and drop option to select from varied categories.

10Houzz
Houzz is also the best AR video creator in the home goods and furniture category. The app allows you to match the furniture with the layout of your house just by sitting at home. The feature, “View in My Room” lets the user place the products on the picture of shoppers’ homes with AR technology. You can also check the product’s look in different lighting.

Part 3 What New AR Effects Could Be Found in Filmora
Filmora is a wonderful AR video editing app that lets the user create appealing videos with less effort. The tool also has some useful AR features and effects which allow the user to give AR touch to their creation.
01Stock Media
A great addition to the Filmora 11 library is stock media. Stock media got integrated with GIPHY, Unsplash, and Pixabay. It is a unique and interesting feature available in Filmora. With this, you can get royalty-free images, GIFs, and videos inside the video editing tool only.
02AI Portrait
The AI portrait feature of Filmora 11 allows the user to remove the background around the human face. The feature also has several AR stickers such as Cute cat, Zombie teeth, etc and effects such as Human glitch, Human Pixelate, etc to play with.
03Auto Beat Sync
This brand new feature will allow you to sync your video with the rhythm and tempo automatically. You just need to upload a video and music, you wish to sync. Then, the app allows you to specify the video effect such as RGB, glow, video wall, blur, etc to be applied. Now, just click on the “Analyze” button to see the magic. The tool will run an algorithm to create an interesting video.
04Boris FX
Boris FX is a feature containing an array of advanced post-production effects. This feature is only available in some professional video editors like VEGAS Pro. Filmora is also proud to be on the list now. The Boris FX Continuum pack includes great post-production video effects such as Art Looks, Blur, Image Restoration, Lights, Stylize, Particles, etc. To use this high-end feature, you will need a paid version and a high-end workstation.
05NewBlue FX
NewBlue FX is also one of the powerful ar features of Filmora. It is a unique collection of Video Essentials, Video Filters, Video Elements, Video Stylizer, and Title Pro 7. This feature allows you to perform advanced titling, stylizing, color enhancement, composition, color correction, etc, professionally.
06Preset Templates
The Preset Templates feature of Filmora allows users to create professional-looking videos in just hours. This feature enables you to access preset templates such as “Business Outro”, “Game Endscreen”, “How to Paint Intro”, “Birthday Openers”, etc. To provide the desired modifications to your video, just drag and drop the templates and have fun.
Some of the new AR effects found in the latest version of Wondershare Filmora Video Editor are: WordArt Font, Modern Birthday Pack, Broken Effect Pack, 3D Like and Subscribe Sticker, Comic Texts Stickers, Vintage Memories, Hi-Tech Intros Pack, Abstract Bubble Intro, Smooth Big Titles, Cinematic Digital Slideshow, Cinematic Dissolve Effect, 3D Fun Emoji, Illustration VR World Pack, Makeups Pack, Trendy Gaming Endscreen Pack, Birthday Pack Vol 02, Blingbling Pack Vol 02, Raindrop Pack, Pixel Game Transition, The Awakening of Magic, Dynamic Lines Title Pack, Fancy Atmosphere Pack, Basic Sunshine Effects, Old Paper Opener, Qte Gaming Effects, Neon Titles Pack.
For Win 7 or later (64-bit)
For macOS 10.12 or later
● Ending Thoughts →
● Augmented reality is an approach that has never-ending scope. The concept is used in a variety of applications these days. And its applications and uses are increasing with each passing day.
● So, here we have shared the list of the best AR video apps. There are many more apps available. But, these are some highly popular applications for business, consumer as well as entertainment purposes.
● If you are also wishing to contribute a little to the world of AR with your unique creativity and skills, then you should try Filmora. The variety of newly added features allows you to create AR-enabled videos with so much ease.
AR i.e. Augmented reality is a unique approach that is trendy for its variety of applications. It is a technology that provides the composite view to the user’s perception of real world images and videos.
It is a great development in the direction of technological advancement. AR is the concept that combines real-life objects with simulated 3D objects. Businesses use this approach to make their products more presentable and lively for the customers. Whereas, it is also very helpful for the users to experiment and have fun. With the evolution of this approach, now there are many applications available in the market that offers AR functionaltiy. Here, we are listing down the top 10 AR video apps which are worth using to experience something unique.
In this article
01 [What Is the Difference Between VR and AR?](#Part 1)
02 [10 Top AR Apps Worth Trying](#Part 2)
03 [What New AR Effects Could Be Found in Filmora](#Part 3)
Part 1 What Is the Difference Between VR and AR?
Both AR and VR use a distinctive approach and consider different use cases. They work on the concept of bringing a simulated environment to the user. Both VR i.e. the virtual reality and AR i.e. augmented reality are technologies used to replace or enhance the real-life environment with the simulated one. Virtual reality is the replacement of real-life environments with simulated ones. Whereas, Augmented reality is the procedure of augmenting the real-life environment with the addition of digital elements to a live view. This can be done by the camera on a smartphone.
The main aim of designing AR is to provide detailed information to the user about the real world. Its whole design is done by considering and adding the elements of the real world. Whereas, virtual reality is an entirely different simulation. It completely replaces the real-world environment with the virtual world.
Even Though both technologies are the simulation of the real world, they use different components of design and also have distinct targeted audiences. The concept behind VR is to distance the user from the real world as much as possible. Whereas, the concept of AR works with the real world to create a simulated environment.
The use of an eye-covering headset and headphones is very common to make an illusion of the real world, in the case of VR. Whereas, AR is usually accomplished with a smartphone or tablet screen. Here, the camera of the phone is focused at a point to capture the live-streaming of a moment on the screen. The captured data is then prepared by adding some useful information.
The applications of VR are architecture and retail, training, product design, etc. Whereas, the applications of AR are diagnostic data, navigation information, repair instructions, etc. The availability of ar video maker also eases the task of the industries for the mentioned purposes.
Part 2 10 Top AR Apps Worth Trying
Here, you can run down the list of top 10 augmented video apps which are best and are worth trying. This list is prepared based on user ratings, reviews, and experiences.
01IKEA Place
The Swedish furniture giant has made a great mark in the AR world with the development of a high-tech app. Ikea Place is a great app that lets the shoppers visualize the placements of products at home before buying. You just need to scan the floor from your mobile phone. Then, the easy drag and drop feature enables you to select the best match. The app makes the selection of furniture and home decors fun.

02YouCam Makeup
YouCam Makeup is an AR assisted app that provides a variety of filters for photos. It also acts as a fashion and makeup assistant. This app allows you to preview a variety of beauty products in real-time. Some top makeup brands such as Urban Decay, Maybelline, and Loreal offer their products in the app for the user to test. The app also has the features of sharing the look, following other users and shopping and reviewing featured products.

03GIPHY World
GIPHY World is a 3D coloring app. It lets the colored picture turn into 3D animated graphics. This app can also be used for social media marketing. With its use, you can make your product more appealing to the audience. The tool is just fun, as it lets you convert the images into a variety of other fun characters.

04Google Lens
Google Lens works on the concept of Google Goggles. It is a very useful AR app widely used by users for various purposes. With standard Google, you can search for anything only by typing in the search bar. But, this tool enables searching by opening the camera of a smartphone. You only need to focus the camera lens on the object or text. The app will then identify it and show the top results. It also shows the link to read details about your object or text. If you are searching for a product, then the tool will also help with the location to buy it.

05Augment
Augment is another best-rated AR video editor app. It secured top ratings just within a short period after launch. The app allows users to create videos by considering the characters of both real and fictional worlds. With this app, the users can use augmented reality for the placement of animated 3D models on the surroundings. It can be used by business owners to create appealing videos of their products.

06Roar
Roar is also a powerful AR weapon for business owners. It generates AR content in addition to video, audio, and 3D content. There are lots of options available for business owners to use this app: creating an AR-powered online store, incorporating AR into print ads, experiencing the most popular categories and products, etc. Also, the shoppers can experience the more detailed content about the product, with pricing, reviews, and also the option of purchasing.

07Amikasa
Amikasa is amongst the best home-furnishing AR apps accessible by iPhone users. Anyone can measure the land areas and create floor plans like professionals, with this app. Also, the professionals can use this tool to generate appealing floor and design plans. For this, they can use AR applications along with their measuring tools. The app has listed down the products from the whole web, rather than focusing on any single brand.

08Snapchat
Snapchat is one of the most popular Augmented reality social media apps. There are a variety of features available in the app which is winning millions of hearts all around the world. The app provides features in the form of lenses to add special effects, filters, and real-time transformations to the video messages. This tool also can be used by businesses for marketing purposes.

09Wanna Kicks
Wanna kicks is the perfect app for sneaker lovers. Online shopping is a more demanded and convenient option these days, but the app allows you to visualize the look of footwear before buying. You can visualize the look of footwear on the foot from any desired angle. You just need to focus the phone’s camera on your feet and use the drag and drop option to select from varied categories.

10Houzz
Houzz is also the best AR video creator in the home goods and furniture category. The app allows you to match the furniture with the layout of your house just by sitting at home. The feature, “View in My Room” lets the user place the products on the picture of shoppers’ homes with AR technology. You can also check the product’s look in different lighting.

Part 3 What New AR Effects Could Be Found in Filmora
Filmora is a wonderful AR video editing app that lets the user create appealing videos with less effort. The tool also has some useful AR features and effects which allow the user to give AR touch to their creation.
01Stock Media
A great addition to the Filmora 11 library is stock media. Stock media got integrated with GIPHY, Unsplash, and Pixabay. It is a unique and interesting feature available in Filmora. With this, you can get royalty-free images, GIFs, and videos inside the video editing tool only.
02AI Portrait
The AI portrait feature of Filmora 11 allows the user to remove the background around the human face. The feature also has several AR stickers such as Cute cat, Zombie teeth, etc and effects such as Human glitch, Human Pixelate, etc to play with.
03Auto Beat Sync
This brand new feature will allow you to sync your video with the rhythm and tempo automatically. You just need to upload a video and music, you wish to sync. Then, the app allows you to specify the video effect such as RGB, glow, video wall, blur, etc to be applied. Now, just click on the “Analyze” button to see the magic. The tool will run an algorithm to create an interesting video.
04Boris FX
Boris FX is a feature containing an array of advanced post-production effects. This feature is only available in some professional video editors like VEGAS Pro. Filmora is also proud to be on the list now. The Boris FX Continuum pack includes great post-production video effects such as Art Looks, Blur, Image Restoration, Lights, Stylize, Particles, etc. To use this high-end feature, you will need a paid version and a high-end workstation.
05NewBlue FX
NewBlue FX is also one of the powerful ar features of Filmora. It is a unique collection of Video Essentials, Video Filters, Video Elements, Video Stylizer, and Title Pro 7. This feature allows you to perform advanced titling, stylizing, color enhancement, composition, color correction, etc, professionally.
06Preset Templates
The Preset Templates feature of Filmora allows users to create professional-looking videos in just hours. This feature enables you to access preset templates such as “Business Outro”, “Game Endscreen”, “How to Paint Intro”, “Birthday Openers”, etc. To provide the desired modifications to your video, just drag and drop the templates and have fun.
Some of the new AR effects found in the latest version of Wondershare Filmora Video Editor are: WordArt Font, Modern Birthday Pack, Broken Effect Pack, 3D Like and Subscribe Sticker, Comic Texts Stickers, Vintage Memories, Hi-Tech Intros Pack, Abstract Bubble Intro, Smooth Big Titles, Cinematic Digital Slideshow, Cinematic Dissolve Effect, 3D Fun Emoji, Illustration VR World Pack, Makeups Pack, Trendy Gaming Endscreen Pack, Birthday Pack Vol 02, Blingbling Pack Vol 02, Raindrop Pack, Pixel Game Transition, The Awakening of Magic, Dynamic Lines Title Pack, Fancy Atmosphere Pack, Basic Sunshine Effects, Old Paper Opener, Qte Gaming Effects, Neon Titles Pack.
For Win 7 or later (64-bit)
For macOS 10.12 or later
● Ending Thoughts →
● Augmented reality is an approach that has never-ending scope. The concept is used in a variety of applications these days. And its applications and uses are increasing with each passing day.
● So, here we have shared the list of the best AR video apps. There are many more apps available. But, these are some highly popular applications for business, consumer as well as entertainment purposes.
● If you are also wishing to contribute a little to the world of AR with your unique creativity and skills, then you should try Filmora. The variety of newly added features allows you to create AR-enabled videos with so much ease.
5 Best Video Denoisers
We all know that our recorded videos are not always perfect – when we use a mobile phone or digital cameras to shoot, our clips may contain hiss, compression and particles. These are the impurities that make our videos look uncomfortable, but it’s not a final result impossible to altar – help can come in the form of several video denoise software.
Editing is the guarantor that makes sure we can do different operations and achieve our desired results – computer programs, tools, opportunities that give us a hand in this process are kind of endless.
So, sometimes it’s really difficult to choose among so many options that come into waves. And if we choose our preferred ways, some people might not agree with us. Even so that it is quite subjective, we can still explain which tools and software we like to modify our videos, and fight with the impurities they have.
It looks amateur if the video is grainy, even if it is night shooting. We can get rid of the noise when we add lights or shoot in well-lit places, but there are some situations we can just depend on the ISO. So, for these grainy videos, there is a thing called denoising – when you get rid of the grains and make your shots as clear as possible. There are different ways to do this, and that happens in different software as well. What are the 5 best video denoisers in 2024 for us to work with? That, as we have already mentioned, might be something very subjective, but here is our selection: Wondershare Filmora, Neat Video, Shotcut, Adobe Premiere Pro, and DaVinci Resolve
Wondershare Filmora X
Wondershare Filmora X offers to change our damaged scene into something more acceptable. How to operate it? - You need to go to the Effects panel and type: “Smart Denoise”. right-click on the video and choose Edit Properties.
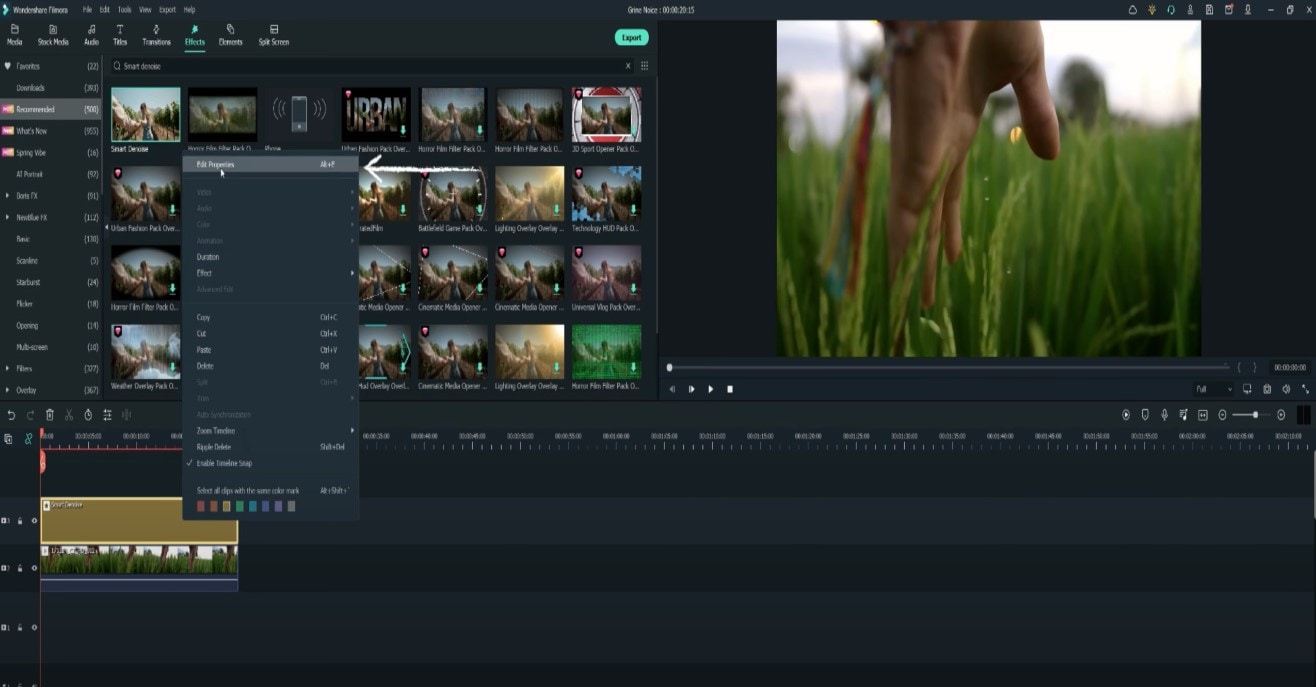
This ensures you see the Smart Denoise, where you can change opacity of the clip, threshold and radius.
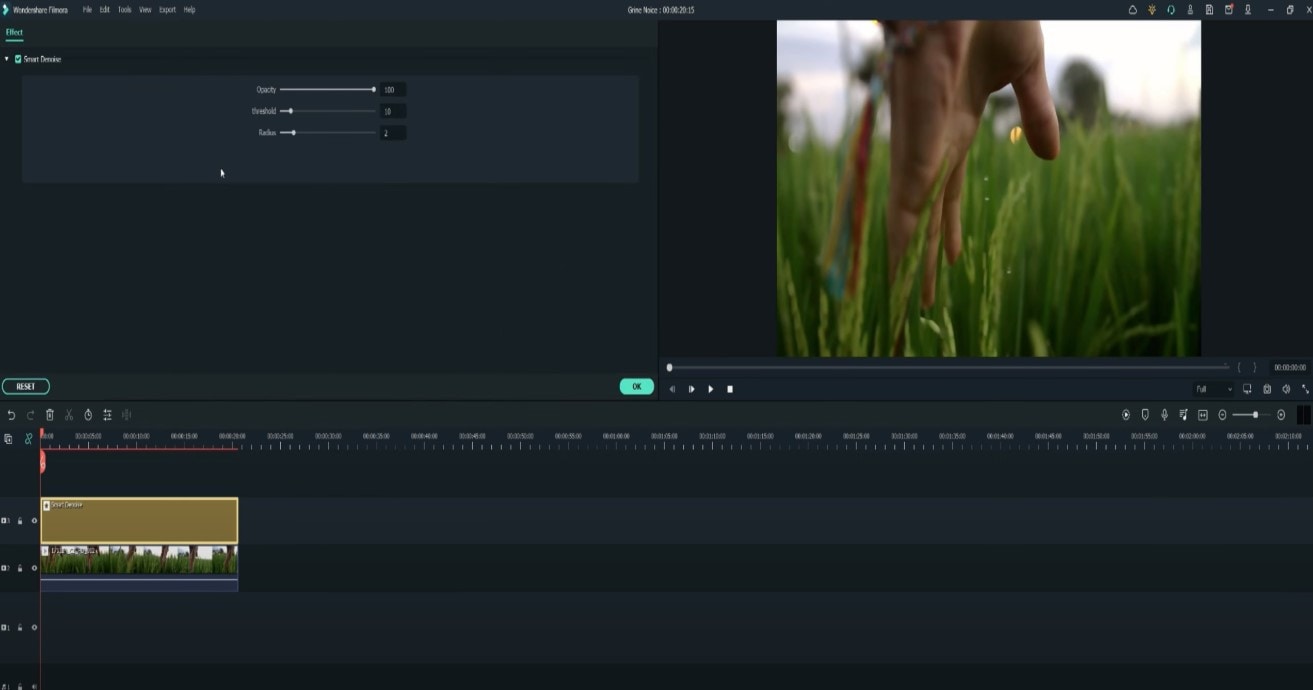
Reduce Opacity until you are satisfied with the result. The box next to Smart Denoise will show you the scene before and after the effect.
Bonus tip: Wondershare Filmora audio denoise
We already explained how video denoising works, and we will go on with our selection and explanatory article about the process, but, as we are on the Filmora topic, we might as well mention that denoising might mean another thing too – which, in this case, regards audio background noise. It means to remove unwanted hum from the audio in order for it to become more hearable. So, doing this in Wondershare Filmora works in a quite easy way. Use the guideline:
Drag and drop your video into the timeline. Right-click on the clip and hit Detach Audio, which will let you separate audio and video from one another and make sure you can work on them one by one.
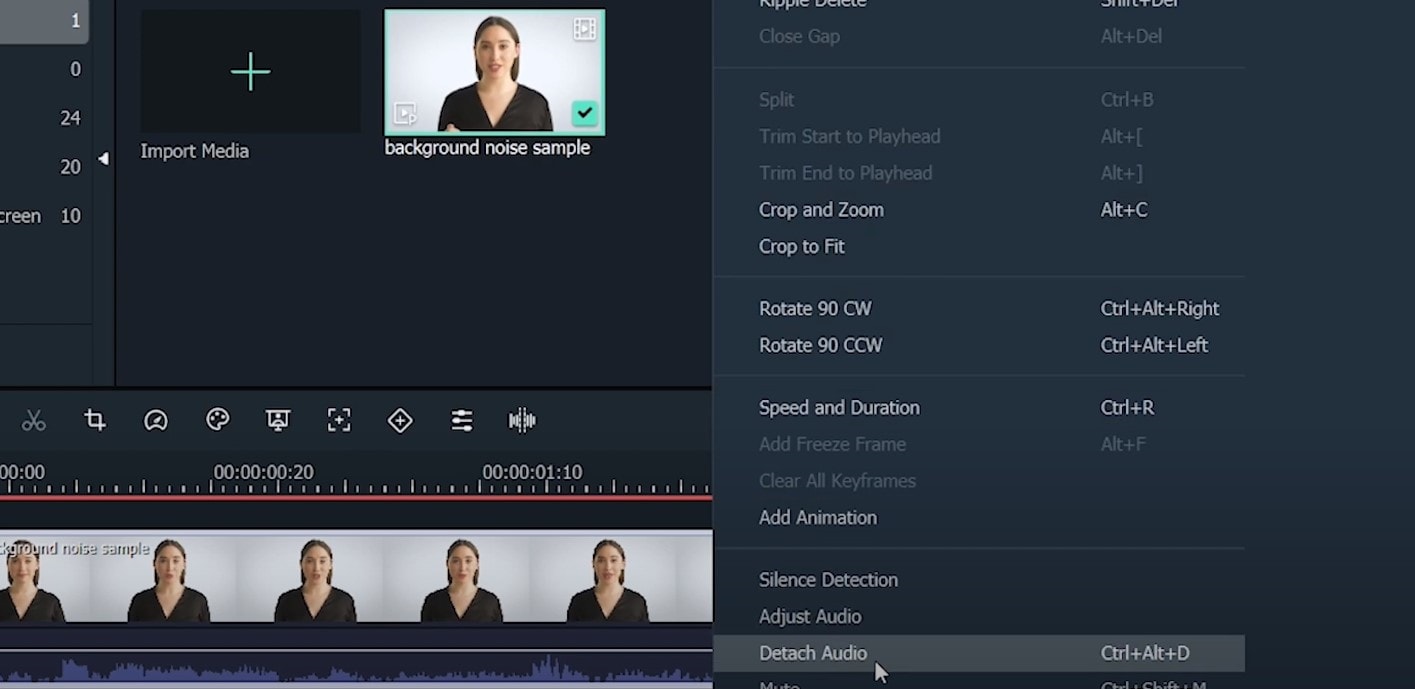
Double-click on the audio track and have access to the editing panel, where you can see Remove background noise – it is not needed to emphasize what this option does for you!
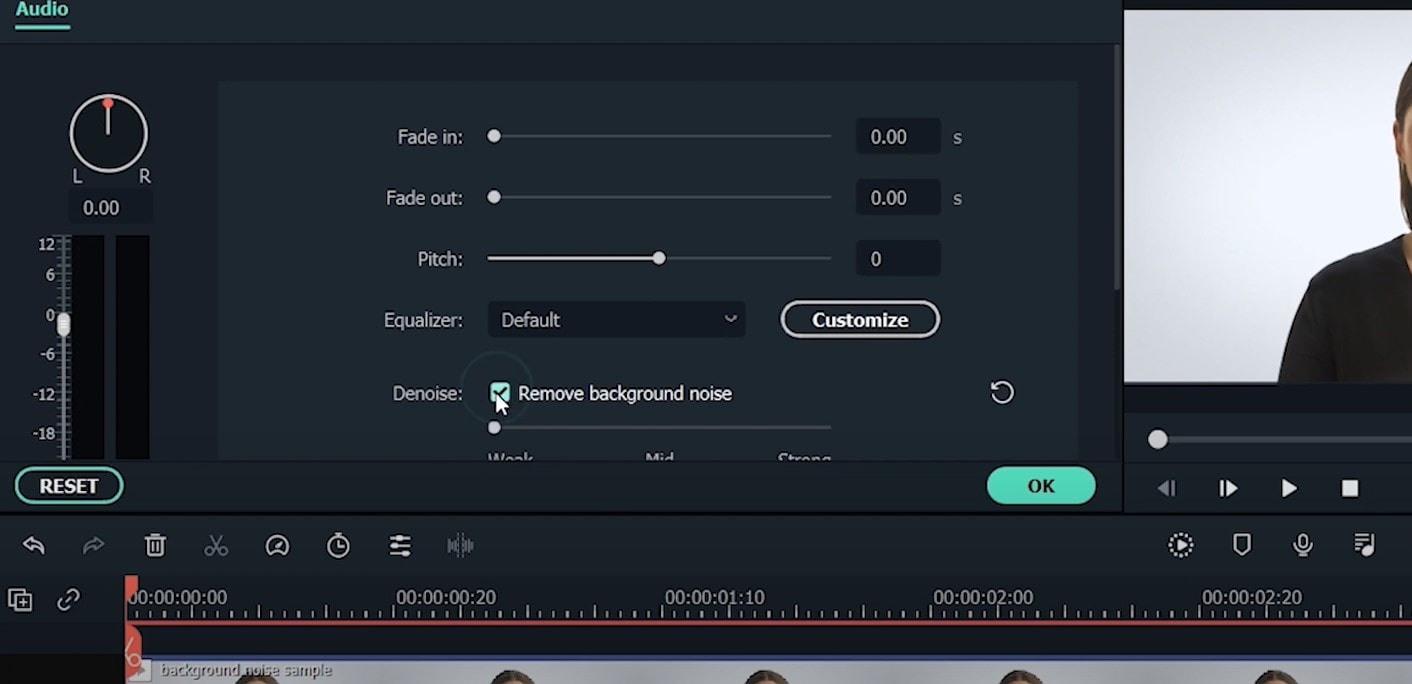
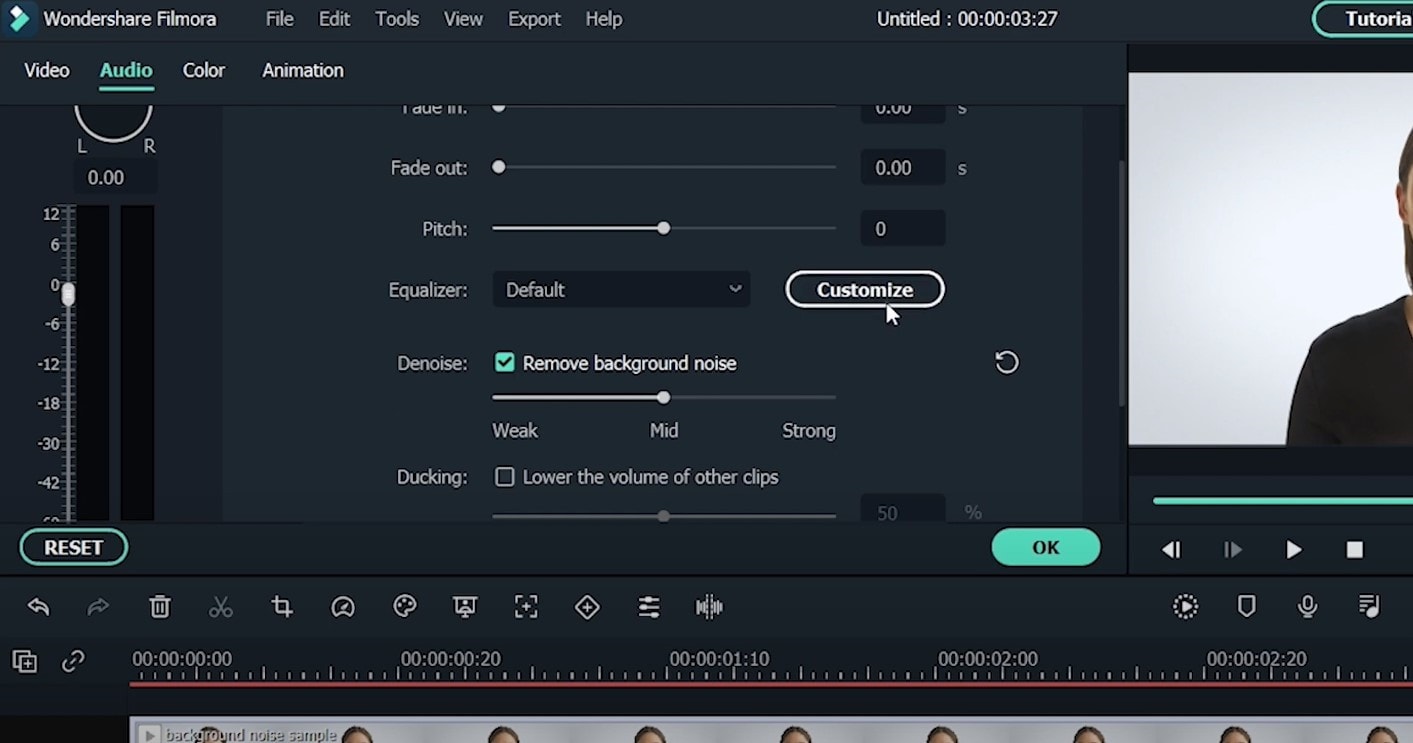
That’s it – you are done, but keep in mind that there is a second way to achieve the same result as well, but this in case you don’t want to detach the audio: Double-click on the video clip in the timeline, the editing panel opens, so switch to Audio. Checking the box next to Remove background noise will show that there are three levels – weak, mid, and strong, and of course, you can choose to your liking!
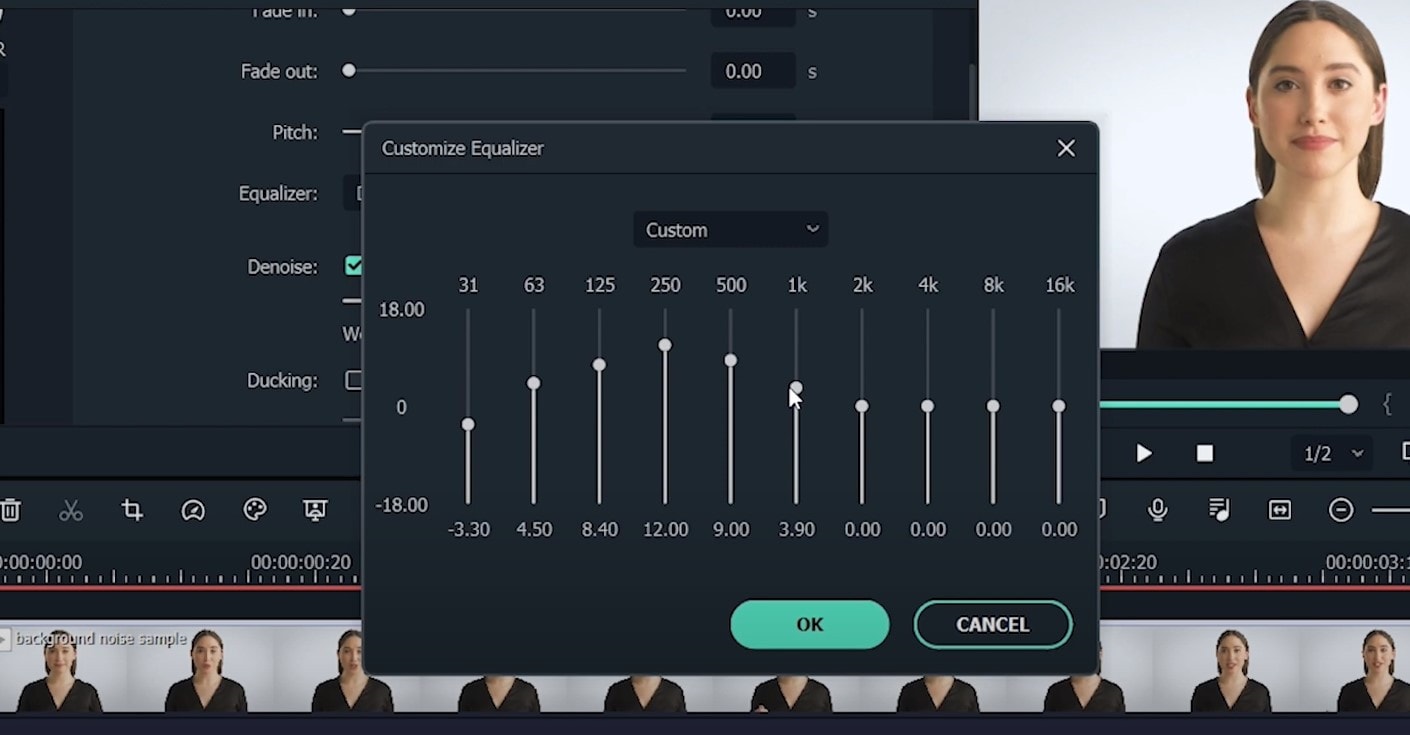
If the voice recording doesn’t sound natural anymore, you can do the following: Click on Customize and Customize Equalizer window will open.
On the left, you can see the low tunes, while the highs are on the right. Background noises are often on the left, so you can lower them to get rid of them, but in order to have a more natural sound, raise the middle ones a little – and you are done when you are content with the sound!
So, hmm… back to the original topic – denoising a video, shall we?..
Neat video
Neat Video kind of, speaks for itself… it is a powerful video editing tool suitable for Windows, macOS and Linux. It aims to reduce the digital noise, flicker, dust, scratches and other defects in the captured videos to improve the visual quality of the videos.
It is a plug-in for Premiere Pro, that does more or less what the product noise says: it makes grainy video look neater. It’s very easy to use and
How to do that in Neat Video? Here are the steps:
Find the clip you want to reduce the noise of and search for the neat video effect in the Effects Panel.
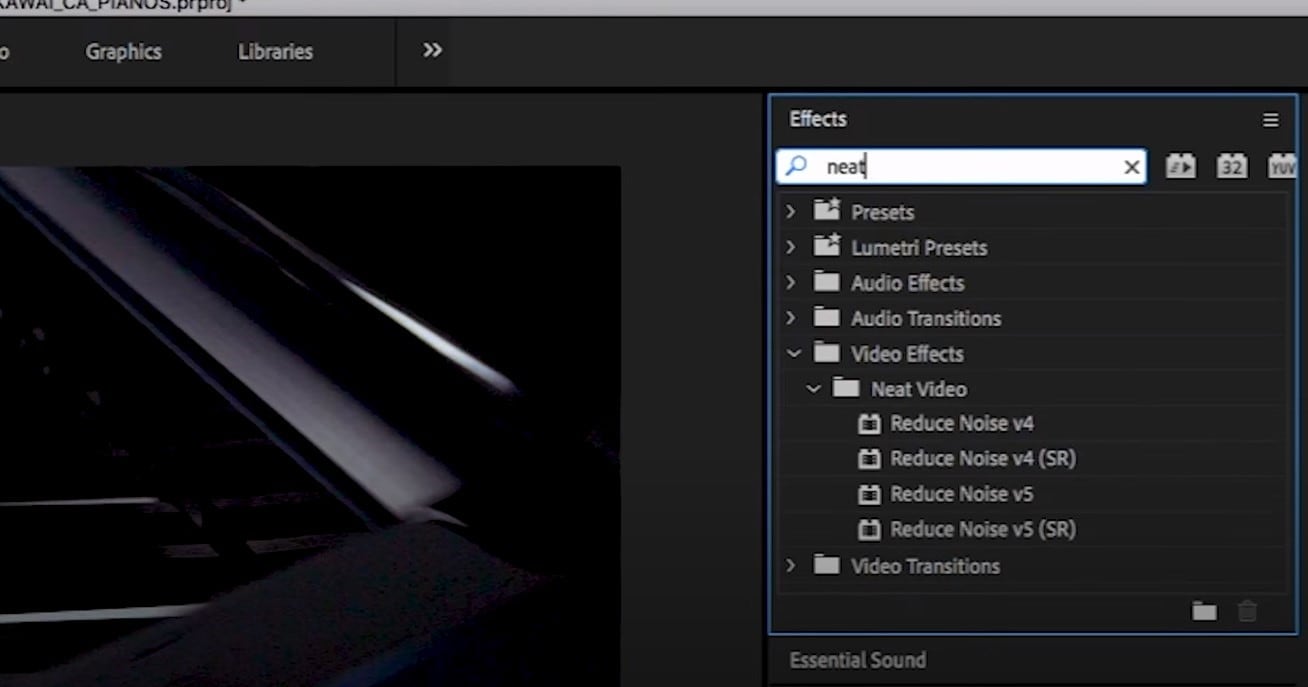
The video editors mostly use the SR version of it, because it seems faster and has kind of a better performance.
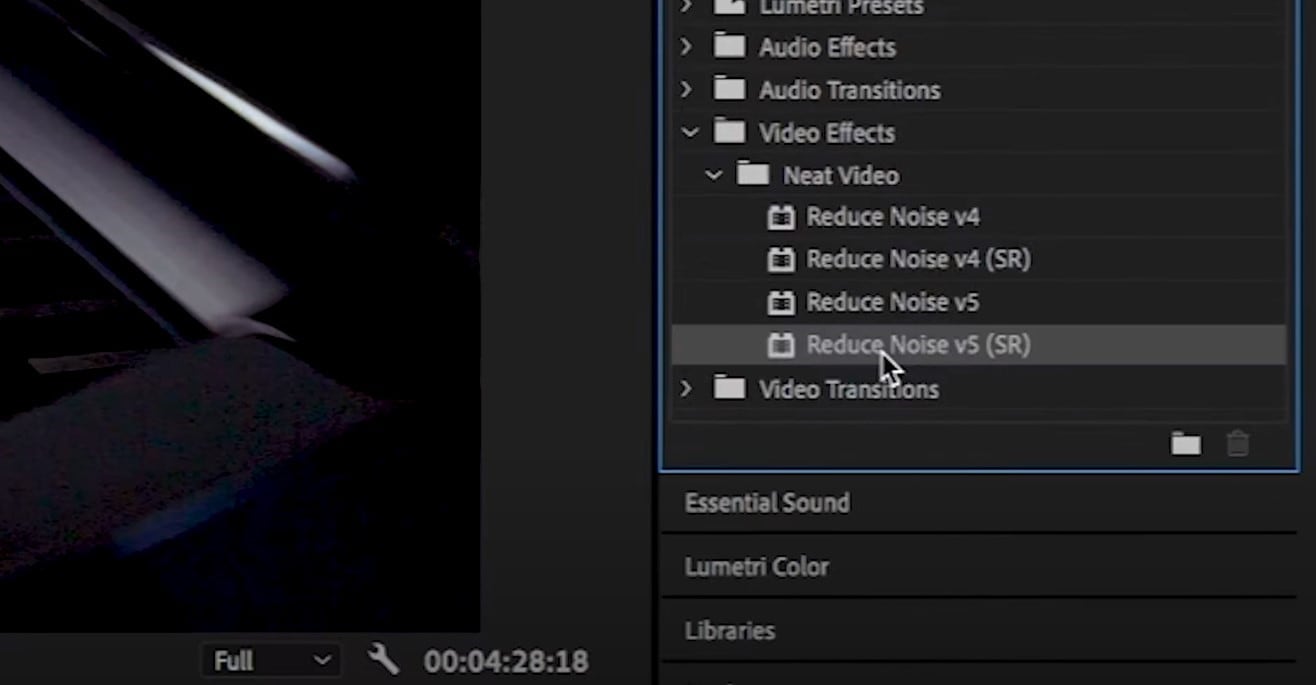
Then, you’ll have to drag the neat video plug-in to the clip to your choosing, take your attention to the Effect Controls panel on the left, and find: fx Reduce Noise v5 (SR) – press the button saying Prepare and this will open up the Build button as well, which wil open the Neat video effect window.
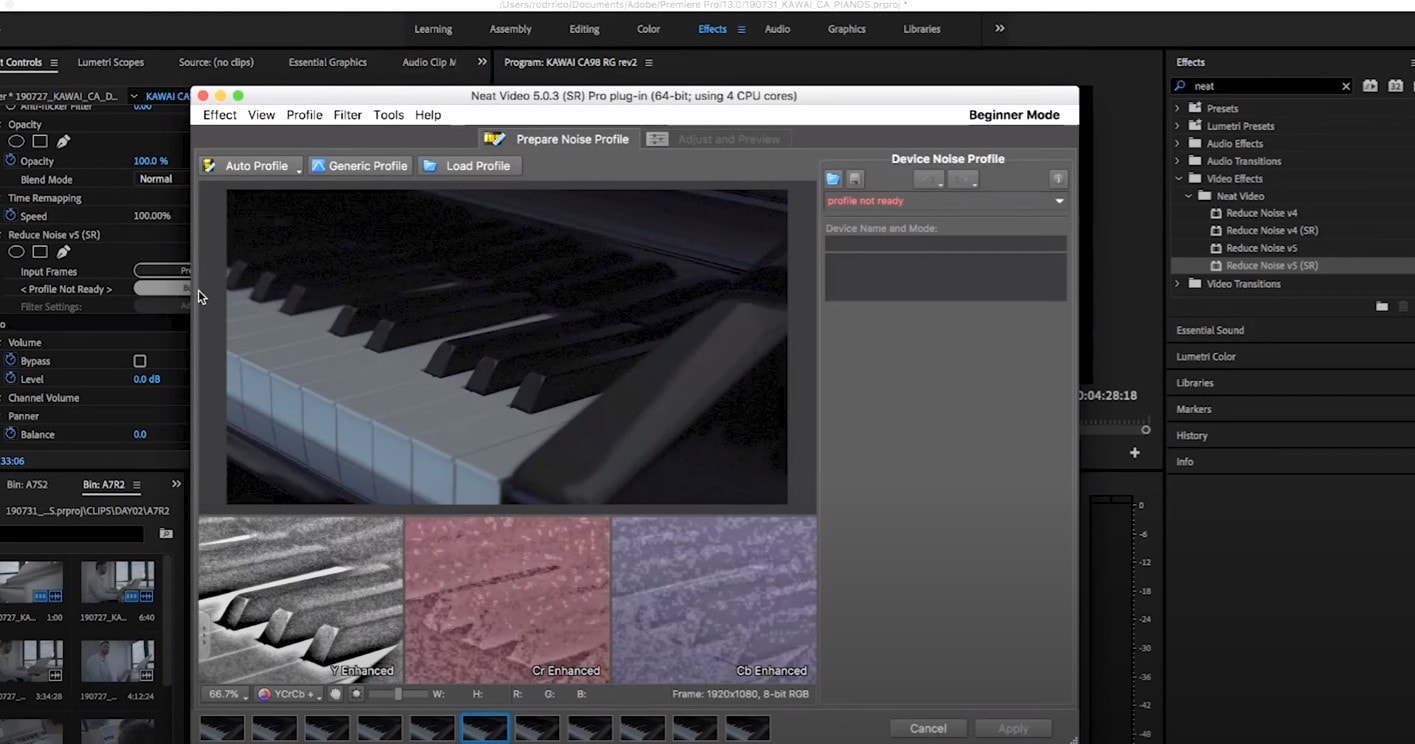
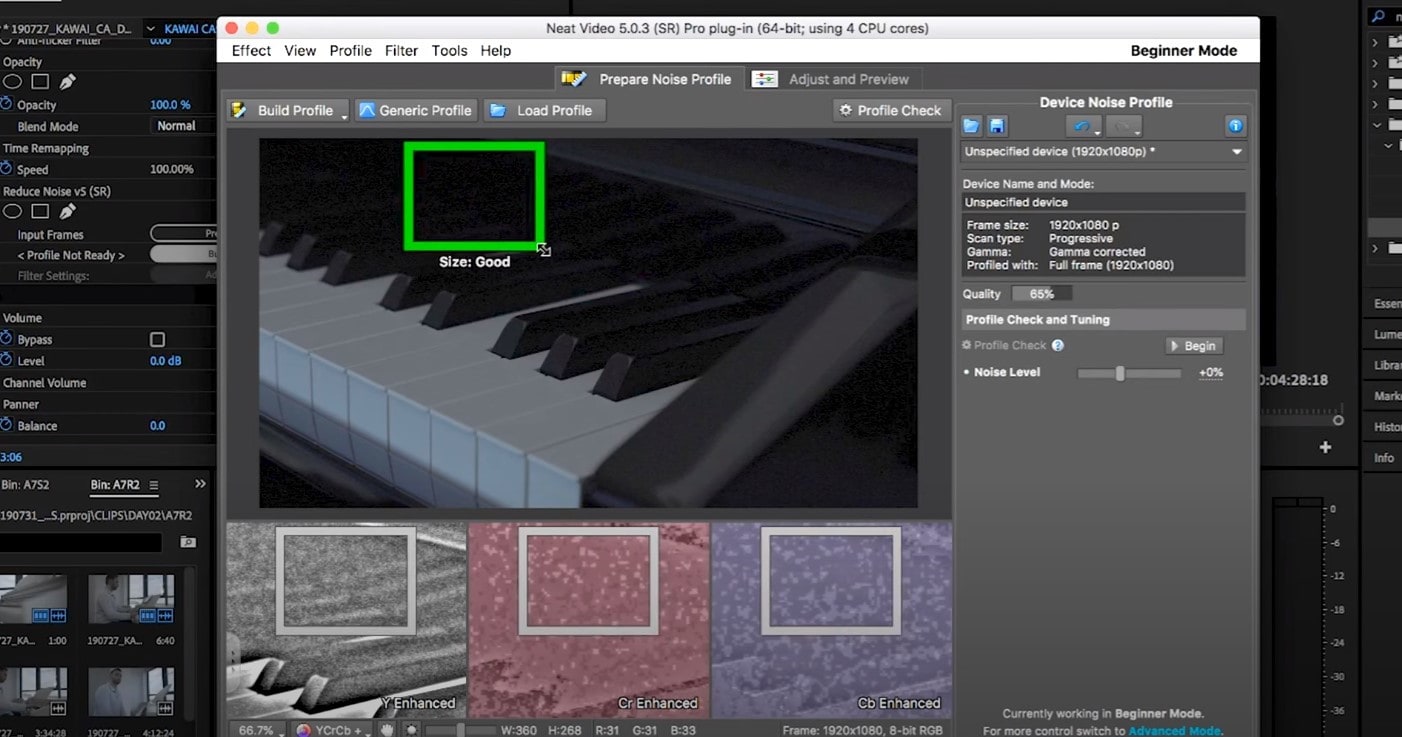
There, you’ll need to click on the Auto Profile. Selection window will appear, which you can move around the scene and resize, in order to select the noisy area of your footage. It is recommended to find the darkest or grainiest area there and select judging by this.
On the left side, you will find Filter Settings: under Spatial, you can play with the Noise Reduction Amount and Noise Level.
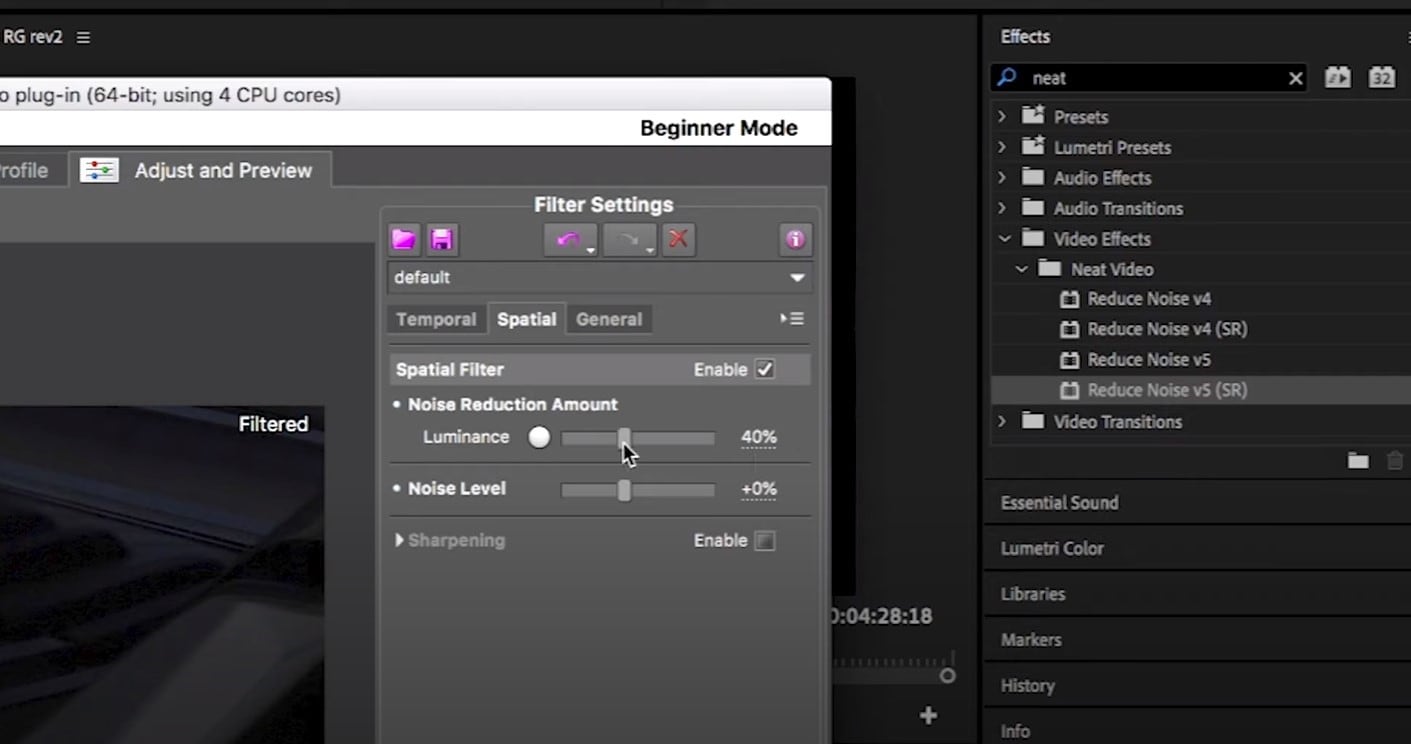
Then, you will hit Apply and – done, you can instantly see the results!
Shotcut
What about Shotcut? It is a free, open-source and cross-platform video denoiser for Windows operating system. It is also an outstanding video editor with trimming, splitting, color correction and other tools.
In order to reduce the noise there, do the following: first off, find filters, open that window and type in: Noise. This will open the options, and several of them are for noise reduction.
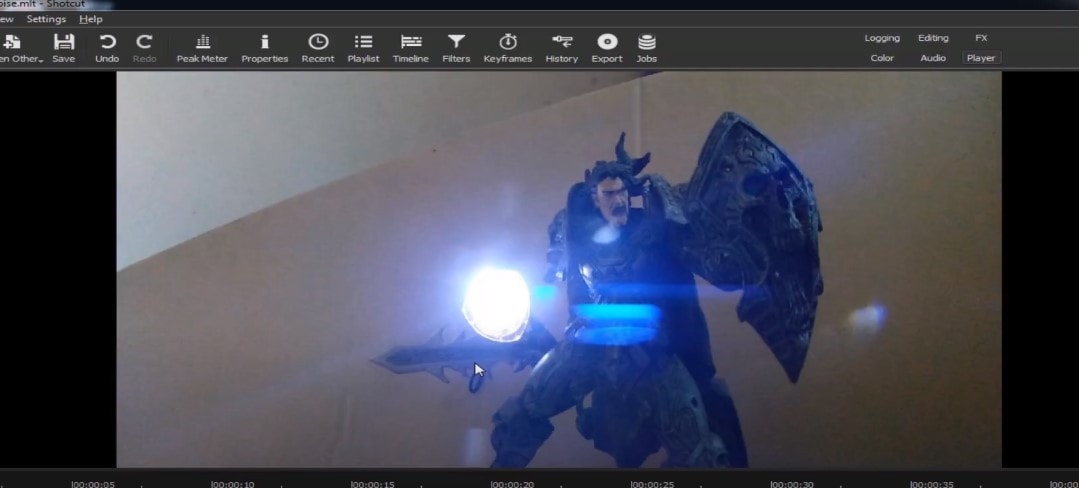
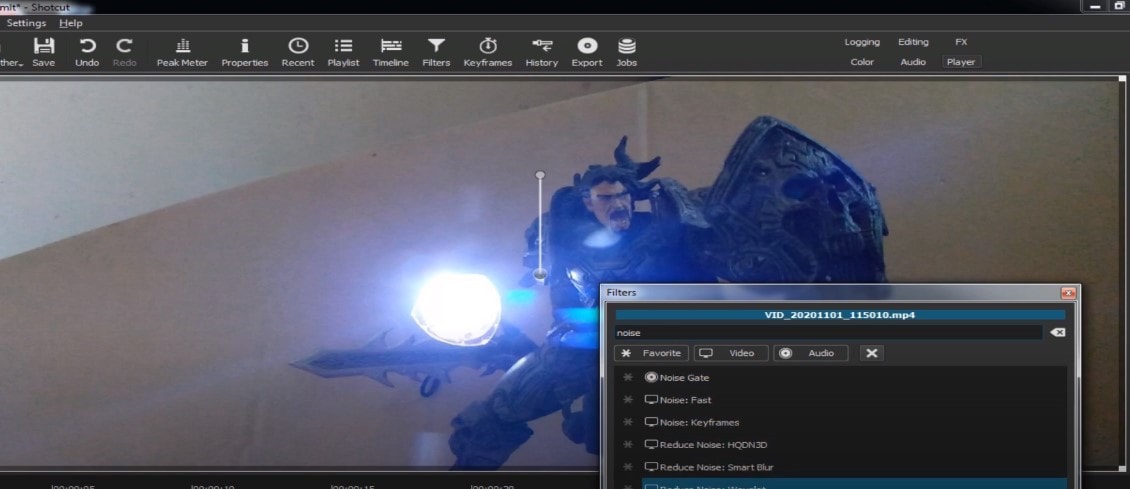
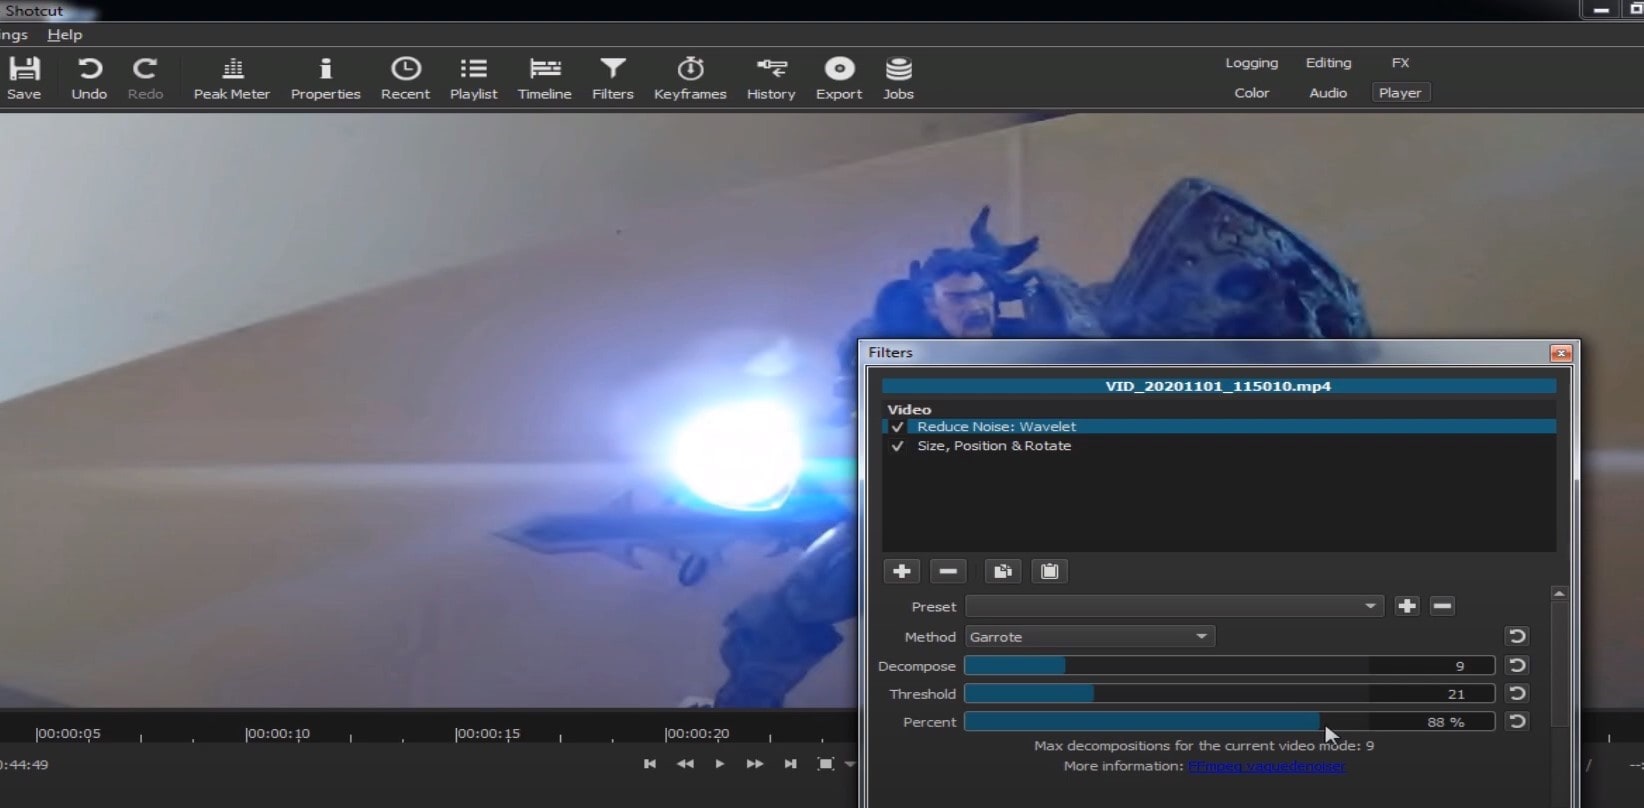
Choose Reduce Noise: Wavelet, add it to the Video and then feel free to modify the settings, such as: Decompose, Threshold, Percent. You can check and uncheck the effect in order to see the before-after difference. Then, click Apply button and it is ready to go!
Anyway, you can also try other similar effects such as Reduce Noise: HQDN3D and Reduce Noise: Smart Blur.
Adobe Premiere Pro
Even though we discussed video denoising in Adobe Premier Pro but with the help of a plug-in called Neat Video, reducing the noise in the video in this software can be achieved without the plug-in as well, through using effect which is called Median. And, Premiere Pro kind of deserves to be mentioned, so, let’s go for it!
Add the desired footage into the Timeline of Premiere Pro. Then, find the Effects Panel, where our wanted Median can be found –drag and drop the effect to the clip.
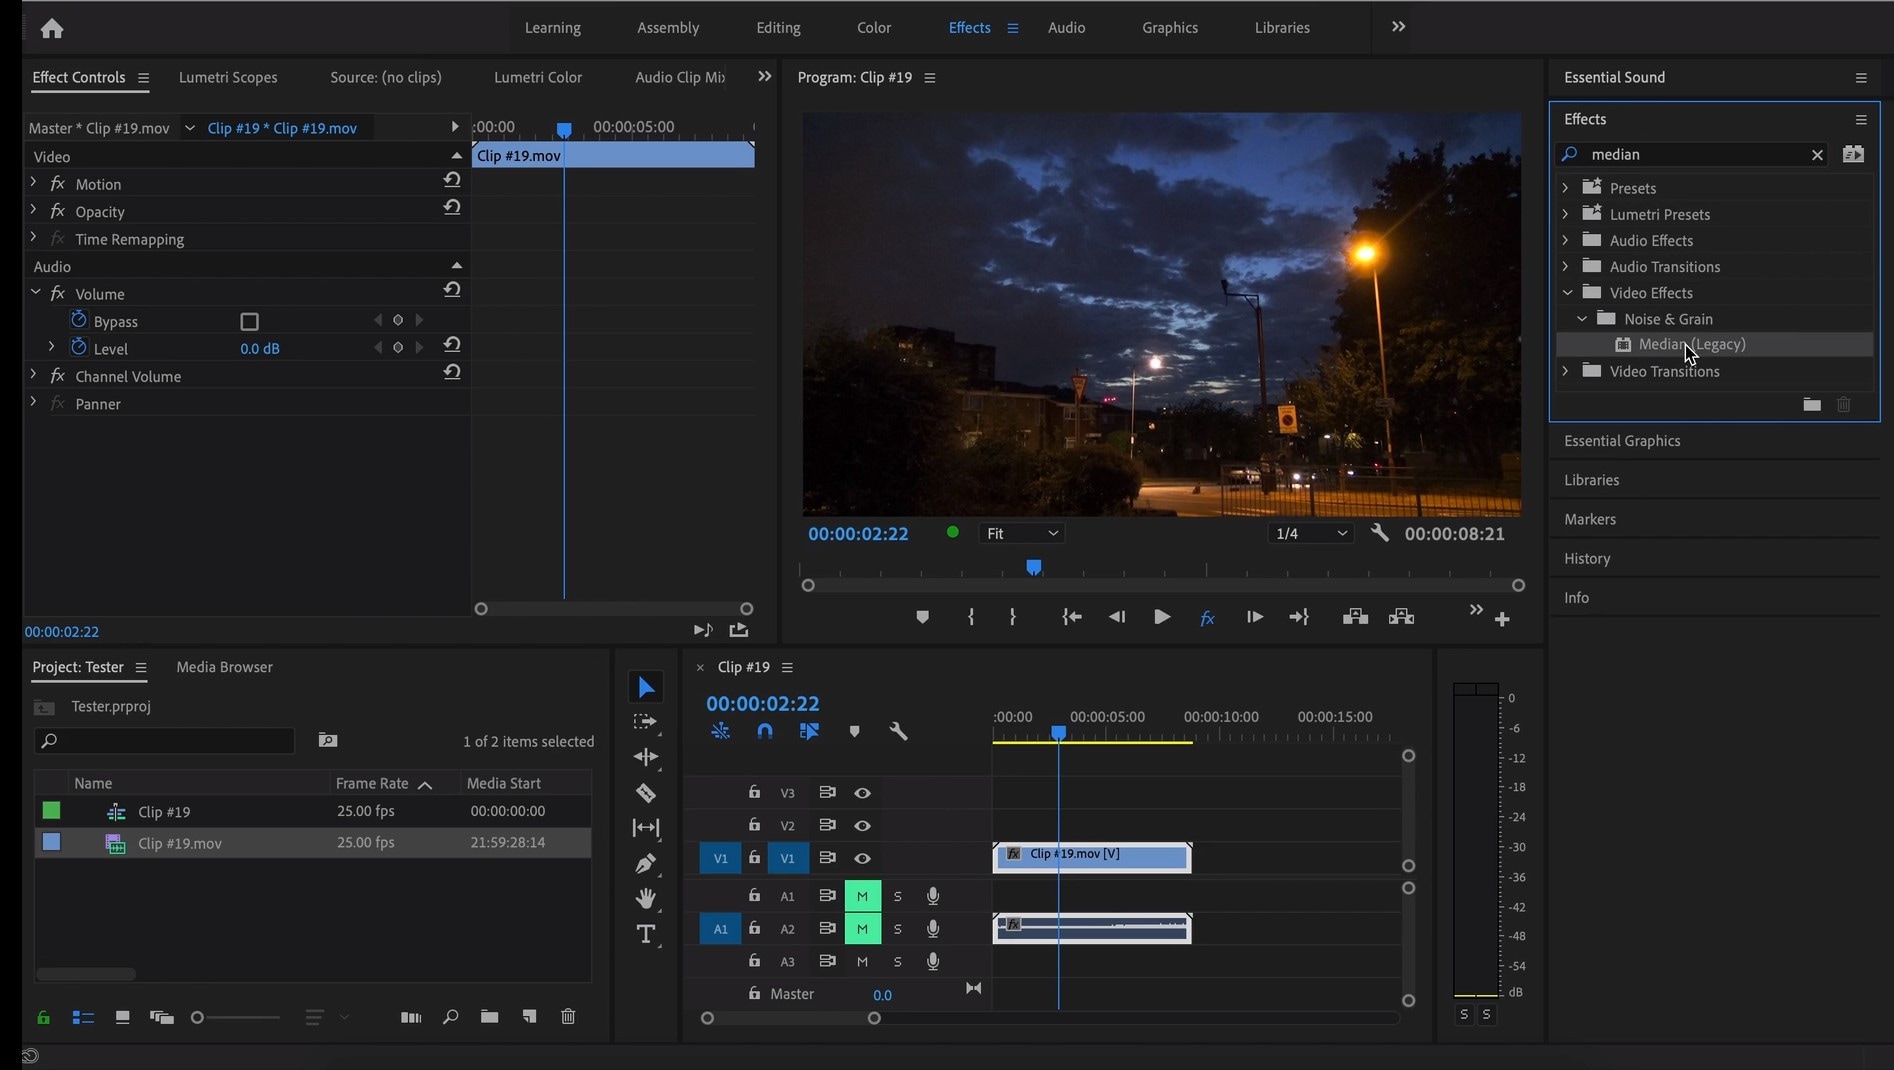
The Median should modify the grainiest parts of the whole clip, so in order to do this, we need to use masks. In the Effects Control panel, select the mask shape for the clip – the options are: rectangle, circle, or pen tool. With Pen tool, you move the Mask around the screen and resize it – the covered area will be affected.
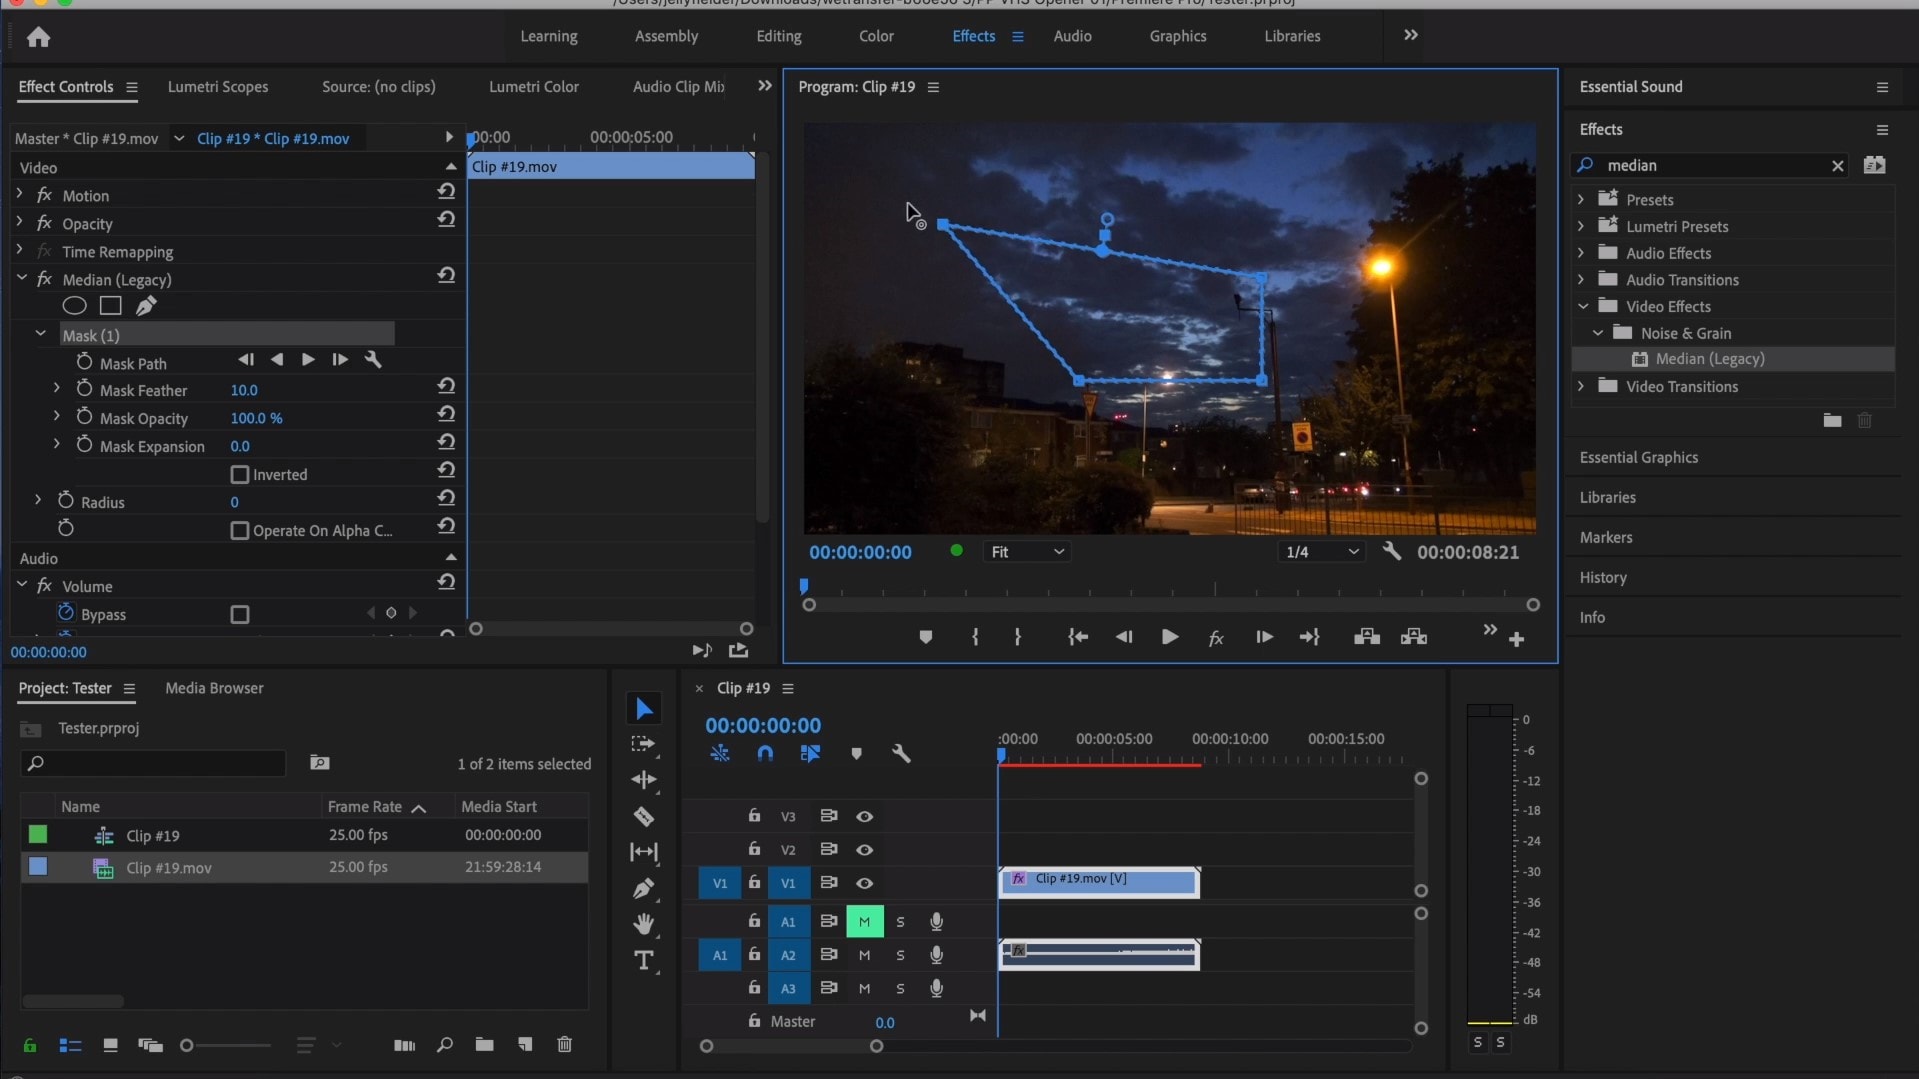
If you change Feather setting to 100, the effect will lose a sharp edge and instead, there will be a smooth border.
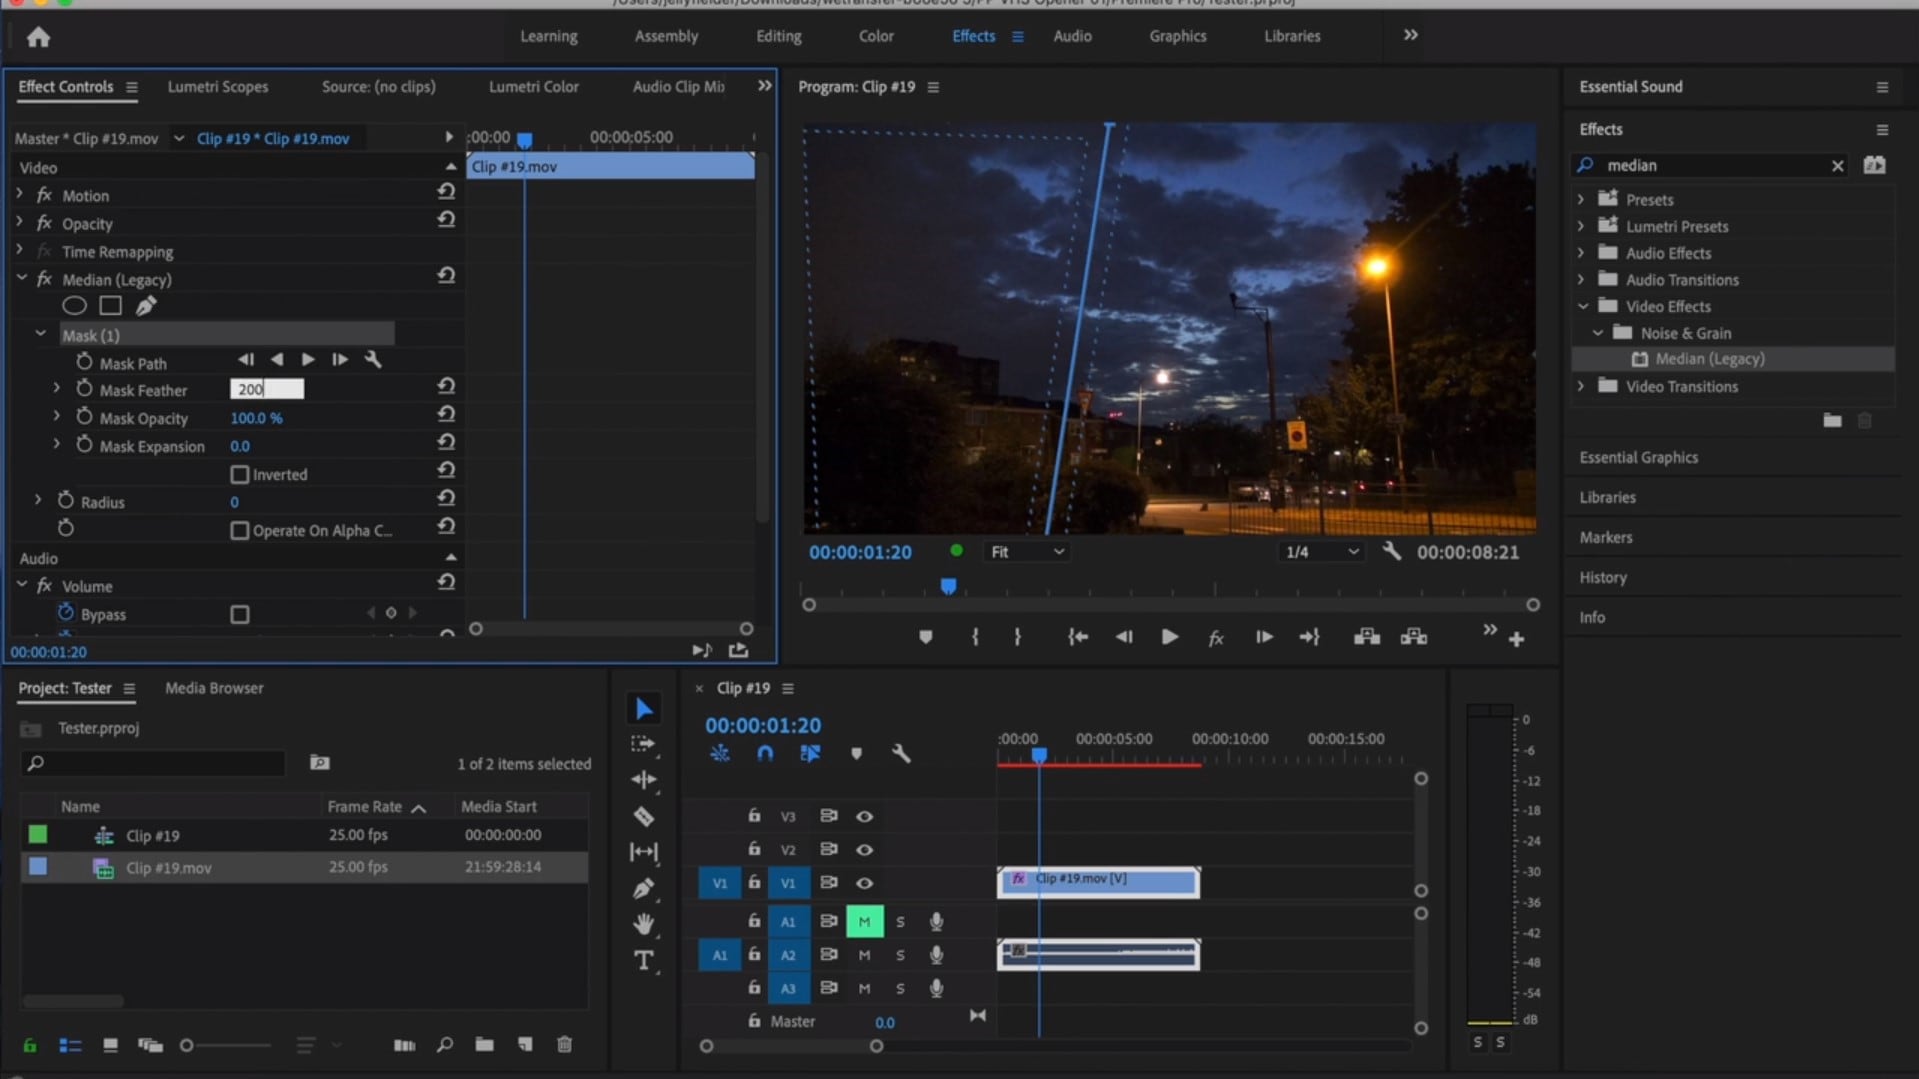
So, you might think it is needed to repeat these steps several time to create masks in different areas, in order to cover all of the grainy space of the scene.
And, at last, to reduce the noise, adjust the effect settings.
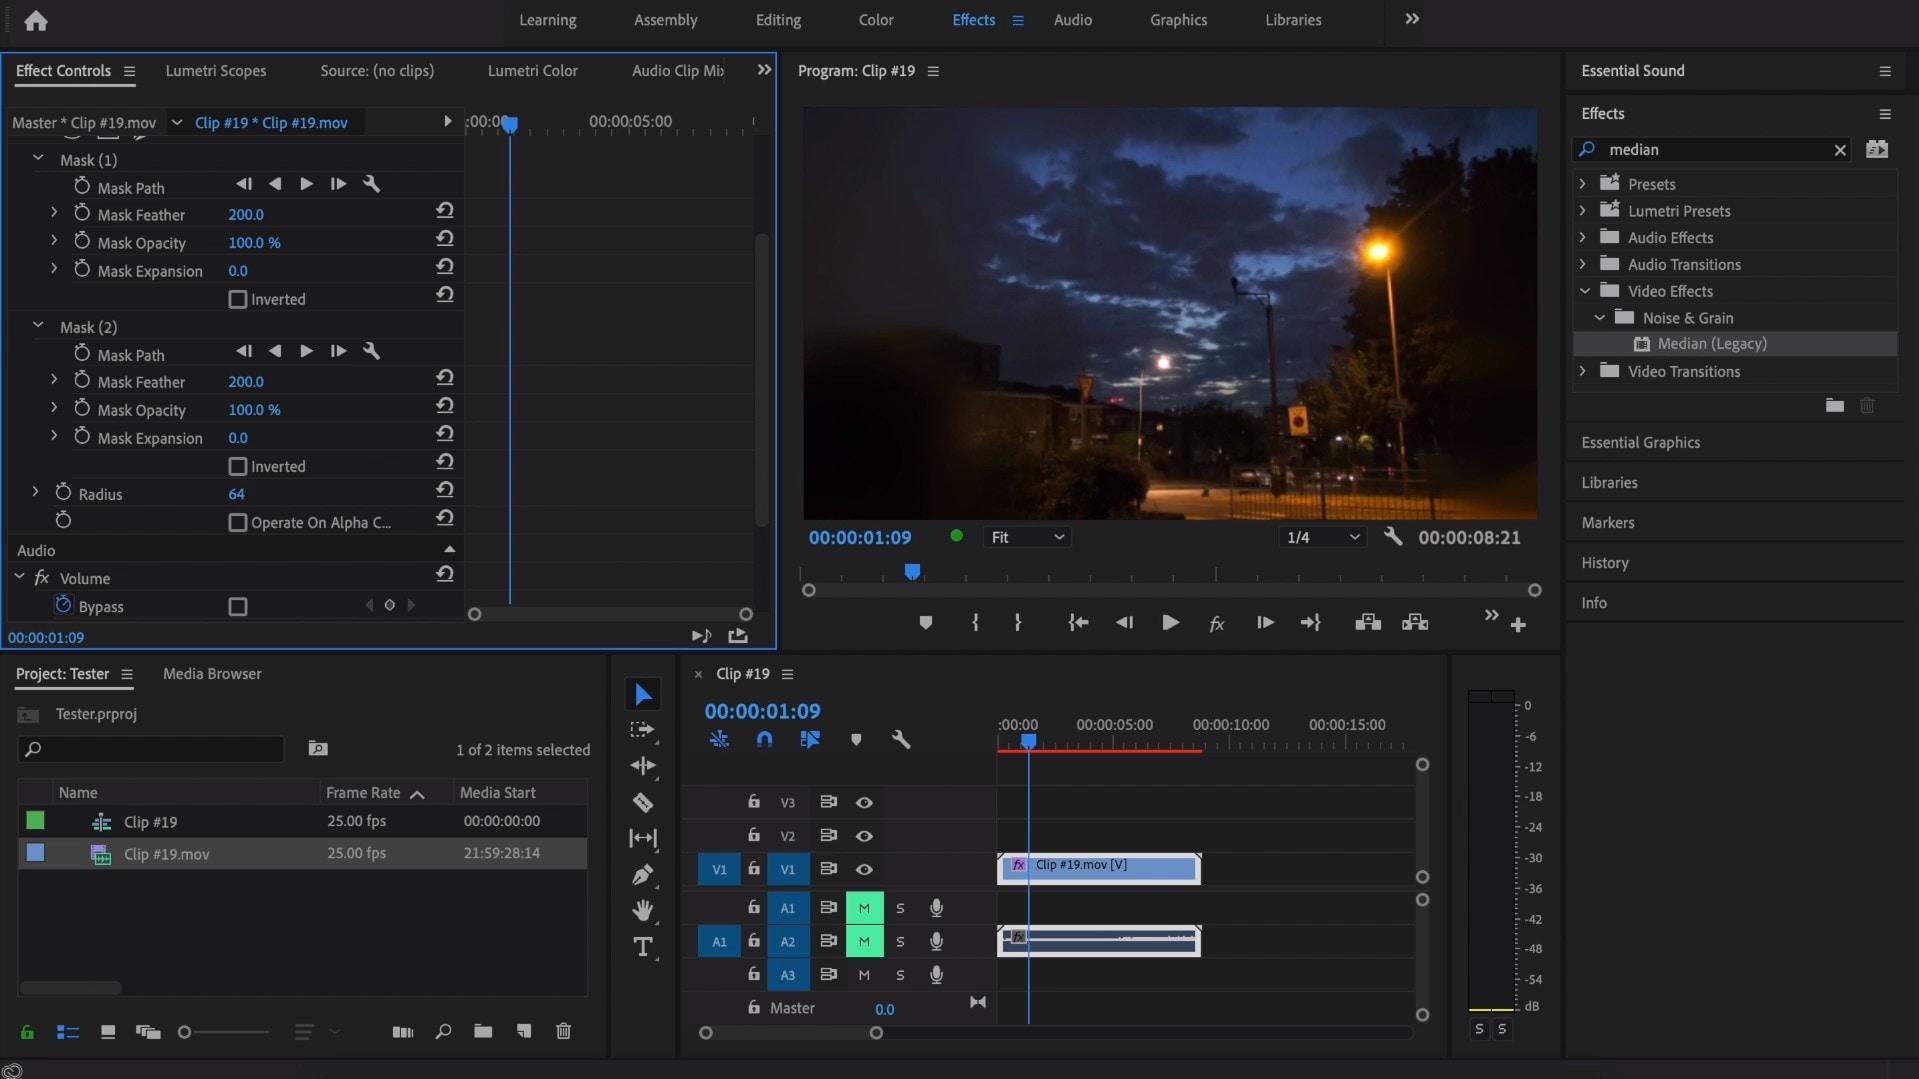
Actually, Median just blurs the grainy parts, without directly taking them away. Lastly, you can get to know the Radios settings, which will help you to achieve your most desired look!
Davinci Resolve
DaVinci Resolve is also worth mentioning in this list, in a way because it is also different from other video editors. Let’s see how it works and, meanwhile, differs:
Add the footage into the timeline. Find the fusion tab underneath the timeline panel.
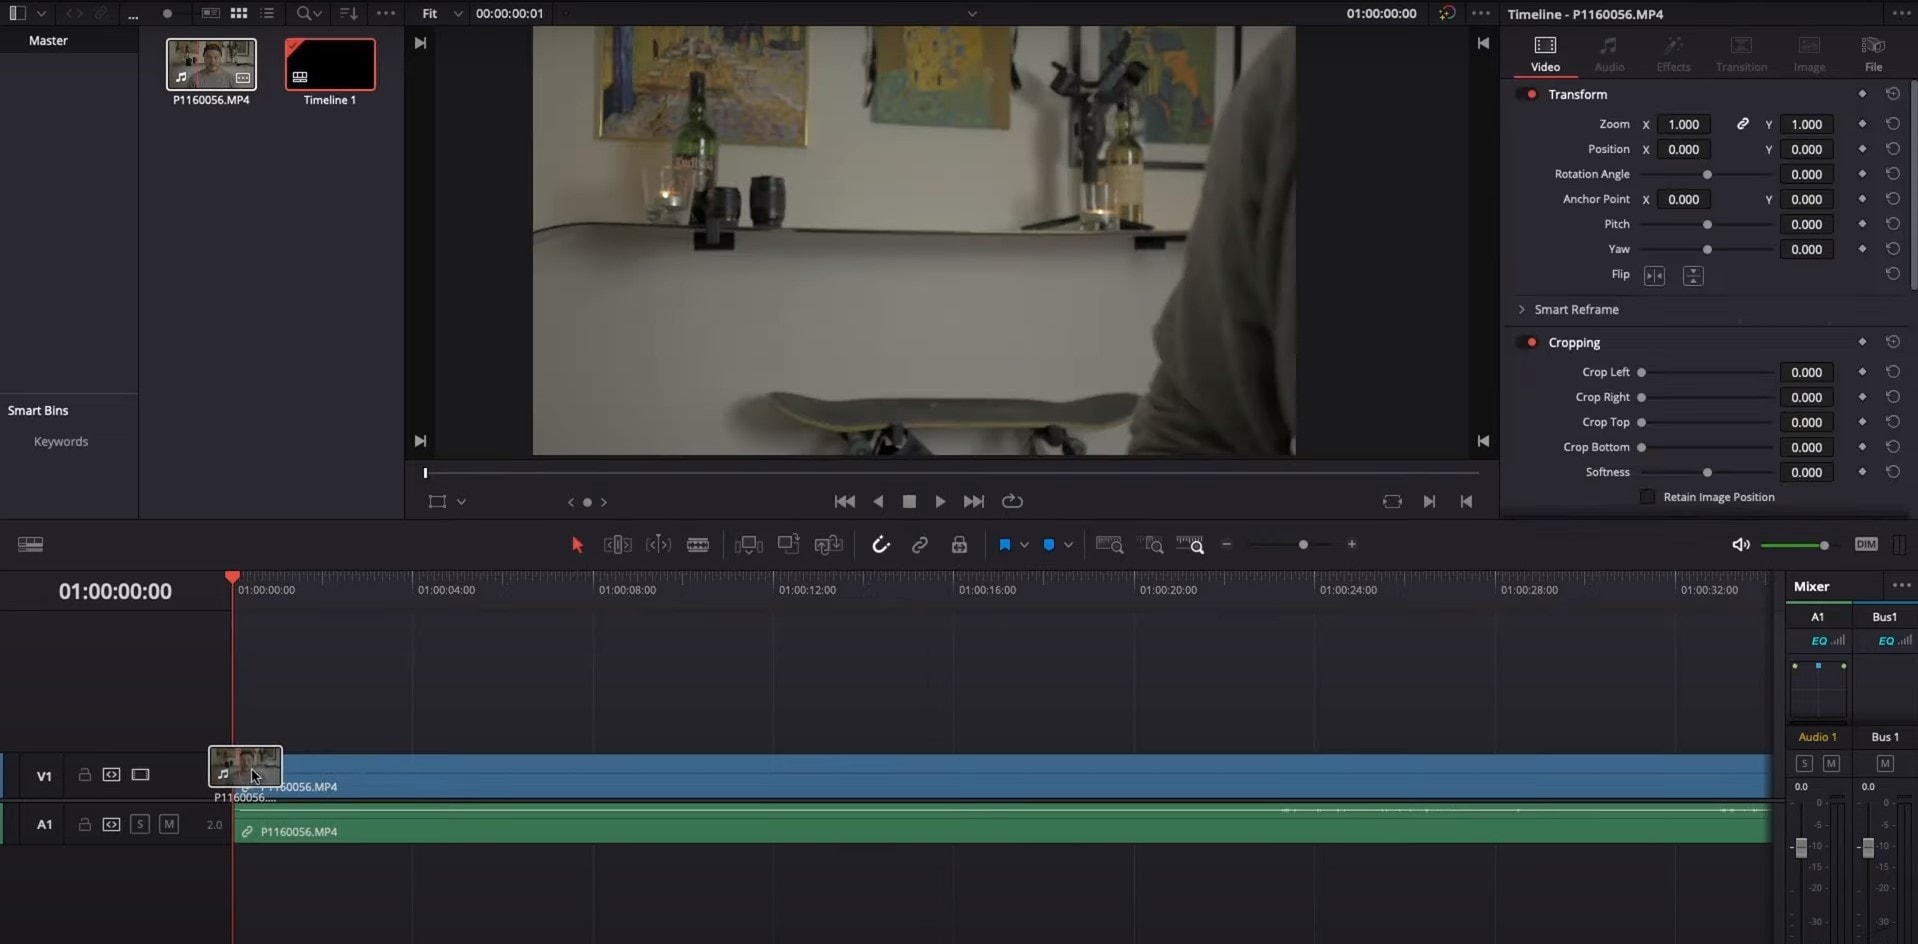
There, MediaIn1 and MediaOut1 will appear, and first, click on MediaIn1, - the scene will be shown in the first viewer – and MediaOut1 by default is appearing in the second. So, stay on MediaIn1, hit shift+spacebar, and find Remove Noise (RN). Click Add, which adds the Remove Noise1 node. On the top right corner there is an Inspector, which opens all the properties you can modify.

After going only into the second viewer, and in the top bar there is channel icons. Open it and click on red, but don’t get alarmed when your footage turns black and white – it’s just for a while. Go back to the Inspector, increase Softness Red and Detail Red.
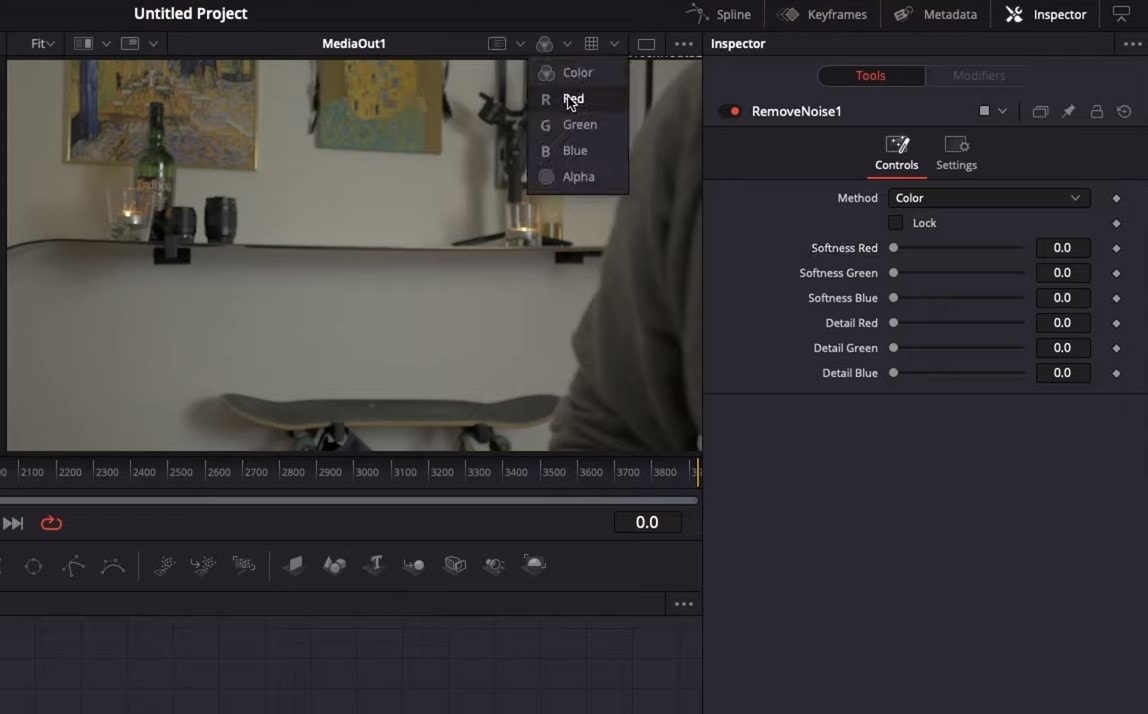
This step helps remove grain from the red channel. Then repeat the same for green and blue channels. After finishing go to the same channel button and set it to “back to color”. The clip will be colorized again and now be clearer, compared to the first viewer.
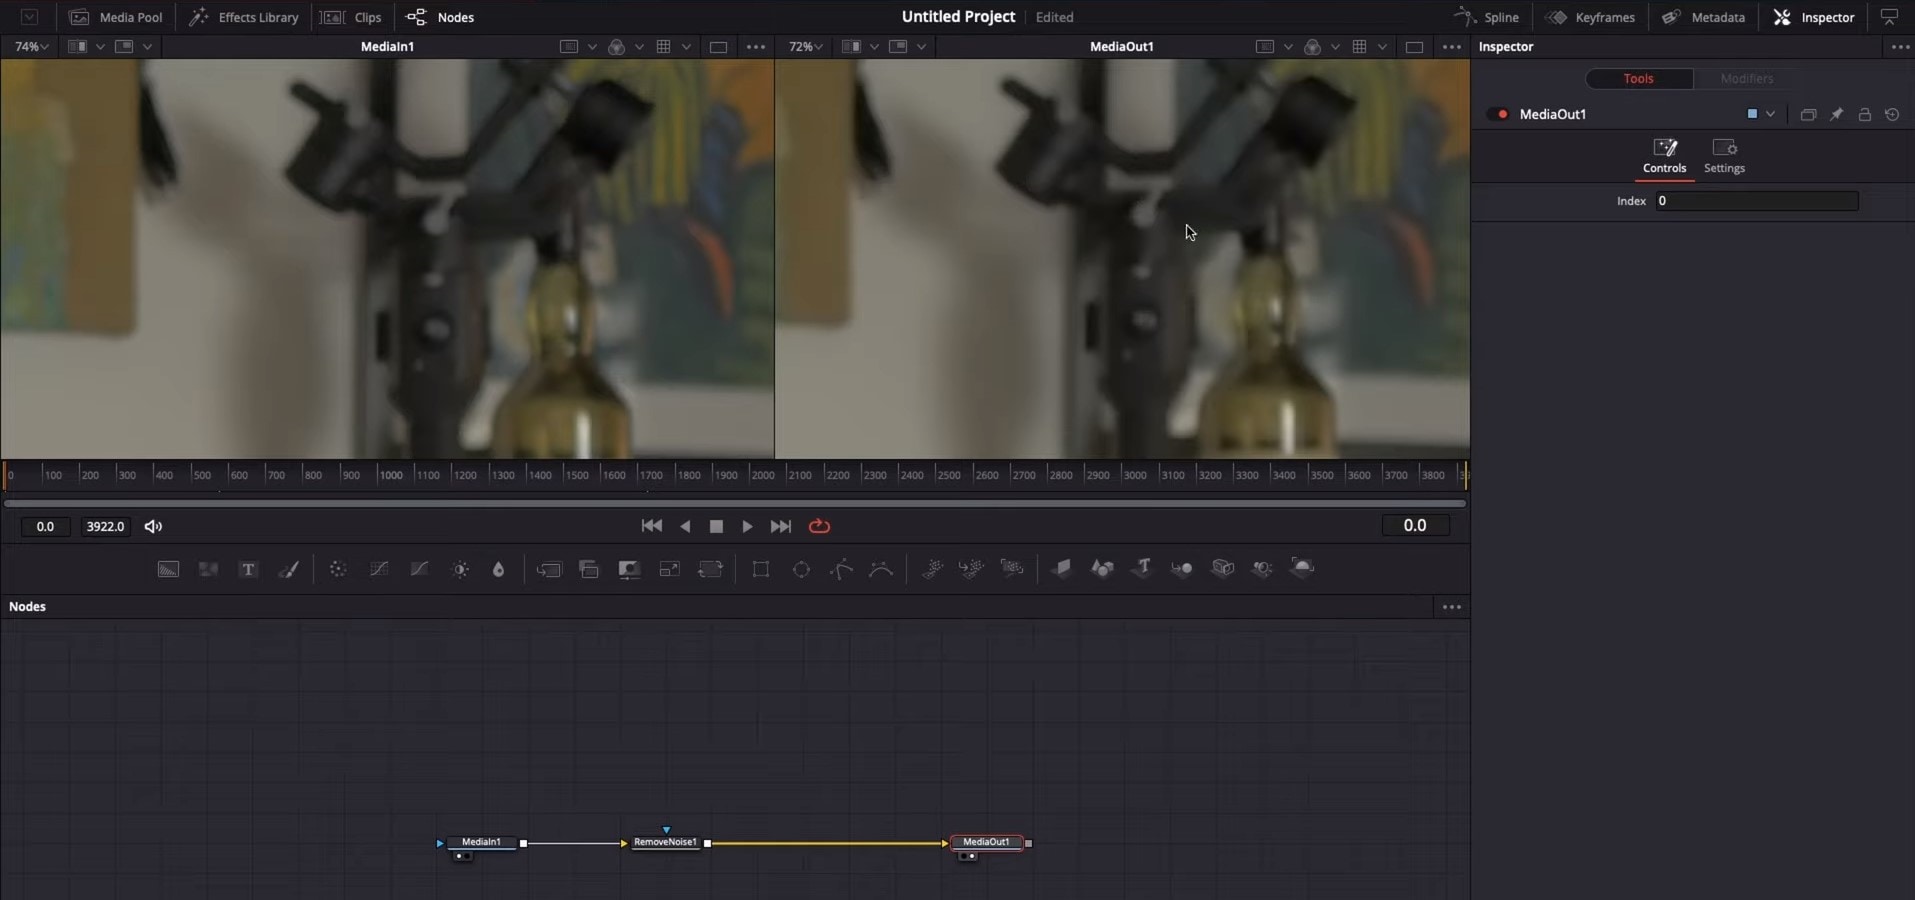
So, Evrika – we hot to know 5 best video denoisers in 2024, with the addition of audio background noise removal in Wondershare Filmora – hope you enjoyed it, and hope this will help you create better videos for yourself and your viewers!
This ensures you see the Smart Denoise, where you can change opacity of the clip, threshold and radius.

Reduce Opacity until you are satisfied with the result. The box next to Smart Denoise will show you the scene before and after the effect.
Bonus tip: Wondershare Filmora audio denoise
We already explained how video denoising works, and we will go on with our selection and explanatory article about the process, but, as we are on the Filmora topic, we might as well mention that denoising might mean another thing too – which, in this case, regards audio background noise. It means to remove unwanted hum from the audio in order for it to become more hearable. So, doing this in Wondershare Filmora works in a quite easy way. Use the guideline:
Drag and drop your video into the timeline. Right-click on the clip and hit Detach Audio, which will let you separate audio and video from one another and make sure you can work on them one by one.

Double-click on the audio track and have access to the editing panel, where you can see Remove background noise – it is not needed to emphasize what this option does for you!

That’s it – you are done, but keep in mind that there is a second way to achieve the same result as well, but this in case you don’t want to detach the audio: Double-click on the video clip in the timeline, the editing panel opens, so switch to Audio. Checking the box next to Remove background noise will show that there are three levels – weak, mid, and strong, and of course, you can choose to your liking!
If the voice recording doesn’t sound natural anymore, you can do the following: Click on Customize and Customize Equalizer window will open.

On the left, you can see the low tunes, while the highs are on the right. Background noises are often on the left, so you can lower them to get rid of them, but in order to have a more natural sound, raise the middle ones a little – and you are done when you are content with the sound!

So, hmm… back to the original topic – denoising a video, shall we?..
Neat video
Neat Video kind of, speaks for itself… it is a powerful video editing tool suitable for Windows, macOS and Linux. It aims to reduce the digital noise, flicker, dust, scratches and other defects in the captured videos to improve the visual quality of the videos.
It is a plug-in for Premiere Pro, that does more or less what the product noise says: it makes grainy video look neater. It’s very easy to use and
How to do that in Neat Video? Here are the steps:
Find the clip you want to reduce the noise of and search for the neat video effect in the Effects Panel.

The video editors mostly use the SR version of it, because it seems faster and has kind of a better performance.

Then, you’ll have to drag the neat video plug-in to the clip to your choosing, take your attention to the Effect Controls panel on the left, and find: fx Reduce Noise v5 (SR) – press the button saying Prepare and this will open up the Build button as well, which wil open the Neat video effect window.

There, you’ll need to click on the Auto Profile. Selection window will appear, which you can move around the scene and resize, in order to select the noisy area of your footage. It is recommended to find the darkest or grainiest area there and select judging by this.

On the left side, you will find Filter Settings: under Spatial, you can play with the Noise Reduction Amount and Noise Level.

Then, you will hit Apply and – done, you can instantly see the results!
Shotcut
What about Shotcut? It is a free, open-source and cross-platform video denoiser for Windows operating system. It is also an outstanding video editor with trimming, splitting, color correction and other tools.
In order to reduce the noise there, do the following: first off, find filters, open that window and type in: Noise. This will open the options, and several of them are for noise reduction.


Choose Reduce Noise: Wavelet, add it to the Video and then feel free to modify the settings, such as: Decompose, Threshold, Percent. You can check and uncheck the effect in order to see the before-after difference. Then, click Apply button and it is ready to go!
Anyway, you can also try other similar effects such as Reduce Noise: HQDN3D and Reduce Noise: Smart Blur.
Adobe Premiere Pro
Even though we discussed video denoising in Adobe Premier Pro but with the help of a plug-in called Neat Video, reducing the noise in the video in this software can be achieved without the plug-in as well, through using effect which is called Median. And, Premiere Pro kind of deserves to be mentioned, so, let’s go for it!
Add the desired footage into the Timeline of Premiere Pro. Then, find the Effects Panel, where our wanted Median can be found –drag and drop the effect to the clip.

The Median should modify the grainiest parts of the whole clip, so in order to do this, we need to use masks. In the Effects Control panel, select the mask shape for the clip – the options are: rectangle, circle, or pen tool. With Pen tool, you move the Mask around the screen and resize it – the covered area will be affected.

If you change Feather setting to 100, the effect will lose a sharp edge and instead, there will be a smooth border.

So, you might think it is needed to repeat these steps several time to create masks in different areas, in order to cover all of the grainy space of the scene.
And, at last, to reduce the noise, adjust the effect settings.

Actually, Median just blurs the grainy parts, without directly taking them away. Lastly, you can get to know the Radios settings, which will help you to achieve your most desired look!
Davinci Resolve
DaVinci Resolve is also worth mentioning in this list, in a way because it is also different from other video editors. Let’s see how it works and, meanwhile, differs:
Add the footage into the timeline. Find the fusion tab underneath the timeline panel.

There, MediaIn1 and MediaOut1 will appear, and first, click on MediaIn1, - the scene will be shown in the first viewer – and MediaOut1 by default is appearing in the second. So, stay on MediaIn1, hit shift+spacebar, and find Remove Noise (RN). Click Add, which adds the Remove Noise1 node. On the top right corner there is an Inspector, which opens all the properties you can modify.

After going only into the second viewer, and in the top bar there is channel icons. Open it and click on red, but don’t get alarmed when your footage turns black and white – it’s just for a while. Go back to the Inspector, increase Softness Red and Detail Red.

This step helps remove grain from the red channel. Then repeat the same for green and blue channels. After finishing go to the same channel button and set it to “back to color”. The clip will be colorized again and now be clearer, compared to the first viewer.

So, Evrika – we hot to know 5 best video denoisers in 2024, with the addition of audio background noise removal in Wondershare Filmora – hope you enjoyed it, and hope this will help you create better videos for yourself and your viewers!
This ensures you see the Smart Denoise, where you can change opacity of the clip, threshold and radius.

Reduce Opacity until you are satisfied with the result. The box next to Smart Denoise will show you the scene before and after the effect.
Bonus tip: Wondershare Filmora audio denoise
We already explained how video denoising works, and we will go on with our selection and explanatory article about the process, but, as we are on the Filmora topic, we might as well mention that denoising might mean another thing too – which, in this case, regards audio background noise. It means to remove unwanted hum from the audio in order for it to become more hearable. So, doing this in Wondershare Filmora works in a quite easy way. Use the guideline:
Drag and drop your video into the timeline. Right-click on the clip and hit Detach Audio, which will let you separate audio and video from one another and make sure you can work on them one by one.

Double-click on the audio track and have access to the editing panel, where you can see Remove background noise – it is not needed to emphasize what this option does for you!

That’s it – you are done, but keep in mind that there is a second way to achieve the same result as well, but this in case you don’t want to detach the audio: Double-click on the video clip in the timeline, the editing panel opens, so switch to Audio. Checking the box next to Remove background noise will show that there are three levels – weak, mid, and strong, and of course, you can choose to your liking!
If the voice recording doesn’t sound natural anymore, you can do the following: Click on Customize and Customize Equalizer window will open.

On the left, you can see the low tunes, while the highs are on the right. Background noises are often on the left, so you can lower them to get rid of them, but in order to have a more natural sound, raise the middle ones a little – and you are done when you are content with the sound!

So, hmm… back to the original topic – denoising a video, shall we?..
Neat video
Neat Video kind of, speaks for itself… it is a powerful video editing tool suitable for Windows, macOS and Linux. It aims to reduce the digital noise, flicker, dust, scratches and other defects in the captured videos to improve the visual quality of the videos.
It is a plug-in for Premiere Pro, that does more or less what the product noise says: it makes grainy video look neater. It’s very easy to use and
How to do that in Neat Video? Here are the steps:
Find the clip you want to reduce the noise of and search for the neat video effect in the Effects Panel.

The video editors mostly use the SR version of it, because it seems faster and has kind of a better performance.

Then, you’ll have to drag the neat video plug-in to the clip to your choosing, take your attention to the Effect Controls panel on the left, and find: fx Reduce Noise v5 (SR) – press the button saying Prepare and this will open up the Build button as well, which wil open the Neat video effect window.

There, you’ll need to click on the Auto Profile. Selection window will appear, which you can move around the scene and resize, in order to select the noisy area of your footage. It is recommended to find the darkest or grainiest area there and select judging by this.

On the left side, you will find Filter Settings: under Spatial, you can play with the Noise Reduction Amount and Noise Level.

Then, you will hit Apply and – done, you can instantly see the results!
Shotcut
What about Shotcut? It is a free, open-source and cross-platform video denoiser for Windows operating system. It is also an outstanding video editor with trimming, splitting, color correction and other tools.
In order to reduce the noise there, do the following: first off, find filters, open that window and type in: Noise. This will open the options, and several of them are for noise reduction.


Choose Reduce Noise: Wavelet, add it to the Video and then feel free to modify the settings, such as: Decompose, Threshold, Percent. You can check and uncheck the effect in order to see the before-after difference. Then, click Apply button and it is ready to go!
Anyway, you can also try other similar effects such as Reduce Noise: HQDN3D and Reduce Noise: Smart Blur.
Adobe Premiere Pro
Even though we discussed video denoising in Adobe Premier Pro but with the help of a plug-in called Neat Video, reducing the noise in the video in this software can be achieved without the plug-in as well, through using effect which is called Median. And, Premiere Pro kind of deserves to be mentioned, so, let’s go for it!
Add the desired footage into the Timeline of Premiere Pro. Then, find the Effects Panel, where our wanted Median can be found –drag and drop the effect to the clip.

The Median should modify the grainiest parts of the whole clip, so in order to do this, we need to use masks. In the Effects Control panel, select the mask shape for the clip – the options are: rectangle, circle, or pen tool. With Pen tool, you move the Mask around the screen and resize it – the covered area will be affected.

If you change Feather setting to 100, the effect will lose a sharp edge and instead, there will be a smooth border.

So, you might think it is needed to repeat these steps several time to create masks in different areas, in order to cover all of the grainy space of the scene.
And, at last, to reduce the noise, adjust the effect settings.

Actually, Median just blurs the grainy parts, without directly taking them away. Lastly, you can get to know the Radios settings, which will help you to achieve your most desired look!
Davinci Resolve
DaVinci Resolve is also worth mentioning in this list, in a way because it is also different from other video editors. Let’s see how it works and, meanwhile, differs:
Add the footage into the timeline. Find the fusion tab underneath the timeline panel.

There, MediaIn1 and MediaOut1 will appear, and first, click on MediaIn1, - the scene will be shown in the first viewer – and MediaOut1 by default is appearing in the second. So, stay on MediaIn1, hit shift+spacebar, and find Remove Noise (RN). Click Add, which adds the Remove Noise1 node. On the top right corner there is an Inspector, which opens all the properties you can modify.

After going only into the second viewer, and in the top bar there is channel icons. Open it and click on red, but don’t get alarmed when your footage turns black and white – it’s just for a while. Go back to the Inspector, increase Softness Red and Detail Red.

This step helps remove grain from the red channel. Then repeat the same for green and blue channels. After finishing go to the same channel button and set it to “back to color”. The clip will be colorized again and now be clearer, compared to the first viewer.

So, Evrika – we hot to know 5 best video denoisers in 2024, with the addition of audio background noise removal in Wondershare Filmora – hope you enjoyed it, and hope this will help you create better videos for yourself and your viewers!
This ensures you see the Smart Denoise, where you can change opacity of the clip, threshold and radius.

Reduce Opacity until you are satisfied with the result. The box next to Smart Denoise will show you the scene before and after the effect.
Bonus tip: Wondershare Filmora audio denoise
We already explained how video denoising works, and we will go on with our selection and explanatory article about the process, but, as we are on the Filmora topic, we might as well mention that denoising might mean another thing too – which, in this case, regards audio background noise. It means to remove unwanted hum from the audio in order for it to become more hearable. So, doing this in Wondershare Filmora works in a quite easy way. Use the guideline:
Drag and drop your video into the timeline. Right-click on the clip and hit Detach Audio, which will let you separate audio and video from one another and make sure you can work on them one by one.

Double-click on the audio track and have access to the editing panel, where you can see Remove background noise – it is not needed to emphasize what this option does for you!

That’s it – you are done, but keep in mind that there is a second way to achieve the same result as well, but this in case you don’t want to detach the audio: Double-click on the video clip in the timeline, the editing panel opens, so switch to Audio. Checking the box next to Remove background noise will show that there are three levels – weak, mid, and strong, and of course, you can choose to your liking!
If the voice recording doesn’t sound natural anymore, you can do the following: Click on Customize and Customize Equalizer window will open.

On the left, you can see the low tunes, while the highs are on the right. Background noises are often on the left, so you can lower them to get rid of them, but in order to have a more natural sound, raise the middle ones a little – and you are done when you are content with the sound!

So, hmm… back to the original topic – denoising a video, shall we?..
Neat video
Neat Video kind of, speaks for itself… it is a powerful video editing tool suitable for Windows, macOS and Linux. It aims to reduce the digital noise, flicker, dust, scratches and other defects in the captured videos to improve the visual quality of the videos.
It is a plug-in for Premiere Pro, that does more or less what the product noise says: it makes grainy video look neater. It’s very easy to use and
How to do that in Neat Video? Here are the steps:
Find the clip you want to reduce the noise of and search for the neat video effect in the Effects Panel.

The video editors mostly use the SR version of it, because it seems faster and has kind of a better performance.

Then, you’ll have to drag the neat video plug-in to the clip to your choosing, take your attention to the Effect Controls panel on the left, and find: fx Reduce Noise v5 (SR) – press the button saying Prepare and this will open up the Build button as well, which wil open the Neat video effect window.

There, you’ll need to click on the Auto Profile. Selection window will appear, which you can move around the scene and resize, in order to select the noisy area of your footage. It is recommended to find the darkest or grainiest area there and select judging by this.

On the left side, you will find Filter Settings: under Spatial, you can play with the Noise Reduction Amount and Noise Level.

Then, you will hit Apply and – done, you can instantly see the results!
Shotcut
What about Shotcut? It is a free, open-source and cross-platform video denoiser for Windows operating system. It is also an outstanding video editor with trimming, splitting, color correction and other tools.
In order to reduce the noise there, do the following: first off, find filters, open that window and type in: Noise. This will open the options, and several of them are for noise reduction.


Choose Reduce Noise: Wavelet, add it to the Video and then feel free to modify the settings, such as: Decompose, Threshold, Percent. You can check and uncheck the effect in order to see the before-after difference. Then, click Apply button and it is ready to go!
Anyway, you can also try other similar effects such as Reduce Noise: HQDN3D and Reduce Noise: Smart Blur.
Adobe Premiere Pro
Even though we discussed video denoising in Adobe Premier Pro but with the help of a plug-in called Neat Video, reducing the noise in the video in this software can be achieved without the plug-in as well, through using effect which is called Median. And, Premiere Pro kind of deserves to be mentioned, so, let’s go for it!
Add the desired footage into the Timeline of Premiere Pro. Then, find the Effects Panel, where our wanted Median can be found –drag and drop the effect to the clip.

The Median should modify the grainiest parts of the whole clip, so in order to do this, we need to use masks. In the Effects Control panel, select the mask shape for the clip – the options are: rectangle, circle, or pen tool. With Pen tool, you move the Mask around the screen and resize it – the covered area will be affected.

If you change Feather setting to 100, the effect will lose a sharp edge and instead, there will be a smooth border.

So, you might think it is needed to repeat these steps several time to create masks in different areas, in order to cover all of the grainy space of the scene.
And, at last, to reduce the noise, adjust the effect settings.

Actually, Median just blurs the grainy parts, without directly taking them away. Lastly, you can get to know the Radios settings, which will help you to achieve your most desired look!
Davinci Resolve
DaVinci Resolve is also worth mentioning in this list, in a way because it is also different from other video editors. Let’s see how it works and, meanwhile, differs:
Add the footage into the timeline. Find the fusion tab underneath the timeline panel.

There, MediaIn1 and MediaOut1 will appear, and first, click on MediaIn1, - the scene will be shown in the first viewer – and MediaOut1 by default is appearing in the second. So, stay on MediaIn1, hit shift+spacebar, and find Remove Noise (RN). Click Add, which adds the Remove Noise1 node. On the top right corner there is an Inspector, which opens all the properties you can modify.

After going only into the second viewer, and in the top bar there is channel icons. Open it and click on red, but don’t get alarmed when your footage turns black and white – it’s just for a while. Go back to the Inspector, increase Softness Red and Detail Red.

This step helps remove grain from the red channel. Then repeat the same for green and blue channels. After finishing go to the same channel button and set it to “back to color”. The clip will be colorized again and now be clearer, compared to the first viewer.

So, Evrika – we hot to know 5 best video denoisers in 2024, with the addition of audio background noise removal in Wondershare Filmora – hope you enjoyed it, and hope this will help you create better videos for yourself and your viewers!
How To Make Ninja Jump Effect
Superpower scenes derived from movies are trending these days. Everyone wants to add these superpower effects to their clips. We have covered several of these tutorials, and here we are with a new one; the Super/Ninja Jump effect.
This effect is for the quick movement of a subject from one position to another. Naruto is the prime example where ninjas are made to move around by this effect. Anime creators use this ninja effect a lot.
This article includes tutorials on what to shoot and how to add the Super Jump effect using Wondershare Filmora . The use of tools like masking, time ramping, keyframing, and the new version addition, the Boris FX Pack, makes it super easy to get a perfect super jump effect.
Shots Required For Super Jump Effect
You can use either a mobile phone or a camera for shooting, but you have to keep these things in mind:
Keep the following important tips in mind while shooting clips using your phone or camera.
● Use Wide-Angle
Always use the wide-angle view to ensure everything is in focus with a good depth of field.
● The Camera Should Be Steady
Make sure that the phone or camera is on a steady surface to avoid any turbulence or frame shifting.
● Sufficient Light
Make sure there is sufficient light and ambiance. Once you have set your camera, these are the three shots you have to take:
Shot 1: Jump Into the Air at a Distance
The subject will jump into the air at a distance from the camera. He should jump as high as he can, folding his legs so his body is in a ball position while in the air. The distance should be proper—not very far away.
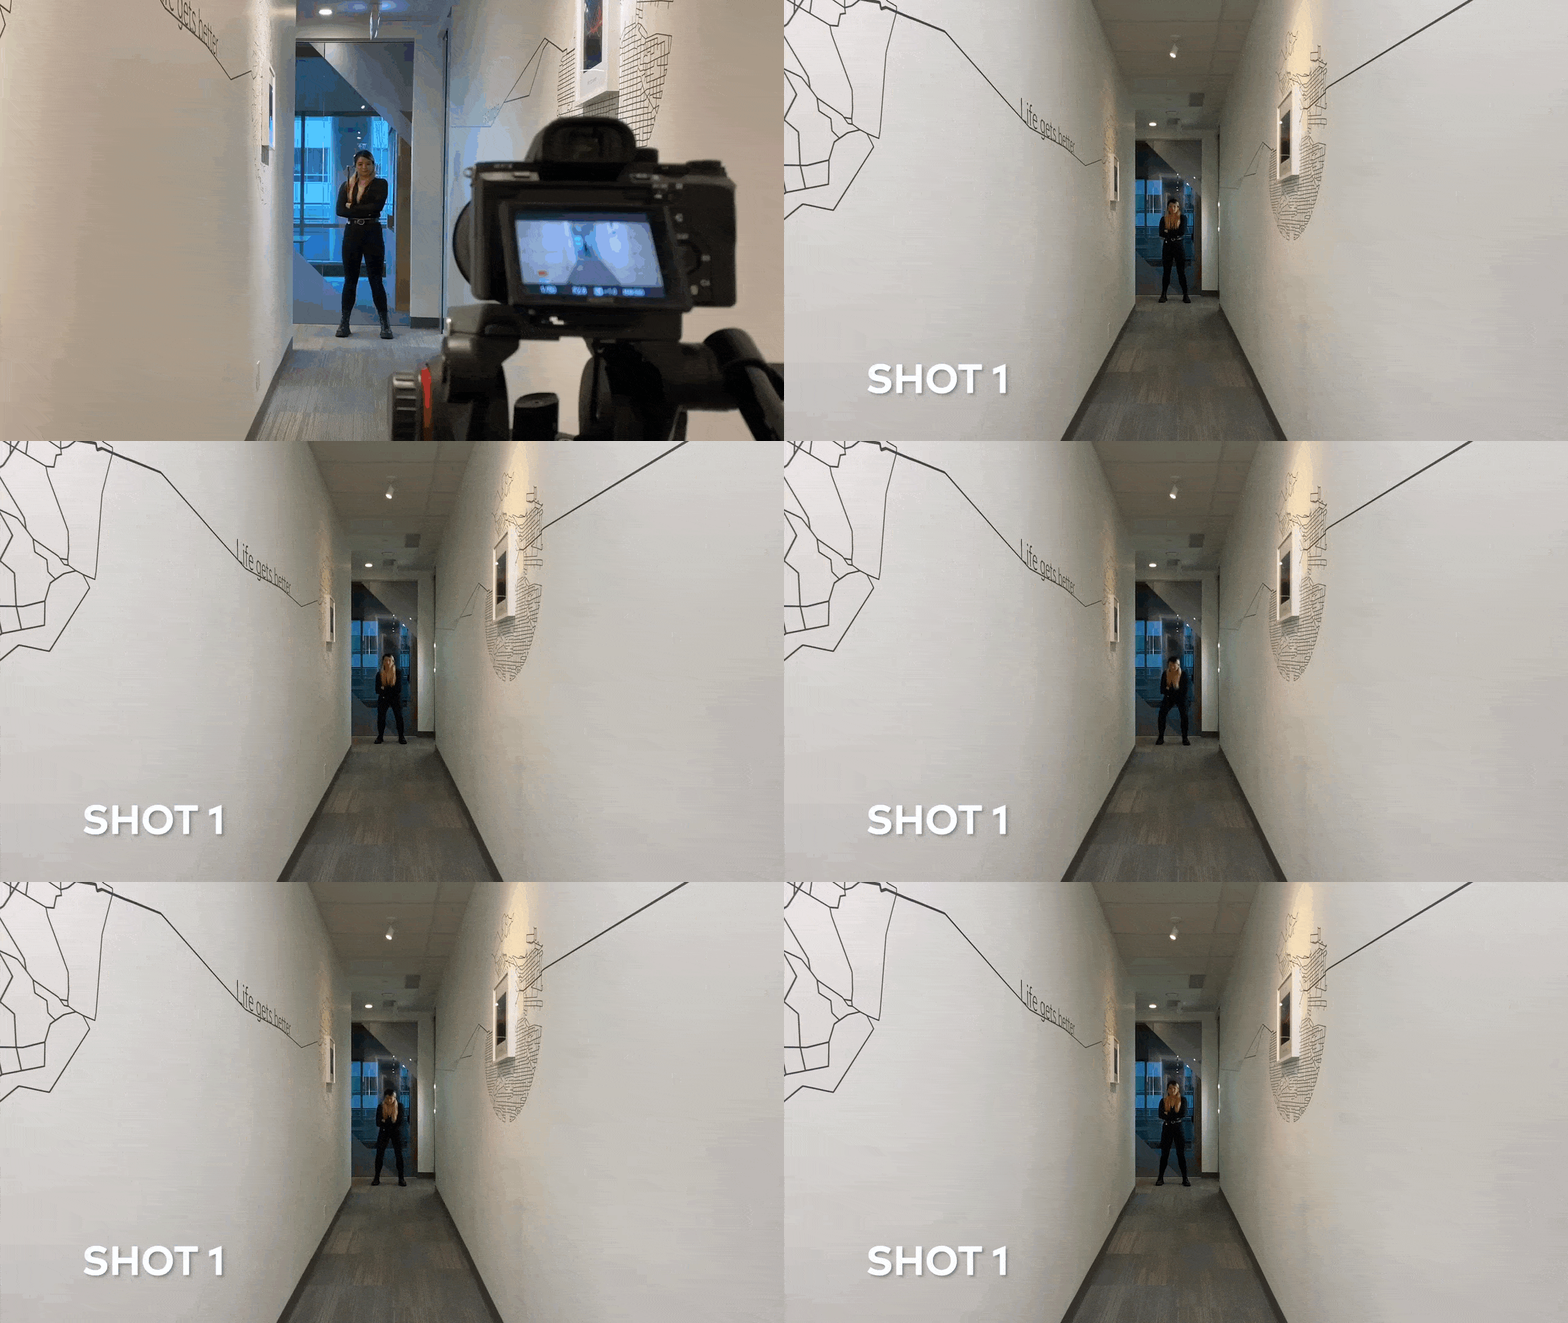
Shot 2: Jump and Act Like You Are Landing
The subject should jump and act like he is landing on the floor. This shot has to be taken directly in front of the camera.
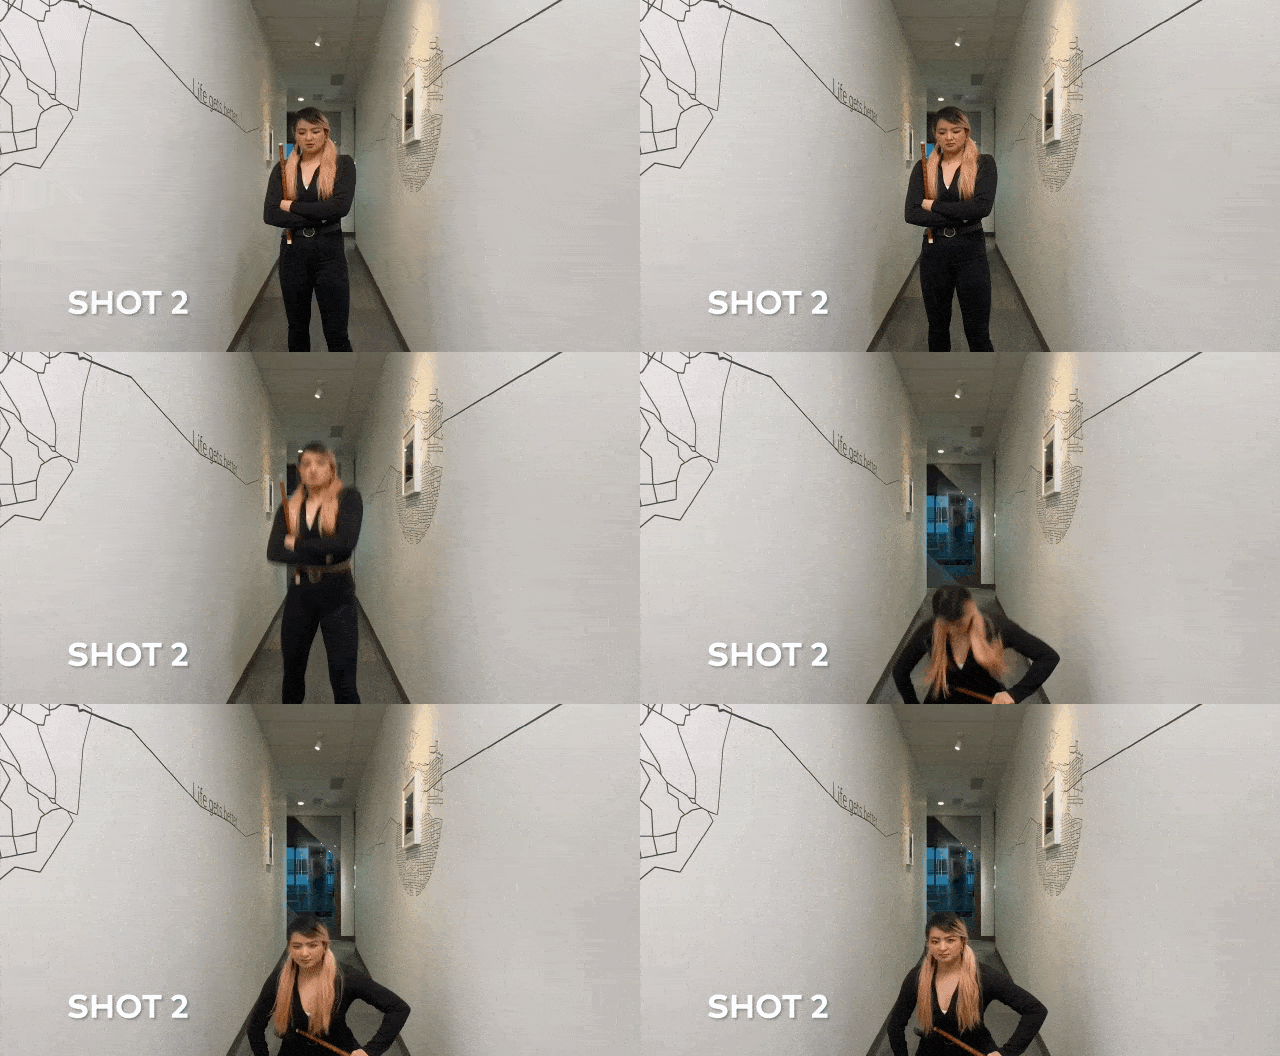
Shot 3: Empty Background Clip
This is an empty background clip. This clip includes only background settings without the subject. We need this clip to make layers while editing.
How To Edit These Clips On Filmora?
Once the shots have been taken, we move towards editing these clips, and for this purpose, we are using Filmora. Here is a step-by-step guide for editing these shots.
Steps To Edit These Clips
The tools we are going to use in this editing are masking, time ramping, speed ramping, keyframing, the Boris FX effect, and many more.
Open Wondershare Filmora and Add Video Tracks
Steps
Step1 Select the empty background clip (shot 3) and place it on the first video track timeline.
Step2 Now place the jumping clip (shot 4) on the top.
Adding a Freeze Frame
A freeze frame is a type of still image that is created by simply freezing the action. Most of the time, this is used in the last shot of a movie to capture a moment in time. Here are the steps to adding a free frame.
Steps
Step1 Move the playhead up to the point where the subject’s body appears smallest.
Step2 Add a freeze frame at this point by right-clicking on the playhead and selecting the speed option.
Step3 Make a cut at the start of the freeze frame, keep it for 8 frames and delete the rest.
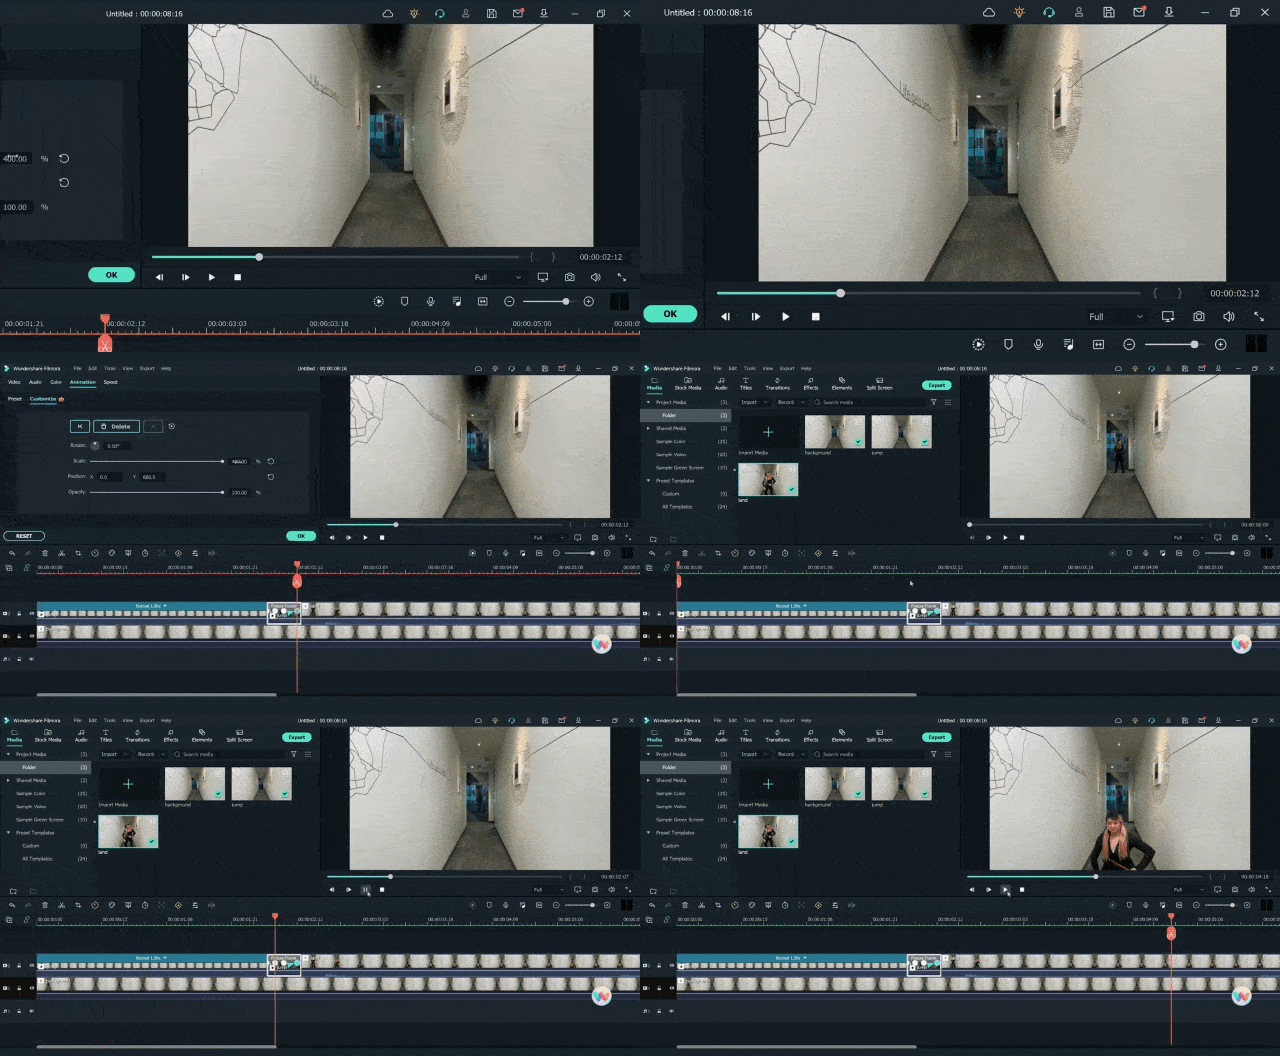
Masking of the Video Clips
Masking is a tool in editing software that allows you to hide, duplicate, show, or adjust footage by selecting a specific section of the video or using video overlays. The steps for adding the masking effect are given below:
Steps
Step1 Now click on the clip view to open the “settings” window.
Step2 Click on the “mask” section and select the circle mask and create the mask of the jumping subject.
Step3 Hide the first track clip so that mask can be viewed better and edited effectively.
Step4 Adjust the scale, position, and shape of the mask and make the edges smoother to match the object.
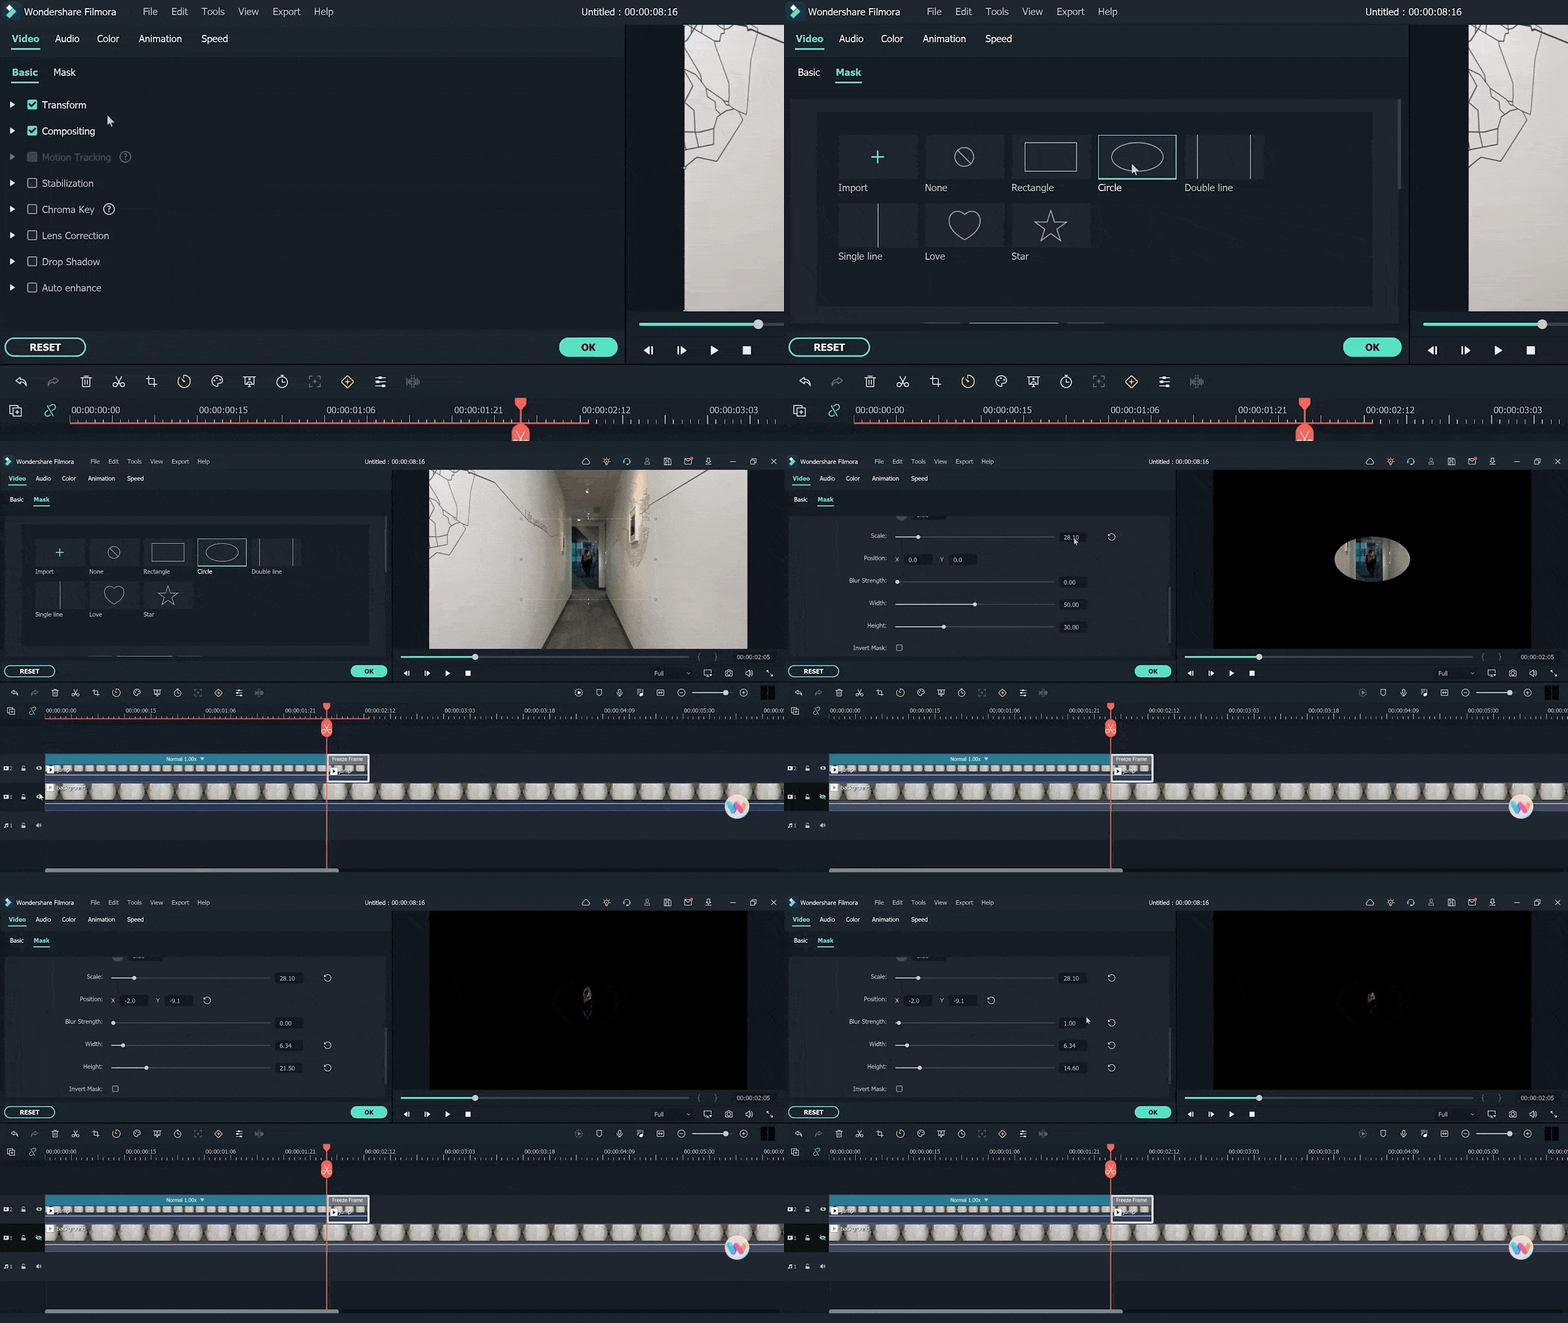
Boris Fx Effect
Boris FX is a video editing and visual effects software. Filmora supports six continuum units-professional quality effects plugins from award-winning developer Boris FX.
To add these effects to your videos, follow the steps below:
Steps
Step1 Go to the “effects” window and open the Boris FX effects.
Step2 Select the directional blur from the bcc blur category.
Step3 Drag the effect to the freeze frame.
Step4 Now clicking on freeze frame, its settings will open.
Step5 Adjust the degree and angle of blur to get a perfect mask object. Turn ON the first video track.
Step6 Add the landing clip (shot 2) on top of the first video track after the freezing frame.
Step7 Find the point where the subject starts to descend toward the floor. Cut the clip here and delete the previous part.
Step8 Move the clip next to the freeze frame clip.
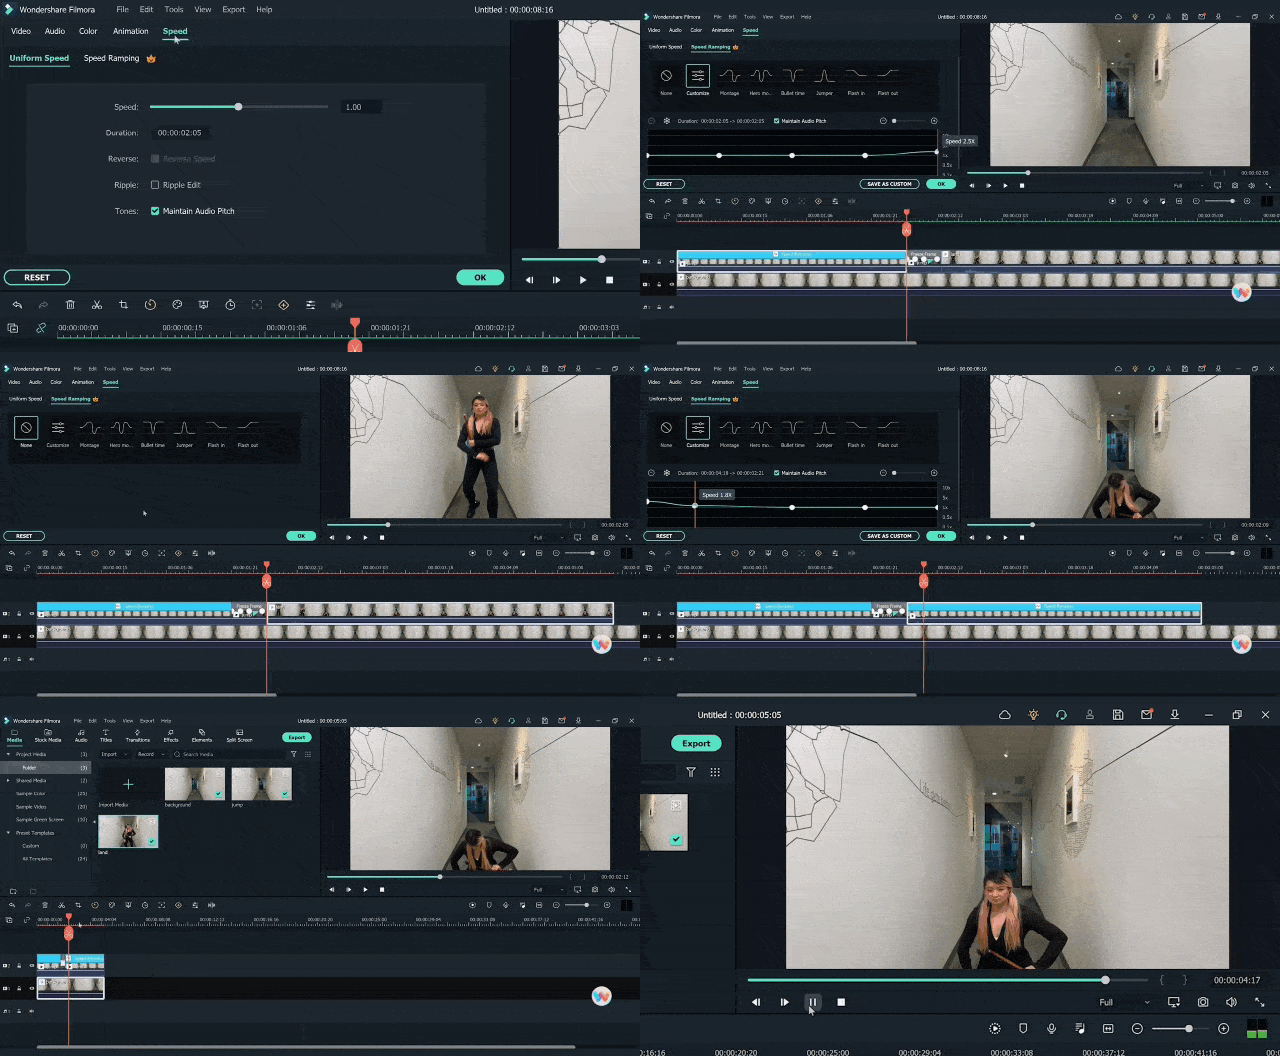
Keyframing
Now we have to add animation in the freezing frame so that the masked shadow can be shown moving from the back towards the front, a speedy moving shadow. This is probably the most crucial step in editing.
Steps
Step1 Click on the freezing frame, and in the settings window, open “animation.”
Step2 Click on the customized option. Add the first keyframe at the start of the clip.
Step3 Now move two frames and add another keyframe with the position of the masked shadow as it is moving out of frame.
Step4 Now move two frames keeping the settings the same.
Step5 Add another keyframe at the end with your masked shadow appearing half from the top of the frame.
This step is a bit tricky to understand, but the most important. Once it is done, your animation will give the impression of an object moving like a flash from the back to the front of view.
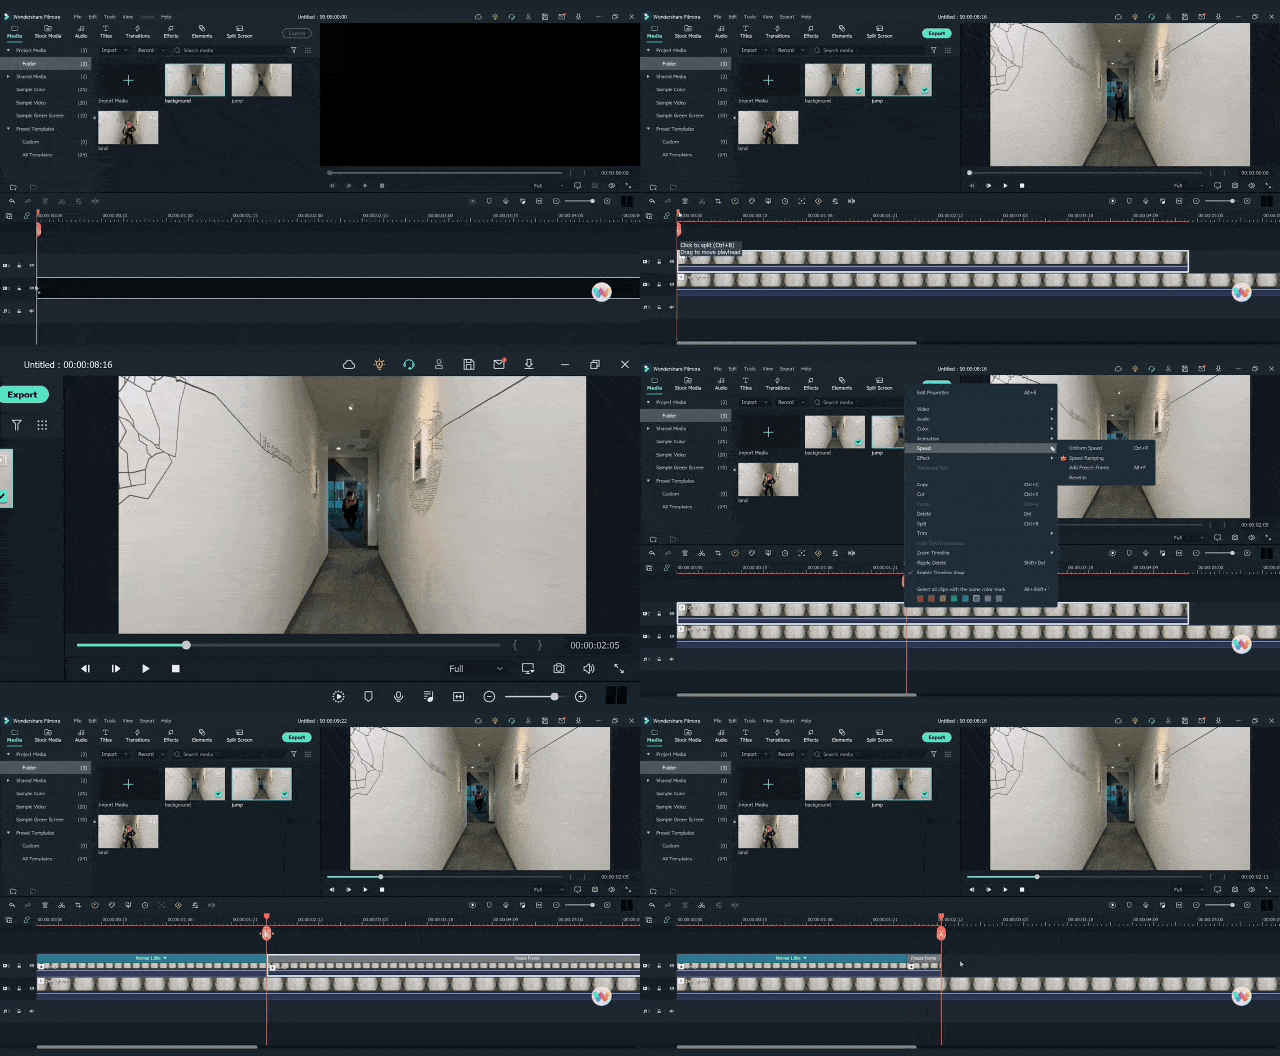
Speed Ramping
Once the keyframing is done, your super jump effect is roughly ready. All you have to do now is synchronize the speed of jumping, moving shadow, and landing. Here we will use the “speed ramping” tool.
Steps
Step1 Click on the clip, and in the settings window, choose “speed.”
Step2 Click on customize and increase the speed of any frame or clip.
Step3 Move the play head on the frame that you intend to increase the speed of, and move the frame on the speed window to speed up that part.
Once you have done speed ramping on both clips, your editing is done. Now play the video and see how the clip looks and if your super jump effect is remarkable or not.
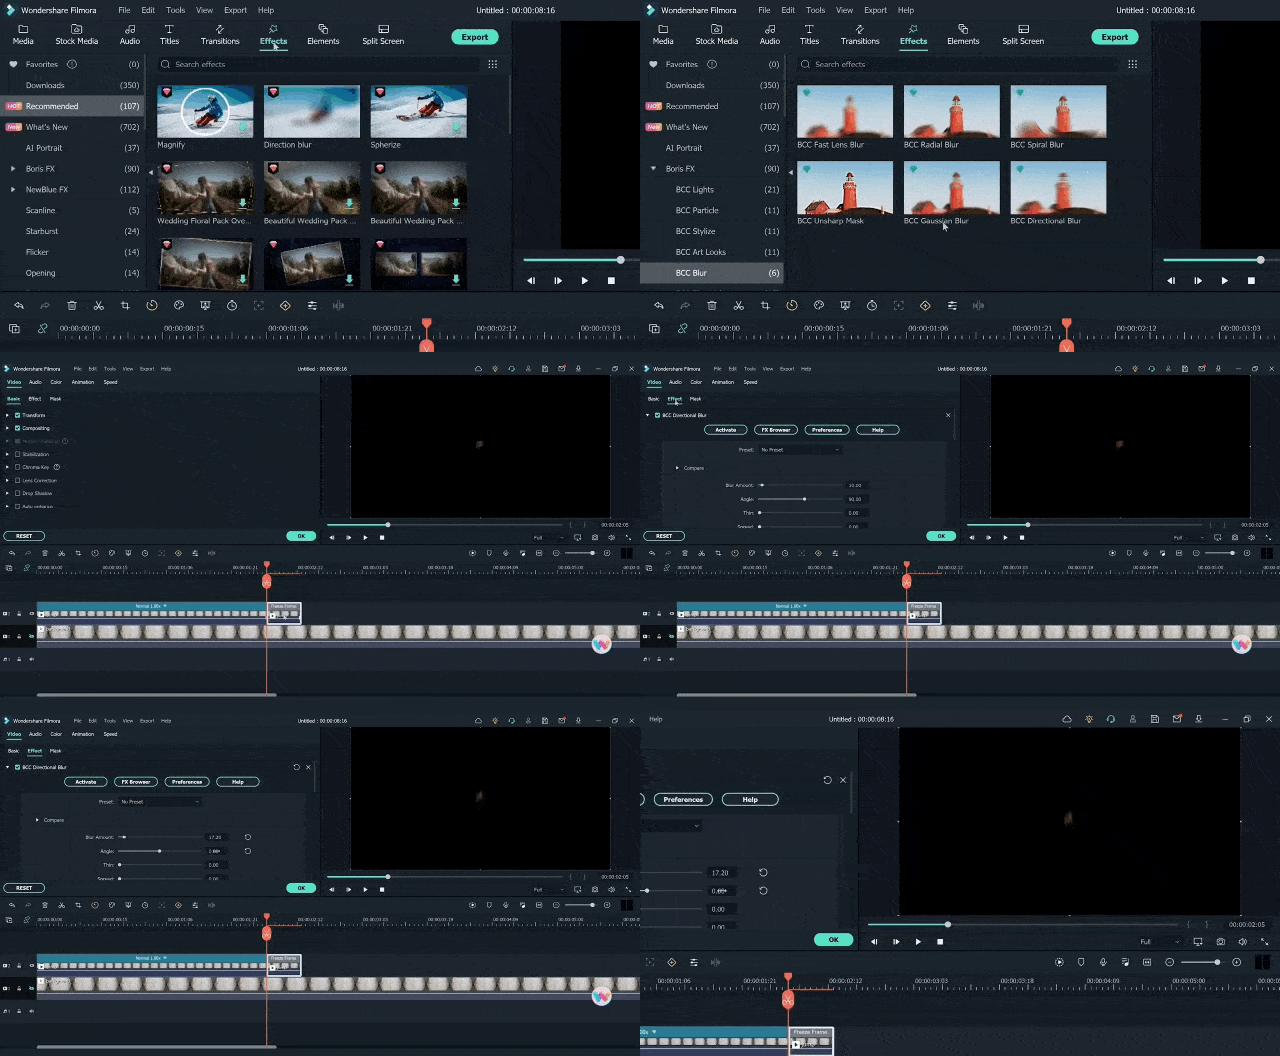
Final Words
Make sure you follow all these steps in the correct order. You can get Filmora from the Filmora website, but its cracked versions are also available. While editing, try to make the transitions and clips as smooth and synchronized as you can. Also, if you find this article helpful, do not forget to share these tips with your friends.
Free Download For Win 7 or later(64-bit)
Free Download For macOS 10.14 or later
Free Download For macOS 10.14 or later
Also read:
- Updated In 2024, How to Rotate Video in iMovie with Alternative
- Updated The Complete Guide to Making Fortnite Montage for 2024
- Updated Have You Ever Created a Slow Motion Video on Your Phonr or Camera? This Article Will Show You some Knowledge About Slow Motion Photography for 2024
- In 2024, This Blog Post Shows How to Create an Eye-Catching Paper Rip Effect for Your Videos Using Wondershare Filmora with These Easy-to-Follow Steps
- New In 2024, Would You Like to Know How to Change the Ratio of the Video or Which Is the Correct Aspect Ratio for Uploading to the Online Platform? Then, Go Through the Article to Get Complete Details About the Video Aspect Ratio
- New In 2024, 12 Best Picks of Video Enhancer Software
- Best Free Video Editing Software to Boost Your Content Creation for 2024
- New In 2024, This Review Post Introduces You to EasyHDR to Review and Customize Your HDR Photos. Youll Also Learn the Best Desktop Application to Edit Your HDR Videos Effortlessly
- New How to Edit Facebook eCommerce Video Ads
- How-To Tutorials of Kapwing Collage Maker for 2024
- 2024 Approved Step by Step to Rotate Video in Google Photos
- Updated Guaranteed 10 Storyboard Creators To Make Animation Easier for 2024
- 2024 Approved TEXT REVEAL Animation | Easy Masking Filmora
- Updated 2024 Approved Are You Searching for the Best Canon LUT Download? This Article Provides the Best Recommendations for Creating the Best Professional Videos
- New Blender Green Screen Effects for 2024
- New Whatre the Best Alternatives to Pexels?
- New 2024 Approved How to Make Stunning Glitch Effect in Photoshop? Ultimate Guide
- New Discover the Top 5 Online Tools for Merging Videos and Audios Quickly and Easily. Streamline Your Editing Process and Create Seamless Multimedia Content
- Updated How to Add Effects on TikTok
- Updated Do You Know What Is Motion Blur in Fortnite? Read This Article to Find Out How to Apply Motion Blur in Fortnite Efficiently and with Ease for 2024
- Updated The Latest 100+ Best TikTok Captions to Improve Your Next Post
- New In 2024, AVI Editor for Windows 11/10/8.1/8/7 Easily Edit AVI Files on PC
- How To Make a Photo Collage in Microsoft Word — Step by Step Guide
- New In 2024, Camtasia Vs Captivate - Which to Choose?
- Updated How to Split a Clip in DaVinci Resolve Step by Step
- Updated In 2024, In-Depth Review of Ivona Text to Speech Converter
- In 2024, How To Change Your Apple ID on iPhone 13 Pro With or Without Password | Dr.fone
- In 2024, Recommended Best Applications for Mirroring Your Samsung Galaxy A54 5G Screen | Dr.fone
- A Guide Infinix Note 30 VIP Racing Edition Wireless and Wired Screen Mirroring | Dr.fone
- How to Reset iPhone 8 Plus to Factory Settings? | Dr.fone
- How To Change Vivo X90S Lock Screen Clock in Seconds
- Top 10 Telegram Spy Tools On Samsung Galaxy M54 5G for Parents | Dr.fone
- In 2024, How to Spy on Text Messages from Computer & Nokia G22 | Dr.fone
- Complete Guide For iPhone SE Lock Screen
- How To Pause Life360 Location Sharing For Oppo A79 5G | Dr.fone
- In 2024, Delete Gmail Account With/Without Password On Samsung Galaxy A25 5G
- Title: LumaFusion Color Grading Achieving It Through LUTs
- Author: Morgan
- Created at : 2024-05-19 05:11:36
- Updated at : 2024-05-20 05:11:36
- Link: https://ai-video-editing.techidaily.com/lumafusion-color-grading-achieving-it-through-luts/
- License: This work is licensed under CC BY-NC-SA 4.0.


