
MAGIX Vegas Pro Review A Professional Video Editing Software

MAGIX Vegas Pro Review: A Professional Video Editing Software
MAGIX Vegas Pro is a powerful and flexible solution for editing, creating, and adding a finishing touch to your videos. The software combines cutting-edge technology with a highly intuitive user interface, making it easy to use for newbies in the world of video production.
In this MAGIX Vegas Pro review, we’ll take a look at the software and tell you why it’s a great video editor. We’ll also provide a Sony Vegas vs. Adobe Premiere comparison to see how they stand against each other.
Part 1. What Is MAGIX Vegas Pro
Firstly, let’s have a deeper understanding of MAGIX Vegas Pro before we have a review in Part 2.
MAGIX is a computer software company that produces a variety of audio, video, and graphic design digital products. MAGIX has been in business for over 25 years, and its products are used by millions worldwide.
Vegas software was first released in 1999 by Sonic Foundry. Sony Creator Software purchased the program in 2003 and released its several versions till 2014. The company later sold it to MAGIX.
Sony Vegas History Series
Some of the Vegas software series released by Sony Creative Software are listed below:
- Vegas 4.0e: Released in November 2003, the first version by Sony.
- Vegas 5.0: Released in April 2004.
- Vegas 6.0: Released in April 2005.
- Vegas 7.0: Released in September 2006.
- Vegas Pro 8.0: Released in September 2007.
- Vegas Pro 8.1: First Sony Vegas version to support 64-bit.
- Vegas Pro 9.0: Released in 2009 with greater support for digital cinema.
- Vegas Pro 10: Released in 2010.
- Vegas Pro 11: Released on 17 October 2011.
- Vegas Pro 12: Released in November 2012.
- Vegas Pro 13: Released in April 2014 with new collaboration tools, the last version by Sony.
MAGIX Vegas Pro 20
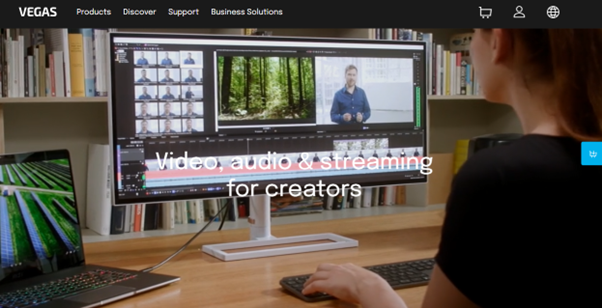
MAGIX Vegas Pro 20 is an industry-leading video editing software program owned by MAGIX. The software can help you manipulate, combine, and edit your video clips with various tools in an easy-to-use interface. Vegas Pro is well known among professionals who need to create high-quality videos.
Some basic functions of the Vegas Pro 20 include Speech to Text functionality, Audio production with VST3, Eight Preset Window Layouts, Track effect, Color grading, Optical Flow mode, Fade In/Out features, Honeycomb, and Color Plane presets for GL transitions, and Add and Arrange Media.
Part 2. MAGIX Vegas Pro Review
The Vegas Pro 20 is a tailor-made software for content creators with an optimized interface, fast rendering speed, and many features to help them create video projects that stand out.
The Score On G2
MAGIX Vegas Pro - a top-of-the-line video editing software that has received several positive reviews from critics and developers on the G2, a famous software review platform.
- Ease of Use: 8.6 stars out of 10.
- Ease of Setup: 9.2 stars.
- Quality of Support: 7.2 stars.
- Overall: 4.2 stars out of 5.
Price
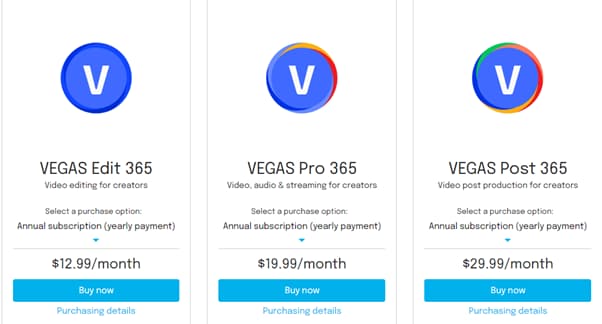
VEGAS editing software has three tiers that are each designed to fit your specific workflow requirements and budget:
- VEGAS Edit: Includes a basic package that costs $12.99/ month or $249 for a perpetual license.
- VEGAS Pro: Advanced package with SOUND FORGE Audio Studio and advanced video editing tools. The package is priced at $19.99/ month or $399 for a perpetual license.
- VEGAS Post: Ultimate bundle with Vegas effects for high-end compositing and RAW image support. The package will cost you $29.99/ month or $599 for a perpetual license.
![]()
Note: MAGIX Vegas Pro also offers a 30-day free trial that is only limited to basic features.
Functions Review
We’ll now review some of the most important features of MAGIX Vegas Pro 20 and see how they can be used to improve your video editing workflow.
- Color Touches: The interface has now got a new look that is a bit darker, sleeker, and more professional that lets the icons pop up and become more visible than before.
- Color Grading: The color grading panel has also received some improvements and is redesigned into a range-limited color wheel, providing more functionalities.

- Track Effects: The Vegas Pro 20 offers adjustment tracks that help apply effects to the entire track. You can also alter the intensity of these effects and use keyframes from the timeline.
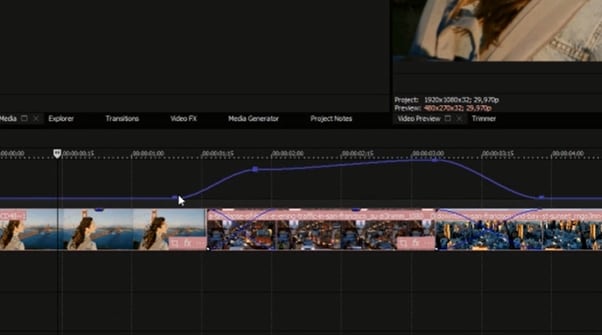
- Scene Detection: The new “Automatic Scene Detection” feature saves you the hassle of cutting your video clips manually before adding them to the timeline. The software does this in three ways: Analyse, Detect, and Split the scenes to add them to the timeline in a sequence.
- Supported Formats: VEGAS Pro is compatible with Blackmagic RAW, MP4, Apple ProRes, MPEG-2, MPEG-1, AVI,AVC, Panasonic P2, and RED RAW video formats. The software also supports images and audio formats.
And we have prepared a video for you below, so that you can establish an overview of MAGIX Vegas Pro 20 better.
Video - Full Walkthrough of Vegas Pro 20
Part 3. MAGIX Vegas Pro Pros and Cons
Like any other software, MAGIX Vegas Pro also has pros and cons that you must be aware of before making any purchase.
Pros
- Comes with improved and user-friendly color grading tools.
- Offers free stock clips for the premium version.
- Improved rendering performance.
- Traditional nested timeline.
- Offers social export options such as YouTube and Facebook.
- Save your project automatically.
- Supports chroma key and AI AIDs.
- Has an advanced HDR color correction tool.
Cons
- Expensive for some users.
- Only supports Windows 10/11.
- Lacks convenience found in similar software.
- Unstable Multicam.
- The startup does not offer a Welcome panel.
- Lacks tutorials to help.
- Some programs lack stability.
- Do not support timely after-sale services.
Part 4. Sony Vegas VS Adobe Premiere, Which One is Better?
Both Sony Vegas and Adobe Premiere are powerful video editing software programs with their own unique strengths and weaknesses. As with any software decision, it ultimately comes down to the specific needs of the user to decide which one is better.
Here is our complete guide to the two software programs to help you decide which is best for your needs: Sony Vegas VS Adobe Premiere. Which One is Better ?
Conclusion
Vegas Pro 19 is an excellent video editor that offers robust features and a streamlined user experience. In addition, the software’s intuitive interface allows anyone to edit videos quickly and easily without having to know any complicated techniques.
In this article, we’ve provided the MAGIX Vegas Pro review to help you understand the features, pros, and cons and what the software has to offer for content creators. We’ve also explored the series of versions developed and released by Sony Vegas.
Hopefully, you find our Magix Vegas Pro 20 review helpful and can now make a better buying decision.
Free Download For Win 7 or later(64-bit)
Free Download For macOS 10.14 or later
Functions Review
We’ll now review some of the most important features of MAGIX Vegas Pro 20 and see how they can be used to improve your video editing workflow.
- Color Touches: The interface has now got a new look that is a bit darker, sleeker, and more professional that lets the icons pop up and become more visible than before.
- Color Grading: The color grading panel has also received some improvements and is redesigned into a range-limited color wheel, providing more functionalities.

- Track Effects: The Vegas Pro 20 offers adjustment tracks that help apply effects to the entire track. You can also alter the intensity of these effects and use keyframes from the timeline.

- Scene Detection: The new “Automatic Scene Detection” feature saves you the hassle of cutting your video clips manually before adding them to the timeline. The software does this in three ways: Analyse, Detect, and Split the scenes to add them to the timeline in a sequence.
- Supported Formats: VEGAS Pro is compatible with Blackmagic RAW, MP4, Apple ProRes, MPEG-2, MPEG-1, AVI,AVC, Panasonic P2, and RED RAW video formats. The software also supports images and audio formats.
And we have prepared a video for you below, so that you can establish an overview of MAGIX Vegas Pro 20 better.
Video - Full Walkthrough of Vegas Pro 20
Part 3. MAGIX Vegas Pro Pros and Cons
Like any other software, MAGIX Vegas Pro also has pros and cons that you must be aware of before making any purchase.
Pros
- Comes with improved and user-friendly color grading tools.
- Offers free stock clips for the premium version.
- Improved rendering performance.
- Traditional nested timeline.
- Offers social export options such as YouTube and Facebook.
- Save your project automatically.
- Supports chroma key and AI AIDs.
- Has an advanced HDR color correction tool.
Cons
- Expensive for some users.
- Only supports Windows 10/11.
- Lacks convenience found in similar software.
- Unstable Multicam.
- The startup does not offer a Welcome panel.
- Lacks tutorials to help.
- Some programs lack stability.
- Do not support timely after-sale services.
Part 4. Sony Vegas VS Adobe Premiere, Which One is Better?
Both Sony Vegas and Adobe Premiere are powerful video editing software programs with their own unique strengths and weaknesses. As with any software decision, it ultimately comes down to the specific needs of the user to decide which one is better.
Here is our complete guide to the two software programs to help you decide which is best for your needs: Sony Vegas VS Adobe Premiere. Which One is Better ?

Conclusion
Vegas Pro 19 is an excellent video editor that offers robust features and a streamlined user experience. In addition, the software’s intuitive interface allows anyone to edit videos quickly and easily without having to know any complicated techniques.
In this article, we’ve provided the MAGIX Vegas Pro review to help you understand the features, pros, and cons and what the software has to offer for content creators. We’ve also explored the series of versions developed and released by Sony Vegas.
Hopefully, you find our Magix Vegas Pro 20 review helpful and can now make a better buying decision.
Free Download For Win 7 or later(64-bit)
Free Download For macOS 10.14 or later
How to Perform Mask Tracking: Discovering the Best Methods
Mask tracking refers to editing a specific part of a video without overlapping. Masking helps with creative transitions and background removal with ease. The integration of AI technology in masking tools has made masking more accessible. They help with masking an object or landscape with precision.
In addition, you can correct the colors of a specific part through a motion tracking mask. In this article, we’ll discuss masker tracking using three different software. Two of those software are renowned for their professionalism and precision. We’ll discuss masking in Adobe After Effects , Adobe Premiere Pro , and an alternative.
AI Smart Masking Spice up your video content with the endless possibilities of AI masking functions!
Free Download Free Download Learn More

Part 1: Working Out the Comprehensive Methods to Perform Mask Tracking on Adobe After Effects
Adobe After Effects is a powerful tool for mask tracking and other functions. The interface of this tool tailors your content to your needs with precision. The process of masking is convenient and accessible and provides accurate results. Its advanced masking options, like filling up the mask, add a realistic touch. Before learning about masking in After Effects, let’s discuss some of its features:
- Text Animations: Animating your text in Adobe After Effects is a comprehensive experience. It is because the software has amazing text fonts and animation options. You can also set the appearance settings like opacity, color, and more text. In addition, the software has pre-installed effects and presets to ease the process.
- VFX/Visual Effects: Elevate your images and videos using Adobe’s amazing visual elements. It can eliminate mistakes, and results are so promising that they become invisible. You can use the mask tracking effect to hide and fill objects. In addition, you can turn your transitions into high-resolution 3D or 4D videos.
- Motion Graphics: It moves anything with its motion graphics functionality and advanced keyframing. Along with animating text, the feature allows you to move the logos. You can move a logo on any background from top to bottom or left to right. With its flickering and wiggling effects, make animations without keyframing.
- Rotoscoping: This After Effects function eliminates using green screens in your videos. Using the pen tool, you can merge a different object in a different footage. Afterward, you can polish the mask by resizing and adjusting opacity values.
- Motion Tracking: Elevate the graphics of your videos using the motion tracking feature. This function connects any image with an object’s motion. Therefore, your images become animated and add a creative element to the content. Its cloud collaboration with other software allows users to download assets.
Step-by-Step Procedure for Masking in Adobe After Effects
Now that you know the After Effects masker line tracking feature, let’s move forward. Read the following guide to learn more about masking:
Step 1
After importing your clip into the timeline, select it in the timeline panel. Navigate towards the upper toolbar and select the “Pen Tool” option. Afterward, create a mask around the object that you want to remove.
![]()
Step 2
You’ll see a mask around the object, and the rest of the screen will disappear. Navigate to the timeline panel, expand the video track options, and select “Mask.” Click the “Mask” navigation arrow and select “None.”
![]()
Step 3
Click the “Mask” button and select the “Track Mask” option. A mask tracker window will appear on the right side; expand the “Method” option. Following that, select the type of masking you want, like “Position.” Play the video from beginning to end for motion detection. Afterward, change the “Mask” mode to “Add” to apply masking.
![]()
Step 4
Afterward, change the Mask mode to “Subtract” from the timeline. Now, navigate towards the topmost toolbar and expand the “Window” tab. From the expansion menu, click the “Content-Aware Fill” option.
![]()
Step 5
Move towards the “Mask” option, expand “Mask Path,” and change the values below. Now, go to the right side, increase “Alpha Expansion,” and click “Generate Fill Layer.” Once the mask tracking completes, download your video.
![]()
Part 2: Providing a Detailed Guide on How to Do Mask Tracking with Adobe Premiere Pro
Adobe Premiere Pro is one of the industry’s leading tools for editing videos. It offers a wide range of features and built-in effects to elevate content. The software offers precise editing capabilities for mask tracking and other enhancements. In addition, it has many visual, video, and audio effects and presets to apply. Let’s discuss some key features of this tool that make it worthy of being top:
- Motion Graphics Templates: With its seamless After Effect collaboration, it offers built-in templates. These templates include multiple text, shapes, and graphics. You can also customize these templates as per content relevancy and taste.
- Edit Audio: Premiere Pro has multiple audio editing options to maintain audio quality. The tool allows you to decrease the volume of one track while increasing others. In addition, you can make audio adjustments that fit a sound.
- Color Correction: Enhance the graphical element in your videos using this feature. It offers both color correction and enhancing capabilities. You can employ this color correction if you have overexposed or underexposed videos.
- Movie and Film Editing: A professional editor offers applications in the media industry. The Premiere Pro offers seamless collaboration with all video and audio formats. In addition, it can import files from all sources like DSLRs and more.
- Speech to Text: It doesn’t just limit you to video editing but also offers transcript creation. The software analyzes your footage’s audio and creates transcripts. Afterward, you can use them as subtitles and captions.
Step-by-Step Procedure for Masking in Premiere Pro
After introducing mask tracking in Adobe Premiere Pro, let’s progress further. Continue reading the following guide to gain a deeper understanding of masking:
Step 1
After importing your video in the timeline, select it and navigate towards the toolbar. In the “Edit > Effect” section, select “Lumetri Color” under “Video Effects.” Then, select the mask option under Lumetri colors and set it on the screen.
![]()
Step 2
Then, apply the color correction options on the masked areas.
![]()
Step 3
Select “Mask Path” under the Mask section and play it upon color correcting. This will start the mask tracking throughout the clip. The color corrections will be applied to the masked area throughout the video.
![]()
Part 3: Make Mask Tracking Easy with Wondershare Filmora: Working Out the Details
The above-mentioned mask tracking software is professional but is difficult to comprehend. This software is not compatible in terms of convenience. This was when users needed software with easy access and an editing interface. Wondershare Filmora performs diverse creation and editing tasks with expertise. The software assists in diverse audio, video, and text-editing tasks.
The AI-backed algorithms have made achieving perfection in your editing task seamless. In Filmora’s new V13 upgrade, it has introduced an AI masking feature. This feature offers to mask character or subject and auto-analyzes the selected area. In addition, for manual motion tracking masks, users can also resize the mask brush.
Step-by-Step Guide to AI Masking in Filmora
To understand this mask tracking feature better, we have assembled the steps of it. In the following guide, you will learn about accessing and applying this tool:
Step 1Place Media to the Timeline
Upon entering Filmora, click the “New Project” button and access its editing interface. Go to the Project Media section and click the “Import” button. Afterward, import your file and bring it to the timeline using your cursor.
![]()
Step 2Access and Employ AI Masking
Select the video in the timeline and navigate towards the right-side settings panel. In the “Video” tab, you’ll find the “Mask” section. Under this section, select the “AI Mask” option and scroll down to adjust its settings. Expand the “AI Mask” section, and choose the options you want masking for. Once you see the masked results on the preview screen, adjust the other settings below.
![]()
Step 3Save the Settings and Export
Afterward, click the “Save as custom” button to save these settings as a preset for later use. Further, make other adjustments and click on the “Export” button to finalize.
![]()
Free Download For Win 7 or later(64-bit)
Free Download For macOS 10.14 or later
Additional Editing Features of Wondershare Filmora
Along with masker line tracking, there are other video editing and AI features of Filmora. Keep reading the below section to know more about them:
1. AI Text-to-Video
Turn your words into graphics using this generative AI of Filmora. It transforms your textual directions into videos, along with images and voices. Using this AI will save you the effort of creating or hiring a professional.
2. AI Copilot Editing
Why spend hours exploring Filmora’s interface when you can have your guide? The AI Copilot acts like your personal chatbot assistant. You can converse with it like regular people, and it will show you directions on the feature. In addition, it features buttons to employ a specific effect or function.
3. Screen Recorder
Are you a creator who uploads video tutorials and educational videos? You can use Filmora’s screen recorder to create content in a seamless manner. It offers microphone recording and webcam recording for maximum interactivity. In addition, you can adjust custom screen resolution settings and more.
4. Video Background Remover
Leave the effort of adding a green screen in your background during video creation. Filmora’s AI technology can remove video backgrounds without any flaws. Users can replace the background with solid colors, gradients, and more afterward.
5. Silence Detection
Those long or short pauses during video recording are annoying for your audience. They decline the quality of the video and ultimately decline audience engagement. To remove such pauses, use Filmora silence detection AI to auto-eliminate them.
Free Download For Win 7 or later(64-bit)
Free Download For macOS 10.14 or later
Conclusion
In this article, users have gained insights into top mask tracking software. Along with their applications, the article discussed how to access and apply masking. However, masking in the first two tools can be difficult for some people. Hence, we introduced Wondershare Filmora as an easy desktop alternative. If you want to employ an easy motion tracking mask, use this versatile software.
Free Download Free Download Learn More

Part 1: Working Out the Comprehensive Methods to Perform Mask Tracking on Adobe After Effects
Adobe After Effects is a powerful tool for mask tracking and other functions. The interface of this tool tailors your content to your needs with precision. The process of masking is convenient and accessible and provides accurate results. Its advanced masking options, like filling up the mask, add a realistic touch. Before learning about masking in After Effects, let’s discuss some of its features:
- Text Animations: Animating your text in Adobe After Effects is a comprehensive experience. It is because the software has amazing text fonts and animation options. You can also set the appearance settings like opacity, color, and more text. In addition, the software has pre-installed effects and presets to ease the process.
- VFX/Visual Effects: Elevate your images and videos using Adobe’s amazing visual elements. It can eliminate mistakes, and results are so promising that they become invisible. You can use the mask tracking effect to hide and fill objects. In addition, you can turn your transitions into high-resolution 3D or 4D videos.
- Motion Graphics: It moves anything with its motion graphics functionality and advanced keyframing. Along with animating text, the feature allows you to move the logos. You can move a logo on any background from top to bottom or left to right. With its flickering and wiggling effects, make animations without keyframing.
- Rotoscoping: This After Effects function eliminates using green screens in your videos. Using the pen tool, you can merge a different object in a different footage. Afterward, you can polish the mask by resizing and adjusting opacity values.
- Motion Tracking: Elevate the graphics of your videos using the motion tracking feature. This function connects any image with an object’s motion. Therefore, your images become animated and add a creative element to the content. Its cloud collaboration with other software allows users to download assets.
Step-by-Step Procedure for Masking in Adobe After Effects
Now that you know the After Effects masker line tracking feature, let’s move forward. Read the following guide to learn more about masking:
Step 1
After importing your clip into the timeline, select it in the timeline panel. Navigate towards the upper toolbar and select the “Pen Tool” option. Afterward, create a mask around the object that you want to remove.
![]()
Step 2
You’ll see a mask around the object, and the rest of the screen will disappear. Navigate to the timeline panel, expand the video track options, and select “Mask.” Click the “Mask” navigation arrow and select “None.”
![]()
Step 3
Click the “Mask” button and select the “Track Mask” option. A mask tracker window will appear on the right side; expand the “Method” option. Following that, select the type of masking you want, like “Position.” Play the video from beginning to end for motion detection. Afterward, change the “Mask” mode to “Add” to apply masking.
![]()
Step 4
Afterward, change the Mask mode to “Subtract” from the timeline. Now, navigate towards the topmost toolbar and expand the “Window” tab. From the expansion menu, click the “Content-Aware Fill” option.
![]()
Step 5
Move towards the “Mask” option, expand “Mask Path,” and change the values below. Now, go to the right side, increase “Alpha Expansion,” and click “Generate Fill Layer.” Once the mask tracking completes, download your video.
![]()
Part 2: Providing a Detailed Guide on How to Do Mask Tracking with Adobe Premiere Pro
Adobe Premiere Pro is one of the industry’s leading tools for editing videos. It offers a wide range of features and built-in effects to elevate content. The software offers precise editing capabilities for mask tracking and other enhancements. In addition, it has many visual, video, and audio effects and presets to apply. Let’s discuss some key features of this tool that make it worthy of being top:
- Motion Graphics Templates: With its seamless After Effect collaboration, it offers built-in templates. These templates include multiple text, shapes, and graphics. You can also customize these templates as per content relevancy and taste.
- Edit Audio: Premiere Pro has multiple audio editing options to maintain audio quality. The tool allows you to decrease the volume of one track while increasing others. In addition, you can make audio adjustments that fit a sound.
- Color Correction: Enhance the graphical element in your videos using this feature. It offers both color correction and enhancing capabilities. You can employ this color correction if you have overexposed or underexposed videos.
- Movie and Film Editing: A professional editor offers applications in the media industry. The Premiere Pro offers seamless collaboration with all video and audio formats. In addition, it can import files from all sources like DSLRs and more.
- Speech to Text: It doesn’t just limit you to video editing but also offers transcript creation. The software analyzes your footage’s audio and creates transcripts. Afterward, you can use them as subtitles and captions.
Step-by-Step Procedure for Masking in Premiere Pro
After introducing mask tracking in Adobe Premiere Pro, let’s progress further. Continue reading the following guide to gain a deeper understanding of masking:
Step 1
After importing your video in the timeline, select it and navigate towards the toolbar. In the “Edit > Effect” section, select “Lumetri Color” under “Video Effects.” Then, select the mask option under Lumetri colors and set it on the screen.
![]()
Step 2
Then, apply the color correction options on the masked areas.
![]()
Step 3
Select “Mask Path” under the Mask section and play it upon color correcting. This will start the mask tracking throughout the clip. The color corrections will be applied to the masked area throughout the video.
![]()
Part 3: Make Mask Tracking Easy with Wondershare Filmora: Working Out the Details
The above-mentioned mask tracking software is professional but is difficult to comprehend. This software is not compatible in terms of convenience. This was when users needed software with easy access and an editing interface. Wondershare Filmora performs diverse creation and editing tasks with expertise. The software assists in diverse audio, video, and text-editing tasks.
The AI-backed algorithms have made achieving perfection in your editing task seamless. In Filmora’s new V13 upgrade, it has introduced an AI masking feature. This feature offers to mask character or subject and auto-analyzes the selected area. In addition, for manual motion tracking masks, users can also resize the mask brush.
Step-by-Step Guide to AI Masking in Filmora
To understand this mask tracking feature better, we have assembled the steps of it. In the following guide, you will learn about accessing and applying this tool:
Step 1Place Media to the Timeline
Upon entering Filmora, click the “New Project” button and access its editing interface. Go to the Project Media section and click the “Import” button. Afterward, import your file and bring it to the timeline using your cursor.
![]()
Step 2Access and Employ AI Masking
Select the video in the timeline and navigate towards the right-side settings panel. In the “Video” tab, you’ll find the “Mask” section. Under this section, select the “AI Mask” option and scroll down to adjust its settings. Expand the “AI Mask” section, and choose the options you want masking for. Once you see the masked results on the preview screen, adjust the other settings below.
![]()
Step 3Save the Settings and Export
Afterward, click the “Save as custom” button to save these settings as a preset for later use. Further, make other adjustments and click on the “Export” button to finalize.
![]()
Free Download For Win 7 or later(64-bit)
Free Download For macOS 10.14 or later
Additional Editing Features of Wondershare Filmora
Along with masker line tracking, there are other video editing and AI features of Filmora. Keep reading the below section to know more about them:
1. AI Text-to-Video
Turn your words into graphics using this generative AI of Filmora. It transforms your textual directions into videos, along with images and voices. Using this AI will save you the effort of creating or hiring a professional.
2. AI Copilot Editing
Why spend hours exploring Filmora’s interface when you can have your guide? The AI Copilot acts like your personal chatbot assistant. You can converse with it like regular people, and it will show you directions on the feature. In addition, it features buttons to employ a specific effect or function.
3. Screen Recorder
Are you a creator who uploads video tutorials and educational videos? You can use Filmora’s screen recorder to create content in a seamless manner. It offers microphone recording and webcam recording for maximum interactivity. In addition, you can adjust custom screen resolution settings and more.
4. Video Background Remover
Leave the effort of adding a green screen in your background during video creation. Filmora’s AI technology can remove video backgrounds without any flaws. Users can replace the background with solid colors, gradients, and more afterward.
5. Silence Detection
Those long or short pauses during video recording are annoying for your audience. They decline the quality of the video and ultimately decline audience engagement. To remove such pauses, use Filmora silence detection AI to auto-eliminate them.
Free Download For Win 7 or later(64-bit)
Free Download For macOS 10.14 or later
Conclusion
In this article, users have gained insights into top mask tracking software. Along with their applications, the article discussed how to access and apply masking. However, masking in the first two tools can be difficult for some people. Hence, we introduced Wondershare Filmora as an easy desktop alternative. If you want to employ an easy motion tracking mask, use this versatile software.
Unleash the Power of Video Slow Motion with Wondershare Filmora. Find Out How to Create Slow Motion Video with the Effective Speed Ramping Feature on Filmora
How to make a video slow motion on your PC and other devices? It is easier than most people think. Slow-motion videos are cool and exciting. You could be watching a CGI fight scene or a dog making a face when trying to catch a treat. The slow-moving objects make it more exciting and intriguing. Probably it is a gender reveal party or a dramatic waterfall, and you are wondering how do I make a video slow motion. In this article, we provide you with a guide on how to make video to slow motion quickly and the easy way.
Slow Motion Video Maker Slow your video’s speed with better control of your keyframes to create unique cinematic effects!
Make A Slow Motion Video Make A Slow Motion Video More Features

Part 1. Introducing Wondershare Filmora: A Great Help for Making Slow Motion Videos
If you are looking for a solution on how to put videos in slow mo, you need to try Wondershare Filmora. The recent Filmora V13 comes with some brilliant tools that make editing videos easier and fun. The fully-equipped suite is now powered by AI allowing users to effortlessly create outstanding videos in minutes. With new features to realize your ideas and bring them to life, Filmora empowers you to work smarter and not harder.
Free Download For Win 7 or later(64-bit)
Free Download For macOS 10.14 or later
How do you make a video slow motion with Filmora? The solution lies in the unique video editing features of the software. From manually editing the speed of the video to using slo mo effects, Filmora is a great choice. Using Filmora for creating slow motion videos has various advantages to your video editing journey:
- Precise speed control: Filmora allows you to precisely set the speed of your videos up to a single frame, giving you creative control over your slo mo effects.
- AI-powered capabilities: Powered by artificial intelligence, FIlmora gives you accurate results quickly and efficiently
- Easy to Use: Filmora is a versatile video editing software that is easy to learn and use
- High-quality output: Filmora offers a wide range of editing features, allowing you to export slo mo video without compromising the quality
- Multiple slow-motion effects: Get access to a variety of slo mo video effects, including speed ramp, time remap, optical flow, and more
Ready to add some epic slow-motion action to your videos? In the next section, we’ll guide you step-by-step through how to make a slo mo video in just a few clicks. You will be turning your ordinary footage into amazing slo-mo clips in the simplest way possible.
Part 2. How to Make a Video Slow Motion: Step-by-Step Guide
Wondershare Filmora allows users to create a video slow motion using the Speed Ramping feature. This feature is specifically designed for adjusting the speed of videos with better control of keyframes, allowing you to create unique cinematic effects. You may want your YouTube clips to look cool or slow down your video for particular reasons. Take your video editing skills to the next level with the Speed Ramping feature. Filmora makes it possible to create slow motions of high quality with smooth transitions for incredible results.
The Speed Ramping feature is effective in:
- Applying Professional Speed Effect: Quickly change the speed of your video by making it more creative.
- Speed Ramping Template Presets: Get access to Filmora’s six present speed ramping effects. They include Bullet Time, Hero Moment, Montage, Flash in, and Jumper. These effects help in creating a professional speed change effect with ease.
- Support for Customized Speed Ramping Template: Filmora allows you to create a unique speed ramping effect for your own and save it for later use.
- Maintaining the Audio Pitch: The Speed Ramping feature by Filmora allows you to maintain the original audio pitch even after changing the speed of the video.
The Speed Ramping feature is quite effective in making video slow motion with Filmora. Let’s have a look at the steps you will need to follow:
Step 1: Find the Speed Ramping Tab
Once you have launched Filmora and imported your files, double clip on the video clip or audio clip you want to create a slow motion from. Then click, Speed followed by Speed Ramping in the pop-up editing window. You may also right-click on the video clip on the timeline and choose Speed Ramping, or click on the Speed icon on the toolbar followed by Speed Ramping.
Step 2: Customize the Speed Ramps
After starting the feature, you need to customize the speed ramps to achieve the desired results. The quickest way is to select a speed ramp present from the available Hero Moment, Montage, Jumper, Bullet Time, Flash Out, and Flash In. Customizing the speed ramps will, however, give you more creative outcomes.
Strp 3: Apply the Speed Ramping
With the speed ramp ready, place the play head where you want to create a slo mo video. Then click the Add icon to add the speed keyframes. Drag the keyframe dot downward or upward as desired to control the point speed. This will give you the specific slow motion video that you want while maintaining the audio pitch. When you are satisfied with the adjustments, click OK to save the settings and export your creation.
Creating slow motion videos with the speed ramping feature can be beneficial in many ways. The slow-motion effects draw attention to specific details of the video. It could be a big reveal happening or a flashback that allows viewers to realize the clues you were giving all along. When you slow down scenes in your video, it lets people focus on specific details, gestures, or objects.
Conclusion
Creating a slow motion video can be exciting. There’s just something that makes slo mo fun and interesting to watch. How to do video slow motion you may ask. With the right software, slowing down videos is a fun and thrilling effect. To this effect, we recommend using Wondershare Filmora to create slow motions in your projects and keep your audience engaged. The Speed ramping feature of Filmors is easy to use and can be customized to achieve specific results.
Make A Slow Motion Video Make A Slow Motion Video More Features

Part 1. Introducing Wondershare Filmora: A Great Help for Making Slow Motion Videos
If you are looking for a solution on how to put videos in slow mo, you need to try Wondershare Filmora. The recent Filmora V13 comes with some brilliant tools that make editing videos easier and fun. The fully-equipped suite is now powered by AI allowing users to effortlessly create outstanding videos in minutes. With new features to realize your ideas and bring them to life, Filmora empowers you to work smarter and not harder.
Free Download For Win 7 or later(64-bit)
Free Download For macOS 10.14 or later
How do you make a video slow motion with Filmora? The solution lies in the unique video editing features of the software. From manually editing the speed of the video to using slo mo effects, Filmora is a great choice. Using Filmora for creating slow motion videos has various advantages to your video editing journey:
- Precise speed control: Filmora allows you to precisely set the speed of your videos up to a single frame, giving you creative control over your slo mo effects.
- AI-powered capabilities: Powered by artificial intelligence, FIlmora gives you accurate results quickly and efficiently
- Easy to Use: Filmora is a versatile video editing software that is easy to learn and use
- High-quality output: Filmora offers a wide range of editing features, allowing you to export slo mo video without compromising the quality
- Multiple slow-motion effects: Get access to a variety of slo mo video effects, including speed ramp, time remap, optical flow, and more
Ready to add some epic slow-motion action to your videos? In the next section, we’ll guide you step-by-step through how to make a slo mo video in just a few clicks. You will be turning your ordinary footage into amazing slo-mo clips in the simplest way possible.
Part 2. How to Make a Video Slow Motion: Step-by-Step Guide
Wondershare Filmora allows users to create a video slow motion using the Speed Ramping feature. This feature is specifically designed for adjusting the speed of videos with better control of keyframes, allowing you to create unique cinematic effects. You may want your YouTube clips to look cool or slow down your video for particular reasons. Take your video editing skills to the next level with the Speed Ramping feature. Filmora makes it possible to create slow motions of high quality with smooth transitions for incredible results.
The Speed Ramping feature is effective in:
- Applying Professional Speed Effect: Quickly change the speed of your video by making it more creative.
- Speed Ramping Template Presets: Get access to Filmora’s six present speed ramping effects. They include Bullet Time, Hero Moment, Montage, Flash in, and Jumper. These effects help in creating a professional speed change effect with ease.
- Support for Customized Speed Ramping Template: Filmora allows you to create a unique speed ramping effect for your own and save it for later use.
- Maintaining the Audio Pitch: The Speed Ramping feature by Filmora allows you to maintain the original audio pitch even after changing the speed of the video.
The Speed Ramping feature is quite effective in making video slow motion with Filmora. Let’s have a look at the steps you will need to follow:
Step 1: Find the Speed Ramping Tab
Once you have launched Filmora and imported your files, double clip on the video clip or audio clip you want to create a slow motion from. Then click, Speed followed by Speed Ramping in the pop-up editing window. You may also right-click on the video clip on the timeline and choose Speed Ramping, or click on the Speed icon on the toolbar followed by Speed Ramping.
Step 2: Customize the Speed Ramps
After starting the feature, you need to customize the speed ramps to achieve the desired results. The quickest way is to select a speed ramp present from the available Hero Moment, Montage, Jumper, Bullet Time, Flash Out, and Flash In. Customizing the speed ramps will, however, give you more creative outcomes.
Strp 3: Apply the Speed Ramping
With the speed ramp ready, place the play head where you want to create a slo mo video. Then click the Add icon to add the speed keyframes. Drag the keyframe dot downward or upward as desired to control the point speed. This will give you the specific slow motion video that you want while maintaining the audio pitch. When you are satisfied with the adjustments, click OK to save the settings and export your creation.
Creating slow motion videos with the speed ramping feature can be beneficial in many ways. The slow-motion effects draw attention to specific details of the video. It could be a big reveal happening or a flashback that allows viewers to realize the clues you were giving all along. When you slow down scenes in your video, it lets people focus on specific details, gestures, or objects.
Conclusion
Creating a slow motion video can be exciting. There’s just something that makes slo mo fun and interesting to watch. How to do video slow motion you may ask. With the right software, slowing down videos is a fun and thrilling effect. To this effect, we recommend using Wondershare Filmora to create slow motions in your projects and keep your audience engaged. The Speed ramping feature of Filmors is easy to use and can be customized to achieve specific results.
Create Chroma Key Written Text Effects in Filmora
Did you know it only takes a few clicks to key out the color in Filmora? It means that you can add green screen effects to many other objects. This article will show a cool chroma key effect you can try using written text.
Part 1. What Is Chroma Key Text Effect?
Composing of the chroma key effect is widely used in the gaming and newscasting industries. In this technique, you can make layering images and videos for the text together based on color hues.
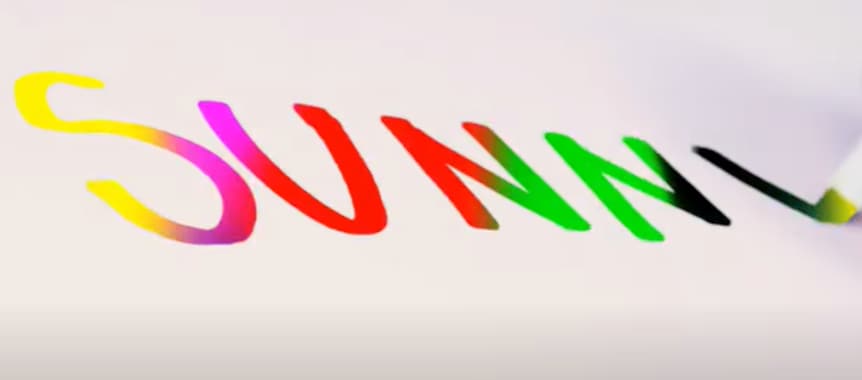
Video editors can eliminate the basis from a picture by automatically choosing a certain hue in post-production. An interactive animation results by adding different color schemes; it’s an easy way to make 3D motion videos.
To make the effects on text, we have to film the subject writing on white paper. For this, follow the below instructions:
Part 2. Filming Tips for Written Texts
To write a key text before adding the chroma effect, we have to film the writing process to understand your next project better. You can create your own by following these tips. We are just concluding a single example here.
Tip 1. A Pen and a White Paper
We need blank white paper with no boundaries and lines for writing a text. Because the chroma effect will embellish the other lines if present on paper. Make sure to choose a prominent color for writing a text.
We are using a purple color pen here for writing an essential text to make it more prominent, as shown below:
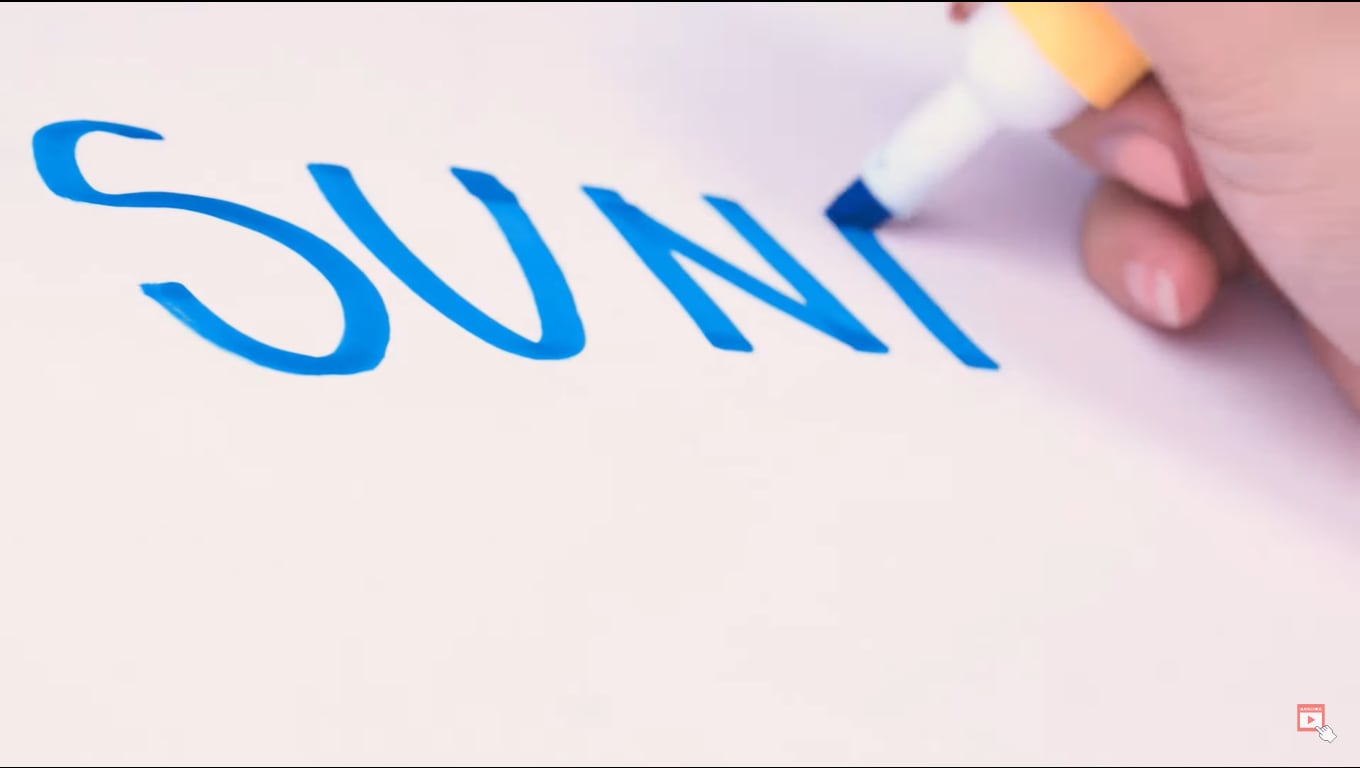
It all depends upon the contrast, and you can choose another color too but ensure that it’s more apparent during filming.
Tip 2. Different Color Paper
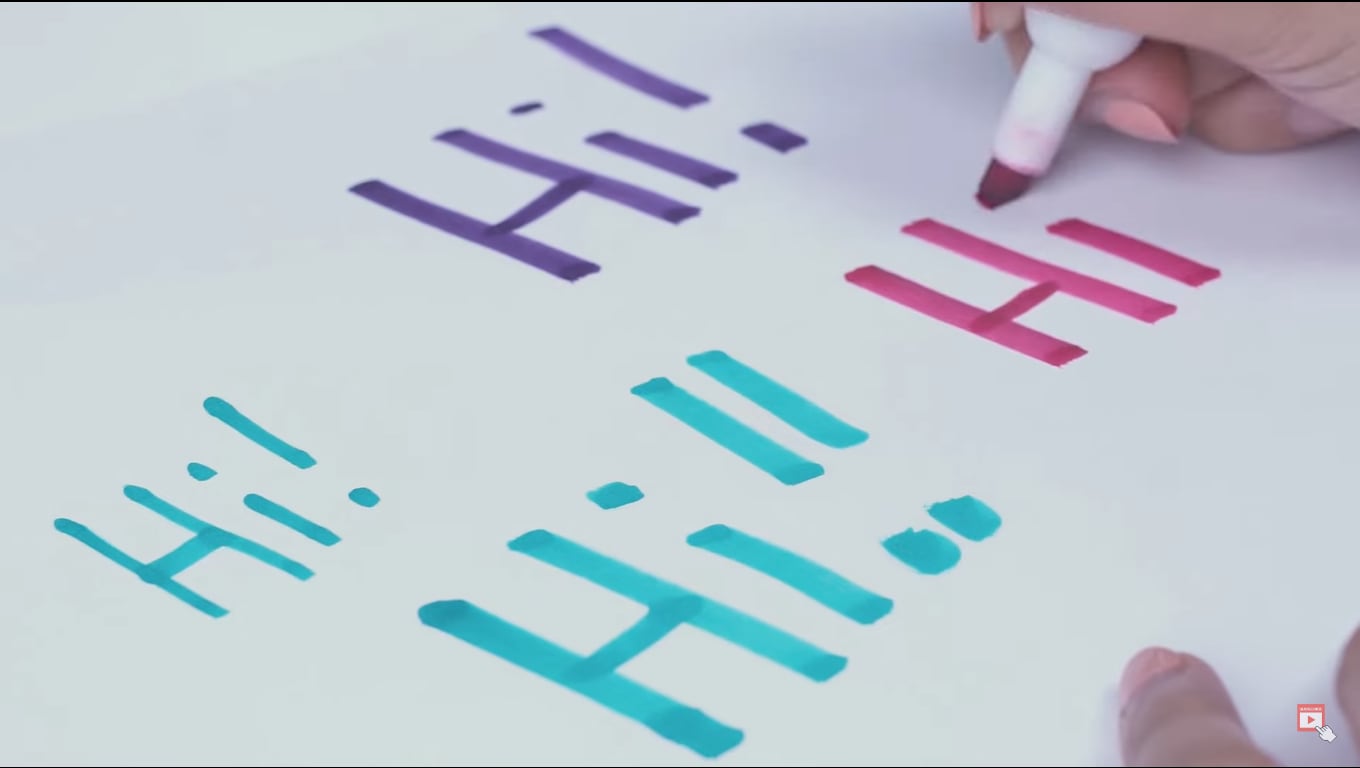
There are many chances that you don’t have only white paper in your studio, or your requirement is not going with a blank white sheet. Then you don’t need to worry because you can use different color papers too.
But always try to use clearer paper and a prominent pen or highlighter. See the below example of a different color paper with a different highlighter.
![]()
Note: Ensure that the colored pens have good contrast with colored paper. Don’t use dull color pens with bright color paper.
Tip 3. Camera Angles
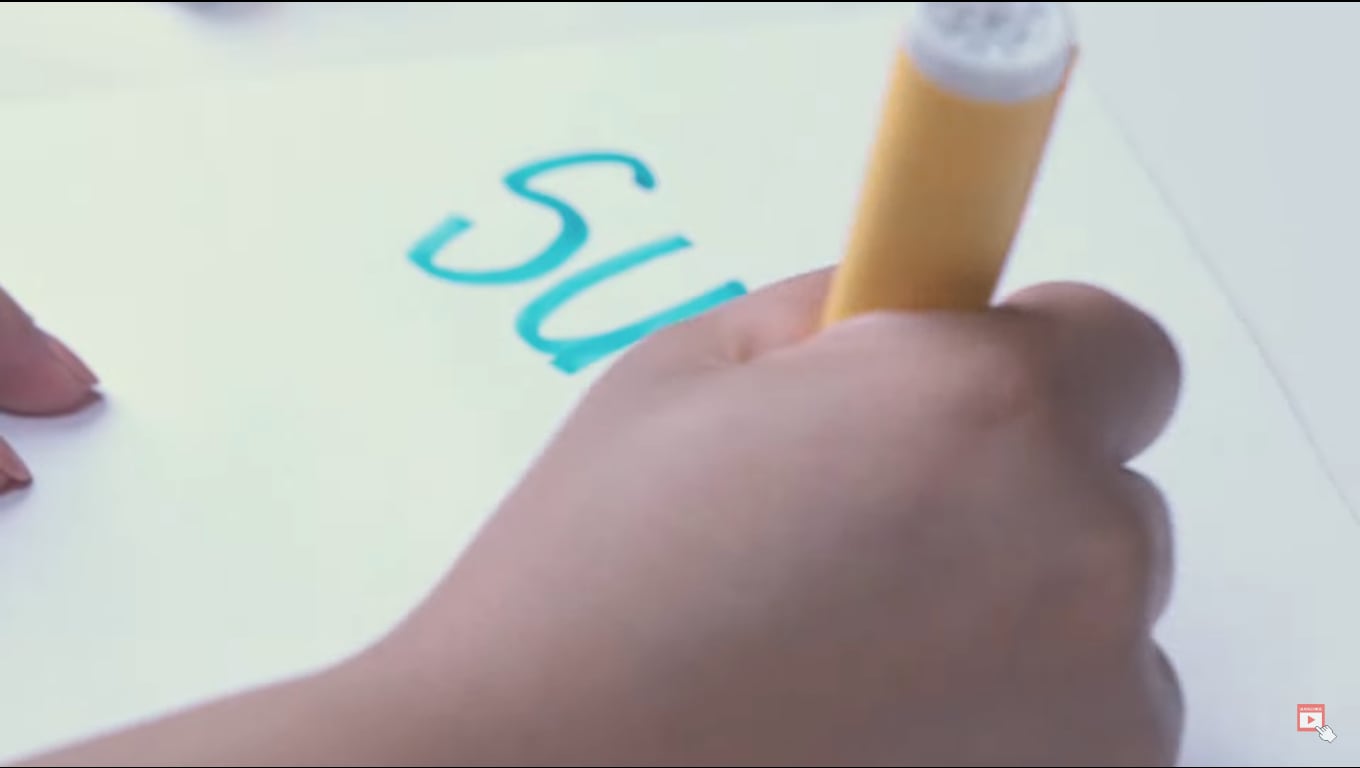
While filming a writing process for a video, you have to take care of the alignment of the camera. First, ensure the camera is at a suitable angle so it will not block the writing letters from the left side.
Sometimes, the writer’s hand blocks the letters on the left side during writing. Take note of this tip during filming a professional video, as shown below.
After checking the alignment of the camera, it’s time to look at what size we have to use for writing!
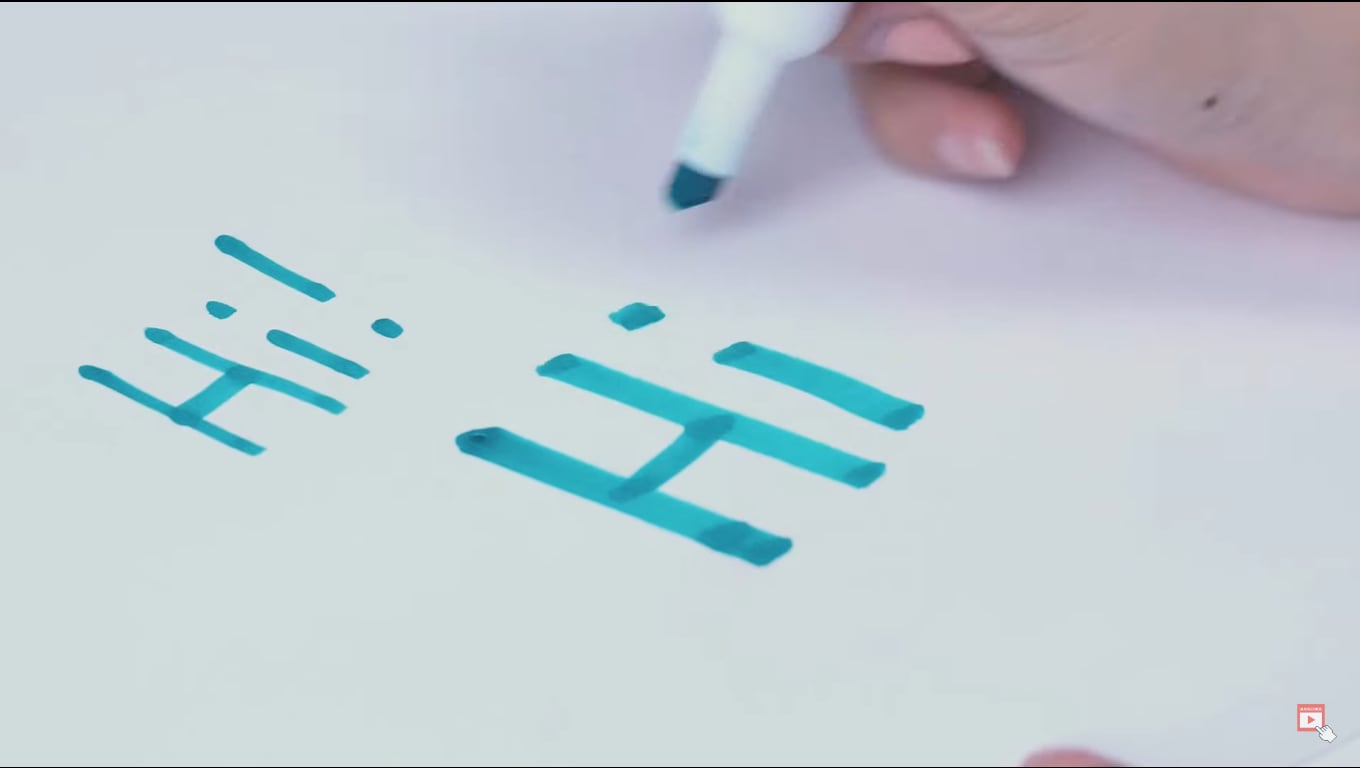
Tip 4. Larger Size of Letters
As we already said about the prominence of written text, we have to follow one more instruction related to the structure of the letters. Use the larger size and bold words when writing from a highlighter.
It is because the effect we insert during editing will be more standing and give a professional look to the video.
![]()
Note: You can create more shots till you get the right angle for a final video. Just focus on the camera alignment and highlighted words, then it will be all set.
After filming all the clips, you must edit those shots on the Filmora to get the chroma effect. Scroll more to get the step-by-step process!
Part 3. Editing the Chroma Key Text With Filmora
We need software that will give great setting choices and stock videos for a more professional look. For this, Wondershare Filmora will work more than a robot and give high-resolution results. To do the editing process on Filmora, follow the steps below and enjoy yourself with your followers.
Free Download For Win 7 or later(64-bit)
Free Download For macOS 10.14 or later
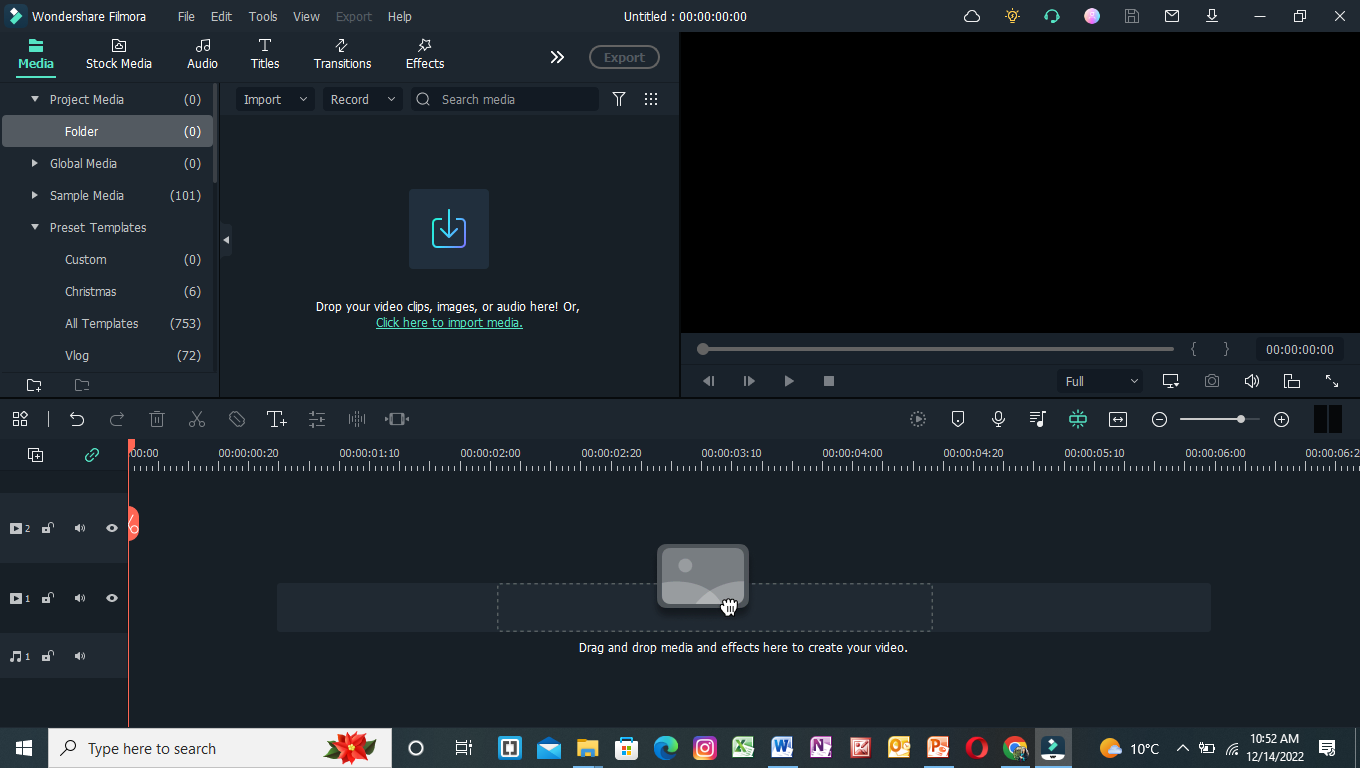
Step1 Download and install Wondershare Filmora
Launch Wondershare Filmora on your PC or Mac after downloading.
![]()
Note: If you want to enjoy its unlimited effect, you get its premium version quickly.
Step2 Import the clips to the Filmora
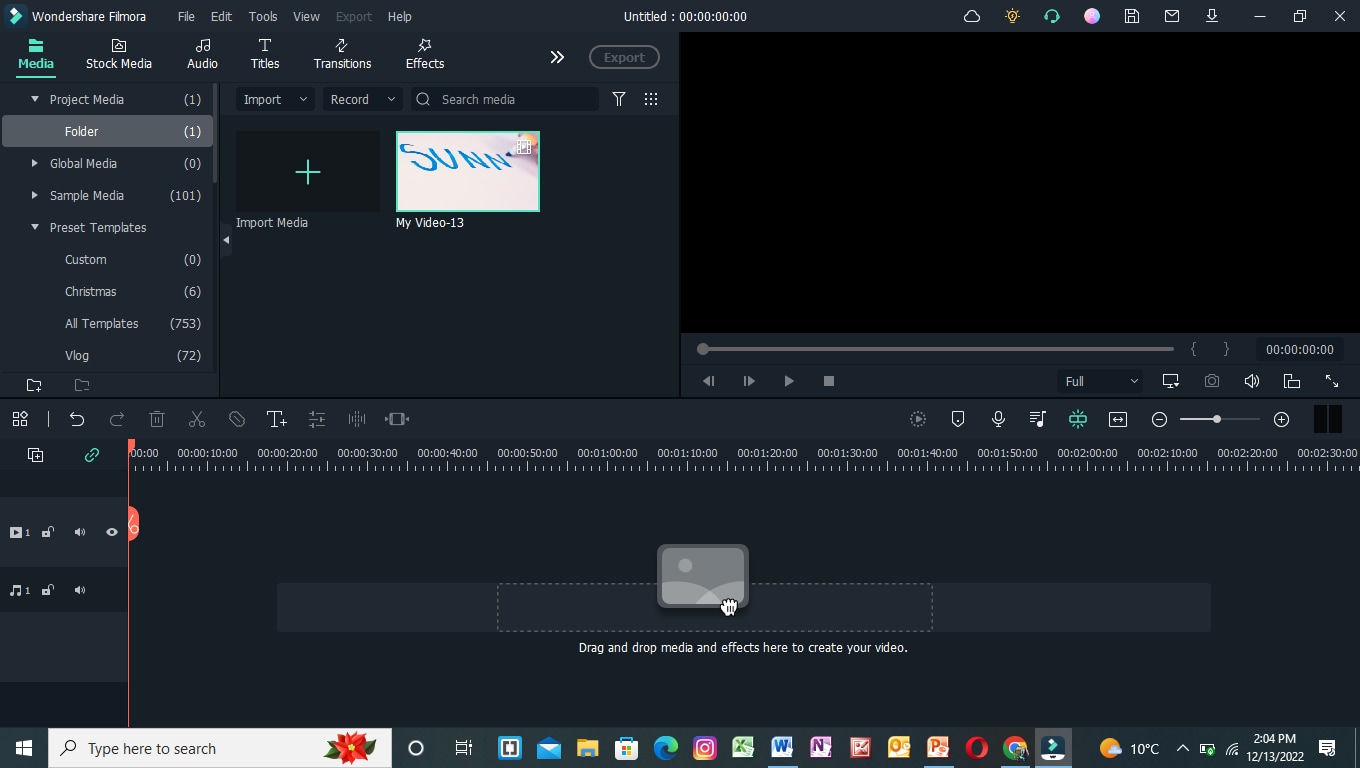
First, import the best footage into the filmora which you have shot. Ensure that the clip should have the best recording angle and that every word will be prominent on the page.
For this, click on Import Media and choose from the PC library what you want to edit.
Step3 Drag the clip to the timeline
Drag and drop the clip into the timeline from the import section. If you have more clips, choose first according to your script.
Add the text-written clip into the second video track because we have to insert the background into the first video track later.
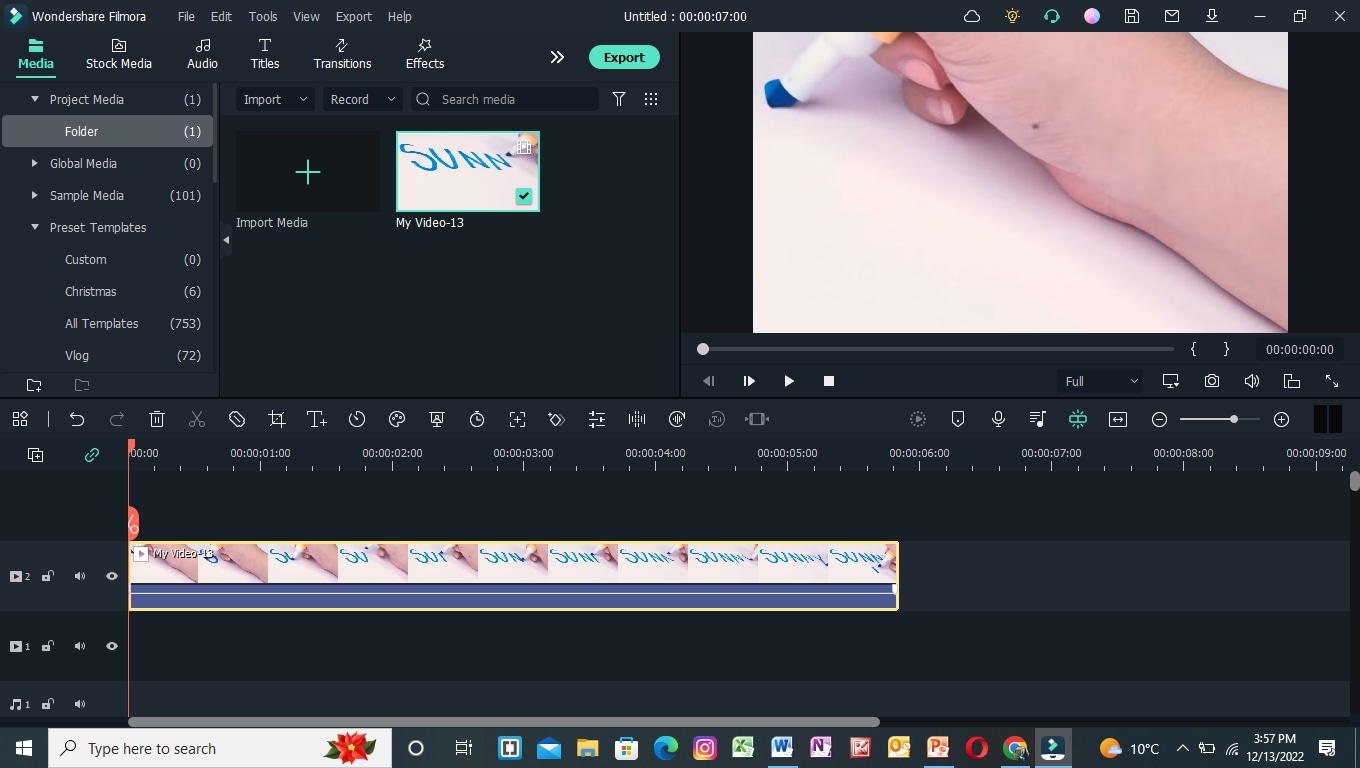
After inserting the clip into the timeline, it’s time to edit it. For this, keep following the below-mentioned steps!
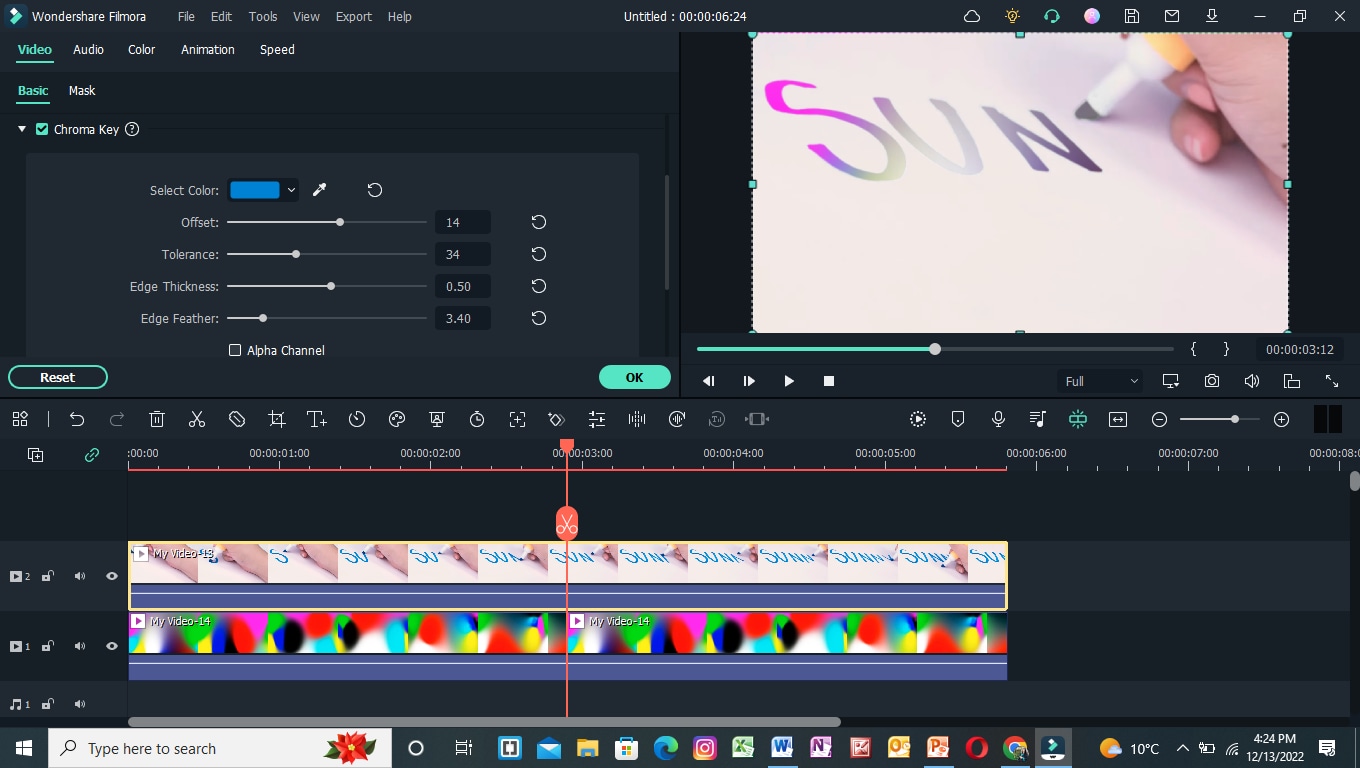
Step4 Chroma key settings
To edit the chroma key, you need to open the settings. For this, follow the below instructions:
- First, double-click on the clip in the timeline of the Filmora.
- Then, the setting section of the video will pop up at the top left side.
- Mark the tick in front of the Chroma Key section, and it will show the list of different features as shown below.
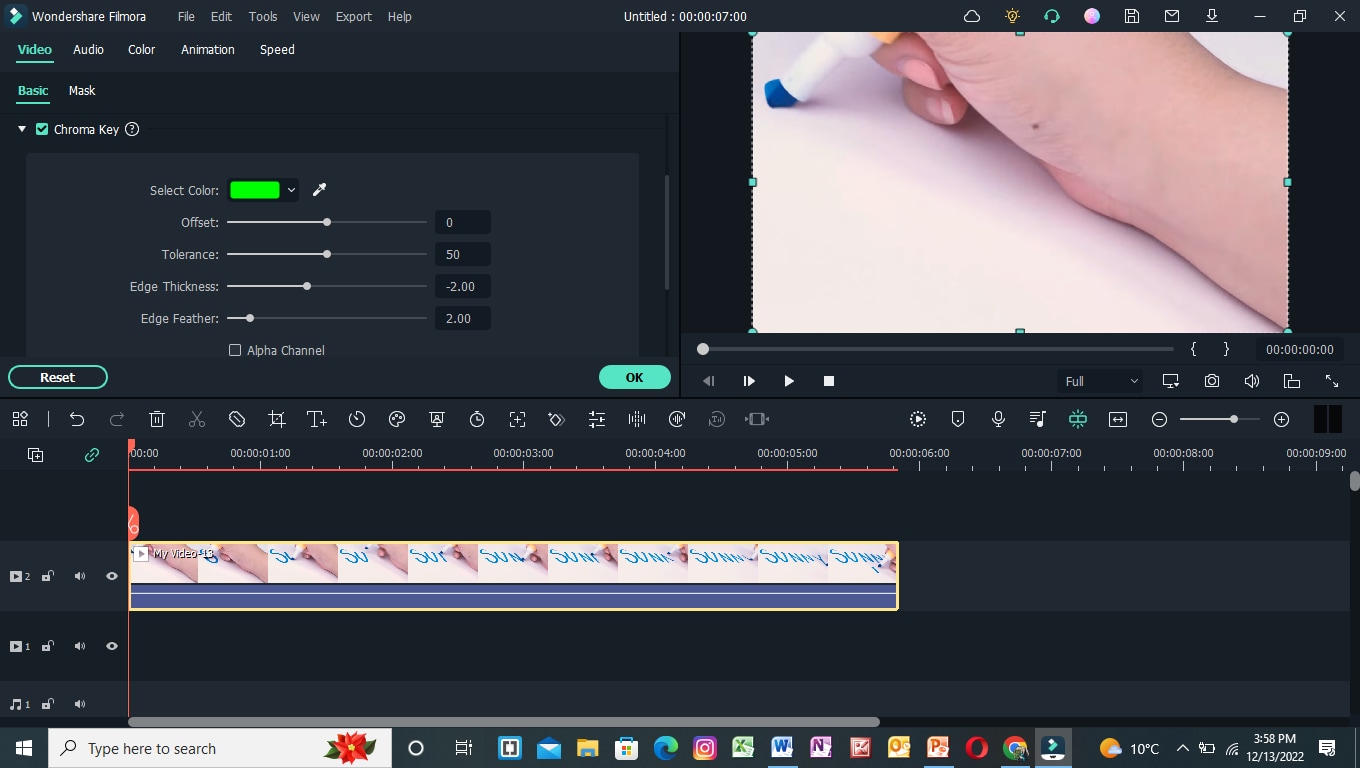
Step5 Color key out
To key out the specific color for changing its background, you have to perform the following actions:
- First, find the Select color option in the settings of the clip.
- Then click on the color dropper in front of the color tab.
- After that, pick the color dropper and move it on the video to select the color from the text.
![]()
Note: Ensure to select the color from the middle of the text for better key-out accuracy.
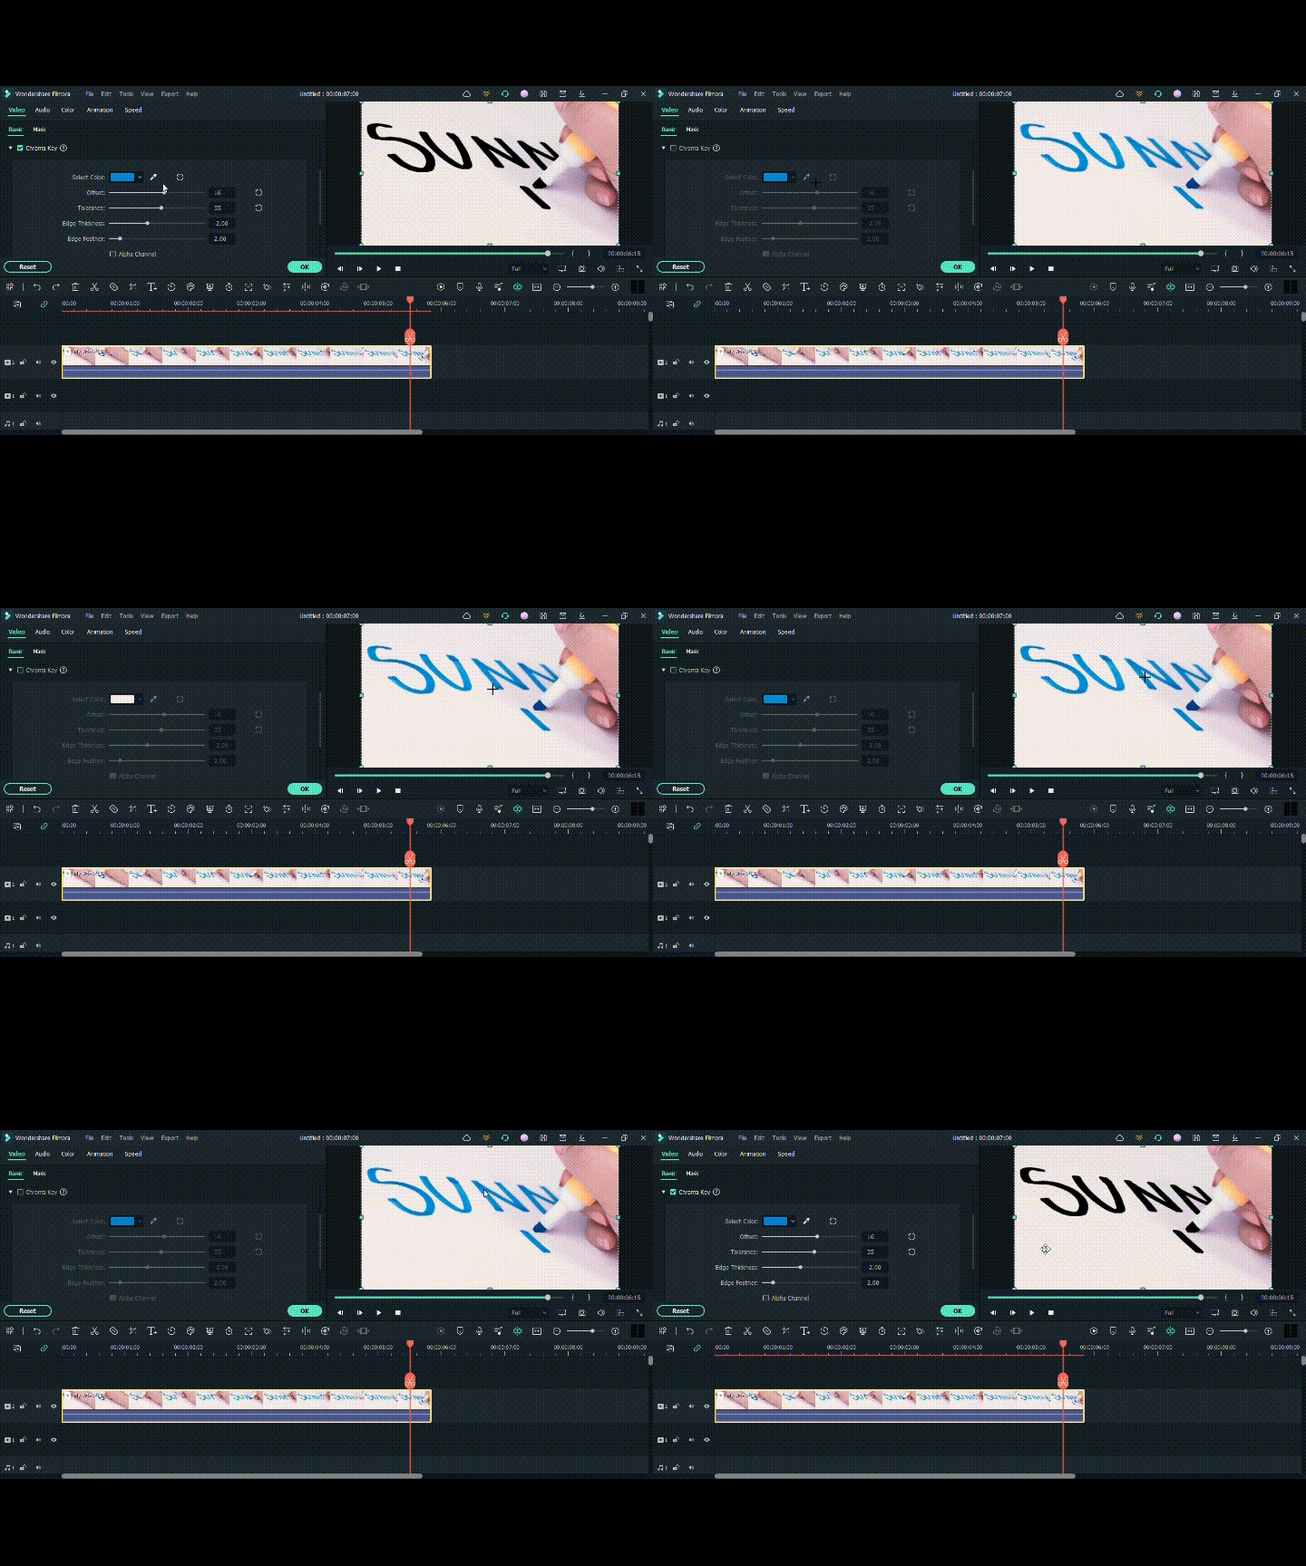
You have to adjust the size and thickness after selecting the key-out. For this, follow the next step!
Step6 Adjust the settings
To adjust the Chroma Key’s settings, set the offset, tolerance, edge thickness, and edge feather. Increase or decrease according to your range and that suits you the best.
Then click on Alpha Channel to mark the tick in front of the option. It is due to that chroma key effects will be more clearly shown.
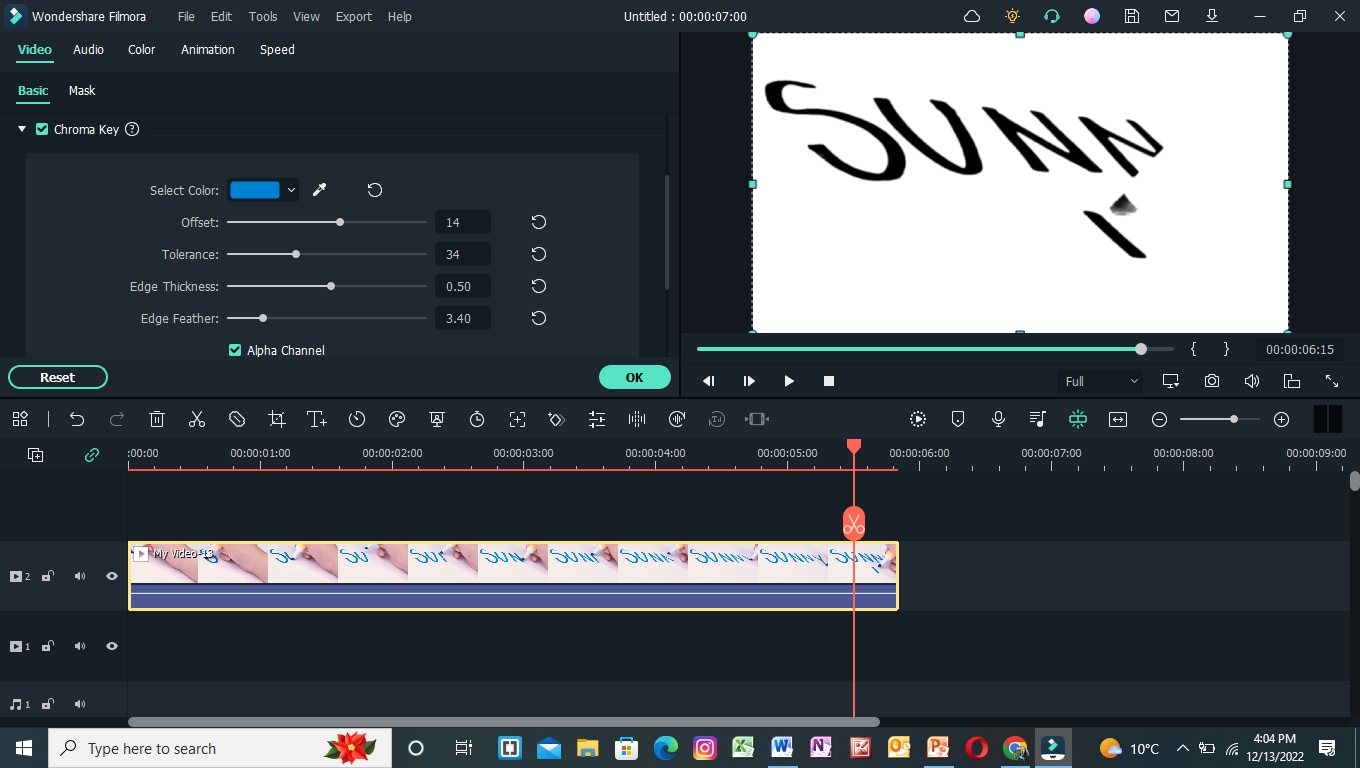
Now, it’s time to set the background after fixing all the settings of the chroma key effect. To perform this, scroll more to get to the next step.
Step7 Import background clips
You have to add an excellent motion background in the handwritten text video. For this, you must first import the background clip into the filmora. Then, click on Import Media and choose what you want from your PC.
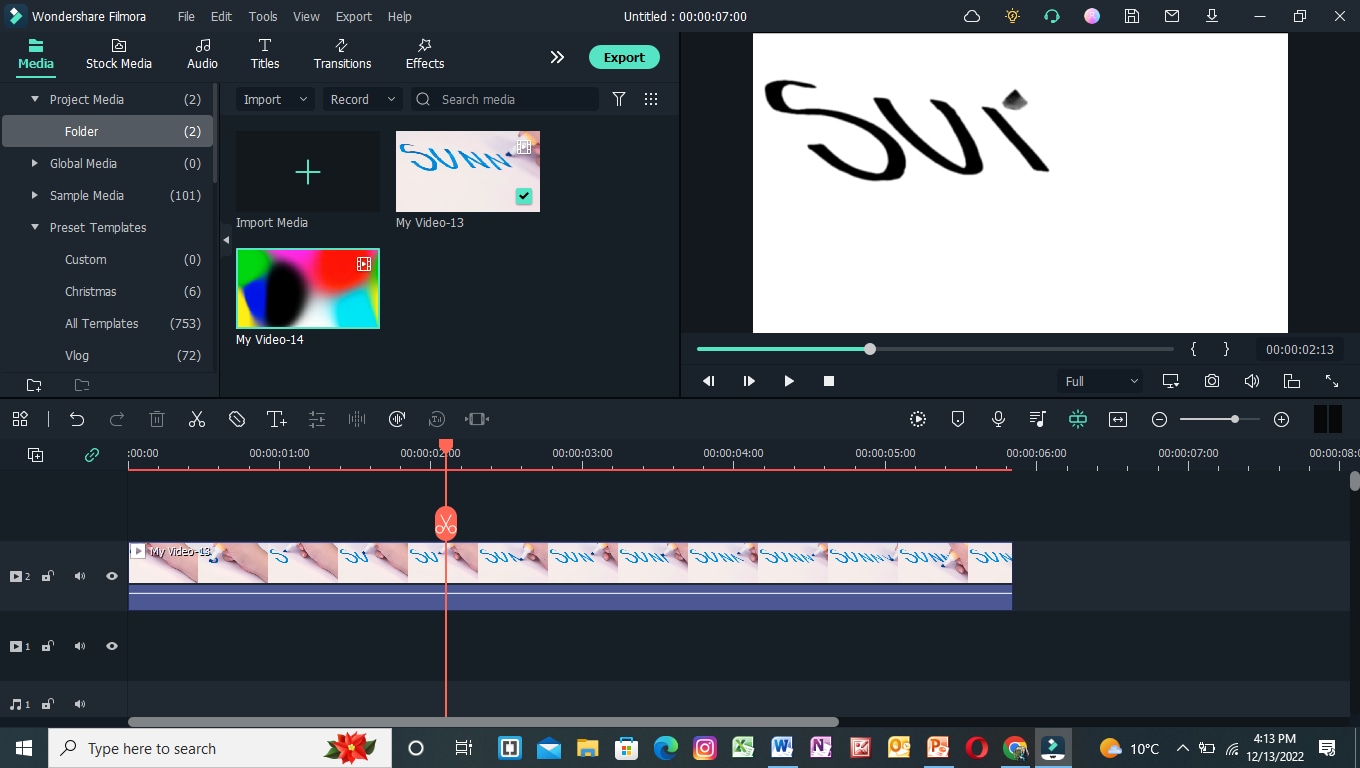
Step8 Add a background clip to the timeline
After importing the background clip, now drag and drop the clip into the timeline. Finally, add the background clip to the first video track at the bottom.
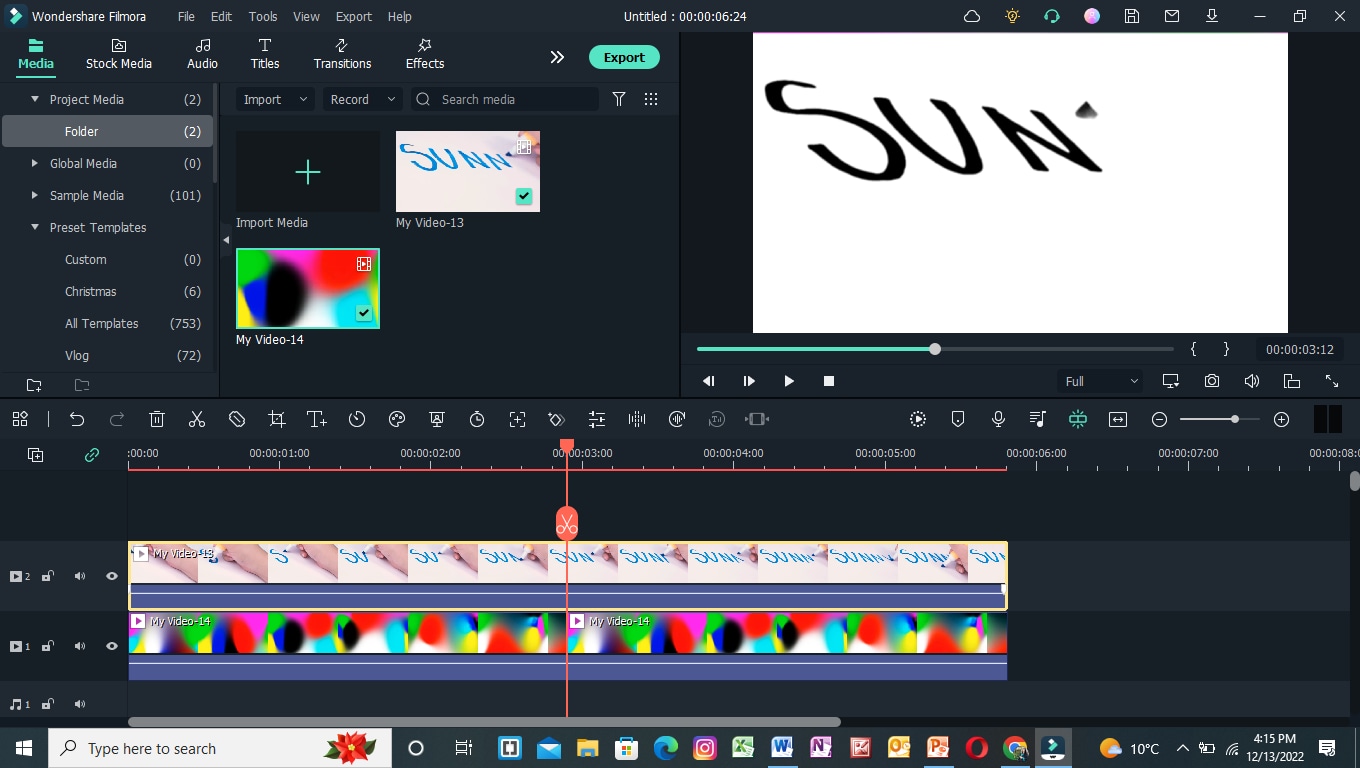
Step9 Turn off the alpha channel
The last step is merging the background clip with the first clip. For this, follow the below guidelines:
- First, double-click on the handwritten text video.
- It will show the settings section at the top left corner.
- Find the chroma key section and turn Alpha Channel
Final Results
You have all done with the steps and got such a fascinating result. Following the above tricks, you can easily make your vlogs and daily videos more professional and creative. Make sure to add a great and colorful background clip.
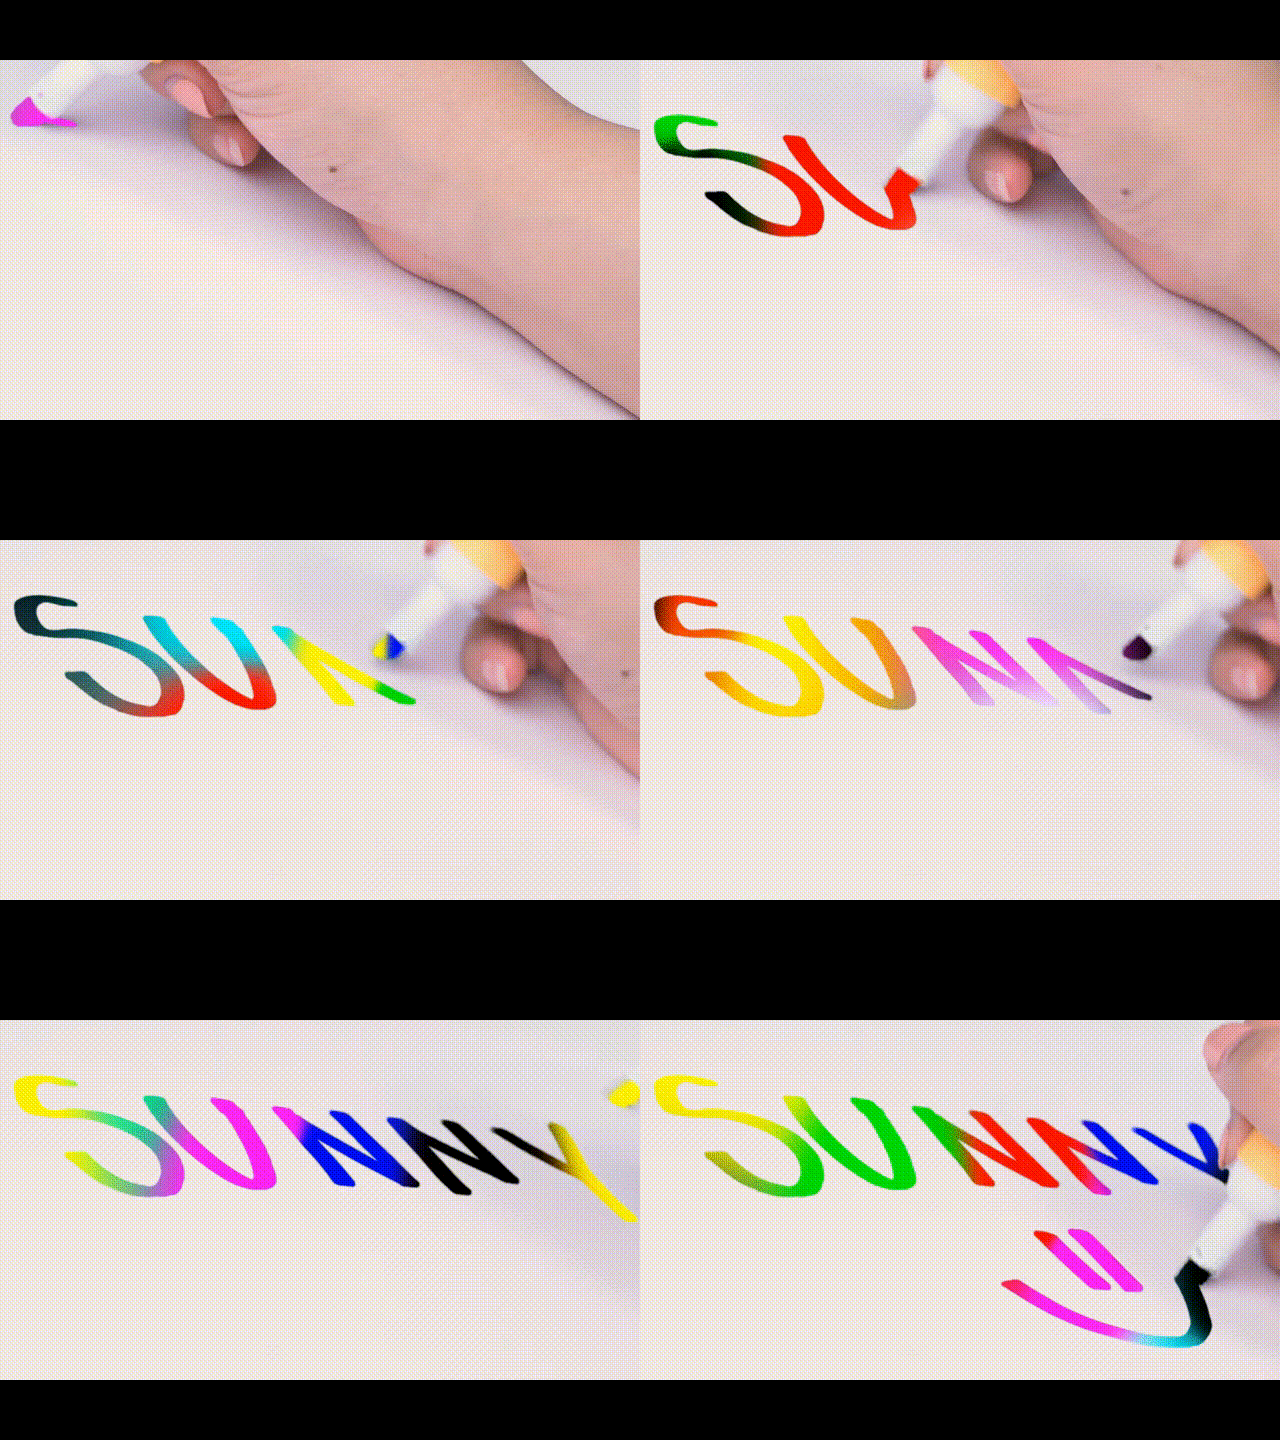
You can also use any other motion video of scenes rather than colorful videos to give a striking look.
Conclusion
Create more attractive looks and share them with your subscribers. Mainly, vloggers can attract many viewers by making the introductory part with this effect. Then, choose hundreds of other videos from the stock media and create different looks daily.
See how you can get editing tricks on Wondershare Filmora and use them in a few clicks to get an attractive look!
Tip 3. Camera Angles
While filming a writing process for a video, you have to take care of the alignment of the camera. First, ensure the camera is at a suitable angle so it will not block the writing letters from the left side.
Sometimes, the writer’s hand blocks the letters on the left side during writing. Take note of this tip during filming a professional video, as shown below.

After checking the alignment of the camera, it’s time to look at what size we have to use for writing!
Tip 4. Larger Size of Letters
As we already said about the prominence of written text, we have to follow one more instruction related to the structure of the letters. Use the larger size and bold words when writing from a highlighter.
It is because the effect we insert during editing will be more standing and give a professional look to the video.

![]()
Note: You can create more shots till you get the right angle for a final video. Just focus on the camera alignment and highlighted words, then it will be all set.
After filming all the clips, you must edit those shots on the Filmora to get the chroma effect. Scroll more to get the step-by-step process!
Part 3. Editing the Chroma Key Text With Filmora
We need software that will give great setting choices and stock videos for a more professional look. For this, Wondershare Filmora will work more than a robot and give high-resolution results. To do the editing process on Filmora, follow the steps below and enjoy yourself with your followers.
Free Download For Win 7 or later(64-bit)
Free Download For macOS 10.14 or later
Step1 Download and install Wondershare Filmora
Launch Wondershare Filmora on your PC or Mac after downloading.
![]()
Note: If you want to enjoy its unlimited effect, you get its premium version quickly.

Step2 Import the clips to the Filmora
First, import the best footage into the filmora which you have shot. Ensure that the clip should have the best recording angle and that every word will be prominent on the page.
For this, click on Import Media and choose from the PC library what you want to edit.

Step3 Drag the clip to the timeline
Drag and drop the clip into the timeline from the import section. If you have more clips, choose first according to your script.
Add the text-written clip into the second video track because we have to insert the background into the first video track later.

After inserting the clip into the timeline, it’s time to edit it. For this, keep following the below-mentioned steps!
Step4 Chroma key settings
To edit the chroma key, you need to open the settings. For this, follow the below instructions:
- First, double-click on the clip in the timeline of the Filmora.
- Then, the setting section of the video will pop up at the top left side.
- Mark the tick in front of the Chroma Key section, and it will show the list of different features as shown below.

Step5 Color key out
To key out the specific color for changing its background, you have to perform the following actions:
- First, find the Select color option in the settings of the clip.
- Then click on the color dropper in front of the color tab.
- After that, pick the color dropper and move it on the video to select the color from the text.
![]()
Note: Ensure to select the color from the middle of the text for better key-out accuracy.

You have to adjust the size and thickness after selecting the key-out. For this, follow the next step!
Step6 Adjust the settings
To adjust the Chroma Key’s settings, set the offset, tolerance, edge thickness, and edge feather. Increase or decrease according to your range and that suits you the best.
Then click on Alpha Channel to mark the tick in front of the option. It is due to that chroma key effects will be more clearly shown.

Now, it’s time to set the background after fixing all the settings of the chroma key effect. To perform this, scroll more to get to the next step.
Step7 Import background clips
You have to add an excellent motion background in the handwritten text video. For this, you must first import the background clip into the filmora. Then, click on Import Media and choose what you want from your PC.

Step8 Add a background clip to the timeline
After importing the background clip, now drag and drop the clip into the timeline. Finally, add the background clip to the first video track at the bottom.

Step9 Turn off the alpha channel
The last step is merging the background clip with the first clip. For this, follow the below guidelines:
- First, double-click on the handwritten text video.
- It will show the settings section at the top left corner.
- Find the chroma key section and turn Alpha Channel

Final Results
You have all done with the steps and got such a fascinating result. Following the above tricks, you can easily make your vlogs and daily videos more professional and creative. Make sure to add a great and colorful background clip.

You can also use any other motion video of scenes rather than colorful videos to give a striking look.
Conclusion
Create more attractive looks and share them with your subscribers. Mainly, vloggers can attract many viewers by making the introductory part with this effect. Then, choose hundreds of other videos from the stock media and create different looks daily.
See how you can get editing tricks on Wondershare Filmora and use them in a few clicks to get an attractive look!
Also read:
- New What Is an Eye Zoom Transition Effect? Its a Close-Up Video Effect Allowing Viewers to Transit to the Next Clip From the Eye
- Updated In 2024, You Are at the Right Post if You Are Surfing for a GIF to MP4 Conversion Tool. This Article Will Provide You with the Top Best Converters that Can Help You Convert GIF to MP4 Videos Quickly and Easily
- New Focusing On The Best Ways To Convert Slow-Motion Video to Normal for 2024
- Updated How to Create Cinematic Style Videos?
- New This Post Will Make You Learn Anything and Everything About Animated GIFs, the Ways to Use Cool Gifs in My Marketing, and How to Create Unique Custom Animated Gifs
- Updated Things You Need to Know About Transparent PNG Remove and Convert for 2024
- Updated Consider a LUT to Be a Color Preset that a Filmmaker Can Use to Start Working on a Project Quickly. Sony Engineers Have Developed LUTs to Help Filmmakers Perform Specific Tasks. All of These Are Available for Free
- New This Article Describes Different Ways for Removing Gif Backgrounds, How We Can Use Them, and How This Way Differs From One Another
- Updated How To Add Motion Blur On CapCut? (IPhone & Android)
- Updated In 2024, Looking for a Free Video Editor to Edit Videos on Mac? IMovie by Apple Is a Great Choice? But Is It the Best Video Editor or Is There a Better Alternative Available? Check Out Our iMovie Review
- In 2024, Top Best Free LUTs For Premiere Pro
- Updated Do You Want to Make Your Photos and Videos Look Different From Others? There Are Many Lightroom LUTs Free, and They Make Your Media Content Stand Out From Others
- New In 2024, How to Convert Images Into Video - Kapwing Tutorial
- New In 2024, ReVisionFX ReelSmart Motion Blur Plugin For Premiere Pro
- Learn How to Convert MP4 Videos to 60 FPS GIFs with This Easy-to-Follow Tutorial. Get Smooth and Crisp Motion in Your GIFs in Just a Few Simple Steps
- Updated In 2024, Know How to Make a Video Background Transparent? Export Transparent Background Video After Adding Effects. Steps to Remove White Background From Video
- Updated Add Subtitles To Videos With Kapwing Step by Step for 2024
- New 2024 Approved Have You Ever Used the Path Blur Effect in Your Photos? This Article Will Address How to Use Path Blur in Photoshop to Generate Appealing Results Accurately
- Explore the Advanced Tools to Help You Reshape the Art of Sky Replacement in Digital Imagery. Discover Methods to Enhance Your Visual Narratives Through AI
- New In 2024, The Ultimate Wedding Videography Checklist
- Do You Know that You Can Apply Different LUTs and Create Your Own? There Are Many LUT Online and Offline Generators that You Can Use to Create Your LUT
- Updated Do You Want to Print Designs Onto Your Garments or Other Fashion Accessories? Find Out How to Create a Screen Print Effect in Photoshop to Give Your Text or Graphics a Vintage or Retro Look for 2024
- The Ultimate Guide How to Bypass Swipe Screen to Unlock on Motorola Moto G24 Device
- CatchEmAll Celebrate National Pokémon Day with Virtual Location On Nokia C12 Pro | Dr.fone
- In 2024, A Complete Guide To OEM Unlocking on Oppo Find X7
- How Do You Remove Restricted Mode on iPhone SE
- How does the stardust trade cost In pokemon go On Xiaomi Redmi A2? | Dr.fone
- How to Track Vivo X Flip Location without Installing Software? | Dr.fone
- How to Track Nokia G310 by Phone Number | Dr.fone
- In 2024, Hassle-Free Ways to Remove FRP Lock from Infinix Zero 30 5G Phones with/without a PC
- How to Hard Reset Xiaomi 13 Ultra Without Password | Dr.fone
- In 2024, How to Change Google Play Location On Samsung Galaxy A05 | Dr.fone
- In 2024, 3 Ways for Android Pokemon Go Spoofing On Motorola Edge+ (2023) | Dr.fone
- Full Guide to Fix iToolab AnyGO Not Working On Oppo A38 | Dr.fone
- 5 Hassle-Free Solutions to Fake Location on Find My Friends Of Poco X6 | Dr.fone
- Top 10 Fixes for Phone Keep Disconnecting from Wi-Fi On Asus ROG Phone 8 | Dr.fone
- How to Stop Life360 from Tracking You On ZTE Axon 40 Lite? | Dr.fone
- In 2024, Top 12 Prominent Oppo A38 Fingerprint Not Working Solutions
- In 2024, The 6 Best SIM Unlock Services That Actually Work On Your Motorola Edge 40 Pro Device
- Title: MAGIX Vegas Pro Review A Professional Video Editing Software
- Author: Morgan
- Created at : 2024-06-15 18:56:22
- Updated at : 2024-06-16 18:56:22
- Link: https://ai-video-editing.techidaily.com/magix-vegas-pro-review-a-professional-video-editing-software/
- License: This work is licensed under CC BY-NC-SA 4.0.


