:max_bytes(150000):strip_icc():format(webp)/GettyImages-1135364530-dec5678c0c2c427ba18ae21452ff6326.jpg)
Multi Object Tracking The Ultimate Guide for 2024

Multi Object Tracking: The Ultimate Guide
Multi Object Tracking (MOT) in a video is a challenging process with many applications in both the public and private sectors. Surveillance cameras in public places can track potential criminals, while retail stores can use object tracking to monitor customer behavior.
Developed in 1988 by Zenon Pylyshyn, MOT is a technique first designed to study the human visual system’s ability to track multiple moving objects. However, since then, various methods have been introduced for Object Tracking through computer vision.
In this article, we will explore Multi Object Tracking and provide a detailed guide on object tracking and the requirement to track multiple objects.
Part 1. What Is Object Tracking
Object Tracking is an application of computer vision that involves tracking the movement of objects in real-time. It is a useful tool for many different purposes, such as video surveillance, human-computer interaction, and automotive safety.
The Object Tracking algorithm is a deep-learning-based program that works by developing a model for each individual object and creating a set of trajectories to represent their movement. This is done through an indication, such as a square that follows the object and tells the users about its location on the screen in real-time.
Its algorithms are designed to work with various types of inputs, including everything from images and videos to real-time footage. The input you expect to use will impact the category, use cases, and object tracking applications.
![]()
Part 2. Types Of Object Tracking
There are two main types or levels of Object Tracking: SOT and MOT
SOT
Single Object Tracking or Visual Object Tracking is a process in which the bounding box of the target object is assigned to the tracker in the first frame. The tracker then detects the same object in all the other frames.
SOT only detects and tracks a single object and comes under the category of detection-free tracking, which implies that it is manually initialized with a fixed number of objects, even though other objects are present in the frames.
Let’s understand it with an example: A police department is resolving a murder case that involves a car on the highway. They received surveillance camera footage and wanted to track the vehicle to resolve the mystery. However, it might take time to do it manually. Therefore, they will use the Single Object Tracking process and will assign the tracker a bounding box for the target car to check what happens to it.
![]()
MOT
Multiple Object Tracking involves tracking multiple objects in a frame. Since its development in 1988 by Zenon Pylyshyn, several experiments have been conducted to see how human and computer vision systems can detect and track multiple objects in a frame.
As an output, multiple tracking creates several bounding boxes and are identified using certain parameters such as coordinates, width, height, etc. MOT program is not pre-trained regarding the appearance or amount of objects to be tracked.
Moreover, the algorithm assigns a detection ID to each box which helps the model in identifying the objects within a class. For instance, if multiple cars are in a frame, the MOT algorithm will identify each car as a separate object and assign them a unique ID.
![]()
Part 3. What Multi Object Tracking Needs?
Above is the explaination of MOT. In this part, we will focus on its mechanism. Following are some of the most important requirements of Multi Object Tracking:
1. Detection
The best approach to detect objects of your interest depends on what you’re trying to track and if the camera is stationary or moving.
MOT Using Stationary Camera
The vision.ForegroundDetector System object can be used to detect objects in motion against a stationary background by performing background subtraction. This approach is efficient but requires that the camera be stationary.
MOT Using Moving Camera
A sliding-window detection approach is often used with a moving camera to detect objects in motion. However, this approach is slower than the background subtraction method.
Use the following approaches for tracing the given categories of objects.
| Type of the Tracking Object | Camera Position | Approach |
|---|---|---|
| Custom object category | Stationary/Moving | custom sliding window detector using selectStrongestBbox and extractHOGFeatures or trainCascadeObjectDetector function |
| Pedestrians | Stationary/Moving | vision.PeopleDetector System object |
| Moving object | Stationary | vision.ForegroundDetector System object™ |
| Faces, upper body, mouth, nose, eyes, etc. | Stationary/Moving | vision.CascadeObjectDetector System object |
2. Prediction
The second requirement for Multi Object Tracking is “Prediction.” In this, you have to predict the position of the tracking object in the next frame. To do this, you can design the model to use the Kalman filter (vision.KalmanFilter ).
This will help predict the next location of the object in the frames. For this, it will take into account the object’s constant velocity, constant acceleration measurement noise, and process noise. Measurement noise is the detection of an error, while process noise is the variation in the object’s actual motion from that of the motion model.
3. Data Association
Data association is a critical step in Multiple Object Tracking and involves linking the data points together that represent the same thing across different frames.
A “track” is the temporal history of an object consisting of multiple detections and can include the entire history of past locations of the object or simply the object’s last known location and current velocity.
Part 4. Approaches Of Object Tracking
After understanding what MOT needs, let’s learn about the theory of how Object Tracking works.
The following are the most popular approaches for Object Tracking:
1. OpenCV-Based Object Tracking
There are many ways to approach object tracking, but one of the most popular is through the use of built-in algorithms in the OpenCV library.
The library has a tracking API containing Object Tracking algorithms and eight trackers: BOOSTING, MEDIANFLOW, MIL, KCF, CSRT, TLD, GOTURN, and MOSSE. Each tracker has its own advantages and disadvantages and has different goals. For instance, the MOSSE tracker is best for the fastest object tracking.
To have a deeper review of OpenCV Object Tracking and what is OpenCV, please read our article about: OpenCV Tracking: A complete Guide in 2022. (同期交付,可以插这个文章主题的内链)
2. MDNet
MDNet is a breakthrough in the field of tracking because it is the first network to use classification-based models instead of the more traditional approach. This makes MDNet much faster and more accurate than other tracking methods.
Inspired by the R-CNN object detection network, the MDNet algorithm can detect objects in real-time more efficiently and with high speed, making it a state-of-the-art visual tracker.
![]()
3. DeepSort
DeepSort is the most popular Object Tracking algorithm choice. The integration of appearance information or deep appearance distance metrics vastly improves DeepSORT performance.
The addition of the “Deep Appearance” distance metric enables DeepSort to avoid identifying switches by 45% and handle complex scenarios. On the MOT17 dataset, DeepSORT has received 77.2 IDF1 and 75.4 MOTA with 239 ID switches but a lower FPS of 13.
4. ROLO
ROLO - a combination of YOLO and LSTM is a Spatio-temporal convolutional neural network that uses the YOLO module and LTSM network for collecting visual features, location inference priors, and locating the target object’s trajectory.
The LSTM network uses an input feature vector of length 4096 for each frame to predict the target object’s location. This vector is obtained by combining the high-level visual features with the YOLO detection. By working together, the LSTM and YOLO can predict the target object’s location more accurately.
ALT TEXT: rolo for object tracking
![]()
Conclusion
In this ultimate guide, we’ve discussed Multi Object Tracking and its requirements. We also explored different approaches for object tracking to help you determine which one is best for your needs.
Hopefully, you found this guide helpful, and your queries related to Object Tracking and its types have been resolved.
Free Download For Win 7 or later(64-bit)
Free Download For macOS 10.14 or later
How to Add VHS Effects to Videos for Free 2024
2023 has ushered in a wave of nostalgia, sweeping across various domains, from fashion to technology. Amidst this, videos have become a powerful medium to relive the past. If you’re aiming to infuse your videos with a touch of the ‘90s, look no further than the VHS effect.
For those who need a quick trip down memory lane, VHS tapes were once the cornerstone of home entertainment. These clunky plastic cassettes captured countless memories, from family gatherings to favorite films and TV shows. While they might be alien to newer generations, they hold a special place in the chronicles of video evolution.
The VHS effect isn’t just about mimicking the look of these tapes. It’s about encapsulating their essence—grainy visuals, occasional jitters, and that characteristic static. Incorporating these imperfections into today’s high-definition videos imparts a distinctive vintage flair. It’s akin to applying an Instagram filter to a photo, where a simple touch can transport a viewer back in time. Dive in as we guide you on adding this retro charm to your free videos.
Part 1: Free VHS overlay video resource download website
In today’s digital age, with so many resources out there, finding the right ones for our specific needs can be quite challenging, like searching for a needle in a haystack.
To achieve that authentic VHS look for your videos, starting with the right VHS overlays is crucial. Here are some websites that offer free VHS overlay video resources:
01Freepik
Renowned for its seemingly endless library of graphic resources, Freepik is not just about captivating images and vectors. Dive deeper into their platform and uncover a treasure trove of VHS video overlays. For those unfamiliar with the platform, the search functionality is intuitive.
Enter “VHS overlay video,” and you’re instantly presented with nostalgic results, each ready to seamlessly integrate into your project. Freepik’s resources are often high-quality, ensuring that your video doesn’t just look retro but feels authentic.
02Color grading central
Primarily catered to the more seasoned video editors, Color Grading Central is not your average overlay repository.
It’s an immersive platform that delves deep into the art of video editing. Beyond their remarkable VHS overlays, which promise a genuine vintage touch, the website is a haven for tips and tutorials on color grading.
This is your go-to platform for those keen on mastering the art of video editing while achieving the VHS look. The overlays here, particularly the VHS ones, have been meticulously crafted, ensuring every pixel exudes the 90s charm.
03Vecteezy
If you’ve spent some time in the video editing, you’ve likely stumbled upon or actively sought out Vecteezy. Lauded as a video editor’s dream, Vecteezy doesn’t disappoint regarding VHS effects.
Their vast collection ensures that you’re not limited to one generic VHS look but have the luxury to pick and choose, ensuring your video remains unique. Input “VHS filter video” in their search bar, and you’re met with a smorgasbord of overlays, each bringing its flavor of the past. From subtle grains to pronounced static lines, the choice is all yours.
04Brusheezy
A designer’s paradise for its exquisite collection of Photoshop brushes, Brusheezy has recently expanded its offerings. Recognizing the growing trend of video content, they’ve ventured into video overlays, and it’s no surprise they’ve added VHS effects to their roster.
Their overlays capture the essence of VHS, ensuring videos are tinged with a touch of the past. For those who trust Brusheezy for design resources, this is a familiar and reliable platform to source your VHS video overlays.
Part 2: Use Filmora’s built-in VHS effects presets
For those unfamiliar, Filmora is more than just another video editing tool. It’s a platform that has been applauded by beginners and professionals alike for its intuitive interface and powerful editing capabilities.
Among its vast array of features is a collection of built-in VHS effects presets, ensuring that users can achieve that much-coveted retro look without relying on external resources.
Here’s a comprehensive guide:
VHS Effects Editor
VHS Effects Editor For Win 7 or later(64-bit)
VHS Effects Editor For macOS 10.14 or later
Step 1: Navigate to the Filters Feature
Kickstart your editing journey by launching your desired project within Filmora. As you familiarize yourself with the interface, direct your attention to the left sidebar. You’ll spot the ‘Filters’ option among the various icons, symbolized by an artistic palette. This section houses a myriad of filters ready to elevate your video content. Give it a click to delve deeper into the world of Filmora filters.
Step 2: Dive into the Retro Realm with VHS and Glitch Effects
Now that you’re in the Filters section, the search bar at the top beckons. This feature ensures you can quickly access desired effects without sifting through the extensive collection. Begin by typing “VHS” or “Glitch.”
As you type, the list below starts to populate with related effects. These aren’t just your run-of-the-mill effects. Each has been crafted to bring a distinct vintage vibe, ensuring that every video has its unique touch of the past.
Step 3: Instantly Apply the Chosen Effect with a Double Click
With the list of VHS effects now at your disposal, take a moment to preview each one by hovering over them. Found one that captures the essence of your vision?
It’s time to apply the magic. Simply double-click on your chosen effect. Like that, your video segment, currently active on the timeline, gets transported back in time, imbued with all the charm of the VHS era.
For those who wish to refine the effect further, Filmora offers adjustment tools, allowing you to tweak the intensity, hue, and other parameters of the filter, ensuring your video looks just the way you envisioned.
Part 3: Summary
Giving your videos a vintage VHS look has never been easier. With the availability of free resources online and built-in presets in editing software like Filmora, you’re only a few clicks away from transporting your audience back to the 90s.
Whether for aesthetic or nostalgic reasons, the VHS effect is a fun way to spice up your videos. So, grab your camcorder (or smartphone) and start filming!
A Complete Guide to Use Distortion Effect in Premiere Pro
Create High-Quality Video - Wondershare Filmora
An easy and powerful YouTube video editor
Numerous video and audio effects to choose from
Detailed tutorials are provided by the official channel
Premiere Pro is one of the most popular timeline-based video editing software, with over 9 million users. It’s the successor to Adobe Premiere, and it comes with cool distortion effects. We’ll look at Premiere Pro distortion effects and how to use them.
In this article
01 How to Use Distortion Effect in Premiere Pro?
02 Bonus! Free Distortion Effects for Premiere Pro
Adobe Premiere Pro offers a wide variety of beneficial editing tools and effects. Below are some of the impressive distortion effects you’ll find in Premiere Pro and how to use them in your project.
1. Corner Pin Effect
This effect distorts your image by simply changing the position of its corners. You can use the Corner pin effect to twist, skew, shrink, or stretch an image. Additionally, you can use it to simulate movement or perspective pivoting from the edge of your clip like a door opening.
You can directly manipulate the properties of the Corner Pin effect in the Program monitor by clicking the Transform right next to Corner Pin. To adjust the properties, drag one of the corner handles.
- To use this effect, open Premiere Pro and click File. Choose Import from the drop-down menu. The File Explorer window will open and allow you to find your footage. Select the video file you want to import, then click Open.
- Go to Effects Control and click Distortion. Choose Corner Pin Effect from the drop-down menu.

- You can now pin each corner from its original point to another specific point by adjusting the slider on the Upper Left, Upper Right, Lower Left, and Lower Right. You can also highlight your selection tool when working with the Corner Pin effect.

2. Lens Distortion Effect
This distortion effect Premiere Pro simulates the distorted lens through which people view the clip.
1. Go to Effects Control>Distortion>Lens Distortion Effect.
2. Choose the settings you want to use from the available options and adjust the slider.
- The Vertical and Horizontal Decentering control displaces the lens’ focal and makes the image bend and smear. The image will wrap in on itself at extreme settings.
- The Curvature setting alters the curvature of the lens. You can specify a positive value to make the image convex, while the negative value makes the image concave.
- The Vertical and Horizontal Prism FX setting created results similar to horizontal decentering and vertical, but the image does not wrap in on itself at extreme values.
- Use the Fill Color option to specify the background color, and Fill Alpha to make your background transparent.

3. Magnify Effect
This effect allows you to enlarge a selected area of your clip. The Magnify effect acts as a magnifying glass set over an area of an image. You can also use this effect to scale the whole image far beyond 100 percent and still maintain resolution.
1. To use this effect, go to Effect Control>Distortion>Magnify.
2. Next, go to the left side of the Effects Control panel and make the necessary adjustments to suit your preferences.
- Shape: This control specifies the magnified area shape.
- Center: The Center control allows you to specify the center of the magnified section.
- Magnification: This setting lets users specify the percentage of the magnification of the area they have selected, while the values represent the scale percentage.
- Link: The Link control allows you to specify how the effect will link the Size, Feather, and Magnification amount, to enable them to decrease or increase proportionally. You will disable the Resize Layer option if you set the Link control to any of the available settings except None. Setting the Link control to any setting except None disables Resize Layer. Size & Feather To Magnification allows you to specify that the edge feather and size of the magnified section decrease or increase proportionally regarding the magnification adjustment.
- Size: This control allows you to specify the magnified area size in pixels.
- Feather: With the Feather option, you can specify the amount of feather the effect applies to the magnified area edge. Lower values will sharpen the edge. Higher values will soften the edge while blending the edge with the layer that’s behind it.
- Opacity: This control allows you to specify the transparency of the magnified region.
- Scaling: Use this option to specify the kind of scaling the effect is using to magnify an image.
- Blending Mode: Use this control to specify the blend mode the effect will use to combine the original clip with the magnified area. The None option shows transparent pixels around the magnified section.
- Resize Layer: Selecting this option means the effect will only use the boundaries as the clip’s edge when the magnified region extends beyond the original boundaries of the clip. Deselecting the Resize Layer means that the boundaries of the clip will crop any area of your image outside the bounding box of the original clip.

4. Mirror Effect
This distortion Premiere Pro effect splits an image along a line while reflecting one side onto the other. Where the reflection appears and which side will be reflected is determined by the reflection angles.
1. Head over to Effect Control>Distortion>Mirror to use this effect.
2. Adjust the controls until you get the results you desire.
- Reflection Angle: With the Reflection Angle control, you can specify the angle of reflection and where it appears on the clip. A zero-degree angle reflects the left-hand side on the right.
- Reflection Center: This control allows you to specify the position of the line. You need to click the box, then drag the resulting crosshair up to the area in the image where you would like to place the line.

5. Offset Effect
This effect pans your image within a clip, and visual details pushed off one side of this image will appear on the opposite side. You have to perform the offset with subpixel precision at the best quality.
Also, you can use Offset with a combination of other effects. Head over to Effect Control>Distortion>Offset to use this effect.

6. Spherize Effect
The Spherize effect allows users to wrap a video clip around a spherical shape. You can use it to give texts and objects a three-dimensional effect. Go to Effect Control>Distortion>Spherize and adjust the radius and center of the sphere.

7. Transform Effect
This effect applies 2-dimensional geometric transformations to your clip. You can use this effect to skew clips along any axis.
1. Go to Effect Control>Distortion>Transform to apply this effect to your clip.
2. Use Transform settings to adjust Opacity, Skew, Rotation, Scale, Anchor Point, and more.

8. Turbulent Displace Effect
This fun effect utilizes fractal noise to create turbulent Premiere Pro distortion effects in your image. You can use the Turbulent Displace effect to add movement to your clip.
1. Head to Effect Control>Distortion>Turbulent Displace.
2. Adjust the following controls:
- Displacement
- Amount
- Size
- Offset (Turbulence)
- Complexity
- Evolution
- Pinning
- Resize Layer
- Antialiasing For Best Quality

9. Twirl Effect
The Twirl effect allows you to rotate your clip around its center. It rotates the image more sharply in the middle than at the edge. You can use it on faces to make a funny clip. Navigate to Effect Control>Distortion>Twirl to start using this effect. Next, use the settings to adjust how much angle it twirls and the radius.

10. Wave Warp Effect
This effect is one of the most popular Premiere Pro distortion effects. It generates the appearance of a wave as it’s traveling across an image. The Wave Warp effect allows you to produce various wave shapes, including sine, circular, and square waves.
It’s automatically animated at a steady speed across the time range, and that’s without frames. You need to set keyframes to vary speeds.
1. Head to Effect Control>Distortion>Wave Warp to apply this effect in your video clip.
2. Now, change the wave speed, direction, height, width, and type to suit your preference.

Bonus! Free Distortion Effects for Premiere Pro
1. Liquid Distortion Effect
This effect can distort the content in a clip and can be used to shift into the next clip. It could be utilized in editing or used as a transition.

2. Earthquake Effect
This effect adds a shaking motion to the video clip you add it to; it works as a transition but could also be a useful editing tool.

3. Glass Effect
This effect can add various blurs to the video clip and be used to transition from one clip to the next.

4. TV Effect
This effect imitates the view of a television being turned on or off. You can use it to introduce a new video clip. It would also be a great start or end to the entire video.

5. Glitch Effect
This effect adds a glitch to the video clip. You can use it in editing or as a transition from one clip to the next.

Conclusion
● You can add any of these Premiere Pro distortion effects to make your videos more catchy. In turn, they will get more attention and views. Premiere Pro comes with tons of distortion effects and a responsive interface.
Premiere Pro is one of the most popular timeline-based video editing software, with over 9 million users. It’s the successor to Adobe Premiere, and it comes with cool distortion effects. We’ll look at Premiere Pro distortion effects and how to use them.
In this article
01 How to Use Distortion Effect in Premiere Pro?
02 Bonus! Free Distortion Effects for Premiere Pro
Adobe Premiere Pro offers a wide variety of beneficial editing tools and effects. Below are some of the impressive distortion effects you’ll find in Premiere Pro and how to use them in your project.
1. Corner Pin Effect
This effect distorts your image by simply changing the position of its corners. You can use the Corner pin effect to twist, skew, shrink, or stretch an image. Additionally, you can use it to simulate movement or perspective pivoting from the edge of your clip like a door opening.
You can directly manipulate the properties of the Corner Pin effect in the Program monitor by clicking the Transform right next to Corner Pin. To adjust the properties, drag one of the corner handles.
- To use this effect, open Premiere Pro and click File. Choose Import from the drop-down menu. The File Explorer window will open and allow you to find your footage. Select the video file you want to import, then click Open.
- Go to Effects Control and click Distortion. Choose Corner Pin Effect from the drop-down menu.

- You can now pin each corner from its original point to another specific point by adjusting the slider on the Upper Left, Upper Right, Lower Left, and Lower Right. You can also highlight your selection tool when working with the Corner Pin effect.

2. Lens Distortion Effect
This distortion effect Premiere Pro simulates the distorted lens through which people view the clip.
1. Go to Effects Control>Distortion>Lens Distortion Effect.
2. Choose the settings you want to use from the available options and adjust the slider.
- The Vertical and Horizontal Decentering control displaces the lens’ focal and makes the image bend and smear. The image will wrap in on itself at extreme settings.
- The Curvature setting alters the curvature of the lens. You can specify a positive value to make the image convex, while the negative value makes the image concave.
- The Vertical and Horizontal Prism FX setting created results similar to horizontal decentering and vertical, but the image does not wrap in on itself at extreme values.
- Use the Fill Color option to specify the background color, and Fill Alpha to make your background transparent.

3. Magnify Effect
This effect allows you to enlarge a selected area of your clip. The Magnify effect acts as a magnifying glass set over an area of an image. You can also use this effect to scale the whole image far beyond 100 percent and still maintain resolution.
1. To use this effect, go to Effect Control>Distortion>Magnify.
2. Next, go to the left side of the Effects Control panel and make the necessary adjustments to suit your preferences.
- Shape: This control specifies the magnified area shape.
- Center: The Center control allows you to specify the center of the magnified section.
- Magnification: This setting lets users specify the percentage of the magnification of the area they have selected, while the values represent the scale percentage.
- Link: The Link control allows you to specify how the effect will link the Size, Feather, and Magnification amount, to enable them to decrease or increase proportionally. You will disable the Resize Layer option if you set the Link control to any of the available settings except None. Setting the Link control to any setting except None disables Resize Layer. Size & Feather To Magnification allows you to specify that the edge feather and size of the magnified section decrease or increase proportionally regarding the magnification adjustment.
- Size: This control allows you to specify the magnified area size in pixels.
- Feather: With the Feather option, you can specify the amount of feather the effect applies to the magnified area edge. Lower values will sharpen the edge. Higher values will soften the edge while blending the edge with the layer that’s behind it.
- Opacity: This control allows you to specify the transparency of the magnified region.
- Scaling: Use this option to specify the kind of scaling the effect is using to magnify an image.
- Blending Mode: Use this control to specify the blend mode the effect will use to combine the original clip with the magnified area. The None option shows transparent pixels around the magnified section.
- Resize Layer: Selecting this option means the effect will only use the boundaries as the clip’s edge when the magnified region extends beyond the original boundaries of the clip. Deselecting the Resize Layer means that the boundaries of the clip will crop any area of your image outside the bounding box of the original clip.

4. Mirror Effect
This distortion Premiere Pro effect splits an image along a line while reflecting one side onto the other. Where the reflection appears and which side will be reflected is determined by the reflection angles.
1. Head over to Effect Control>Distortion>Mirror to use this effect.
2. Adjust the controls until you get the results you desire.
- Reflection Angle: With the Reflection Angle control, you can specify the angle of reflection and where it appears on the clip. A zero-degree angle reflects the left-hand side on the right.
- Reflection Center: This control allows you to specify the position of the line. You need to click the box, then drag the resulting crosshair up to the area in the image where you would like to place the line.

5. Offset Effect
This effect pans your image within a clip, and visual details pushed off one side of this image will appear on the opposite side. You have to perform the offset with subpixel precision at the best quality.
Also, you can use Offset with a combination of other effects. Head over to Effect Control>Distortion>Offset to use this effect.

6. Spherize Effect
The Spherize effect allows users to wrap a video clip around a spherical shape. You can use it to give texts and objects a three-dimensional effect. Go to Effect Control>Distortion>Spherize and adjust the radius and center of the sphere.

7. Transform Effect
This effect applies 2-dimensional geometric transformations to your clip. You can use this effect to skew clips along any axis.
1. Go to Effect Control>Distortion>Transform to apply this effect to your clip.
2. Use Transform settings to adjust Opacity, Skew, Rotation, Scale, Anchor Point, and more.

8. Turbulent Displace Effect
This fun effect utilizes fractal noise to create turbulent Premiere Pro distortion effects in your image. You can use the Turbulent Displace effect to add movement to your clip.
1. Head to Effect Control>Distortion>Turbulent Displace.
2. Adjust the following controls:
- Displacement
- Amount
- Size
- Offset (Turbulence)
- Complexity
- Evolution
- Pinning
- Resize Layer
- Antialiasing For Best Quality

9. Twirl Effect
The Twirl effect allows you to rotate your clip around its center. It rotates the image more sharply in the middle than at the edge. You can use it on faces to make a funny clip. Navigate to Effect Control>Distortion>Twirl to start using this effect. Next, use the settings to adjust how much angle it twirls and the radius.

10. Wave Warp Effect
This effect is one of the most popular Premiere Pro distortion effects. It generates the appearance of a wave as it’s traveling across an image. The Wave Warp effect allows you to produce various wave shapes, including sine, circular, and square waves.
It’s automatically animated at a steady speed across the time range, and that’s without frames. You need to set keyframes to vary speeds.
1. Head to Effect Control>Distortion>Wave Warp to apply this effect in your video clip.
2. Now, change the wave speed, direction, height, width, and type to suit your preference.

Bonus! Free Distortion Effects for Premiere Pro
1. Liquid Distortion Effect
This effect can distort the content in a clip and can be used to shift into the next clip. It could be utilized in editing or used as a transition.

2. Earthquake Effect
This effect adds a shaking motion to the video clip you add it to; it works as a transition but could also be a useful editing tool.

3. Glass Effect
This effect can add various blurs to the video clip and be used to transition from one clip to the next.

4. TV Effect
This effect imitates the view of a television being turned on or off. You can use it to introduce a new video clip. It would also be a great start or end to the entire video.

5. Glitch Effect
This effect adds a glitch to the video clip. You can use it in editing or as a transition from one clip to the next.

Conclusion
● You can add any of these Premiere Pro distortion effects to make your videos more catchy. In turn, they will get more attention and views. Premiere Pro comes with tons of distortion effects and a responsive interface.
Premiere Pro is one of the most popular timeline-based video editing software, with over 9 million users. It’s the successor to Adobe Premiere, and it comes with cool distortion effects. We’ll look at Premiere Pro distortion effects and how to use them.
In this article
01 How to Use Distortion Effect in Premiere Pro?
02 Bonus! Free Distortion Effects for Premiere Pro
Adobe Premiere Pro offers a wide variety of beneficial editing tools and effects. Below are some of the impressive distortion effects you’ll find in Premiere Pro and how to use them in your project.
1. Corner Pin Effect
This effect distorts your image by simply changing the position of its corners. You can use the Corner pin effect to twist, skew, shrink, or stretch an image. Additionally, you can use it to simulate movement or perspective pivoting from the edge of your clip like a door opening.
You can directly manipulate the properties of the Corner Pin effect in the Program monitor by clicking the Transform right next to Corner Pin. To adjust the properties, drag one of the corner handles.
- To use this effect, open Premiere Pro and click File. Choose Import from the drop-down menu. The File Explorer window will open and allow you to find your footage. Select the video file you want to import, then click Open.
- Go to Effects Control and click Distortion. Choose Corner Pin Effect from the drop-down menu.

- You can now pin each corner from its original point to another specific point by adjusting the slider on the Upper Left, Upper Right, Lower Left, and Lower Right. You can also highlight your selection tool when working with the Corner Pin effect.

2. Lens Distortion Effect
This distortion effect Premiere Pro simulates the distorted lens through which people view the clip.
1. Go to Effects Control>Distortion>Lens Distortion Effect.
2. Choose the settings you want to use from the available options and adjust the slider.
- The Vertical and Horizontal Decentering control displaces the lens’ focal and makes the image bend and smear. The image will wrap in on itself at extreme settings.
- The Curvature setting alters the curvature of the lens. You can specify a positive value to make the image convex, while the negative value makes the image concave.
- The Vertical and Horizontal Prism FX setting created results similar to horizontal decentering and vertical, but the image does not wrap in on itself at extreme values.
- Use the Fill Color option to specify the background color, and Fill Alpha to make your background transparent.

3. Magnify Effect
This effect allows you to enlarge a selected area of your clip. The Magnify effect acts as a magnifying glass set over an area of an image. You can also use this effect to scale the whole image far beyond 100 percent and still maintain resolution.
1. To use this effect, go to Effect Control>Distortion>Magnify.
2. Next, go to the left side of the Effects Control panel and make the necessary adjustments to suit your preferences.
- Shape: This control specifies the magnified area shape.
- Center: The Center control allows you to specify the center of the magnified section.
- Magnification: This setting lets users specify the percentage of the magnification of the area they have selected, while the values represent the scale percentage.
- Link: The Link control allows you to specify how the effect will link the Size, Feather, and Magnification amount, to enable them to decrease or increase proportionally. You will disable the Resize Layer option if you set the Link control to any of the available settings except None. Setting the Link control to any setting except None disables Resize Layer. Size & Feather To Magnification allows you to specify that the edge feather and size of the magnified section decrease or increase proportionally regarding the magnification adjustment.
- Size: This control allows you to specify the magnified area size in pixels.
- Feather: With the Feather option, you can specify the amount of feather the effect applies to the magnified area edge. Lower values will sharpen the edge. Higher values will soften the edge while blending the edge with the layer that’s behind it.
- Opacity: This control allows you to specify the transparency of the magnified region.
- Scaling: Use this option to specify the kind of scaling the effect is using to magnify an image.
- Blending Mode: Use this control to specify the blend mode the effect will use to combine the original clip with the magnified area. The None option shows transparent pixels around the magnified section.
- Resize Layer: Selecting this option means the effect will only use the boundaries as the clip’s edge when the magnified region extends beyond the original boundaries of the clip. Deselecting the Resize Layer means that the boundaries of the clip will crop any area of your image outside the bounding box of the original clip.

4. Mirror Effect
This distortion Premiere Pro effect splits an image along a line while reflecting one side onto the other. Where the reflection appears and which side will be reflected is determined by the reflection angles.
1. Head over to Effect Control>Distortion>Mirror to use this effect.
2. Adjust the controls until you get the results you desire.
- Reflection Angle: With the Reflection Angle control, you can specify the angle of reflection and where it appears on the clip. A zero-degree angle reflects the left-hand side on the right.
- Reflection Center: This control allows you to specify the position of the line. You need to click the box, then drag the resulting crosshair up to the area in the image where you would like to place the line.

5. Offset Effect
This effect pans your image within a clip, and visual details pushed off one side of this image will appear on the opposite side. You have to perform the offset with subpixel precision at the best quality.
Also, you can use Offset with a combination of other effects. Head over to Effect Control>Distortion>Offset to use this effect.

6. Spherize Effect
The Spherize effect allows users to wrap a video clip around a spherical shape. You can use it to give texts and objects a three-dimensional effect. Go to Effect Control>Distortion>Spherize and adjust the radius and center of the sphere.

7. Transform Effect
This effect applies 2-dimensional geometric transformations to your clip. You can use this effect to skew clips along any axis.
1. Go to Effect Control>Distortion>Transform to apply this effect to your clip.
2. Use Transform settings to adjust Opacity, Skew, Rotation, Scale, Anchor Point, and more.

8. Turbulent Displace Effect
This fun effect utilizes fractal noise to create turbulent Premiere Pro distortion effects in your image. You can use the Turbulent Displace effect to add movement to your clip.
1. Head to Effect Control>Distortion>Turbulent Displace.
2. Adjust the following controls:
- Displacement
- Amount
- Size
- Offset (Turbulence)
- Complexity
- Evolution
- Pinning
- Resize Layer
- Antialiasing For Best Quality

9. Twirl Effect
The Twirl effect allows you to rotate your clip around its center. It rotates the image more sharply in the middle than at the edge. You can use it on faces to make a funny clip. Navigate to Effect Control>Distortion>Twirl to start using this effect. Next, use the settings to adjust how much angle it twirls and the radius.

10. Wave Warp Effect
This effect is one of the most popular Premiere Pro distortion effects. It generates the appearance of a wave as it’s traveling across an image. The Wave Warp effect allows you to produce various wave shapes, including sine, circular, and square waves.
It’s automatically animated at a steady speed across the time range, and that’s without frames. You need to set keyframes to vary speeds.
1. Head to Effect Control>Distortion>Wave Warp to apply this effect in your video clip.
2. Now, change the wave speed, direction, height, width, and type to suit your preference.

Bonus! Free Distortion Effects for Premiere Pro
1. Liquid Distortion Effect
This effect can distort the content in a clip and can be used to shift into the next clip. It could be utilized in editing or used as a transition.

2. Earthquake Effect
This effect adds a shaking motion to the video clip you add it to; it works as a transition but could also be a useful editing tool.

3. Glass Effect
This effect can add various blurs to the video clip and be used to transition from one clip to the next.

4. TV Effect
This effect imitates the view of a television being turned on or off. You can use it to introduce a new video clip. It would also be a great start or end to the entire video.

5. Glitch Effect
This effect adds a glitch to the video clip. You can use it in editing or as a transition from one clip to the next.

Conclusion
● You can add any of these Premiere Pro distortion effects to make your videos more catchy. In turn, they will get more attention and views. Premiere Pro comes with tons of distortion effects and a responsive interface.
Premiere Pro is one of the most popular timeline-based video editing software, with over 9 million users. It’s the successor to Adobe Premiere, and it comes with cool distortion effects. We’ll look at Premiere Pro distortion effects and how to use them.
In this article
01 How to Use Distortion Effect in Premiere Pro?
02 Bonus! Free Distortion Effects for Premiere Pro
Adobe Premiere Pro offers a wide variety of beneficial editing tools and effects. Below are some of the impressive distortion effects you’ll find in Premiere Pro and how to use them in your project.
1. Corner Pin Effect
This effect distorts your image by simply changing the position of its corners. You can use the Corner pin effect to twist, skew, shrink, or stretch an image. Additionally, you can use it to simulate movement or perspective pivoting from the edge of your clip like a door opening.
You can directly manipulate the properties of the Corner Pin effect in the Program monitor by clicking the Transform right next to Corner Pin. To adjust the properties, drag one of the corner handles.
- To use this effect, open Premiere Pro and click File. Choose Import from the drop-down menu. The File Explorer window will open and allow you to find your footage. Select the video file you want to import, then click Open.
- Go to Effects Control and click Distortion. Choose Corner Pin Effect from the drop-down menu.

- You can now pin each corner from its original point to another specific point by adjusting the slider on the Upper Left, Upper Right, Lower Left, and Lower Right. You can also highlight your selection tool when working with the Corner Pin effect.

2. Lens Distortion Effect
This distortion effect Premiere Pro simulates the distorted lens through which people view the clip.
1. Go to Effects Control>Distortion>Lens Distortion Effect.
2. Choose the settings you want to use from the available options and adjust the slider.
- The Vertical and Horizontal Decentering control displaces the lens’ focal and makes the image bend and smear. The image will wrap in on itself at extreme settings.
- The Curvature setting alters the curvature of the lens. You can specify a positive value to make the image convex, while the negative value makes the image concave.
- The Vertical and Horizontal Prism FX setting created results similar to horizontal decentering and vertical, but the image does not wrap in on itself at extreme values.
- Use the Fill Color option to specify the background color, and Fill Alpha to make your background transparent.

3. Magnify Effect
This effect allows you to enlarge a selected area of your clip. The Magnify effect acts as a magnifying glass set over an area of an image. You can also use this effect to scale the whole image far beyond 100 percent and still maintain resolution.
1. To use this effect, go to Effect Control>Distortion>Magnify.
2. Next, go to the left side of the Effects Control panel and make the necessary adjustments to suit your preferences.
- Shape: This control specifies the magnified area shape.
- Center: The Center control allows you to specify the center of the magnified section.
- Magnification: This setting lets users specify the percentage of the magnification of the area they have selected, while the values represent the scale percentage.
- Link: The Link control allows you to specify how the effect will link the Size, Feather, and Magnification amount, to enable them to decrease or increase proportionally. You will disable the Resize Layer option if you set the Link control to any of the available settings except None. Setting the Link control to any setting except None disables Resize Layer. Size & Feather To Magnification allows you to specify that the edge feather and size of the magnified section decrease or increase proportionally regarding the magnification adjustment.
- Size: This control allows you to specify the magnified area size in pixels.
- Feather: With the Feather option, you can specify the amount of feather the effect applies to the magnified area edge. Lower values will sharpen the edge. Higher values will soften the edge while blending the edge with the layer that’s behind it.
- Opacity: This control allows you to specify the transparency of the magnified region.
- Scaling: Use this option to specify the kind of scaling the effect is using to magnify an image.
- Blending Mode: Use this control to specify the blend mode the effect will use to combine the original clip with the magnified area. The None option shows transparent pixels around the magnified section.
- Resize Layer: Selecting this option means the effect will only use the boundaries as the clip’s edge when the magnified region extends beyond the original boundaries of the clip. Deselecting the Resize Layer means that the boundaries of the clip will crop any area of your image outside the bounding box of the original clip.

4. Mirror Effect
This distortion Premiere Pro effect splits an image along a line while reflecting one side onto the other. Where the reflection appears and which side will be reflected is determined by the reflection angles.
1. Head over to Effect Control>Distortion>Mirror to use this effect.
2. Adjust the controls until you get the results you desire.
- Reflection Angle: With the Reflection Angle control, you can specify the angle of reflection and where it appears on the clip. A zero-degree angle reflects the left-hand side on the right.
- Reflection Center: This control allows you to specify the position of the line. You need to click the box, then drag the resulting crosshair up to the area in the image where you would like to place the line.

5. Offset Effect
This effect pans your image within a clip, and visual details pushed off one side of this image will appear on the opposite side. You have to perform the offset with subpixel precision at the best quality.
Also, you can use Offset with a combination of other effects. Head over to Effect Control>Distortion>Offset to use this effect.

6. Spherize Effect
The Spherize effect allows users to wrap a video clip around a spherical shape. You can use it to give texts and objects a three-dimensional effect. Go to Effect Control>Distortion>Spherize and adjust the radius and center of the sphere.

7. Transform Effect
This effect applies 2-dimensional geometric transformations to your clip. You can use this effect to skew clips along any axis.
1. Go to Effect Control>Distortion>Transform to apply this effect to your clip.
2. Use Transform settings to adjust Opacity, Skew, Rotation, Scale, Anchor Point, and more.

8. Turbulent Displace Effect
This fun effect utilizes fractal noise to create turbulent Premiere Pro distortion effects in your image. You can use the Turbulent Displace effect to add movement to your clip.
1. Head to Effect Control>Distortion>Turbulent Displace.
2. Adjust the following controls:
- Displacement
- Amount
- Size
- Offset (Turbulence)
- Complexity
- Evolution
- Pinning
- Resize Layer
- Antialiasing For Best Quality

9. Twirl Effect
The Twirl effect allows you to rotate your clip around its center. It rotates the image more sharply in the middle than at the edge. You can use it on faces to make a funny clip. Navigate to Effect Control>Distortion>Twirl to start using this effect. Next, use the settings to adjust how much angle it twirls and the radius.

10. Wave Warp Effect
This effect is one of the most popular Premiere Pro distortion effects. It generates the appearance of a wave as it’s traveling across an image. The Wave Warp effect allows you to produce various wave shapes, including sine, circular, and square waves.
It’s automatically animated at a steady speed across the time range, and that’s without frames. You need to set keyframes to vary speeds.
1. Head to Effect Control>Distortion>Wave Warp to apply this effect in your video clip.
2. Now, change the wave speed, direction, height, width, and type to suit your preference.

Bonus! Free Distortion Effects for Premiere Pro
1. Liquid Distortion Effect
This effect can distort the content in a clip and can be used to shift into the next clip. It could be utilized in editing or used as a transition.

2. Earthquake Effect
This effect adds a shaking motion to the video clip you add it to; it works as a transition but could also be a useful editing tool.

3. Glass Effect
This effect can add various blurs to the video clip and be used to transition from one clip to the next.

4. TV Effect
This effect imitates the view of a television being turned on or off. You can use it to introduce a new video clip. It would also be a great start or end to the entire video.

5. Glitch Effect
This effect adds a glitch to the video clip. You can use it in editing or as a transition from one clip to the next.

Conclusion
● You can add any of these Premiere Pro distortion effects to make your videos more catchy. In turn, they will get more attention and views. Premiere Pro comes with tons of distortion effects and a responsive interface.
Step by Step Guide of Make Gimp Transparent Background PNG
Step by Step Guide on Make Gimp Transparent Background PNG
An easy yet powerful editor
Numerous effects to choose from
Detailed tutorials provided by the official channel
Removing background of images and making them transparent is a really very tough task for the newbies. Sometimes you may need to learn lots of software to get the work done and most of the programs are paid over the internet. There are many reasons why you need to remove the background of images such as you don’t like the background and replace with the new one. Here, in this article we will share the information about the GIMP which is a free and open source programs and can help you to remove background from the images and make the transparent.
In this article
01 [What’s Gimp?](#Part 1)
02 [How to Create a Transparent Background in GIMP](#Part 2)
03 [How to Turn the Complex Image Background Transparent](#Part 3)
04 [How to Turn a One-Color Background Transparent](#Part 4)
Part 1 What’s Gimp?
GIMP is open source software which allows you to do image manipulations. The program is distributed over the internet for free of cost the beginners to learn the photography skills. GIMP software can be used for photo retouching, image authoring and image compositions. GIMP supports all features of photo editing even it can be used for GIMP remove background to transparent. You can also use it as a paint program, online batch processing system, image format converter and as an image renderer.
Part 2 How to Create a Transparent Background in GIMP
With the help of GIMP software you can easily remove background from image and make it transparent. Here, we are going to tell you that how you can remove background with the help of GIMP. Let’s learn it step by step.
Step 1:
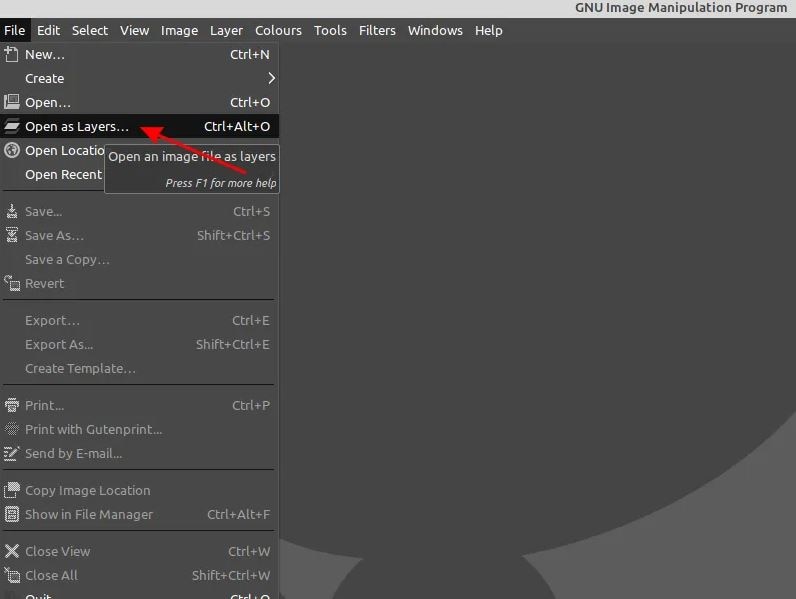
Install and launch GIMP program on your system. Now click the “File > Open” or you can also use “File > Open as Layers” option.
Step 2:
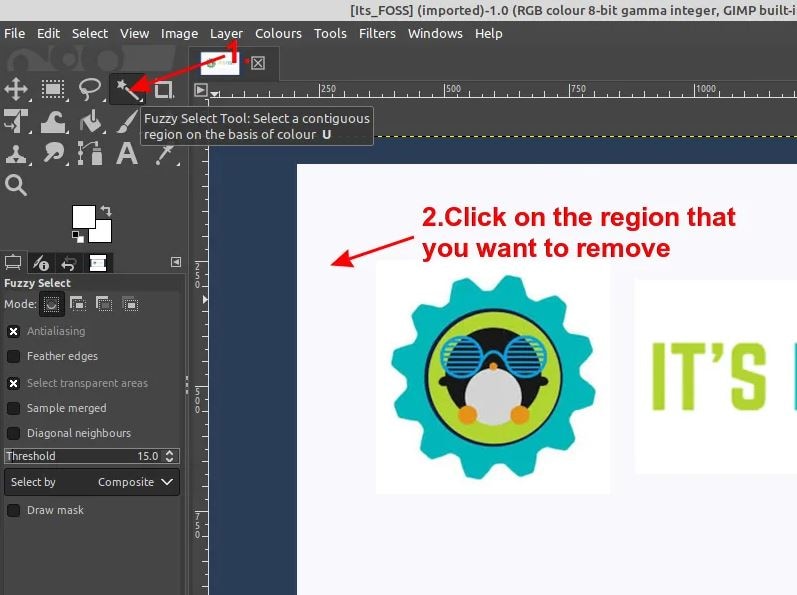
Now, you have to use the Fuzzy tool. The Fuzzy tool is mainly designed to select the current layer area and the image on the basis of color. Using this tool you can easily select the background which you want to remove with just one click.
Step 3:
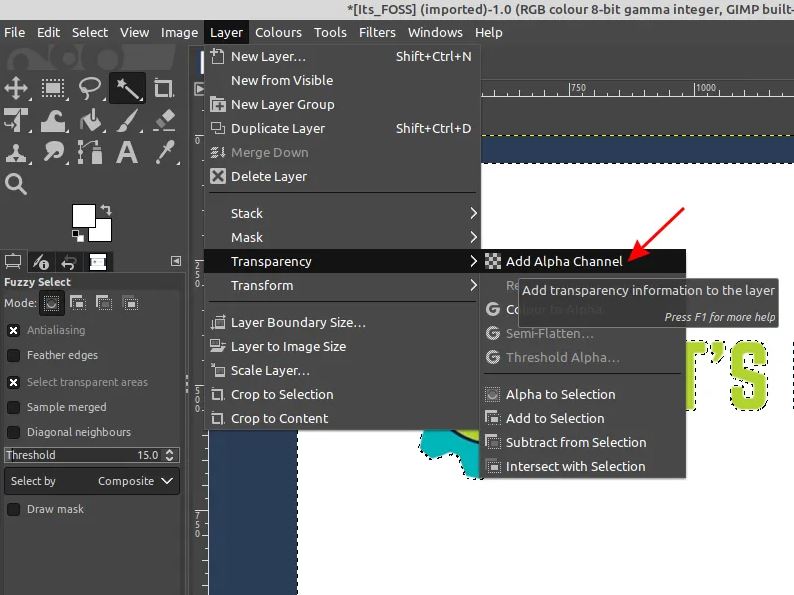
On your image, now you will see a channel dialog when you add a second layer on it. This layer will tell the transparency of the image you have added to remove background. So, click the “Layer > Transparency > Add Alpha Channel option.
Step 4:
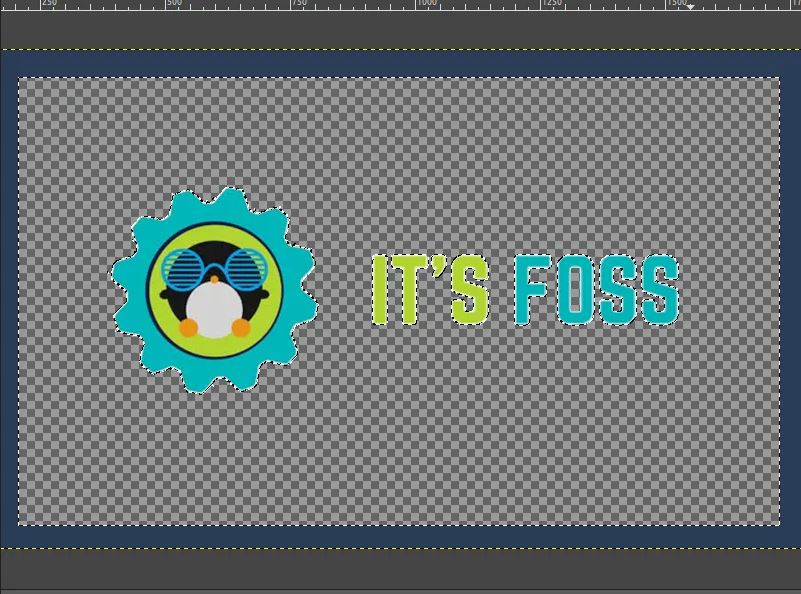
On your keyboard now you need to hit the “Delete” button to remove background. You may need to repeat the steps 2 to 4 if the background is not completely removed else there is no problem. We have removed blue background here for example.
Step 5:
Finally, you can click the “File > Export As” and then select the PNG format and save it on your computer in the PNG format. This is the way about GIMP remove background to transparent.

Part 3 How to Turn the Complex Image Background Transparent
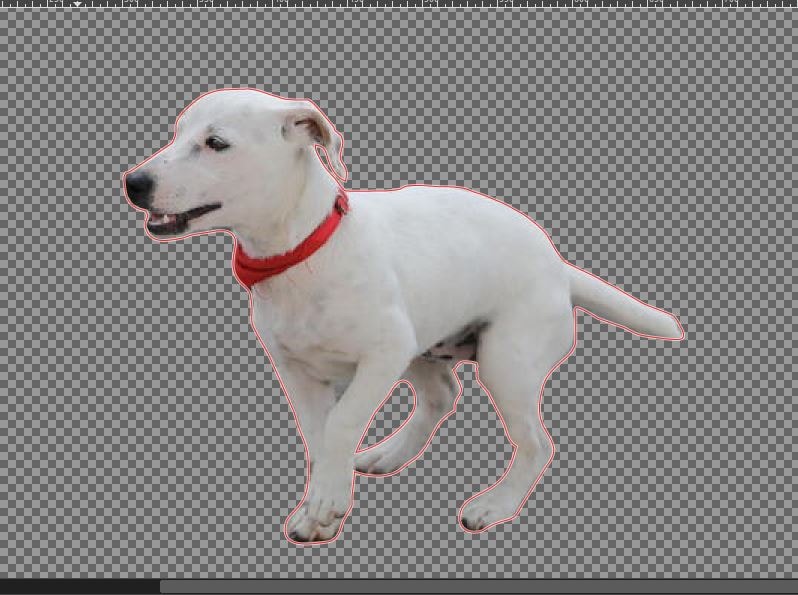
The above part was about removing the simple and easy background from the image. Here we will share about GIMP transparent background PNG when you have the complex background. For, GIMP create transparent background in the complex images you need to add a transparent layer on the image.
Step 1:
Open the image in GIMP and then right click on the layer of image. Now, click the “Add Alpha Chanel” option.
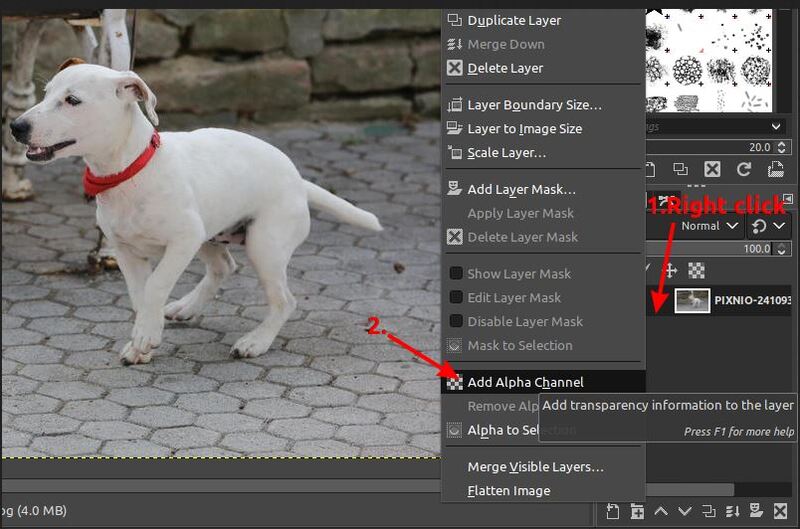
Step 2:
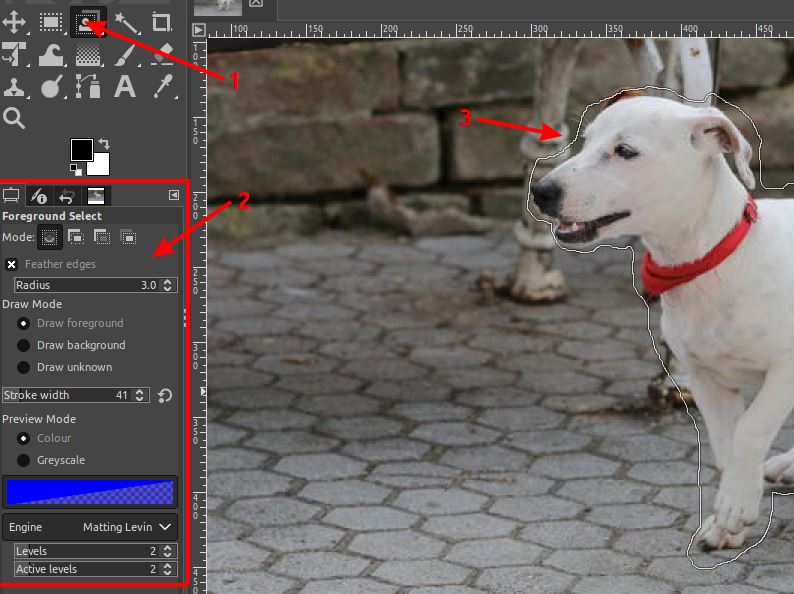
After making a layer for background now you have to select the foreground of the image which you want to keep using the select tool of GIMP. To start, first you need to make sure the in the settings you have selected “Draw foreground option” is selected.
After doing all adjustments of the settings you need to draw outline of the object and finally press the enter button on keyboard.
Step 3:
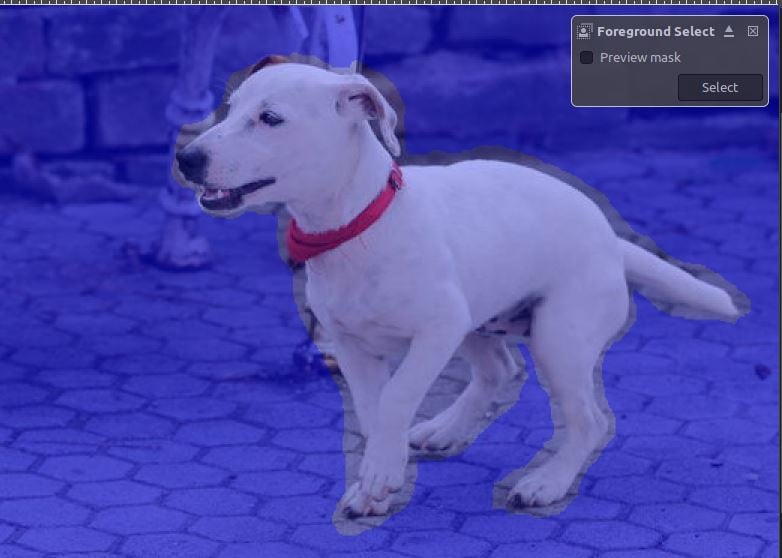
After doing all the settings you have to adjust the stroke width from settings panel of GIMP. Use your mouse now and start dragging and drawing the image just like you are painting with a brush. Once your drawing is finished and you leave your mouse the image will look like the below screenshot.
Step 4:
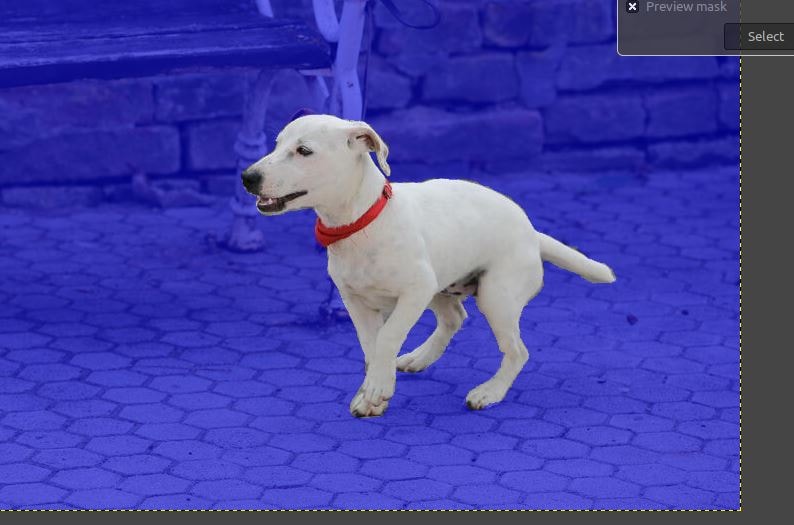
You can also fine tune your selection now with the help of draw background option in the GIMP. This will help you to adjust the rough outline you created previously. Once you are happy then simply press the enter button.
Step 5:
Still, if you want to refine your results more than you can refine your outlines by using the path nodes option. You can view the path nodes by following the below steps.
● Keep your mouse cursor at paths dialog.
● Now, hit selection.
● To view the path you can click the CTRL+Shift+A button.
● Now, select the paths tool.
● Finally click the “Path”.
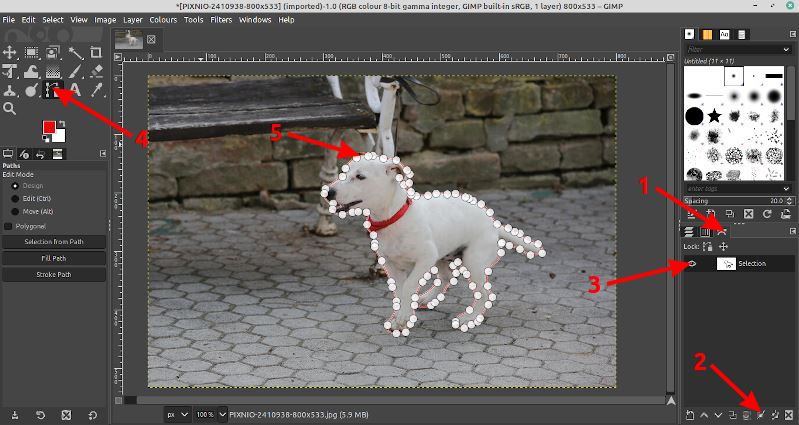
Step 6:
Now, it’s a time to adjust the outlines according to the output of your foreground image. You can zoom the image and add or adjust the previous nodes. To adjust node you can click the CTRL button on keyboard and drag the node using your mouse. If you need to remove a node then you can use CTRL+Shift button and then click on the node.
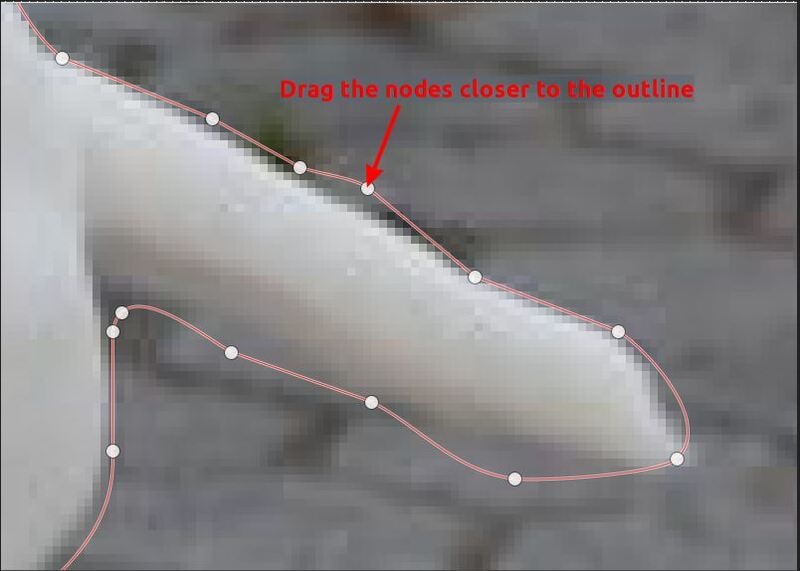
Step 7:
Once the path is refined according to your need hit the “Selection from Path” option at the left side.
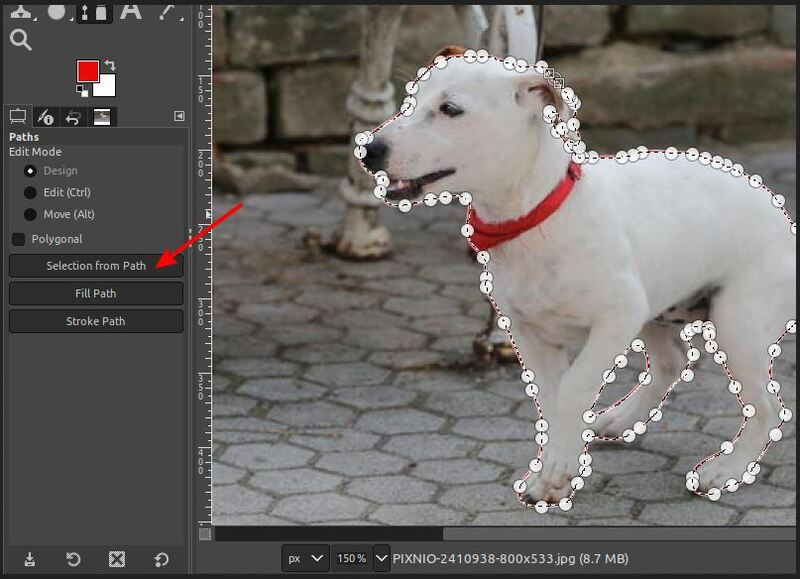
Step 8:
You will have to add the layer mask on the image now to which will reveal the transparency. Right click the Current layer > Add Layer Mask > Selection and finally click “Add” button.
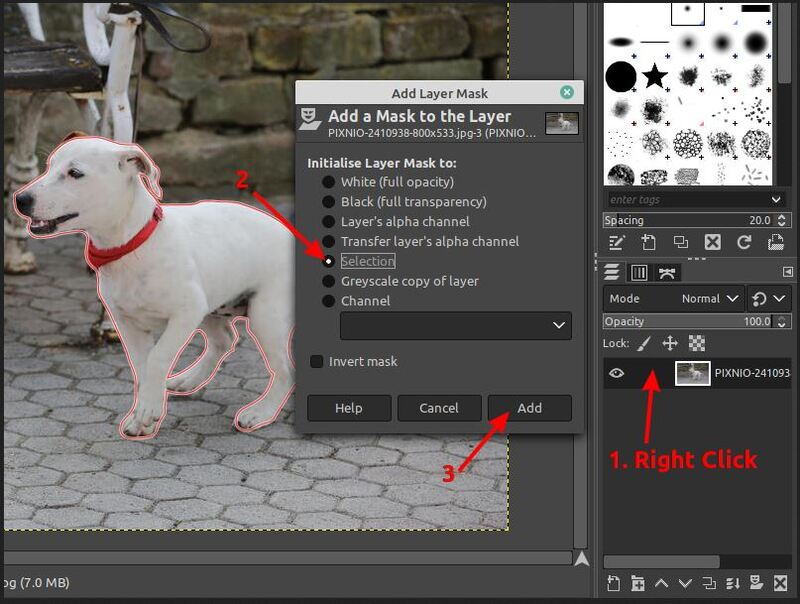
Step 9:
Now, if you have followed all the previous steps perfectly then your background will be removed now and you can also add a new background to the image. This is way about GIMP delete background to transparent for the complex images.
Part 4 How to Turn a One-Color Background Transparent
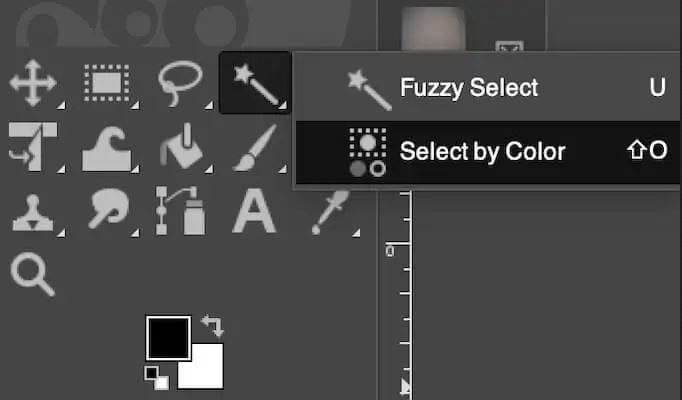
While using the GIMP you can also run the one color images background in the transparent. This method helps you to make the transparent background in case if you have the single color in the background of your image. In this method you just need to select the background by the color and it will be removed in the seconds. For GIMP create transparent background image in the single color background image you can follow the below steps.
Steps to Follow:
● Open the image using “File > Open” in the GIMP program.
● Once image is opened you have to select the image layer at the right side corner of the screen. Now right click and select the Add Alpha Channel option.
● Now, you have to choose the select by color tool.
Step 2:
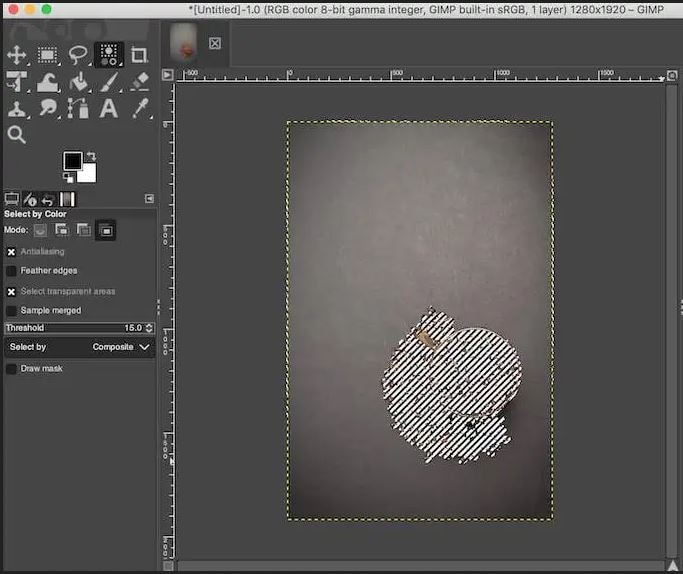
After selecting the color tool you can select the area of the background image which you need to make transparent by clicking on the image. You can also select it manually by clicking and dragging using your mouse pointer. To increase the selection press Shift button on keyboard and then select the different area which you want to select.
Step 3:
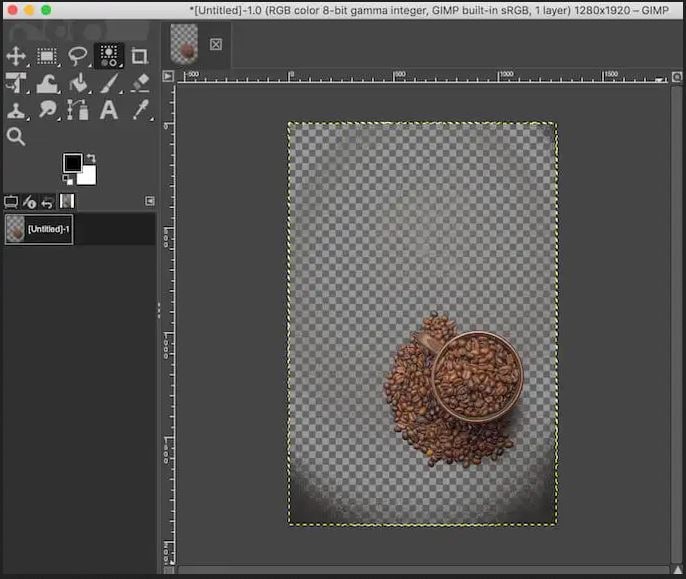
Finally, when you have selected the complete area which you want to make transparent then simply select the delete button. This is the way about GIMP set transparent background for one color background images.
Learn New Ways to Make Transparent Background
GIMP software is a free program for newbie users to expand their skills. With the help of GIMP software you can easily remove background from mostly any kind of images. If you like to go for pro software to make the video from the images you have created then you can try the Wondershare Filmora Video Editor which allows you to make the beautiful videos and edit them quickly.
For Win 7 or later (64-bit)
For macOS 10.12 or later
Wondershare Filmora program is video editor software which also offers you some of the photo editing options as well. It is compatible with the windows as well as the Mac operating system devices. The program comes with a very easy to use interface and allows you to edit the videos and design them from scratch. It comes with the premade templates in it so you can directly use them for your videos to make the process faster. You can do keyframing, speed ramping, splitting screen, motion tracking etc for editing your videos.
Filmora offers you an inbuilt screen recorder which is the best for recording the gaming videos. it also offers you the effects to apply on the videos, color correction, color matching and many more others features which can be used for making the best quality videos.

● Ending Thoughts →
● Well, this is all about making transparent background in the GIMP. GIMP is really a very helpful program that comes with most all features what you need to edit the images and change the background of your images.
● If you need to edit the videos as well or you want to make videos with the images edited using GIMP then you can simply use Wondershare Filmora which the best in the video editing Era.
Removing background of images and making them transparent is a really very tough task for the newbies. Sometimes you may need to learn lots of software to get the work done and most of the programs are paid over the internet. There are many reasons why you need to remove the background of images such as you don’t like the background and replace with the new one. Here, in this article we will share the information about the GIMP which is a free and open source programs and can help you to remove background from the images and make the transparent.
In this article
01 [What’s Gimp?](#Part 1)
02 [How to Create a Transparent Background in GIMP](#Part 2)
03 [How to Turn the Complex Image Background Transparent](#Part 3)
04 [How to Turn a One-Color Background Transparent](#Part 4)
Part 1 What’s Gimp?
GIMP is open source software which allows you to do image manipulations. The program is distributed over the internet for free of cost the beginners to learn the photography skills. GIMP software can be used for photo retouching, image authoring and image compositions. GIMP supports all features of photo editing even it can be used for GIMP remove background to transparent. You can also use it as a paint program, online batch processing system, image format converter and as an image renderer.
Part 2 How to Create a Transparent Background in GIMP
With the help of GIMP software you can easily remove background from image and make it transparent. Here, we are going to tell you that how you can remove background with the help of GIMP. Let’s learn it step by step.
Step 1:
Install and launch GIMP program on your system. Now click the “File > Open” or you can also use “File > Open as Layers” option.

Step 2:
Now, you have to use the Fuzzy tool. The Fuzzy tool is mainly designed to select the current layer area and the image on the basis of color. Using this tool you can easily select the background which you want to remove with just one click.

Step 3:
On your image, now you will see a channel dialog when you add a second layer on it. This layer will tell the transparency of the image you have added to remove background. So, click the “Layer > Transparency > Add Alpha Channel option.

Step 4:
On your keyboard now you need to hit the “Delete” button to remove background. You may need to repeat the steps 2 to 4 if the background is not completely removed else there is no problem. We have removed blue background here for example.

Step 5:
Finally, you can click the “File > Export As” and then select the PNG format and save it on your computer in the PNG format. This is the way about GIMP remove background to transparent.

Part 3 How to Turn the Complex Image Background Transparent
The above part was about removing the simple and easy background from the image. Here we will share about GIMP transparent background PNG when you have the complex background. For, GIMP create transparent background in the complex images you need to add a transparent layer on the image.
Step 1:
Open the image in GIMP and then right click on the layer of image. Now, click the “Add Alpha Chanel” option.

Step 2:
After making a layer for background now you have to select the foreground of the image which you want to keep using the select tool of GIMP. To start, first you need to make sure the in the settings you have selected “Draw foreground option” is selected.
After doing all adjustments of the settings you need to draw outline of the object and finally press the enter button on keyboard.

Step 3:
After doing all the settings you have to adjust the stroke width from settings panel of GIMP. Use your mouse now and start dragging and drawing the image just like you are painting with a brush. Once your drawing is finished and you leave your mouse the image will look like the below screenshot.

Step 4:
You can also fine tune your selection now with the help of draw background option in the GIMP. This will help you to adjust the rough outline you created previously. Once you are happy then simply press the enter button.

Step 5:
Still, if you want to refine your results more than you can refine your outlines by using the path nodes option. You can view the path nodes by following the below steps.
● Keep your mouse cursor at paths dialog.
● Now, hit selection.
● To view the path you can click the CTRL+Shift+A button.
● Now, select the paths tool.
● Finally click the “Path”.

Step 6:
Now, it’s a time to adjust the outlines according to the output of your foreground image. You can zoom the image and add or adjust the previous nodes. To adjust node you can click the CTRL button on keyboard and drag the node using your mouse. If you need to remove a node then you can use CTRL+Shift button and then click on the node.

Step 7:
Once the path is refined according to your need hit the “Selection from Path” option at the left side.

Step 8:
You will have to add the layer mask on the image now to which will reveal the transparency. Right click the Current layer > Add Layer Mask > Selection and finally click “Add” button.

Step 9:
Now, if you have followed all the previous steps perfectly then your background will be removed now and you can also add a new background to the image. This is way about GIMP delete background to transparent for the complex images.

Part 4 How to Turn a One-Color Background Transparent
While using the GIMP you can also run the one color images background in the transparent. This method helps you to make the transparent background in case if you have the single color in the background of your image. In this method you just need to select the background by the color and it will be removed in the seconds. For GIMP create transparent background image in the single color background image you can follow the below steps.
Steps to Follow:
● Open the image using “File > Open” in the GIMP program.
● Once image is opened you have to select the image layer at the right side corner of the screen. Now right click and select the Add Alpha Channel option.
● Now, you have to choose the select by color tool.

Step 2:
After selecting the color tool you can select the area of the background image which you need to make transparent by clicking on the image. You can also select it manually by clicking and dragging using your mouse pointer. To increase the selection press Shift button on keyboard and then select the different area which you want to select.

Step 3:
Finally, when you have selected the complete area which you want to make transparent then simply select the delete button. This is the way about GIMP set transparent background for one color background images.

Learn New Ways to Make Transparent Background
GIMP software is a free program for newbie users to expand their skills. With the help of GIMP software you can easily remove background from mostly any kind of images. If you like to go for pro software to make the video from the images you have created then you can try the Wondershare Filmora Video Editor which allows you to make the beautiful videos and edit them quickly.
For Win 7 or later (64-bit)
For macOS 10.12 or later
Wondershare Filmora program is video editor software which also offers you some of the photo editing options as well. It is compatible with the windows as well as the Mac operating system devices. The program comes with a very easy to use interface and allows you to edit the videos and design them from scratch. It comes with the premade templates in it so you can directly use them for your videos to make the process faster. You can do keyframing, speed ramping, splitting screen, motion tracking etc for editing your videos.
Filmora offers you an inbuilt screen recorder which is the best for recording the gaming videos. it also offers you the effects to apply on the videos, color correction, color matching and many more others features which can be used for making the best quality videos.

● Ending Thoughts →
● Well, this is all about making transparent background in the GIMP. GIMP is really a very helpful program that comes with most all features what you need to edit the images and change the background of your images.
● If you need to edit the videos as well or you want to make videos with the images edited using GIMP then you can simply use Wondershare Filmora which the best in the video editing Era.
Removing background of images and making them transparent is a really very tough task for the newbies. Sometimes you may need to learn lots of software to get the work done and most of the programs are paid over the internet. There are many reasons why you need to remove the background of images such as you don’t like the background and replace with the new one. Here, in this article we will share the information about the GIMP which is a free and open source programs and can help you to remove background from the images and make the transparent.
In this article
01 [What’s Gimp?](#Part 1)
02 [How to Create a Transparent Background in GIMP](#Part 2)
03 [How to Turn the Complex Image Background Transparent](#Part 3)
04 [How to Turn a One-Color Background Transparent](#Part 4)
Part 1 What’s Gimp?
GIMP is open source software which allows you to do image manipulations. The program is distributed over the internet for free of cost the beginners to learn the photography skills. GIMP software can be used for photo retouching, image authoring and image compositions. GIMP supports all features of photo editing even it can be used for GIMP remove background to transparent. You can also use it as a paint program, online batch processing system, image format converter and as an image renderer.
Part 2 How to Create a Transparent Background in GIMP
With the help of GIMP software you can easily remove background from image and make it transparent. Here, we are going to tell you that how you can remove background with the help of GIMP. Let’s learn it step by step.
Step 1:
Install and launch GIMP program on your system. Now click the “File > Open” or you can also use “File > Open as Layers” option.

Step 2:
Now, you have to use the Fuzzy tool. The Fuzzy tool is mainly designed to select the current layer area and the image on the basis of color. Using this tool you can easily select the background which you want to remove with just one click.

Step 3:
On your image, now you will see a channel dialog when you add a second layer on it. This layer will tell the transparency of the image you have added to remove background. So, click the “Layer > Transparency > Add Alpha Channel option.

Step 4:
On your keyboard now you need to hit the “Delete” button to remove background. You may need to repeat the steps 2 to 4 if the background is not completely removed else there is no problem. We have removed blue background here for example.

Step 5:
Finally, you can click the “File > Export As” and then select the PNG format and save it on your computer in the PNG format. This is the way about GIMP remove background to transparent.

Part 3 How to Turn the Complex Image Background Transparent
The above part was about removing the simple and easy background from the image. Here we will share about GIMP transparent background PNG when you have the complex background. For, GIMP create transparent background in the complex images you need to add a transparent layer on the image.
Step 1:
Open the image in GIMP and then right click on the layer of image. Now, click the “Add Alpha Chanel” option.

Step 2:
After making a layer for background now you have to select the foreground of the image which you want to keep using the select tool of GIMP. To start, first you need to make sure the in the settings you have selected “Draw foreground option” is selected.
After doing all adjustments of the settings you need to draw outline of the object and finally press the enter button on keyboard.

Step 3:
After doing all the settings you have to adjust the stroke width from settings panel of GIMP. Use your mouse now and start dragging and drawing the image just like you are painting with a brush. Once your drawing is finished and you leave your mouse the image will look like the below screenshot.

Step 4:
You can also fine tune your selection now with the help of draw background option in the GIMP. This will help you to adjust the rough outline you created previously. Once you are happy then simply press the enter button.

Step 5:
Still, if you want to refine your results more than you can refine your outlines by using the path nodes option. You can view the path nodes by following the below steps.
● Keep your mouse cursor at paths dialog.
● Now, hit selection.
● To view the path you can click the CTRL+Shift+A button.
● Now, select the paths tool.
● Finally click the “Path”.

Step 6:
Now, it’s a time to adjust the outlines according to the output of your foreground image. You can zoom the image and add or adjust the previous nodes. To adjust node you can click the CTRL button on keyboard and drag the node using your mouse. If you need to remove a node then you can use CTRL+Shift button and then click on the node.

Step 7:
Once the path is refined according to your need hit the “Selection from Path” option at the left side.

Step 8:
You will have to add the layer mask on the image now to which will reveal the transparency. Right click the Current layer > Add Layer Mask > Selection and finally click “Add” button.

Step 9:
Now, if you have followed all the previous steps perfectly then your background will be removed now and you can also add a new background to the image. This is way about GIMP delete background to transparent for the complex images.

Part 4 How to Turn a One-Color Background Transparent
While using the GIMP you can also run the one color images background in the transparent. This method helps you to make the transparent background in case if you have the single color in the background of your image. In this method you just need to select the background by the color and it will be removed in the seconds. For GIMP create transparent background image in the single color background image you can follow the below steps.
Steps to Follow:
● Open the image using “File > Open” in the GIMP program.
● Once image is opened you have to select the image layer at the right side corner of the screen. Now right click and select the Add Alpha Channel option.
● Now, you have to choose the select by color tool.

Step 2:
After selecting the color tool you can select the area of the background image which you need to make transparent by clicking on the image. You can also select it manually by clicking and dragging using your mouse pointer. To increase the selection press Shift button on keyboard and then select the different area which you want to select.

Step 3:
Finally, when you have selected the complete area which you want to make transparent then simply select the delete button. This is the way about GIMP set transparent background for one color background images.

Learn New Ways to Make Transparent Background
GIMP software is a free program for newbie users to expand their skills. With the help of GIMP software you can easily remove background from mostly any kind of images. If you like to go for pro software to make the video from the images you have created then you can try the Wondershare Filmora Video Editor which allows you to make the beautiful videos and edit them quickly.
For Win 7 or later (64-bit)
For macOS 10.12 or later
Wondershare Filmora program is video editor software which also offers you some of the photo editing options as well. It is compatible with the windows as well as the Mac operating system devices. The program comes with a very easy to use interface and allows you to edit the videos and design them from scratch. It comes with the premade templates in it so you can directly use them for your videos to make the process faster. You can do keyframing, speed ramping, splitting screen, motion tracking etc for editing your videos.
Filmora offers you an inbuilt screen recorder which is the best for recording the gaming videos. it also offers you the effects to apply on the videos, color correction, color matching and many more others features which can be used for making the best quality videos.

● Ending Thoughts →
● Well, this is all about making transparent background in the GIMP. GIMP is really a very helpful program that comes with most all features what you need to edit the images and change the background of your images.
● If you need to edit the videos as well or you want to make videos with the images edited using GIMP then you can simply use Wondershare Filmora which the best in the video editing Era.
Removing background of images and making them transparent is a really very tough task for the newbies. Sometimes you may need to learn lots of software to get the work done and most of the programs are paid over the internet. There are many reasons why you need to remove the background of images such as you don’t like the background and replace with the new one. Here, in this article we will share the information about the GIMP which is a free and open source programs and can help you to remove background from the images and make the transparent.
In this article
01 [What’s Gimp?](#Part 1)
02 [How to Create a Transparent Background in GIMP](#Part 2)
03 [How to Turn the Complex Image Background Transparent](#Part 3)
04 [How to Turn a One-Color Background Transparent](#Part 4)
Part 1 What’s Gimp?
GIMP is open source software which allows you to do image manipulations. The program is distributed over the internet for free of cost the beginners to learn the photography skills. GIMP software can be used for photo retouching, image authoring and image compositions. GIMP supports all features of photo editing even it can be used for GIMP remove background to transparent. You can also use it as a paint program, online batch processing system, image format converter and as an image renderer.
Part 2 How to Create a Transparent Background in GIMP
With the help of GIMP software you can easily remove background from image and make it transparent. Here, we are going to tell you that how you can remove background with the help of GIMP. Let’s learn it step by step.
Step 1:
Install and launch GIMP program on your system. Now click the “File > Open” or you can also use “File > Open as Layers” option.

Step 2:
Now, you have to use the Fuzzy tool. The Fuzzy tool is mainly designed to select the current layer area and the image on the basis of color. Using this tool you can easily select the background which you want to remove with just one click.

Step 3:
On your image, now you will see a channel dialog when you add a second layer on it. This layer will tell the transparency of the image you have added to remove background. So, click the “Layer > Transparency > Add Alpha Channel option.

Step 4:
On your keyboard now you need to hit the “Delete” button to remove background. You may need to repeat the steps 2 to 4 if the background is not completely removed else there is no problem. We have removed blue background here for example.

Step 5:
Finally, you can click the “File > Export As” and then select the PNG format and save it on your computer in the PNG format. This is the way about GIMP remove background to transparent.

Part 3 How to Turn the Complex Image Background Transparent
The above part was about removing the simple and easy background from the image. Here we will share about GIMP transparent background PNG when you have the complex background. For, GIMP create transparent background in the complex images you need to add a transparent layer on the image.
Step 1:
Open the image in GIMP and then right click on the layer of image. Now, click the “Add Alpha Chanel” option.

Step 2:
After making a layer for background now you have to select the foreground of the image which you want to keep using the select tool of GIMP. To start, first you need to make sure the in the settings you have selected “Draw foreground option” is selected.
After doing all adjustments of the settings you need to draw outline of the object and finally press the enter button on keyboard.

Step 3:
After doing all the settings you have to adjust the stroke width from settings panel of GIMP. Use your mouse now and start dragging and drawing the image just like you are painting with a brush. Once your drawing is finished and you leave your mouse the image will look like the below screenshot.

Step 4:
You can also fine tune your selection now with the help of draw background option in the GIMP. This will help you to adjust the rough outline you created previously. Once you are happy then simply press the enter button.

Step 5:
Still, if you want to refine your results more than you can refine your outlines by using the path nodes option. You can view the path nodes by following the below steps.
● Keep your mouse cursor at paths dialog.
● Now, hit selection.
● To view the path you can click the CTRL+Shift+A button.
● Now, select the paths tool.
● Finally click the “Path”.

Step 6:
Now, it’s a time to adjust the outlines according to the output of your foreground image. You can zoom the image and add or adjust the previous nodes. To adjust node you can click the CTRL button on keyboard and drag the node using your mouse. If you need to remove a node then you can use CTRL+Shift button and then click on the node.

Step 7:
Once the path is refined according to your need hit the “Selection from Path” option at the left side.

Step 8:
You will have to add the layer mask on the image now to which will reveal the transparency. Right click the Current layer > Add Layer Mask > Selection and finally click “Add” button.

Step 9:
Now, if you have followed all the previous steps perfectly then your background will be removed now and you can also add a new background to the image. This is way about GIMP delete background to transparent for the complex images.

Part 4 How to Turn a One-Color Background Transparent
While using the GIMP you can also run the one color images background in the transparent. This method helps you to make the transparent background in case if you have the single color in the background of your image. In this method you just need to select the background by the color and it will be removed in the seconds. For GIMP create transparent background image in the single color background image you can follow the below steps.
Steps to Follow:
● Open the image using “File > Open” in the GIMP program.
● Once image is opened you have to select the image layer at the right side corner of the screen. Now right click and select the Add Alpha Channel option.
● Now, you have to choose the select by color tool.

Step 2:
After selecting the color tool you can select the area of the background image which you need to make transparent by clicking on the image. You can also select it manually by clicking and dragging using your mouse pointer. To increase the selection press Shift button on keyboard and then select the different area which you want to select.

Step 3:
Finally, when you have selected the complete area which you want to make transparent then simply select the delete button. This is the way about GIMP set transparent background for one color background images.

Learn New Ways to Make Transparent Background
GIMP software is a free program for newbie users to expand their skills. With the help of GIMP software you can easily remove background from mostly any kind of images. If you like to go for pro software to make the video from the images you have created then you can try the Wondershare Filmora Video Editor which allows you to make the beautiful videos and edit them quickly.
For Win 7 or later (64-bit)
For macOS 10.12 or later
Wondershare Filmora program is video editor software which also offers you some of the photo editing options as well. It is compatible with the windows as well as the Mac operating system devices. The program comes with a very easy to use interface and allows you to edit the videos and design them from scratch. It comes with the premade templates in it so you can directly use them for your videos to make the process faster. You can do keyframing, speed ramping, splitting screen, motion tracking etc for editing your videos.
Filmora offers you an inbuilt screen recorder which is the best for recording the gaming videos. it also offers you the effects to apply on the videos, color correction, color matching and many more others features which can be used for making the best quality videos.

● Ending Thoughts →
● Well, this is all about making transparent background in the GIMP. GIMP is really a very helpful program that comes with most all features what you need to edit the images and change the background of your images.
● If you need to edit the videos as well or you want to make videos with the images edited using GIMP then you can simply use Wondershare Filmora which the best in the video editing Era.
Also read:
- New 2024 Approved How to Use LUTs in VN Editor – Complete Guide and Best LUTs Download
- Searching for the Best Video Editor to Make Your Video More Attractive? This Article Introduce You Everything About Choosing a Video Editing Software for 2024
- New In 2024, Step-by-Step Guide | Control Playback Speed in Premiere Pro
- Updated 2024 Approved Complete Tutorial on After Effects Countdown Timer Adding
- New In 2024, If You Are Trying to Create a Countdown Effect, but Youre Not Sure Where to Start, Then This Post Is Going to Show You some Ways to Create a Countdown Animation for Your Videos
- Updated In 2024, 20 Best LUTs for Music Videos
- 2024 Approved How to Add Slideshow in PowerPoint
- Updated Color Lut Is an Easy and Powerful Tool to Make Your Video Stands Out From the Crowd. Check This Article to Learn the Details About Color Lut for 2024
- New In 2024, This Article Is Regarding the Guidance About the Split of the Audio From the Video in Premiere Pro. And Also, the Discussion of the Wondershare Fllmora as the Replacement and How to Perform a Similar Task in It
- Updated Want to Make Use of a Lovely Background for Your Image by Removing the Background or Making It Transparent? Here Is Something You Need to Cover
- Updated Best Options to Replace Sky of Any Photo Online + Offline
- New ReVisionFX ReelSmart Motion Blur Plugin For Premiere Pro for 2024
- Updated In 2024, How to Make Transparent Background in Canva
- Updated Best MOV to GIF Converters for 2024
- New Keyframes Interval Everything You Need To Know | Filmora
- Updated In 2024, Learn How to Extract Sound From Video Using the Different Online and Software Tools. Details About Their Features, Pros/Cons, and More Are Given
- New Kdenlive Review – Is It The Best Video Editor for 2024
- New How to Create a Slideshow with Movavi Slideshow Maker for 2024
- 2024 Approved Creating Collages on Canva Is Simple and Quick. The Tool Lets You Create some Amazing Customized Collages as Needed. So, Get Ready to Explore the World of Canva Collages
- New 2024 Approved Whats The Best Laptops For Video Editing
- Updated How to Make a Smooth Speed Ramping in Premiere Pro for 2024
- New In 2024, Free Ways to Download Mobile Phone Green Screen Videos and Pictures No Copyright
- Updated In 2024, Free Ways To Split Video For Whatsapp Status On All Platforms
- How to Downgrade Apple iPhone 13 Pro to the Previous iOS Version? | Dr.fone
- In 2024, 3 Methods to Mirror Vivo V30 to Roku | Dr.fone
- How to Use Phone Clone to Migrate Your Tecno Camon 20 Premier 5G Data? | Dr.fone
- In 2024, How To Check if Your Oppo A1x 5G Is Unlocked
- Various Methods to Transfer Pictures from Apple iPhone 13 Pro to PC | Dr.fone
- How do I reset my OnePlus Open Phone without technical knowledge? | Dr.fone
- Cellular Network Not Available for Voice Calls On OnePlus Ace 3 | Dr.fone
- How to Share Location in Messenger On Samsung Galaxy A15 4G? | Dr.fone
- How to Show Wi-Fi Password on Vivo T2 5G
- In 2024, Complete Guide For Apple iPhone 12 Lock Screen | Dr.fone
- How to restore wiped videos on Nokia C300
- Hard Reset Tecno Pova 6 Pro 5G in 3 Efficient Ways | Dr.fone
- In 2024, How to Fake Snapchat Location on Motorola Moto G73 5G | Dr.fone
- Hassle-Free Ways to Remove FRP Lock on Motorola Edge 40 Pro Phones with/without a PC
- Does Airplane Mode Turn off GPS Location On Honor Play 8T? | Dr.fone
- Title: Multi Object Tracking The Ultimate Guide for 2024
- Author: Morgan
- Created at : 2024-05-19 05:12:22
- Updated at : 2024-05-20 05:12:22
- Link: https://ai-video-editing.techidaily.com/multi-object-tracking-the-ultimate-guide-for-2024/
- License: This work is licensed under CC BY-NC-SA 4.0.

