
:max_bytes(150000):strip_icc():format(webp)/TheWolfAmongUsBigby-793544cded2749488ae1d20113d8d73a.jpg)
New 2024 Approved 2 Solutions to Cut Video in VLC on Windows
2 Solutions to Cut Video in VLC on Windows
Other than playing videos and music, VLC Media Player can also be used as a video editing tool. While advanced video editing requires unconventional and powerful video editing software, VLC offers a simpler and easy-to-learn process of cutting and/or trimming videos.
You can cut a section of your video and make shorter video clips. This means that you can now get rid of parts of a video that you do not need and preserve those that you like. VLC automatically saves the video clips made, so you do not have to save them again.
In this article, we are going to learn the simplest procedure on how to cut and/or trim videos using VLC Media Player. Each step is carefully explained, with screenshots attached.
To Cut Video Using VLC Media Player
- Download VLC Media Player
You need to have the app before using it. To download it, visit Google Play Store or any other suitable app, search and download. There are a variety of versions that is, 32-bit, 64-bit and Windows ARM. You may as well narrow down your search to the version of your gadget, be it Android, iOS, Linux or Windows.
- Install and Open VLC Media Player
The installation process is simple. You click on the icon indicating ‘install’ then open. On opening, you will come across a page that looks like the one attached below.

This is the dashboard of the VLC Media Player.
- Select the file you would like to cut
On the top of the screen is the menu with ‘Media’ being the first on the far left. On clicking the ‘Media’ button, a drop-down menu will appear. Select the first option, ‘Open File’ to access your files. From the dialogue box that appears, locate your video (the one you would like to cut), select it then click to open. The video will start playing.

- Click on Advanced Controls (View > Advanced Controls)
Some videos will play automatically while others will wait for an action. In case your video plays automatically, it is advisable that you pause it.
On the menu is a tab labelled ‘View’. Choose the tab, click open it and on the drop-down menu, select ‘Advanced Options’.

On selecting ‘Advanced Options’, a red button will appear at the bottom-left corner of the VLC. This is the record button.

Its purpose is to indicate the recording of the section of the video that you would like to cut.
- Click to Cut or Trim
If you had paused your video, you can play it at this stage. If you do not want to cut/trim your video from the start, scroll to the point from which you would like to cut it. Click on the red button for the recording to start. If the video does not play automatically, click to play.
After the video has played till the point where you would like to end, click on the red button again to stop the recording. The cut section will be automatically saved on the videos’ folder on C:\Users\Username\Videos.
An easier way to cut videos with Wondershare Filmora
Wondershare Filmora Video Editor is an alternative video editor. Unlike VLC Media Player, Filmora gives you more options. It allows you to split, trim, edit, combine, and crop a video, among others. It also gives you room to add footnotes, a variety of transitions, lower thirds, among other features. You can as well resize your video and enhance its quality.
For Win 7 or later (64-bit)
For macOS 10.14 or later
To Cut/Trim Videos with Wondershare Filmora:
- Drag and Drop the Video
Assuming that you have already downloaded and installed Wondershare Filmora app, click to open. There are two ways through which you can locate your video.
One, you can opt to drag and drop the video from its location to the app’s timeline. Secondly, you can right click on the space at the top left then select the video to be edited from the dialogue box that will appear.

- Trimming the video
After dropping the video on the timeline, it is likely to take up a lot of space, especially if it is long.
To trim the video from the beginning, place your cursor at the starting point and wait for the pointer to appear. Then move the point forward. To trim from the end, place the cursor at that point, hold and move the pointer forward till the required point.


Trimming the video does not mean that you lose the parts. It is more like shortening it to fit in place.
- Cutting the video
Unlike trimming, cutting involves getting rid of a section of the video completely. To do so, you need to first of all isolate that section.
With the video on the timeline, move and point your cursor at the starting point of the video and click on the scissors icon at the top. Then move it to the end of the video section and click on the scissors icon again. By so doing, you will have selected that section.
Once the section has been selected, right click on the video, select and click to delete. You can then drag the remaining parts to make them one.

After cutting or trimming, you can choose to add several effects to the video. Transitions, watermarks, cropping, resizing, ripple effects among others are some of the changes you could make. All these appear on the menu at the top.
- Save and/or Import your video
The final step is saving or importing your file to prevent its loss. By clicking on the ‘Import’ button, you save the file to the Media Library. By selecting ‘save as’, you select the location where you want to store your file.

Conclusion
There are so many video editors, each with different features. Some are simple to use while others will require advanced software to operate. Whether you use VLC Media Player or Wondershare Filmora, the results will be the same. The difference comes in where you have the knowledge and skills to use one app better than the other one.
The above steps on how to use both VLC Media Player and Wondershare Filmora will guide you through the whole process. It is said that, ‘practice makes perfect’. So yes, keep practicing and putting these skills into use. Sooner or later you will be an expert!
This is the dashboard of the VLC Media Player.
- Select the file you would like to cut
On the top of the screen is the menu with ‘Media’ being the first on the far left. On clicking the ‘Media’ button, a drop-down menu will appear. Select the first option, ‘Open File’ to access your files. From the dialogue box that appears, locate your video (the one you would like to cut), select it then click to open. The video will start playing.
- Click on Advanced Controls (View > Advanced Controls)
Some videos will play automatically while others will wait for an action. In case your video plays automatically, it is advisable that you pause it.
On the menu is a tab labelled ‘View’. Choose the tab, click open it and on the drop-down menu, select ‘Advanced Options’.
On selecting ‘Advanced Options’, a red button will appear at the bottom-left corner of the VLC. This is the record button.
Its purpose is to indicate the recording of the section of the video that you would like to cut.
- Click to Cut or Trim
If you had paused your video, you can play it at this stage. If you do not want to cut/trim your video from the start, scroll to the point from which you would like to cut it. Click on the red button for the recording to start. If the video does not play automatically, click to play.
After the video has played till the point where you would like to end, click on the red button again to stop the recording. The cut section will be automatically saved on the videos’ folder on C:\Users\Username\Videos.
An easier way to cut videos with Wondershare Filmora
Wondershare Filmora Video Editor is an alternative video editor. Unlike VLC Media Player, Filmora gives you more options. It allows you to split, trim, edit, combine, and crop a video, among others. It also gives you room to add footnotes, a variety of transitions, lower thirds, among other features. You can as well resize your video and enhance its quality.
For Win 7 or later (64-bit)
For macOS 10.14 or later
To Cut/Trim Videos with Wondershare Filmora:
- Drag and Drop the Video
Assuming that you have already downloaded and installed Wondershare Filmora app, click to open. There are two ways through which you can locate your video.
One, you can opt to drag and drop the video from its location to the app’s timeline. Secondly, you can right click on the space at the top left then select the video to be edited from the dialogue box that will appear.
- Trimming the video
After dropping the video on the timeline, it is likely to take up a lot of space, especially if it is long.
To trim the video from the beginning, place your cursor at the starting point and wait for the pointer to appear. Then move the point forward. To trim from the end, place the cursor at that point, hold and move the pointer forward till the required point.
Trimming the video does not mean that you lose the parts. It is more like shortening it to fit in place.
- Cutting the video
Unlike trimming, cutting involves getting rid of a section of the video completely. To do so, you need to first of all isolate that section.
With the video on the timeline, move and point your cursor at the starting point of the video and click on the scissors icon at the top. Then move it to the end of the video section and click on the scissors icon again. By so doing, you will have selected that section.
Once the section has been selected, right click on the video, select and click to delete. You can then drag the remaining parts to make them one.
After cutting or trimming, you can choose to add several effects to the video. Transitions, watermarks, cropping, resizing, ripple effects among others are some of the changes you could make. All these appear on the menu at the top.
- Save and/or Import your video
The final step is saving or importing your file to prevent its loss. By clicking on the ‘Import’ button, you save the file to the Media Library. By selecting ‘save as’, you select the location where you want to store your file.
Conclusion
There are so many video editors, each with different features. Some are simple to use while others will require advanced software to operate. Whether you use VLC Media Player or Wondershare Filmora, the results will be the same. The difference comes in where you have the knowledge and skills to use one app better than the other one.
The above steps on how to use both VLC Media Player and Wondershare Filmora will guide you through the whole process. It is said that, ‘practice makes perfect’. So yes, keep practicing and putting these skills into use. Sooner or later you will be an expert!
Wondering How to Replace Sky in After Effects? Learn How
Replacing Sky After Effects can change the essence of your videos with an authentic feel. In sci-fi movies, the colors of the sky add a dramatic, intense, or soft touch to videos. In scenes of war, peace, crime, and love, skies represent the theme. Shooting outdoors cannot always capture the essence of the sky. Replacing skies can help with covering over-exposed or under-exposed skies.
In this article, the focus of the discussion is how to replace Sky After Effects. Users can also learn about the advantages of using background replacers. If you want to learn sky replacement in After Effects, there is an instruction manual. It will give you some tips and tricks for replacing and adjusting the sky. At the end, we will discuss another software for replacing video backgrounds .
Sky Replacement A cross-platform works like magic for background removal or sky replacement photos!
Free Download Free Download Learn More

Part 1: What Are the Benefits of Having Video Background Replacers?
Along with enhancing the creative element in videos, background replacers help with more. Users can integrate them for both personal and professional uses. The following section will give a sneak peek at the advantages of background removers:
1. Privacy and Concealment
Video background removers extract the real surroundings, which addresses privacy concerns. In addition, they conceal any mess or imperfections in your background.
2. Maintains Professional Appearance
They help you set up professional backgrounds for Zoom meetings or Google Classrooms. In this way, they maintain the professional element of your videos.
3. Marketing Consistency
When it comes to marketing, they help choose a reliable background for the brand. The background becomes the identity of the brand and maintains its consistency.
4. Creative Expression in Movies
In the media industry, backgrounds like the sky help express the emotion of an actor or a mass. If there is anger, the sky will turn red; if there is peace, it will have a calm outlook.
5. Audience Engagement and Focus
A well-aligned background increases the audience’s focus on the theme of the video. This is because irrelevant backgrounds can catch the audience’s interest and distract them.
Part 2: Top Guide Explaining How to Replace Sky in Adobe After Effects?
Do you want to elevate the graphics of your videos professionally? Adobe After Effects is an ideal software for it as it helps professionals to edit films. It offers multiple animations for titles and videos like revolve, rotate, and more. In addition, you can overlap videos with precision using its Rotoscope feature.
There are built-in effects and features to ease the editing process for you. In addition, you can do custom settings in it and save them as presets. One of its many specifications is that it is an elite background remover and replacement. It enables a seamless addition of the sky in the background. We have mentioned the step-by-step procedure of After Effects replace Sky below:
Procedure 1: Removing Video Background
Step 1: After bringing your video to the timeline, navigate towards the top search bar at the left. In the Effects Control option, search for the “Extractor” effect and add it. Then, change the “Channel” of this effect to your “Blue” or “Luminance.” Change the position of both sliders there to remove and feather the background.

Step 2: To avoid removing parts other than the sky, duplicate this video to the timeline. From the bottom video, eliminate the extractor effect. Navigate towards the top toolbar and select the “Mask” option. Create a mask around the ground at the bottom of the video. In the timeline, click the “Mask Path” option to create the mask throughout the video.

Step 3: Now, select the top video in the timeline and search for “Key Cleaner.” Adjust the values of options under the key cleaner for precision.

Step 4: If there are still some spaces left, use the “Simple Choker” effect to correct them. You can find it using the search bar and adjust the given values.

Procedure 2: 3D Camera Tracking
Step 1: Now, duplicate the video again on the timeline and remove all its effects. Afterward, add a “3D Camera Tracker” in it. Then click “Analyze” and let the tracker analyze your video.

Step 2: Next, select any three points from the footage and right-click on them. From the drop-down menu, select “Create Null and Camera” or “Create Solid and Camera.”

Procedure 3: Replacing the Sky
Step 1: Import the video of your sky and bring it to the timeline. Bring the sky in the back of your footage and change it to a 3D layer. Afterward, change the “Position” of your sky from the timeline. We recommend you set the values as far away as possible for realistic effect.

Step 2: Once you have set the sky’s position, navigate towards the timeline panel again. From there, change the “Scale” of the background to set according to your footage. Afterward, see if the sky needs any flipping. This is because you must align the bright parts of the sky with the bright parts of the ground.

Procedure 4: Color Matching
Step 1: Play with the color setting elements like “Saturation” or “Lightness.” Change the position of their sliders to observe the changes in your footage.

Step 2: Right-click on the timeline and add “New > Adjustment Layer” for settling colors. Afterward, see the preview of your video and export it.

Part 3: Wondershare Filmora: A Breath-taking Alternative to Replacing Backgrounds in Videos
For those who find sky replacement in After Effects difficult, there are alternatives. One of the simplest alternatives to replace sky is Wondershare Filmora . It is a video editor driven by AI technology with multiple effects and presets. Filmora keeps updating its functionalities, and it has recently launched the V13 upgrade. There was the addition of multiple AI tools and enhanced effects for creativity purposes.
Free Download For Win 7 or later(64-bit)
Free Download For macOS 10.14 or later
Filmora’s video background remover uses AI to extract the background with precision. Afterward, users can replace it with Filmora’s pre-assembled background collection. There are multiple colors, gradients, and other replacements for the background. The integration of AI has eliminated the human effort of cutting out background.
Step-by-Step Guide on Replacing Backgrounds in Filmora
Unlike replacing Sky After Effects, it keeps the background changing process simpler. In this guide, we will remove the background first and then replace it. Here is the step-by-step procedure to replace the background using this alternative:
Step 1Create a New Project to Import Media
First, install Wondershare Filmora on your device and launch it. Afterward, use the “New Project” button to start a project and enter its editing interface. Use the “Ctrl +I” keys to import your video and drop it on the timeline.

Step 2Enable the Smart Cutout Option
In the timeline panel, select the video and navigate towards the right-side settings panel. Afterwards, go to the “AI Tools” section under the “Video” tab. From there, enable the “Smart Cutout” option and click the Start button below.

Step 3Start Removing Background
In the Smart Cutout Video window, use the brush to mark the object you want in the video. The AI will auto-select the rest of the object. After that, hit the “Click to start Smart Cutout” option, and it will initiate. Then, click the “Save” button to save the background, removing settings.

Step 4Replace a Background and Export Video
Once the background has been removed, click this video in the timeline. Hover the cursor towards the right settings panel and access the “Video > Basic” tab. Scroll down to find the “Backgrounds” section and enable it. In the “Type” section, select the background type and choose from the options to add. Once you have added the background, click the “Export” button to save this video.

Conclusion
The article emphasized the importance of video background removers and their benefits. In addition, we discussed replacing sky After Effects in detail. In the end, we provided a simple alternative for those looking for it. This is because Adobe After Effects might have a technical editing interface.
Wondershare Filmora, on the other hand, can carry on the process with efficiency and simplicity. If you haven’t yet used this software, visit its website to download it. There are other features that help with uplifting the content. You will also find the detailed user guides to use those functions.
Free Download Free Download Learn More
Part 1: What Are the Benefits of Having Video Background Replacers?
Along with enhancing the creative element in videos, background replacers help with more. Users can integrate them for both personal and professional uses. The following section will give a sneak peek at the advantages of background removers:
1. Privacy and Concealment
Video background removers extract the real surroundings, which addresses privacy concerns. In addition, they conceal any mess or imperfections in your background.
2. Maintains Professional Appearance
They help you set up professional backgrounds for Zoom meetings or Google Classrooms. In this way, they maintain the professional element of your videos.
3. Marketing Consistency
When it comes to marketing, they help choose a reliable background for the brand. The background becomes the identity of the brand and maintains its consistency.
4. Creative Expression in Movies
In the media industry, backgrounds like the sky help express the emotion of an actor or a mass. If there is anger, the sky will turn red; if there is peace, it will have a calm outlook.
5. Audience Engagement and Focus
A well-aligned background increases the audience’s focus on the theme of the video. This is because irrelevant backgrounds can catch the audience’s interest and distract them.
Part 2: Top Guide Explaining How to Replace Sky in Adobe After Effects?
Do you want to elevate the graphics of your videos professionally? Adobe After Effects is an ideal software for it as it helps professionals to edit films. It offers multiple animations for titles and videos like revolve, rotate, and more. In addition, you can overlap videos with precision using its Rotoscope feature.
There are built-in effects and features to ease the editing process for you. In addition, you can do custom settings in it and save them as presets. One of its many specifications is that it is an elite background remover and replacement. It enables a seamless addition of the sky in the background. We have mentioned the step-by-step procedure of After Effects replace Sky below:
Procedure 1: Removing Video Background
Step 1: After bringing your video to the timeline, navigate towards the top search bar at the left. In the Effects Control option, search for the “Extractor” effect and add it. Then, change the “Channel” of this effect to your “Blue” or “Luminance.” Change the position of both sliders there to remove and feather the background.
Step 2: To avoid removing parts other than the sky, duplicate this video to the timeline. From the bottom video, eliminate the extractor effect. Navigate towards the top toolbar and select the “Mask” option. Create a mask around the ground at the bottom of the video. In the timeline, click the “Mask Path” option to create the mask throughout the video.
Step 3: Now, select the top video in the timeline and search for “Key Cleaner.” Adjust the values of options under the key cleaner for precision.
Step 4: If there are still some spaces left, use the “Simple Choker” effect to correct them. You can find it using the search bar and adjust the given values.
Procedure 2: 3D Camera Tracking
Step 1: Now, duplicate the video again on the timeline and remove all its effects. Afterward, add a “3D Camera Tracker” in it. Then click “Analyze” and let the tracker analyze your video.
Step 2: Next, select any three points from the footage and right-click on them. From the drop-down menu, select “Create Null and Camera” or “Create Solid and Camera.”
Procedure 3: Replacing the Sky
Step 1: Import the video of your sky and bring it to the timeline. Bring the sky in the back of your footage and change it to a 3D layer. Afterward, change the “Position” of your sky from the timeline. We recommend you set the values as far away as possible for realistic effect.
Step 2: Once you have set the sky’s position, navigate towards the timeline panel again. From there, change the “Scale” of the background to set according to your footage. Afterward, see if the sky needs any flipping. This is because you must align the bright parts of the sky with the bright parts of the ground.
Procedure 4: Color Matching
Step 1: Play with the color setting elements like “Saturation” or “Lightness.” Change the position of their sliders to observe the changes in your footage.
Step 2: Right-click on the timeline and add “New > Adjustment Layer” for settling colors. Afterward, see the preview of your video and export it.
Part 3: Wondershare Filmora: A Breath-taking Alternative to Replacing Backgrounds in Videos
For those who find sky replacement in After Effects difficult, there are alternatives. One of the simplest alternatives to replace sky is Wondershare Filmora . It is a video editor driven by AI technology with multiple effects and presets. Filmora keeps updating its functionalities, and it has recently launched the V13 upgrade. There was the addition of multiple AI tools and enhanced effects for creativity purposes.
Free Download For Win 7 or later(64-bit)
Free Download For macOS 10.14 or later
Filmora’s video background remover uses AI to extract the background with precision. Afterward, users can replace it with Filmora’s pre-assembled background collection. There are multiple colors, gradients, and other replacements for the background. The integration of AI has eliminated the human effort of cutting out background.
Step-by-Step Guide on Replacing Backgrounds in Filmora
Unlike replacing Sky After Effects, it keeps the background changing process simpler. In this guide, we will remove the background first and then replace it. Here is the step-by-step procedure to replace the background using this alternative:
Step 1Create a New Project to Import Media
First, install Wondershare Filmora on your device and launch it. Afterward, use the “New Project” button to start a project and enter its editing interface. Use the “Ctrl +I” keys to import your video and drop it on the timeline.
Step 2Enable the Smart Cutout Option
In the timeline panel, select the video and navigate towards the right-side settings panel. Afterwards, go to the “AI Tools” section under the “Video” tab. From there, enable the “Smart Cutout” option and click the Start button below.
Step 3Start Removing Background
In the Smart Cutout Video window, use the brush to mark the object you want in the video. The AI will auto-select the rest of the object. After that, hit the “Click to start Smart Cutout” option, and it will initiate. Then, click the “Save” button to save the background, removing settings.
Step 4Replace a Background and Export Video
Once the background has been removed, click this video in the timeline. Hover the cursor towards the right settings panel and access the “Video > Basic” tab. Scroll down to find the “Backgrounds” section and enable it. In the “Type” section, select the background type and choose from the options to add. Once you have added the background, click the “Export” button to save this video.
Conclusion
The article emphasized the importance of video background removers and their benefits. In addition, we discussed replacing sky After Effects in detail. In the end, we provided a simple alternative for those looking for it. This is because Adobe After Effects might have a technical editing interface.
Wondershare Filmora, on the other hand, can carry on the process with efficiency and simplicity. If you haven’t yet used this software, visit its website to download it. There are other features that help with uplifting the content. You will also find the detailed user guides to use those functions.
Best 5 Tips to Freeze-Frame in After Effects
Top 5 Tips to Freeze Frame in After Effects
An easy yet powerful editor
Numerous effects to choose from
Detailed tutorials provided by the official channel
After Effects (AE) does not require any introduction as it is one of the most preferred video editing tools for commercial and professional purposes. However, this editing software is a bit complex for beginners. A freeze-frame is basically for holding the video on a single frame for an extended period. When it comes to clip editing, Adobe After Effects is a tool that no one can miss as it has plenty of editing tools and features that other tools do not have. In addition, AE offers a layer-based editing tool that provides the most professional way to edit videos, whereby users can add transition, multiple layers, effects, audio, etc., at the same instant.

Among many other features, one of the essential features of AE that we will talk about is a freeze-frame. Now the question is, what is freeze-frame? The freeze-frame stops or freezes stop the specific frame that users should focus on or feature. Simply, select or pick the frame required to be frozen and follow the steps to freeze the frame of their choice. This article will explain how you can frame hold in After Effects by following a few simple steps.
In this article
01 [How to Freeze-frame in After Effects](#Part 1)
02 [FAQs on Freeze Effect on After Effects](#Part 2)
03 [Compared with Filmora, What Are the Advantages of Freeze-frame After Effects?](#Part 3)
Part 1 How to Freeze-frame in After Effects
This part explains how to hold a frame in After Effects and the working of the freeze-frame button. After Effects requires ample resources, and the layers need to be solo for the editing process to speed up. However, sometimes you may need to see other objects in the scene, and that is where the freeze-frame button will be helpful. This freeze-frame Effect temporarily freezes the selected layers while you continue editing the video and does not overload the After Effects editor. In addition, you can press the button again to remove the freeze. Here is a step-by-step guide on how to use Adobe After Effects to freeze-frame:
Step 1: Add Video Clip to Adobe After Effects
First, make sure you have the AE composition open, and the video clip added. Next is to find the point where you want the video to “pause” or freeze by moving the time position indicator on the timeline.
Step 2: Choose Layer for Freezing Frame
Next, select the layer and then right-click on the layer to find Time in the menu that appears, and under Time find Freeze-frame and click it. Once done, the entire layer will get stuck on that frame.

Step 3: Add Multiple Layers for Effects
Start the same way before and repeat it several times by splitting the layer, which means that After Effects will take the layer at the time position indicator and cut it into two layers. To achieve this, use the keyboard shortcut Command+Shift+D if you are using a Mac or Control+Shift+D if you are using a Windows operating system.
Step 4: Zoom in
Next, hit the plus (+) sign a few times to zoom into the timeline, move forward one frame, select the new layer, the one on top, and split the layer again using the keyboard shortcut, and now have three layers.

Finally, export and save it on your device when you are satisfied with the result.
Thus, you successfully used the After Effects Freeze Frame to bring cinematic effects to your video.
Part 2 FAQs on Freeze Effect on After Effects
Now, let us view some common FAQs that may come across while using After Effects frame hold.
● What does freeze do in After Effects?
With After Effects holding the last frame (freeze-frame), you can instantly add multiple layers, effects, transitions, audio, and other media. In addition, the freeze-frame in After Effect pauses or stops the specific frame that you want to feature or focus.
● Why can’t I freeze-frame in After Effects?
The reason you cannot freeze-frame in After Effect could be a result of the greyed-out features. With this grey-out feature, a freeze-frame cannot be created or added from a sequence, as you will be required to go back to the original clip to create a freeze-frame or any other type of Effect.
● How do you Freeze the current frame for the duration of the layer in After Effects 2020?
● First, in the Composition or the Timeline panel, pick the layer.
● Place the current-time indicator on the frame that you want to freeze.
● Choose Layer > Time > Freeze-frame.
Part 3 Compared with Filmora, What Are the Advantages of Freeze-frame After Effects?
A freeze-frame can be any frame from a video clip you would like to turn into an After Effects still frame or still image. Another perfect way to explain a freeze-frame called a still image is that it is like pressing the pause button on remote control, making a statue, or taking a photo.
Other Advantages of Freeze-frame in Adobe After Effect is that:
● The images can be worked upon quickly without discussion or rehearsed and planned.
● They are instrumental as an immediate way of communicating ideas or telling a story.
● They can be valuable to represent people or objects and even abstract concepts like emotions or atmospheres.
● As there are no lines to learn, frame hold in After Effects can help shyer performers to gain confidence.
More so, with the Filmora Video Editor, you can freeze a frame of your video clip, and it also allows users to set the duration of the freeze automatically.
Other Advantages of Freeze-frame in Filmora are that:
● Freeze Frame in Filmora has made the editing tasks more flexible and accessible.
● It makes the video more appealing and exciting.
● It helps extend the duration of any point in the video and makes it more focused.
▲Comparison Table of Adobe After Effect and Wondershare Filmora Video Editor
For Win 7 or later (64-bit)
For macOS 10.12 or later
| DIMENSIONS | ADOBE AFTER EFFECT (AE) | FILMORA |
|---|---|---|
| Smartscore | 9.0 | 9.5 |
| User Satisfaction | 82% | 96% |
| Price | $29.99 | $7.99 |
| Price Model | Monthly PaymentAnnual SubscriptionQuote Based | Monthly PaymentAnnual SubscriptionQuote BasedOne-time Payment |
| List of Features | Immersive Virtual Reality EffectsData-Driven AnimationExpression Access to Shape, Mask, And Brush Stroke Path PointsCreate Virtual Reality EffectsVR ConverterVR Comp EditorVR Rotate SphereCreate Nulls from Path PanelGPU Accelerated Effects | 4K editing supportGIF supportNoise removalColor tuningAdvanced text editorAudio mixerVideo stabilizationScene detectionAudio equalizer |
| Integration | Video collaboration tool3D graphic programProject management solution | YouTubeFacebookTwitterInstagramVimeo |
| Language Supported | EnglishDutchPolishTurkishSwedish | EnglishSwedishPortugueseDutchItalianRussianFrenchSpanishJapaneseHindiGermanChinese |
| Available Device | WindowsMacAndroidWeb-basediPhone/iPadLinux | WindowsMac |
In short, Adobe After Effects is a much better instrument for professionals due to its extensive range of features. However, it can seem complex for newbies. Thus, if you are new to video editing and freeze frames on After Effects, we suggest you go for Filmora first to get yourself acquainted.
● Ending Thoughts →
● Thus, this report recommends Filmora as an essential alternative to After Effect in using freeze-frame as Filmora allows work with ease.
● We added a list of FAQs on the After Effects freeze-frame.
After Effects (AE) does not require any introduction as it is one of the most preferred video editing tools for commercial and professional purposes. However, this editing software is a bit complex for beginners. A freeze-frame is basically for holding the video on a single frame for an extended period. When it comes to clip editing, Adobe After Effects is a tool that no one can miss as it has plenty of editing tools and features that other tools do not have. In addition, AE offers a layer-based editing tool that provides the most professional way to edit videos, whereby users can add transition, multiple layers, effects, audio, etc., at the same instant.
Among many other features, one of the essential features of AE that we will talk about is a freeze-frame. Now the question is, what is freeze-frame? The freeze-frame stops or freezes stop the specific frame that users should focus on or feature. Simply, select or pick the frame required to be frozen and follow the steps to freeze the frame of their choice. This article will explain how you can frame hold in After Effects by following a few simple steps.
In this article
01 [How to Freeze-frame in After Effects](#Part 1)
02 [FAQs on Freeze Effect on After Effects](#Part 2)
03 [Compared with Filmora, What Are the Advantages of Freeze-frame After Effects?](#Part 3)
Part 1 How to Freeze-frame in After Effects
This part explains how to hold a frame in After Effects and the working of the freeze-frame button. After Effects requires ample resources, and the layers need to be solo for the editing process to speed up. However, sometimes you may need to see other objects in the scene, and that is where the freeze-frame button will be helpful. This freeze-frame Effect temporarily freezes the selected layers while you continue editing the video and does not overload the After Effects editor. In addition, you can press the button again to remove the freeze. Here is a step-by-step guide on how to use Adobe After Effects to freeze-frame:
Step 1: Add Video Clip to Adobe After Effects
First, make sure you have the AE composition open, and the video clip added. Next is to find the point where you want the video to “pause” or freeze by moving the time position indicator on the timeline.
Step 2: Choose Layer for Freezing Frame
Next, select the layer and then right-click on the layer to find Time in the menu that appears, and under Time find Freeze-frame and click it. Once done, the entire layer will get stuck on that frame.
Step 3: Add Multiple Layers for Effects
Start the same way before and repeat it several times by splitting the layer, which means that After Effects will take the layer at the time position indicator and cut it into two layers. To achieve this, use the keyboard shortcut Command+Shift+D if you are using a Mac or Control+Shift+D if you are using a Windows operating system.
Step 4: Zoom in
Next, hit the plus (+) sign a few times to zoom into the timeline, move forward one frame, select the new layer, the one on top, and split the layer again using the keyboard shortcut, and now have three layers.
Finally, export and save it on your device when you are satisfied with the result.
Thus, you successfully used the After Effects Freeze Frame to bring cinematic effects to your video.
Part 2 FAQs on Freeze Effect on After Effects
Now, let us view some common FAQs that may come across while using After Effects frame hold.
● What does freeze do in After Effects?
With After Effects holding the last frame (freeze-frame), you can instantly add multiple layers, effects, transitions, audio, and other media. In addition, the freeze-frame in After Effect pauses or stops the specific frame that you want to feature or focus.
● Why can’t I freeze-frame in After Effects?
The reason you cannot freeze-frame in After Effect could be a result of the greyed-out features. With this grey-out feature, a freeze-frame cannot be created or added from a sequence, as you will be required to go back to the original clip to create a freeze-frame or any other type of Effect.
● How do you Freeze the current frame for the duration of the layer in After Effects 2020?
● First, in the Composition or the Timeline panel, pick the layer.
● Place the current-time indicator on the frame that you want to freeze.
● Choose Layer > Time > Freeze-frame.
Part 3 Compared with Filmora, What Are the Advantages of Freeze-frame After Effects?
A freeze-frame can be any frame from a video clip you would like to turn into an After Effects still frame or still image. Another perfect way to explain a freeze-frame called a still image is that it is like pressing the pause button on remote control, making a statue, or taking a photo.
Other Advantages of Freeze-frame in Adobe After Effect is that:
● The images can be worked upon quickly without discussion or rehearsed and planned.
● They are instrumental as an immediate way of communicating ideas or telling a story.
● They can be valuable to represent people or objects and even abstract concepts like emotions or atmospheres.
● As there are no lines to learn, frame hold in After Effects can help shyer performers to gain confidence.
More so, with the Filmora Video Editor, you can freeze a frame of your video clip, and it also allows users to set the duration of the freeze automatically.
Other Advantages of Freeze-frame in Filmora are that:
● Freeze Frame in Filmora has made the editing tasks more flexible and accessible.
● It makes the video more appealing and exciting.
● It helps extend the duration of any point in the video and makes it more focused.
▲Comparison Table of Adobe After Effect and Wondershare Filmora Video Editor
For Win 7 or later (64-bit)
For macOS 10.12 or later
| DIMENSIONS | ADOBE AFTER EFFECT (AE) | FILMORA |
|---|---|---|
| Smartscore | 9.0 | 9.5 |
| User Satisfaction | 82% | 96% |
| Price | $29.99 | $7.99 |
| Price Model | Monthly PaymentAnnual SubscriptionQuote Based | Monthly PaymentAnnual SubscriptionQuote BasedOne-time Payment |
| List of Features | Immersive Virtual Reality EffectsData-Driven AnimationExpression Access to Shape, Mask, And Brush Stroke Path PointsCreate Virtual Reality EffectsVR ConverterVR Comp EditorVR Rotate SphereCreate Nulls from Path PanelGPU Accelerated Effects | 4K editing supportGIF supportNoise removalColor tuningAdvanced text editorAudio mixerVideo stabilizationScene detectionAudio equalizer |
| Integration | Video collaboration tool3D graphic programProject management solution | YouTubeFacebookTwitterInstagramVimeo |
| Language Supported | EnglishDutchPolishTurkishSwedish | EnglishSwedishPortugueseDutchItalianRussianFrenchSpanishJapaneseHindiGermanChinese |
| Available Device | WindowsMacAndroidWeb-basediPhone/iPadLinux | WindowsMac |
In short, Adobe After Effects is a much better instrument for professionals due to its extensive range of features. However, it can seem complex for newbies. Thus, if you are new to video editing and freeze frames on After Effects, we suggest you go for Filmora first to get yourself acquainted.
● Ending Thoughts →
● Thus, this report recommends Filmora as an essential alternative to After Effect in using freeze-frame as Filmora allows work with ease.
● We added a list of FAQs on the After Effects freeze-frame.
Create Glitch Text Effect
Glitch text effect is a trending video effect whereby the texts get distorted for a few seconds. The effect is comparable to the glitch you face when your screen starts to malfunction, and the screen appears to be wavy and disoriented. A glitch text effect is better than a regular animated text effect as it helps to get the attention of the viewers immediately and get the message across clearly.
The glitch effect can be applied to the entire video as well as the text as per your preference. There are several video editors available where the glitch text effect comes pre-loaded. All you need to do is to apply it to the text and get it done in a few steps. We will illustrate how to add glitch text effect Premiere Pro. But we recommend Filmora for the best glitter text effect that you can add to your video instantly.
Part 1. Create Glitch Text in Video with Filmora
We have already stated that Wondershare Filmora is the best video editor for the best glitch text effect download and apply to your video in simple steps. Filmora is a premium video editor that is widely used by amateur and professional video editors. You can get all glitch text effect After Effects and add them to your video conveniently in comparison to After Effects.
As a matter of fact, there are literally unlimited video and text effects available, and you can find different types of glitch text effects to apply to your titles and texts. Filmora is available for both Windows and mac users. Here are the steps to create glitch text in video with Filmora.
Free Download For Win 7 or later(64-bit)
Free Download For macOS 10.14 or later
Step1 Download and install Filmora on your computer. Go to File> New Project from the menu bar to start video editing project.

Step2 Go to File> Import Media > Import Media Files to import the video clips where you want to add glitch text effect. Drop the clip into the Timeline to get started.

Step3 Go to Titles tab located at the top. From the left panel, click on Titles option. Search “glitch” in the search field and you will see all the glitch text effects that you can apply to the text in your video.
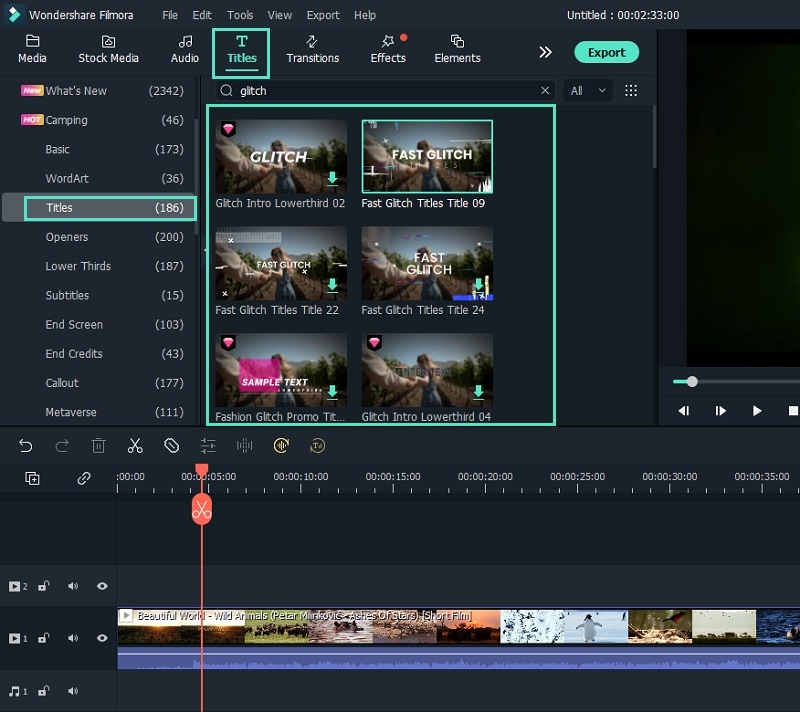
Step4 Select any glitch text effect and drop it into the Timeline above the video clip exactly where you want the text and the effect to appear.
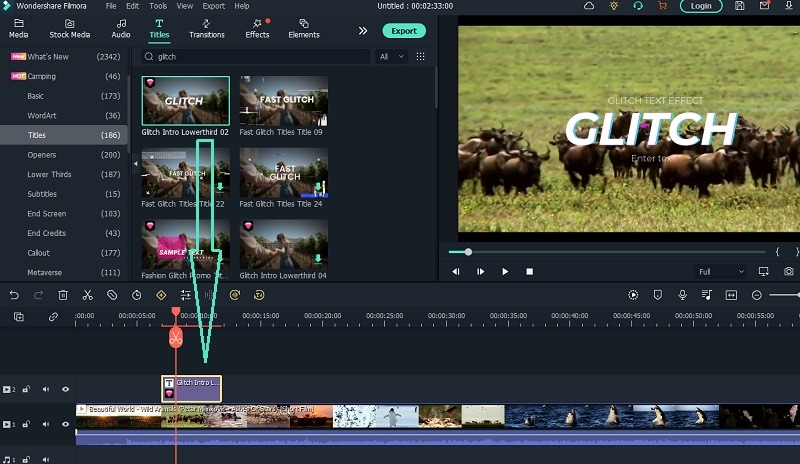
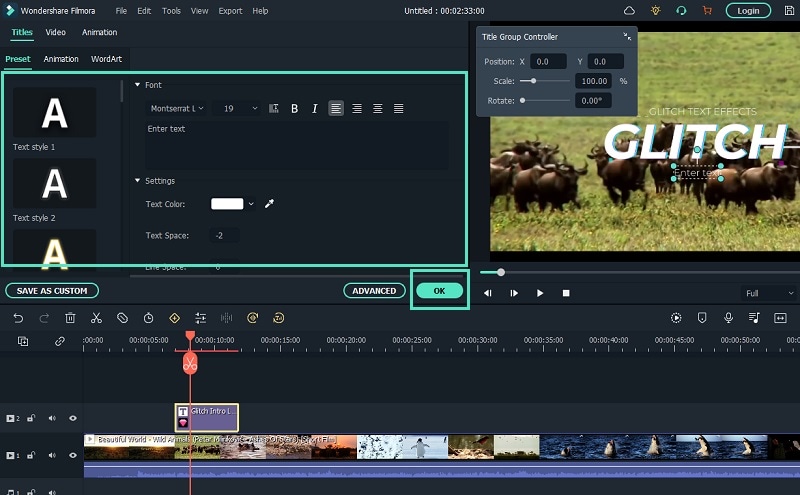
Step5 Double-click on the glitch text effect located on Timeline and edit the text, style, and other parameters as per your preference. Click on Ok and play the video to see your edited video with the glitch text effect.
Part 2. How to Make Glitch Text Effect with Premiere Pro
Adobe Premiere Pro is another renowned video editor where you can add glitch text effect to your video. Premiere Pro is strictly for professional video editors as the user interface is not as intuitive as Filmora . The learning curve is steep, and therefore, you need to go through the steps to add glitch text effect Premiere Pro. There are several glitch text effect presets available that you can apply to any text on your video to make them engaging. Here are the steps to make glitch text effect with Premiere Pro.
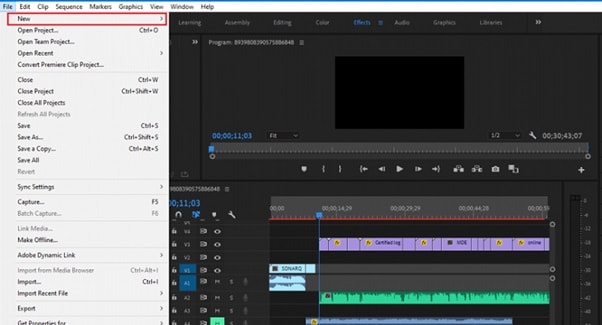
Step1 Launch Adobe Premiere Pro and go to New> Project to get started. Import your video and drop it into Timeline.
Step2 Use the Type tool to write any text on your video to add glitch text effect. You should have a text layer on Timeline.
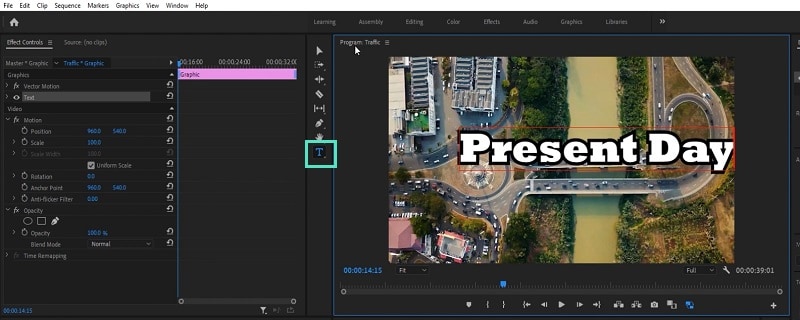
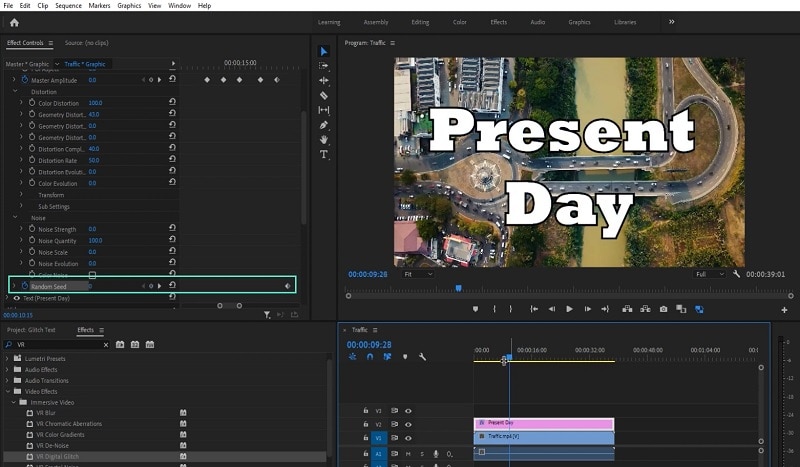
Step3 Go to Effects> Immersive Video> VR Digital Glitch option. Drag and drop the effect to text layer.
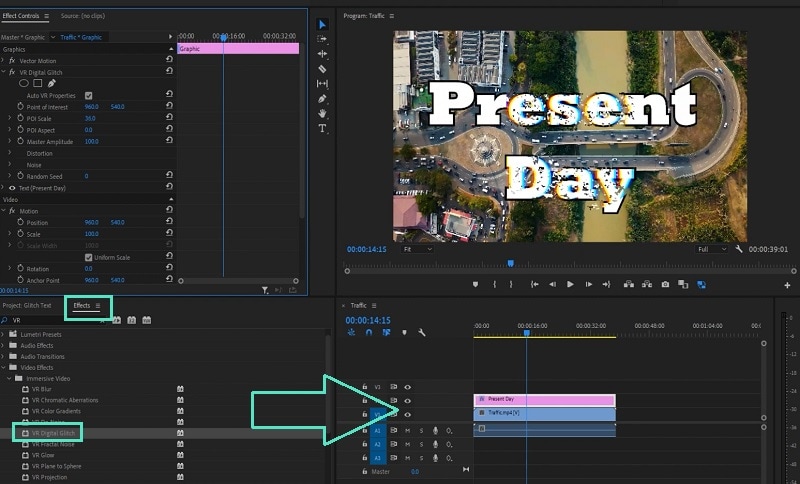
Step4 Under Effect Controls tab, you will find all the different parameters that you can adjust to get the glitch text effect perfectly.
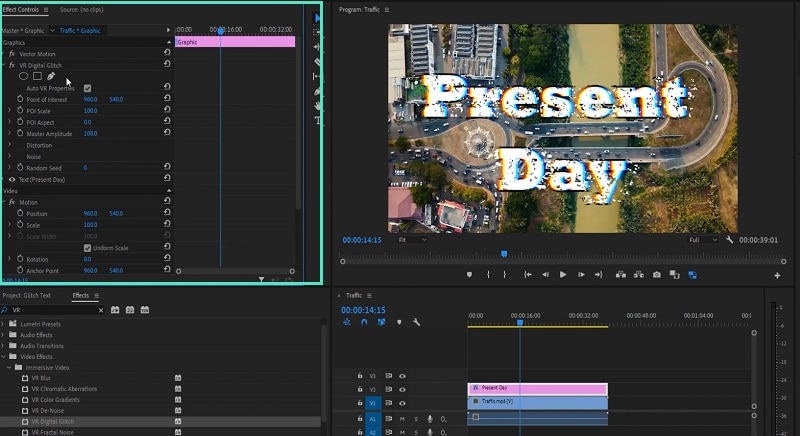
Step5 Turn on Master Amplitude and add multiple keyframes as different points in the Timeline and change the distortion value to make the effect prominent.
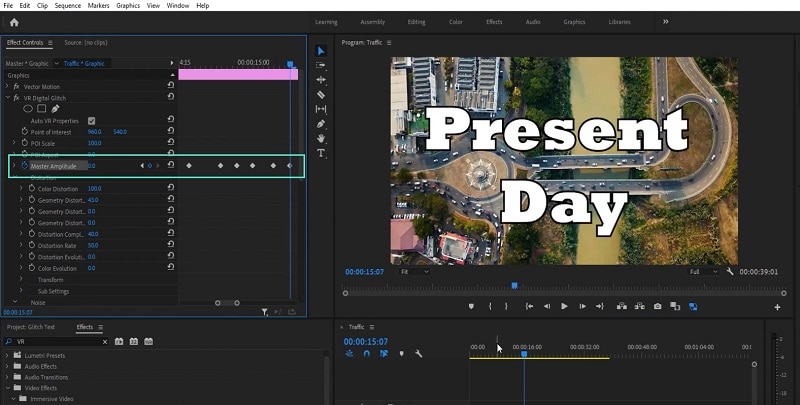
Step6 Go to the first keyframe and turn on Random Seed effect. Go to the last keyframe and turn on Random Seed effect and change the value to 75. Play the video to check the entire video with glitch text effect.
Part 3. Use VSDC Video Editor to Create Glitch Text
If you do not have any premium video editor on your computer and you do not want to purchase any premium video editor, you can still get glitter text effect free. You need to download and install VSDC free video editor on your computer. But the steps to create glitch text on VSDC video editor are slightly complicated as the user interface is not as intuitive as Filmora . Here are the steps to add free glitch text effect on your video.
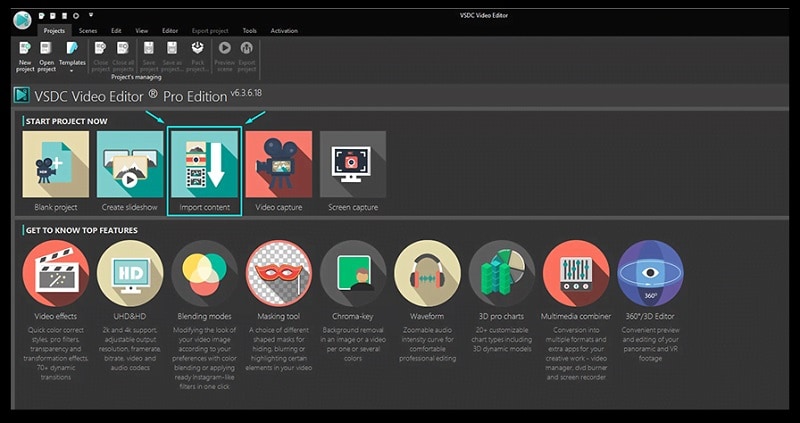
Step1 Download and install VSDC video editor. Launch the editor and click on New Project to get started. Import your video to your project where you want to add glitch text effect.
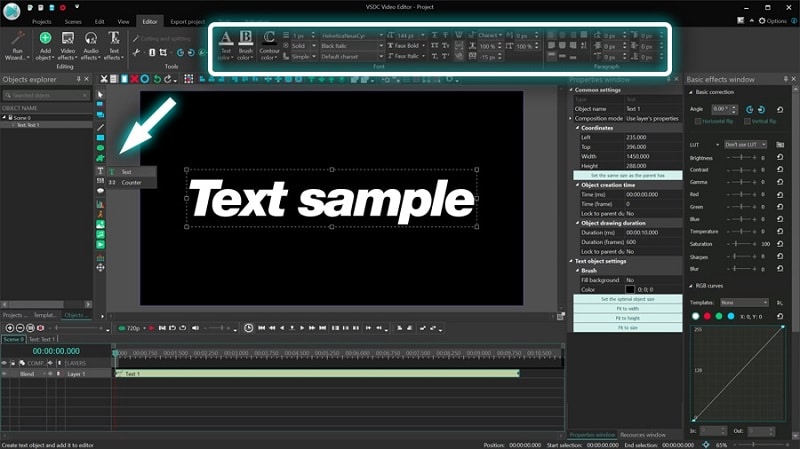
Step2 Use Type tool to write a text on the video. You can press Shift+T shortcut as well. After typing the text, adjust the text style as per your preference.
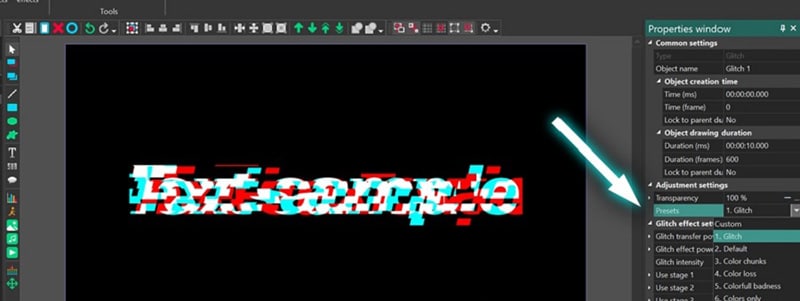
Step3 Double-click on the text layer on Timeline and go to Video Effects> Special FX and click on Glitch option.
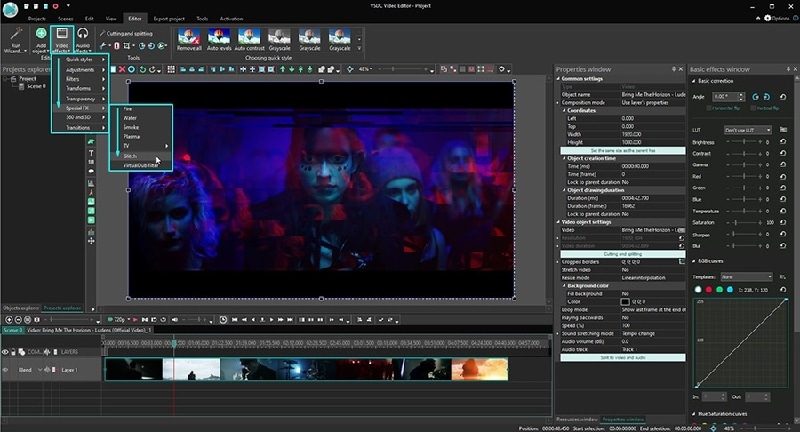
Step4 A window will appear where you can set the starting point, duration, and different parameters. Click on Ok button.
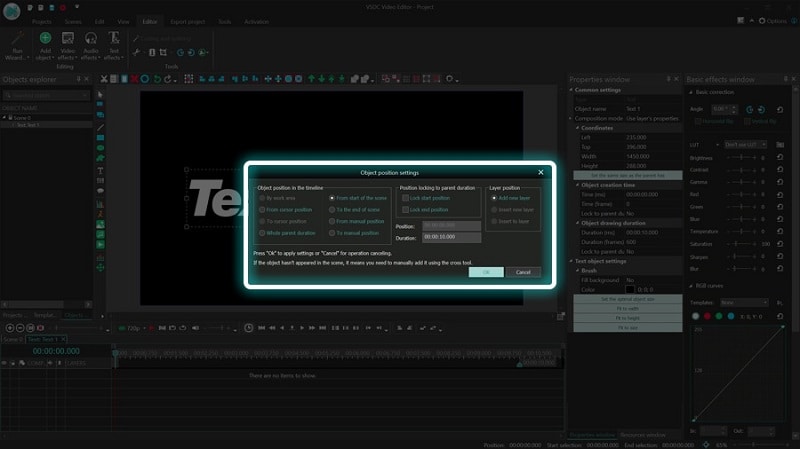
Step5 Go to Properties Windows and click on Presets to select different types of glitch text effects. You can also adjust the intensity of the text effects and other parameters as you feel.
Part 4. Related FAQs about Glitch Text
1. How do you animate glitch text?
If you want to animate glitch text for free, VSDC video editor is ideal as you can customize the effect on any text in simple steps. If you want to use a premium video editor, we recommend Filmora as there are various glitch text effects available to apply to any text on your video instantly.
2. How do you glitch text on video?
First, you have to import your video in your video editor. Type the desired text and set the style. Thereafter, go to glitch text effect presets available on the video editor and apply it to the text instantly. You can customize the glitch text effect as per your preference to make the animation more prominent.
3. How do you glitch text on Android?
You should first install Glitch Video Effect: Glitch FX app from Play Store. Edit your video on the app to add any text, and thereafter, add glitch text effect instantly. In fact, the glitch text effect is available in almost all popular video editor apps on Android due to the effect being trendy and viral.
Free Download For macOS 10.14 or later
Step1 Download and install Filmora on your computer. Go to File> New Project from the menu bar to start video editing project.
Step2 Go to File> Import Media > Import Media Files to import the video clips where you want to add glitch text effect. Drop the clip into the Timeline to get started.
Step3 Go to Titles tab located at the top. From the left panel, click on Titles option. Search “glitch” in the search field and you will see all the glitch text effects that you can apply to the text in your video.
Step4 Select any glitch text effect and drop it into the Timeline above the video clip exactly where you want the text and the effect to appear.
Step5 Double-click on the glitch text effect located on Timeline and edit the text, style, and other parameters as per your preference. Click on Ok and play the video to see your edited video with the glitch text effect.
Part 2. How to Make Glitch Text Effect with Premiere Pro
Adobe Premiere Pro is another renowned video editor where you can add glitch text effect to your video. Premiere Pro is strictly for professional video editors as the user interface is not as intuitive as Filmora . The learning curve is steep, and therefore, you need to go through the steps to add glitch text effect Premiere Pro. There are several glitch text effect presets available that you can apply to any text on your video to make them engaging. Here are the steps to make glitch text effect with Premiere Pro.
Step1 Launch Adobe Premiere Pro and go to New> Project to get started. Import your video and drop it into Timeline.
Step2 Use the Type tool to write any text on your video to add glitch text effect. You should have a text layer on Timeline.
Step3 Go to Effects> Immersive Video> VR Digital Glitch option. Drag and drop the effect to text layer.
Step4 Under Effect Controls tab, you will find all the different parameters that you can adjust to get the glitch text effect perfectly.
Step5 Turn on Master Amplitude and add multiple keyframes as different points in the Timeline and change the distortion value to make the effect prominent.
Step6 Go to the first keyframe and turn on Random Seed effect. Go to the last keyframe and turn on Random Seed effect and change the value to 75. Play the video to check the entire video with glitch text effect.
Part 3. Use VSDC Video Editor to Create Glitch Text
If you do not have any premium video editor on your computer and you do not want to purchase any premium video editor, you can still get glitter text effect free. You need to download and install VSDC free video editor on your computer. But the steps to create glitch text on VSDC video editor are slightly complicated as the user interface is not as intuitive as Filmora . Here are the steps to add free glitch text effect on your video.
Step1 Download and install VSDC video editor. Launch the editor and click on New Project to get started. Import your video to your project where you want to add glitch text effect.
Step2 Use Type tool to write a text on the video. You can press Shift+T shortcut as well. After typing the text, adjust the text style as per your preference.
Step3 Double-click on the text layer on Timeline and go to Video Effects> Special FX and click on Glitch option.
Step4 A window will appear where you can set the starting point, duration, and different parameters. Click on Ok button.
Step5 Go to Properties Windows and click on Presets to select different types of glitch text effects. You can also adjust the intensity of the text effects and other parameters as you feel.
Part 4. Related FAQs about Glitch Text
1. How do you animate glitch text?
If you want to animate glitch text for free, VSDC video editor is ideal as you can customize the effect on any text in simple steps. If you want to use a premium video editor, we recommend Filmora as there are various glitch text effects available to apply to any text on your video instantly.
2. How do you glitch text on video?
First, you have to import your video in your video editor. Type the desired text and set the style. Thereafter, go to glitch text effect presets available on the video editor and apply it to the text instantly. You can customize the glitch text effect as per your preference to make the animation more prominent.
3. How do you glitch text on Android?
You should first install Glitch Video Effect: Glitch FX app from Play Store. Edit your video on the app to add any text, and thereafter, add glitch text effect instantly. In fact, the glitch text effect is available in almost all popular video editor apps on Android due to the effect being trendy and viral.
Also read:
- New In 2024, Hey! Are You Looking for Video Reverse Effects in Your Videos? Then, You Are at the Right Place. This Article Will Guide You in Creating a Video Reverse Effect
- New Want to Learn How to Create the Random Letter Reveal Intro? Read Through the Stages of Preparing This Effect via Filmora in This Guide
- In 2024, Top iOS Solutions Finding Premium Slow Motion Apps For Video Creation
- Updated In 2024, Best Way to Freeze-Frame in Final Cut Pro
- Updated In 2024, Steps to Create Makeup Videos
- 2024 Approved How to Make Discord Emoji GIF
- Updated 7 Best MP4 Video Editors on Mac Edit MP4 Videos Easily
- Updated 2024 Approved Learn to Splice Videos Together on iPhone
- Updated 2024 Approved 3D Ray Traced Settings In After Effects
- 2024 Approved This Article Will Help You Understand How to Create Flying Objects Using Editing Tools Such as Wondershare Filmora
- New Confused About Which GoPro Should You Use? This Article Introduces and Provides a Detailed Overview of the Best GoPro for YouTubers You Can Find in the Market for Vlogging
- On the Tiktok App, You Can Make a Photo Video Slideshow. You Can Make Photo Video Slideshow with Music, Animated Tiktok Templates, and Can Also Add Text to Slideshow Video for 2024
- Updated 2024 Approved Best Software or Website to Convert Video Format
- Updated In 2024, How to Resize FLV Videos Efficiently Windows, Mac,Android, iPhone & Online
- Updated Confused as to How to Add Subtitles to a Video on iPhone? No Worries as We Bring You the Best Solution to Get the Task Done
- Updated How to Add Green Screen Effects In Phhotoshop
- In This Article, You Will Learn How to Record Creative Cinematic Videos Using a Smartphone and Edit the Video with Wondershare Filmora for 2024
- Updated An Intro Video Describing You and Your Content Is the First and the Foremost Thing Which a Viewer Sees. Thinking of How to Make an Interesting Intro Video, This Blog Is Surely a Supportive Guide for You. Learn More Here for 2024
- In 2024, Why Your WhatsApp Location is Not Updating and How to Fix On Lava Blaze 2 5G | Dr.fone
- In 2024, CatchEmAll Celebrate National Pokémon Day with Virtual Location On Nokia C02 | Dr.fone
- How to Fix My Meizu 21 Pro Location Is Wrong | Dr.fone
- Complete Tutorial to Use GPS Joystick to Fake GPS Location On Vivo Y78 5G | Dr.fone
- In 2024, How to Successfully Bypass iCloud Activation Lock on iPhone 13
- Pokemon Go Error 12 Failed to Detect Location On Oppo A79 5G? | Dr.fone
- In 2024, Ultimate Guide to Catch the Regional-Located Pokemon For Lava Blaze Curve 5G | Dr.fone
- How To Recover iPhone SE (2022) Data From iCloud? | Dr.fone
- Fix App Not Available in Your Country Play Store Problem on Honor Magic 6 | Dr.fone
- In 2024, A Guide Xiaomi Redmi Note 12 Pro+ 5G Wireless and Wired Screen Mirroring | Dr.fone
- How to Unlock iPhone 12 with a Mask On | Dr.fone
- How to Unlock Xiaomi Redmi Note 12T Pro Phone without Any Data Loss
- The Best 8 VPN Hardware Devices Reviewed On Motorola Moto G23 | Dr.fone
- New The 15 Most Efficient Photo to Cartoon Software for Android
- In 2024, A Guide Honor 100 Wireless and Wired Screen Mirroring | Dr.fone
- In 2024, Can I Remove the Apple Watch Activation Lock By iPhone 6 Plus without the Previous Owner?
- How to Detect and Remove Spyware on Samsung Galaxy F54 5G? | Dr.fone
- Whats Music Video GIF & How to Add Music to GIF Files for 2024
- Title: New 2024 Approved 2 Solutions to Cut Video in VLC on Windows
- Author: Morgan
- Created at : 2024-05-19 05:12:50
- Updated at : 2024-05-20 05:12:50
- Link: https://ai-video-editing.techidaily.com/new-2024-approved-2-solutions-to-cut-video-in-vlc-on-windows/
- License: This work is licensed under CC BY-NC-SA 4.0.
