
:max_bytes(150000):strip_icc():format(webp)/ps6-concept-trailer-64aac5b7323041ad93d7535eccf7df40.png)
New 2024 Approved Are You Searching for the Best Cinematic LUTs for Premiere Pro? You Are in the Right Place because This Article Is Dedicated to LUTs
Are You Searching for the Best Cinematic LUTs for Premiere Pro? You Are in the Right Place because This Article Is Dedicated to LUTs
LUTs stand for Look-Up Tables and are compatible with a wide array of editing software. This element in video editing can be used during production or before and after production. Using the LUTs, you can color grade your media content to make it more visually appealing. The LUTs can create consistency in your videos and photos and also leads to accurate results.
This article is designed to provide all the information about cinematic LUTs for Premiere Pro. You will not only find the best LUTs present for Premiere Pro, but we will also discuss the compatibility of LUTs with other editing software. Above all, the bonus tip will also provide a great alternative to Premiere Pro for cinematic LUTs.
Part 1: Which File Formats Are LUTs Available In?
You must be wondering if there are any specific file formats for cinematic LUTs Premiere Pro. Yes, some formats define the availability of LUTs. Some of them are:
- 3DL: 3DL is the 3D lattice of RGB output colors. You can find this in DaVinci Resolve, Adobe After Effects, and Photoshop.
- CUBE: It is one of the most popular file formats for video editing. If you want to work with CUBE, you can access it on Final Cut Pro, Adobe Premiere Pro, and other editing software.
- DAT: If you are an animation maker or work with 3D modeling, this file format is for you. In case you want to use it, go to Autodesk Maya.
- CSP: This stands for Clip Studio Paint. As the name suggests, you can use it for making high-class digital art.
- ICC: The International Color Consortium is a file format specifically used for color calibrations along with color management.
- MGA: Are you irritated by low-quality graphics? No worries because MGA can help you in improving the graphics in versatile gaming software.
- Look: With this file format; you can work with Sony Camera’s postproduction work. It leads to high-quality results, so you can use it without issues.
Empower your videos with a new mood using different LUTs. Filmora now offers 100+ top-quality 3D LUTs cover a broad range of scenarios. Transform your videos with Filmora’s powerful 3D LUTs.
Apply LUT on Videos Apply LUT on Videos Learn More


Part 2: Are LUTs Compatible With All Media Editing Software?
Predominantly, LUTs are compatible with a considerable number of media editing software. Yet, the specificity of the compatibility is somehow dependent on the file formats for the LUTs you want to use. Moreover, some software does not have the ability to import or apply the LUTs to a satisfactory quality. Many video editing software supports 3DL and CUBE as they are the most commonly used software.
In addition, popular platforms such as Final Cut Pro, Adobe Acrobat, DaVinci Resolve, and many other software can provide you with LUTs. However, you need to make sure that you are using their latest version because versions of software can affect the compatibility of LUTs. In case you want to use the less commonly used LUTs formats, you need to find a reliable source to import or apply it.
Part 3: What Are The Best Cinematic LUTs For Premiere Pro?
Now that you know considerable information about LUTs, you must be wondering where to find them. In this section, you will discover the cinematic LUTs for Premiere Pro, one of the most known platforms for providing LUTs. Thus, look below to find the LUTs of Premiere Pro:
1. Fast Film LUTs
With this cinematic LUTs Premiere Pro, you can add aesthetic emulation to your film project. It can even add a filmy touch to simple photographs. This can also save the low light issues in the footage to show clear scenes to your audience. Above all, it also reduces the noise and helps improve your film’s outlook.

2. Emulation LUTs
Using this LUT preset, you can optimize your film’s dynamic range and emulation metrics. It can escalate every little detail of your footage and help engage more viewers. In addition to this, you can apply these LUTs to multiple shots to add consistency to your video. These Premiere Pro cinematic LUTs can also

3. Pro Color Grading LUTs
A video or photo without colors can never attract the target audience. Yet, you can cater to these issues using the intuitive LUT named Pro Color Grading LUTs. It can not only fix the color grading problems of your media but can also add aesthetics to it. Moreover, you can also customize it as per your need.

4. Filmy Tone LUTs
If you wish to evoke a sense of nostalgia in your viewers, there is no better way than the Filmy Tone LUTs. It enhances the visibility of videos and photos and aims to show different periods. This can be the perfect choice for those who want to create films and photos dedicated to the past.

5. City Skyline LUTs
For creating and adding the city-lighted environment to media, you can take assistance from this LUT. It is widely used in travel and commercial videos. Moreover, you can also emphasize the features of the cityscape by using it. This also helps to add vibrant colors and styling, just as in city shots.

6. LUTs Summer Film
Creating summer videos with precise summer lights can be a tricky procedure. However, the LUTs Summer Film can help you with this as it can add summer vibes to any videos and photos. You can even use it to give summer looks to the videos shot in the winter season.

7. Exhale LUTs
To add the soft highlight along with a moody environment, you can use the Exhale LUTs. These cinematic filters Premiere Pro are widely used in music and fashion videos. You can also use it in art videos to create a sense of immersion and connection for the viewers.

8. DELUTS
The Digital Film Emulation Look-Up Tables are useful for creating a classic filmy look for simple videos and photos. It can enhance the texture and depth of everything in the video, making it more studio friendly. You can use this LUT for weddings or corporate videos.

9. Free Reign Sample LUTs
With the help of this LUT, you can experience full control over the color metrics of videos and photos. Even if the video’s color gets compromised during shooting, you can fix them with this. This type of LUTs can be used for experiments, independent or travel videos.

10. Vintage LUTs for Premiere Pro
As the name suggests, you can use these LUTs to add a more vintage look to the photos and videos. This can improve the warmth and clarify the theme of the video. You can make your videos and photos stand out in a crowd with the help of this type of LUTs.

11. Airy Bright LUTs
Many users love to make their videos airier and fuller in brightness. This LUT is perfect for users of these types of liking. You can access these LUTs to add soothing brightness and airer effects in videos and photos. It is widely used for fixing the photos of bad videos captured at night.

12. Canon Cinestyle to Rec.709 LUT
This LUT can help the videographers to add a more cinematic look to the videos captured by Cannon DSLR. You can also create a color space of Rec.709 in your videos with this LUT. No matter if you want to work on wedding shots or short films, this LUT can help you with all.

13. Urban Fashion Premiere Pro LUTs
By applying this LUT, you can convert simple fashion videos into professional ones. It can create VOUGE-standard videos for you; thus, you can also use this for startup brands. Moreover, if you are an Instagram or TikTok model, you should get familiar with it because it can make any footage premiere level in a few taps.

14. Osiris Cinematic LUTs
For making travel or advertisement videos more high quality, you can use this Premiere Pro cinematic presets. It can make all types of videos more visually appealing and can add cinematic looks to it. Moreover, this LUT allows you to upscale all the visuals and characters in the video.

15. Finishing LUTs
To add eye-catching finishing effects to the videos, you can use the Finishing LUTs. This can enhance the end-of-color grading procedure for you. It can also add a more contrast and color-friendly look to the ends. You can use it for TV series, films, music, and other videos.

Bonus Part: Wondershare Filmora – A Great Alternative To Discover Cinematic LUTs
Undoubtedly, you can use the cinematic LUTs for Premiere Pro, yet sometimes it can be a tricky platform. Thus, you need to know the best alternative to Premiere Pro so you can apply LUTs to your videos in an optimized manner. The best tool that can help you with this is Wondershare Filmora . You can experience professional-level video editing with this.
Add LUTs on Video For Win 7 or later(64-bit)
Add LUTs on Video For macOS 10.14 or later
Moreover, you can apply LUTs to the videos and can also adjust their intensity as per your need. Above all, it can help you to apply LUTs to several types of videos, such as landscapers or short videos. It also supports the LUTs hover, which lets you preview the LUTs effects .

Prominent Features of Wondershare Filmora
- With its Color Wheel, you can adjust every color metric of video. It can include mid-tones, shadows, hue, and more.
- Along with color customization, you can also sharpen the blur videos to improve the quality of your video.
- You can also control the speed ramping of your video with Filmora. It can also do motion tracking for you.
- By using the batch edit feature, you can edit multiple videos at once without compromising the quality.
Conclusion
Considering everything, you can use the cinematic LUTs for Premiere Pro to upgrade the functionality of your video. The LUTs are available in several file formats, which are mentioned above. Moreover, several editing software can help you to import and apply LUTs on photos and videos. One of the popular ones is Premiere Pro.
Other than this, the best Premiere Pro cinematic LUTs are also discussed above for your ease. Yet, if you find the Premiere Pro difficult, you can use its best alternative named Wondershare Filmora. To find out more about Filmora, go to the previous part.
Add LUTs on Video For Win 7 or later(64-bit)
Add LUTs on Video For macOS 10.14 or later
Apply LUT on Videos Apply LUT on Videos Learn More
Part 2: Are LUTs Compatible With All Media Editing Software?
Predominantly, LUTs are compatible with a considerable number of media editing software. Yet, the specificity of the compatibility is somehow dependent on the file formats for the LUTs you want to use. Moreover, some software does not have the ability to import or apply the LUTs to a satisfactory quality. Many video editing software supports 3DL and CUBE as they are the most commonly used software.
In addition, popular platforms such as Final Cut Pro, Adobe Acrobat, DaVinci Resolve, and many other software can provide you with LUTs. However, you need to make sure that you are using their latest version because versions of software can affect the compatibility of LUTs. In case you want to use the less commonly used LUTs formats, you need to find a reliable source to import or apply it.
Part 3: What Are The Best Cinematic LUTs For Premiere Pro?
Now that you know considerable information about LUTs, you must be wondering where to find them. In this section, you will discover the cinematic LUTs for Premiere Pro, one of the most known platforms for providing LUTs. Thus, look below to find the LUTs of Premiere Pro:
1. Fast Film LUTs
With this cinematic LUTs Premiere Pro, you can add aesthetic emulation to your film project. It can even add a filmy touch to simple photographs. This can also save the low light issues in the footage to show clear scenes to your audience. Above all, it also reduces the noise and helps improve your film’s outlook.
2. Emulation LUTs
Using this LUT preset, you can optimize your film’s dynamic range and emulation metrics. It can escalate every little detail of your footage and help engage more viewers. In addition to this, you can apply these LUTs to multiple shots to add consistency to your video. These Premiere Pro cinematic LUTs can also
3. Pro Color Grading LUTs
A video or photo without colors can never attract the target audience. Yet, you can cater to these issues using the intuitive LUT named Pro Color Grading LUTs. It can not only fix the color grading problems of your media but can also add aesthetics to it. Moreover, you can also customize it as per your need.
4. Filmy Tone LUTs
If you wish to evoke a sense of nostalgia in your viewers, there is no better way than the Filmy Tone LUTs. It enhances the visibility of videos and photos and aims to show different periods. This can be the perfect choice for those who want to create films and photos dedicated to the past.
5. City Skyline LUTs
For creating and adding the city-lighted environment to media, you can take assistance from this LUT. It is widely used in travel and commercial videos. Moreover, you can also emphasize the features of the cityscape by using it. This also helps to add vibrant colors and styling, just as in city shots.
6. LUTs Summer Film
Creating summer videos with precise summer lights can be a tricky procedure. However, the LUTs Summer Film can help you with this as it can add summer vibes to any videos and photos. You can even use it to give summer looks to the videos shot in the winter season.
7. Exhale LUTs
To add the soft highlight along with a moody environment, you can use the Exhale LUTs. These cinematic filters Premiere Pro are widely used in music and fashion videos. You can also use it in art videos to create a sense of immersion and connection for the viewers.
8. DELUTS
The Digital Film Emulation Look-Up Tables are useful for creating a classic filmy look for simple videos and photos. It can enhance the texture and depth of everything in the video, making it more studio friendly. You can use this LUT for weddings or corporate videos.
9. Free Reign Sample LUTs
With the help of this LUT, you can experience full control over the color metrics of videos and photos. Even if the video’s color gets compromised during shooting, you can fix them with this. This type of LUTs can be used for experiments, independent or travel videos.
10. Vintage LUTs for Premiere Pro
As the name suggests, you can use these LUTs to add a more vintage look to the photos and videos. This can improve the warmth and clarify the theme of the video. You can make your videos and photos stand out in a crowd with the help of this type of LUTs.
11. Airy Bright LUTs
Many users love to make their videos airier and fuller in brightness. This LUT is perfect for users of these types of liking. You can access these LUTs to add soothing brightness and airer effects in videos and photos. It is widely used for fixing the photos of bad videos captured at night.
12. Canon Cinestyle to Rec.709 LUT
This LUT can help the videographers to add a more cinematic look to the videos captured by Cannon DSLR. You can also create a color space of Rec.709 in your videos with this LUT. No matter if you want to work on wedding shots or short films, this LUT can help you with all.
13. Urban Fashion Premiere Pro LUTs
By applying this LUT, you can convert simple fashion videos into professional ones. It can create VOUGE-standard videos for you; thus, you can also use this for startup brands. Moreover, if you are an Instagram or TikTok model, you should get familiar with it because it can make any footage premiere level in a few taps.
14. Osiris Cinematic LUTs
For making travel or advertisement videos more high quality, you can use this Premiere Pro cinematic presets. It can make all types of videos more visually appealing and can add cinematic looks to it. Moreover, this LUT allows you to upscale all the visuals and characters in the video.
15. Finishing LUTs
To add eye-catching finishing effects to the videos, you can use the Finishing LUTs. This can enhance the end-of-color grading procedure for you. It can also add a more contrast and color-friendly look to the ends. You can use it for TV series, films, music, and other videos.
Bonus Part: Wondershare Filmora – A Great Alternative To Discover Cinematic LUTs
Undoubtedly, you can use the cinematic LUTs for Premiere Pro, yet sometimes it can be a tricky platform. Thus, you need to know the best alternative to Premiere Pro so you can apply LUTs to your videos in an optimized manner. The best tool that can help you with this is Wondershare Filmora . You can experience professional-level video editing with this.
Add LUTs on Video For Win 7 or later(64-bit)
Add LUTs on Video For macOS 10.14 or later
Moreover, you can apply LUTs to the videos and can also adjust their intensity as per your need. Above all, it can help you to apply LUTs to several types of videos, such as landscapers or short videos. It also supports the LUTs hover, which lets you preview the LUTs effects .
Prominent Features of Wondershare Filmora
- With its Color Wheel, you can adjust every color metric of video. It can include mid-tones, shadows, hue, and more.
- Along with color customization, you can also sharpen the blur videos to improve the quality of your video.
- You can also control the speed ramping of your video with Filmora. It can also do motion tracking for you.
- By using the batch edit feature, you can edit multiple videos at once without compromising the quality.
Conclusion
Considering everything, you can use the cinematic LUTs for Premiere Pro to upgrade the functionality of your video. The LUTs are available in several file formats, which are mentioned above. Moreover, several editing software can help you to import and apply LUTs on photos and videos. One of the popular ones is Premiere Pro.
Other than this, the best Premiere Pro cinematic LUTs are also discussed above for your ease. Yet, if you find the Premiere Pro difficult, you can use its best alternative named Wondershare Filmora. To find out more about Filmora, go to the previous part.
Add LUTs on Video For Win 7 or later(64-bit)
Add LUTs on Video For macOS 10.14 or later
7 Solutions to Cut Video on Mac without Using FFmpeg?
Tiktok, Instagram reels, and Ads are well-known short video platforms that are popular due to their ease of use. Making film collections for entertainment purposes is a popular trend. As the previous user mentioned, sometimes all you want is a section of your movie, which can be the highlight or any other part you want to keep. Long videos are no longer a problem with such a video cutter for Mac. If that’s what you’re looking for, you might want to look into some of the software that’s available here.
HOW TO CUT VIDEO ON MAC WITHOUT USING FFMPEG?
What are FFmpeg and its cons for cut videos?
Without transcoding the media, FFmpeg can cut, trim, and extract videos. This is an excellent method for preserving original quality and avoiding generation loss.
Because of how keyframes work, it is impossible to cut at an exact point in time using FFmpeg without transcoding the video. As a result, you’re left with a cut at the nearest keyframe.
BEST FREE FFMPEG ALTERNATIVE TO CUT VIDEO ON MAC

FILMORA VIDEO EDITOR
Supported OS: Windows and Mac
Filmora Video Editor is another well-known video editor that is widely used for video editing. It was released two decades ago to provide low-cost video editing software. Aside from video cutting and joining, it has some great features such as adding filters, titles, texts, and so on. You can also record your voice or live music, mix audio and video tracks, and do other things. It is simple to use and is available for both Mac and Windows users.
Filmora includes an instant cutter tool that can be used throughout clip import and is designed for use with large amounts of high-resolution content. As the names indicate, it is very simple and serves only one purpose. You can drag multiple clips onto its window, but only if the Merge sub-mode is enabled. Trim mode is only for trimming the ends of a single clip, and its interface only displays one clip in the left-size source tray. You can Add Segments, which creates a new clip based on your trimmed original, but you can’t split a clip explicitly.
For Win 7 or later (64-bit)
For macOS 10.14 or later
Features:
- All editing tools and features are well-displayed in the main windows, which can be found and used easily;
- Very easy to cut or trim video files just with a few clicks;
- Lots of filters, overlays, motion graphics, titles, and more special effects can be added to the video.
- More features like Picture in Picture and Green Screen and Split Screen can be used to make videos more unique.
Pros:
- Intuitive Interface
- Easy To Use
- Great Features
- Affordable Perpetual License
- Great Final Video Results
- Faster Renders And Previews
- Supports Screen Capturing
- Support Wide Range Of File Formats
- User Support Is Good
Cons:
- Lacks Advanced Feature
- Free Version Has Watermark
- Not Available For Linux And Phones
- Pricing Is Expensive
- Software Lagging
Steps On How To Cut Video On Mac Using Filmora Video Editor
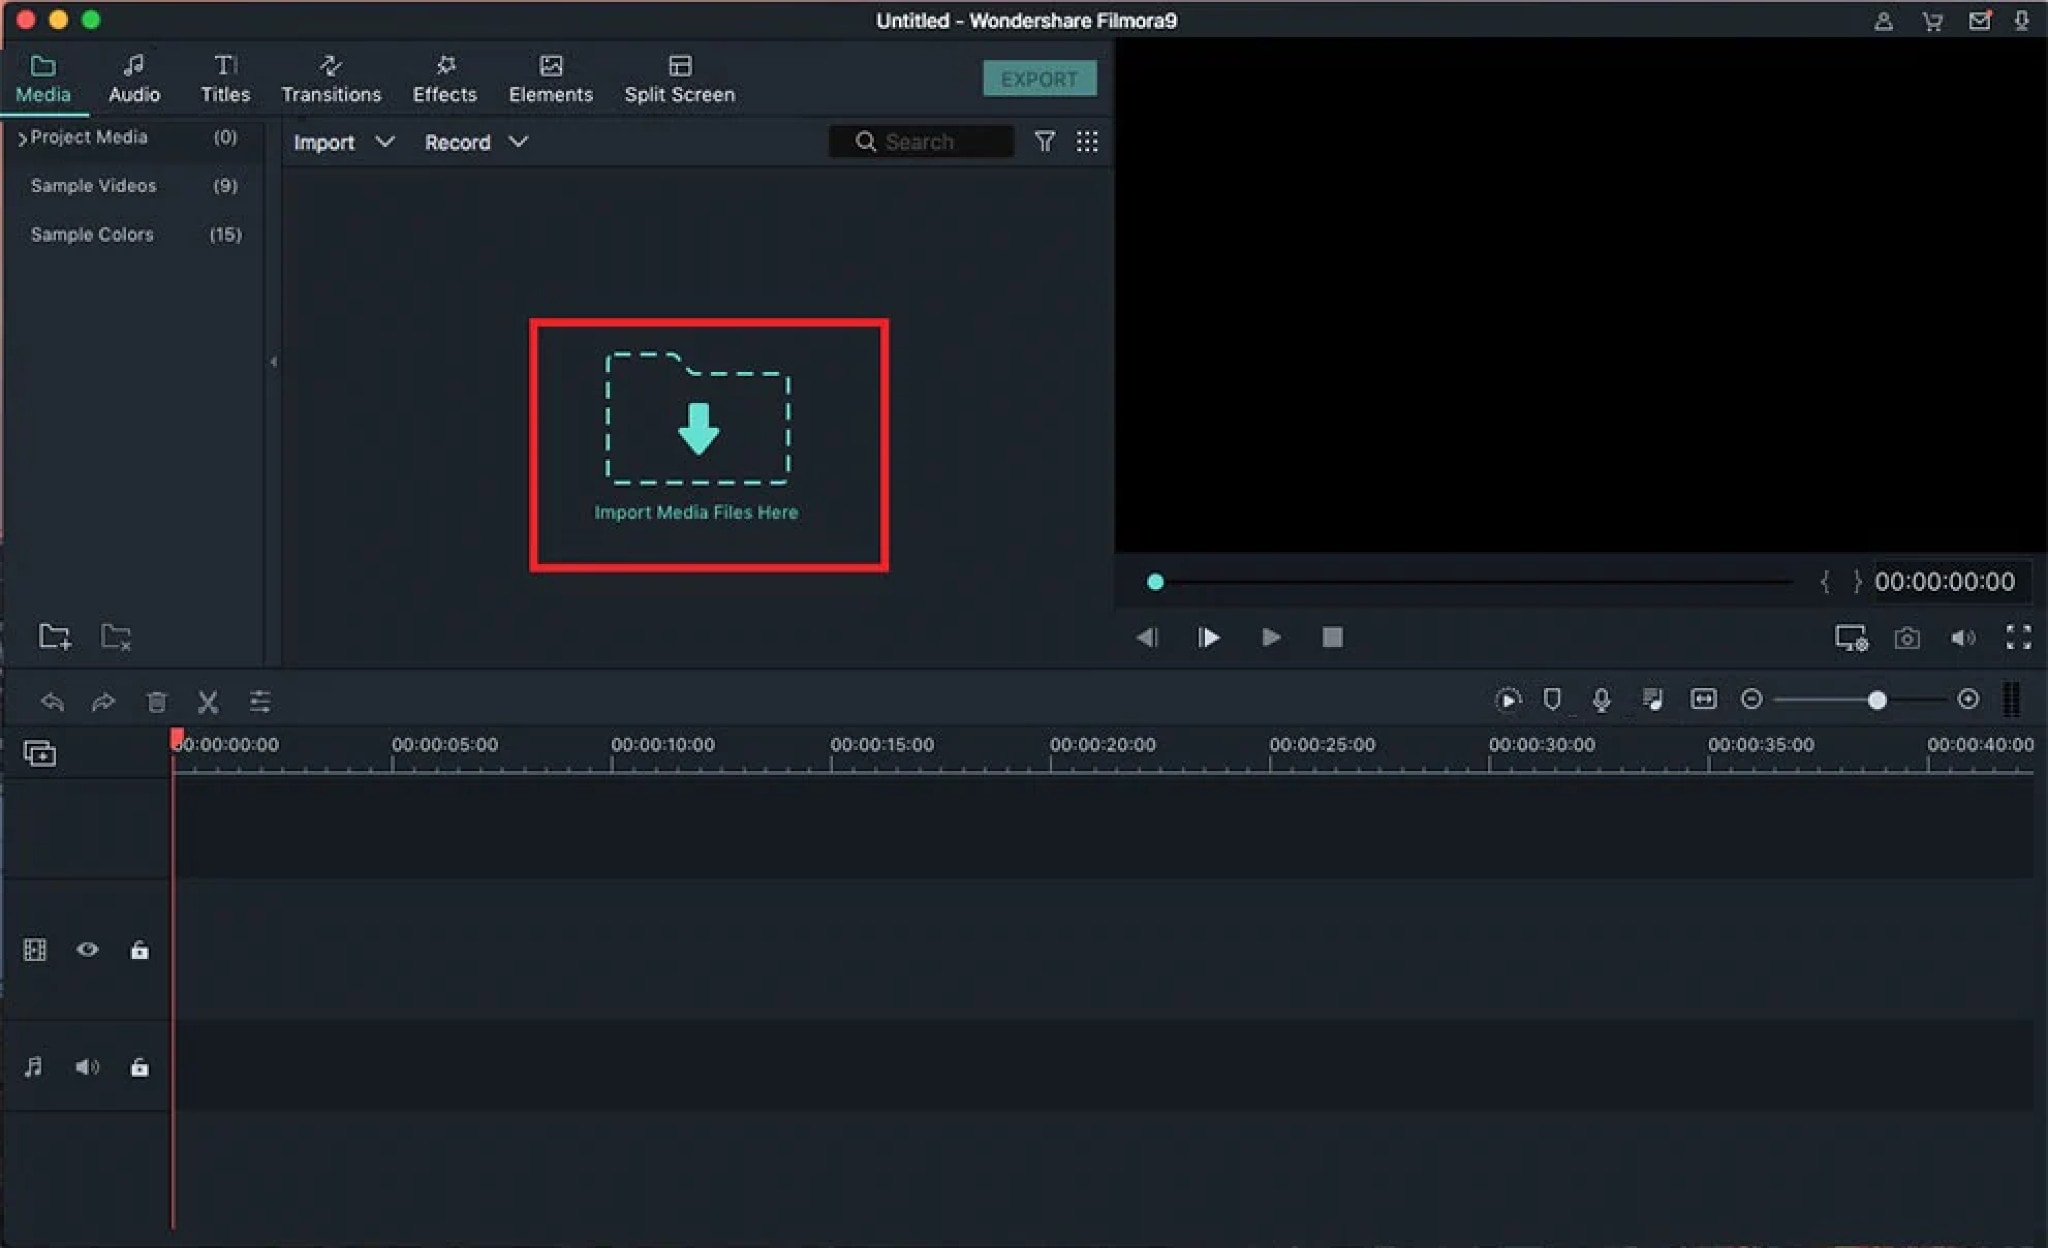
Step 1: Import Video Files
You will begin by importing the video files into the project window of your program through dragging and dropping.
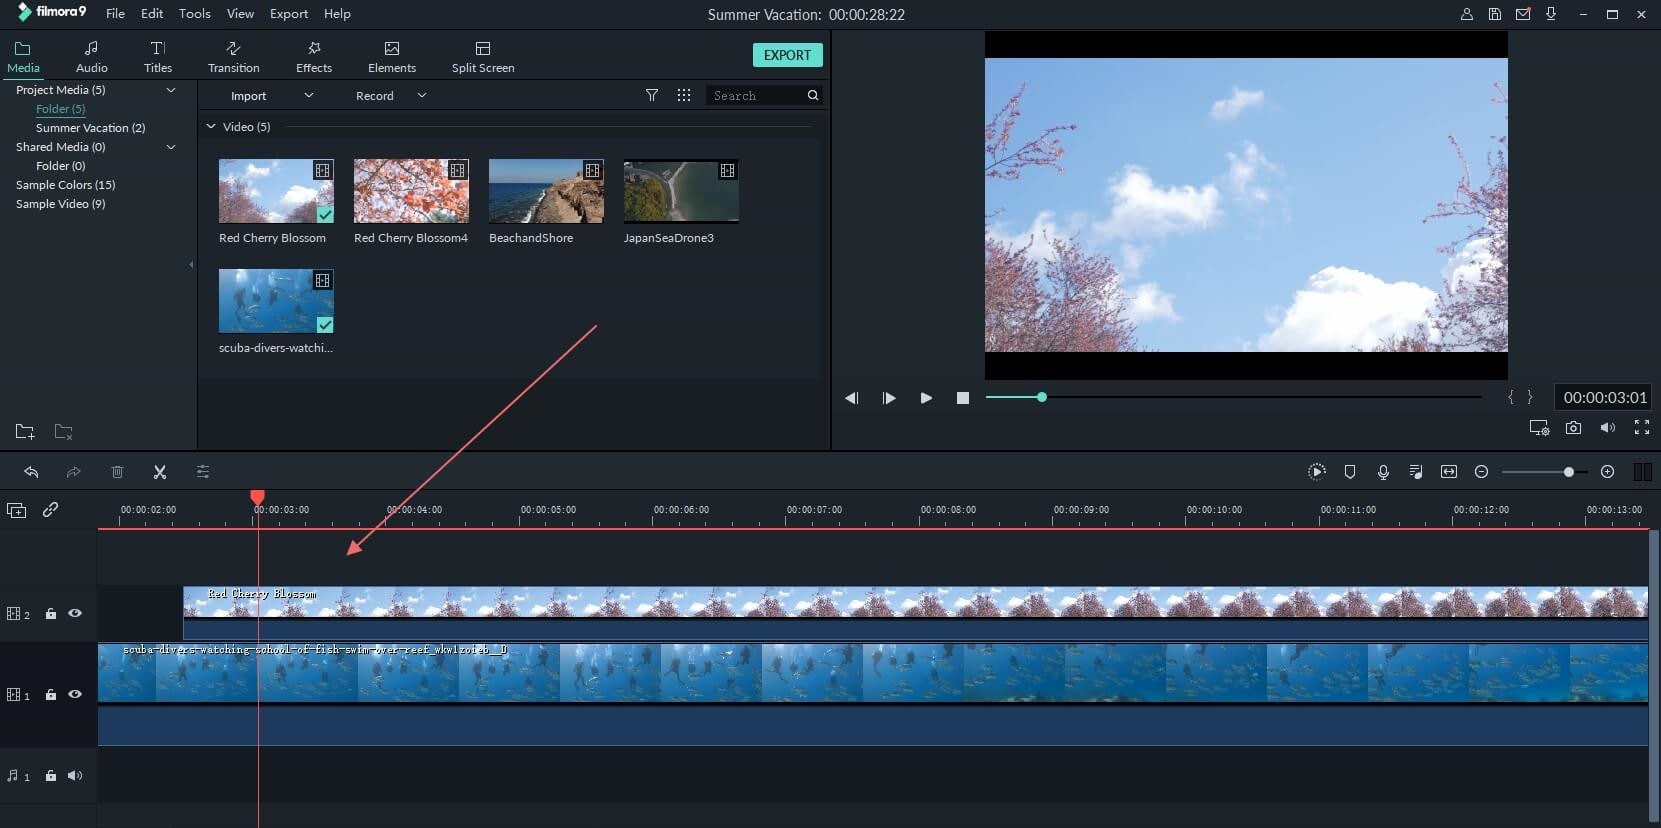
Step 2: Add Video To The Timeline
Drag and dropping are the easiest way to add the video to the timeline.
Step 3: Cut Video
If you want to trim the video, just move the cursor at the beginning or end of the video. When the cursor becomes a cross, move it forward or backward. Trimming only allows you to cut the beginning or end of a video.
If you need to cut a section of a video, you should follow do this: move the cursor at the beginning of the video section you want to cut, then click the scissors icon > Next, move the cursor to the end of the video section you want to cut and click scissors icon > Right-click on the video section you want to cut and click “Delete“.
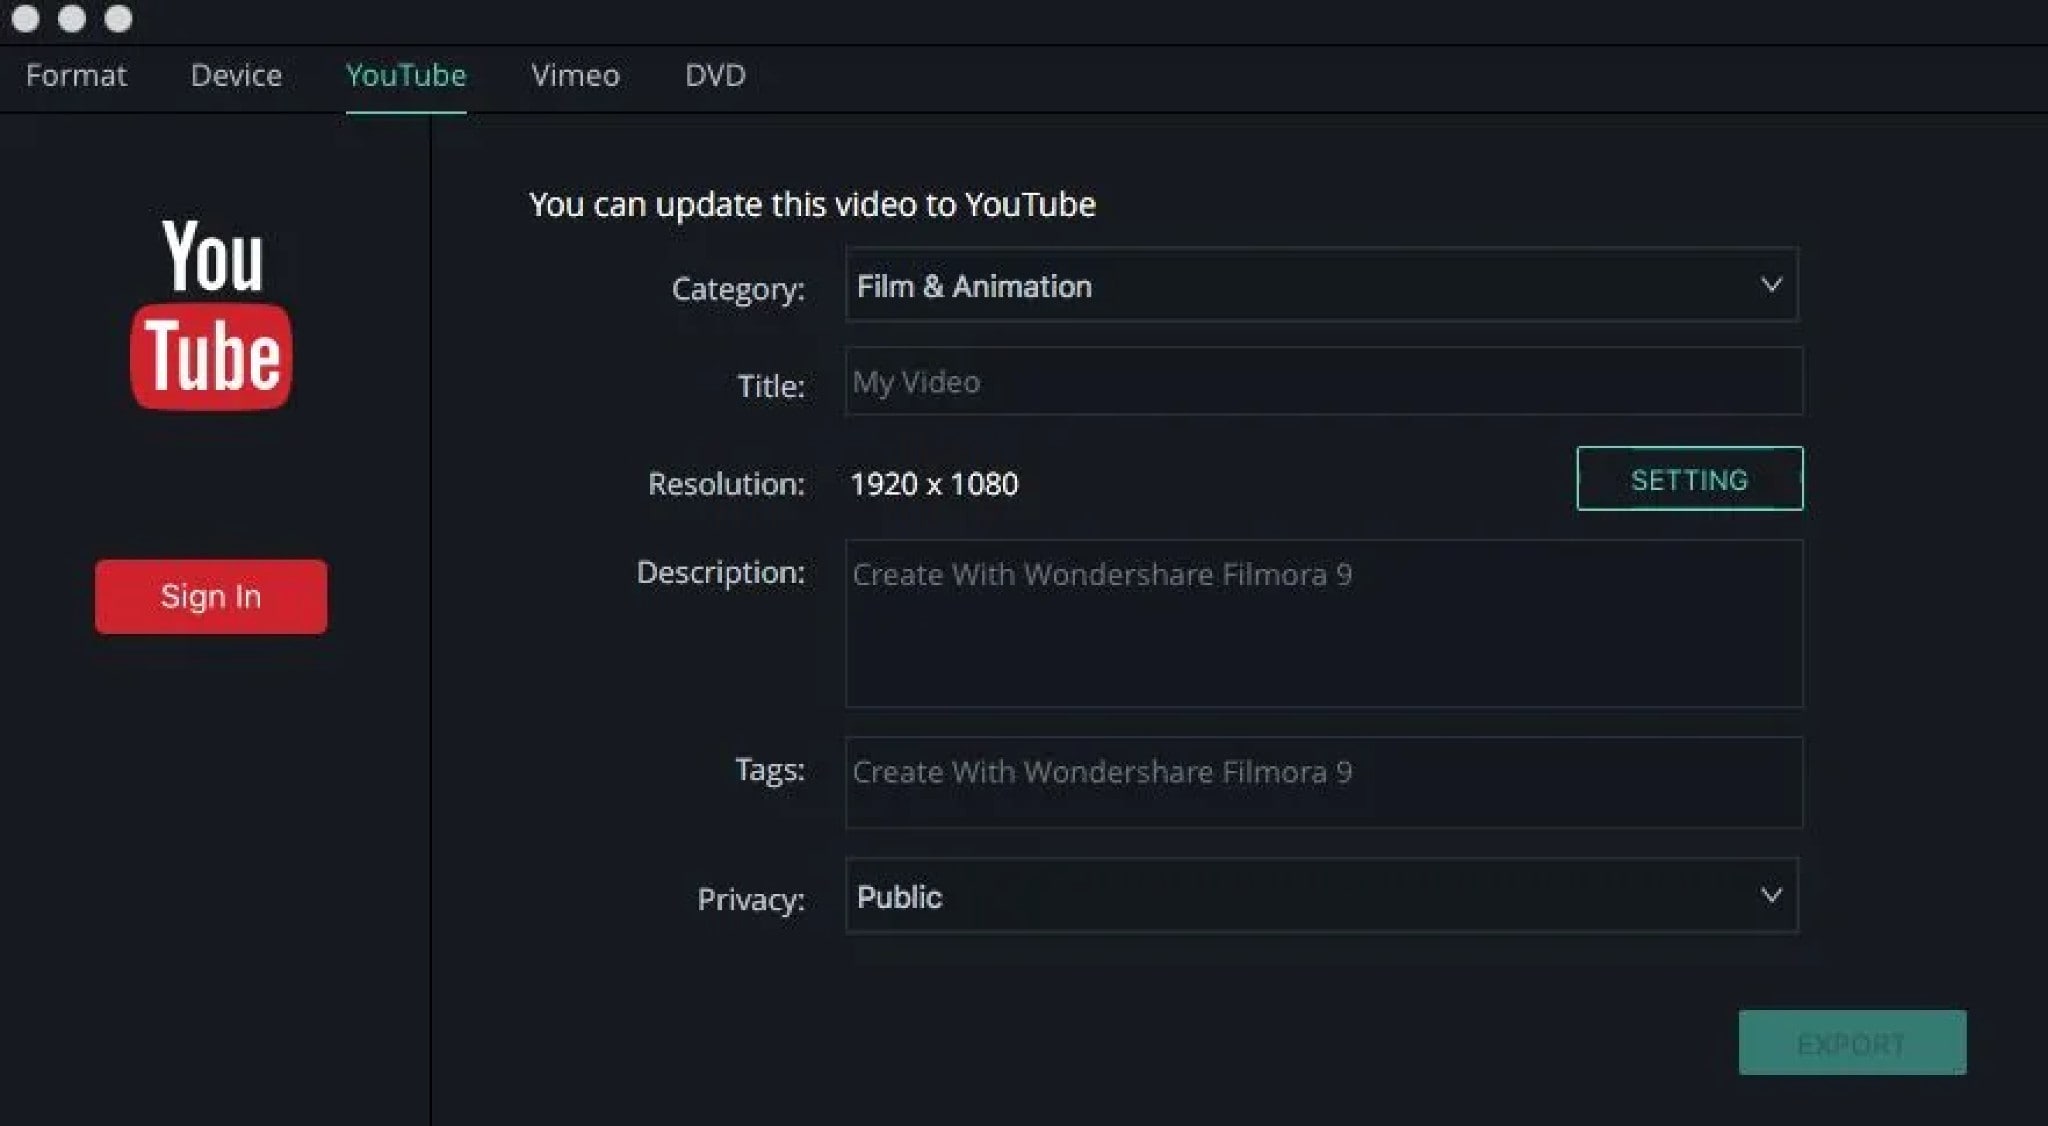
Step 4: Export the Video
To export your video, click the “export” button and choose the local tab. After selecting the output device and format, just click “Create” to save it.
HANDBRAKE
Supported OS: Linux, Windows, and Mac
HandBrake is a multithreaded video transcoder that is unfastened and open source. It can compress and convert nearly any virtual media layout to another. HandBrake is able to rip encrypted DVDs the usage of libdvdcss (libdvdcss is covered with the VLC media participant on macOS and AnyDVD/DVD forty three on Windows).
This software program additionally enables batch processing, which converts a couple of video files at the same time. Additionally, a plethora of presets are available to guide you to the preferred output without having to tinker with a plethora of options.
Handbrake is a powerful and excellent video converter for Windows, Mac, and Linux that should not be overlooked. It provides all of the necessary features in a simple tool that gives the user complete control over the output. Before we get into the specifics, here’s a rundown of Handbrake’s advantages and disadvantages.
Features:
- Support of chapter selections
- Support of subtitles
- Integrated bitrate calculator
- Picture deinterlacing, cropping, and scaling
- Live Video Preview
Pros:
- HandBrake has a very simple layout which makes the video converter very easy to use, even for those who are converting videos for the first time.
- The live preview helps.
- The fact that the software is free and has device presets for iOS and Android certainly makes HandBrake a welcome video converter.
- The queuing tray for batch conversions is particularly nice.
- People who convert a lot of videos will find it very helpful.
Cons:
- On the flip side, the settings are not always easy to deal with.
- It takes a lot of time and then there are errors. The latest version fixes some old bugs but there are hiccups.
- The live preview is for up to four minutes of a video.
- It is futile for very long videos.
- The settings interface and that of the live preview could be better.
- The open-source software also doesn’t support all video formats.
- Given the diversity of devices and the multitude of formats in use today, HandBrake needs more compatibility.
Steps On How To Compress Video Using Handbrake
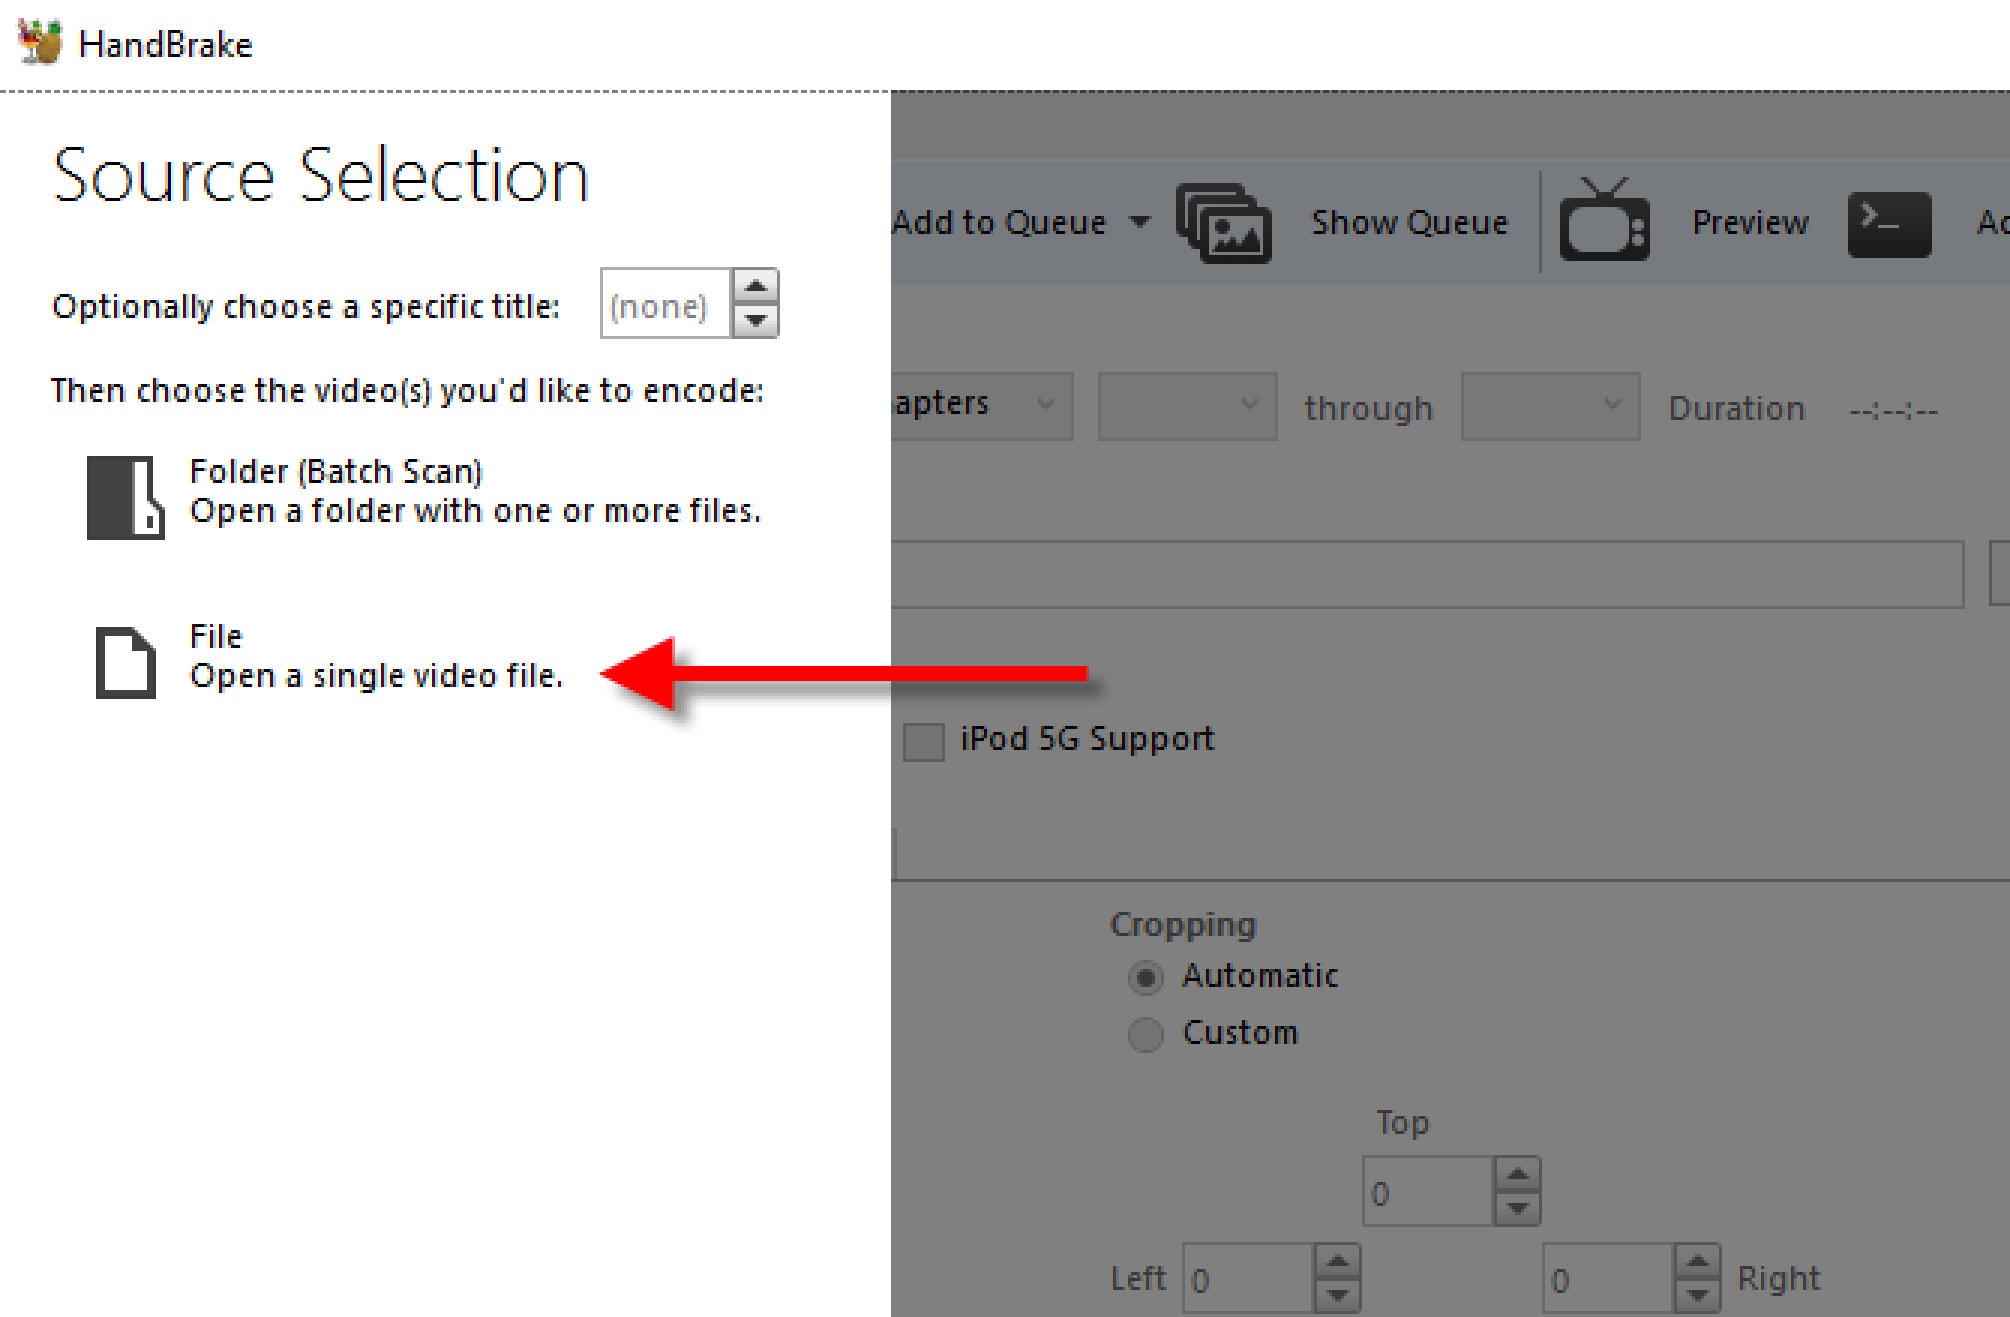
- After you download and install Handbrake, open the app. On the left side, under ‘Source Selection’, click ‘File’. Select the file from the folder and then click ‘open’.
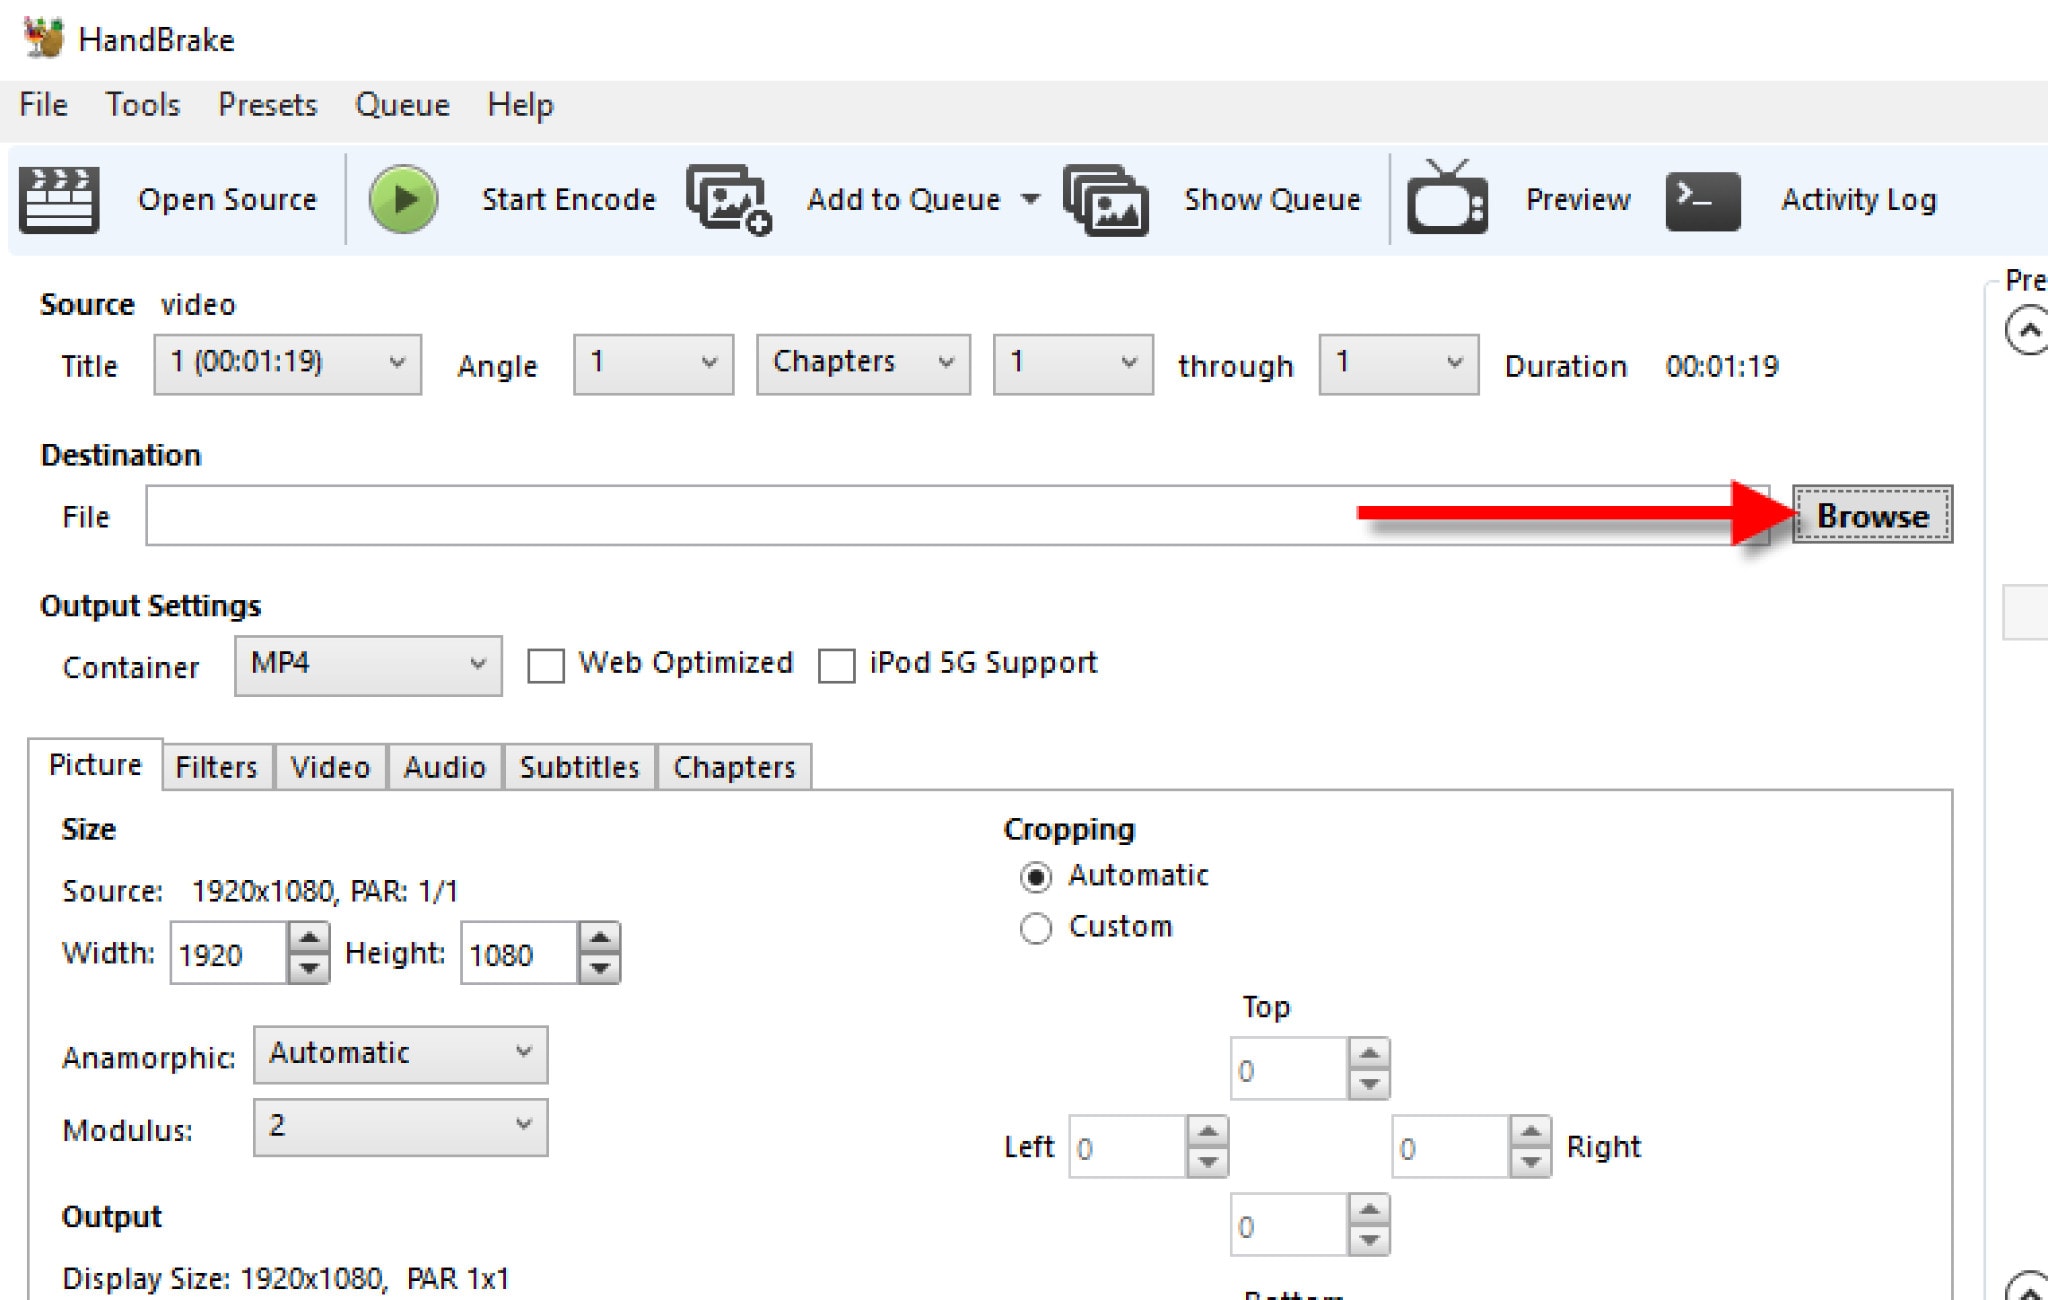
- Choose where you want the compressed video to be saved by clicking ‘Browse’.
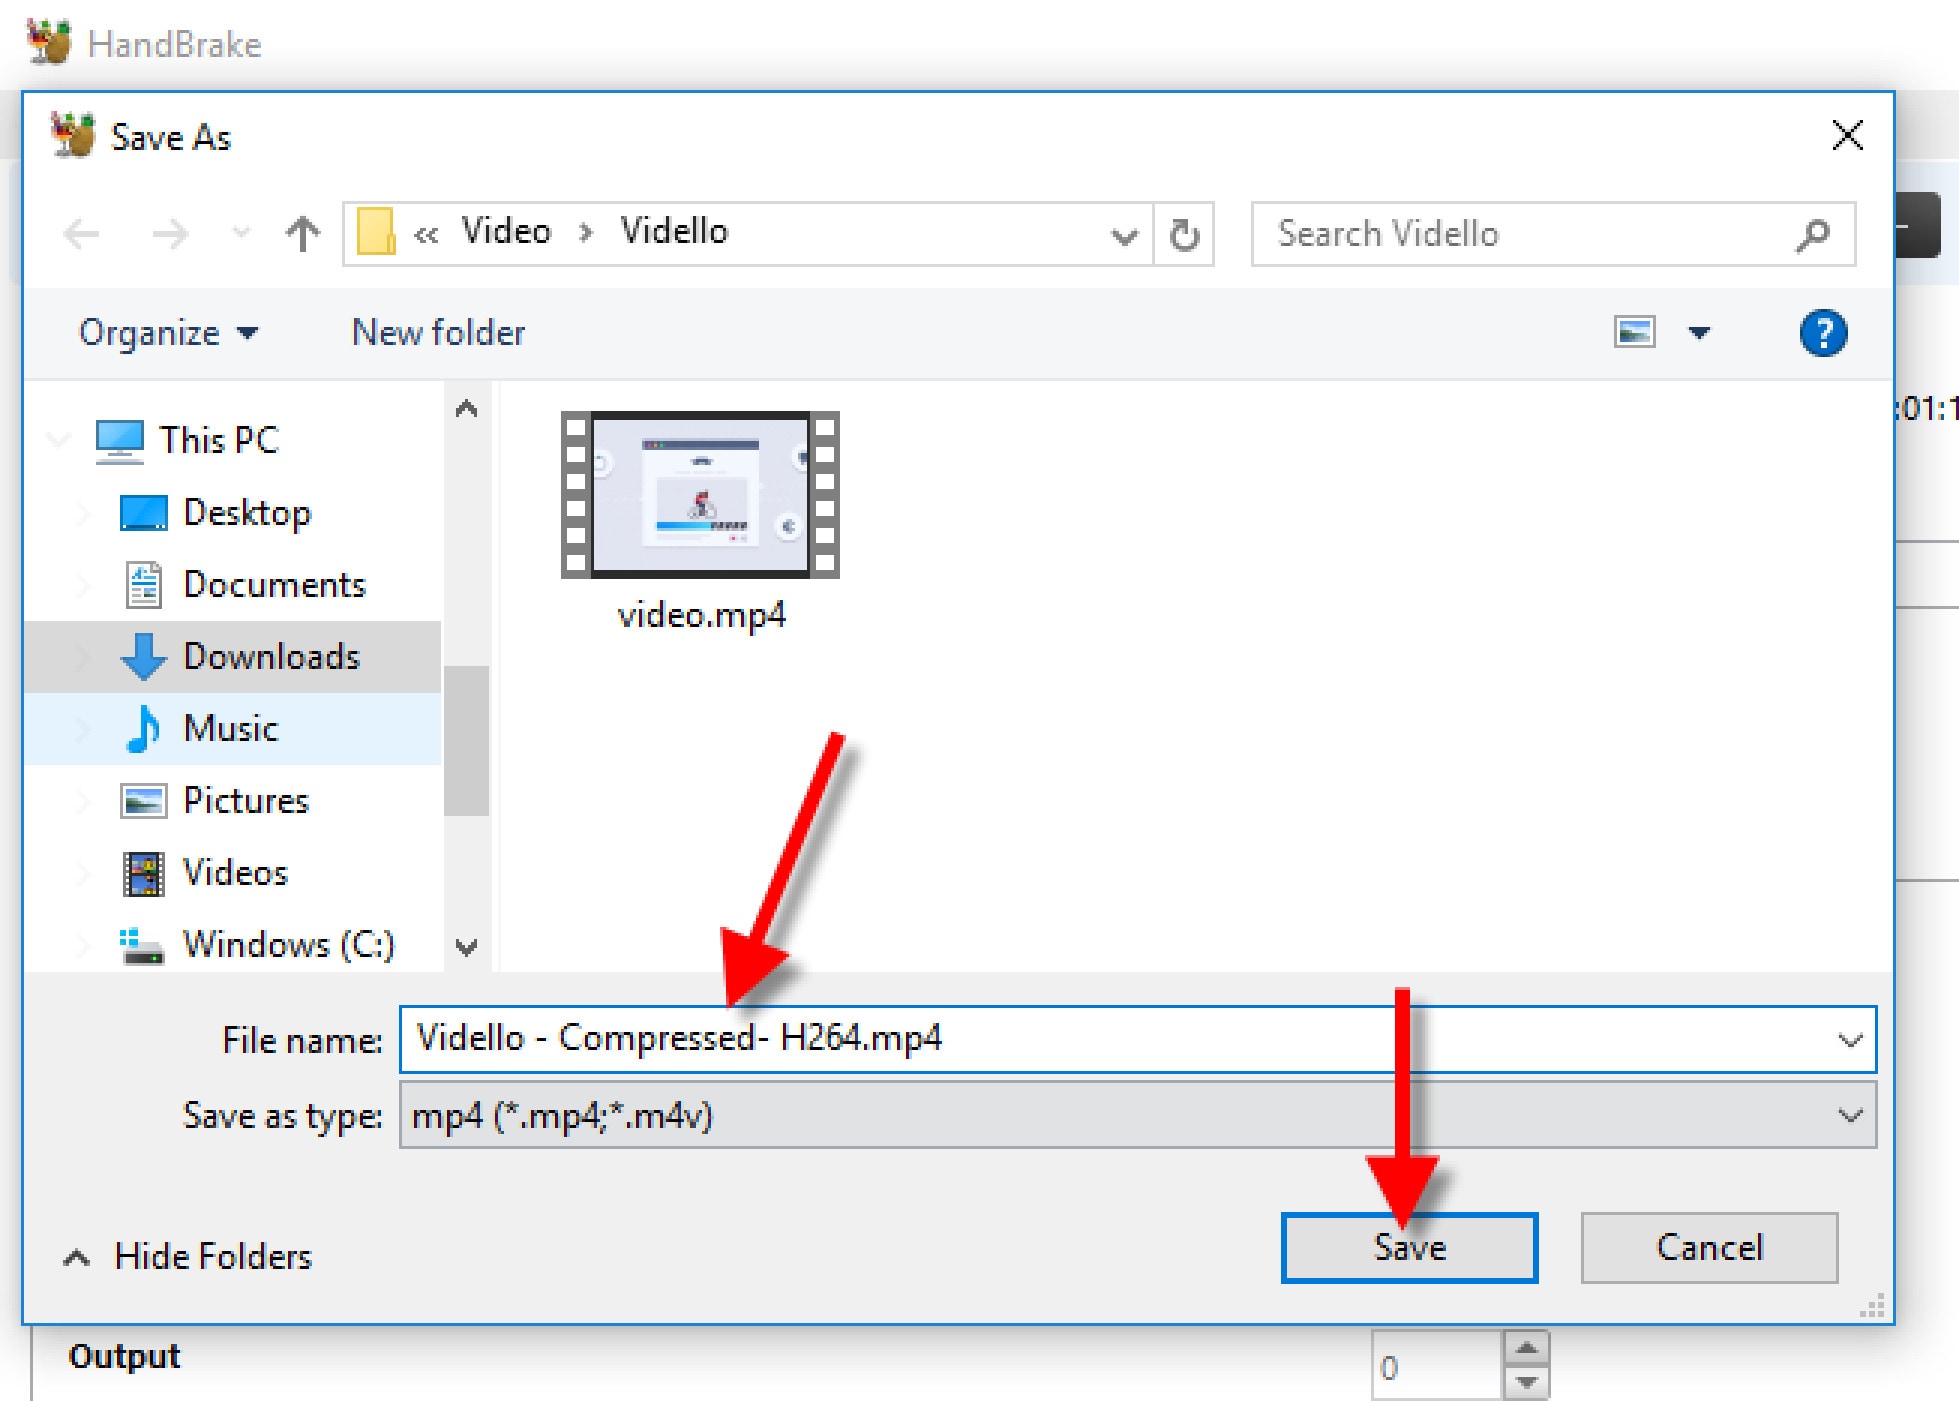
- Enter a name for the video, and click ‘Save’.
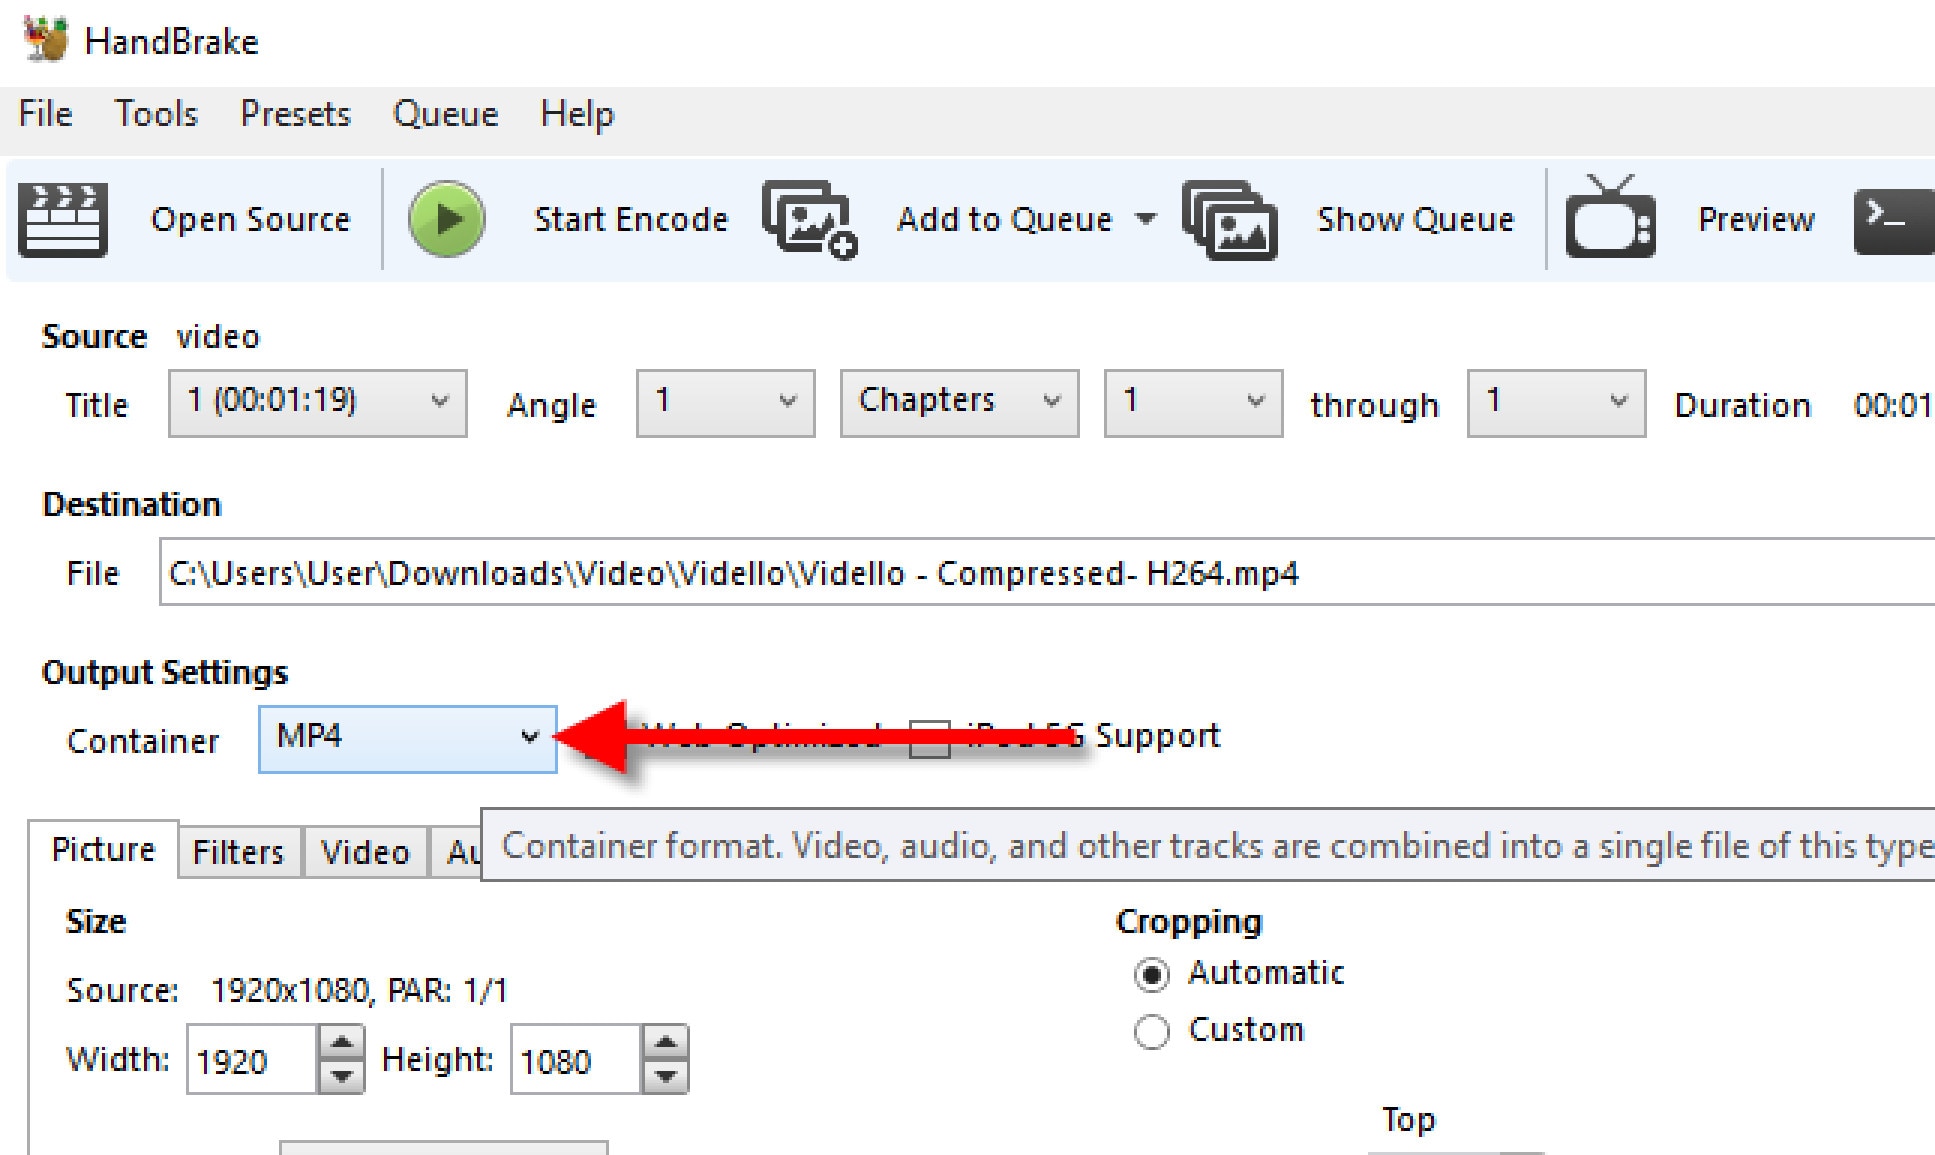
- Under ‘Output Settings’, choose MP4 for ‘Container’.
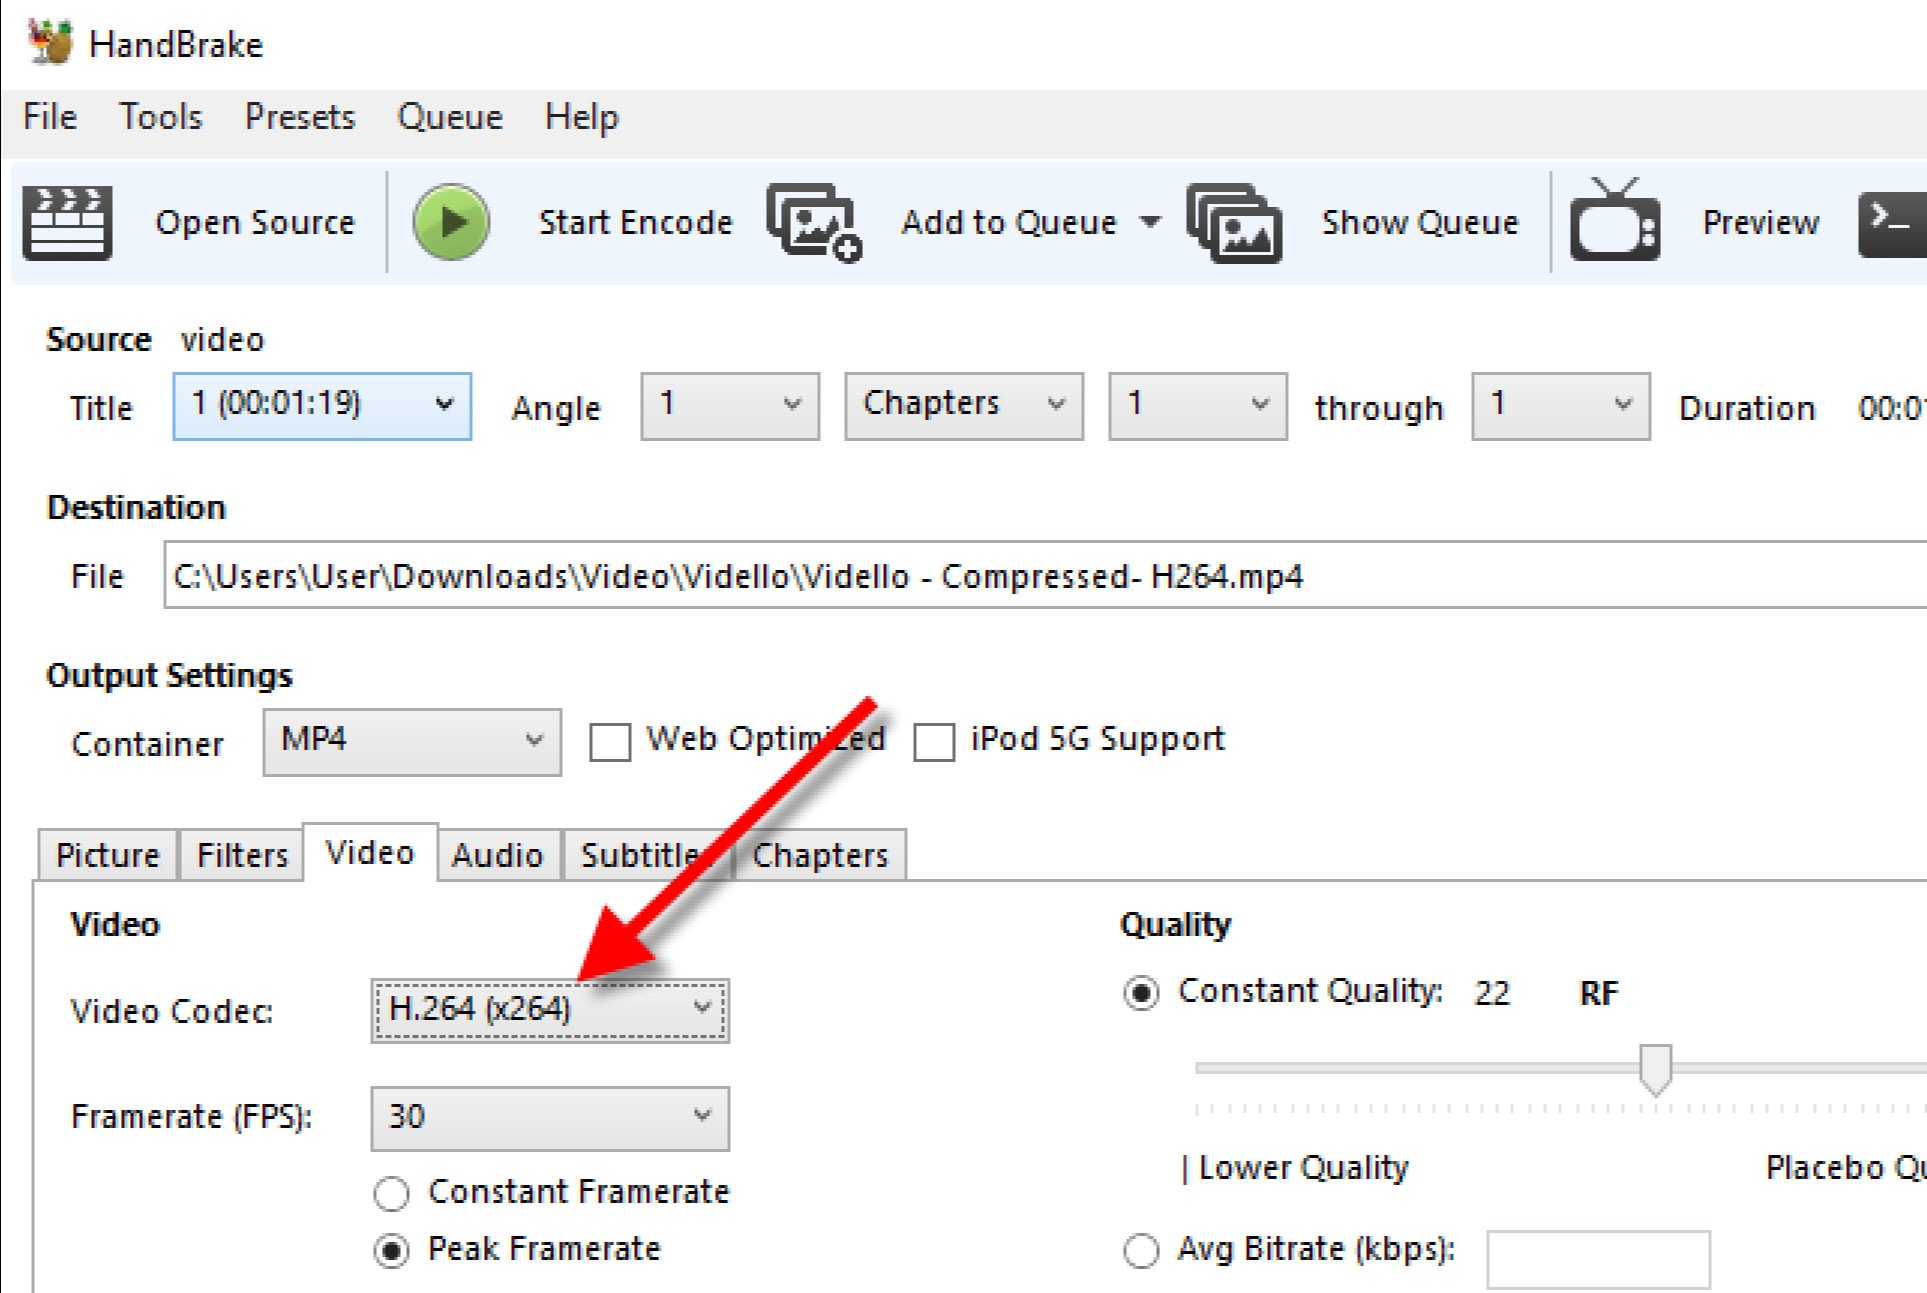
- Click the ‘Video’ tab, under it, is the ‘Video Codec’, choose (x264).
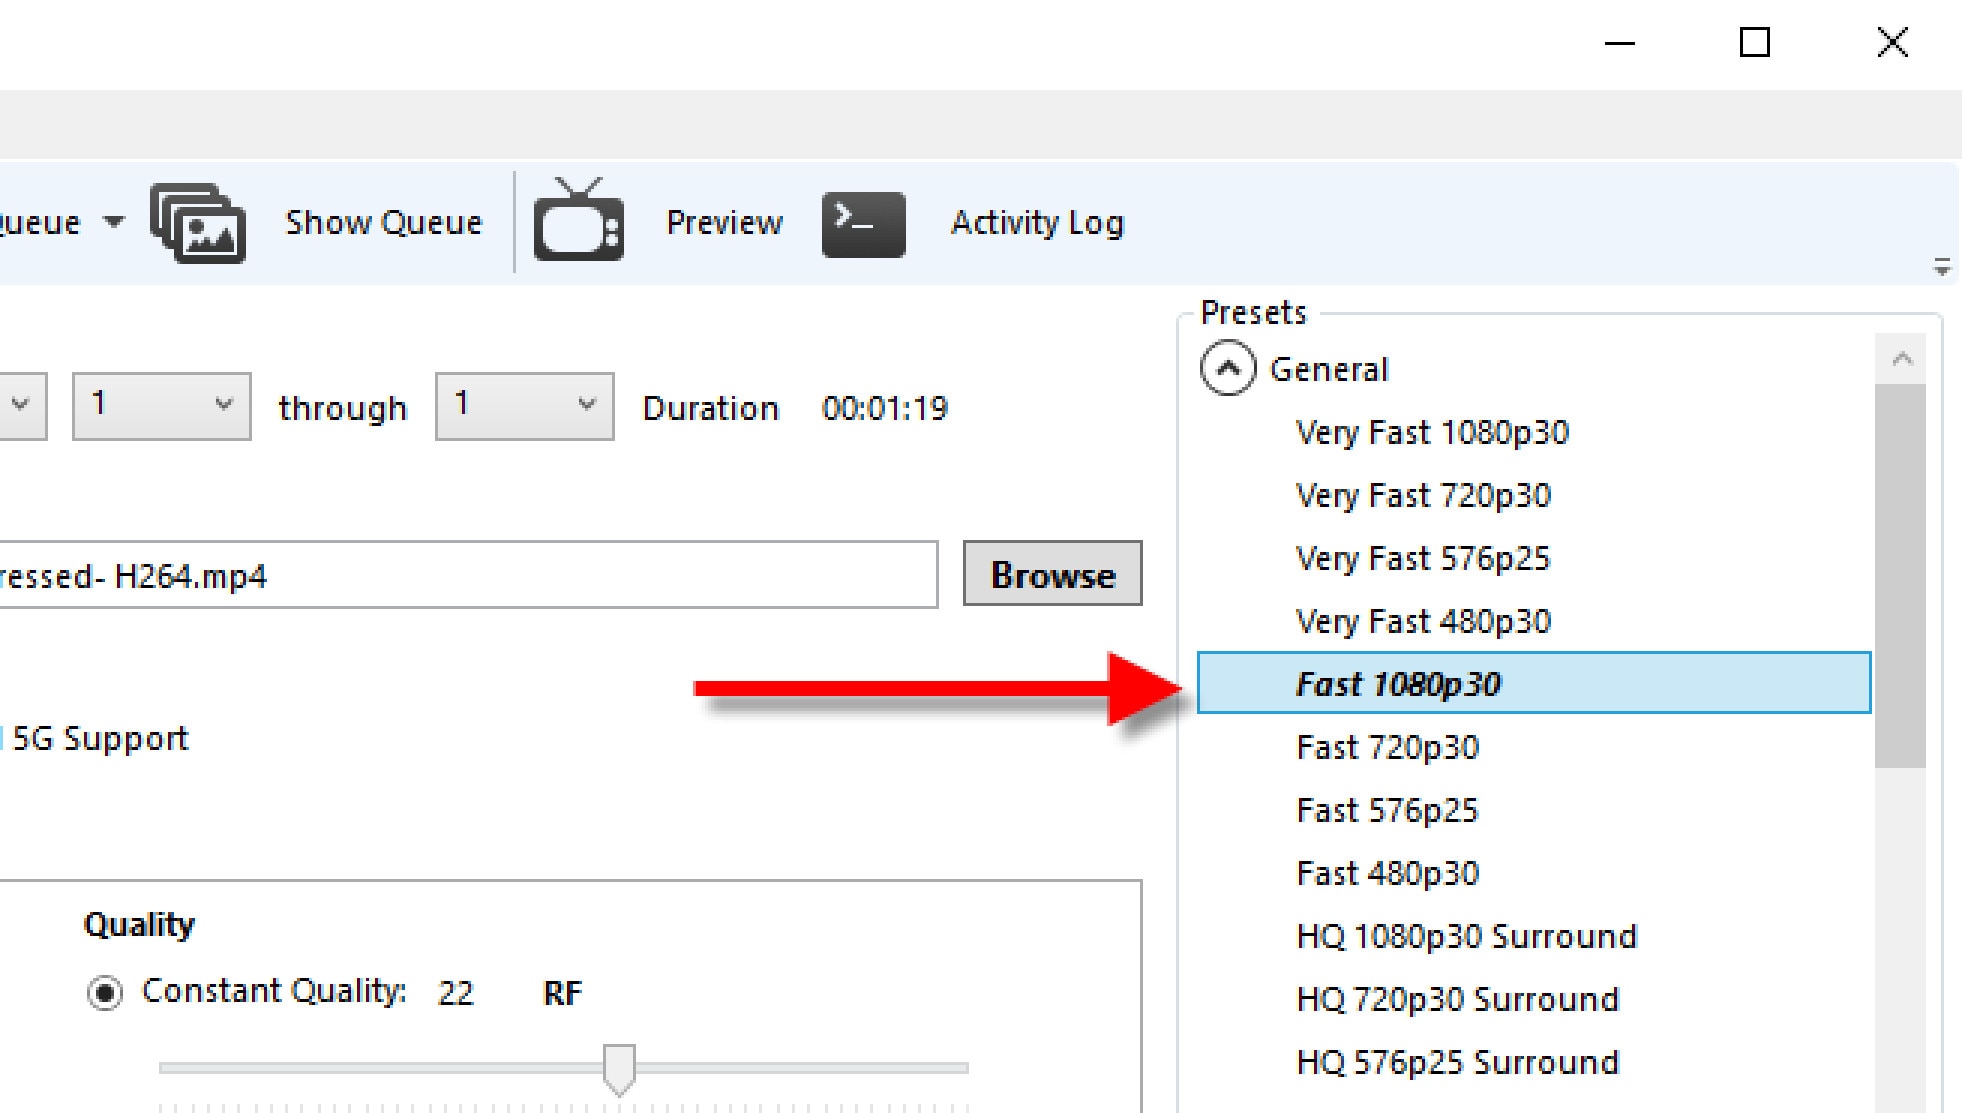
- Select a Preset from the ‘Preset Drawer’. We recommend you choose Fast1030p 30 for high quality.
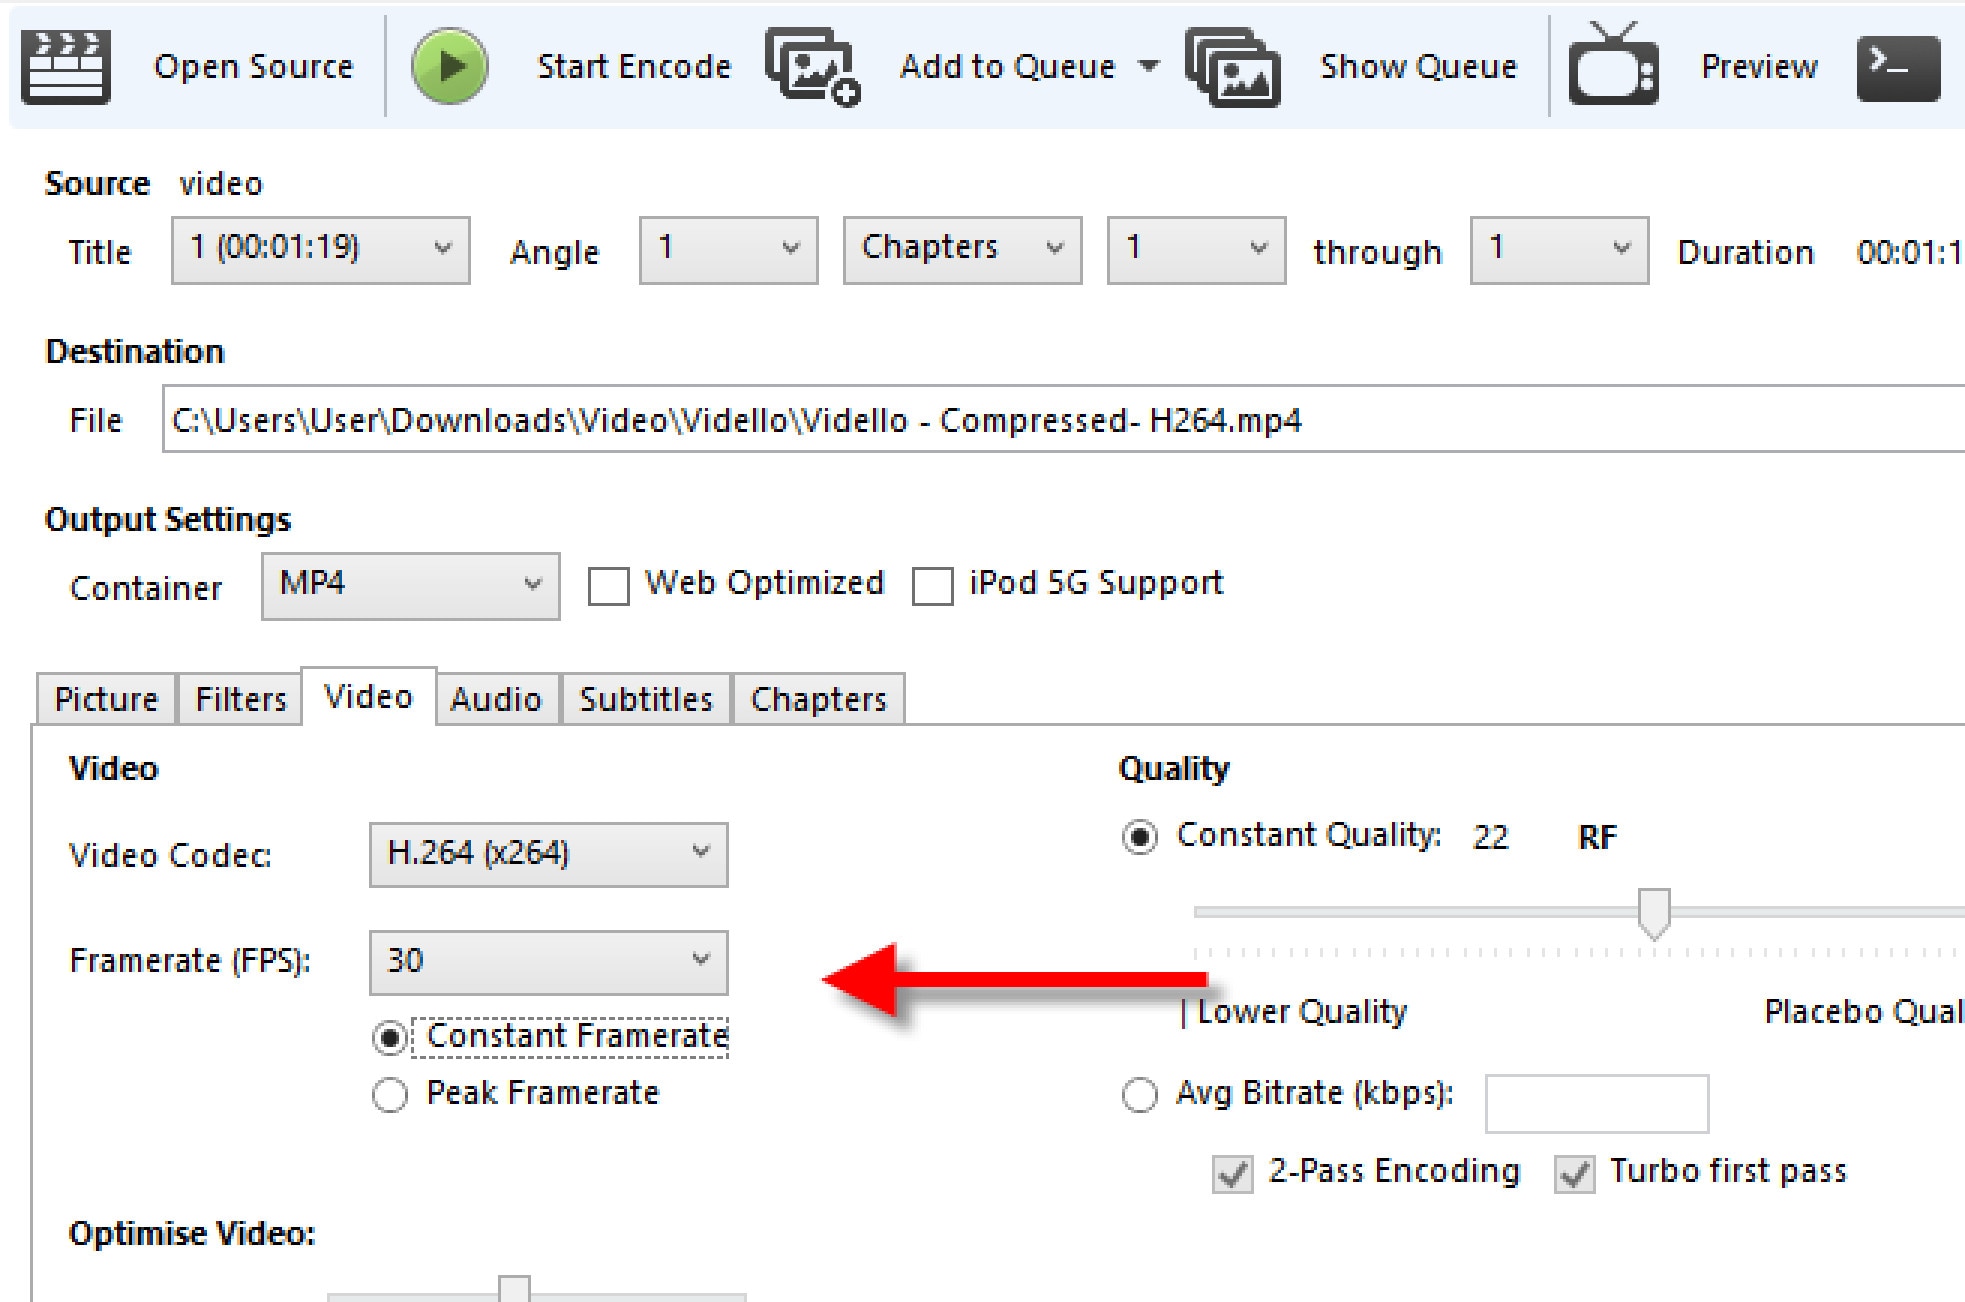
- Choose the ‘framerate’, depending on your source video i.e. NTSC (29.97fps), then make it 30fps by choosing 30. Also, tick the ‘Constant Framerate’ to ensure better compatibility.
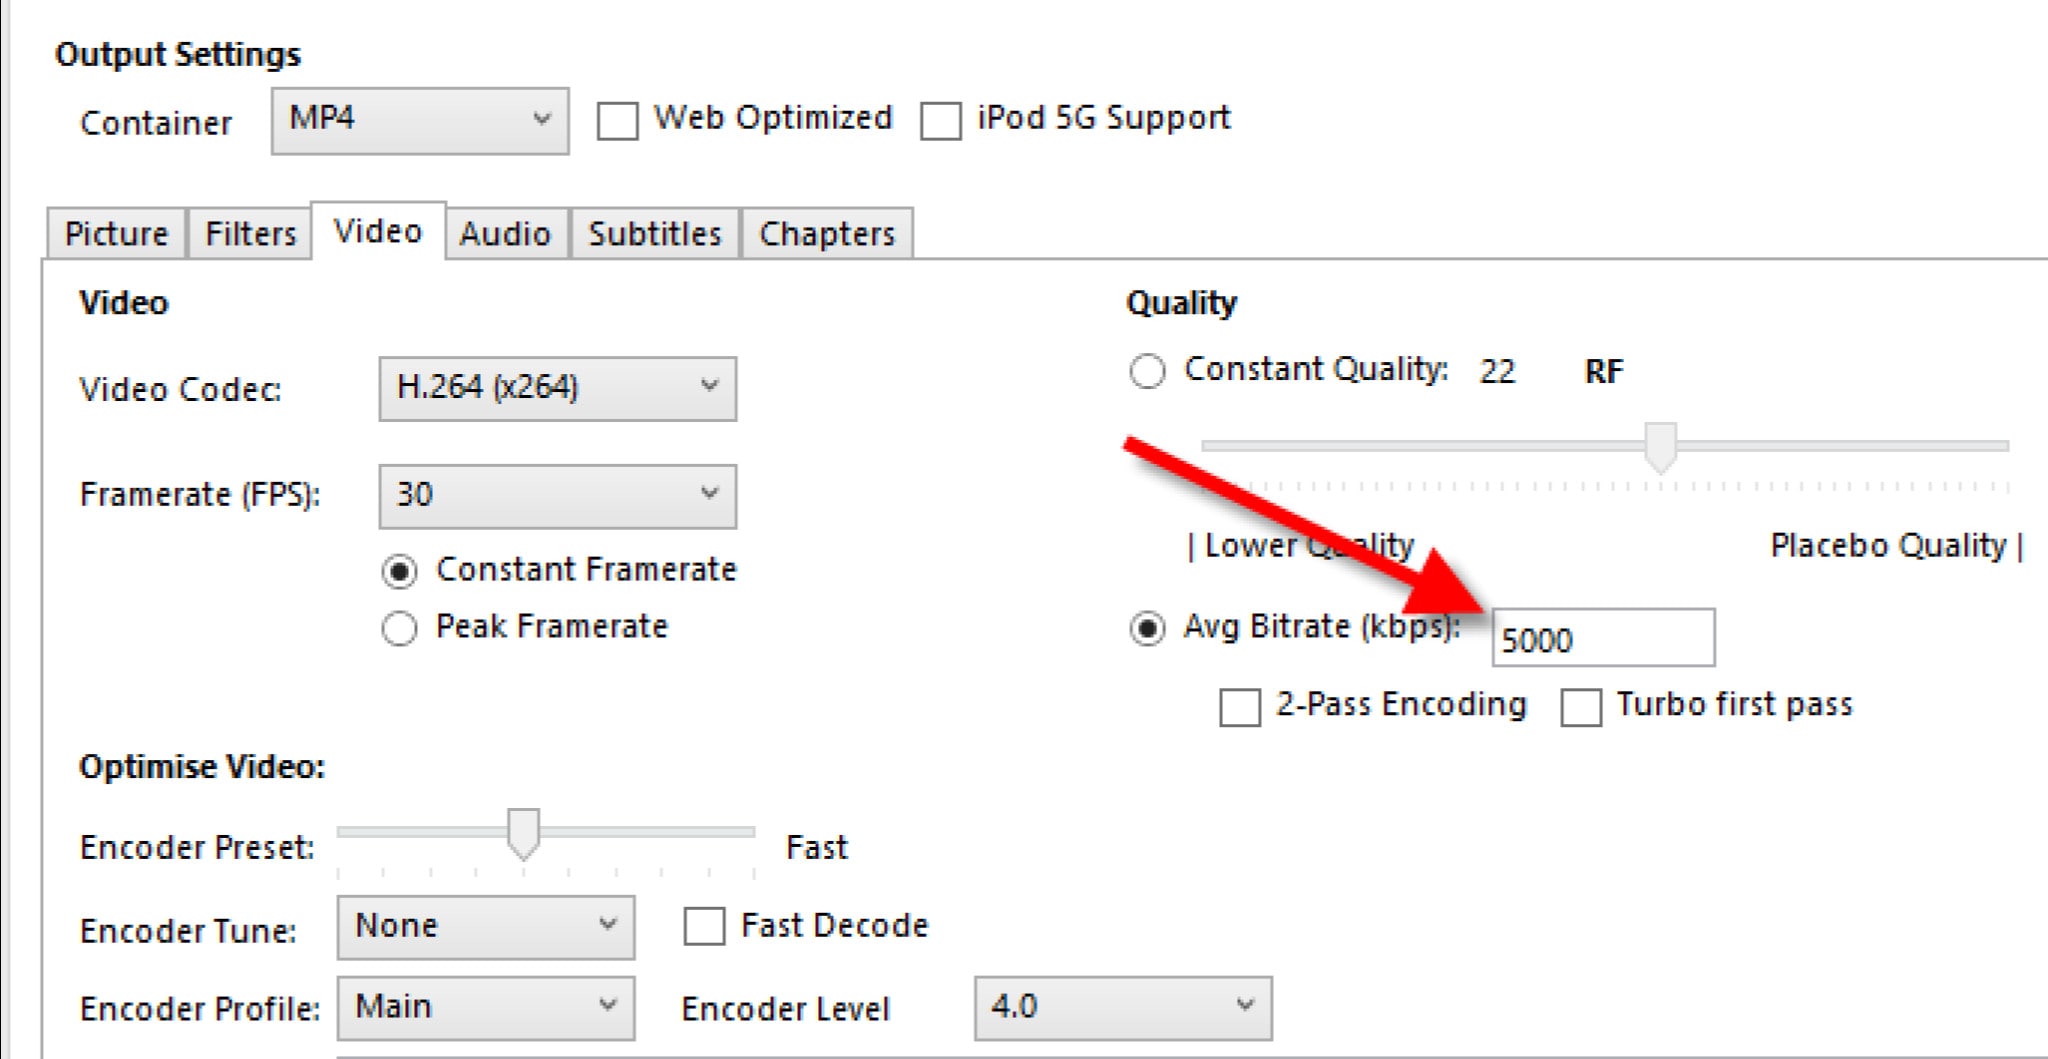
- Enter an ‘Average Bitrate (kbps)’ for the video between 5,000-10,000 (take note: higher bitrate has higher quality video but will take longer to upload and download).
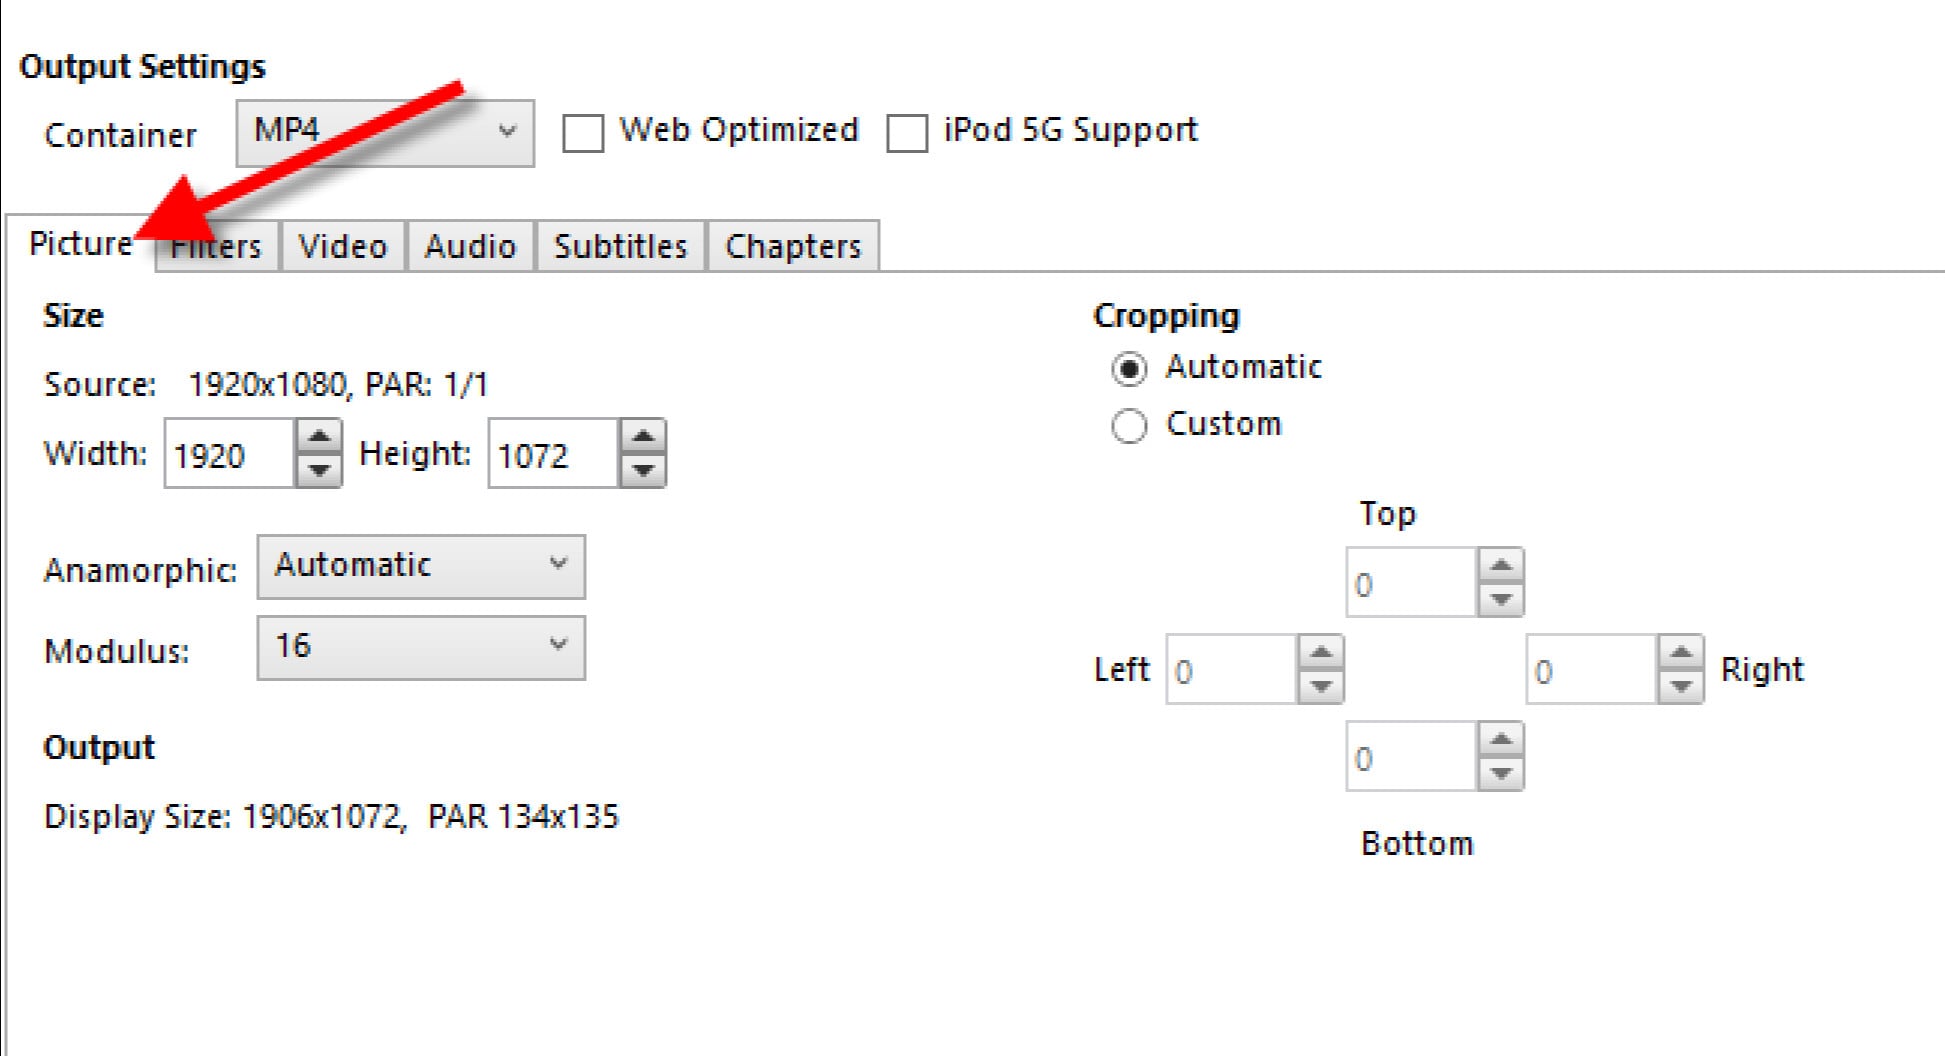
- Click the ‘Picture’ tab if you want to change the video frame size or resolution.
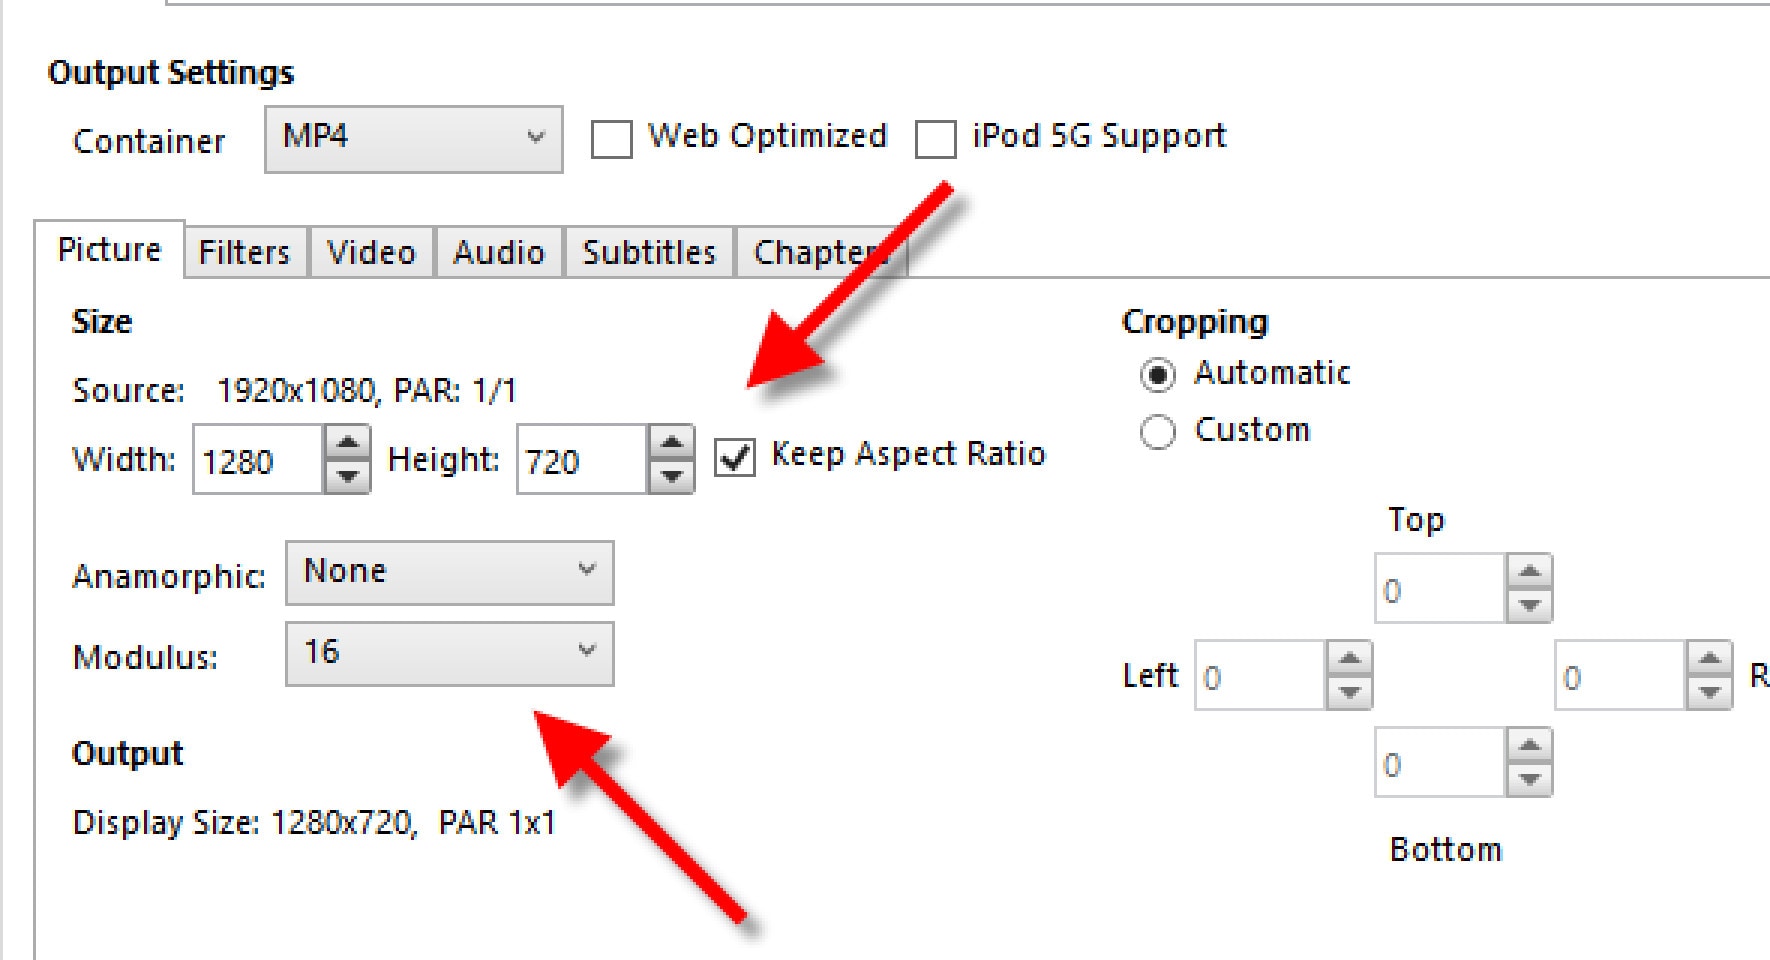

Change ‘Anamorphic’ to ‘None’, and ‘Modulus’ to ‘16’. And tick ‘Keep Aspect Ratio’. Use the arrow down on Width to change from 1920 (full HD) down to 1280.
Select the ‘Audio’ tab and choose 48 for the Samplerate. Choose Stereo for Mixdown. Choose 320 for your audio Bitrate.
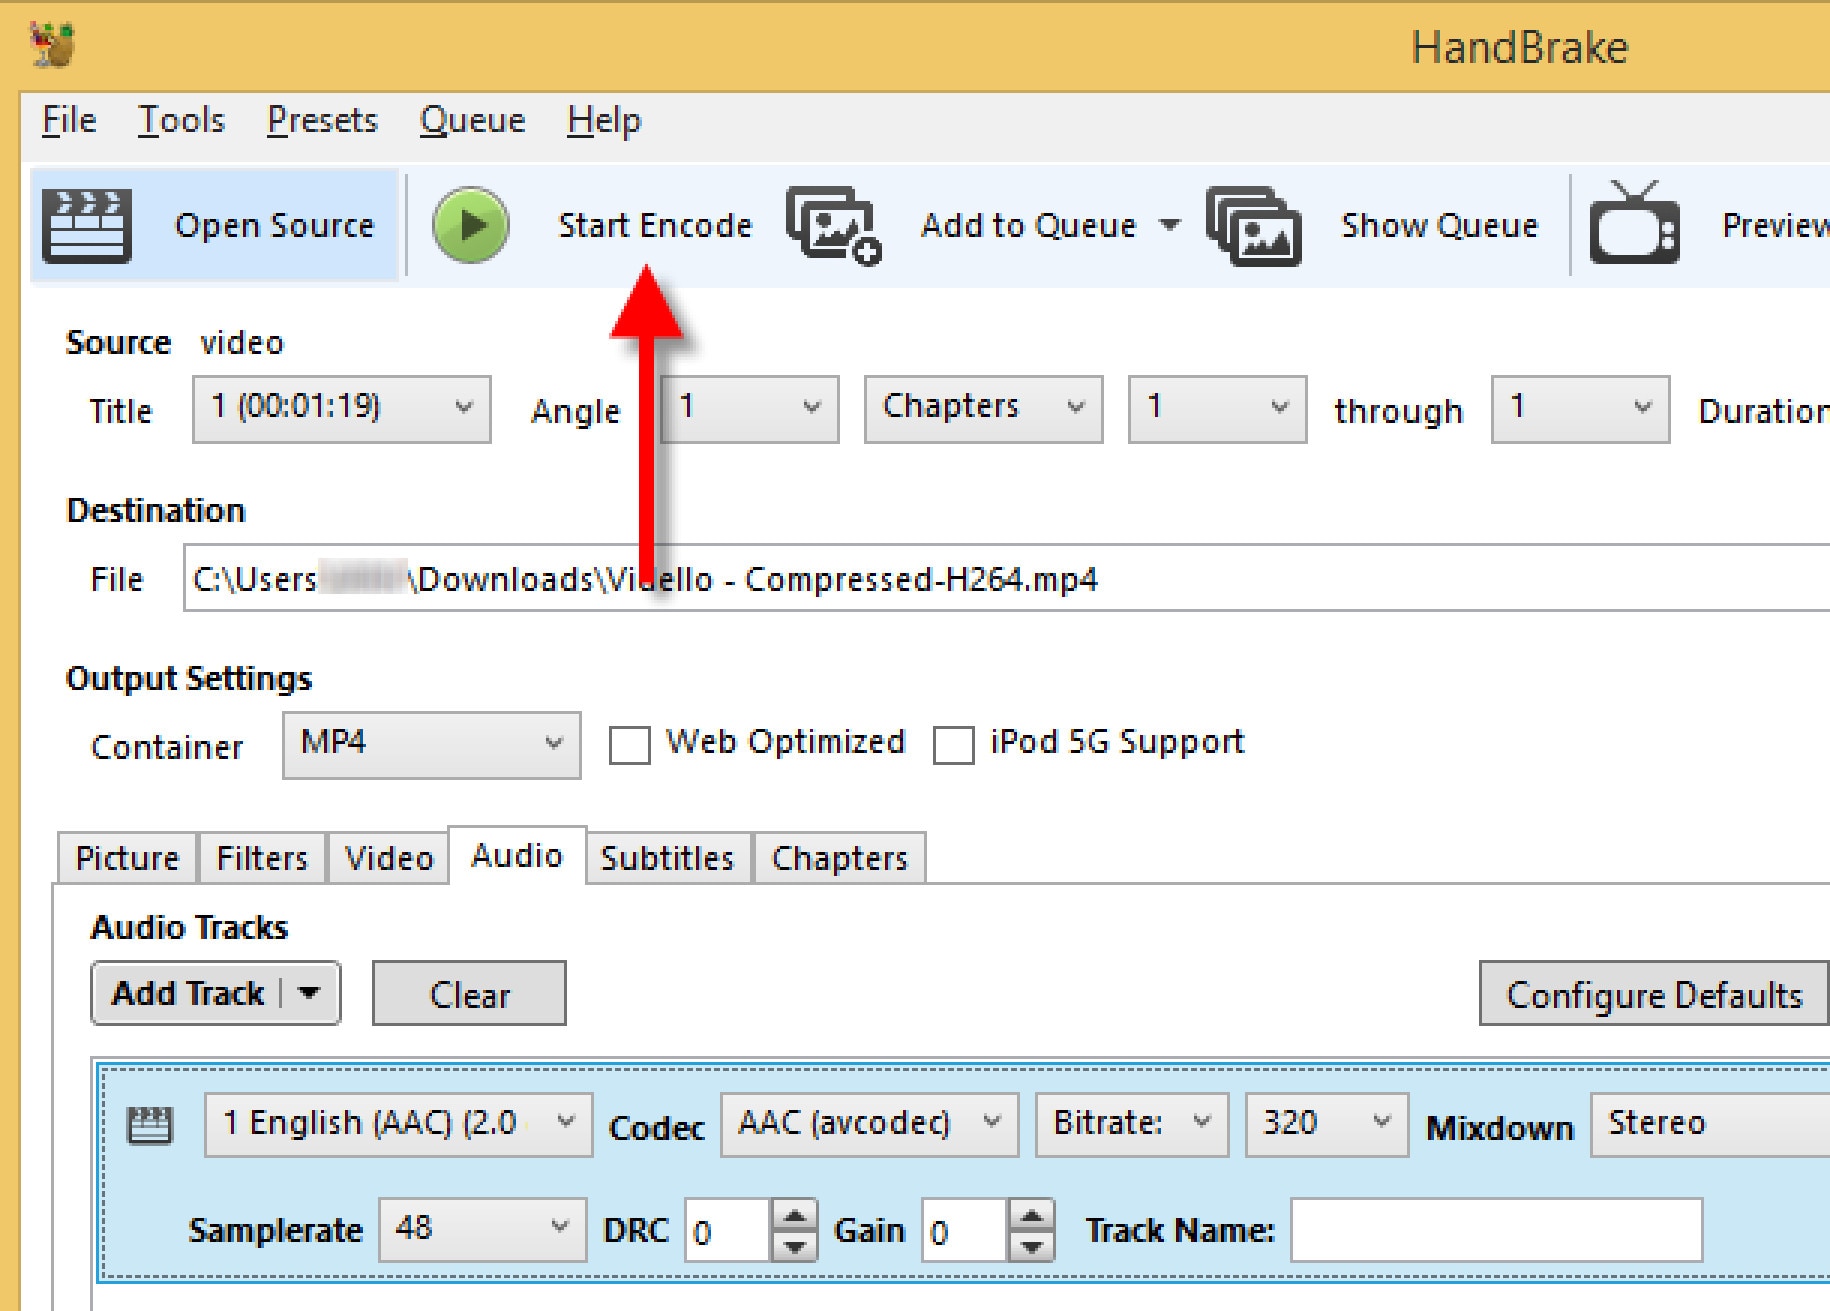
- Hit the ‘Start Encode’ button and wait until the video has finished compressing. Handbrake will let you know when it has finished.
SHUTTER ENCODER
Supported OS: Mac, Linux, and Windows
Shutter Encoder offers a complimentary codec and conversion tool for everyone that was created in collaboration with video editors.
Convert your videos, images, and audio files to OP-Atom format, which is compatible with Avid Media Composer and Pro Tools. Encode your files, replace audio, burn to DVD, analyze audio volume, download web videos, and create your own timelapse.
Analyze audio loudness, replace audio, author DVDs and Blu-rays, create image sequences, download web videos, and more. Everything is done as simply and efficiently as possible
Shutter Encoder makes use of Java as well as other tools such as 7za, VLC, FFmpeg, ExifTool, MKVMerge (part of MKVToolNix), MediaInfo, DVDAuthor, youtube-dl, and others.
Shutter Encoder offers advanced users the option to tailor the conversion individually. You can, for example, manually change the bitrate of audio and video, but you can also set a file size limit and perform the conversion based on that. Further work techniques, such as the ability to enable hardware of the computer itself and complete the conversion according to a predefined profile, are available in a separate box.
Features:
- Without conversion: Cut without re-encoding, Replace audio, Rewrap, Conform, Merge, Subtitling (create subtitles for a video), Video inserts
- Sound conversion: WAV, AIFF, FLAC, MP3, AC3, OPUS, OGG
- Editing codecs: DNxHD, DNxHR, Apple ProRes, QT Animation, Uncompressed YUV
- Output codecs: , DV PAL, XDCAM HD422, AVC-Intra 100, XAVC, HAP, , VP9, AV1, OGV, MJPEG, Xvid, WMV, MPEG
- Archiving codec: FFV1
- Image creation: JPEG, PNG, TIF, TGA, DPX, BPM, ICO, WEBP
- Burn & Rip: DVD, Blu-ray, DVD RIP
- Analysis: Loudness & True Peak, Audio normalization, Cut detection, Black detection
- Download web videos using youtube-dl
Pros:
- Conversion according to profiles
- Extensive advanced options
- Built-in editing capabilities
Cons:
- Limited preview capability
Steps On How To Use Shutter Encoder
- To start, drag the video from your file manager and drop it onto the Shutter Encoder window, or use the ‘Browse’ button available in the upper left-hand side corner of the window to add a video.
- Next, from the ‘Choose function’ drop-down menu, scroll to (it’s the first under Output codecs). You will now see some new options in a new panel that appears on the right-hand side of the Shutter Encoder window. From there, if you want to crop the video, click the Crop checkbox:
A new window will pop up where you can use your mouse to crop the video to the desired size. If you want to change it to a predefined, fixed-size ratio value, uncheck the ‘Manual mode’ box, and you’ll be able to choose a ratio from the ‘Pre-settings’ drop-down.
Next, if you want to change the profile, expand the ‘Advanced features’ item in the Shutter Encoder sidebar, check the box for the Force profile option, then change the profile to what you want to use:
- When you’re done with the video adjustments you want to make, click the ‘Start function’ button, and Shutter Encoder will begin encoding your new video.
AVIDEMUX
Supported OS: Linux, BSD, Mac OS X, and Microsoft Windows
Avidemux offers three fundamental operations: cutting, encoding, and filtering. Cutting allows users to copy, paste, save, or delete a specific part of a video and is incredibly beneficial when users are only interested in a small portion of a video or want to remove commercials from a TV show that they have recorded.
Encoding, on the other contrary, is the way of transforming a video to various formats so that it can be played on different players. Users of Avidemux can use this feature on videos they want to use for business or archive for personal use. They could also use this to convert a video that they intend to post online.
Users can also use Avidemux to filter their videos, which include incorporating subtitles and color profiles, deinterlacing, resizing and sharpening the image of a video, and increasing or decreasing the overall volume of the audio.
Meanwhile, Avidemux has task automation features that make video processing and editing quick and painless. A feature called Joblist allows users to organize their projects in a queue so that they can access their files from a single location. They can use this queue to handle videos in bulk as well.
Features:
- Multiple Formats
- Video Filters
- Advanced Interlacing
- Full Editing Control
- Simple Interface
- Open Source
Pros:
- Covers standard formats.
- All essential features are present.
- Surprisingly advanced filtering, processing, editing, and filtering controls.
- The interface is easy to learn.
- Open-source
Cons:
- The interface is very legacy and needs remodeling
- No longer updated
- No support
Steps On How To Cut Videos On Avidemux:
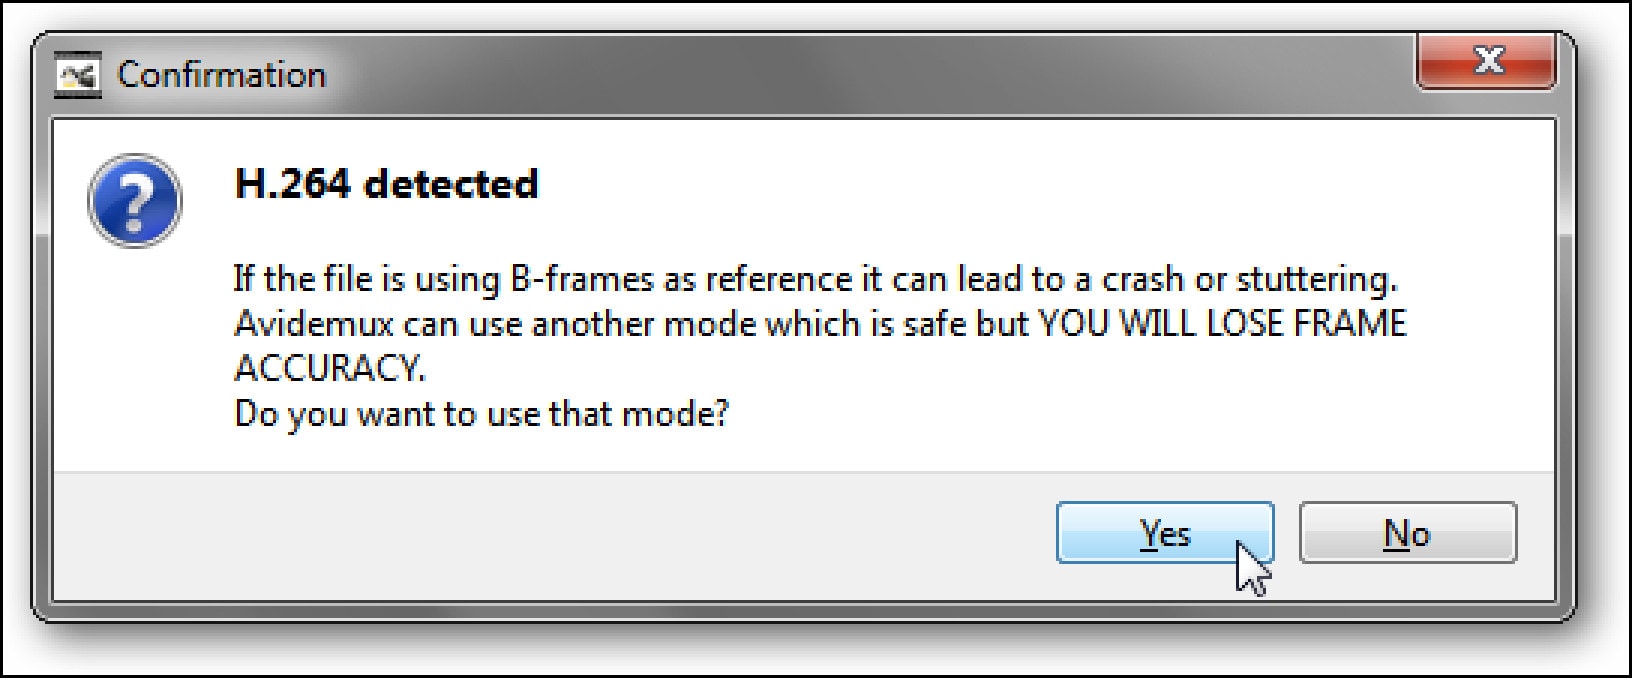
- Open up Avidemux, and load the video file that you want to work with. If you get a prompt like this one: we recommend clicking Yes to use the safer mode.


Find the portion of the video that you’d like to isolate. Get as close as you can to the start of the clip you want to cut.
You want it to read I; if it isn’t framed type I, then use the single left and right arrow buttons to go forward or backward one frame until you find an appropriate I frame.
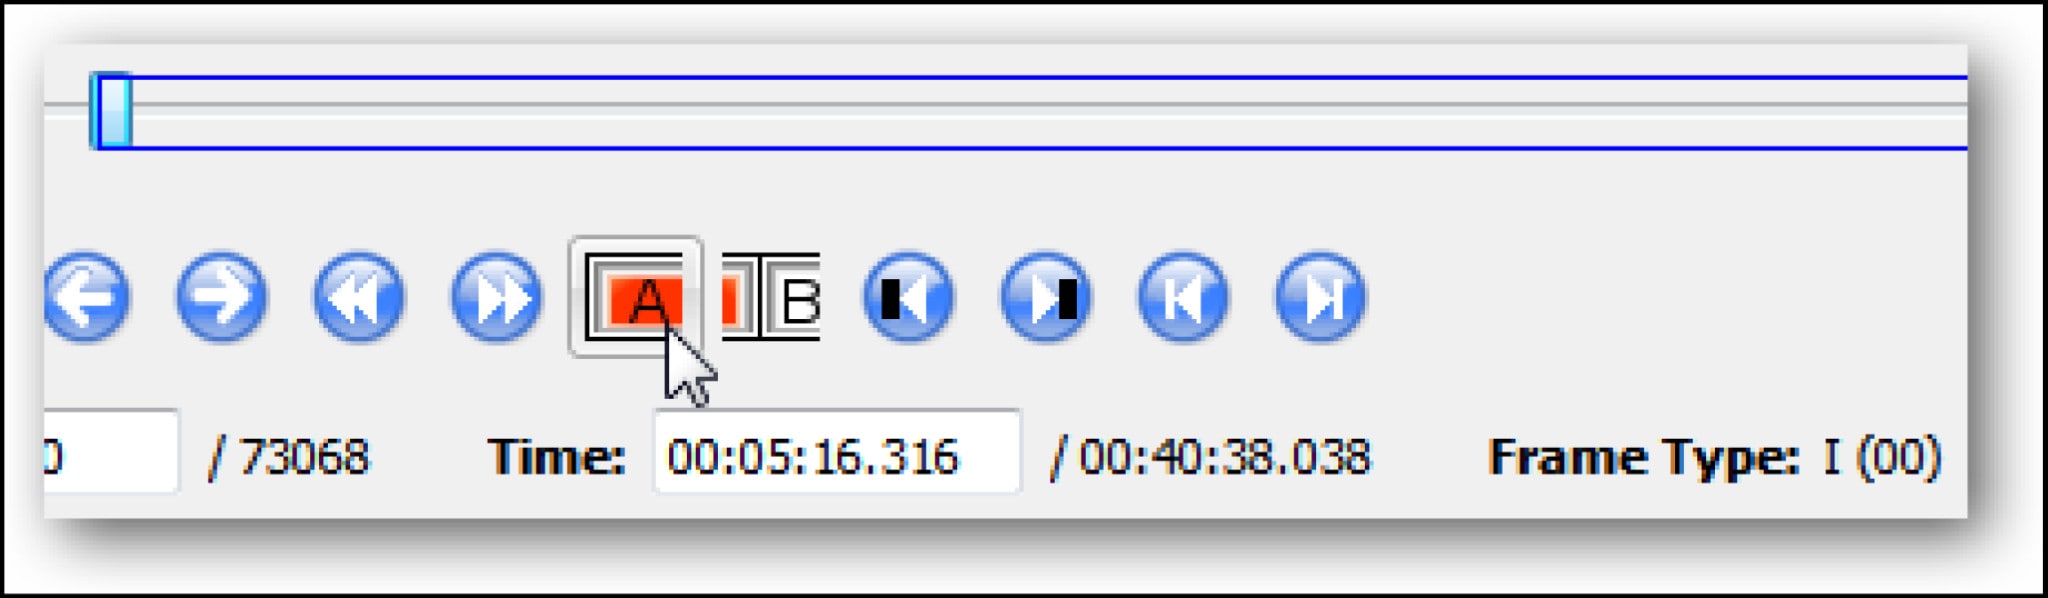
- Once you’ve found the right starting frame, click the button with the A over a red bar. This will set the start of the clip.
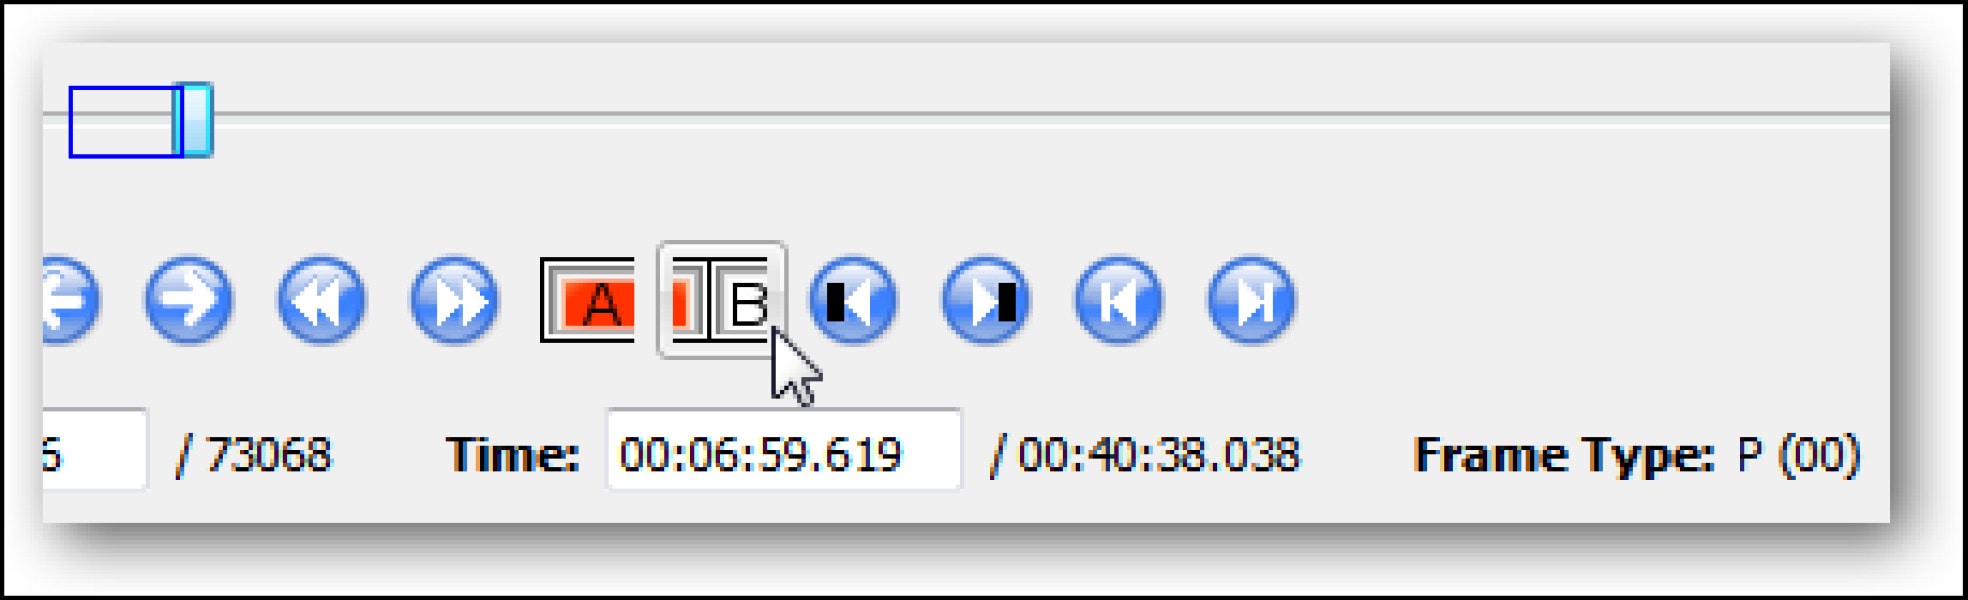
- Advance to where you want your clip to end. Click on the button with a B when you’ve found the appropriate frame. This frame can be of any type.
- You can now save the clip, either by going to File –> Save –> Save Video, or by pressing Ctrl+S. Give the file a name, and Avidemux will prepare your clip.
BEST PAID FFMPEG ALTERNATIVE TO CUT VIDEO ON MAC
JOYOSHARE MEDIA CUTTER
Supported OS: Mac and Windows
The best video cutting tool is Joyoshare Media Cutter for Windows (or Mac). As a professional video trimmer, it allows you to cut your media files at a 60X faster rate, allowing you to clip a 60-minute video or audio file in just one minute. The interface design is also simple and clean, allowing you to do it quickly.
Another noteworthy feature is the ability to easily cut and merge both video and audio without sacrificing quality. The cropper supports a variety of video and audio formats, including AVI, MP4, MPEG, VOB, WMV, ASF, RM, RMVB, 3GP, MP3, WMA, M4R, and others, allowing you to save the file in any format and on any device, including Apple.
More notably, this is a capable all-in-one video cutter. In addition to cutting videos and audio, it can convert all popular video formats, extract audio from video files, and merge video and audio files from the same source into a new one.
Features:
Convert to Any File Format
Merge Video and Audio Files into Multiple Formats
Improved Accuracy & Efficiency in Cutting Videos
60X Fast Conversion
Pros:
- Offers an easy way to cut, merge, and convert video files
- Blazing fast video-cutting and file-conversion speed
- Supports multiple audio and video file formats
Cons:
- Can only merge videos from the same source. That means you can’t use the program to merge separate videos from your gallery.
- The program doesn’t offer an easy way to remove an unwanted part of a video if it’s in the middle of the video. The only way to do that is by cutting the section before and after the video, then merging them into one.
Steps:
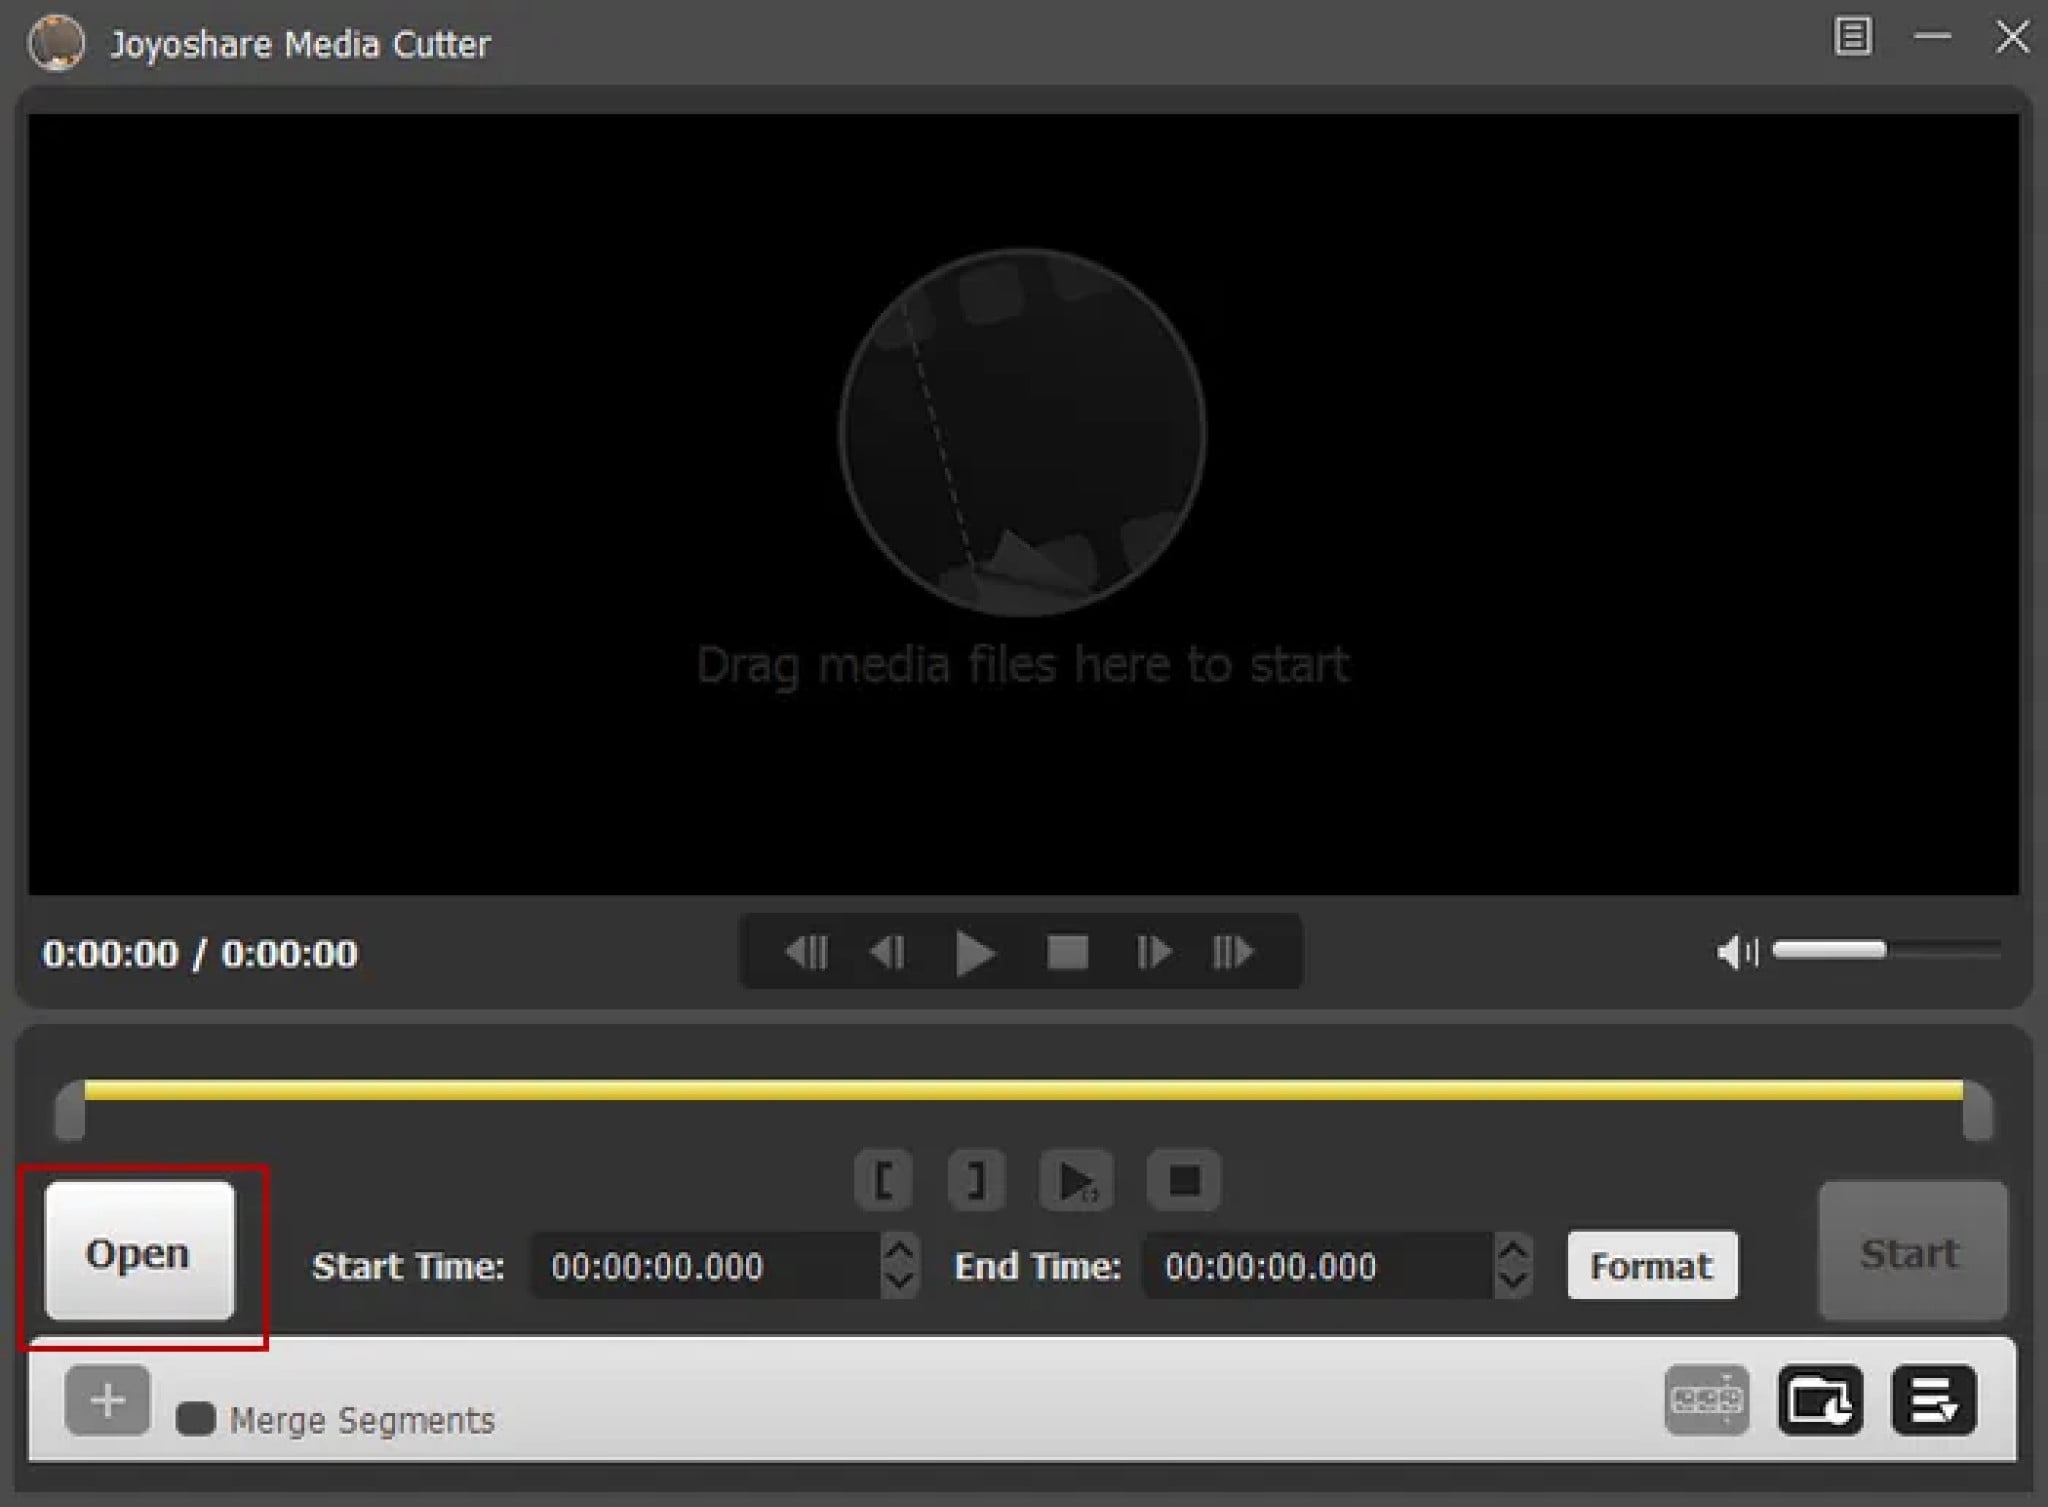
Step 1: Adding Video
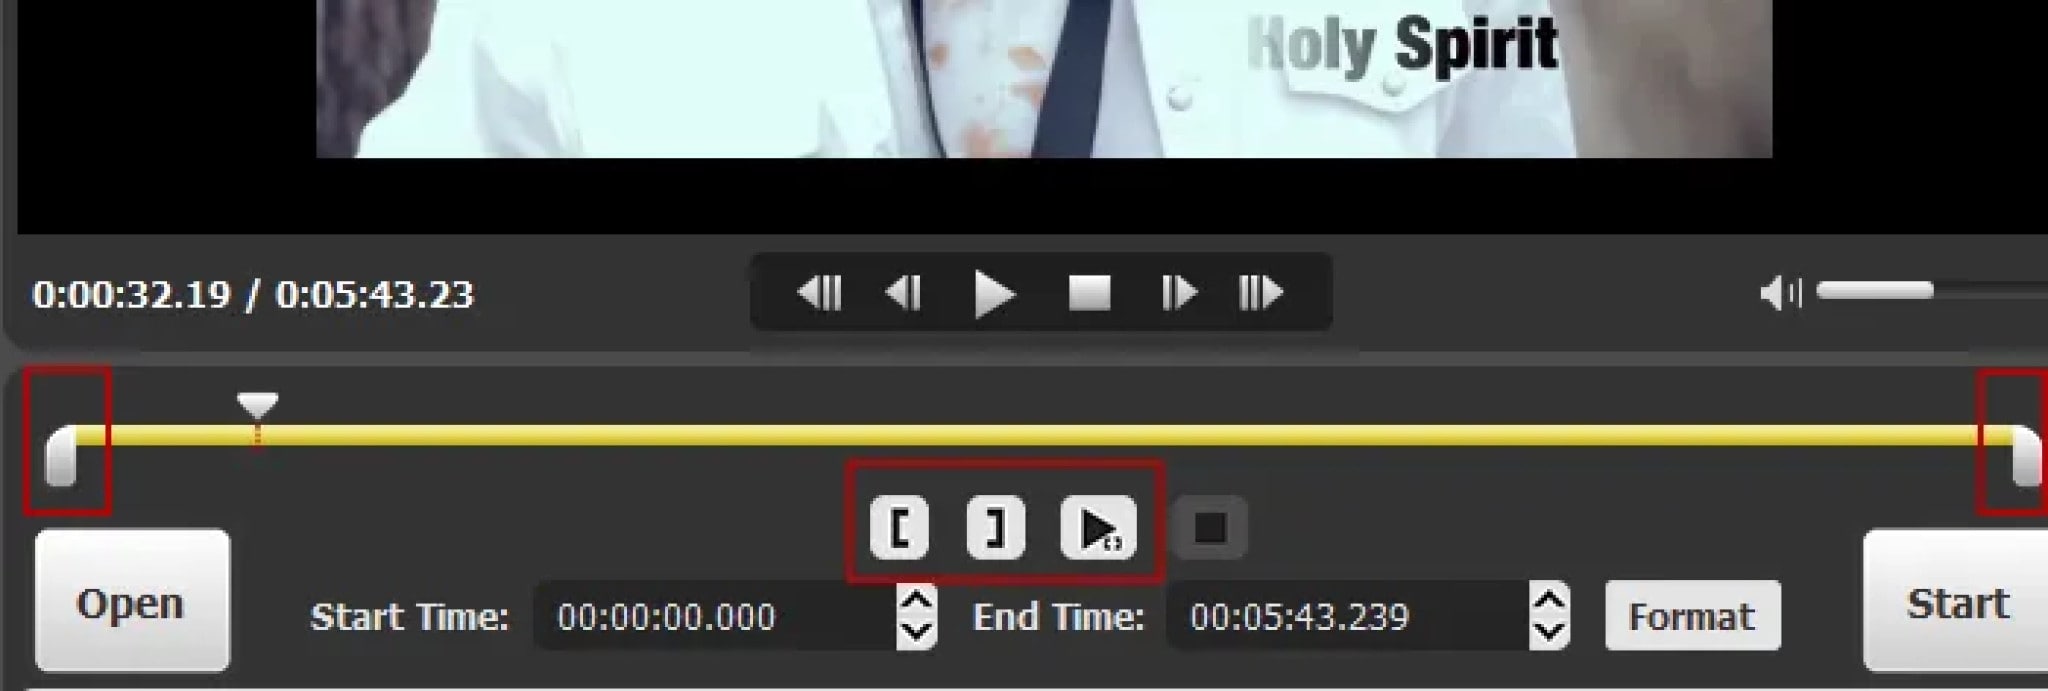
To add a video, click the “Open” button. Locate the video you want to trim from your collection and open it. Alternatively, you can use the drag-and-drop feature.
Step 2: Select the Segment to Be Trimmed
At the bottom of the Joyoshare video window, you’ll be able to see a time slider through which you can skip to your desired timeframe. Move the slider handles attached to the yellow timeline bar to set the starting and ending points of your video.
Once you’ve set your desired starting point, click on the “[” button to highlight the starting segment, then move the right-hand slider to select the ending point, and click the ] button to set the end segment.
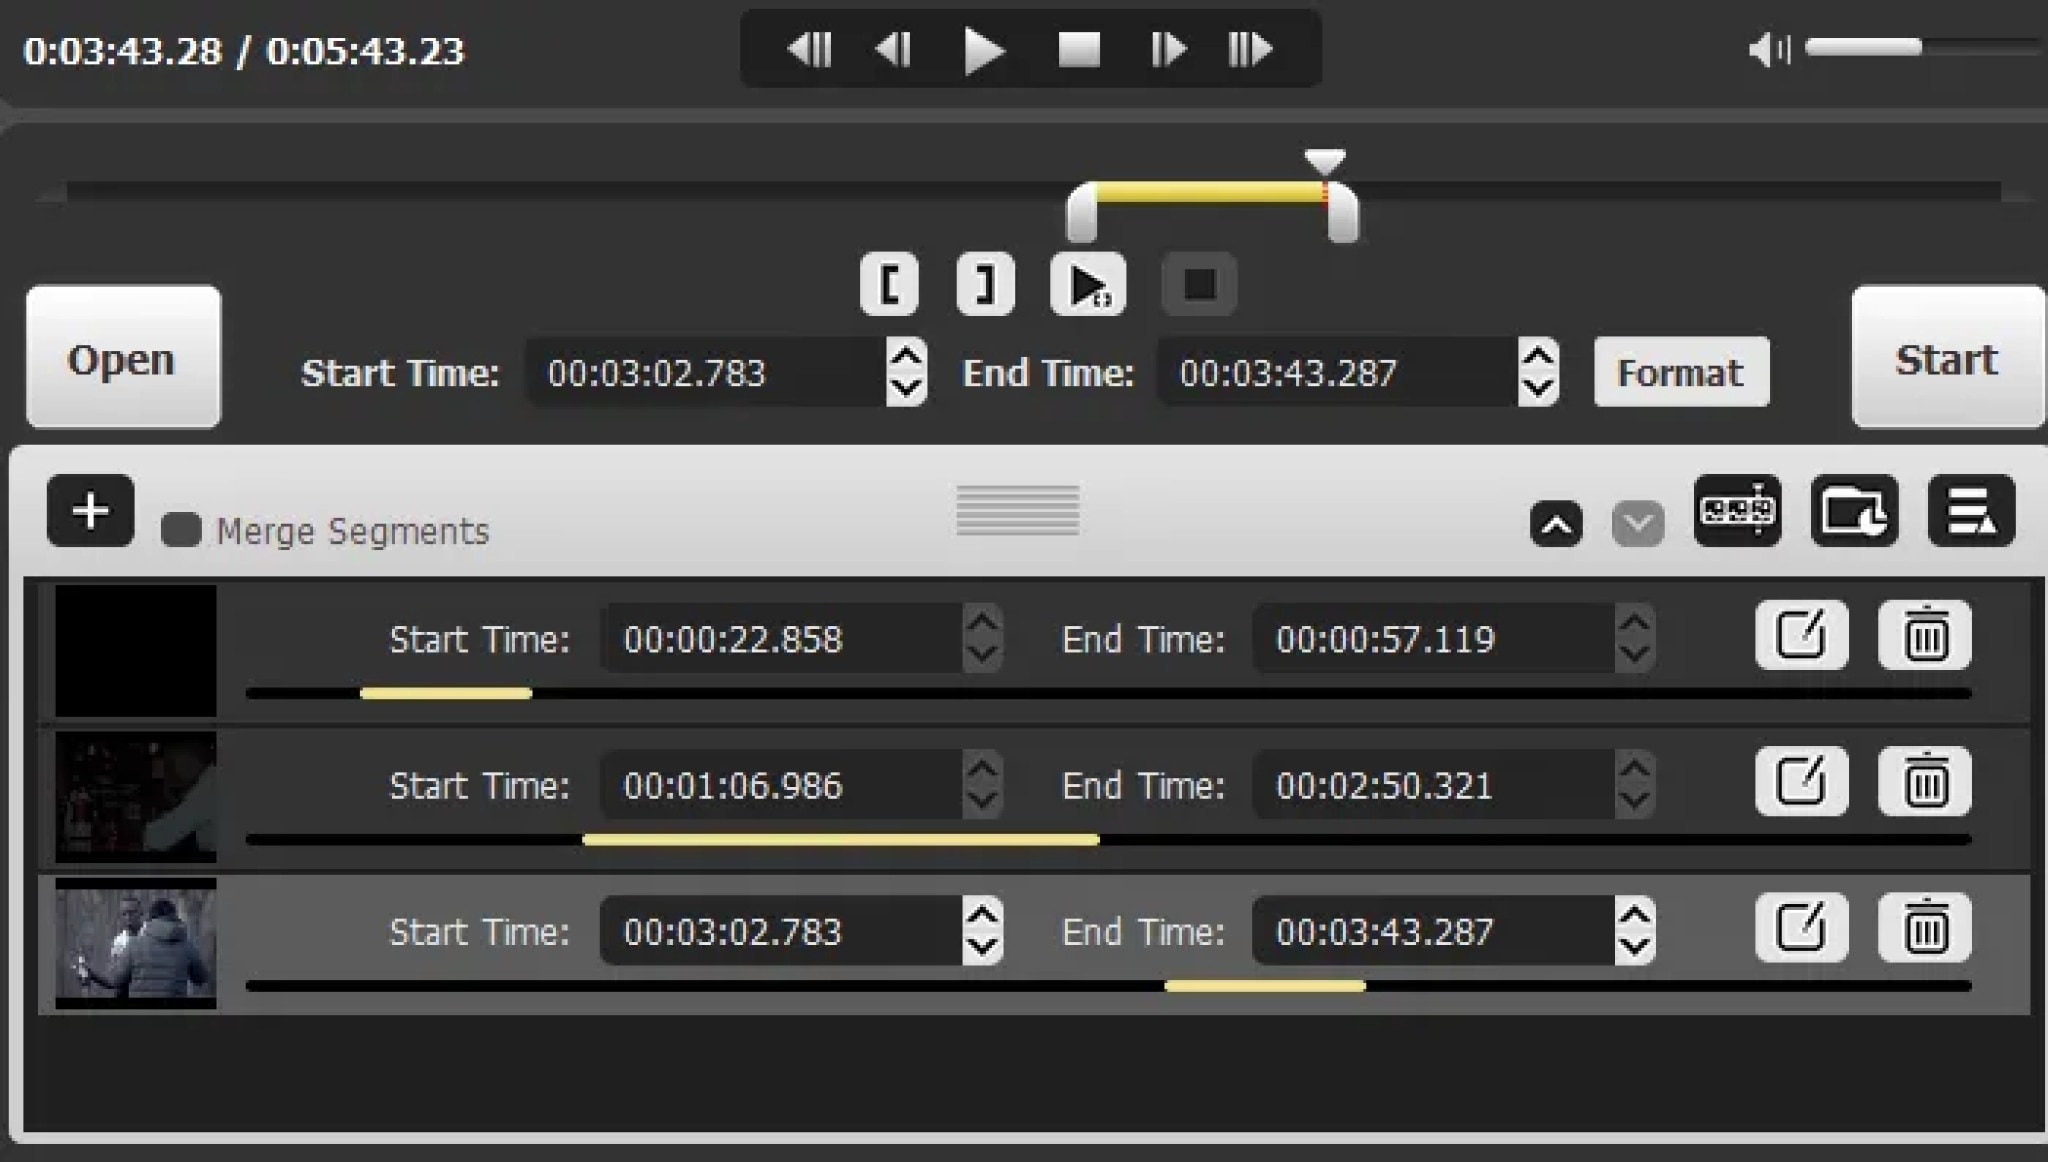
Step 3: Choose Your Desired Output Format and Destination Folder
Click the “Format” button, and a new window will pop up where you’ll be able to choose your preferred output format.
Step 4: Trim the Video
Click the “Start” button to begin trimming the segment. Wait for a minute for the program to finalize trimming the segment, then click the save button. That’s it! You’ve successfully trimmed your first video.
If you wish to cut and merge several segments, click the “+” icon at the bottom of the segments tab, then follow the above procedure to create several segments.
MOVAVI VIDEO EDITOR
Supported OS: Mac and Windows
Movavi Video Editor for Mac and Windows is a simple-to-use yet effective video editor and cutter. Aside from cutting and joining short videos, it can apply various video effects, add music and titles, and so on to make your movie more visually appealing. The video cutter tool has an easy-to-use interface and outstanding instructional videos, so you can get started quickly.
Movavi comes with a bunch of video editing controls into a straightforward, user-friendly interface. PiP, chroma-key, titling, basic keyframing, and even motion tracking are included. It isn’t as feature-rich or as fast as most of the competition, but it allows you to easily create visually appealing work.
The tool is not free, but it does offer a limited-time free trial to users. However, it is a little irritating when the ad appears after you install and launch the trial version.
Features:
- Media Library
- Templates
- Upload video or audio file
- Video and image management
- Title Editor
- Trim & Slice
- Video Effect
- Slow Motion & Time Effect
- Social Sharing
- Brand Overlay
- Text Overlay
- Audio Tools
- Speed Adjustment
- Split / Merge
- Video Stabilization
Pros:
- Easy-to-understand user interface
- Transitions with sound
- Motion tracking and picture-in-picture tools
- Chroma keying
- Quick movie-creation tool
Cons:
- Lacks advanced trim modes and clip pre-trimming
- Rendering on the slow side
- Not compatible with Apple Silicon M1
Steps:
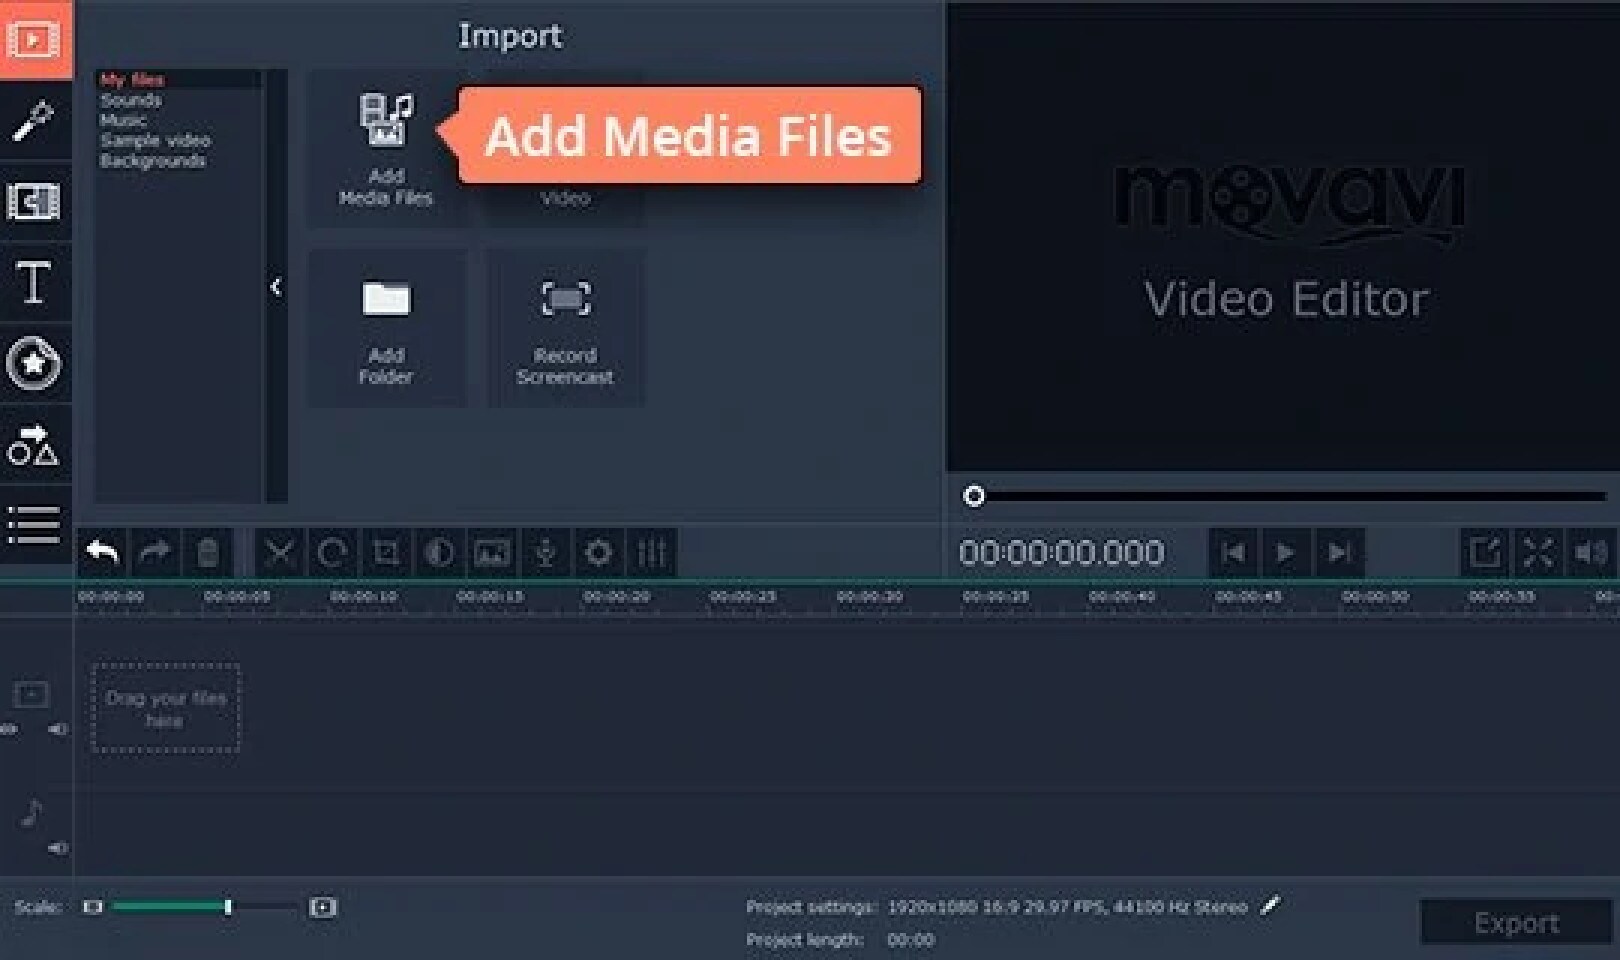
- Add Video Files
Launch Movavi’s MP4 trimmer, click the Add Media Files button, and upload the MP4 files you want to work with. The videos you’ve added will appear on the Timeline in the lower part of the program window.
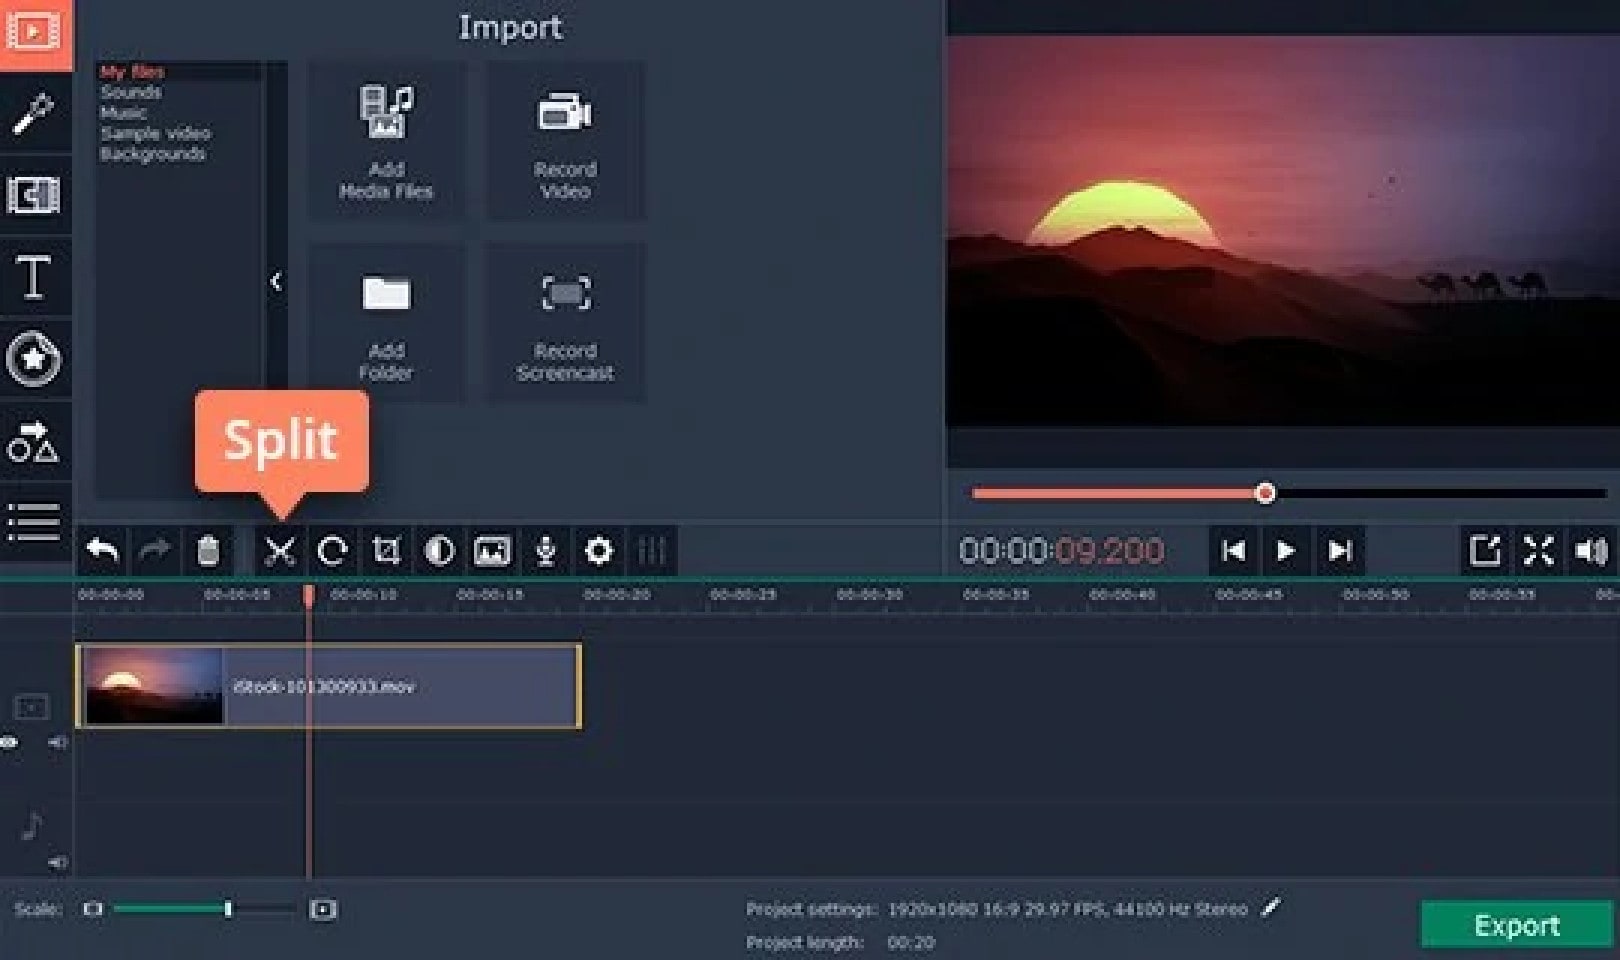
- Cut And Trim Your Videos

So how to cut MP4 video with Movavi Video Editor Plus? If you want to snip a video into two or more parts, click the file on the Timeline and move the red marker to the place where you want to make the first cut. Then click the Split button with the scissors icon or hit Ctrl+B. Repeat the process as many times as you need.
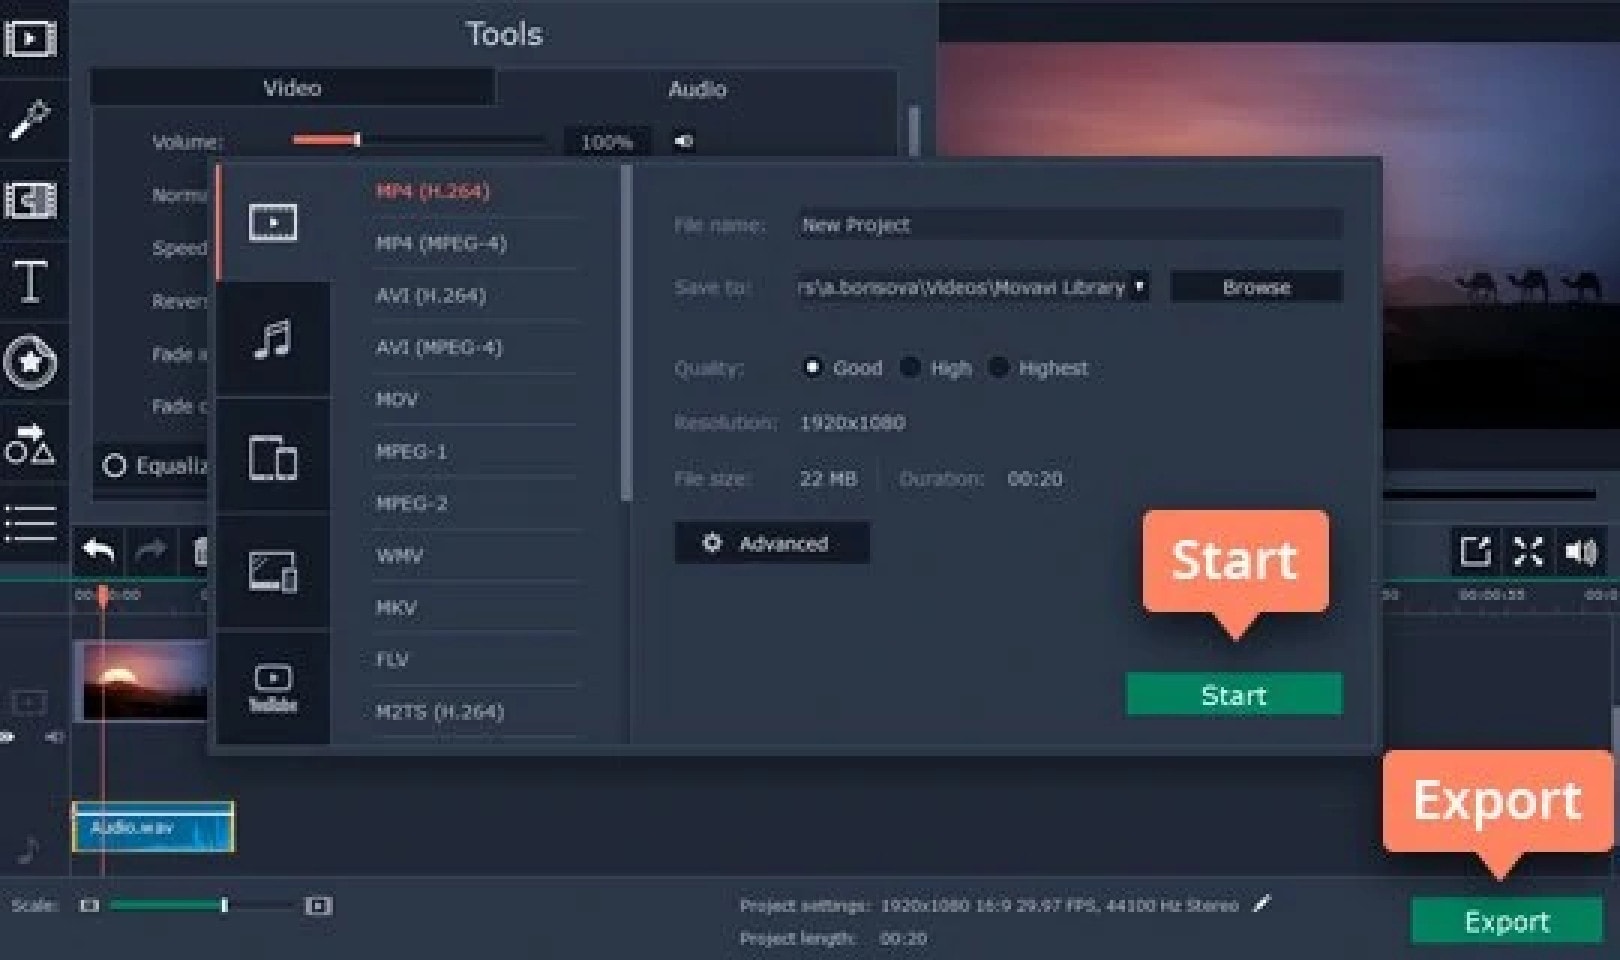
If you want to trim your video clip, select the file on the Timeline and then just pull the edge of the clip to shorten it as shown in the picture.
- Save The Result
All that’s left to do is save your edited video. Click the Export button, choose the appropriate video format, and hit Start.
XILISOFT VIDEO CUTTER

Supported OS: Mac and Windows
Xilisoft Video Cutter is an effective programming cutter that lets you choose and cut your preferred segments in a single file as well as cut out the segments you don’t like. It is compatible with almost all popular video formats, including VCD, AVI, MPEG, MP4, WMV, 3GP, /MPEG-4 AVC, /PSP AVC, MOV, ASF, and others. It enables you to precisely set the start and end points.
While the software cannot cut segments from multiple input files at the same time, it can cut your selected source video into the number of clips you require in a single step. Xilisoft Video Cutter goes beyond standard cutting or slicing by allowing you to convert your video input files to a variety of well-known codecs. It is possible to convert the entire source file or just a specific segment, but this requires removing those unnecessary parts that frequently cause problems (TV advertisements, trailers, etc.).
Features:
Easily Cut Video Clips
Multi-trim Video to Whole
Output Clips to Multiple Formats
Instant Preview
Clear Timeline
Advanced Editing
1-2-3 Interface
Multilingual Interface
Pros:
Supports all of the most widely used video file formats
Converts your videos between formats
Simple cutting interface
Allows for multiple cuttings from a single source file
Cons:
Does not support batch processing
Steps On How To Cut Your Favored Segments:
- Add Source Video File

Click the “Open“ button on the main interface, and select a video file in the pop-up window.
- Set Clip Segments
Click “Play” and click the “Set Start Point” and “Set End Point” buttons successively during playing the video to set the start point and endpoint of the clip.
You can also set several segments. Click the “Show Advanced Mode” button and click the “New Clip” button in advanced mode to set the start and endpoints of the segments. Repeat the above steps to set several segments.
Tip: To delete a segment, please choose the segment in the segment list, and click the “Delete Clip” button on the toolbar; to adjust the segment order, please choose the segment and click the “Move Up” or “Move Down” button to adjust its order.
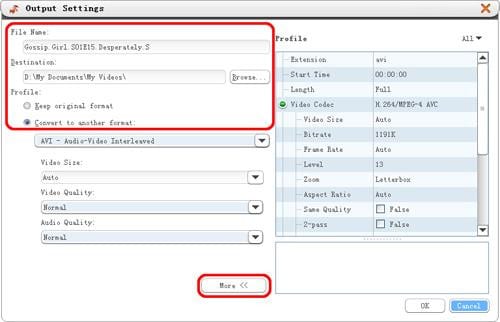
- Output Settings
Click the “Cut” button at the bottom of the window to open the “Output Settings” window.
- Start Cutting
Click the “OK” button to start video cutting. During cutting, you can check the cutting status by dragging the process bar or canceling the cutting. Tip: After cutting is done, click the “Open Output Folder” button to open the destination folder to check the clippings. Click the “Done” button to go back to the main window.
WHICH SHOULD I CHOOSE: FREE OR PAID VIDEO CUTTER ON MAC?
Whether you choose Free or Paid Video Cutter, it still depends on your edit and navigation if the project will succeed like what you’re anticipating. Beginners in the industry can go for Free Video Cutters to practice the craft without worrying about the monthly subscription.
However, if you’re a professional, I highly suggest that you choose Paid Video Cutter to lessen the hassle and create amazing output.
FAQS ABOUT CUTTING VIDEOS
- How can I cut a video without losing quality?
Trimming VLC through LosslessCut
LosslessCut is an open-source video cutter that runs on Windows, Linux, and Mac. Like Filmora, this software also allows you to cut videos without re-encoding, so there is no loss of quality.
- Who is the best video cutter?
Filmora is one of the best video cutter software that allows you to change the aesthetic of your video with one click. It comes with a wide range of video effects that enable you to make clips look good. Features: This tool provides fast editing processing and adjustable preview quality.
- Why does trimming videos reduce quality?
In most cases, trimming only causes a minor loss of video quality. And there is no clear causal relationship between trimming and losing video quality. The main factors that influence video quality are Resolution, Bitrate, and Frame size.
If you are longing to pick up the best video cutter for Mac, you are supposed to evaluate it from different aspects, like operating interface, cutting features, output quality, post-processing ability, etc. Frankly speaking, there is no fixed answer. Everything depends on your actual requirements. If you want to cut videos on Mac with the forthright method, iMovie can be your top priority. If you prefer top-leading editing features, Blender is competitive enough for you.
Conclusion:
There you have it! Here is the alternative software to cut/shorten your video without using FFmpeg. All these editors cater to different needs, so be sure to try them out, understand your requirements, and use the right one for your project!
FILMORA VIDEO EDITOR
Supported OS: Windows and Mac
Filmora Video Editor is another well-known video editor that is widely used for video editing. It was released two decades ago to provide low-cost video editing software. Aside from video cutting and joining, it has some great features such as adding filters, titles, texts, and so on. You can also record your voice or live music, mix audio and video tracks, and do other things. It is simple to use and is available for both Mac and Windows users.
Filmora includes an instant cutter tool that can be used throughout clip import and is designed for use with large amounts of high-resolution content. As the names indicate, it is very simple and serves only one purpose. You can drag multiple clips onto its window, but only if the Merge sub-mode is enabled. Trim mode is only for trimming the ends of a single clip, and its interface only displays one clip in the left-size source tray. You can Add Segments, which creates a new clip based on your trimmed original, but you can’t split a clip explicitly.
For Win 7 or later (64-bit)
For macOS 10.14 or later
Features:
- All editing tools and features are well-displayed in the main windows, which can be found and used easily;
- Very easy to cut or trim video files just with a few clicks;
- Lots of filters, overlays, motion graphics, titles, and more special effects can be added to the video.
- More features like Picture in Picture and Green Screen and Split Screen can be used to make videos more unique.
Pros:
- Intuitive Interface
- Easy To Use
- Great Features
- Affordable Perpetual License
- Great Final Video Results
- Faster Renders And Previews
- Supports Screen Capturing
- Support Wide Range Of File Formats
- User Support Is Good
Cons:
- Lacks Advanced Feature
- Free Version Has Watermark
- Not Available For Linux And Phones
- Pricing Is Expensive
- Software Lagging
Steps On How To Cut Video On Mac Using Filmora Video Editor
Step 1: Import Video Files
You will begin by importing the video files into the project window of your program through dragging and dropping.
Step 2: Add Video To The Timeline
Drag and dropping are the easiest way to add the video to the timeline.
Step 3: Cut Video
If you want to trim the video, just move the cursor at the beginning or end of the video. When the cursor becomes a cross, move it forward or backward. Trimming only allows you to cut the beginning or end of a video.
If you need to cut a section of a video, you should follow do this: move the cursor at the beginning of the video section you want to cut, then click the scissors icon > Next, move the cursor to the end of the video section you want to cut and click scissors icon > Right-click on the video section you want to cut and click “Delete“.
Step 4: Export the Video
To export your video, click the “export” button and choose the local tab. After selecting the output device and format, just click “Create” to save it.
HANDBRAKE
Supported OS: Linux, Windows, and Mac
HandBrake is a multithreaded video transcoder that is unfastened and open source. It can compress and convert nearly any virtual media layout to another. HandBrake is able to rip encrypted DVDs the usage of libdvdcss (libdvdcss is covered with the VLC media participant on macOS and AnyDVD/DVD forty three on Windows).
This software program additionally enables batch processing, which converts a couple of video files at the same time. Additionally, a plethora of presets are available to guide you to the preferred output without having to tinker with a plethora of options.
Handbrake is a powerful and excellent video converter for Windows, Mac, and Linux that should not be overlooked. It provides all of the necessary features in a simple tool that gives the user complete control over the output. Before we get into the specifics, here’s a rundown of Handbrake’s advantages and disadvantages.
Features:
- Support of chapter selections
- Support of subtitles
- Integrated bitrate calculator
- Picture deinterlacing, cropping, and scaling
- Live Video Preview
Pros:
- HandBrake has a very simple layout which makes the video converter very easy to use, even for those who are converting videos for the first time.
- The live preview helps.
- The fact that the software is free and has device presets for iOS and Android certainly makes HandBrake a welcome video converter.
- The queuing tray for batch conversions is particularly nice.
- People who convert a lot of videos will find it very helpful.
Cons:
- On the flip side, the settings are not always easy to deal with.
- It takes a lot of time and then there are errors. The latest version fixes some old bugs but there are hiccups.
- The live preview is for up to four minutes of a video.
- It is futile for very long videos.
- The settings interface and that of the live preview could be better.
- The open-source software also doesn’t support all video formats.
- Given the diversity of devices and the multitude of formats in use today, HandBrake needs more compatibility.
Steps On How To Compress Video Using Handbrake
- After you download and install Handbrake, open the app. On the left side, under ‘Source Selection’, click ‘File’. Select the file from the folder and then click ‘open’.
- Choose where you want the compressed video to be saved by clicking ‘Browse’.
- Enter a name for the video, and click ‘Save’.
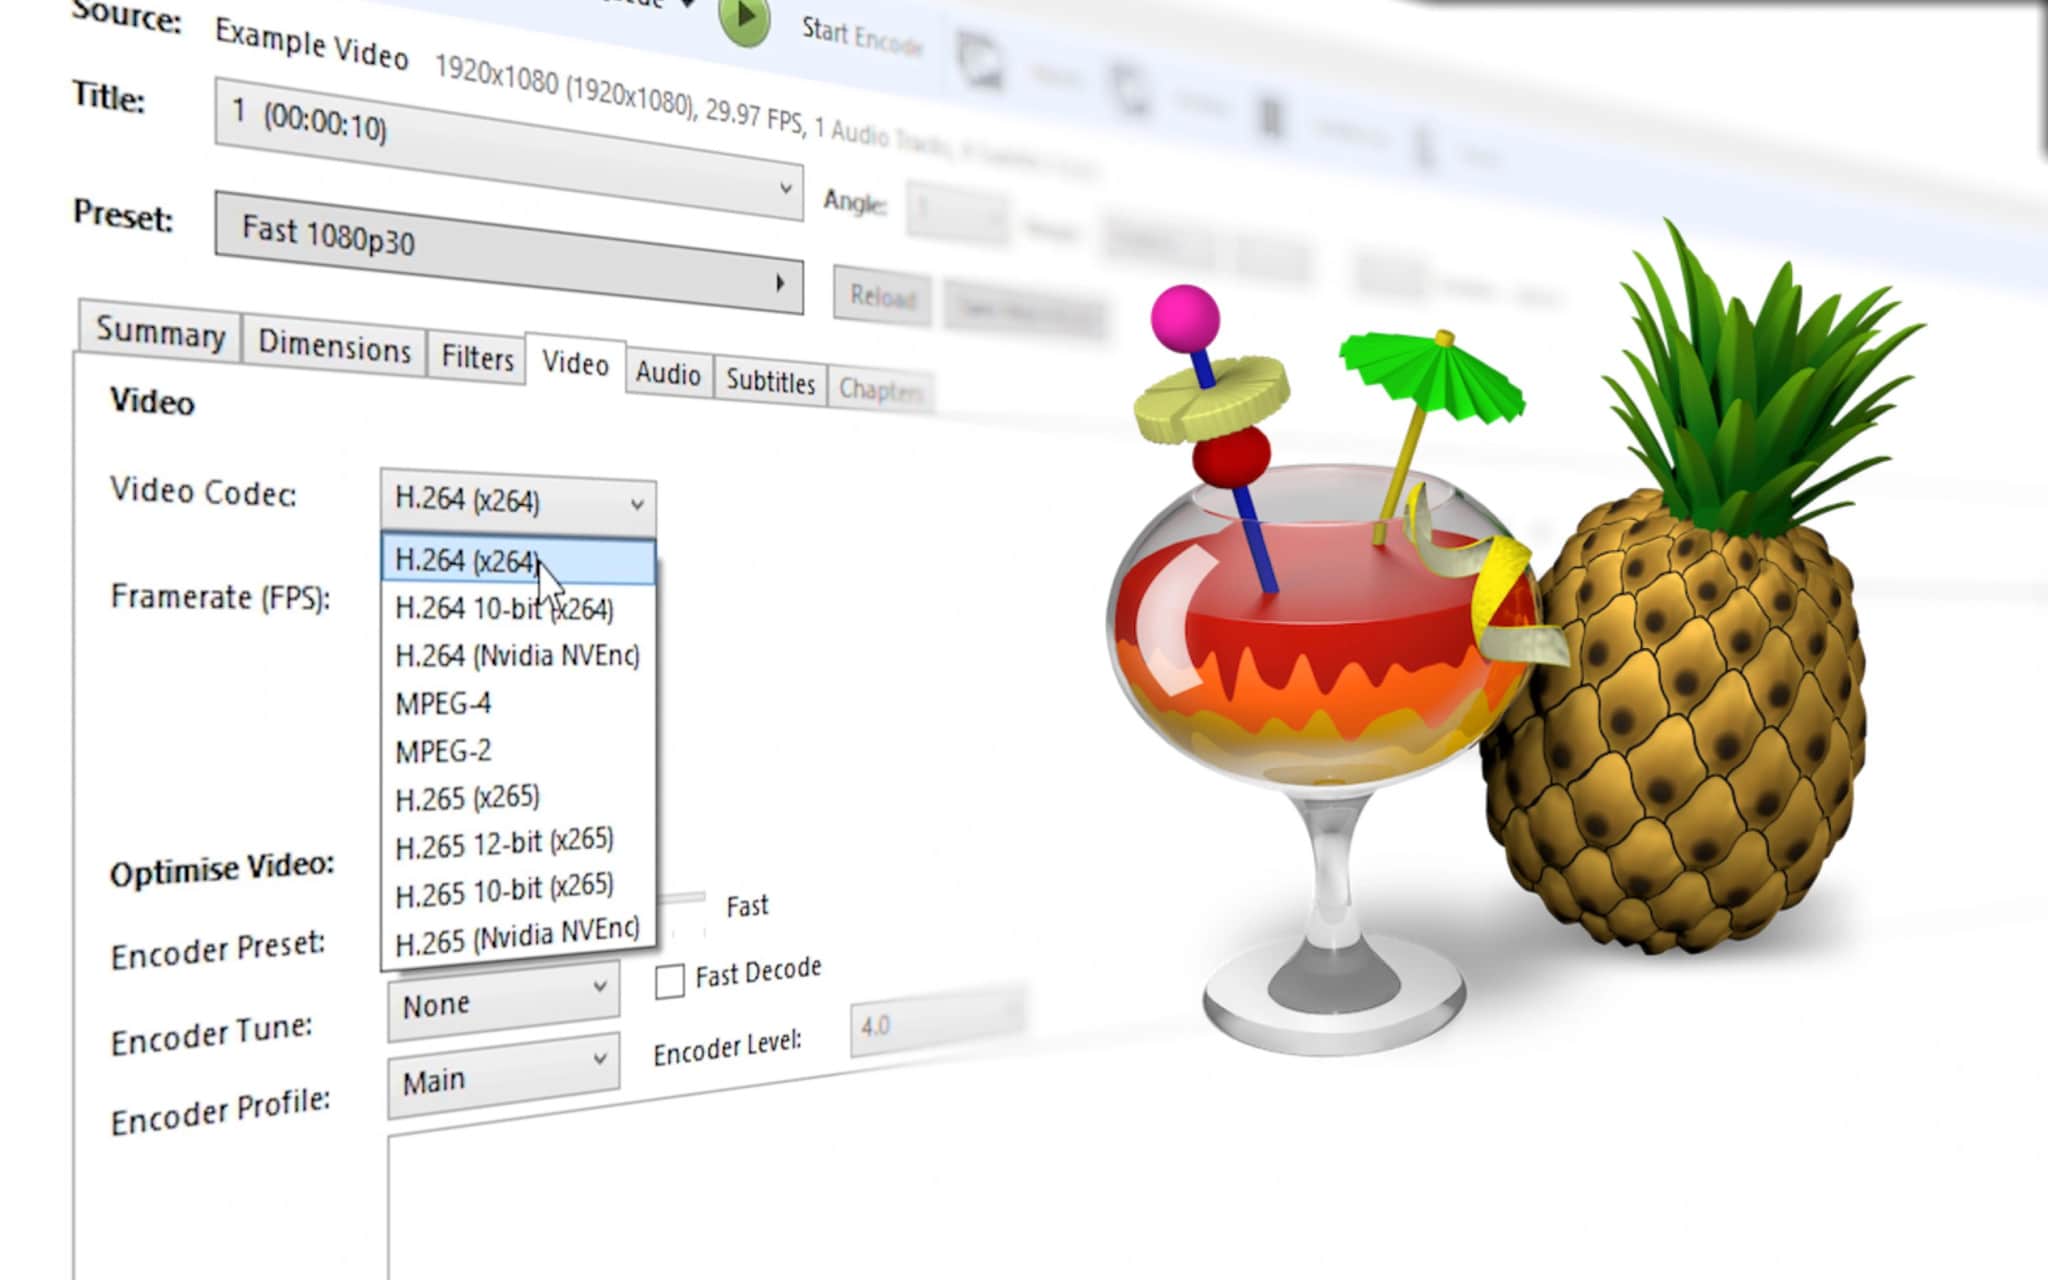
- Under ‘Output Settings’, choose MP4 for ‘Container’.
- Click the ‘Video’ tab, under it, is the ‘Video Codec’, choose (x264).
- Select a Preset from the ‘Preset Drawer’. We recommend you choose Fast1030p 30 for high quality.
- Choose the ‘framerate’, depending on your source video i.e. NTSC (29.97fps), then make it 30fps by choosing 30. Also, tick the ‘Constant Framerate’ to ensure better compatibility.
- Enter an ‘Average Bitrate (kbps)’ for the video between 5,000-10,000 (take note: higher bitrate has higher quality video but will take longer to upload and download).
- Click the ‘Picture’ tab if you want to change the video frame size or resolution.
Change ‘Anamorphic’ to ‘None’, and ‘Modulus’ to ‘16’. And tick ‘Keep Aspect Ratio’. Use the arrow down on Width to change from 1920 (full HD) down to 1280.
Select the ‘Audio’ tab and choose 48 for the Samplerate. Choose Stereo for Mixdown. Choose 320 for your audio Bitrate.
- Hit the ‘Start Encode’ button and wait until the video has finished compressing. Handbrake will let you know when it has finished.
SHUTTER ENCODER
Supported OS: Mac, Linux, and Windows
Shutter Encoder offers a complimentary codec and conversion tool for everyone that was created in collaboration with video editors.
Convert your videos, images, and audio files to OP-Atom format, which is compatible with Avid Media Composer and Pro Tools. Encode your files, replace audio, burn to DVD, analyze audio volume, download web videos, and create your own timelapse.
Analyze audio loudness, replace audio, author DVDs and Blu-rays, create image sequences, download web videos, and more. Everything is done as simply and efficiently as possible
Shutter Encoder makes use of Java as well as other tools such as 7za, VLC, FFmpeg, ExifTool, MKVMerge (part of MKVToolNix), MediaInfo, DVDAuthor, youtube-dl, and others.
Shutter Encoder offers advanced users the option to tailor the conversion individually. You can, for example, manually change the bitrate of audio and video, but you can also set a file size limit and perform the conversion based on that. Further work techniques, such as the ability to enable hardware of the computer itself and complete the conversion according to a predefined profile, are available in a separate box.
Features:
- Without conversion: Cut without re-encoding, Replace audio, Rewrap, Conform, Merge, Subtitling (create subtitles for a video), Video inserts
- Sound conversion: WAV, AIFF, FLAC, MP3, AC3, OPUS, OGG
- Editing codecs: DNxHD, DNxHR, Apple ProRes, QT Animation, Uncompressed YUV
- Output codecs: , DV PAL, XDCAM HD422, AVC-Intra 100, XAVC, HAP, , VP9, AV1, OGV, MJPEG, Xvid, WMV, MPEG
- Archiving codec: FFV1
- Image creation: JPEG, PNG, TIF, TGA, DPX, BPM, ICO, WEBP
- Burn & Rip: DVD, Blu-ray, DVD RIP
- Analysis: Loudness & True Peak, Audio normalization, Cut detection, Black detection
- Download web videos using youtube-dl
Pros:
- Conversion according to profiles
- Extensive advanced options
- Built-in editing capabilities
Cons:
- Limited preview capability
Steps On How To Use Shutter Encoder
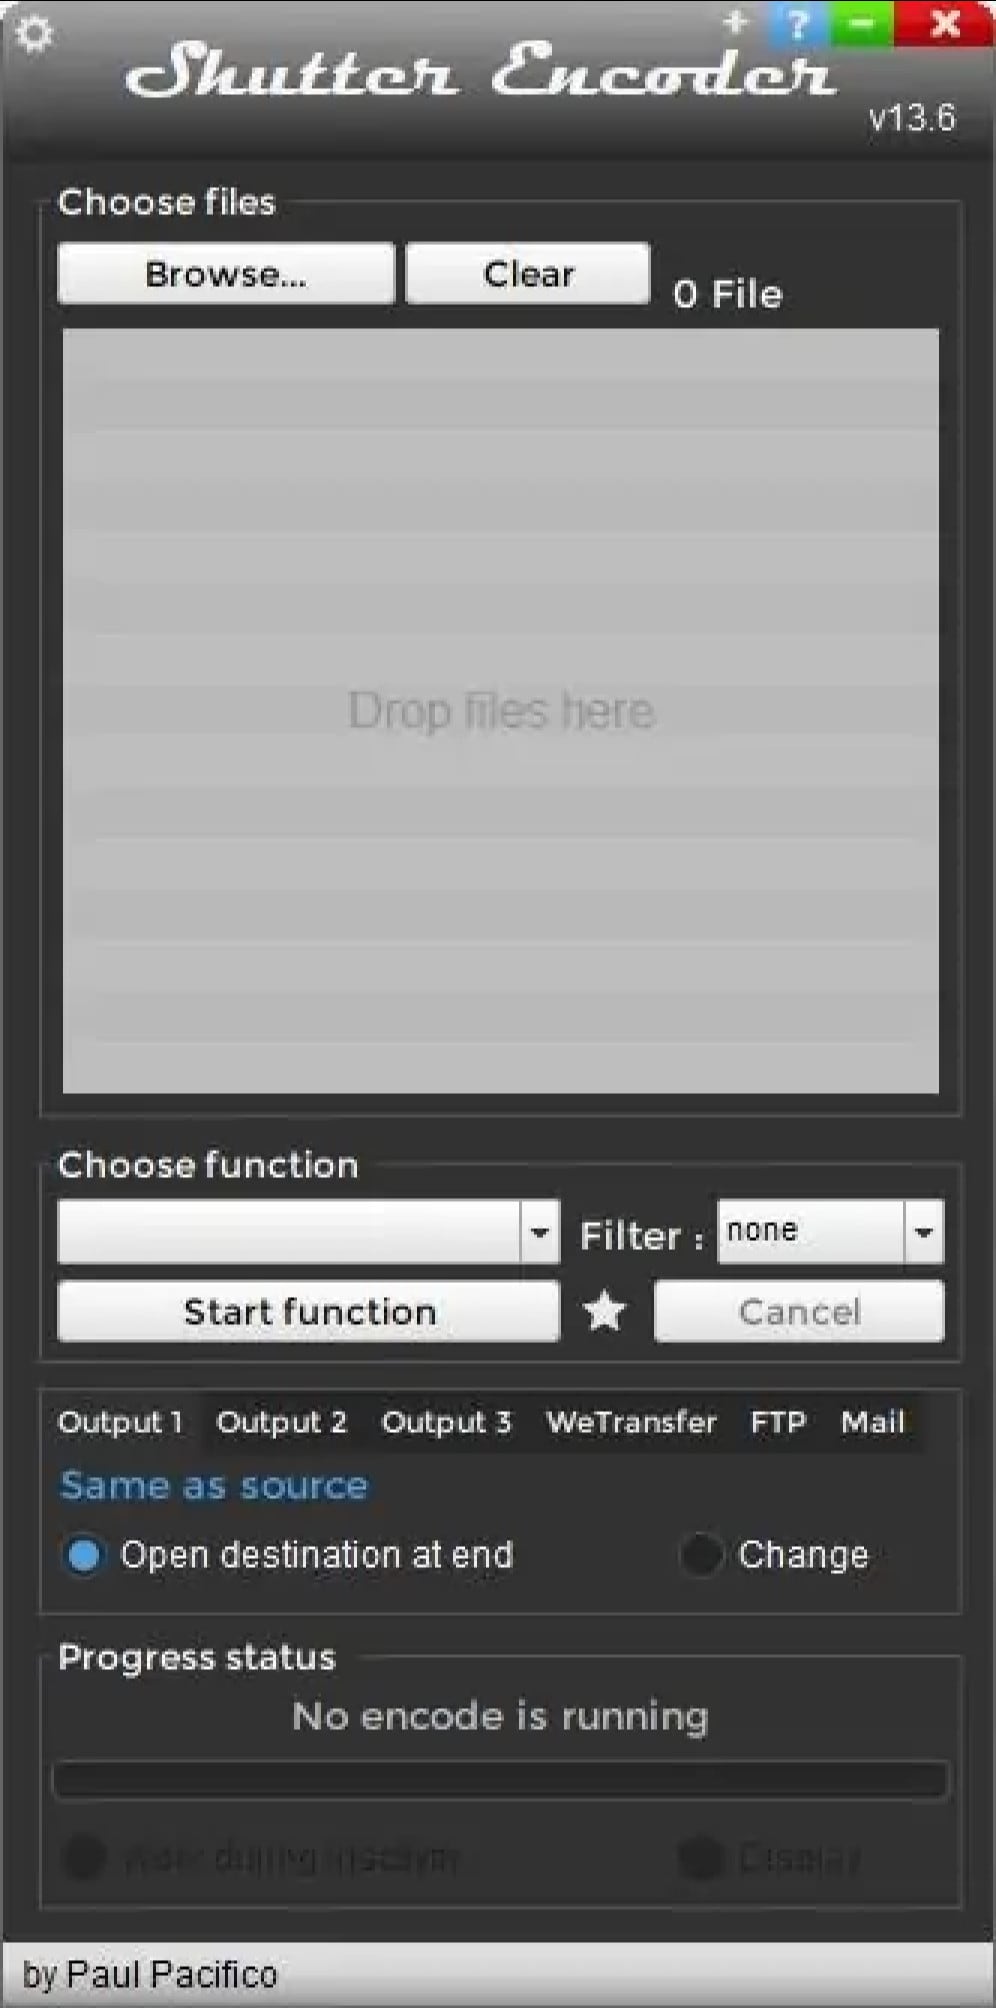
- To start, drag the video from your file manager and drop it onto the Shutter Encoder window, or use the ‘Browse’ button available in the upper left-hand side corner of the window to add a video.
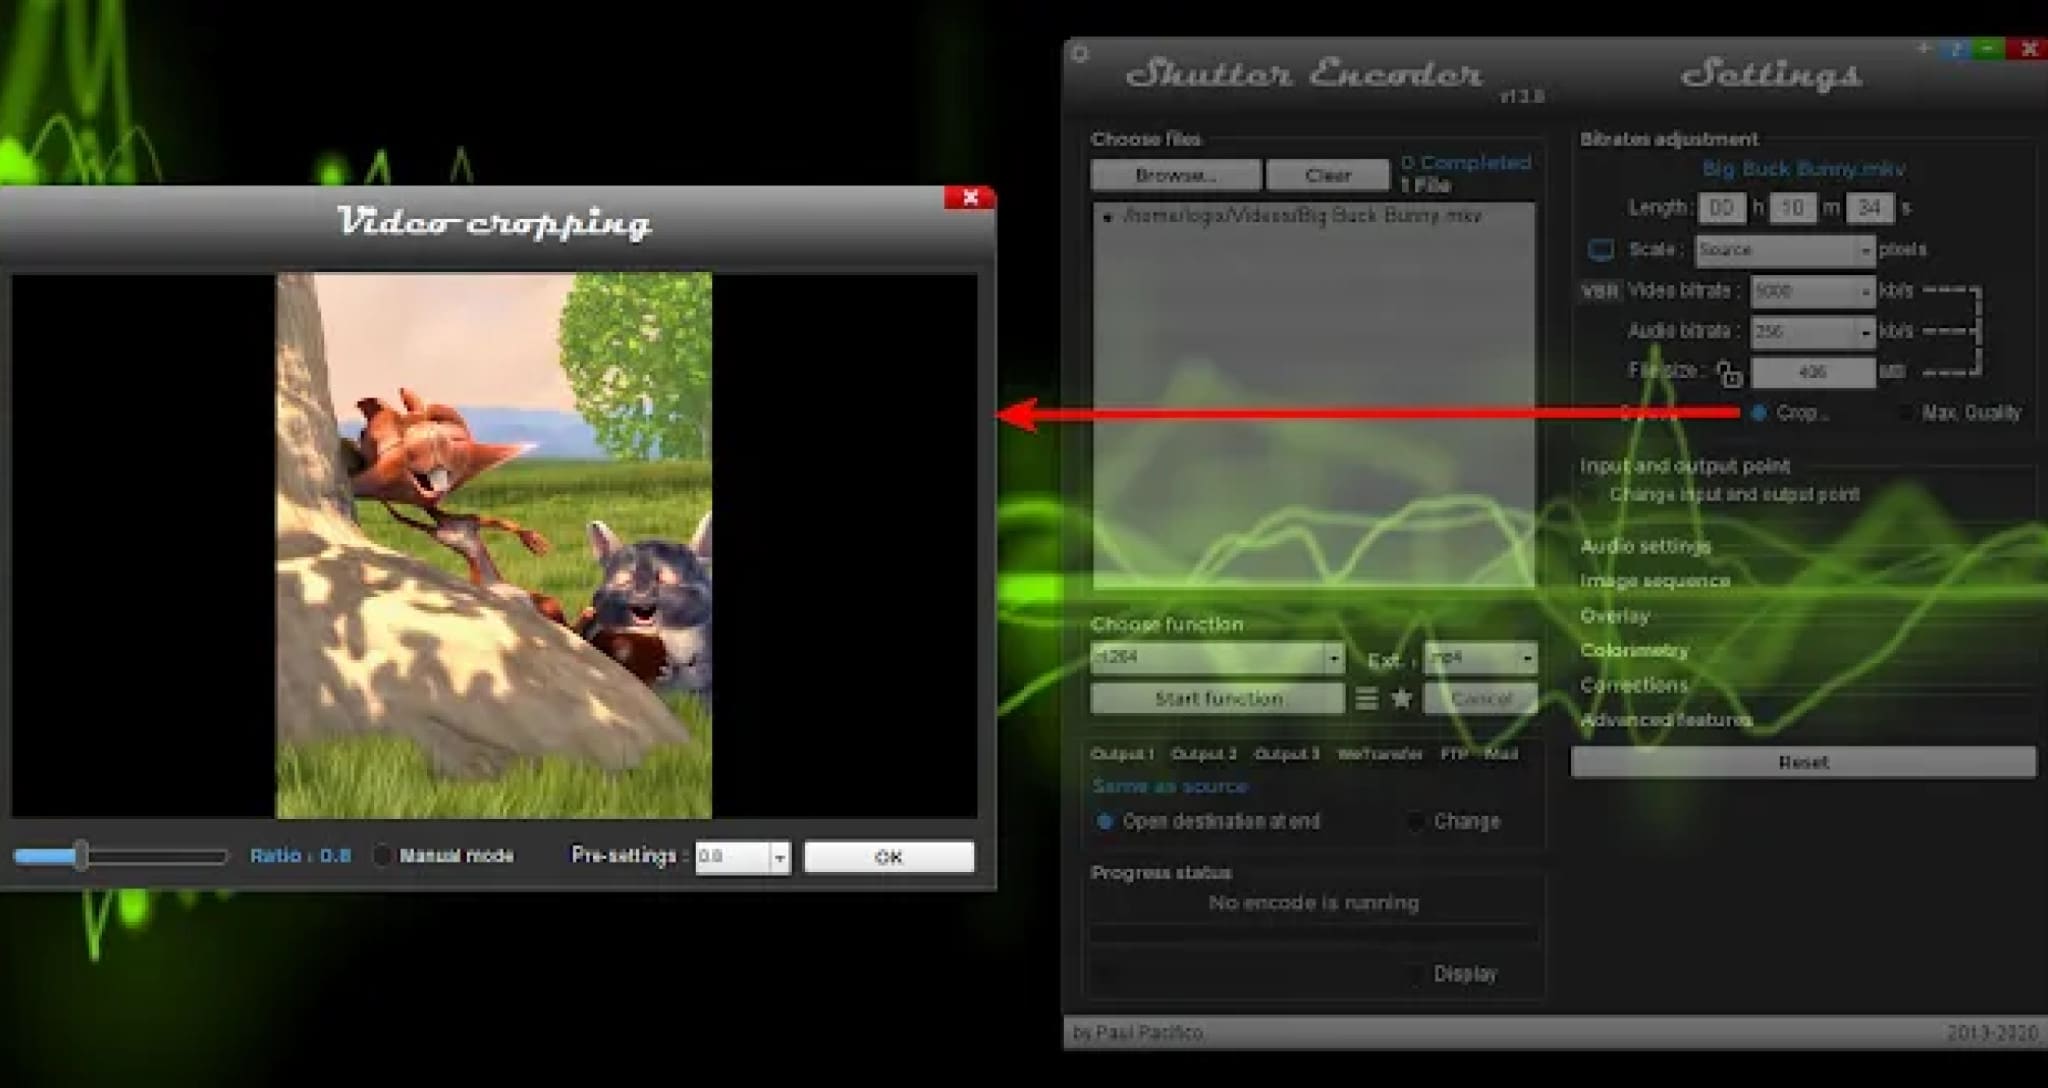
- Next, from the ‘Choose function’ drop-down menu, scroll to (it’s the first under Output codecs). You will now see some new options in a new panel that appears on the right-hand side of the Shutter Encoder window. From there, if you want to crop the video, click the Crop checkbox:
A new window will pop up where you can use your mouse to crop the video to the desired size. If you want to change it to a predefined, fixed-size ratio value, uncheck the ‘Manual mode’ box, and you’ll be able to choose a ratio from the ‘Pre-settings’ drop-down.
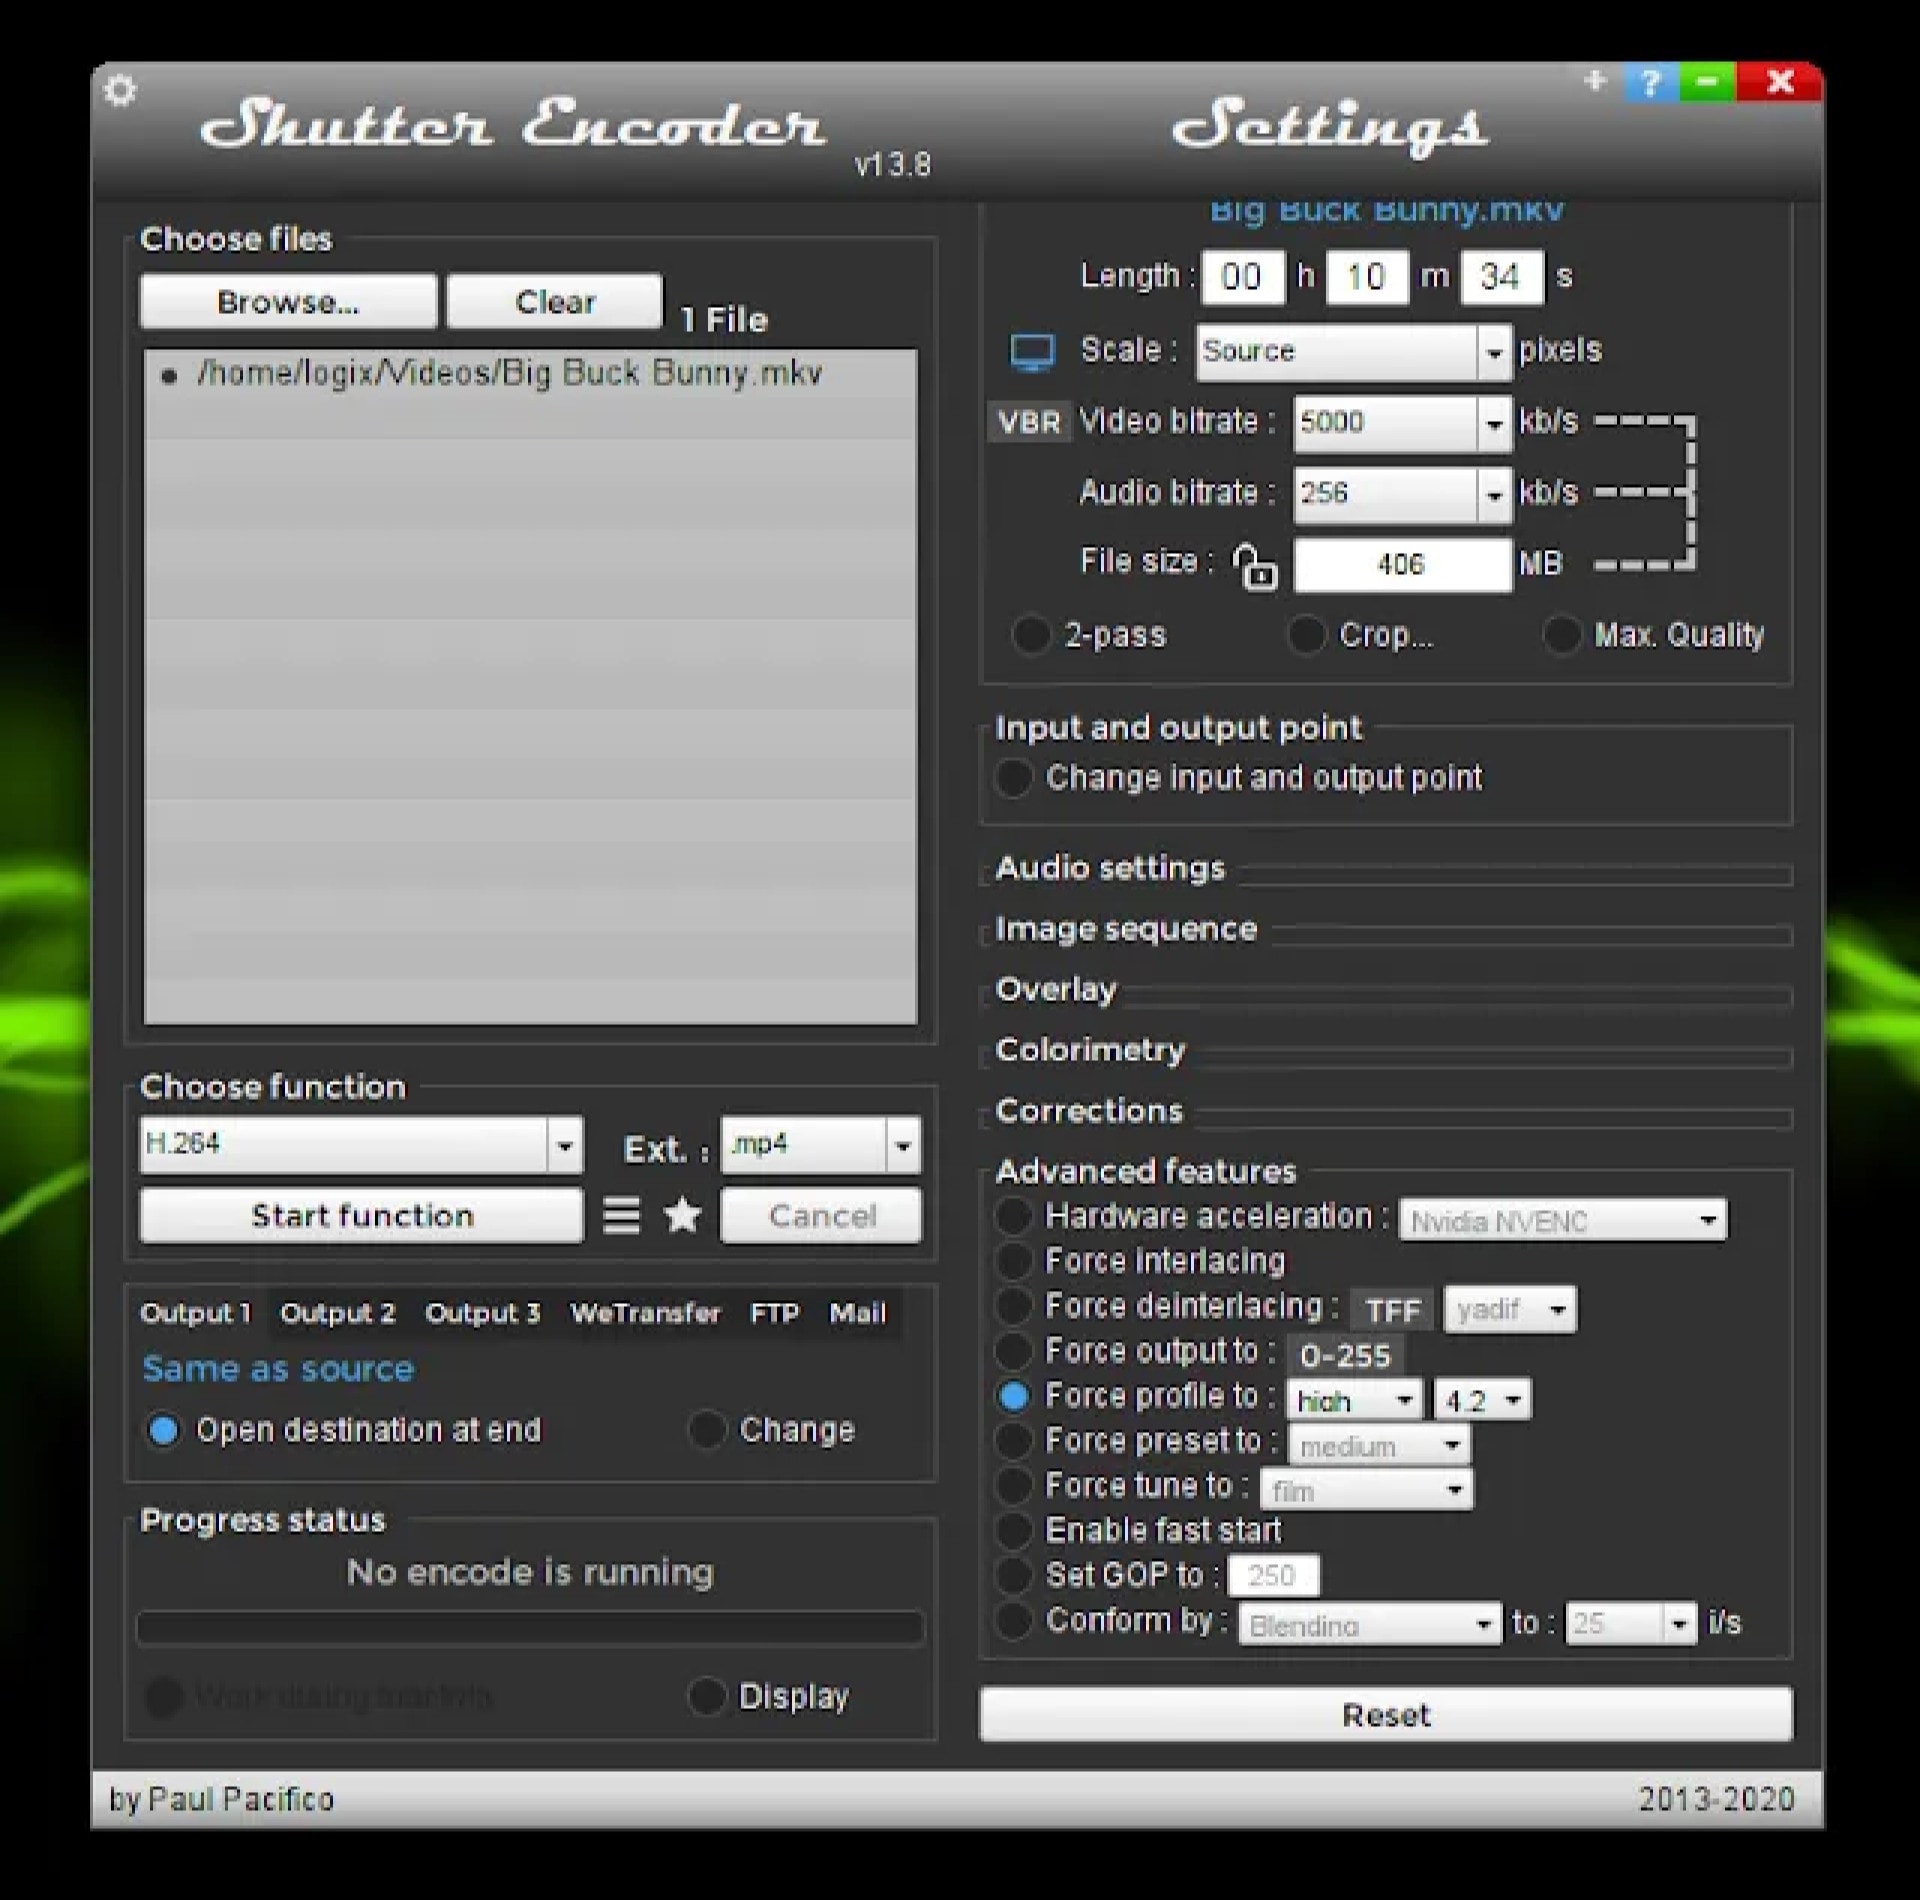
Next, if you want to change the profile, expand the ‘Advanced features’ item in the Shutter Encoder sidebar, check the box for the Force profile option, then change the profile to what you want to use:
- When you’re done with the video adjustments you want to make, click the ‘Start function’ button, and Shutter Encoder will begin encoding your new video.
AVIDEMUX
Supported OS: Linux, BSD, Mac OS X, and Microsoft Windows
Avidemux offers three fundamental operations: cutting, encoding, and filtering. Cutting allows users to copy, paste, save, or delete a specific part of a video and is incredibly beneficial when users are only interested in a small portion of a video or want to remove commercials from a TV show that they have recorded.
Encoding, on the other contrary, is the way of transforming a video to various formats so that it can be played on different players. Users of Avidemux can use this feature on videos they want to use for business or archive for personal use. They could also use this to convert a video that they intend to post online.
Users can also use Avidemux to filter their videos, which include incorporating subtitles and color profiles, deinterlacing, resizing and sharpening the image of a video, and increasing or decreasing the overall volume of the audio.
Meanwhile, Avidemux has task automation features that make video processing and editing quick and painless. A feature called Joblist allows users to organize their projects in a queue so that they can access their files from a single location. They can use this queue to handle videos in bulk as well.
Features:
- Multiple Formats
- Video Filters
- Advanced Interlacing
- Full Editing Control
- Simple Interface
- Open Source
Pros:
- Covers standard formats.
- All essential features are present.
- Surprisingly advanced filtering, processing, editing, and filtering controls.
- The interface is easy to learn.
- Open-source
Cons:
- The interface is very legacy and needs remodeling
- No longer updated
- No support
Steps On How To Cut Videos On Avidemux:
- Open up Avidemux, and load the video file that you want to work with. If you get a prompt like this one: we recommend clicking Yes to use the safer mode.
Find the portion of the video that you’d like to isolate. Get as close as you can to the start of the clip you want to cut.
You want it to read I; if it isn’t framed type I, then use the single left and right arrow buttons to go forward or backward one frame until you find an appropriate I frame.
- Once you’ve found the right starting frame, click the button with the A over a red bar. This will set the start of the clip.
- Advance to where you want your clip to end. Click on the button with a B when you’ve found the appropriate frame. This frame can be of any type.
- You can now save the clip, either by going to File –> Save –> Save Video, or by pressing Ctrl+S. Give the file a name, and Avidemux will prepare your clip.
BEST PAID FFMPEG ALTERNATIVE TO CUT VIDEO ON MAC
JOYOSHARE MEDIA CUTTER
Supported OS: Mac and Windows
The best video cutting tool is Joyoshare Media Cutter for Windows (or Mac). As a professional video trimmer, it allows you to cut your media files at a 60X faster rate, allowing you to clip a 60-minute video or audio file in just one minute. The interface design is also simple and clean, allowing you to do it quickly.
Another noteworthy feature is the ability to easily cut and merge both video and audio without sacrificing quality. The cropper supports a variety of video and audio formats, including AVI, MP4, MPEG, VOB, WMV, ASF, RM, RMVB, 3GP, MP3, WMA, M4R, and others, allowing you to save the file in any format and on any device, including Apple.
More notably, this is a capable all-in-one video cutter. In addition to cutting videos and audio, it can convert all popular video formats, extract audio from video files, and merge video and audio files from the same source into a new one.
Features:
Convert to Any File Format
Merge Video and Audio Files into Multiple Formats
Improved Accuracy & Efficiency in Cutting Videos
60X Fast Conversion
Pros:
- Offers an easy way to cut, merge, and convert video files
- Blazing fast video-cutting and file-conversion speed
- Supports multiple audio and video file formats
Cons:
- Can only merge videos from the same source. That means you can’t use the program to merge separate videos from your gallery.
- The program doesn’t offer an easy way to remove an unwanted part of a video if it’s in the middle of the video. The only way to do that is by cutting the section before and after the video, then merging them into one.
Steps:
Step 1: Adding Video
To add a video, click the “Open” button. Locate the video you want to trim from your collection and open it. Alternatively, you can use the drag-and-drop feature.
Step 2: Select the Segment to Be Trimmed
At the bottom of the Joyoshare video window, you’ll be able to see a time slider through which you can skip to your desired timeframe. Move the slider handles attached to the yellow timeline bar to set the starting and ending points of your video.
Once you’ve set your desired starting point, click on the “[” button to highlight the starting segment, then move the right-hand slider to select the ending point, and click the ] button to set the end segment.
Step 3: Choose Your Desired Output Format and Destination Folder
Click the “Format” button, and a new window will pop up where you’ll be able to choose your preferred output format.
Step 4: Trim the Video
Click the “Start” button to begin trimming the segment. Wait for a minute for the program to finalize trimming the segment, then click the save button. That’s it! You’ve successfully trimmed your first video.
If you wish to cut and merge several segments, click the “+” icon at the bottom of the segments tab, then follow the above procedure to create several segments.
MOVAVI VIDEO EDITOR
Supported OS: Mac and Windows
Movavi Video Editor for Mac and Windows is a simple-to-use yet effective video editor and cutter. Aside from cutting and joining short videos, it can apply various video effects, add music and titles, and so on to make your movie more visually appealing. The video cutter tool has an easy-to-use interface and outstanding instructional videos, so you can get started quickly.
Movavi comes with a bunch of video editing controls into a straightforward, user-friendly interface. PiP, chroma-key, titling, basic keyframing, and even motion tracking are included. It isn’t as feature-rich or as fast as most of the competition, but it allows you to easily create visually appealing work.
The tool is not free, but it does offer a limited-time free trial to users. However, it is a little irritating when the ad appears after you install and launch the trial version.
Features:
- Media Library
- Templates
- Upload video or audio file
- Video and image management
- Title Editor
- Trim & Slice
- Video Effect
- Slow Motion & Time Effect
- Social Sharing
- Brand Overlay
- Text Overlay
- Audio Tools
- Speed Adjustment
- Split / Merge
- Video Stabilization
Pros:
- Easy-to-understand user interface
- Transitions with sound
- Motion tracking and picture-in-picture tools
- Chroma keying
- Quick movie-creation tool
Cons:
- Lacks advanced trim modes and clip pre-trimming
- Rendering on the slow side
- Not compatible with Apple Silicon M1
Steps:
- Add Video Files
Launch Movavi’s MP4 trimmer, click the Add Media Files button, and upload the MP4 files you want to work with. The videos you’ve added will appear on the Timeline in the lower part of the program window.
- Cut And Trim Your Videos
So how to cut MP4 video with Movavi Video Editor Plus? If you want to snip a video into two or more parts, click the file on the Timeline and move the red marker to the place where you want to make the first cut. Then click the Split button with the scissors icon or hit Ctrl+B. Repeat the process as many times as you need.
If you want to trim your video clip, select the file on the Timeline and then just pull the edge of the clip to shorten it as shown in the picture.
- Save The Result
All that’s left to do is save your edited video. Click the Export button, choose the appropriate video format, and hit Start.
XILISOFT VIDEO CUTTER
Supported OS: Mac and Windows
Xilisoft Video Cutter is an effective programming cutter that lets you choose and cut your preferred segments in a single file as well as cut out the segments you don’t like. It is compatible with almost all popular video formats, including VCD, AVI, MPEG, MP4, WMV, 3GP, /MPEG-4 AVC, /PSP AVC, MOV, ASF, and others. It enables you to precisely set the start and end points.
While the software cannot cut segments from multiple input files at the same time, it can cut your selected source video into the number of clips you require in a single step. Xilisoft Video Cutter goes beyond standard cutting or slicing by allowing you to convert your video input files to a variety of well-known codecs. It is possible to convert the entire source file or just a specific segment, but this requires removing those unnecessary parts that frequently cause problems (TV advertisements, trailers, etc.).
Features:
Easily Cut Video Clips
Multi-trim Video to Whole
Output Clips to Multiple Formats
Instant Preview
Clear Timeline
Advanced Editing
1-2-3 Interface
Multilingual Interface
Pros:
Supports all of the most widely used video file formats
Converts your videos between formats
Simple cutting interface
Allows for multiple cuttings from a single source file
Cons:
Does not support batch processing
Steps On How To Cut Your Favored Segments:
- Add Source Video File
Click the “Open“ button on the main interface, and select a video file in the pop-up window.
- Set Clip Segments
Click “Play” and click the “Set Start Point” and “Set End Point” buttons successively during playing the video to set the start point and endpoint of the clip.
You can also set several segments. Click the “Show Advanced Mode” button and click the “New Clip” button in advanced mode to set the start and endpoints of the segments. Repeat the above steps to set several segments.
Tip: To delete a segment, please choose the segment in the segment list, and click the “Delete Clip” button on the toolbar; to adjust the segment order, please choose the segment and click the “Move Up” or “Move Down” button to adjust its order.
- Output Settings
Click the “Cut” button at the bottom of the window to open the “Output Settings” window.
- Start Cutting
Click the “OK” button to start video cutting. During cutting, you can check the cutting status by dragging the process bar or canceling the cutting. Tip: After cutting is done, click the “Open Output Folder” button to open the destination folder to check the clippings. Click the “Done” button to go back to the main window.
WHICH SHOULD I CHOOSE: FREE OR PAID VIDEO CUTTER ON MAC?
Whether you choose Free or Paid Video Cutter, it still depends on your edit and navigation if the project will succeed like what you’re anticipating. Beginners in the industry can go for Free Video Cutters to practice the craft without worrying about the monthly subscription.
However, if you’re a professional, I highly suggest that you choose Paid Video Cutter to lessen the hassle and create amazing output.
FAQS ABOUT CUTTING VIDEOS
- How can I cut a video without losing quality?
Trimming VLC through LosslessCut
LosslessCut is an open-source video cutter that runs on Windows, Linux, and Mac. Like Filmora, this software also allows you to cut videos without re-encoding, so there is no loss of quality.
- Who is the best video cutter?
Filmora is one of the best video cutter software that allows you to change the aesthetic of your video with one click. It comes with a wide range of video effects that enable you to make clips look good. Features: This tool provides fast editing processing and adjustable preview quality.
- Why does trimming videos reduce quality?
In most cases, trimming only causes a minor loss of video quality. And there is no clear causal relationship between trimming and losing video quality. The main factors that influence video quality are Resolution, Bitrate, and Frame size.
If you are longing to pick up the best video cutter for Mac, you are supposed to evaluate it from different aspects, like operating interface, cutting features, output quality, post-processing ability, etc. Frankly speaking, there is no fixed answer. Everything depends on your actual requirements. If you want to cut videos on Mac with the forthright method, iMovie can be your top priority. If you prefer top-leading editing features, Blender is competitive enough for you.
Conclusion:
There you have it! Here is the alternative software to cut/shorten your video without using FFmpeg. All these editors cater to different needs, so be sure to try them out, understand your requirements, and use the right one for your project!
FILMORA VIDEO EDITOR
Supported OS: Windows and Mac
Filmora Video Editor is another well-known video editor that is widely used for video editing. It was released two decades ago to provide low-cost video editing software. Aside from video cutting and joining, it has some great features such as adding filters, titles, texts, and so on. You can also record your voice or live music, mix audio and video tracks, and do other things. It is simple to use and is available for both Mac and Windows users.
Filmora includes an instant cutter tool that can be used throughout clip import and is designed for use with large amounts of high-resolution content. As the names indicate, it is very simple and serves only one purpose. You can drag multiple clips onto its window, but only if the Merge sub-mode is enabled. Trim mode is only for trimming the ends of a single clip, and its interface only displays one clip in the left-size source tray. You can Add Segments, which creates a new clip based on your trimmed original, but you can’t split a clip explicitly.
For Win 7 or later (64-bit)
For macOS 10.14 or later
Features:
- All editing tools and features are well-displayed in the main windows, which can be found and used easily;
- Very easy to cut or trim video files just with a few clicks;
- Lots of filters, overlays, motion graphics, titles, and more special effects can be added to the video.
- More features like Picture in Picture and Green Screen and Split Screen can be used to make videos more unique.
Pros:
- Intuitive Interface
- Easy To Use
- Great Features
- Affordable Perpetual License
- Great Final Video Results
- Faster Renders And Previews
- Supports Screen Capturing
- Support Wide Range Of File Formats
- User Support Is Good
Cons:
- Lacks Advanced Feature
- Free Version Has Watermark
- Not Available For Linux And Phones
- Pricing Is Expensive
- Software Lagging
Steps On How To Cut Video On Mac Using Filmora Video Editor
Step 1: Import Video Files
You will begin by importing the video files into the project window of your program through dragging and dropping.
Step 2: Add Video To The Timeline
Drag and dropping are the easiest way to add the video to the timeline.
Step 3: Cut Video
If you want to trim the video, just move the cursor at the beginning or end of the video. When the cursor becomes a cross, move it forward or backward. Trimming only allows you to cut the beginning or end of a video.
If you need to cut a section of a video, you should follow do this: move the cursor at the beginning of the video section you want to cut, then click the scissors icon > Next, move the cursor to the end of the video section you want to cut and click scissors icon > Right-click on the video section you want to cut and click “Delete“.
Step 4: Export the Video
To export your video, click the “export” button and choose the local tab. After selecting the output device and format, just click “Create” to save it.
HANDBRAKE
Supported OS: Linux, Windows, and Mac
HandBrake is a multithreaded video transcoder that is unfastened and open source. It can compress and convert nearly any virtual media layout to another. HandBrake is able to rip encrypted DVDs the usage of libdvdcss (libdvdcss is covered with the VLC media participant on macOS and AnyDVD/DVD forty three on Windows).
This software program additionally enables batch processing, which converts a couple of video files at the same time. Additionally, a plethora of presets are available to guide you to the preferred output without having to tinker with a plethora of options.
Handbrake is a powerful and excellent video converter for Windows, Mac, and Linux that should not be overlooked. It provides all of the necessary features in a simple tool that gives the user complete control over the output. Before we get into the specifics, here’s a rundown of Handbrake’s advantages and disadvantages.
Features:
- Support of chapter selections
- Support of subtitles
- Integrated bitrate calculator
- Picture deinterlacing, cropping, and scaling
- Live Video Preview
Pros:
- HandBrake has a very simple layout which makes the video converter very easy to use, even for those who are converting videos for the first time.
- The live preview helps.
- The fact that the software is free and has device presets for iOS and Android certainly makes HandBrake a welcome video converter.
- The queuing tray for batch conversions is particularly nice.
- People who convert a lot of videos will find it very helpful.
Cons:
- On the flip side, the settings are not always easy to deal with.
- It takes a lot of time and then there are errors. The latest version fixes some old bugs but there are hiccups.
- The live preview is for up to four minutes of a video.
- It is futile for very long videos.
- The settings interface and that of the live preview could be better.
- The open-source software also doesn’t support all video formats.
- Given the diversity of devices and the multitude of formats in use today, HandBrake needs more compatibility.
Steps On How To Compress Video Using Handbrake
- After you download and install Handbrake, open the app. On the left side, under ‘Source Selection’, click ‘File’. Select the file from the folder and then click ‘open’.
- Choose where you want the compressed video to be saved by clicking ‘Browse’.
- Enter a name for the video, and click ‘Save’.
- Under ‘Output Settings’, choose MP4 for ‘Container’.
- Click the ‘Video’ tab, under it, is the ‘Video Codec’, choose (x264).
- Select a Preset from the ‘Preset Drawer’. We recommend you choose Fast1030p 30 for high quality.
- Choose the ‘framerate’, depending on your source video i.e. NTSC (29.97fps), then make it 30fps by choosing 30. Also, tick the ‘Constant Framerate’ to ensure better compatibility.
- Enter an ‘Average Bitrate (kbps)’ for the video between 5,000-10,000 (take note: higher bitrate has higher quality video but will take longer to upload and download).
- Click the ‘Picture’ tab if you want to change the video frame size or resolution.
Change ‘Anamorphic’ to ‘None’, and ‘Modulus’ to ‘16’. And tick ‘Keep Aspect Ratio’. Use the arrow down on Width to change from 1920 (full HD) down to 1280.
Select the ‘Audio’ tab and choose 48 for the Samplerate. Choose Stereo for Mixdown. Choose 320 for your audio Bitrate.
- Hit the ‘Start Encode’ button and wait until the video has finished compressing. Handbrake will let you know when it has finished.
SHUTTER ENCODER
Supported OS: Mac, Linux, and Windows
Shutter Encoder offers a complimentary codec and conversion tool for everyone that was created in collaboration with video editors.
Convert your videos, images, and audio files to OP-Atom format, which is compatible with Avid Media Composer and Pro Tools. Encode your files, replace audio, burn to DVD, analyze audio volume, download web videos, and create your own timelapse.
Analyze audio loudness, replace audio, author DVDs and Blu-rays, create image sequences, download web videos, and more. Everything is done as simply and efficiently as possible
Shutter Encoder makes use of Java as well as other tools such as 7za, VLC, FFmpeg, ExifTool, MKVMerge (part of MKVToolNix), MediaInfo, DVDAuthor, youtube-dl, and others.
Shutter Encoder offers advanced users the option to tailor the conversion individually. You can, for example, manually change the bitrate of audio and video, but you can also set a file size limit and perform the conversion based on that. Further work techniques, such as the ability to enable hardware of the computer itself and complete the conversion according to a predefined profile, are available in a separate box.
Features:
- Without conversion: Cut without re-encoding, Replace audio, Rewrap, Conform, Merge, Subtitling (create subtitles for a video), Video inserts
- Sound conversion: WAV, AIFF, FLAC, MP3, AC3, OPUS, OGG
- Editing codecs: DNxHD, DNxHR, Apple ProRes, QT Animation, Uncompressed YUV
- Output codecs: , DV PAL, XDCAM HD422, AVC-Intra 100, XAVC, HAP, , VP9, AV1, OGV, MJPEG, Xvid, WMV, MPEG
- Archiving codec: FFV1
- Image creation: JPEG, PNG, TIF, TGA, DPX, BPM, ICO, WEBP
- Burn & Rip: DVD, Blu-ray, DVD RIP
- Analysis: Loudness & True Peak, Audio normalization, Cut detection, Black detection
- Download web videos using youtube-dl
Pros:
- Conversion according to profiles
- Extensive advanced options
- Built-in editing capabilities
Cons:
- Limited preview capability
Steps On How To Use Shutter Encoder
- To start, drag the video from your file manager and drop it onto the Shutter Encoder window, or use the ‘Browse’ button available in the upper left-hand side corner of the window to add a video.
- Next, from the ‘Choose function’ drop-down menu, scroll to (it’s the first under Output codecs). You will now see some new options in a new panel that appears on the right-hand side of the Shutter Encoder window. From there, if you want to crop the video, click the Crop checkbox:
A new window will pop up where you can use your mouse to crop the video to the desired size. If you want to change it to a predefined, fixed-size ratio value, uncheck the ‘Manual mode’ box, and you’ll be able to choose a ratio from the ‘Pre-settings’ drop-down.
Next, if you want to change the profile, expand the ‘Advanced features’ item in the Shutter Encoder sidebar, check the box for the Force profile option, then change the profile to what you want to use:
- When you’re done with the video adjustments you want to make, click the ‘Start function’ button, and Shutter Encoder will begin encoding your new video.
AVIDEMUX
Supported OS: Linux, BSD, Mac OS X, and Microsoft Windows
Avidemux offers three fundamental operations: cutting, encoding, and filtering. Cutting allows users to copy, paste, save, or delete a specific part of a video and is incredibly beneficial when users are only interested in a small portion of a video or want to remove commercials from a TV show that they have recorded.
Encoding, on the other contrary, is the way of transforming a video to various formats so that it can be played on different players. Users of Avidemux can use this feature on videos they want to use for business or archive for personal use. They could also use this to convert a video that they intend to post online.
Users can also use Avidemux to filter their videos, which include incorporating subtitles and color profiles, deinterlacing, resizing and sharpening the image of a video, and increasing or decreasing the overall volume of the audio.
Meanwhile, Avidemux has task automation features that make video processing and editing quick and painless. A feature called Joblist allows users to organize their projects in a queue so that they can access their files from a single location. They can use this queue to handle videos in bulk as well.
Features:
- Multiple Formats
- Video Filters
- Advanced Interlacing
- Full Editing Control
- Simple Interface
- Open Source
Pros:
- Covers standard formats.
- All essential features are present.
- Surprisingly advanced filtering, processing, editing, and filtering controls.
- The interface is easy to learn.
- Open-source
Cons:
- The interface is very legacy and needs remodeling
- No longer updated
- No support
Steps On How To Cut Videos On Avidemux:
- Open up Avidemux, and load the video file that you want to work with. If you get a prompt like this one: we recommend clicking Yes to use the safer mode.
Find the portion of the video that you’d like to isolate. Get as close as you can to the start of the clip you want to cut.
You want it to read I; if it isn’t framed type I, then use the single left and right arrow buttons to go forward or backward one frame until you find an appropriate I frame.
- Once you’ve found the right starting frame, click the button with the A over a red bar. This will set the start of the clip.
- Advance to where you want your clip to end. Click on the button with a B when you’ve found the appropriate frame. This frame can be of any type.
- You can now save the clip, either by going to File –> Save –> Save Video, or by pressing Ctrl+S. Give the file a name, and Avidemux will prepare your clip.
BEST PAID FFMPEG ALTERNATIVE TO CUT VIDEO ON MAC
JOYOSHARE MEDIA CUTTER
Supported OS: Mac and Windows
The best video cutting tool is Joyoshare Media Cutter for Windows (or Mac). As a professional video trimmer, it allows you to cut your media files at a 60X faster rate, allowing you to clip a 60-minute video or audio file in just one minute. The interface design is also simple and clean, allowing you to do it quickly.
Another noteworthy feature is the ability to easily cut and merge both video and audio without sacrificing quality. The cropper supports a variety of video and audio formats, including AVI, MP4, MPEG, VOB, WMV, ASF, RM, RMVB, 3GP, MP3, WMA, M4R, and others, allowing you to save the file in any format and on any device, including Apple.
More notably, this is a capable all-in-one video cutter. In addition to cutting videos and audio, it can convert all popular video formats, extract audio from video files, and merge video and audio files from the same source into a new one.
Features:
Convert to Any File Format
Merge Video and Audio Files into Multiple Formats
Improved Accuracy & Efficiency in Cutting Videos
60X Fast Conversion
Pros:
- Offers an easy way to cut, merge, and convert video files
- Blazing fast video-cutting and file-conversion speed
- Supports multiple audio and video file formats
Cons:
- Can only merge videos from the same source. That means you can’t use the program to merge separate videos from your gallery.
- The program doesn’t offer an easy way to remove an unwanted part of a video if it’s in the middle of the video. The only way to do that is by cutting the section before and after the video, then merging them into one.
Steps:
Step 1: Adding Video
To add a video, click the “Open” button. Locate the video you want to trim from your collection and open it. Alternatively, you can use the drag-and-drop feature.
Step 2: Select the Segment to Be Trimmed
At the bottom of the Joyoshare video window, you’ll be able to see a time slider through which you can skip to your desired timeframe. Move the slider handles attached to the yellow timeline bar to set the starting and ending points of your video.
Once you’ve set your desired starting point, click on the “[” button to highlight the starting segment, then move the right-hand slider to select the ending point, and click the ] button to set the end segment.
Step 3: Choose Your Desired Output Format and Destination Folder
Click the “Format” button, and a new window will pop up where you’ll be able to choose your preferred output format.
Step 4: Trim the Video
Click the “Start” button to begin trimming the segment. Wait for a minute for the program to finalize trimming the segment, then click the save button. That’s it! You’ve successfully trimmed your first video.
If you wish to cut and merge several segments, click the “+” icon at the bottom of the segments tab, then follow the above procedure to create several segments.
MOVAVI VIDEO EDITOR
Supported OS: Mac and Windows
Movavi Video Editor for Mac and Windows is a simple-to-use yet effective video editor and cutter. Aside from cutting and joining short videos, it can apply various video effects, add music and titles, and so on to make your movie more visually appealing. The video cutter tool has an easy-to-use interface and outstanding instructional videos, so you can get started quickly.
Movavi comes with a bunch of video editing controls into a straightforward, user-friendly interface. PiP, chroma-key, titling, basic keyframing, and even motion tracking are included. It isn’t as feature-rich or as fast as most of the competition, but it allows you to easily create visually appealing work.
The tool is not free, but it does offer a limited-time free trial to users. However, it is a little irritating when the ad appears after you install and launch the trial version.
Features:
- Media Library
- Templates
- Upload video or audio file
- Video and image management
- Title Editor
- Trim & Slice
- Video Effect
- Slow Motion & Time Effect
- Social Sharing
- Brand Overlay
- Text Overlay
- Audio Tools
- Speed Adjustment
- Split / Merge
- Video Stabilization
Pros:
- Easy-to-understand user interface
- Transitions with sound
- Motion tracking and picture-in-picture tools
- Chroma keying
- Quick movie-creation tool
Cons:
- Lacks advanced trim modes and clip pre-trimming
- Rendering on the slow side
- Not compatible with Apple Silicon M1
Steps:
- Add Video Files
Launch Movavi’s MP4 trimmer, click the Add Media Files button, and upload the MP4 files you want to work with. The videos you’ve added will appear on the Timeline in the lower part of the program window.
- Cut And Trim Your Videos
So how to cut MP4 video with Movavi Video Editor Plus? If you want to snip a video into two or more parts, click the file on the Timeline and move the red marker to the place where you want to make the first cut. Then click the Split button with the scissors icon or hit Ctrl+B. Repeat the process as many times as you need.
If you want to trim your video clip, select the file on the Timeline and then just pull the edge of the clip to shorten it as shown in the picture.
- Save The Result
All that’s left to do is save your edited video. Click the Export button, choose the appropriate video format, and hit Start.
XILISOFT VIDEO CUTTER
Supported OS: Mac and Windows
Xilisoft Video Cutter is an effective programming cutter that lets you choose and cut your preferred segments in a single file as well as cut out the segments you don’t like. It is compatible with almost all popular video formats, including VCD, AVI, MPEG, MP4, WMV, 3GP, /MPEG-4 AVC, /PSP AVC, MOV, ASF, and others. It enables you to precisely set the start and end points.
While the software cannot cut segments from multiple input files at the same time, it can cut your selected source video into the number of clips you require in a single step. Xilisoft Video Cutter goes beyond standard cutting or slicing by allowing you to convert your video input files to a variety of well-known codecs. It is possible to convert the entire source file or just a specific segment, but this requires removing those unnecessary parts that frequently cause problems (TV advertisements, trailers, etc.).
Features:
Easily Cut Video Clips
Multi-trim Video to Whole
Output Clips to Multiple Formats
Instant Preview
Clear Timeline
Advanced Editing
1-2-3 Interface
Multilingual Interface
Pros:
Supports all of the most widely used video file formats
Converts your videos between formats
Simple cutting interface
Allows for multiple cuttings from a single source file
Cons:
Does not support batch processing
Steps On How To Cut Your Favored Segments:
- Add Source Video File
Click the “Open“ button on the main interface, and select a video file in the pop-up window.
- Set Clip Segments
Click “Play” and click the “Set Start Point” and “Set End Point” buttons successively during playing the video to set the start point and endpoint of the clip.
You can also set several segments. Click the “Show Advanced Mode” button and click the “New Clip” button in advanced mode to set the start and endpoints of the segments. Repeat the above steps to set several segments.
Tip: To delete a segment, please choose the segment in the segment list, and click the “Delete Clip” button on the toolbar; to adjust the segment order, please choose the segment and click the “Move Up” or “Move Down” button to adjust its order.
- Output Settings
Click the “Cut” button at the bottom of the window to open the “Output Settings” window.
- Start Cutting
Click the “OK” button to start video cutting. During cutting, you can check the cutting status by dragging the process bar or canceling the cutting. Tip: After cutting is done, click the “Open Output Folder” button to open the destination folder to check the clippings. Click the “Done” button to go back to the main window.
WHICH SHOULD I CHOOSE: FREE OR PAID VIDEO CUTTER ON MAC?
Whether you choose Free or Paid Video Cutter, it still depends on your edit and navigation if the project will succeed like what you’re anticipating. Beginners in the industry can go for Free Video Cutters to practice the craft without worrying about the monthly subscription.
However, if you’re a professional, I highly suggest that you choose Paid Video Cutter to lessen the hassle and create amazing output.
FAQS ABOUT CUTTING VIDEOS
- How can I cut a video without losing quality?
Trimming VLC through LosslessCut
LosslessCut is an open-source video cutter that runs on Windows, Linux, and Mac. Like Filmora, this software also allows you to cut videos without re-encoding, so there is no loss of quality.
- Who is the best video cutter?
Filmora is one of the best video cutter software that allows you to change the aesthetic of your video with one click. It comes with a wide range of video effects that enable you to make clips look good. Features: This tool provides fast editing processing and adjustable preview quality.
- Why does trimming videos reduce quality?
In most cases, trimming only causes a minor loss of video quality. And there is no clear causal relationship between trimming and losing video quality. The main factors that influence video quality are Resolution, Bitrate, and Frame size.
If you are longing to pick up the best video cutter for Mac, you are supposed to evaluate it from different aspects, like operating interface, cutting features, output quality, post-processing ability, etc. Frankly speaking, there is no fixed answer. Everything depends on your actual requirements. If you want to cut videos on Mac with the forthright method, iMovie can be your top priority. If you prefer top-leading editing features, Blender is competitive enough for you.
Conclusion:
There you have it! Here is the alternative software to cut/shorten your video without using FFmpeg. All these editors cater to different needs, so be sure to try them out, understand your requirements, and use the right one for your project!
How to Make Sony Vegas Freeze Frame
How to Make Sony Vegas Freeze Frame
An easy yet powerful editor
Numerous effects to choose from
Detailed tutorials provided by the official channel
The simplest of tools is Freeze-Frame. It’s a one-minute technique that allows for a significant perception shift. It produces a definitive, sincere transformation in how we view a circumstance, an individual, or ourselves, and it is more than positive thinking.
Freezing a picture in a video with Sony Vegas is a simple editing method that you can accomplish with the help of simple tools and a basic understanding of the software. The terms “freezing an image” and “freezing a frame” is often helpful to describe interchangeably.
For informational purposes, Sony Vegas is non-linear video editing software widely recognized to be of good quality by many people throughout the world. Sony Vegas is recommendable for professionals and amateurs for excellent video editing results. Allowing publishers to use the Sony Vegas pause frame is one of the thousands of possibilities supplied by Sony Vegas; there are many tools in this application, but this task is achievable with only a few of them.
In this article
01 [Step-by-Step Guide on Adding Freeze Frame in Sony Vegas](#Part 1)
02 [How to Add Freeze Frame in Filmora](#Part 2)
Part 1 Step-by-Step Guide on Adding Freeze Frame in Sony Vegas
The Freeze-Frame effect freezes a portion of your video for a few seconds, allowing you to manipulate it. Stay with us; we’ll show you how to freeze a frame in Sony Vegas in a few simple steps.
Filmmakers, YouTubers, and professional videographers use Sony Vegas, a professional video editing software.
Here is a guide on how to freeze-frame in Sony Vegas
Step 1: Download and Import File
Install the app on your device after downloading it. To import your file, open the software, create a new project, then select the Import Media button towards the top left portion of the screen.

Step 2: Paste and Copy Video Parts
Drag/drop the imported file on the timeline, where you can stretch or zoom it. Now you can either play the video or move and stop the timeline marker where you wish to freeze the frame. After placing the marker, press S on the keyboard to split the video into two pieces. Then, copy and paste.

Step 3: Reduce the Velocity to 0%.
Right-click on the pasted video segment and choose Insert/Remove Envelope>Velocity from the context menu. It will draw a light green border around the pasted video segment. Set to 0 percent Velocity by right-clicking on that green box. It will freeze the extra part, making it look like a frozen frame.

Step 4: Disconnect the audio
You may also detach audio with Sony Vegas. Select the frozen frame and press U on the keyboard to cut the background audio of the frozen area. Remove the audio segment from the timeline by clicking on it and deleting it. You can pick Delete from the right-click drop-down menu or use the Delete key on your keyboard.
After that, attach the second part.

Step 6: Make any necessary changes and save your work.
Finally, choose the frozen frame and customize it with text, effects, and other options. You may also modify the time duration by dragging the edges of the frozen frame. Finally, save the final file to the specified location on your device.
Apart from using the Sony Vegas Freeze frame, you can also look at another fantastic video editor like Wondershare Filmora to get the job all done.
Part 2 How to Add Freeze Frame in Wondershare Filmora Video Editor
Freezing a video to emphasize an action or adding captions is relatively simple if you have the correct technology.
For Win 7 or later (64-bit)
For macOS 10.12 or later
The editing duties have become more flexible and more straightforward, thanks to Freeze Frame. It allows individuals to make a video more concentrated by extending the duration of any single moment in the film. It adds to the video’s attractiveness and intrigue. Filmora also allows you to apply Freeze Frame to your videos to make them more attractive.
Wondershare Filmora is shared with you right here. It allows you to quickly produce a still image with your preferred zoom in and out effect.
Features
● Create a video effortlessly with Filmora Instant mode.
● Built-in preset templates are available.
● Quickly help match footage with music.
● Easily screen record activities.
● Resize videos in no time.
● Video editor suitable for amateurs.
How to Use Filmora to Freeze Video
This is a simple step guide on how to make a freeze-frame in Sony Vegas using filmora
Step 1 Import media files
To browse your file folder, click “Import,” or drag and drop all files into the main window. WMV, MOV, MP4, AVI, MKV, MTS, DV, TS, 3GP, M4V, and other media formats are supported by this tool.
They’ll appear in the Media Library as thumbnails when you’ve loaded all of them. Drag them over to the Video Timeline now.

Step 2 Easily freeze video
Now, play the video clip you want to freeze and pause when it reaches the desired position. Underneath the Viewer panel, click the “Snapshot” icon. A photo will get added to the media library right away. Set the duration of the still picture by dragging it to the PIP track over the main video track.

Step 3 Save your work
Click “Export” to save your work when you’re happy with everything. Choose from a choice of format options to save to your computer in the display pop-up box. Alternatively, you may share it with your friends and family by uploading it to YouTube, Facebook, or Twitter.

To make the still image more meaningful, you might wish to add subtitles. With the help of Wondershare Filmora, this is a reasonably simple task. Go to the toolbar’s “Text/Credit” tab and select your favorite template to personalize it further. You can customize all:
● the time of the animation,
● the size of the image, and
● the zoom in/out effect.
● Ending Thoughts →
● how to freeze-frame in Sony Vegas, you can now see that it is a straightforward process only if you follow the simple steps listed in the article.
● You can also know that you can easily use the Sony Vegas pause frame on videos using different tools. Still, we shall again recommend using the fantastic Filmora software to get this done as desired.
The simplest of tools is Freeze-Frame. It’s a one-minute technique that allows for a significant perception shift. It produces a definitive, sincere transformation in how we view a circumstance, an individual, or ourselves, and it is more than positive thinking.
Freezing a picture in a video with Sony Vegas is a simple editing method that you can accomplish with the help of simple tools and a basic understanding of the software. The terms “freezing an image” and “freezing a frame” is often helpful to describe interchangeably.
For informational purposes, Sony Vegas is non-linear video editing software widely recognized to be of good quality by many people throughout the world. Sony Vegas is recommendable for professionals and amateurs for excellent video editing results. Allowing publishers to use the Sony Vegas pause frame is one of the thousands of possibilities supplied by Sony Vegas; there are many tools in this application, but this task is achievable with only a few of them.
In this article
01 [Step-by-Step Guide on Adding Freeze Frame in Sony Vegas](#Part 1)
02 [How to Add Freeze Frame in Filmora](#Part 2)
Part 1 Step-by-Step Guide on Adding Freeze Frame in Sony Vegas
The Freeze-Frame effect freezes a portion of your video for a few seconds, allowing you to manipulate it. Stay with us; we’ll show you how to freeze a frame in Sony Vegas in a few simple steps.
Filmmakers, YouTubers, and professional videographers use Sony Vegas, a professional video editing software.
Here is a guide on how to freeze-frame in Sony Vegas
Step 1: Download and Import File
Install the app on your device after downloading it. To import your file, open the software, create a new project, then select the Import Media button towards the top left portion of the screen.
Step 2: Paste and Copy Video Parts
Drag/drop the imported file on the timeline, where you can stretch or zoom it. Now you can either play the video or move and stop the timeline marker where you wish to freeze the frame. After placing the marker, press S on the keyboard to split the video into two pieces. Then, copy and paste.
Step 3: Reduce the Velocity to 0%.
Right-click on the pasted video segment and choose Insert/Remove Envelope>Velocity from the context menu. It will draw a light green border around the pasted video segment. Set to 0 percent Velocity by right-clicking on that green box. It will freeze the extra part, making it look like a frozen frame.
Step 4: Disconnect the audio
You may also detach audio with Sony Vegas. Select the frozen frame and press U on the keyboard to cut the background audio of the frozen area. Remove the audio segment from the timeline by clicking on it and deleting it. You can pick Delete from the right-click drop-down menu or use the Delete key on your keyboard.
After that, attach the second part.
Step 6: Make any necessary changes and save your work.
Finally, choose the frozen frame and customize it with text, effects, and other options. You may also modify the time duration by dragging the edges of the frozen frame. Finally, save the final file to the specified location on your device.
Apart from using the Sony Vegas Freeze frame, you can also look at another fantastic video editor like Wondershare Filmora to get the job all done.
Part 2 How to Add Freeze Frame in Wondershare Filmora Video Editor
Freezing a video to emphasize an action or adding captions is relatively simple if you have the correct technology.
For Win 7 or later (64-bit)
For macOS 10.12 or later
The editing duties have become more flexible and more straightforward, thanks to Freeze Frame. It allows individuals to make a video more concentrated by extending the duration of any single moment in the film. It adds to the video’s attractiveness and intrigue. Filmora also allows you to apply Freeze Frame to your videos to make them more attractive.
Wondershare Filmora is shared with you right here. It allows you to quickly produce a still image with your preferred zoom in and out effect.
Features
● Create a video effortlessly with Filmora Instant mode.
● Built-in preset templates are available.
● Quickly help match footage with music.
● Easily screen record activities.
● Resize videos in no time.
● Video editor suitable for amateurs.
How to Use Filmora to Freeze Video
This is a simple step guide on how to make a freeze-frame in Sony Vegas using filmora
Step 1 Import media files
To browse your file folder, click “Import,” or drag and drop all files into the main window. WMV, MOV, MP4, AVI, MKV, MTS, DV, TS, 3GP, M4V, and other media formats are supported by this tool.
They’ll appear in the Media Library as thumbnails when you’ve loaded all of them. Drag them over to the Video Timeline now.
Step 2 Easily freeze video
Now, play the video clip you want to freeze and pause when it reaches the desired position. Underneath the Viewer panel, click the “Snapshot” icon. A photo will get added to the media library right away. Set the duration of the still picture by dragging it to the PIP track over the main video track.
Step 3 Save your work
Click “Export” to save your work when you’re happy with everything. Choose from a choice of format options to save to your computer in the display pop-up box. Alternatively, you may share it with your friends and family by uploading it to YouTube, Facebook, or Twitter.
To make the still image more meaningful, you might wish to add subtitles. With the help of Wondershare Filmora, this is a reasonably simple task. Go to the toolbar’s “Text/Credit” tab and select your favorite template to personalize it further. You can customize all:
● the time of the animation,
● the size of the image, and
● the zoom in/out effect.
● Ending Thoughts →
● how to freeze-frame in Sony Vegas, you can now see that it is a straightforward process only if you follow the simple steps listed in the article.
● You can also know that you can easily use the Sony Vegas pause frame on videos using different tools. Still, we shall again recommend using the fantastic Filmora software to get this done as desired.
How to Turn Text Into a Podcast
Being a content creator, either writing or generating videos, requires podcast text-to-speech knowledge. The impact of content depends on how many people see it. It means finding new ways to get it into real and virtual places where customers and users might be.
Depending on the context, podcasting can be a perfect alternative for sharing content.
This article will address your questions about the easiest way to turn a blog into a podcast. Let’s begin with the reasons why you should do a podcast.
Part 1. Why You Should Podcast
Podcasts are one of the simplest and most cost-effective ways. It helps to advertise yourself and your products to a highly targeted audience. Podcasts are also excellent for engaging with potential clients interested in your content. In your field, you can achieve fame and expertise.

Repurposing of Content
Podcasters can maximize their potential for successful episodes and repurposing their podcast into multiple content pieces.
This podcasting strategy can help you reach more people by putting your podcasts on more channels and engaging more people who might be interested.
More Fulfilling than Articles
Unlike music, news, TV, and social media, podcast listeners don’t have to watch the screen like they do with YouTube videos or TV shows. This means they can listen while walking or driving home from work.
Podcasts are the best way to get people to pay attention and make fundamental societal changes. They can keep people interested for a long time, so you can go into detail and get personal without turning off your audience.
Minimal Start-Up Costs
To start a podcast, you can spend a little money. Even some of the most famous podcasts use a microphone, a computer, and software for recording. But it’s common to spend more money on advertising and better hosting.
Starting a podcast doesn’t cost much, as you can get everything you need for about $145.
Expansion of Search Potential
In the past few years, many big brands and small to medium-sized businesses have started using podcasts as a marketing strategy. This is because podcasts are becoming more and more popular and can help raise your company’s profile.
Podcasting is another way to disseminate your study to a broader audience, whether that audience consists of policymakers or interested citizens.
Potential to Monetize
Using an affiliate program podcast, you can earn money. Businesses can increase their income by offering paid advertising sponsorships to monetize podcasts. Suppose you accept an affiliate offer to sell ads. In that case, you become the company’s voice and put recorded ads in your podcast episodes.
The most common way to make money from a podcast is through sponsorship. It’s also the easiest way to make money because you don’t have to make or sell anything. You just have to make a deal with a sponsor.
Part 2. Why Are Writers Hesitant to Start a Podcast?
Even after knowing all these benefits, writers are still hesitant to start a podcast. One of the main reasons a writer may be reluctant to launch a podcast is the cost of the necessary equipment. You will need at least $80 to $500 for this unpromissing business.
However, let me tell you a secret that many podcastors didn’t buy any audio equipment for the launch of their podcast channel on Spotify.
Moreover, many writers don’t want to show their voice through recordings. This is because they couldn’t just make a recording and hand it off to a sound specialist. Besides, finding their voice through the stories they write is the routine.
But we all need to get the truth that many podcastors don’t record a single word of the podcast with their own voice. Due to a solution: text-to-speech, technology like this has been around for a while and continues to improve.
The two important issues have been solved, so what are you waiting for? Platform building has always relied heavily on content marketing. With blog posts and social media, additional support was provided, and now podcasts are becoming more commonplace.
Part 3. How to Turn a Text Into a Podcast?
Text To Speech
To turn your text into audible content, Text-to-speech (TTS) is an assistive technology. With a single click, TTS reads your written text aloud. Many people also use it for writing and editing to maintain audience concentration.
Text-to-speech technology is compatible with all digital devices, including computers, tablets, and smartphones. Increasing numbers of websites and products now have developed this function. For example, you can find it within the trusted video editing software like Filmora. With Filmora’s Text to Speech (TTS) feature , you may add extra aspects to your video by turning your text files into voiceovers.
Free Download For Win 7 or later(64-bit)
Free Download For macOS 10.14 or later
Why we regard text to speech as a good
For writers, imagination is the only tool to construct their stories. To bring our stories to life, all we need is a laptop. The same holds for text-to-speech technologies, which can significantly assist writing and editing by allowing the author to hear their words without using their voice.
- Text-to-speech applications can assist you in repurposing your material.
Your written work can be converted into spoken language or a podcast. A podcast can be converted into a YouTube video with a few alterations. All of these factors can help you reach new audiences.
Repurposing material permits your audience to consume it in a variety of ways. The audience can read, listen to, or view your content.
- Text-to-speech systems enable authors to create information that is accessible.
As per World Health Organization, there are almost 285 million visually impaired persons and 39 million blind people. We writers can create a more inclusive world by constantly keeping accessibility in mind.
The limitations of text to speech
Text-to-speech software is becoming increasingly lifelike thanks to technological advancements. However, it cannot still express genuine human emotions. However, this should allow you to utilize these tools. The positives significantly exceed the disadvantages, and technology is continually improving.
Easiest Fix: Turn Texts Into Podcasts With TTS in Filmora
So how can you use text-to-speech? Andhow you can turn your texts into audio podcasts in a daily routine? Filmora, a all-in-one video editor, gets you the solution.
Step1 Download and install Filmora on your PC or Mac.

Step2 Open Filmora and select the video on which you wish to add audio.

Step3 After adding your selected video, select the option “Titles” to add text to your video.

Step4 Select your favorite position for text in the video, like “lower third,” which is used the most in video titles.

Step5 Add text to the timeline and click “Ok.” You can move the red timeline marker if you want your text in a certain spot.

Click the “+” button marked in the picture below to add text.

You can also edit the text by changing its style, color, and font or by animating it.

Step6 Press the “Text-to-Speech” button in the lower right side and choose your preferred voice. For example, Lilly’s voice resembles Siri.

You can also choose another language other than English.

Click “Ok” once you’ve selected everything according to your requirements.
Step7 Once the transcription is completed, go ahead and test the video and audio to see if it’s synching.

And that’s done. This is how easy it is to turn your texts into speech using Filmora.
Part 4. Hot FAQs on Podcast Text to Speech
How do I convert podcasts to text?
With the help of the smartphone app Google Recorder you can easily convert podcasts to texts for free.
- Open the app on your phone, start recording to it, and start recording your podcast simultaneously.
- The words will be automatically recorded and entered into the application as you talk into your phone’s microphone.
- After you click stop on the app, you can store and share the files once you finish your recording.
You have an option of sharing the text, the audio, or both. Alternatively, you can save them to your Google Drive if you don’t want to share them.
How to turn my podcast into a sound?
To convert your video podcasts into audio through Filmora. Follow these steps:
- Drag the imported video from the media library into the video timeline.
- To extract the audio from the video, right-click the video clip and select “Audio Detach.”
- After a while, audio and video will be seen on separate tracks.
Can I save the sound after converting text to speech?
Once the text has been converted to speech, you can save the sound. Select your preferred format after clicking the “export” option in Filmora.
Conclusion
Many of us wish to launch a podcast and blog. A productive podcast’s essence is turning writing into audio using various podcasting techniques. AI-powered text-to-speech softwares can quickly convert articles into podcasts. Or, you can invite significant people to your podcast to personalize it. Podcasting can give outdated content a new life.
Free Download For macOS 10.14 or later
Why we regard text to speech as a good
For writers, imagination is the only tool to construct their stories. To bring our stories to life, all we need is a laptop. The same holds for text-to-speech technologies, which can significantly assist writing and editing by allowing the author to hear their words without using their voice.
- Text-to-speech applications can assist you in repurposing your material.
Your written work can be converted into spoken language or a podcast. A podcast can be converted into a YouTube video with a few alterations. All of these factors can help you reach new audiences.
Repurposing material permits your audience to consume it in a variety of ways. The audience can read, listen to, or view your content.
- Text-to-speech systems enable authors to create information that is accessible.
As per World Health Organization, there are almost 285 million visually impaired persons and 39 million blind people. We writers can create a more inclusive world by constantly keeping accessibility in mind.
The limitations of text to speech
Text-to-speech software is becoming increasingly lifelike thanks to technological advancements. However, it cannot still express genuine human emotions. However, this should allow you to utilize these tools. The positives significantly exceed the disadvantages, and technology is continually improving.
Easiest Fix: Turn Texts Into Podcasts With TTS in Filmora
So how can you use text-to-speech? Andhow you can turn your texts into audio podcasts in a daily routine? Filmora, a all-in-one video editor, gets you the solution.
Step1 Download and install Filmora on your PC or Mac.
Step2 Open Filmora and select the video on which you wish to add audio.
Step3 After adding your selected video, select the option “Titles” to add text to your video.
Step4 Select your favorite position for text in the video, like “lower third,” which is used the most in video titles.
Step5 Add text to the timeline and click “Ok.” You can move the red timeline marker if you want your text in a certain spot.
Click the “+” button marked in the picture below to add text.
You can also edit the text by changing its style, color, and font or by animating it.
Step6 Press the “Text-to-Speech” button in the lower right side and choose your preferred voice. For example, Lilly’s voice resembles Siri.
You can also choose another language other than English.
Click “Ok” once you’ve selected everything according to your requirements.
Step7 Once the transcription is completed, go ahead and test the video and audio to see if it’s synching.
And that’s done. This is how easy it is to turn your texts into speech using Filmora.
Part 4. Hot FAQs on Podcast Text to Speech
How do I convert podcasts to text?
With the help of the smartphone app Google Recorder you can easily convert podcasts to texts for free.
- Open the app on your phone, start recording to it, and start recording your podcast simultaneously.
- The words will be automatically recorded and entered into the application as you talk into your phone’s microphone.
- After you click stop on the app, you can store and share the files once you finish your recording.
You have an option of sharing the text, the audio, or both. Alternatively, you can save them to your Google Drive if you don’t want to share them.
How to turn my podcast into a sound?
To convert your video podcasts into audio through Filmora. Follow these steps:
- Drag the imported video from the media library into the video timeline.
- To extract the audio from the video, right-click the video clip and select “Audio Detach.”
- After a while, audio and video will be seen on separate tracks.
Can I save the sound after converting text to speech?
Once the text has been converted to speech, you can save the sound. Select your preferred format after clicking the “export” option in Filmora.
Conclusion
Many of us wish to launch a podcast and blog. A productive podcast’s essence is turning writing into audio using various podcasting techniques. AI-powered text-to-speech softwares can quickly convert articles into podcasts. Or, you can invite significant people to your podcast to personalize it. Podcasting can give outdated content a new life.
Also read:
- New Do You Want to Know All About Video Frame Rates and Speed? Wondershare Filmora Will Help You to Get More Information on This Matter for 2024
- Updated In This Article, We Talk About How to Add Old Film Overlays and Other Effects to Turn the Videos or Photos More Vintage and with an Older Aspect. We Take a Look at Filmora in This Guide and Give Tips on How to Create Great Retro Videos for 2024
- New How to Use Adjustment Layer in Final Cut Pro for 2024
- Looking Forward to Complement Your Weekend Evenings with a Fantasy Tour to the Anime World? Stay Here to Pick the Most Appealing Alternative From the Best and Timeless Anime Creations
- Updated In 2024, Learning How to Create LUTs with LUTs Generator
- Updated Why Your Transparent GIF Is Hard to Remove for 2024
- Updated Making Creative and Engaging Youtube Videos Is Now Easy with Several Tools. Now, YouTube Also Offers You Its Own Built-In Video Editor Through Which You Can Edit and Enhance the Video Quality
- 10 Best Vlogging Cameras for Beginners
- 2024 Approved Best 10 Fun Discord Bots You Need
- Updated If You Are Looking for an Open-Source, Cross-Platform Video Editor, Shotcut Is a Great Choice for 2024 But Is It Truly the Best Video Editor or Is There a Better Alternative Available?
- New In 2024, Best iOS Slow Motion Apps To Work With
- How To Slow Down GIF Building an Understanding
- New Tutorial | How to Make a Smooth Speed Ramping in Premiere Pro?
- In 2024, Step-by-Step Guide | Control Playback Speed in Premiere Pro
- How To Blur Background in Adobe Premiere Pro Detailed Guide
- New In 2024, Best 6 WMV to GIF Converters
- Thousands Already Know Ezgif and So Can You for 2024
- Updated 8 Excellent Video and Photo Mergers on Desktop/Mobile/Online
- In 2024, Adding a Spooky Shadow Effect with Filmora
- New Do You Want to Replace the Sky in Your Media? Read the Article to Learn How to Change the Sky App on Your Mobile Phone for 2024
- Updated 2024 Approved Transforming a Slow-Motion Video to Normal Mastering the Skill
- New In 2024, Split Audio From a Video in Adobe Premiere Pro Step by Step
- In 2024, Top Best Free LUTs For Premiere Pro
- New 2024 Approved How to Make Discord GIF Avatar in Depth Guide
- New 2024 Approved How to Export Video From iMovie
- 15 Camera Shake Preset for Premiere Pro for 2024
- New 2024 Approved 100+ Best TikTok Captions Enhance Your Content
- New Beginners Guide About WMV Format and Best WMV Video Editor
- Updated In 2024, Any Video May Be Enhanced Using Adobe Premiere Transitions. If You Are Looking to Learn How to Add Fade to Black in Premiere Pro? Then, Check Out This Fade to Black Transition Premiere Pro Guide to Learn the Trick
- Updated 5 Best Video Denoisers for 2024
- In 2024, A Review of Efectum App Making Slow Motion Video
- New 2024 Approved Easy Guide to Use a Stabilization Tool in Filmora
- New 2024 Approved Final Cut Pro - How to Download and Install It
- New Step by Step to Rotate Videos Using Handbrake
- 2024 Approved Which 10 Best Video Editing Online Makers Is Worth Your Attention?
- In 2024, What Is AI Marketing?
- Android Screen Stuck General Vivo Y17s Partly Screen Unresponsive | Dr.fone
- How To Fake GPS On Vivo Y27s For Mobile Legends? | Dr.fone
- How to use Pokemon Go Joystick on Motorola Moto E13? | Dr.fone
- In 2024, Bypass iCloud Activation Lock with IMEI Code From your iPhone 6s
- How To Exit DFU Mode on iPhone 13 mini? | Dr.fone
- In 2024, How to Reset Gmail Password on Nokia C12 Pro Devices
- How to Track WhatsApp Messages on Vivo Y28 5G Without Them Knowing? | Dr.fone
- In 2024, Wireless Methods to MirrorApple iPhone 13 Pro & iPad to Fire Stick With Ease | Dr.fone
- How To Track IMEI Number Of Infinix Hot 40 Pro Through Google Earth?
- In 2024, 5 Ways to Transfer Music from Honor 100 Pro to Other Android Devices Easily | Dr.fone
- Full Solutions to Fix Error Code 920 In Google Play on Itel P40+ | Dr.fone
- In 2024, How to Unlock Xiaomi Phone without Google Account?
- How to Hard Reset Samsung Galaxy A24 Without Password | Dr.fone
- How To Fix Unresponsive Phone Touchscreen Of Honor 90 GT | Dr.fone
- A Perfect Guide To Remove or Disable Google Smart Lock On Honor Magic 6
- Guide How To Unbrick a Bricked Realme 11 Pro Phone | Dr.fone
- In 2024, Planning to Use a Pokemon Go Joystick on Samsung Galaxy XCover 7? | Dr.fone
- Does Galaxy A15 4G support AVCHD video?
- Solutions to Spy on Xiaomi Redmi A2+ with and without jailbreak | Dr.fone
- In 2024, Overview of the Best Infinix Hot 30i Screen Mirroring App | Dr.fone
- 15 Best Strongest Pokémon To Use in Pokémon GO PvP Leagues For Poco X6 | Dr.fone
- The Easiest Methods to Hard Reset Honor X8b | Dr.fone
- In 2024, The Best Android SIM Unlock Code Generators Unlock Your Vivo Y55s 5G (2023) Phone Hassle-Free
- Top 5 Car Locator Apps for Lava Blaze Curve 5G | Dr.fone
- Top 10 Best Spy Watches For your Samsung Galaxy S24+ | Dr.fone
- How to Unlock Samsung Galaxy A34 5G Phone without Any Data Loss
- Updated 2024 Approved What Is AI Voice Text to Speech?
- Title: New 2024 Approved Are You Searching for the Best Cinematic LUTs for Premiere Pro? You Are in the Right Place because This Article Is Dedicated to LUTs
- Author: Morgan
- Created at : 2024-04-24 01:08:32
- Updated at : 2024-04-25 01:08:32
- Link: https://ai-video-editing.techidaily.com/new-2024-approved-are-you-searching-for-the-best-cinematic-luts-for-premiere-pro-you-are-in-the-right-place-because-this-article-is-dedicated-to-luts/
- License: This work is licensed under CC BY-NC-SA 4.0.
