New 2024 Approved Do You Want to Be Aware of VHSs Meaning? There Is Nothing to Be Worried About because We Will Guide You in This Article
Do You Want to Be Aware of VHS’s Meaning? There Is Nothing to Be Worried About because We Will Guide You in This Article
Videos are a person’s crucial and cherished memory, and no one wants to compromise their quality. People tend to rely on several effects to exceed the quality of the beloved videos. VHS is the most used effect, popular in professional and personal videos. It stands for “Video Home System” and is often integrated with noises, color bleeding, and smooth glitches.
With VHS-style videos, you can not only make videos more high-class but can also intuitively define their worth. If you are new to this field, you should get familiar with the VHS effects in video. This context will provide basic information about VHS tapes and how to add VHS effects to videos.
Part 1: What Is VHS Technology? An Overview of the 70s Sensation
From definition to usability, every piece of information plays an important role in your videography journey. Don’t worry if you don’t have video editing skills or know what VHS means. This section will provide you with reliable information about this:
What Do You Mean by VHS Technology?
VHS, also known as Video Home System, are the auditory artifacts and visual glitches you see in the pictures. It creates a sense of distortion in the video, making the viewer think the camera equipment is malfunctioning. From the 1980s to the 1990s, this effect gained considerable popularity among video creators and viewers.
In recent years, retro lovers have brought this intuitive effect again into a trend to create a perfect flashback scene. The nostalgic and vintage appeal of these effects is insane. VHS is not just one effect because it divides into further categories. You are also free to select the VHS effects according to the theme of your video and the scene you are going to create.
Key Aspects of The VHS Effects
Several key aspects are crucial to making high-quality VHS effects in the videos. You can see some of the key aspects listed and discussed here:
- **Tracking Lines of VHS:**The VHS tapes are integrated with magnetic strips to sort audio and video signals. However, over time, these tapes degraded, leading to glitches in playback with noticeable distortion.
- **Video Color Bleeding:**You must have noticed that color is bleeding in the VHS videos. In this, the colors in the videos are quite smudged and mixed. This together adds the unique yet smoother distortion in the videos.
- **Vintage and Glitching:**Vintage and glitches are essential to videos with VHS effects. This was initially caused by the limitations of playback equipment and signal interference. At this time, people add glitch VHS to the videos in a manual manner to add a sense of interference in the scene.
- **Noise and Jitters:**VHS tapes are known to be susceptible to wrappings and jitters. It causes a slightly unstable effect in the videos in the form of distorted objects. Moreover, the grainy and noisy appearance due to analog recording technology is also a part of this effect.

Add VHS Effect to Video
Simply add video effects on Video with Filmora Video Effect Editor ! Experience the magic of cool yet outstanding video effects, where your videos come to life in beautiful visuals.
Apply VHS Effect Apply VHS Effect Learn More >


Part 2: What are VHS Effects and What Is Its Use?
Now that you have learned what VHS technology is and what are its key aspects, you must be eager to learn about the VHS effects. Moreover, knowing the proper and effective usage of VHS effects is also an important thing. The below-given information will help you regarding this issue:
What are VHS Effects?
Video Home System, which is famous as VHS, is the type of effect that is used in videos to create manual distortion. It was initially developed by the Victor Company in Japan and was introduced in the 1970s. From then to now, VHS tapes gained reliable popularity across the world. The purpose of creating this effect was to give video recording capabilities to consumers.
In addition to this, the video format in which you can apply this effect was also recognized by potential marketers. The aim of creating this effect was to make affordable yet user-friendly videos. With the help of VHS effects, people could watch cinematic quality movies in their living rooms. The popularity of VHS never stops growing, and even now, video editors love to add this intuitive effect to their videos.
What is the Use of the VHS Effect?
You can use the VHS effects in several creative contexts to achieve artistic goals. Some of the uses of the VHS style are listed below for you:
Video Production
You are free to use the glitch VHS effect in filmmaking and video production projects. It is perfect for retro and vintage-themed movies. This effect also has the capability to add the old fashion sense to engage more users.
Motion and Designing Graphics
The VHS effects are also very helpful in graphic and motion designing. You can add eye-catching visual composition elements to every type of video. This may include scan lines, glitches, and, of course, distortion.
Social Media Content Creation
If you plan to share your past life with your followers, don’t forget to add the old life-themed VHS effects in the videos. This makes your video more retro-friendly and adds a sense of consistency to the videos.
Editing and Experimentations
Getting something new without losing the video quality is the dream of every video editor. The VHS effects can help you in making this dream come true. You can use this effect while editing your videos and can also use it as an experiment.

Part 3: Legacy and Influence of VHS in Video Making
The legacy and influence of this preliminary effect will continue to take hold in every age of digitalization. Here are some of the key points which will guide you about this to a further extent:
Democratization of VHS in Videos
You will never fail to see the pivotal role of VHS in democratizing video productions. It helps to make the video more accessible to a wider amount of audience. Before the introduction of VHS, video production was limited to professional studios. However, now every person can use this to make independent files and share their creativity with the world.
Editing Techniques and Influence
VHS has introduced a wide array of editing techniques and manuals to the users to manipulate video content. Moreover, the VHS editing system and techniques also encourage experimentation. You also get a sense of trying the latest editing skills. It is also known to explore and add a sense of storytelling through simple procedures.
Aesthetics and Pop Culture
In recent years, VHS has experienced several revivals of pop culture themes. It can add aesthetics and a sense of nostalgia to every type of video. You will also see VHS integrations on several music, ads, and events videos. You can also use this effect to preserve the digitalized content without extra effort.
Documentation and Accessibility
With the help of the VHS effect, you can formulate several types of documentation in lossless quality. It helps you to add retro appeal to all your formatted documentaries and make them easily accessible. Above all, you can also distribute the video content at an optimized speed without using any non-mainstream server.
Part 4: Wondershare Filmora: A Great Video Editor Influencing the Use of VHS Effects
You cannot apply the VHS effect to the videos without a reliable video editor. The most known and significant video editor that can help you apply the glitch VHS effect in videos is Filmora Video Editor . Using this premium-grade tool, you can create new projects at any time and customize its visual metrics.
Add VHS Effect For Win 7 or later(64-bit)
Add VHS Effect For macOS 10.14 or later
This premium-grade video editor understands the VHS definition and offers you a wide array of VHS effects. This includes VHS Distortion, VHS Static 1, Vintage Viewfinder, and more. You can drag any effect of your choice to the video in the timeline and apply it to the whole video or a personalized part of the video. One of the best things about Filmora is that it integrates versatile built-in templates. Through this, you can make videos without any issues.


Conclusion
To wrap things up, this discussion has guided you about VHS style and technology. Now, you know what VHS technology is, its key aspects, and what scenarios you can use it. Other than this, the legacy and influence of this effect are also mentioned above. For applying the VHS effects, you can use the industry standard video editor named Wondershare Filmora.
This video editor supports multiple VHS effects, and you can also customize its size and opacity. More valuable information about Filmora is listed above for you.
Add VHS Effect For Win 7 or later(64-bit)
Add VHS Effect For macOS 10.14 or later
Apply VHS Effect Apply VHS Effect Learn More >
Part 2: What are VHS Effects and What Is Its Use?
Now that you have learned what VHS technology is and what are its key aspects, you must be eager to learn about the VHS effects. Moreover, knowing the proper and effective usage of VHS effects is also an important thing. The below-given information will help you regarding this issue:
What are VHS Effects?
Video Home System, which is famous as VHS, is the type of effect that is used in videos to create manual distortion. It was initially developed by the Victor Company in Japan and was introduced in the 1970s. From then to now, VHS tapes gained reliable popularity across the world. The purpose of creating this effect was to give video recording capabilities to consumers.
In addition to this, the video format in which you can apply this effect was also recognized by potential marketers. The aim of creating this effect was to make affordable yet user-friendly videos. With the help of VHS effects, people could watch cinematic quality movies in their living rooms. The popularity of VHS never stops growing, and even now, video editors love to add this intuitive effect to their videos.
What is the Use of the VHS Effect?
You can use the VHS effects in several creative contexts to achieve artistic goals. Some of the uses of the VHS style are listed below for you:
Video Production
You are free to use the glitch VHS effect in filmmaking and video production projects. It is perfect for retro and vintage-themed movies. This effect also has the capability to add the old fashion sense to engage more users.
Motion and Designing Graphics
The VHS effects are also very helpful in graphic and motion designing. You can add eye-catching visual composition elements to every type of video. This may include scan lines, glitches, and, of course, distortion.
Social Media Content Creation
If you plan to share your past life with your followers, don’t forget to add the old life-themed VHS effects in the videos. This makes your video more retro-friendly and adds a sense of consistency to the videos.
Editing and Experimentations
Getting something new without losing the video quality is the dream of every video editor. The VHS effects can help you in making this dream come true. You can use this effect while editing your videos and can also use it as an experiment.
Part 3: Legacy and Influence of VHS in Video Making
The legacy and influence of this preliminary effect will continue to take hold in every age of digitalization. Here are some of the key points which will guide you about this to a further extent:
Democratization of VHS in Videos
You will never fail to see the pivotal role of VHS in democratizing video productions. It helps to make the video more accessible to a wider amount of audience. Before the introduction of VHS, video production was limited to professional studios. However, now every person can use this to make independent files and share their creativity with the world.
Editing Techniques and Influence
VHS has introduced a wide array of editing techniques and manuals to the users to manipulate video content. Moreover, the VHS editing system and techniques also encourage experimentation. You also get a sense of trying the latest editing skills. It is also known to explore and add a sense of storytelling through simple procedures.
Aesthetics and Pop Culture
In recent years, VHS has experienced several revivals of pop culture themes. It can add aesthetics and a sense of nostalgia to every type of video. You will also see VHS integrations on several music, ads, and events videos. You can also use this effect to preserve the digitalized content without extra effort.
Documentation and Accessibility
With the help of the VHS effect, you can formulate several types of documentation in lossless quality. It helps you to add retro appeal to all your formatted documentaries and make them easily accessible. Above all, you can also distribute the video content at an optimized speed without using any non-mainstream server.
Part 4: Wondershare Filmora: A Great Video Editor Influencing the Use of VHS Effects
You cannot apply the VHS effect to the videos without a reliable video editor. The most known and significant video editor that can help you apply the glitch VHS effect in videos is Filmora Video Editor . Using this premium-grade tool, you can create new projects at any time and customize its visual metrics.
Add VHS Effect For Win 7 or later(64-bit)
Add VHS Effect For macOS 10.14 or later
This premium-grade video editor understands the VHS definition and offers you a wide array of VHS effects. This includes VHS Distortion, VHS Static 1, Vintage Viewfinder, and more. You can drag any effect of your choice to the video in the timeline and apply it to the whole video or a personalized part of the video. One of the best things about Filmora is that it integrates versatile built-in templates. Through this, you can make videos without any issues.
Conclusion
To wrap things up, this discussion has guided you about VHS style and technology. Now, you know what VHS technology is, its key aspects, and what scenarios you can use it. Other than this, the legacy and influence of this effect are also mentioned above. For applying the VHS effects, you can use the industry standard video editor named Wondershare Filmora.
This video editor supports multiple VHS effects, and you can also customize its size and opacity. More valuable information about Filmora is listed above for you.
Add VHS Effect For Win 7 or later(64-bit)
Add VHS Effect For macOS 10.14 or later
How To Add Text In After Effects
In almost every video you come across, you will see text added to the video in different parts. There are various reasons why adding text to videos becomes a necessity. First of all, you can highlight the underlying message or key points in your video. Along with audio and video, the viewers will have another cue point in the form of text that they can retain in their memory for longer. You add animated texts to video to make the video interesting to watch and break the monotony of visual cues only.
Besides, you may have to want credits and add intro as well as outro to your video where adding text is almost a necessity. Text can help your viewer get the context of your video and make sense of the content. After Effects is a popular video editor thanks to its visual effects, text animation animations, and instant video enhancement tools. We will illustrate the different ways of adding text in After Effects in simple steps.
Part 1. Add Text in After Effects with Horizontal Type Tool
Once you have imported your video clip into the Timeline, there are several ways you can add text to your video. First of all, you can right-click on the Timeline and select New> Text to create an empty text layer and add any text you want. Similarly, you can go to Layer> New> Text option to do the same. But the easiest way of adding text in After Effects is by using Horizontal Type Tool. Here are the steps on how you can add text in AE with the type tool.
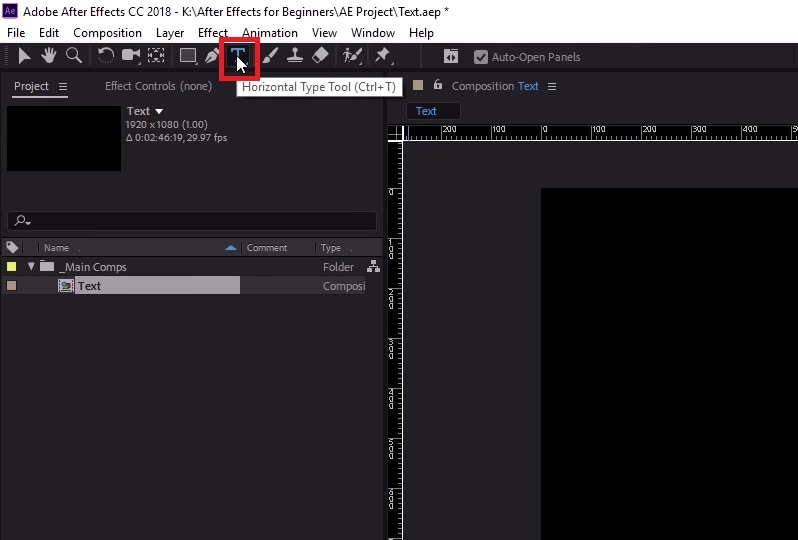
Step1Once you have imported your video into the Timeline, click on Horizontal Type Tool located in the top bar to add any text. You can press Ctrl+T(Windows) or Command+H(Mac) to get it instantly.
Step2Click on the video where you want to place the text and type your desired text there. After you are done adding your text, press Enter key in Num pad to exit out of the text field in the video.
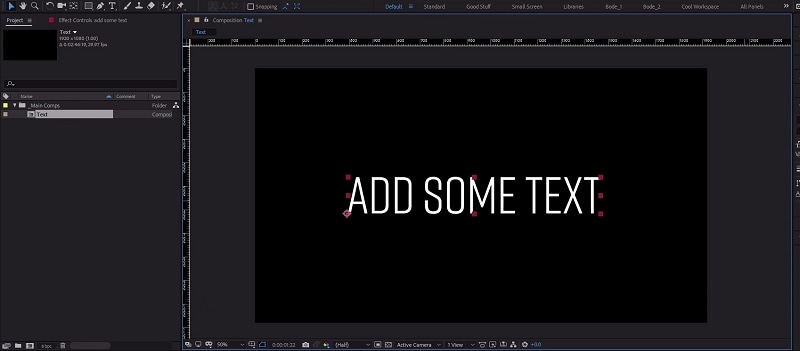
Step3This will automatically create a text layer on Timeline. You can now move the text and place it anywhere you want. You can also modify the text style and add animation which we will illustrate in the next section.
Part 2. Use the Character Panel to Edit Text in AE
When you select Type tool and add your desired text, you get a default style for the text. It is most likely that you have to modify the text style such as changing color, font, and size to fit in your video seamlessly. That is when you have to visit the Character Panel. Character Panel is where you get to edit the font of the text you have typed, increase or decrease the font size, change the font color, and much more. Apart from that, you can increase the spacing between lines when your text is a paragraph instead of a few words. Here are the steps to use Character Panel to edit text in AE.
Step1Once you have typed your text using Horizontal Type tool on the video, click on the text.
Step2Go to Character panel located in the right side of the screen. If it is minimized, click on the panel to expand it.
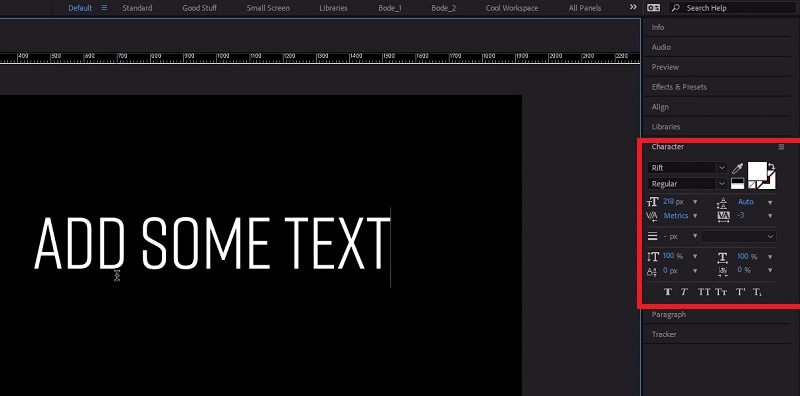
Step3The first option in the panel is the font of the text. By the side of the font is the text color. You can use the color picker tool to choose any color as per your preference.
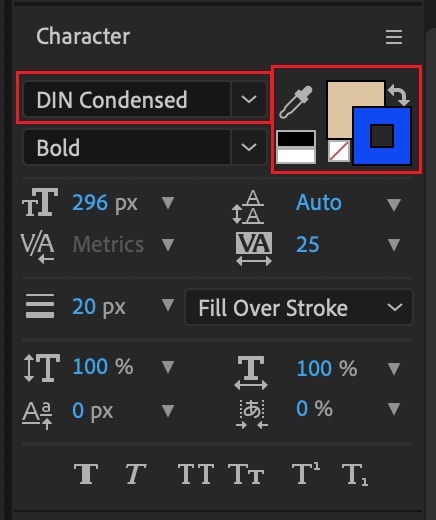
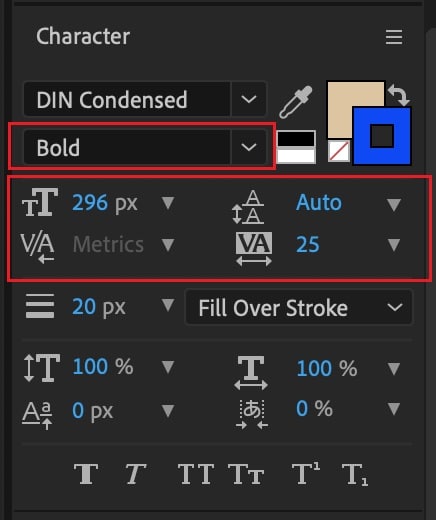
Step4Below the font, you can select the font style such as regular, bold, italics, and likewise. The subsequent part is to change the font size and adjust vertical spacing between lines and horizontal spacing between characters.
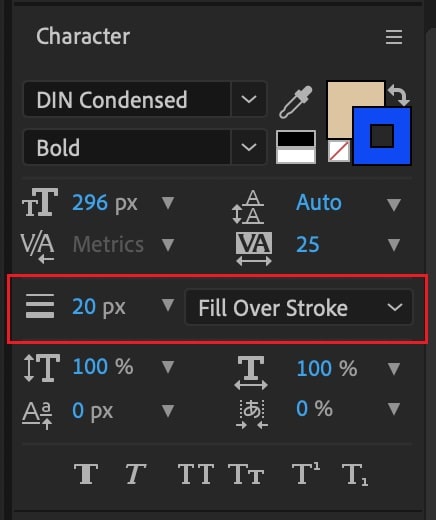
Step5The next section deals with Stroke option as well as fill the text option. You can fill the background of the text with any desired color.
Part 3. Add Animated Text to Video with Animation Presets
Now that you have added a static text and set the text format as per your preference, it is time to animate the text. A static text in a video does not look appealing, and animated texts make the video eye-catching instantly. You can use text animation presets in After Effects to add animated text to video. Here are the steps to add animated text to video with animation presets and effects.
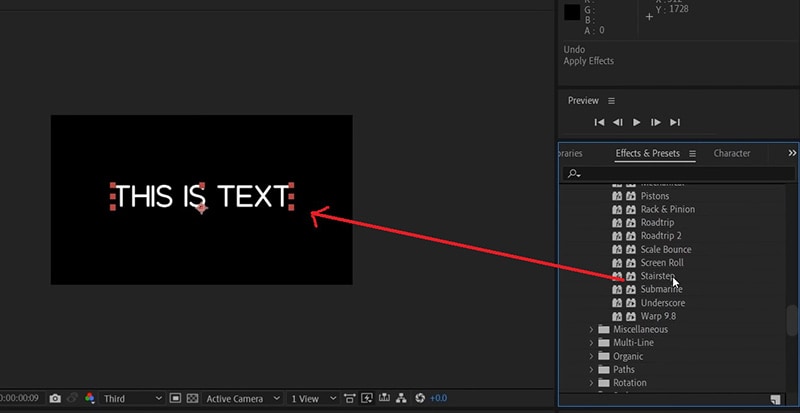
Step1Click on the text on your video that you want to animate. Go to Effects and Presets panel located on the right side.
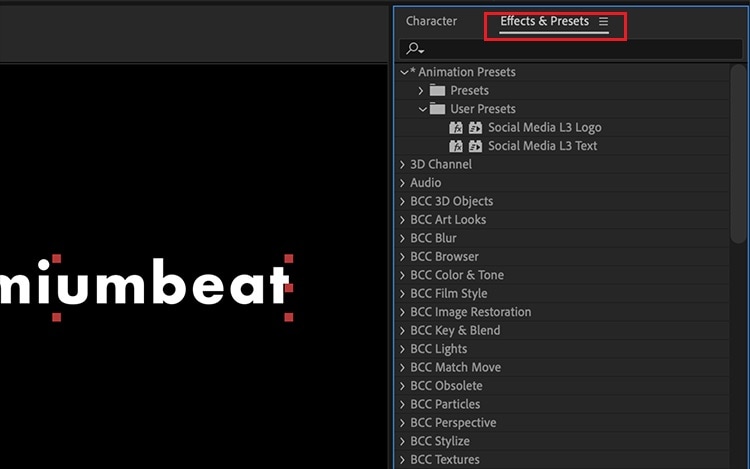
Step2Under Effects and Presets panel, Click on Text option. This will open all the different categories of animation presets available that you can apply to the text on your video.
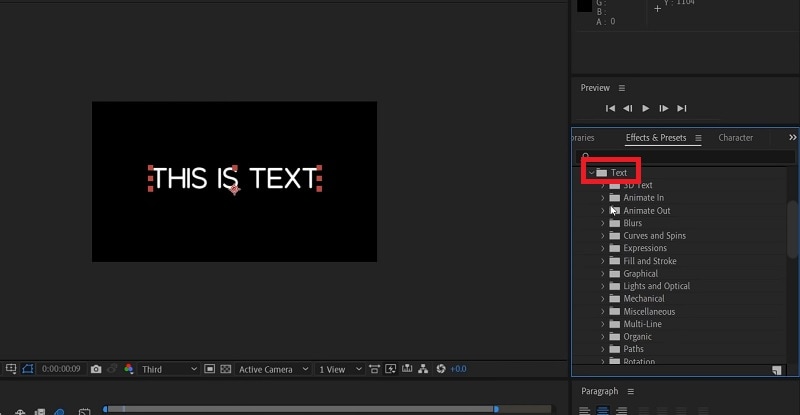
Step3Select any desired animation that you want to apply to the text and drag and drop the animation on the text in the composition window. Play the video and watch the applied animation on the text.
Part 4. Alternative Way to Add Text to Videos
If you are not comfortable with After Effects as a video editor, we recommend Wondershare as the best AE alternative. This is because the user interface of Filmora is super simple and there are loads of text effects and animations available to enhance your video content. Filmora is a professional video editor that is extremely popular among amateur and professional video editors. The application is available for both Windows and Mac users. Here are the steps for adding animated text to video using Filmora.
Step1Install Wondershare Filmora on your computer and launch the application. Click on New Project option on the welcome screen. Otherwise, you can go to File> New Project option.

Step2Go to File> Import Media> Import Media Files to import your video file. You can also drop the video file directly into Project Media folder.

Step3Drag and drop the video file from Project Media folder into the Timeline. If you have multiple video clips, you need to arrange them sequentially on the Timeline.
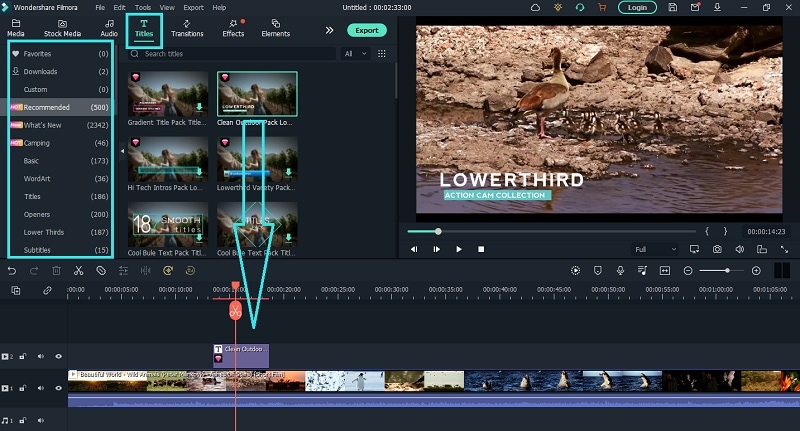
Step4To add text to your video, go to Titles located at the top bar. Check the left panel where you can see different categories of text effects. Select any desired text effect and drop into the Timeline. Make sure that the text layer is above the video layer on Timeline. You can shift the text layer on Timeline to place it where you want it to appear. You can also stretch the duration of the text effect as per your requirements.
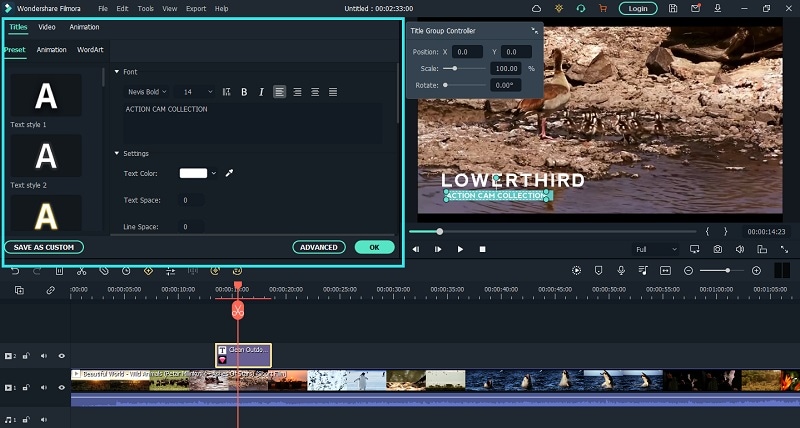
Step5You can edit the text effect by double clicking on the text layer on Timeline. Under Preset tab, you can change the text, font type and size, text color and much more. For further customization, you can click on Advanced button. At last, click on OK button to save the edits done.
The Bottom Line
If you want to add animated text to photo and video, After Effects is a great editor you can use. We have illustrated how you can add text and customize the text and finally, animate it as per your preference. However, if you are looking for AE alternative, we recommend Wondershare Filmora where you can add text to video instantly and choose from a wide range of text effects and animations.
Free Download For Win 7 or later(64-bit)
Free Download For macOS 10.14 or later
How to Convert Images Into Video - Kapwing Tutorial
There are effortless ways to turn images into a video with stylish text and transitions, plus licensed music for any occasion. Simply add your photos to our online video creation software and quickly rearrange your pictures to tell your story. Drag and drop your way to a stunning video in minutes. Which software can help you? Find it in this article.
Part 1. What is Kapwing?
Kapwing is a collaborative video editing solution designed to help users create creative content online. With Kawing, users can upload, edit and share files with other team members in one place. Just share the link with other users and work on the content together in real-time.
Kapwing allows users to create videos from scratch with Kapwing’s extensive library of pre-made templates, stock content, and assets. Users can add layers of images, videos, and audio to create the desired video. Because Kapwing is a cloud-based solution, all projects and work are automatically saved to the cloud. However, Kapwing only allows the first 3 projects to be free, after that the image or video will be automatically watermarked, and you need to purchase kapwing premium access for the best image or video quality.
Part 2. How to convert image to video with Kapwing?

Easily convert images and GIFs to videos with music and stop scrolling with Kapwing’s image-to-video tool. With kapwing, you can turn your photos into a dynamic slideshow for a presentation or an engaging video for social media and YouTube. Even with minimal editing experience, you can turn a single image into a professional video.
Kapwing supports turning a single image into a video, as well as joining multiple images one by one into a slideshow-style video. With an intuitive timeline and the ability to specify the duration of each image, you won’t need to read a long tutorial to convert an image to a video with this easy online tool. Follow the steps below to convert your images to videos using kapwing.
Step1Upload your image or images
Upload an image or set of images directly to Kapwing. You can also embed a link to a .png or .jpg on the web. Once uploaded, your images will appear on the canvas as a collage.
Step2Select time and size
Select the image and find the duration dropdown in the right edit menu. Use the “adjust duration“ dropdown to choose how long you want your output video to be. You can also resize the image to a different aspect ratio. Crop, add music, set the background color, and more with Kapwing’s simple editor. If you have uploaded multiple images, arrange the photos in the correct order to make the presentation perfect.
Step3Export and share
Just click Export and your final video will be created. The output file is MP4. Kapwing is completely free and requires no downloads. Enjoy the new video you created with your image or images.
Part 3. Other 3 ways to convert image to video online
Even though an online image-to-video maker is not as powerful as photo and video editing software products like Filmora , you can still use this online image-to-video maker to create videos effortlessly. However, to save time, you should prepare all the material you want to use in your video in advance so that you can upload it to the platform of your choice and have your video ready in minutes. Let’s take a look at the image-to-video maker that you can use to create captivating social media videos.
2. Image to video

This website offers a lot of different tools that you can use to create videos from your photos, crop videos, or add 3D transitions between frames. Keep in mind that the maximum number of photos you can use in one video is limited to thirty. Once you get to the home page of this platform, just upload your photos and arrange them in any way you want.
You can also add text, music, or your company logo to the video, then follow the on-screen instructions to complete the process. You can preview the video after the platform has generated it and decide whether you want to download it or start over if you didn’t like the result.
3. Mp3Care

This web application makes converting JPEG files to MP4 video files a simple two-step process that only requires uploading photos and then selecting the time between the two images. The maximum number of photos you can use in a video is limited to just twenty, with the maximum duration of each image in the video not exceeding the 20-second mark. Adding transitions between images is also on the list of options this platform provides, but Mp3 Care Photo to Video lacks any other video editing features. Despite some obvious drawbacks, this online photo-to-video maker is still a great choice if you want to convert your photos to videos quickly and for free.
How to convert image to video on desktop using Filmora
Free Download For Win 7 or later(64-bit)
Free Download For macOS 10.14 or later
First, download and install Filmora on your Windows or Mac computer. In the following section, I will cover how to add photos to a video using Filmora on Windows. The procedure for adding photos to a video on Mac is similar.
Step1Import both photos and video files into Filmora

Launch Filmora Video Editor and click “New Project“ to get started. Click “Import“ and then “Import media files“ or click “Import media files here“ to find your video and photos on your computer. Double-click the files and they will be imported into the program. You can also directly drag and drop photo and video files into the video editing program. Then you need to set up the project such as aspect ratio and resolution.
Step2Add a photo to the video and apply some effects
After importing the files into the program, drag the video clip to the video editor timeline at the bottom of the screen. Then drag the photo to the track above the video. Click the “Play“ icon to preview the video. Move the photo on the track to the point where you want to view it and drag the end to shorten or increase the duration of the photo.

After that, edit your photo as you choose. Place the image anywhere you want, then drag its edge to change the size of the playing windows. The picture-in-picture track can also be customized using a variety of customizable settings provided by Filmora. To access the picture, color, and motion panel, double-click the additional image on the track. Here, you can select from more than 30 motion effects to animate the added photo, alter its saturation and hue, perform some color correction, or alter its transformation.

Then click the “Effects“ button for more mask and effect options. Go to the Utility option under Filters and then drag the image mask onto the photo on the timeline. Double click on the photo and then you can change the shape, height, width, and blending of the image mask. On the mask tab, you can shape the photo with a single click. You can also invert the mask to create a new shape. Choose one of the effects according to your wish to make your video more unique.
Step3Save the new video file

After adding a photo to a video and making basic adjustments, you can export it in various ways by pressing the “Export“ button. You can save it in different formats in the Format tab. If you want to play the video creation on iPod, iPhone, or iPad, click “Device“ and select the device from the list. You can also upload your video directly to YouTube or burn it to DVDs for playback on your TV using a DVD player. You can also share the video directly on social networks.
Conclusion
The above article talks about different software that can convert images to videos, hope it is helpful if you were wondering how to do that. As we can see above, using Filmora video editor, you will be more creative in making videos with fun or using Kapwing online software to convert your images to videos.
Free Download For Win 7 or later(64-bit)
Free Download For macOS 10.14 or later
Free Download For macOS 10.14 or later
First, download and install Filmora on your Windows or Mac computer. In the following section, I will cover how to add photos to a video using Filmora on Windows. The procedure for adding photos to a video on Mac is similar.
Step1Import both photos and video files into Filmora
Launch Filmora Video Editor and click “New Project“ to get started. Click “Import“ and then “Import media files“ or click “Import media files here“ to find your video and photos on your computer. Double-click the files and they will be imported into the program. You can also directly drag and drop photo and video files into the video editing program. Then you need to set up the project such as aspect ratio and resolution.
Step2Add a photo to the video and apply some effects
After importing the files into the program, drag the video clip to the video editor timeline at the bottom of the screen. Then drag the photo to the track above the video. Click the “Play“ icon to preview the video. Move the photo on the track to the point where you want to view it and drag the end to shorten or increase the duration of the photo.
After that, edit your photo as you choose. Place the image anywhere you want, then drag its edge to change the size of the playing windows. The picture-in-picture track can also be customized using a variety of customizable settings provided by Filmora. To access the picture, color, and motion panel, double-click the additional image on the track. Here, you can select from more than 30 motion effects to animate the added photo, alter its saturation and hue, perform some color correction, or alter its transformation.
Then click the “Effects“ button for more mask and effect options. Go to the Utility option under Filters and then drag the image mask onto the photo on the timeline. Double click on the photo and then you can change the shape, height, width, and blending of the image mask. On the mask tab, you can shape the photo with a single click. You can also invert the mask to create a new shape. Choose one of the effects according to your wish to make your video more unique.
Step3Save the new video file
After adding a photo to a video and making basic adjustments, you can export it in various ways by pressing the “Export“ button. You can save it in different formats in the Format tab. If you want to play the video creation on iPod, iPhone, or iPad, click “Device“ and select the device from the list. You can also upload your video directly to YouTube or burn it to DVDs for playback on your TV using a DVD player. You can also share the video directly on social networks.
Conclusion
The above article talks about different software that can convert images to videos, hope it is helpful if you were wondering how to do that. As we can see above, using Filmora video editor, you will be more creative in making videos with fun or using Kapwing online software to convert your images to videos.
Free Download For Win 7 or later(64-bit)
Free Download For macOS 10.14 or later
Unraveling How the Slow Motion Guys Have Revolutionized The Slow Motion Game
All the aspects of our lives are inspired by someone, and we try to follow in their footsteps. Sometimes, it can be a person in your life, an influential personality, or YouTube. When it comes to editing, beginners often try to follow those who have mastered it. In a similar way, you might seek inspiration from social media or websites to create slomos.
One of the greatest inspirations in the realm of slow-motion videos is The Slow Mo Guys . Continue reading this article for a brief review of The Slow Mo Guys. In addition, the article will give you a basic guide on creating slo-mos. You can also learn how to create high-quality slo-mo videos like the Slow Motion Guys.
Slow Motion Video Maker Slow your video’s speed with better control of your keyframes to create unique cinematic effects!
Make A Slow Motion Video Make A Slow Motion Video More Features
Part 1: The Slow Mo Guys: A Real-Life Sensation in Creating Slow Motion Videos
The Slow Mo Guys is a YouTube channel with over 14.8M subscribers and is determined to deliver high-quality content. The channel appeared as a collaboration between Gavin Free and Daniel Gruchy. Both had a history of using high-speed slow-motion cameras and set their channel in 2010. The channel began to gain recognition in 2012 and became a living sensation in the slo-mo world.

In this era, if you are looking for a start to create slomos, Slow Motion Guys come to mind. One of the many things that took the channel to heights is their ability to explain everything. The normal slow-mo speed by most editors is either 120 or 240 fps. However, The Slow Mo Guys shoot videos at 1000 fps, which is ultra-slow motion. The channel usually features natural phenomena, pranks, and relevant content.
Part 2: Want to Make Such Slow-Motion Videos on Your Smartphone? Learn How
The most used and dear gadget to all of us in this era is our smartphones. It has also become a requirement to stay connected, and so we often shoot on them. To retain the video quality, we try to edit it through built-in features. This section highlights creating slow-motion videos using iPhone or Android. Learn to create professional slo-mos like Gave Slow Mo Guys here:
Step-by-Step Guide to Create a Slow Motion in iPhone
Apple offers a pre-developed feature to create slomos using a simple method. In this section, we will discuss how to shoot a video in slow motion using an iPhone. Follow the lead and create results like The Slow Mo Guys camera:
Instruction: Once you launch the “Camera” application, open the recorder and select “SLO-MO.” Now, redirect to your camera and hit the recorder button to start recording a solo.

Step-by-Step Guide to Creating a Slow Motion in Android
The Android has also introduced a slo-mo feature to record content in slow motion. It helps creators in crafting transitions or aesthetic videos. We have given a detailed procedure for recording a slow-motion video in Android:
Step 1
Locate and launch the “Camera” application on your Android. In the bottom bar, you’ll find multiple camera modes and settings. Drag and find the “More” option in this settings bar.

Step 2
In the appearing menu, locate and select the “Slow motion” option. After setting these preferences, hit the recorder button and record the video. The video will record normally, but when you preview it later, you’ll have a slomo.

Part 3: Slow Motion Video Making and Wondershare Filmora: Make Videos Like Slow Mo Guys
All the above methods of creating slow motion are effective, but there is a drawback. You’ll have to record the complete video in slow motion, and there are no custom options. Wondershare Filmora is a professional video editing software that can resolve this. This software will help you create videos similar to Dan Slow Mo Guys.
In addition, you can infuse your slomo with multiple visual effects, transitions, and more. Filmora displays two features to create a slow-motion video, one of which is Uniform Speed. The other feature is Speed Ramping with pre-assembled slow-motion presets. With its AI-backed technology, you can increase the video frame rate as well.
Free Download For Win 7 or later(64-bit)
Free Download For macOS 10.14 or later
Using Uniform Speed to Create a Slow-Motion Video in Filmora
Uniform Speed is the basic method of creating slow motion in Filmora. It simply modifies the playback speed of video with the help of a slider. The procedure of slomo creation, like The Slow Mo Guys in Filmora, is given below:
Step 1Import Media to Start Slomo Creation
After downloading Filmora on your device, click the “New Project” button to start. From the editing interface, click the “Ctrl + I” keys, choose the video, and bring it to the timeline after import. Select the clip in the timeline and use your cursor to reach the settings panel. Go to the “Uniform Speed” section under the “Speed” tab and change the speed slider settings.

Step 2Start AI Frame Interpolation Settings
This is the AI feature that increases the video frame rate for a smooth, slow-motion effect. You can access this option at the bottom of Uniform Speed settings. Expand it and select the “Optical Flow” option for your purpose.

Step 3Enable Render Preview to See Results
Once all is set and done, navigate towards the timeline panel to select this video again. With the help of your cursor, access the “File” tab at the top toolbar. Select the “Render Preview” option from the expanding menu. After rendering is complete, use the preview screen to observe the slo-mo and export it.

Using Speed Ramping to Create a Slow-Motion Video in Filmora
The second method is also simple, but it has more precise options to create a slow-mo. It uses the velocity graph to rise or decline video speed at certain intervals. Gather the knowledge about how The Slow Mo Guys YouTube creates slow-mo here:
Step 1Access the Speed Ramping Feature
After importing and bringing media to the timeline, select it and reach the settings panel. Access the “Speed” > “Speed Ramping” option to start editing. There, you can find many custom speed presets for automated editing. However, you can also use the “Customize” preset to create from scratch. Then, reach the speed graph and move the slider downward to bring the slo-mo effect.

Step 2Enable the Optical Flow Option
Navigate to the bottom of this panel and expand the AI Frame Interpolation menu. Choose the “Optical Flow” option to achieve your desired outcome.

Step 3Activate Render Preview for Confirmed Results
After configuring your settings, return to the timeline panel and reselect the video. From the timeline toolbar, click the “Render Preview” option. Once the rendering process ends, see the preview before exporting.

Conclusion
This article introduced readers to The Slow Mo Guys and their work. If you haven’t heard about them before, you are now familiar with them. You can head over to YouTube to find their channel and see their work. After guiding users on creating slo-mos on Android and iPhone, we introduced Filmora.
It’s a proficient way of creating slo-mo with AI assistance and custom settings. It has recently launched the V13 upgrade, which is full of AI features and editing possibilities. Head over to their official site and download it to edit like The Slow Mo Guys.
Make A Slow Motion Video Make A Slow Motion Video More Features
Part 1: The Slow Mo Guys: A Real-Life Sensation in Creating Slow Motion Videos
The Slow Mo Guys is a YouTube channel with over 14.8M subscribers and is determined to deliver high-quality content. The channel appeared as a collaboration between Gavin Free and Daniel Gruchy. Both had a history of using high-speed slow-motion cameras and set their channel in 2010. The channel began to gain recognition in 2012 and became a living sensation in the slo-mo world.
In this era, if you are looking for a start to create slomos, Slow Motion Guys come to mind. One of the many things that took the channel to heights is their ability to explain everything. The normal slow-mo speed by most editors is either 120 or 240 fps. However, The Slow Mo Guys shoot videos at 1000 fps, which is ultra-slow motion. The channel usually features natural phenomena, pranks, and relevant content.
Part 2: Want to Make Such Slow-Motion Videos on Your Smartphone? Learn How
The most used and dear gadget to all of us in this era is our smartphones. It has also become a requirement to stay connected, and so we often shoot on them. To retain the video quality, we try to edit it through built-in features. This section highlights creating slow-motion videos using iPhone or Android. Learn to create professional slo-mos like Gave Slow Mo Guys here:
Step-by-Step Guide to Create a Slow Motion in iPhone
Apple offers a pre-developed feature to create slomos using a simple method. In this section, we will discuss how to shoot a video in slow motion using an iPhone. Follow the lead and create results like The Slow Mo Guys camera:
Instruction: Once you launch the “Camera” application, open the recorder and select “SLO-MO.” Now, redirect to your camera and hit the recorder button to start recording a solo.
Step-by-Step Guide to Creating a Slow Motion in Android
The Android has also introduced a slo-mo feature to record content in slow motion. It helps creators in crafting transitions or aesthetic videos. We have given a detailed procedure for recording a slow-motion video in Android:
Step 1
Locate and launch the “Camera” application on your Android. In the bottom bar, you’ll find multiple camera modes and settings. Drag and find the “More” option in this settings bar.
Step 2
In the appearing menu, locate and select the “Slow motion” option. After setting these preferences, hit the recorder button and record the video. The video will record normally, but when you preview it later, you’ll have a slomo.
Part 3: Slow Motion Video Making and Wondershare Filmora: Make Videos Like Slow Mo Guys
All the above methods of creating slow motion are effective, but there is a drawback. You’ll have to record the complete video in slow motion, and there are no custom options. Wondershare Filmora is a professional video editing software that can resolve this. This software will help you create videos similar to Dan Slow Mo Guys.
In addition, you can infuse your slomo with multiple visual effects, transitions, and more. Filmora displays two features to create a slow-motion video, one of which is Uniform Speed. The other feature is Speed Ramping with pre-assembled slow-motion presets. With its AI-backed technology, you can increase the video frame rate as well.
Free Download For Win 7 or later(64-bit)
Free Download For macOS 10.14 or later
Using Uniform Speed to Create a Slow-Motion Video in Filmora
Uniform Speed is the basic method of creating slow motion in Filmora. It simply modifies the playback speed of video with the help of a slider. The procedure of slomo creation, like The Slow Mo Guys in Filmora, is given below:
Step 1Import Media to Start Slomo Creation
After downloading Filmora on your device, click the “New Project” button to start. From the editing interface, click the “Ctrl + I” keys, choose the video, and bring it to the timeline after import. Select the clip in the timeline and use your cursor to reach the settings panel. Go to the “Uniform Speed” section under the “Speed” tab and change the speed slider settings.
Step 2Start AI Frame Interpolation Settings
This is the AI feature that increases the video frame rate for a smooth, slow-motion effect. You can access this option at the bottom of Uniform Speed settings. Expand it and select the “Optical Flow” option for your purpose.
Step 3Enable Render Preview to See Results
Once all is set and done, navigate towards the timeline panel to select this video again. With the help of your cursor, access the “File” tab at the top toolbar. Select the “Render Preview” option from the expanding menu. After rendering is complete, use the preview screen to observe the slo-mo and export it.
Using Speed Ramping to Create a Slow-Motion Video in Filmora
The second method is also simple, but it has more precise options to create a slow-mo. It uses the velocity graph to rise or decline video speed at certain intervals. Gather the knowledge about how The Slow Mo Guys YouTube creates slow-mo here:
Step 1Access the Speed Ramping Feature
After importing and bringing media to the timeline, select it and reach the settings panel. Access the “Speed” > “Speed Ramping” option to start editing. There, you can find many custom speed presets for automated editing. However, you can also use the “Customize” preset to create from scratch. Then, reach the speed graph and move the slider downward to bring the slo-mo effect.
Step 2Enable the Optical Flow Option
Navigate to the bottom of this panel and expand the AI Frame Interpolation menu. Choose the “Optical Flow” option to achieve your desired outcome.
Step 3Activate Render Preview for Confirmed Results
After configuring your settings, return to the timeline panel and reselect the video. From the timeline toolbar, click the “Render Preview” option. Once the rendering process ends, see the preview before exporting.
Conclusion
This article introduced readers to The Slow Mo Guys and their work. If you haven’t heard about them before, you are now familiar with them. You can head over to YouTube to find their channel and see their work. After guiding users on creating slo-mos on Android and iPhone, we introduced Filmora.
It’s a proficient way of creating slo-mo with AI assistance and custom settings. It has recently launched the V13 upgrade, which is full of AI features and editing possibilities. Head over to their official site and download it to edit like The Slow Mo Guys.
Also read:
- [New] Creative Uses for Home Webcams
- [New] Ignite Your Digital Engagement Top Strategies for More FB Fans
- [New] Reigniting Creativity Exclusive FREE Drawing Tools for Mac Users for 2024
- [Updated] 2024 Approved Enhance Your Shorts Fresh and Original Thumbnails with Minimal Effort
- [Updated] In 2024, Assessing the Usefulness of Insta’s Verified Posts
- Conquer Call of Duty Warzone Glitches: Mastering Error 6328 Hacks for Players
- How To Overcome The Obstacle of 'Application Failure to Start' In Windows
- In 2024, 4 solution to get rid of pokemon fail to detect location On Apple iPhone 8 | Dr.fone
- Legal Battle: HP Enterprise Accuses Inspur of Intellectual Property Theft as It Persists in American Market Operations
- Next-Level Peripheral Connectivity: PCI-SIG Releases Innovative CopprLink Cables to Power PCI Express Gen V and VI, While Preparing for Version VII Development
- No More Glitches: Master Easy Techniques for Stable RAGE 2 Gameplay
- The Author's Secret Weapon? Discover How ChatGPT Revolutionizes Writing
- Ultimate Walkthrough for Scheduling a Technical Assistance Session at Apple Retail
- Title: New 2024 Approved Do You Want to Be Aware of VHSs Meaning? There Is Nothing to Be Worried About because We Will Guide You in This Article
- Author: Morgan
- Created at : 2024-09-26 17:13:18
- Updated at : 2024-09-30 21:01:46
- Link: https://ai-video-editing.techidaily.com/new-2024-approved-do-you-want-to-be-aware-of-vhss-meaning-there-is-nothing-to-be-worried-about-because-we-will-guide-you-in-this-article/
- License: This work is licensed under CC BY-NC-SA 4.0.