
:max_bytes(150000):strip_icc():format(webp)/how-to-set-up-a-ps5-5088641-1bcc6bca24cd460bb2b276fdeb6cb830.jpg)
New 2024 Approved Final Cut Pro Is a Video Editing Software Exclusive to Apple Devices. It Features Numerous Editing Tools and Video Effects, Enabling You to Produce Quality Creations Every Time. Keep Reading to Discover How to Apply the Final Cut Pro Camera Shake Effect
Final Cut Pro Is a Video Editing Software Exclusive to Apple Devices. It Features Numerous Editing Tools and Video Effects, Enabling You to Produce Quality Creations Every Time. Keep Reading to Discover How to Apply the Final Cut Pro Camera Shake Effect

Are you struggling to attract audiences to your videos? If so, you may consider adding effects to them during your editing process. Most video editing software includes preset video effects to create and publish attractive videos quickly. For example, Final Cut Pro is a video editing software for Apple devices and includes lots of editing tools and video effects. Here is a detailed guide on how to apply the Final Cut Pro camera shake effect to your videos.
- What are hand shake effects for
- What kind of shots are best for such an effect
- Is it better to hand shake when shooting or add the effects
Part1: When Do You Need a Hand Shake Effect?

Adding effects to your videos is a great way to make them more impactful. However, you need to apply them correctly for them to be effective. The following information explores different aspects of the Final Cut Pro camera shake effect, including its definition, why video creators use it, and how best to apply it.
What are hand shake effects for?
Hand shake effects are video adjustments you apply to specific scenes that make the shot vibrate. Depending on the software you use, there are multiple variations of the effect. In addition, developers refer to it by different names. For example, Final Cut Pro users know it as the earthquake effect, which is a preset video effect in most versions of the software.
Typically, video creators use the Final Cut Pro camera shake effect to add energy to their videos. As such, their scenes are more dramatic and encourage you to pay more attention to the video. For example, you can apply the effect to indicate the arrival of the villain in your video. In addition, the effect will be more impactful if the villain is a giant.
You can also use the camera shake video effect for the following purposes:
- Break the monotony in a scene. Applying this scene after a long dialogue scene will give your audience a brief respite, allowing them to regain their focus.
- The camera shake effect can also be an effective tool to build your brand identity. Instead of applying it during the screenplay, you can use it in the end credits to introduce your logo to audiences. Furthermore, you can include a creative sound track for additional emphasis.
What kind of shots are best for such an effect?
The best shot to apply the camera shake effect are still shots. This is because they give you extra creative room with the scene since the subjects are facing the camera directly from a level angle. As such, you can customize unique motion patterns for each subject when applying the camera shake effect.
Is it better to hand shake when shooting or add the effects?
Although it may seem tempting to physically shake the camera when shooting, most filmmakers prefer to add the effect during editing. This is because shaking the camera during shooting may result in unusable shots in post-production. For example, shooting a car scene from a hand-held camera in the passenger seat often results in shaky footage. As such, video creators mount the camera on a tripod to capture still shots and then add the camera shake during post-production.
Part2: How to Add a hand shake effect with FCPX?
The following is a step-to-step guide on how to add a hand shake effect on Final Cut Pro X. However, you need to meet the following requirements for the process to work.
A licensed copy of Final Cut Pro X

The camera shake effect is only available with the full version of Final Cut Pro X. In addition, you will access all variations of the effect with the full version.
A compatible video file
Apple’s Final Cut Pro X is compatible with the following video file formats:
- QuickTime formats.
- Apple ProRes
- Apple Animation Codec
- XF-AVC
- Container files, such as3GP, AVI, and MP4.
Camera shake effect plugins
The video editing software comes with preset camera shake effects, which you can find in the Effects Browser. However, you can also download compatible plugins from established sources, such as the Camera Shake Effects pack from Motion Array.
Once you have everything in place, follow the below steps.
- Import your desired video clip to the Final Cut Pro X workspace. Your video will appear in the timeline section at the bottom of your workspace.

- Select the section where you want to add the camera shake effect. In addition, you need to set the in and out points from the timeline. For example, Mac users can set these points by pressing the Iand O keys, respectively.
- Then, select the Shakefrom the Effects browser and search for Hand Held.

- Drag the effect over your selection to apply the effect.
- You can also make additional adjustments to your hand-held shake effect from the inspector panel.

For example, you can prevent black borders from appearing with the effect by increasing the Scale attribute to 105%. Scroll to the bottom right section of your workspace to the Inspector Panel, and click on Scale to make the adjustment.
Part3: How to add hand shake effect in the simplest way?
If the above guide is too complicated for you, Wondershare Filmora offers you the simplest way to add the hand shake effect to your videos.

The program is a stand-alone video editor for Windows and macOS users. It comes with a variety of preset camera shaking effects, including
- Up-down shaking
- Extreme shaking
- Chaos shaking
- Sideways shaking
Free Download For Win 7 or later(64-bit)
Free Download For macOS 10.14 or later
The above effects offer various shaking intensities and patterns to help you achieve your desired effect. In addition, you will need to purchase a license to access the different versions of the hand shake video effect. Once you have Wondershare Filmora running on your device, follow the below steps to add the hand shake effect to your videos.
1. Import your video
Click on the Import tab on your user interface and select Import Media Files. Then, drag and drop the files you want to edit to your timeline from the resulting window.
2. Applying Wondershare Filmora’s hand shake effect
Click on the Effects tab from the user interface and then select Filters. Next, proceed to the Shake subcategory to view all available presets. Currently, the program has eight camera shake presets, which you can preview using the pop-up thumbnail on your workspace.
Once you identify your desired effect, drag and drop it over the video selection, you want to apply it. You can make further adjustments using the sliders on the effect’s sub menu. For example, you can vary the duration of the effect by adjusting the frequency and intensity sliders.
Finally, click on Ok to apply the hand shake effect to your video and save the changes.
3. Exporting your final project
Wondershare Filmora allows you to export your completed projects to external locations, such as external hard drives and cloud storage. In addition, you can directly upload your videos to YouTube and Vimeo from the workspace.
Here is how to export videos from Filmora:
- Click on the Exporttab from the program’s main menu.
- Identify your file destination from the options on the Export The latest version of Filmora allows file exports to your local storage, YouTube, Vimeo, and DVD.
- Select your file format from the left menu and click Exporton the bottom right corner to finalize the process. Some of the available file formats include MP4, WMV, and FLV.
Kindly note that the above guide is for the latest version of Wondershare Filmora. As such, confirm that you have the latest edition before using it. Alternatively, you can download the latest version for free from the Filmora website.
FAQs
1. What are the minimum system requirements to run Film Cut Pro X?
According to Apple, your device needs to have the below minimum system requirements.
- 4 gigabytes of RAM. However, running the program on a device with 8 GB RAM allows you to work with 4K videos and perform 360-degree video editing seamlessly.
- A dedicated graphics processing unit with at least 1 GB of VRAM.
- About 4.5 GB of storage space for Final Cut Pro’s system files.
- An active internet connection to enable access to online customer support and additional features.
- You will also need a Blu-ray recorder to export videos directly to DVDs.
- Finally, your device should be running macOS 11.5.1 or later.
2. Can you import custom hand shake effects to Final Cut Pro?
Yes, you can import custom hand shake effects to your licensed version of Final Cut Pro. However, always install custom plugins from verifiable sites to prevent the installation of malicious software such as spyware. Some of the sites to consider consist of Motion Array, Studio Binder, and FCPX Free. For example, you can check out these 10 free plugins for Final Cut Pro from Filmora .
- A licensed copy of Final Cut Pro X
- A compatible video file
- Camera shake effect plugins
- How to add hand shake effect in the simplest way
Part1: When Do You Need a Hand Shake Effect?
Adding effects to your videos is a great way to make them more impactful. However, you need to apply them correctly for them to be effective. The following information explores different aspects of the Final Cut Pro camera shake effect, including its definition, why video creators use it, and how best to apply it.
What are hand shake effects for?
Hand shake effects are video adjustments you apply to specific scenes that make the shot vibrate. Depending on the software you use, there are multiple variations of the effect. In addition, developers refer to it by different names. For example, Final Cut Pro users know it as the earthquake effect, which is a preset video effect in most versions of the software.
Typically, video creators use the Final Cut Pro camera shake effect to add energy to their videos. As such, their scenes are more dramatic and encourage you to pay more attention to the video. For example, you can apply the effect to indicate the arrival of the villain in your video. In addition, the effect will be more impactful if the villain is a giant.
You can also use the camera shake video effect for the following purposes:
- Break the monotony in a scene. Applying this scene after a long dialogue scene will give your audience a brief respite, allowing them to regain their focus.
- The camera shake effect can also be an effective tool to build your brand identity. Instead of applying it during the screenplay, you can use it in the end credits to introduce your logo to audiences. Furthermore, you can include a creative sound track for additional emphasis.
What kind of shots are best for such an effect?
The best shot to apply the camera shake effect are still shots. This is because they give you extra creative room with the scene since the subjects are facing the camera directly from a level angle. As such, you can customize unique motion patterns for each subject when applying the camera shake effect.
Is it better to hand shake when shooting or add the effects?
Although it may seem tempting to physically shake the camera when shooting, most filmmakers prefer to add the effect during editing. This is because shaking the camera during shooting may result in unusable shots in post-production. For example, shooting a car scene from a hand-held camera in the passenger seat often results in shaky footage. As such, video creators mount the camera on a tripod to capture still shots and then add the camera shake during post-production.
Part2: How to Add a hand shake effect with FCPX?
The following is a step-to-step guide on how to add a hand shake effect on Final Cut Pro X. However, you need to meet the following requirements for the process to work.
A licensed copy of Final Cut Pro X
The camera shake effect is only available with the full version of Final Cut Pro X. In addition, you will access all variations of the effect with the full version.
A compatible video file
Apple’s Final Cut Pro X is compatible with the following video file formats:
- QuickTime formats.
- Apple ProRes
- Apple Animation Codec
- XF-AVC
- Container files, such as3GP, AVI, and MP4.
Camera shake effect plugins
The video editing software comes with preset camera shake effects, which you can find in the Effects Browser. However, you can also download compatible plugins from established sources, such as the Camera Shake Effects pack from Motion Array.
Once you have everything in place, follow the below steps.
- Import your desired video clip to the Final Cut Pro X workspace. Your video will appear in the timeline section at the bottom of your workspace.
- Select the section where you want to add the camera shake effect. In addition, you need to set the in and out points from the timeline. For example, Mac users can set these points by pressing the Iand O keys, respectively.
- Then, select the Shakefrom the Effects browser and search for Hand Held.
- Drag the effect over your selection to apply the effect.
- You can also make additional adjustments to your hand-held shake effect from the inspector panel.
For example, you can prevent black borders from appearing with the effect by increasing the Scale attribute to 105%. Scroll to the bottom right section of your workspace to the Inspector Panel, and click on Scale to make the adjustment.
Part3: How to add hand shake effect in the simplest way?
If the above guide is too complicated for you, Wondershare Filmora offers you the simplest way to add the hand shake effect to your videos.
The program is a stand-alone video editor for Windows and macOS users. It comes with a variety of preset camera shaking effects, including
- Up-down shaking
- Extreme shaking
- Chaos shaking
- Sideways shaking
Free Download For Win 7 or later(64-bit)
Free Download For macOS 10.14 or later
The above effects offer various shaking intensities and patterns to help you achieve your desired effect. In addition, you will need to purchase a license to access the different versions of the hand shake video effect. Once you have Wondershare Filmora running on your device, follow the below steps to add the hand shake effect to your videos.
1. Import your video
Click on the Import tab on your user interface and select Import Media Files. Then, drag and drop the files you want to edit to your timeline from the resulting window.
2. Applying Wondershare Filmora’s hand shake effect
Click on the Effects tab from the user interface and then select Filters. Next, proceed to the Shake subcategory to view all available presets. Currently, the program has eight camera shake presets, which you can preview using the pop-up thumbnail on your workspace.
Once you identify your desired effect, drag and drop it over the video selection, you want to apply it. You can make further adjustments using the sliders on the effect’s sub menu. For example, you can vary the duration of the effect by adjusting the frequency and intensity sliders.
Finally, click on Ok to apply the hand shake effect to your video and save the changes.
3. Exporting your final project
Wondershare Filmora allows you to export your completed projects to external locations, such as external hard drives and cloud storage. In addition, you can directly upload your videos to YouTube and Vimeo from the workspace.
Here is how to export videos from Filmora:
- Click on the Exporttab from the program’s main menu.
- Identify your file destination from the options on the Export The latest version of Filmora allows file exports to your local storage, YouTube, Vimeo, and DVD.
- Select your file format from the left menu and click Exporton the bottom right corner to finalize the process. Some of the available file formats include MP4, WMV, and FLV.
Kindly note that the above guide is for the latest version of Wondershare Filmora. As such, confirm that you have the latest edition before using it. Alternatively, you can download the latest version for free from the Filmora website.
FAQs
1. What are the minimum system requirements to run Film Cut Pro X?
According to Apple, your device needs to have the below minimum system requirements.
- 4 gigabytes of RAM. However, running the program on a device with 8 GB RAM allows you to work with 4K videos and perform 360-degree video editing seamlessly.
- A dedicated graphics processing unit with at least 1 GB of VRAM.
- About 4.5 GB of storage space for Final Cut Pro’s system files.
- An active internet connection to enable access to online customer support and additional features.
- You will also need a Blu-ray recorder to export videos directly to DVDs.
- Finally, your device should be running macOS 11.5.1 or later.
2. Can you import custom hand shake effects to Final Cut Pro?
Yes, you can import custom hand shake effects to your licensed version of Final Cut Pro. However, always install custom plugins from verifiable sites to prevent the installation of malicious software such as spyware. Some of the sites to consider consist of Motion Array, Studio Binder, and FCPX Free. For example, you can check out these 10 free plugins for Final Cut Pro from Filmora .
Zoom In and Out on Snapchat
Abundant Video Effects - Wondershare Filmora
Provide abundant video effects - A creative video editor
Powerful color correction and grading
Detailed tutorials are provided by the official channel
People make Snapchat videos for various purposes, such as capturing beautiful natural scenery or a funny video of a friend. To capture the details or to focus on a specific part, the zoom in and out feature is commonly used. By doing so, you can manually focus on a particular area clearly with your fingers.
The following article will focus on how to zoom in on Snapchat by offering detailed and easy steps. Moreover, we will suggest a powerful tool that can help you in zooming in and out on Snapchat flawlessly, along with additional distinct features.
In this article
Part 1: How to Zoom In and Out a Video on Snapchat While Recording?
Part 2: How to Zoom In and Out a Pre-Recorded Video on Snapchat?
Part 3: How to Zoom In and Zoom Out Videos using Wondershare Filmora?
Part 1: How to Zoom In and Out a Video on Snapchat While Recording?
In this section, we will provide you with two methods of how to zoom in and out on Snapchat videos instantly:
Method 1: Without Locking Snapchat Recorder
Step 1: Start by opening your Snapchat from on your mobile device to access the camera screen for recording a video. Now, start capturing the video by holding the center red button from the middle of your screen.

Step 2: While holding the center recording button, use your finger and slide it in the upward direction to zoom in.

Step 3: To zoom out, use the same finger by sliding it to the bottom direction. Once done, leave the recording button by removing your finger to finish the recording. Now you can save the recorded video on Snapchat.

Method 2: By Using the Snapchat Lock Feature
Step 1: Begin with opening your Snapchat account and stay on your camera screen to record the video. Now start the recording by holding the center red button from your displayed screen.

Step 2: To “Lock” the recording, move your finger towards the left side, after which you can see the padlock icon on your screen.

Step 3: After recording the video is locked, use your two fingers simultaneously and move them apart to zoom in on the specific part. Conversely, for zooming out, use your two fingers and move them in an inward direction.

Step 4: To finalize the recording, simply tap on the recording icon, and the recording will stop. You can now edit your snap and send it to your friends or post it on your Snapchat.

Part 2: How to Zoom In and Out a Pre-Recorded Video on Snapchat?
In this section, we will offer detailed steps on how to zoom in and out on Snapchat with pre-recorded videos:
Step 1: Open your Snapchat from your smartphone and then tap on the icon showing on the left side depicting “Two Mobiles Overlapping Each Other.” From this icon, navigate to your “Camera Roll.”

Step 2: From your camera roll, choose the video you want to edit. Then click on the “Pencil” icon by going to the bottom left corner to zoom in and out on your video.

Step 3: On the next screen, you will see various editing options on the right side. Select the second last option, which is for cropping and can be used to zoom in on the videos.

Step 4: By using this selected option, you can zoom in and out on the video according to your preference. Just use your two fingers and place them on the screen. To zoom in, stretch the fingers and move them apart and control the zoom value manually.

Step 5: For zooming out, move the fingers in an inward direction. Once done with all the changes, tap on the “Tick” button. Afterward, click on the “Done” option and save the changes by tapping on “Save Changes.”

Part 3: How to Zoom In and Zoom Out Videos using Wondershare Filmora?
If you are finding it difficult how to zoom in on Snapchat effortlessly, we will recommend Wondershare Filmora as a complete toolbox for editing videos. Through this tool, you can not only flawlessly zoom in on the multiple Snapchat videos but can also perform various editing functions. The user interface is specially designed in a way to assist beginners in executing the editing process.
You can take advantage of tons of advanced features in Filmora like auto reframing, video effects, transitions, and instant mode. The user interface is so simple that within seconds you can zoom in and out on any video perfectly.
Collectively, this tool functions as a complete professional toolbox for video editing and does not require technical experience or additional tools. Steps to Zoom In and Out through Wondershare Filmora:
Step 1: Select New Project
Begin with launching Wondershare Filmora on your computer and click to open its user interface. Afterward, tap on the option “New Project” to continue with the process.

Step 2: Import your Snapchat Video
On the new window, click on the icon of the “Arrowhead” to import the video on this tool. Once done with uploading the video, drag the video to the timeline of this tool.

Step 3: Go to Transitions Tab
From the tabs displayed on the left side, navigate to the “Transitions” tab by clicking on them. On its search box, type “Zoom In Out,” and the tool will automatically fetch transitions related to it.

Step 4: Choose Transitions
From the displayed transitions, select any transition of your choice. Apply the transition to your video by dragging it to the video available on the timeline.

Step 5: Preview the video
If you find the results satisfactory in the preview window, tap on the “Export” button displayed on top and save the video on your computer.

Conclusion
Snapchat videos are highly popular due to their high-quality results and features. However, if you are struggling to focus on certain parts while recording a video through Snapchat, this article has offered a well-structured guide on how to zoom in and out on Snapchat quickly. If you are finding manual methods confusing, you can rely on the top-notch tool called Wondershare Filmora for Snapchat zoomed in.
People make Snapchat videos for various purposes, such as capturing beautiful natural scenery or a funny video of a friend. To capture the details or to focus on a specific part, the zoom in and out feature is commonly used. By doing so, you can manually focus on a particular area clearly with your fingers.
The following article will focus on how to zoom in on Snapchat by offering detailed and easy steps. Moreover, we will suggest a powerful tool that can help you in zooming in and out on Snapchat flawlessly, along with additional distinct features.
In this article
Part 1: How to Zoom In and Out a Video on Snapchat While Recording?
Part 2: How to Zoom In and Out a Pre-Recorded Video on Snapchat?
Part 3: How to Zoom In and Zoom Out Videos using Wondershare Filmora?
Part 1: How to Zoom In and Out a Video on Snapchat While Recording?
In this section, we will provide you with two methods of how to zoom in and out on Snapchat videos instantly:
Method 1: Without Locking Snapchat Recorder
Step 1: Start by opening your Snapchat from on your mobile device to access the camera screen for recording a video. Now, start capturing the video by holding the center red button from the middle of your screen.
Step 2: While holding the center recording button, use your finger and slide it in the upward direction to zoom in.
Step 3: To zoom out, use the same finger by sliding it to the bottom direction. Once done, leave the recording button by removing your finger to finish the recording. Now you can save the recorded video on Snapchat.
Method 2: By Using the Snapchat Lock Feature
Step 1: Begin with opening your Snapchat account and stay on your camera screen to record the video. Now start the recording by holding the center red button from your displayed screen.
Step 2: To “Lock” the recording, move your finger towards the left side, after which you can see the padlock icon on your screen.
Step 3: After recording the video is locked, use your two fingers simultaneously and move them apart to zoom in on the specific part. Conversely, for zooming out, use your two fingers and move them in an inward direction.
Step 4: To finalize the recording, simply tap on the recording icon, and the recording will stop. You can now edit your snap and send it to your friends or post it on your Snapchat.
Part 2: How to Zoom In and Out a Pre-Recorded Video on Snapchat?
In this section, we will offer detailed steps on how to zoom in and out on Snapchat with pre-recorded videos:
Step 1: Open your Snapchat from your smartphone and then tap on the icon showing on the left side depicting “Two Mobiles Overlapping Each Other.” From this icon, navigate to your “Camera Roll.”
Step 2: From your camera roll, choose the video you want to edit. Then click on the “Pencil” icon by going to the bottom left corner to zoom in and out on your video.
Step 3: On the next screen, you will see various editing options on the right side. Select the second last option, which is for cropping and can be used to zoom in on the videos.
Step 4: By using this selected option, you can zoom in and out on the video according to your preference. Just use your two fingers and place them on the screen. To zoom in, stretch the fingers and move them apart and control the zoom value manually.
Step 5: For zooming out, move the fingers in an inward direction. Once done with all the changes, tap on the “Tick” button. Afterward, click on the “Done” option and save the changes by tapping on “Save Changes.”
Part 3: How to Zoom In and Zoom Out Videos using Wondershare Filmora?
If you are finding it difficult how to zoom in on Snapchat effortlessly, we will recommend Wondershare Filmora as a complete toolbox for editing videos. Through this tool, you can not only flawlessly zoom in on the multiple Snapchat videos but can also perform various editing functions. The user interface is specially designed in a way to assist beginners in executing the editing process.
You can take advantage of tons of advanced features in Filmora like auto reframing, video effects, transitions, and instant mode. The user interface is so simple that within seconds you can zoom in and out on any video perfectly.
Collectively, this tool functions as a complete professional toolbox for video editing and does not require technical experience or additional tools. Steps to Zoom In and Out through Wondershare Filmora:
Step 1: Select New Project
Begin with launching Wondershare Filmora on your computer and click to open its user interface. Afterward, tap on the option “New Project” to continue with the process.
Step 2: Import your Snapchat Video
On the new window, click on the icon of the “Arrowhead” to import the video on this tool. Once done with uploading the video, drag the video to the timeline of this tool.
Step 3: Go to Transitions Tab
From the tabs displayed on the left side, navigate to the “Transitions” tab by clicking on them. On its search box, type “Zoom In Out,” and the tool will automatically fetch transitions related to it.
Step 4: Choose Transitions
From the displayed transitions, select any transition of your choice. Apply the transition to your video by dragging it to the video available on the timeline.
Step 5: Preview the video
If you find the results satisfactory in the preview window, tap on the “Export” button displayed on top and save the video on your computer.
Conclusion
Snapchat videos are highly popular due to their high-quality results and features. However, if you are struggling to focus on certain parts while recording a video through Snapchat, this article has offered a well-structured guide on how to zoom in and out on Snapchat quickly. If you are finding manual methods confusing, you can rely on the top-notch tool called Wondershare Filmora for Snapchat zoomed in.
What Are the Best 10 GIF Creator?
What are the 10 Best GIF Creator?
An easy yet powerful editor
Numerous effects to choose from
Detailed tutorials provided by the official channel
Stay tuned to find the most affordable GIF creator solutions.
In this article
01 [Why Gifs Are Essential for Every Marketer?](#Part 1)
02 [How to Make Your Own GIF?](#Part 2)
03 [What Are 10 Best GIF Creator to Find Brilliant Pre-made Gifs?](#Part 3)
Part 1 Why Gifs Are Essential for Every Marketer?
Everyone around you today is accustomed with the fact that GIFs are an interesting and impactful means of content sharing. These 3-5 second snippets are highly preferred and convenient ways to deliver information that is precise, clear and to the point. When it comes to time frames, short and quick GIFs are obvious choices over lengthy videos. Additionally, GIFs are eye-catchy and keep you captivated to see though the entire content within seconds, contradictory to those monotonous and often dull videos that sound more like a long, boring lecture.
These are an effective media tool that is not limited to sharing information that is chiefly entertainment based or fun centered. You can use them to deliver important content that addresses a specific purpose or audience. Owing to this, GIFs have become an essential marketing utility, here’s why:
● Improve Product Branding:
GIFs can serve as impressive branding tools for your products in the market. Markets today are considerably impacted by the ‘What You See is What You Buy’ concept, which puts forward the need to lay added stress on effective branding.
GIFs are ready to sort this out with their exciting range of features. From video editing choices to sound and color customization, GIFs are loaded with everything you need to improvise your product branding. All you have to do is explore your creativity to make the most of the GIF branding choices.
● Explain it Better
On a preference poll, most of us would shift to ‘watch’ over ‘read’ for a comprehensive understanding. An attractive motion visual is an even better treat. GIFs are pivotal in making viewers relate to the concept and message behind your product in a more enhanced manner.
Additionally, these are a continent means to introduce emotional mobility among your target audience with depictive emojis. You can use GIFs to develop effective content approaches to make the audience connect with your product viability, both practically band emotionally.
● Increase Visitor Attraction
Today’s changing times have brought about a rapid outlook towards everything. All of us are bounded by time constraints and when browsing the web, the prime need is to look for quick and accurate solutions to everything concerned.
Short and exact information delivery of GIFs is something that would keep visitors glued to your site because they will be assured of getting exactly what they search for and that too in an interesting and entertaining way.
Part 2 How to Make Your Own GIF?
Now that you are familiar with the creative marketing credibility of GIFs, you might naturally feel motivated towards creating a GIF of your own. In case you are, see through the following section of this article to find out interesting ways of creating interesting and catchy GIFs, either for impressive product marketing or just to make your social media posts leave your community peers in awe!
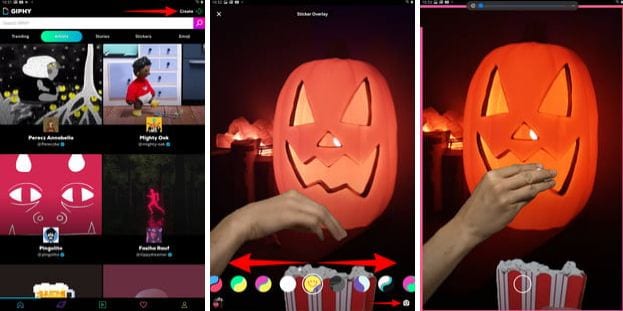
Looking for the best GIF creator solutions on the web, you can rely on GIPHY, one of the most preferred and convenient databases to create GIFs quickly. This is a smartphone compatible tool and works well with almost any device. Follow the steps given below to make GIFs with this tool:
Step 1:
Download and install the GIPHY app in your device.
Step 2:
Click on ‘Create’ in the app’s welcome screen. This will change (+) icon at the top-right corner to the ‘Camera’ symbol. You can also navigate to the ‘Profile’ at the bottom-right and tap the (+) or ‘Camera’ icon in the app’s account page.
Step 3:
Click on ‘Allow Camera Access’. You will receive two successive prompt messages from the app. Click on ‘Allow’ to grant access permissions to your device media. When you are done, click on ‘I Agree’.
Step 4:
GIFHY uses your device’s front camera for GIF creation. However, if you need to go for a camera switch, click on the ‘Camera’ sign at the bottom-right.
Step 5:
Choose a desired filter and effect for your GIF with a left or right swipe on the live feed toolbar. The app has 11 amazing and realistic effects, including VHS Static, 3D Glasses, etc.
Step 6:
You can take up either of the following:
Press either of the ‘Filter’ or ‘Effect’ buttons to take static shots to create GIF from images, or press and hold the same to create animated GIF. For simply using effects, tap the white button.
In case you choose to create a motion GIF, the app forms a ‘visual timer’ around the editor screen. The motion recording stops once the line is in sync with the screen edges.
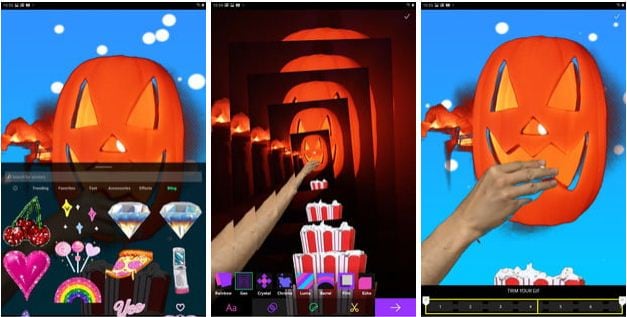
Step 7:
Having captured your perfect shot, you have the liberty to merge it with an image or video. However, do consider the following options to add some more elements to your capture: You can add relatable text in 9 color choices.
● Enhance your graphic presentation with 8 amazing effects like, ‘rainbow overlays’, BW film grains, etc.
● Choose from a never ending list of suitable stickers to add the feel through connect to your GIFs.
● Trim your animated GIFs to the ‘just perfect’ portion by adjusting the editing markers.
Relax; that’s no rocket science. Just tap on the respective buttons and there you go!
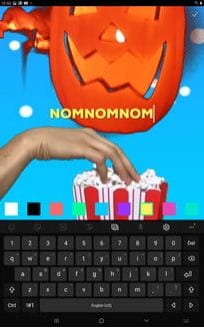
Step 8:
Set your GIF in a desired size frame by choosing the ‘Crop’ tool from the top-right corner of the editing screen. You are given a size flexibility of 1:1, 3:2, 16:9, 4:5 and 9:16.

Step 9:
Once you are satisfied with your creation, tap the ‘Right Arrow’ icon. In the interface that follows, add suitable share tags to the GIF.
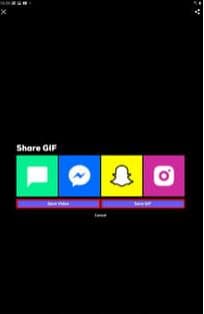
Step 10:
Tap ‘Share GIF’ to post your creation on social media platforms or share it through popular IM apps. To save your initially captured clip, click on ‘Save Video’ or tap ‘Save GIF’ to save your creation in your smartphone’s memory.
Part 1 What Are 10 Best GIF Creator to Find Brilliant Pre-made Gifs?
Having talked about GIF creation on the go, let’s take a dive into the best GIF creator solutions that are a storehouse of exciting pre-made GIFs. When browsing the web for an affordable GIF maker tool, you land across a pool of choices. Read through the further sections of this article to find out what’s best for you.
Described below are 10 best alternatives to get amazing pre-made GIFs:
● Wondershare Filmora Video Editor
This one is a popular, preferred and top rated application where you get to choose from an exciting range of pre-made GIFs under a variety of specific categories. All you need to do is, visit the app’s official site, browse to your favorite GIF category and select a desired GIF. Follow a few app instructions to save your selection and that’s it! Your selected GIF reaches your device memory within seconds.

Wondershare Filmora - Best Video Editor for Mac/Windows
5,481,435 people have downloaded it.
Build unique custom animations without breaking a sweat.
Focus on creating epic stories and leave the details to Filmora’s auto features.
Start a creative adventure with drag & drop effects and endless possibilities.
Filmora simplifies advanced features to save you time and effort.
Filmora cuts out repetition so you can move on to your next creative breakthrough.
Key Features
● This app is available to you absolutely free of cost.
● Has an intelligent and user cohesive interface.
● Loaded with tons of brilliant GIFs to choose from.
● The app supports GIF customization.
● GIFHY
Launched in 2013, this one is probably the best GIF maker and downloader tool available on the web today. It is a free tool, packed with enormous varieties of GIFs to choose from. What’s more interesting about the app is that you are free to play with your editing creativity to enhance your downloaded GIFs in the GIPHY editor.
Key Features
● It comes with an easy to use, convenient interface.
● You can edit downloaded GIFs with hundreds of effects and filters.
● The app provides you a direct sharing platform, allowing you to post GIFs to various social media platforms and also go for sharing via Instant Messaging applications.
● This is a fast processing tool that allows you to escape the notch of annoying and delayed download processes.
● Tenor
You can conveniently regard this one as the closest competitor to the GIPHY GIF creator and downloader tool. Needless to say, both are quite similar to each other in interface and usage respects. However, focusing on search results for a common keyword, you find diverse variations to your obvious surprise.
Key Features
● This is a free to use, interactive interface tool.
● It introduces a GIF Keyboard that allows you to search the most specific and relatable GIFs.
● It ensures a speedy and high quality GIF download.
● You can explore your editing skills to your heart’s content to improvise the downloaded GIFs with this tool.
● This tool gives you the liberty to directly share GIFs across different platforms.
If you like to spend ample time on choosing what’s perfect for you, refer this online tool for your GIF download solutions. It caters to your love of diversity with the most deep rooted and broad GIF range. However, this one comes with a little messy interface, demanding some patience from you to get to the right thing.
Key Features
● This tool provides you with almost all possible choices for a GIF category.
● It is available to you free of cost
● The tool site is loaded with rich and quality GIF content.
● This one is a direct save and export tool for your downloaded GIFs.
● Gfycat
You can prefer this one as a GIF hosting tool. Developed with a view to launch a common medium for GIF and HTML contents, this app ensures in-time and hassle free downloads and delivery. Though lacking a refined search bar, this tool promises you of excellence in content quality.
Key Features
● This comes to you as one of the most reliable GIF hosting tools.
● It is a free and quick content delivery tool.
● You are allowed to select the most suitable one from a variety of playback choices.
● This tool also gives you the flexibility of direct media sharing.
● GIFbin
If you are hung-over decade old nostalgia and the fever doesn’t seem to go away, you can check this site for some really satisfying retro and other similar content. This would definitely make you take a toll back to the times when MSN and Limewire were unparalleled market leaders in content sharing.
Key Features
● GIFbin is a storehouse of the best animated GIFs, that is on a continuous update to facilitate fresh and quality based content, every time you visit the site.
● It has an advanced, API enabled search mechanism.
● It boasts of having the handiest and convenient user interface.
● If you prefer GIFs of the comic genre, this tool is heaven for you.
● Imgflip
This is another GIF download site, commonly preferred for comedy and fun oriented content. Using this site, you can download and create a variety of GIF based memes that have the potential to flood your social media posts with likes and comments. This one is a complete GIF basket, suited to vast content varieties and user preferences. You will find the site’s official watermark on all its contents.
Key Features
● The site stands among the most preferred GIF-meme creation and sharing platforms.
● The tool is packed with loads of quality content under specific categories
● You can improvise the dimensions of your editing skills to modify downloaded GIFs.
● This site has a default media export feature that you can use to share your GIFs on social media.
● Imgur
Launched in 2009, this is among the most visited GIF sites, originally created for sharing meme based contents on social media. Its extensive search filters are dedicated to fetch the exact GIFs and memes you are looking for. If you are tired of browsing sites for particular content requirements, your search spree will definitely end here.
Key Features
● The site is known for its extensive and diversified content quality.
● It is a free, convenient and dependable GIF download tool.
● Imgur is highly preferred for content export across various media platforms.
● It is equipped with an advanced and updated search filter that assures you of getting fresh and top quality GIFs on almost every possible keyword.
● Tumblr
Claiming a launch date of 13 years back, this is quite a good GIF download option. You can find excellent quality GIF content on the site, particularly in the comic genre. Though not as popular as its online counterparts today, the site definitely enjoyed commendable visitor preferences at the time of its launch. You can certainly visit this site for a filling entertainment dose.
Key Features
● Tumblr is a free download site with a user friendly interface.
● The site is loaded with notable content varieties.
● You can go for direct media sharing through this site.
● Its comic GIFs are quite hilarious.
● Know Your Meme
This site uses the Wiki software to stock an inventory of classic GIFs and memes. Using this database for GIF downloads means that you don’t need to compromise on content and image quality. The site contents are periodically updated to ensure that visitors are not exposed to stale and outdated content.
Key Features
● The site offers fresh content having catchy and latest GIFs.
● This is a complete storehouse of GIFs and memes that can definitely keep you rolling.
● The site comes as a free tool and gas a user cohesive interface
● It hast the most efficient search filters that are regularly improvised to ensure quality content delivery.
● Key Takeaways from This Episode →
● GIFs are an effective and captivating means of quality content sharing and message delivery. Take them as a hilarious entertainment source or use them to enhance your marketing policies, GIFs can do it all.
● Influenced by the user credibility of GIFs, there are loads of GIF creator and download tools available online; among which Filmora by Wondershare is the current market leader. You can use this app to explore your GIF editing skills or download and share latest GIFs across media sharing platforms.
Stay tuned to find the most affordable GIF creator solutions.
In this article
01 [Why Gifs Are Essential for Every Marketer?](#Part 1)
02 [How to Make Your Own GIF?](#Part 2)
03 [What Are 10 Best GIF Creator to Find Brilliant Pre-made Gifs?](#Part 3)
Part 1 Why Gifs Are Essential for Every Marketer?
Everyone around you today is accustomed with the fact that GIFs are an interesting and impactful means of content sharing. These 3-5 second snippets are highly preferred and convenient ways to deliver information that is precise, clear and to the point. When it comes to time frames, short and quick GIFs are obvious choices over lengthy videos. Additionally, GIFs are eye-catchy and keep you captivated to see though the entire content within seconds, contradictory to those monotonous and often dull videos that sound more like a long, boring lecture.
These are an effective media tool that is not limited to sharing information that is chiefly entertainment based or fun centered. You can use them to deliver important content that addresses a specific purpose or audience. Owing to this, GIFs have become an essential marketing utility, here’s why:
● Improve Product Branding:
GIFs can serve as impressive branding tools for your products in the market. Markets today are considerably impacted by the ‘What You See is What You Buy’ concept, which puts forward the need to lay added stress on effective branding.
GIFs are ready to sort this out with their exciting range of features. From video editing choices to sound and color customization, GIFs are loaded with everything you need to improvise your product branding. All you have to do is explore your creativity to make the most of the GIF branding choices.
● Explain it Better
On a preference poll, most of us would shift to ‘watch’ over ‘read’ for a comprehensive understanding. An attractive motion visual is an even better treat. GIFs are pivotal in making viewers relate to the concept and message behind your product in a more enhanced manner.
Additionally, these are a continent means to introduce emotional mobility among your target audience with depictive emojis. You can use GIFs to develop effective content approaches to make the audience connect with your product viability, both practically band emotionally.
● Increase Visitor Attraction
Today’s changing times have brought about a rapid outlook towards everything. All of us are bounded by time constraints and when browsing the web, the prime need is to look for quick and accurate solutions to everything concerned.
Short and exact information delivery of GIFs is something that would keep visitors glued to your site because they will be assured of getting exactly what they search for and that too in an interesting and entertaining way.
Part 2 How to Make Your Own GIF?
Now that you are familiar with the creative marketing credibility of GIFs, you might naturally feel motivated towards creating a GIF of your own. In case you are, see through the following section of this article to find out interesting ways of creating interesting and catchy GIFs, either for impressive product marketing or just to make your social media posts leave your community peers in awe!
Looking for the best GIF creator solutions on the web, you can rely on GIPHY, one of the most preferred and convenient databases to create GIFs quickly. This is a smartphone compatible tool and works well with almost any device. Follow the steps given below to make GIFs with this tool:
Step 1:
Download and install the GIPHY app in your device.
Step 2:
Click on ‘Create’ in the app’s welcome screen. This will change (+) icon at the top-right corner to the ‘Camera’ symbol. You can also navigate to the ‘Profile’ at the bottom-right and tap the (+) or ‘Camera’ icon in the app’s account page.
Step 3:
Click on ‘Allow Camera Access’. You will receive two successive prompt messages from the app. Click on ‘Allow’ to grant access permissions to your device media. When you are done, click on ‘I Agree’.
Step 4:
GIFHY uses your device’s front camera for GIF creation. However, if you need to go for a camera switch, click on the ‘Camera’ sign at the bottom-right.
Step 5:
Choose a desired filter and effect for your GIF with a left or right swipe on the live feed toolbar. The app has 11 amazing and realistic effects, including VHS Static, 3D Glasses, etc.
Step 6:
You can take up either of the following:
Press either of the ‘Filter’ or ‘Effect’ buttons to take static shots to create GIF from images, or press and hold the same to create animated GIF. For simply using effects, tap the white button.
In case you choose to create a motion GIF, the app forms a ‘visual timer’ around the editor screen. The motion recording stops once the line is in sync with the screen edges.
Step 7:
Having captured your perfect shot, you have the liberty to merge it with an image or video. However, do consider the following options to add some more elements to your capture: You can add relatable text in 9 color choices.
● Enhance your graphic presentation with 8 amazing effects like, ‘rainbow overlays’, BW film grains, etc.
● Choose from a never ending list of suitable stickers to add the feel through connect to your GIFs.
● Trim your animated GIFs to the ‘just perfect’ portion by adjusting the editing markers.
Relax; that’s no rocket science. Just tap on the respective buttons and there you go!
Step 8:
Set your GIF in a desired size frame by choosing the ‘Crop’ tool from the top-right corner of the editing screen. You are given a size flexibility of 1:1, 3:2, 16:9, 4:5 and 9:16.
Step 9:
Once you are satisfied with your creation, tap the ‘Right Arrow’ icon. In the interface that follows, add suitable share tags to the GIF.
Step 10:
Tap ‘Share GIF’ to post your creation on social media platforms or share it through popular IM apps. To save your initially captured clip, click on ‘Save Video’ or tap ‘Save GIF’ to save your creation in your smartphone’s memory.
Part 1 What Are 10 Best GIF Creator to Find Brilliant Pre-made Gifs?
Having talked about GIF creation on the go, let’s take a dive into the best GIF creator solutions that are a storehouse of exciting pre-made GIFs. When browsing the web for an affordable GIF maker tool, you land across a pool of choices. Read through the further sections of this article to find out what’s best for you.
Described below are 10 best alternatives to get amazing pre-made GIFs:
● Wondershare Filmora Video Editor
This one is a popular, preferred and top rated application where you get to choose from an exciting range of pre-made GIFs under a variety of specific categories. All you need to do is, visit the app’s official site, browse to your favorite GIF category and select a desired GIF. Follow a few app instructions to save your selection and that’s it! Your selected GIF reaches your device memory within seconds.
Wondershare Filmora - Best Video Editor for Mac/Windows
5,481,435 people have downloaded it.
Build unique custom animations without breaking a sweat.
Focus on creating epic stories and leave the details to Filmora’s auto features.
Start a creative adventure with drag & drop effects and endless possibilities.
Filmora simplifies advanced features to save you time and effort.
Filmora cuts out repetition so you can move on to your next creative breakthrough.
Key Features
● This app is available to you absolutely free of cost.
● Has an intelligent and user cohesive interface.
● Loaded with tons of brilliant GIFs to choose from.
● The app supports GIF customization.
● GIFHY
Launched in 2013, this one is probably the best GIF maker and downloader tool available on the web today. It is a free tool, packed with enormous varieties of GIFs to choose from. What’s more interesting about the app is that you are free to play with your editing creativity to enhance your downloaded GIFs in the GIPHY editor.
Key Features
● It comes with an easy to use, convenient interface.
● You can edit downloaded GIFs with hundreds of effects and filters.
● The app provides you a direct sharing platform, allowing you to post GIFs to various social media platforms and also go for sharing via Instant Messaging applications.
● This is a fast processing tool that allows you to escape the notch of annoying and delayed download processes.
● Tenor
You can conveniently regard this one as the closest competitor to the GIPHY GIF creator and downloader tool. Needless to say, both are quite similar to each other in interface and usage respects. However, focusing on search results for a common keyword, you find diverse variations to your obvious surprise.
Key Features
● This is a free to use, interactive interface tool.
● It introduces a GIF Keyboard that allows you to search the most specific and relatable GIFs.
● It ensures a speedy and high quality GIF download.
● You can explore your editing skills to your heart’s content to improvise the downloaded GIFs with this tool.
● This tool gives you the liberty to directly share GIFs across different platforms.
If you like to spend ample time on choosing what’s perfect for you, refer this online tool for your GIF download solutions. It caters to your love of diversity with the most deep rooted and broad GIF range. However, this one comes with a little messy interface, demanding some patience from you to get to the right thing.
Key Features
● This tool provides you with almost all possible choices for a GIF category.
● It is available to you free of cost
● The tool site is loaded with rich and quality GIF content.
● This one is a direct save and export tool for your downloaded GIFs.
● Gfycat
You can prefer this one as a GIF hosting tool. Developed with a view to launch a common medium for GIF and HTML contents, this app ensures in-time and hassle free downloads and delivery. Though lacking a refined search bar, this tool promises you of excellence in content quality.
Key Features
● This comes to you as one of the most reliable GIF hosting tools.
● It is a free and quick content delivery tool.
● You are allowed to select the most suitable one from a variety of playback choices.
● This tool also gives you the flexibility of direct media sharing.
● GIFbin
If you are hung-over decade old nostalgia and the fever doesn’t seem to go away, you can check this site for some really satisfying retro and other similar content. This would definitely make you take a toll back to the times when MSN and Limewire were unparalleled market leaders in content sharing.
Key Features
● GIFbin is a storehouse of the best animated GIFs, that is on a continuous update to facilitate fresh and quality based content, every time you visit the site.
● It has an advanced, API enabled search mechanism.
● It boasts of having the handiest and convenient user interface.
● If you prefer GIFs of the comic genre, this tool is heaven for you.
● Imgflip
This is another GIF download site, commonly preferred for comedy and fun oriented content. Using this site, you can download and create a variety of GIF based memes that have the potential to flood your social media posts with likes and comments. This one is a complete GIF basket, suited to vast content varieties and user preferences. You will find the site’s official watermark on all its contents.
Key Features
● The site stands among the most preferred GIF-meme creation and sharing platforms.
● The tool is packed with loads of quality content under specific categories
● You can improvise the dimensions of your editing skills to modify downloaded GIFs.
● This site has a default media export feature that you can use to share your GIFs on social media.
● Imgur
Launched in 2009, this is among the most visited GIF sites, originally created for sharing meme based contents on social media. Its extensive search filters are dedicated to fetch the exact GIFs and memes you are looking for. If you are tired of browsing sites for particular content requirements, your search spree will definitely end here.
Key Features
● The site is known for its extensive and diversified content quality.
● It is a free, convenient and dependable GIF download tool.
● Imgur is highly preferred for content export across various media platforms.
● It is equipped with an advanced and updated search filter that assures you of getting fresh and top quality GIFs on almost every possible keyword.
● Tumblr
Claiming a launch date of 13 years back, this is quite a good GIF download option. You can find excellent quality GIF content on the site, particularly in the comic genre. Though not as popular as its online counterparts today, the site definitely enjoyed commendable visitor preferences at the time of its launch. You can certainly visit this site for a filling entertainment dose.
Key Features
● Tumblr is a free download site with a user friendly interface.
● The site is loaded with notable content varieties.
● You can go for direct media sharing through this site.
● Its comic GIFs are quite hilarious.
● Know Your Meme
This site uses the Wiki software to stock an inventory of classic GIFs and memes. Using this database for GIF downloads means that you don’t need to compromise on content and image quality. The site contents are periodically updated to ensure that visitors are not exposed to stale and outdated content.
Key Features
● The site offers fresh content having catchy and latest GIFs.
● This is a complete storehouse of GIFs and memes that can definitely keep you rolling.
● The site comes as a free tool and gas a user cohesive interface
● It hast the most efficient search filters that are regularly improvised to ensure quality content delivery.
● Key Takeaways from This Episode →
● GIFs are an effective and captivating means of quality content sharing and message delivery. Take them as a hilarious entertainment source or use them to enhance your marketing policies, GIFs can do it all.
● Influenced by the user credibility of GIFs, there are loads of GIF creator and download tools available online; among which Filmora by Wondershare is the current market leader. You can use this app to explore your GIF editing skills or download and share latest GIFs across media sharing platforms.
Create a Kickass COD Warzone Thumbnail for Free
Gaming is a popular video category. And COD: Warzone is one of the most popular games nowadays. That said, many gamers flock to video streaming websites to watch Warzone gameplays. And there are so many of them, and the competition for views is tough. So you must use all you can to win that battle. Your Warzone thumbnails, titles, and videos themselves must be on point.
With kickass thumbnails, the eyes of users searching for Call of Duty: Warzone videos will be attracted to your content. If your content is good, that will convert to an increase in views and subscribers.

How To Make an Impressive Warzone Thumbnail for Free
We have clarified how important a Warzone thumbnail that pop is. But how to make one? That’s what this article is for. Here, you will learn how to create impressive Warzone thumbnails for free. That’s right - FOR FREE.
Without further ado, here are the steps that you should follow:
Step1 Download & Install an Excellent Warzone Thumbnail Maker
Of course, the first step is to find good software for making thumbnails. But there is no thumbnail maker specifically made for Warzone. So, the best choice is a thumbnail maker that is also a video editor - like Wondershare Filmora .
Free Download For Win 7 or later(64-bit)
Free Download For macOS 10.14 or later
Admittedly, Wondershare Filmora has premium plans. But you can download it for free. Additionally, you can use the free trial version to create video thumbnails without upgrading to the paid version. So essentially, Wondershare Filmora is a free Warzone thumbnail maker. The best part is that you can use some of Filmora’s other features to make the thumbnail as cool as possible.
Step2 Take a Snapshot of Your Call of Duty Warzone Game
Using in-game screenshots is recommended. That way, the image is personalized and can’t be found anywhere else. Unfortunately, COD: Warzone does not have an in-game functionality for screenshots. So, you have to get the image using other means. You can use the following keyboard shortcuts to grab a screenshot:
- Using Windows’ Game Bar - Windows key + ALT + PrintScreen
- NVIDIA’s Shadow Play - ALT + Z
- Windows Screenshot - Windows + PrintScreen
Step3 Create a Project, Set Project Ratio & Import the Snapshot
- Download and launch Wondershare Filmora.
- Click “New Project.”

- Click “File” button. In the drop-down menu, select “Project Settings.”

- In the pop-up window, set the resolution to 1280*720, which is the recommended resolution of YouTube Thumbnail.
- Drag and drop the screenshot you took into the Filmora window. Alternatively, click the “Click here to import media” link to locate and import it.

Step4 Drag the Media to the Timeline, Add Effects, Stickers & Texts
- Drag the image from the Project Media section into the timeline.

- Click “Effects.” Select an effect to use and drag it into the timeline.
- Click “Stickers.” Select stickers to use and drag them into the timeline.

- Add Text overlays to the video. To do so, click “Titles.” Select the text style and drag it into the timeline. Double-click it to edit the written text.
Step5 Find a Desired Frame and Take a Screenshot
- Play the video preview.
- Pause the video when you see the best frame to use as the thumbnail.
- Click the “Camera” icon below the video preview to take a snapshot.

- Select a file format and a target destination folder for the image.

- Click “Ok.”
Step6 Use the Screenshot as Your New COD Warzone Thumbnail
- The screenshot will appear in the Project Media section in Filmora. Right-click the image.
- Click “Reveal in Explorer.” It will open the folder where the screenshot is saved.

- Use the screenshot as your video thumbnail.

![]()
Note: The free version of Wondershare Filmora will add a watermark to saved videos. But it will not add a watermark to a snapshot. Indeed, it is a free Warzone thumbnail creator.
If you want to know more tricks about creating a nice Warzone thumbnail, please check the video below:
Tips for a Superb Call of Duty: Warzone Thumbnail
A thumbnail is useless if it does not look good on YouTube. But how can you ensure it looks good on YouTube? That’s a good question. Actually, the YouTube help center gave pointers on how your video thumbnail should be. These are the five important things you should know about:
- The Warzone thumbnail size should be at least 640 pixels wide.
- YouTube thumbnail dimensions use an aspect ratio of 16:9.
- Your Warzone thumbnail should not exceed 2MB.
- The best size for YouTube video thumbnails is 1280 pixels by 720 pixels.
- The supported image formats are JPG, PNG, and GIF.
The next question is how the actual thumbnail image should look. There’s only one rule for that. Make it as cool as possible. Call of Duty: Warzone is a first-person shooter/battle royale game. People who are into these games are drawn to this aesthetic.
5 Best Call of Duty: Warzone Thumbnails on YouTube That May Inspire You
Research is always key to accomplishing something. If you want to create kickass COD: Warzone video thumbnails, you should look at the ones that worked. Visit YouTube and find videos that have great success. That will help you get some ideas for your thumbnails.
Let us help you with that. Here are 5 Call of Duty: Warzone thumbnails you should check out.
1. Call of Duty Warzone: THE BATTLE OF VERDANSK GAMEPLAY! (No Commentary)

This video from the channel NoAnnoyingCommentary has 3.3 million views. It shows the player pointing their gun upwards. Flying in the sky are many fighter planes (obviously edited.) Then, a sepia filter is applied to make it look like a shot from past real-world wars. It is cool and sure to attract the attention of the COD: Warzone demographics.
2. TOP 300 FUNNIEST FAILS IN WARZONE

This video is made by Red Arcade . It has attracted more than 12 million views. Admittedly, the title and the video concept are already enough to attract many viewers. But we can’t say that the thumbnail did not help. It’s actually really good.
The thumbnail shows a screenshot from Warzone. A player’s character is in the middle, with his back facing the camera. The words “AFK. Don’t shoot!” are written on the wall he is facing. The character is viewed through a sniper scope. It’s more “funny” than cool. But for what the video is about, it works fantastic.
3. Clean House [PS5 UHD 4K] Next-Gen Ultra Realistic Graphics PlayStation 5 Call of Duty Gameplay

This video from HEDGEHOG ヅ has a whopping 12 million views. Again, the title likely is the main reason why it got that many views. But for sure, people did not read that long title at first. They were drawn to it by the thumbnail.
The thumbnail shows a clear-as-crystal screenshot of a team of 4 players on the battlefield. At the top left corner is the PS5 logo. Then, at the bottom left is an icon that says the video is in 4K UHD. If you’re also uploading 4K Warzone videos, you can try doing this. Users are attracted to videos that are eye-pleasing.
4. Call of Duty: Warzone Battle Royale | RTX 3080 10GB ( 4K Maximum Settings Ray Tracing OFF )

The thumbnail for this video (made by GTX 1050 Ti ), with 5.2 million views, is just an in-game screenshot. At the top-right is a large logo of GEFORCE RTX 3080 and at the bottom left is an Intel logo. Like the previous one, it attracts viewers by stating the visual appeal of the video.
5. NEW RECORD! 64 KILL GAME in CoD WARZONE! (Best Classes / Loadouts)

Like most Warzone thumbnails, this thumbnail from a Vikkstar123 video features a gun. At the top right is the victory banner, and at the bottom is the logo for kills with the number 64 next to it. The top right shows the logo of COD Warzone.
Players are attracted to amazing gameplay. Unsurprisingly, the player who got 64 kills got 3.1 million views in his video. The gist is that if you have achieved something amazing, try to incorporate it into the thumbnail.
Conclusion
Using in-game screenshots is recommended for making amazing COD Warzone thumbnails. But you should not use raw photos. You must edit them to ensure they have visual appeal. Of course, that means you need a good thumbnail maker.
Your best option is Wondershare Filmora. Why? Because it is a thumbnail maker and video editing software in one. Also, it allows you to make thumbnails for free! What could be better than that?
Free Download For macOS 10.14 or later
Admittedly, Wondershare Filmora has premium plans. But you can download it for free. Additionally, you can use the free trial version to create video thumbnails without upgrading to the paid version. So essentially, Wondershare Filmora is a free Warzone thumbnail maker. The best part is that you can use some of Filmora’s other features to make the thumbnail as cool as possible.
Step2 Take a Snapshot of Your Call of Duty Warzone Game
Using in-game screenshots is recommended. That way, the image is personalized and can’t be found anywhere else. Unfortunately, COD: Warzone does not have an in-game functionality for screenshots. So, you have to get the image using other means. You can use the following keyboard shortcuts to grab a screenshot:
- Using Windows’ Game Bar - Windows key + ALT + PrintScreen
- NVIDIA’s Shadow Play - ALT + Z
- Windows Screenshot - Windows + PrintScreen
Step3 Create a Project, Set Project Ratio & Import the Snapshot
- Download and launch Wondershare Filmora.
- Click “New Project.”
- Click “File” button. In the drop-down menu, select “Project Settings.”
- In the pop-up window, set the resolution to 1280*720, which is the recommended resolution of YouTube Thumbnail.
- Drag and drop the screenshot you took into the Filmora window. Alternatively, click the “Click here to import media” link to locate and import it.
Step4 Drag the Media to the Timeline, Add Effects, Stickers & Texts
- Drag the image from the Project Media section into the timeline.
- Click “Effects.” Select an effect to use and drag it into the timeline.
- Click “Stickers.” Select stickers to use and drag them into the timeline.
- Add Text overlays to the video. To do so, click “Titles.” Select the text style and drag it into the timeline. Double-click it to edit the written text.
Step5 Find a Desired Frame and Take a Screenshot
- Play the video preview.
- Pause the video when you see the best frame to use as the thumbnail.
- Click the “Camera” icon below the video preview to take a snapshot.
- Select a file format and a target destination folder for the image.
- Click “Ok.”
Step6 Use the Screenshot as Your New COD Warzone Thumbnail
- The screenshot will appear in the Project Media section in Filmora. Right-click the image.
- Click “Reveal in Explorer.” It will open the folder where the screenshot is saved.
- Use the screenshot as your video thumbnail.
![]()
Note: The free version of Wondershare Filmora will add a watermark to saved videos. But it will not add a watermark to a snapshot. Indeed, it is a free Warzone thumbnail creator.
If you want to know more tricks about creating a nice Warzone thumbnail, please check the video below:
Tips for a Superb Call of Duty: Warzone Thumbnail
A thumbnail is useless if it does not look good on YouTube. But how can you ensure it looks good on YouTube? That’s a good question. Actually, the YouTube help center gave pointers on how your video thumbnail should be. These are the five important things you should know about:
- The Warzone thumbnail size should be at least 640 pixels wide.
- YouTube thumbnail dimensions use an aspect ratio of 16:9.
- Your Warzone thumbnail should not exceed 2MB.
- The best size for YouTube video thumbnails is 1280 pixels by 720 pixels.
- The supported image formats are JPG, PNG, and GIF.
The next question is how the actual thumbnail image should look. There’s only one rule for that. Make it as cool as possible. Call of Duty: Warzone is a first-person shooter/battle royale game. People who are into these games are drawn to this aesthetic.
5 Best Call of Duty: Warzone Thumbnails on YouTube That May Inspire You
Research is always key to accomplishing something. If you want to create kickass COD: Warzone video thumbnails, you should look at the ones that worked. Visit YouTube and find videos that have great success. That will help you get some ideas for your thumbnails.
Let us help you with that. Here are 5 Call of Duty: Warzone thumbnails you should check out.
1. Call of Duty Warzone: THE BATTLE OF VERDANSK GAMEPLAY! (No Commentary)
This video from the channel NoAnnoyingCommentary has 3.3 million views. It shows the player pointing their gun upwards. Flying in the sky are many fighter planes (obviously edited.) Then, a sepia filter is applied to make it look like a shot from past real-world wars. It is cool and sure to attract the attention of the COD: Warzone demographics.
2. TOP 300 FUNNIEST FAILS IN WARZONE
This video is made by Red Arcade . It has attracted more than 12 million views. Admittedly, the title and the video concept are already enough to attract many viewers. But we can’t say that the thumbnail did not help. It’s actually really good.
The thumbnail shows a screenshot from Warzone. A player’s character is in the middle, with his back facing the camera. The words “AFK. Don’t shoot!” are written on the wall he is facing. The character is viewed through a sniper scope. It’s more “funny” than cool. But for what the video is about, it works fantastic.
3. Clean House [PS5 UHD 4K] Next-Gen Ultra Realistic Graphics PlayStation 5 Call of Duty Gameplay
This video from HEDGEHOG ヅ has a whopping 12 million views. Again, the title likely is the main reason why it got that many views. But for sure, people did not read that long title at first. They were drawn to it by the thumbnail.
The thumbnail shows a clear-as-crystal screenshot of a team of 4 players on the battlefield. At the top left corner is the PS5 logo. Then, at the bottom left is an icon that says the video is in 4K UHD. If you’re also uploading 4K Warzone videos, you can try doing this. Users are attracted to videos that are eye-pleasing.
4. Call of Duty: Warzone Battle Royale | RTX 3080 10GB ( 4K Maximum Settings Ray Tracing OFF )
The thumbnail for this video (made by GTX 1050 Ti ), with 5.2 million views, is just an in-game screenshot. At the top-right is a large logo of GEFORCE RTX 3080 and at the bottom left is an Intel logo. Like the previous one, it attracts viewers by stating the visual appeal of the video.
5. NEW RECORD! 64 KILL GAME in CoD WARZONE! (Best Classes / Loadouts)
Like most Warzone thumbnails, this thumbnail from a Vikkstar123 video features a gun. At the top right is the victory banner, and at the bottom is the logo for kills with the number 64 next to it. The top right shows the logo of COD Warzone.
Players are attracted to amazing gameplay. Unsurprisingly, the player who got 64 kills got 3.1 million views in his video. The gist is that if you have achieved something amazing, try to incorporate it into the thumbnail.
Conclusion
Using in-game screenshots is recommended for making amazing COD Warzone thumbnails. But you should not use raw photos. You must edit them to ensure they have visual appeal. Of course, that means you need a good thumbnail maker.
Your best option is Wondershare Filmora. Why? Because it is a thumbnail maker and video editing software in one. Also, it allows you to make thumbnails for free! What could be better than that?
Also read:
- In 2024, Fixes | What If YouTube Zoom to Fill Not Working?
- New In 2024, How to Find a High-Quality Video Marketing Agency?
- New 2024 Approved Create Kinetice Typography Text Effect in Filmora
- Detailed Guide to the Best Convertors for Turning GIF Into PDF Files. Know Their Features, Pros, Cons, and More for 2024
- New 2024 Approved Do You Want to Give Your Videos and Photos a Cinematic Look but Couldnt Find How? Here Are Different Cinematic LUTs Discussed that You Can Try and Use
- Updated Want to Add a Motion Blur Effect to Your Photos? This Step-by-Step Tutorial Will Show You How to Use GIMP Software to Get the Effect You Want
- Updated In 2024, Doable Ways to Create Transparent Background in Procreate
- Updated Bandicut Video Editor Download and Review for 2024
- Updated Do You Want to Know How to Edit a Time Lapse Video on iPhone, Interesting Ideas, and some Tips and Pointers for Shooting a Professional Time Lapse Video? Find Out Everything in This Guide
- New In 2024, 10 Top Free GIF Background Remover for PC and Online
- Making a Countdown Timer Video Like a Pro Isnt a Problem Anymore. Follow the Steps Mentioned in This Guide and Create an Impressive Countdown Timer for Your Videos
- New In 2024, How to Create a Freeze Frame Sequence Effect
- Updated A Detailed Guid to Remove Background From a Video in Premier Pro
- A Review On 3D LUT Creator for 2024
- Replacing the Sky in Adobe After Effects An Extensive Guide for 2024
- New In 2024, Best AR Video App - Top 10 Picks
- New How to Cut Videos on Mac without Using FFmpeg for 2024
- New 2024 Approved A Guide to Effective Video Marketing
- New How to Make a YouTube Intro by Filmora
- Updated 2024 Approved REVIEW Whats Top 10 Software to Make AI Upscaling Video
- How to Repair corrupt MP4 and MOV files of Realme Narzo 60 5G using Video Repair Utility on Windows?
- How to Lava Yuva 2 Get Deleted Pictures Back with Ease and Safety?
- Top 5 Tracking Apps to Track Realme Note 50 without Them Knowing | Dr.fone
- Best Methods for Poco X5 Pro Wont Turn On | Dr.fone
- How To Use Allshare Cast To Turn On Screen Mirroring On Itel P55 | Dr.fone
- How to Access Your iPhone XS When You Forget the Passcode? | Dr.fone
- How To Recover Lost Data of iPhone 15 Plus? | Dr.fone
- In 2024, Does Life360 Notify When You Log Out On Vivo G2? | Dr.fone
- In 2024, A Working Guide For Pachirisu Pokemon Go Map On Meizu 21 | Dr.fone
- In 2024, The Ultimate Guide to Get the Rare Candy on Pokemon Go Fire Red On Vivo Y55s 5G (2023) | Dr.fone
- In 2024, 3 Ways to Track Asus ROG Phone 7 Ultimate without Them Knowing | Dr.fone
- In 2024, Android to Apple How To Transfer Photos From Infinix Smart 8 to iPad Easily | Dr.fone
- In 2024, Hassle-Free Ways to Remove FRP Lock on Vivo Y27 4Gwith/without a PC
- Title: New 2024 Approved Final Cut Pro Is a Video Editing Software Exclusive to Apple Devices. It Features Numerous Editing Tools and Video Effects, Enabling You to Produce Quality Creations Every Time. Keep Reading to Discover How to Apply the Final Cut Pro Camera Shake Effect
- Author: Morgan
- Created at : 2024-04-24 01:09:36
- Updated at : 2024-04-25 01:09:36
- Link: https://ai-video-editing.techidaily.com/new-2024-approved-final-cut-pro-is-a-video-editing-software-exclusive-to-apple-devices-it-features-numerous-editing-tools-and-video-effects-enabling-you-to-/
- License: This work is licensed under CC BY-NC-SA 4.0.
