
:max_bytes(150000):strip_icc():format(webp)/GettyImages-541916248-593842a43df78c537be2cf44.jpg)
New 2024 Approved How to Change Quicktime Player Speed on Mac?
| How to Change Quicktime Player Speed on Mac?
Powerful Video Editor - Wondershare Filmora
An easy and powerful editor
Numerous effects to choose from
Detailed tutorials are provided by the official channel
Quicktime Player is an Apple Inc. software that is compatible with all current versions of macOS X as well as Windows.
The user interface of the Quicktime media player is straightforward to navigate. The majority of video formats may be supported, as well. Like VLC, you can quickly speed up or slow down videos with Quicktime player using specific hotkeys or by manually altering the speed of the video.

A broad number of formats may be handled by QuickTime, including music, graphics, and panoramic photography. All of your music and video files will play without a hitch, and it is a fully complete media player.
Many customers buy a Mac computer and instantly install QuickTime, the default video player, under the notion that it is a basic video player with few additional functions. In fact, the QuickTime player has a slew of hidden functions that are pretty useful, but only a few people are aware of it. The option to increase the Quicktime player speed is one of these hidden features’ which is most popular and helpful. This is particularly true if you have to sit through a presentation or lecture.
How to Speed up Videos in Quicktime Player?
If you want to watch your movies on Quicktime player as quickly as possible, go with a long-term solution. The pace of the clip may be raised or lowered from the toolbar, and the settings of the application can be altered.
Thus, in easy words when you download a video to your Mac, you can control the speed at which it plays back on your computer using Quicktime player.

There are two ways to achieve this goal, one is manually through settings whereas the second way is using hotkeys. Let’s discuss both by understanding how to increase QuickTime player speed manually.
Manually Setting Up Quicktime player speed
- Open the Quicktime player installed on your computer.
- Embedding video within the interface is recommended.
- Go to the Toolbar and choose the Windows tab from the drop-down menu.
- To access the A/V controls, press the A/V Controls button. There will be a dialogue box that appears.
- Locate the Playback Speed option and adjust the speed of the movie by increasing or decreasing it.
- Close the box and go to watch the video in its entirety.
Speeding Up playback Speed Quicktime Using Hotkeys
- There isn’t a special hotkey for Quicktime that allows you to speed up or slow down the video. Using your mouse and keyboard, on the other hand, you may do the task in an instant.
- Open the video in the Quicktime Player on your computer by clicking on it.
- Play the video clip, and then hit the “OPTIONS” key on your keyboard to stop it.
- Press the Fast Forward button on the player and the left mouse button at the same time. It will speed up the pace at which the video is played back.
- The tap will cause a 1.1x choice to appear at the top of the screen.

Increasing the speed is accomplished by repeatedly clicking until the desired speed is achieved.
However, keep in mind that there has been a glitch that has existed for years that causes the audio to stop working after you reach 2x speed. To get around this problem, just accelerate to 1.9x and then stop.
If you come across anything you like and want to view it again, you may stop the video by pressing the space bar twice. However, pressing the spacebar will cause the playing speed to be reset.
How to Slow Down Videos in Quicktime Player?
When viewing a movie on your Mac, you may discover that you need to slow it down on a frequent basis. You may discover a range of slow down video editing tools that can help you slow down a video on the internet. Furthermore, various video players may be able to let you quickly slow down your movie. QuickTime Player is one of those programs that may be customized to your individual needs.
We sometimes overlook the enormous capacity inherent inside the dependable and dependable QuickTime Player. QuickTime contains a number of key capabilities meant to help you deal with your media files and play video and audio files.
Steps to follow to slow down Quicktime Player speed
Like speeding up the QuickTime playback speed, the users can simultaneously slow down the playback speed as well. It can be done manually and through the use of specific keys already present on the keyboard.
Manual Setup
In order to manually slowdown QuickTime video, follow the below-mentioned steps:
- Launch the Quicktime player application
- Click on “File” and choose the video which is already saved or downloaded on your MAC.
- Once the video is loaded in the Quicktime player, click on “View” on the toolbar on the top.
- As you click on “View”, a drop-down menu will appear. Locate the “Playback speed” option from the drop-down menu.

- When you click on “Playback speed”, another dialogue box will appear right next to the drop-down menu, which will have options regarding the playback speed.

- Click on “Half speed” and press the play button to watch the video with a slower playback rate.

Slowdown QuickTime speed using Hotkeys
- Open the video or the clip you want to watch.
- If Quicktime is your default player, the video loads in it.
- Otherwise, launch the QuickTime application
- By clicking on “Open”, choose your specific clip or video.
- Once the video is loaded, press the ““OPTIONS”” key next to cmd and simultaneously press the rewind button on the task bar of Quicktime. It starts to slow down the playback speed of the video.
What If Quicktime Player Speed up With No Sound?
No sound may be heard when the video is played back if it was encoded in a format that QuickTime cannot understand. Verifying your QuickTime installation is the most obvious way to find out whether it has decoded all of the video files. Let’s investigate the issue to its root.
Updating Your Quicktime to the Latest Version
The user must carefully study the QuickTime player. For some reason, your QuickTime behaviour is out of whack.
People often neglect to keep their QuickTime software up-to-date, which results in problems with video playback, such as no sound or stuttering, among many other things. To fix this issue, just download and install the most latest release of QuickTime player.
Examine the System and Driver
Faulty speakers, audio issues in the system, and update failures will ultimately cause media playback difficulties.
To find the root cause, you should first check internally to see whether your speakers are working correctly. Speaking straight to Siri and hearing her reaction is the fastest and most straightforward option.
Another reason you may be hearing no sound on QuickTime is because of a recent system update. Apple, as we all know, often releases new operating systems, and you must keep track of the most current versions of updates in order to keep your system running effectively.
You just need to ensure that your machine is running the most recent version. As a result, your system will resume regular functioning, and QuickTime will be immediately fixed and restored.
Inspect if the File is Corrupted or not
Checking the file to see whether it has been corrupted is a good idea regardless of whether QuickTime and your system are up and running. To make matters worse, the lack of sound in QuickTime will be the consequence of a corrupted video file.
Try opening the file in a different programme or player to see if the issue may be resolved. If this is the case, your source video file is either destroyed or corrupted. You may wish to consider regaining access to the file in this situation. The likelihood of your file being corrupted by malware or a virus is relatively high. Remember to be patient if this does happen to you.
It is necessary to use third-party repair programmes to successfully fix the file. Consequently, using third-party software to recover and restore the source file should be considered if you are in a situation where the source file is crucial and do not have a backup. As we’ll see, there are a number of options available, including Filmora.
How to Play Videos at 2X Speed with Sound in Quicktime?
Follow the below-mentioned steps to play video at 2x speed with sound in Quicktime:
- Launch QuickTime.
- Click on Edit, which is located on the toolbar on the top. A drop-down menu will appear.
- From the drop-down menu, click on QuickTime Preferences.
- Then select Audio from the dialogue box.
- Then moving forward, change the music synthesizer to Promethean Audio Device, Promethean USB Audio or USB Audio Device. These options might vary depending on the user’s specific hardware.
- Click on Apply and then OK.
Use Quick Time Features in Filmora
What is Wondershare Filmora?
For users to quickly and easily create high-quality films using a variety of sophisticated editing tools, Wondershare Filmora provides an extensive set of powerful tools for video editors. Wondershare Filmora’s user-friendly interface makes it easy for anybody to become an expert video editor on Mac .
In addition to the usual video effects, Wondershare Filmora provides filters, animated components, and other video effects. In order to alter a movie, you may use filters and overlays to add a variety of effects and graphic overlays. There are several options for titles, openers, and bottom thirds to pick from in Wondershare Filmora.

Using Wondershare Filmora’s drag and drop, users may include moving graphics into their movies. Additionally, users may quickly combine many videos and photographs and choose the good royalty-free music from a wide range of options, all in one spot.
Among the many functions offered by Wondershare Filmora include the ability to edit in 4K and GIF format, noise reduction and colour correction, and an advanced text editor and an audio mixer. A wide range of operating systems can run Wondershare Filmora.
Although there are many other video editors out there vying for attention, Wondershare has been one of the few that has managed to stay relevant in an increasingly competitive industry saturated with old and new video editors all competing for the same consumer base.
Unique and Distinct Features of Filmora
Software is not nearly as good if it does not have the appropriate set of functionalities, and most users will not bother to use it if it does not include these features. Listed here are the most eagerly anticipated features of Filmora’s latest version:
Motion Tracking
The Motion Tracking module enables you to identify an object or point inside a video and then have the computer track that object or point to generate a moving path.
It allows you to capture the motion of a moving object in the frame and add text, subtitles, effects, and other components to the frame that follow the moving object’s motion as it moves around the screen. After you’ve constructed that path, you may link any other item to it and have it follow the initial object.
Colour Matching Feature
This team has always considered that Filmora’s colour grading and correction tools were excellent, but their most recent addition to the ‘Color Matching’ program has garnered them even more praise.
Colour matching is crucial when trying to merge several video images obtained by two different cameras. In this semi-automated module, you may match video from multiple sources or footage acquired at different times of day with one another.
Keyframing Feature
Keyframing is an essential feature for users who wish to boost the appeal of their video by incorporating critical animation sequences throughout the film.
It enables you to create custom animations and have fine-grained control over the effects you apply to your projects via the use of keyframes.
Keyframing becomes critical when creating special effects, custom title cards at the beginning or middle of a film or conjuring precise paths for visuals or picture-in-picture movies to follow.
Audio Ducking
Audio ducking is a method used in video editing and production that allows the narrator’s voice to be heard consistently and clearly over other sounds on the recording that are happening at the same time, such as background music, without being dominated.
Transitions and Vast Amount of Effects
Over 300 special effects, objects, overlays, transitions, and music and audio effects are available whenever and wherever you need them. The bundle includes 25 sound effects and 26 royalty-free recordings, making it a complete package.
Then there are 176 transitions, each of which may be customized to liven up your project. You may also alter and manipulate visuals and text to make your project more aesthetically appealing.
Hardcore Video Editing
Moving on to the heart of this application, Filmora latest version’s video editing features are both excellent and user-friendly. [pagebreak] The editing options in Filmora are comprehensive, with the most noticeable being cutting, audio manipulation, transition creation, visual effects, and a plethora of additional features and functions.
The above editing functions are simple to carry out by selecting a specific section of the video on your timeline, double-clicking it, waiting for it to appear in the preview section, and then applying effects and transitions, adding audio, stabilizing and correcting the video using any of the editing options available to you.
Simplified Exporting Of Your Masterpiece
Exporting a finished project is as simple as any other activity in Filmora latest version. Indeed, the option to export your completed project is clearly presented on the main page and instantly visible to the human eye. After you’ve completed making changes, all you have to do is click the ‘Export’ button.
How to change video playback speed in Filmora
When using fast-motion/slow-motion effects on a video, the clips are sped up or slowed down in comparison to their original speed.
If you’re looking for a “close up in time,” the slow-motion effect may be the best choice, while the fast-forward effect may be used to produce dramatic or amusing videos.
Filmora is widely praised and utilized by professionals throughout the globe because of its user-friendly design and uncomplicated editing features. For this, it is often chosen over other editing programs.
Steps
Follow the below-mentioned steps to change video speed in Filmora:
- A wide range of video formats is supported by Wondershare Filmora, including MP4 and AVI, WMV and MOV, and FLV and M4V, etc. Enter the media library and click Import to import videos from your PC. The software will use the video files on your computer. Drag and drop is also an option for adding files to the User’s Album.

- Right-click on the video track on the Timeline and then drag movies from your User’s Album into it to access the Speed and Duration choices.

- A pop-up window will be shown. The rapidity or sluggishness of the motion effects is denoted by speed numbers. Then you may go at your own speed. Just click on the preview box to test out effects like sped-up or slowed-down videos. 0.5 speed is a good choice if you think it’s too much.

Video playback speed similarly affects the audio playback speed. Delete the video’s audio if you want to maintain the original playing speed of the video’s audio.
You must first double-click the audio clip in the audio editing window in order to adjust it. Adding and deleting fade in/out effects and reducing background noise are all options.
After you’ve finished adjusting the video speed, click Export. To save your movie in a standard format, just choose Format from the File menu.

It’s also possible to publish your videos to YouTube and Vimeo or create a DVD if you’d like.
Choose Device from the drop-down box and choose the proper symbol to view your new video output on your iPod, iPhone, or iPad.
Conclusion
While watching a movie, you may want the audio to be slower or faster, and you may want to adjust the atmosphere with the help of the music track, either when merely a soundtrack is being played or while a movie is being watched. This article, which includes images, explains in great detail how Mac users can achieve this using playback speed Quicktime. It also explains how to alter the speed at which a video play by in Filmora. Filmora has a variety of easy and advanced editing options, as well as video effects like slow motion and fast motion.
Quicktime Player is an Apple Inc. software that is compatible with all current versions of macOS X as well as Windows.
The user interface of the Quicktime media player is straightforward to navigate. The majority of video formats may be supported, as well. Like VLC, you can quickly speed up or slow down videos with Quicktime player using specific hotkeys or by manually altering the speed of the video.
A broad number of formats may be handled by QuickTime, including music, graphics, and panoramic photography. All of your music and video files will play without a hitch, and it is a fully complete media player.
Many customers buy a Mac computer and instantly install QuickTime, the default video player, under the notion that it is a basic video player with few additional functions. In fact, the QuickTime player has a slew of hidden functions that are pretty useful, but only a few people are aware of it. The option to increase the Quicktime player speed is one of these hidden features’ which is most popular and helpful. This is particularly true if you have to sit through a presentation or lecture.
How to Speed up Videos in Quicktime Player?
If you want to watch your movies on Quicktime player as quickly as possible, go with a long-term solution. The pace of the clip may be raised or lowered from the toolbar, and the settings of the application can be altered.
Thus, in easy words when you download a video to your Mac, you can control the speed at which it plays back on your computer using Quicktime player.
There are two ways to achieve this goal, one is manually through settings whereas the second way is using hotkeys. Let’s discuss both by understanding how to increase QuickTime player speed manually.
Manually Setting Up Quicktime player speed
- Open the Quicktime player installed on your computer.
- Embedding video within the interface is recommended.
- Go to the Toolbar and choose the Windows tab from the drop-down menu.
- To access the A/V controls, press the A/V Controls button. There will be a dialogue box that appears.
- Locate the Playback Speed option and adjust the speed of the movie by increasing or decreasing it.
- Close the box and go to watch the video in its entirety.
Speeding Up playback Speed Quicktime Using Hotkeys
- There isn’t a special hotkey for Quicktime that allows you to speed up or slow down the video. Using your mouse and keyboard, on the other hand, you may do the task in an instant.
- Open the video in the Quicktime Player on your computer by clicking on it.
- Play the video clip, and then hit the “OPTIONS” key on your keyboard to stop it.
- Press the Fast Forward button on the player and the left mouse button at the same time. It will speed up the pace at which the video is played back.
- The tap will cause a 1.1x choice to appear at the top of the screen.
Increasing the speed is accomplished by repeatedly clicking until the desired speed is achieved.
However, keep in mind that there has been a glitch that has existed for years that causes the audio to stop working after you reach 2x speed. To get around this problem, just accelerate to 1.9x and then stop.
If you come across anything you like and want to view it again, you may stop the video by pressing the space bar twice. However, pressing the spacebar will cause the playing speed to be reset.
How to Slow Down Videos in Quicktime Player?
When viewing a movie on your Mac, you may discover that you need to slow it down on a frequent basis. You may discover a range of slow down video editing tools that can help you slow down a video on the internet. Furthermore, various video players may be able to let you quickly slow down your movie. QuickTime Player is one of those programs that may be customized to your individual needs.
We sometimes overlook the enormous capacity inherent inside the dependable and dependable QuickTime Player. QuickTime contains a number of key capabilities meant to help you deal with your media files and play video and audio files.
Steps to follow to slow down Quicktime Player speed
Like speeding up the QuickTime playback speed, the users can simultaneously slow down the playback speed as well. It can be done manually and through the use of specific keys already present on the keyboard.
Manual Setup
In order to manually slowdown QuickTime video, follow the below-mentioned steps:
- Launch the Quicktime player application
- Click on “File” and choose the video which is already saved or downloaded on your MAC.
- Once the video is loaded in the Quicktime player, click on “View” on the toolbar on the top.
- As you click on “View”, a drop-down menu will appear. Locate the “Playback speed” option from the drop-down menu.
- When you click on “Playback speed”, another dialogue box will appear right next to the drop-down menu, which will have options regarding the playback speed.
- Click on “Half speed” and press the play button to watch the video with a slower playback rate.
Slowdown QuickTime speed using Hotkeys
- Open the video or the clip you want to watch.
- If Quicktime is your default player, the video loads in it.
- Otherwise, launch the QuickTime application
- By clicking on “Open”, choose your specific clip or video.
- Once the video is loaded, press the ““OPTIONS”” key next to cmd and simultaneously press the rewind button on the task bar of Quicktime. It starts to slow down the playback speed of the video.
What If Quicktime Player Speed up With No Sound?
No sound may be heard when the video is played back if it was encoded in a format that QuickTime cannot understand. Verifying your QuickTime installation is the most obvious way to find out whether it has decoded all of the video files. Let’s investigate the issue to its root.
Updating Your Quicktime to the Latest Version
The user must carefully study the QuickTime player. For some reason, your QuickTime behaviour is out of whack.
People often neglect to keep their QuickTime software up-to-date, which results in problems with video playback, such as no sound or stuttering, among many other things. To fix this issue, just download and install the most latest release of QuickTime player.
Examine the System and Driver
Faulty speakers, audio issues in the system, and update failures will ultimately cause media playback difficulties.
To find the root cause, you should first check internally to see whether your speakers are working correctly. Speaking straight to Siri and hearing her reaction is the fastest and most straightforward option.
Another reason you may be hearing no sound on QuickTime is because of a recent system update. Apple, as we all know, often releases new operating systems, and you must keep track of the most current versions of updates in order to keep your system running effectively.
You just need to ensure that your machine is running the most recent version. As a result, your system will resume regular functioning, and QuickTime will be immediately fixed and restored.
Inspect if the File is Corrupted or not
Checking the file to see whether it has been corrupted is a good idea regardless of whether QuickTime and your system are up and running. To make matters worse, the lack of sound in QuickTime will be the consequence of a corrupted video file.
Try opening the file in a different programme or player to see if the issue may be resolved. If this is the case, your source video file is either destroyed or corrupted. You may wish to consider regaining access to the file in this situation. The likelihood of your file being corrupted by malware or a virus is relatively high. Remember to be patient if this does happen to you.
It is necessary to use third-party repair programmes to successfully fix the file. Consequently, using third-party software to recover and restore the source file should be considered if you are in a situation where the source file is crucial and do not have a backup. As we’ll see, there are a number of options available, including Filmora.
How to Play Videos at 2X Speed with Sound in Quicktime?
Follow the below-mentioned steps to play video at 2x speed with sound in Quicktime:
- Launch QuickTime.
- Click on Edit, which is located on the toolbar on the top. A drop-down menu will appear.
- From the drop-down menu, click on QuickTime Preferences.
- Then select Audio from the dialogue box.
- Then moving forward, change the music synthesizer to Promethean Audio Device, Promethean USB Audio or USB Audio Device. These options might vary depending on the user’s specific hardware.
- Click on Apply and then OK.
Use Quick Time Features in Filmora
What is Wondershare Filmora?
For users to quickly and easily create high-quality films using a variety of sophisticated editing tools, Wondershare Filmora provides an extensive set of powerful tools for video editors. Wondershare Filmora’s user-friendly interface makes it easy for anybody to become an expert video editor on Mac .
In addition to the usual video effects, Wondershare Filmora provides filters, animated components, and other video effects. In order to alter a movie, you may use filters and overlays to add a variety of effects and graphic overlays. There are several options for titles, openers, and bottom thirds to pick from in Wondershare Filmora.
Using Wondershare Filmora’s drag and drop, users may include moving graphics into their movies. Additionally, users may quickly combine many videos and photographs and choose the good royalty-free music from a wide range of options, all in one spot.
Among the many functions offered by Wondershare Filmora include the ability to edit in 4K and GIF format, noise reduction and colour correction, and an advanced text editor and an audio mixer. A wide range of operating systems can run Wondershare Filmora.
Although there are many other video editors out there vying for attention, Wondershare has been one of the few that has managed to stay relevant in an increasingly competitive industry saturated with old and new video editors all competing for the same consumer base.
Unique and Distinct Features of Filmora
Software is not nearly as good if it does not have the appropriate set of functionalities, and most users will not bother to use it if it does not include these features. Listed here are the most eagerly anticipated features of Filmora’s latest version:
Motion Tracking
The Motion Tracking module enables you to identify an object or point inside a video and then have the computer track that object or point to generate a moving path.
It allows you to capture the motion of a moving object in the frame and add text, subtitles, effects, and other components to the frame that follow the moving object’s motion as it moves around the screen. After you’ve constructed that path, you may link any other item to it and have it follow the initial object.
Colour Matching Feature
This team has always considered that Filmora’s colour grading and correction tools were excellent, but their most recent addition to the ‘Color Matching’ program has garnered them even more praise.
Colour matching is crucial when trying to merge several video images obtained by two different cameras. In this semi-automated module, you may match video from multiple sources or footage acquired at different times of day with one another.
Keyframing Feature
Keyframing is an essential feature for users who wish to boost the appeal of their video by incorporating critical animation sequences throughout the film.
It enables you to create custom animations and have fine-grained control over the effects you apply to your projects via the use of keyframes.
Keyframing becomes critical when creating special effects, custom title cards at the beginning or middle of a film or conjuring precise paths for visuals or picture-in-picture movies to follow.
Audio Ducking
Audio ducking is a method used in video editing and production that allows the narrator’s voice to be heard consistently and clearly over other sounds on the recording that are happening at the same time, such as background music, without being dominated.
Transitions and Vast Amount of Effects
Over 300 special effects, objects, overlays, transitions, and music and audio effects are available whenever and wherever you need them. The bundle includes 25 sound effects and 26 royalty-free recordings, making it a complete package.
Then there are 176 transitions, each of which may be customized to liven up your project. You may also alter and manipulate visuals and text to make your project more aesthetically appealing.
Hardcore Video Editing
Moving on to the heart of this application, Filmora latest version’s video editing features are both excellent and user-friendly. [pagebreak] The editing options in Filmora are comprehensive, with the most noticeable being cutting, audio manipulation, transition creation, visual effects, and a plethora of additional features and functions.
The above editing functions are simple to carry out by selecting a specific section of the video on your timeline, double-clicking it, waiting for it to appear in the preview section, and then applying effects and transitions, adding audio, stabilizing and correcting the video using any of the editing options available to you.
Simplified Exporting Of Your Masterpiece
Exporting a finished project is as simple as any other activity in Filmora latest version. Indeed, the option to export your completed project is clearly presented on the main page and instantly visible to the human eye. After you’ve completed making changes, all you have to do is click the ‘Export’ button.
How to change video playback speed in Filmora
When using fast-motion/slow-motion effects on a video, the clips are sped up or slowed down in comparison to their original speed.
If you’re looking for a “close up in time,” the slow-motion effect may be the best choice, while the fast-forward effect may be used to produce dramatic or amusing videos.
Filmora is widely praised and utilized by professionals throughout the globe because of its user-friendly design and uncomplicated editing features. For this, it is often chosen over other editing programs.
Steps
Follow the below-mentioned steps to change video speed in Filmora:
- A wide range of video formats is supported by Wondershare Filmora, including MP4 and AVI, WMV and MOV, and FLV and M4V, etc. Enter the media library and click Import to import videos from your PC. The software will use the video files on your computer. Drag and drop is also an option for adding files to the User’s Album.
- Right-click on the video track on the Timeline and then drag movies from your User’s Album into it to access the Speed and Duration choices.
- A pop-up window will be shown. The rapidity or sluggishness of the motion effects is denoted by speed numbers. Then you may go at your own speed. Just click on the preview box to test out effects like sped-up or slowed-down videos. 0.5 speed is a good choice if you think it’s too much.
Video playback speed similarly affects the audio playback speed. Delete the video’s audio if you want to maintain the original playing speed of the video’s audio.
You must first double-click the audio clip in the audio editing window in order to adjust it. Adding and deleting fade in/out effects and reducing background noise are all options.
After you’ve finished adjusting the video speed, click Export. To save your movie in a standard format, just choose Format from the File menu.
It’s also possible to publish your videos to YouTube and Vimeo or create a DVD if you’d like.
Choose Device from the drop-down box and choose the proper symbol to view your new video output on your iPod, iPhone, or iPad.
Conclusion
While watching a movie, you may want the audio to be slower or faster, and you may want to adjust the atmosphere with the help of the music track, either when merely a soundtrack is being played or while a movie is being watched. This article, which includes images, explains in great detail how Mac users can achieve this using playback speed Quicktime. It also explains how to alter the speed at which a video play by in Filmora. Filmora has a variety of easy and advanced editing options, as well as video effects like slow motion and fast motion.
12 Impressive AI Video Ideas for Creating Engaging Video Content
12 Impressive AI Video Ideas for Creating Engaging Video Content
An easy yet powerful editor
Numerous effects to choose from
Detailed tutorials provided by the official channel
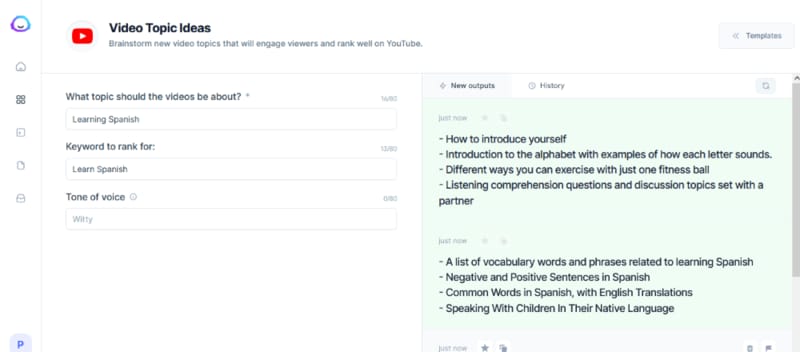
In recent times, AI technology has become more useful for content creators to get more effective and engaging AI video ideas. Various AI video idea generator tools like Jasper, WeShare, etc., save con-tent creators time by giving the latest trending video ideas. These tools made content creators work easy as they need not spend much time on video ideas.
Most of us know AI-Artificial Intelligence and its role in achieving better and fast results in different areas. This article will let us know the position of YouTube video idea generator AI in generating engaging video content using Artificial Intelligence. Nowadays, these tools also help add audio/video summary and animations for the videos.
In this article
01 [What’s Video Ideas Generator and How to Use This Tool to Get More Views](#Part 1)
02 [12 Great AI Video Ideas to Bring More Traffic](#Part 2)
Part 1 What’s Video Ideas Generator and How to Use This Tool to Get More Views
It’s not enough to create a YouTube channel and post some video that does not have informative content. Sometimes, even though the video has informative content, the content might not be attractive to the viewers for various reasons, like the content might be routine and does not have more reach, likes, or shares. Along with good content, we also need new and creative ideas to get more viewers. Thus, we have some tools to provide unique and innovative ideas based on the niche you choose.
Videos Idea Generator is a tool that gives ideas for YouTube videos, and it works based on AI technology (Neural Networks). This tool will be more beneficial for the content creators to get more AI video ideas. Naturally, you might be out of ideas for your channel, or sometimes it takes more time to get an idea, or it could be a routine idea that does not sound interesting to the viewers. In such cases, an AI video idea generator is more helpful in suggesting new and innovative ideas for the content creators based on their interesting topics.
Some of the advantages of a video idea generator are:
● Time-saving – as one can utilize the time in other work, such as editing the video/ adding subtitles, etc., instead of thinking of an idea.
● Engaging with the audience – can utilize the time in engaging with the audience by answering their questions.
● Promote videos – can utilize time to promote their videos on other social media platforms or collaborate with other content creators for promotions.
● Add animations – animations and other visual effects can be added to the videos using AI. Also, we can add video and audio summaries after each video so that the viewers can get brief detailing of the whole video.
How to use Videos Idea Generator:
There are different AI video idea generator tools, and most of them work similarly. The most common steps are:
Step 1: Provide Topic
Here you need to provide the topic’s name on which we are planning to create the video.
Step 2: Provide Keywords
After providing a topic, give the keywords required for publishing. The video needs to have all the keywords so that the main content of the video can project adequately.
Based on the topic name and keywords, the tool will generate suggestions for the video ideas using the Neural Network concept of Artificial Learning.
Part 2 12 Great AI Video Ideas to Bring More Traffic
Now, let us know 12 AI video ideas that can become viral and get more likes and views :
01Idea 1: Know your Interest
Before starting a YouTube channel or posting a video, know your area of interest first. Once you get clarity on the area of interest, it’s easy to pick a topic from that and create an innovative video. Try to be more specific in the topic you choose. Also, have clarity on the section of audience you want to target.
For example, if your topic is more related to children, add more animations of animals/ cartoons that interest children. If you choose a related topic, do not add more animations that might confuse the audience. Add more reference links so that they can refer to those and be more particular on the specific topic you are trying to explain through the video. Similarly, if you choose a gaming-related topic, do not be more general about gaming.
Be specific towards a particular section of games like mobile gaming/ desktop/ virtual to reach more audience, and it does not seem boring to the audience.
02Idea 2: Interview Questions
As many students graduate every year, the competition for jobs has increased. People are more interested in getting an appointment as soon as possible, and for that, they need to prepare for the interview thoroughly. A video containing the main topics for the discussion that has references for the interview questions would benefit the students. It can engage with people within no time. Also, if the video is more specific to the department-wise interview questions/ job-level interview questions, it would reach more people and be more helpful to them.
03Idea 3: Full Course in Any Technology
Apart from the entertainment-related videos, education-related videos will be more helpful and engaging. Any video related to any technology course can get more views. Using the YouTube video idea generator AI tool, you can generate more unique videos related to education. Instead of giving a brief idea of the technology, it’s better to pick up a few topics and explain them in detail so that it would be helpful for interviews too. You can use AI technology to add a voice-over and a small summary at the end of the video so that the main points get revised once again.
04Idea 4: Cooking Ideas
Cooking is one of the most trending topics on YouTube. Whatever the language might be, cooking-related videos can get more views, create more creativity, and engage with the audience. You can choose a dish from any cuisine and make a video. You can add slow motion/ fast forward actions and small creative animations using AI. Using AI video ideas tools, you can get more creative ideas related to cooking that can increase views, as viewers will be more interested if the videos are innovative.
05Idea 5: Art and Craft ideas
Recently, people have seem more interested in the interior design of the house. For such people, art and craft ideas might be more helpful. Also, nowadays, schools are encouraging students in other circular activities and studies. These videos might be more attractive to the school’s students. Also, in crafts, select a specific area and make videos on that so that the video will be short and crisp, and easily understandable to the viewers. You can also add a voice-over while doing the craftwork to make it more transparent for the viewers.
06Idea 6: Photo and Video Editing Related Videos
People have become more addicted to taking photos and storing them. Any video related to editing the photos/ videos will engage more with viewers as it is not associated with any section of people. Anyone from any place and with any qualification can understand such videos. Consider a few topics related to the editing and give a detailed description/ explanation of those ideas, or consider any photo/ video editing app and explain how the app works in the video so that it might be helpful for the people who are using the app for the first time. Also, please reply to the frequently asked questions related to the app in the form of comments or summary so that it can reach more people, and there is a chance that the viewers might suggest the video to others who are about to use the app.
07Idea 7: Movies Related Videos
In every country, people are more addicted to movies regardless of language. Movies have become a part of daily life for almost all people. Some of the movie-related video ideas can be:
● Video regarding actor interviews.
● Video regarding the movie review/ collections.
● Video regarding highlights/ mistakes in the movie.
● Video related to small clips/ songs in the film.
● Video related to the spoof of the central theme of the film.
Any video related to a movie can be more viral. To create new content, use AI video idea generator tools so that the videos can be more engaging and creative.
08Idea 8: Lifehacks Related Videos
Simple daily life hack idea-related videos will be more helpful to people irrespective of their living. Any statements about keeping the house clean/clothing/makeup/skincare can be beneficial. You can take simple concepts related to our daily life like:
● How to use a few tools in our everyday life.
● Simple cleaning techniques.
● Folding clothes easily saves time.
09Idea 9: Earning Related Ideas
Videos related to earning can get more views and become more viral among people. Any detailed description of any earning app/ small startup ideas can be helpful. The video ideas generator tool can give more suggestions related to such trending topics.
10Idea 10: Sports related ideas
A large population is into sports, like football and cricket. People enjoy watching and playing these sports regularly from young to old age. It will be a good idea if you can try videos on sports. Using the video generator AI, you can generate animation videos playing cricket and add small clips of old generation cricket players as examples. You may also create small teaching videos on other sports for children. Through animation, giving the latest sports updates worldwide will also be a better idea to get more views for videos.
11Idea 11: Current Affairs Related Videos
Current affairs and general knowledge-related videos will be more helpful to people preparing for competitive exams as most people are learning through the internet rather than from books. If you can take a specific subject and give a detailed description of its past and current updates, it can be helpful for many people. And also, while doing such information-related videos, you get a chance to research it, and it will help improve your knowledge of the subject and searching skills.
12Idea 12: Gadget And Product Review Ideas
Reportedly, there has been a tremendous increase in new products related to mobiles, laptops, TV, other hardware tools, skin, hair care products, etc. You can take a specific product and create innovative ideas on how to use the product using animations/ cartoons and give a short review of the product. Through this, you can earn as you promote a company product, and people will know about the product. This is beneficial in both ways. If the product is related to electronic gadgets, make a video explaining the product’s features and how to use them. If it is hair or skincare related, include the ingredients used, advantages of the product, how to use the product, and any disadvantages, etc. Based on the product you choose, the content of the video should change.
Bonus Idea:
Use an innovative and powerful tool like Wondershare Filmora Video Editor to beautify your AI videos in the shortest time frame.
Filmora’s latest version offers various upgraded tools like:
● Instant Mode to create accessible and quick videos.
● A shop of preset templates to power up your videos.
● The Filmora Auto Beat Sync can match your clip with music.
● Adjust the speed of your video and introduce cinematic effects.
● You can even record your screen with Filmora and use that in your AI videos ideas.

Wondershare Filmora - Best Video Editor for Mac/Windows
5,481,435 people have downloaded it.
Build unique custom animations without breaking a sweat.
Focus on creating epic stories and leave the details to Filmora’s auto features.
Start a creative adventure with drag & drop effects and endless possibilities.
Filmora simplifies advanced features to save you time and effort.
Filmora cuts out repetition so you can move on to your next creative breakthrough.
● Ending Thoughts →
● Finally, that you have a fair idea of what a YouTube video idea generator is about and how it helps content creators in daily life get more innovative ideas for YouTube videos.
● Make use of this tool to get more engaging and creative content and more AI video ideas so that the views for the video increase and the audience receives good knowledge through the videos. Try out these ideas, use Filmora to create exceptional animations on your videos, and watch your YouTube channel grow as expected.
In recent times, AI technology has become more useful for content creators to get more effective and engaging AI video ideas. Various AI video idea generator tools like Jasper, WeShare, etc., save con-tent creators time by giving the latest trending video ideas. These tools made content creators work easy as they need not spend much time on video ideas.
Most of us know AI-Artificial Intelligence and its role in achieving better and fast results in different areas. This article will let us know the position of YouTube video idea generator AI in generating engaging video content using Artificial Intelligence. Nowadays, these tools also help add audio/video summary and animations for the videos.
In this article
01 [What’s Video Ideas Generator and How to Use This Tool to Get More Views](#Part 1)
02 [12 Great AI Video Ideas to Bring More Traffic](#Part 2)
Part 1 What’s Video Ideas Generator and How to Use This Tool to Get More Views
It’s not enough to create a YouTube channel and post some video that does not have informative content. Sometimes, even though the video has informative content, the content might not be attractive to the viewers for various reasons, like the content might be routine and does not have more reach, likes, or shares. Along with good content, we also need new and creative ideas to get more viewers. Thus, we have some tools to provide unique and innovative ideas based on the niche you choose.
Videos Idea Generator is a tool that gives ideas for YouTube videos, and it works based on AI technology (Neural Networks). This tool will be more beneficial for the content creators to get more AI video ideas. Naturally, you might be out of ideas for your channel, or sometimes it takes more time to get an idea, or it could be a routine idea that does not sound interesting to the viewers. In such cases, an AI video idea generator is more helpful in suggesting new and innovative ideas for the content creators based on their interesting topics.
Some of the advantages of a video idea generator are:
● Time-saving – as one can utilize the time in other work, such as editing the video/ adding subtitles, etc., instead of thinking of an idea.
● Engaging with the audience – can utilize the time in engaging with the audience by answering their questions.
● Promote videos – can utilize time to promote their videos on other social media platforms or collaborate with other content creators for promotions.
● Add animations – animations and other visual effects can be added to the videos using AI. Also, we can add video and audio summaries after each video so that the viewers can get brief detailing of the whole video.
How to use Videos Idea Generator:
There are different AI video idea generator tools, and most of them work similarly. The most common steps are:
Step 1: Provide Topic
Here you need to provide the topic’s name on which we are planning to create the video.
Step 2: Provide Keywords
After providing a topic, give the keywords required for publishing. The video needs to have all the keywords so that the main content of the video can project adequately.
Based on the topic name and keywords, the tool will generate suggestions for the video ideas using the Neural Network concept of Artificial Learning.
Part 2 12 Great AI Video Ideas to Bring More Traffic
Now, let us know 12 AI video ideas that can become viral and get more likes and views :
01Idea 1: Know your Interest
Before starting a YouTube channel or posting a video, know your area of interest first. Once you get clarity on the area of interest, it’s easy to pick a topic from that and create an innovative video. Try to be more specific in the topic you choose. Also, have clarity on the section of audience you want to target.
For example, if your topic is more related to children, add more animations of animals/ cartoons that interest children. If you choose a related topic, do not add more animations that might confuse the audience. Add more reference links so that they can refer to those and be more particular on the specific topic you are trying to explain through the video. Similarly, if you choose a gaming-related topic, do not be more general about gaming.
Be specific towards a particular section of games like mobile gaming/ desktop/ virtual to reach more audience, and it does not seem boring to the audience.
02Idea 2: Interview Questions
As many students graduate every year, the competition for jobs has increased. People are more interested in getting an appointment as soon as possible, and for that, they need to prepare for the interview thoroughly. A video containing the main topics for the discussion that has references for the interview questions would benefit the students. It can engage with people within no time. Also, if the video is more specific to the department-wise interview questions/ job-level interview questions, it would reach more people and be more helpful to them.
03Idea 3: Full Course in Any Technology
Apart from the entertainment-related videos, education-related videos will be more helpful and engaging. Any video related to any technology course can get more views. Using the YouTube video idea generator AI tool, you can generate more unique videos related to education. Instead of giving a brief idea of the technology, it’s better to pick up a few topics and explain them in detail so that it would be helpful for interviews too. You can use AI technology to add a voice-over and a small summary at the end of the video so that the main points get revised once again.
04Idea 4: Cooking Ideas
Cooking is one of the most trending topics on YouTube. Whatever the language might be, cooking-related videos can get more views, create more creativity, and engage with the audience. You can choose a dish from any cuisine and make a video. You can add slow motion/ fast forward actions and small creative animations using AI. Using AI video ideas tools, you can get more creative ideas related to cooking that can increase views, as viewers will be more interested if the videos are innovative.
05Idea 5: Art and Craft ideas
Recently, people have seem more interested in the interior design of the house. For such people, art and craft ideas might be more helpful. Also, nowadays, schools are encouraging students in other circular activities and studies. These videos might be more attractive to the school’s students. Also, in crafts, select a specific area and make videos on that so that the video will be short and crisp, and easily understandable to the viewers. You can also add a voice-over while doing the craftwork to make it more transparent for the viewers.
06Idea 6: Photo and Video Editing Related Videos
People have become more addicted to taking photos and storing them. Any video related to editing the photos/ videos will engage more with viewers as it is not associated with any section of people. Anyone from any place and with any qualification can understand such videos. Consider a few topics related to the editing and give a detailed description/ explanation of those ideas, or consider any photo/ video editing app and explain how the app works in the video so that it might be helpful for the people who are using the app for the first time. Also, please reply to the frequently asked questions related to the app in the form of comments or summary so that it can reach more people, and there is a chance that the viewers might suggest the video to others who are about to use the app.
07Idea 7: Movies Related Videos
In every country, people are more addicted to movies regardless of language. Movies have become a part of daily life for almost all people. Some of the movie-related video ideas can be:
● Video regarding actor interviews.
● Video regarding the movie review/ collections.
● Video regarding highlights/ mistakes in the movie.
● Video related to small clips/ songs in the film.
● Video related to the spoof of the central theme of the film.
Any video related to a movie can be more viral. To create new content, use AI video idea generator tools so that the videos can be more engaging and creative.
08Idea 8: Lifehacks Related Videos
Simple daily life hack idea-related videos will be more helpful to people irrespective of their living. Any statements about keeping the house clean/clothing/makeup/skincare can be beneficial. You can take simple concepts related to our daily life like:
● How to use a few tools in our everyday life.
● Simple cleaning techniques.
● Folding clothes easily saves time.
09Idea 9: Earning Related Ideas
Videos related to earning can get more views and become more viral among people. Any detailed description of any earning app/ small startup ideas can be helpful. The video ideas generator tool can give more suggestions related to such trending topics.
10Idea 10: Sports related ideas
A large population is into sports, like football and cricket. People enjoy watching and playing these sports regularly from young to old age. It will be a good idea if you can try videos on sports. Using the video generator AI, you can generate animation videos playing cricket and add small clips of old generation cricket players as examples. You may also create small teaching videos on other sports for children. Through animation, giving the latest sports updates worldwide will also be a better idea to get more views for videos.
11Idea 11: Current Affairs Related Videos
Current affairs and general knowledge-related videos will be more helpful to people preparing for competitive exams as most people are learning through the internet rather than from books. If you can take a specific subject and give a detailed description of its past and current updates, it can be helpful for many people. And also, while doing such information-related videos, you get a chance to research it, and it will help improve your knowledge of the subject and searching skills.
12Idea 12: Gadget And Product Review Ideas
Reportedly, there has been a tremendous increase in new products related to mobiles, laptops, TV, other hardware tools, skin, hair care products, etc. You can take a specific product and create innovative ideas on how to use the product using animations/ cartoons and give a short review of the product. Through this, you can earn as you promote a company product, and people will know about the product. This is beneficial in both ways. If the product is related to electronic gadgets, make a video explaining the product’s features and how to use them. If it is hair or skincare related, include the ingredients used, advantages of the product, how to use the product, and any disadvantages, etc. Based on the product you choose, the content of the video should change.
Bonus Idea:
Use an innovative and powerful tool like Wondershare Filmora Video Editor to beautify your AI videos in the shortest time frame.
Filmora’s latest version offers various upgraded tools like:
● Instant Mode to create accessible and quick videos.
● A shop of preset templates to power up your videos.
● The Filmora Auto Beat Sync can match your clip with music.
● Adjust the speed of your video and introduce cinematic effects.
● You can even record your screen with Filmora and use that in your AI videos ideas.
Wondershare Filmora - Best Video Editor for Mac/Windows
5,481,435 people have downloaded it.
Build unique custom animations without breaking a sweat.
Focus on creating epic stories and leave the details to Filmora’s auto features.
Start a creative adventure with drag & drop effects and endless possibilities.
Filmora simplifies advanced features to save you time and effort.
Filmora cuts out repetition so you can move on to your next creative breakthrough.
● Ending Thoughts →
● Finally, that you have a fair idea of what a YouTube video idea generator is about and how it helps content creators in daily life get more innovative ideas for YouTube videos.
● Make use of this tool to get more engaging and creative content and more AI video ideas so that the views for the video increase and the audience receives good knowledge through the videos. Try out these ideas, use Filmora to create exceptional animations on your videos, and watch your YouTube channel grow as expected.
How to Use Rules of Thirds
So you have your work flow sorted out and you’re well on your way with Filmora but you’re not quite happy with your results or something just seems off when you watch your videos back. You may be missing an important element of all visual media and that’s composition. This is where the building blocks of every frame come together to make a visually pleasing piece for the viewer and helps the eyes concentrate on the content rather than trying to figure out what they are looking at.
I’m sure you may have heard of the rule of thirds for art or photography and you may not know or understand what it is. You may even be wondering how the rule of thirds can help you with your video creation. Well, that is what I’m going to show and explain to you today.
What is the rule of thirds
At its core the rule of thirds is a guide to follow whenever you create something visual.
You break an image into thirds both horizontally and vertically, in doing this you are left with nine boxes and four gridlines, the rule states that by placing key elements in line with gridlines you will have an overall better composition.
To gain a better understanding of this here is a visual example of the gridlines and nine boxes.

This may seem simple but is often overlooked due to time restraints and eagerness to get that video out there. By following these guidelines your overall composition will gain interesting and pleasing results that can help with viewer engagement. This is only one piece of the puzzle but as any photography professional or artist will tell you, It’s the small things that add up.
How to use the rule of thirds
To show how to use the rule of thirds I will be showing an image with and without the use of the guidelines. In doing this you will be able to see how impactful this system is and how it can help with your own creations within Filmora .
This will be our scene example, you can see buildings, boats, water and skyline. This may be typical of a backdrop or an insert for a holiday picture amongst many other things.
I will now show this picture with no compositional thought and without the use of the thirds system.

Notice how all the elements are in the scene but it just looks interesting and something just seems off when you look at it. You may find yourself searching for understanding of the image rather than taking the image in and concentrating on what the creator intended. This is seen commonly due to the need to fit every element in the scene but sometimes it is best to sacrifice something you may see as important for the sake of the whole picture.
We will now look at the example image with the rule of thirds in place and see if overall this makes a more interesting scene.

We have aligned the skyline with the first horizontal grid line and aligned the boats with the vertical grid lines. We have sacrificed the crane in the scene but overall I’m sure you can agree that this is more pleasing and makes more sense when you’re viewing this. The whole middle section of the scene now has information within it and the contrast between the middle and the rest of the scene directs your eyes to what was intended to be viewed, This is called effect use of empty space. In doing this you save yourself time from adding more information to direct the viewer.
Placing key elements directly in the center of your scene can seem static and boring but by placing elements to one side or using the first and second horizontal grid lines you create something called Dynamism , where the viewer sees an element along the grid and takes a journey through the rest of the image.
Studies have shown that this is the humans natural way of viewing imagery, we first find something interesting to look at and then journey around that. So by using this rule you are creating a more natural process for your viewer.
Tips when starting using the rule of thirds
The first tip I would say is to view other videos, YouTube is a good starting point. Watch interviews and notice where the chairs are aligned. Watch reviewers and notice where they position themselves in the scene. Lastly watch movies and pause on an interesting scene and try to deconstruct where everything is placed and why they chose that composition.
The idea with the rule is to have it become something you do naturally, by always considering the form you save yourself time in the editing process. The key things you have in your mind whenever you make a scene should be.
1. What is the key element in my scene or what am I trying to make the viewer focus on.
2. where do I intend to place these in my scene?
3. Have I created a balanced scene with enough negative space to direct the eye.
If you consider this with every video you make then in time this will become as natural as drinking water on a hot day. As a practice you could open some old projects and apply this rule to your video to see the results and you may find yourself impressed with the change.
When is it best to not use the rule of thirds?
The rule is very useful when you’re aiming to grab the attention towards a certain element but that being said, when you have a symmetrical scene you can get away with not using the rule as your eyes can make sense of symmetry very well.
Even when working with a symmetrical scene you can incorporate the rule within for elements such as people or key figures but in this situation it is down to the creator to figure what they feel is best in any given shot.
How to Use Rule of Thirds in Filmora
The tools provided within Filmora are generous and one great feature is the crop and size tool.
When inserting an image or movie file you can right click on the timeline and select crop and size bringing up a handy screen with the gridlines already there for you. It’s just a matter of aligning your shot for the best composition.
For reference I will show you what this looks like.
First right click the timeline on the image you want to reposition. Alternatively you can select the desired insert and press Alt+C this will also bring up the same editing box.

Now click on the crop and zoom option and this editor will appear.

As you can see you are able to align the shot and change the aspect ratio to align with your project. For a better look at the built in grid lines see image below.

Conclusion
To conclude, the rule of thirds is very important within visual media and is tough within the fundamentals of art and photography from beginner level right up to the highest point of education, Practice thinking about your placement of key elements within your videos and how this affects your overall composition. The goal is to have this as an automatic thought when shooting your videos or still images. This is a small change you can make but has a big impact on how a viewer engages your content and in return leaves a positive opinion towards your creativity and eye for detail.
Free Download For Win 7 or later(64-bit)
Free Download For macOS 10.14 or later
Free Download For macOS 10.14 or later
How to Use Speed Ramping to Create a Footage
Are you tired of using the same old way to edit your montages? Or do you want to learn to be more professional in your creativity? Don’t worry. We got you.
Here you will learn how to take your videos to the next level using speed ramping with a professional video editor- Wondershare Filmora. Moreover, you will get to know two ways to add the effect.
- Using speed ramping effect and glitch effects.
- Using the standard speed settings.
These effects can work well for any action sports or dance video. Let’s check out about speed ramping effect and ways to add it.
Part 1. What is speed ramping?
You’ve probably seen speed ramping used in suspenseful moments of a basketball video before, like a ball bouncing on the rim or a long buzzer-beating shot.

With speed ramping, we can slow down our most exciting moments to show our audience. And then speed it up again to keep pace with the music or action. So it will give you a smooth transition effect.
Part 2. How to enhance action videos with the speed ramping effect?
For example, we’ll create an intense basketball video with speed ramping and glitch effects in Filmora . Then, to show you how to show off your filming, editing, and basketball skills.
Free Download For Win 7 or later(64-bit)
Free Download For macOS 10.14 or later
Step1 Shot the footage
To edit a montage, you must first capture it correctly. For our example footage, we want to ensure we have set our camera to a higher frame rate for filming this type of video since we’re going to use slow motion.

How to capture the best footage?
You can shoot handheld with a camera or a mobile phone because it allows you to move around your talent and catch some movements and action while giving a shaky camera effect for added suspense. To make evenly balanced videos, you can use a gimbal stabilizer. Here are some tips to get better shots.
- Change camera angles. Try getting shots low to the ground as well as at higher angles. That will give you more options to cut between when you edit the video.
- Get various shots. You can get shots of dribbling, shooting, and just running with the ball to work with.
- Try shooting on a longer lens. It is because you may not be able to get close to the action.
- Record footage in slow mode on your camera or phone. It will allow you to capture more frames: the more frames, the smoother the slow-motion effect.
Best capturing will make your video more cinematic and visually pleasing after preparing the footage. Finally, we will dive into edit tutorials on speed ramping and glitch effects separately for better understanding.
Step2 Edit the speed of footage in Filmora
There are two ways to achieve the speed ramping effect. One is to use the speed ramping feature to adjust the video speed—the other way to achieve a similar effect is by using the standard speed settings.
Edit with speed ramping feature in Filmora
The speed ramping feature is included in Filmora standard license. So let’s start by opening Filmora.
1. Import media
First, import a video from your media library in the Wondershare Filmora. And drag the clip down on the timeline to start editing.

2. Apply the speed ramping feature
To apply the speed ramping feature, right-click on the clip on the timeline. And click speed in the menu and choose speed ramping to open the settings window.

You can choose different speed templates in the setting window. Or, on the left corner, click on the customize option to adjust the keyframes and create the speed you want for the video.

The lower keyframe is when the video is slowest, and the peak is when the video is fastest. The middle parts between the keyframes are when it speeds up or slows down to reach the specific speed you set on each keyframe.

Grab the keyframes and move them up to increase the speed or down to slow down the rate. You can also add more keyframes by moving the playhead to the spot where you want to change speed and clicking the plus button.
After adjusting our keyframes, we can play it back to see if we like the result.
Edit with standard speed settings in Filmora
Since speed ramping can only be used for paid users, we also provide you with an alternative way to give an exact transition effect, like speed ramping. Check out the following steps to add it.
1. You can drag the video from your library to the timeline. While in the timeline, double-click to open the speed menu. Then choose the starting speed you want your video to be with the speed slider.

2. Next, move your playhead to the point of the video you want to slow down the speed. Here we will cut and then double-click that clip to open the speed menu again. Change the pace with the speed slider again

Following the above steps, a speed ramping style effect can be created without using the premium feature. Stealthy, isn’t it?
Step3 Add some intensity to shots with the BCC glitch effect
We will use Boris FX BCC glitch to add some intensity to our video. It is a plug-in built-in Filmora and gives a feeling of chaos to match the action in the video. To apply the BCC glitch effect to the video.
- Click on the effects options in the top bar. For example, a window on the left side showing you the option Boris FX will have a sub-option BCC stylize. Click on it.
- Drag the effect above the place you want it in the timeline.
- Double-click the effect to open its settings.
- A drop-down menu at the top of the screen has tons of glitch presets to try out.
- We are going to scroll down and select shake with motion blur. This preset will use the exact look we want for our basketball video to make the speed ramping more intense.

- You can change the settings around after choosing a preset. For example, let’s turn up the glitch intensity to have our glitch a little more extreme. Moving further, we can change the glitch duration to our specific needs.
Now we can watch our video to see our glitch with the motion blur effect. Isn’t it crazy to make a cinematic video by yourself? The speed ramping feature and glitch effects can bring any sports video to the next level.
Free Download For macOS 10.14 or later
Step1 Shot the footage
To edit a montage, you must first capture it correctly. For our example footage, we want to ensure we have set our camera to a higher frame rate for filming this type of video since we’re going to use slow motion.
How to capture the best footage?
You can shoot handheld with a camera or a mobile phone because it allows you to move around your talent and catch some movements and action while giving a shaky camera effect for added suspense. To make evenly balanced videos, you can use a gimbal stabilizer. Here are some tips to get better shots.
- Change camera angles. Try getting shots low to the ground as well as at higher angles. That will give you more options to cut between when you edit the video.
- Get various shots. You can get shots of dribbling, shooting, and just running with the ball to work with.
- Try shooting on a longer lens. It is because you may not be able to get close to the action.
- Record footage in slow mode on your camera or phone. It will allow you to capture more frames: the more frames, the smoother the slow-motion effect.
Best capturing will make your video more cinematic and visually pleasing after preparing the footage. Finally, we will dive into edit tutorials on speed ramping and glitch effects separately for better understanding.
Step2 Edit the speed of footage in Filmora
There are two ways to achieve the speed ramping effect. One is to use the speed ramping feature to adjust the video speed—the other way to achieve a similar effect is by using the standard speed settings.
Edit with speed ramping feature in Filmora
The speed ramping feature is included in Filmora standard license. So let’s start by opening Filmora.
1. Import media
First, import a video from your media library in the Wondershare Filmora. And drag the clip down on the timeline to start editing.
2. Apply the speed ramping feature
To apply the speed ramping feature, right-click on the clip on the timeline. And click speed in the menu and choose speed ramping to open the settings window.
You can choose different speed templates in the setting window. Or, on the left corner, click on the customize option to adjust the keyframes and create the speed you want for the video.
The lower keyframe is when the video is slowest, and the peak is when the video is fastest. The middle parts between the keyframes are when it speeds up or slows down to reach the specific speed you set on each keyframe.
Grab the keyframes and move them up to increase the speed or down to slow down the rate. You can also add more keyframes by moving the playhead to the spot where you want to change speed and clicking the plus button.
After adjusting our keyframes, we can play it back to see if we like the result.
Edit with standard speed settings in Filmora
Since speed ramping can only be used for paid users, we also provide you with an alternative way to give an exact transition effect, like speed ramping. Check out the following steps to add it.
1. You can drag the video from your library to the timeline. While in the timeline, double-click to open the speed menu. Then choose the starting speed you want your video to be with the speed slider.
2. Next, move your playhead to the point of the video you want to slow down the speed. Here we will cut and then double-click that clip to open the speed menu again. Change the pace with the speed slider again
Following the above steps, a speed ramping style effect can be created without using the premium feature. Stealthy, isn’t it?
Step3 Add some intensity to shots with the BCC glitch effect
We will use Boris FX BCC glitch to add some intensity to our video. It is a plug-in built-in Filmora and gives a feeling of chaos to match the action in the video. To apply the BCC glitch effect to the video.
- Click on the effects options in the top bar. For example, a window on the left side showing you the option Boris FX will have a sub-option BCC stylize. Click on it.
- Drag the effect above the place you want it in the timeline.
- Double-click the effect to open its settings.
- A drop-down menu at the top of the screen has tons of glitch presets to try out.
- We are going to scroll down and select shake with motion blur. This preset will use the exact look we want for our basketball video to make the speed ramping more intense.
- You can change the settings around after choosing a preset. For example, let’s turn up the glitch intensity to have our glitch a little more extreme. Moving further, we can change the glitch duration to our specific needs.
Now we can watch our video to see our glitch with the motion blur effect. Isn’t it crazy to make a cinematic video by yourself? The speed ramping feature and glitch effects can bring any sports video to the next level.
Also read:
- New Creating Collages on Canva Is Simple and Quick. The Tool Lets You Create some Amazing Customized Collages as Needed. So, Get Ready to Explore the World of Canva Collages
- Updated In 2024, 22 Free Video Editing Software to Save Your Money and Time
- In 2024, How to Loop a Video with iMovie on Mac and iPhone
- New Recommended Video Background Online Changers
- New 2024 Approved How to Zoom in Discord
- Updated In 2024, Wondering How to Replace Sky in After Effects? Learn How
- 5 Tools to Create a Time-Lapse Video Online for 2024
- New Color Match Game Tips for You for 2024
- New In 2024, Top 10 Audio Visualizers Windows, Mac, Android, iPhone & Online
- New In 2024, How to Slow Down a Video on iPhone and Android The Easy Way
- Updated If You Want to Record Video Streams on Windows or Mac Using FFmpeg, Read Our Guide and Learn How to Do This with Easy Step-by-Step Instructions for 2024
- Updated How to Make Text Reveal Effect Easily for 2024
- How to Add Subtitles to Videos With Kapwing
- New In 2024, Have You Ever Wanted to Speed up or Slow Down a Video? Maybe It Was Too Long, or You Wanted to Draw Out an Exciting Part of the Video without Having to Watch the Boring Parts
- In 2024, Denoise a Video in Adobe Premiere Pro – Audio and Video Noise Removal
- New What Does It Mean to Color Grade Your Images, and Why Is It so Important? Does It Mean the Same Thing as a Color Correction? Read on to Gather All the Information You Need on Color Grading Photography
- New “Create. Edit. Share. Transform Your Videos with KineMaster! Powerful Tools, Easy to Use.” – a Few Words We Read when We Come up with the Official Web-Site of KineMaster, a Mobile Video Editing Application
- How Did AI Video Games Act More Human Than Human?
- 2024 Approved How to Got Free After Effects Templates Slideshow with Simple Trick
- How To Use Virtual Green Screen to Shoot Video for 2024
- New 2024 Approved The Craziest 10 AI Editors Youve Seen
- In 2024, 4 Ways for Rotating Your GoPro Videos Professionally
- New 2024 Approved This Article Will Show You How to Make a Tattoo Disappear on Your Body Magically
- New In 2024, Some of the Top Sites to Replace a Sky Background in Videos
- 2024 Approved How to Zoom Picture in Picture Easy Solution
- New Quick Answer What Is a GIF File, In 2024
- New Top List of Best VHS Video Effect Makers for 2024
- Updated An Ultimate Guide To Edit a Music Video Aspect Ratio and First Cut for 2024
- Looking Forward to Complement Your Weekend Evenings with a Fantasy Tour to the Anime World? Stay Here to Pick the Most Appealing Alternative From the Best and Timeless Anime Creations
- Updated Read on to Learn About Multi Object Tracking, Its Types, and Requirements. Youll Also Learn About the Different Approaches Toward Object Tracking for 2024
- New Track Mattes The Ultimate Guide For After Effects
- In 2024, 3 Ways to Track Realme GT 3 without Them Knowing | Dr.fone
- In 2024, Top 15 Apps To Hack WiFi Password On Samsung Galaxy F14 5G
- Top 12 Prominent Poco M6 Pro 5G Fingerprint Not Working Solutions
- Why Your WhatsApp Location is Not Updating and How to Fix On OnePlus Nord N30 SE | Dr.fone
- How to Cast Honor X9b to Computer for iPhone and Android? | Dr.fone
- In 2024, How to Mirror PC Screen to Honor Play 7T Phones? | Dr.fone
- How to Track Nokia G42 5G Location without Installing Software? | Dr.fone
- In 2024, Top 9 ZTE Axon 40 Lite Monitoring Apps for Parental Controls | Dr.fone
- How to use Device Manager to reinstall your hardware drivers on Windows 10
- How to Screen Mirroring Samsung Galaxy F34 5G to PC? | Dr.fone
- 2 Ways to Monitor Oppo Find X6 Activity | Dr.fone
- Android Safe Mode - How to Turn off Safe Mode on Xiaomi 14? | Dr.fone
- Solved Warning Camera Failed on Vivo X Fold 2 | Dr.fone
- In 2024, Network Locked SIM Card Inserted On Your Vivo T2 Pro 5G Phone? Unlock It Now
- Title: New 2024 Approved How to Change Quicktime Player Speed on Mac?
- Author: Morgan
- Created at : 2024-05-19 05:12:58
- Updated at : 2024-05-20 05:12:58
- Link: https://ai-video-editing.techidaily.com/new-2024-approved-how-to-change-quicktime-player-speed-on-mac/
- License: This work is licensed under CC BY-NC-SA 4.0.
