
:max_bytes(150000):strip_icc():format(webp)/GettyImages-541365354-5c8ad42246e0fb00014a9687.jpg)
New 2024 Approved How to Make Video Slow Motion?
How to Make Video Slow Motion?
Slow-motion videos are in trend now, especially when shooting for Instagram Reels , TikTok videos, or YouTube Shorts . While many users record the entire video in slow motion, there are others who need only a particular section of a clip to play at a reduced speed. Nevertheless, slowing down footage is no longer rocket science, thanks to the advancements in technology, and the availability and ease of access to relevant apps.
That said, here you will learn what is needed to record a video in slow motion, and how to get the job done in a simple way. In addition, you will also learn how to reduce the playback speed of an already existing video if it was recorded at a normal pace.
In this article
01 How to Make Slow Motion Videos via Recording?
02 How to Apply the Smooth Slow-Motion Effect in Post-Production?
Part 1: How to Make Slow Motion Videos via Recording?
The fact is, the playback speed of a video is inversely proportional to the frames per second (FPS) it has been recorded in. Usually, to have a video play at normal speed, it is recorded at 24 FPS or 30 FPS. On the other hand, if you increase the frame rate (FPS) to 120 or 240, the playback speed slows down. You can easily check this if you have access to a DSLR camera or an iPhone. These devices allow you to adjust the FPS so the videos can be recorded in slow motion.
For your convenience and learning, the step-by-step procedure on how to record a video in slow motion using an iPhone is explained below:
Step 1: Get to the SLO-MO Mode
Launch the Camera app on your iPhone (iPhone 13 Pro Max is used here for illustrations), and swipe the screen to the left to get to the SLO-MO mode.

Step 2: Adjust Recording Preferences
Tap the number at the top-right corner to switch between 120 FPS and 240 FPS as needed. Tap 1x from the lower-middle section of the screen, and use the rotator to adjust your preferred zoom level.

Step 3: Start and Stop Recording
Tap the Record button from the bottom-center of the screen to begin recording the video in slow motion. Tap Stop when you are done. You can access the recorded video from the Videos container of the Photos app in your iPhone.
If you are using Android phone, you can check this article to find out more details about How to Record Super Slow Motion Videos on Your Phone.
You may also like: Best Slo-mo Camera Apps for Android And iPhone
Part 2: How to Apply the Smooth Slow-Motion Effect in Post-Production?
If you don’t have access to a camera that can record videos in slow motion, or in case you want to capture the footage at normal playback speed and then slow it down later, you need a dedicated tool to get the job done. Even though several post-production applications are available in the market, the one that is most versatile, has an intuitive interface, and is quite easy to use is Filmora video editor from Wondershare .
The latest version of the app, i.e., Wondershare Filmora 11 has a new feature called Speed Ramping that enables you to graphically manage the speed of the clips. While using the feature, you can either slow down the entire video or certain parts of it according to your requirements. For your learning, both the methods are explained below:
Method 1: Add Slow Motion Effect to the Whole Clip
For Win 7 or later (64-bit)
For macOS 10.12 or later
Step 1: Import the Source Video and Add to Timeline
Launch Wondershare Filmora on your Windows or Mac computer (a Windows 11 PC is used here for illustrations), click New Project from the first screen that appears. Make sure that the Media tool is selected from the standard tool bar at the top, click anywhere inside the Media window, and select and import the source clip to the program.

Next, hover the mouse over the thumbnail of the imported video in the Media window, and click the + icon present at its bottom-right corner. When the confirmation box comes up, click the Match to Media or Keep Project Settings button to change the project settings to match the resolution of the video, or change the footage to meet the project settings respectively.

Step 2: Add Slow Motion Effect to the Whole Clip
Once the media is added to the timeline, click on it and then click the Speed icon on the toolbar. Scroll down to the Slow menu and then you will see 0.5x, 0.25x, 0.1x, 0.05x and 0.01x presets. Select one to add slo-mo effects to the whole select clip. and click Speed Ramping from the menu that drops down.

You can also right click the video in the timeline, and hover over to Speed option to select Uniform Speed to adjust the speed of the video to make a slo-mo effect video. Drag the speed slider to the left to slow down the video and you will see how many times it slowed down in the next field.

Method 2: Use Speed Ramping to Add Slow Motion Effect
For Win 7 or later (64-bit)
For macOS 10.12 or later
Speed Ramping enables you to add the slow-motion effect at different parts of a video and even freeze the screen for the duration that you specify. The processes to get these done are given below in detail:
Step 1: Add Source Video to Timeline and Get to the Speed Ramping Window
Use the process given in the previous method to import a source video to Wondershare Filmora 11 and add it to the Timeline. Then use the process given in the second step of the previous method to get to the Speed Ramping window.
Step 2: Add Slow Motion Effect to Different Parts of the Clip
Go to the Speed Ramping tab if it is not already selected, click Custom from the available options, and drag the adjustment points below the center line to reduce the playback speed for that particular section of the clip. Optionally, you can click any of the available presets to automatically add the slow-motion effect to the video.
Note: You can also drag the adjustment points above the line to increase the playback speed.
To add an adjustment point on the frame where it is not already present, place the playhead (skimmer) at the correct position, and click Add Adjust Point from the left of the Speed Ramping window itself. Once added, you can drag it downward to reduce the playback speed of that part of the clip.

Step 3: Freeze the Video
Place the skimmer on the frame where you want to freeze the video for a while, and click Add Freeze Frame from the left of the Speed Ramping window. When the time box appears, in the Freeze Time field, enter the duration in seconds you want to freeze the screen for, and click OK.

After adding a freeze point, optionally, you can drag and reposition it in the Speed Ramping timeline as needed. Finally, click OK from the bottom-right area to save the changes.
Part 3: When to Use Slow Motion?
There could be many instances when you want to add a slow-motion effect to your videos. Some of the most common ones include:
- Add Focus
If there is a particular scene in a clip that you want the audience to focus on, it would be a good idea to add the slow-motion effect right before that action appears on the screen, and bring the speed back to normal when the section is over.
- Skill or Style Demonstration
When a clip is playing at a normal speed, many times, the audience isn’t able to see the skills that you want to display. This is where you may want to add the slow-motion effect so that every detail can be noticed clearly and in detail.
- Replays
Mostly used for tournaments and matches where the actual action is to replayed so the audience, umpires, and other viewers can see the movements in detail before making the right decision.
- Observation
Some natural phenomena such as a deer running in the woods, a balloon full of water bursting, etc. occur quite quickly. If you want to witness such things clearly and in detail, it would be good to record them, and then reduce the playback speed for better viewing.
- Add Suspense
When you add the slow-motion effect to a scene, the impulse of the audience is automatically increased, and they take that particular section more seriously and with a thrill.
Conclusion
The slow-motion effect is inversely proportional to the framerate, i.e., frames per second or FPS. Almost all DSLR cameras that are available nowadays allow you to switch between different FPS values (typically 120 and 240) before recording. Also, if you have access to an iPhone, its Camera app has a built-in SLO-MO mode that can capture the footage in slow motion.
In addition, if you already have a video that has been recorded at a normal speed, you can use an efficient post-production software like Wondershare Filmora 11, and exploit its Speed Ramping feature to add the slow-motion effect at different scenes of a clip.
02 How to Apply the Smooth Slow-Motion Effect in Post-Production?
Part 1: How to Make Slow Motion Videos via Recording?
The fact is, the playback speed of a video is inversely proportional to the frames per second (FPS) it has been recorded in. Usually, to have a video play at normal speed, it is recorded at 24 FPS or 30 FPS. On the other hand, if you increase the frame rate (FPS) to 120 or 240, the playback speed slows down. You can easily check this if you have access to a DSLR camera or an iPhone. These devices allow you to adjust the FPS so the videos can be recorded in slow motion.
For your convenience and learning, the step-by-step procedure on how to record a video in slow motion using an iPhone is explained below:
Step 1: Get to the SLO-MO Mode
Launch the Camera app on your iPhone (iPhone 13 Pro Max is used here for illustrations), and swipe the screen to the left to get to the SLO-MO mode.
Step 2: Adjust Recording Preferences
Tap the number at the top-right corner to switch between 120 FPS and 240 FPS as needed. Tap 1x from the lower-middle section of the screen, and use the rotator to adjust your preferred zoom level.
Step 3: Start and Stop Recording
Tap the Record button from the bottom-center of the screen to begin recording the video in slow motion. Tap Stop when you are done. You can access the recorded video from the Videos container of the Photos app in your iPhone.
If you are using Android phone, you can check this article to find out more details about How to Record Super Slow Motion Videos on Your Phone.
You may also like: Best Slo-mo Camera Apps for Android And iPhone
Part 2: How to Apply the Smooth Slow-Motion Effect in Post-Production?
If you don’t have access to a camera that can record videos in slow motion, or in case you want to capture the footage at normal playback speed and then slow it down later, you need a dedicated tool to get the job done. Even though several post-production applications are available in the market, the one that is most versatile, has an intuitive interface, and is quite easy to use is Filmora video editor from Wondershare .
The latest version of the app, i.e., Wondershare Filmora 11 has a new feature called Speed Ramping that enables you to graphically manage the speed of the clips. While using the feature, you can either slow down the entire video or certain parts of it according to your requirements. For your learning, both the methods are explained below:
Method 1: Add Slow Motion Effect to the Whole Clip
For Win 7 or later (64-bit)
For macOS 10.12 or later
Step 1: Import the Source Video and Add to Timeline
Launch Wondershare Filmora on your Windows or Mac computer (a Windows 11 PC is used here for illustrations), click New Project from the first screen that appears. Make sure that the Media tool is selected from the standard tool bar at the top, click anywhere inside the Media window, and select and import the source clip to the program.
Next, hover the mouse over the thumbnail of the imported video in the Media window, and click the + icon present at its bottom-right corner. When the confirmation box comes up, click the Match to Media or Keep Project Settings button to change the project settings to match the resolution of the video, or change the footage to meet the project settings respectively.
Step 2: Add Slow Motion Effect to the Whole Clip
Once the media is added to the timeline, click on it and then click the Speed icon on the toolbar. Scroll down to the Slow menu and then you will see 0.5x, 0.25x, 0.1x, 0.05x and 0.01x presets. Select one to add slo-mo effects to the whole select clip. and click Speed Ramping from the menu that drops down.
You can also right click the video in the timeline, and hover over to Speed option to select Uniform Speed to adjust the speed of the video to make a slo-mo effect video. Drag the speed slider to the left to slow down the video and you will see how many times it slowed down in the next field.
Method 2: Use Speed Ramping to Add Slow Motion Effect
For Win 7 or later (64-bit)
For macOS 10.12 or later
Speed Ramping enables you to add the slow-motion effect at different parts of a video and even freeze the screen for the duration that you specify. The processes to get these done are given below in detail:
Step 1: Add Source Video to Timeline and Get to the Speed Ramping Window
Use the process given in the previous method to import a source video to Wondershare Filmora 11 and add it to the Timeline. Then use the process given in the second step of the previous method to get to the Speed Ramping window.
Step 2: Add Slow Motion Effect to Different Parts of the Clip
Go to the Speed Ramping tab if it is not already selected, click Custom from the available options, and drag the adjustment points below the center line to reduce the playback speed for that particular section of the clip. Optionally, you can click any of the available presets to automatically add the slow-motion effect to the video.
Note: You can also drag the adjustment points above the line to increase the playback speed.
To add an adjustment point on the frame where it is not already present, place the playhead (skimmer) at the correct position, and click Add Adjust Point from the left of the Speed Ramping window itself. Once added, you can drag it downward to reduce the playback speed of that part of the clip.
Step 3: Freeze the Video
Place the skimmer on the frame where you want to freeze the video for a while, and click Add Freeze Frame from the left of the Speed Ramping window. When the time box appears, in the Freeze Time field, enter the duration in seconds you want to freeze the screen for, and click OK.
After adding a freeze point, optionally, you can drag and reposition it in the Speed Ramping timeline as needed. Finally, click OK from the bottom-right area to save the changes.
Part 3: When to Use Slow Motion?
There could be many instances when you want to add a slow-motion effect to your videos. Some of the most common ones include:
- Add Focus
If there is a particular scene in a clip that you want the audience to focus on, it would be a good idea to add the slow-motion effect right before that action appears on the screen, and bring the speed back to normal when the section is over.
- Skill or Style Demonstration
When a clip is playing at a normal speed, many times, the audience isn’t able to see the skills that you want to display. This is where you may want to add the slow-motion effect so that every detail can be noticed clearly and in detail.
- Replays
Mostly used for tournaments and matches where the actual action is to replayed so the audience, umpires, and other viewers can see the movements in detail before making the right decision.
- Observation
Some natural phenomena such as a deer running in the woods, a balloon full of water bursting, etc. occur quite quickly. If you want to witness such things clearly and in detail, it would be good to record them, and then reduce the playback speed for better viewing.
- Add Suspense
When you add the slow-motion effect to a scene, the impulse of the audience is automatically increased, and they take that particular section more seriously and with a thrill.
Conclusion
The slow-motion effect is inversely proportional to the framerate, i.e., frames per second or FPS. Almost all DSLR cameras that are available nowadays allow you to switch between different FPS values (typically 120 and 240) before recording. Also, if you have access to an iPhone, its Camera app has a built-in SLO-MO mode that can capture the footage in slow motion.
In addition, if you already have a video that has been recorded at a normal speed, you can use an efficient post-production software like Wondershare Filmora 11, and exploit its Speed Ramping feature to add the slow-motion effect at different scenes of a clip.
Windows Movie Maker Review
Are you considering creating impressive movies from your video clips? Then you need to install this famous Windows movie maker tool to fulfill your job. This is expert video editing Microsoft software that you may use for free. This video editing tool by Windows has received massive recognition due to its simplicity. Also, it makes every task easy and quick, like combining video clips to form digital movies, including various effects, background music, transitions, and titles.
So, Windows Movie Maker is undoubtedly the ideal software for this job. Moreover, video editors using this app experience several attributes in their organization to finally emerge with the perfect videos, like audio options, animations, transitions overlays, and timeline narration. It has user-friendly features, which you’ll enjoy experimenting with. This software also has XML code allowing its end users to modify live effects and transitions or even prepare very new ones.
This brilliant tool can even do primary track editing, including fade-out and fade-in effects in your final audio tracks. Windows movie maker even allows you to post your final project effortlessly on various video sites and social media platforms. Here’s a complete guide:
1. Download and Install Windows Movie Maker
Windows movie maker was previously recognized in Windows 7 as Windows Live Movie Maker. So to experience the features of this software, first, you need to download and install this app which is available free of charge. The steps are as follows.
- Firstly, download the setup file of Windows Live Essentials.
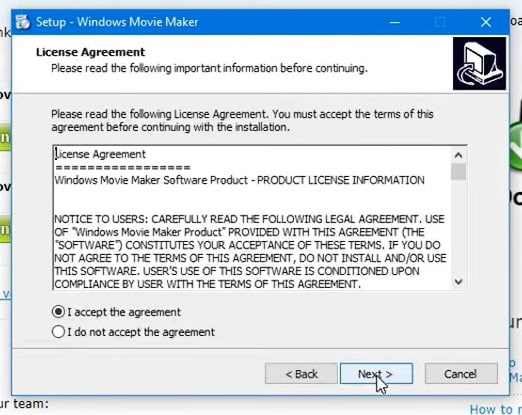
- You’ve to double-click on this setup file called windows-movie-maker.exe. Then tap on ‘Yes’ to permit the setup package to function.
- You’ll now be redirected to the installation window of Windows Essential. Next, you’ll see two options towards the web page’s top, and you’ll have to select the option ‘Install all of Windows Essentials (recommended)’ to continue with the installation process.
Windows Essentials comprise Microsoft OneDrive, Outlook Connector Pack, Movie Maker, Writer, Mail, Photo Gallery, and Messenger.
- Locate ‘View Details’ towards the left end of the page and tap on it. A progress and percentage bar will pop out along with the details regarding the program you’re installing.
- You need to wait a while to install Windows Movie Maker Software. Pause until the program completes its installation. After you find that the program title changes to another program such as Mail, you may proceed again.
- Now click on the Windows icon and then the ‘Start’ menu on the bottom left of your computer screen.
- Type and Search for ‘Windows Movie Maker, and you’ll find the newly downloaded app on the screen.
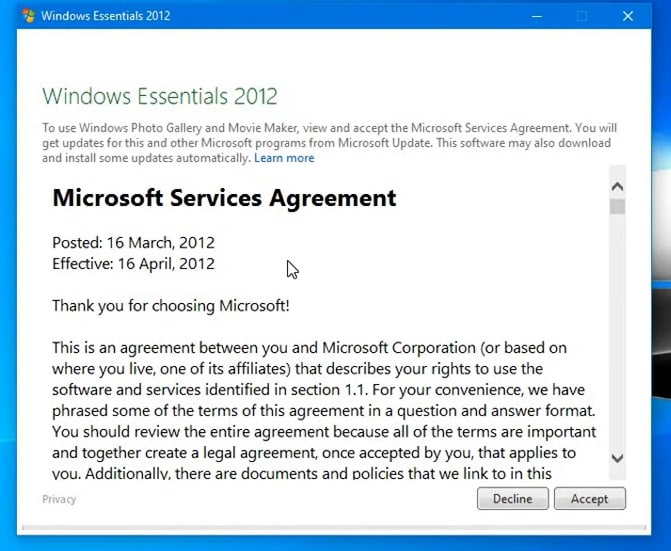
- Click on the icon with film reel, which is the Movie Maker app, and you’ll locate it above the Start menu. Next, you’ll be redirected to the terms of use of Windows Essentials for this Window to begin.
- Find the ‘Accept ‘ button towards the screen’s right-end corner and tap on it. Windows Movie Maker will now open.
- Next, tap on ‘Close’ when prompted with an error message from the installation windows.
You may now Enjoy Windows Movie Maker Live and begin making movies and videos using this software.
2. Interface
The user interface of Winona Movie Maker has three essential areas: the timeline and the storyboard, the panes and the toolbar, and the menu bar. This area covers…
- Timeline and storyboard: It offers a timeline and storyboard usage details for working with the current project clips.
- Panes: It offers details regarding Collections pane usage for viewing all your collections. Furthermore, it offers information regarding the Movie Task pane for all general tasks during movie making or project editing.
- Toolbar and Menubar: Here, you’ll get details regarding toolbar and menu commands usage for different tasks in this software.
3. Basic Editing
Adding clips to your timeline is the most straightforward method for creating digital movies using Movie Maker. Thereby, picking any one AutoMovie Themes out of those seven choices from default, sepia, black and white, pan and zoom, fade, cinematic, and contemporary.
You can enjoy the following choices for editing all your video clips:
- Creating clips: You may create new clips from different video clips after you’re done with capturing and importing in the Windows Movie Maker. You may create clips in the software anytime, according to your convenience.
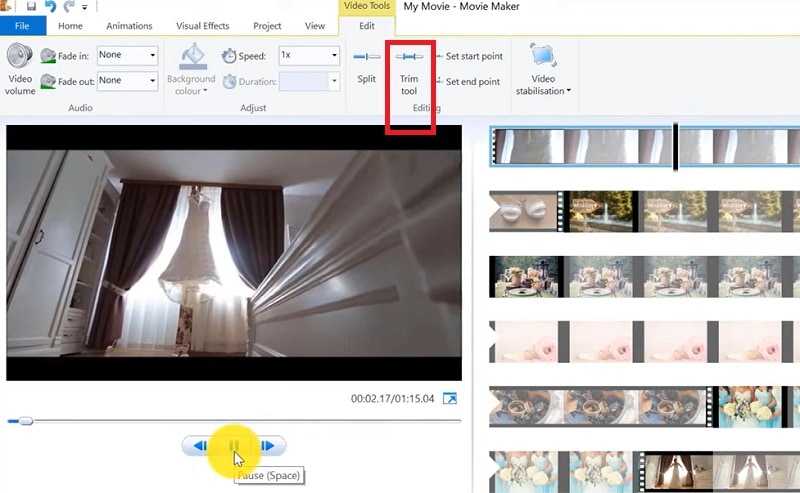
- Trimming any clip: You may hide any clip part you don’t wish to keep in the project. For instance, you may trim the clip’s end or beginning. Also, trimming doesn’t erase the details provided in their source material.
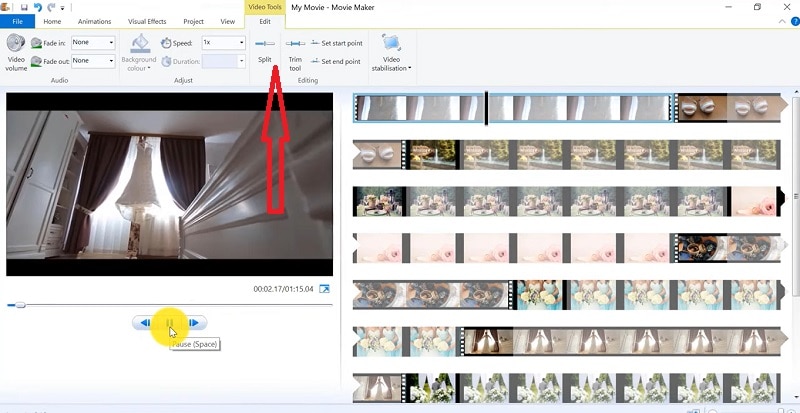
- Splitting Clips: Movie Maker allows you to split any video into two parts which can be helpful when you wish to add a video transition picture between the clips.
- Combining clips: Movie Maker allows you to merge two or multiple contiguous clips. Contiguous indicates that you need to record these clips together so that the beginning and end times are the same as the following video clip.
4. Add Video Effects
Video effects’ ascertain how any title, picture, or video clip displays in the final movie or project. Video effects permit you to include various effects in the movie and are added for the total time that the title, picture, or video clip displays.
Furthermore, you may add various other effects, which you’ll find in the folder of video effects in their Collections pane. You may maintain video effects when moving, copying, cutting, or splitting a picture or video clip.
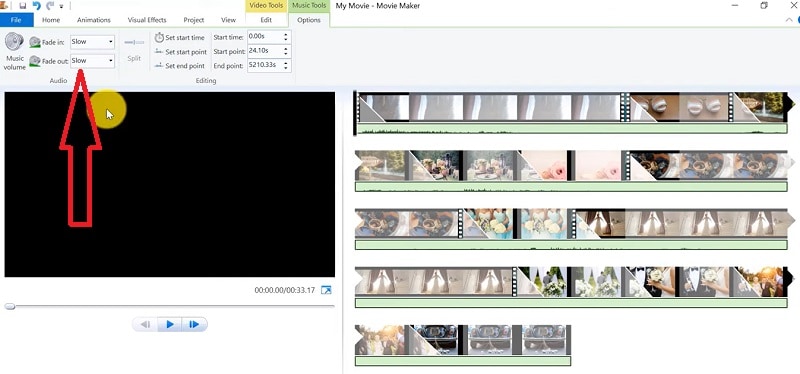
5. Audio Editing
Windows Movie Maker permits you to operate various audios in several ways. A few specific audio-related jobs you may execute in Windows Movie Live Maker comprise the following:
- Audio levels adjustment: You can adjust your audio level so that you can easily control the audio playback and balance after you have the audio that comes up on Music/ Audio and Audio tracks in your timeline.
- Timeline narration: You may include a voice narration for the picture or video clips, which will appear on the timeline’s video track. There’ll be an automated synchronization of the audio narration with your video, where the narration shall elaborate on the movie event or action when you play it.
- Audio Clips Volume adjustment: You may adjust the audio volume for the video clip’s audio portion or the clips containing only audio. This permits you to control the audio clip’s volume such that you can hear it based on the sound level you’ve set for your audio clip.
- Adding audio effects: You may add various audio effects like mute, fade out and fade in.
6. Share Files
Are you done with video project editing, and now you wish to share it? Windows Movie Maker offers you various choices for sharing straight away from their app, comprising:
- YouTube
- Vimeo
So with this power, you may guarantee to share the video’s correct aspect ratio and size version to any planned platform. Nevertheless, you don’t require signing in to your Microsoft account for sharing to the preferred platform, which may act as a hurdle for all its users who do not have Microsoft Office accounts.
7. Pros and Cons
The software’s advantages are its automated preview, simple controls, and user-friendliness. Additionally, the following are some clear advantages and disadvantages of using Windows Movie Maker:
Pros
- This app is perfect for all novices and is an ideal introduction as it utilizes several pro editing systems’ general workflow components like assembling timelines and importing. Its interface has easy navigation and is exceptionally intuitive for most new beginners as well.
- Windows Live MovieMaker is a video editing Microsoft application that arrives standard with all Windows computers. It is amongst the most favorite editing apps obtainable and exact, as other programs are user-friendly and fun. This software comes free with Vista, XP, and Windows Me and has effortless usage. Moreover, you may download additional video plugins, plus it won’t give you any chance to complain regarding its free software.
- This app is straightforward to learn, and you won’t require any experience in film editing for using Windows Media Player. You’ll explore more than 130 effects with accessible Fantastic credits, titles, and transitions. Next to this, you may drag and then drop the clip at any place in the timeline.
- Windows Movie Maker is an ideal app for image slide shows and was developed to create photo and home movie slide shows. It presents excellent fun transitions and themes; you may add music easily. This app provides excellent variety, being a free editing application. Furthermore, it offers transitions and striking effects to function with.
- Windows Live Movie Maker is free of cost for all Microsoft Windows users and is basically for clients having zero to minimum experience editing audio and videos. Moreover, it has many special effects you may use while creating videos. Also, you may frag and then place any picture or video anywhere you wish to see it.
- You can choose from several themes, enhancing your film with tools like contemporary themes, fade effects, and sepia toning choices. You have to click once, and then the users can choose and apply from the multiple effects collection.
Cons
- Windows Movie Maker contains unlimited audio and video tracks, yet it provides just one accessible one at a time. Hence, if you wish to include some other audio or music track, you may prepare the video, thereby sending it to the ultimate file.
- It isn’t uninstallable using any remove or add control panel. Also, it is impossible to do video overlaying.
- This app requires much patience because it is prone to crashes. Moreover, you’ll require enough time and effort to do video reversing. It often becomes frustrating for all advanced editors to cut clips into small parts and then add them back. Hence, Windows Movie maker isn’t good for professional video editors.
- Windows Live MovieMaker can crash and freeze and is known to suffer frequent crashes. Hence, ensure saving often and avoid creating complex videos. Also, you cannot perform complex editing and can now prepare single audio and video track.
8. Windows Movie Maker Alternative Software
Wondershare Filmora Video Editor is the best alternative for Windows Movie Live Maker and is a highly favored and most effective software program. You can download it for free, and it is adaptable with Windows 7 OS or above. This app is user-friendly but powerful and allows you to split, merge, crop, and trip various video clips with essential built-in video editing attributes.
Free Download For Win 7 or later(64-bit)
Free Download For macOS 10.14 or later
Additionally, you may get a few advanced properties like video stabilization, color correction, and green screen in Filmora effortlessly. You may even explore several fashionable and modern video effects such as music, text, and intros for topics like games, Education, Travel, Vlogger, Beauty, etc. Here is the comparison between the two software:
Filmora and Windows Movie Maker comparison
| Basis | Windows Movie Maker | Wondershare Filmora |
|---|---|---|
| Pricing | Free/ inexpensive | Quote basedAnnual SubscriptionOne-time paymentMonthly Payment |
| Interface | Pleasing interface | Auto movie options |
| Effects | Several overlays and effects | Special effects choices and transition overlays |
| Integration | YouTubeFacebookVimeoEmail | TwitterInstagramFacebookVimeoYouTube |
Conclusion
You may use Windows Movie Maker Live for capturing videos and audio to the computer using various video sources, including Web Cameras and Video Cameras, thereby using the recorded data in your new movies. You may import still pictures, video, and audio into this application to use in the movies you’re making. Moreover, after you’ve finished with video and audio content editing in this app, which may involve adding effects, video transitions, and titles, you may finally save the ultimate movie and then share and watch it with your family and friends.
Unlink Audio and Video in DaVinci Resolve [Detailed Steps]
There are various reasons why someone might want to remove audio from a video. Some of the film shots will have a lot of background noise, which might be distracting while watching the video. Some people like to include alternative audio or a soundtrack to make their films more presentable and attract people. So, whether you want to watch a silent video or one with a separate audio file, you’ll have to erase the original audio.
How To Detach Audio and Video in Da Vinci Resolve
DaVinci Resolve is a sound and video editing program for all types of files. It has numerous applications. Let’s begin with audio extraction from a video clip below:
- Launch the DaVinci Resolve and open the file from File>Open>Select video clip.

- All you have to do with DaVinci Resolve is tap on the chain link in the toolbar above to delete audio from any clip. Alternatively, you may just press down the “ctrl + shift + I” keys to connect and unlink the audio from your clip. Inspect the equalizer after that, and you’re done.

- You can now export the footage on your computer once you’ve finished editing and are pleased with the progress.
Other Alternatives
Suppose you find Da Vinci Resolve very complicated, and you get confused a lot while using it. I prepared a list of a few alternatives that you may use to detach the audio to your videos.
Besides extracting sound from video, the software listed below also has functionality for editing the audio file. Here are some of the most excellent and most popular audio separation and replacement tools:
#1: Wondershare Filmora – Overall Best
It is available on Windows and Mac.
Wondershare Filmora is a popular video editing program used all over the world. Filmora includes all the capabilities that will give you the most outstanding results, whether you’re doing easy video editing, advanced video editing, or even making movies. It also has specific editing features for social media videos.
Follow these steps below, and let’s look at how to detach audio from a video file with Filmora:
- Launch Filmora, then click on File-Import Media and load the video clip to the Media Library, wherein the sound needs to be deleted.

- Drag and drop using the mouse the video clips from the Media Library to the Timeline when it has been imported.
- Click Detach Audio from the context menu of the video file on the timeline.

- The audio will now show on the audio track below in a different format.

- To completely remove the audio file, press on it and simply tap the Delete icon.

You may add a new sound to your video clip in the same manner, you did with the video (import, drag, and drop). Filmora also offers options that enable you to edit and add effects to an audio track.
#2: VSDC Video Editor
It is available on Windows and Mac.
VSDC is a popular video editing program that can handle high-resolution videos such as VR 360-degree, 4K UHD, and 3D films. It also allows users to capture speech and film from the screen and save the material in any format they want. Let’s look at how VSDC can be used to eliminate audio from video:
- Upload the clips you want to edit into VSDC.
- Pick the Properties option from the toolbar by right-clicking on the file with the cursor. A small window will drop down from the right side of the screen.

- You will find a Split to Audio and Video tab at the very bottom of the window; select it.

- On the timeline, the sound will now be divided from the video.

- Erase the audio file by clicking on it. Then, the video is now playable without audio.
VSDC also gives you the option of muting the audio rather than deleting it; however, deleting the audio is preferred.
#3: AudioRemover Tool
It is available on Windows, Mac, and Online.
The AudioRemover Tool is a program that allows you to eliminate audio from any video without having to re-encode it. It is an online service that can be accessed using a browser on Windows and Mac computers. The AudioRemover program can be used by those who do not want to download and install video editing software or just wish to remove audio from video files without additional editing. It can handle any video format, including MP4, MOV, and AVI.
Let’s look at how you can use this application to delete audio:
- Open the online AudioRemover.
- Choose the source video using the Browse tab, then press the Upload Video icon.

- You can save the media files (without audio) once the uploading is finished by clicking the Download File button next to the Completed indication.

This program requires an active connection to the internet, and you cannot upload files larger than 500 MB.
#4: Windows Movie Maker
It is available on Windows.
Because it used to be included in the Windows Essentials software set, Windows Movie Maker is among the most popular accessible editing programs. Let’s have a look at how Movie Maker handles audio extraction.
- Upload the video you want to modify into Windows Movie Maker.

- Create a timeline for the video. Remove audio by right-clicking it (You may also click Detach Audio, and then it will detach the sound from the audio track)

- It will immediately erase the sound, and it will not show any Audio input anymore.

Wrapping Things Up
People’s viewing experiences are greatly influenced by the audio accompanying a video. No matter how wonderful or perfect a video clip is, if the audio playing while watching it is terrible, it may be a very frustrating experience. So, we’ve gone over a few different software options for removing audio from a video file and replacing it with another audio in a couple of moments.
Frequently Asked Questions
How to Insert Audio to Video Clip in Da Vinci Resolve?
There may be times that your video may require the addition of music, background audio, or wooshing sounds.
To begin, open Resolve and import your audio clip:
- Navigate to the “Edit” page.
- Select the tab “Media Pool.”
- Right-click and choose “Import Media” or push “Ctrl + i.”
- Pick your audio clip and browse to your location.
- Select “Open.”
The audio clip is now imported into the “Media Pool.” After that, you’ll need to figure out which part of the audio track you’ll use.
Double-click the audio clip to play it. In the “Source Viewer,” it will appear.
Set the needed audio parts in (press I) and out (press O). Alternatively, if you need the entire soundtrack, there’s no need to set in and out.
Drag & drop the audio track (from the media pool) underneath the video you want to use. It will then add the sound file with the selected portion of the audio. You can now modify the audio to match the visual.
How to Link Your Audio and Video in DaVinci Resolve?
It’s best to link the soundtrack (music, sound effect, or background music) to the relevant video once you’ve adjusted the audio file.
Here’s how to connect audio and video in a timeline:
- Press “Ctrl” or “Cmd” to toggle both the video and audio.
- Right-click and choose “Link Clips.” You may also use the shortcuts “Ctrl + Alt + L” or “Option + Command + L.”
- The sound and visual are now both connected.
Thus, you can rest guaranteed that the audio will follow your movie wherever it goes. There will be no issues with out-of-sync!
How Do You Link Many Audio and Video Files Together in DaVinci Resolve?
Several video and audio segments can be linked together to form a single one. You can rearrange them anywhere in the timeline, and they will not be out of sync.
This is how you connect many clips:
- By holding down the “Ctrl” or “Cmd” key, you can choose all the video and audio clips you want.
- Right-click and choose “Link Clips.” You may also use the shortcut keys “Ctrl + Alt + L” or “Option + Command + L”.
- Now, all your video or audio files are linked together.
Is Any Music Available to Use for Editing?
Understanding copyright law can be complicated. It’s best to use free music for video editing if you don’t want to be accused of copyright violation.
Additionally, you can purchase two licenses to avoid copyright concerns. The producer controls the synchronization license, and the master license to use the song recording is managed by the publishing company.
If you don’t want to go into legal trouble, the only thing you need to remember is never to utilize any illegal video.
Is There Any Free Music in DaVinci Resolve?
DaVinci Resolve does not include any free music; however, it does include royalty-free sound effects noise. To get started, you can download and install the available sound package.
What Software Provides Free Music?
The Audio Collection in Wondershare Filmora has over 50 royalty-free audio tracks for videos, with more to come.
For video production, you can acquire free background music.
In addition, Filmora has 25 sound effects, including animal sounds, video game sounds, and beeps. With Filmora, you may use more advanced editing features like keyframing, background noise elimination, cut, trim, crop, PIP effects, green-screen effects, and more to add free-choice music to your film.
Filmora will enhance the appeal of your video by giving free background music. You may also tweak the background sound, such as speeding up and slowing down, fade-in and fade-out.
- All you have to do with DaVinci Resolve is tap on the chain link in the toolbar above to delete audio from any clip. Alternatively, you may just press down the “ctrl + shift + I” keys to connect and unlink the audio from your clip. Inspect the equalizer after that, and you’re done.
- You can now export the footage on your computer once you’ve finished editing and are pleased with the progress.
Other Alternatives
Suppose you find Da Vinci Resolve very complicated, and you get confused a lot while using it. I prepared a list of a few alternatives that you may use to detach the audio to your videos.
Besides extracting sound from video, the software listed below also has functionality for editing the audio file. Here are some of the most excellent and most popular audio separation and replacement tools:
#1: Wondershare Filmora – Overall Best
It is available on Windows and Mac.
Wondershare Filmora is a popular video editing program used all over the world. Filmora includes all the capabilities that will give you the most outstanding results, whether you’re doing easy video editing, advanced video editing, or even making movies. It also has specific editing features for social media videos.
Follow these steps below, and let’s look at how to detach audio from a video file with Filmora:
- Launch Filmora, then click on File-Import Media and load the video clip to the Media Library, wherein the sound needs to be deleted.
- Drag and drop using the mouse the video clips from the Media Library to the Timeline when it has been imported.
- Click Detach Audio from the context menu of the video file on the timeline.
- The audio will now show on the audio track below in a different format.
- To completely remove the audio file, press on it and simply tap the Delete icon.
You may add a new sound to your video clip in the same manner, you did with the video (import, drag, and drop). Filmora also offers options that enable you to edit and add effects to an audio track.
#2: VSDC Video Editor
It is available on Windows and Mac.
VSDC is a popular video editing program that can handle high-resolution videos such as VR 360-degree, 4K UHD, and 3D films. It also allows users to capture speech and film from the screen and save the material in any format they want. Let’s look at how VSDC can be used to eliminate audio from video:
- Upload the clips you want to edit into VSDC.
- Pick the Properties option from the toolbar by right-clicking on the file with the cursor. A small window will drop down from the right side of the screen.
- You will find a Split to Audio and Video tab at the very bottom of the window; select it.
- On the timeline, the sound will now be divided from the video.
- Erase the audio file by clicking on it. Then, the video is now playable without audio.
VSDC also gives you the option of muting the audio rather than deleting it; however, deleting the audio is preferred.
#3: AudioRemover Tool
It is available on Windows, Mac, and Online.
The AudioRemover Tool is a program that allows you to eliminate audio from any video without having to re-encode it. It is an online service that can be accessed using a browser on Windows and Mac computers. The AudioRemover program can be used by those who do not want to download and install video editing software or just wish to remove audio from video files without additional editing. It can handle any video format, including MP4, MOV, and AVI.
Let’s look at how you can use this application to delete audio:
- Open the online AudioRemover.
- Choose the source video using the Browse tab, then press the Upload Video icon.
- You can save the media files (without audio) once the uploading is finished by clicking the Download File button next to the Completed indication.
This program requires an active connection to the internet, and you cannot upload files larger than 500 MB.
#4: Windows Movie Maker
It is available on Windows.
Because it used to be included in the Windows Essentials software set, Windows Movie Maker is among the most popular accessible editing programs. Let’s have a look at how Movie Maker handles audio extraction.
- Upload the video you want to modify into Windows Movie Maker.
- Create a timeline for the video. Remove audio by right-clicking it (You may also click Detach Audio, and then it will detach the sound from the audio track)
- It will immediately erase the sound, and it will not show any Audio input anymore.
Wrapping Things Up
People’s viewing experiences are greatly influenced by the audio accompanying a video. No matter how wonderful or perfect a video clip is, if the audio playing while watching it is terrible, it may be a very frustrating experience. So, we’ve gone over a few different software options for removing audio from a video file and replacing it with another audio in a couple of moments.
Frequently Asked Questions
How to Insert Audio to Video Clip in Da Vinci Resolve?
There may be times that your video may require the addition of music, background audio, or wooshing sounds.
To begin, open Resolve and import your audio clip:
- Navigate to the “Edit” page.
- Select the tab “Media Pool.”
- Right-click and choose “Import Media” or push “Ctrl + i.”
- Pick your audio clip and browse to your location.
- Select “Open.”
The audio clip is now imported into the “Media Pool.” After that, you’ll need to figure out which part of the audio track you’ll use.
Double-click the audio clip to play it. In the “Source Viewer,” it will appear.
Set the needed audio parts in (press I) and out (press O). Alternatively, if you need the entire soundtrack, there’s no need to set in and out.
Drag & drop the audio track (from the media pool) underneath the video you want to use. It will then add the sound file with the selected portion of the audio. You can now modify the audio to match the visual.
How to Link Your Audio and Video in DaVinci Resolve?
It’s best to link the soundtrack (music, sound effect, or background music) to the relevant video once you’ve adjusted the audio file.
Here’s how to connect audio and video in a timeline:
- Press “Ctrl” or “Cmd” to toggle both the video and audio.
- Right-click and choose “Link Clips.” You may also use the shortcuts “Ctrl + Alt + L” or “Option + Command + L.”
- The sound and visual are now both connected.
Thus, you can rest guaranteed that the audio will follow your movie wherever it goes. There will be no issues with out-of-sync!
How Do You Link Many Audio and Video Files Together in DaVinci Resolve?
Several video and audio segments can be linked together to form a single one. You can rearrange them anywhere in the timeline, and they will not be out of sync.
This is how you connect many clips:
- By holding down the “Ctrl” or “Cmd” key, you can choose all the video and audio clips you want.
- Right-click and choose “Link Clips.” You may also use the shortcut keys “Ctrl + Alt + L” or “Option + Command + L”.
- Now, all your video or audio files are linked together.
Is Any Music Available to Use for Editing?
Understanding copyright law can be complicated. It’s best to use free music for video editing if you don’t want to be accused of copyright violation.
Additionally, you can purchase two licenses to avoid copyright concerns. The producer controls the synchronization license, and the master license to use the song recording is managed by the publishing company.
If you don’t want to go into legal trouble, the only thing you need to remember is never to utilize any illegal video.
Is There Any Free Music in DaVinci Resolve?
DaVinci Resolve does not include any free music; however, it does include royalty-free sound effects noise. To get started, you can download and install the available sound package.
What Software Provides Free Music?
The Audio Collection in Wondershare Filmora has over 50 royalty-free audio tracks for videos, with more to come.
For video production, you can acquire free background music.
In addition, Filmora has 25 sound effects, including animal sounds, video game sounds, and beeps. With Filmora, you may use more advanced editing features like keyframing, background noise elimination, cut, trim, crop, PIP effects, green-screen effects, and more to add free-choice music to your film.
Filmora will enhance the appeal of your video by giving free background music. You may also tweak the background sound, such as speeding up and slowing down, fade-in and fade-out.
Using Montage In Movies | Learn to Use Montage With Movies
As with many new things in life, Montage isn’t your best friend right off the bat. So, if you want to learn to use montages with movies, they need to be the right ones. If you don’t know what Montage is, it is a way of compressing an action or series of actions into a short amount of time. We look at movies because they are a common type of entertainment everyone has seen before, which makes them easier to understand as a concept.
Using Montage is a great way to create engaging video content. There are many people interested in the topic of Montage, so if you get that video out there, you can easily find an audience. When used in conjunction with YouTube advertising, creating videos about Montage could be an excellent business idea for you.
Learning how to use Montage properly can be challenging. The process isn’t intuitive, and using it can feel like hiding random pieces around your page. But, when you watch the right movies, they can help you understand how to use this tool effectively. So, take some time, check out these movies, and learn how to get the most out of Montage!
What Is A Montage?
The definition of a montage is a “series of short scenes or episodes forming a unified whole.” That definition can lead to different interpretations of a montage and can be applied to any art medium. A “montage” isn’t just for movies. Music artists use montages to tell stories that often describe their emotions and experiences; writers create poetry and prose contained in such an artistic form, and painters often use this art form. However, many people are most familiar with the term associated with movies: a montage is essentially a collection of images or scenes that populate a movie with music.
If you’ve seen any blockbuster Hollywood films in the last ten years, you’ve probably seen some Montage. The Montage is a sequence that takes place over a set period and shows us how the lead character goes from being an ordinary person to an extraordinary one. The difference between these two states is dramatic, so we see so many montages in movies. They are meant to grab your attention and excitingly introduce a character.
Purpose of Montage
Montage movies are made up of a compilation of short yet powerful scenes put together to make one movie or project. Even though these types of movies have become a common genre, there’s a list of reasons why this is popular in movies today.
- Montage has several uses in movies. Of course, Montage can be used to show events such as battles or dancing. It can also describe emotions, including sadness, happiness, and sarcasm. These different uses of Montage do come with their styles, but they all share a few common traits.
- They’re often used to condense periods of storytime into much smaller but more entertaining segments. The word montage is French for “to construct from many parts .”Montages can now be seen everywhere in film and television, from silent films to blockbuster action movies.
- This is frequently used in narratives when the story needs to advance quickly. The characters are going somewhere or doing something else not within the context of the moment in time that represents them. A great example of a montage was used in Rocky when Rocky was training for his fight with Apollo Creed.
- A montage allows filmmakers to explore a theme using several sequential shots that can’t be covered in a single shot.
Learn To Use Montage With These Movies
1. Rocky (1976)
The training montage is popular in cinema. A montage like this helps us follow how the protagonist prepares himself for a life-threatening fight and claims honor in society. Sylvester Stallone plays Robert “Rocky” Balboa, going through the rigorous preparations for his fight. A song by Bill Conti called “Gonna Fly Now” is playing in the background, contributing to the scene’s energy.
Rocky (1976)
2. Scarface (1983)
A fictional Cuban Tony (Al Pacino) becomes a gangster in Brian De Palma’s 1983 film Scarface against the backdrop of the cocaine boom of the 1980s. He is portrayed as a criminal rising to the echelons of the underworld and slowly falling. In this montage sequence, Tony becomes the biggest drug lord in Miami and controls nearly all the cocaine that comes through the city.
Scarface (1983)
3. Goodfellas (1990)
Martin Scorsese’s Goodfellas is a gangster film set in 1950s New York City, one of the best. In it, Irish-Italian Henry Hill (Ray Liotta) is portrayed as he rises through the ranks of the crime branch of his Brooklyn neighborhood. As we watch this Montage, we see Henry and his gang members viciously murdering anyone who stands in their path. This edit is beautifully complemented by Eric Clapton’s “Layla.” voice-over.
Goodfellas (1990)
4. Trainspotting (1996)
Ewan McGregor stars in Danny Boyle’s black comedy, which tells the tale of drug addict Mark Renton (Danny Boyle). Mark tries to get clean and get back on his feet. Despite this, drug enticements and friend influence are major deterrents. Through this introductory Montage, we are introduced to the protagonist’s lifestyle. In addition, the film explores the themes of drug abuse, addiction, and nihilism.
Trainspotting (1996)
5. Run Lola Run (1998)
In his movie Run Lola Run (1998), Tom Tykwer tells the story of Lola (Franka Potente) and Mani (Moritz Bleibtreu) as they face the different possibilities that arise from a single event in their lives. This Montage shows Lola bumping into various people as she begins to sprint. Her encounter has a profound impact on their lives. Through Montage, the film is given a sense of exhilarating pace and multi-layered visual design.
Run Lola Run (1998)
6. Requiem for a Dream (2000)
Hubert Selby Jr.’s titular novel is the source material for Darren Aronofsky’s psychological drama. Four people trapped by their addictions are the focus of the narrative. By watching this Montage, a viewer can get a better sense of the world or the film’s characters. As a result of their drug addictions, four ambitious people will eventually have their dreams dashed. As a result, we gain insight into how addiction takes hold of the characters’ minds and bodies.
Requiem for a Dream (2000)
7. Swades (2004)
Songs have played an integral role in bringing the story of the film to life in the hands of some of India’s most thoughtful filmmakers. Among them is Ashutosh Gowariker. Montage techniques are used to create the title song sequence of his film Swades. The fictional Indian village of Charanpur, where the protagonist Mohan Bhargava (Shahrukh Khan) has lived, is a source of great trauma for the protagonist. As he ends up returning to India, the song signifies his development psychologically.
Swades (2004)
8. Whiplash (2014)
Miles Teller plays Andrew Neiman, a promising young drummer who enrolls in a tough music conservatory. Damien Chazelle directs the film. Terence Fletcher (J. K. Simmons) mentors him, and he is determined to see his students’ dreams come true. Neiman pushes himself to his limits in this Montage, suffering a breakdown as a result. Edited shots and tempo match the visual images to accentuate the protagonist’s mental state.
Whiplash (2014)
9. Gone Girl (2014)
Gillian Flynn’s eponymous novel is the basis for David Fincher’s psychological crime drama. On their fifth wedding anniversary, Amy Elliott Dunne (Rosamund Pike) disappears, and Nicholas Dunne (Ben Affleck) becomes the prime suspect. Amy carefully crafts her new identity in this Montage as we learn she is alive. The Montage ends as Amy sets up her cabin and begins purchasing supplies. After hitting herself with a hammer, the sequence ends.
Whiplash (2014)
10. Parasite (2019)
In Bong Joon-ho’s Oscar-winning dark comedy thriller, the Kim family lives on the edge of poverty. They are suddenly thrown into a world of affluence when a family member gets a job at an affluent family. Moon-Gwang (Lee Jung-Eun) is a long-time housekeeper for the Kim family. The family comes up with a cunning plan to exploit her allergy to peaches. In the closing montage, they convince Mrs. Park (Cho Yeo-Jeong) that Moon-Gwang has tuberculosis.
Whiplash (2014)
Wondershare Filmora11 Express Better
Achieve More
Grow Together
Free Download Free Download Learn More

![]()
Summarize:
If you’re thinking about using Montage, check out movies and trailers in the Action and Comedy genres. Keep in mind that finding material that works well with montages is no accident. They are filled with some of the best soundtracks, action scenes, and comedy routines that can help guide your project through its rough spots. Montage can do amazing things for any movie, so it’s important to learn when and where it should be used.
Rocky (1976)
2. Scarface (1983)
A fictional Cuban Tony (Al Pacino) becomes a gangster in Brian De Palma’s 1983 film Scarface against the backdrop of the cocaine boom of the 1980s. He is portrayed as a criminal rising to the echelons of the underworld and slowly falling. In this montage sequence, Tony becomes the biggest drug lord in Miami and controls nearly all the cocaine that comes through the city.
Scarface (1983)
3. Goodfellas (1990)
Martin Scorsese’s Goodfellas is a gangster film set in 1950s New York City, one of the best. In it, Irish-Italian Henry Hill (Ray Liotta) is portrayed as he rises through the ranks of the crime branch of his Brooklyn neighborhood. As we watch this Montage, we see Henry and his gang members viciously murdering anyone who stands in their path. This edit is beautifully complemented by Eric Clapton’s “Layla.” voice-over.
Goodfellas (1990)
4. Trainspotting (1996)
Ewan McGregor stars in Danny Boyle’s black comedy, which tells the tale of drug addict Mark Renton (Danny Boyle). Mark tries to get clean and get back on his feet. Despite this, drug enticements and friend influence are major deterrents. Through this introductory Montage, we are introduced to the protagonist’s lifestyle. In addition, the film explores the themes of drug abuse, addiction, and nihilism.
Trainspotting (1996)
5. Run Lola Run (1998)
In his movie Run Lola Run (1998), Tom Tykwer tells the story of Lola (Franka Potente) and Mani (Moritz Bleibtreu) as they face the different possibilities that arise from a single event in their lives. This Montage shows Lola bumping into various people as she begins to sprint. Her encounter has a profound impact on their lives. Through Montage, the film is given a sense of exhilarating pace and multi-layered visual design.
Run Lola Run (1998)
6. Requiem for a Dream (2000)
Hubert Selby Jr.’s titular novel is the source material for Darren Aronofsky’s psychological drama. Four people trapped by their addictions are the focus of the narrative. By watching this Montage, a viewer can get a better sense of the world or the film’s characters. As a result of their drug addictions, four ambitious people will eventually have their dreams dashed. As a result, we gain insight into how addiction takes hold of the characters’ minds and bodies.
Requiem for a Dream (2000)
7. Swades (2004)
Songs have played an integral role in bringing the story of the film to life in the hands of some of India’s most thoughtful filmmakers. Among them is Ashutosh Gowariker. Montage techniques are used to create the title song sequence of his film Swades. The fictional Indian village of Charanpur, where the protagonist Mohan Bhargava (Shahrukh Khan) has lived, is a source of great trauma for the protagonist. As he ends up returning to India, the song signifies his development psychologically.
Swades (2004)
8. Whiplash (2014)
Miles Teller plays Andrew Neiman, a promising young drummer who enrolls in a tough music conservatory. Damien Chazelle directs the film. Terence Fletcher (J. K. Simmons) mentors him, and he is determined to see his students’ dreams come true. Neiman pushes himself to his limits in this Montage, suffering a breakdown as a result. Edited shots and tempo match the visual images to accentuate the protagonist’s mental state.
Whiplash (2014)
9. Gone Girl (2014)
Gillian Flynn’s eponymous novel is the basis for David Fincher’s psychological crime drama. On their fifth wedding anniversary, Amy Elliott Dunne (Rosamund Pike) disappears, and Nicholas Dunne (Ben Affleck) becomes the prime suspect. Amy carefully crafts her new identity in this Montage as we learn she is alive. The Montage ends as Amy sets up her cabin and begins purchasing supplies. After hitting herself with a hammer, the sequence ends.
Whiplash (2014)
10. Parasite (2019)
In Bong Joon-ho’s Oscar-winning dark comedy thriller, the Kim family lives on the edge of poverty. They are suddenly thrown into a world of affluence when a family member gets a job at an affluent family. Moon-Gwang (Lee Jung-Eun) is a long-time housekeeper for the Kim family. The family comes up with a cunning plan to exploit her allergy to peaches. In the closing montage, they convince Mrs. Park (Cho Yeo-Jeong) that Moon-Gwang has tuberculosis.
Whiplash (2014)
Wondershare Filmora11 Express Better
Achieve More
Grow Together
Free Download Free Download Learn More
![]()
Summarize:
If you’re thinking about using Montage, check out movies and trailers in the Action and Comedy genres. Keep in mind that finding material that works well with montages is no accident. They are filled with some of the best soundtracks, action scenes, and comedy routines that can help guide your project through its rough spots. Montage can do amazing things for any movie, so it’s important to learn when and where it should be used.
Also read:
- Updated 2024 Approved Create Glitch Text Effect
- How to Find a High-Quality Video Marketing Agency for 2024
- New 2024 Approved Step by Step to Rotate Videos in Davinci Resolve
- Updated Explore Our Comprehensive Guide to the 10 Best Cameras . Unlock the World of Advanced Technology Perfect for Capturing Slow-Motion Footage in Various Scenarios
- Updated What Should Be Considered to Choose A Nice GoPro for Vlogging?
- Updated In 2024, Troubleshoot Snapchat Camera Zoomed in Issue
- In 2024, This Article Will Explore in Detail How You Can Use the Features Available in Wondershare Filmora to Export the Video by Changing the Resolution of the Footage
- 2024 Approved 20 Best LUTs for Music Videos
- New In 2024, How to Brighten Video in Premiere Pro
- Updated 2024 Approved The Complete Guide to Converting GIF to SVG With Ease
- New In 2024, TOP 10 Types of Video Framing From Novice to Master
- New How to Denoise in After Effects – Audio and Video Noise Removal
- 2024 Approved Offering The Best Understanding of Performing iMovie Slow Motion Video
- 2024 Approved Ultimate Guidelines to Help You Use VLC Media Player Better
- Updated 2024 Approved Convert Slow Motion Videos to Regular Videos in Your iOS Device |A How
- Step by Step Guide on Make Gimp Transparent Background PNG
- Updated In 2024, AI Features of Wondershare Filmora - Silence Detection in Videos
- New Camtasia Vs Captivate - Which to Choose, In 2024
- What Is an Eye Zoom Transition Effect? Its a Close-Up Video Effect Allowing Viewers to Transit to the Next Clip From the Eye for 2024
- How to Turn On/Off Motion Blur in Fortnite for 2024 Is It Good for Fortnite?
- In 2024, Do You Want to Rotate Your TikTok Video to Stylize It More? This Article Will Provide Simple Methods of Rotating TikTok Videos to Improve the Audience Viewing Experience
- 2024 Approved This Article Will Focus on Understanding the Secret Tips in Wondershare Filmora that You Can Use to Edit Videos Faster and More Efficiently
- How to Create Vintage Film Effect 1950S
- 2 Ways to Fade in Text in Premiere Pro
- 2024 Approved Dollar-Store DIY Hacks to Use for Filmmaking on a Budget
- New In 2024, Repeated Text Animation Tutorial in Filmora
- New In 2024, Quick Answer What Is a Transparent Logo and Why Do You Need It
- How to Add Zoom Blur Effect In Photoshop
- Updated In 2024, Are You a Teacher? Are You Looking for Educational Background Music? This Article Has Everything You Will Need to Know for Creating Outstanding Educational Teaching Videos
- 2024 Approved Create Promotional Video
- Easy Ways to Edit Recorded Video
- Best Free LUTs to Use for 2024
- New 2024 Approved How to Make Video Fade to Black in Movie Maker
- New Hitfilm Express Video Editor Review
- Updated 2024 Approved Find The Best LUTs for Lightroom
- New Have You Ever Heard Hyperlapse and Tume Lapse Videos? Do You Know the Differences Between Them? This Article Will Introduce the Concepts, Features and Differnces of Them for 2024
- Updated 2024 Approved Why Did Filmora AI Portrait Attract People?
- New In 2024, Finding Best GIF Websites Is Easy as Pie — Heres What You Should Know
- Easy Way to Combine Several Xvid Files Into One Windows, Mac,Android for 2024
- 2024 Approved Have You Ever Heard Hyperlapse and Tume Lapse Videos? Do You Know the Differences Between Them? This Article Will Introduce the Concepts, Features and Differnces of Them
- Updated Top LUTs for Sony HLG
- Updated 2024 Approved Frame Blending Is a Great Way to Smooth Out Your Video Footage in Adobe Premiere Pro. Using This Technique, You Can Create a More Natural Looking Motion by Averaging Out the Frames in Your Clips
- Ways to Learn Discord Game Bots – Even if Youre Just Starting Out 20
- Updated 15 Best Vloggers That You Should Follow for Travel for 2024
- New How To Zoom In On TikTok Videos?
- Updated How to Create a Bokeh Effect for 2024
- Updated 2024 Approved To Help You Perform This Action, in This Article, We List the Steps You Will Need for Cropping Into Video Clips with PowerDirector. As an Added Bonus, We Have Also Included the Method to Perform the Same Actions in WonderShare Filmora
- Latest way to get Shiny Meltan Box in Pokémon Go Mystery Box On Motorola Defy 2 | Dr.fone
- Complete guide for recovering video files on Tecno Spark 20 Pro
- What Pokémon Evolve with A Dawn Stone For Apple iPhone 8 Plus? | Dr.fone
- How To Remove the Two Factor Authentication On iPhone XR
- In 2024, Unlocking Apple iPhone 13 Lock Screen 3 Foolproof Methods that Actually Work | Dr.fone
- How to Downgrade iPhone 6 without Losing Any Content? | Dr.fone
- Is your Vivo Y78t working too slow? Heres how you can hard reset it | Dr.fone
- In 2024, Best 3 Software to Transfer Files to/from Your Xiaomi Redmi Note 12 5G via a USB Cable | Dr.fone
- How To Recover Data From Lost or Stolen iPhone 12 Pro Max In Easy Steps | Stellar
- How to convert AVCHD MTS to MP4 for Motorola Moto G34 5G?
- In 2024, How To Stream Anything From Realme C67 4G to Apple TV | Dr.fone
- Why is iPogo not working On Motorola Moto G04? Fixed | Dr.fone
- The Best Methods to Unlock the iPhone Locked to Owner for iPhone 13 mini
- Fix App Not Available in Your Country Play Store Problem on Huawei Nova Y71 | Dr.fone
- 4 Most-Known Ways to Find Someone on Tinder For Samsung Galaxy S21 FE 5G (2023) by Name | Dr.fone
- Ways To Find Unlocking Codes For Vivo S17t Phones
- How to Check Distance and Radius on Google Maps For your Oppo A78 | Dr.fone
- In 2024, Detailed guide of ispoofer for pogo installation On OnePlus Nord CE 3 Lite 5G | Dr.fone
- new Translate Live Video Making It Possible With The Best Tool
- 9 Best Phone Monitoring Apps for Vivo Y27 4G | Dr.fone
- In 2024, How To Change Infinix Note 30 Pro Lock Screen Clock in Seconds
- Which is the Best Fake GPS Joystick App On Nokia 130 Music? | Dr.fone
- 8 Solutions to Fix Find My Friends Location Not Available On Vivo V29e | Dr.fone
- In 2024, Ultimate Guide from iPhone 8 iCloud Activation Lock Bypass
- How To Restore Missing Messages Files from Honor Play 8T
- How to Reset Lava Yuva 3 Without the Home Button | Dr.fone
- 7 Fixes for Unfortunately, Phone Has Stopped on Motorola Edge 40 | Dr.fone
- 15 Best Strongest Pokémon To Use in Pokémon GO PvP Leagues For Vivo Y36 | Dr.fone
- Dose Life360 Notify Me When Someone Checks My Location On Samsung Galaxy A23 5G? | Dr.fone
- How To Recover Whatsapp Chat History From iPhone XS Max | Stellar
- Title: New 2024 Approved How to Make Video Slow Motion?
- Author: Morgan
- Created at : 2024-05-19 05:13:00
- Updated at : 2024-05-20 05:13:00
- Link: https://ai-video-editing.techidaily.com/new-2024-approved-how-to-make-video-slow-motion/
- License: This work is licensed under CC BY-NC-SA 4.0.
