
:max_bytes(150000):strip_icc():format(webp)/laptop-2443739-5b55bc7c46e0fb00378df55b.jpg)
New 2024 Approved How to Slow Down Time-Lapse Videos on iPhone
How to Slow Down Time-Lapse Videos on iPhone
There are moments that need highlighting and there are moments that need a flashing speed. You can control both moments if you are just wondering can slow down a time lapse. There are video editing softwares like Filmora if you want to know how to slow down time lapse on iPhone. Let’s discuss some of the best time lapse editing tools and also learn about how to slow down a time lapse
What Is Time-Lapse?
Time-lapse is a cinematography and photography technique that captures a series of images or frames at specific intervals over a prolonged period of time and then plays them back at a much faster rate. This creates a visually captivating effect where time appears to be moving faster than in real life.
In a time-lapse video, moments typically occur slowly or over an extended period, such as the movement of clouds, the growth of plants, or construction of buildings are compressed into a short video clip. Time-lapse is a powerful storytelling tool and if you are tempted to learn how to slow down a time lapse video because sometimes they can be faster than we intend them to be. Let’s discuss how you can slow down time lapse video.
Method 1: Using Filmora To Change Time Lapse Speed
Filmora is one of the best video editing software whose user-friendly interface allows both beginners and professionals to create compelling videos effortlessly. With Filmora, you can cut, trim, slow down time lapse video, and edit videos. You can also apply built-in effects and transitions, and adjust the playback speed to create stunning time-lapse or slow-motion effects.
Filmora also offers advanced color grading tools so that you can correct and enhance the color in your videos to make them visually appealing. Additionally, Filmora supports a wide range of video formats and allows easy exporting of edited videos to various platforms, making the sharing process convenient and straightforward. With its rich library of royalty-free music and sound effects. Let’s discuss how to change time lapse speed on iPhone.
AI Time-Lapse For Win 7 or later(64-bit)
AI Time-Lapse For macOS 10.14 or later
- Open Filmora and start a new project.
- Import your time-lapse video by either clicking on “Import” or dragging and dropping the file into the media library.
- Drag the imported video from the media library to the timeline at the bottom of the screen.
- Click on the video in the timeline to select it. You should see editing options appear.
- Look for a speed option, often represented as a speedometer icon. Click on it to open the speed settings.
- In the speed settings, you can slow down time lapse video. You can make it slower according to your preference.
- After adjusting the speed, play the video in the preview window to see if it’s at the desired speed.
- Once done with performing time lapse slower, save and export your edited time-lapse video by choosing the “Export” option.
- Choose the desired output format and save location, then click “Export” to save the edited video.
Method 2: Using Imovie To Change Time Lapse Speed
- Open iMovie on your iOS device.
- Import the time-lapse video you want to edit.
- Drag and drop the video onto the timeline.
- Select the video clip on the timeline.
- Look for the speed adjustment settings; it is usually represented by a turtle or hare icon.
- Click on the speed adjustment icon, and a slider or option to change the speed will appear.
- Adjust the speed according to your preference by dragging the slider or entering a value.
- Play the video to preview the new speed.
- Once you are done with the slow down time lapse video, you can save or export the edited video.
Summary
Learning how to slow down time lapse videos on iPhone enhances the storytelling power of your cinematography, allowing viewers to engage more deeply with your content. There are video editing tools like Filmora and iMovie which have revolutionized the editing process, making it feasible to slow down time lapse video directly on your iPhone. These tools are user-friendly
TRANSLATE with x
English
TRANSLATE with
COPY THE URL BELOW
Back
EMBED THE SNIPPET BELOW IN YOUR SITE
Enable collaborative features and customize widget: Bing Webmaster Portal
Back
Top 10 Best Free Video Compressors
Powerful Video Editor - Wondershare Filmora
Provide abundant video effects - A creative video editor
Powerful color correction and grading
Detailed tutorials are provided by the official channel
Introduction
Are you aware that the videos you record with your iPad, iPhone, or other camera are often larger than 1GB when captured in high resolution? However, some social-media networks often have video size limitations. Therefore, if your video exceeds the video size limitation of the platform, you will be required to shorten that video’s size to meet the specifications of a particular social network using the best video compressor.
Additionally, there are various video compressors online and some video compression software for Windows 10 and Mac that you can use. So, there is no need to spend a lot of money on professional video editing software if you need a quick way to downsize your videos. Besides, tasks can be performed online for free regardless of the operating system used.
In this article, we will assist you through the best free video compressor that you can choose from and learn:
In this article
01 Best Online Video Compressors
02 How to Compress a Large Video File Online and Free Using Wondershare Media.io?

Part 1: Best Online Video Compressors
1. Wondershare Media.io
This video compressor for free allows you to shrink audio and video files effortlessly. Additionally, it supports more than a thousand audio and video file formats, meaning that you can compress videos with Online Uniconverter recorded on different devices. However, compressing videos more extensive than 100MB is not an option.
Price: 2 Free and 3 pricing plans if you intend to subscribe to the pro version starting at $9.99 / Month
Supported Formats: MP4, MOV, WEBM, AVI, WMV, MP3, etc.
Features:
- Uses HTTPS secure socket layer
- It supports multiple devices
- The free version helps quickly compress up to 100MB file
- Without signing up, upload, and edit unlimited image file size
- No watermark even in the free version
- Conversion speed up to 30 times faster in the premium version.
Pros
- It has a quick download and upload speed
- Over a thousand video and audio files supported
- Supports 5 and 10 file editing per day for non-registered and no sign-up users.
- 100% secure
- Voted 4.7 of 5 in quality.
Cons
- Importing clips from Google Drive or Dropbox is not an option
- The file size limit is 100MB
- The free version of io online video compressorhas limited options

2. FreeConvert
This is a straightforward and primary online compression tool for your content, including audio, images, documents, or videos. Although its outlook is quite intimidating, it is pretty simple and easy to use. It also allows you to convert your audio or video file into any format and size. If you are looking for the top MP4 compressor, go for this.
It also ensures that your privacy remains intact by deleting your uploaded files from their server after the processing.
Price: Free and three pricing plans if you intend to subscribe to the pro version starting at $9.99 / Month
Supported Formats: MP4, MOV, WEBM, AVI, WMV, MP3, etc.
Features
- It is available online only
- Supports many output formats.
- Video, audio, image converter
- Files are uploaded securely via HTTPS protocol.
Pros
- It is effortless, fast, and easy to use
- According to user reviews, this tool is excellent for those looking for free MP4 video compressors.
- No pop-up ads when converting
- It delivers excellent quality compressed videos.
Cons
- You get limited to 25 minutes of converted files in the free version

3. VEED.IO Free Online Video Compressor
This online video editing tool offers a free, fast, and easy online video compressor. Since it is online software, you do not need to have a specific type of laptop or desktop to use it. In addition, it does not use up precious storage space since it’s cloud-based.
Price: Free, and a free trial version is available, and three pricing plans if you intend to subscribe to the pro version starting at $12 / Month
Supported Formats: MP4, MKV, MOV, FLV, AVI
Features
- Captions are autogenerated
- Customer service support is excellent
- Add music, text, and photos to videos.
- Offers music visualizer, effects and removes background voices.
- Record via screen, webcam, voice, or even teleprompter.
- Crop, trim, copy, compress, join, loop, or rotate your videos.
- Innumerable features for adding subtitles and transcribing.
Pros
- The best spec is their subtitle tools that automatically generate captions for videos.
- It is swift to use
- It has an excellent support service.
- It’s a straightforward but powerful video editor.
Cons
- The pro version is quite expensive

4. Clideo Video Compressor Online
This web-based video editing application allows users to efficiently perform basic video editing tasks. Aside from rotating, trimming, or merging videos, users can also use Clideo to compress video files.
Price: Pricing plans start at $9,00 per month
Supported Formats: WAV, OGG, MP3, FLAC, AIFF, OOFF, etc.
Features
- There are umpteen features in this tool, like fast compression, previewing the work before saving, etc.
- Easy sign-in process
- Secure as you will only have access to the files.
- Fast and simple online video compressor, so no downloading or installing.
Pros
- The video compression process is quick
- Provides video editing tools
- The easy sign-in process via Facebook or Google
- Offers tons of methods of reducing the size of video files
Cons
- Not possible to choose the video file format
- There is a watermark in the accessible version

5. Compress Video
This free online video compression tool lets users process video files online and delete unnecessary video parts to compress them into the file size you want. It offers various video file formats where users can set the size of the output video file. In addition, this tool will compress the video to the specified size and try to ensure quality. Compress video is also very safe as you do not need to upload your files.
Price: Free
Supported Formats: MP4, MOV, WMV, FLV, AVI, AVCHD, WebM, MKV, etc.
Features
- Safe and easy to use
- It uses HTML5 Technology and FFMPEG JS Technology for extra safety
- Available in different formats.
- Works with Windows, Linux, Mac, and other systems.
Pros
- The video files do not need to get uploaded to the server but are processed directly in the browser
- Only four steps to compress your file.
- Save the video to your local device post-processing.
- 100% free tool.
Cons
- Has limited features

6. Online Converter
If you need a video compressor that is easy to use and reliable, you should not look much further than the Online Converter. With this tool, users can upload videos saved in MP4, MOV, WMV, and other file formats either from a URL or from your computer.
Price: Free
Supported Formats: MP3 to WAV, M4A to MP3, etc.
Features
- Video size output is set directly
- Support different file format.
- Easy to use, choose a file, select your desired video size and click compress.
- It offers an audio quality of 32kbps to 128kbps.
- No compromise on original audio quality.
Pros
- The uploads are smooth
- Supports a range of video file formats
- Allows users set their desired output video size directly
Cons
- Limit the file size to 200MB
- It slows the video compression process
- It does not allow users to choose the file format of the output video
- There is no support for encrypted video files

7. XConvert
XConvert is a free online file conversion and video compressor tool provider specializing in converting, compressing, and splitting files into various formats.
Price: Free
Supported Formats: WeBM, Mp3, MP4, JPG, PNG
Features:
- Simply add files and start your job.
- A completely free online video compressor.
- Select , , VP8, or VP9 basis convert to file format.
- A rating of 4.7 of 5 by users.
Pros
- Allows the conversion to different files format
- It is a multipurpose editing tool.
- Download files individually or in zip format.
Cons
- The website is compact
- Lots of ads on the interface

8. Flixier Online Video Compressor
This is a cloud-powered video editor that dramatically speeds up your video editing process. In addition, it processes your videos on powerful cloud computers to enable you to run it smoothly on any device ranging from slower PC or Chromebooks to Macbooks or any powerful desktop PCs.
Also, it is perfect for anyone that wants to grow a YouTube channel and create marketing or sales videos. The interface is smooth but still offers advanced features, including color adjustments, picture in picture, green screen, horizontal, vertical, and square videos to take your content to the next level.
Price: Free, Pricing plans start at $9.00 per month
Supported Formats: MP4, MOV, MKV, and WEBM,
Features
- Perfect for content marketing and sales
- Works on any device
- No need to open an account to start.
- No download or installation needed.
- No loss of audio or video quality with this video compressor.
- You can trim, crop, and add music, images, and text to videos.
- Its advanced settings options let you optimize CRF and bitrate that suits you.
Pros
- Allows users to record and edit their voice on a microphone or webcam
- Users can edit any video content from their smartphone or camera
- Publish to YouTube, Vimeo, Google Drive, or Dropbox in seconds.
- Only a three-step and three minutes, lightning-fast best video compressor.
- You can develop Facebook ads and add text to videos.
Cons
- Watermark in the free version
- Limited feature in free version

9. Fastreel Video Compressor
Fastreel Video Compressor, a simple video editor, is available for everyone and is an easy-to-use online video editor. Additionally, it helps create video montages like a pro.
Price: Free
Supported Formats: MP4, MOV, MKV, AVI, and WMV files
Features
- Easy to use
- Perfect for creating a montage
- You get to choose three types of compression quality: high, medium, or low.
- Three steps to video compression, add a video file, choose the level, and export.
- It is free. Just drop or add files to start the process.
Pros
- It is free and straightforward to use
- It has an intuitive interface
- It encourages people to express their creativity and bring business ideas to life
- It helps users promote their brand, get more YouTube subscribers, and increase conversion rates.
- It is fast to use
Cons
- Watermark in the free version
- Limited features in the free version
- The high compression level reduces the quality significantly.

10. VideoSmaller
VideoSmaller is an online free service that allows you to reduce video file size online and compress video file size without losing quality. With this service, users can reduce video file size and make video files smaller. Additionally, users can also reduce the size of MP4 videos captured with an iPhone or Android.
Price: Free
Supported Formats: MP4, AVI, MPEG, MOV formats
Features
- Reduce the video size for free.
- Compress the videos right from the browser
- Safe as uploaded files vanish after a few hours.
Pros
- This free online video compressoris simple to use
- VideoSmaller helps compress files without losing quality
Cons
- File upload is limited to 500MB
- Limited features

Media.io is the top online video compressor from the 10 that was listed as it allows you to compress video files without losing quality. Additionally, it is simple, accessible, and easy to use.
Part 2: How to Compress a Large Video File Online and Free Using Wondershare Media.io?
Now, let us see how you can use this video compressor in just three quick steps and get an excellent output for your video files.
Step 1: Open Media.io to Add Files
Click on Media.io video compressor and add Video Files, then click on Choose Files button to upload video file(s) from your network disk or library.

Step 2: Edit the Video File
Reduce Video Size Online and set the custom video resolution, size, bitrate, and output format required in compressing the video, then click the Compress button.
Step 3: Export and Save the Compressed Clip
Save your compressed video(s) by clicking on the Download button to save the resultant video(s) locally, to Dropbox or Google Drive.
Thus, with Media.io, you can compress your videos without downloading any software. It is a 100% safe and secure tool from one of the top software companies, called Wondershare. This free video compressor tool is a must-try for a new video maker.
Part 3: People Also Want to Know
This section shall go through some FAQs that you may come across about video compressors.
Which free video compressor is the best?
Media.io is the top online video compressor that allows you to compress video files without losing quality. Additionally, it is simple, accessible, and easy to use.
What is a video compressor used for?
It is a tool used to reduce the total number of bits needed to represent a given video or image sequence. Additionally, it helps to reduce file size so that it does not occupy too much space.
Conclusion
Thus, as you saw, in this report, we clubbed and summarized a few essential points regarding video compressors. You learned:
- The video compressor online for freethat you should know of.
- The ten best video compressorsto choose from.
- Why is Media.io an excellent online video compressor, and how does it work?
- Lastly, a few FAQs to make you understand the process and tool better.
So, use these tips and start sharing your in-house video-making talent with your family and the world.
Introduction
Are you aware that the videos you record with your iPad, iPhone, or other camera are often larger than 1GB when captured in high resolution? However, some social-media networks often have video size limitations. Therefore, if your video exceeds the video size limitation of the platform, you will be required to shorten that video’s size to meet the specifications of a particular social network using the best video compressor.
Additionally, there are various video compressors online and some video compression software for Windows 10 and Mac that you can use. So, there is no need to spend a lot of money on professional video editing software if you need a quick way to downsize your videos. Besides, tasks can be performed online for free regardless of the operating system used.
In this article, we will assist you through the best free video compressor that you can choose from and learn:
In this article
01 Best Online Video Compressors
02 How to Compress a Large Video File Online and Free Using Wondershare Media.io?
Part 1: Best Online Video Compressors
1. Wondershare Media.io
This video compressor for free allows you to shrink audio and video files effortlessly. Additionally, it supports more than a thousand audio and video file formats, meaning that you can compress videos with Online Uniconverter recorded on different devices. However, compressing videos more extensive than 100MB is not an option.
Price: 2 Free and 3 pricing plans if you intend to subscribe to the pro version starting at $9.99 / Month
Supported Formats: MP4, MOV, WEBM, AVI, WMV, MP3, etc.
Features:
- Uses HTTPS secure socket layer
- It supports multiple devices
- The free version helps quickly compress up to 100MB file
- Without signing up, upload, and edit unlimited image file size
- No watermark even in the free version
- Conversion speed up to 30 times faster in the premium version.
Pros
- It has a quick download and upload speed
- Over a thousand video and audio files supported
- Supports 5 and 10 file editing per day for non-registered and no sign-up users.
- 100% secure
- Voted 4.7 of 5 in quality.
Cons
- Importing clips from Google Drive or Dropbox is not an option
- The file size limit is 100MB
- The free version of io online video compressorhas limited options
2. FreeConvert
This is a straightforward and primary online compression tool for your content, including audio, images, documents, or videos. Although its outlook is quite intimidating, it is pretty simple and easy to use. It also allows you to convert your audio or video file into any format and size. If you are looking for the top MP4 compressor, go for this.
It also ensures that your privacy remains intact by deleting your uploaded files from their server after the processing.
Price: Free and three pricing plans if you intend to subscribe to the pro version starting at $9.99 / Month
Supported Formats: MP4, MOV, WEBM, AVI, WMV, MP3, etc.
Features
- It is available online only
- Supports many output formats.
- Video, audio, image converter
- Files are uploaded securely via HTTPS protocol.
Pros
- It is effortless, fast, and easy to use
- According to user reviews, this tool is excellent for those looking for free MP4 video compressors.
- No pop-up ads when converting
- It delivers excellent quality compressed videos.
Cons
- You get limited to 25 minutes of converted files in the free version
3. VEED.IO Free Online Video Compressor
This online video editing tool offers a free, fast, and easy online video compressor. Since it is online software, you do not need to have a specific type of laptop or desktop to use it. In addition, it does not use up precious storage space since it’s cloud-based.
Price: Free, and a free trial version is available, and three pricing plans if you intend to subscribe to the pro version starting at $12 / Month
Supported Formats: MP4, MKV, MOV, FLV, AVI
Features
- Captions are autogenerated
- Customer service support is excellent
- Add music, text, and photos to videos.
- Offers music visualizer, effects and removes background voices.
- Record via screen, webcam, voice, or even teleprompter.
- Crop, trim, copy, compress, join, loop, or rotate your videos.
- Innumerable features for adding subtitles and transcribing.
Pros
- The best spec is their subtitle tools that automatically generate captions for videos.
- It is swift to use
- It has an excellent support service.
- It’s a straightforward but powerful video editor.
Cons
- The pro version is quite expensive
4. Clideo Video Compressor Online
This web-based video editing application allows users to efficiently perform basic video editing tasks. Aside from rotating, trimming, or merging videos, users can also use Clideo to compress video files.
Price: Pricing plans start at $9,00 per month
Supported Formats: WAV, OGG, MP3, FLAC, AIFF, OOFF, etc.
Features
- There are umpteen features in this tool, like fast compression, previewing the work before saving, etc.
- Easy sign-in process
- Secure as you will only have access to the files.
- Fast and simple online video compressor, so no downloading or installing.
Pros
- The video compression process is quick
- Provides video editing tools
- The easy sign-in process via Facebook or Google
- Offers tons of methods of reducing the size of video files
Cons
- Not possible to choose the video file format
- There is a watermark in the accessible version
5. Compress Video
This free online video compression tool lets users process video files online and delete unnecessary video parts to compress them into the file size you want. It offers various video file formats where users can set the size of the output video file. In addition, this tool will compress the video to the specified size and try to ensure quality. Compress video is also very safe as you do not need to upload your files.
Price: Free
Supported Formats: MP4, MOV, WMV, FLV, AVI, AVCHD, WebM, MKV, etc.
Features
- Safe and easy to use
- It uses HTML5 Technology and FFMPEG JS Technology for extra safety
- Available in different formats.
- Works with Windows, Linux, Mac, and other systems.
Pros
- The video files do not need to get uploaded to the server but are processed directly in the browser
- Only four steps to compress your file.
- Save the video to your local device post-processing.
- 100% free tool.
Cons
- Has limited features
6. Online Converter
If you need a video compressor that is easy to use and reliable, you should not look much further than the Online Converter. With this tool, users can upload videos saved in MP4, MOV, WMV, and other file formats either from a URL or from your computer.
Price: Free
Supported Formats: MP3 to WAV, M4A to MP3, etc.
Features
- Video size output is set directly
- Support different file format.
- Easy to use, choose a file, select your desired video size and click compress.
- It offers an audio quality of 32kbps to 128kbps.
- No compromise on original audio quality.
Pros
- The uploads are smooth
- Supports a range of video file formats
- Allows users set their desired output video size directly
Cons
- Limit the file size to 200MB
- It slows the video compression process
- It does not allow users to choose the file format of the output video
- There is no support for encrypted video files
7. XConvert
XConvert is a free online file conversion and video compressor tool provider specializing in converting, compressing, and splitting files into various formats.
Price: Free
Supported Formats: WeBM, Mp3, MP4, JPG, PNG
Features:
- Simply add files and start your job.
- A completely free online video compressor.
- Select , , VP8, or VP9 basis convert to file format.
- A rating of 4.7 of 5 by users.
Pros
- Allows the conversion to different files format
- It is a multipurpose editing tool.
- Download files individually or in zip format.
Cons
- The website is compact
- Lots of ads on the interface
8. Flixier Online Video Compressor
This is a cloud-powered video editor that dramatically speeds up your video editing process. In addition, it processes your videos on powerful cloud computers to enable you to run it smoothly on any device ranging from slower PC or Chromebooks to Macbooks or any powerful desktop PCs.
Also, it is perfect for anyone that wants to grow a YouTube channel and create marketing or sales videos. The interface is smooth but still offers advanced features, including color adjustments, picture in picture, green screen, horizontal, vertical, and square videos to take your content to the next level.
Price: Free, Pricing plans start at $9.00 per month
Supported Formats: MP4, MOV, MKV, and WEBM,
Features
- Perfect for content marketing and sales
- Works on any device
- No need to open an account to start.
- No download or installation needed.
- No loss of audio or video quality with this video compressor.
- You can trim, crop, and add music, images, and text to videos.
- Its advanced settings options let you optimize CRF and bitrate that suits you.
Pros
- Allows users to record and edit their voice on a microphone or webcam
- Users can edit any video content from their smartphone or camera
- Publish to YouTube, Vimeo, Google Drive, or Dropbox in seconds.
- Only a three-step and three minutes, lightning-fast best video compressor.
- You can develop Facebook ads and add text to videos.
Cons
- Watermark in the free version
- Limited feature in free version
9. Fastreel Video Compressor
Fastreel Video Compressor, a simple video editor, is available for everyone and is an easy-to-use online video editor. Additionally, it helps create video montages like a pro.
Price: Free
Supported Formats: MP4, MOV, MKV, AVI, and WMV files
Features
- Easy to use
- Perfect for creating a montage
- You get to choose three types of compression quality: high, medium, or low.
- Three steps to video compression, add a video file, choose the level, and export.
- It is free. Just drop or add files to start the process.
Pros
- It is free and straightforward to use
- It has an intuitive interface
- It encourages people to express their creativity and bring business ideas to life
- It helps users promote their brand, get more YouTube subscribers, and increase conversion rates.
- It is fast to use
Cons
- Watermark in the free version
- Limited features in the free version
- The high compression level reduces the quality significantly.
10. VideoSmaller
VideoSmaller is an online free service that allows you to reduce video file size online and compress video file size without losing quality. With this service, users can reduce video file size and make video files smaller. Additionally, users can also reduce the size of MP4 videos captured with an iPhone or Android.
Price: Free
Supported Formats: MP4, AVI, MPEG, MOV formats
Features
- Reduce the video size for free.
- Compress the videos right from the browser
- Safe as uploaded files vanish after a few hours.
Pros
- This free online video compressoris simple to use
- VideoSmaller helps compress files without losing quality
Cons
- File upload is limited to 500MB
- Limited features
Media.io is the top online video compressor from the 10 that was listed as it allows you to compress video files without losing quality. Additionally, it is simple, accessible, and easy to use.
Part 2: How to Compress a Large Video File Online and Free Using Wondershare Media.io?
Now, let us see how you can use this video compressor in just three quick steps and get an excellent output for your video files.
Step 1: Open Media.io to Add Files
Click on Media.io video compressor and add Video Files, then click on Choose Files button to upload video file(s) from your network disk or library.
Step 2: Edit the Video File
Reduce Video Size Online and set the custom video resolution, size, bitrate, and output format required in compressing the video, then click the Compress button.
Step 3: Export and Save the Compressed Clip
Save your compressed video(s) by clicking on the Download button to save the resultant video(s) locally, to Dropbox or Google Drive.
Thus, with Media.io, you can compress your videos without downloading any software. It is a 100% safe and secure tool from one of the top software companies, called Wondershare. This free video compressor tool is a must-try for a new video maker.
Part 3: People Also Want to Know
This section shall go through some FAQs that you may come across about video compressors.
Which free video compressor is the best?
Media.io is the top online video compressor that allows you to compress video files without losing quality. Additionally, it is simple, accessible, and easy to use.
What is a video compressor used for?
It is a tool used to reduce the total number of bits needed to represent a given video or image sequence. Additionally, it helps to reduce file size so that it does not occupy too much space.
Conclusion
Thus, as you saw, in this report, we clubbed and summarized a few essential points regarding video compressors. You learned:
- The video compressor online for freethat you should know of.
- The ten best video compressorsto choose from.
- Why is Media.io an excellent online video compressor, and how does it work?
- Lastly, a few FAQs to make you understand the process and tool better.
So, use these tips and start sharing your in-house video-making talent with your family and the world.
Five Thoughts on Discord Create Account’s How-To Questions
Five Thoughts on Discord Create Account
An easy yet powerful editor
Numerous effects to choose from
Detailed tutorials provided by the official channel
Discord was a great alternative to voice chat systems such as TeamSpeak, Mumble, and Ventrilo for online gamers. Gamers make discord accounts for these services to play together rather than the voice communication facilities integrated into games, which are frequently of poor quality and lack functionality.
Founded in 2015, discord allowed individuals to talk while playing PC games seamlessly. Users may utilize the service to establish servers that can include many text and audio channels. A typical discord account server may feature chat rooms dedicated to specific themes (such as “gaming” and “anime x manga”), as well as voice channels devoted to specific games or activities. The service’s high-quality, low-latency audio chat is a popular tool for Twitch broadcasters and podcasters. It has also expanded to accommodate massive video conversations to compete with Zoom.
In this article
01 [How Does Discord Work and What is it Used for?](#Part 1)
02 [How to Make a Discord Signup in the Browser?](#Part 2)
03 [How to Make a Discord Signup with Desktop?](#Part 3)
04 [How to Make a Signup Discord with App?](#Part 4)
05 [Discord Create Account FAQs](#Part 5)
Part 1 How Does Discord Work and What is it Used for?
Discord account allows friends to communicate with one another one-on-one or in groups via a server. You may use it to send direct messages to pals, as well as video calls, audio chat, and screen sharing. Once on a server, you can join a voice chat channel to communicate with other gamers who are playing certain games.
You can share many things on discord, including media files like images, gifs, audio, and videos. Speaking of videos, video editing doesn’t get any better than Filmora. Wondershare Filmora Video Editor is a sophisticated editing application for Windows and Mac users. It was initially known as Wondershare Video Editor, but following its fifth release, it got renamed Filmora. The video editor’s primary features include animation, overlays, audio control, on-screen recording, and multi-editing modes. The video editor is well-known for its feature-rich but the simple interface, making it suited for both novice and experienced users.
For Win 7 or later (64-bit)
For macOS 10.12 or later
Filmora’s standout features
● Editing Audio Equalizer 4K Resolution Support
● Support for GIFs
● Screen Dividers
● Controls For Video And Audio
● Multiple Video Clips Can Be Layered
● Stabilization of Video
● Presets for Color Grading
● Text Editing Expertise
● Tilt-Shift
● The mosaic (Blurring)
● Noise Elimination
● Importance in Social Life
● Preview of Each Frame
● Controlling the Speed
● Audio-Mixer
● Backgrounds in Chroma Key
● Screen Capture
● Separation of audio
● Scene Recognition
You can make your discord account and use it on almost any platform, including discord desktop software for Windows and Mac and iOS and Android apps for talking and calling on the move. If you prefer not to download anything, it also works in a web browser. You can link your discord account app to various popular services, such as Twitch and Spotify, so your friends can see your actions. While there is no discord Xbox app, you may link your discord and Xbox accounts so that others can see what you’re up to on your Xbox Series X or Xbox Series S.
Part 2 How to Make a Discord Signup in the Browser
Don’t have the discord account?
You can quickly sign up using your preferred web browser, i.e., Chrome, Microsoft Edge, Firefox, or Safari.
Follow the steps below to make a discord account using your web browser:
Step 1: Go to <www.discord.com> and click the “Login” button in the upper right corner.
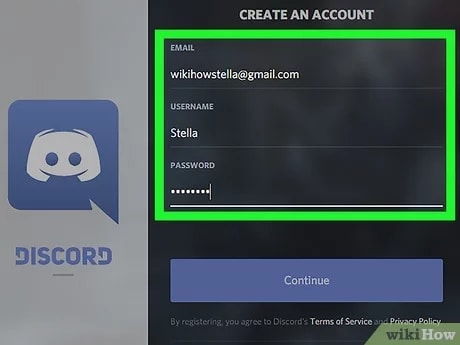
Step 2: To establish a new discord account, click “Register” underneath the login page.
Step 3:
● Enter your email, a username, and a strong password.
● Date of birth.
● Accept the terms of service.
After entering the above, click the “Continue” button.
Step 4: Check the box besides “I am human” to enable the captcha.
Step 5: You will receive an email asking you to confirm your information. Select the “Verify email” option.
Once you’ve signed up for discord, you may access it via the Discord website or the mobile app. The program is free to download for Windows, Linux, Mac, Android, and iOS.
Follow the steps above to sign up on discord account successfully. Easy right? Let’s proceed!
Part 3 How to Make a Discord Signup with Desktop?
The discord creating account on your desktop is pretty much the same as using your browser.
Follow the steps below to make a discord account using your desktop.
Step 1: Click “Login” on the Discord website (top right).
Step 2: Underneath the sign-in box, click “Register.”
Step 3: Enter the email address, username, password, and birth date.
Step 4: Agree to the terms of service and then click “Continue.”
Step 5: Use the captcha to prove that you are not a robot.
Step 6: You will get an email to confirm your data; click on the link in the email to confirm.
See that? No big deal, right?
Part 4 How to Make a Signup Discord with App
Signing up for a discord account through the app is relatively easy, like the procedures above, you will not break a sweat.
Follow the easy steps below for discord create account on your smartphone device:

Step 1: Install and launch the Discord app on your smartphone
Step 2: Select the Register option.
Step 3: Choose whether to register by cellphone number or email address and input either one.
Step 4: You will get a message with a confirmation code or an email with a link.
Step 5: Enter the code or navigate to the URL.
Step 6: Enter your username and password here.
Step 7: Enter your birth date.
Step 8: Accept the terms of the agreement.
Step 9: Click “Next” to finish the Discord registration.
What Happens When You Disable your Discord Account?
When you deactivate your account, it goes to suspension mode. You may reactivate it by signing in and following the on-screen instructions. Keep in mind that discord accounts dormant for two years are removed, so if you want to keep yours, you must reactivate it (but you can disable it after this if you like).
After you deactivate an account, users will no longer get discord alerts. Users may, however, still receive friend requests, and any friend requests users get while their account is blocked will be ready for when they reactivate it. However, when a user decides to delete their account, the said account will get permanently deleted.
Tip: If you want to stay away from your discord account for a while with a plan to return to it later, it is advisable to log out or deactivate rather than delete it.
Part 5 Discord Create Account FAQs
Q. Is discord free, or do I have to pay?
A. Yes and no. The premium edition of discord is not free. If you don’t want to utilize the premium features, you may still download and make a discord account for free.
Q. Is there anything I cannot do on discord?
A. Do not organize, promote, or participate in any unlawful or possibly dangerous activities, such as sexual solicitation, human trafficking, or selling or enabling the sale of forbidden or potentially harmful products (firearms, ammunition, drugs, and controlled substances).
Q. Do messages disappear on discord?
A. Your messages are only destroyed: 1. if they are deleted individually (by you or a user with proper rights), 2. if you get banned, and the person banning you decides to delete all of your messages at once.
Q. Does discord account keep a record of interactions?
A. Yes, discord will track every discussion you have on discord acount, record everything you say on discord, and examine all photographs you transmit over discord.
Q. How will I know when someone blocks me on discord?
A. When you block someone, their online status on discord account changes to “offline” until unblocked and vice versa. They will also show offline in mutual servers or your chat history.
Q. How do I permanently delete my discord account?
A. To delete your discord created account for good, head to user settings, then tap on ‘my account.’ From there, tap on ‘Account Removal’ then tap on ‘Delete Account.’
If you are a server owner, you will have to delete the server or pass ownership of the server.
Q. How do I find servers to join on discord?
A. If you have a buddy who has a discord server you’d want to join, request an invite. If you’re a member of a discord community, ask for an invite or check on the community website.
By tapping the magnifying glass in the left window of the discord account app, you may also search for public servers that anybody can join.
● Ending Thoughts →
● Discord is a web program that works in most browsers. A desktop version is available for Windows, macOS, Linux, iOS, and Android. Discord’s desktop and browser versions are functionally and visually identical in practically every regard if you want to make a discord account. So, re-read the article and the FAQs on discord create account, and start your journey.
● Finally, for the creatives, boost your discord create account and usage experience by using Filmora to edit videos and make cool animations.
Discord was a great alternative to voice chat systems such as TeamSpeak, Mumble, and Ventrilo for online gamers. Gamers make discord accounts for these services to play together rather than the voice communication facilities integrated into games, which are frequently of poor quality and lack functionality.
Founded in 2015, discord allowed individuals to talk while playing PC games seamlessly. Users may utilize the service to establish servers that can include many text and audio channels. A typical discord account server may feature chat rooms dedicated to specific themes (such as “gaming” and “anime x manga”), as well as voice channels devoted to specific games or activities. The service’s high-quality, low-latency audio chat is a popular tool for Twitch broadcasters and podcasters. It has also expanded to accommodate massive video conversations to compete with Zoom.
In this article
01 [How Does Discord Work and What is it Used for?](#Part 1)
02 [How to Make a Discord Signup in the Browser?](#Part 2)
03 [How to Make a Discord Signup with Desktop?](#Part 3)
04 [How to Make a Signup Discord with App?](#Part 4)
05 [Discord Create Account FAQs](#Part 5)
Part 1 How Does Discord Work and What is it Used for?
Discord account allows friends to communicate with one another one-on-one or in groups via a server. You may use it to send direct messages to pals, as well as video calls, audio chat, and screen sharing. Once on a server, you can join a voice chat channel to communicate with other gamers who are playing certain games.
You can share many things on discord, including media files like images, gifs, audio, and videos. Speaking of videos, video editing doesn’t get any better than Filmora. Wondershare Filmora Video Editor is a sophisticated editing application for Windows and Mac users. It was initially known as Wondershare Video Editor, but following its fifth release, it got renamed Filmora. The video editor’s primary features include animation, overlays, audio control, on-screen recording, and multi-editing modes. The video editor is well-known for its feature-rich but the simple interface, making it suited for both novice and experienced users.
For Win 7 or later (64-bit)
For macOS 10.12 or later
Filmora’s standout features
● Editing Audio Equalizer 4K Resolution Support
● Support for GIFs
● Screen Dividers
● Controls For Video And Audio
● Multiple Video Clips Can Be Layered
● Stabilization of Video
● Presets for Color Grading
● Text Editing Expertise
● Tilt-Shift
● The mosaic (Blurring)
● Noise Elimination
● Importance in Social Life
● Preview of Each Frame
● Controlling the Speed
● Audio-Mixer
● Backgrounds in Chroma Key
● Screen Capture
● Separation of audio
● Scene Recognition
You can make your discord account and use it on almost any platform, including discord desktop software for Windows and Mac and iOS and Android apps for talking and calling on the move. If you prefer not to download anything, it also works in a web browser. You can link your discord account app to various popular services, such as Twitch and Spotify, so your friends can see your actions. While there is no discord Xbox app, you may link your discord and Xbox accounts so that others can see what you’re up to on your Xbox Series X or Xbox Series S.
Part 2 How to Make a Discord Signup in the Browser
Don’t have the discord account?
You can quickly sign up using your preferred web browser, i.e., Chrome, Microsoft Edge, Firefox, or Safari.
Follow the steps below to make a discord account using your web browser:
Step 1: Go to <www.discord.com> and click the “Login” button in the upper right corner.
Step 2: To establish a new discord account, click “Register” underneath the login page.
Step 3:
● Enter your email, a username, and a strong password.
● Date of birth.
● Accept the terms of service.
After entering the above, click the “Continue” button.
Step 4: Check the box besides “I am human” to enable the captcha.
Step 5: You will receive an email asking you to confirm your information. Select the “Verify email” option.
Once you’ve signed up for discord, you may access it via the Discord website or the mobile app. The program is free to download for Windows, Linux, Mac, Android, and iOS.
Follow the steps above to sign up on discord account successfully. Easy right? Let’s proceed!
Part 3 How to Make a Discord Signup with Desktop?
The discord creating account on your desktop is pretty much the same as using your browser.
Follow the steps below to make a discord account using your desktop.
Step 1: Click “Login” on the Discord website (top right).
Step 2: Underneath the sign-in box, click “Register.”
Step 3: Enter the email address, username, password, and birth date.
Step 4: Agree to the terms of service and then click “Continue.”
Step 5: Use the captcha to prove that you are not a robot.
Step 6: You will get an email to confirm your data; click on the link in the email to confirm.
See that? No big deal, right?
Part 4 How to Make a Signup Discord with App
Signing up for a discord account through the app is relatively easy, like the procedures above, you will not break a sweat.
Follow the easy steps below for discord create account on your smartphone device:
Step 1: Install and launch the Discord app on your smartphone
Step 2: Select the Register option.
Step 3: Choose whether to register by cellphone number or email address and input either one.
Step 4: You will get a message with a confirmation code or an email with a link.
Step 5: Enter the code or navigate to the URL.
Step 6: Enter your username and password here.
Step 7: Enter your birth date.
Step 8: Accept the terms of the agreement.
Step 9: Click “Next” to finish the Discord registration.
What Happens When You Disable your Discord Account?
When you deactivate your account, it goes to suspension mode. You may reactivate it by signing in and following the on-screen instructions. Keep in mind that discord accounts dormant for two years are removed, so if you want to keep yours, you must reactivate it (but you can disable it after this if you like).
After you deactivate an account, users will no longer get discord alerts. Users may, however, still receive friend requests, and any friend requests users get while their account is blocked will be ready for when they reactivate it. However, when a user decides to delete their account, the said account will get permanently deleted.
Tip: If you want to stay away from your discord account for a while with a plan to return to it later, it is advisable to log out or deactivate rather than delete it.
Part 5 Discord Create Account FAQs
Q. Is discord free, or do I have to pay?
A. Yes and no. The premium edition of discord is not free. If you don’t want to utilize the premium features, you may still download and make a discord account for free.
Q. Is there anything I cannot do on discord?
A. Do not organize, promote, or participate in any unlawful or possibly dangerous activities, such as sexual solicitation, human trafficking, or selling or enabling the sale of forbidden or potentially harmful products (firearms, ammunition, drugs, and controlled substances).
Q. Do messages disappear on discord?
A. Your messages are only destroyed: 1. if they are deleted individually (by you or a user with proper rights), 2. if you get banned, and the person banning you decides to delete all of your messages at once.
Q. Does discord account keep a record of interactions?
A. Yes, discord will track every discussion you have on discord acount, record everything you say on discord, and examine all photographs you transmit over discord.
Q. How will I know when someone blocks me on discord?
A. When you block someone, their online status on discord account changes to “offline” until unblocked and vice versa. They will also show offline in mutual servers or your chat history.
Q. How do I permanently delete my discord account?
A. To delete your discord created account for good, head to user settings, then tap on ‘my account.’ From there, tap on ‘Account Removal’ then tap on ‘Delete Account.’
If you are a server owner, you will have to delete the server or pass ownership of the server.
Q. How do I find servers to join on discord?
A. If you have a buddy who has a discord server you’d want to join, request an invite. If you’re a member of a discord community, ask for an invite or check on the community website.
By tapping the magnifying glass in the left window of the discord account app, you may also search for public servers that anybody can join.
● Ending Thoughts →
● Discord is a web program that works in most browsers. A desktop version is available for Windows, macOS, Linux, iOS, and Android. Discord’s desktop and browser versions are functionally and visually identical in practically every regard if you want to make a discord account. So, re-read the article and the FAQs on discord create account, and start your journey.
● Finally, for the creatives, boost your discord create account and usage experience by using Filmora to edit videos and make cool animations.
Step by Step to Crop Videos with CyberLink PowerDirector
Video Editing is an art form dependent on various elements and factors that are part of your video; this means people, items, or objects in the background can often make or break the viewing experience.
Can you imagine having shot a scene with impeccable attention to detail, but a small uncontrollable action leaves a portion of an unwanted cable or equipment in the frame? Bummer, right? But luckily, due to the power of video editing software, it is not hard to deal with such problems.
A way to work with such clips is to use the crop function while editing, as it can help emphasize or detract attention from a particular part of any video project.
Author’s Note: While filming, try to capture footage in the highest resolution allowed by the available camera hardware; this will give you more room to play with while using the crop function.
To preface, CyberLink PowerDirector is a free video editing tool capable of accomplishing this and providing a professional touch to your video projects. And like other competing software, the program not only allows you to crop into clips but also uses keyframes to modify aspects like panning and zoom. So to help you perform this action, in this article, we list the steps you will need for cropping into video clips with PowerDirector. As an added bonus, we have also included the method to perform the same actions in WonderShare Filmora.
Note: We documented the steps in this guide with PowerDirector 365 and WonderShare Filmora X.
How to Crop Videos with CyberLink PowerDirector?
The idea of cropping into clips has always been an easy action to perform; once you have PowerDirector 365 open, follow the steps listed below.
If you do not already have CyberLink PowerDirector 365, download the software by visiting Cyberlink’s official website.
Step 1: Create a new video project in Cyberlink PowerDirector 365 by choosing Full Mode.

Note: Full Mode in Cyberlink PowerDirector 365 provides access to a full-featured video editing tool, similar to Wondershare Filmora. The other available options cater to distinct video types.
Step 2: Import media onto the Timeline from the Media Library; in this guide, we have gone ahead and used the pre-existing stock footage.

Step 3: Now, click on the video file on the Timeline; this will activate the video toolbar giving you access to the various controls built into PowerDirector 365. Hover over the tools open, following which you need to click on the Crop, Zoom, and Pan option.

Step 4: Pick either corner of the frame visible around the video and set the area you want the clip to focus upon; following this, click Save.

This action will crop the video clip according to your desired size.
Tip:
The activation of Keyframes while cropping will allow you to create an effect that slowly zooms into the footage. To do this, set Keyframe Point 1 at a specific time (say the fifth second) and at one zoom level (say zero) and create Keyframe Point 2 at another time (fifteenth second) and a different zoom level (say fifty). So, between the fifth second and fifteenth second, the zoom will steadily increase and raise emphasis on an object. You can also add an element of position to this action if you want the focus to be on something not in the center of the screen.
Definition: Keyframes while Video Editing is a software-based feature that allows you to set In and Out Points, giving clips between the two positions different properties that change as the playhead continues to move. These properties can be increased zoom, rotation, different colors, or even a gradual pan.
We recommend experimenting with this feature if you want to bring a more dynamic feeling to your video project.
An Easier Way to Crop Video with Wondershare Filmora
While Cyberlink PowerDirector 365 is a powerful video editing tool, in our experience, its menus are not as simple to navigate as some of the other competing video editing tools available, Wondershare Filmora Video Editor included.
An emphasis on quick accessibility is present with Filmora, and we believe this is a huge plus for beginning creators. The use of iconography resemblant to mobile software is another aspect that helps increase familiarity.
If you do not already have Wondershare Filmora, you can download the software by visiting the official website.
Now, to help you learn how to use the Crop Tool and to show you an example of what we mean, here is how you can use the feature Wondershare Filmora to get the desired output.
For Win 7 or later (64-bit)
For macOS 10.14 or later
Once you have the software open, follow the steps listed below.
Step 1: Import the Media File into your Video Project.

Step 2: Drag the clip onto the Timeline and then select it to activate further interactions.

Step 3: Choose the Crop Options (marked in Red) to open the Crop window.

Step 4: Pick any edge within the visible box and resize them to select the portion you want to keep in the clip.

Having read this bit of the guide, we believe you may have noticed how Filmora is more convenient due to the easier access it provides to the crop function.
The Bottom Line
So, at the end of the day, both software listed in this article are fully functional and highly-capable video editing tools, but saving time spent in front of the computer is a huge factor for any video editor.
And Wondershare Filmora does just that with its modern iconography and increased accessibility. With its thoughtful, less-frills approach, Filmora is the one to pick if you do not want to be bogged down by needless menus and have to hunt for actions that will help you create a video that you would want to watch yourself.
Note: Full Mode in Cyberlink PowerDirector 365 provides access to a full-featured video editing tool, similar to Wondershare Filmora. The other available options cater to distinct video types.
Step 2: Import media onto the Timeline from the Media Library; in this guide, we have gone ahead and used the pre-existing stock footage.
Step 3: Now, click on the video file on the Timeline; this will activate the video toolbar giving you access to the various controls built into PowerDirector 365. Hover over the tools open, following which you need to click on the Crop, Zoom, and Pan option.
Step 4: Pick either corner of the frame visible around the video and set the area you want the clip to focus upon; following this, click Save.
This action will crop the video clip according to your desired size.
Tip:
The activation of Keyframes while cropping will allow you to create an effect that slowly zooms into the footage. To do this, set Keyframe Point 1 at a specific time (say the fifth second) and at one zoom level (say zero) and create Keyframe Point 2 at another time (fifteenth second) and a different zoom level (say fifty). So, between the fifth second and fifteenth second, the zoom will steadily increase and raise emphasis on an object. You can also add an element of position to this action if you want the focus to be on something not in the center of the screen.
Definition: Keyframes while Video Editing is a software-based feature that allows you to set In and Out Points, giving clips between the two positions different properties that change as the playhead continues to move. These properties can be increased zoom, rotation, different colors, or even a gradual pan.
We recommend experimenting with this feature if you want to bring a more dynamic feeling to your video project.
An Easier Way to Crop Video with Wondershare Filmora
While Cyberlink PowerDirector 365 is a powerful video editing tool, in our experience, its menus are not as simple to navigate as some of the other competing video editing tools available, Wondershare Filmora Video Editor included.
An emphasis on quick accessibility is present with Filmora, and we believe this is a huge plus for beginning creators. The use of iconography resemblant to mobile software is another aspect that helps increase familiarity.
If you do not already have Wondershare Filmora, you can download the software by visiting the official website.
Now, to help you learn how to use the Crop Tool and to show you an example of what we mean, here is how you can use the feature Wondershare Filmora to get the desired output.
For Win 7 or later (64-bit)
For macOS 10.14 or later
Once you have the software open, follow the steps listed below.
Step 1: Import the Media File into your Video Project.
Step 2: Drag the clip onto the Timeline and then select it to activate further interactions.
Step 3: Choose the Crop Options (marked in Red) to open the Crop window.
Step 4: Pick any edge within the visible box and resize them to select the portion you want to keep in the clip.
Having read this bit of the guide, we believe you may have noticed how Filmora is more convenient due to the easier access it provides to the crop function.
The Bottom Line
So, at the end of the day, both software listed in this article are fully functional and highly-capable video editing tools, but saving time spent in front of the computer is a huge factor for any video editor.
And Wondershare Filmora does just that with its modern iconography and increased accessibility. With its thoughtful, less-frills approach, Filmora is the one to pick if you do not want to be bogged down by needless menus and have to hunt for actions that will help you create a video that you would want to watch yourself.
Also read:
- New If You Do Not Know How to QuickTime Trim Video Clips, You Are in the Right Place. We Have Provided Information that Will Help You Trim Videos with This Application and Make Them Engaging for Viewers
- Updated TEXT REVEAL Animation | Easy Masking Filmora
- Complete Guide to Change Video Resolution in Filmora
- Updated In 2024, How to Turn On/Off Motion Blur in Fortnite? Is It Good for Fortnite?
- New In 2024, TOP 10 Types of Video Framing From Novice to Master
- New How to Make Split Screen Videos in Filmora
- New In 2024, How to Make Discord Emoji GIF
- Updated In 2024, Looking for Efficient Ways to Create a Slow-Motion Video? Read the Article for Reliable Solutions that Provide Excellent Results
- In 2024, This Article Is Actually the Guide Regarding Editing the Videos Through VEED. As a Substitute, Wondershare Filmora Is Also Under Discussion that Is Also Available for the Same Purpose
- 2024 Approved What If YouTube Zoom to Fill Not Working?
- Updated In 2024, In Todays Article, We Are Going to Show You How Adding a Simple Lower Third to Your Video Can Add a Degree of Professionalism and Polish to Your Videos While Giving It a Higher Perceived Value
- Updated 2024 Approved 5 Methods to Denoise a Video
- New 2024 Approved Do You Want Your Photo and Video Edits to Look Like Peter McKinnons? Color-Grade Your Media Files with Peter McKinnon LUTs to Make Your Content Stand Out
- New In This Article, You Will Learn About the Top 5 Editors for Windows, Top 5 Editors for iPhone/Android, and Top 5 Editors for Animated GIF Editing
- Do You Want a LUT that You Can Use for Your High-Definition Content? You Can Use Rec 709 LUT Premiere Pro for Your HD Digital Media to Give the Perfect Result for 2024
- Best 12 AI Video Generators to Pick for 2024
- 7 Solutions to Edit GoPro Video on Mac for 2024
- How to Unlock Verizon iPhone 6s
- In 2024, Pokemon Go Error 12 Failed to Detect Location On Vivo S17 Pro? | Dr.fone
- In 2024, How to Send and Fake Live Location on Facebook Messenger Of your OnePlus Ace 2 | Dr.fone
- Recover your music after Oppo Reno 10 Pro+ 5G has been deleted
- How to Fix Android App Not Installed Error on Infinix Zero 5G 2023 Turbo Quickly? | Dr.fone
- Simple ways to get lost files back from Samsung Galaxy F34 5G
- In 2024, How to Unlock SIM Card on iPhone 12 Pro Max online without jailbreak
- 3 Facts You Need to Know about Screen Mirroring Oppo Find X7 Ultra | Dr.fone
- In 2024, Three Ways to Sim Unlock Vivo Y100
- In 2024, Here are Some of the Best Pokemon Discord Servers to Join On Vivo S18 | Dr.fone
- Title: New 2024 Approved How to Slow Down Time-Lapse Videos on iPhone
- Author: Morgan
- Created at : 2024-05-19 05:12:58
- Updated at : 2024-05-20 05:12:58
- Link: https://ai-video-editing.techidaily.com/new-2024-approved-how-to-slow-down-time-lapse-videos-on-iphone/
- License: This work is licensed under CC BY-NC-SA 4.0.
