
:max_bytes(150000):strip_icc():format(webp)/audio-books-56a324b93df78cf7727c00f5.jpg)
New 2024 Approved How to Use Kahoot! On Zoom
How to Use Kahoot! On Zoom
In the educational game Kahoot! participants respond to multiple-choice questions based on trivia. Each participant uses their own controller to answer questions in the online game. There are several question kinds to pick from, allowing for complete customization of the test. Each player needs their own controller for Kahoot! The game questions will be shown in the Zoom/Google Meet window, but the answers must be entered using the controller. With the Kahoot!! app for Zoom, presenters may use play and friendly rivalry to increase participant engagement. Users may organize knowledge- and feedback-gathering pulse checks with staff members, encourage original thought with word clouds, and empower participants’ voices with surveys, open-ended questions, and other tools. Utilizing the brainstorm tool, organizations may crowdsource ideas and advance teamwork.
Engagement has emerged as a crucial component of successful learning, collaboration, and connection as the globe has increased the use of video communications in social and professional situations. Users may access, host, and play Kahoot!! games and educational information with other meeting participants using the Kahoot!! app for Zoom without ever leaving the Zoom Meeting or requiring a second device. Corporate executives may motivate their staff via speeches, meetings, and online activities. Meeting hosts will have immediate access to data and statistics from their Kahoot!! experience, allowing them to respond in real time to audience engagement with the material. Additionally, hosts may email the Kahoot!! games to all participants so they can practice and improve their scores, which will increase participant engagement and learning retention. Hosts can also distribute the Kahoot!! games as self-paced challenges with individuals who couldn’t attend in person.
Part 1: Key Features of Kahoot
What more is there to discuss, Kahoot!? Every pupil adores it. Many instructors and educators use it all around the world to make learning simple, enjoyable, and interesting. Everyone may use it since it is free and extremely simple to use. These are some of its attributes:
- Quizzes may be made in a matter of minutes.
- Develop games based on the abilities of the kids. Playing at home or in the Zoom is simple for them.
- Various templates are offered. You can choose one of them with confidence.
- Kahoot! has the ability to be organized into many folders according to topics or subjects.
- Additionally, multiple choice questions may be included by quiz makers.
- Teachers using Kahoot! may combine different questions into one format, such as quizzes, polls, riddles, and slides.
- Use Apple Schoolwork, Google Zooms, and Microsoft Teams to share student-centered tasks.
Part 2: How to Host a Kahoot! Session within a Zoom Meeting
With the Zoom app, Kahoot! may be viewed, hosted, and used. It’s amazing that Kahoot!!, one of the most well-known brands in quiz-based learning, still provides a free-to-use platform, making it very accessible to both instructors and students. It’s also a useful resource for a hybrid class that combines online and classroom instruction. Most devices will be able to use the cloud-based service using a web browser. This implies that students using computers, tablets, and cellphones in class or at home may access this. Participants in Zoom Meetings may play games and learn without having to leave the Zoom meeting or bring a second device.
Step1Sign up for Zoom ahead of time and get ready. On the other hand, launch the Kahoot! test in your web browser, then be ready to share your screen in Zoom.
Step2As the participants come, allow them in and check to see whether you and they can both hear each other. To access the Kahoot! quiz, make sure they have a device or another browser tab open.
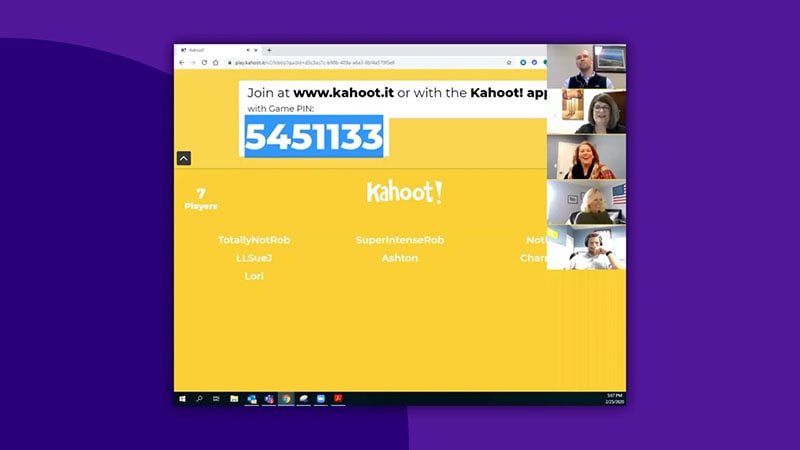
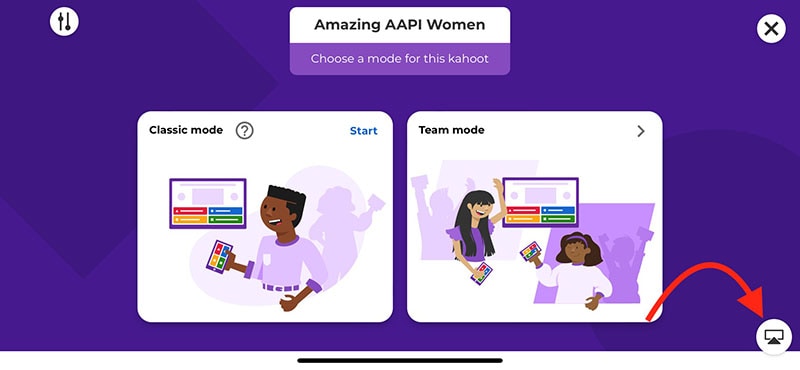
Step3Open the Kahoot! test and share it using Zoom’s “Share Screen” feature. While your screen is shared, continue to host the Kahoot! as normal. To view participants next to your shared screen, we advise selecting Side-by-Side Mode.
Part 3: How to Participate in Kahoot! Sessions within a Zoom Meeting
With more than 40 million ready-made games available on Kahoot!!, getting started is fast and simple. When time and resources are limited, hybrid or distant learning is ideal. After linking the Kahoot! to your Zoom account, you may utilize it. Use this app and start a meeting. Go to Apps on the toolbar and choose the program you wish to use. Select Who is Hosting to locate their host or to join a Kahoot! session being hosted by a friend or another player. Players may post a question to a shared screen on the Kahoot! platform. Kahoot!! just needs an account to be made in order to use it since it is free. Most devices may be used by students to access Kahoot!! from wherever there is an internet connection. This is how:
Step1Take the time to check that Zoom, Skype, Cisco Webex, or Google Hangout are operating and that your camera, microphone, and speaker are all operational.
Step2In the right-side panel, add the Kahoot!! app to your list of apps and click Join.
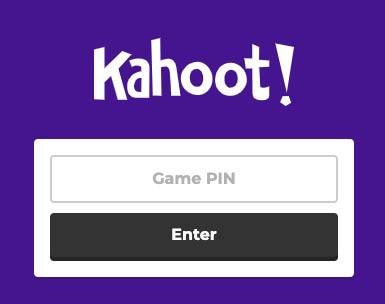
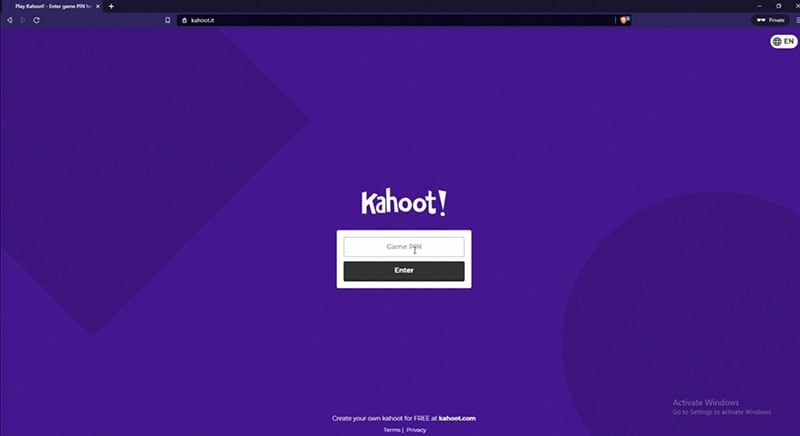
Step3The lobby will reveal your game PIN when you click the Play button, allowing the computer to show you a Kahoot! You may enter the game PIN and press Enter to join the Kahoot! session once the host shows their screen with you. To participate in a Kahoot! session, you don’t need a Kahoot! account.
Part 4: How to Record Zoom Meetings
Zoom is a conference tool that enables real-time, high-quality, low-latency communication. Filmora is an excellent video recorder for that reason, enabling users to capture on-screen activity such Zoom audio tracks and video conversations. Wondershare One of the most versatile and portable Zoom voice recorders is the Filmora. Even novices may easily utilize it due to its user-friendly UI. All you have to do is click the record button after choosing the proper audio source in the settings. The all-in-one video editing program Filmora allows you to record your screen with audio, a facecam, and a green screen effect. You can record the entire screen or just a portion of it, and you can perform a number of quick edits on your video using tools like trimming, cropping, changing the audio track’s volume, and so on.
How to Use Filmora to Record Zoom Lectures
Having said that, Filmora is a great Zoom recorder that can capture games, audio, and video conversations. This video recorder may be used to make video clip lessons in addition to recording movies, video games, and webcam footage. In addition to Zoom, it can also capture internet streaming audio. Here is information on how to record Zoom meetings using this software:
Step1Download and Install Filmora on your PC
To use this program for a number of tasks, including screen recording and recording editing, you must first download and install it on your computer. To achieve this, download the recording program by clicking the link below. Launch the program as soon as the download is finished to start the installation process, and then adhere to the on-screen directions to install and make this software available for usage.
Step2Choose the Record’s Ideal Position in the Zoom
Use it on your PC at this point. As soon as you start the program, a window interface with two choices for screen recording, editing already recorded videos, and generating videos will display. Choose the Recording option from the menu. When you click the record button, the program will direct you to the recording interface, where you can easily adjust the settings for your camera and audio. To add the microphone or Zoom sound in that particular field, use the necessary buttons as described below:
Step3Press the Record Button
It goes without saying that you must test your recording tools to ensure they are functional and capturing the highest quality audio. But once you’re ready, click the record button, which will allow you 3-5 seconds before starting to record the personalized screen of your PC as seen below:
Step4Export and Save Your Zoom Recording
You may now save the Zoom video for sharing on social media after making and modifying it. The following file types may be used to save the document: MP4, WMV, AVI, MOV, GIF, and MP3. The finest feature of Wondershare Filmora is the direct export and sharing of Zoom video recordings to YouTube; the only need is that you must be signed in to your YouTube account inside the application:
Because the MOV format is only available for online movies, you may also export your Zoom recordings to MP4 if you want to publish them to your YouTube channel. You are free to choose the format that best suits your needs. You may choose the encoder from a drop-down menu in the export options.
Conclusion
With the aid of several interesting tools and programs made accessible in this virtual environment, learning has now become enjoyable. Of them is Kahoot! In Zoom. It is an application that acts as a learning tool by providing fun games, tests, and a variety of other chances. In only a few minutes, quizzes may be made and distributed. Games and quizzes may be planned using this platform quite easily. The Kahoot! with Zoom will make it simpler than ever for corporate leaders to engage and encourage their team members with Kahoot!! engaging game-based learning experiences at a time when many organizations are staying virtual or planning for a hybrid model. Head towards recording Kahoot with Filmora to experience a smooth Kahoot! usage on Zoom. Plus, you can also share the gameplay afterwards.
In the educational game Kahoot! participants respond to multiple-choice questions based on trivia. Each participant uses their own controller to answer questions in the online game. There are several question kinds to pick from, allowing for complete customization of the test. Each player needs their own controller for Kahoot! The game questions will be shown in the Zoom/Google Meet window, but the answers must be entered using the controller. With the Kahoot!! app for Zoom, presenters may use play and friendly rivalry to increase participant engagement. Users may organize knowledge- and feedback-gathering pulse checks with staff members, encourage original thought with word clouds, and empower participants’ voices with surveys, open-ended questions, and other tools. Utilizing the brainstorm tool, organizations may crowdsource ideas and advance teamwork.
Engagement has emerged as a crucial component of successful learning, collaboration, and connection as the globe has increased the use of video communications in social and professional situations. Users may access, host, and play Kahoot!! games and educational information with other meeting participants using the Kahoot!! app for Zoom without ever leaving the Zoom Meeting or requiring a second device. Corporate executives may motivate their staff via speeches, meetings, and online activities. Meeting hosts will have immediate access to data and statistics from their Kahoot!! experience, allowing them to respond in real time to audience engagement with the material. Additionally, hosts may email the Kahoot!! games to all participants so they can practice and improve their scores, which will increase participant engagement and learning retention. Hosts can also distribute the Kahoot!! games as self-paced challenges with individuals who couldn’t attend in person.
Part 1: Key Features of Kahoot
What more is there to discuss, Kahoot!? Every pupil adores it. Many instructors and educators use it all around the world to make learning simple, enjoyable, and interesting. Everyone may use it since it is free and extremely simple to use. These are some of its attributes:
- Quizzes may be made in a matter of minutes.
- Develop games based on the abilities of the kids. Playing at home or in the Zoom is simple for them.
- Various templates are offered. You can choose one of them with confidence.
- Kahoot! has the ability to be organized into many folders according to topics or subjects.
- Additionally, multiple choice questions may be included by quiz makers.
- Teachers using Kahoot! may combine different questions into one format, such as quizzes, polls, riddles, and slides.
- Use Apple Schoolwork, Google Zooms, and Microsoft Teams to share student-centered tasks.
Part 2: How to Host a Kahoot! Session within a Zoom Meeting
With the Zoom app, Kahoot! may be viewed, hosted, and used. It’s amazing that Kahoot!!, one of the most well-known brands in quiz-based learning, still provides a free-to-use platform, making it very accessible to both instructors and students. It’s also a useful resource for a hybrid class that combines online and classroom instruction. Most devices will be able to use the cloud-based service using a web browser. This implies that students using computers, tablets, and cellphones in class or at home may access this. Participants in Zoom Meetings may play games and learn without having to leave the Zoom meeting or bring a second device.
Step1Sign up for Zoom ahead of time and get ready. On the other hand, launch the Kahoot! test in your web browser, then be ready to share your screen in Zoom.
Step2As the participants come, allow them in and check to see whether you and they can both hear each other. To access the Kahoot! quiz, make sure they have a device or another browser tab open.
Step3Open the Kahoot! test and share it using Zoom’s “Share Screen” feature. While your screen is shared, continue to host the Kahoot! as normal. To view participants next to your shared screen, we advise selecting Side-by-Side Mode.
Part 3: How to Participate in Kahoot! Sessions within a Zoom Meeting
With more than 40 million ready-made games available on Kahoot!!, getting started is fast and simple. When time and resources are limited, hybrid or distant learning is ideal. After linking the Kahoot! to your Zoom account, you may utilize it. Use this app and start a meeting. Go to Apps on the toolbar and choose the program you wish to use. Select Who is Hosting to locate their host or to join a Kahoot! session being hosted by a friend or another player. Players may post a question to a shared screen on the Kahoot! platform. Kahoot!! just needs an account to be made in order to use it since it is free. Most devices may be used by students to access Kahoot!! from wherever there is an internet connection. This is how:
Step1Take the time to check that Zoom, Skype, Cisco Webex, or Google Hangout are operating and that your camera, microphone, and speaker are all operational.
Step2In the right-side panel, add the Kahoot!! app to your list of apps and click Join.
Step3The lobby will reveal your game PIN when you click the Play button, allowing the computer to show you a Kahoot! You may enter the game PIN and press Enter to join the Kahoot! session once the host shows their screen with you. To participate in a Kahoot! session, you don’t need a Kahoot! account.
Part 4: How to Record Zoom Meetings
Zoom is a conference tool that enables real-time, high-quality, low-latency communication. Filmora is an excellent video recorder for that reason, enabling users to capture on-screen activity such Zoom audio tracks and video conversations. Wondershare One of the most versatile and portable Zoom voice recorders is the Filmora. Even novices may easily utilize it due to its user-friendly UI. All you have to do is click the record button after choosing the proper audio source in the settings. The all-in-one video editing program Filmora allows you to record your screen with audio, a facecam, and a green screen effect. You can record the entire screen or just a portion of it, and you can perform a number of quick edits on your video using tools like trimming, cropping, changing the audio track’s volume, and so on.
How to Use Filmora to Record Zoom Lectures
Having said that, Filmora is a great Zoom recorder that can capture games, audio, and video conversations. This video recorder may be used to make video clip lessons in addition to recording movies, video games, and webcam footage. In addition to Zoom, it can also capture internet streaming audio. Here is information on how to record Zoom meetings using this software:
Step1Download and Install Filmora on your PC
To use this program for a number of tasks, including screen recording and recording editing, you must first download and install it on your computer. To achieve this, download the recording program by clicking the link below. Launch the program as soon as the download is finished to start the installation process, and then adhere to the on-screen directions to install and make this software available for usage.
Step2Choose the Record’s Ideal Position in the Zoom
Use it on your PC at this point. As soon as you start the program, a window interface with two choices for screen recording, editing already recorded videos, and generating videos will display. Choose the Recording option from the menu. When you click the record button, the program will direct you to the recording interface, where you can easily adjust the settings for your camera and audio. To add the microphone or Zoom sound in that particular field, use the necessary buttons as described below:
Step3Press the Record Button
It goes without saying that you must test your recording tools to ensure they are functional and capturing the highest quality audio. But once you’re ready, click the record button, which will allow you 3-5 seconds before starting to record the personalized screen of your PC as seen below:
Step4Export and Save Your Zoom Recording
You may now save the Zoom video for sharing on social media after making and modifying it. The following file types may be used to save the document: MP4, WMV, AVI, MOV, GIF, and MP3. The finest feature of Wondershare Filmora is the direct export and sharing of Zoom video recordings to YouTube; the only need is that you must be signed in to your YouTube account inside the application:
Because the MOV format is only available for online movies, you may also export your Zoom recordings to MP4 if you want to publish them to your YouTube channel. You are free to choose the format that best suits your needs. You may choose the encoder from a drop-down menu in the export options.
Conclusion
With the aid of several interesting tools and programs made accessible in this virtual environment, learning has now become enjoyable. Of them is Kahoot! In Zoom. It is an application that acts as a learning tool by providing fun games, tests, and a variety of other chances. In only a few minutes, quizzes may be made and distributed. Games and quizzes may be planned using this platform quite easily. The Kahoot! with Zoom will make it simpler than ever for corporate leaders to engage and encourage their team members with Kahoot!! engaging game-based learning experiences at a time when many organizations are staying virtual or planning for a hybrid model. Head towards recording Kahoot with Filmora to experience a smooth Kahoot! usage on Zoom. Plus, you can also share the gameplay afterwards.
6 Instant Mp4 to GIF Online Tools for You
6 Instant mp4 to GIF Online Tools
An easy yet powerful editor
Numerous effects to choose from
Detailed tutorials provided by the official channel
Content creation has become easier than before with the popularity of mp4 to gif online. GIFs help to create compelling and engaging content in every industry. They can also be used in all sorts of ways, from adding animation to your designs to visually communicating information.
Moreover, if you don’t want to include videos and are interested in giving a good laugh dose to your audience, GIFs are the solution.
They are being used heavily today by content creators, marketing experts, and digital marketing agencies. However, they are not easily available in the way you want. So, you may have to convert mp4 to gif online. Fortunately, a number of tools are available for MP4 to GIF conversion that we are going to share here.
In this article
01 [6 Online Tools for Converting an MP4 to a GIF](#Part 1)
02 [6 Online Tools for Converting GIFs to MP4](#Part 2)
Part 1 6 Online Tools for Converting an MP4 to a GIF
01Any GIF Animator

Any GIF Animator is a popular choice for content creators when making GIFs. Its simple interface helps in turning video files of any format into attractive GIFs. Even those who have no technical idea of video editing can use this software easily. You can even import media files from optical storage devices using this mp4 to gif online platform.
Key Features
● Best for those without a technical background
● Comes with an animation wizard and a built-in image editor
● Quickly add effects or customize your GIF the way you want
● Get access to some advanced features like text overlays, resolution effects, and more
● It is possible to make adjustments to frame rate, width, height, and more in a GIF
● Convert a Youtube video to a GIF as well
Supported Platforms: Windows
02Adobe Creative Cloud Express

Adobe Creative Cloud Express is the simplest and quickest way to convert an MP4 to GIF. The users have to drag and drop the file and wait for the magic to happen. It has been powered by adobe premiere pro. The only requirement is there to sign up and then you get access to a plethora of creative tools.
Key Features
● Drag and Drop Feature Available
● Download the Converted file in your desired size and quality
● Simple and effective
Supported Platforms: All
03Instagriffer

Instagriffer is widely used forextracting GIFs from YouTube videos, Netflix shows, and more. It assists you in capturing your favorite moments from the screen in GIF format for free. There is no need to worry about watermarks because it doesn’t add them to the output.
Key Features
● You can add text, filters, loops, and more
● A plethora of customizable text and logos
● Decide the starting and ending time of a GIF
Supported Platforms: Windows & Mac
04Cute GIF to Video Converter

It allows you to add various animation effects during GIF processing. Apart from that, the users get the privilege of sharing GIFs on other networks. You can also extract a clip from a video and create a GIF out of it with this online tool. What makes this tool so demanding is the interface, where all the app segments are shown in one frame.
Key Features
● Navigating through the interface is easier than you can imagine
● Compatible with the batch conversion
● Supports numerous file types, including audio
● Supported Platforms: Windows
05Ezgif

Ezgif offers flexible options to convert online mp4 to gif. Either you can upload a file from your computer or paste a video URL to make a GIF. But the maximum file size should not exceed 100 MB. You can preview the GIF before converting it too.
Key Features
● Can convert transparent videos into animated GIFs
● You can set the width, height, and other elements before saving your GIF.
● It lets you choose the frame rate at your convenience
Platforms Supported: All
06Zamzar

Do you want to convert an endless number of file formats? If so, go ahead to Zamzar. It is powerful enough to convert more than 1100 file formats on the go. Not only does it work as an online mp4 to gif converter, but it also lets you convert a document, image, video, or audio file.
Key Features
● Use the “drag and drop” feature to upload multiple files
● It gives a fast output of heavy media files within 10 minutes
● Simple to use
● Over 1200 file formats are supported
Supported Platforms: All Web Browsers
Part 2 6 Online Tools for Converting GIFs to MP4
01**Wondershare Filmora Video Editor ** by Wondershare

Wondershare Filmora - Best Video Editor for Mac/Windows
5,481,435 people have downloaded it.
Build unique custom animations without breaking a sweat.
Focus on creating epic stories and leave the details to Filmora’s auto features.
Start a creative adventure with drag & drop effects and endless possibilities.
Filmora simplifies advanced features to save you time and effort.
Filmora cuts out repetition so you can move on to your next creative breakthrough.
The Wondershare Filmora V11 is a one-stop platform for all of your online mp4 to GIF needs. This tool can deliver you a high-resolution GIF output from an mp4 video. It also allows you to do much more, like video trimming, editing, conversion to different file formats, etc. In addition, the advanced elements added in Filmora can help to create original GIFs.
Key Features
● There is no file size limitation during conversion
● It works with all the major video formats
● Interactive interface
● Fast in processing GIFs from HD videos
Platforms supported: Windows 8 and later, Mac 10.14 and later
02CloudConvert

CloudConvert is a robust online file conversion platform. It can convert vectors, documents, ebooks, cad, archives, and more kinds of files. It enables you to adjust timing, dimensions, quality, and more. To convert a gif to an mp4 online, you have to upload the file and click on the export option. That’s it! Your file will start converting. However, you will only get the first 25 minutes free every day, and thereafter, you will have to pay a charge to convert large files.
Key Features
● Supports 200+ formats.
● Personalized conversion service based on your requirements
● It yields a high quality output at the end.
Platforms Supported: All
03Converterlite

Converterlite supports batch conversion of audio and video file formats. It can convert GIF files into MP4 format efficiently. It supports all major video formats such as AVI, MPEG, WMV, MOV, FLV, etc. For someone involved in content creation at a broad level, this is a must-use platform.
Key Features
● Available in five different languages
● Based on the powerful FFmpeg project
● Produce high-quality output in a timely manner
● This is best for social media content creators, meme makers, and marketers
Platforms supported: Windows XP, Vista, and 7
04GIFtoMP4

As the name implies, it simplifies gif to mp4 online conversion. The maximum number of GIFs it can convert to MP4 is 20. Once the conversion process ends, you can either download the files individually or get them all in zip format. It doesn’t keep any data on the site. All the stored data is deleted after anhour.
Key Features
● Use with confidence.
● Quickly convert GIF animations to MP4 videos
● No need to download software
● More than 16 languages to choose from
Platforms Supported: All
05Thundersoft GIF to Video Converter

It may appear to be one of the most unusual tools for the online GIF to MP4 conversion. Prior to getting the MP4 file, you can add music and many other custom elements to the uploaded GIF. There are many other customization features, which you can only explore after trying out this tool.
Key Features
● A great tool for novice editors and video makers
● It permits batch conversion of GIFs at a single click
● Compatible with the majority of video formats
● Allows you to convert GIF files to image series
Platforms supported: Windows 2000, 2003, XP, Vista, 7, 8, and 10 are all supported platforms
06Aconvert

Although there are many alternatives for gif to mp4 online conversion, the simplicity of Aconvert attracts all. You have to choose the file that you can upload from your local disk, Google Drive, Dropbox, and more. After that, select the target format and whether you want to change anything or let it be as it is. You can also upload multiple files at once.
Key Features
● Converts audio, video, documents, ebooks, images, and a variety of other file types to audio, video, document, ebook, image, and a variety of other file types
● Batch conversion is supported
● Ensure final conversion without interruption by automatically trying a new server if one fails
Platforms Supported: All
● Key Takeaways from This Episode →
● Nowadays, there are so many tools for making GIFs that it’s hard to find the best one. But the six instant mp4 to gif online tools above will accelerate this process. You just have to upload the video and be patient while they work. From our findings, we can come to these conclusions:
● Converting mp4 to gif online and vice versa is easy with a tool.
● Get familiar with the tools for doing your things quickly.
● Wondershare Filmore is the best and most highly recommended one among them.
● Whatever the reason you want to convert an mp4 to GIF online, there are a number of ways to do it. Use this guide to learn the best methods. Read more here.
Content creation has become easier than before with the popularity of mp4 to gif online. GIFs help to create compelling and engaging content in every industry. They can also be used in all sorts of ways, from adding animation to your designs to visually communicating information.
Moreover, if you don’t want to include videos and are interested in giving a good laugh dose to your audience, GIFs are the solution.
They are being used heavily today by content creators, marketing experts, and digital marketing agencies. However, they are not easily available in the way you want. So, you may have to convert mp4 to gif online. Fortunately, a number of tools are available for MP4 to GIF conversion that we are going to share here.
In this article
01 [6 Online Tools for Converting an MP4 to a GIF](#Part 1)
02 [6 Online Tools for Converting GIFs to MP4](#Part 2)
Part 1 6 Online Tools for Converting an MP4 to a GIF
01Any GIF Animator
Any GIF Animator is a popular choice for content creators when making GIFs. Its simple interface helps in turning video files of any format into attractive GIFs. Even those who have no technical idea of video editing can use this software easily. You can even import media files from optical storage devices using this mp4 to gif online platform.
Key Features
● Best for those without a technical background
● Comes with an animation wizard and a built-in image editor
● Quickly add effects or customize your GIF the way you want
● Get access to some advanced features like text overlays, resolution effects, and more
● It is possible to make adjustments to frame rate, width, height, and more in a GIF
● Convert a Youtube video to a GIF as well
Supported Platforms: Windows
02Adobe Creative Cloud Express
Adobe Creative Cloud Express is the simplest and quickest way to convert an MP4 to GIF. The users have to drag and drop the file and wait for the magic to happen. It has been powered by adobe premiere pro. The only requirement is there to sign up and then you get access to a plethora of creative tools.
Key Features
● Drag and Drop Feature Available
● Download the Converted file in your desired size and quality
● Simple and effective
Supported Platforms: All
03Instagriffer
Instagriffer is widely used forextracting GIFs from YouTube videos, Netflix shows, and more. It assists you in capturing your favorite moments from the screen in GIF format for free. There is no need to worry about watermarks because it doesn’t add them to the output.
Key Features
● You can add text, filters, loops, and more
● A plethora of customizable text and logos
● Decide the starting and ending time of a GIF
Supported Platforms: Windows & Mac
04Cute GIF to Video Converter
It allows you to add various animation effects during GIF processing. Apart from that, the users get the privilege of sharing GIFs on other networks. You can also extract a clip from a video and create a GIF out of it with this online tool. What makes this tool so demanding is the interface, where all the app segments are shown in one frame.
Key Features
● Navigating through the interface is easier than you can imagine
● Compatible with the batch conversion
● Supports numerous file types, including audio
● Supported Platforms: Windows
05Ezgif
Ezgif offers flexible options to convert online mp4 to gif. Either you can upload a file from your computer or paste a video URL to make a GIF. But the maximum file size should not exceed 100 MB. You can preview the GIF before converting it too.
Key Features
● Can convert transparent videos into animated GIFs
● You can set the width, height, and other elements before saving your GIF.
● It lets you choose the frame rate at your convenience
Platforms Supported: All
06Zamzar
Do you want to convert an endless number of file formats? If so, go ahead to Zamzar. It is powerful enough to convert more than 1100 file formats on the go. Not only does it work as an online mp4 to gif converter, but it also lets you convert a document, image, video, or audio file.
Key Features
● Use the “drag and drop” feature to upload multiple files
● It gives a fast output of heavy media files within 10 minutes
● Simple to use
● Over 1200 file formats are supported
Supported Platforms: All Web Browsers
Part 2 6 Online Tools for Converting GIFs to MP4
01**Wondershare Filmora Video Editor ** by Wondershare
Wondershare Filmora - Best Video Editor for Mac/Windows
5,481,435 people have downloaded it.
Build unique custom animations without breaking a sweat.
Focus on creating epic stories and leave the details to Filmora’s auto features.
Start a creative adventure with drag & drop effects and endless possibilities.
Filmora simplifies advanced features to save you time and effort.
Filmora cuts out repetition so you can move on to your next creative breakthrough.
The Wondershare Filmora V11 is a one-stop platform for all of your online mp4 to GIF needs. This tool can deliver you a high-resolution GIF output from an mp4 video. It also allows you to do much more, like video trimming, editing, conversion to different file formats, etc. In addition, the advanced elements added in Filmora can help to create original GIFs.
Key Features
● There is no file size limitation during conversion
● It works with all the major video formats
● Interactive interface
● Fast in processing GIFs from HD videos
Platforms supported: Windows 8 and later, Mac 10.14 and later
02CloudConvert
CloudConvert is a robust online file conversion platform. It can convert vectors, documents, ebooks, cad, archives, and more kinds of files. It enables you to adjust timing, dimensions, quality, and more. To convert a gif to an mp4 online, you have to upload the file and click on the export option. That’s it! Your file will start converting. However, you will only get the first 25 minutes free every day, and thereafter, you will have to pay a charge to convert large files.
Key Features
● Supports 200+ formats.
● Personalized conversion service based on your requirements
● It yields a high quality output at the end.
Platforms Supported: All
03Converterlite
Converterlite supports batch conversion of audio and video file formats. It can convert GIF files into MP4 format efficiently. It supports all major video formats such as AVI, MPEG, WMV, MOV, FLV, etc. For someone involved in content creation at a broad level, this is a must-use platform.
Key Features
● Available in five different languages
● Based on the powerful FFmpeg project
● Produce high-quality output in a timely manner
● This is best for social media content creators, meme makers, and marketers
Platforms supported: Windows XP, Vista, and 7
04GIFtoMP4
As the name implies, it simplifies gif to mp4 online conversion. The maximum number of GIFs it can convert to MP4 is 20. Once the conversion process ends, you can either download the files individually or get them all in zip format. It doesn’t keep any data on the site. All the stored data is deleted after anhour.
Key Features
● Use with confidence.
● Quickly convert GIF animations to MP4 videos
● No need to download software
● More than 16 languages to choose from
Platforms Supported: All
05Thundersoft GIF to Video Converter
It may appear to be one of the most unusual tools for the online GIF to MP4 conversion. Prior to getting the MP4 file, you can add music and many other custom elements to the uploaded GIF. There are many other customization features, which you can only explore after trying out this tool.
Key Features
● A great tool for novice editors and video makers
● It permits batch conversion of GIFs at a single click
● Compatible with the majority of video formats
● Allows you to convert GIF files to image series
Platforms supported: Windows 2000, 2003, XP, Vista, 7, 8, and 10 are all supported platforms
06Aconvert
Although there are many alternatives for gif to mp4 online conversion, the simplicity of Aconvert attracts all. You have to choose the file that you can upload from your local disk, Google Drive, Dropbox, and more. After that, select the target format and whether you want to change anything or let it be as it is. You can also upload multiple files at once.
Key Features
● Converts audio, video, documents, ebooks, images, and a variety of other file types to audio, video, document, ebook, image, and a variety of other file types
● Batch conversion is supported
● Ensure final conversion without interruption by automatically trying a new server if one fails
Platforms Supported: All
● Key Takeaways from This Episode →
● Nowadays, there are so many tools for making GIFs that it’s hard to find the best one. But the six instant mp4 to gif online tools above will accelerate this process. You just have to upload the video and be patient while they work. From our findings, we can come to these conclusions:
● Converting mp4 to gif online and vice versa is easy with a tool.
● Get familiar with the tools for doing your things quickly.
● Wondershare Filmore is the best and most highly recommended one among them.
● Whatever the reason you want to convert an mp4 to GIF online, there are a number of ways to do it. Use this guide to learn the best methods. Read more here.
Land Into the Thrill of Creating Stunning GIFs with Ezgif
Thousands Already Know Ezgif and So Can You
An easy yet powerful editor
Numerous effects to choose from
Detailed tutorials provided by the official channel
Everything about the know-how of Ezgif creator is here!
In this article
01 [How to Make a GIF on Ezgif](#Part 1)
02 [Video to GIF Made Easy Only With Ezgif](#Part 2)
03 [How to Crop a Video With Ezgif & Filmora](#Part 3)
Part 1 How to Make a GIF on Ezgif
GIFs take you to an exciting journey of expression and impact. With the introduction of GIF keyboards and a variety of creator tools, you are granted the liberty to use pre made GIFs as well as create stirring ones of your own to deliver your messages in unique and impactful ways. When it comes to creating GIFs, the online market is always ready with a heap of creator choices. While each of these tools is distinctive in its own way, some of them are leaders in making the mark among users.
About the Ezgif GIF Maker
Ezgif online GIF maker tool is amongst the most preferred GIF creators in today’s times. This one is a free and super convenient online tool that lets you create and convert animated GIFs in just a few clicks. Compatible with your Windows or MacOS devices, this tool is evidently among the fastest GIF creators of its time.
Apart from creating GIFs, you can also use this tool to cut, crop, trim and resize videos, ass and remove GIF backgrounds and much more. The tool is compatible with almost all common video and image formats; hence you can easily escape the glitch of sticking to a particular format for using this tool.
Here’s how you can use this tool for making next level GIFs:
Step 1: Launch the Tool
Open the Ezgif maker tool in your favorite browser. In the site’s welcome page, tap on ‘GIF Maker’ from the top toolbar.

Step 2: Upload Your Media
Click on ‘Browse’ to select your desired video or a set of still captures from your device and upload the same to the GIF maker timeline. You can choose from a manually or an alphabetically ordered upload. Ensure that the total file size is restricted within 100 MB.


Step 3: Let’s Create!
Click on ‘Upload and Make a GIF’. You will be shown a preview of your creation. At this point, you can customize the GIF with effects, filters and texts.

Step 4: Visual Adjustments
When using still images, consider arranging them in a particular order with the ‘Drag and Drop method’. You can skip this step if you are satisfied with the default arrangement. If you are creating a GIF from a video, pay attention to adjust its play duration.

Step 5: Beautify and Save Your Artwork
When you are satisfied with your work, tap ‘Make a GIF’. You can see your final creation appear. Click on ‘Save’ to add your artwork to your device memory. You can also customize your creation from the toolbar below the created GIF before saving it.

Part 2 Video to GIF Made Easy Only With Ezgif
As stated earlier, you can create GIFs from images and convert videos to GIFs using the Ezgif converter. What’s interesting is that the conversion process is quite fast and you are allowed to play with your editing skills to your heart’s content while customizing your artwork. Given below is a quick guide to convert videos in any common file format into impressive GIFs:
● Step 1
Visit ezgif.com, the official site of the Ezgif creator tool, in any suitable browser of your choice. In the homepage of the tool’s website, navigate to the toolbar at the top and click on ‘Video to GIF’.
Ezgif Video to GIF Converter Link:

● Step 2
In the converter interface, you can either upload a locally saved video from your device by clicking on ‘Browse’ or copy-paste a desired video URL in the address box and tap ‘Upload Video’.

● Step 3
In the tool’s editing interface, set required play duration for your video by setting the start and end points of the clip.
● Step 4
When you are done, click on ‘Convert to GIF’ and wait for the conversion process to finish. You can now see your created GIF in the pop up window that appears next. Click on ‘Save’ option in the toolbar beneath the created GIF to download your creation to your device.
Part 3 How to Crop a Video With Ezgif & Filmora
Ezgif is a multi faceted online tool that allows you to take up a variety of tasks in addition to just creating classy GIFs. Video to GIF conversion is one thing, besides that, you can also crop your videos using this tool. Wondering how to go about the process? Here’s a quick, stepwise tutorial to answer this for you. Follow the steps given below to crop your videos with a blink:
● Step 1: Launch the Ezgif Crop Tool
Open the official Ezgif website and navigate to the ‘Crop Video’ tab on the top toolbar in the welcome page. You can alternatively click on the link given below to reach the ‘Crop Video’ interface directly.
● Step 2: Upload Your Video
To upload a locally saved video, click on the ‘Choose File’ button. You will see the file name appear beside it. You can alternatively, copy-paste the URL of a desired video in the address box. Click on ‘Upload Video’ for the file to get uploaded.

● Step 3: Adjust Video Borders
To crop the video to a desired part, you need to set its borders within the required section. To do this, ‘Hold and Drag’ the mouse to highlight a desired section. Now leave the mouse to see the highlighted section within a frame.

● Step 4: Final Touches
After you have the desired section, scroll down to find some adjustment options. Here, you can resize, set aspect ratio and make frame adjustments to your cropping clip. When selecting the output video format, you can either choose to stick with the original file format or change to mp4.
Tap on ‘Crop Video’ when you are done making the changes. The conversion process may take a few seconds. You can enjoy looking at the swaying kitten in the meantime.

● Step 5: Download and Save
Once the conversion finishes, you will see your cropped video appear on the screen. Click on ‘Save’ from the toolbar below the video to download the sane to your device.

Ezgif is certainly an affordable GIF creator and video cropper tool, no doubt about that, but if you are looking for an alternative, you can consider using the Filmora GIF creator software for cropping a video to your favorite part. This one is a free to use, quick and smart tool with the most convenient user interface.
The huge audio-visual effects library of this software allows you to add sound, music and overlays to your clips and intensify them with text and filters. Here’s a quick tutorial on cropping videos with this software:
● Step 1
Download and install Filmora in your device. When finished, launch the software to reach its editor timeline.
Filmora Crop Video Tool Direct Link:
● Step 2
Within the timeline, select and right click on a desired video. Select ‘Crop and Zoom’ for the drop down menu. You can alternatively click on the ‘Crop’ icon.
● Step 3
In the pop-up window that follows, either choose a preset aspect ratio, or click on ‘Custom’ and navigate the rectangle to select a clip area to crop.
Wondershare Filmora - Best Video Editor for Mac/Windows
5,481,435 people have downloaded it.
Build unique custom animations without breaking a sweat.
Focus on creating epic stories and leave the details to Filmora’s auto features.
Start a creative adventure with drag & drop effects and endless possibilities.
Filmora simplifies advanced features to save you time and effort.
Filmora cuts out repetition so you can move on to your next creative breakthrough.
● Key Takeaways from This Episode →
● Ezgif is one of the most suitable GIF creator and converter tools available online that allows you to explore your skills and create top quality GIFs, convert videos to GIFs and crop video clips, all at one place.
●This one is a quick and hassle free solution to your video and GIF editing concerns. When browsing through its feasible alternatives, you can safely count upon the Filmora video editor and GIF creator software for making and customizing GIFs and video clips.
Everything about the know-how of Ezgif creator is here!
In this article
01 [How to Make a GIF on Ezgif](#Part 1)
02 [Video to GIF Made Easy Only With Ezgif](#Part 2)
03 [How to Crop a Video With Ezgif & Filmora](#Part 3)
Part 1 How to Make a GIF on Ezgif
GIFs take you to an exciting journey of expression and impact. With the introduction of GIF keyboards and a variety of creator tools, you are granted the liberty to use pre made GIFs as well as create stirring ones of your own to deliver your messages in unique and impactful ways. When it comes to creating GIFs, the online market is always ready with a heap of creator choices. While each of these tools is distinctive in its own way, some of them are leaders in making the mark among users.
About the Ezgif GIF Maker
Ezgif online GIF maker tool is amongst the most preferred GIF creators in today’s times. This one is a free and super convenient online tool that lets you create and convert animated GIFs in just a few clicks. Compatible with your Windows or MacOS devices, this tool is evidently among the fastest GIF creators of its time.
Apart from creating GIFs, you can also use this tool to cut, crop, trim and resize videos, ass and remove GIF backgrounds and much more. The tool is compatible with almost all common video and image formats; hence you can easily escape the glitch of sticking to a particular format for using this tool.
Here’s how you can use this tool for making next level GIFs:
Step 1: Launch the Tool
Open the Ezgif maker tool in your favorite browser. In the site’s welcome page, tap on ‘GIF Maker’ from the top toolbar.
Step 2: Upload Your Media
Click on ‘Browse’ to select your desired video or a set of still captures from your device and upload the same to the GIF maker timeline. You can choose from a manually or an alphabetically ordered upload. Ensure that the total file size is restricted within 100 MB.
Step 3: Let’s Create!
Click on ‘Upload and Make a GIF’. You will be shown a preview of your creation. At this point, you can customize the GIF with effects, filters and texts.
Step 4: Visual Adjustments
When using still images, consider arranging them in a particular order with the ‘Drag and Drop method’. You can skip this step if you are satisfied with the default arrangement. If you are creating a GIF from a video, pay attention to adjust its play duration.
Step 5: Beautify and Save Your Artwork
When you are satisfied with your work, tap ‘Make a GIF’. You can see your final creation appear. Click on ‘Save’ to add your artwork to your device memory. You can also customize your creation from the toolbar below the created GIF before saving it.
Part 2 Video to GIF Made Easy Only With Ezgif
As stated earlier, you can create GIFs from images and convert videos to GIFs using the Ezgif converter. What’s interesting is that the conversion process is quite fast and you are allowed to play with your editing skills to your heart’s content while customizing your artwork. Given below is a quick guide to convert videos in any common file format into impressive GIFs:
● Step 1
Visit ezgif.com, the official site of the Ezgif creator tool, in any suitable browser of your choice. In the homepage of the tool’s website, navigate to the toolbar at the top and click on ‘Video to GIF’.
Ezgif Video to GIF Converter Link:
● Step 2
In the converter interface, you can either upload a locally saved video from your device by clicking on ‘Browse’ or copy-paste a desired video URL in the address box and tap ‘Upload Video’.
● Step 3
In the tool’s editing interface, set required play duration for your video by setting the start and end points of the clip.
● Step 4
When you are done, click on ‘Convert to GIF’ and wait for the conversion process to finish. You can now see your created GIF in the pop up window that appears next. Click on ‘Save’ option in the toolbar beneath the created GIF to download your creation to your device.
Part 3 How to Crop a Video With Ezgif & Filmora
Ezgif is a multi faceted online tool that allows you to take up a variety of tasks in addition to just creating classy GIFs. Video to GIF conversion is one thing, besides that, you can also crop your videos using this tool. Wondering how to go about the process? Here’s a quick, stepwise tutorial to answer this for you. Follow the steps given below to crop your videos with a blink:
● Step 1: Launch the Ezgif Crop Tool
Open the official Ezgif website and navigate to the ‘Crop Video’ tab on the top toolbar in the welcome page. You can alternatively click on the link given below to reach the ‘Crop Video’ interface directly.
● Step 2: Upload Your Video
To upload a locally saved video, click on the ‘Choose File’ button. You will see the file name appear beside it. You can alternatively, copy-paste the URL of a desired video in the address box. Click on ‘Upload Video’ for the file to get uploaded.
● Step 3: Adjust Video Borders
To crop the video to a desired part, you need to set its borders within the required section. To do this, ‘Hold and Drag’ the mouse to highlight a desired section. Now leave the mouse to see the highlighted section within a frame.
● Step 4: Final Touches
After you have the desired section, scroll down to find some adjustment options. Here, you can resize, set aspect ratio and make frame adjustments to your cropping clip. When selecting the output video format, you can either choose to stick with the original file format or change to mp4.
Tap on ‘Crop Video’ when you are done making the changes. The conversion process may take a few seconds. You can enjoy looking at the swaying kitten in the meantime.
● Step 5: Download and Save
Once the conversion finishes, you will see your cropped video appear on the screen. Click on ‘Save’ from the toolbar below the video to download the sane to your device.
Ezgif is certainly an affordable GIF creator and video cropper tool, no doubt about that, but if you are looking for an alternative, you can consider using the Filmora GIF creator software for cropping a video to your favorite part. This one is a free to use, quick and smart tool with the most convenient user interface.
The huge audio-visual effects library of this software allows you to add sound, music and overlays to your clips and intensify them with text and filters. Here’s a quick tutorial on cropping videos with this software:
● Step 1
Download and install Filmora in your device. When finished, launch the software to reach its editor timeline.
Filmora Crop Video Tool Direct Link:
● Step 2
Within the timeline, select and right click on a desired video. Select ‘Crop and Zoom’ for the drop down menu. You can alternatively click on the ‘Crop’ icon.
● Step 3
In the pop-up window that follows, either choose a preset aspect ratio, or click on ‘Custom’ and navigate the rectangle to select a clip area to crop.
Wondershare Filmora - Best Video Editor for Mac/Windows
5,481,435 people have downloaded it.
Build unique custom animations without breaking a sweat.
Focus on creating epic stories and leave the details to Filmora’s auto features.
Start a creative adventure with drag & drop effects and endless possibilities.
Filmora simplifies advanced features to save you time and effort.
Filmora cuts out repetition so you can move on to your next creative breakthrough.
● Key Takeaways from This Episode →
● Ezgif is one of the most suitable GIF creator and converter tools available online that allows you to explore your skills and create top quality GIFs, convert videos to GIFs and crop video clips, all at one place.
●This one is a quick and hassle free solution to your video and GIF editing concerns. When browsing through its feasible alternatives, you can safely count upon the Filmora video editor and GIF creator software for making and customizing GIFs and video clips.
How to Create a Custom Slide Show in PowerPoint
How to Create a Custom Slide Shows in Powerpoint
An easy yet powerful editor
Numerous effects to choose from
Detailed tutorials provided by the official channel
Designing custom slideshows in PowerPoint is an absolute fun to do activity for infotainment and information sharing needs. Stay here to get an insight into creating the same, all in a wink!
In this article
01 [How to Create a Custom Slide Show in PowerPoint?](#Part 1)
02 [How to Show a Custom Show in PowerPoint?](#Part 2)
03 [How to Hide Slides in PowerPoint?](#Part 3)
Part 1 How to Create a Custom Slide Show in PowerPoint?
PowerPoint presentations are an already elusive and captivating media of information delivery and content sharing, be it a personal entertainment need or a high end professional requirement, PowerPoint presentations can do it all! Responding to the day to day IT upgrades of modern times, the aforesaid MS Office utility program has introduced its custom slideshow feature, which you can work upon to expand your creative skills in graphic design.
Custom slideshows are a convenient means of abstracting a required set of contents from a rather detailed slideshow presentation to address the needs of a specific audience, instead of distracting them with showcasing the entire content, most of which turns irrelevant to their exclusive requirements.
Talking about the knowhow to work with the feature, the following section encompasses a comprehensive understanding of the custom slide show creation process with the finest details:
User’s Guide to Create Custom Slideshows in PowerPoint
Step 1: Launch the PowerPoint Tool
Start the custom slide show PowerPoint creation process with launching the PowerPoint tool in any of your preferred devices. It would be better to work on a desktop or a PC. Proceed to open the presentation that you wish to create a custom slideshow from.
Step 2: Custom Slide Show Option
In the welcome interface of PowerPoint, navigate to the ribbon at the top and hit the ‘Slide Show’ tab, followed by clicking on the ‘Custom Slide Show’ button from the ‘Options Panel’ that appears. As you tap the aforesaid button, a dropdown menu follows next, from where you need to choose the ‘Custom Shows…’ option.

Step 3: Custom Shows Dialog Box
The completion of Step 2 brings up the ‘Custom Shows’ dialog box, with a blank area at the left, indicating the absence of any custom slide show as yet. To create one, navigate to and click on the ‘New’ button at the right side within the dialog box.

Step 4: Define Custom Show Dialog Box
As you tap the ‘New’ button, the ‘Define Custom Shows’ dialog box pops up with a display of the following fields and buttons:
● Slide Show Name Box
Use this field to assign a name to your custom slideshow. In case you don’t add a name of your choice, PowerPoint will assign the name ‘Custom Show 1’ to your custom presentation.
● Slides in Presentation
Below the ‘Slide Show Name’ box, appears a list of slides in the chosen presentation which you can use to create the custom slide show. To add slides to the same, click on the respective slide names.
● Add Button
The ‘Add’ button in the middle of the ‘Define Custom Show’ dialog box is used to include selected slides from the main list explained above to the ‘Slides in Custom Show’ list at the right. The ‘Add’ button however, remains disabled until you make a selection from the main slides list to include within the custom slides list. Take note that you can choose to repeat the slides within the custom list.
● Remove Button
You can use this button to select and delete specific slides from the ‘Slides in Custom Show’ list. The button however, remains disabled till you make a slide selection to be removed.
● Slides in Custom Show
This is a list of slides that you have selected from the main slides list to include in the custom slideshow.
● Re-Order Buttons
These are ‘Up’ and ‘Down’ arrows at the right side of the ‘Define Custom Show’ dialog box, which are active only if the ‘Slides in Custom Show’ list has more than one slide to its credit. In such a case, you can use these arrows to change the sequence of appearance of the slides within the custom presentation.

Step 5: Back to Custom Shows Dialog Box
When you have finished making all the required entries in the aforesaid fields, click on ‘OK’ to create your custom slideshow, which is visible in the ‘Custom Shows’ dialog box. You can preview the just created custom presentation by selecting the slideshow in the ‘Custom Shows’ list, followed by clicking on the ‘Show’ button at the bottom right of the dialog box.

The ‘Custom Shows’ dialog box has an additional list of buttons, which are explained as follows:
● The ‘New’ button, which you can click on to continue creating as many custom slideshows as you like.
● The ‘Edit’ button, which allows you to make changes to a specific custom slideshow.
● The ‘Remove’ button, which you can use to select and delete an existing custom presentation.
● The ‘Copy’ button, that lets you create multiple copies of a selected slideshow. This utility comes handy when you need to work on creating similar custom presentations with an affordably small number of differential elements.
When you are satisfied with your work, navigate to and hit the ‘Close’ button to finalize and save the custom presentation within your device.

Part 2 How to Show a Custom Show in PowerPoint?
When working to share any kind of information through slideshow presentations, creating a custom show is just half the job, with the significant part of a flawless content presentation remains still under the line. Having understood the process of creating a custom slide show in PowerPoint in enough detail, let us now move ahead with learning how to show the same in PowerPoint in the following section:
User’s Guide to Play a Custom Slideshow in PowerPoint
Step 1: Launch the Parent Presentation
In any suitable device of your preference, proceed with opening the presentation in which you have worked on creating the custom slideshow, followed by hitting the ‘Slide Show’ tab in the PowerPoint ribbon at the top. From the list of options that appears next, click on the ‘Custom Slide Show’ button.

Step 2: Custom Slideshow Dropdown Menu
Clicking on the ‘Custom Slide Show’ button in step 2 causes the latter’s dropdown menu to get displayed, with a list of all the created custom shows within the currently accessed parent slideshow presentation. Navigate to and click on the name of the custom presentation that you wish to play.

How to Set a Custom Show as the Default Slideshow?
If you are interested in playing the custom show as a default presentation, see through the following stepwise tutorial guide to go ahead with the process:
Step 1: Set Up Slideshow Button
After you have launched the parent presentation, navigate to and click on the ‘Slide Show’ tab within the topmost PowerPoint ribbon and tap the ‘Set Up Slide Show’ button from the list of options that follows.

Step 2: Set Up Show Dialog Box
Clicking on the aforesaid button makes the ‘Set Up Show’ dialog box to appear, where you are required to hit the ‘Custom Show’ radio button. You can now click on the dropdown arrow below the radio buttons to select your specific one from the list of custom shows that pops down. Hit ‘OK’ at the bottom right corner of the dialog box when you have made your choice.

The custom show is now your default slideshow. In your future launches of ‘Slide Show View’, only the selected custom show slides will appear to be used as a presentation.
Part 3 How to Hide Slides in PowerPoint?
In case you have worked on a detailed slideshow presentation in the PowerPoint tool, that consists of selective contents for different audience groups, all within the main presentation, it is a wise step to hide the content slides that are not useful to particular audiences, lest your viewers might get distracted with the irrelevant content.
By far, you must have developed a significant understanding of the custom slideshow PowerPoint creation and presentation procedure in much detail. Moving further into our discussion, let us now work on hiding slides within a PowerPoint presentation through the following step by step guide:
How to Hide or Unhide a Slide in PowerPoint?
Step 1: Launch the PowerPoint Presentation
Start with opening a desired PowerPoint Presentation in your preferred device.
Step 2: Make Your Selection
Visit the slide navigation pane at the left to select slide you wish to delete. Your selections will be highlighted as you tap on them. You can either delete the slides one at a time, or make multiple selections to delete them all at once.

Step 3: Hide Slide Option
When you have made the required selections, right click on the same, followed by choosing the ‘Hide Slide’ option from the dropdown menu that appears next. The selected slides will now be hidden and you can recognize them in the ‘Presenter View’ with lighter thumbnails as compared to the included slides, in the slide navigation pane.


Step 4: Unhiding the Presentation Slides
If you wish to unhide a previously hidden presentation slide, reach to the slide navigation pane in the left and right click on the hidden slide thumbnail. The dropdown menu in Step 3 pops up again, and you need to tap on the ‘Hide Slide’ option. The selected slide will now be included in the presentation.

An alternative to show a hidden slide within a running presentation, while remaining in the ‘Presenter View’, make a random right click anywhere within the currently running slide. The ‘Options Panel’ pops up, and you are required to choose the ‘See All Slides’ option.

All the slides of your presentation will now get displayed in the slide navigation pane, with the hidden ones being grayed out with a crossed slide number. Click on the thumbnail of the respective hidden slides that you want to present before the audience.
asterpieces crea

Creating PowerPoint Presentation Slides in Filmora
The Wondershare Filmora Video Editor franchise of graphic editor software is a pioneer in creating stunning masterpieces of content presentation alternatives. Talking of slideshow presentations, you can work with the software program to create and edit slideshow presentations in high end professional quality. The inbuilt library of the program is a vast trunk of features, effects and tools that allow you to explore your graphic creation abilities to your heart’s content and design top quality slideshows.
For Win 7 or later (64-bit)
For macOS 10.12 or later
Apart from creating slideshow presentations, you can use the software program to convert the same into video edits and customize them to suit your needs. As an example, you can work with removing the slideshow background, overlaying the slide contents; add tons of audio-visual effects and transitions to the slides and supplement them with pleasing background music.
Additional advantages of the application are a welcoming and user cohesive interface, high speed output response characteristics, high end, professional quality slideshow output and an extensive device compatibility. The bottom line is, the Filmora graphic editor package is an all in one solution to your most diverse and specific slideshow creation needs.
● Ending Thoughts →
● Custom slideshows are an important part of PowerPoint presentations, especially when you need to showcase selective contents of a detailed project.
● Apart from creating, you also get to play the custom slideshow, make it your default presentation and hide the latter’s slides using the PowerPoint tool.
● If you are searching for a PowerPoint alternative to create custom slideshows, picking the Wondershare Filmora slideshow creator tool is indeed a smart choice.
Designing custom slideshows in PowerPoint is an absolute fun to do activity for infotainment and information sharing needs. Stay here to get an insight into creating the same, all in a wink!
In this article
01 [How to Create a Custom Slide Show in PowerPoint?](#Part 1)
02 [How to Show a Custom Show in PowerPoint?](#Part 2)
03 [How to Hide Slides in PowerPoint?](#Part 3)
Part 1 How to Create a Custom Slide Show in PowerPoint?
PowerPoint presentations are an already elusive and captivating media of information delivery and content sharing, be it a personal entertainment need or a high end professional requirement, PowerPoint presentations can do it all! Responding to the day to day IT upgrades of modern times, the aforesaid MS Office utility program has introduced its custom slideshow feature, which you can work upon to expand your creative skills in graphic design.
Custom slideshows are a convenient means of abstracting a required set of contents from a rather detailed slideshow presentation to address the needs of a specific audience, instead of distracting them with showcasing the entire content, most of which turns irrelevant to their exclusive requirements.
Talking about the knowhow to work with the feature, the following section encompasses a comprehensive understanding of the custom slide show creation process with the finest details:
User’s Guide to Create Custom Slideshows in PowerPoint
Step 1: Launch the PowerPoint Tool
Start the custom slide show PowerPoint creation process with launching the PowerPoint tool in any of your preferred devices. It would be better to work on a desktop or a PC. Proceed to open the presentation that you wish to create a custom slideshow from.
Step 2: Custom Slide Show Option
In the welcome interface of PowerPoint, navigate to the ribbon at the top and hit the ‘Slide Show’ tab, followed by clicking on the ‘Custom Slide Show’ button from the ‘Options Panel’ that appears. As you tap the aforesaid button, a dropdown menu follows next, from where you need to choose the ‘Custom Shows…’ option.
Step 3: Custom Shows Dialog Box
The completion of Step 2 brings up the ‘Custom Shows’ dialog box, with a blank area at the left, indicating the absence of any custom slide show as yet. To create one, navigate to and click on the ‘New’ button at the right side within the dialog box.
Step 4: Define Custom Show Dialog Box
As you tap the ‘New’ button, the ‘Define Custom Shows’ dialog box pops up with a display of the following fields and buttons:
● Slide Show Name Box
Use this field to assign a name to your custom slideshow. In case you don’t add a name of your choice, PowerPoint will assign the name ‘Custom Show 1’ to your custom presentation.
● Slides in Presentation
Below the ‘Slide Show Name’ box, appears a list of slides in the chosen presentation which you can use to create the custom slide show. To add slides to the same, click on the respective slide names.
● Add Button
The ‘Add’ button in the middle of the ‘Define Custom Show’ dialog box is used to include selected slides from the main list explained above to the ‘Slides in Custom Show’ list at the right. The ‘Add’ button however, remains disabled until you make a selection from the main slides list to include within the custom slides list. Take note that you can choose to repeat the slides within the custom list.
● Remove Button
You can use this button to select and delete specific slides from the ‘Slides in Custom Show’ list. The button however, remains disabled till you make a slide selection to be removed.
● Slides in Custom Show
This is a list of slides that you have selected from the main slides list to include in the custom slideshow.
● Re-Order Buttons
These are ‘Up’ and ‘Down’ arrows at the right side of the ‘Define Custom Show’ dialog box, which are active only if the ‘Slides in Custom Show’ list has more than one slide to its credit. In such a case, you can use these arrows to change the sequence of appearance of the slides within the custom presentation.
Step 5: Back to Custom Shows Dialog Box
When you have finished making all the required entries in the aforesaid fields, click on ‘OK’ to create your custom slideshow, which is visible in the ‘Custom Shows’ dialog box. You can preview the just created custom presentation by selecting the slideshow in the ‘Custom Shows’ list, followed by clicking on the ‘Show’ button at the bottom right of the dialog box.
The ‘Custom Shows’ dialog box has an additional list of buttons, which are explained as follows:
● The ‘New’ button, which you can click on to continue creating as many custom slideshows as you like.
● The ‘Edit’ button, which allows you to make changes to a specific custom slideshow.
● The ‘Remove’ button, which you can use to select and delete an existing custom presentation.
● The ‘Copy’ button, that lets you create multiple copies of a selected slideshow. This utility comes handy when you need to work on creating similar custom presentations with an affordably small number of differential elements.
When you are satisfied with your work, navigate to and hit the ‘Close’ button to finalize and save the custom presentation within your device.
Part 2 How to Show a Custom Show in PowerPoint?
When working to share any kind of information through slideshow presentations, creating a custom show is just half the job, with the significant part of a flawless content presentation remains still under the line. Having understood the process of creating a custom slide show in PowerPoint in enough detail, let us now move ahead with learning how to show the same in PowerPoint in the following section:
User’s Guide to Play a Custom Slideshow in PowerPoint
Step 1: Launch the Parent Presentation
In any suitable device of your preference, proceed with opening the presentation in which you have worked on creating the custom slideshow, followed by hitting the ‘Slide Show’ tab in the PowerPoint ribbon at the top. From the list of options that appears next, click on the ‘Custom Slide Show’ button.
Step 2: Custom Slideshow Dropdown Menu
Clicking on the ‘Custom Slide Show’ button in step 2 causes the latter’s dropdown menu to get displayed, with a list of all the created custom shows within the currently accessed parent slideshow presentation. Navigate to and click on the name of the custom presentation that you wish to play.
How to Set a Custom Show as the Default Slideshow?
If you are interested in playing the custom show as a default presentation, see through the following stepwise tutorial guide to go ahead with the process:
Step 1: Set Up Slideshow Button
After you have launched the parent presentation, navigate to and click on the ‘Slide Show’ tab within the topmost PowerPoint ribbon and tap the ‘Set Up Slide Show’ button from the list of options that follows.
Step 2: Set Up Show Dialog Box
Clicking on the aforesaid button makes the ‘Set Up Show’ dialog box to appear, where you are required to hit the ‘Custom Show’ radio button. You can now click on the dropdown arrow below the radio buttons to select your specific one from the list of custom shows that pops down. Hit ‘OK’ at the bottom right corner of the dialog box when you have made your choice.
The custom show is now your default slideshow. In your future launches of ‘Slide Show View’, only the selected custom show slides will appear to be used as a presentation.
Part 3 How to Hide Slides in PowerPoint?
In case you have worked on a detailed slideshow presentation in the PowerPoint tool, that consists of selective contents for different audience groups, all within the main presentation, it is a wise step to hide the content slides that are not useful to particular audiences, lest your viewers might get distracted with the irrelevant content.
By far, you must have developed a significant understanding of the custom slideshow PowerPoint creation and presentation procedure in much detail. Moving further into our discussion, let us now work on hiding slides within a PowerPoint presentation through the following step by step guide:
How to Hide or Unhide a Slide in PowerPoint?
Step 1: Launch the PowerPoint Presentation
Start with opening a desired PowerPoint Presentation in your preferred device.
Step 2: Make Your Selection
Visit the slide navigation pane at the left to select slide you wish to delete. Your selections will be highlighted as you tap on them. You can either delete the slides one at a time, or make multiple selections to delete them all at once.
Step 3: Hide Slide Option
When you have made the required selections, right click on the same, followed by choosing the ‘Hide Slide’ option from the dropdown menu that appears next. The selected slides will now be hidden and you can recognize them in the ‘Presenter View’ with lighter thumbnails as compared to the included slides, in the slide navigation pane.
Step 4: Unhiding the Presentation Slides
If you wish to unhide a previously hidden presentation slide, reach to the slide navigation pane in the left and right click on the hidden slide thumbnail. The dropdown menu in Step 3 pops up again, and you need to tap on the ‘Hide Slide’ option. The selected slide will now be included in the presentation.
An alternative to show a hidden slide within a running presentation, while remaining in the ‘Presenter View’, make a random right click anywhere within the currently running slide. The ‘Options Panel’ pops up, and you are required to choose the ‘See All Slides’ option.
All the slides of your presentation will now get displayed in the slide navigation pane, with the hidden ones being grayed out with a crossed slide number. Click on the thumbnail of the respective hidden slides that you want to present before the audience.
asterpieces crea
Creating PowerPoint Presentation Slides in Filmora
The Wondershare Filmora Video Editor franchise of graphic editor software is a pioneer in creating stunning masterpieces of content presentation alternatives. Talking of slideshow presentations, you can work with the software program to create and edit slideshow presentations in high end professional quality. The inbuilt library of the program is a vast trunk of features, effects and tools that allow you to explore your graphic creation abilities to your heart’s content and design top quality slideshows.
For Win 7 or later (64-bit)
For macOS 10.12 or later
Apart from creating slideshow presentations, you can use the software program to convert the same into video edits and customize them to suit your needs. As an example, you can work with removing the slideshow background, overlaying the slide contents; add tons of audio-visual effects and transitions to the slides and supplement them with pleasing background music.
Additional advantages of the application are a welcoming and user cohesive interface, high speed output response characteristics, high end, professional quality slideshow output and an extensive device compatibility. The bottom line is, the Filmora graphic editor package is an all in one solution to your most diverse and specific slideshow creation needs.
● Ending Thoughts →
● Custom slideshows are an important part of PowerPoint presentations, especially when you need to showcase selective contents of a detailed project.
● Apart from creating, you also get to play the custom slideshow, make it your default presentation and hide the latter’s slides using the PowerPoint tool.
● If you are searching for a PowerPoint alternative to create custom slideshows, picking the Wondershare Filmora slideshow creator tool is indeed a smart choice.
Also read:
- New 2024 Approved What Is Motion Blur in the Game? Do You Really Need It?
- Updated Easy Steps to Add Miniature Effect to Videos
- 2024 Approved Top 5 Solutions on How to Add Emojis to iPhone
- In 2024, How to Make A Jaw-Dropping Time Lapse Video? Full Guide
- Updated Can You Enhance Your Drone Footage with Cinematic Drone LUTs? This Article Discusses Top Drone LUTs Recommendations to Simplify Video Editing
- Learning The Details Of How To Replace Sky in Lightroom
- New 2024 Approved Top 12 Best Freeze Frame Video Editing Examples
- Updated In 2024, Have You Ever Wanted to Speed up or Slow Down a Video? Maybe It Was Too Long, or You Wanted to Draw Out an Exciting Part of the Video without Having to Watch the Boring Parts
- Color Matching Is the Trickiest Part of Graphic Designing. Learn in Detail About Using Canva Color Match Ideally While Working on Your Pins, Social Media Posts, and Other Designs
- New Make Eye Zoom Transition Effect with Filmora for 2024
- Updated 2024 Approved Are You Looking for Funny Discord Emojis to Massively Improve Your Discord Experience? Using some Fun Bots for Discord Is an Excellent Way of Doing That! Thus, We Compiled a List of 10 Fun Discord Bots You Need
- Updated In 2024, Do You Want to Stream and Record at the Same Time but Cant Find an Easy Solution? This Guide Will Help You Get This Done Using Three Easy-to-Follow Methods
- How Did AI Video Games Act More Human Than Human?
- Updated How to Remove Echo From Videos with Adobe Audition
- 2024 Approved Easily Cut Large Video Faster on Mac
- New 2024 Approved This Article Discusses What Is Adobe Premiere Pro, How to Download, Install and Use It, and Its Key Features. It Further Discusses Its Alternative for Editing Your Videos and More. Check Out Now
- 2024 Approved Bandicut Video Editor Review
- 5 Quick Methods to Bypass Xiaomi Redmi Note 12 Pro+ 5G FRP
- How to Repair Excel File Name is Not Valid Error | Stellar
- Translate Videos and Subtitles with Veed.io for 2024
- How to Fix the Soft Bricked Honor 70 Lite 5G? | Dr.fone
- List of Pokémon Go Joysticks On OnePlus Ace 2 | Dr.fone
- How to Upgrade Apple iPhone 15 Plus without iTunes? | Dr.fone
- Huawei P60 Stuck on Screen – Finding Solutions For Stuck on Boot | Dr.fone
- New 2024 Approved Learn Pencil2D Animation Tutorial Overview
- Updated 2024 Approved Best 12 2D Animation Studios All Should Check Out
- In 2024, 6 Proven Ways to Unlock Oppo A59 5G Phone When You Forget the Password
- Can Life360 Track Or See Text Messages? What Can You Do with Life360 On Oppo F25 Pro 5G? | Dr.fone
- How to Share Location in Messenger On Samsung Galaxy A15 5G? | Dr.fone
- How to Use Phone Clone to Migrate Your Samsung Galaxy M34 5G Data? | Dr.fone
- In 2024, How To Remove Passcode From Apple iPhone 6s? Complete Guide | Dr.fone
- In 2024, Edit and Send Fake Location on Telegram For your Motorola Moto G14 in 3 Ways | Dr.fone
- Title: New 2024 Approved How to Use Kahoot! On Zoom
- Author: Morgan
- Created at : 2024-04-24 01:06:37
- Updated at : 2024-04-25 01:06:37
- Link: https://ai-video-editing.techidaily.com/new-2024-approved-how-to-use-kahoot-on-zoom/
- License: This work is licensed under CC BY-NC-SA 4.0.
