
:max_bytes(150000):strip_icc():format(webp)/wimbledonlivestream-c22d5eefbf8f40e9b25ba4cab1734ece.jpg)
New 2024 Approved How To Zoom In On TikTok Videos?
2 Easy Methods | How To Zoom In On TikTok Videos?
Abundant Video Effects - Wondershare Filmora
Provide abundant video effects - A creative video editor
Powerful color correction and grading
Detailed tutorials are provided by the official channel
TikTok is one of the most common and grossing social media platforms that is utilized by millions of users in the world. Social media platforms, as a whole, have made a significant impact across their users with their impressive features. With the ability to perform multiple functions across your TikTok recording, it makes it a great choice for many users.
This article comes up with the idea of providing users with a guide on how to zoom in on TikTok videos without putting themselves in a mess. We have put up the best methods that can be performed across the easiest of levels.
In this article
Part 1: Zoom In On TikTok After Recording
Part 2: Zoom In TikTok Videos Using Wondershare Filmora
Part 1: Zoom In On TikTok After Recording
The Zoom In feature across any mobile platform has some specific uses and highlights a particular set of characteristics for its users. While using TikTok, you may find the need to highlight a certain section of the video that you’ve recorded to make it visible to users. It may be something that needs to be shown out of curiosity. To understand how to zoom in on TikTok after recording, go through the detailed steps presented as follows:
Step 1: You need to start the process of downloading and installing TikTok on your device. Launch it on your phone and proceed by clicking the “+” icon on the bottom of the screen to record or create a new video across TikTok.

Step 2: Hold the red button of the recording and effectively create a video of your liking. Leave the button once you are done recording the video. As you’ve recorded the video, click on the “Tick” icon to proceed to the edit page of TikTok.

Step 3: Find yourselves on the editing page of TikTok with a list of multiple editing options across the screen. Click on the “Effects” button and find the “Zoom” effect across the available list. To find the effect, let the editor cursor of the video reach the point where you want to add the Zoom in effect. Once it reaches the point of the video, hold the “Zoom” effect button for the specific time that you want to add the effect to your video. You can then conclude editing your video on TikTok and proceed to save it.

Advantages of Zooming Videos After Recording
- This puts you in more control of the video rather than improvising the need to zoom in on a video during recording.
- Zoom into the specific part or portion of the video that you find necessary for covering the purpose. You cannot perform such actions while recording a video since the recording is quite restricted across a device.
- Adding zoom in effect across the video gives it a proper effect that enhances the quality rather than depreciating it.
Disadvantages of Zooming Videos After Recording
- If you put in a zoom in effect on your video, this cannot be reverted back or zoomed out.
- The frame rate of the video is heavily damaged by using such effects across your recorded video. As this is done through the software, there is a guaranteed decrease in the quality output of the video.
Part 2: Zoom In TikTok Videos Using Wondershare Filmora
The default TikTok platform does provide you with the option of zooming in on your videos after recording. This, however, had its disadvantages which have been featured above. As you are aware of these drawbacks, it is necessary for you to go through other options that are proficient and better for users on a similar scale.
Wondershare Filmora has made its name as a video editor in the market. With simple tools like adding zoom in effects across videos, it makes it software accessible for all users. Find out how to zoom in on TikTok using Wondershare Filmora with the steps exclaimed as follows:
Step 1: Download and Install Wondershare Filmora
For starters, you need to download and install the latest version of Wondershare Filmora across your computer. Once installed, launch the platform and click on “New Project” to start working on a project from scratch.

Step 2: Upload Video
As a new canvas opens on your front, you need to click on the “Arrow Head” icon under the “Media” tab to import the video file from TikTok that needs to be zoomed in.

Step 3: Cut Video Part to Slow Zoom
Dissect the specific part of the video that you want to put in the slow zoom feature from Filmora. Take the red indicator across the timeline to the point where you want to start the specific part. Click the split icon on the red line to divide the video. Drag the indicator to the point where you want to end the specific part of the video for the slow zoom feature.

Step 4: Set the Speed of the Clip
Select the split part of the video and find the “Speed” icon on the edit menu at the top of the timeline. Select an appropriate speed that you want to work according to. You can find speeds as low as 0.5x in the ‘Slow’ section and speeds as high as 2x in the ‘Fast’ section.

Step 5: Add Animation Keyframes
To add animation keyframes, right-click on a certain clip of the TikTok video and select the “Add Animation” button from the option of “Animation” in the drop-down menu. Go across the “Customize” section in the “Animation” tab across the menu that opens up and move the indicator where you want to create a keyframe. Click on “Add’ and find a keyframe added to the video. Move the indicator further along the clip to add another animation, as two keyframes create an animation keyframe.

Step 6: Scale Clip Edge
Once you are done adjusting your TikTok video, it is time to scale the clip according to your required settings. Double-click on the video to open a new set of settings on your front. Proceed by opening the menu of “Transform” across the menu. Find the “Scale” option in the provided list and adjust the scale settings as required. Once you are done, click on the “Export” button to conclude the process.

Conclusion
Have you gone through the reasons that provide you the ability to zoom in on a TikTok video with ease? We are hopeful that you’ve learned the process of how to zoom in on TikTok videos with different tools and features. Go through the provided details to know more about the process and make yourselves perfect in executing the process.
TikTok is one of the most common and grossing social media platforms that is utilized by millions of users in the world. Social media platforms, as a whole, have made a significant impact across their users with their impressive features. With the ability to perform multiple functions across your TikTok recording, it makes it a great choice for many users.
This article comes up with the idea of providing users with a guide on how to zoom in on TikTok videos without putting themselves in a mess. We have put up the best methods that can be performed across the easiest of levels.
In this article
Part 1: Zoom In On TikTok After Recording
Part 2: Zoom In TikTok Videos Using Wondershare Filmora
Part 1: Zoom In On TikTok After Recording
The Zoom In feature across any mobile platform has some specific uses and highlights a particular set of characteristics for its users. While using TikTok, you may find the need to highlight a certain section of the video that you’ve recorded to make it visible to users. It may be something that needs to be shown out of curiosity. To understand how to zoom in on TikTok after recording, go through the detailed steps presented as follows:
Step 1: You need to start the process of downloading and installing TikTok on your device. Launch it on your phone and proceed by clicking the “+” icon on the bottom of the screen to record or create a new video across TikTok.
Step 2: Hold the red button of the recording and effectively create a video of your liking. Leave the button once you are done recording the video. As you’ve recorded the video, click on the “Tick” icon to proceed to the edit page of TikTok.
Step 3: Find yourselves on the editing page of TikTok with a list of multiple editing options across the screen. Click on the “Effects” button and find the “Zoom” effect across the available list. To find the effect, let the editor cursor of the video reach the point where you want to add the Zoom in effect. Once it reaches the point of the video, hold the “Zoom” effect button for the specific time that you want to add the effect to your video. You can then conclude editing your video on TikTok and proceed to save it.
Advantages of Zooming Videos After Recording
- This puts you in more control of the video rather than improvising the need to zoom in on a video during recording.
- Zoom into the specific part or portion of the video that you find necessary for covering the purpose. You cannot perform such actions while recording a video since the recording is quite restricted across a device.
- Adding zoom in effect across the video gives it a proper effect that enhances the quality rather than depreciating it.
Disadvantages of Zooming Videos After Recording
- If you put in a zoom in effect on your video, this cannot be reverted back or zoomed out.
- The frame rate of the video is heavily damaged by using such effects across your recorded video. As this is done through the software, there is a guaranteed decrease in the quality output of the video.
Part 2: Zoom In TikTok Videos Using Wondershare Filmora
The default TikTok platform does provide you with the option of zooming in on your videos after recording. This, however, had its disadvantages which have been featured above. As you are aware of these drawbacks, it is necessary for you to go through other options that are proficient and better for users on a similar scale.
Wondershare Filmora has made its name as a video editor in the market. With simple tools like adding zoom in effects across videos, it makes it software accessible for all users. Find out how to zoom in on TikTok using Wondershare Filmora with the steps exclaimed as follows:
Step 1: Download and Install Wondershare Filmora
For starters, you need to download and install the latest version of Wondershare Filmora across your computer. Once installed, launch the platform and click on “New Project” to start working on a project from scratch.
Step 2: Upload Video
As a new canvas opens on your front, you need to click on the “Arrow Head” icon under the “Media” tab to import the video file from TikTok that needs to be zoomed in.
Step 3: Cut Video Part to Slow Zoom
Dissect the specific part of the video that you want to put in the slow zoom feature from Filmora. Take the red indicator across the timeline to the point where you want to start the specific part. Click the split icon on the red line to divide the video. Drag the indicator to the point where you want to end the specific part of the video for the slow zoom feature.
Step 4: Set the Speed of the Clip
Select the split part of the video and find the “Speed” icon on the edit menu at the top of the timeline. Select an appropriate speed that you want to work according to. You can find speeds as low as 0.5x in the ‘Slow’ section and speeds as high as 2x in the ‘Fast’ section.
Step 5: Add Animation Keyframes
To add animation keyframes, right-click on a certain clip of the TikTok video and select the “Add Animation” button from the option of “Animation” in the drop-down menu. Go across the “Customize” section in the “Animation” tab across the menu that opens up and move the indicator where you want to create a keyframe. Click on “Add’ and find a keyframe added to the video. Move the indicator further along the clip to add another animation, as two keyframes create an animation keyframe.
Step 6: Scale Clip Edge
Once you are done adjusting your TikTok video, it is time to scale the clip according to your required settings. Double-click on the video to open a new set of settings on your front. Proceed by opening the menu of “Transform” across the menu. Find the “Scale” option in the provided list and adjust the scale settings as required. Once you are done, click on the “Export” button to conclude the process.
Conclusion
Have you gone through the reasons that provide you the ability to zoom in on a TikTok video with ease? We are hopeful that you’ve learned the process of how to zoom in on TikTok videos with different tools and features. Go through the provided details to know more about the process and make yourselves perfect in executing the process.
Reversing Time Lapse Videos on iPhone Using Top Applications
We have all seen time-lapse videos in vlogs or developmental videos. The time-lapse effect has been around the corner for some time and assists in several tasks. However, when it comes to understanding the content of a video, they aren’t helpful. This article will help you understand how to slow down time lapse on an i Phone.
In addition, we’ll provide some insights on slow-down time-lapse videos. You can learn about its advantages for both viewers and creators. The article will highlight some tools for transforming a time-lapse into a slo-mo. We’ll also discuss an offline tool on how to slow down a time-lapse on an iPhone. Start reading this article for a brief overview of slow-motion videos and tools.
Slow Motion Video Maker Slow your video’s speed with better control of your keyframes to create unique cinematic effects!
Make A Slow Motion Video Make A Slow Motion Video More Features

Part 1: How Does Slowing Down Videos Help Viewers and Creators?
A time-lapse video certainly makes some scenes worthy of watching. However, a slow-motion video helps in better comprehension of the topic. In this section, we’ll discuss how slowing down time-lapse video s is helpful. We’ll shed light on their applications for viewers and content creators. Without further delay, let’s dive in to solve this mystery:
For Creators
Since the era of social media , content creation has become a new trend. Creators around the globe can interact with their followers from a single platform. It gives them a chance to share their ideas and showcase their talents. Hence, here is how slow-motion videos benefit a creator in his journey:
- In Video Tutorials: Do you have a channel where you post tutorials to perform a specific task? This effect can help you slow down the video for the audience to absorb your words. It helps creators to show their viewers that they genuinely care about them. A video where basics and details are discussed is considered right.
- In Revealing Details: We encounter situations where the camera cannot capture a moment right. This is because the normal playback speed cannot highlight video details. On the other hand, a slo-mo takes proper time to showcase details. These help handle an event planning or dress designing page.
- In Creating Aesthetics: Another application of slo-mos is that they help with creativity. Adding this effect at the right time and duration enhances visuals. Moreover, adding a slo-mo effect gives the video an aesthetic appeal. It can enhance the visuals of a travel, cooking, or fashion video.
For Viewers
Slow-motion videos benefit not only creators but also viewers. They help them with enhanced learning by breaking down complex information. If you are creating slo-mos as a creator, here is how they are helping your viewers:
- In Effective Learning: You are not unaware of tutorial or explainer videos. Whether you are a student or a housewife, you must have used YouTube to your benefit. A slow-motion video can break down a complex concept or steps for a recipe. In addition, it can help you operate technology better, like Word, Excel, and more.
- In Understanding Nature: People out there prefer documentaries over dramas. They are curious about nature and the way it works. In such documentaries, slo-mos are used to present a natural phenomenon. It helps the viewers understand how a certain process occurs. Moreover, it focuses on small details in an ecosystem to explain better.
- In Reflecting Content: Next time you watch reels, notice that slo-mos catch your attention. Videos with the right speed manipulation appeal to the eyes, and viewers often watch them again. In addition, they help focus on the specifics of a gadget, fashion product, or more.
Part 2: A Guide on How to Slow Down Time Lapses on iPhone
Now that you know the benefits of slow motions, let’s proceed to our next segment. Here, we will learn how to slow down a time-lapse on an i Phone using different techniques. This will involve looking into some tools for an i Phone time lapse slowdown:
1. iMovie
This tool is perfect if you are looking for a tool to effectively slow down time-laps e. It offers speed change options to transform your time-lapse videos into slomos. The tool supports popular video formats and creates results in 4K high resolution. Creating a slo-mo is straightforward, and users can also create a high-speed motion.

Key Features
- Provides 14 templates and 20 storyboards to get started with creative videos.
- The tool operates online; hence, it isn’t necessary to download any application.
- You can synchronize your work with devices like macOS, iPad, AirDrop, and iCloud.
Steps
Do you want to know ho w to slow down a time-lapse on i Phone ? The method of performing this function is very plain and accessible, and here is the guide:
Step 1: Open iMovie and click the “Start New Project” option to start editing. Continue to select “Magic Movie” across the pop-up to proceed into the editing section.

Step 2: Choose a file from the iPhone’s video gallery and select the “Pencil” icon to start editing. Go to the “Speed” option and click it to access speed change options.

Step 3: Navigate towards the speed slider and drag it towards the left to slow down. The option “1/2x” means the speed will be half the original speed.

2. Filmmaker Pro - Video Editor
If you want to slow down the time-lapse i Phone with additional editing options, use this tool. It is a professional-level content editor for iDevices and offers to slow down the speed. You can create or slow down timelapses. The editor will export your videos in 4K high resolution. Moreover, 120 royalty-free music tracks can be inserted into your slo-mo afterward.

Key Features
- Decorate your videos with stunning animations using keyframing and track motion.
- You have over 46 transition options to complete trending TikTok and Instagram challenges.
- Over 79 classic fonts, 92 beautiful fonts, 15 Hollywood, and 26 retro fonts options.
3. Video Up! Video Editor and Maker
Adjusting the time-lapse speed of the i Phone is possible via third-party applications. This is a versatile platform for creating slo-mos without any technicalities. You will find speed setting presets when you access its video adjustment options. These presets can automatically slow down or fasten a video at a specific point. However, you can also choose its Custom option to slow down a complete video.

Key Features
- It provides 2 video export resolution options: Ultra – 4K and Full HD – 1080p.
- Offers an option to insert voiceovers and built-in music tracks in your slo-mos or videos.
- CTA to share videos straight to Instagram, Facebook, WhatsApp, and more.
4. Vidma - Video Editor Music
Are you wondering how to slow down time-lapse videos on iPhone for specific durations? Vidma is the right tool for you, offering custom speed change and duration options. The speed slider option is a simple drag and adjust method. In addition, there is an audio pitch adjustment option to maintain audio during speed alteration.

Key Features
- Users have the option to merge, crop, or resize your images or videos using this tool.
- With its AI abilities, you can generate art from text and edit it further.
- The lowest playback speed to create slow motion is 0.1x, and the highest is 10.0x.
Part 3: A Comprehensive Desktop Solution for Slowing Down Time Lapses: Wondershare Filmora
Wondershare Filmora is a platform with diverse possibilities and compatibility across iOS devices. This allows you to import media using a cable from your iPhone. It doesn’t decline the video quality upon export or import; hence, it proves to be a superior tool to adjust the time-lapse speed of the i Phone. Filmora offers multiple opportunities to transform a time lapse into slo-mo.
You can also select the time period to apply the slow-motion effect via timeline editing. In addition, users can also choose the speed ramping option for professional results. Upon creating a slow motion, you can use Filmora’s video templates, text, and more to enhance visuals. In addition, there is an Optical Flow feature to help in enhancing the slo-mo effect.
Free Download For Win 7 or later(64-bit)
Free Download For macOS 10.14 or later
Step-by-Step Guide to Slow Down a Time Lapse Video into Slow Motion in Filmora
The basic technique to change the time-lapse speed of the i Phone involves Uniform Speed. This method modulates the playback speed of a video through the slider’s position. Here is how do I slow down time lapse on i Phone using Filmora:
Step 1Commence the Speed Change Action
Initiate Filmora by giving a “New Project” command and gaining access to the editing interface. Use the “Import” > “Import from a Camera or Phone” to import files. You need to connect to the iOS device first. Bring the clip to the timeline and access the settings panel that will appear on the screen. Further, choose the “Speed” > “Uniform Speed” option and drag the Speed slider towards the left to reduce it.

Step 2Access the AI Frame Interpolation Settings
In the pursuit of achieving a seamless slow-motion effect, use the AI Frame Interpolation settings. Navigate towards the bottom to access it and opt for the “Optical Flow” option.

Step 3Activate Render Preview for Thorough Evaluation
Upon adjusting, return to the timeline panel and select the video. With the help of your cursor, navigate to the “File” > “Render Preview” option. Enable a preview prior to finalizing the video, and then hit “Export.”

Key Features of Filmora
Filmora is not just confined to creating slow motion; the interface offers much more. There are multiple AI and manual features to edit videos, adjust audio, and insert text. Here are a few video editing features of Filmora amongst many:
Green Screen: Get rid of messy or unwanted backgrounds and replace them with something captivating. For this, film the model or object in front of a green screen and enable Chroma Key. It is an AI-driven function that will auto-remove the background while preserving the object.
AI Text-to-Video: Can’t find the right visuals or time to shoot content for your channel? Use this AI to create videos from prompts without having to put in any effort. The AI will auto-generate graphics to add to the video along with the AI voice insertion.
Compound Clip: Are there multiple clips in your timeline that you want to apply the same effects to? This function will help you transform multiple clips into one. Furthermore, you can apply similar effects or transitions. In addition, this function also ensures a smooth transfer from one clip to another.
AI Thumbnail Creator: Create and edit compelling thumbnails for your videos using this AI. The AI will analyze and select the perfect video frames as thumbnail options. Further, you can edit the thumbnail and insert multiple templates to show what the video is going to be about.
Conclusion
After going through this article, readers have an extensive knowledge of how to slow down time-lapse on i Phones using multiple tools and techniques. We provided a review of these tools but also the benefits of slo-mos in content creation and viewing.
In the end, we suggest Wondershare Filmora as the best alternative to all these applications. The software is not just AI integrated but has everything you need to create slo-mos in one place. Use Filmora for creative slo-mo and other video editing features.
Make A Slow Motion Video Make A Slow Motion Video More Features
Part 1: How Does Slowing Down Videos Help Viewers and Creators?
A time-lapse video certainly makes some scenes worthy of watching. However, a slow-motion video helps in better comprehension of the topic. In this section, we’ll discuss how slowing down time-lapse video s is helpful. We’ll shed light on their applications for viewers and content creators. Without further delay, let’s dive in to solve this mystery:
For Creators
Since the era of social media , content creation has become a new trend. Creators around the globe can interact with their followers from a single platform. It gives them a chance to share their ideas and showcase their talents. Hence, here is how slow-motion videos benefit a creator in his journey:
- In Video Tutorials: Do you have a channel where you post tutorials to perform a specific task? This effect can help you slow down the video for the audience to absorb your words. It helps creators to show their viewers that they genuinely care about them. A video where basics and details are discussed is considered right.
- In Revealing Details: We encounter situations where the camera cannot capture a moment right. This is because the normal playback speed cannot highlight video details. On the other hand, a slo-mo takes proper time to showcase details. These help handle an event planning or dress designing page.
- In Creating Aesthetics: Another application of slo-mos is that they help with creativity. Adding this effect at the right time and duration enhances visuals. Moreover, adding a slo-mo effect gives the video an aesthetic appeal. It can enhance the visuals of a travel, cooking, or fashion video.
For Viewers
Slow-motion videos benefit not only creators but also viewers. They help them with enhanced learning by breaking down complex information. If you are creating slo-mos as a creator, here is how they are helping your viewers:
- In Effective Learning: You are not unaware of tutorial or explainer videos. Whether you are a student or a housewife, you must have used YouTube to your benefit. A slow-motion video can break down a complex concept or steps for a recipe. In addition, it can help you operate technology better, like Word, Excel, and more.
- In Understanding Nature: People out there prefer documentaries over dramas. They are curious about nature and the way it works. In such documentaries, slo-mos are used to present a natural phenomenon. It helps the viewers understand how a certain process occurs. Moreover, it focuses on small details in an ecosystem to explain better.
- In Reflecting Content: Next time you watch reels, notice that slo-mos catch your attention. Videos with the right speed manipulation appeal to the eyes, and viewers often watch them again. In addition, they help focus on the specifics of a gadget, fashion product, or more.
Part 2: A Guide on How to Slow Down Time Lapses on iPhone
Now that you know the benefits of slow motions, let’s proceed to our next segment. Here, we will learn how to slow down a time-lapse on an i Phone using different techniques. This will involve looking into some tools for an i Phone time lapse slowdown:
1. iMovie
This tool is perfect if you are looking for a tool to effectively slow down time-laps e. It offers speed change options to transform your time-lapse videos into slomos. The tool supports popular video formats and creates results in 4K high resolution. Creating a slo-mo is straightforward, and users can also create a high-speed motion.
Key Features
- Provides 14 templates and 20 storyboards to get started with creative videos.
- The tool operates online; hence, it isn’t necessary to download any application.
- You can synchronize your work with devices like macOS, iPad, AirDrop, and iCloud.
Steps
Do you want to know ho w to slow down a time-lapse on i Phone ? The method of performing this function is very plain and accessible, and here is the guide:
Step 1: Open iMovie and click the “Start New Project” option to start editing. Continue to select “Magic Movie” across the pop-up to proceed into the editing section.
Step 2: Choose a file from the iPhone’s video gallery and select the “Pencil” icon to start editing. Go to the “Speed” option and click it to access speed change options.
Step 3: Navigate towards the speed slider and drag it towards the left to slow down. The option “1/2x” means the speed will be half the original speed.
2. Filmmaker Pro - Video Editor
If you want to slow down the time-lapse i Phone with additional editing options, use this tool. It is a professional-level content editor for iDevices and offers to slow down the speed. You can create or slow down timelapses. The editor will export your videos in 4K high resolution. Moreover, 120 royalty-free music tracks can be inserted into your slo-mo afterward.
Key Features
- Decorate your videos with stunning animations using keyframing and track motion.
- You have over 46 transition options to complete trending TikTok and Instagram challenges.
- Over 79 classic fonts, 92 beautiful fonts, 15 Hollywood, and 26 retro fonts options.
3. Video Up! Video Editor and Maker
Adjusting the time-lapse speed of the i Phone is possible via third-party applications. This is a versatile platform for creating slo-mos without any technicalities. You will find speed setting presets when you access its video adjustment options. These presets can automatically slow down or fasten a video at a specific point. However, you can also choose its Custom option to slow down a complete video.
Key Features
- It provides 2 video export resolution options: Ultra – 4K and Full HD – 1080p.
- Offers an option to insert voiceovers and built-in music tracks in your slo-mos or videos.
- CTA to share videos straight to Instagram, Facebook, WhatsApp, and more.
4. Vidma - Video Editor Music
Are you wondering how to slow down time-lapse videos on iPhone for specific durations? Vidma is the right tool for you, offering custom speed change and duration options. The speed slider option is a simple drag and adjust method. In addition, there is an audio pitch adjustment option to maintain audio during speed alteration.
Key Features
- Users have the option to merge, crop, or resize your images or videos using this tool.
- With its AI abilities, you can generate art from text and edit it further.
- The lowest playback speed to create slow motion is 0.1x, and the highest is 10.0x.
Part 3: A Comprehensive Desktop Solution for Slowing Down Time Lapses: Wondershare Filmora
Wondershare Filmora is a platform with diverse possibilities and compatibility across iOS devices. This allows you to import media using a cable from your iPhone. It doesn’t decline the video quality upon export or import; hence, it proves to be a superior tool to adjust the time-lapse speed of the i Phone. Filmora offers multiple opportunities to transform a time lapse into slo-mo.
You can also select the time period to apply the slow-motion effect via timeline editing. In addition, users can also choose the speed ramping option for professional results. Upon creating a slow motion, you can use Filmora’s video templates, text, and more to enhance visuals. In addition, there is an Optical Flow feature to help in enhancing the slo-mo effect.
Free Download For Win 7 or later(64-bit)
Free Download For macOS 10.14 or later
Step-by-Step Guide to Slow Down a Time Lapse Video into Slow Motion in Filmora
The basic technique to change the time-lapse speed of the i Phone involves Uniform Speed. This method modulates the playback speed of a video through the slider’s position. Here is how do I slow down time lapse on i Phone using Filmora:
Step 1Commence the Speed Change Action
Initiate Filmora by giving a “New Project” command and gaining access to the editing interface. Use the “Import” > “Import from a Camera or Phone” to import files. You need to connect to the iOS device first. Bring the clip to the timeline and access the settings panel that will appear on the screen. Further, choose the “Speed” > “Uniform Speed” option and drag the Speed slider towards the left to reduce it.
Step 2Access the AI Frame Interpolation Settings
In the pursuit of achieving a seamless slow-motion effect, use the AI Frame Interpolation settings. Navigate towards the bottom to access it and opt for the “Optical Flow” option.
Step 3Activate Render Preview for Thorough Evaluation
Upon adjusting, return to the timeline panel and select the video. With the help of your cursor, navigate to the “File” > “Render Preview” option. Enable a preview prior to finalizing the video, and then hit “Export.”
Key Features of Filmora
Filmora is not just confined to creating slow motion; the interface offers much more. There are multiple AI and manual features to edit videos, adjust audio, and insert text. Here are a few video editing features of Filmora amongst many:
Green Screen: Get rid of messy or unwanted backgrounds and replace them with something captivating. For this, film the model or object in front of a green screen and enable Chroma Key. It is an AI-driven function that will auto-remove the background while preserving the object.
AI Text-to-Video: Can’t find the right visuals or time to shoot content for your channel? Use this AI to create videos from prompts without having to put in any effort. The AI will auto-generate graphics to add to the video along with the AI voice insertion.
Compound Clip: Are there multiple clips in your timeline that you want to apply the same effects to? This function will help you transform multiple clips into one. Furthermore, you can apply similar effects or transitions. In addition, this function also ensures a smooth transfer from one clip to another.
AI Thumbnail Creator: Create and edit compelling thumbnails for your videos using this AI. The AI will analyze and select the perfect video frames as thumbnail options. Further, you can edit the thumbnail and insert multiple templates to show what the video is going to be about.
Conclusion
After going through this article, readers have an extensive knowledge of how to slow down time-lapse on i Phones using multiple tools and techniques. We provided a review of these tools but also the benefits of slo-mos in content creation and viewing.
In the end, we suggest Wondershare Filmora as the best alternative to all these applications. The software is not just AI integrated but has everything you need to create slo-mos in one place. Use Filmora for creative slo-mo and other video editing features.
Top 6 Text to Speech Generators for YouTube Videos [Windows, Mac, And
Best Text To Speech Converter and Video Editor
Filmora’s Text to Speech (TTS) function allows you to convert your text files to voiceover and bring more elements to enrich your video.
Free Download Free Download Free Download Learn More >

Speech has a significant impact on the success rate of the entire YouTube adventure, whether storytelling or a standard sales pitch. It helps to have a decent voice and speaking abilities. However, not everyone gets both simultaneously; many individuals employ voice artists to provide voice-overs.
Some freelancers charge $5-$100 for a 5-minute voice-over. However, not everyone can afford an expensive voice artist, especially for longer films or just starting. Here are other options that I discovered as the most acceptable free text to voice generators for YouTube videos.
Let’s take a deeper look at the most excellent free text to speech software for YouTube videos.
Getting Started
Text to speech is a speech synthesis software that speaks aloud digital and textual content. The software offers a wide range of applications and is utilized by everyone from professionals and students to toddlers and adults.
Viewers are emotionally attached to documents such as PDFs, books, novels, and e-learning courses when they hear narration with a human voice. Text-to-speech systems are ideal for multitasking by busy professionals.
It’s no surprise that there are numerous text-to-speech options available. Audiobooks are also becoming more popular for the same reasons.
We’ll go over the best text-to-speech tools available in this guide. We’ve gathered a detailed list of the most exemplary free and commercial text-to-speech applications to help you choose the best option for your needs:
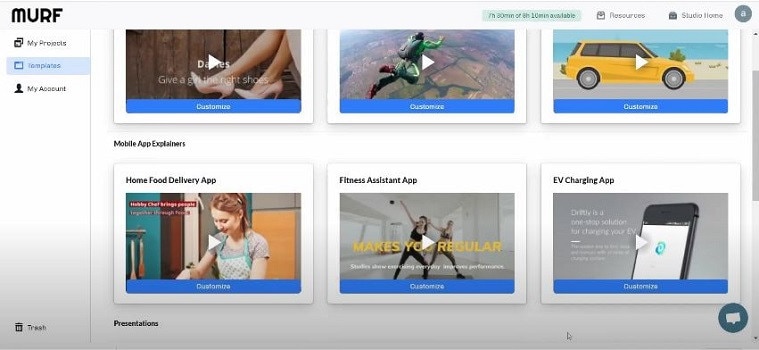
#1: Murf
It is available on Windows, Mac, Android, iPhone, and Online
Murf is a text-based voice-over maker. You can either compose your script or submit a voice clip to convert it into hyper-realistic AI voices. Murf delivers expert voice-over artists with experienced voices. You can check multiple parameters in the voices. You can use Murf to signify a brand, a product, a company, a presentation, and many more.
Features:
- Murf allows you to create voice-overs from the text. It also allows you to transform your speech into editable text, which you can subsequently edit or convert into AI voice.
- Murf Studio provides the ability to synchronize your speech with visuals.
- Murf provides over 100 authentic voices in 19 languages.
- It also gives options for inserting pauses, altering narration tempo, and emphasizing certain points.
- It also includes features such as script checking with grammar assistance, free background music, video and music cutting, and more.
- Murf offers comprehensive communication and collaboration tools, access control, a pronunciation library, and a service level agreement (SLA) for enterprises wishing to develop voice-overs in bulk.
Price
| Free | Basic | Pro | Enterprise |
|---|---|---|---|
| $0 / Month | $13 / Month | $26 / Month | $166 / Month |
| Try all 120+ voices 10 mins of voice generation 10 mins of transcription Share link for audio/video output No downloads Single User No credit card required | Unlimited Downloads 24 hours of voice generation/year Access to 60 voices (10 languages) Commercial Usage rights Chat and Email support Single User | Unlimited Downloads 96 hours of voice generation/year 48 hours of transcription/year Access 120+ voices (20 languages) Commercial Usage rights Recorded voice editing Voice changer Up to 3 users Priority Support | 5+ Users Unlimited Voice Generation Time Unlimited Transcription time Custom Voices Single-sign on (SSO) Collaboration and Access Control Dedicated Account Representative Centralized invoicing Service Agreement Deletion recovery Unlimited Storage |
Cons
- You may experience frequent technical glitches.
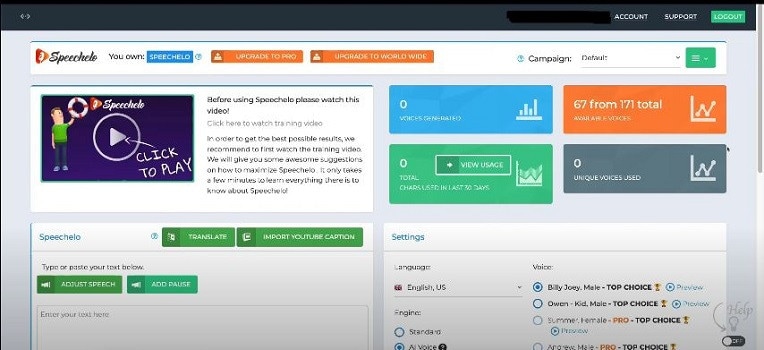
#2: Speechelo
It is available on Windows, Mac, Android, iPhone, and Online
Speechelo gives a realistic voice tone and expressions. This gets people more interested in voice-overs. You can use Speechelo to create sales videos, training films, and instructive videos, among other things. It includes attributes such as breathing and pauses, vocal tones, changing speed and pitch, and compatibility for 23 languages.
Features
- The text-to-speech engine in Speechelo can add intonation to the voice.
- It contains over 30 voices that sound natural.
- It has both male and female voices.
- It works with various video editing tools, including Camatasia, Adobe, Premier, and iMovie.
- Ordinary tone, cheerful tone, and serious tone are the three tones you may use to read your text.
Price
| Premium |
|---|
| $47 (Discount price) |
| One-time payment With 60-day money-back guarantee |
Cons
- The output of Speechelo will be 48kbps. If you’re familiar with sound production, you’ll see that this is a very low output.
- It might produce inaccurate output if you input long voice-overs.
#3: Synthesys
It is available on Windows, Mac, Android, iPhone, and Online
Synthesys helps to convert text into a natural-sounding voice. With Synthesis, you can choose from various tones, accents, male and female voices, languages, and reading speeds. Moreover, It simply takes three steps to create a natural-sounding artificial speech that you may use for a variety of commercial applications.
- To begin, select the gender, style, accent, and tone you want the created voice to have.
- You can paste or type the content you want to turn into speech into Synthesys’ AI voice-producing platform.
- Lastly, click ‘create’ to start creating your artificial speech in minutes. You may adjust the reading speed and pause length from here.
Features
- Cloud-based software.
- Expert and natural-sounding voices are available in an extensive collection.
- There are over 35 female voices and 30 male voices.
- You can create and sell unlimited voices.
- Extremely user-friendly interface.
Price
| Audio Synthesys | Human Studio Synthesys | Audio and Human Studio Synthesys |
|---|---|---|
| $29 / Month | #39 / Month | $59 / Month |
| Unlimited voice-overs downloads Access to 30 Real Human Voices Access to 66 Languages & 254 General Voices Fully Web-Based | Unlimited Videos Access to 73 Humatars (Extra Outfits included) Access to 66 Languages & 254 General Voices Upload Your Own Voice Full Video Customization Fully Web-Based | Unlimited Videos & Voice Overs Access to both Software All features included 20% OFF |
Cons
- It has character limitations when making a voice-over.
- It does not have a free trial version.
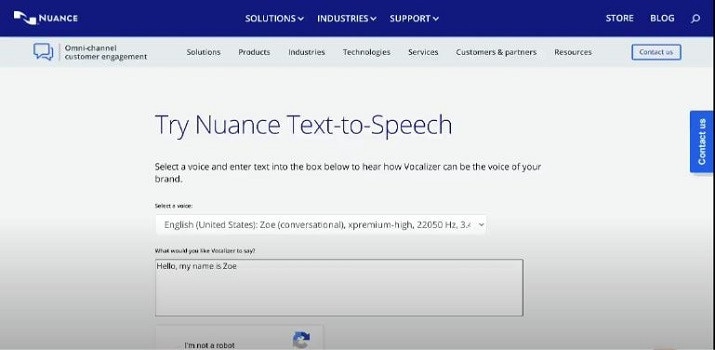
#4: Nuance Dragon
It is available in Windows only
Nuance Dragon is an artificial intelligence-powered voice recognition system. It offers both residential and commercial solutions. It spans across various data centers and delivers cloud services.
Its hosting platform is Microsoft Azure, which is HITRUST CSF-approved. All of their solutions follow industry-standard guidelines. Nuance Dragon protects data in transit and at rest with 256-bit encryption.
Features
- Nuance Dragon complies with HIPAA regulations, which are critical for public sector security and confidentiality.
- It applies to a wide range of professions.
- It offers complete protection.
Price
| Home | Professional |
|---|---|
| $200 | $500 |
| It has 99% recognition accuracy Immediate access to your dictation. One-time payment. | It has 99% recognition accuracy Share documents Sync custom words and commands Immediate access to your dictation. One-time payment. |
Cons
- It works only on Windows, and it is not available on Mac.
- It does not have a free trial version.
- It does not include Premium Consulting or Integration Services.
#5: Notevibes
It is available on Windows, Mac, Android, iPhone, and Online
Notevibes is a tremendous text-to-speech tool that comes in both a free and a commercial edition with many features. It offers customers over five hundred translation characters while also allowing them to modify the pronunciation.
As a result, users have access to all of their resources to learn a new language and significantly increase their reading skills. Furthermore, Notevibes features 177 distinct voices speaking in 18 different languages.
Users appreciate the natural-sounding voices that assist them in pronouncing words correctly. Users from many walks of life can profit from the tool because it has many functions.
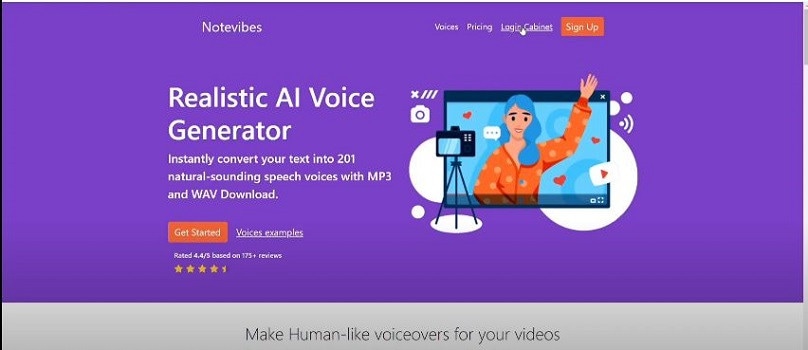
Features
- Realistic voice generator
- Aloud Speaking
- Make an MP3 of your audio speech.
- 47 Individual Voices
- Characters: 200 – 1,000,000
Price
| Personal Pack | Commercial Pack | Corporate Pack |
|---|---|---|
| $9 / Month ($107 per year) | $90 / Month ($1080 per year) | $4,000 / Year |
| For personal use only: private listening, personal e-learning 1,200,000 characters pack per year 201 Premium Voices available 18 Languages (EN, ES, DE, FR, VT, RU, PT, IT, NL, TR, JP, KO, HI and etc) MP3 Download 1 Account License | For Commercial use: YouTube, broadcasts, TV, IVR voiceover and other businesses 12,000,000 characters pack per year Advanced voice editor new 201 Premium Voices available 18 Languages (EN, ES, DE, FR, VT, RU, PT, IT, NL, TR, JP, KO, HI and etc.) SSML tags support MP3, Wav Download Audio files history You 100% own intellectual property for all files | For Corporate Users All in Commercial and 50,000,000 characters pack per year Master account for management Team License (up to 10 users) Priority email support |
Cons
- It does not have a preview. You have to generate the voice-over to listen.
- You can’t combine a single audio file out of many audio files.
- The Voiceover & Editor Page is unique in that it has two sections: one for creating the voice-over and another for obtaining audio files. Switching between them will take some time. If you’re working on a large project, moving between bot sites will be a hassle.
- No project-based organization
#6: Natural Reader
It is available on Windows, Mac, Android, iPhone, and Online
Natural Reader is among the few free text-to-speech programs with several exciting features. It’s pretty easy to use, and you can get started right away by loading texts into its library.
Furthermore, the tool allows users to manage several files in various formats. Lastly, the built-in OCR will enable you to submit images or text scans and have them read aloud.
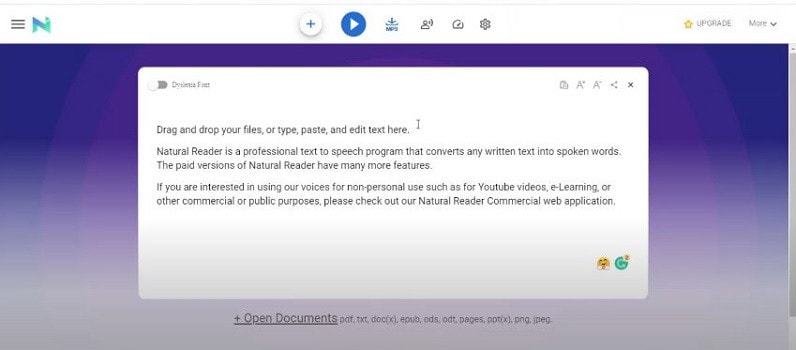
Features
- Built-in OCR
- Choice of interfaces
- Built-in browser
- Dyslexic-friendly font
Price
| Free | Personal | Professional | Ultimate |
|---|---|---|---|
| $0 (Free to use) | $99.50 (One-time payment) | $129.50 (One-time payment) | $199.50 (One-time payment) |
| Unlimited use with Free Voices Miniboard to read text in other applications Pronunciation Editor Works with PDF, Docx, TXT and ePub | 2 natural voices included All features of Free Version included Convert to MP3 | 4 natural voices included All features of Personal Version included | 6 natural voices included All features of Professional Version included 5000 images/year for OCR to read from images & scanned PDFs |
Cons
- There is no way to skip or jump around any text on the page.
- You will need internet access in the free software to access the voices.
- The paid version is very expensive in comparison to others.
- Long-term use is complex.
Pro Tip:
If you just use text-to-speech software sometimes, it’s best to utilize one of the many free options available. On the other hand, paid versions are great if you want extensive functionality and don’t mind limitations on usage.
You should check for text-to-speech software with natural voices enabled in commercial applications. A top-rated system should include real-time speech capabilities and a user-friendly UI.
Text to Speech Services’ Advantages
TTS systems can help content owners such as corporations, YouTubers, institutions, media houses, mobile app developers, e-learning solution providers, and others in comparable fields in the following ways:
- Global Reach: TTS voices that sound human, are clear, and can be customized can let you communicate with people worldwide. You can even incorporate translations in multiple languages to read the text in their own language.
- Improve User Experience: Allowing speech in pre-sales and after-sales can reduce human agent burden, provide individualized services, lower operating expenses, and speed up productivity.
- Saves Money and Time: Companies can quickly and easily implement TTS systems with little maintenance.
- Improves Productivity: E-learning experts and HR departments can create learning modules for staff training using TTS. This will allow employees to learn the information while working anywhere and at any time.
Text to speech solutions can also help online students, researchers, teachers, device users, app users, website visitors, machine users, and others in the following ways:
- People with Reading Difficulties: A considerable portion of the global population suffers from learning or reading disabilities, including language-based learning disabilities. TTS solutions in your documents might assist them in better understanding the document. It can also aid persons with vision problems and literacy issues.
- Multitasking: Listening to something allows you to execute multiple physical duties at once, such as cooking, cleaning, exercising, etc. It’s a welcome break for busy professionals who can’t find time to read the stacks of books that have accumulated on their desks for years. They can just put on their headphones and listen to them while doing other things.
- Great for Kids: Instead of being glued to their computers or phones all day, your children can listen to audio files, including their books and other study materials. It will safeguard their priceless sight. It will also increase word recognition, cognitive skills, make finding and correcting problems in their writing easier.
- Journey Mate: People can listen to information while traveling by using speech to text. You may always listen to the noises and enjoy them while riding without having to strain your eyes, regardless of how rocky the road is.
Frequently Asked Questions
What is Text to Speech Software?
TTS (text-to-speech) is an assistive technology that reads text aloud. TTS systems provide computer-generated sound, and we may vary the reading speed by increasing the speed or slowing things down.
Is Text-To-Speech Technology Handy?
According to studies, text-to-speech technology helps viewers concentrate on the content rather than the process of reading, resulting in a greater understanding of the topic and more engagement.
While some argue that audiobooks, or scripts read by paid voice actors, are superior to computer-generated voices, there is compelling proof that text to speech can be a handy tool for YouTube content creators.
Is The Voice Quality Consistent Across All Text to Speech Programs?
Voice quality ultimately depends on the service. However, some use human voices, while premium solutions employ the voices of well-known narrators like David Attenborough and Morgan Freeman.
You can even mimic the sound of youngsters speaking. Many gadgets, particularly online web page scanners and even audiobooks emphasize the text they are scanning.
What Are the Benefits of Using Text to Speech Software?
You can use this type of technology in a variety of ways. Some programs read text from a digital document or an interactive online page for users. Some programs can even convert handwritten text into speech using modern technology such as Optical Character Recognition (OCR).
Text-to-speech software is compatible with various devices and applies to all kinds of individual digital devices, including laptops, PCs, tablets, and smartphones.
What Is the Process of Converting Speech in Text to Speech Software?
The majority of text-to-speech software works in the same way. Users can either upload or input the content to convert to audio. Then they choose from the different voices to evaluate which sound is best for the voice-over.
Many TTS solutions rely on OCR technology in some form. OCR allows us to obtain text from documents and photos by recognizing written and digital text. If you click an image of a street sign, the program will read the words printed on it.
Is it possible to use Text to Speech on YouTube?
Absolutely, you can get them in YouTube videos, but to prevent advertising strikes, make sure you post videos with authentic human voices somewhere between.
What Text-To-Speech Software Does YouTube Content Creators Use?
To incorporate voice-overs on their sales pitches and informative videos, most YouTubers pay for text-to-speech software like Synthesys and Speechelo.
Is It Possible to Monetize YouTube Videos Using Text to Speech?
It varies on the text to speech engine you’re using; some TTS engines support YouTube monetization while others don’t.
Speech has a significant impact on the success rate of the entire YouTube adventure, whether storytelling or a standard sales pitch. It helps to have a decent voice and speaking abilities. However, not everyone gets both simultaneously; many individuals employ voice artists to provide voice-overs.
Some freelancers charge $5-$100 for a 5-minute voice-over. However, not everyone can afford an expensive voice artist, especially for longer films or just starting. Here are other options that I discovered as the most acceptable free text to voice generators for YouTube videos.
Let’s take a deeper look at the most excellent free text to speech software for YouTube videos.
Getting Started
Text to speech is a speech synthesis software that speaks aloud digital and textual content. The software offers a wide range of applications and is utilized by everyone from professionals and students to toddlers and adults.
Viewers are emotionally attached to documents such as PDFs, books, novels, and e-learning courses when they hear narration with a human voice. Text-to-speech systems are ideal for multitasking by busy professionals.
It’s no surprise that there are numerous text-to-speech options available. Audiobooks are also becoming more popular for the same reasons.
We’ll go over the best text-to-speech tools available in this guide. We’ve gathered a detailed list of the most exemplary free and commercial text-to-speech applications to help you choose the best option for your needs:
#1: Murf
It is available on Windows, Mac, Android, iPhone, and Online
Murf is a text-based voice-over maker. You can either compose your script or submit a voice clip to convert it into hyper-realistic AI voices. Murf delivers expert voice-over artists with experienced voices. You can check multiple parameters in the voices. You can use Murf to signify a brand, a product, a company, a presentation, and many more.
Features:
- Murf allows you to create voice-overs from the text. It also allows you to transform your speech into editable text, which you can subsequently edit or convert into AI voice.
- Murf Studio provides the ability to synchronize your speech with visuals.
- Murf provides over 100 authentic voices in 19 languages.
- It also gives options for inserting pauses, altering narration tempo, and emphasizing certain points.
- It also includes features such as script checking with grammar assistance, free background music, video and music cutting, and more.
- Murf offers comprehensive communication and collaboration tools, access control, a pronunciation library, and a service level agreement (SLA) for enterprises wishing to develop voice-overs in bulk.
Price
| Free | Basic | Pro | Enterprise |
|---|---|---|---|
| $0 / Month | $13 / Month | $26 / Month | $166 / Month |
| Try all 120+ voices 10 mins of voice generation 10 mins of transcription Share link for audio/video output No downloads Single User No credit card required | Unlimited Downloads 24 hours of voice generation/year Access to 60 voices (10 languages) Commercial Usage rights Chat and Email support Single User | Unlimited Downloads 96 hours of voice generation/year 48 hours of transcription/year Access 120+ voices (20 languages) Commercial Usage rights Recorded voice editing Voice changer Up to 3 users Priority Support | 5+ Users Unlimited Voice Generation Time Unlimited Transcription time Custom Voices Single-sign on (SSO) Collaboration and Access Control Dedicated Account Representative Centralized invoicing Service Agreement Deletion recovery Unlimited Storage |
Cons
- You may experience frequent technical glitches.
#2: Speechelo
It is available on Windows, Mac, Android, iPhone, and Online
Speechelo gives a realistic voice tone and expressions. This gets people more interested in voice-overs. You can use Speechelo to create sales videos, training films, and instructive videos, among other things. It includes attributes such as breathing and pauses, vocal tones, changing speed and pitch, and compatibility for 23 languages.
Features
- The text-to-speech engine in Speechelo can add intonation to the voice.
- It contains over 30 voices that sound natural.
- It has both male and female voices.
- It works with various video editing tools, including Camatasia, Adobe, Premier, and iMovie.
- Ordinary tone, cheerful tone, and serious tone are the three tones you may use to read your text.
Price
| Premium |
|---|
| $47 (Discount price) |
| One-time payment With 60-day money-back guarantee |
Cons
- The output of Speechelo will be 48kbps. If you’re familiar with sound production, you’ll see that this is a very low output.
- It might produce inaccurate output if you input long voice-overs.
#3: Synthesys
It is available on Windows, Mac, Android, iPhone, and Online
Synthesys helps to convert text into a natural-sounding voice. With Synthesis, you can choose from various tones, accents, male and female voices, languages, and reading speeds. Moreover, It simply takes three steps to create a natural-sounding artificial speech that you may use for a variety of commercial applications.
- To begin, select the gender, style, accent, and tone you want the created voice to have.
- You can paste or type the content you want to turn into speech into Synthesys’ AI voice-producing platform.
- Lastly, click ‘create’ to start creating your artificial speech in minutes. You may adjust the reading speed and pause length from here.
Features
- Cloud-based software.
- Expert and natural-sounding voices are available in an extensive collection.
- There are over 35 female voices and 30 male voices.
- You can create and sell unlimited voices.
- Extremely user-friendly interface.
Price
| Audio Synthesys | Human Studio Synthesys | Audio and Human Studio Synthesys |
|---|---|---|
| $29 / Month | #39 / Month | $59 / Month |
| Unlimited voice-overs downloads Access to 30 Real Human Voices Access to 66 Languages & 254 General Voices Fully Web-Based | Unlimited Videos Access to 73 Humatars (Extra Outfits included) Access to 66 Languages & 254 General Voices Upload Your Own Voice Full Video Customization Fully Web-Based | Unlimited Videos & Voice Overs Access to both Software All features included 20% OFF |
Cons
- It has character limitations when making a voice-over.
- It does not have a free trial version.
#4: Nuance Dragon
It is available in Windows only
Nuance Dragon is an artificial intelligence-powered voice recognition system. It offers both residential and commercial solutions. It spans across various data centers and delivers cloud services.
Its hosting platform is Microsoft Azure, which is HITRUST CSF-approved. All of their solutions follow industry-standard guidelines. Nuance Dragon protects data in transit and at rest with 256-bit encryption.
Features
- Nuance Dragon complies with HIPAA regulations, which are critical for public sector security and confidentiality.
- It applies to a wide range of professions.
- It offers complete protection.
Price
| Home | Professional |
|---|---|
| $200 | $500 |
| It has 99% recognition accuracy Immediate access to your dictation. One-time payment. | It has 99% recognition accuracy Share documents Sync custom words and commands Immediate access to your dictation. One-time payment. |
Cons
- It works only on Windows, and it is not available on Mac.
- It does not have a free trial version.
- It does not include Premium Consulting or Integration Services.
#5: Notevibes
It is available on Windows, Mac, Android, iPhone, and Online
Notevibes is a tremendous text-to-speech tool that comes in both a free and a commercial edition with many features. It offers customers over five hundred translation characters while also allowing them to modify the pronunciation.
As a result, users have access to all of their resources to learn a new language and significantly increase their reading skills. Furthermore, Notevibes features 177 distinct voices speaking in 18 different languages.
Users appreciate the natural-sounding voices that assist them in pronouncing words correctly. Users from many walks of life can profit from the tool because it has many functions.
Features
- Realistic voice generator
- Aloud Speaking
- Make an MP3 of your audio speech.
- 47 Individual Voices
- Characters: 200 – 1,000,000
Price
| Personal Pack | Commercial Pack | Corporate Pack |
|---|---|---|
| $9 / Month ($107 per year) | $90 / Month ($1080 per year) | $4,000 / Year |
| For personal use only: private listening, personal e-learning 1,200,000 characters pack per year 201 Premium Voices available 18 Languages (EN, ES, DE, FR, VT, RU, PT, IT, NL, TR, JP, KO, HI and etc) MP3 Download 1 Account License | For Commercial use: YouTube, broadcasts, TV, IVR voiceover and other businesses 12,000,000 characters pack per year Advanced voice editor new 201 Premium Voices available 18 Languages (EN, ES, DE, FR, VT, RU, PT, IT, NL, TR, JP, KO, HI and etc.) SSML tags support MP3, Wav Download Audio files history You 100% own intellectual property for all files | For Corporate Users All in Commercial and 50,000,000 characters pack per year Master account for management Team License (up to 10 users) Priority email support |
Cons
- It does not have a preview. You have to generate the voice-over to listen.
- You can’t combine a single audio file out of many audio files.
- The Voiceover & Editor Page is unique in that it has two sections: one for creating the voice-over and another for obtaining audio files. Switching between them will take some time. If you’re working on a large project, moving between bot sites will be a hassle.
- No project-based organization
#6: Natural Reader
It is available on Windows, Mac, Android, iPhone, and Online
Natural Reader is among the few free text-to-speech programs with several exciting features. It’s pretty easy to use, and you can get started right away by loading texts into its library.
Furthermore, the tool allows users to manage several files in various formats. Lastly, the built-in OCR will enable you to submit images or text scans and have them read aloud.
Features
- Built-in OCR
- Choice of interfaces
- Built-in browser
- Dyslexic-friendly font
Price
| Free | Personal | Professional | Ultimate |
|---|---|---|---|
| $0 (Free to use) | $99.50 (One-time payment) | $129.50 (One-time payment) | $199.50 (One-time payment) |
| Unlimited use with Free Voices Miniboard to read text in other applications Pronunciation Editor Works with PDF, Docx, TXT and ePub | 2 natural voices included All features of Free Version included Convert to MP3 | 4 natural voices included All features of Personal Version included | 6 natural voices included All features of Professional Version included 5000 images/year for OCR to read from images & scanned PDFs |
Cons
- There is no way to skip or jump around any text on the page.
- You will need internet access in the free software to access the voices.
- The paid version is very expensive in comparison to others.
- Long-term use is complex.
Pro Tip:
If you just use text-to-speech software sometimes, it’s best to utilize one of the many free options available. On the other hand, paid versions are great if you want extensive functionality and don’t mind limitations on usage.
You should check for text-to-speech software with natural voices enabled in commercial applications. A top-rated system should include real-time speech capabilities and a user-friendly UI.
Text to Speech Services’ Advantages
TTS systems can help content owners such as corporations, YouTubers, institutions, media houses, mobile app developers, e-learning solution providers, and others in comparable fields in the following ways:
- Global Reach: TTS voices that sound human, are clear, and can be customized can let you communicate with people worldwide. You can even incorporate translations in multiple languages to read the text in their own language.
- Improve User Experience: Allowing speech in pre-sales and after-sales can reduce human agent burden, provide individualized services, lower operating expenses, and speed up productivity.
- Saves Money and Time: Companies can quickly and easily implement TTS systems with little maintenance.
- Improves Productivity: E-learning experts and HR departments can create learning modules for staff training using TTS. This will allow employees to learn the information while working anywhere and at any time.
Text to speech solutions can also help online students, researchers, teachers, device users, app users, website visitors, machine users, and others in the following ways:
- People with Reading Difficulties: A considerable portion of the global population suffers from learning or reading disabilities, including language-based learning disabilities. TTS solutions in your documents might assist them in better understanding the document. It can also aid persons with vision problems and literacy issues.
- Multitasking: Listening to something allows you to execute multiple physical duties at once, such as cooking, cleaning, exercising, etc. It’s a welcome break for busy professionals who can’t find time to read the stacks of books that have accumulated on their desks for years. They can just put on their headphones and listen to them while doing other things.
- Great for Kids: Instead of being glued to their computers or phones all day, your children can listen to audio files, including their books and other study materials. It will safeguard their priceless sight. It will also increase word recognition, cognitive skills, make finding and correcting problems in their writing easier.
- Journey Mate: People can listen to information while traveling by using speech to text. You may always listen to the noises and enjoy them while riding without having to strain your eyes, regardless of how rocky the road is.
Frequently Asked Questions
What is Text to Speech Software?
TTS (text-to-speech) is an assistive technology that reads text aloud. TTS systems provide computer-generated sound, and we may vary the reading speed by increasing the speed or slowing things down.
Is Text-To-Speech Technology Handy?
According to studies, text-to-speech technology helps viewers concentrate on the content rather than the process of reading, resulting in a greater understanding of the topic and more engagement.
While some argue that audiobooks, or scripts read by paid voice actors, are superior to computer-generated voices, there is compelling proof that text to speech can be a handy tool for YouTube content creators.
Is The Voice Quality Consistent Across All Text to Speech Programs?
Voice quality ultimately depends on the service. However, some use human voices, while premium solutions employ the voices of well-known narrators like David Attenborough and Morgan Freeman.
You can even mimic the sound of youngsters speaking. Many gadgets, particularly online web page scanners and even audiobooks emphasize the text they are scanning.
What Are the Benefits of Using Text to Speech Software?
You can use this type of technology in a variety of ways. Some programs read text from a digital document or an interactive online page for users. Some programs can even convert handwritten text into speech using modern technology such as Optical Character Recognition (OCR).
Text-to-speech software is compatible with various devices and applies to all kinds of individual digital devices, including laptops, PCs, tablets, and smartphones.
What Is the Process of Converting Speech in Text to Speech Software?
The majority of text-to-speech software works in the same way. Users can either upload or input the content to convert to audio. Then they choose from the different voices to evaluate which sound is best for the voice-over.
Many TTS solutions rely on OCR technology in some form. OCR allows us to obtain text from documents and photos by recognizing written and digital text. If you click an image of a street sign, the program will read the words printed on it.
Is it possible to use Text to Speech on YouTube?
Absolutely, you can get them in YouTube videos, but to prevent advertising strikes, make sure you post videos with authentic human voices somewhere between.
What Text-To-Speech Software Does YouTube Content Creators Use?
To incorporate voice-overs on their sales pitches and informative videos, most YouTubers pay for text-to-speech software like Synthesys and Speechelo.
Is It Possible to Monetize YouTube Videos Using Text to Speech?
It varies on the text to speech engine you’re using; some TTS engines support YouTube monetization while others don’t.
How to Add Video Effects with Movavi Slideshow Maker
Many video editors won’t be late in their artwork. They tend to use different effects to light up their crafts. For them, editing videos with effects applications gives more life to the story. In this composition, you will learn more about Effects, and if you are just about to do your video editing right now, these details are definitely for you.
What are Video Effects?
According to the dictionary, an effect is brought about by a cause or an agency.
In video editing, there are a few video effects you must know to apply them to your video project. Video effects can alter the speed and produce distortions, reflections, aesthetic filters, stylistic color grading, animation transitions, and more. They can also contain 3D features like CGI. When used well, these effects improve the narrative, the atmosphere, and the images’ overall impact.
Let’s dissect a few of the major effects, which will be most helpful to you.
Pans and Tilts
Your first thought upon hearing these two words may be tripod motions. Pans and tilts are a quick way to add additional movement and sensation to your video, making it more dynamic.
Change the Speed/Duration
One feature that virtually every NLE or Non-Linear Editing software gives us is the option to modify the playback speed of your video while reducing or increasing the actual duration and tempo of your segments. Slowing down your footage to match the frame rate at which the video was initially captured is one of the critical explanations for doing this.
To incorporate some frantic or chaotic moments into your production, you can use this to generate slow-motion shots and fast-forward effects. This effect can also quickly pan through footage for humorous effect. Find the “Speed/Duration” option under Effects controls to accomplish this.
Light Leaks and Flares
Nothing gives your video a more ethereal vibe than gentle, warm light emerging from the scene. A direct source visible in the photo may be the source of this light, or it may enter the frame from the edge. You’ve probably seen these flares and leaks countless times in movies, whether they were added in post-production or resulted from the cinematographer’s lens choice. You can select where the light comes from if it doesn’t distract from the task. Remember that these spills and flares must contribute to the narrative while remaining barely perceptible to the viewer.
Retro/VHS Effects
While light leaks and lens flares give your movie or film a timeless feel, nothing gives it a dated or, one would say, “scrappy” vibe. The grunge appearance of the ‘90s is in right now, and one of the most popular effects is the VHS look.
There are several ways to get this effect. Applying a preset, essentially a LUT (look-up table or filter), to your color grade will make the image appear fuzzier, desaturated, and blurrier (using the different alpha and gamma channels). This will cause “chroma errors,” which result from poor recordings and a lack of a flying erase head (a function that enables you to record over previously filmed video; imagine formatting your SD card while the video is still present on the card and you are simply recording over it), giving your images an outline of distorted blues and reds.
Color Grading and Color Correction
Besides actual editing, color grading and correction are arguably the most significant post-production steps. With the help of these tools, you may alter skin tones, highlight, and shadow levels, add vignettes, experiment with contrast, and much more. We’ll briefly go through one aspect of color grading—the ability to adjust particular colors in your image—even though this subject needs its ebook.
Adding Overlays
Although we’ve talked about adding overlays, such as VHS effects or light leaks, you may use many other editing overlays to add particular components to your shot, including weather particles!
Using Titles and Motion Graphics
Motion graphics and clean titles are essential for any video that wishes to appear professional. These could be subtitles, and the animation logo reveals post-credits, lower thirds, or even major titles. There are various free typefaces available that you may use to make your project stand out, regardless of the program you’re working in.
Once you’ve selected the appropriate font, color, and weight, it’s time to move on to motion graphics. These are crucial because they may transform a clear, ageless title or text into a lively, entertaining illustration of the product or concept your movie is attempting to market.
The abundance of tutorials nowadays makes learning the fundamentals of motion graphics a piece of cake. As I previously stated, you can access all the various effects and movements you might need, regardless of the editing program, you use.
These various methods and approaches need the practice to perfect, just like any other component of filmmaking. As you add these video editing effects to your editing toolkit, there will undoubtedly be a lot of trial and error. Still, eventually, they will become second nature to your workflow.
Importance of Applying Effects to your Video
Almost from the first motion film, cinematic storytelling and video effects have gone hand in hand. They can improve a scene, create something that doesn’t exist, hide an error, and do much more. In essence, they assist a filmmaker in telling a tale in the manner they desire.
Applying Effects using Movavi Slideshow Maker
Making picture collages is less appealing than slide show presentations. This method is ideal for presenting a gallery of images or creating a polished photo-video presentation for your brand and goods. You’ll need a creative slideshow program with loads of capabilities to create a polished slideshow that will enhance your production. The Movavi Slideshow Maker now comes into play.
In this composition, I will show you how to apply “Effects” on your video using Movavi Slideshow Maker video editing software. A professional slideshow program called Movavi slideshow creator is made for usage by both professional and amateur picture editors. It is a Mac and Windows PC freemium program with many options to give your slideshow presentation a polished and distinctive appearance.
Features of Movavi Slideshow Maker
- It offers an easy-to-use UI
- Includes a complete toolbox for altering photos
- Advanced features for improving slideshows
- Internal media tools
- Native recording capability
- Features scalable video adjustment.
Take note that this software is not just for editing pictures but also for videos.
Step1 Click the Import tab.

Step2 Click “Add Files” and locate your desired video to edit.

Step3 Drag the imported video that you want to edit onto the video track.

Applying Filter effects
A video filter is software that modifies a multimedia stream somehow. A filter graph is a series of filters that each accept input from an upstream filter, process the information, and then output the edited video to their downstream counterparts.
Step1 Click the Filter tab.

Step2 Choose your desired Filter effects depending on your preferred category.

Step3 You can see the preview of a Filter effect by clicking it before applying it to your desired video to be edited.

Step4 If you finally chose a Filter effect, drag it onto the imported video.
Step5 And now you will see the changes. The “star” symbol on the imported video means you have already applied a Filter effect on it.

Raw Footage vs With Applied Filter Effect
Raw Footage

Brush – Sketch Filter effect

Adding Transition Effect
Transitions guide your audience.
From the opening to the very end, they structure the movie. There are numerous typical forms, including the wipe, dissolve, split-cut, and many others. Film editors use transitions to transfer a scene from one video clip to another practice. Transitions don’t need to be visible.
Step1 Click the Transition tab.

Step2 Choose your desired Transition effect depending on your preferred category.

Step3 You can see the preview of a Transition effect by clicking it before applying it to your desired video to be edited.
Step4 If you finally chose a Transition effect, drag it between each imported video.

Step5 Now you will see this kind of symbol, which means you have already put a Transition effect between the imported videos.
![]()
Note: Transition effects can also be applied even if you have only one video. You can put transitions effects either at the start of the video, which could make your video introduction more appealing. Also, you can set the Transition effect at the end of the video, which could give you a pleasant closing.
Transition Effect at the start
Transition Effect at the end
Also, you can make your Transition effect longer or shorter simply by clicking this symbol then it will turn yellow. Point your cursor either on the left side of the symbol; the cursor will become a horizontal double-arrow to change the span of your Transition effect on the left video or on the right end side of the symbol to change the span of the Transition effect on the right video.
Applying Titling Motion Effect
Most video editing applications come with built-in titling choices, and many of them vary from basic letters to a collection of motion graphics that have already been pre-programmed. Enter your text into a template to insert them.
The majority of video projects have crucial titles. You can use them to build a mood, label key elements of the film, and convey information.
Step1 Click the Title tab.

Step2 Choose your desired Titling motion effect depending on your preferred category. You can also see the preview of a title effect by clicking it before applying it to your selected video to be edited.

Step3 To apply the Title Motion effect, drag the effect onto the title track, just above the video track.

Step4 You can place your Title Motion effect on your desired time where you want it to appear.

Step5 To edit your Title texts, you can double-click the applied title on the title track or right-click on it and click the “edit” option. You can also edit the text by double-clicking the title portion on the current video editing.

Step6 In this step, you can edit the Title text in the “clip editing” section, as seen in the red color box. You can change the color, text style, and font size on the yellow color box. And in the green color box, you can change the alignment of the text; you can Bold it, Italizing, and make it an Underlined text.

Step7 You can also adjust the time duration of the Titling Motion effect in two ways. First, by clicking the Title effect from the title track and placing your cursor on either side (the cursor will become a double-headed arrow), you have to shorten or lengthen the Title effect. The second step is to click the “Clip” section and adjust the duration.

These are some ways to apply effects on Movavi Slideshow Maker video editing software. You can choose your desired effects that can make an excellent contribution to your video project. You can download other effects not included in this software by simply going to their store. Click the Help tab to find “Movavi Store” or “Movavi Effects Store.”

You know many video editing software you can find on the internet, and most of them need your subscription to unlock all their features. But of course, there are also several video editing software that is free to use, which could be very helpful for you, especially when you are just a beginner in this field. Choosing the best video editing software is recommended to develop your skills gradually. You can start with a basic one before working on a professional type of video editing software.
Overall, I hope you learn more about applying effects to video editing. I hope this article helps you decide what video effects you will be using when you start editing videos. Remember that too many effects can ruin your work, so sometimes you need to keep it simple. Just be sure that you will guide the audience very well and lead them to your beautiful story.
Free Download For Win 7 or later(64-bit)
Free Download For macOS 10.14 or later
Transition Effect at the start
Transition Effect at the end
Also, you can make your Transition effect longer or shorter simply by clicking this symbol then it will turn yellow. Point your cursor either on the left side of the symbol; the cursor will become a horizontal double-arrow to change the span of your Transition effect on the left video or on the right end side of the symbol to change the span of the Transition effect on the right video.
Applying Titling Motion Effect
Most video editing applications come with built-in titling choices, and many of them vary from basic letters to a collection of motion graphics that have already been pre-programmed. Enter your text into a template to insert them.
The majority of video projects have crucial titles. You can use them to build a mood, label key elements of the film, and convey information.
Step1 Click the Title tab.
Step2 Choose your desired Titling motion effect depending on your preferred category. You can also see the preview of a title effect by clicking it before applying it to your selected video to be edited.
Step3 To apply the Title Motion effect, drag the effect onto the title track, just above the video track.
Step4 You can place your Title Motion effect on your desired time where you want it to appear.
Step5 To edit your Title texts, you can double-click the applied title on the title track or right-click on it and click the “edit” option. You can also edit the text by double-clicking the title portion on the current video editing.
Step6 In this step, you can edit the Title text in the “clip editing” section, as seen in the red color box. You can change the color, text style, and font size on the yellow color box. And in the green color box, you can change the alignment of the text; you can Bold it, Italizing, and make it an Underlined text.
Step7 You can also adjust the time duration of the Titling Motion effect in two ways. First, by clicking the Title effect from the title track and placing your cursor on either side (the cursor will become a double-headed arrow), you have to shorten or lengthen the Title effect. The second step is to click the “Clip” section and adjust the duration.
These are some ways to apply effects on Movavi Slideshow Maker video editing software. You can choose your desired effects that can make an excellent contribution to your video project. You can download other effects not included in this software by simply going to their store. Click the Help tab to find “Movavi Store” or “Movavi Effects Store.”
You know many video editing software you can find on the internet, and most of them need your subscription to unlock all their features. But of course, there are also several video editing software that is free to use, which could be very helpful for you, especially when you are just a beginner in this field. Choosing the best video editing software is recommended to develop your skills gradually. You can start with a basic one before working on a professional type of video editing software.
Overall, I hope you learn more about applying effects to video editing. I hope this article helps you decide what video effects you will be using when you start editing videos. Remember that too many effects can ruin your work, so sometimes you need to keep it simple. Just be sure that you will guide the audience very well and lead them to your beautiful story.
Free Download For Win 7 or later(64-bit)
Free Download For macOS 10.14 or later
Also read:
- In 2024, Doable Ways to Make Transparent Background in Procreate
- Looking for the Ways by Which Subtitles Can Be Extracted From Your MKV Files without Affecting the File Quality? Look No Further as We Are Here to Help You Know the Best Tools that Can Easily Extract SRT From MKV for 2024
- In 2024, 3 In-Camera Transitions Tricks To Make Videos
- Updated 6 Instant Ways to Create Windows 10 Slideshow
- In 2024, Ways to Make Canva Collages
- 2024 Approved Detailed Guide to Crop Video in Sony Vegas Pro
- 2024 Approved Kdenlive Review – Is It The Best Video Editor?
- New 2024 Approved Slow-Motion Innovation with Sony S&Q Feature
- New What Is TS Format and How To Play TS Files? Basic Tips
- Updated Have You Tried Using a Craig Bot on Discord to Record Audio? Do You Have an Idea of Using a Discord Craig Bot Is Safe? Get Answers to These Questions and More From This Article as You Continue Reading for 2024
- Updated 2024 Approved How Important It Is to Perform Color Correction to Your Video? Here Is a Solution with After Effects Color Correction with Illustrative Videos
- Updated Want to Make Your Slideshows More Fun and Exciting? Follow the Given Discussion to Know How to Make a Slideshow Gif, Thereby Making Your Slideshow More Enjoyable than Ever
- New Add Subtitles To Videos With Kapwing Step by Step for 2024
- Updated In 2024, Find Out the Best Animated Text Video Tools and Learn How to Animate Text in a Video in Simple Steps. Discover the Best Fonts to Animate Text Along with the Text Animation Templates
- Updated 2024 Approved Convert Slow Motion Videos to Regular Videos in Your iOS Device |A How
- Updated Best Ai Generated Memes
- Updated Looking Forward to Try Hands at Using the Icecream Slideshow Maker Program to Create High End Slideshow Presentations? Stay Here for a Complete Insight Into the Process for 2024
- New Ultimate Guide on How to Film Better in Public
- Updated AVI Video Format Is Known and Famous for Its Features. Many of You Must Have Heard About It but Do You Know some Details About AVI? Lets Increase Your Knowledge and Talk About It
- 2024 Approved Everything That You Need to Know About Video Montages- Ideas, Techniques, and Software
- How to Add Text in Adobe Rush
- How to Add Font Effects to Videos for 2024
- Want to Buy a Drone for Better Videography Creating? This Article Will Review 6 of the Best Drones on the Market for You to Consider
- In 2024, Easy Steps to Export Video in Filmora
- How to Polish Your Music Video Edits Using Filmora
- New In 2024, Ultimate Guide on Converting Word to SRT
- 4 Solutions to Crop a Video on Android Easily for 2024
- 2024 Approved 8 Best Free Title Maker You Must Try and Put to Use
- Updated In 2024, Applying the Effect of Camera Shake in Video Creation
- Updated In 2024, Bored of Extraneous Software Downloads and Program Installations to Edit Your Videos? The Best Video Editing Online Utilities Are Here at Your Rescue
- New In 2024, Ll About GIF Keyboard That You Want to Know
- Updated Create Realistic Fire Effects by Filmora
- Top 31 Video Trimmers That Will Save You Time in Ediitng for 2024
- Updated 2024 Approved Free Ways To Split Video For Whatsapp Status On All Platforms
- 2024 Approved How to Get Zoom on TV Easy Solutions
- Updated Learn Color Correction in After Effects with These YouTube Videos for 2024
- New How to Rotate a Video in Windows 10
- 2024 Approved How to Blur a Still or Moving Part of Video
- 2024 Approved This Article Talks About if the Windows Movie Maker Available and if Yes, Then How You Can Download It and so On. It Further Comprises an Alternative to the Same to Create Videos
- Updated 2024 Approved If You Are Into GIFs and Want to Know a Great Extent of Information About It Then We Have Got You Covered in This Article. Here Is What We Have Learned so Far About It
- Its Always a Cool Thing to Use a 3D Intro Maker to Create Intro Videos for Your Clips. This Post Will Introduce You 4 of the Best Intro Video Makers to Help You Improve Your Video for 2024
- The Best Android SIM Unlock Code Generators Unlock Your HTC U23 Pro Phone Hassle-Free
- In 2024, Best Anti Tracker Software For Apple iPhone 14 Pro Max | Dr.fone
- In 2024, The Ultimate Guide to Get the Rare Candy on Pokemon Go Fire Red On Lava Yuva 2 | Dr.fone
- How Can I Catch the Regional Pokémon without Traveling On Vivo S18 Pro | Dr.fone
- 3 Ways to Change Location on Facebook Marketplace for Honor X8b | Dr.fone
- In 2024, Complete Guide For Apple iPhone 15 Pro Lock Screen
- Easy steps to recover deleted messages from A78
- Does Samsung Galaxy XCover 7 support AVCHD video?
- The Ultimate Guide to Get the Rare Candy on Pokemon Go Fire Red On Oppo Reno 11 Pro 5G | Dr.fone
- 9 Mind-Blowing Tricks to Hatch Eggs in Pokemon Go Without Walking On Vivo V27 Pro | Dr.fone
- 9 Best Phone Monitoring Apps for Infinix Hot 30i | Dr.fone
- How to recover deleted photos on Galaxy A24
- Easy steps to recover deleted messages from Vivo X Flip
- In 2024, 3 Effective Methods to Fake GPS location on Android For your Nokia XR21 | Dr.fone
- In 2024, iSpoofer is not working On Apple iPhone 11 Pro Max? Fixed | Dr.fone
- How to Bypass Activation Lock from Apple iPhone XS or iPad?
- In 2024, How to Change/Add Location Filters on Snapchat For your Realme 11 Pro+ | Dr.fone
- 3 Ways to Fake GPS Without Root On Xiaomi Redmi Note 13 Pro+ 5G | Dr.fone
- Life360 Learn How Everything Works On Apple iPhone 12 mini | Dr.fone
- In 2024, How Do You Remove Restricted Mode on Apple iPhone 15 Pro Max
- In 2024, How to fix iCloud lock from your iPhone 7 Plus and iPad
- Forgot Pattern Lock? Heres How You Can Unlock Honor Magic 5 Pro Pattern Lock Screen
- Preparation to Beat Giovani in Pokemon Go For Apple iPhone 8 Plus | Dr.fone
- Title: New 2024 Approved How To Zoom In On TikTok Videos?
- Author: Morgan
- Created at : 2024-04-24 01:03:08
- Updated at : 2024-04-25 01:03:08
- Link: https://ai-video-editing.techidaily.com/new-2024-approved-how-to-zoom-in-on-tiktok-videos/
- License: This work is licensed under CC BY-NC-SA 4.0.
