
:max_bytes(150000):strip_icc():format(webp)/Unlockedphone_mikkelwilliam_Getty_Eplus-bd0f806b392b4069ab6618d3b520f5b7.jpg)
New 2024 Approved How to Zoom Picture in Picture Easy Solution
How to Zoom Picture in Picture [Easy Solution]
Zoom is one of the greatest options on the market for video conferencing. It doesn’t matter whether you use it at home or in an office environment; it will quickly link the team members. One of the most popular video conferencing programs is Zoom. When in-person meetings aren’t feasible, it enables you to communicate electronically with employees, and it’s been a major popularity for social occasions as well. In case you’re not acquainted, picture-in-picture mode enables you to watch videos from one app while using your PC normally. The movie will keep playing in a tiny thumbnail window so that two applications may work simultaneously on your smartphone.
You may create virtual audio and video conferences, webinars, live chats, screen sharing, and other collaboration tools with Zoom, a cloud-based video communications solution. Zoom’s most recent iPhone apps let you dismiss a Zoom Meeting while keeping the Zoom video call open in a picture-in-picture mode. To join a Zoom conference, you don’t need an account, and because the software works with Mac, Windows, Linux, iOS, and Android devices, nearly anybody can use it. Since using Zoom’s picture-in-picture mode is the same as using it with other applications, you shouldn’t have any trouble if you often use PiP mode. Here are the top 4 methods you can refer to picture in picture in Zoom.
Method 1: Swap Shared Screen with Video
You may move the Zoom Meeting PiP window across the screen, change the thumbnail’s size, and utilize other applications while it remains open, just like any other picture-in-picture window. Before leaving the meeting if you’re not giving a presentation or speaking, you should definitely mute Zoom on your iPhone to prevent noises from your typing or other activities from entering the conversation. Additionally, keep in mind to switch off the camera if you’re engaged in something distracting, at least for the duration of your activity. To reopen the Zoom Meeting and go back to the Zoom app, touch the Picture-in-Picture mode pane. Here are some actions to keep in mind:
Steps to Swap Shared Screen for Zoom Picture in Picture
Step1Launch or enter a Zoom meeting. Keep the video on your main screen at all times, closing the chat and participant list as necessary.
Step2Tap the Home button or swipe up from the bottom of the screen.
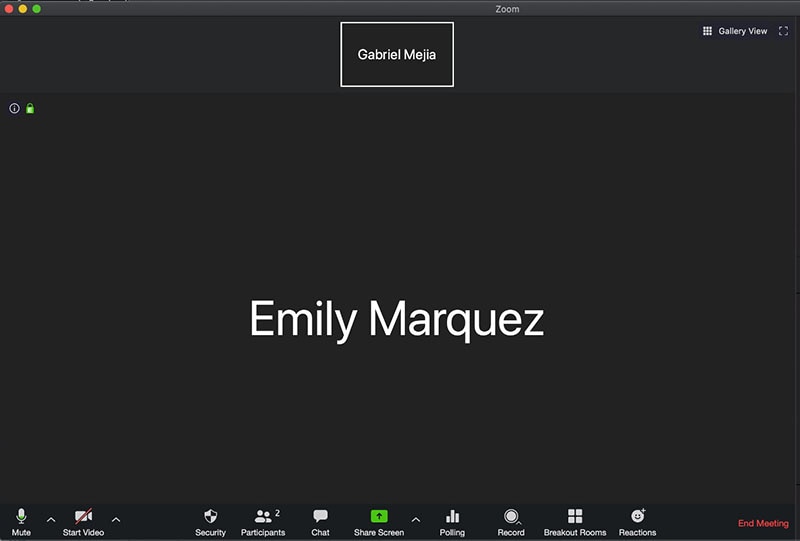
Step3Picture-in-picture mode should be activated automatically throughout the meeting.
Method 2: Use Ecamm Live
Live streaming is a fantastic way to provide original content and stand out from the crowd. To prevent any operational difficulties, a more sophisticated virtual camera is absolutely necessary. You now have magical abilities thanks to Ecamm virtual cam, including the ability to add text, animations, observe a live stream, post viewer comments, play music, share your screen, use sound effects, and many more. It offers the Ecamm live virtual camera zoom function for video conferences so you may improve your Zoom discussions by sending output to other PC programs. You could see a quality difference between what you view in Ecamm Live and what your Zoom visitors see while utilizing virtual camera with Zoom. The quality of a Zoom video stream cannot be improved using Ecamm Live. Simply broadcast the Zoom app using Ecamm Live’s Screen Share mode to utilize Ecamm Live for picture-in-picture virtual presentations on Zoom.
Steps to Use Ecamm Live for Zoom Picture in Picture
Step1Download the Ecamm Application
Install Ecamm Live on your computer, then choose the center button in the source switcher at the top of the main window to enter Screen Share mode.
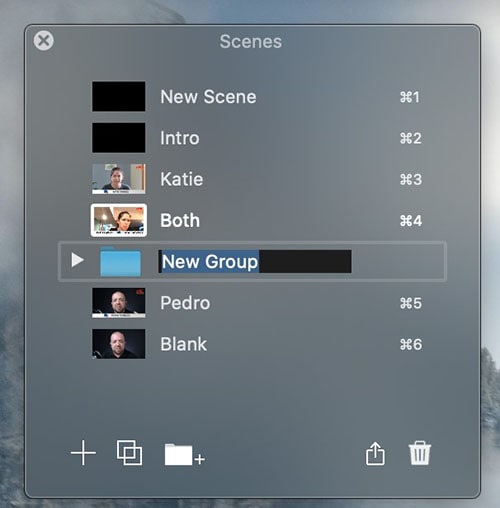
Step2Create Scenes
With the use of Ecamm Live’s Virtual Camera and Virtual Mic capabilities, you may transfer Ecamm Live’s output to almost any other Mac software, including Zoom. After setting, create the scenes in the program to quickly switch between various cameras.
Step3Select Ecamm on Zoom
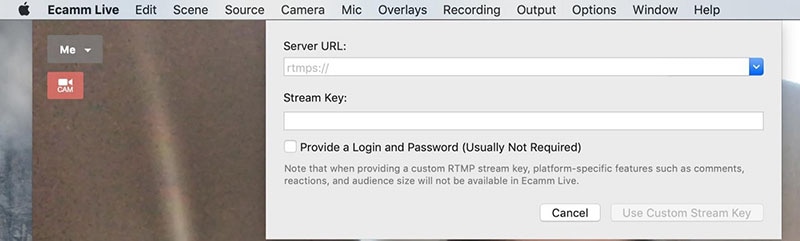
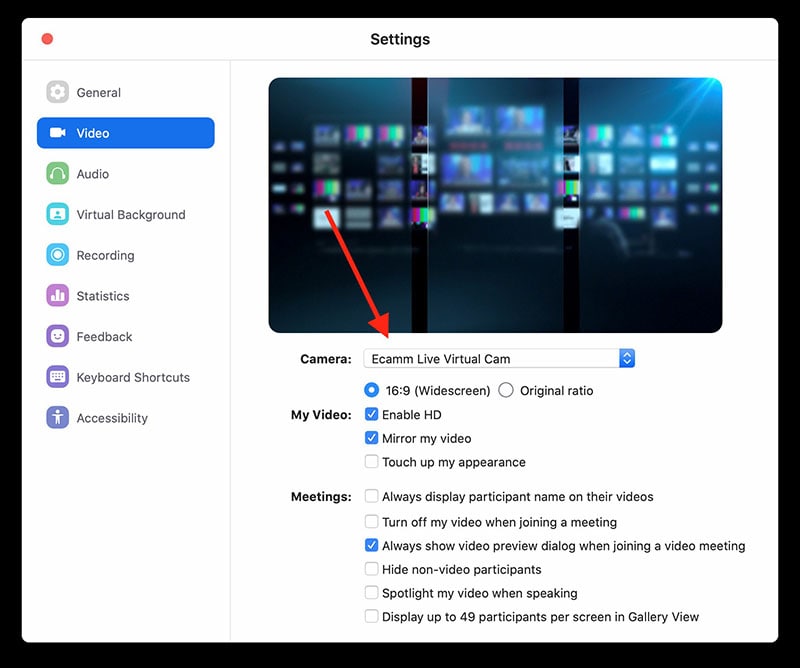
You may also utilize Ecamm Live’s Sharing Window capability to feed Ecamm Live output into Zoom. Simply activate the virtual camera, and then, as seen below, choose Ecamm Live Virtual Camera in Zoom’s video settings:
Step4Begin Your Presentation
Finally, click the PC share option to show your Zoom app to your audience. To conceal a picture-in-picture window that displays your camera image while live streaming, click the PIP button.
Method 3: Use Filmora as A Switcher
Zoom has solutions that will make your meetings simple and secure. It gives your remote staff a secure setting to interact and share crucial information. Ideal control over your film and configuration options to make them aesthetically pleasing is something Zoom lacks. To overcome the drawbacks and improve the quality of your online meetings, you may take use of the capabilities of Zoom in conjunction with Filmora. Filmora was developed with the intention of easing user burden and supporting applications. Though complicated, the program is simple to use. The perhaps most popular web information that may be saved on your computer can be easily captured by just angling your screen. For more information on how to record and save your Zoom for picture in picture, see the guide here.
To broadcast a variety of situations in a grid style, you may also combine inputs from your camera, microphone, computer screen, and web conferencing software. Wondershare -the finest desktop application for recording a Zoom Picture in Picture meeting- is Filmora. With the majority of cameras, this app’s screen recording capability is both user-friendly and feature-rich. Here, users may either choose a particular region to record or record their zoom meetings in Fullscreen mode. Additionally, you may choose the camera and input microphone that will be used while recording a video overlay. The addition of relevant comments like phrases, lines, drawings, symbols, etc. is also possible by users. The detailed procedure for recording a Zoom Picture-in-Picture meeting using a Filmora recorder is given below:
Free Download For Win 7 or later(64-bit)
Free Download For macOS 10.14 or later
Step1Download and Install Filmora Zoom Recorder
You may find both types, i.e., the most recent Windows and Mac versions, by first visiting the usual website and then using this Zoom. Install the program on your computer once you download it to get started.

Step2Initiate Filmora Recorder
After finishing the installation process for this Reside Zoom recorder, launch it from the main menus and choose “New Task” when prompted. It will take you to Filmora’s streamlined user interface where you can immediately start filming. Then, as seen in the picture below, you may adjust the screen recording using your preferred camera, microphone, and system settings:

Step3Begin/End the Recording
When you are through configuring this Zoom picture in picture recorder, click the Record button, and it will immediately begin recording your customized screen. Similar to that, after you’re done recording, click Stop, which will take you inside the video editor where you may edit your recorded information.

Step4Share Recordings
When you have everything ready, export your recording right away. After you’re done with the editing part, you do have a lot of options to choose from when displaying your screen capture and webcam stories. To do so, click the Export button in the item user interface’s top-right corner as shown below:
You may easily choose your preferred way to share from there if you choose to upload your work of zoom picture in picture recordings straight to the YouTube or other reputable websites right now. Simply refer to the Sharing plug-ins in the Export window to find out more.
Method 4: Use Hardware Switcher ATEM Mini Pro
Particularly on Zoom, the ATEM Mini is excellent for video conferences. The Blackmagic ATEM Mini is a USB video interface and HDMI switcher. Four HDMI inputs, or four cameras that can produce an HDMI video stream, may be switched between live. This device integrates Zoom meetings fast and makes it incredibly simple to set up your audio, a sometimes-forgotten aspect of video broadcasting. This sophisticated video switcher promises to offer broadcast-quality multi-camera footage with ease and is targeted at gamers, streamers, and online reviewers. It connects to a computer via a USB-C to USB-A connection. The video feed may then be sent to distant colleagues via a number of well-liked videos streaming services, including Zoom.
Step1The ATEM Mini Pro is a basic control switcher with pro-broadcast performance. Your ATEM Mini Pro is really simple to set up. You can connect a full setup with several cameras and microphones in around 30 minutes.
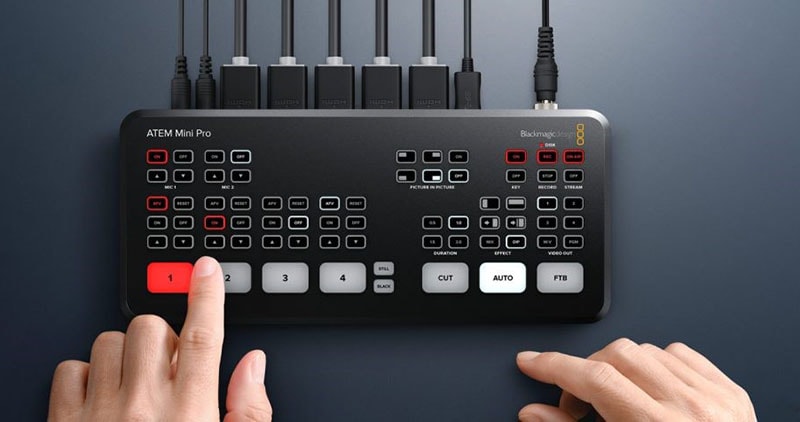
Step2You may connect several camera sources to the inputs of the ATEM Mini Pro. The 4 HDMI inputs each have a separate standards converter built in. As a result, the ATEM Mini can automatically convert inputs that are 1080p, 1080i, or 720p to the switcher’s video standard. You may make quick changes between inputs with no latency or disruption to your video output by using the ergonomic buttons.
Step3As a third option, Zoom offers ATEM Mini, which enables you to switch between several inputs, add custom visuals, and adjust audio levels all from a single interface. To improve the quality of your production, you may even use smooth transitions like wipes or fades. You can even test any input stream before making it live.
Conclusion
When you are doing a Zoom Meeting and share your screen, only to discover that what the other attendees see is a split screen with your material and the other Attendee cams, it is highly annoying. You may move the Zoom Meeting PiP window across the screen, change the thumbnail’s size, and utilize other applications while it remains open, just like any other picture-in-picture window. Someone must be sharing information in the Zoom conference for the Picture in Picture, or “Split Screen” option, to be active. We’ve listed the top techniques for doing it effectively above. To do this work without difficulty, use them as your guide.
Free Download For macOS 10.14 or later
Step1Download and Install Filmora Zoom Recorder
You may find both types, i.e., the most recent Windows and Mac versions, by first visiting the usual website and then using this Zoom. Install the program on your computer once you download it to get started.
Step2Initiate Filmora Recorder
After finishing the installation process for this Reside Zoom recorder, launch it from the main menus and choose “New Task” when prompted. It will take you to Filmora’s streamlined user interface where you can immediately start filming. Then, as seen in the picture below, you may adjust the screen recording using your preferred camera, microphone, and system settings:
Step3Begin/End the Recording
When you are through configuring this Zoom picture in picture recorder, click the Record button, and it will immediately begin recording your customized screen. Similar to that, after you’re done recording, click Stop, which will take you inside the video editor where you may edit your recorded information.
Step4Share Recordings
When you have everything ready, export your recording right away. After you’re done with the editing part, you do have a lot of options to choose from when displaying your screen capture and webcam stories. To do so, click the Export button in the item user interface’s top-right corner as shown below:
You may easily choose your preferred way to share from there if you choose to upload your work of zoom picture in picture recordings straight to the YouTube or other reputable websites right now. Simply refer to the Sharing plug-ins in the Export window to find out more.
Method 4: Use Hardware Switcher ATEM Mini Pro
Particularly on Zoom, the ATEM Mini is excellent for video conferences. The Blackmagic ATEM Mini is a USB video interface and HDMI switcher. Four HDMI inputs, or four cameras that can produce an HDMI video stream, may be switched between live. This device integrates Zoom meetings fast and makes it incredibly simple to set up your audio, a sometimes-forgotten aspect of video broadcasting. This sophisticated video switcher promises to offer broadcast-quality multi-camera footage with ease and is targeted at gamers, streamers, and online reviewers. It connects to a computer via a USB-C to USB-A connection. The video feed may then be sent to distant colleagues via a number of well-liked videos streaming services, including Zoom.
Step1The ATEM Mini Pro is a basic control switcher with pro-broadcast performance. Your ATEM Mini Pro is really simple to set up. You can connect a full setup with several cameras and microphones in around 30 minutes.
Step2You may connect several camera sources to the inputs of the ATEM Mini Pro. The 4 HDMI inputs each have a separate standards converter built in. As a result, the ATEM Mini can automatically convert inputs that are 1080p, 1080i, or 720p to the switcher’s video standard. You may make quick changes between inputs with no latency or disruption to your video output by using the ergonomic buttons.
Step3As a third option, Zoom offers ATEM Mini, which enables you to switch between several inputs, add custom visuals, and adjust audio levels all from a single interface. To improve the quality of your production, you may even use smooth transitions like wipes or fades. You can even test any input stream before making it live.
Conclusion
When you are doing a Zoom Meeting and share your screen, only to discover that what the other attendees see is a split screen with your material and the other Attendee cams, it is highly annoying. You may move the Zoom Meeting PiP window across the screen, change the thumbnail’s size, and utilize other applications while it remains open, just like any other picture-in-picture window. Someone must be sharing information in the Zoom conference for the Picture in Picture, or “Split Screen” option, to be active. We’ve listed the top techniques for doing it effectively above. To do this work without difficulty, use them as your guide.
Want to Make Use of a Lovely Background for Your Image by Removing the Background or Making It Transparent? Here Is Something You Need to Cover
Doable Ways to Make Transparent Background in Procreate
An easy yet powerful editor
Numerous effects to choose from
Detailed tutorials provided by the official channel
Figuring out the crucial steps to make the canvas excellent is one of the loveliest things users are performing for exporting the closing Procreate-projects. Once after getting expert with things trick you can be able to position the canvas surprisingly on great back for a memorable moment. You can make the most of it for your procreate mission that you have created.
Out of many essentials tools you have ever used for experiencing the benefits of equipment & skills, the Procreate is a kind of solution that comes with one of the most trustworthy as well as brilliant capability to erase the undesired background from the pictures. It is more than a general tool and there are some specified approaches to do so, but in today possible scenario, you can easily focus around choice of right selections to erase a background at ease. People can explore the chances of creating various attractive methods to work in the PNG structure after removing the desired background.
In this article
01 [How to Delete a White Background with Procreate for the IPad?](#Part 1)
02 [How to Make Transparent Background with Procreate for iPhone?](#Part 2)
03 [How to Create Popping Thumbnails or Profile Photos](#Part 3)
Part 1 How to Delete a White Background with Procreate for the IPad?

In case you are facing discoloration problem too then it is always a better idea to cast image with desired background and remove the objects.
Now turning your background with a lovely image or your own is just a matter of few clicks. With great transparent background procreate, you will be heading towards the satisfaction of obtaining transparent background. With few crucial steps you can stay from the other competitors or it will make your posts viral. With stepwise guidelines on removing the background as well as replacing it with a transparent one in Procreate is what you need the most today.
When it comes to deleting the white-background with a Procreate, then with great selection of tools you can easily create amazing performance for your post. If you are still in a dilemma to make use of the white coloured Background. After tapping on the top-left corner of the screen, you can open-up brilliant level of opportunities to make the most out of it. Are you ready to begin? Next you will learn about how to turn the background into a desired canvas for all your Instagram stories.
The following steps will provide you a quick walkthrough of entire process, stepwise:-
Step 1: First you are required to open the picture with Procreate. Get your desired image for the edit or open your picture & turn-off the overall visibility of background layer by layers-icon, tap it, it is presented on the top-right corner. Here, you will see layer labelled as the background, you need to uncheck the layer’s box for turning-off overall visibility at the bottom of Layers menu.
It is an important step to perform as if you want to deleting any white background from the image otherwise background will be treated as transparent with white-background showing through, thus you will experience no changes to the document. You are not required to remove background from image procreate if your image is not having a background layer.
Step 2: Create the selection at around white area of an image & delete background
For you to perform the step of procreate remove white background, you are required to make selection around white area. For this, open-up the selection-menu and it is placed in the form round icon named ‘S’ at the top-left-corner of the screen. At this menu, choose auto & Add. To create such level of perfection in selection, just hold & tap over any area of white-background at this screen. You can also increase threshold of your selection by moving the fingers/stylus at the right. For the opposite process, you can move the same to the left.You need to adjust the desired threshold until selection-area on your screen lines-up in accordance with an edges of the subject. You are now heading towards the process of make background transparent procreatefor your desired image quickly.
With your current selection still in active state, just tap on wrench-icon it the top-left area of your screen, then navigate to Add-menu, and here tap on the Cut option. Congrats, you have effectively deleted the background from an image.
**Step 3:**Just release the selection in the form of tapping on Selection-menu icon and repeat the process again for negative space-areas & at last clean-up stray-pixels with through an Eraser. You can repeat the process further from the step-2 in case any stray pixels still remains there as it is a normal situation to face while removing the pixels background with ‘remove background on procreate’ option.You can also take the Eraser & then manually erase those stray-pixels in there is any.
Step 4: Export your final work as PNG-file to preserve the transparency
After finishing the task of deleting background from the picture you can easily export your work to a desirable file format. The image you want to export can be in the form of PNG to retain the transparency. Other useful formats you can choose is JPEG but this doesn’tsupport transparency. So, be wise & be careful while choose your file formats.You are now having procreate export transparent backgroundand can also place the same to any sort of backdrop like an app, website, or any other workspace.
Part 2 How to Make Transparent Background with Procreate for iPhone?

Let’s dive-in quickly into the process of making the background transparent with procreate, if you are an iPhone User.
● GO Into an option of Canvas
It is up-to you whether you want to create a new canvas or want to work-upon already saved canvas. In your device through procreate app, you can do the same without any worries.
● Tap onto the option of Layers Panel
This option is located at the top-right corner of your toolbar. This option looks similar to the two-squares on the top of one another.
● Replace dull looking background with transparent background
You can quickly go down to the layers-panel placed at the bottom to choose the background color.Transparent background in procreateis always a good option to consider.
● Put uncheck before the box
At the right of toolbar you can be able to see words ‘Background color’ and if it is checked then you need to uncheck it. Now your goal to make the background completely transparent with procreate make background transparent tool, will be achieved. Now your background is completely transparent and ready to use.
Part 3 How to Create Popping Thumbnails or Profile Photos

There are various tools available in the market to make a popping thumbnail for your YouTube or Instagram pages. Thumbnail maker like Filmora can be an interesting option to choose as it is quick and effective. You can also customized as well as download the thumbnails at no cost with the same. However, they comes with certain limitations like overall size of the image to be downloaded. For better versions you can use premium tools. With better creativity and great imagination you can make the thumbnail as crisp as possible.
● Upload your desired photo to Filmora’s thumbnail maker templates.
You can easily create your video thumbnail, but you need some inspiration and for that you can make use of amazing tool like Filmora. With access to more than 50 free templates you can achieve your goal of making popping thumbnails.
● Adding text, clipart, or perfect quality of background can give it a boost
After picking your template, one can make use of thumbnail to stand out different in terms of adding text, clipart or background. For adding custom background to your thumbnail you can make use of procreate that can remove the background with procreateremove white backgroundfeatures and give you better featured image with nice background. Also to clarify the objectives of your thumbnail you can add titles, and also consider placing the same on the top of any dark color background if your thumbnail is light in color. For making the background darker just choose remove white background procreateas discussed above.
● Just Download your finished product to your device
After polishing the thumbnails with creative stuff, you can download the same to your device or export it to your smartphone.
Voila, you just have create your own custom popping thumbnail. With remove background on procreate, you can never feel disappointed.
****Wondershare Filmora Video Editor App to Remove Unwanted Background Easily**
For Win 7 or later (64-bit)
For macOS 10.12 or later
In case you are searching for any professional tool to remove het background and replace the one with any of your favorite picture then there is a tool for you to consider. With greater different functionalities, you can make any Instagram post or story interesting through the help of Fillmora App. This has set of brilliant solutions to provide with most brilliant picture and video editing features. It is interesting, fun-loving as well as attractive enough to turn any moments extraordinary.
Handy features to enjoy:-
● You can make use of this tool to create custom thumbnails for your YouTube or Instagram page.
● Great varieties of templates for making popping thumbnails
● Greater capability to beautifully construct picture editing animations
● Varieties of Effects for every age group
● Attractive filters, GIFs packs and images to turn any dull looking background into an amazing moment.
● Delete white background quickly
● Right selection of tools to make the editing effective
● Flawless features to crop, cut-up, cut, trim & mix operations.
● Single click operation to turn the images into a beauty mode
● Options to save your creations into your device or virtual space
● Share your creations to your community, to your friends via Facebook, Instagram, YouTube, and Twitter quickly.
It is a greater idea to try this app for making use of its image editing features for deleting the white background in an easy manner.
● Ending Thoughts →
● With great varieties of features it is now very easy for you to create some automated selections in just single tap.
● Deleting the white background through a pro-tool like Procreate is smart, quick & seamless process.
● You are not going to get confused, even if you are using it for the very first time.
● It is the trend that every Instagram user is following for posting better images with nice background options.
Figuring out the crucial steps to make the canvas excellent is one of the loveliest things users are performing for exporting the closing Procreate-projects. Once after getting expert with things trick you can be able to position the canvas surprisingly on great back for a memorable moment. You can make the most of it for your procreate mission that you have created.
Out of many essentials tools you have ever used for experiencing the benefits of equipment & skills, the Procreate is a kind of solution that comes with one of the most trustworthy as well as brilliant capability to erase the undesired background from the pictures. It is more than a general tool and there are some specified approaches to do so, but in today possible scenario, you can easily focus around choice of right selections to erase a background at ease. People can explore the chances of creating various attractive methods to work in the PNG structure after removing the desired background.
In this article
01 [How to Delete a White Background with Procreate for the IPad?](#Part 1)
02 [How to Make Transparent Background with Procreate for iPhone?](#Part 2)
03 [How to Create Popping Thumbnails or Profile Photos](#Part 3)
Part 1 How to Delete a White Background with Procreate for the IPad?
In case you are facing discoloration problem too then it is always a better idea to cast image with desired background and remove the objects.
Now turning your background with a lovely image or your own is just a matter of few clicks. With great transparent background procreate, you will be heading towards the satisfaction of obtaining transparent background. With few crucial steps you can stay from the other competitors or it will make your posts viral. With stepwise guidelines on removing the background as well as replacing it with a transparent one in Procreate is what you need the most today.
When it comes to deleting the white-background with a Procreate, then with great selection of tools you can easily create amazing performance for your post. If you are still in a dilemma to make use of the white coloured Background. After tapping on the top-left corner of the screen, you can open-up brilliant level of opportunities to make the most out of it. Are you ready to begin? Next you will learn about how to turn the background into a desired canvas for all your Instagram stories.
The following steps will provide you a quick walkthrough of entire process, stepwise:-
Step 1: First you are required to open the picture with Procreate. Get your desired image for the edit or open your picture & turn-off the overall visibility of background layer by layers-icon, tap it, it is presented on the top-right corner. Here, you will see layer labelled as the background, you need to uncheck the layer’s box for turning-off overall visibility at the bottom of Layers menu.
It is an important step to perform as if you want to deleting any white background from the image otherwise background will be treated as transparent with white-background showing through, thus you will experience no changes to the document. You are not required to remove background from image procreate if your image is not having a background layer.
Step 2: Create the selection at around white area of an image & delete background
For you to perform the step of procreate remove white background, you are required to make selection around white area. For this, open-up the selection-menu and it is placed in the form round icon named ‘S’ at the top-left-corner of the screen. At this menu, choose auto & Add. To create such level of perfection in selection, just hold & tap over any area of white-background at this screen. You can also increase threshold of your selection by moving the fingers/stylus at the right. For the opposite process, you can move the same to the left.You need to adjust the desired threshold until selection-area on your screen lines-up in accordance with an edges of the subject. You are now heading towards the process of make background transparent procreatefor your desired image quickly.
With your current selection still in active state, just tap on wrench-icon it the top-left area of your screen, then navigate to Add-menu, and here tap on the Cut option. Congrats, you have effectively deleted the background from an image.
**Step 3:**Just release the selection in the form of tapping on Selection-menu icon and repeat the process again for negative space-areas & at last clean-up stray-pixels with through an Eraser. You can repeat the process further from the step-2 in case any stray pixels still remains there as it is a normal situation to face while removing the pixels background with ‘remove background on procreate’ option.You can also take the Eraser & then manually erase those stray-pixels in there is any.
Step 4: Export your final work as PNG-file to preserve the transparency
After finishing the task of deleting background from the picture you can easily export your work to a desirable file format. The image you want to export can be in the form of PNG to retain the transparency. Other useful formats you can choose is JPEG but this doesn’tsupport transparency. So, be wise & be careful while choose your file formats.You are now having procreate export transparent backgroundand can also place the same to any sort of backdrop like an app, website, or any other workspace.
Part 2 How to Make Transparent Background with Procreate for iPhone?
Let’s dive-in quickly into the process of making the background transparent with procreate, if you are an iPhone User.
● GO Into an option of Canvas
It is up-to you whether you want to create a new canvas or want to work-upon already saved canvas. In your device through procreate app, you can do the same without any worries.
● Tap onto the option of Layers Panel
This option is located at the top-right corner of your toolbar. This option looks similar to the two-squares on the top of one another.
● Replace dull looking background with transparent background
You can quickly go down to the layers-panel placed at the bottom to choose the background color.Transparent background in procreateis always a good option to consider.
● Put uncheck before the box
At the right of toolbar you can be able to see words ‘Background color’ and if it is checked then you need to uncheck it. Now your goal to make the background completely transparent with procreate make background transparent tool, will be achieved. Now your background is completely transparent and ready to use.
Part 3 How to Create Popping Thumbnails or Profile Photos
There are various tools available in the market to make a popping thumbnail for your YouTube or Instagram pages. Thumbnail maker like Filmora can be an interesting option to choose as it is quick and effective. You can also customized as well as download the thumbnails at no cost with the same. However, they comes with certain limitations like overall size of the image to be downloaded. For better versions you can use premium tools. With better creativity and great imagination you can make the thumbnail as crisp as possible.
● Upload your desired photo to Filmora’s thumbnail maker templates.
You can easily create your video thumbnail, but you need some inspiration and for that you can make use of amazing tool like Filmora. With access to more than 50 free templates you can achieve your goal of making popping thumbnails.
● Adding text, clipart, or perfect quality of background can give it a boost
After picking your template, one can make use of thumbnail to stand out different in terms of adding text, clipart or background. For adding custom background to your thumbnail you can make use of procreate that can remove the background with procreateremove white backgroundfeatures and give you better featured image with nice background. Also to clarify the objectives of your thumbnail you can add titles, and also consider placing the same on the top of any dark color background if your thumbnail is light in color. For making the background darker just choose remove white background procreateas discussed above.
● Just Download your finished product to your device
After polishing the thumbnails with creative stuff, you can download the same to your device or export it to your smartphone.
Voila, you just have create your own custom popping thumbnail. With remove background on procreate, you can never feel disappointed.
****Wondershare Filmora Video Editor App to Remove Unwanted Background Easily**
For Win 7 or later (64-bit)
For macOS 10.12 or later
In case you are searching for any professional tool to remove het background and replace the one with any of your favorite picture then there is a tool for you to consider. With greater different functionalities, you can make any Instagram post or story interesting through the help of Fillmora App. This has set of brilliant solutions to provide with most brilliant picture and video editing features. It is interesting, fun-loving as well as attractive enough to turn any moments extraordinary.
Handy features to enjoy:-
● You can make use of this tool to create custom thumbnails for your YouTube or Instagram page.
● Great varieties of templates for making popping thumbnails
● Greater capability to beautifully construct picture editing animations
● Varieties of Effects for every age group
● Attractive filters, GIFs packs and images to turn any dull looking background into an amazing moment.
● Delete white background quickly
● Right selection of tools to make the editing effective
● Flawless features to crop, cut-up, cut, trim & mix operations.
● Single click operation to turn the images into a beauty mode
● Options to save your creations into your device or virtual space
● Share your creations to your community, to your friends via Facebook, Instagram, YouTube, and Twitter quickly.
It is a greater idea to try this app for making use of its image editing features for deleting the white background in an easy manner.
● Ending Thoughts →
● With great varieties of features it is now very easy for you to create some automated selections in just single tap.
● Deleting the white background through a pro-tool like Procreate is smart, quick & seamless process.
● You are not going to get confused, even if you are using it for the very first time.
● It is the trend that every Instagram user is following for posting better images with nice background options.
Vintage Film Effect 1990S - How to Make
In the 90s, movie production technology improved a lot. This decade saw horror movies become much more fun and immersive than in the 80s and 50s because they were more psychological. In fact, we can say that the horror movies of the 90s laid the foundation for current horror movies. So, without wasting time, let’s create a 1990s horror movie similar to The Blair Witch Project.
Preparation

The preparation for this horror film production is relatively self-explanatory if you’ve watched The Blair Witch Project. Simply shoot footage inside a dark room and apply some light to your face. It’s even better if you can shoot the video inside the woods. Just add some drama and a few screaming scenes to evoke emotions.
How to create a 1990s horror film with Filmora :
Free Download For Win 7 or later(64-bit)
Free Download For macOS 10.14 or later
Step1 Add the horror video to the timeline

Open Wondershare Filmora on your computer, then load the video you want to edit. After adding the video, drag it to the editing timeline, then move it a few keyframes to the right. The idea is to apply some black screen to add drama and fear before the film starts playing.
Step2 Apply color grading

Next, double-click the horror clip and go to the Color menu. Then, click the Tone arrow before lowering the Saturation to -50%. This will give us a less saturated look popularly used in horror films.

Now click the 3D LUT option and choose a LUT that works for your film. For this horror film project, we’ll select the Dark Film option.
Step3 Add creepiness to the video

Obviously, you’ll want your horror film to look as creepy as possible. To achieve that, click the Elements tab, then search for the Smokescreen 1 effect. Move the effect to the timeline above the video track before trimming the effect clip to fit with the original horror video.

We’ll now change the size and positioning of the smokescreen effect to match the feature video. To do that, double-click the effect track. You can also reduce the opacity to around 30% to make the smoke more visible.
Step4 Add a retro filming effect

Now we’ll make the film more believable by adding a retro overlay. Click the Effects tab, then search for Retro Film Overlay 15 before dragging and dropping the effect above all the tracks in the editing timeline.

Summary
That’s it! With these tips and tricks, you can effortlessly create a retro-style 1990s horror film. Follow this tutorial and play around with the movie effects to find what works best for you. Remember, Filmstock is the ultimate resource for video and movie effects. Give it a try!
Free Download For macOS 10.14 or later
Step1 Add the horror video to the timeline
Open Wondershare Filmora on your computer, then load the video you want to edit. After adding the video, drag it to the editing timeline, then move it a few keyframes to the right. The idea is to apply some black screen to add drama and fear before the film starts playing.
Step2 Apply color grading
Next, double-click the horror clip and go to the Color menu. Then, click the Tone arrow before lowering the Saturation to -50%. This will give us a less saturated look popularly used in horror films.
Now click the 3D LUT option and choose a LUT that works for your film. For this horror film project, we’ll select the Dark Film option.
Step3 Add creepiness to the video
Obviously, you’ll want your horror film to look as creepy as possible. To achieve that, click the Elements tab, then search for the Smokescreen 1 effect. Move the effect to the timeline above the video track before trimming the effect clip to fit with the original horror video.
We’ll now change the size and positioning of the smokescreen effect to match the feature video. To do that, double-click the effect track. You can also reduce the opacity to around 30% to make the smoke more visible.
Step4 Add a retro filming effect
Now we’ll make the film more believable by adding a retro overlay. Click the Effects tab, then search for Retro Film Overlay 15 before dragging and dropping the effect above all the tracks in the editing timeline.
Summary
That’s it! With these tips and tricks, you can effortlessly create a retro-style 1990s horror film. Follow this tutorial and play around with the movie effects to find what works best for you. Remember, Filmstock is the ultimate resource for video and movie effects. Give it a try!
Guide To Make a YouTube Intro by Filmora
You are starting a YouTube channel and looking to create a video intro. Then, this article will allow you to experience the magic of Wondershare Filmora in creating a YouTube intro. Wondershare Filmora allows you to access the range of opener templates you can edit to create engaging YouTube intros. This will help to hook up your audience till the end.
But before we learn how to create a YouTube intro, let’s understand what makes an Intro creative and exciting.
Part 1. What Is a Creative YouTube Intro?
A good intro is a crucial feature of a good YouTube video. Whenever a viewer or a subscriber clicks on your video, the YouTube intro is the first thing they see. And a successful channel’s secret is to captivate the viewer from the start.
What Goes Into a Creative YouTube Intro?
A good YouTube intro consists of the following qualities:
- Graphic: The intro text will be written on the graphics template.
- Text: This text will be your channel’s name. Or, if it’s a Vlog, it could be its number. Such as i.e., Vlog #2.
- Images: If you use plain templates, you can add pictures behind them to make them pop up even more.
- Catchy music: To spice up the video and make it more pleasing, the music will be added to hook the audience in the intro section.
You must have an engaging YouTube intro. You will need a few things to create a YouTube intro.
Part 2. What Do You Need to Make a Creative YouTube Intro?
You are all set to engage the audience, then you need the following essentials to create an exemplary YouTube intro:
Requirement 1. Wondershare Filmora
Free Download For Win 7 or later(64-bit)
Free Download For macOS 10.14 or later
First, you will need to have a good video editor. Wondershare Filmora is the best for editing your videos. It enables you to make creative and appealing videos.
It has a very engaging system UI that allows even novices to quickly get the hang of it. Also, it has a wide range of stock media. Thus, it allows you to access the intro templates and customise features.

Requirement 2. Footage for Intro
When creating content for your YouTube videos, remember that you will also need some footage for your intro. Intros need to be as captivating as possible.
So to hook the audience from the start, you will need an entertaining start. These video clips can be the exciting moments that you cut before the climax or landscapes of the scenery. The choice is yours.
Part 3. Step-by-Step Guide to Creating a YouTube Intro
You can create a YouTube intro in two ways.
- Create a YouTube intro with an opener template.
- By using video clips from your library.
To use both of these methods, you will need Wondershare Filmora. For this, read below to get your hands on it!
Create a YouTube Intro with an opener template
Opener templates are full of fancy graphics and animations that you can change according to your style. The library provides you with the most vibrant and simplest form of opener templates.
Step1 Download Wondershare Filmora
Before all, you need to have access to Filmora. If you don’t have then follow the below actions:
- First, download and install the Wondershare Filmora.
- Then, on your PC or Mac, run this application.
Step2 Preview The Intro Template
After downloading the Wondershare Filmora, you must select an intro template. To perform this action, you will need to preview it first as:
- Click on the Title icon above the Import window.
- On the left column, scroll down to Titles > Openers.
- Double-click on any intro template to preview it.
After previewing the opener, we need to insert it into the timeline. Simply click on an intro you like and place it in the timeline below. Here you can edit the Opener.
Step3 Edit The Text
After adding the opener to the timeline, your goal is to type in your text. This text will appear in the intro. To perform this action, follow the steps mentioned below:
- Double-click on the opener added to the timeline.
- This will open the settings menu in the import window.
- Type in the text box your channel’s or vlog’s name.

- Then change the font of text if you want.
- You can also edit the sub-heading. Here you can write a short description of your video.
- Once you are done typing the text, click on OK to confirm your changes.
After you have typed in the text for your opener, it is time to add some music to it.
Step4 Add Music into Clip
Music will spice up your intro video and give more pleasing effect. To proceed it further, follow the following steps:
- Click on the Audio icon above the import window and Audio library will pop up.
- Here, you can see the variety of Royalty-free music available.
- Browse through the library and choose whatever you like.
- After you have selected the music for your video, click to drop it below your opener in the timeline.
- Trim the music to the length of the opener.
- Play the opener from the start to confirm your changes.

This is how you can create an opener intro for your YouTube videos. Choose the graphics that most suit your video’s vibe.
Now that we have learned how to make an opener by template, let’s look at how to create an intro using clips in your library.
Create an Intro with Video Clips in Your Library
Wondershare Filmora also allows you to edit your videos to turn them into openers. This will enable your intros to be more personal and unique, giving you the edge of creativity.
Creating an intro by using video clips is an easy task. You just need suitable video clips to use as an intro, and you are good to go.
Follow the steps as mentioned to create an intro using Video clips:
Step1 Import the Video Clips
After downloading Wondershare Filmora, your next step is to import your video clips. To perform this, follow the steps as mentioned below:
- On the Filmora Home Interface, find the Import icon on the top left side and select it.
- This will direct you to your PC library.
- Select the photos and videos you want to edit and click OK.

Step2 Add The Video Clips to the Timeline
Once you have imported clips in the Import window, your next step is simply to add them to the timeline. For this, follow the steps mentioned below:
- Drag and select the clips in the import window.
- Then, drop them in the timeline.

Once in the timeline, your video is ready to go into editing mode. But before we insert the template of our intro, we need another step as shown!
Step3 Trim The Video Clips
As it’s the intro, we need to trim the video clips, so they are concise. You may have recorded longer video clips, but we need clips that are no longer than 5 seconds.
To trim the video clips, follow the steps mentioned:
- Move the playhead on the video clip to where you want to trim.
- Click on the scissors icon on the Playhead.
This will split your video clip into two parts. Now, you can delete whatever part you like and keep the other one.
![]()
Note: To measure the time of the video clip, keep an eye on the Time map above the Playhead.

When you have trimmed your video clips to your liking, it’s time to add the Title text that will act as an intro to your video!
Step4 Add The Title Text
You will need a title template to add text to your video clips. For this,perform the following actions:
- First, click on the Title icon above the import window.
- On the left column explore and browse the animated title as you want.
- Double-click on a title template to preview it.
- Once you have selected the Title template, drag it above the start of your timeline above the video clip and it’ll all set.
After you have added the title, the next step is to add your intro text.
Step5 Type The Intro Text
For specifications of the video and ongoing content, you have to tell the audience before starting. For this, you need to type the intro text as shown:
- Double-click on the title template.
- Type in the text you want in the text box.

Play the video clip from the beginning to confirm your changes. Now that we have created a graphic text, it’s time to add the audio.
Step6 Add Music
To give more pleasing look and effect, you must add the music into it. Follow the steps below to proceed it further:
- First select the Audio icon above the import window. This will direct you to Filmora’s Audio library.
- Browse the library and pick whatever royalty-free music you want.
- After you’ve chosen the music for your video, drag it to the timeline below the video clip.
- Cut the music to match the length of the intro and it’s all done.

Once you are done adding the music, hit the play button to ensure everything is according to your need.

Step7 Export The Video
Its time to export the video and share it with your audience. For this, check below steps:
- Click on the export icon on the top right of the import window.
- This will pop-up another window of settings.
- Select the settings your want your video to be exported in.
![]()
Note: You can also change the name of your intro.
- When you are done, click on Export.
- Wait till Filmora finishes exporting your video.

Congratulations! You have successfully created a YouTube intro. Now you can use them freely in your YouTube videos and please your audience.
Conclusion
YouTube intros are a great way to attract the viewer at first glance. The more creative the YouTube Intro is, the more the chances of your video getting views.
By following the steps mentioned in the article above, you can easily create YouTube intros by Wondershare Filmora. Try with new features and stock media to make your video more exemplary!
Free Download For macOS 10.14 or later
First, you will need to have a good video editor. Wondershare Filmora is the best for editing your videos. It enables you to make creative and appealing videos.
It has a very engaging system UI that allows even novices to quickly get the hang of it. Also, it has a wide range of stock media. Thus, it allows you to access the intro templates and customise features.
Requirement 2. Footage for Intro
When creating content for your YouTube videos, remember that you will also need some footage for your intro. Intros need to be as captivating as possible.
So to hook the audience from the start, you will need an entertaining start. These video clips can be the exciting moments that you cut before the climax or landscapes of the scenery. The choice is yours.
Part 3. Step-by-Step Guide to Creating a YouTube Intro
You can create a YouTube intro in two ways.
- Create a YouTube intro with an opener template.
- By using video clips from your library.
To use both of these methods, you will need Wondershare Filmora. For this, read below to get your hands on it!
Create a YouTube Intro with an opener template
Opener templates are full of fancy graphics and animations that you can change according to your style. The library provides you with the most vibrant and simplest form of opener templates.
Step1 Download Wondershare Filmora
Before all, you need to have access to Filmora. If you don’t have then follow the below actions:
- First, download and install the Wondershare Filmora.
- Then, on your PC or Mac, run this application.
Step2 Preview The Intro Template
After downloading the Wondershare Filmora, you must select an intro template. To perform this action, you will need to preview it first as:
- Click on the Title icon above the Import window.
- On the left column, scroll down to Titles > Openers.
- Double-click on any intro template to preview it.
After previewing the opener, we need to insert it into the timeline. Simply click on an intro you like and place it in the timeline below. Here you can edit the Opener.
Step3 Edit The Text
After adding the opener to the timeline, your goal is to type in your text. This text will appear in the intro. To perform this action, follow the steps mentioned below:
- Double-click on the opener added to the timeline.
- This will open the settings menu in the import window.
- Type in the text box your channel’s or vlog’s name.
- Then change the font of text if you want.
- You can also edit the sub-heading. Here you can write a short description of your video.
- Once you are done typing the text, click on OK to confirm your changes.
After you have typed in the text for your opener, it is time to add some music to it.
Step4 Add Music into Clip
Music will spice up your intro video and give more pleasing effect. To proceed it further, follow the following steps:
- Click on the Audio icon above the import window and Audio library will pop up.
- Here, you can see the variety of Royalty-free music available.
- Browse through the library and choose whatever you like.
- After you have selected the music for your video, click to drop it below your opener in the timeline.
- Trim the music to the length of the opener.
- Play the opener from the start to confirm your changes.
This is how you can create an opener intro for your YouTube videos. Choose the graphics that most suit your video’s vibe.
Now that we have learned how to make an opener by template, let’s look at how to create an intro using clips in your library.
Create an Intro with Video Clips in Your Library
Wondershare Filmora also allows you to edit your videos to turn them into openers. This will enable your intros to be more personal and unique, giving you the edge of creativity.
Creating an intro by using video clips is an easy task. You just need suitable video clips to use as an intro, and you are good to go.
Follow the steps as mentioned to create an intro using Video clips:
Step1 Import the Video Clips
After downloading Wondershare Filmora, your next step is to import your video clips. To perform this, follow the steps as mentioned below:
- On the Filmora Home Interface, find the Import icon on the top left side and select it.
- This will direct you to your PC library.
- Select the photos and videos you want to edit and click OK.
Step2 Add The Video Clips to the Timeline
Once you have imported clips in the Import window, your next step is simply to add them to the timeline. For this, follow the steps mentioned below:
- Drag and select the clips in the import window.
- Then, drop them in the timeline.
Once in the timeline, your video is ready to go into editing mode. But before we insert the template of our intro, we need another step as shown!
Step3 Trim The Video Clips
As it’s the intro, we need to trim the video clips, so they are concise. You may have recorded longer video clips, but we need clips that are no longer than 5 seconds.
To trim the video clips, follow the steps mentioned:
- Move the playhead on the video clip to where you want to trim.
- Click on the scissors icon on the Playhead.
This will split your video clip into two parts. Now, you can delete whatever part you like and keep the other one.
![]()
Note: To measure the time of the video clip, keep an eye on the Time map above the Playhead.
When you have trimmed your video clips to your liking, it’s time to add the Title text that will act as an intro to your video!
Step4 Add The Title Text
You will need a title template to add text to your video clips. For this,perform the following actions:
- First, click on the Title icon above the import window.
- On the left column explore and browse the animated title as you want.
- Double-click on a title template to preview it.
- Once you have selected the Title template, drag it above the start of your timeline above the video clip and it’ll all set.
After you have added the title, the next step is to add your intro text.
Step5 Type The Intro Text
For specifications of the video and ongoing content, you have to tell the audience before starting. For this, you need to type the intro text as shown:
- Double-click on the title template.
- Type in the text you want in the text box.
Play the video clip from the beginning to confirm your changes. Now that we have created a graphic text, it’s time to add the audio.
Step6 Add Music
To give more pleasing look and effect, you must add the music into it. Follow the steps below to proceed it further:
- First select the Audio icon above the import window. This will direct you to Filmora’s Audio library.
- Browse the library and pick whatever royalty-free music you want.
- After you’ve chosen the music for your video, drag it to the timeline below the video clip.
- Cut the music to match the length of the intro and it’s all done.
Once you are done adding the music, hit the play button to ensure everything is according to your need.
Step7 Export The Video
Its time to export the video and share it with your audience. For this, check below steps:
- Click on the export icon on the top right of the import window.
- This will pop-up another window of settings.
- Select the settings your want your video to be exported in.
![]()
Note: You can also change the name of your intro.
- When you are done, click on Export.
- Wait till Filmora finishes exporting your video.
Congratulations! You have successfully created a YouTube intro. Now you can use them freely in your YouTube videos and please your audience.
Conclusion
YouTube intros are a great way to attract the viewer at first glance. The more creative the YouTube Intro is, the more the chances of your video getting views.
By following the steps mentioned in the article above, you can easily create YouTube intros by Wondershare Filmora. Try with new features and stock media to make your video more exemplary!
Also read:
- Updated Do You Want to Edit a TikTok After Posting? This Article Will Provide Multiple Methods Through Which You Can Do It in No Time
- New 2024 Approved How to Create and Use Adjustment Layers in After Effects
- New 2024 Approved How to Do Motion Graphics in Filmora
- Updated 2024 Approved What Is First Impression Review Video
- Top 10 Movie Trailer Voice Generators Windows, Mac, Android, iPhone for 2024
- Are You an Apple User Interested in Adding a Slow-Mo to Their Videos? This Article Features an Exceptional Procedure for Creating Slow-Mo in iMovie
- Do You Have the Habit to Create Subtitle for Your Video? You Can Always Add Open and Close Subtitles to Your Video to Make It Perfect. Follow This Article to Learn More About It for 2024
- Updated TOP 6 Online Video Speed Controller for Chrome, Safari, Firefox for 2024
- New Heres All About GIF Keyboard Youll Ever Want to Know
- Updated In 2024, In This Article, You Will Learn How to Record Creative Cinematic Videos Using a Smartphone and Edit the Video with Wondershare Filmora
- New Replacing Sky in Your Pictures Using Online and Offline Tools
- Updated How to Do Velocity Edits on PC
- Updated 2024 Approved Easy Steps to Make Glitch Effect with Filmora
- New In 2024, Best iOS Slow Motion Apps To Work With
- New Do You Want to Stream and Record at the Same Time but Cant Find an Easy Solution? This Guide Will Help You Get This Done Using Three Easy-to-Follow Methods for 2024
- Updated 2024 Approved Top Online Video Background Changers Transform Your Videos with Ease
- New Thousands Already Know Ezgif and So Can You
- New Want to Know How to Slow Down a Video on iPhone or Speed It Up? This Guide Provides Step by Step Method to Do so Using Simple Techniques. Find Out More About It
- Updated 2024 Approved Understanding More About CapCut Lenta Template and Slow-Motion Videos
- New Get Creative with These 10 Video Editing App With Templates for 2024
- 20 Best LUTs for Music Videos
- Updated In 2024, Best Cinematic LUTs For Premiere Pro Recommendation
- 2024 Approved Turn Your Blog Content Into Audio Podcasts to Reach a Wider Audience and Increase Reader Participation
- New In 2024, How To Blur Background in Adobe Premiere Pro Detailed Guide
- New Color Match Game Tips for You for 2024
- Updated 2024 Approved Create Eye-Catching Slow-Motion Videos to Set Your Own Trend. For This Purpose, Read This Article to Find and Learn to Use CapCuts New Slow-Motion Templates
- Step by Step to Rotate Video in Google Photos for 2024
- Updated 2024 Approved You Must Be Wondering Which the Best Online Transparent Image-Maker Is! Well, There Is No Need to Get Confused as Here; You Will Get a Curated List for the Same
- Updated In 2024, Do You Want to Know Which Are the Best Wondershare Filmora LUTs to Use? There Are Many LUTs that You Can Download, Each with a Different Tone and Style
- With Looping Videos, People Stay on Your Site Longer, Boosting Engagement. With Video Being Watched on Mobile over 3X More than Any Other Content, Its an Essential Part of Mobile Advertising for 2024
- Updated Create a Brand Video to Make Your Business Shine for 2024
- How to Create Custom Lower Thirds in Filmora for 2024
- New 2024 Approved Finding The Finest Way to Add Subtitles to Videos | Filmora
- 2024 Approved How to Comment on YouTube Live Chat
- Updated 2024 Approved Create Your Slow Zoom TikTok in Minutes
- New Make Super Easy Coin Magic With Filmora for 2024
- New Do You Want to Add a Motion Blur Effect in Valorant? Read This Guide to Find Out How to Create a Motion Blur Effect in Valorant without Any Hassle
- 10 Innovative AR Teaching Examples to Tell You What Is AR in Teaching for 2024
- How to Time-Lapse a Video on iMovie
- 2024 Approved How to Create a Light Sweep (Shine) Effect with Filmora
- Techniques You Never Heard of for Learning AI Marketing YouTube for 2024
- In 2024, Best 31 Video Trimmers for Computer, Phone and Online
- Updated MAGIX Vegas Pro Review A Professional Video Editing Software for 2024
- Updated 2024 Approved As an Online Marketer, It Is Important to Know the Algorithm of YouTube Platform. Ill Share You the History of Algorithm of YouTube and the New Changes in This Year
- New Slow-Motion Edits Are Pretty Mesmerizing, and Weve All Imagined Ourselves in One of Those Visually Appealing, Slowed-Down Movies. Well Teach You How to Make a Smooth Slo-Mo Video Using Twixtor in This Article. Stay Tuned Until the End for 2024
- Updated 2 Methods to Cut Video in VLC on Windows for 2024
- New Do You Want to Excel at Using Adobe Premiere Pro Software for Splitting Videos and Audio? Learn About Splitting a Video and Audio Using Different Tools and Add a New Skill to Your Skillset with a Step-by-Step Guide in This Article for 2024
- 2024 Approved Top 10 Best Slideshow Makers with Music
- New How To Start a Private Live Stream on YouTube for 2024
- In 2024, How to Use Google Assistant on Your Lock Screen Of Infinix Smart 8 HD Phone
- Easy steps to recover deleted music from Motorola Moto G24
- In 2024, How to Detect and Remove Spyware on Vivo T2 5G? | Dr.fone
- Additional Tips About Sinnoh Stone For Apple iPhone 6s Plus | Dr.fone
- Pattern Locks Are Unsafe Secure Your Xiaomi Redmi Note 12R Phone Now with These Tips
- How to Soft Reset Infinix Note 30 VIP Racing Edition phone? | Dr.fone
- Use Device Manager to identify malfunctioning your drivers with Windows Device Manager on Windows 11 & 10
- 4 Ways to Transfer Contacts from Apple iPhone XR to iPhone Quickly | Dr.fone
- Can I use iTools gpx file to catch the rare Pokemon On Oppo Find X6 | Dr.fone
- Google Play Services Wont Update? 12 Fixes are Here on Motorola Moto G13 | Dr.fone
- In 2024, Fixing Foneazy MockGo Not Working On Oppo Reno 11F 5G | Dr.fone
- How to Transfer Photos from Realme GT Neo 5 SE to Laptop Without USB | Dr.fone
- How to Fix Locked Apple ID on Apple iPhone 6 Plus
- How to Unlock iPhone 13 mini Passcode without iTunes without Knowing Passcode? | Dr.fone
- The way to get back lost videos from Samsung Galaxy M34 5G
- How to Soft Reset Nubia Red Magic 9 Pro+ phone? | Dr.fone
- The Top 5 Android Apps That Use Fingerprint Sensor to Lock Your Apps On Itel P55T
- Unova Stone Pokémon Go Evolution List and How Catch Them For Samsung Galaxy A05 | Dr.fone
- In 2024, How to Transfer Everything from Apple iPhone 8 Plus to iPhone 8/X/11 | Dr.fone
- In 2024, How to Change Location on TikTok to See More Content On your OnePlus Nord N30 SE | Dr.fone
- How to Recover Deleted Excel 2000 Files on Mac Complete Guide | Stellar
- How to Fix Error 495 While Download/Updating Android Apps On Tecno Phantom V Flip | Dr.fone
- Edit and Send Fake Location on Telegram For your Samsung Galaxy M14 5G in 3 Ways | Dr.fone
- In 2024, How to Mirror PC Screen to Vivo Y27s Phones? | Dr.fone
- In 2024, How To Bypass Activation Lock On Apple Watch Or iPhone 12 Pro Max?
- In 2024, How to Intercept Text Messages on Realme C55 | Dr.fone
- How To Simulate GPS Movement With Location Spoofer On Vivo V27 Pro? | Dr.fone
- Is GSM Flasher ADB Legit? Full Review To Bypass Your Vivo Y78tFRP Lock
- Title: New 2024 Approved How to Zoom Picture in Picture Easy Solution
- Author: Morgan
- Created at : 2024-04-24 01:06:46
- Updated at : 2024-04-25 01:06:46
- Link: https://ai-video-editing.techidaily.com/new-2024-approved-how-to-zoom-picture-in-picture-easy-solution/
- License: This work is licensed under CC BY-NC-SA 4.0.
