
:max_bytes(150000):strip_icc():format(webp)/GettyImages-515810476-aabe0e5a88b44bb1ae49a5bfa97bec62.jpg)
New 2024 Approved How to Zoom Webcam on PC
How to Zoom Webcam on PC
Making certain our digital presence is the best it can be pays dividends as more and more of what we do online; similar is the case with how to zoom out webcam windows 10. The majority of experts advise against using the built-in camera that comes with your laptop or computer and instead advocate getting a webcam or an HD camera. These, however, may be hard to come by and pricy if you locate a nice one. If the built-in camera on your laptop doesn’t perform effectively during Zoom meetings, you may want to consider about investing in a separate, better webcam. Webcams offer automatic settings that are intended to function with the largest variety of lighting situations possible. This suggests that they average out a great number of responses to the content of the frame. Because of this, we have incorporated basic PC webcam zooming settings. These answers may be found in the portions that follow.
It’s vital to know how to zoom in on a webcam before visiting there. The camera wasn’t always as vital as it is today, and only very large corporations could afford to employ it as a convenience. But today, nearly everyone, from huge organizations to little firms, acknowledges its value. Everybody needs a webcam that works properly. The camera control software you are using determines the zoom function. The resolution of your picture window and the capabilities of the application dictate how far you can zoom in on the webcam’s video image. You can zoom in and out on camera photos using tools like YouCam and Windows Live Messenger. The most critical camera capabilities for the ideal video conferencing experience are zoom in and zoom out, which at first look may appear trivial. Here, we’ll walk you through each step, in detail. Continue reading, and we’ll check your understanding of webcam zoom in and zoom out skills!
Way 1: Zoom with Windows Live Messenger
When utilizing a camera for video conferencing, you may zoom in on a user’s face to get rid of the background. Webcam settings are not accessible by default in Microsoft Windows. However, camera zoom settings may be changed in instant chat systems. Through an instant messaging tool, such as Windows Live Messenger, you may simply access these options. This application provides private offline chat, video messaging, image and video sharing, and video chatting.
Step1Start Windows Live Messenger on your PC or laptop first. Enter your login name and password by clicking the “Sign In” button.

Step2On the top menu bar, pick “Tools.” And then select the “Audio and Video Setup”. Drag the slider next to “Speaker” to modify the speaker volume. Drag the slider next to “Microphone” to modify the microphone sensitivity. Press “Next.”

Step3From the drop-down list, pick the webcam. The “Camera Control” option is situated on the top; pick “Webcam Settings” after that.
Step4Now, to alter the zoom settings, drag the “Zoom” slider. To zoom in or out, drag the slider to the left or right. Press “OK.”
Way 2: Use Windows 10 Camera App
Wondering how to zoom your camera in the Windows 10 Camera app? The Camera app enables you to zoom in or out on your webcam in both image and video modes. To accomplish so, click or push the Magnification button, and then use the slider to modify the webcam’s zoom level. To operate the zoom feature manually, pick “Manual Zoom.” In the preview window, a square appears when you pick this option. To zoom in on a specific region of the capture window, drag the square there. To expand the image that was acquired by the webcam, slide the slider bar. In simply, The Camera app enables you zoom in or out of photographs and movies shot with your webcam. To do this, click on the “Zoom” button and drag the slider to the left or right as appropriate on your Windows 10 camera. the following steps:
Step1To open the “Start Menu,” make a right-click on “Start.” Now, to access the Camera app, type “Camera App” into the start menu’s search box.

Step2Tap the Camera Control icon when you start or join a meeting. To zoom and pan the camera to the appropriate spot, utilize the icons on the Camera Control panel.
![]()
Step3To exit the Camera Control window and return to the Meeting Controls, touch outside of it.
Way 3: Zoom with YouCam
Unfortunately, the default cameras or webcams bundled with the majority of Windows laptops and desktops don’t have an automatic zoom option. In fact, the only method to adjust their crop is to switch from “Standard” to “Widescreen,” which does slightly zoom in on you but not in the manner we’d want. This makes it inescapable that the only method to manually alter a webcam’s magnification is to acquire one separately and apply its software settings. , like YouCam. YouCam provides video calling, streaming, and broadcasting. includes an integrated app. To employ Zoom with YouCam, refer to the methods given below:
Step1Launch the YouCam camera program and activate the webcam.

Step2In the camera preview window, pick Settings. Then, select “Enable Video Zoom” from the menu.
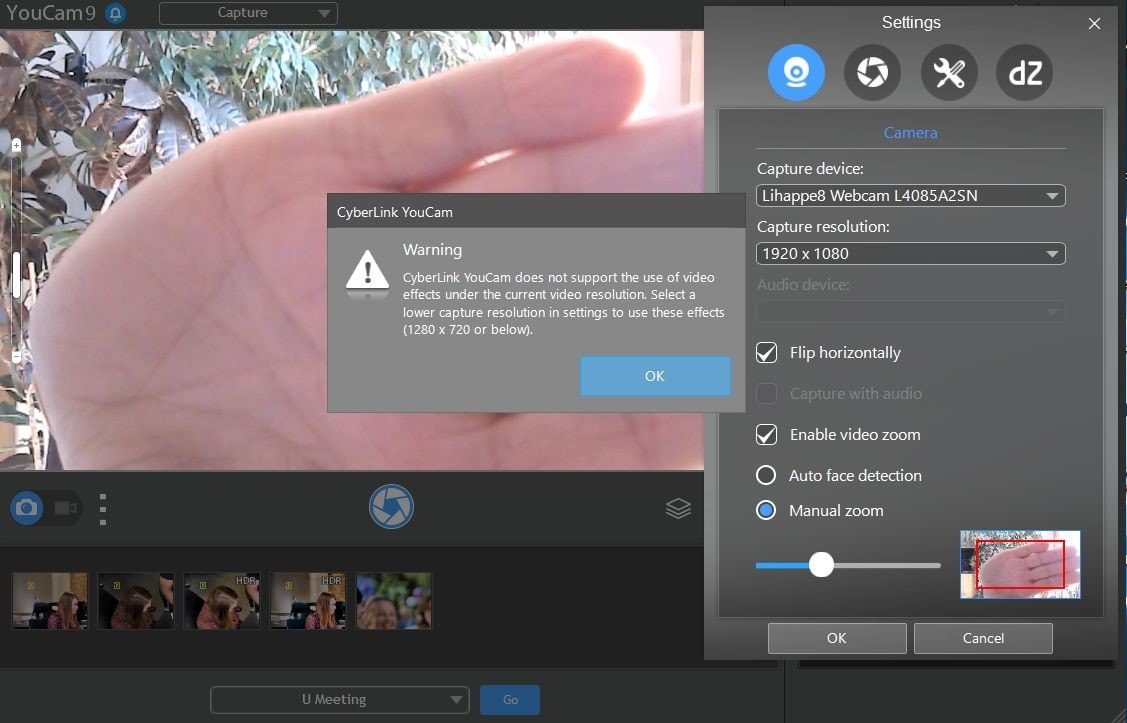
Step3Select “Automatic Face Detection” from the menu. As you wander about in the capture window, the camera watches your face and automatically zooms in on your photo as shown above.
Step4To handle the zoom feature manually, pick “Manual Zoom.” In the preview window, a square appears when you pick this option. To zoom in on a specific region of the capture window, drag the square there. To expand the image that was acquired by the webcam, slide the slider bar.

Way 4: Use iGlasses on Mac
For the perfect webcam look on a MAC, install the Chrome plugin iGlasses for video effects and style tweaks. Your videos will appear better on Zoom as a consequence. You may instantly enhance the appearance of your video interactions by utilizing the digital zoom on your iGlasses. Digital pan, tilt, and zoom are all possible with easy controls. For Macs that support it, an Apple Remote may be used to operate. iGlasses will become an option in Zoom’s video settings when it has been installed. You may improve your camera by altering the settings in iGlasses. You may experiment with a range of amusing effects, like 3-D distortions, using the virtual camera. Let’s learn how to utilize iGlasses on a Mac:
Step1Installing Ecamm’s iGlasses on a MacBook in the first step.
Step2To activate the camera, go to your video settings and pick iGlasses.
Step3Choose the Zoom window and execute the appropriate operations using the Zoom and Flip options. You may now zoom in and out using the camera on your MacBook as you like.

Conclusion
In conclusion, so many people currently take part in online conferences and virtual meetings. You want to create a lasting impression, don’t you? Not or whether you are the host of an online meeting or event, you must now maintain a professional image to prevent turning off attendees. You have discovered how to utilize the tools at your disposal to boost the zoom in and out quality of your camera in this post. However, as will be explained in the sections ahead, you may do it without the third-party plugins. With just one quick plugin, you can significantly transform how you look on a camera. Hence, try out the easy method from the above enlisted ones to get hold on your PC webcam to zoom in or out purposes.
Making certain our digital presence is the best it can be pays dividends as more and more of what we do online; similar is the case with how to zoom out webcam windows 10. The majority of experts advise against using the built-in camera that comes with your laptop or computer and instead advocate getting a webcam or an HD camera. These, however, may be hard to come by and pricy if you locate a nice one. If the built-in camera on your laptop doesn’t perform effectively during Zoom meetings, you may want to consider about investing in a separate, better webcam. Webcams offer automatic settings that are intended to function with the largest variety of lighting situations possible. This suggests that they average out a great number of responses to the content of the frame. Because of this, we have incorporated basic PC webcam zooming settings. These answers may be found in the portions that follow.
It’s vital to know how to zoom in on a webcam before visiting there. The camera wasn’t always as vital as it is today, and only very large corporations could afford to employ it as a convenience. But today, nearly everyone, from huge organizations to little firms, acknowledges its value. Everybody needs a webcam that works properly. The camera control software you are using determines the zoom function. The resolution of your picture window and the capabilities of the application dictate how far you can zoom in on the webcam’s video image. You can zoom in and out on camera photos using tools like YouCam and Windows Live Messenger. The most critical camera capabilities for the ideal video conferencing experience are zoom in and zoom out, which at first look may appear trivial. Here, we’ll walk you through each step, in detail. Continue reading, and we’ll check your understanding of webcam zoom in and zoom out skills!
Way 1: Zoom with Windows Live Messenger
When utilizing a camera for video conferencing, you may zoom in on a user’s face to get rid of the background. Webcam settings are not accessible by default in Microsoft Windows. However, camera zoom settings may be changed in instant chat systems. Through an instant messaging tool, such as Windows Live Messenger, you may simply access these options. This application provides private offline chat, video messaging, image and video sharing, and video chatting.
Step1Start Windows Live Messenger on your PC or laptop first. Enter your login name and password by clicking the “Sign In” button.
Step2On the top menu bar, pick “Tools.” And then select the “Audio and Video Setup”. Drag the slider next to “Speaker” to modify the speaker volume. Drag the slider next to “Microphone” to modify the microphone sensitivity. Press “Next.”
Step3From the drop-down list, pick the webcam. The “Camera Control” option is situated on the top; pick “Webcam Settings” after that.
Step4Now, to alter the zoom settings, drag the “Zoom” slider. To zoom in or out, drag the slider to the left or right. Press “OK.”
Way 2: Use Windows 10 Camera App
Wondering how to zoom your camera in the Windows 10 Camera app? The Camera app enables you to zoom in or out on your webcam in both image and video modes. To accomplish so, click or push the Magnification button, and then use the slider to modify the webcam’s zoom level. To operate the zoom feature manually, pick “Manual Zoom.” In the preview window, a square appears when you pick this option. To zoom in on a specific region of the capture window, drag the square there. To expand the image that was acquired by the webcam, slide the slider bar. In simply, The Camera app enables you zoom in or out of photographs and movies shot with your webcam. To do this, click on the “Zoom” button and drag the slider to the left or right as appropriate on your Windows 10 camera. the following steps:
Step1To open the “Start Menu,” make a right-click on “Start.” Now, to access the Camera app, type “Camera App” into the start menu’s search box.
Step2Tap the Camera Control icon when you start or join a meeting. To zoom and pan the camera to the appropriate spot, utilize the icons on the Camera Control panel.
![]()
Step3To exit the Camera Control window and return to the Meeting Controls, touch outside of it.
Way 3: Zoom with YouCam
Unfortunately, the default cameras or webcams bundled with the majority of Windows laptops and desktops don’t have an automatic zoom option. In fact, the only method to adjust their crop is to switch from “Standard” to “Widescreen,” which does slightly zoom in on you but not in the manner we’d want. This makes it inescapable that the only method to manually alter a webcam’s magnification is to acquire one separately and apply its software settings. , like YouCam. YouCam provides video calling, streaming, and broadcasting. includes an integrated app. To employ Zoom with YouCam, refer to the methods given below:
Step1Launch the YouCam camera program and activate the webcam.
Step2In the camera preview window, pick Settings. Then, select “Enable Video Zoom” from the menu.
Step3Select “Automatic Face Detection” from the menu. As you wander about in the capture window, the camera watches your face and automatically zooms in on your photo as shown above.
Step4To handle the zoom feature manually, pick “Manual Zoom.” In the preview window, a square appears when you pick this option. To zoom in on a specific region of the capture window, drag the square there. To expand the image that was acquired by the webcam, slide the slider bar.
Way 4: Use iGlasses on Mac
For the perfect webcam look on a MAC, install the Chrome plugin iGlasses for video effects and style tweaks. Your videos will appear better on Zoom as a consequence. You may instantly enhance the appearance of your video interactions by utilizing the digital zoom on your iGlasses. Digital pan, tilt, and zoom are all possible with easy controls. For Macs that support it, an Apple Remote may be used to operate. iGlasses will become an option in Zoom’s video settings when it has been installed. You may improve your camera by altering the settings in iGlasses. You may experiment with a range of amusing effects, like 3-D distortions, using the virtual camera. Let’s learn how to utilize iGlasses on a Mac:
Step1Installing Ecamm’s iGlasses on a MacBook in the first step.
Step2To activate the camera, go to your video settings and pick iGlasses.
Step3Choose the Zoom window and execute the appropriate operations using the Zoom and Flip options. You may now zoom in and out using the camera on your MacBook as you like.
Conclusion
In conclusion, so many people currently take part in online conferences and virtual meetings. You want to create a lasting impression, don’t you? Not or whether you are the host of an online meeting or event, you must now maintain a professional image to prevent turning off attendees. You have discovered how to utilize the tools at your disposal to boost the zoom in and out quality of your camera in this post. However, as will be explained in the sections ahead, you may do it without the third-party plugins. With just one quick plugin, you can significantly transform how you look on a camera. Hence, try out the easy method from the above enlisted ones to get hold on your PC webcam to zoom in or out purposes.
The Complete Guide to Slideshow Maker with Music
The Ultimate Guide to Slideshow Maker with Music
An easy yet powerful editor
Numerous effects to choose from
Detailed tutorials provided by the official channel
A slideshow maker can also work towards developing an engaging professional presentation. Something to pique the interest of your co-workers at your next meeting or persuade potential clients that you are the best choice for their business.
If the tool you’re using doesn’t include a simple drag-and-drop feature, extensive formatting options, or smooth transitions, coming up with a customised slideshow can take a long time. As a result, we researched and reviewed the finest slideshow-creating software for Windows and Mac, apps for iPhone and Android, as well as an online slideshow maker with music.
In this article
01 [5 Slideshows Created with Music Software](#Part 1)
02 [The Top 5 Apps for Creating a Music Slideshow](#Part 2)
03 [5 Online Slideshows Made with Music Maker](#Part 3)
04 [How to Create a Photo Slideshow with Music](#Part 4)
Part 1 Slideshows Created with Music Software
● SmartSHOW in 3D
SmartSHOW 3D allows you to combine your favourite photos and music to create amazing presentations to share with friends and family. You don’t need to have any technical knowledge to add motion to your still photographs. Fade-ins, wipes, gradients, and 3D transitions are some of the transition effects you can use. Even if you’re not tech-savvy, SmartSHOW 3D allows you to create a professional slideshow with music.

Compatibility: Windows
Features:
● Make slideshows from photos, videos, and music.
● Effects and templates
● Various music tracks
● Burn the DVD after it has been converted to DVD format.
● PhotoStage Slideshow Creator
PhotoStage is another software programme for creating slideshows. Thousands of photographs and video snippets can be used to create presentations. Text, effects, music, and voice-over can all be easily added. Brightness, saturation, colour, and other aspects of your photographs and movies can all be tweaked.
Quick Create allows you to quickly create a slideshow, including pans, zooms, and fades. After that, you can burn your slideshow on a CD, upload it to the internet, or save it.

Compatibility: Windows, Mac.
Features:
● The Slidehow Wizard
● Image editing software
● Effects and transitions
● Optimize for the web and mobile devices, burn to a DVD, or save as a video.
● Kizoa-Slideshow Maker Online
Adapt your slides to any screen with up to seven different aspect ratios with Kizoa. No matter what kind of TV, computer, smartphone, or tablet you use, you’ll have the standard size slideshow.
The intelligent cropping tool will recommend the optimal cropping option for your photos based on the format you select, allowing you to fill the screen as much as possible without leaving out important details.

Compatibility: Windows, Mac.
Features:
● Seven different aspect ratios are available.
● Slideshows can be viewed on television.
● Variety of formats.
● PowerDirector
There are hundreds of transitions, video effects, and themed slideshow templates to pick from in this free slideshow maker. Instead of generic slides and monotonous text, professionals may use PowerDirector to create compelling corporate slideshows for meetings, professional showcases, and industry conferences.

Compatibility: Windows, Mac.
Features:
● Interfaces for Storyboards, Timelines, and Slideshows
● Overlays, titles, and transitions
● The ability to generate a wide range of visual effects
● Audio and colour correction software.
● SlideLab
The high-quality transitions, filters, and music in SlideLab make it a great choice for beginners who enjoy sharing their lives with their friends. The app also includes a built-in sharing platform that allows users to make and share films on Instagram or YouTube with a single swipe.
SlideLab has the ability to export projects as PDF and PPTX files, which can then be opened in PowerPoint and Keynote.

Compatibility: Windows, Mac
Features:
● Professional interactive presentations.
● Workflow and export are both simple.
● Share it with one click.
Part 2 The Top 5 Apps for Creating a Music Slideshow
Here are five of the greatest free slideshow makers with music applications for iPhone users to check out:
01SlideLab
SlideLab is a fantastic presentation software with music. According to Vine and Instagram, you can change the start point of your music or the length of the slideshow video.
The programme also includes fantastic features that make your job easier. Awesome photo filters, various transitions, photo zooming, cropping, rotating, and flipping tools, and more are included.

02Pic Music
Pic Music is one of the most popular slideshow, video, and quotation generators for SnapChat, Instagram, Tumblr, and Viddy. The entertaining and user-friendly app lets you combine music and images to create a film.
Users can upload music from their libraries or record their own voices, and they can even select which part of the audio/song to play. Slideshow previews will also be available within the app.

03Filmora
The quick and easy video editor is ideal for mixing video clips, images, effects, and audio into a single film. In comparison to other alternatives, it enables users to incorporate lengthier popular music snippets, and users can choose the right soundtrack for their videos.
After you’ve downloaded Filmora, you’ll be able to take use of its extensive features, which will make your job easier. It allows you to apply filters, reorder your greatest bits, zoom and crop your videos/photos, combine selfies/snaps into a single film with your favorite song, and publish the resulting slideshow video to practically all social media sites, among other things.

04Slide-show video maker
Slide-show Video Maker is an excellent choice if you want to make photo or video slideshows from your Photo Library, Instagram, or Facebook and afterwards add your own music. It allows you to quickly and easily create slideshow videos.
Simply choose your videos and photographs, add transitions and music, choose the slideshow duration, filters, and text if wanted.

05Animoto
Animoto lets you create slideshow films with music using various video clips and photographs from your camera roll or iCloud.
The software includes a built-in music library with hundreds of songs, over 50 slick video styles to pick from, a video clip cutter, captions for photographs, intro cards, and several other useful features. Email, SMS, Facebook, and Twitter can all be used to share the final slideshow videos.

Here are 5 of the greatest video slideshow generator apps for Android users to download for free:
06Magisto Video Editor
Magisto Video Editor turns videos and photos into marvelous video stories that you can share with your friends and family. After you’ve uploaded photographs or videos from your gallery, the app lets you to add music from the Magisto music library or your iPhone to create a stunning presentation. You may then send them to your friends and family via WhatsApp, YouTube, Facebook and Instagram.

07KlipMix Free Video Editor
KlipMix is a fantastic, user-friendly tool. In just a minute, anyone can combine several photos/videos, add their preferred music, and make an incredible slideshow presentation. It allows you to change the duration of each photo or video’s display, unselect and rearrange photos with touch and drag and share the final slideshow video with family and friends.

08Slidegram
You can upload 100 photographs at a time and combine them in one video with Slidegram loaded on your smartphone. The slideshow pictures with music consists of only a few stages, including selecting photographs from a gallery, previewing and sorting them, adding your favorite music, setting the slideshow video’s time, and sharing it on social media.

09PicMotion
PicMotion makes professional video slideshows and photo slideshows with music that can be uploaded on any social networking platform. After installing the programme, you may build slideshows from photos or videos and enhance them by adding music from your collection or recording and adding your charming voice to the movie.

10Slideshow Maker
This music slideshow programme is simple to use, and everyone can make beautiful videos from images in under a minute. It’s absolutely free, and your slideshows will not have a watermark. Users can add their preferred music to the slideshow and the finished product can be shared with their friends on YouTube or Facebook. The f t Free Slideshow Maker enables you to rotate images, unselect and reorganize them using touch and drag, as well as change the duration of each picture’s display.

Part 3 Online Slideshows Made with Music Maker
01FlexClip
FlexClip is a music-and-effects-enabled internet slideshow creator. It’s at the top because current video templates allow anyone to make a slideshow by dragging and dropping, and effects like transitions, animations, filters, frames, and extensive music resources can help those who are specialists in slideshow creation realize all of their ideas. Aside from that, all layouts, effects, and music are completely free!

Features:
● Watermark free
● Supports HD resolution
02Renderforest
Professional presentation software Renderforest promotes simplicity as well. Choose a stunning template, and then add photographs and music to complete your photo slideshow. It features a lot of 3D effects that make your presentation look more professional. The music selection may be limited.

Features:
● Beautiful templates are available on.
● Making a photo slideshow is quite simple.
03Smilebox
Smilebox’s slideshow creator has templates for any event, including family gatherings, holidays, and simply for fun. You may need to upgrade to the premium edition of this slideshow generator to gain access to the music collection and some effects.

Features:
● The user interface is simple and straightforward.
● Numerous templates to choose from.
● All templates are categorized so you can quickly find the ones you need.
04Motionden
Motionden includes a large picture media library and numerous stunning templates. It’s also a three-step slideshow builder that you can use to quickly create a slideshow.

Features:
● All of the templates are lovely.
● All of the templates have intros so you know where to use them.
05Kizoa
Kizoa allows you to make slideshows with images, movies, and music, which you can then distribute via email, blogs, Facebook, YouTube, or even burn to DVD. Its key features include the ability to add text, music, transitions, and effects. Although it has a lot of music and materials, you have to upgrade to get access to them.

Features:
● Beginners friendly.
● The slideshow templates from Kizoa are excellent.
Part 4 How to Create a Photo Slideshow with Music
If you’re looking for the greatest free slideshow software, we’d recommend Wondershare Filmora Video Editor . It makes it simple to generate high-quality videos as well as slideshows. Furthermore, its user-friendly interface and extensive feature set make it suitable for users of all skill levels, allowing anyone to create a video slideshow in only a few minutes.
For Win 7 or later (64-bit)
For macOS 10.12 or later
The benefits of using Filmora to create a video slideshow include:
The sound effects and music tracks in the royalty-free audio library are suitable for a variety of scenarios.
● There are a lot of transitions and filters to make the slideshow look amazing.
● There are various text templates to help you annotate more effectively.
Let your imagination run wild with editing tools that are both powerful and easy to use.
Step 1: Uploading Images and Videos to Filmora
Once the video editor has loaded, go to the Media tab’s Import menu and select Import a Media Folder. Navigate to the folder containing the materials for your slideshow, select it with a click, then hit OK to import it into your project.
Step 2: Position the Media Files on the Timeline
Simply select a file to be added to the timeline and drag and drop it to the preferred location. Repeat this method for all of the images you’d like to include in your slideshow, then organise them in the same order as they’ll appear in the presentation.
Step 3: Avoid Hard Cuts Between Slides by Using Transitions
A hard cut between two photographs can break the flow of your slideshow, but you can simply correct this by transitioning gently from one slide to the next.
If you double-click a transition after it’s been added to the timeline, you’ll be sent to the Transition Setting Window, where you can define the default duration for all transitions you add to a slideshow and choose your preferred transition mode.
Step 4: Enhance the colours in your slideshow with filters and overlays.
The Effects tab, which is next to the Transitions tab, contains a variety of visual effects that desaturate or brighten the colours in your images. Filmora’s visual effects are divided into filter and overlay categories, each with its own subcategories such as Lomography, Sepia Tone, and Light Leaks.
Step 5: Incorporating Motion Graphics Elements into Slides
Hundreds of motion graphics templates are available in the Elements tab, which you can rapidly add to the timeline.
Step 6: Creating Slideshow Soundtracks and Recording Voiceovers
Select the Record Voiceover tool from the Record drop-down menu on the Media tab. When the Record Audio window appears on the screen, select the microphone you’ll use to record the narration and press the Record button.
You may use Filmora’s large library of music and sound effects for free. Simply navigate to the Audio tab and browse the subcategories of Electronic, Young & Bright, and Rock until you select the perfect song for the slideshow’s soundtrack.
Step 7: Exporting Slideshows from Filmora
The final step in the process of creating a slideshow in Filmora is to export the project. Click on the Export button and wait for the Export window to appear on the screen. You can then select the output file format, set a preferred frame rate or resolution for your slideshow, or export
● Ending Thoughts →
● Bye-bye to the limits and restraints of other slideshow creators.
● Instead, download the slideshow generator with music that suits your needs and requirements from our revised apps and software today and start producing unique, customized slideshows.
● Let us know what we missed and stay in touch with us for more such blogs.
A slideshow maker can also work towards developing an engaging professional presentation. Something to pique the interest of your co-workers at your next meeting or persuade potential clients that you are the best choice for their business.
If the tool you’re using doesn’t include a simple drag-and-drop feature, extensive formatting options, or smooth transitions, coming up with a customised slideshow can take a long time. As a result, we researched and reviewed the finest slideshow-creating software for Windows and Mac, apps for iPhone and Android, as well as an online slideshow maker with music.
In this article
01 [5 Slideshows Created with Music Software](#Part 1)
02 [The Top 5 Apps for Creating a Music Slideshow](#Part 2)
03 [5 Online Slideshows Made with Music Maker](#Part 3)
04 [How to Create a Photo Slideshow with Music](#Part 4)
Part 1 Slideshows Created with Music Software
● SmartSHOW in 3D
SmartSHOW 3D allows you to combine your favourite photos and music to create amazing presentations to share with friends and family. You don’t need to have any technical knowledge to add motion to your still photographs. Fade-ins, wipes, gradients, and 3D transitions are some of the transition effects you can use. Even if you’re not tech-savvy, SmartSHOW 3D allows you to create a professional slideshow with music.
Compatibility: Windows
Features:
● Make slideshows from photos, videos, and music.
● Effects and templates
● Various music tracks
● Burn the DVD after it has been converted to DVD format.
● PhotoStage Slideshow Creator
PhotoStage is another software programme for creating slideshows. Thousands of photographs and video snippets can be used to create presentations. Text, effects, music, and voice-over can all be easily added. Brightness, saturation, colour, and other aspects of your photographs and movies can all be tweaked.
Quick Create allows you to quickly create a slideshow, including pans, zooms, and fades. After that, you can burn your slideshow on a CD, upload it to the internet, or save it.
Compatibility: Windows, Mac.
Features:
● The Slidehow Wizard
● Image editing software
● Effects and transitions
● Optimize for the web and mobile devices, burn to a DVD, or save as a video.
● Kizoa-Slideshow Maker Online
Adapt your slides to any screen with up to seven different aspect ratios with Kizoa. No matter what kind of TV, computer, smartphone, or tablet you use, you’ll have the standard size slideshow.
The intelligent cropping tool will recommend the optimal cropping option for your photos based on the format you select, allowing you to fill the screen as much as possible without leaving out important details.
Compatibility: Windows, Mac.
Features:
● Seven different aspect ratios are available.
● Slideshows can be viewed on television.
● Variety of formats.
● PowerDirector
There are hundreds of transitions, video effects, and themed slideshow templates to pick from in this free slideshow maker. Instead of generic slides and monotonous text, professionals may use PowerDirector to create compelling corporate slideshows for meetings, professional showcases, and industry conferences.
Compatibility: Windows, Mac.
Features:
● Interfaces for Storyboards, Timelines, and Slideshows
● Overlays, titles, and transitions
● The ability to generate a wide range of visual effects
● Audio and colour correction software.
● SlideLab
The high-quality transitions, filters, and music in SlideLab make it a great choice for beginners who enjoy sharing their lives with their friends. The app also includes a built-in sharing platform that allows users to make and share films on Instagram or YouTube with a single swipe.
SlideLab has the ability to export projects as PDF and PPTX files, which can then be opened in PowerPoint and Keynote.
Compatibility: Windows, Mac
Features:
● Professional interactive presentations.
● Workflow and export are both simple.
● Share it with one click.
Part 2 The Top 5 Apps for Creating a Music Slideshow
Here are five of the greatest free slideshow makers with music applications for iPhone users to check out:
01SlideLab
SlideLab is a fantastic presentation software with music. According to Vine and Instagram, you can change the start point of your music or the length of the slideshow video.
The programme also includes fantastic features that make your job easier. Awesome photo filters, various transitions, photo zooming, cropping, rotating, and flipping tools, and more are included.
02Pic Music
Pic Music is one of the most popular slideshow, video, and quotation generators for SnapChat, Instagram, Tumblr, and Viddy. The entertaining and user-friendly app lets you combine music and images to create a film.
Users can upload music from their libraries or record their own voices, and they can even select which part of the audio/song to play. Slideshow previews will also be available within the app.
03Filmora
The quick and easy video editor is ideal for mixing video clips, images, effects, and audio into a single film. In comparison to other alternatives, it enables users to incorporate lengthier popular music snippets, and users can choose the right soundtrack for their videos.
After you’ve downloaded Filmora, you’ll be able to take use of its extensive features, which will make your job easier. It allows you to apply filters, reorder your greatest bits, zoom and crop your videos/photos, combine selfies/snaps into a single film with your favorite song, and publish the resulting slideshow video to practically all social media sites, among other things.
04Slide-show video maker
Slide-show Video Maker is an excellent choice if you want to make photo or video slideshows from your Photo Library, Instagram, or Facebook and afterwards add your own music. It allows you to quickly and easily create slideshow videos.
Simply choose your videos and photographs, add transitions and music, choose the slideshow duration, filters, and text if wanted.
05Animoto
Animoto lets you create slideshow films with music using various video clips and photographs from your camera roll or iCloud.
The software includes a built-in music library with hundreds of songs, over 50 slick video styles to pick from, a video clip cutter, captions for photographs, intro cards, and several other useful features. Email, SMS, Facebook, and Twitter can all be used to share the final slideshow videos.
Here are 5 of the greatest video slideshow generator apps for Android users to download for free:
06Magisto Video Editor
Magisto Video Editor turns videos and photos into marvelous video stories that you can share with your friends and family. After you’ve uploaded photographs or videos from your gallery, the app lets you to add music from the Magisto music library or your iPhone to create a stunning presentation. You may then send them to your friends and family via WhatsApp, YouTube, Facebook and Instagram.
07KlipMix Free Video Editor
KlipMix is a fantastic, user-friendly tool. In just a minute, anyone can combine several photos/videos, add their preferred music, and make an incredible slideshow presentation. It allows you to change the duration of each photo or video’s display, unselect and rearrange photos with touch and drag and share the final slideshow video with family and friends.
08Slidegram
You can upload 100 photographs at a time and combine them in one video with Slidegram loaded on your smartphone. The slideshow pictures with music consists of only a few stages, including selecting photographs from a gallery, previewing and sorting them, adding your favorite music, setting the slideshow video’s time, and sharing it on social media.
09PicMotion
PicMotion makes professional video slideshows and photo slideshows with music that can be uploaded on any social networking platform. After installing the programme, you may build slideshows from photos or videos and enhance them by adding music from your collection or recording and adding your charming voice to the movie.
10Slideshow Maker
This music slideshow programme is simple to use, and everyone can make beautiful videos from images in under a minute. It’s absolutely free, and your slideshows will not have a watermark. Users can add their preferred music to the slideshow and the finished product can be shared with their friends on YouTube or Facebook. The f t Free Slideshow Maker enables you to rotate images, unselect and reorganize them using touch and drag, as well as change the duration of each picture’s display.
Part 3 Online Slideshows Made with Music Maker
01FlexClip
FlexClip is a music-and-effects-enabled internet slideshow creator. It’s at the top because current video templates allow anyone to make a slideshow by dragging and dropping, and effects like transitions, animations, filters, frames, and extensive music resources can help those who are specialists in slideshow creation realize all of their ideas. Aside from that, all layouts, effects, and music are completely free!
Features:
● Watermark free
● Supports HD resolution
02Renderforest
Professional presentation software Renderforest promotes simplicity as well. Choose a stunning template, and then add photographs and music to complete your photo slideshow. It features a lot of 3D effects that make your presentation look more professional. The music selection may be limited.
Features:
● Beautiful templates are available on.
● Making a photo slideshow is quite simple.
03Smilebox
Smilebox’s slideshow creator has templates for any event, including family gatherings, holidays, and simply for fun. You may need to upgrade to the premium edition of this slideshow generator to gain access to the music collection and some effects.
Features:
● The user interface is simple and straightforward.
● Numerous templates to choose from.
● All templates are categorized so you can quickly find the ones you need.
04Motionden
Motionden includes a large picture media library and numerous stunning templates. It’s also a three-step slideshow builder that you can use to quickly create a slideshow.
Features:
● All of the templates are lovely.
● All of the templates have intros so you know where to use them.
05Kizoa
Kizoa allows you to make slideshows with images, movies, and music, which you can then distribute via email, blogs, Facebook, YouTube, or even burn to DVD. Its key features include the ability to add text, music, transitions, and effects. Although it has a lot of music and materials, you have to upgrade to get access to them.
Features:
● Beginners friendly.
● The slideshow templates from Kizoa are excellent.
Part 4 How to Create a Photo Slideshow with Music
If you’re looking for the greatest free slideshow software, we’d recommend Wondershare Filmora Video Editor . It makes it simple to generate high-quality videos as well as slideshows. Furthermore, its user-friendly interface and extensive feature set make it suitable for users of all skill levels, allowing anyone to create a video slideshow in only a few minutes.
For Win 7 or later (64-bit)
For macOS 10.12 or later
The benefits of using Filmora to create a video slideshow include:
The sound effects and music tracks in the royalty-free audio library are suitable for a variety of scenarios.
● There are a lot of transitions and filters to make the slideshow look amazing.
● There are various text templates to help you annotate more effectively.
Let your imagination run wild with editing tools that are both powerful and easy to use.
Step 1: Uploading Images and Videos to Filmora
Once the video editor has loaded, go to the Media tab’s Import menu and select Import a Media Folder. Navigate to the folder containing the materials for your slideshow, select it with a click, then hit OK to import it into your project.
Step 2: Position the Media Files on the Timeline
Simply select a file to be added to the timeline and drag and drop it to the preferred location. Repeat this method for all of the images you’d like to include in your slideshow, then organise them in the same order as they’ll appear in the presentation.
Step 3: Avoid Hard Cuts Between Slides by Using Transitions
A hard cut between two photographs can break the flow of your slideshow, but you can simply correct this by transitioning gently from one slide to the next.
If you double-click a transition after it’s been added to the timeline, you’ll be sent to the Transition Setting Window, where you can define the default duration for all transitions you add to a slideshow and choose your preferred transition mode.
Step 4: Enhance the colours in your slideshow with filters and overlays.
The Effects tab, which is next to the Transitions tab, contains a variety of visual effects that desaturate or brighten the colours in your images. Filmora’s visual effects are divided into filter and overlay categories, each with its own subcategories such as Lomography, Sepia Tone, and Light Leaks.
Step 5: Incorporating Motion Graphics Elements into Slides
Hundreds of motion graphics templates are available in the Elements tab, which you can rapidly add to the timeline.
Step 6: Creating Slideshow Soundtracks and Recording Voiceovers
Select the Record Voiceover tool from the Record drop-down menu on the Media tab. When the Record Audio window appears on the screen, select the microphone you’ll use to record the narration and press the Record button.
You may use Filmora’s large library of music and sound effects for free. Simply navigate to the Audio tab and browse the subcategories of Electronic, Young & Bright, and Rock until you select the perfect song for the slideshow’s soundtrack.
Step 7: Exporting Slideshows from Filmora
The final step in the process of creating a slideshow in Filmora is to export the project. Click on the Export button and wait for the Export window to appear on the screen. You can then select the output file format, set a preferred frame rate or resolution for your slideshow, or export
● Ending Thoughts →
● Bye-bye to the limits and restraints of other slideshow creators.
● Instead, download the slideshow generator with music that suits your needs and requirements from our revised apps and software today and start producing unique, customized slideshows.
● Let us know what we missed and stay in touch with us for more such blogs.
An Intro Video Describing You and Your Content Is the First and the Foremost Thing Which a Viewer Sees. Thinking of How to Make an Interesting Intro Video, This Blog Is Surely a Supportive Guide for You. Learn More Here
You scroll through different social media platforms which lead you to different bloggers and content creators who introduce themselves through the precise intro videos. It the point where a viewer either turns towards or turns away from a person presenting a brand or a business. Intro videos are a must, particularly when you are new in business and promotions. Bringing your story to life in your intro video requires a propaganda to ensure that it evokes feelings of trust, confidence, and curiosity among your target viewers.
The pillar on which a striking intro videos stands is not just a monotonous visualization with poor graphics and music. It requires expertise and moreover, it requires a ‘point’. Your boring intro video would be purposeless for the people who’re watching it. Each second, you express something new, yet filled with intricate details about your work and brand. Let’s dig in a little deeper to know how exactly your introduction video will generate leads and connects you with your target audience.
Part 1: Why Intro Video is Important
An intro video, just like it sounds, is an introduction of your brand, your content or anything that you’re promoting. It appears as soon as the viewers are all set to explore your content and brand. To make the viewer’s first glimpse of your work worthwhile, it is crucial that you explain your value preposition through a precise and appealing intro video. It is through the intro videos that your work is noticed and promoted. It is important to create a story highlight for your viewers while you’re setting the decorum of your business, brand or other content.
Additionally, your video must fulfill components of a striking intro video. Whatever you are trying to say should be clear in your video. Besides being clear enough, your intro video must be short, precise and goal-oriented. You are attracting viewers so make their view purposeful with your intro video which should tell your story. The intro video, if presented flawlessly, can captivate the visitors to interact with you and can even inspire them to add into the growth of your business/content. In a nutshell, an intro video brings your business to life, increase your boost and grabs your visitors’ attention.
Part 2: When to Use Intro Video
Apart from a variety of benefits it offers, the intro video basically forms the balusters of your brand or content. Intro videos are commonly used in the following domains:
Boost Sales : Incorporating a precise piece of work in the form of an intro video can help you boost sales magically. It is far the most effective strategy you company or brand can adopt. Your brief intro video can tell your story and convey your message in an emotional and dramatic way, which consequently attracts more viewers and ultimately, results in the boost of your sales. It is just as similar to you playing with the minds of your audience. A higher audience engagement due to your intro video can definitely prove that intro video is an asset which you can offer in addition to your marketing strategies.

More Social Shares: Social media is undoubtedly far the most highly competitive space for your brands and businesses to work like magic. It is insane how brands and businesses are promoted on the tip of your fingers by sharing the gist of your work. That gist, is of course what we are talking about here in this article. Intro videos are brief and appealing which can easily by shared over multiple platforms. The more the social shares of your intro video, the more you receive the nectar of your input.

Build Personality: If you’re socially awkward or on the contrary, a social freak; the intro video covers you all. Whoever you are and whatever you do, is most creatively presented through a precise intro video. The intricately woven description of your work in an intro video definitely does wonders. People see you through your work and they see your work and you simultaneously through an intro video, then why risk creating it conventionally?

Increase Brand Awareness: Creating a brand awareness video which narrates your story in a presentable manner is like wining the internet’s mode of lottery. A thoroughly considered and precise piece of your intro video can go viral at an unbelievable pace and before you even know, your marketing has done wonders all over the digital media. What is your brand, what it offers, how it benefits you and who is the target audience; all these queries are explained through a short intro video which would ultimately result in your brand recognition and thus the growth.

Part 3: Best Intro Video Maker
Out there, the market is jam-packed with people witnessing millions of videos on different media platforms every day. This only leads to crowded digital market but only your intro video can stand out and flaunt your work charmingly. Filmora is one best choice to professionally craft your intro video which can give your brand a head start in no time.
Wondershare Filmora is a time effective and easy to use video editing software that enable the users to create variety of videos by choosing among some great presets and powerful editing tools. Maintaining and improving the quality of videos, Filmora enables the users to choose across a variety of different video editing features. This video editing software is developed by Wondershare and it includes features for a range of users from beginner to intermediate levels.

For a composition of your intro video, Filmora is the best go-to software so why wait another minute? Currently, Filmora is compatible with Windows and macOS computers. Some of the features offered by Filmora include the following:
Rich Intro Templates
A wide variety of professionally crafted templates are available on your fingertips so instead of conventionally editing your videos, get your hands on the stunning templates offered by Filmora. Filmora is equipped with multiple templates which provide the users a plethora of options when it comes to customizing videos. These templates are easy to use and your intro videos can turn into a magic movie with presets offered by Filmora so grab your setup today and enjoy the affordable software now.

Numerous Video Effects
Importing media and editing it on the timeline to create a compelling tale is the first step in a video editor’s post-production process. Following those foundational steps, an editor applies various effects to the video in order to fix issues, improve mood, intensify suspense, and add magic to the video. Filmora offers a great variety of customizable filters, effects, transitions and the best part? You don’t even have to be a pro to use these effects.

Title Editing
Filmora enables the intro video makers to adorn the titles of their videos by selecting among multiple text editing options. Both short videos and full-length movies must have opening titles and closing credits. You may catch the audience’s attention from the first frame of your video by coming up with inventive methods to employ text which precisely conveys the tale of your film. You may utilize more than a hundred text settings in Filmora’s Titles tab to add text to the video.

Text to Speech/STT
Speaking in your videos may increase engagement and make it simpler for viewers to grasp what you’re saying. But how can you add audio without first recording it? Are you considering hiring a voice actor? Don’t worry! Filmora got your back by offering Text to Speech (TTS) function, which enables the users to add voice to your video. Filmora automatically transcripts your text files into speech on the click of a button.

Audio Editing
Filmora additionally offers an audio panel where the software helps to manipulate audio added to your intro videos. The audio editing feature of Filmora enables users to improve the quality of the audio, to remove unwanted noises, balance pitch or change the length of a particular audio file.

Part 4: How to Create Intro Videos
To maintain consistency and to provide your brand with a unique identity, it is essential to carefully craft an intro video. Following is a step-by-step guide through which you can get your hands on this effective video editing software:
Free Download For Win 7 or later(64-bit)
Free Download For macOS 10.14 or later
Step1Download and Install the Software
The first step in creating an intro video requires the user to download and install the Filmora software in Windows or MacOS computers. To download the setup, go to https://filmora.wondershare.com/ and click ‘Download’. Afterwards, when the setup is downloaded, run the setup and install Filmora on your computer:

Step2Add Color Templates
After installing, wait until the installation is finished. Launch Wondershare Filmora and go to MEDIA tab at the top left of the interface and select the best suitable background color for your intro video from the dropdown menu in the MEDIA tab. Drag your cursor over the tile of the color you wish to use as a background and click to add the icon that appears in the center to add it to the timeline.

Additionally, if you don’t prefer the preset backgrounds and colors, Filmora lets you use your own background image or video clip. For this, select PROJECT MEDIA > click anywhere inside the media window > import media file of your choice. After importing the file, click on the imported file to add it to the timeline.
Step3Select and add audio effect to your Intro Video
Your video automatically grasps a lot of viewers’ attention with a spice of some music/audio in the background. To adorn your intro video further, you can add audio/music effect to your intro video using the inbuilt music and sound effects from the library. If you want to listen to a track from the inbuilt library collection of audio and music, double click on the thumbnail.

Click the AUDIO tab. Choose from Recommended audio files or import your own audio. Once, you find your desired audio/music file, drag and drop it to the audio track below the video.
Step4Add Text/Logo to your Intro Video
Click the ‘TITLE’ tab. To customize, choose title options from Recommended or add your own custom design. To change, format, and animate the text as needed, click on your desired preset or custom title and double click or drag it to the bottom area of the main library to insert a title.
Also, you need to adjust the position and duration of the title to get a better view. In the intro video, it is recommended to add your logo or slogan as well. To add your logo, drag and drop it to the track above the video, and adjust its position and size.
Step5Add Effects to your Intro Video
Go to ‘EFFECTS’ tab, choose a category from the top-left pane, and click and drag your preferred effect from the Effects library to the timeline. Adjust the playback duration by dragging the right handle of the track in the timeline as explained above. Optionally, double-click the Effects track to customize the appearance as needed.
Step6Export the Intro and Add to Shared Media
Once you’re done making your intro video, click on the ‘EXPORT’ tab in the center > go to LOCAL tab on export box > choose your preferred output format (e.g., MP4) > adjust other preferences such as destination location, resolution etc. from the right pane of the box > Click EXPORT.

Free Download For macOS 10.14 or later
Step1Download and Install the Software
The first step in creating an intro video requires the user to download and install the Filmora software in Windows or MacOS computers. To download the setup, go to https://filmora.wondershare.com/ and click ‘Download’. Afterwards, when the setup is downloaded, run the setup and install Filmora on your computer:
Step2Add Color Templates
After installing, wait until the installation is finished. Launch Wondershare Filmora and go to MEDIA tab at the top left of the interface and select the best suitable background color for your intro video from the dropdown menu in the MEDIA tab. Drag your cursor over the tile of the color you wish to use as a background and click to add the icon that appears in the center to add it to the timeline.
Additionally, if you don’t prefer the preset backgrounds and colors, Filmora lets you use your own background image or video clip. For this, select PROJECT MEDIA > click anywhere inside the media window > import media file of your choice. After importing the file, click on the imported file to add it to the timeline.
Step3Select and add audio effect to your Intro Video
Your video automatically grasps a lot of viewers’ attention with a spice of some music/audio in the background. To adorn your intro video further, you can add audio/music effect to your intro video using the inbuilt music and sound effects from the library. If you want to listen to a track from the inbuilt library collection of audio and music, double click on the thumbnail.
Click the AUDIO tab. Choose from Recommended audio files or import your own audio. Once, you find your desired audio/music file, drag and drop it to the audio track below the video.
Step4Add Text/Logo to your Intro Video
Click the ‘TITLE’ tab. To customize, choose title options from Recommended or add your own custom design. To change, format, and animate the text as needed, click on your desired preset or custom title and double click or drag it to the bottom area of the main library to insert a title.
Also, you need to adjust the position and duration of the title to get a better view. In the intro video, it is recommended to add your logo or slogan as well. To add your logo, drag and drop it to the track above the video, and adjust its position and size.
Step5Add Effects to your Intro Video
Go to ‘EFFECTS’ tab, choose a category from the top-left pane, and click and drag your preferred effect from the Effects library to the timeline. Adjust the playback duration by dragging the right handle of the track in the timeline as explained above. Optionally, double-click the Effects track to customize the appearance as needed.
Step6Export the Intro and Add to Shared Media
Once you’re done making your intro video, click on the ‘EXPORT’ tab in the center > go to LOCAL tab on export box > choose your preferred output format (e.g., MP4) > adjust other preferences such as destination location, resolution etc. from the right pane of the box > Click EXPORT.
If You Are Trying to Create a Countdown Effect, but You’re Not Sure Where to Start, Then This Post Is Going to Show You some Ways to Create a Countdown Animation for Your Videos
Many online marketers find that the animated countdown timer is the perfect way to bring a visual element to their videos while maintaining the quality and effectiveness of the video itself.
There are many ways to show a countdown timer on videos using animated GIFs. But they can be hard to implement or could cost a lot of money. You can use some free services, but they are limited in terms of features.
But not to worry, this post will go through a detailed process of creating an animated timer with 3 different methods. Before that, let’s discuss the benefits of using a timer for videos.
- Method 1: Make a Countdown Animation with a Professional Video Editing Software
- Method 2: Generate the timer with Free Online Countdown Timer Video Generators
- Method 3: Make a Countdown Timer with a Graphic Design Platform
- Cool Countdown
- Fitness Countdown
- Cinematic Countdown
- Neon Countdown
- Cyber Countdown
- Digital Countdown Pack
- Big Metal Countdown
- Glitch Countdown Transition
- Countdown To New Year
- Flashing Light Countdown
What are the benefits of using a countdown timer for videos/live streams?
Countdowns are a great way to get your message across and get your viewers excited about your product or service. A countdown timer provides a very simple visual cue to help motivate yourself and your audience to start watching the video.
It also works well with vlogs and YouTube, seamlessly transitioning from one part of your video to the next. This works best when your video isn’t about the product itself (but rather a review, a demo, or something else that lends itself well to a countdown).
As you can see, the Vlogger uses a countdown timer at the beginning of his video. Vlogger uses a countdown timer to make it appear as if the time is running out because it adds urgency and suspense. As a viewer, you’ll want to hurry up and watch this video, so you don’t miss out on anything.
Let’s now dive deep into methods of creating countdown animation for videos.
Method 1: Make a Countdown Animation with a Professional Video Editing Software
The most common trend today is video content creation, and it’s everywhere. Videos are not only entertaining, but they have a significant impact on audience retention.
With a video editor, you can create compelling content that will entice your viewers to watch the whole thing. Moreover, it can also help you get started by adding captions, transitions, effects, etc.
If you’re ready to make your next project more engaging and interactive, you can try the best video editing software, Wondershare Filmora !

Wondershare Filmora is the industry standard when it comes to editing video. The video editing software industry is filled with features that promise to be faster, smarter, and easier to use than others.
Moreover, Wondershare has Filmstock effects that have revolutionized the world of video creators.
Filmstock is a collection of videos ready to be used with Filmora that contains more than 1,000 free stock footage clips of various scenes and locations, plus video effects, transitions, and titles, to make creating professional-quality videos faster and easier.
Let’s see some of its features that help us make animation countdown timers easily.
- Rich effects for you to choose customizing countdown animation at ease.
- You’re not stuck with traditional slow motion in your videos; you can add dynamism and energy to your videos with smooth animations.
- It has various countdown animation templates simplify the whole process, just drag-and-drop, everything gets done.
How to make a countdown animation with Filmora
You’re looking for an animated countdown timer for your website or your very first YouTube video, but you want one that stands out. You don’t want your visitors to think it’s generic or boring, so you’re thinking about how to make your countdown timer more interesting.
That’s where Filmora comes in. It’s an amazing tool that makes it easy to create countdown animations on websites or videos for almost any purpose. Let’s look at how to create your own cool, creative countdown timers using Filmora.
Free Download For Win 7 or later(64-bit)
Free Download For macOS 10.14 or later
Step1 Open Filmora and import the background video file from the media section.

Step2 After importing the video, go to elements options from the top tab.

Step3 After choosing elements, you’ll see the countdown tab on your left. Click on the countdown and choose any animation. You can adjust the animation duration, size, and audio.

Step4 Adjust the animation duration according to the background video, and finally, export your animated countdown timer.

Pros and Cons of using Video Editing Software to make a countdown animation
Pros
- You can save any countdown effects project as a project to be used in future videos
- You can create a vision of your brand concept in your way
- Free templates are available according to your brand and target audience
- More stable
Cons
- Standard out-of-the-box video editing software isn’t enough to create a professional-quality video
Method 2: Generate the timer with Free Online Countdown Timer Video Generators
If you’re trying to catch your audience’s attention by giving them a reason to ‘countdown’ to something, then you’ll want to use a countdown timer with some great free online countdown videos.
There are many countdown timer websites like;Biteable ,Kapwing ,Movavi ,and MakeWebVideo . But we’ve rounded up the best countdown video generator site you’ll ever see:
FlexClip

FlexClip is a powerful yet easy-to-use online video editor. Its music library is versatile and high-quality. It lets you pick and add favorite tracks without infringing worries. Apply interesting editing to make your videos look better by adding transitions, filters, text, and more.
FlexClip’s biggest advantage is its extensive amount of free media assets. Whether you’re a master or rookie with FlexClip, you’re capable of producing excellent videos with music. You can be a video guru or a video beginner. You’re capable of producing awesome videos with great sound using FlexClip.
Key Features:
- Provides a complete set of video-making processes.
- A diverse range of royalty-free music selection
- Loads of handy editing tools
- Thousands of ready-made templates
- Multiple advanced features like adding text, emoji, effects, and more
How to make a countdown animation with FlexClip
The FlexClip countdown creator is a leading video editor with many powerful features. To make your countdown video, click the Create a Video button below.
Step1 Set Your Countdown Video Background
Set your timer to how long you want your message to start your countdown. Usually, it’s 10 seconds.
Then add scenes and adjust the duration of scenes to make them all length. You can use the background color to make it more appealing to your audience.

Step2 Highlight Your Countdown with Animated Elements
Using the amazing elements, you can make your countdown interactive and much more fun. Just go to the sidebar and switch to the Elements options. Apply the elements you want, then customize them on size, position, and color.

Step3 Add the Number to Your Countdown
Now, add the numbers for the countdown, e.g., if you want a 10-second countdown, type in the number “10”. You can pick a basic text effect and manually enter the number.
After you’ve created the number, go to the timeline and control how long the number will appear and when it will disappear.

Step4 Add Music or Sound Effects to Your Countdown Video
FlexClip lets you upload your audio files from a local folder, or you can select one from FlexClip’s library. Once you’re done adding the countdown music, you can trim the duration, set it to start and end at any time, and use the fade-in/out effect to make the music match your countdown. Plus, you can also adjust the volume to make the music softer.

Step5 Preview and Export Your Countdown Video
You can preview it to see how the countdown video will look in the end, finally, hit export, and you’re done!
Method 3: Make a Countdown Timer with a Graphic Design Platform
Today’s graphic design platforms give designers more options than ever before, but many designers struggle to make the most of these resources. Let us share some tips and tricks on designing a countdown timer using the tools available through Canva, a graphic design platform.
Canva

Many types of graphic design software are available, and Canva is one of the best. While its critics may disagree, Canva is an undeniable tool to help millions of business owners and marketers improve their social media graphics and redesign their brand image without needing to learn graphic design.
Key Features:
- Drag and drop feature
- Free templates
- Background Removal Tool
- Canva Brand Kit
- Magic Resizing
How to make a countdown animation with Canva
Canva offers a range of great-looking countdown templates that’ll help you create one in just a few minutes. And if you need a simple countdown animation, you can download one of their free templates. Let’s make it from scratch:
Step1 Select The Background
With Canva, you get a wide range of free backgrounds. Click on the button labeled “Search.” Now choose the “light old film” background element and click Add.

Step2 Enter Your Text (Number)
Then select the text tab and choose any font style, color, and size.

Step3 Animate Text
Next, select the font again, and then, at the top, there’s an option for Text Animation.
Adding text animation to your countdown timer will make it more realistic and match your background better than a straight-up countdown timer.

Step4 Edit The Page Timing
Next, click on the “Edit Timing” option. You can set the timer for each page as per your choice

Step5 Duplicate The Page
Now, select the duplicate page option and change the number of duplicate pages from 3 to 2,1, with the same design and formatting.

Step6 Export / Download Video
You’re finally done! Click the Download button to export your design.
The background of this photo is not a static image, so you cannot select the JPG, PNG, or SVG. You must choose an MP4 video or a GIF when creating an animation.

Top 10 animated countdown effects to make your video like a Pro
Animated countdown effects are a great way to add some “pizzazz” to a simple video. They look awesome and are extremely effective in creating a memorable video. When used well, they can add some excitement to a boring video. We’ll go over the top 10 animated countdown effects from Filmstock
1. Cool Countdown

2. Fitness Countdown

3. Cinematic Countdown

4. Neon Countdown

5. Cyber Countdown

6. Digital Countdown Pack

7. Big Metal Countdown

8. Glitch Countdown Transition

9. Countdown To New Year

10. Flashing Light Countdown

How to use these effects in Wondershare Filmora
You can access Filmstock directly from the Filmora application or by visiting the website:
- Create a new project by clicking Filmora Video Editor in the menu.
- Select the audio effects tab, or go to the Audio tab, title tab. You will see the film stock option.
- Click the Visit Filmstock button, and you will be taken to the Filmstock website.
Free Download For Win 7 or later(64-bit)
Free Download For macOS 10.14 or later

- Log in to Filmstock using your Wondershare account.

- After the download, the new effects will be added to your project in the appropriate section (Audio, Title, Transitions, and Elements). You’ll also be able to preview each effect from this window.

![]()
Note: it is highly recommended to log in to Filmstock and Filmora with the same Wondershare ID.
Final Words
A countdown is a powerful tool to add suspense to your videos. It gives your audience more incentive to watch your video all the way through. Get this article, as it is the ultimate guide to making your countdown animations, plus the best video editing software, Wondershare Filmora.
Wondershare Filmora is an excellent place to be creative and make some terrific countdown timers that can improve your viewers’ overall experience. Use their templates to create a strong and engaging online presence. Your audience won’t be able to resist the mesmerizing, hypnotizing, and enthralling effects of Wondershare Filmora.
Free Download For Win 7 or later(64-bit)
Free Download For macOS 10.14 or later
- Cool Countdown
- Fitness Countdown
- Cinematic Countdown
- Neon Countdown
- Cyber Countdown
- Digital Countdown Pack
- Big Metal Countdown
- Glitch Countdown Transition
- Countdown To New Year
- Flashing Light Countdown
What are the benefits of using a countdown timer for videos/live streams?
Countdowns are a great way to get your message across and get your viewers excited about your product or service. A countdown timer provides a very simple visual cue to help motivate yourself and your audience to start watching the video.
It also works well with vlogs and YouTube, seamlessly transitioning from one part of your video to the next. This works best when your video isn’t about the product itself (but rather a review, a demo, or something else that lends itself well to a countdown).
As you can see, the Vlogger uses a countdown timer at the beginning of his video. Vlogger uses a countdown timer to make it appear as if the time is running out because it adds urgency and suspense. As a viewer, you’ll want to hurry up and watch this video, so you don’t miss out on anything.
Let’s now dive deep into methods of creating countdown animation for videos.
Method 1: Make a Countdown Animation with a Professional Video Editing Software
The most common trend today is video content creation, and it’s everywhere. Videos are not only entertaining, but they have a significant impact on audience retention.
With a video editor, you can create compelling content that will entice your viewers to watch the whole thing. Moreover, it can also help you get started by adding captions, transitions, effects, etc.
If you’re ready to make your next project more engaging and interactive, you can try the best video editing software, Wondershare Filmora !
Wondershare Filmora is the industry standard when it comes to editing video. The video editing software industry is filled with features that promise to be faster, smarter, and easier to use than others.
Moreover, Wondershare has Filmstock effects that have revolutionized the world of video creators.
Filmstock is a collection of videos ready to be used with Filmora that contains more than 1,000 free stock footage clips of various scenes and locations, plus video effects, transitions, and titles, to make creating professional-quality videos faster and easier.
Let’s see some of its features that help us make animation countdown timers easily.
- Rich effects for you to choose customizing countdown animation at ease.
- You’re not stuck with traditional slow motion in your videos; you can add dynamism and energy to your videos with smooth animations.
- It has various countdown animation templates simplify the whole process, just drag-and-drop, everything gets done.
How to make a countdown animation with Filmora
You’re looking for an animated countdown timer for your website or your very first YouTube video, but you want one that stands out. You don’t want your visitors to think it’s generic or boring, so you’re thinking about how to make your countdown timer more interesting.
That’s where Filmora comes in. It’s an amazing tool that makes it easy to create countdown animations on websites or videos for almost any purpose. Let’s look at how to create your own cool, creative countdown timers using Filmora.
Free Download For Win 7 or later(64-bit)
Free Download For macOS 10.14 or later
Step1 Open Filmora and import the background video file from the media section.
Step2 After importing the video, go to elements options from the top tab.
Step3 After choosing elements, you’ll see the countdown tab on your left. Click on the countdown and choose any animation. You can adjust the animation duration, size, and audio.
Step4 Adjust the animation duration according to the background video, and finally, export your animated countdown timer.
Pros and Cons of using Video Editing Software to make a countdown animation
Pros
- You can save any countdown effects project as a project to be used in future videos
- You can create a vision of your brand concept in your way
- Free templates are available according to your brand and target audience
- More stable
Cons
- Standard out-of-the-box video editing software isn’t enough to create a professional-quality video
Method 2: Generate the timer with Free Online Countdown Timer Video Generators
If you’re trying to catch your audience’s attention by giving them a reason to ‘countdown’ to something, then you’ll want to use a countdown timer with some great free online countdown videos.
There are many countdown timer websites like;Biteable ,Kapwing ,Movavi ,and MakeWebVideo . But we’ve rounded up the best countdown video generator site you’ll ever see:
FlexClip
FlexClip is a powerful yet easy-to-use online video editor. Its music library is versatile and high-quality. It lets you pick and add favorite tracks without infringing worries. Apply interesting editing to make your videos look better by adding transitions, filters, text, and more.
FlexClip’s biggest advantage is its extensive amount of free media assets. Whether you’re a master or rookie with FlexClip, you’re capable of producing excellent videos with music. You can be a video guru or a video beginner. You’re capable of producing awesome videos with great sound using FlexClip.
Key Features:
- Provides a complete set of video-making processes.
- A diverse range of royalty-free music selection
- Loads of handy editing tools
- Thousands of ready-made templates
- Multiple advanced features like adding text, emoji, effects, and more
How to make a countdown animation with FlexClip
The FlexClip countdown creator is a leading video editor with many powerful features. To make your countdown video, click the Create a Video button below.
Step1 Set Your Countdown Video Background
Set your timer to how long you want your message to start your countdown. Usually, it’s 10 seconds.
Then add scenes and adjust the duration of scenes to make them all length. You can use the background color to make it more appealing to your audience.
Step2 Highlight Your Countdown with Animated Elements
Using the amazing elements, you can make your countdown interactive and much more fun. Just go to the sidebar and switch to the Elements options. Apply the elements you want, then customize them on size, position, and color.
Step3 Add the Number to Your Countdown
Now, add the numbers for the countdown, e.g., if you want a 10-second countdown, type in the number “10”. You can pick a basic text effect and manually enter the number.
After you’ve created the number, go to the timeline and control how long the number will appear and when it will disappear.
Step4 Add Music or Sound Effects to Your Countdown Video
FlexClip lets you upload your audio files from a local folder, or you can select one from FlexClip’s library. Once you’re done adding the countdown music, you can trim the duration, set it to start and end at any time, and use the fade-in/out effect to make the music match your countdown. Plus, you can also adjust the volume to make the music softer.
Step5 Preview and Export Your Countdown Video
You can preview it to see how the countdown video will look in the end, finally, hit export, and you’re done!
Method 3: Make a Countdown Timer with a Graphic Design Platform
Today’s graphic design platforms give designers more options than ever before, but many designers struggle to make the most of these resources. Let us share some tips and tricks on designing a countdown timer using the tools available through Canva, a graphic design platform.
Canva
Many types of graphic design software are available, and Canva is one of the best. While its critics may disagree, Canva is an undeniable tool to help millions of business owners and marketers improve their social media graphics and redesign their brand image without needing to learn graphic design.
Key Features:
- Drag and drop feature
- Free templates
- Background Removal Tool
- Canva Brand Kit
- Magic Resizing
How to make a countdown animation with Canva
Canva offers a range of great-looking countdown templates that’ll help you create one in just a few minutes. And if you need a simple countdown animation, you can download one of their free templates. Let’s make it from scratch:
Step1 Select The Background
With Canva, you get a wide range of free backgrounds. Click on the button labeled “Search.” Now choose the “light old film” background element and click Add.
Step2 Enter Your Text (Number)
Then select the text tab and choose any font style, color, and size.
Step3 Animate Text
Next, select the font again, and then, at the top, there’s an option for Text Animation.
Adding text animation to your countdown timer will make it more realistic and match your background better than a straight-up countdown timer.
Step4 Edit The Page Timing
Next, click on the “Edit Timing” option. You can set the timer for each page as per your choice
Step5 Duplicate The Page
Now, select the duplicate page option and change the number of duplicate pages from 3 to 2,1, with the same design and formatting.
Step6 Export / Download Video
You’re finally done! Click the Download button to export your design.
The background of this photo is not a static image, so you cannot select the JPG, PNG, or SVG. You must choose an MP4 video or a GIF when creating an animation.
Top 10 animated countdown effects to make your video like a Pro
Animated countdown effects are a great way to add some “pizzazz” to a simple video. They look awesome and are extremely effective in creating a memorable video. When used well, they can add some excitement to a boring video. We’ll go over the top 10 animated countdown effects from Filmstock
1. Cool Countdown
2. Fitness Countdown
3. Cinematic Countdown
4. Neon Countdown
5. Cyber Countdown
6. Digital Countdown Pack
7. Big Metal Countdown
8. Glitch Countdown Transition
9. Countdown To New Year
10. Flashing Light Countdown
How to use these effects in Wondershare Filmora
You can access Filmstock directly from the Filmora application or by visiting the website:
- Create a new project by clicking Filmora Video Editor in the menu.
- Select the audio effects tab, or go to the Audio tab, title tab. You will see the film stock option.
- Click the Visit Filmstock button, and you will be taken to the Filmstock website.
Free Download For Win 7 or later(64-bit)
Free Download For macOS 10.14 or later
- Log in to Filmstock using your Wondershare account.
- After the download, the new effects will be added to your project in the appropriate section (Audio, Title, Transitions, and Elements). You’ll also be able to preview each effect from this window.
![]()
Note: it is highly recommended to log in to Filmstock and Filmora with the same Wondershare ID.
Final Words
A countdown is a powerful tool to add suspense to your videos. It gives your audience more incentive to watch your video all the way through. Get this article, as it is the ultimate guide to making your countdown animations, plus the best video editing software, Wondershare Filmora.
Wondershare Filmora is an excellent place to be creative and make some terrific countdown timers that can improve your viewers’ overall experience. Use their templates to create a strong and engaging online presence. Your audience won’t be able to resist the mesmerizing, hypnotizing, and enthralling effects of Wondershare Filmora.
Free Download For Win 7 or later(64-bit)
Free Download For macOS 10.14 or later
Also read:
- New How To Add Fade In Windows Video Editor for 2024
- Updated 2024 Approved How to Livestream Zoom on Facebook?
- Updated Easy Steps to Create Intro Video with After Effects for 2024
- New Why You Should Master Slideshows In Lightroom, Fresh Insight?
- Updated Want to Apply a Filter on Your Video Using Your iPhone or Mac? Here Are the Simple Steps to Put Add Filters on iMovie. Find Out a Better iMovie Alternative with More Filters for 2024
- Updated How to Make a Custom Slide Show in PowerPoint
- Have You Ever Wanted to Stop Your Video and Hold on to a Single Frame to Draw Attention to a Point or for Dramatic Flair? Good News! VEGAS Pro Makes It Easy to Do Just That. In This Tutorial, Well Look at How to Make Sony Vegas Freeze Frame for 2024
- New Wish to Rock on YouTube, but Lacking Tricks? Here, We Will Tell You Everything About How the YouTube Algorithm AI Works and How You Can Perform Well According to AI for 2024
- 2024 Approved How to Got Free After Effects Templates Slideshow with Simple Trick
- New Want to Add the Radial Blur Image Effect to Your Photos to Make Them Stand Out? Read on to Find the 11 Best Tools for Creating Stunning Image Editing Projects for 2024
- 2024 Approved If You Are Looking for Reliable Solutions to Export Your Musical Slideshow Through a DVD Burning Process, Take a Breath, You Have Landed at the Right Place
- Updated 2024 Approved 15 Camera Shake Preset for Premiere Pro to Add Camera Shake with Simple Keyframes. Each Preset Is Editable with Easy Steps. Make Your Video Shocking and Impressive with These Camera Shake Effects
- Updated 15 Must-Use Gifs Editors
- New GIF Splitting Into Frames Is an Interesting Activity to Do with the Right Tools. Convert GIFs Into Frames Easily with Tools and Use Them as Needed
- Updated How to Easily Create a Free Eye-Catching Intro Videos with Invideo
- In 2024, How to Enable and Use OBS Zoom Camera
- Updated 2024 Approved Quick Answer Why Did Filmora AI Portrait Attract People?
- Updated 2024 Approved Learn How to Use Face Tracking in After Effects to Quickly Mask Out Faces, Animate Objects on Faces, and More
- In 2024, Top 10 Anime Movies of All Time
- Updated How to Concatenate Videos Using FFmpeg
- Updated Can You Enhance Your Drone Footage with Cinematic Drone LUTs? This Article Discusses Top Drone LUTs Recommendations to Simplify Video Editing
- New In 2024, 10 Matching Color Combination That Works Together Greatly
- 10 Best Video Editing Apps With Templates for 2024
- How PGSharp Save You from Ban While Spoofing Pokemon Go On Tecno Phantom V Flip? | Dr.fone
- Strategies for Apps That Wont Download From Play Store On Tecno Spark Go (2023) | Dr.fone
- In 2024, 8 Best Apps for Screen Mirroring Motorola Razr 40 PC | Dr.fone
- Fix the Error of Unfortunately the Process.com.android.phone Has Stopped on OnePlus Nord 3 5G | Dr.fone
- How To Transfer WhatsApp From iPhone 13 to other iPhone 13 Pro devices? | Dr.fone
- updated Top 5 Udemy Subtitle Translation Tools for Seamless Auto Translations
- How to Transfer Music from Oppo Find X7 Ultra to iPod | Dr.fone
- How to Fake GPS on Android without Mock Location For your Tecno Phantom V Fold | Dr.fone
- How to Unlock SIM Card on HTC U23 Pro online without jailbreak
- How does the stardust trade cost In pokemon go On Oppo Reno 8T 5G? | Dr.fone
- Title: New 2024 Approved How to Zoom Webcam on PC
- Author: Morgan
- Created at : 2024-04-24 01:06:46
- Updated at : 2024-04-25 01:06:46
- Link: https://ai-video-editing.techidaily.com/new-2024-approved-how-to-zoom-webcam-on-pc/
- License: This work is licensed under CC BY-NC-SA 4.0.
