
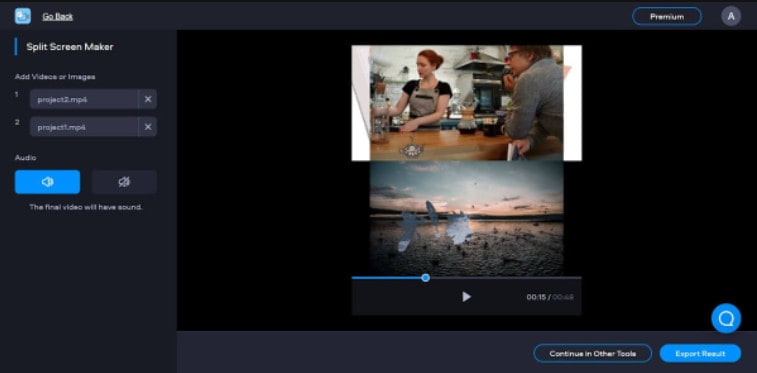
:max_bytes(150000):strip_icc():format(webp)/duet-c82ee94b39e24788bcfd51d1eea24288.jpg)
New 2024 Approved If You Wish to Edit FLV Videos without Any Problems, You Should Utilize a Multipurpose Video Editor that Supports the FLV File Format
If You Wish to Edit FLV Videos without Any Problems, You Should Utilize a Multipurpose Video Editor that Supports the FLV File Format
FLV is a common container format for transferring digital video and audio information over the Internet. A.flv file is a flash video that may be seen on your computer with Adobe Flash Player, Adobe Air, or some third-party Adobe Flash plugins.
FLV has become the standard video format for web-based streaming video service providers such as Hulu and VEVO due to its superior functionality and tiny size. It’s also the default format for Quicktime on Mac systems.
If you wish to edit FLV videos without any problems, you should utilize a multipurpose video editor that supports the FLV file format.
Best FLV Editor to Edit FlV Video on Windows and Mac - Filmroa Video Editor
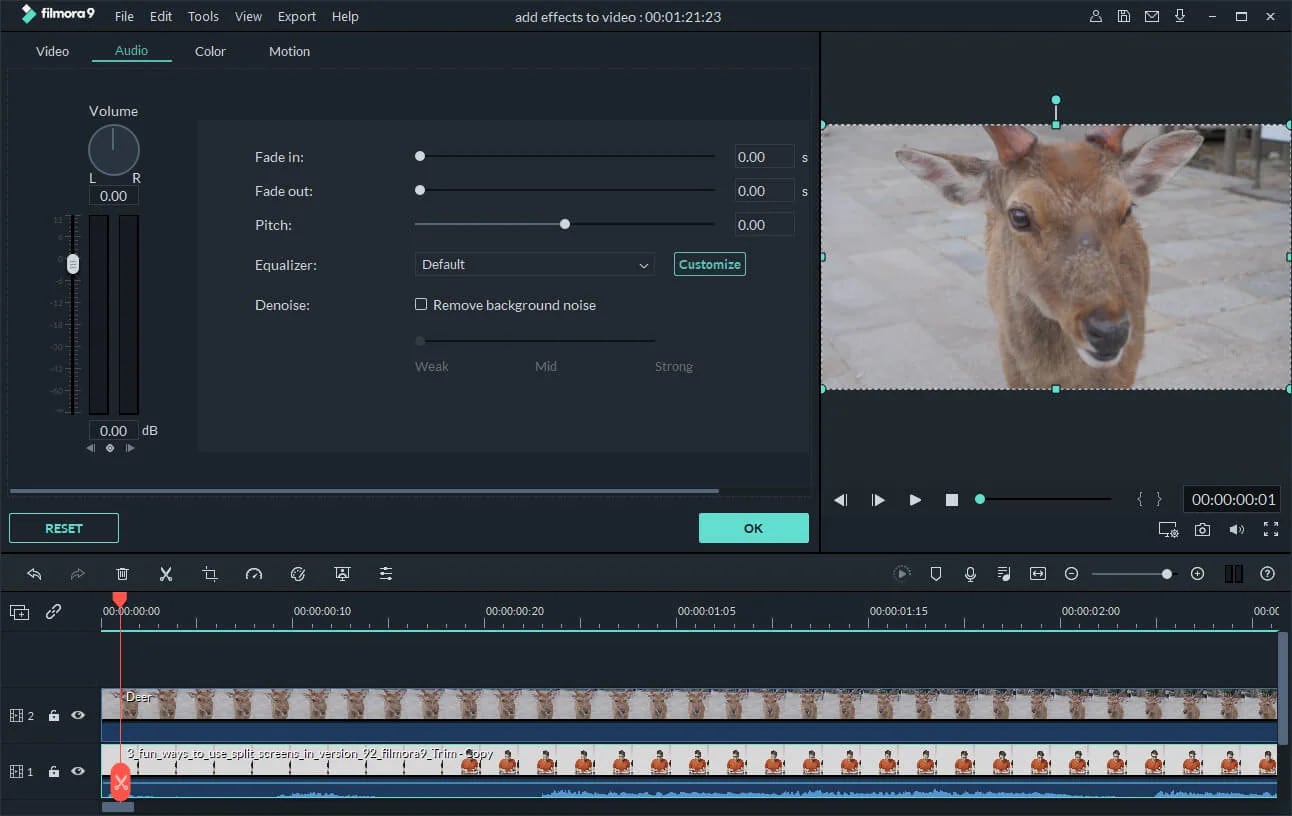
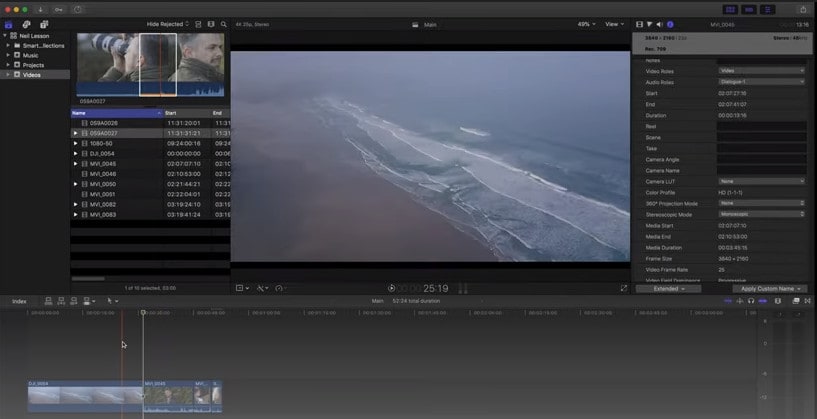
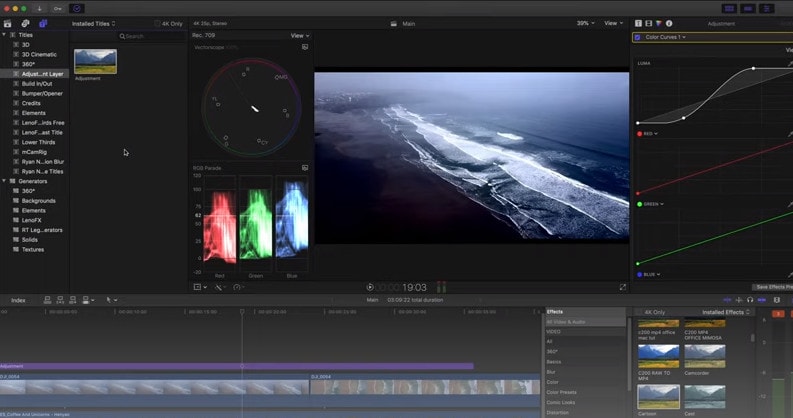
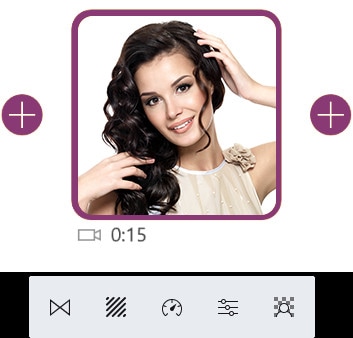
Filmora Video Editor is a professional FLV video editing application. This software allows you to edit 4K video files, share completed films directly on social media platforms, and add subtitles and audio files.
You may mix multiple films and enhance your footage with numerous transitions and other effects using this FLV video editing software. Furthermore, the free Filmora application is ideal for adding audio files or video clips from the wide library and uploading your soundtrack.
For Win 7 or later (64-bit)
For macOS 10.14 or later
Therefore, you can use the following steps to edit FLV video on Windows and Mac:
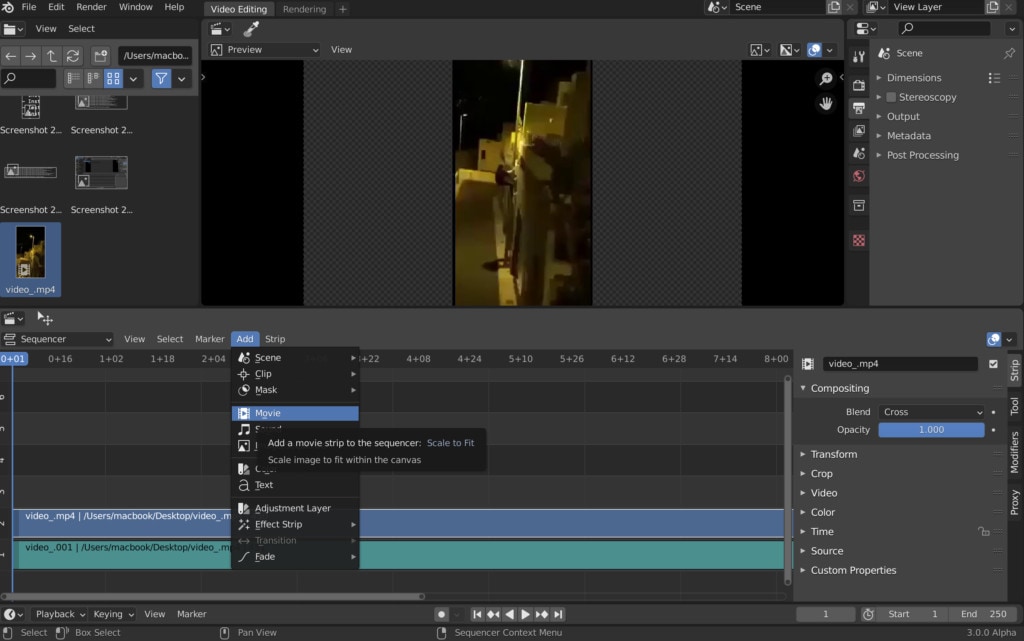
Step 1: Import file:

Step 2: Edit the FLV file:
Acquire the perfect tool in your palm for anything you want to do, such as clipping, cropping, rotating, and more.
Furthermore, all editing capabilities in the toolbar allow drag-and-drop, making it even easier to touch up your films quickly. Consider the following scenario:
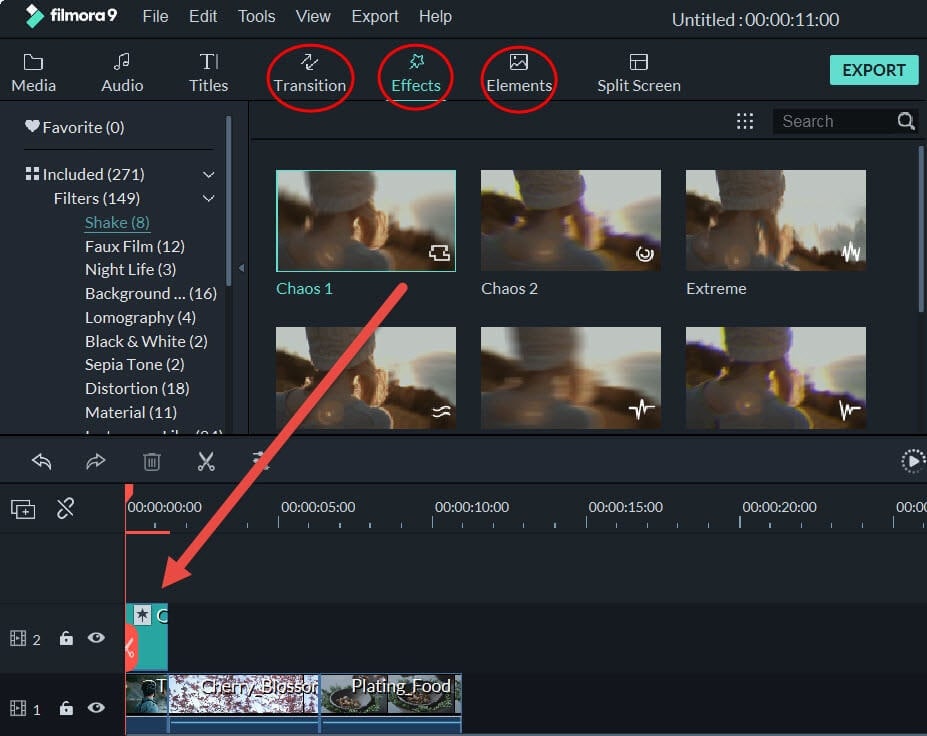
- Drag and drop a transition into the video/photo, or right-click it and select “Apply to All.”
- Please drag & drop a title template to the position where you want it to appear, then adjust it.
- To use the effects, select one from the 50+ available video effects, select it, and apply it to your photos/videos instantaneously.
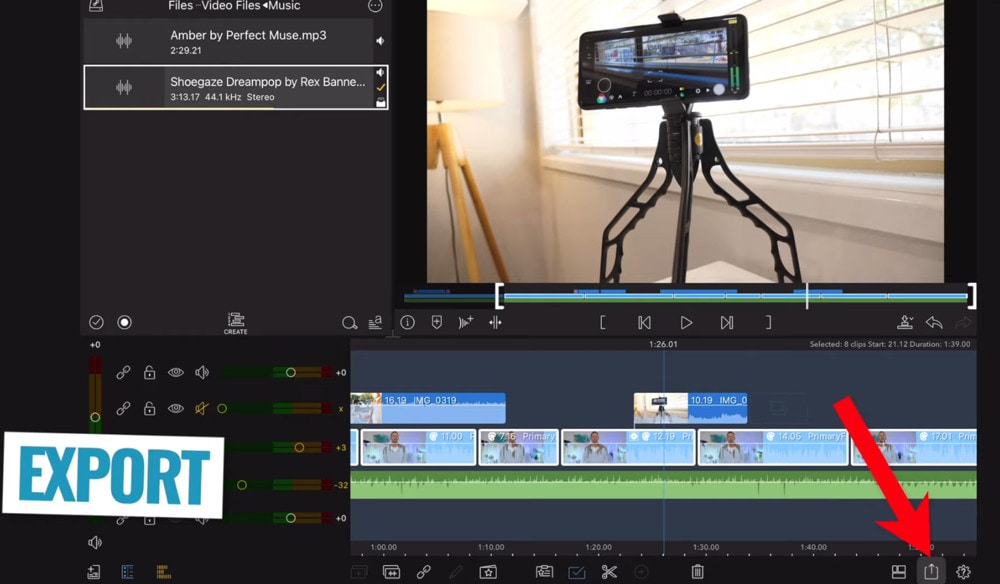
Step 3: Save or Export the file:

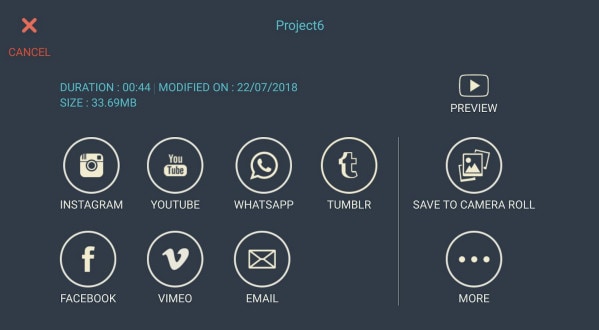
When you’re done, export your modified MP4 files to Windows/Mac and quickly share them on YouTube, with the option of sending a message to Facebook and Twitter. When you click Create in the program window’s middle right corner, you’ll be taken to the Output window below.
Alternative Way to Edit FlV Video on Windows
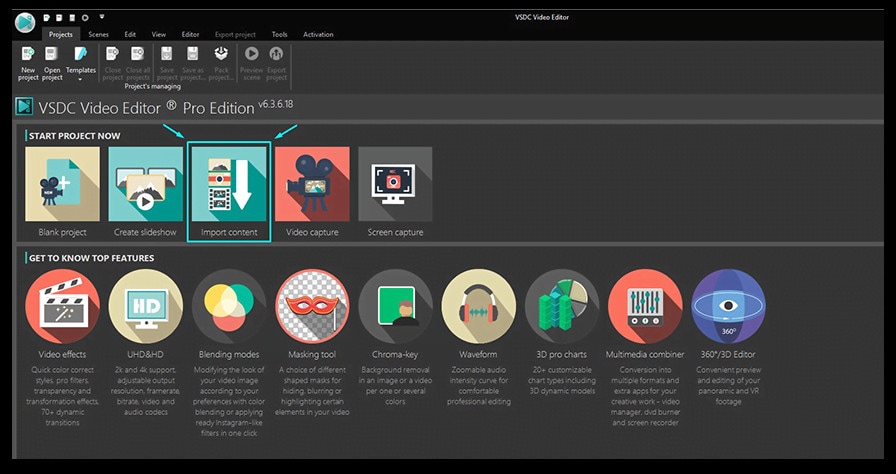
1. VSDC
VSDC is a free video editor along with a lot of advanced features. Cut, combine, trim, crop, and other editing capabilities are available to help you polish your FLV films.
Although it may not look logical, learning the editing capabilities hidden within modular boxes is simple. One noteworthy aspect of VSDC is its ability to produce good visual effects using many trendy video effects, transitions, and filters.
Furthermore, strong chroma keys, color correction, object modification, and other editing tools can be utilized to edit FLV videos. It not only creates excellent FLV videos, but it also supports a wide range of media conversion, allowing you to convert FLV files to various formats and export them without a watermark.
Therefore, follow the below mentioned steps to edit FLV video using VSDC:
Step 1: Install the software on the Windows. Open the application and import the video.
Step 2: Use cutting and splitting tools to edit the video.
The first icon is a picture of a pair of scissors, which is a cutting tool. It’s very useful when you need to cut the beginning or end of a film. Place the cursor exactly where you want to cut, then select “Trim start” or “Trim finish” from the dropdown cutting menu (the small triangle next to the scissors icon).
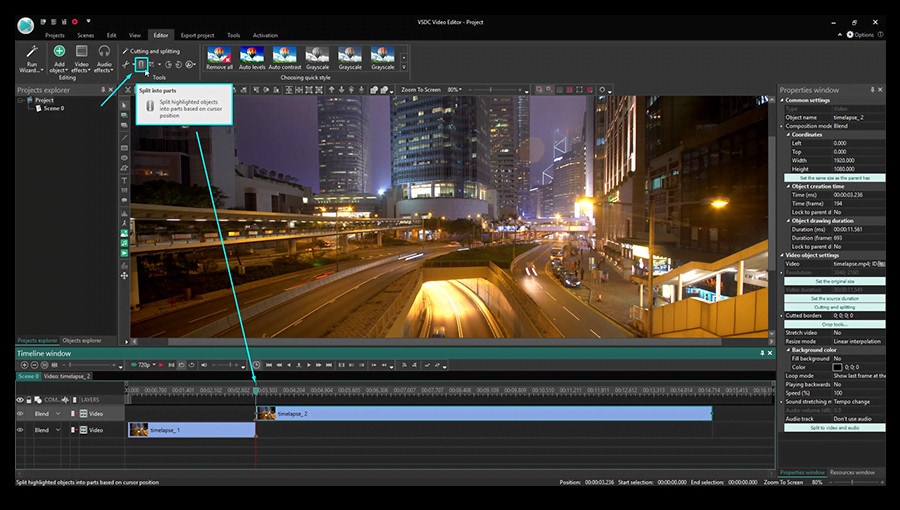
Cropping is also simple. If you have too much additional space around the scene object recorded, just choose the file you want to trim and select the cropping icon from the “Cutting and Splitting” option. A new window will appear, allowing you to select the region of the scene that should stay.
Step 3: Apply effects and transitions.
To use one, first select the video file you wish to edit, then go to the Video effects tab and select the effect you want to use. On the timeline, a new tab will appear, containing all of the effects done to the selected object. You can alter the effect’s duration and position in time by dragging it with the mouse there. The properties pane on the right-hand side can be used to change other parameters.
Transitions follow the same rule. Place your cursor where you want the transition to begin, then choose a transition from the Video effects dropdown menu and manually adjust the duration.
Step 4: Save changes and export video.
Make sure your movie appears exactly how you want it to before exporting it. If the video appears choppy, use the red preview button and lower the preview quality. When the PC’s resources are insufficient to process the video in real time, lagging can occur. Keep in mind that it has no bearing on the outcome. When you’re finished, navigate to the Export project tab and select an export format.
2. Adobe Premiere Pro:
Professional video editors use Premiere Pro to make everything from YouTube videos to Hollywood films like Mank, a 2021 Oscar candidate. It’s also widely utilized in the workflows of designers, animators, and VFX artists, and we can see why after lengthy testing.
We found the software’s UI to be simple to use, and it increased our productivity by separating things into various workspaces, such as editing, effects, and audio. When we tested it on both Mac and PC, we discovered that each workspace helps handle a specific activity while minimizing distraction.
Edit the FLV video with Adobe Premiere Pro using the following steps:
Step 1: Import the video and create initial sequence.
Step 2: In the Timeline, trim and rearrange clips, add audio, and transitions.
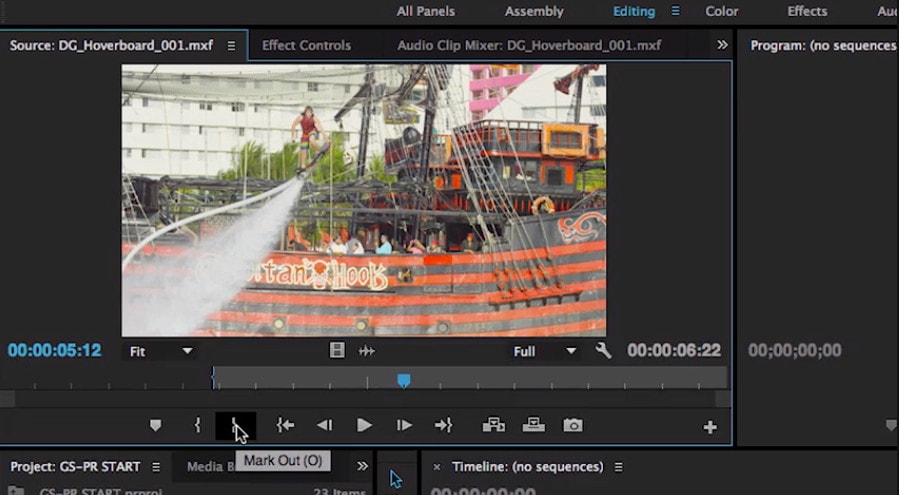
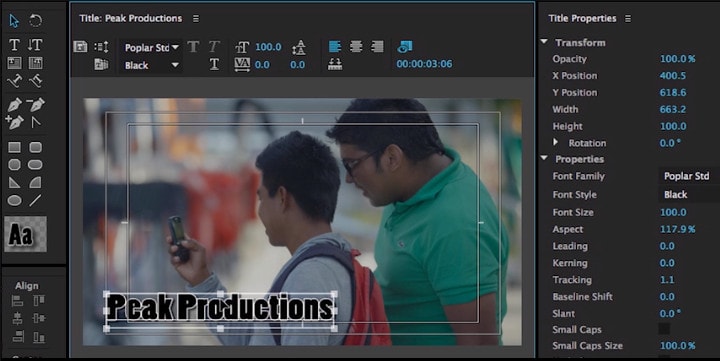
Step 3: Add title and graphics.
In Premiere Pro, you may make onscreen titles, as well as stylize and animate your images.
Step 4: Export your video.

Alternative Way to Edit FlV Video on Mac
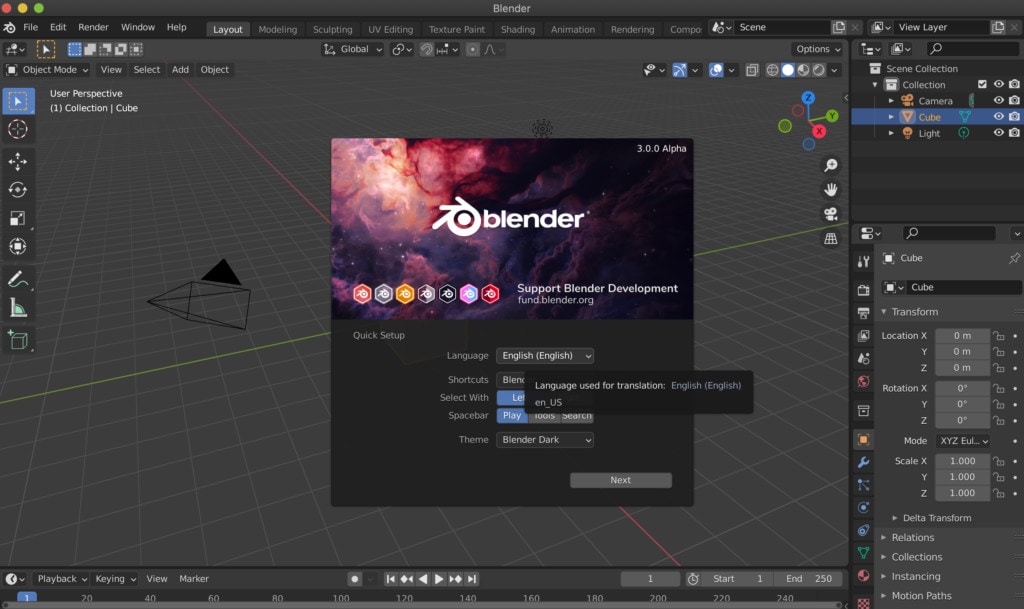
1. Blender:
Under the GNU General Public License, Blender is a free, open-source 3D content production program that runs on all major operating systems. Blender is one of the greatest video editors for both Windows and Mac, with advanced features such as modifier-based modeling tools, powerful character animation capabilities, a node-based material, etc.
Because it is developed for professionals, it is tough to use as a beginner. However, it is unrestricted in its use and distribution. In addition, color options are changeable and versatile in the UI.
In contrast, this free video editor is perfect for semi-pros or those who want to enhance their video editing skills. However, you’ll need a lot of time and effort to learn it.
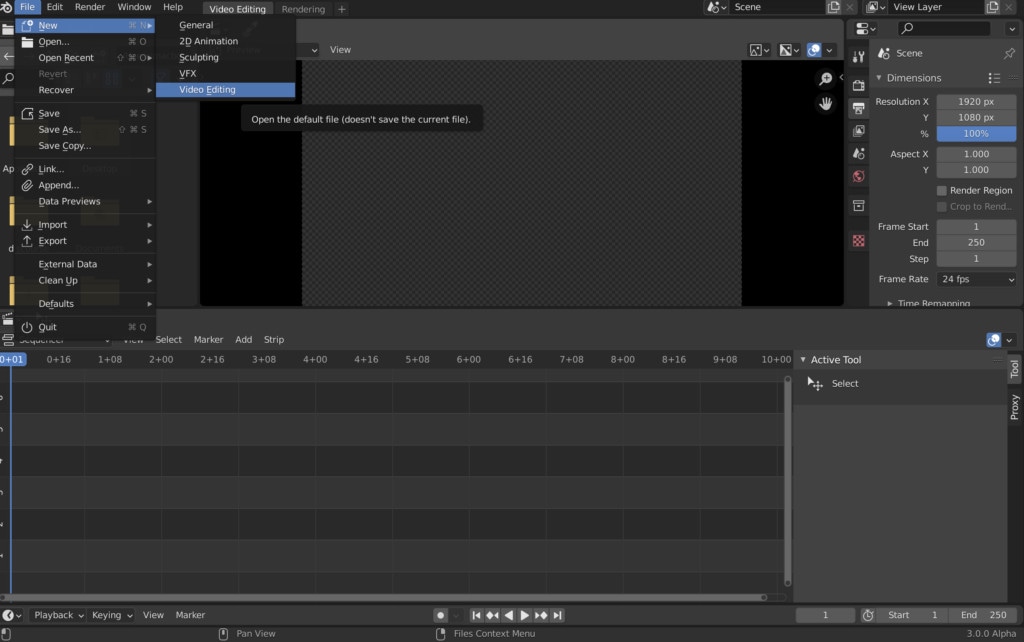
Step 1: Open the application.
Step 2: Then, go into File->New->Video Editing to open the video editor.
Step 3: Import the video and start editing using the editing tools.
Step 4: Save and export the video.

2. Final Cut Pro:
When it comes to video editing software, Apple’s Final Cut Pro is one of the industry standards. As a result, it’s widely utilized in the television and film industries - at least among Mac users. However, one of the truly convincing reasons to choose it over Premiere Pro is because it is subscription-free: you only pay once.
The software’s Magnetic Timeline, grouping tools, a vast selection of effects, solid organizational capabilities, and simple ways to add and edit audio make it a favorite among professional video editors. 360° video, HDR, and powerful color correcting tools are among the other capabilities. It’s a strong software with a lot of features.
Follow the steps to edit FLV video using Final Cut Pro:
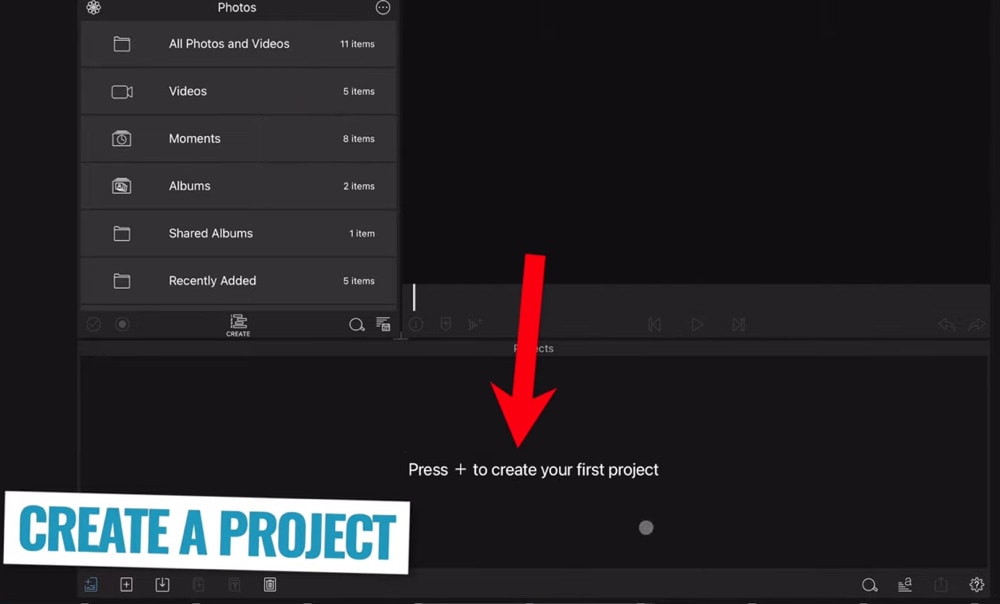
Step 1: Create Project.
To make a movie in Final Cut Pro, you must first establish a project, which keeps track of your editing selections and the media you utilize.
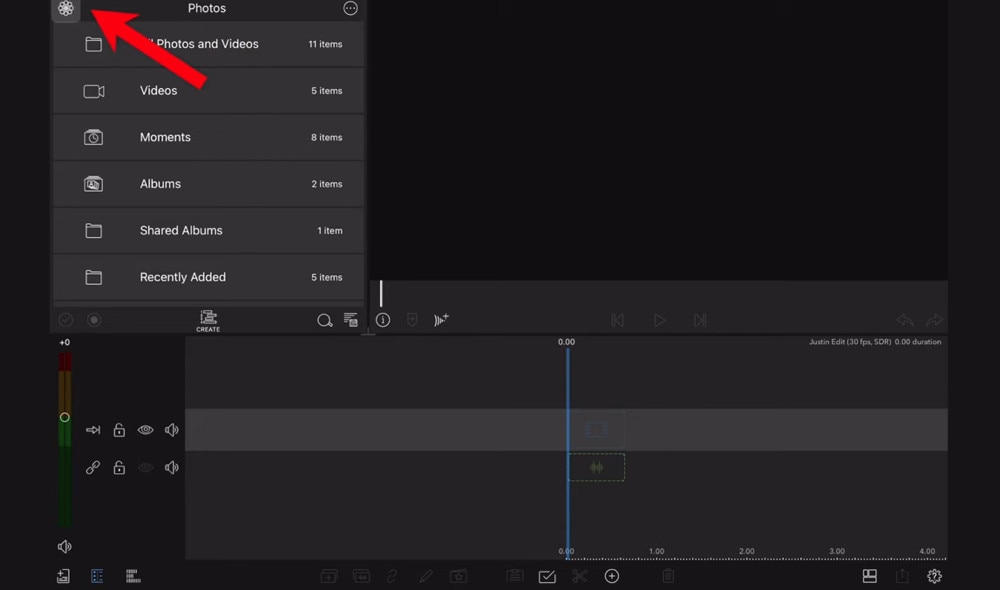
Step 2: Select and add clips to the timeline:
The second stage in making a movie with Final Cut Pro is to add and arrange clips in your project. In the timeline, you can move and reorder clips.
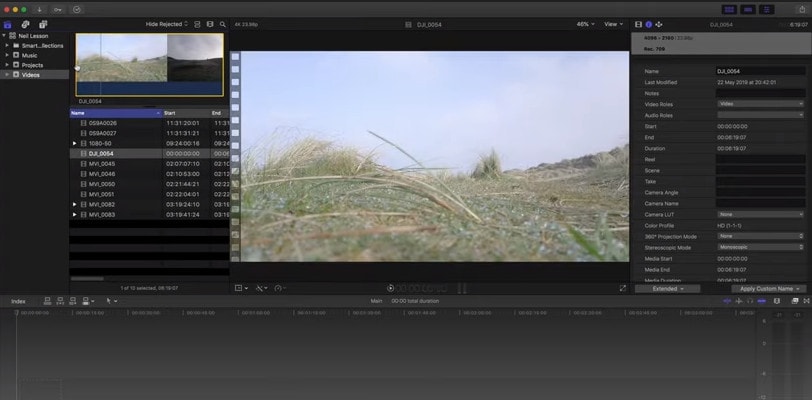
Step 3: Cut and trim video:
Final Cut Pro has a number of features for altering the start and stop points of clips in the timeline, as well as regulating the pacing of shots from one to the next.
Step 4: Edit the video by adding effects and transitions:
Final Cut Pro includes a number of advanced editing features that make it simple to create a professional film. Visual enhancements and colour correction are among the finishing touches.

Step 5: Save and export video:
2 Ways to Edit FlV Video on Android:
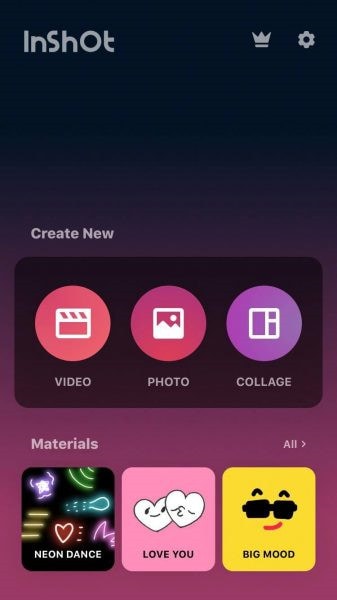
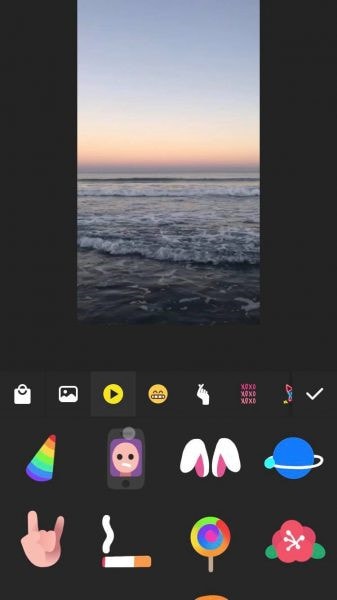
1. Inshot:
For Android users, Inshot is a fantastic image and video editor. This Android video editor allows you to add popular stickers and emoticons to your films, making them more fashionable and unique.
The program supports HD video output, allowing you more control over your footage. Moreover, the additional sound and video can be synchronized with the available video chronology.
You can quickly blend more than two movies into one with rich effects and sound with this Android editor app. In addition, you can generate a watermark using unique text provided in the app, and subtitles support allow you to produce one with a variety of fonts.
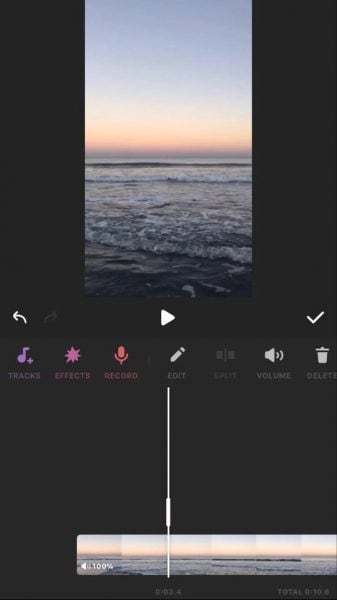
Following are the steps that you can follow to edit FLV video using Inshot:
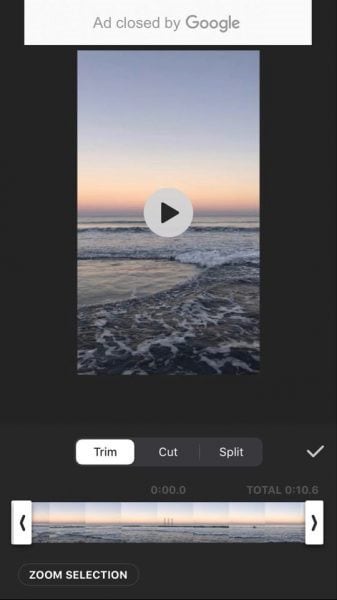
Step 1: Open the app and import the video.
Tap “Video” to open your phone’s gallery folder and begin editing a video in the InShot app. Select a video to work with. Adjust the canvass after your video has been loaded into the InShot App. For your other social media accounts, there are aspect ratios and sizes that work well with the video. It also has the option of being in portrait or landscape mode.
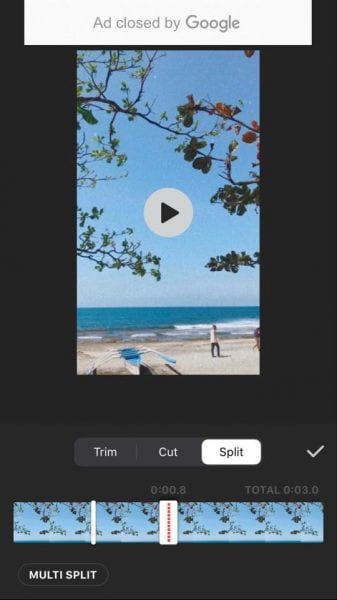
Step 2: Trim and split videos.
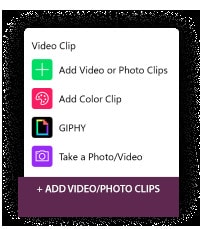
Step 3: Merge videos (optional):
By combining clips, you can combine them into a single film or project. Simply choose the videos you want to import from the drop-down menu. By tapping the “+” button on the lower left of the screen, you can insert and merge more videos. Your project will then be updated using the selected video.
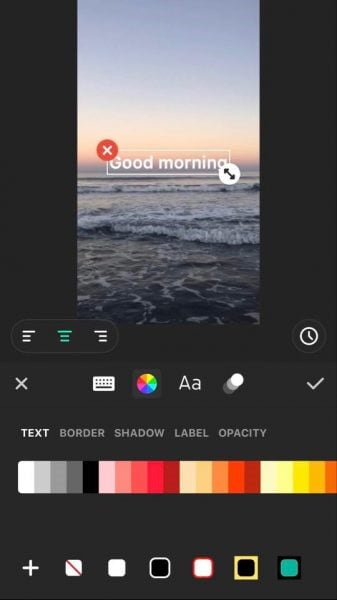
Step 4: Apply filters, add music, text and stickers.
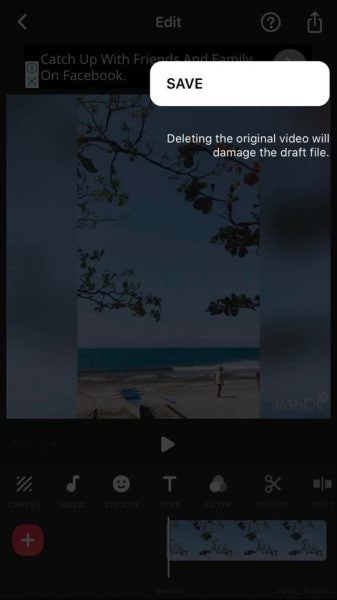
Step 5: Once you are done with the editing process, save the file.
2. Videoshow:
VideoShow has a lot of video editing options. It is a simple and practical video editing program and movie scene maker for art directors and beginners. Using this video cutter, you may reverse, blur, duplicate, edit, merge and split collage clips or films.
You can also use VideoShow to adjust the audio or add subtitles to any video. It also allows you to use different filters on any video on your device. Over 50 intricate themes are included in the program, allowing you to create gorgeous music videos, slide shows, and vlogs in no time.
The annual subscription package is for $135.19, or you can also make a one-time purchase for $225.78.
However, to edit the video, you can use the following steps:
Step 1: Download and install the videoshow application and open it. Upload the video that you want to edit.
Step 2: Edit the video by applying filters or cutting and trimming the part of the video that you want to remove.
Step 3: Save changes and export the video to your preferred location.
2 Ways to Edit FlV Video on iPhone:
1. LumaFusion:
No other software program on the iPhone comes close to the feature set that LumaFusion offers for video editing. It is the only premium app on this list, and it is well worth every penny.
But, of course, YouTubers aren’t the only ones who use the program; mobile journalists and professional video producers who don’t want to lug along their bulky camera equipment and editing apparatus also use it.
LumaFusion deals with up to six video and audio tracks for photographs, movies, audio, titles, and graphics, and six audio tracks for narration, music, and sound effects. You also receive a magnetic timeline; importing clips is a breeze once they’ve been imported.
There are many transitions and effects to choose from, all of which can be layered. Finally, it includes much royalty-free music, sound effects, and other assets. So if you need a professional video editing tool for your iPhone, LumaFusion ($29.99) is the way to go.
Follow these steps to edit FLV video using LumaFusion:
Step 1: To create your first project, press + at the bottom of the screen. You can create a new project by tapping that area or by tapping the Plus button.
Step 2: Import video:
The Import section is located in the top left corner of the screen. This defaults to the Photos tab when you initially launch a new project. All of the photographs and videos can be seen here.
Step 3: Check layout and adjust volume levels
Step 4: Edit the video and add titles.
Step 5: Export the video.
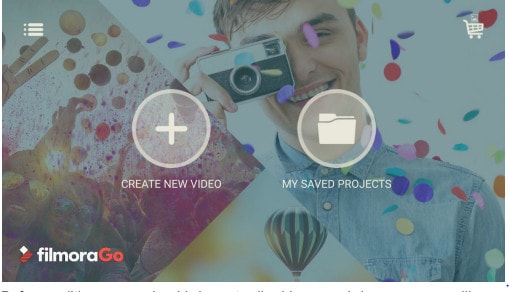
2. Filmora Go:
Without a doubt, Filmora is one of the greatest free video editors for iPhone that does not contain any watermarks. In addition, it’s compatible with both iPhones and Android devices and has a simple user interface.
Filmora is the greatest iPhone video editor for beginners, with themed filters and effects that add flair to your videos without any work.
Filmora has many unique features, including themes for your videos and ‘Materials,’ which are visual effects created by the program. Unfortunately, materials are only available with Filmora Pro, so keep that in mind.
Aside from that, you’ll find all of the typical features here. You can also add titles to videos, utilize stickers and effects, and add music to the background of your movie. You may also add another clip in picture-in-picture mode, which is beneficial.
Below are the following steps to edit FLV video:
Step 1: Open the application and select ‘Create new video’. Now, import the video by choosing the video icon.
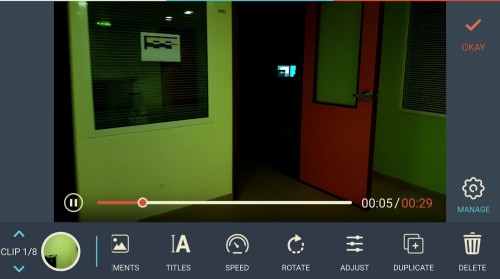
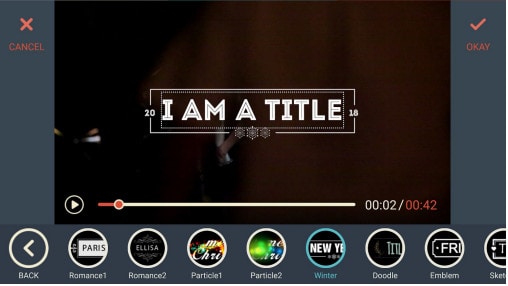
Step 2: Edit the video. Within the edit tool, you can trim and split the video. You can also improve the video quality by adding titles, transitions, and music, and voiceovers.


Step 3: After editing the video, select ‘SAVE’ and export the video or download it.
2 Ways to Edit FlV Video Online:
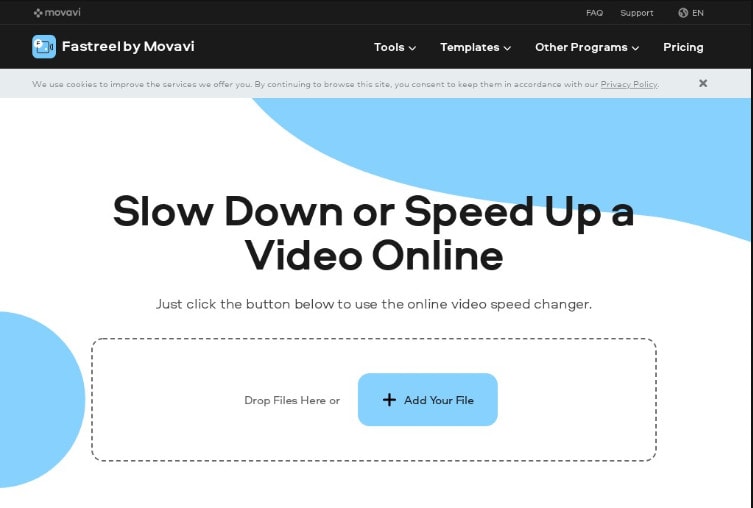
1. Fastreel:
If you’re seeking the finest free online video editor, Fastreel is a terrific tool to start with. This online video editing software provides a wide range of editing options. It can merge, edit, crop, and compress videos to make sharing easier.
It also includes many pre-made templates that you can change to create titles and transitions and other editing features like reverse, looping, and rotating. It’s also quite simple to use, and you can have polished videos in minutes.
There are also numerous pricing options to suit different customers, ranging from a completely free plan with watermarks to paid subscriptions with no limitations.
Use the following steps to edit FLV video:
Step 1: Open Fastreel web and import the video.
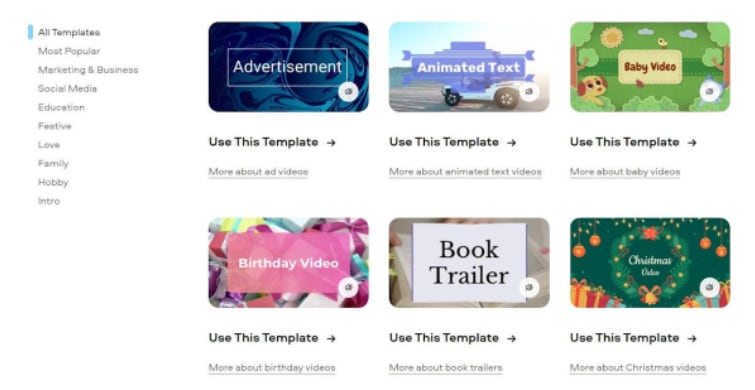
Step 2: Use templates to make it look attractive.
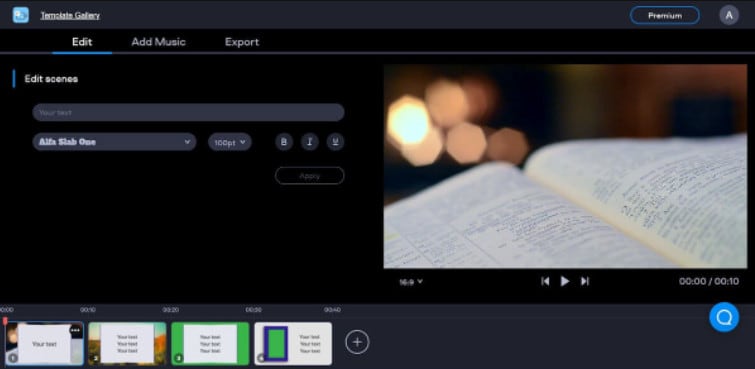
Step 3: Edit the video using the template.
Templates are unfinished videos with all of the effects already applied, such as backdrops, transitions, animated stickers, and titles. There are blank spots for your photos or videos, and you can arrange them in any sequence you like. You can also add music from the Fastreel library or upload your own track after entering your text.
Step 4: Once you are done with edits, save the video and export it.
2. WeVideo:
When you’re seeking the greatest video producer online, another wonderful choice to explore is WeVideo.
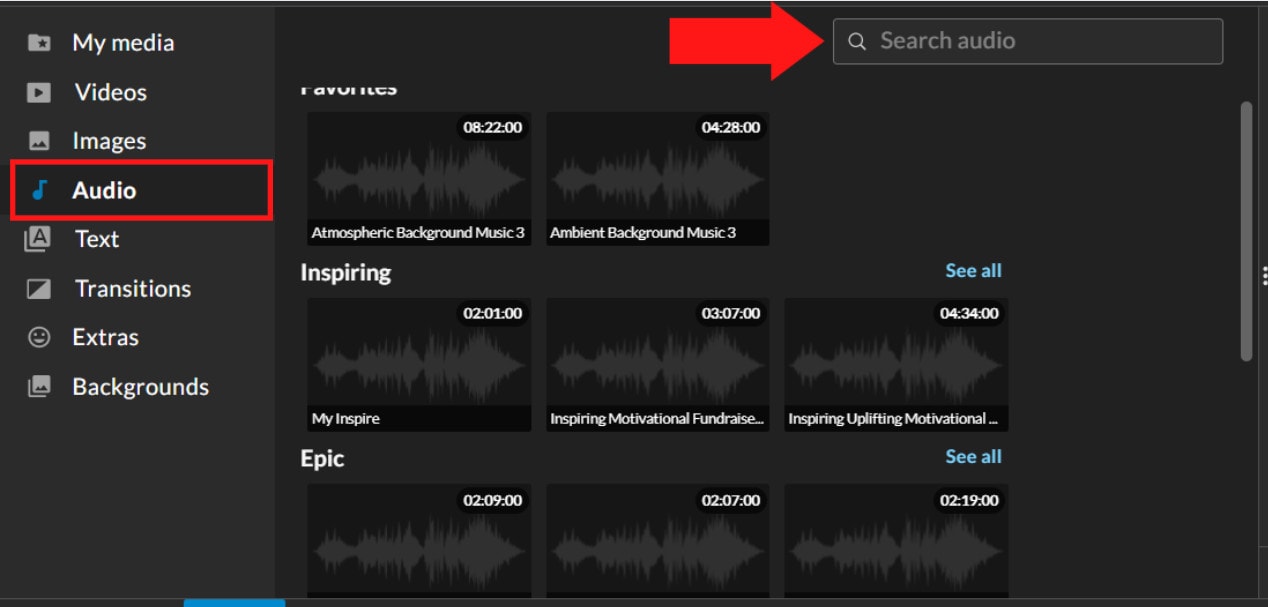
Google, Dropbox, Rover, and Roche are just a few of the huge names that trust our online editor. Its fast, versatile editing engine and vast stock content collection for adding stock movies, photos, and audio tracks to your productions are ideal for business users.
WeVideo also stands out since it provides unlimited cloud storage for all of your videos, which you can download and watch on any device. The only drawback is that all of this comes at a price, with WeVideo offering a variety of payment plans ranging from $4.99 to $36.99 a month.
Follow the steps to edit videos using WeVideo:
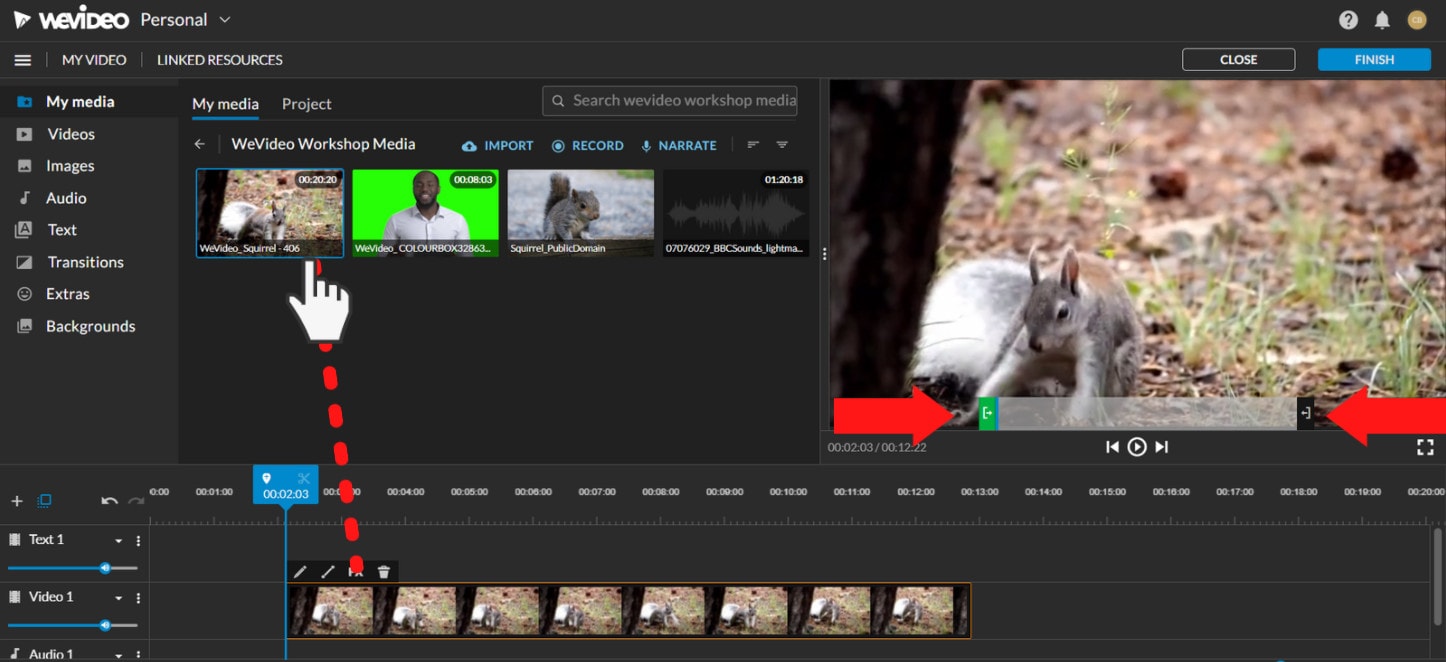
Step 1: Open WeVideo and import the video file.
Step 2: Click on create new video in the left-hand corner of the screen.
Step 3: Edit the video.
The video clip you imported will appear in the viewing window to the right once you click on it. By moving the arrows and either end, you can edit out the beginning or end of your footage.
- Drag the clip into your timeline from your media pool.
- Place the clip on your timeline by dragging and dropping it.
- Click the scissor symbol after moving the blue marker to the spot where you want to cut your clip.
- Once the material has been chopped, you can erase bits of it by selecting it with your mouse and then pressing delete on your keyboard or rearrange the clips in the timeline by dragging and dropping them to other positions.
Step 4: Add effects, transitions, and music to the video.
Step 5: Save and export the video by clicking on the Finish tab.
FAQs about editing FLV video
- How to open FLV files?
Any FLV player is required to view FLV files. Various players are available, including VLC, FLV Player, Sothink FLV Player for Mac, Tonec Free FLV Player, Any FLV Player, and others.
- Is Filmora compatible with Mac?
Filmora requires macOS Sierra (version 10.12) or later and the Big Sur (version 11) and Apple M1 chips. Touch Bar compatibility for MacBook Pro users and custom shortcuts to speed up editing.
- What is the best online FLV editor?
There are numerous free online editors to choose from. Fastreel, WeVideo, and FlexClip Video Maker are a few of the most popular.
- Is FLV better than MP4?
Because FLV and MP4 are the two most popular video file formats, it’s crucial to know which one is preferable. Adobe’s proprietary format is FLV. Both formats employ video and audio codecs and have equal performance levels. In their unprocessed state, MP4 files are more adaptable. You can, however, use an FLV file at the same time if you have the correct player.
- How do I choose a video editor?
When comparing video editing software, there are six crucial elements to consider.
- Budget and cost
- Ease of use/learning curve
- Multi-GPGPU acceleration and video format support
- Tools for advanced editing
- Music, special effects, and other goodies
- Customer service is second to none.
For macOS 10.14 or later
Therefore, you can use the following steps to edit FLV video on Windows and Mac:
Step 1: Import file:
Step 2: Edit the FLV file:
Acquire the perfect tool in your palm for anything you want to do, such as clipping, cropping, rotating, and more.
Furthermore, all editing capabilities in the toolbar allow drag-and-drop, making it even easier to touch up your films quickly. Consider the following scenario:
- Drag and drop a transition into the video/photo, or right-click it and select “Apply to All.”
- Please drag & drop a title template to the position where you want it to appear, then adjust it.
- To use the effects, select one from the 50+ available video effects, select it, and apply it to your photos/videos instantaneously.
Step 3: Save or Export the file:
When you’re done, export your modified MP4 files to Windows/Mac and quickly share them on YouTube, with the option of sending a message to Facebook and Twitter. When you click Create in the program window’s middle right corner, you’ll be taken to the Output window below.
Alternative Way to Edit FlV Video on Windows
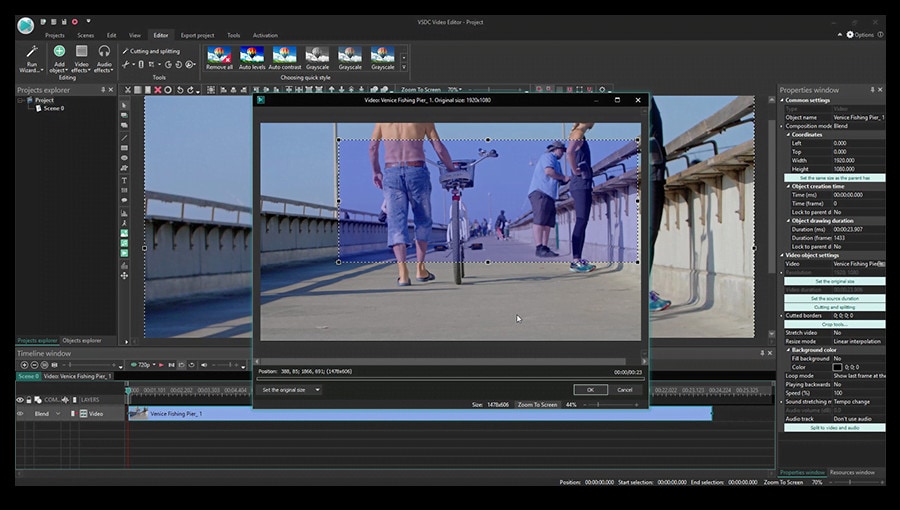
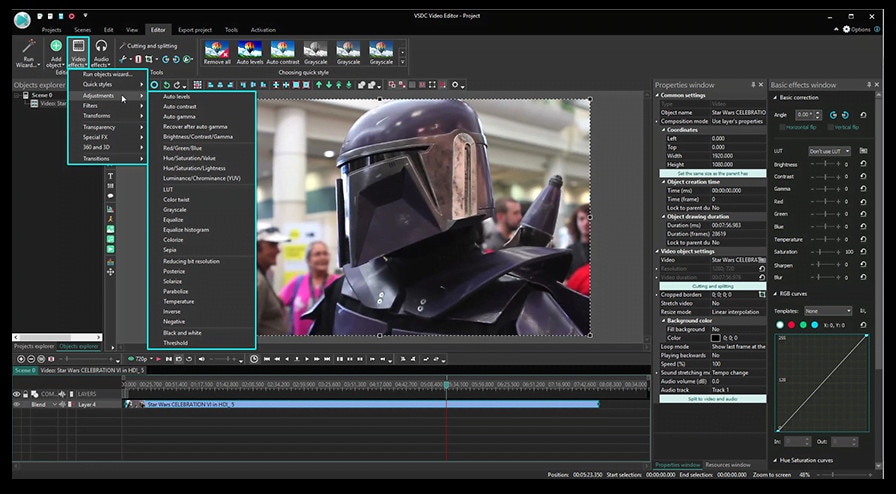
1. VSDC
VSDC is a free video editor along with a lot of advanced features. Cut, combine, trim, crop, and other editing capabilities are available to help you polish your FLV films.
Although it may not look logical, learning the editing capabilities hidden within modular boxes is simple. One noteworthy aspect of VSDC is its ability to produce good visual effects using many trendy video effects, transitions, and filters.
Furthermore, strong chroma keys, color correction, object modification, and other editing tools can be utilized to edit FLV videos. It not only creates excellent FLV videos, but it also supports a wide range of media conversion, allowing you to convert FLV files to various formats and export them without a watermark.
Therefore, follow the below mentioned steps to edit FLV video using VSDC:
Step 1: Install the software on the Windows. Open the application and import the video.
Step 2: Use cutting and splitting tools to edit the video.
The first icon is a picture of a pair of scissors, which is a cutting tool. It’s very useful when you need to cut the beginning or end of a film. Place the cursor exactly where you want to cut, then select “Trim start” or “Trim finish” from the dropdown cutting menu (the small triangle next to the scissors icon).
Cropping is also simple. If you have too much additional space around the scene object recorded, just choose the file you want to trim and select the cropping icon from the “Cutting and Splitting” option. A new window will appear, allowing you to select the region of the scene that should stay.
Step 3: Apply effects and transitions.
To use one, first select the video file you wish to edit, then go to the Video effects tab and select the effect you want to use. On the timeline, a new tab will appear, containing all of the effects done to the selected object. You can alter the effect’s duration and position in time by dragging it with the mouse there. The properties pane on the right-hand side can be used to change other parameters.
Transitions follow the same rule. Place your cursor where you want the transition to begin, then choose a transition from the Video effects dropdown menu and manually adjust the duration.
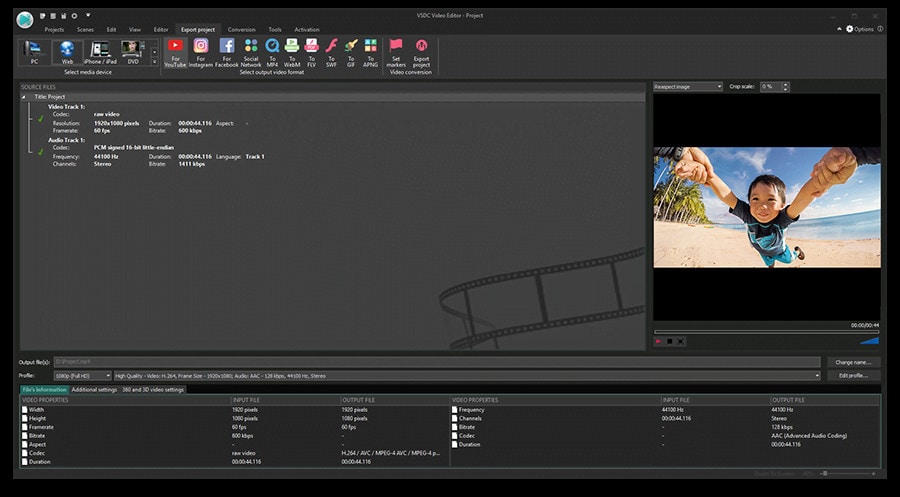
Step 4: Save changes and export video.
Make sure your movie appears exactly how you want it to before exporting it. If the video appears choppy, use the red preview button and lower the preview quality. When the PC’s resources are insufficient to process the video in real time, lagging can occur. Keep in mind that it has no bearing on the outcome. When you’re finished, navigate to the Export project tab and select an export format.
2. Adobe Premiere Pro:
Professional video editors use Premiere Pro to make everything from YouTube videos to Hollywood films like Mank, a 2021 Oscar candidate. It’s also widely utilized in the workflows of designers, animators, and VFX artists, and we can see why after lengthy testing.
We found the software’s UI to be simple to use, and it increased our productivity by separating things into various workspaces, such as editing, effects, and audio. When we tested it on both Mac and PC, we discovered that each workspace helps handle a specific activity while minimizing distraction.
Edit the FLV video with Adobe Premiere Pro using the following steps:
Step 1: Import the video and create initial sequence.
Step 2: In the Timeline, trim and rearrange clips, add audio, and transitions.
Step 3: Add title and graphics.
In Premiere Pro, you may make onscreen titles, as well as stylize and animate your images.
Step 4: Export your video.
Alternative Way to Edit FlV Video on Mac
1. Blender:
Under the GNU General Public License, Blender is a free, open-source 3D content production program that runs on all major operating systems. Blender is one of the greatest video editors for both Windows and Mac, with advanced features such as modifier-based modeling tools, powerful character animation capabilities, a node-based material, etc.
Because it is developed for professionals, it is tough to use as a beginner. However, it is unrestricted in its use and distribution. In addition, color options are changeable and versatile in the UI.
In contrast, this free video editor is perfect for semi-pros or those who want to enhance their video editing skills. However, you’ll need a lot of time and effort to learn it.
Step 1: Open the application.
Step 2: Then, go into File->New->Video Editing to open the video editor.
Step 3: Import the video and start editing using the editing tools.
Step 4: Save and export the video.
2. Final Cut Pro:
When it comes to video editing software, Apple’s Final Cut Pro is one of the industry standards. As a result, it’s widely utilized in the television and film industries - at least among Mac users. However, one of the truly convincing reasons to choose it over Premiere Pro is because it is subscription-free: you only pay once.
The software’s Magnetic Timeline, grouping tools, a vast selection of effects, solid organizational capabilities, and simple ways to add and edit audio make it a favorite among professional video editors. 360° video, HDR, and powerful color correcting tools are among the other capabilities. It’s a strong software with a lot of features.
Follow the steps to edit FLV video using Final Cut Pro:
Step 1: Create Project.
To make a movie in Final Cut Pro, you must first establish a project, which keeps track of your editing selections and the media you utilize.
Step 2: Select and add clips to the timeline:
The second stage in making a movie with Final Cut Pro is to add and arrange clips in your project. In the timeline, you can move and reorder clips.
Step 3: Cut and trim video:
Final Cut Pro has a number of features for altering the start and stop points of clips in the timeline, as well as regulating the pacing of shots from one to the next.
Step 4: Edit the video by adding effects and transitions:
Final Cut Pro includes a number of advanced editing features that make it simple to create a professional film. Visual enhancements and colour correction are among the finishing touches.
Step 5: Save and export video:
2 Ways to Edit FlV Video on Android:
1. Inshot:
For Android users, Inshot is a fantastic image and video editor. This Android video editor allows you to add popular stickers and emoticons to your films, making them more fashionable and unique.
The program supports HD video output, allowing you more control over your footage. Moreover, the additional sound and video can be synchronized with the available video chronology.
You can quickly blend more than two movies into one with rich effects and sound with this Android editor app. In addition, you can generate a watermark using unique text provided in the app, and subtitles support allow you to produce one with a variety of fonts.
Following are the steps that you can follow to edit FLV video using Inshot:
Step 1: Open the app and import the video.
Tap “Video” to open your phone’s gallery folder and begin editing a video in the InShot app. Select a video to work with. Adjust the canvass after your video has been loaded into the InShot App. For your other social media accounts, there are aspect ratios and sizes that work well with the video. It also has the option of being in portrait or landscape mode.
Step 2: Trim and split videos.
Step 3: Merge videos (optional):
By combining clips, you can combine them into a single film or project. Simply choose the videos you want to import from the drop-down menu. By tapping the “+” button on the lower left of the screen, you can insert and merge more videos. Your project will then be updated using the selected video.
Step 4: Apply filters, add music, text and stickers.
Step 5: Once you are done with the editing process, save the file.
2. Videoshow:
VideoShow has a lot of video editing options. It is a simple and practical video editing program and movie scene maker for art directors and beginners. Using this video cutter, you may reverse, blur, duplicate, edit, merge and split collage clips or films.
You can also use VideoShow to adjust the audio or add subtitles to any video. It also allows you to use different filters on any video on your device. Over 50 intricate themes are included in the program, allowing you to create gorgeous music videos, slide shows, and vlogs in no time.
The annual subscription package is for $135.19, or you can also make a one-time purchase for $225.78.
However, to edit the video, you can use the following steps:
Step 1: Download and install the videoshow application and open it. Upload the video that you want to edit.
Step 2: Edit the video by applying filters or cutting and trimming the part of the video that you want to remove.
Step 3: Save changes and export the video to your preferred location.
2 Ways to Edit FlV Video on iPhone:
1. LumaFusion:
No other software program on the iPhone comes close to the feature set that LumaFusion offers for video editing. It is the only premium app on this list, and it is well worth every penny.
But, of course, YouTubers aren’t the only ones who use the program; mobile journalists and professional video producers who don’t want to lug along their bulky camera equipment and editing apparatus also use it.
LumaFusion deals with up to six video and audio tracks for photographs, movies, audio, titles, and graphics, and six audio tracks for narration, music, and sound effects. You also receive a magnetic timeline; importing clips is a breeze once they’ve been imported.
There are many transitions and effects to choose from, all of which can be layered. Finally, it includes much royalty-free music, sound effects, and other assets. So if you need a professional video editing tool for your iPhone, LumaFusion ($29.99) is the way to go.
Follow these steps to edit FLV video using LumaFusion:
Step 1: To create your first project, press + at the bottom of the screen. You can create a new project by tapping that area or by tapping the Plus button.
Step 2: Import video:
The Import section is located in the top left corner of the screen. This defaults to the Photos tab when you initially launch a new project. All of the photographs and videos can be seen here.
Step 3: Check layout and adjust volume levels
Step 4: Edit the video and add titles.
Step 5: Export the video.
2. Filmora Go:
Without a doubt, Filmora is one of the greatest free video editors for iPhone that does not contain any watermarks. In addition, it’s compatible with both iPhones and Android devices and has a simple user interface.
Filmora is the greatest iPhone video editor for beginners, with themed filters and effects that add flair to your videos without any work.
Filmora has many unique features, including themes for your videos and ‘Materials,’ which are visual effects created by the program. Unfortunately, materials are only available with Filmora Pro, so keep that in mind.
Aside from that, you’ll find all of the typical features here. You can also add titles to videos, utilize stickers and effects, and add music to the background of your movie. You may also add another clip in picture-in-picture mode, which is beneficial.
Below are the following steps to edit FLV video:
Step 1: Open the application and select ‘Create new video’. Now, import the video by choosing the video icon.
Step 2: Edit the video. Within the edit tool, you can trim and split the video. You can also improve the video quality by adding titles, transitions, and music, and voiceovers.
Step 3: After editing the video, select ‘SAVE’ and export the video or download it.
2 Ways to Edit FlV Video Online:
1. Fastreel:
If you’re seeking the finest free online video editor, Fastreel is a terrific tool to start with. This online video editing software provides a wide range of editing options. It can merge, edit, crop, and compress videos to make sharing easier.
It also includes many pre-made templates that you can change to create titles and transitions and other editing features like reverse, looping, and rotating. It’s also quite simple to use, and you can have polished videos in minutes.
There are also numerous pricing options to suit different customers, ranging from a completely free plan with watermarks to paid subscriptions with no limitations.
Use the following steps to edit FLV video:
Step 1: Open Fastreel web and import the video.
Step 2: Use templates to make it look attractive.
Step 3: Edit the video using the template.
Templates are unfinished videos with all of the effects already applied, such as backdrops, transitions, animated stickers, and titles. There are blank spots for your photos or videos, and you can arrange them in any sequence you like. You can also add music from the Fastreel library or upload your own track after entering your text.
Step 4: Once you are done with edits, save the video and export it.
2. WeVideo:
When you’re seeking the greatest video producer online, another wonderful choice to explore is WeVideo.
Google, Dropbox, Rover, and Roche are just a few of the huge names that trust our online editor. Its fast, versatile editing engine and vast stock content collection for adding stock movies, photos, and audio tracks to your productions are ideal for business users.
WeVideo also stands out since it provides unlimited cloud storage for all of your videos, which you can download and watch on any device. The only drawback is that all of this comes at a price, with WeVideo offering a variety of payment plans ranging from $4.99 to $36.99 a month.
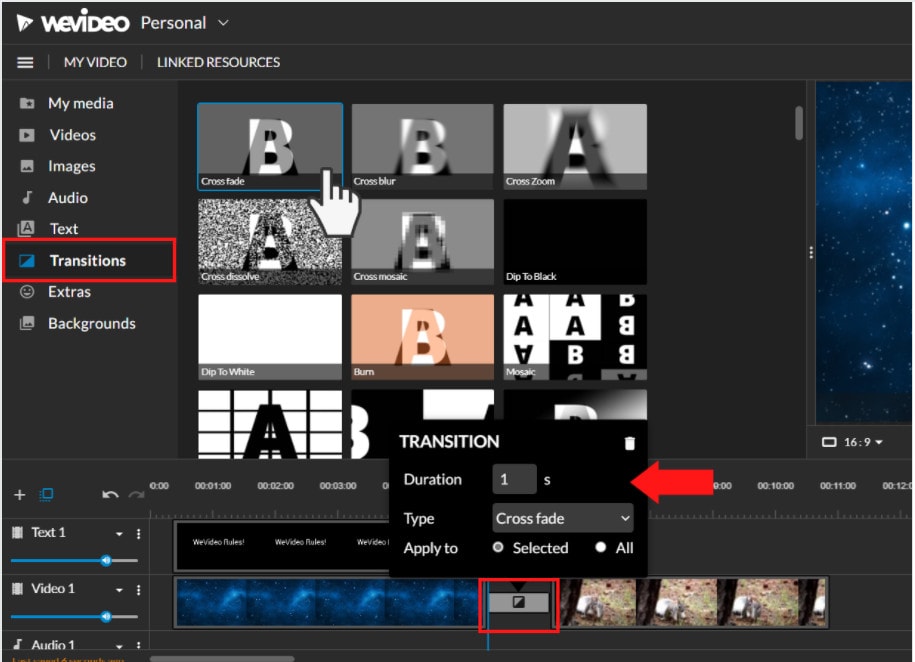
Follow the steps to edit videos using WeVideo:
Step 1: Open WeVideo and import the video file.
Step 2: Click on create new video in the left-hand corner of the screen.
Step 3: Edit the video.
The video clip you imported will appear in the viewing window to the right once you click on it. By moving the arrows and either end, you can edit out the beginning or end of your footage.
- Drag the clip into your timeline from your media pool.
- Place the clip on your timeline by dragging and dropping it.
- Click the scissor symbol after moving the blue marker to the spot where you want to cut your clip.
- Once the material has been chopped, you can erase bits of it by selecting it with your mouse and then pressing delete on your keyboard or rearrange the clips in the timeline by dragging and dropping them to other positions.
Step 4: Add effects, transitions, and music to the video.
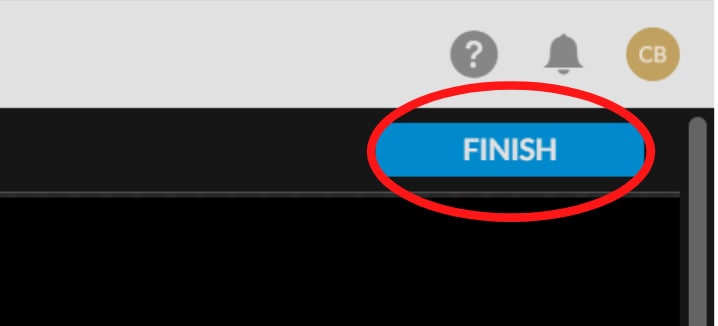
Step 5: Save and export the video by clicking on the Finish tab.
FAQs about editing FLV video
- How to open FLV files?
Any FLV player is required to view FLV files. Various players are available, including VLC, FLV Player, Sothink FLV Player for Mac, Tonec Free FLV Player, Any FLV Player, and others.
- Is Filmora compatible with Mac?
Filmora requires macOS Sierra (version 10.12) or later and the Big Sur (version 11) and Apple M1 chips. Touch Bar compatibility for MacBook Pro users and custom shortcuts to speed up editing.
- What is the best online FLV editor?
There are numerous free online editors to choose from. Fastreel, WeVideo, and FlexClip Video Maker are a few of the most popular.
- Is FLV better than MP4?
Because FLV and MP4 are the two most popular video file formats, it’s crucial to know which one is preferable. Adobe’s proprietary format is FLV. Both formats employ video and audio codecs and have equal performance levels. In their unprocessed state, MP4 files are more adaptable. You can, however, use an FLV file at the same time if you have the correct player.
- How do I choose a video editor?
When comparing video editing software, there are six crucial elements to consider.
- Budget and cost
- Ease of use/learning curve
- Multi-GPGPU acceleration and video format support
- Tools for advanced editing
- Music, special effects, and other goodies
- Customer service is second to none.
For macOS 10.14 or later
Therefore, you can use the following steps to edit FLV video on Windows and Mac:
Step 1: Import file:
Step 2: Edit the FLV file:
Acquire the perfect tool in your palm for anything you want to do, such as clipping, cropping, rotating, and more.
Furthermore, all editing capabilities in the toolbar allow drag-and-drop, making it even easier to touch up your films quickly. Consider the following scenario:
- Drag and drop a transition into the video/photo, or right-click it and select “Apply to All.”
- Please drag & drop a title template to the position where you want it to appear, then adjust it.
- To use the effects, select one from the 50+ available video effects, select it, and apply it to your photos/videos instantaneously.
Step 3: Save or Export the file:
When you’re done, export your modified MP4 files to Windows/Mac and quickly share them on YouTube, with the option of sending a message to Facebook and Twitter. When you click Create in the program window’s middle right corner, you’ll be taken to the Output window below.
Alternative Way to Edit FlV Video on Windows
1. VSDC
VSDC is a free video editor along with a lot of advanced features. Cut, combine, trim, crop, and other editing capabilities are available to help you polish your FLV films.
Although it may not look logical, learning the editing capabilities hidden within modular boxes is simple. One noteworthy aspect of VSDC is its ability to produce good visual effects using many trendy video effects, transitions, and filters.
Furthermore, strong chroma keys, color correction, object modification, and other editing tools can be utilized to edit FLV videos. It not only creates excellent FLV videos, but it also supports a wide range of media conversion, allowing you to convert FLV files to various formats and export them without a watermark.
Therefore, follow the below mentioned steps to edit FLV video using VSDC:
Step 1: Install the software on the Windows. Open the application and import the video.
Step 2: Use cutting and splitting tools to edit the video.
The first icon is a picture of a pair of scissors, which is a cutting tool. It’s very useful when you need to cut the beginning or end of a film. Place the cursor exactly where you want to cut, then select “Trim start” or “Trim finish” from the dropdown cutting menu (the small triangle next to the scissors icon).
Cropping is also simple. If you have too much additional space around the scene object recorded, just choose the file you want to trim and select the cropping icon from the “Cutting and Splitting” option. A new window will appear, allowing you to select the region of the scene that should stay.
Step 3: Apply effects and transitions.
To use one, first select the video file you wish to edit, then go to the Video effects tab and select the effect you want to use. On the timeline, a new tab will appear, containing all of the effects done to the selected object. You can alter the effect’s duration and position in time by dragging it with the mouse there. The properties pane on the right-hand side can be used to change other parameters.
Transitions follow the same rule. Place your cursor where you want the transition to begin, then choose a transition from the Video effects dropdown menu and manually adjust the duration.
Step 4: Save changes and export video.
Make sure your movie appears exactly how you want it to before exporting it. If the video appears choppy, use the red preview button and lower the preview quality. When the PC’s resources are insufficient to process the video in real time, lagging can occur. Keep in mind that it has no bearing on the outcome. When you’re finished, navigate to the Export project tab and select an export format.
2. Adobe Premiere Pro:
Professional video editors use Premiere Pro to make everything from YouTube videos to Hollywood films like Mank, a 2021 Oscar candidate. It’s also widely utilized in the workflows of designers, animators, and VFX artists, and we can see why after lengthy testing.
We found the software’s UI to be simple to use, and it increased our productivity by separating things into various workspaces, such as editing, effects, and audio. When we tested it on both Mac and PC, we discovered that each workspace helps handle a specific activity while minimizing distraction.
Edit the FLV video with Adobe Premiere Pro using the following steps:
Step 1: Import the video and create initial sequence.
Step 2: In the Timeline, trim and rearrange clips, add audio, and transitions.
Step 3: Add title and graphics.
In Premiere Pro, you may make onscreen titles, as well as stylize and animate your images.
Step 4: Export your video.
Alternative Way to Edit FlV Video on Mac
1. Blender:
Under the GNU General Public License, Blender is a free, open-source 3D content production program that runs on all major operating systems. Blender is one of the greatest video editors for both Windows and Mac, with advanced features such as modifier-based modeling tools, powerful character animation capabilities, a node-based material, etc.
Because it is developed for professionals, it is tough to use as a beginner. However, it is unrestricted in its use and distribution. In addition, color options are changeable and versatile in the UI.
In contrast, this free video editor is perfect for semi-pros or those who want to enhance their video editing skills. However, you’ll need a lot of time and effort to learn it.
Step 1: Open the application.
Step 2: Then, go into File->New->Video Editing to open the video editor.
Step 3: Import the video and start editing using the editing tools.
Step 4: Save and export the video.
2. Final Cut Pro:
When it comes to video editing software, Apple’s Final Cut Pro is one of the industry standards. As a result, it’s widely utilized in the television and film industries - at least among Mac users. However, one of the truly convincing reasons to choose it over Premiere Pro is because it is subscription-free: you only pay once.
The software’s Magnetic Timeline, grouping tools, a vast selection of effects, solid organizational capabilities, and simple ways to add and edit audio make it a favorite among professional video editors. 360° video, HDR, and powerful color correcting tools are among the other capabilities. It’s a strong software with a lot of features.
Follow the steps to edit FLV video using Final Cut Pro:
Step 1: Create Project.
To make a movie in Final Cut Pro, you must first establish a project, which keeps track of your editing selections and the media you utilize.
Step 2: Select and add clips to the timeline:
The second stage in making a movie with Final Cut Pro is to add and arrange clips in your project. In the timeline, you can move and reorder clips.
Step 3: Cut and trim video:
Final Cut Pro has a number of features for altering the start and stop points of clips in the timeline, as well as regulating the pacing of shots from one to the next.
Step 4: Edit the video by adding effects and transitions:
Final Cut Pro includes a number of advanced editing features that make it simple to create a professional film. Visual enhancements and colour correction are among the finishing touches.
Step 5: Save and export video:
2 Ways to Edit FlV Video on Android:
1. Inshot:
For Android users, Inshot is a fantastic image and video editor. This Android video editor allows you to add popular stickers and emoticons to your films, making them more fashionable and unique.
The program supports HD video output, allowing you more control over your footage. Moreover, the additional sound and video can be synchronized with the available video chronology.
You can quickly blend more than two movies into one with rich effects and sound with this Android editor app. In addition, you can generate a watermark using unique text provided in the app, and subtitles support allow you to produce one with a variety of fonts.
Following are the steps that you can follow to edit FLV video using Inshot:
Step 1: Open the app and import the video.
Tap “Video” to open your phone’s gallery folder and begin editing a video in the InShot app. Select a video to work with. Adjust the canvass after your video has been loaded into the InShot App. For your other social media accounts, there are aspect ratios and sizes that work well with the video. It also has the option of being in portrait or landscape mode.
Step 2: Trim and split videos.
Step 3: Merge videos (optional):
By combining clips, you can combine them into a single film or project. Simply choose the videos you want to import from the drop-down menu. By tapping the “+” button on the lower left of the screen, you can insert and merge more videos. Your project will then be updated using the selected video.
Step 4: Apply filters, add music, text and stickers.
Step 5: Once you are done with the editing process, save the file.
2. Videoshow:
VideoShow has a lot of video editing options. It is a simple and practical video editing program and movie scene maker for art directors and beginners. Using this video cutter, you may reverse, blur, duplicate, edit, merge and split collage clips or films.
You can also use VideoShow to adjust the audio or add subtitles to any video. It also allows you to use different filters on any video on your device. Over 50 intricate themes are included in the program, allowing you to create gorgeous music videos, slide shows, and vlogs in no time.
The annual subscription package is for $135.19, or you can also make a one-time purchase for $225.78.
However, to edit the video, you can use the following steps:
Step 1: Download and install the videoshow application and open it. Upload the video that you want to edit.
Step 2: Edit the video by applying filters or cutting and trimming the part of the video that you want to remove.
Step 3: Save changes and export the video to your preferred location.
2 Ways to Edit FlV Video on iPhone:
1. LumaFusion:
No other software program on the iPhone comes close to the feature set that LumaFusion offers for video editing. It is the only premium app on this list, and it is well worth every penny.
But, of course, YouTubers aren’t the only ones who use the program; mobile journalists and professional video producers who don’t want to lug along their bulky camera equipment and editing apparatus also use it.
LumaFusion deals with up to six video and audio tracks for photographs, movies, audio, titles, and graphics, and six audio tracks for narration, music, and sound effects. You also receive a magnetic timeline; importing clips is a breeze once they’ve been imported.
There are many transitions and effects to choose from, all of which can be layered. Finally, it includes much royalty-free music, sound effects, and other assets. So if you need a professional video editing tool for your iPhone, LumaFusion ($29.99) is the way to go.
Follow these steps to edit FLV video using LumaFusion:
Step 1: To create your first project, press + at the bottom of the screen. You can create a new project by tapping that area or by tapping the Plus button.
Step 2: Import video:
The Import section is located in the top left corner of the screen. This defaults to the Photos tab when you initially launch a new project. All of the photographs and videos can be seen here.
Step 3: Check layout and adjust volume levels
Step 4: Edit the video and add titles.
Step 5: Export the video.
2. Filmora Go:
Without a doubt, Filmora is one of the greatest free video editors for iPhone that does not contain any watermarks. In addition, it’s compatible with both iPhones and Android devices and has a simple user interface.
Filmora is the greatest iPhone video editor for beginners, with themed filters and effects that add flair to your videos without any work.
Filmora has many unique features, including themes for your videos and ‘Materials,’ which are visual effects created by the program. Unfortunately, materials are only available with Filmora Pro, so keep that in mind.
Aside from that, you’ll find all of the typical features here. You can also add titles to videos, utilize stickers and effects, and add music to the background of your movie. You may also add another clip in picture-in-picture mode, which is beneficial.
Below are the following steps to edit FLV video:
Step 1: Open the application and select ‘Create new video’. Now, import the video by choosing the video icon.
Step 2: Edit the video. Within the edit tool, you can trim and split the video. You can also improve the video quality by adding titles, transitions, and music, and voiceovers.
Step 3: After editing the video, select ‘SAVE’ and export the video or download it.
2 Ways to Edit FlV Video Online:
1. Fastreel:
If you’re seeking the finest free online video editor, Fastreel is a terrific tool to start with. This online video editing software provides a wide range of editing options. It can merge, edit, crop, and compress videos to make sharing easier.
It also includes many pre-made templates that you can change to create titles and transitions and other editing features like reverse, looping, and rotating. It’s also quite simple to use, and you can have polished videos in minutes.
There are also numerous pricing options to suit different customers, ranging from a completely free plan with watermarks to paid subscriptions with no limitations.
Use the following steps to edit FLV video:
Step 1: Open Fastreel web and import the video.
Step 2: Use templates to make it look attractive.
Step 3: Edit the video using the template.
Templates are unfinished videos with all of the effects already applied, such as backdrops, transitions, animated stickers, and titles. There are blank spots for your photos or videos, and you can arrange them in any sequence you like. You can also add music from the Fastreel library or upload your own track after entering your text.
Step 4: Once you are done with edits, save the video and export it.
2. WeVideo:
When you’re seeking the greatest video producer online, another wonderful choice to explore is WeVideo.
Google, Dropbox, Rover, and Roche are just a few of the huge names that trust our online editor. Its fast, versatile editing engine and vast stock content collection for adding stock movies, photos, and audio tracks to your productions are ideal for business users.
WeVideo also stands out since it provides unlimited cloud storage for all of your videos, which you can download and watch on any device. The only drawback is that all of this comes at a price, with WeVideo offering a variety of payment plans ranging from $4.99 to $36.99 a month.
Follow the steps to edit videos using WeVideo:
Step 1: Open WeVideo and import the video file.
Step 2: Click on create new video in the left-hand corner of the screen.
Step 3: Edit the video.
The video clip you imported will appear in the viewing window to the right once you click on it. By moving the arrows and either end, you can edit out the beginning or end of your footage.
- Drag the clip into your timeline from your media pool.
- Place the clip on your timeline by dragging and dropping it.
- Click the scissor symbol after moving the blue marker to the spot where you want to cut your clip.
- Once the material has been chopped, you can erase bits of it by selecting it with your mouse and then pressing delete on your keyboard or rearrange the clips in the timeline by dragging and dropping them to other positions.
Step 4: Add effects, transitions, and music to the video.
Step 5: Save and export the video by clicking on the Finish tab.
FAQs about editing FLV video
- How to open FLV files?
Any FLV player is required to view FLV files. Various players are available, including VLC, FLV Player, Sothink FLV Player for Mac, Tonec Free FLV Player, Any FLV Player, and others.
- Is Filmora compatible with Mac?
Filmora requires macOS Sierra (version 10.12) or later and the Big Sur (version 11) and Apple M1 chips. Touch Bar compatibility for MacBook Pro users and custom shortcuts to speed up editing.
- What is the best online FLV editor?
There are numerous free online editors to choose from. Fastreel, WeVideo, and FlexClip Video Maker are a few of the most popular.
- Is FLV better than MP4?
Because FLV and MP4 are the two most popular video file formats, it’s crucial to know which one is preferable. Adobe’s proprietary format is FLV. Both formats employ video and audio codecs and have equal performance levels. In their unprocessed state, MP4 files are more adaptable. You can, however, use an FLV file at the same time if you have the correct player.
- How do I choose a video editor?
When comparing video editing software, there are six crucial elements to consider.
- Budget and cost
- Ease of use/learning curve
- Multi-GPGPU acceleration and video format support
- Tools for advanced editing
- Music, special effects, and other goodies
- Customer service is second to none.
Phone Aspect Ratio Vertical Definition, Types & Tips
Versatile Video Editor - Wondershare Filmora
If you are a professional video or image creator, you know what aspect ratio is and why aspect ratio is important. Even people passionate about their cameras and visual art enthusiasts know it. If you are a newbie, Let us make it easy for you. This article will talk about the vertical phone aspect ratio ratio, its definition, types, iPhone vertical video dimensions, etc. We’ll also provide you solid tips on mobile vertical video size and how to create phone vertical videos easily. Let’s jump into the topic and see what you can learn.
In this article
01 [What is Phone Aspect Ratio Vertical?](#Part 1)
02 [Types of Phone Aspect Ratio Vertical](#Part 2)
03 [Tips to Create Phone Vertical Videos](#Part 3)
Part 1 What is Phone Aspect Ratio Vertical?
The vertical phone aspect ratio is the “proportional” relationship between the screen’s width and height. For example, if your image or video has an aspect ratio of 4:5, it simply means the width of the screen (photo or video) is four times the height of the image.
The vertical phone aspect ratio is the “proportional” relationship between the screen’s width and height. For example, if your image or video has an aspect ratio of 4:5, it simply means the width of the screen (photo or video) is four times the height of the image.
Back in the television days, you might have seen certain old pictures with black padding on either side of the screen. It was just that they were shot in different aspect ratios and your television screen had different aspect ratios.
Aspect Ratio Vs Resolution
Remember that aspect ratio does not refer to the physical size of an image or its dimensions in pixels (resolution). So aspect ratio 3:1 does not refer to the actual width and height of the image or video; it just describes their relationship.
You are wrong if you think aspect ratio is just another fancy name for resolution. Think again. Check out how it is calculated.
“
| | Aspect Ratio | Resolution | |
| ————— | ————————————————————– | ———————————————————————————- |
| Definition | The Ratio of the width of an image to the height of the image. | Total number of pixels displayed on your screen (computer, cell phone, television) |
| Commonly Used | ● 1:1 ● 3:1 ● 3:2 ● 4:3 ● 5:4 ● 9:1 ● 16:9 | ● 640x480 ● 800x600 ● 1024x768 |
Aspect Ratio Calculator
To get the resolution, you need to multiply width times the height. To get aspect ratio, the formula is: Divide the width by the height or simply divide the long side by the short side.
There are multiple online aspect ratio calculators available. Check out the value for both the images and the videos generated through the photo ratio calculator for your ease.
| Common Aspect Ratio | AR Width | AR Height | Image Width | Image Height |
|---|---|---|---|---|
| 1:1(square) | 1 | 1 | 1920 | 1920 |
| 5:4 (large and medium format cameras) | 5 | 4 | 1920 | 1536 |
| 4:3 Standard | 4 | 3 | 1920 | 1440 |
| 3:2 (35mm camera) | 3 | 2 | 1920 | 1280 |
| 16:9 | 16 | 9 | 1920 | 1080 |
| 3:1 Panoramic | 3 | 1 | 1920 | 640 |
| 9:16 | 9 | 16 | 1080 | 1920 |
For example, the aspect ratio of 3:1 may be an image of 3m wide and 1m high. At the same time it can be 3 feet wide and 1 foot high. For further simplification, consider dimensions in pixels: a 6000×4000 image has 3:2 aspect ratios.
Always remember this small but crucial point. The aspect ratio refers to the image or video you captured or recorded and the display (or screen) in which your video or image would be displayed.
Why is the aspect ratio important?
In the age of web content, asking why aspect ratio is important? Some may consider it naïve. Images need to be uploaded at different aspect ratios for different uses (desktop vs. mobile or blog vs. social media). Incorrect aspect ratio affects your final image and end-user experience.
Choice of the wrong aspect ratio can eliminate the potential for editing (cropping and resizing). In addition, using the correct aspect ratios saves you from facing the trouble of distortion or clipping.
Part 2 Types of Phone Aspect Ratio Vertical
Image Aspect Ratios
The aspect ratio decides and changes the entire composition and how the audience perceives the image. First, let us see some common image aspect ratios.

● 1:1 Ratio

If you have seen a square-shaped image, it had probably a 1:1 aspect ratio. It simply means both sides (width and height of the image) are equal. It was initially the aspect ratio of square television sets. However, this is commonly used for print photos, mobile screens, and social platforms.
● 3:2 Ratio

Initially used for classic 35 mm film and still photography, aspect ratio 3:5 is still used on some laptops, tablets, and handheld game consoles. The famous example of this aspect ratio Images framed at 1080×720 pixels or 6″x4″.
● 5:4 Ratio

It was commonly used for photography and art prints. For Images having dimensions, 8″x10″ and 16x20 have the 5:4 aspect ratios.
Video Aspect Ratios

Like the image aspect ratios, video aspect ratios would also profoundly affect its composition and thus how your directed viewers perceive it. Some common mobile vertical video size or video aspect ratios are given below.
● 16:9 Ratio

If you have seen presentation slides, computer monitors, or widescreee seen this slimmer and more elongated rectangular-shaped 16:9 Ratio. This is the standardized widescreen aspect ratio that you see everywhere on the web. In terms of pixel common dimension for 16:9 is 1920×1080 pixels and 1280×720 pixels.
● 9:16 Ratio (Vertical)

When smartphones started coming with video capabilities, this Ratio became popular. Likewise, today this Ratio is trendy for social media platforms with video story capabilities.
The Instagram story typically consists of 1080x1920 pixels, which in terms of aspect ratio is 9:16. Most phones, such as iPhone, have a feature that allows you to record footage in both (16:9 as well as 9:16).
Phone aspect ratio vertical
Back in the day, taking aspect ratio vertical (portrait mode) footage was considered unprofessional and a sign of an amateur. But the digital revolution has changed that. Now from unforgivable sin, the vewayal mode has practically become a mainstream media sensation. Vertical style has now become the dominant format.

Phone aspect ratio vertical simply means taller screen than wider. The most common type is 9:16 (1080x1920 pixels), a typical vertical videos aspect ratio. Although this phone aspect ratio vertical comes in a few more shapes and sizes such as 4:5, 2:3.
Part 3 Tips to Create Phone Vertical Videos
Creating vertical videos is crucial for getting engagements and growing your brand. It is easy with a phone because most smartphones, by default, record in 9:16, which is the standard vertical aspect ratio. But with a camera, you have to manually edit to the correct aspect ratio before you shoot it.
You can also shoot horizontally and then change it to vertical, but it needs professional videographer expertise.
Who wants to rotate their phones watching videos? Well, as far as the trend, Let us see some tiny but handy tips for creating vertical phone videos.
1. Choose the correct aspect ratio
Video taller than the 1:1 aspect ratio is commonly considered Vertical video. Types of these vertical aspects ratio include 4:5 (social), 2:3 and 9:16. They are all taller than they are wide, thus vertical.
Choosing the correct aspect ratio for your vertical video, always think about why and where you intend to use the video. The second important thing you should consider is your plans for editing that video.
Cropping horizontal can be irritating and sometimes disappointing at the same time. Producing a 9:16 vertical frame at HD resolution from a horizontal HD frame may result in very pixelated and low-quality footage.
If, for some reason, you still want first to shoot it horizontal and then change it back to mobile vertical video size. You may need to shoot in 4K horizontally to get extra pixels to work with. It can later be cropped in the sides to 9:16 (Vertical phone aspect ratio). Plus, you won’t need to scale it anymore.
2. Direct your viewer’s eyes
For hooking social media viewers, you need to put your most interesting visual upfront. These include GIFs, colourful stop-motion or looping animation. Always try to match your first couple of shots with your overall brand personality.
3. Screen splitting into two or more

A tall vertical screen can be styled with multiple horizontal clips on top of each other. These clips must relate to your relevant content and overall look. Natural lines or patterns can help display them in the most creative ways.
4. Be close to your subject
For producing an intimate experience with the vertical frame, you should get closer to the subject. Most of the action will be positioned to the centre as your viewers scroll. Do not let cut off or cover up your main subject by any text and make sure you leave enough room for text, emojis and stickers.
5. Filling the vertical space
First, make sure that your subject is vertical-friendly. Then get closer and fill the space within the vertical frame. The vertical frame can be filled through the following:
● Up-close shot (if the subject is personal).
● Raising the camera high and tilting it down (to film things like a long, empty road).
● Bird’s-eye view from above.
5. Rule of Third

This photography rule says not to place the main subject directly in the center of the frame. Create more dynamic composition by creating imaginary (Horizontal & Vertical) lines that divide your frame into thirds.
You have to place your subject either on the lines or where the lines meet up. And guess what? You don’t need to draw imaginary nowadays. Most cameras and smartphones provide you with this option.
6. Avoid Shaking
You do not want to distract your viewers with shaky camera moments. Normal pan and 360-degree rotation are acceptable or maybe even essential. But moving side to side too quickly will make it difficult for the camera to process that information. You better use a selfie stick or gimbal.
Now, check out the best vertical video ratios for various social platforms.
Best video aspect ratios for Facebook

● 1:1 or 4:5 (Feed)
● 9:16 (Stories) Full portrait/Vertical
● 1:1 (Video Carousel)
● 16:9 (In streams, ads) -> Full landscape
● 9:16 (Audience Network)
● 2:3 (Vertical)
Best video aspect ratios for Instagram
● 1:1 (Feed)
● 4:5 (Feed ads)
● 9:16 (Stories)
● 9:16 (Reels)
● 9:16 (ICTV)
Best video aspect ratios for Twitter

● 1:1 (Promoted Videos)
● 1:1 or 9:16 (Sponsorship)
● 16:9 (Live Videos)
● 1:11 or 16:9 (Video Posts)
Best video aspect ratios for TikTok
● 9:16, 1:1, or 16:9 (For ads)
● 9:16 (For organic videos)
Wondershare Filmora
Being a newbie and producing perfect and professional vertical video content can be challenging, especially for the social platform. And then perfection requires delicate skills. If you want to change the aspect ratio after capturing an image or shooting a video, you need post-processing software.
There are tons of post-processing software available that have aspect ratio tools. As a tech geek, I even want essential tools that can serve all my needs and are also simple to use. Wondershare Filmora (iOS and Android) and Wondershare Filmora (Windows) is just that platform where you simply record, edit and share right away. It is loaded with easy-to-use editing features, special effects, social media integration options, and your desired music.
The best thing about Filmora Go is that it is for every skill level, unlike the other video editing software. Moreover, it lets you build unique custom build animation without breaking a sweat. So if you have a horizontal video, Filmora Go makes it easy to edit it into a Vertical one.
Features:
● Allows users to make videos anywhere using your iOS or Android device.
● The powerful editing tools of Filmora and Filmora help you create excellent iPhone vertical video dimensions.
● A dynamic music library helps users to add great background music in the videos.
● Both Filmora and Filmora (Desktop) have a user-friendly and intuitive user interface.
● The new Video Beautification feature helps you modify the shape of your face, lips, or nose in the picture.
Wondershare Filmora
Get started easily with Filmora’s powerful performance, intuitive interface, and countless effects!
Try It Free Try It Free Try It Free Learn More >

Conclusion
The vertical phone aspect ratio may seem avoidable, but you need a near-perfect influence on your desired audience to engage and grow. Thus, the Aspect ratio is not something to avoid if you want to compete in the business. Smartphone digital evolution has shifted the balance towards the phone aspect ratio vertical. In this article, we also talked about iPhone video dimensions vertical, hope it will help you. Platforms like Filmora provides comprehensive and easy editing solutions to edit aspect ratio as desired.
If you are a professional video or image creator, you know what aspect ratio is and why aspect ratio is important. Even people passionate about their cameras and visual art enthusiasts know it. If you are a newbie, Let us make it easy for you. This article will talk about the vertical phone aspect ratio ratio, its definition, types, iPhone vertical video dimensions, etc. We’ll also provide you solid tips on mobile vertical video size and how to create phone vertical videos easily. Let’s jump into the topic and see what you can learn.
In this article
01 [What is Phone Aspect Ratio Vertical?](#Part 1)
02 [Types of Phone Aspect Ratio Vertical](#Part 2)
03 [Tips to Create Phone Vertical Videos](#Part 3)
Part 1 What is Phone Aspect Ratio Vertical?
The vertical phone aspect ratio is the “proportional” relationship between the screen’s width and height. For example, if your image or video has an aspect ratio of 4:5, it simply means the width of the screen (photo or video) is four times the height of the image.
The vertical phone aspect ratio is the “proportional” relationship between the screen’s width and height. For example, if your image or video has an aspect ratio of 4:5, it simply means the width of the screen (photo or video) is four times the height of the image.
Back in the television days, you might have seen certain old pictures with black padding on either side of the screen. It was just that they were shot in different aspect ratios and your television screen had different aspect ratios.
Aspect Ratio Vs Resolution
Remember that aspect ratio does not refer to the physical size of an image or its dimensions in pixels (resolution). So aspect ratio 3:1 does not refer to the actual width and height of the image or video; it just describes their relationship.
You are wrong if you think aspect ratio is just another fancy name for resolution. Think again. Check out how it is calculated.
“
| | Aspect Ratio | Resolution | |
| ————— | ————————————————————– | ———————————————————————————- |
| Definition | The Ratio of the width of an image to the height of the image. | Total number of pixels displayed on your screen (computer, cell phone, television) |
| Commonly Used | ● 1:1 ● 3:1 ● 3:2 ● 4:3 ● 5:4 ● 9:1 ● 16:9 | ● 640x480 ● 800x600 ● 1024x768 |
Aspect Ratio Calculator
To get the resolution, you need to multiply width times the height. To get aspect ratio, the formula is: Divide the width by the height or simply divide the long side by the short side.
There are multiple online aspect ratio calculators available. Check out the value for both the images and the videos generated through the photo ratio calculator for your ease.
| Common Aspect Ratio | AR Width | AR Height | Image Width | Image Height |
|---|---|---|---|---|
| 1:1(square) | 1 | 1 | 1920 | 1920 |
| 5:4 (large and medium format cameras) | 5 | 4 | 1920 | 1536 |
| 4:3 Standard | 4 | 3 | 1920 | 1440 |
| 3:2 (35mm camera) | 3 | 2 | 1920 | 1280 |
| 16:9 | 16 | 9 | 1920 | 1080 |
| 3:1 Panoramic | 3 | 1 | 1920 | 640 |
| 9:16 | 9 | 16 | 1080 | 1920 |
For example, the aspect ratio of 3:1 may be an image of 3m wide and 1m high. At the same time it can be 3 feet wide and 1 foot high. For further simplification, consider dimensions in pixels: a 6000×4000 image has 3:2 aspect ratios.
Always remember this small but crucial point. The aspect ratio refers to the image or video you captured or recorded and the display (or screen) in which your video or image would be displayed.
Why is the aspect ratio important?
In the age of web content, asking why aspect ratio is important? Some may consider it naïve. Images need to be uploaded at different aspect ratios for different uses (desktop vs. mobile or blog vs. social media). Incorrect aspect ratio affects your final image and end-user experience.
Choice of the wrong aspect ratio can eliminate the potential for editing (cropping and resizing). In addition, using the correct aspect ratios saves you from facing the trouble of distortion or clipping.
Part 2 Types of Phone Aspect Ratio Vertical
Image Aspect Ratios
The aspect ratio decides and changes the entire composition and how the audience perceives the image. First, let us see some common image aspect ratios.
● 1:1 Ratio
If you have seen a square-shaped image, it had probably a 1:1 aspect ratio. It simply means both sides (width and height of the image) are equal. It was initially the aspect ratio of square television sets. However, this is commonly used for print photos, mobile screens, and social platforms.
● 3:2 Ratio
Initially used for classic 35 mm film and still photography, aspect ratio 3:5 is still used on some laptops, tablets, and handheld game consoles. The famous example of this aspect ratio Images framed at 1080×720 pixels or 6″x4″.
● 5:4 Ratio
It was commonly used for photography and art prints. For Images having dimensions, 8″x10″ and 16x20 have the 5:4 aspect ratios.
Video Aspect Ratios
Like the image aspect ratios, video aspect ratios would also profoundly affect its composition and thus how your directed viewers perceive it. Some common mobile vertical video size or video aspect ratios are given below.
● 16:9 Ratio
If you have seen presentation slides, computer monitors, or widescreee seen this slimmer and more elongated rectangular-shaped 16:9 Ratio. This is the standardized widescreen aspect ratio that you see everywhere on the web. In terms of pixel common dimension for 16:9 is 1920×1080 pixels and 1280×720 pixels.
● 9:16 Ratio (Vertical)
When smartphones started coming with video capabilities, this Ratio became popular. Likewise, today this Ratio is trendy for social media platforms with video story capabilities.
The Instagram story typically consists of 1080x1920 pixels, which in terms of aspect ratio is 9:16. Most phones, such as iPhone, have a feature that allows you to record footage in both (16:9 as well as 9:16).
Phone aspect ratio vertical
Back in the day, taking aspect ratio vertical (portrait mode) footage was considered unprofessional and a sign of an amateur. But the digital revolution has changed that. Now from unforgivable sin, the vewayal mode has practically become a mainstream media sensation. Vertical style has now become the dominant format.
Phone aspect ratio vertical simply means taller screen than wider. The most common type is 9:16 (1080x1920 pixels), a typical vertical videos aspect ratio. Although this phone aspect ratio vertical comes in a few more shapes and sizes such as 4:5, 2:3.
Part 3 Tips to Create Phone Vertical Videos
Creating vertical videos is crucial for getting engagements and growing your brand. It is easy with a phone because most smartphones, by default, record in 9:16, which is the standard vertical aspect ratio. But with a camera, you have to manually edit to the correct aspect ratio before you shoot it.
You can also shoot horizontally and then change it to vertical, but it needs professional videographer expertise.
Who wants to rotate their phones watching videos? Well, as far as the trend, Let us see some tiny but handy tips for creating vertical phone videos.
1. Choose the correct aspect ratio
Video taller than the 1:1 aspect ratio is commonly considered Vertical video. Types of these vertical aspects ratio include 4:5 (social), 2:3 and 9:16. They are all taller than they are wide, thus vertical.
Choosing the correct aspect ratio for your vertical video, always think about why and where you intend to use the video. The second important thing you should consider is your plans for editing that video.
Cropping horizontal can be irritating and sometimes disappointing at the same time. Producing a 9:16 vertical frame at HD resolution from a horizontal HD frame may result in very pixelated and low-quality footage.
If, for some reason, you still want first to shoot it horizontal and then change it back to mobile vertical video size. You may need to shoot in 4K horizontally to get extra pixels to work with. It can later be cropped in the sides to 9:16 (Vertical phone aspect ratio). Plus, you won’t need to scale it anymore.
2. Direct your viewer’s eyes
For hooking social media viewers, you need to put your most interesting visual upfront. These include GIFs, colourful stop-motion or looping animation. Always try to match your first couple of shots with your overall brand personality.
3. Screen splitting into two or more
A tall vertical screen can be styled with multiple horizontal clips on top of each other. These clips must relate to your relevant content and overall look. Natural lines or patterns can help display them in the most creative ways.
4. Be close to your subject
For producing an intimate experience with the vertical frame, you should get closer to the subject. Most of the action will be positioned to the centre as your viewers scroll. Do not let cut off or cover up your main subject by any text and make sure you leave enough room for text, emojis and stickers.
5. Filling the vertical space
First, make sure that your subject is vertical-friendly. Then get closer and fill the space within the vertical frame. The vertical frame can be filled through the following:
● Up-close shot (if the subject is personal).
● Raising the camera high and tilting it down (to film things like a long, empty road).
● Bird’s-eye view from above.
5. Rule of Third
This photography rule says not to place the main subject directly in the center of the frame. Create more dynamic composition by creating imaginary (Horizontal & Vertical) lines that divide your frame into thirds.
You have to place your subject either on the lines or where the lines meet up. And guess what? You don’t need to draw imaginary nowadays. Most cameras and smartphones provide you with this option.
6. Avoid Shaking
You do not want to distract your viewers with shaky camera moments. Normal pan and 360-degree rotation are acceptable or maybe even essential. But moving side to side too quickly will make it difficult for the camera to process that information. You better use a selfie stick or gimbal.
Now, check out the best vertical video ratios for various social platforms.
Best video aspect ratios for Facebook
● 1:1 or 4:5 (Feed)
● 9:16 (Stories) Full portrait/Vertical
● 1:1 (Video Carousel)
● 16:9 (In streams, ads) -> Full landscape
● 9:16 (Audience Network)
● 2:3 (Vertical)
Best video aspect ratios for Instagram
● 1:1 (Feed)
● 4:5 (Feed ads)
● 9:16 (Stories)
● 9:16 (Reels)
● 9:16 (ICTV)
Best video aspect ratios for Twitter
● 1:1 (Promoted Videos)
● 1:1 or 9:16 (Sponsorship)
● 16:9 (Live Videos)
● 1:11 or 16:9 (Video Posts)
Best video aspect ratios for TikTok
● 9:16, 1:1, or 16:9 (For ads)
● 9:16 (For organic videos)
Wondershare Filmora
Being a newbie and producing perfect and professional vertical video content can be challenging, especially for the social platform. And then perfection requires delicate skills. If you want to change the aspect ratio after capturing an image or shooting a video, you need post-processing software.
There are tons of post-processing software available that have aspect ratio tools. As a tech geek, I even want essential tools that can serve all my needs and are also simple to use. Wondershare Filmora (iOS and Android) and Wondershare Filmora (Windows) is just that platform where you simply record, edit and share right away. It is loaded with easy-to-use editing features, special effects, social media integration options, and your desired music.
The best thing about Filmora Go is that it is for every skill level, unlike the other video editing software. Moreover, it lets you build unique custom build animation without breaking a sweat. So if you have a horizontal video, Filmora Go makes it easy to edit it into a Vertical one.
Features:
● Allows users to make videos anywhere using your iOS or Android device.
● The powerful editing tools of Filmora and Filmora help you create excellent iPhone vertical video dimensions.
● A dynamic music library helps users to add great background music in the videos.
● Both Filmora and Filmora (Desktop) have a user-friendly and intuitive user interface.
● The new Video Beautification feature helps you modify the shape of your face, lips, or nose in the picture.
Wondershare Filmora
Get started easily with Filmora’s powerful performance, intuitive interface, and countless effects!
Try It Free Try It Free Try It Free Learn More >
Conclusion
The vertical phone aspect ratio may seem avoidable, but you need a near-perfect influence on your desired audience to engage and grow. Thus, the Aspect ratio is not something to avoid if you want to compete in the business. Smartphone digital evolution has shifted the balance towards the phone aspect ratio vertical. In this article, we also talked about iPhone video dimensions vertical, hope it will help you. Platforms like Filmora provides comprehensive and easy editing solutions to edit aspect ratio as desired.
How to Create an Aesthetic Slideshow Presentation
How to Make an Aesthetic Slideshow Presentation
An easy yet powerful editor
Numerous effects to choose from
Detailed tutorials provided by the official channel
The slideshow must be engaging and attractive. And the recent trend is all about making things around your aesthetic, that is, visually pleasant. You might want to know how you, too, can make such aesthetic slideshows? Well, in the following discussion, we will discuss all of it, along with the best tool for making the best aesthetic slideshows.
In this article
01 The Best 8 Premium Aesthetic Slideshow Template Designs
02 [How to Make an Aesthetic Slideshow Presentation](#Part 2)
03 [FAQ of Making Aesthetic Slideshow](#Part 3)
Part 1 The Best 8 Premium Aesthetic Slideshow Template Designs
One of the best ways of making marvellous aesthetic slideshows is by using an aesthetic slideshow template. The templates have readymade elements that emit aesthetic and minimalistic vibes to your slideshow.
You will find numerous templates that have an aesthetic and minimalistic theme. You can choose any among the countless for your slideshows. There are many designs of templates available for making aesthetic slideshows.
We will discuss eight premium aesthetic slideshow template designs that you can readily use in your slideshows to make your work a lot easier. These template designs will be some of the best ones and can serve and suit every possible purpose for creating a slideshow.
So, here are the best and the most useful eight aesthetic slideshow template designs that you can use for making fantastic aesthetic slideshows.
01Leafy Template Design
The Leafy template design is best suitable for making the best aesthetic slideshows with a classy presentation theme. It is available in Google Slides, and it consists of as many as 120 unique designed slides and two variations of colours.
You can readily make changes and edits and customize the tinplated design according to your imagination, reference and skills. It is best for making classy presentations because the designs are simple, yet they reflect the quality of elegance that helps you create the best aesthetic sideshows.

02Cinematic Reel Template
The Cinematic Reel template is a premiere pro template design by Videomaker. It consists of 22 media layers and 12 editable tact layers, and it has a very stylish design and includes simple yet impactful text animations.

Any trailers, demos, reel videos, short movie trails and the like can be ideally and perfectly created with this template design. Using this template design is absolutely effortless, and you can make any content-related slideshows effortlessly and ideally with this slideshow template design by Videomaker.
03B-Clinique
B-Clinique is the template design for making a minimalist aesthetic slideshow avowable on Google Slides. This template design is best suited for creating trendy aesthetic slideshows. It includes designs of line arts, subtle pleasant shares and all the other components that solely and perfectly reflect an aesthetic aura.
It was primarily designed for making slides for cosmetology purposes. It has 30 different slide designs and is ideal for creating slides for the industry by integrating a few edits. It ideally reflects a calming aura as it uses the earthy brown tone and shade for the design of the template.

04YouTube Pack Template
We all know that various social media platforms have become the most influential factor in our lives. And YouTube is the most renowned among all the other social media platforms, and now, it has even become a mode of earning a livelihood.
And for making slideshows that are to be put up on one or more social media platforms, especially on YouTube, they need to be presented in a particular manner. And you can readily make aesthetic slideshows ideal for social media platforms, especially YouTube, with the YouTube Pack Templated designs, which is Mirs.
This template includes all the necessary elements, such as the “Subscribe” panel, other buttons, side frames, and the like. One can readily use it to make incredible aesthetic slides for their social media channels.

05Sunlike Template
The Sunlike Templates by the Google Slides. It is a beautiful and professional aesthetic slideshow template with design slides that can create a clean and highly professional. It is a modern-creative type of template that consists of 39 distinctive design slides. You can readily edit and thus, customise the slides according to your overreference, needs and skills.
It helps you create a lively and aesthetic presentation at the same time. It includes a lot of vibrant colours that make your presentation look exuberant and engaging.

06Fast Glitch Transitions Template
The Fast Glitch Transitions template is by Red Feathers. Transitions have been the recent trend, and in every other video, we see different and unique transitions. And when you integrate transitions in your slideshows, they become more eye-catching.
And the glitch transitions can create a unique yet pleasing effect for your slideshows when you use the many among the uncountable options available.

07Solv Template
The Solv template is by Google Slides. It is best suitable for creating your start-up business slideshow presentation when you are a big fan of aesthetic presentations. 36 slides are present with attractive pop colours, which, although they look vibrant, are gladly aesthetic too.

08Text Messages Template
The Text Messages template by Blinque can be the trendiest and the most aesthetic template design one can find. It helps you create slideshow videos in the form of text messages. So, if you want to narrate anything and do it uniquely, this template can be the best fit for you.

Part 2 How to Make an Aesthetic Slideshow Presentation
Making a slideshow presentation is quite simple and an aspect that is well-known to many. But, how can you make your slideshows look aesthetic? If you include them in your slideshows, there are a few factors that can readily turn them aesthetic.
So, let us look into the different aspects that can help you turn your slides aesthetic when you integrate them into it.
● Minimalistic Text Designs
Minimalism and aesthetic aura go simultaneously. So, the more your efforts to keep your texts and writings in your slide minimalistic, the more aesthetic your slide would look. Several such finds or text designs are available, and you can readily choose among them and integrate them into your slides.
● Use soft and pastel colours for your theme of the template
Every aesthetic object’s most common and signature feature is its subtle, pastel shade. So, stick to using a soft pastel shade for the theme of your template. The colours, such as lavender, sift purple, millennial pink, powder blue or tones of silver, can ideally fit under the collection of aesthetic shades for the youth template of the slideshows.
● Minimalistic Pictures
The images you use in your slideshow will play a considerable role in deeming how aesthetic your slides look. So, choose them after enough analysis. See whether the photos have an aesthetic or minimalistic feature. By that, we are referring to the copper tone of the picture, its content and its size. It is best to include small images to reflect the slide’s minimalistic character.
Part 3 FAQ of Making Aesthetic Slideshow
Here are some of the FAQs about making aesthetic slideshows.
01How can I make an aesthetic slideshow in PowerPoint?
One can effortlessly do so with the templates available. Also, it is best to use small images, subtle pastel shades for the theme and minimalistic text designs or fonts in the slides.
02Which is the best tool for creating aesthetic slideshows?
Filmore is one of the most effective and ideal tools for making the most aesthetically pleasing slideshows. It has over 700 filters, innumerable templates and uncountable beneficial features to make your slides look minimalistic and aesthetic.
03How can I use Filmora for making aesthetic slideshows?
Filmora has several templates that reflect minimalistic designs. You can readily use them for your slideshow video. You can also use several filters to give a subtle pastel tone to your slideshow. Lastly, the different motion control features and fonts available can help you make the most aesthetically pleasing slideshows with Filmora.
04Is Filmora suitable for slideshows?
Wondershare Filmora Video Editor is one of the best and renowned tools for video editing. And for making slideshow videos, it Is equally competent and helps make the best and the most aesthetic slideshows with its incredible features.
For Win 7 or later (64-bit)
For macOS 10.12 or later
Filmora is the best video editing tool that one can come across. It has the best and the most advanced features for editing and is ideal for professionals. But, the beginners, too, can use it to enhance their editing skills, as Filmora is not difficult to use.
Also, it is ideal for creating aesthetic slideshow videos. It is because-
● There are more than 800 templates, and among them, there are numerous aesthetic design templates that you can use
● The filters can help add an aesthetic and minimalistic tone to your slideshow video
● You can integrate different aesthetic fonts from the many available.
● Ending Thoughts →
● Now that you know all about creating the best minimalist aesthetic slideshow, bring out all your creative skills and make the most wholesome and engaging slideshow!
● Choose the best templates, and for the ideal results, pick from the templates mentioned above.
● Follow the above steps to create the most aesthetic slideshows that would perfectly mirror your imagination.
● Lastly, use the best video editing tool, Filmora, that will help you make such aesthetic slideshows that will definitely be incomparable and inimitable!
The slideshow must be engaging and attractive. And the recent trend is all about making things around your aesthetic, that is, visually pleasant. You might want to know how you, too, can make such aesthetic slideshows? Well, in the following discussion, we will discuss all of it, along with the best tool for making the best aesthetic slideshows.
In this article
01 The Best 8 Premium Aesthetic Slideshow Template Designs
02 [How to Make an Aesthetic Slideshow Presentation](#Part 2)
03 [FAQ of Making Aesthetic Slideshow](#Part 3)
Part 1 The Best 8 Premium Aesthetic Slideshow Template Designs
One of the best ways of making marvellous aesthetic slideshows is by using an aesthetic slideshow template. The templates have readymade elements that emit aesthetic and minimalistic vibes to your slideshow.
You will find numerous templates that have an aesthetic and minimalistic theme. You can choose any among the countless for your slideshows. There are many designs of templates available for making aesthetic slideshows.
We will discuss eight premium aesthetic slideshow template designs that you can readily use in your slideshows to make your work a lot easier. These template designs will be some of the best ones and can serve and suit every possible purpose for creating a slideshow.
So, here are the best and the most useful eight aesthetic slideshow template designs that you can use for making fantastic aesthetic slideshows.
01Leafy Template Design
The Leafy template design is best suitable for making the best aesthetic slideshows with a classy presentation theme. It is available in Google Slides, and it consists of as many as 120 unique designed slides and two variations of colours.
You can readily make changes and edits and customize the tinplated design according to your imagination, reference and skills. It is best for making classy presentations because the designs are simple, yet they reflect the quality of elegance that helps you create the best aesthetic sideshows.
02Cinematic Reel Template
The Cinematic Reel template is a premiere pro template design by Videomaker. It consists of 22 media layers and 12 editable tact layers, and it has a very stylish design and includes simple yet impactful text animations.
Any trailers, demos, reel videos, short movie trails and the like can be ideally and perfectly created with this template design. Using this template design is absolutely effortless, and you can make any content-related slideshows effortlessly and ideally with this slideshow template design by Videomaker.
03B-Clinique
B-Clinique is the template design for making a minimalist aesthetic slideshow avowable on Google Slides. This template design is best suited for creating trendy aesthetic slideshows. It includes designs of line arts, subtle pleasant shares and all the other components that solely and perfectly reflect an aesthetic aura.
It was primarily designed for making slides for cosmetology purposes. It has 30 different slide designs and is ideal for creating slides for the industry by integrating a few edits. It ideally reflects a calming aura as it uses the earthy brown tone and shade for the design of the template.
04YouTube Pack Template
We all know that various social media platforms have become the most influential factor in our lives. And YouTube is the most renowned among all the other social media platforms, and now, it has even become a mode of earning a livelihood.
And for making slideshows that are to be put up on one or more social media platforms, especially on YouTube, they need to be presented in a particular manner. And you can readily make aesthetic slideshows ideal for social media platforms, especially YouTube, with the YouTube Pack Templated designs, which is Mirs.
This template includes all the necessary elements, such as the “Subscribe” panel, other buttons, side frames, and the like. One can readily use it to make incredible aesthetic slides for their social media channels.
05Sunlike Template
The Sunlike Templates by the Google Slides. It is a beautiful and professional aesthetic slideshow template with design slides that can create a clean and highly professional. It is a modern-creative type of template that consists of 39 distinctive design slides. You can readily edit and thus, customise the slides according to your overreference, needs and skills.
It helps you create a lively and aesthetic presentation at the same time. It includes a lot of vibrant colours that make your presentation look exuberant and engaging.
06Fast Glitch Transitions Template
The Fast Glitch Transitions template is by Red Feathers. Transitions have been the recent trend, and in every other video, we see different and unique transitions. And when you integrate transitions in your slideshows, they become more eye-catching.
And the glitch transitions can create a unique yet pleasing effect for your slideshows when you use the many among the uncountable options available.
07Solv Template
The Solv template is by Google Slides. It is best suitable for creating your start-up business slideshow presentation when you are a big fan of aesthetic presentations. 36 slides are present with attractive pop colours, which, although they look vibrant, are gladly aesthetic too.
08Text Messages Template
The Text Messages template by Blinque can be the trendiest and the most aesthetic template design one can find. It helps you create slideshow videos in the form of text messages. So, if you want to narrate anything and do it uniquely, this template can be the best fit for you.
Part 2 How to Make an Aesthetic Slideshow Presentation
Making a slideshow presentation is quite simple and an aspect that is well-known to many. But, how can you make your slideshows look aesthetic? If you include them in your slideshows, there are a few factors that can readily turn them aesthetic.
So, let us look into the different aspects that can help you turn your slides aesthetic when you integrate them into it.
● Minimalistic Text Designs
Minimalism and aesthetic aura go simultaneously. So, the more your efforts to keep your texts and writings in your slide minimalistic, the more aesthetic your slide would look. Several such finds or text designs are available, and you can readily choose among them and integrate them into your slides.
● Use soft and pastel colours for your theme of the template
Every aesthetic object’s most common and signature feature is its subtle, pastel shade. So, stick to using a soft pastel shade for the theme of your template. The colours, such as lavender, sift purple, millennial pink, powder blue or tones of silver, can ideally fit under the collection of aesthetic shades for the youth template of the slideshows.
● Minimalistic Pictures
The images you use in your slideshow will play a considerable role in deeming how aesthetic your slides look. So, choose them after enough analysis. See whether the photos have an aesthetic or minimalistic feature. By that, we are referring to the copper tone of the picture, its content and its size. It is best to include small images to reflect the slide’s minimalistic character.
Part 3 FAQ of Making Aesthetic Slideshow
Here are some of the FAQs about making aesthetic slideshows.
01How can I make an aesthetic slideshow in PowerPoint?
One can effortlessly do so with the templates available. Also, it is best to use small images, subtle pastel shades for the theme and minimalistic text designs or fonts in the slides.
02Which is the best tool for creating aesthetic slideshows?
Filmore is one of the most effective and ideal tools for making the most aesthetically pleasing slideshows. It has over 700 filters, innumerable templates and uncountable beneficial features to make your slides look minimalistic and aesthetic.
03How can I use Filmora for making aesthetic slideshows?
Filmora has several templates that reflect minimalistic designs. You can readily use them for your slideshow video. You can also use several filters to give a subtle pastel tone to your slideshow. Lastly, the different motion control features and fonts available can help you make the most aesthetically pleasing slideshows with Filmora.
04Is Filmora suitable for slideshows?
Wondershare Filmora Video Editor is one of the best and renowned tools for video editing. And for making slideshow videos, it Is equally competent and helps make the best and the most aesthetic slideshows with its incredible features.
For Win 7 or later (64-bit)
For macOS 10.12 or later
Filmora is the best video editing tool that one can come across. It has the best and the most advanced features for editing and is ideal for professionals. But, the beginners, too, can use it to enhance their editing skills, as Filmora is not difficult to use.
Also, it is ideal for creating aesthetic slideshow videos. It is because-
● There are more than 800 templates, and among them, there are numerous aesthetic design templates that you can use
● The filters can help add an aesthetic and minimalistic tone to your slideshow video
● You can integrate different aesthetic fonts from the many available.
● Ending Thoughts →
● Now that you know all about creating the best minimalist aesthetic slideshow, bring out all your creative skills and make the most wholesome and engaging slideshow!
● Choose the best templates, and for the ideal results, pick from the templates mentioned above.
● Follow the above steps to create the most aesthetic slideshows that would perfectly mirror your imagination.
● Lastly, use the best video editing tool, Filmora, that will help you make such aesthetic slideshows that will definitely be incomparable and inimitable!
How to Make Falling Text Effect in Filmora?
Indeed, there are different elements of a video that has the potential to make it stand out to viewers. The title you add to the video, content information in the slides, and other elements are some parts that capture one’s interest.
But seeing only the text in single lines or paragraphs can get repetitive and unappealing, especially with so many videos having the same style. In this context, the fun falling text effect is a unique and exciting approach to making your titles in videos engaging. It creates a fun look when the viewer clicks into the video and is met with this styling title effect.
On Wondershare Filmora , there is a feature available for users to apply this effect to videos in a more straightforward sequence of steps than other editors. Yet, knowing how it works is still valid, even for experienced editing professionals. In this post, we shall detail all of the steps that go into creating this effect in videos, with examples.
Launch Filmora on the Device
Before getting started with the editing steps, you need to download and install this third-party editing software into your device. Filmora works on both Mac and Windows-based computers. (Download here:
Free Download For Win 7 or later(64-bit)
Free Download For macOS 10.14 or later
After switching on your device and going to your preferred browser, search for Wonderhsare Filmora’s official website. Upon accessing it, you will see the “Download” button at the top of the screen. Click on it, and the respective Filmora installer will download into your device instantly, depending on your OS type.
Then, you have to double-click on the installer file you will find in the Downloads folder. This will open the software installation problem window. Click on the Install button and then tap the Agree option for the terms & conditions that appear next on the screen. After that, the software will begin installing automatically.

Finally, press the Start Now button on the installation complete prompt window. The software will then launch automatically.
Adjust the project settings
After the software launches on your device, you should tap on the Create New Project button. Before you add the video file you will edit from your device through; you should take time to change some aspects of the project settings.
For this, click on the File tab at the top-most toolbar in the editor window. You should click on the Project Settings option from the drop-down menu, which will open the dialog box. Under the resolution option, you will see the Frame Rate element. Click on the drop-down menu and adjust the video’s frame rate to 25 FPS. After you are done, tap the OK button.

Add the Title
Following this, you must click on the Titles tab at the top toolbar on the editor. Different title templates, like Custom, Openers, End Credits, etc., will appear. Choose the default title of your liking and download it.
Next, hold the title that appears in the library window and then drag it to the first layer of the editing timeline. Clip the title short by moving the play head to the 3-second and 15 frames mark and shape the title to that length. Then, delete the rest of the part.

Edit the Title
After this, you have to double-click on the top of the default title in your Track 1 timeline. A window will appear for editing the title. Click on the Text tab in this window and tap on the Font options. You should change the font of your title to Futura Bold or any other option that you would prefer.

Animate the characters
When this part is done, in the text field, add the first letter of the text you will add to your animated introduction. After inserting the first letter only, click on the Animation tab next. Following that, you have to move the playhead on your timeline to the very front. You will see the Position parameter in the Animation settings and change the number in the Y axis until it goes out of the top frame of the video.

Next, you must move the play head to the 1-second position in the timeline. Here, you must change the number Y axis to a lower position and adjust the Rotate element as per your preference. After that, move the playhead again to 15 frames from the 1-second mark. It would be best if you changed the Y-axis position digit to 0 and adjusted the Rotation value slightly.
Following that, move the playhead again by 15 frames ahead. Rotate the letter again and change the Y-axis value until the letter rests at the bottom of the screen. Again, you have to move the play head on the timeline to 10 frames ahead and adjust the Y-axis and Rotation values to a higher point. Then, continue the step like this at ten frames forward, this time making the character move to the ground again. Press the OK button to complete.

Repeat for the next letters
After you are done with this editing process for the first letter, hold the default title in the library and drag and drop it into Track 2 on the timeline. Adjust the starting point for this layer to frame five from the beginning, and move the file to that starting point. In the end, cut the title length at the same position as layer one was, at 3.15 seconds.
Follow the process explained in the previous section for the first letter, i.e., moving the playhead at specific frames and changing the Y-axis and Rotation value multiple times.
After editing the second letter in the title, repeat the process of holding and dragging the default title to Track 3 in the timeline and adjusting starting position at the 10th frame. Again, follow the process of animating the letter like for Letter 1 and Letter 2. Continue doing this process for multiple more letters in your title text.

Tap on the Play button under the Preview screen to see how the letters have the falling text effect.
Add Screenshot
Next, you have to click on the hide button for Tracks 2 and up. Tap on the Snapshot icon in the editing timeline of the first letter. Then, when it appears in the library window, click on it and move it beside the Track 1 Title file that you were editing. Move the play head to the 1-second position of this file in the timeline.
Hide Track 1 again and click the Unhide button on Track 2. Repeat the snapshot function and add it to Layer 2. Adjust the end as per Track 1. After this, follow these steps for the subsequent letters as well.

Adjust Keyframing
Follow the animation process for all of the title clips and screenshots you did before. Move the play head to the point where the Tracks end and the Screenshots on the timeline start. Choose the first letter and click on the Keyframe icon in the editing window under Animation. Then, make adjustments to the values of Position, Rotation, etc.
Continue this keyframing step for all of the letters in sequence. After you are done here, click on the Render Preview icon on the right-hand side of the toolbar above the editing timeline. See how the falling text effects line up.

After that, you can export the final file to your device or do further editing work through the Export button.
Final Words
Indeed, adding the falling text effect should allow you to create a stunning, dynamic, and engaging video project. While the feature is available in many other editing software, you can expect a better user experience on Filmora, especially as a beginner-level user.
The UI on this software is simple to navigate, with all features easily accessible. Besides the falling text customization benefits, you will also use other effects, filters, and title presets in videos with some simple taps. So, install it soon and give it a try.
Free Download For macOS 10.14 or later
After switching on your device and going to your preferred browser, search for Wonderhsare Filmora’s official website. Upon accessing it, you will see the “Download” button at the top of the screen. Click on it, and the respective Filmora installer will download into your device instantly, depending on your OS type.
Then, you have to double-click on the installer file you will find in the Downloads folder. This will open the software installation problem window. Click on the Install button and then tap the Agree option for the terms & conditions that appear next on the screen. After that, the software will begin installing automatically.
Finally, press the Start Now button on the installation complete prompt window. The software will then launch automatically.
Adjust the project settings
After the software launches on your device, you should tap on the Create New Project button. Before you add the video file you will edit from your device through; you should take time to change some aspects of the project settings.
For this, click on the File tab at the top-most toolbar in the editor window. You should click on the Project Settings option from the drop-down menu, which will open the dialog box. Under the resolution option, you will see the Frame Rate element. Click on the drop-down menu and adjust the video’s frame rate to 25 FPS. After you are done, tap the OK button.
Add the Title
Following this, you must click on the Titles tab at the top toolbar on the editor. Different title templates, like Custom, Openers, End Credits, etc., will appear. Choose the default title of your liking and download it.
Next, hold the title that appears in the library window and then drag it to the first layer of the editing timeline. Clip the title short by moving the play head to the 3-second and 15 frames mark and shape the title to that length. Then, delete the rest of the part.
Edit the Title
After this, you have to double-click on the top of the default title in your Track 1 timeline. A window will appear for editing the title. Click on the Text tab in this window and tap on the Font options. You should change the font of your title to Futura Bold or any other option that you would prefer.
Animate the characters
When this part is done, in the text field, add the first letter of the text you will add to your animated introduction. After inserting the first letter only, click on the Animation tab next. Following that, you have to move the playhead on your timeline to the very front. You will see the Position parameter in the Animation settings and change the number in the Y axis until it goes out of the top frame of the video.
Next, you must move the play head to the 1-second position in the timeline. Here, you must change the number Y axis to a lower position and adjust the Rotate element as per your preference. After that, move the playhead again to 15 frames from the 1-second mark. It would be best if you changed the Y-axis position digit to 0 and adjusted the Rotation value slightly.
Following that, move the playhead again by 15 frames ahead. Rotate the letter again and change the Y-axis value until the letter rests at the bottom of the screen. Again, you have to move the play head on the timeline to 10 frames ahead and adjust the Y-axis and Rotation values to a higher point. Then, continue the step like this at ten frames forward, this time making the character move to the ground again. Press the OK button to complete.
Repeat for the next letters
After you are done with this editing process for the first letter, hold the default title in the library and drag and drop it into Track 2 on the timeline. Adjust the starting point for this layer to frame five from the beginning, and move the file to that starting point. In the end, cut the title length at the same position as layer one was, at 3.15 seconds.
Follow the process explained in the previous section for the first letter, i.e., moving the playhead at specific frames and changing the Y-axis and Rotation value multiple times.
After editing the second letter in the title, repeat the process of holding and dragging the default title to Track 3 in the timeline and adjusting starting position at the 10th frame. Again, follow the process of animating the letter like for Letter 1 and Letter 2. Continue doing this process for multiple more letters in your title text.
Tap on the Play button under the Preview screen to see how the letters have the falling text effect.
Add Screenshot
Next, you have to click on the hide button for Tracks 2 and up. Tap on the Snapshot icon in the editing timeline of the first letter. Then, when it appears in the library window, click on it and move it beside the Track 1 Title file that you were editing. Move the play head to the 1-second position of this file in the timeline.
Hide Track 1 again and click the Unhide button on Track 2. Repeat the snapshot function and add it to Layer 2. Adjust the end as per Track 1. After this, follow these steps for the subsequent letters as well.
Adjust Keyframing
Follow the animation process for all of the title clips and screenshots you did before. Move the play head to the point where the Tracks end and the Screenshots on the timeline start. Choose the first letter and click on the Keyframe icon in the editing window under Animation. Then, make adjustments to the values of Position, Rotation, etc.
Continue this keyframing step for all of the letters in sequence. After you are done here, click on the Render Preview icon on the right-hand side of the toolbar above the editing timeline. See how the falling text effects line up.
After that, you can export the final file to your device or do further editing work through the Export button.
Final Words
Indeed, adding the falling text effect should allow you to create a stunning, dynamic, and engaging video project. While the feature is available in many other editing software, you can expect a better user experience on Filmora, especially as a beginner-level user.
The UI on this software is simple to navigate, with all features easily accessible. Besides the falling text customization benefits, you will also use other effects, filters, and title presets in videos with some simple taps. So, install it soon and give it a try.
Also read:
- New 2024 Approved A Comprehensive Guide to Slow Motion YouTube Videos and How to Manage Them
- Tactics to Create Transparent Image in Minimal Steps for 2024
- Updated Overview of Best LUTs for Vlog for 2024
- Updated In 2024, Deleting White Background in Photoshop Is Hard? No
- How to Add VHS Green Screen to Your Video for 2024
- Color Match Game Tips for You for 2024
- New Best GIF to AVI Converters (Online + Software Solutions) for 2024
- New Best Online GIF to Image (PNG/JPG) Converters for 2024
- Updated Best 5 PDF to GIF Converters You Should Know for 2024
- New Best Ways to Blur Zoom Background for Free
- Quick Answer What Is a GIF File?
- Updated In 2024, How to Zoom Webcam on PC
- New How To Add Motion Blur In Davinci Resolve for 2024
- In 2024, How to Make a Slideshow GIF?
- New 2024 Approved Are You a Video Editor Making Use of iMovie? Do You Wish to Read How to Change Orientation in iMovie? Youre in the Right Place! At the End of This Guide, Youd Have Learned How to Change Video Orientation in iMovie
- New In 2024, How to Upload the Video to Twitch? Well, if You Dont Know the Process, This Detailed Guide Will Help You. While Explaining the Process, This Article Will Also Let You Know some Twitch Video Upload Guidelines
- How to Lock Apps on Poco to Protect Your Individual Information
- In 2024, How To Leave a Life360 Group On Realme 12 Pro+ 5G Without Anyone Knowing? | Dr.fone
- Undelete lost photos from Tecno Spark 20.
- Top ways to unlock iPhone SE (2022) screen lock
- How to Resolve Vivo Y77t Screen Not Working | Dr.fone
- PassFab Apple iPhone 13 Pro Backup Unlocker Top 4 Alternatives
- How To Remove or Bypass Knox Enrollment Service On Nokia C12 Plus
- Mastering Android Device Manager The Ultimate Guide to Unlocking Your Realme 11X 5G Device
- In 2024, How to Change Location On Facebook Dating for your Sony Xperia 10 V | Dr.fone
- Top 15 Augmented Reality Games Like Pokémon GO To Play On Honor Magic V2 | Dr.fone
- How to Cast Xiaomi Redmi Note 12 Pro 5G to Computer for iPhone and Android? | Dr.fone
- In 2024, Why Apple Account Disabled From your Apple iPhone 11? How to Fix
- 9 Solutions to Fix Process System Isnt Responding Error on Samsung Galaxy M14 5G | Dr.fone
- Title: New 2024 Approved If You Wish to Edit FLV Videos without Any Problems, You Should Utilize a Multipurpose Video Editor that Supports the FLV File Format
- Author: Morgan
- Created at : 2024-04-24 01:10:13
- Updated at : 2024-04-25 01:10:13
- Link: https://ai-video-editing.techidaily.com/new-2024-approved-if-you-wish-to-edit-flv-videos-without-any-problems-you-should-utilize-a-multipurpose-video-editor-that-supports-the-flv-file-format/
- License: This work is licensed under CC BY-NC-SA 4.0.
