
New 2024 Approved If Youre Trying to Create a Countdown Effect, but Youre Not Sure Where to Start, Then This Post Is Going to Show You some Ways to Create a Countdown Animation for Your Videos
If You’re Trying to Create a Countdown Effect, but You’re Not Sure Where to Start, Then This Post Is Going to Show You some Ways to Create a Countdown Animation for Your Videos
Many online marketers find that the animated countdown timer is the perfect way to bring a visual element to their videos while maintaining the quality and effectiveness of the video itself.
There are many ways to show a countdown timer on videos using animated GIFs. But they can be hard to implement or could cost a lot of money. You can use some free services, but they are limited in terms of features.
But not to worry, this post will go through a detailed process of creating an animated timer with 3 different methods. Before that, let’s discuss the benefits of using a timer for videos.
- Method 1: Make a Countdown Animation with a Professional Video Editing Software
- Method 2: Generate the timer with Free Online Countdown Timer Video Generators
- Method 3: Make a Countdown Timer with a Graphic Design Platform
What are the benefits of using a countdown timer for videos/live streams?
Countdowns are a great way to get your message across and get your viewers excited about your product or service. A countdown timer provides a very simple visual cue to help motivate yourself and your audience to start watching the video.
It also works well with vlogs and YouTube, seamlessly transitioning from one part of your video to the next. This works best when your video isn’t about the product itself (but rather a review, a demo, or something else that lends itself well to a countdown).
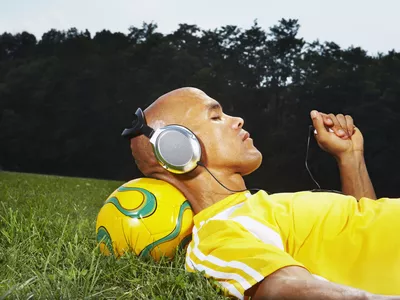
As you can see, the Vlogger uses a countdown timer at the beginning of his video. Vlogger uses a countdown timer to make it appear as if the time is running out because it adds urgency and suspense. As a viewer, you’ll want to hurry up and watch this video, so you don’t miss out on anything.
Let’s now dive deep into methods of creating countdown animation for videos.
Method 1: Make a Countdown Animation with a Professional Video Editing Software
The most common trend today is video content creation, and it’s everywhere. Videos are not only entertaining, but they have a significant impact on audience retention.
With a video editor, you can create compelling content that will entice your viewers to watch the whole thing. Moreover, it can also help you get started by adding captions, transitions, effects, etc.
Free Download For Win 7 or later(64-bit)
Free Download For macOS 10.14 or later
If you’re ready to make your next project more engaging and interactive, you can try the best video editing software, Wondershare Filmora !

Wondershare Filmora is the industry standard when it comes to editing video. The video editing software industry is filled with features that promise to be faster, smarter, and easier to use than others.
Moreover, Wondershare has Filmstock effects that have revolutionized the world of video creators.
Filmstock is a collection of videos ready to be used with Filmora that contains more than 1,000 free stock footage clips of various scenes and locations, plus video effects, transitions, and titles, to make creating professional-quality videos faster and easier.
Let’s see some of its features that help us make animation countdown timers easily.
- Rich effects for you to choose customizing countdown animation at ease.
- You’re not stuck with traditional slow motion in your videos; you can add dynamism and energy to your videos with smooth animations.
- It has various countdown animation templates simplify the whole process, just drag-and-drop, everything gets done.
How to make a countdown animation with Filmora
You’re looking for an animated countdown timer for your website or your very first YouTube video, but you want one that stands out. You don’t want your visitors to think it’s generic or boring, so you’re thinking about how to make your countdown timer more interesting.
That’s where Filmora comes in. It’s an amazing tool that makes it easy to create countdown animations on websites or videos for almost any purpose. Let’s look at how to create your own cool, creative countdown timers using Filmora.
Step1Open Filmora and import the background video file from the media section.

Step2After importing the video, go to elements options from the top tab.

Step3After choosing elements, you’ll see the countdown tab on your left. Click on the countdown and choose any animation. You can adjust the animation duration, size, and audio.

Step4Adjust the animation duration according to the background video, and finally, export your animated countdown timer.

Pros and Cons of using Video Editing Software to make a countdown animation
Pros
- You can save any countdown effects project as a project to be used in future videos.
- You can create a vision of your brand concept in your way.
- Free templates are available according to your brand and target audience.
- More stable.
Cons
- Standard out-of-the-box video editing software isn’t enough to create a professional-quality video.
Method 2: Generate the timer with Free Online Countdown Timer Video Generators
If you’re trying to catch your audience’s attention by giving them a reason to ‘countdown’ to something, then you’ll want to use a countdown timer with some great free online countdown videos.
There are many countdown timer websites like;Biteable ,Kapwing ,Movavi ,and MakeWebVideo . But we’ve rounded up the best countdown video generator site you’ll ever see:
FlexClip

FlexClip is a powerful yet easy-to-use online video editor. Its music library is versatile and high-quality. It lets you pick and add favorite tracks without infringing worries. Apply interesting editing to make your videos look better by adding transitions, filters, text, and more.
FlexClip’s biggest advantage is its extensive amount of free media assets. Whether you’re a master or rookie with FlexClip, you’re capable of producing excellent videos with music. You can be a video guru or a video beginner. You’re capable of producing awesome videos with great sound using FlexClip.
Key Features:
- Provides a complete set of video-making processes.
- A diverse range of royalty-free music selection
- Loads of handy editing tools
- Thousands of ready-made templates
- Multiple advanced features like adding text, emoji, effects, and more
How to make a countdown animation with FlexClip
The FlexClip countdown creator is a leading video editor with many powerful features. To make your countdown video, click the Create a Video button below.
Step1Set Your Countdown Video Background
Set your timer to how long you want your message to start your countdown. Usually, it’s 10 seconds.
Then add scenes and adjust the duration of scenes to make them all length. You can use the background color to make it more appealing to your audience.

Step2Highlight Your Countdown with Animated Elements
Using the amazing elements, you can make your countdown interactive and much more fun. Just go to the sidebar and switch to the Elements options. Apply the elements you want, then customize them on size, position, and color.

Step3Add the Number to Your Countdown
Now, add the numbers for the countdown, e.g., if you want a 10-second countdown, type in the number “10”. You can pick a basic text effect and manually enter the number.
After you’ve created the number, go to the timeline and control how long the number will appear and when it will disappear.

Step4Add Music or Sound Effects to Your Countdown Video
FlexClip lets you upload your audio files from a local folder, or you can select one from FlexClip’s library. Once you’re done adding the countdown music, you can trim the duration, set it to start and end at any time, and use the fade-in/out effect to make the music match your countdown. Plus, you can also adjust the volume to make the music softer.

Step5Preview and Export Your Countdown Video
You can preview it to see how the countdown video will look in the end, finally, hit export, and you’re done!
Method 3: Make a Countdown Timer with a Graphic Design Platform
Today’s graphic design platforms give designers more options than ever before, but many designers struggle to make the most of these resources. Let us share some tips and tricks on designing a countdown timer using the tools available through Canva, a graphic design platform.
Canva

Many types of graphic design software are available, and Canva is one of the best. While its critics may disagree, Canva is an undeniable tool to help millions of business owners and marketers improve their social media graphics and redesign their brand image without needing to learn graphic design.
Key Features:
- Drag and drop feature
- Free templates
- Background Removal Tool
- Canva Brand Kit
- Magic Resizing
How to make a countdown animation with Canva
Canva offers a range of great-looking countdown templates that’ll help you create one in just a few minutes. And if you need a simple countdown animation, you can download one of their free templates. Let’s make it from scratch:
Step1Select The Background
With Canva, you get a wide range of free backgrounds. Click on the button labeled “Search.” Now choose the “light old film” background element and click Add.

Step2Enter Your Text (Number)
Then select the text tab and choose any font style, color, and size.

Step3Animate Text
Next, select the font again, and then, at the top, there’s an option for Text Animation.
Adding text animation to your countdown timer will make it more realistic and match your background better than a straight-up countdown timer.

Step4Edit The Page Timing
Next, click on the “Edit Timing” option. You can set the timer for each page as per your choice

Step5Duplicate The Page
Now, select the duplicate page option and change the number of duplicate pages from 3 to 2,1, with the same design and formatting.

Step6Export / Download Video
You’re finally done! Click the Download button to export your design.
The background of this photo is not a static image, so you cannot select the JPG, PNG, or SVG. You must choose an MP4 video or a GIF when creating an animation.

Top 10 animated countdown effects to make your video like a Pro
Animated countdown effects are a great way to add some “pizzazz” to a simple video. They look awesome and are extremely effective in creating a memorable video. When used well, they can add some excitement to a boring video. We’ll go over the top 10 animated countdown effects from Filmstock


How to use these effects in Wondershare Filmora
You can access Filmstock directly from the Filmora application or by visiting the website:
- Create a new project by clicking Filmora Video Editor in the menu.
- Select the audio effects tab, or go to the Audio tab, title tab. You will see the film stock option.
- Click the Visit Filmstock button, and you will be taken to the Filmstock website.

- Log in to Filmstock using your Wondershare account.

- After the download, the new effects will be added to your project in the appropriate section (Audio, Title, Transitions, and Elements). You’ll also be able to preview each effect from this window.

![]()
Note: It is highly recommended to log in to Filmstock and Filmora with the same Wondershare ID.
Final Words
A countdown is a powerful tool to add suspense to your videos. It gives your audience more incentive to watch your video all the way through. Get this article, as it is the ultimate guide to making your countdown animations, plus the best video editing software, Wondershare Filmora.
Wondershare Filmora is an excellent place to be creative and make some terrific countdown timers that can improve your viewers’ overall experience. Use their templates to create a strong and engaging online presence. Your audience won’t be able to resist the mesmerizing, hypnotizing, and enthralling effects of Wondershare Filmora.
Free Download For Win 7 or later(64-bit)
Free Download For macOS 10.14 or later
What are the benefits of using a countdown timer for videos/live streams?
Countdowns are a great way to get your message across and get your viewers excited about your product or service. A countdown timer provides a very simple visual cue to help motivate yourself and your audience to start watching the video.
It also works well with vlogs and YouTube, seamlessly transitioning from one part of your video to the next. This works best when your video isn’t about the product itself (but rather a review, a demo, or something else that lends itself well to a countdown).
As you can see, the Vlogger uses a countdown timer at the beginning of his video. Vlogger uses a countdown timer to make it appear as if the time is running out because it adds urgency and suspense. As a viewer, you’ll want to hurry up and watch this video, so you don’t miss out on anything.
Let’s now dive deep into methods of creating countdown animation for videos.
Method 1: Make a Countdown Animation with a Professional Video Editing Software
The most common trend today is video content creation, and it’s everywhere. Videos are not only entertaining, but they have a significant impact on audience retention.
With a video editor, you can create compelling content that will entice your viewers to watch the whole thing. Moreover, it can also help you get started by adding captions, transitions, effects, etc.
Free Download For Win 7 or later(64-bit)
Free Download For macOS 10.14 or later
If you’re ready to make your next project more engaging and interactive, you can try the best video editing software, Wondershare Filmora !
Wondershare Filmora is the industry standard when it comes to editing video. The video editing software industry is filled with features that promise to be faster, smarter, and easier to use than others.
Moreover, Wondershare has Filmstock effects that have revolutionized the world of video creators.
Filmstock is a collection of videos ready to be used with Filmora that contains more than 1,000 free stock footage clips of various scenes and locations, plus video effects, transitions, and titles, to make creating professional-quality videos faster and easier.
Let’s see some of its features that help us make animation countdown timers easily.
- Rich effects for you to choose customizing countdown animation at ease.
- You’re not stuck with traditional slow motion in your videos; you can add dynamism and energy to your videos with smooth animations.
- It has various countdown animation templates simplify the whole process, just drag-and-drop, everything gets done.
How to make a countdown animation with Filmora
You’re looking for an animated countdown timer for your website or your very first YouTube video, but you want one that stands out. You don’t want your visitors to think it’s generic or boring, so you’re thinking about how to make your countdown timer more interesting.
That’s where Filmora comes in. It’s an amazing tool that makes it easy to create countdown animations on websites or videos for almost any purpose. Let’s look at how to create your own cool, creative countdown timers using Filmora.
Step1Open Filmora and import the background video file from the media section.
Step2After importing the video, go to elements options from the top tab.
Step3After choosing elements, you’ll see the countdown tab on your left. Click on the countdown and choose any animation. You can adjust the animation duration, size, and audio.
Step4Adjust the animation duration according to the background video, and finally, export your animated countdown timer.
Pros and Cons of using Video Editing Software to make a countdown animation
Pros
- You can save any countdown effects project as a project to be used in future videos.
- You can create a vision of your brand concept in your way.
- Free templates are available according to your brand and target audience.
- More stable.
Cons
- Standard out-of-the-box video editing software isn’t enough to create a professional-quality video.
Method 2: Generate the timer with Free Online Countdown Timer Video Generators
If you’re trying to catch your audience’s attention by giving them a reason to ‘countdown’ to something, then you’ll want to use a countdown timer with some great free online countdown videos.
There are many countdown timer websites like;Biteable ,Kapwing ,Movavi ,and MakeWebVideo . But we’ve rounded up the best countdown video generator site you’ll ever see:
FlexClip
FlexClip is a powerful yet easy-to-use online video editor. Its music library is versatile and high-quality. It lets you pick and add favorite tracks without infringing worries. Apply interesting editing to make your videos look better by adding transitions, filters, text, and more.
FlexClip’s biggest advantage is its extensive amount of free media assets. Whether you’re a master or rookie with FlexClip, you’re capable of producing excellent videos with music. You can be a video guru or a video beginner. You’re capable of producing awesome videos with great sound using FlexClip.
Key Features:
- Provides a complete set of video-making processes.
- A diverse range of royalty-free music selection
- Loads of handy editing tools
- Thousands of ready-made templates
- Multiple advanced features like adding text, emoji, effects, and more
How to make a countdown animation with FlexClip
The FlexClip countdown creator is a leading video editor with many powerful features. To make your countdown video, click the Create a Video button below.
Step1Set Your Countdown Video Background
Set your timer to how long you want your message to start your countdown. Usually, it’s 10 seconds.
Then add scenes and adjust the duration of scenes to make them all length. You can use the background color to make it more appealing to your audience.
Step2Highlight Your Countdown with Animated Elements
Using the amazing elements, you can make your countdown interactive and much more fun. Just go to the sidebar and switch to the Elements options. Apply the elements you want, then customize them on size, position, and color.
Step3Add the Number to Your Countdown
Now, add the numbers for the countdown, e.g., if you want a 10-second countdown, type in the number “10”. You can pick a basic text effect and manually enter the number.
After you’ve created the number, go to the timeline and control how long the number will appear and when it will disappear.
Step4Add Music or Sound Effects to Your Countdown Video
FlexClip lets you upload your audio files from a local folder, or you can select one from FlexClip’s library. Once you’re done adding the countdown music, you can trim the duration, set it to start and end at any time, and use the fade-in/out effect to make the music match your countdown. Plus, you can also adjust the volume to make the music softer.
Step5Preview and Export Your Countdown Video
You can preview it to see how the countdown video will look in the end, finally, hit export, and you’re done!
Method 3: Make a Countdown Timer with a Graphic Design Platform
Today’s graphic design platforms give designers more options than ever before, but many designers struggle to make the most of these resources. Let us share some tips and tricks on designing a countdown timer using the tools available through Canva, a graphic design platform.
Canva
Many types of graphic design software are available, and Canva is one of the best. While its critics may disagree, Canva is an undeniable tool to help millions of business owners and marketers improve their social media graphics and redesign their brand image without needing to learn graphic design.
Key Features:
- Drag and drop feature
- Free templates
- Background Removal Tool
- Canva Brand Kit
- Magic Resizing
How to make a countdown animation with Canva
Canva offers a range of great-looking countdown templates that’ll help you create one in just a few minutes. And if you need a simple countdown animation, you can download one of their free templates. Let’s make it from scratch:
Step1Select The Background
With Canva, you get a wide range of free backgrounds. Click on the button labeled “Search.” Now choose the “light old film” background element and click Add.
Step2Enter Your Text (Number)
Then select the text tab and choose any font style, color, and size.
Step3Animate Text
Next, select the font again, and then, at the top, there’s an option for Text Animation.
Adding text animation to your countdown timer will make it more realistic and match your background better than a straight-up countdown timer.
Step4Edit The Page Timing
Next, click on the “Edit Timing” option. You can set the timer for each page as per your choice
Step5Duplicate The Page
Now, select the duplicate page option and change the number of duplicate pages from 3 to 2,1, with the same design and formatting.
Step6Export / Download Video
You’re finally done! Click the Download button to export your design.
The background of this photo is not a static image, so you cannot select the JPG, PNG, or SVG. You must choose an MP4 video or a GIF when creating an animation.
Top 10 animated countdown effects to make your video like a Pro
Animated countdown effects are a great way to add some “pizzazz” to a simple video. They look awesome and are extremely effective in creating a memorable video. When used well, they can add some excitement to a boring video. We’ll go over the top 10 animated countdown effects from Filmstock
How to use these effects in Wondershare Filmora
You can access Filmstock directly from the Filmora application or by visiting the website:
- Create a new project by clicking Filmora Video Editor in the menu.
- Select the audio effects tab, or go to the Audio tab, title tab. You will see the film stock option.
- Click the Visit Filmstock button, and you will be taken to the Filmstock website.
- Log in to Filmstock using your Wondershare account.
- After the download, the new effects will be added to your project in the appropriate section (Audio, Title, Transitions, and Elements). You’ll also be able to preview each effect from this window.
![]()
Note: It is highly recommended to log in to Filmstock and Filmora with the same Wondershare ID.
Final Words
A countdown is a powerful tool to add suspense to your videos. It gives your audience more incentive to watch your video all the way through. Get this article, as it is the ultimate guide to making your countdown animations, plus the best video editing software, Wondershare Filmora.
Wondershare Filmora is an excellent place to be creative and make some terrific countdown timers that can improve your viewers’ overall experience. Use their templates to create a strong and engaging online presence. Your audience won’t be able to resist the mesmerizing, hypnotizing, and enthralling effects of Wondershare Filmora.
Free Download For Win 7 or later(64-bit)
Free Download For macOS 10.14 or later
The Ultimate Guide to Using AR Emoji Stickers in Your Videos
AR emoji stickers are a fun and creative way to add personality to your videos. With just a few clicks, you can turn yourself into a cartoon character, animal, or any other emoji representing your mood or personality. These stickers use augmented reality technology to superimpose the emoji onto your face in real time, giving your videos a dynamic and interactive element.
In this article, we’ll show you how to add AR emoji stickers to your videos and share some tips and tricks for using them like a pro. Whether creating content for social media, messaging apps, or projects, AR emoji stickers can help you add whimsy and personality to your videos.

- Filmora for Mobile AR Camera
- Samsung AR Emoji Stickers
- iPhone Memoji AR Stickers
- Mirror: Emoji Maker & Stickers for Android
- Yoji: AR Emoji Camera Recorder
What Are AR Emoji Stickers?
AR emoji stickers are a feature that allows users to create custom emoji stickers of themselves or others using augmented reality technology. These stickers can be used in videos or photos to add an extra layer of personalization and fun.

To create an AR emoji sticker, users typically need a smartphone or device with a front-facing camera. The camera scans the user’s face and generates a 3D model, which can then be customized with different facial expressions, hairstyles, and other features. Once the AR emoji sticker is created, it can be added to videos or photos in real-time using the device’s camera or a video editing app.
AR emoji stickers are a popular feature on messaging apps, social media platforms, and video editing software. They can be used to add a playful and personal touch to videos and photos and are especially popular with younger audiences.
Best 5 AR Emoji Stickers App
Many apps and platforms offer a variety of AR emoji stickers for users to choose from. These stickers can be added to videos or photos to add a personal and playful touch. Here are the five best apps and platforms for finding and using AR emoji stickers. Whether you’re looking for animated characters, animal faces, or something else, these apps have you covered.
1. Filmora for Mobile AR Camera

Filmora for Mobile is a video editing app that offers an AR camera feature for adding AR emoji stickers to videos. The AR camera allows users to select from various pre-made AR emoji stickers and add them to their videos in real-time. The stickers can be resized, rotated, and positioned to fit the user’s desired look.
In addition to AR emoji stickers, the Filmora for Mobile AR camera offers fun and creative effects, such as filters, overlays, and text.
Free Download For Win 7 or later(64-bit)
Free Download For macOS 10.14 or later
Editor’s Verdict: Filmora for Mobile’s AR camera is a fun and easy-to-use tool for adding AR emoji stickers and other creative effects to your videos. Its wide selection of stickers and intuitive interface makes it great for adding personality and emotion to videos.
Ratings in App Store: 4.7 out of 5
Ratings in Google Play Store: 4.7 out of 5
Operating System: Android and iOS
Pricing: Free for Download; Paid version starts from $5.99/month.
One of the standout features of Filmora for Mobile’s AR camera is the ability to customize the stickers with different facial expressions and mouth shapes. This allows users to create more dynamic and lifelike AR emoji stickers that can convey various emotions and moods. The app also allows users to record videos with the AR camera and share them directly to social media platforms or save them to their devices.
2. Samsung AR Emoji Stickers

Samsung’s AR Emoji stickers are a popular feature on the company’s messaging app, Samsung Messages. Users can create a 3D avatar of themselves or others using the app’s camera to use the stickers. The avatar can be customized with different hairstyles, facial expressions, and other features.
Once the avatar is created, it can be used as an AR emoji sticker in videos and photos. The stickers can be resized, rotated, and positioned to fit the user’s desired look. In addition to the customizable avatars, Samsung’s AR Emoji stickers also include a variety of pre-made stickers of popular characters and animals.
Editor’s Verdict: Samsung’s AR Emoji stickers are a fun and easy-to-use tool for adding personality and flair to your videos and photos. It is convenient for those looking to add fun to their video projects.
Ratings in Galaxy Store: 4.5 out of 5
Operating Systems: Android
Pricing: Free
One of the standout features of Samsung’s AR Emoji stickers is the ability to record videos with the stickers in real time. This allows users to create dynamic and interactive content that showcases their avatar in action. The app also allows users to save AR Emoji stickers and use them in other apps or share them on social media.
3. iPhone Memoji AR Stickers

iPhone’s Memoji AR stickers allow users to create custom avatars of themselves or others using the app’s camera. These avatars can be customized with different hairstyles, facial expressions, and other features and used as AR emoji stickers in videos and photos. In addition to the customizable avatars, the app also includes a variety of pre-made stickers of popular characters and animals.
Editor’s Verdict: Add personality and flair to your videos and photos with iPhone’s easy-to-use Memoji AR stickers. Customize your avatars or choose from a wide selection of pre-made stickers to convey emotions and moods. Create dynamic and interactive content with the real-time recording feature, and save or share your stickers for added convenience.
Ratings in App Store: 3.4 out of 5
Operating System: iOS
Pricing: Free
iPhone’s Memoji AR stickers create dynamic and interactive content that can be saved and shared on social media or other apps. The app offers customization options for creating personalized avatars and pre-made stickers. These features make iPhone’s Memoji AR stickers a great tool for adding personality and emotion to your videos.
4. Mirror: Emoji Maker & Stickers for Android

Mirror: Emoji Maker & Stickers is an app for Android devices that allows users to create custom AR emoji stickers of themselves or others. The app uses the device’s camera to scan the user’s face and generate a 3D model, which can then be customized with different hairstyles, facial expressions, and other features.
Editor’s Verdict: Personalize your videos and photos with custom AR emoji stickers using Android’s Mirror: Emoji Maker & Stickers app. Customize your avatar and add the sticker in real time, or choose from various pre-made stickers. Create dynamic and interactive content with the app’s real-time recording feature, and save or share your stickers for future use.
Ratings in App Store: 4.8 out of 5
Ratings in Google Play Store: 4.4 out of 5
Operating Systems: Android and iOS
Pricing: Free for Download; 23,99 € for 6-month premium access.
Once the AR emoji sticker is created, it can be added to videos or photos in real-time using the app’s camera or a video editing app. The stickers can be resized, rotated, and positioned to fit the user’s desired look. In addition to the customizable avatars, Mirror: Emoji Maker & Stickers also includes a variety of pre-made stickers of popular characters and animals.
5. Yoji: AR Emoji Camera Recorder

AR Emoji Camera Recorder is a camera app that allows users to create personalized, animated emojis using augmented reality (AR) technology. With this app, users can create emojis that look like them by taking a selfie and customizing the appearance of the emoji with a variety of different features and options.
Editor’s Verdict: The app is easy to use, and the AR technology used to create the personalized emojis is top-notch. The ability to record videos and take photos with the emoji superimposed over the user’s face in real-time adds a fun and personal touch to the content.
Ratings in App Store: 4.5 out of 5
Operating Systems: iOS
Pricing: Free for Download; Paid version starts from $1.99/week.
Once the emoji is created, users can record videos or take photos superimposed over their faces in real time, adding a fun and personal touch to their content. The app also includes a range of stickers and filters to further enhance the user’s videos and photos.
Add AR Emoji Stickers to Your Video
Ready to add some personality and flair to your videos? This section will introduce how to use Filmora for Mobile’s AR camera to add AR emoji stickers to your videos. Filmora for Mobile is a video editing app that offers a variety of creative features, including an AR camera for adding AR emoji stickers to videos in real time.
Whether you want to create your custom stickers or use pre-made ones, Filmora for Mobile has you covered. Follow along as we walk you through the steps for adding AR emoji stickers to your videos.
Recording The AR Video
Here’s how to record your AR video on your iOS device:
Step1 Download and install Filmora for Mobile from the app store.
Step2 Tap on the camera button in the top right corner.

Step3 Adjust the video ratio or switch between the front and rear cameras using the “frame“ icon.

Step4 Preview and select animoji or memoji features using the “Props“ button.

Step5 Tap the purple record button to capture your AR video.

Step6 Your video will be saved automatically and can be edited by tapping “Edit“ below the screen.

Step7 Preview and export your completed video.

Editing The AR Video
After recording the AR video, it’s time to edit it. Follow these steps to do so:
Step1 On the editing timeline, use the various tools and features located below the timeline to edit your video.

Step2 Use the “canvas“ button to adjust the video ratio for TikTok or Instagram.

Step3 Enhance your video with filters by tapping the “Filters“ button.

Step4 Preview and choose transition effects by tapping in between video junctions.

Step5 Preview your edited video and export it to save and share.

Conclusion
AR emoji stickers are a great way to bring personality and emotion to your videos. Filmora for Mobile is a particularly useful app for adding AR emoji stickers to your videos, with its easy-to-use AR camera and a wide variety of customization options. Whether you create your custom avatars or use pre-made stickers, Filmora for Mobile offers much flexibility for adding fun and flair to your video projects.
So, give Filmora for Mobile’s AR emoji stickers a try next time you want to spice up your video content.
What Are AR Emoji Stickers?
AR emoji stickers are a feature that allows users to create custom emoji stickers of themselves or others using augmented reality technology. These stickers can be used in videos or photos to add an extra layer of personalization and fun.
To create an AR emoji sticker, users typically need a smartphone or device with a front-facing camera. The camera scans the user’s face and generates a 3D model, which can then be customized with different facial expressions, hairstyles, and other features. Once the AR emoji sticker is created, it can be added to videos or photos in real-time using the device’s camera or a video editing app.
AR emoji stickers are a popular feature on messaging apps, social media platforms, and video editing software. They can be used to add a playful and personal touch to videos and photos and are especially popular with younger audiences.
Best 5 AR Emoji Stickers App
Many apps and platforms offer a variety of AR emoji stickers for users to choose from. These stickers can be added to videos or photos to add a personal and playful touch. Here are the five best apps and platforms for finding and using AR emoji stickers. Whether you’re looking for animated characters, animal faces, or something else, these apps have you covered.
1. Filmora for Mobile AR Camera
Filmora for Mobile is a video editing app that offers an AR camera feature for adding AR emoji stickers to videos. The AR camera allows users to select from various pre-made AR emoji stickers and add them to their videos in real-time. The stickers can be resized, rotated, and positioned to fit the user’s desired look.
In addition to AR emoji stickers, the Filmora for Mobile AR camera offers fun and creative effects, such as filters, overlays, and text.
Free Download For Win 7 or later(64-bit)
Free Download For macOS 10.14 or later
Editor’s Verdict: Filmora for Mobile’s AR camera is a fun and easy-to-use tool for adding AR emoji stickers and other creative effects to your videos. Its wide selection of stickers and intuitive interface makes it great for adding personality and emotion to videos.
Ratings in App Store: 4.7 out of 5
Ratings in Google Play Store: 4.7 out of 5
Operating System: Android and iOS
Pricing: Free for Download; Paid version starts from $5.99/month.
One of the standout features of Filmora for Mobile’s AR camera is the ability to customize the stickers with different facial expressions and mouth shapes. This allows users to create more dynamic and lifelike AR emoji stickers that can convey various emotions and moods. The app also allows users to record videos with the AR camera and share them directly to social media platforms or save them to their devices.
2. Samsung AR Emoji Stickers
Samsung’s AR Emoji stickers are a popular feature on the company’s messaging app, Samsung Messages. Users can create a 3D avatar of themselves or others using the app’s camera to use the stickers. The avatar can be customized with different hairstyles, facial expressions, and other features.
Once the avatar is created, it can be used as an AR emoji sticker in videos and photos. The stickers can be resized, rotated, and positioned to fit the user’s desired look. In addition to the customizable avatars, Samsung’s AR Emoji stickers also include a variety of pre-made stickers of popular characters and animals.
Editor’s Verdict: Samsung’s AR Emoji stickers are a fun and easy-to-use tool for adding personality and flair to your videos and photos. It is convenient for those looking to add fun to their video projects.
Ratings in Galaxy Store: 4.5 out of 5
Operating Systems: Android
Pricing: Free
One of the standout features of Samsung’s AR Emoji stickers is the ability to record videos with the stickers in real time. This allows users to create dynamic and interactive content that showcases their avatar in action. The app also allows users to save AR Emoji stickers and use them in other apps or share them on social media.
3. iPhone Memoji AR Stickers
iPhone’s Memoji AR stickers allow users to create custom avatars of themselves or others using the app’s camera. These avatars can be customized with different hairstyles, facial expressions, and other features and used as AR emoji stickers in videos and photos. In addition to the customizable avatars, the app also includes a variety of pre-made stickers of popular characters and animals.
Editor’s Verdict: Add personality and flair to your videos and photos with iPhone’s easy-to-use Memoji AR stickers. Customize your avatars or choose from a wide selection of pre-made stickers to convey emotions and moods. Create dynamic and interactive content with the real-time recording feature, and save or share your stickers for added convenience.
Ratings in App Store: 3.4 out of 5
Operating System: iOS
Pricing: Free
iPhone’s Memoji AR stickers create dynamic and interactive content that can be saved and shared on social media or other apps. The app offers customization options for creating personalized avatars and pre-made stickers. These features make iPhone’s Memoji AR stickers a great tool for adding personality and emotion to your videos.
4. Mirror: Emoji Maker & Stickers for Android
Mirror: Emoji Maker & Stickers is an app for Android devices that allows users to create custom AR emoji stickers of themselves or others. The app uses the device’s camera to scan the user’s face and generate a 3D model, which can then be customized with different hairstyles, facial expressions, and other features.
Editor’s Verdict: Personalize your videos and photos with custom AR emoji stickers using Android’s Mirror: Emoji Maker & Stickers app. Customize your avatar and add the sticker in real time, or choose from various pre-made stickers. Create dynamic and interactive content with the app’s real-time recording feature, and save or share your stickers for future use.
Ratings in App Store: 4.8 out of 5
Ratings in Google Play Store: 4.4 out of 5
Operating Systems: Android and iOS
Pricing: Free for Download; 23,99 € for 6-month premium access.
Once the AR emoji sticker is created, it can be added to videos or photos in real-time using the app’s camera or a video editing app. The stickers can be resized, rotated, and positioned to fit the user’s desired look. In addition to the customizable avatars, Mirror: Emoji Maker & Stickers also includes a variety of pre-made stickers of popular characters and animals.
5. Yoji: AR Emoji Camera Recorder
AR Emoji Camera Recorder is a camera app that allows users to create personalized, animated emojis using augmented reality (AR) technology. With this app, users can create emojis that look like them by taking a selfie and customizing the appearance of the emoji with a variety of different features and options.
Editor’s Verdict: The app is easy to use, and the AR technology used to create the personalized emojis is top-notch. The ability to record videos and take photos with the emoji superimposed over the user’s face in real-time adds a fun and personal touch to the content.
Ratings in App Store: 4.5 out of 5
Operating Systems: iOS
Pricing: Free for Download; Paid version starts from $1.99/week.
Once the emoji is created, users can record videos or take photos superimposed over their faces in real time, adding a fun and personal touch to their content. The app also includes a range of stickers and filters to further enhance the user’s videos and photos.
Add AR Emoji Stickers to Your Video
Ready to add some personality and flair to your videos? This section will introduce how to use Filmora for Mobile’s AR camera to add AR emoji stickers to your videos. Filmora for Mobile is a video editing app that offers a variety of creative features, including an AR camera for adding AR emoji stickers to videos in real time.
Whether you want to create your custom stickers or use pre-made ones, Filmora for Mobile has you covered. Follow along as we walk you through the steps for adding AR emoji stickers to your videos.
Recording The AR Video
Here’s how to record your AR video on your iOS device:
Step1 Download and install Filmora for Mobile from the app store.
Step2 Tap on the camera button in the top right corner.
Step3 Adjust the video ratio or switch between the front and rear cameras using the “frame“ icon.
Step4 Preview and select animoji or memoji features using the “Props“ button.
Step5 Tap the purple record button to capture your AR video.
Step6 Your video will be saved automatically and can be edited by tapping “Edit“ below the screen.
Step7 Preview and export your completed video.
Editing The AR Video
After recording the AR video, it’s time to edit it. Follow these steps to do so:
Step1 On the editing timeline, use the various tools and features located below the timeline to edit your video.
Step2 Use the “canvas“ button to adjust the video ratio for TikTok or Instagram.
Step3 Enhance your video with filters by tapping the “Filters“ button.
Step4 Preview and choose transition effects by tapping in between video junctions.
Step5 Preview your edited video and export it to save and share.
Conclusion
AR emoji stickers are a great way to bring personality and emotion to your videos. Filmora for Mobile is a particularly useful app for adding AR emoji stickers to your videos, with its easy-to-use AR camera and a wide variety of customization options. Whether you create your custom avatars or use pre-made stickers, Filmora for Mobile offers much flexibility for adding fun and flair to your video projects.
So, give Filmora for Mobile’s AR emoji stickers a try next time you want to spice up your video content.
Adobe Premiere Pro Rec 709 LUTs: Finding The Best Options
Different styles of LUTs exist because each style serves a specific purpose in color correction and grading. LUTs are designed to replicate various cinematic styles and to change lighting conditions. By using different styles of LUTs, you can effortlessly achieve the desired color grading for your media. There are many types of LUTs to download, each with unique color composition.
However, Rec 709 LUT is a type of LUT commonly used in video editing software like Premiere Pro. Additionally, this LUT ensures that your video appears accurate and consistent on various HD screens. Moreover, it helps maintain the right balance of colors, contrast, and brightness. Furthermore, Rec 709 LUT Premiere Pro is suitable for broadcast, web streaming, or other HD content platforms.
Part 1: What are the Benefits of Using Premiere Pro Rec 709 LUTs in Video Editing?
Do you know the advantages of using Rec 709 Premiere Pro LUTs? Using Rec 709 LUTs in video editing with software like Adobe Premiere Pro can offer several benefits:
Color Accuracy
Rec 709 is the color space standard used for broadcast and video production. Furthermore, applying Rec 709 LUTs ensures accurate color representation of your media. Additionally, it maintains consistency and accuracy across different devices and platforms. It helps to achieve a standardized color look that conforms to industry standards.
Efficient Color Correction
Rec 709 LUTs streamline your color correction process. They provide a starting point for adjusting your videos’ color balance, contrast, and saturation. Moreover, if you apply this LUT at the start of your project, you can bring your video within the acceptable color range. Eventually, it will save you time and effort in the editing process.
Previewing Final Look
When you apply these LUTs, you can preview how your footage will look after color grading. Similarly, it helps you visualize your content to make changes for further adjustments. In addition, it also allows you to assess the tone and mood of the video in real-time.
Consistency and Compatibility
Such LUTs promote consistency across different cameras, lighting conditions, and sources. When working with multiple sources, you can apply this LUT for a consistent look. Furthermore, these LUTs also ensure compatibility with various display devices and platforms. It makes this tool compatible with different platforms and software.
Creative Control
Furthermore, these LUTs also serve as a starting point for further creative grading. You can layer additional adjustments on top of the LUT. In this way, you can achieve a specific artistic style to create a unique look for your project. Additionally, Rec 709 LUT creates a foundation for you to color-grade your content creatively.
Speeding Up Workflow
By using Rec 709 LUTs as a starting point, you can speed up your editing workflow. Using these LUTs, you don’t need to adjust each clip individually manually. In addition, you can apply a LUT to multiple clips simultaneously to color-correct your media files. Moreover, it saves you time when working on larger video projects.
Empower your videos with a new mood using different LUTs. Filmora now offers 100+ top-quality 3D LUTs cover a broad range of scenarios. Transform your videos with Filmora’s powerful 3D LUTs.
Apply LUT on Videos Apply LUT on Videos Learn More


Part 2: How to Use LUTs in Premiere Pro: A Guide
You can apply your Rec 709 LUT for Premiere Pro without needing any prior experience. All you have to do is to follow these simple steps to apply your favorite LUT.
Step 1: To apply a LUT using Adobe Premiere Pro, import your video by clicking the “File” button and selecting the “Import” option. You can also click on “Import media to start” in the Project Tab. Once your file is imported, drag the clip onto the timeline and move into the “Color” workspace.

Step 2: In continuation, click the “Adjustment Layer” button in the Project tab. Select your adjustment layer and drop it on top of your video clip in the timeline. Click on the layer and go to the “Video Effects” in the Effects option in the Project window. Then, navigate to “Color Correction” and select “Lumetri Color.”

Step 3: In the new window that appears, find the “Input LUT” option under the Basic Correction tab. Browse the LUT you want to apply to your video. Additionally, you can explore more creative LUTs by going to the “Creative” tab in the Lumetri Color window. In the “Look” section, browse for different creative LUTs for your video. You can adjust the intensity of the selected LUT using the slider.

Part 3: The Top Notch Premiere Pro LUTs Rec 709
There are many Premiere Pro Rec 709 LUTs available that you can download and purchase. In the list below are some of the best Rec 709 LUTs you can use.
1. LOOK Creative LUT Pack
The LOOK Creative LUT Pack is a collection of 10 creative LUTs. It includes a range of LUTs, including some popular ones like teal and orange and old noir. These LUTs provide a quick and easy way to add a specific color tone or mood to your footage. In addition to the basic LUTs, it also offers unique and creative options. For example, you’ll find LUTs like Subtle Sci-Fi, Grunge Green, and others.

2. Cinematic LUTs V2
Cinematic LUTs V2 is a pack of modern cinematic-style LUTs. This incredible LUTs pack is designed to give your videos a cinematic touch. With this pack, you get access to 10 different cinematic LUTs to color grade your videos. Furthermore, you can use these LUTs for your LOG footage as well. Additionally, with these LUTs, you can add richness and depth to your videos.

3. NATURAL Rec709
The NATURAL Rec709 LUT pack offers 17 different styles of LUTs. It includes ones inspired by Tobacco, Crunchy Gold, and Black & White filters. These LUTs can enhance the colors and tones in your videos, providing a natural look. Furthermore, you can customize the intensity of the LUTs. Moreover, each LUT in this pack offers a unique color scheme for your videos.

4. 35 Free LUTs for Color Grading Videos
It is an amazing LUT pack that offers you a variety of 35 different styles of LUTs. With these LUTs, you can achieve a vintage look or a cinematic vibe for your videos. These LUTs can work perfectly with Rec 709 footage with accurate and vibrant colors. Furthermore, this pack is compatible with different software, including Premiere Pro.

5. S-Log 3 to Rec.709 LUT
The S-Log3 to Rec.709 LUT pack is designed to enhance your footage by adding vibrance. Applying this LUT boosts saturation, giving your video a more natural and realistic look. Additionally, you can bring out the full potential of your videos captured in S-Log3 gamma. Moreover, this LUT amplifies the colors and is compatible with the Rec.709 color space.

6. DJI OSMO POCKET Creative LUTs Pack
The DJI Osmo Pocket Creative LUTs Pack offers a collection of various creative LUTs. You can choose from different styles and color overlays for your media files. Moreover, you can use this LUT pack for both pictures and videos. In addition to this, it is also compatible with popular editing software. Furthermore, this tool pack supports both .3dl and .cube formats.

7. Blockbuster HLG And Standard LUTs
Another amazing pack of LUTs that you can use is Blockbuster HLG and Standard LUTs. This pack includes 21 Rec 709 LUTs with unique color toning and style. Furthermore, applying these LUTs will make your color grading more professional. Additionally, you can get rich and deep tones for your digital medial files. Similarly, you can change the feel of your content in a more professional style.

Conclusion
In conclusion, LUTs are perfect tools to enhance your media by altering its colors and tones. Different styles of LUTs cater to various creative needs. Furthermore, LUTs allow you to achieve specific looks and moods for your digital content. Moreover, the Rec 709 LUT Premiere Pro ensures your video appears accurate and consistent on HD displays. Additionally, you can achieve professional-grade results as well.
To add more LUTs on video, you can try Wondershare Filmora  For Win 7 or later(64-bit)
Add LUTs on Video For macOS 10.14 or later
Apply LUT on Videos Apply LUT on Videos Learn More
Part 2: How to Use LUTs in Premiere Pro: A Guide
You can apply your Rec 709 LUT for Premiere Pro without needing any prior experience. All you have to do is to follow these simple steps to apply your favorite LUT.
Step 1: To apply a LUT using Adobe Premiere Pro, import your video by clicking the “File” button and selecting the “Import” option. You can also click on “Import media to start” in the Project Tab. Once your file is imported, drag the clip onto the timeline and move into the “Color” workspace.
Step 2: In continuation, click the “Adjustment Layer” button in the Project tab. Select your adjustment layer and drop it on top of your video clip in the timeline. Click on the layer and go to the “Video Effects” in the Effects option in the Project window. Then, navigate to “Color Correction” and select “Lumetri Color.”
Step 3: In the new window that appears, find the “Input LUT” option under the Basic Correction tab. Browse the LUT you want to apply to your video. Additionally, you can explore more creative LUTs by going to the “Creative” tab in the Lumetri Color window. In the “Look” section, browse for different creative LUTs for your video. You can adjust the intensity of the selected LUT using the slider.
Part 3: The Top Notch Premiere Pro LUTs Rec 709
There are many Premiere Pro Rec 709 LUTs available that you can download and purchase. In the list below are some of the best Rec 709 LUTs you can use.
1. LOOK Creative LUT Pack
The LOOK Creative LUT Pack is a collection of 10 creative LUTs. It includes a range of LUTs, including some popular ones like teal and orange and old noir. These LUTs provide a quick and easy way to add a specific color tone or mood to your footage. In addition to the basic LUTs, it also offers unique and creative options. For example, you’ll find LUTs like Subtle Sci-Fi, Grunge Green, and others.
2. Cinematic LUTs V2
Cinematic LUTs V2 is a pack of modern cinematic-style LUTs. This incredible LUTs pack is designed to give your videos a cinematic touch. With this pack, you get access to 10 different cinematic LUTs to color grade your videos. Furthermore, you can use these LUTs for your LOG footage as well. Additionally, with these LUTs, you can add richness and depth to your videos.
3. NATURAL Rec709
The NATURAL Rec709 LUT pack offers 17 different styles of LUTs. It includes ones inspired by Tobacco, Crunchy Gold, and Black & White filters. These LUTs can enhance the colors and tones in your videos, providing a natural look. Furthermore, you can customize the intensity of the LUTs. Moreover, each LUT in this pack offers a unique color scheme for your videos.
4. 35 Free LUTs for Color Grading Videos
It is an amazing LUT pack that offers you a variety of 35 different styles of LUTs. With these LUTs, you can achieve a vintage look or a cinematic vibe for your videos. These LUTs can work perfectly with Rec 709 footage with accurate and vibrant colors. Furthermore, this pack is compatible with different software, including Premiere Pro.
5. S-Log 3 to Rec.709 LUT
The S-Log3 to Rec.709 LUT pack is designed to enhance your footage by adding vibrance. Applying this LUT boosts saturation, giving your video a more natural and realistic look. Additionally, you can bring out the full potential of your videos captured in S-Log3 gamma. Moreover, this LUT amplifies the colors and is compatible with the Rec.709 color space.
6. DJI OSMO POCKET Creative LUTs Pack
The DJI Osmo Pocket Creative LUTs Pack offers a collection of various creative LUTs. You can choose from different styles and color overlays for your media files. Moreover, you can use this LUT pack for both pictures and videos. In addition to this, it is also compatible with popular editing software. Furthermore, this tool pack supports both .3dl and .cube formats.
7. Blockbuster HLG And Standard LUTs
Another amazing pack of LUTs that you can use is Blockbuster HLG and Standard LUTs. This pack includes 21 Rec 709 LUTs with unique color toning and style. Furthermore, applying these LUTs will make your color grading more professional. Additionally, you can get rich and deep tones for your digital medial files. Similarly, you can change the feel of your content in a more professional style.
Conclusion
In conclusion, LUTs are perfect tools to enhance your media by altering its colors and tones. Different styles of LUTs cater to various creative needs. Furthermore, LUTs allow you to achieve specific looks and moods for your digital content. Moreover, the Rec 709 LUT Premiere Pro ensures your video appears accurate and consistent on HD displays. Additionally, you can achieve professional-grade results as well.
To add more LUTs on video, you can try Wondershare Filmora For Win 7 or later(64-bit)
Add LUTs on Video For macOS 10.14 or later
How to Add Adjustment Layer (Clip) in DaVinci Resolve?
DaVinci Resolve is one of the popular video editors comprising many advanced features. This tool allows you to conduct 3D video editing and adjust color grading properties. You can also access its audio library to find out suitable music clips. Moreover, you can add transitions and animations to your videos for more enhancements.
While executing video editing, many people add an adjustment layer (clip) in DaVinci Resolve for convenience. By reading this article, you can discover the DaVinci Resolve adjustment layer and an easy method to add it during video editing.

Part 1: What is the Adjustment Layer (clip) in DaVinci Resolve?
Do you know the benefits of adding an adjustment layer (clip) in DaVinci Resolve? The adjustment layer (clip) in DaVinci Resolve gives you more control and flexibility during video editing. By adding this particular layer above your other clips, you can apply tons of effects to them.
Due to this ease, you don’t have to apply the same effect to multiple clips. Thus, it saves your time and manual effort on DaVinci Resolve. One of the main advantages of adding an adjustment layer (clip) is that it does not modify the original pixels of the video. You can also rename the adjustment layers (clips) in DaVinci Resolve according to your desire.
Hence, adjustment layers in any video editor like DaVinci Resolve provide a non-destructive way to edit and apply effects to the video.

Part 2: How to Add an Adjustment Layer (clip) in DaVinci Resolve?
Are you keen to know how to add an adjustment layer in DaVinci Resolve? By reading this section, you can find easy instructions to apply the adjustment layer (clip) in DaVinci Resolve without hassle.
Step1 To add an adjustment layer in DaVinci Resolve, head to the “Effects Library.” From there, click on “Toolbox” and select “Effects.”

Step2 From the Effects section, you will have to search for the “Adjustment Clip.” Drag and drop the adjustment clip and apply it above the layers that you want to edit.

Step3 Now extend the adjustment clip according to the layers. Once done, you can apply effects and transitions to the adjustment clip to add modifications.

Part 3: Three Ways to Use Adjustment Layers in DaVinci Resolve
Do you want to know how to use the DaVinci Resolve adjustment layer? Read this part of the article to discover how to use the adjustment layer (clip) in DaVinci Resolve.
1. Zoom in
Do you want to give the zoom-in element in your video to emphasize your subject? The zoom-in effect is created to focus on the subject to engage the viewers. On DaVinci Resolve, you can create the zoom-in effect using the adjustment layer (clip). To do so, you can read and follow the below instructions:
Step1 First, add the adjustment layer to your timeline by heading to Effects Library and then Toolbox. Make sure to apply the adjustment layer above your talking head on the timeline.
Step2 Now click on “Inspector” from the top right corner and enhance the “Zoom” value according to your desire. Once done, you can play the video to check the results.

2. Color Grading
Color grading can change the perspective of your video clip. Do you want to give your video an aesthetic, gloomy, or colorful vibe? Change the color grading properties using the adjustment layer (clip) in DaVinci Resolve. To use an adjustment layer for color grading, we have jotted down the simple steps below:
Step1 Drag and drop your clip above on the timeline. Once you are done, head to the “Color Page” given below.
Step2 On the Color page, go to “Library” from the right side and select the effect called “Color Space Transform” from the Resolve FX Color section. After applying this effect, you can enhance the visual appearance of your video.

3. Shake Transition
The shake transition adds a dramatic feel to your video to hook up the audience. If you have recorded a music video, you can add a shake transition to make it more captivating. To add this particular transition to your video, we will use the adjustment layer in DaVinci Resolve to produce accurate results.
Step1 Add the adjustment layer to your timeline. Trim it according to the specific part of your clip where you want to create the shake transition effect.
Step2 Now, from the left side, select “Open FX” library and search “Camera shake” effect. Apply it to the adjustment layer and navigate to the “Effects” tab from the top right corner. From there, increase the values of motion scale, speed scale, and motion blur. You can also make further changes in the “Shake Levels” section.

Step3 Afterward, scroll to the bottom and change the Border Type to “Reflect.” Now head back to the Open FX library and select the “Flicker Addition” effect. Apply this particular effect to the adjustment layer. From the “Effects” tab on the right side, select “Flicker Gain” as your flicker type. You can also go to the “Video” tab to enhance the zoom and position value.
Step4 You can also select different composite modes. You can also duplicate the adjustment clip and alter the composite mode of the second clip. Once done, decrease the opacity of the second clip. Now copy and place the adjustment clips on your timeline according to your desire.

Bonus Tips: Use Adjustment Layers in the Best Alternative to DaVinci Resolve
If you are not satisfied with the results of the DaVinci Resolve adjustment layer, you can try Wondershare Filmora . This professional software can prove to be the best alternative to DaVinci Resolve due to its numerous key features. You can find this tool on every major platform, such as iOS, Android, Windows, and Mac. This tool has a clean and friendly user interface so that you can enjoy editing and modifying your videos.
Free Download For Win 7 or later(64-bit)
Free Download For macOS 10.14 or later
You can also use adjustment layers to edit with great ease on this compatible video editor. Moreover, you can find multiple trending effects in its library that can help you to enhance your video clips. To add an adjustment layer in Filmora, you can follow the below steps.
Step1 Start with New Project
Once done with launching Filmora, hit the “New Project” button and upload the desired video. Drag and drop the added video to the timeline to proceed further.

Step2 Add the Adjustment Layer
Go to the “Media” tab and locate the option “Adjustment Layer.” Once done, drag and drop the adjustment layer to the timeline and double-click on it to change its settings.

Step3 Manage the Adjustment Layer Settings
From the opened settings, you can alter the blending mode according to your choice. You can also change opacity and position for more adjustments. Also, you can apply various presets to add a cinematic look. Moreover, you can apply different borders across your video clip for a more enhanced look.

Conclusion
DaVinci Resolve is one of the most famous video editors among professionals. If you want to become an expert in using DaVinci Resolve, you must know how to add an adjustment layer (clip) to this tool. For your help, this article has provided complete guidelines on how to add an adjustment layer in DaVinci Resolve.
Moreover, we have also highlighted a better option than DaVinci Resolve, known as Wondershare Filmora. Using this software, you can apply the adjustment layers to your video to generate more precise and accurate results.
Free Download For macOS 10.14 or later
You can also use adjustment layers to edit with great ease on this compatible video editor. Moreover, you can find multiple trending effects in its library that can help you to enhance your video clips. To add an adjustment layer in Filmora, you can follow the below steps.
Step1 Start with New Project
Once done with launching Filmora, hit the “New Project” button and upload the desired video. Drag and drop the added video to the timeline to proceed further.
Step2 Add the Adjustment Layer
Go to the “Media” tab and locate the option “Adjustment Layer.” Once done, drag and drop the adjustment layer to the timeline and double-click on it to change its settings.
Step3 Manage the Adjustment Layer Settings
From the opened settings, you can alter the blending mode according to your choice. You can also change opacity and position for more adjustments. Also, you can apply various presets to add a cinematic look. Moreover, you can apply different borders across your video clip for a more enhanced look.
Conclusion
DaVinci Resolve is one of the most famous video editors among professionals. If you want to become an expert in using DaVinci Resolve, you must know how to add an adjustment layer (clip) to this tool. For your help, this article has provided complete guidelines on how to add an adjustment layer in DaVinci Resolve.
Moreover, we have also highlighted a better option than DaVinci Resolve, known as Wondershare Filmora. Using this software, you can apply the adjustment layers to your video to generate more precise and accurate results.
Also read:
- If Youre Not Using Video yet, Now Is the Time to Start. In This Post, Well Discuss the Benefits of Using Video for Social Media Marketing and Provide Tips for Getting Started. Keep Reading to Learn More for 2024
- New Best Photo Video Maker Apps with Song PC, Mobile, Online
- Using One of the Best Converter Tools to Turn GIFs Into PNG or JPG. Here, Learn About the Ten Best Ones for Different Operating Systems, with Details on Features, Prices, and More
- Updated How to Make GIF With Transparent Background?
- 2024 Approved How to Fade in Text in Adobe Premiere Pro
- Updated Benefits of Live Streaming on YouTube for 2024
- Updated How Windows Movie Maker Save MP4 File
- 10 Matching Color Combination That Works Together for 2024
- New This Article Will Reveal the Secrets of Choosing a Location to Shoot Your Viral Music Video. As Well as Tips to Make an Energetic Schedule for Shooting Days for 2024
- Updated How to Resize FLV Video Efficiently Windows, Mac,Android, iPhone & O
- New 2024 Approved 4 Solutions to Add White Borders on Mobile and Desktop
- New You May Want to Create Your Video Tutorial and Share Your Knowledge with Others. Fortunately, You Can Easily Create a Professionally Edited Tutorial Video with Filmora. Keep Reading This Article Since We Will Show You How to Do It
- Updated 2024 Approved Do You Want to Add Voiceovers to Your Video Project? Wondershare Filmora Is an Amazing Tool that Lets You Add Audio Files, Including Voiceovers
- New In 2024, 3 Effective Methods to Correct Color Distortion in Videos
- Wondering About Vimeo Slideshow Maker? Know Everything About the Platform Which Is Gaining Much Popularity. Also, Browse some Tips to Create Appealing Video Slideshows
- 2024 Approved Guide To Slowing Down Videos in Snapchat Discussing the Details
- Updated Adding a Spooky Shadow Effect with Filmora
- New Best LUTs for Vlog A 2024 Overview
- 2024 Approved Want to Explore the Exciting World of GIFs? Here Is Everything You Will Ever Want to Know and Learn About the Most Appealing GIF Libraries, All at Once Place
- Updated How to Perfect Quick and Efficient Video Editing | Keyboard Shortcuts in Filmora
- Updated Ways to Make Canva Collages
- Updated Learn to Merge Clips in DaVinci Resolve with Simple Steps for 2024
- Updated Google Meet Green Screen
- Updated In 2024, If You Want to Know What to Prepare and How to Make the Wedding Video Perfect for Videographers, Check Out This Menu Here
- New 2024 Approved Best Voice Changers for WhatsApp Free Included
- Updated How to Add Camera Shake to Video in Adobe After Effects for 2024
- New In 2024, Do You Seek to Blur Out Your Video and Photo to Display some Motion Blur? This Article Provides a List of the Best Motion Blur Apps for Videos and Photos
- In 2024, What Is TS Format and How To Play TS Files? Basic Tips
- New How to Remove Audio From Videos with FFmpeg for 2024
- New Looking for a Great Way to Make Your Own Anime Music Video? The Following Are the Top AMV Makers to Choose From for 2024
- Updated Merge MP4 Online? Its Easy With These 5 Tools
- Updated In 2024, Top 5 Free Online Video Filter Editors
- 2024 Approved Slow Down or Speed Up Videos Easily on PC, Online, and Phone
- Find Out the Best Animated Text Video Tools and Learn How to Animate Text in a Video in Simple Steps. Discover the Best Fonts to Animate Text Along with the Text Animation Templates for 2024
- Updated 2024 Approved Top Ever Ways Make Tiktok Slideshow Solved
- New Learn to Splice Videos Together on iPhone
- In 2024, Step by Step to Rotate Videos Using Kdenlive
- How to Use Renderforest Intro Video Maker
- New 2024 Approved Wondershare Filmora Has Introduced a New Feature - AI Portrait Effect that You Can Use to Remove Background From Various Videos and Images. Explore the Uses, Benefits, and Real-Life Scenarios of This Feature in a Comprehensive Guide
- How Can We Unlock Our Samsung Galaxy A23 5G Phone Screen?
- Forgot Your Apple ID Password and Email From iPhone 14 Pro? Heres the Best Fixes
- In 2024, Easy Ways to Manage Your Google Pixel 8 Location Settings | Dr.fone
- In 2024, How to Fix Pokemon Go Route Not Working On Nubia Red Magic 9 Pro+? | Dr.fone
- In 2024, How to Reset Gmail Password on Samsung Galaxy M34 5G Devices
- Reasons for Samsung Galaxy F04 Stuck on Startup Screen and Ways To Fix Them | Dr.fone
- In 2024, Apple iPhone XR Mirror to PC? Top Apps You Must Know | Dr.fone
- How to Mirror PC Screen to Realme C53 Phones? | Dr.fone
- How to Track WhatsApp Messages on Vivo Y100t Without Them Knowing? | Dr.fone
- 10 Easy-to-Use FRP Bypass Tools for Unlocking Google Accounts On Motorola Edge 40 Neo
- In 2024, Solutions to Spy on Vivo Y78t with and without jailbreak | Dr.fone
- In 2024, How to Use Google Assistant on Your Lock Screen Of Xiaomi Redmi 12 Phone
- In 2024, How to Change Location on TikTok to See More Content On your Poco M6 5G | Dr.fone
- Best Ways on How to Unlock/Bypass/Swipe/Remove Vivo Y56 5G Fingerprint Lock
- Best Fixes For Oppo A1 5G Hard Reset | Dr.fone
- Undelete lost pictures from Infinix Hot 40i.
- Factory Reset on Apple iPhone 8 | Dr.fone
- How to Come up With the Best Pokemon Team On Tecno Pova 5 Pro? | Dr.fone
- In 2024, How to Reset a Locked Xiaomi Redmi 13C Phone
- How to Bypass FRP from Samsung Galaxy S24 Ultra?
- User Choice Top Free Streaming Sites for Sports
- Title: New 2024 Approved If Youre Trying to Create a Countdown Effect, but Youre Not Sure Where to Start, Then This Post Is Going to Show You some Ways to Create a Countdown Animation for Your Videos
- Author: Morgan
- Created at : 2024-06-24 01:30:27
- Updated at : 2024-06-25 01:30:27
- Link: https://ai-video-editing.techidaily.com/new-2024-approved-if-youre-trying-to-create-a-countdown-effect-but-youre-not-sure-where-to-start-then-this-post-is-going-to-show-you-some-ways-to-create-a-c/
- License: This work is licensed under CC BY-NC-SA 4.0.
