
:max_bytes(150000):strip_icc():format(webp)/laptop-2443739-5b55bc7c46e0fb00378df55b.jpg)
New 2024 Approved LumaFusion Offers Various Look Up Table Presets, or LUTs, Such as FiLMiC deLog and FiLMiC DeFlat, and Several Stylistic LUTs for Use with Neutral Use Video. You Can Also Manually Add the LUTs
LumaFusion Offers Various Look Up Table Presets, or LUTs, Such as FiLMiC deLog and FiLMiC DeFlat, and Several Stylistic LUTs for Use with Neutral Use Video. You Can Also Manually Add the LUTs
LumaFusion is one of the most complex iPad and iPhone video editing apps. Many of its customers adore it, and it has some incredible capabilities that you’d find incompetent editing software. They’ve effectively opened up the realm of LUTs to iPhone and iPad users.
LumaFusion LUTs are individual files that act as containers in LumaFusion. This container file includes standard LUT data as well as LumaFusion-specific color preset data. A LumaFusion LUT Preset file is similar to a Super LUT. LumaFusion can only employ one standard LUT at a time; however, LumaFusion LUT presets enable simultaneous Color Grading and Color Corrections.
How will LUTs help with color correction in Lumafusion
Colors in today’s cameras are vibrant, but they may continuously be improved. Color correction corrects the color that’s already there, whether it’s boosting the exposure to brighten a darker photo or increasing the saturation to make the colors pop. Color correction in other NLEs can be difficult, but not in LumaFusion.
The Color Presets tab in the Color & Effects section is where you begin color correcting footage. There are various presets from which to pick. I wouldn’t use these settings on my videos because they’re too stylized, but they’re there. You may alter any of the presets to your taste, so some of the more dramatic ones can be toned down. By picking the original setting, purists can color-fix their raw footage without using LumaFusion. Moving the sliders till the color seems perfect is all that’s required from there.
Exposure, contrast, highlights, shadows, mid-tones, and saturation and hue are all controlled by sliders. The color sliders can be used for a more forceful approach. But proceed with caution. The sliders are delicate, and it’s easy to overdo them. Play around with the sliders until you get the look you want. If you don’t like it, toss it in the trashcan and start over.
Color grading and color correction are not interchangeable terms. Color correction is a technical requirement, but color grading is primarily creative. You’ll have no command over the color grading process if you’re working with film material where primary colors aren’t even visible. Before diving into the creative LUTs, make sure you complete adequate color correcting.
Color grading, unlike color correction, adjusts the shot’s color to modify the atmosphere or feel. The only way to do that in LumaFusion is to play around with the color sliders under the Color Presets tab, but that’s not ideal. As previously stated, the three sliders are sensitive and limited. LumaFusion isn’t designed for color grading, which is OK. Thankfully, LumaFusion allows you to use LUTs.
Always color correct your footage before utilizing any LUTS, which entails changing the White-balance, Highlights, Contrast, and Shadows. Do not apply the LUTS to your footage directly.
How to use LUTs in Lumafusion?
Videographers, colorists, and editors use LUTs because they are efficient. Rather than starting from zero every time you work on a video editing project, you may speed up the color grading process using a LUT with predefined color profiles. It’s elementary to import LUTs. Simply import the preset files into LumaFusion and add the preset to your footage like an Instagram filter.
The Import button in the Color & Effects editor is the easiest way to load LUTs.
- Double click on any video/photo clip on the timeline to access the Clip Editors.
- At the bottom of the Clip Editor UI, select the Color & Effects tab.
- The import button is located directly below the effect preset library.

How to use LUTs in Lumafuison
LUTs must be loaded via the LumaFX clip editor at the moment. Follow the steps below to accomplish this:
- To access the LumaFX UI, double-tap any video/photo clip in the timeline.
- At the bottom of the LumaFX UI, select the ‘Color & Effects’ tool.
- In the upper right panel, press the cube icon.
- The import button is located directly below the effect preset library.

Load LumaFX LUTs
- Once hit, it will display your transfer site options; select your desired transfer site and navigate to the folder where your LUTs are stored.
- Select and import all of the LUTs in the folder.

Import LUTs
Free LUTs Resource for Lumafusion
Choosing the appropriate LUT pack will boost your photography and videography immediately. With our quick guide to the top free LUTs available, you can find the appropriate one for you.
1. Jaun Melara free LUTs
LUTs aren’t simply for stylizing video. They’re frequently employed as a color correction tool to ensure that your colors are shown correctly in various formats. Juan Melara has provided a free LUT set to assist you in color correcting your footage for printing on film stock. These free LUTs will provide modest stylization to your footage if you don’t want to send it to print.
Melara developed this video to demonstrate his free LUTs in action. The colors are more subdued than in the other LUTs on this list. This free LUT pack is ideal if you’re looking to produce a modern-style cinematic color grade. Melara also has a great article about using LUTs to create a lovely color grade. DaVinci PowerGrades are available for several of these LUTs. They color correct your film in the same way as LUTs do, but you’ll have more flexibility over individual PowerGrade components.

Jaun Melara free LUTs
2. Small Hd free LUTs
SmallHD, a company that makes small, full HD on-camera monitors, is giving away a free set of color grades that reproduce the appearance of seven classic movies. The company is also releasing a series of video lessons that show how to get the most out of these effects throughout production and post-production. Everything is completely free. The color grades are provided as a.zip file and are in the form of 3D LUT files created in DaVinci Resolve. If you’re unfamiliar with SmallHD, the company offers free LUTs for on-set monitoring in real-time. This free set of Movie Look LUTs is inspired by seven recent films, including Apocalypse Now’s warmth and The Matrix’s green overtones. Take use of SmallHD’s free LUT set if you want to give your footage a dramatic and cinematic vibe.

Small Hd free LUTs
3. Color Grading Central free LUTs
Color Grading Central is essential knowledge for any aspiring colorist or video editor who takes color seriously. CGC is a company that specializes in color grading. Their website has a wide range of outstanding color-related products, from grain to LUTs. They also provide their email members with a wealth of free color grading information. Free trials of some LUTs are also available, so you may try them out before you buy. They’re giving away an array of color presets, grains, and burns exclusively to their email list and the seven free color LUTs. We strongly recommend them if you want to give your footage a shot-on-film look.

Color Grading Central free LUTs
4. PremiumBeat Free LUTs
PremiumBeat has freely given countless LUT packs as well as other assets to any video editor or filmmaker over the years. Todd Blankenship has designed a fresh new set of FREE LUTs for Shutterstock, which is their latest addition. Todd chose distinct looks from films and pictures that inspire his daily work to create this bundle with attention and love. There are many options, and these looks will offer you a great place to start when it comes to grading your footage. They recently published an in-depth evaluation of Photon.io, a new color grading tool. Todd Blankenship, who ended up utilizing the tool to create these LUTs, wrote the initial review. The pack has been fine-tuned to replicate some clean, cinematic looks that you may use as a jumping-off point for your video.

PremiumBeat Free LUTs
5. Frank Glencairn free LUT
Despite having access to the most advanced filming gear, there’s something about a vintage film aesthetic that looks fantastic. Frank Glencairn has made a nice K-Tone LUT that is meant to look like vintage Kodachrome film. This film grade, which was formerly popular among photographers and filmmakers, has fallen out of favor due to the rise of digital cameras. With this free LUT, you can get the appearance of retro-looking reds, blues, and yellows.

Frank Glencairn free LUT
6. Reverse Tree Media free LUTs
Reverse Tree Media is releasing a new LUTS bundle that is absolutely free. In addition to LUTS, this LUTS collection includes utility LUTS, film grains, and a Black-Bar layer. For the color-grading procedure, this is critical. This bundle contains 56 free LUTS for various scenarios like weddings, television commercials, travel films, landscapes, Rec.709, and so on. It also has several useful LUTS and film grain overlays for 8mm, 16mm, and 35mm video, as well as a cinematic black bar PNG file with a ratio of 2.35:1 to assist you in achieving a more cinematic appearance quickly and save time. Check out the link to learn more about LUTS and to obtain their previous cinematic LUTS bundle, which is also free.

Reverse Tree
Wondershare Filmora11 Express Better
Achieve More
Grow Together
Free Download Free Download Learn More

![]()
Closing Thoughts:
LUTs are most typically used to build and store color profiles that can be utilized in other film projects. By using contrast and design, you can bring logs and flat materials to life. Everything you need to know is right here. You can now rush to your desk and fix your video.
Free Download Free Download Learn More
![]()
Closing Thoughts:
LUTs are most typically used to build and store color profiles that can be utilized in other film projects. By using contrast and design, you can bring logs and flat materials to life. Everything you need to know is right here. You can now rush to your desk and fix your video.
How to Rotate AVI in Vertical/Portrait Orientation [Windows, Mac,Android, iPhone & Online]

Video editing is the process of cutting and rearranging multiple clips or segments of video to create a new and more improved video. This involves adding titles, animations, sound effects, music and more. Video editing has not ceased to follow the trend of technology as it keeps thriving tirelessly through the ages. With advancement springing forth from many sides, video editing followed every pace to ensure it’s not left behind. This largely involves gadgets, computers and smartphones.
Before the advent of smartphones, computers have been the only video editing tools, and that culture is preserved even till date as its use has spread round the world. It is therefore evident that film making cannot bypass this process. Improvements have been made over the years on video editing softwares for computers to stay up to date as regards features and usability. There are other video editors which were introduced, and are still being updated such as Adobe Premiere Pro, Final Cut, Filmora and so on. As the case is today, smartphones have proven to be relevant in the process; they have also come up with video editing applications such as Power Video Director, InShot, Filmora for Android, Kinemaster and many more for Android, iPhone and iPads.
This article aims at giving guides and steps on how to rotate AVI videos using different softwares on different PCs (Windows and Mac) and smartphones (Android and iPhone). This does not leave online video editing softwares behind also.
WHAT IS AVI?

AVI means Audio Video Interleave. It’s a multimedia container format introduced by Microsoft in November 1992 as part of its video for Windows technology. AVI files can contain both audio and video data in a file container that allows synchronous audio-with-video playback.
KDENLIVE – FREE FOR WINDOWS

Introduced in 2002, Kdenlive has a good quality and design. The design is straightforward, user-friendly which makes you know what you are getting into, as well as the actual quality of the effects that you might want to apply to your video while editing. Overall, it looks really professional, neat and organized.
HOW TO ROTATE AVI VIDEO IN KDENLIVE
- STEP 1 - Launch Kdenlive on your Windows and import the video from where you have saved it locally. Drag and drop video on timeline

- STEP 2 - Select video effects and in the search box, type ‘rotate’ and click on it. Click on effects, then select video effects
- STEP 3 - Drag the video to the timeline and go to effects, then drag and drop the ‘rotate’ effect on the clip.

ALTERNATIVE WAY TO ROTATE AVI VIDEO ON KDENLIVE
- STEP 1 - Create a vertical project: create profile, select size, 1080 x 1920 and select aspect ratio: 9:16. Afterwards, there will be a vertical outline on your program window. Import your video to the project bin and drag it to the timeline
- STEP 2 - Go to effects, then click on ‘transform’ and double-click on it
- STEP 3 - Go to the down-right part of your screen and click on ‘rotation’ and highlight to change the number to whichever is ideal for your screen; you can change it to 270. This will make it rotate but will not fill the screen yet. Highlight the size and change it to 180 an hit the ‘enter’ key.
OPENSHOT – FREE FOR WINDOWS
OpenShot Video Editor is a free and open-source video editor for Windows, macOS, Linux, and Chrome OS. The project started in August 2008 by Jonathan Thomas, with the objective of providing a stable, free, and friendly to use video editor.

HOW TO ROTATE AVI VIDEO ON OPENSHOT
- STEP 1 - Launch OpenShot on your Windows and import your clip form where you’ve saved it locally

- STEP 2 - Drag and drop footage on your timeline and click on the ‘play’ button to check your footage. Right click on the footage and an option box will appear

- STEP 3 - Click on rotate; you can choose to rotate either left or right. Rotate till it ideally fits the screen

ALTERNATIVE WAY TO ROTATE AVI VIDEO ON OPEN SHOT
- STEP 1 - Launch OpenShot on your Windows and drag your footage to the timeline.
- STEP 2 - Right click on your video and select properties.
- STEP 3 - Go to rotation and change the value, and your video will rotate
ADOBE PREMIERE PRO – PAID FOR WINDOWS

Introduced in 2003, Adobe Premiere Pro is known to be a video editing software. It has a lot of features that can be used in the process of editing. It’s capable of editing feature movies such as Hollywood and the likes.
HOW TO ROTATE AVI VIDEO ON ADOBE PREMIERE PRO – FIXING A LANDSCAPE SHOT
- STEP 1 - Go to sequence and click on sequence settings

- STEP 2 - Click on frame size and type in 3840; for the horizontal, type in 2160 and then proceed to click ok
FIXING A PORTRAIT SHOT
- Put your play-head (the thin line that moves over the clips on your timeline) on the clip on the timeline
- Go to the top and click on ‘Editing’, then you go to effects control

- Go to ‘scale’, and type in the number according to the degree you desire to effect
your rotation. However, your video will be just perfect if you type in -90

ALTERNATIVE WAY TO ROTATE AVI VIDEO ON ADOBE PREMIERE PRO
- STEP 1 - Go to the effects window and search for ‘flip’
- STEP 2 - Click on ‘Transform’. You can then decide to do a horizontal flip or a vertical flip
- STEP 3 - All you need to do is click and drag it on to your clip and it will flip, whether horizontal or vertical
- STEP 4 - It is easy to remedy when you click and drag the other to place on your footage, whether horizontal or vertical.
TO ROTATE YOUR CLIP
- STEP 1 - Highlight your footage on the timeline and go to your effects controls window. Underneath ‘motion’, there is the perimeter of rotation. If you click and drag the mouse on the number, it will rotate either clockwise or counter-clockwise. Also, you can type in whatever rotation amount you want

- STEP 2 - It’s also worth mentioning that when you rotate a clip, you’re always rotating around the inker point (the little blue cross in a circle). You can click and drag this through the program monitor to any point on the clip and start rotating it around the inker point. In fact, it doesn’t have to be on the clip; you can make the inker point up further and rotate, and will still rotate around the inker point. If you don’t see this on your program monitor, that’s because you haven’t highlighted the motion.

- STEP 3 - A good tip is using guides to help you level and horizontal or whether you are working with on-screen. To get a slant perfectly leveled, there’s an easy way to reference a straight line on your program monitor. On the bottom right of your program monitor is the button [a plus (+) button] editor. Click on it and a box full of tools will pop up which you can work with. Click ‘add show rulers’, ‘show guides’ and ‘safe margins’


- STEP 4 - In the ruler section, take your mouse, click and drag it down to the little crosses of your safe margins. The same goes for the vertical ruler; click and drag over. That will create a new guide. For your footage, what you might need to do is get your horizontal guide down to your horizon view. You can go to your rotation and rotate your footage to get straight with your guide. If you are left with black bars at the corners, take off your safe margin rulers and guides and then zoom in on your footage and take off the black bars. To do this, go back to your effect controls

- STEP 5 - Instead of doing rotation, you scale by clicking and sliding the mouse on the number to the right


iMOVIE – FREE FOR MAC

iMovie is a preinstalled video editing application developed by Apple Inc. for macOS, Ios, and iPadOS devices. It was originally released in 1999 as a Mac OS 8 application bundle with the first FireWire-enabled consumer Mac model, the iMac DV. With iMovie, you can create professional-looking videos without an editing degree.
HOW TO ROTATE AVI VIDEO IN iMOVIE
- STEP 1 - Run iMovie on your PC and create a new project by clicking ‘create new’ and selecting ‘movie’. Import your footage: Click on the arrow pointing downwards just below your menu bar, and select the video from wherever it is saved locally.

- STEP 2 - Click on the video once it’s imported; make sure it has the yellow boundary on it. Click and drag it onto the timeline
- STEP 3 - Leave your play-head on the footage and go just above your program window and click on the crop icon, the third from the left. Afterwards, a rotate ion will show just by the right above the program monitor. There are actually two buttons to rotate in either direction. You can save time by clicking the correct direction for whichever way your videos need to be rotated


- STEP 4 - Your videos is rotated; you can go ahead and save

FILMORA – PAID FOR MAC

Formerly known as Wondershare Video Editor as at when it first launched in 2015, Filmora Video Editor is a video editing software that helps businesses create and distribute white-labeled marketing videos. Filmora is an easy-to-use video editing software for a beginner. It supports 50 above formats, 4k editing, Filmstock effects store, all basic and advanced editing tools in the most easily accessible and used manner.
For Win 7 or later (64-bit)
For macOS 10.14 or later
HOW TO ROTATE AVI VIDEO IN FILMORA
- STEP 1 - Run Filmora on your PC, import your video from where it has been locally saved and drag to the timeline
- STEP 2 - Go to file, and select ‘project settings’. By default, the video is recorded on portrait – 9:11, so change the aspect ratio to 16:9


- STEP 3 - Go to your timeline and double-click your footage. A box of options will pop up beside the program monitor. Simply go to rotate and click and slide to rotate. It may be difficult to line it up even and straight. Just go to the program monitor and click on the little line and drag; it makes it easier to align


- STEP 4 - Go to ‘scale’ and slide it to the right to make it fill the screen. Your video is rotated and ready to be previewed
VIDEOLEAP – PAID FOR ANDROID AND iPHONE

Videoleap includes the usual basic cutting and pasting tools, plus greenscreen aspect ratios, slow-mo and fast motion, audio editing, and unlimited undo and redo actions. Access to the app and premium features is available with a subscription for $7.99/month, or with additional discounts if bought as a one-time purchase or multiple month bundles.
HOW TO ROTATE AVI VIDEO IN VIDEOLEAP
- STEP 1 - Launch Videoleap on your android and Import your footage from where you have saved it locally. Tap on ‘transform’, and then tap on rotate, then tap on rotate as many times as it takes so that it can be ideally fit


- STEP 2 - Change the format from 16:9 (YouTube format) to 9:16 (for TikTok). To do that, deselect the clip, tap on canvas, and then choose 9:16. Play the clip to preview and save.

INSHOT – FREE FOR ANDROID

InShot app is an all-in-one visual content editing app. It allows you to create videos, edit photos, and create image collages. The app has plenty of features too. You can trim clips, change the speed of your footage, and add filters, music and text. InShot is a free mobile application that you can download on your Windows to create or edit videos and photos.
HOW TO ROTATE AVI VIDEO ON INSHOT
- STEP 1 - Import your video from where you have locally saved it
- STEP 2 - Tap on the clip, and swipe the toolbar to the left to find the ‘rotate’ icon. When you tap on ‘rotate’, it will rotate your video to your left; you can keep rotating till it’s ideally fit


QUICKTIME VIDEO EDITOR – FREE FOR MAC

- Open your video on your PC using the Quicktime program. Go to ‘edit’ and click on ‘rotate left’; keep clicking until your video ideally fits the screen. Your video is rotated successfully. Preview, save and export your video.


VLLO – PAID FOR ANDROID

VLLO is a super easy video editor. Beginner and casual users will enjoy editing video with its intuitive but precise control abled split, txt, BGM and transition. For the pro editors, premium paid features are also ready with Chroma-Key, PIP, mosaic and keyframe animations.
HOW TO ROTATE AVI VIDEO IN VLLO – LANDSCAPE TO PORTRAIT
- STEP 1 - Import your footage from where you have saved it locally and change aspect ratio to 16:9 and select the ‘fill’ icon.

- STEP 2 - On your timeline, click on the footage and select the curved arrow icon to rotate as you click and drag. You can choose to rotate either ways, and your video is rotated, and ready to be previewed and saved

VEED – ONLINE/CLOUD-BASED VIDEO EDITOR

VEED.IO is an online video editing platform that makes creating videos easy and accessible to everyone. Millions of creators around the world use our products to tell stories, create content, grow their audience and more.
HOW TO ROTATE AVI VIDEO ONLINE USING VEED – PORTRAIT TO LANDSCAPE
- STEP 1 - Create an account online on Veed – Visit <www.veed.io>

- STEP 2 - Click the ‘view project’ button and import/upload footage form where it has been saved locally

- STEP 3 - Go to ‘edit video’ and select ‘adjust’. Go to rotation and click and drag to the right and to the left for your video to fit ideally

- STEP 4 - You can export your video once it is rotated
ALTRNATIVE WAY TO ROTATE AVI VIDEO ONLINE USING VEED
- STEP 1 - Import your footage and drag it to the timeline
- STEP 2 - Click on ‘try sample’ or ‘upload video’

- STEP 3 - Click on ‘rotate’. Click to rotate either ways, 90 degrees
- STEP 4 - Go to crop and choose whether ‘vertical’ or ‘landscape’ to get rid of the bars

WEVIDEO – ONLINE/CLOUD-BASED VIDEO EDITOR
WeVideo is an online, cloud-based video editing platform that works in web browsers and on mobile devices. The company was originally founded in 2011 in Europe. Their main headquarters is in Mountain View, California with a team based in Romania.
HOW TO ROTATE AVI VIDEO ON WEVIDEO ONLINE
- STEP 1 - Import your footage and drag it to the timeline

- STEP 2 - Click on the little pencil icon right above the timeline

- STEP 3 - That will open up your editor, popping up a box full of option. Select the ‘transform’ tab, then two arrows right in front of ‘rotation’ till it fits: two clicks for 180, and one click for 90. Adjust it as needed, and save changes to preview.

Video editing is the process of cutting and rearranging multiple clips or segments of video to create a new and more improved video. This involves adding titles, animations, sound effects, music and more. Video editing has not ceased to follow the trend of technology as it keeps thriving tirelessly through the ages. With advancement springing forth from many sides, video editing followed every pace to ensure it’s not left behind. This largely involves gadgets, computers and smartphones.
Before the advent of smartphones, computers have been the only video editing tools, and that culture is preserved even till date as its use has spread round the world. It is therefore evident that film making cannot bypass this process. Improvements have been made over the years on video editing softwares for computers to stay up to date as regards features and usability. There are other video editors which were introduced, and are still being updated such as Adobe Premiere Pro, Final Cut, Filmora and so on. As the case is today, smartphones have proven to be relevant in the process; they have also come up with video editing applications such as Power Video Director, InShot, Filmora for Android, Kinemaster and many more for Android, iPhone and iPads.
This article aims at giving guides and steps on how to rotate AVI videos using different softwares on different PCs (Windows and Mac) and smartphones (Android and iPhone). This does not leave online video editing softwares behind also.
WHAT IS AVI?
AVI means Audio Video Interleave. It’s a multimedia container format introduced by Microsoft in November 1992 as part of its video for Windows technology. AVI files can contain both audio and video data in a file container that allows synchronous audio-with-video playback.
KDENLIVE – FREE FOR WINDOWS
Introduced in 2002, Kdenlive has a good quality and design. The design is straightforward, user-friendly which makes you know what you are getting into, as well as the actual quality of the effects that you might want to apply to your video while editing. Overall, it looks really professional, neat and organized.
HOW TO ROTATE AVI VIDEO IN KDENLIVE
- STEP 1 - Launch Kdenlive on your Windows and import the video from where you have saved it locally. Drag and drop video on timeline
- STEP 2 - Select video effects and in the search box, type ‘rotate’ and click on it. Click on effects, then select video effects
- STEP 3 - Drag the video to the timeline and go to effects, then drag and drop the ‘rotate’ effect on the clip.
ALTERNATIVE WAY TO ROTATE AVI VIDEO ON KDENLIVE
- STEP 1 - Create a vertical project: create profile, select size, 1080 x 1920 and select aspect ratio: 9:16. Afterwards, there will be a vertical outline on your program window. Import your video to the project bin and drag it to the timeline
- STEP 2 - Go to effects, then click on ‘transform’ and double-click on it
- STEP 3 - Go to the down-right part of your screen and click on ‘rotation’ and highlight to change the number to whichever is ideal for your screen; you can change it to 270. This will make it rotate but will not fill the screen yet. Highlight the size and change it to 180 an hit the ‘enter’ key.
OPENSHOT – FREE FOR WINDOWS
OpenShot Video Editor is a free and open-source video editor for Windows, macOS, Linux, and Chrome OS. The project started in August 2008 by Jonathan Thomas, with the objective of providing a stable, free, and friendly to use video editor.
HOW TO ROTATE AVI VIDEO ON OPENSHOT
- STEP 1 - Launch OpenShot on your Windows and import your clip form where you’ve saved it locally
- STEP 2 - Drag and drop footage on your timeline and click on the ‘play’ button to check your footage. Right click on the footage and an option box will appear
- STEP 3 - Click on rotate; you can choose to rotate either left or right. Rotate till it ideally fits the screen
ALTERNATIVE WAY TO ROTATE AVI VIDEO ON OPEN SHOT
- STEP 1 - Launch OpenShot on your Windows and drag your footage to the timeline.
- STEP 2 - Right click on your video and select properties.
- STEP 3 - Go to rotation and change the value, and your video will rotate
ADOBE PREMIERE PRO – PAID FOR WINDOWS
Introduced in 2003, Adobe Premiere Pro is known to be a video editing software. It has a lot of features that can be used in the process of editing. It’s capable of editing feature movies such as Hollywood and the likes.
HOW TO ROTATE AVI VIDEO ON ADOBE PREMIERE PRO – FIXING A LANDSCAPE SHOT
- STEP 1 - Go to sequence and click on sequence settings
- STEP 2 - Click on frame size and type in 3840; for the horizontal, type in 2160 and then proceed to click ok
FIXING A PORTRAIT SHOT
- Put your play-head (the thin line that moves over the clips on your timeline) on the clip on the timeline
- Go to the top and click on ‘Editing’, then you go to effects control
- Go to ‘scale’, and type in the number according to the degree you desire to effect
your rotation. However, your video will be just perfect if you type in -90
ALTERNATIVE WAY TO ROTATE AVI VIDEO ON ADOBE PREMIERE PRO
- STEP 1 - Go to the effects window and search for ‘flip’
- STEP 2 - Click on ‘Transform’. You can then decide to do a horizontal flip or a vertical flip
- STEP 3 - All you need to do is click and drag it on to your clip and it will flip, whether horizontal or vertical
- STEP 4 - It is easy to remedy when you click and drag the other to place on your footage, whether horizontal or vertical.
TO ROTATE YOUR CLIP
- STEP 1 - Highlight your footage on the timeline and go to your effects controls window. Underneath ‘motion’, there is the perimeter of rotation. If you click and drag the mouse on the number, it will rotate either clockwise or counter-clockwise. Also, you can type in whatever rotation amount you want
- STEP 2 - It’s also worth mentioning that when you rotate a clip, you’re always rotating around the inker point (the little blue cross in a circle). You can click and drag this through the program monitor to any point on the clip and start rotating it around the inker point. In fact, it doesn’t have to be on the clip; you can make the inker point up further and rotate, and will still rotate around the inker point. If you don’t see this on your program monitor, that’s because you haven’t highlighted the motion.
- STEP 3 - A good tip is using guides to help you level and horizontal or whether you are working with on-screen. To get a slant perfectly leveled, there’s an easy way to reference a straight line on your program monitor. On the bottom right of your program monitor is the button [a plus (+) button] editor. Click on it and a box full of tools will pop up which you can work with. Click ‘add show rulers’, ‘show guides’ and ‘safe margins’
- STEP 4 - In the ruler section, take your mouse, click and drag it down to the little crosses of your safe margins. The same goes for the vertical ruler; click and drag over. That will create a new guide. For your footage, what you might need to do is get your horizontal guide down to your horizon view. You can go to your rotation and rotate your footage to get straight with your guide. If you are left with black bars at the corners, take off your safe margin rulers and guides and then zoom in on your footage and take off the black bars. To do this, go back to your effect controls
- STEP 5 - Instead of doing rotation, you scale by clicking and sliding the mouse on the number to the right
iMOVIE – FREE FOR MAC
iMovie is a preinstalled video editing application developed by Apple Inc. for macOS, Ios, and iPadOS devices. It was originally released in 1999 as a Mac OS 8 application bundle with the first FireWire-enabled consumer Mac model, the iMac DV. With iMovie, you can create professional-looking videos without an editing degree.
HOW TO ROTATE AVI VIDEO IN iMOVIE
- STEP 1 - Run iMovie on your PC and create a new project by clicking ‘create new’ and selecting ‘movie’. Import your footage: Click on the arrow pointing downwards just below your menu bar, and select the video from wherever it is saved locally.
- STEP 2 - Click on the video once it’s imported; make sure it has the yellow boundary on it. Click and drag it onto the timeline
- STEP 3 - Leave your play-head on the footage and go just above your program window and click on the crop icon, the third from the left. Afterwards, a rotate ion will show just by the right above the program monitor. There are actually two buttons to rotate in either direction. You can save time by clicking the correct direction for whichever way your videos need to be rotated
- STEP 4 - Your videos is rotated; you can go ahead and save
FILMORA – PAID FOR MAC
Formerly known as Wondershare Video Editor as at when it first launched in 2015, Filmora Video Editor is a video editing software that helps businesses create and distribute white-labeled marketing videos. Filmora is an easy-to-use video editing software for a beginner. It supports 50 above formats, 4k editing, Filmstock effects store, all basic and advanced editing tools in the most easily accessible and used manner.
For Win 7 or later (64-bit)
For macOS 10.14 or later
HOW TO ROTATE AVI VIDEO IN FILMORA
- STEP 1 - Run Filmora on your PC, import your video from where it has been locally saved and drag to the timeline
- STEP 2 - Go to file, and select ‘project settings’. By default, the video is recorded on portrait – 9:11, so change the aspect ratio to 16:9
- STEP 3 - Go to your timeline and double-click your footage. A box of options will pop up beside the program monitor. Simply go to rotate and click and slide to rotate. It may be difficult to line it up even and straight. Just go to the program monitor and click on the little line and drag; it makes it easier to align
- STEP 4 - Go to ‘scale’ and slide it to the right to make it fill the screen. Your video is rotated and ready to be previewed
VIDEOLEAP – PAID FOR ANDROID AND iPHONE
Videoleap includes the usual basic cutting and pasting tools, plus greenscreen aspect ratios, slow-mo and fast motion, audio editing, and unlimited undo and redo actions. Access to the app and premium features is available with a subscription for $7.99/month, or with additional discounts if bought as a one-time purchase or multiple month bundles.
HOW TO ROTATE AVI VIDEO IN VIDEOLEAP
- STEP 1 - Launch Videoleap on your android and Import your footage from where you have saved it locally. Tap on ‘transform’, and then tap on rotate, then tap on rotate as many times as it takes so that it can be ideally fit
- STEP 2 - Change the format from 16:9 (YouTube format) to 9:16 (for TikTok). To do that, deselect the clip, tap on canvas, and then choose 9:16. Play the clip to preview and save.
INSHOT – FREE FOR ANDROID
InShot app is an all-in-one visual content editing app. It allows you to create videos, edit photos, and create image collages. The app has plenty of features too. You can trim clips, change the speed of your footage, and add filters, music and text. InShot is a free mobile application that you can download on your Windows to create or edit videos and photos.
HOW TO ROTATE AVI VIDEO ON INSHOT
- STEP 1 - Import your video from where you have locally saved it
- STEP 2 - Tap on the clip, and swipe the toolbar to the left to find the ‘rotate’ icon. When you tap on ‘rotate’, it will rotate your video to your left; you can keep rotating till it’s ideally fit
QUICKTIME VIDEO EDITOR – FREE FOR MAC
- Open your video on your PC using the Quicktime program. Go to ‘edit’ and click on ‘rotate left’; keep clicking until your video ideally fits the screen. Your video is rotated successfully. Preview, save and export your video.
VLLO – PAID FOR ANDROID
VLLO is a super easy video editor. Beginner and casual users will enjoy editing video with its intuitive but precise control abled split, txt, BGM and transition. For the pro editors, premium paid features are also ready with Chroma-Key, PIP, mosaic and keyframe animations.
HOW TO ROTATE AVI VIDEO IN VLLO – LANDSCAPE TO PORTRAIT
- STEP 1 - Import your footage from where you have saved it locally and change aspect ratio to 16:9 and select the ‘fill’ icon.
- STEP 2 - On your timeline, click on the footage and select the curved arrow icon to rotate as you click and drag. You can choose to rotate either ways, and your video is rotated, and ready to be previewed and saved
VEED – ONLINE/CLOUD-BASED VIDEO EDITOR
VEED.IO is an online video editing platform that makes creating videos easy and accessible to everyone. Millions of creators around the world use our products to tell stories, create content, grow their audience and more.
HOW TO ROTATE AVI VIDEO ONLINE USING VEED – PORTRAIT TO LANDSCAPE
- STEP 1 - Create an account online on Veed – Visit <www.veed.io>
- STEP 2 - Click the ‘view project’ button and import/upload footage form where it has been saved locally
- STEP 3 - Go to ‘edit video’ and select ‘adjust’. Go to rotation and click and drag to the right and to the left for your video to fit ideally
- STEP 4 - You can export your video once it is rotated
ALTRNATIVE WAY TO ROTATE AVI VIDEO ONLINE USING VEED
- STEP 1 - Import your footage and drag it to the timeline
- STEP 2 - Click on ‘try sample’ or ‘upload video’
- STEP 3 - Click on ‘rotate’. Click to rotate either ways, 90 degrees
- STEP 4 - Go to crop and choose whether ‘vertical’ or ‘landscape’ to get rid of the bars
WEVIDEO – ONLINE/CLOUD-BASED VIDEO EDITOR
WeVideo is an online, cloud-based video editing platform that works in web browsers and on mobile devices. The company was originally founded in 2011 in Europe. Their main headquarters is in Mountain View, California with a team based in Romania.
HOW TO ROTATE AVI VIDEO ON WEVIDEO ONLINE
- STEP 1 - Import your footage and drag it to the timeline
- STEP 2 - Click on the little pencil icon right above the timeline
- STEP 3 - That will open up your editor, popping up a box full of option. Select the ‘transform’ tab, then two arrows right in front of ‘rotation’ till it fits: two clicks for 180, and one click for 90. Adjust it as needed, and save changes to preview.
Trailer Guide for Creators and Developers
Trailers are a popular means to showcase a product you are about to release to the market. Teasers and trailers are traditionally created for movies, but have eventually evolved to include book trailers, game trailers, and app trailers. In this article, we will explain the key details of a trailer, highlight some examples, and show you how to create an effective trailer.
Part 1. What is a Trailer?
A trailer is a type of video commercial advertisement made to advertise and inform audiences about a specific program or item. To persuade customers to view or use the product, it includes a brief series of previews of the entire material. It also serves as a means of creating anticipation for a show or product that is about to hit the market.

Trailers were originally made for cinema movies. Nowadays, trailers are created for different forms of media like shows, apps, programs, video games, and book videos. A typical traditional trailer lasts between 1 to 3 minutes.
Part 2. What Are the Similarities and Differences Between a Teaser and Trailer?
Teasers and trailers can often be confused with each other. After all, they pretty much have the same objective.
Both are created for the purpose of advertising an upcoming show, product, or service. Teasers and trailers are similarly shown to audiences prior to the release of the thing they are advertising. They are meant to show a small portion of the full experience to create curiosity and excitement towards a targeted market. Both videos are typically short in length - taking up only a maximum of 3 minutes in duration.
The differences between them lie in their content, timeline, and duration. A teaser is much shorter than a trailer - the former runs for only 20-30 seconds while the latter can go between 1-3 minutes in length. This is because teasers are typically made before or during the production process of a movie or feature, whilst trailers are commonly made at the end.
For films, movies, and shows, teasers generally capture only a single part of that media. It focuses on the most intense or impactful scene. Trailers are formed from a series of clips depicting striking scenes derived from the beginning, middle, and end of the show. These scenes are normally arranged in a nonlinear structure, allowing viewers to have a general understanding of the story without revealing the entirety of the plot.
Part 3. Examples of good trailers
An excellent trailer is one who can effectively attract and maintain the audience’s attention. It satisfies its objective of showcasing striking and captivating pieces of the main product and entices viewers to experience its entirety. Here are some examples of trailers who have well fulfilled the criteria of a good trailer.
1. The Suicide Squad
The Suicide Squad is a fresh take featuring DC’s anti-heroes assemble in a single chaotic and unconventional team. James Gunn’s iteration on these characters is brought to life in the trailer with a majestic cast including John Cena, Idris Elba, Margot Robbie, and David Dastmalchian. Several key scenes are shown, highlighting its standout characters in the process while portraying the movie’s setting.
2. Raya and the Last Dragon
The trailer starts out innocently and comes with an adorable and surprising twist. The brief 2-minute trailer is packed with relevant scenes that depict the character’s quest without revealing too much. Many action-packed scenes and emotional interactions are satisfactorily squeezed into the trailer. Excitement builds further with Tamara Bubble’s “I’m That Good” playing in the background on the last minute of the video.
3. Men (2022)
Ingenious combination of sound effects and background music play a distinct role in this 2022 trailer. The female lead’s voice echoing from a tunnel, the haunting piano keys gradually building up the suspense, and the common but cleverly used horror audio effects create a chilling ensemble of haunting scenes in the movie. The sounds gradually rise up as more aggressive and energized scenes flash on the screen, and eventually end back into the sombre intro that leaves the audience with questions.
4. The Farewell
Lulu Wang’s dramatic comedy The Farewell is all about a family hiding the truth of a family member’s terminal illness from the person herself. What makes the trailer special is that it steers away from the sad, melancholic direction and veers toward a feel-good movie vibe. The conflict, struggle, and the beliefs featured in the movie are depicted in the trailer. However, the clever placement of interactions and the uplifting music tug at the audience’s heartstrings and urge them to want to see more.
5. Pokémon Go
Pokémon has become a culture to several generations. Becoming a Pokémon trainer is a secret dream that almost all of us have, even as adults. Niantic’s collaboration with the Pokémon franchise brings people closer to that reality by introducing its AR and location-powered app Pokémon Go. The trailer shows people of all ages living out their trainer dreams in the real world and interacting with Pokémon. The different features of the game are dramatized in a real-life setting, inciting more excitement, and pulling out the nostalgia from its market. The trailer keeps the actual app showcase to a minimum, instead focusing on once again selling that dream to audiences and bringing out the inner child in everyone.
Part 4. How to bring your trailer to the next level?
While it may seem intimidating to create a trailer for your upcoming product, there is no need to worry. It is now easier than ever to create a well-crafted trailer by taking advantage of a program’s tools and templates.
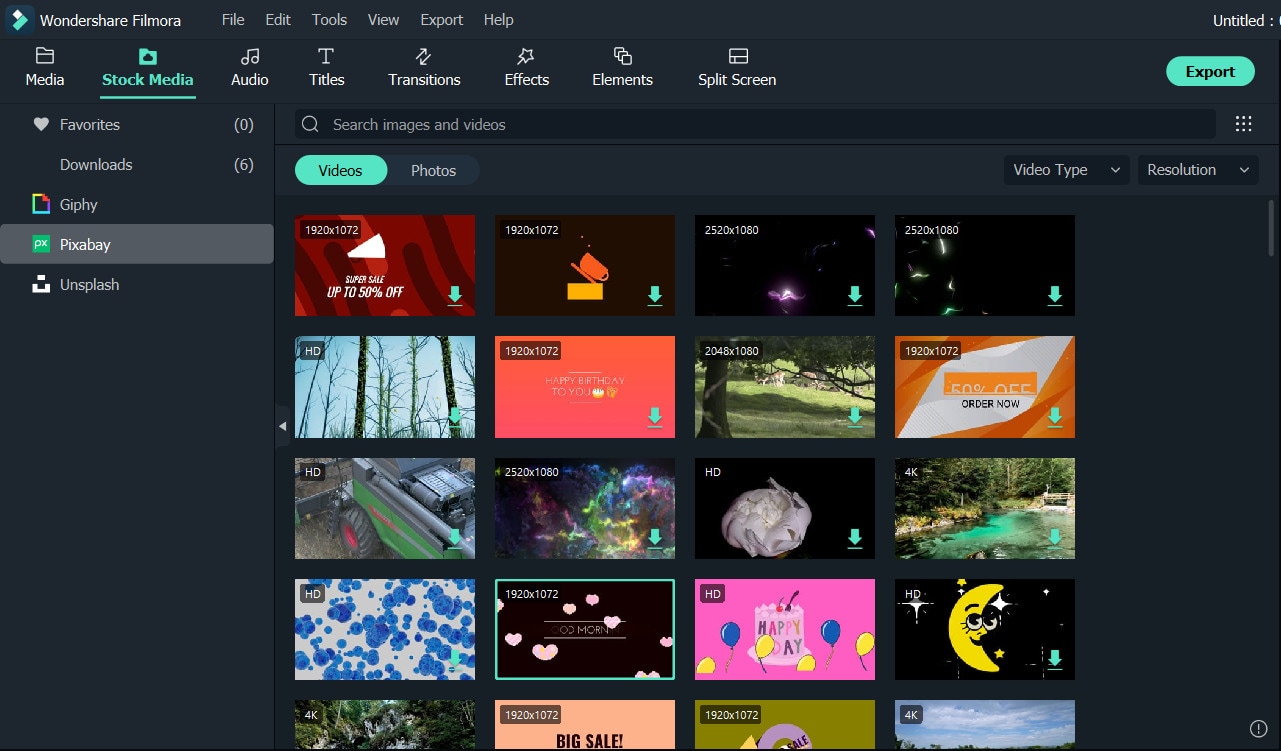
- Stock media
Filmora makes it easy to craft a trailer with only a few clicks. Make use of the program’s media library to gain access to a wealth of resources like stock photos, videos, music, and audio files.
- Keyframing
Keyframing lets you smoothly transition from one scene to another, making it an effective tool for trailers. It is particularly appealing for shows that highlight motion like sports, dancing, and action. Experiment with more than 80 preset templates and create smooth scene transitions with ease.
- Speed Ramping
Speed Ramping is a feature that works perfectly with keyframing. Increase the energy and dynamics in your trailer with 6 preset speed types. You can also customize these templates. There is also no need for concern about the audio - Filmora lets you maintain the audio pitch even when using these features.
- FX Effects
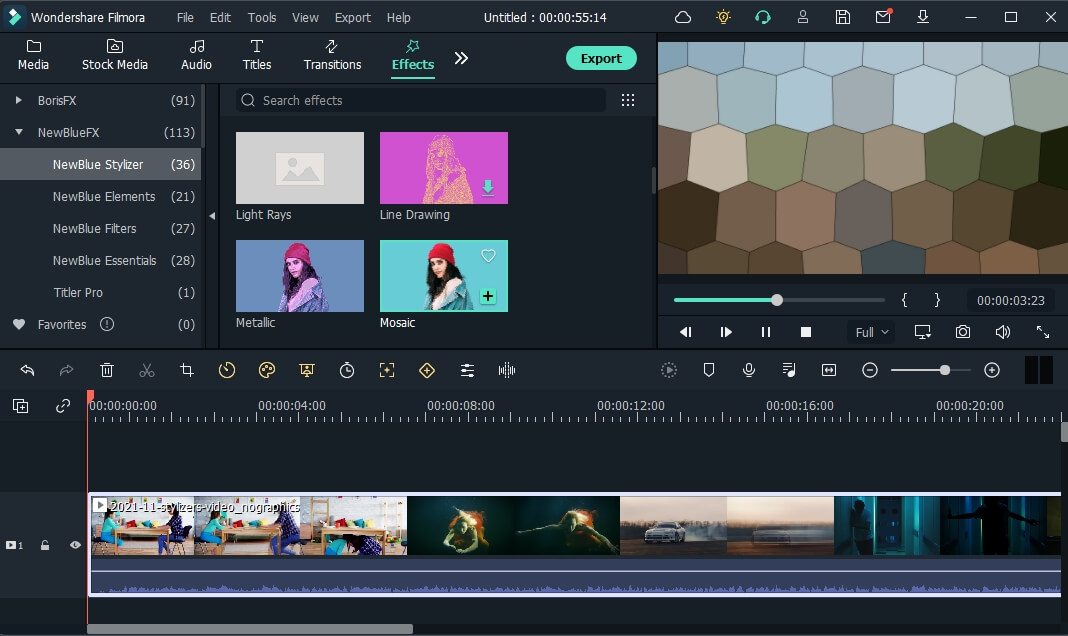
The program also offers many effects and filters for an extra element in your trailer. The Borix FX is an example of that. Designed in collaboration with the award-winning developer of the same name, Boris FX and its extension Continuum features a wide array of tasteful effects for your convenience. There are over 91 customizable and adjustable presets including types like blurs, stylization, and lights. NewBlue is another option that carries choices of filters, titlers, and stylizers.
Filmora offers different features, tools, and effects to explore that can help make your trailer editing objectives easier and more convenient. Save time and resources by taking advantage of its powerful yet easy-to-use tools.
Free Download For Win 7 or later(64-bit)
Free Download For macOS 10.14 or later
2. Raya and the Last Dragon
The trailer starts out innocently and comes with an adorable and surprising twist. The brief 2-minute trailer is packed with relevant scenes that depict the character’s quest without revealing too much. Many action-packed scenes and emotional interactions are satisfactorily squeezed into the trailer. Excitement builds further with Tamara Bubble’s “I’m That Good” playing in the background on the last minute of the video.
3. Men (2022)
Ingenious combination of sound effects and background music play a distinct role in this 2022 trailer. The female lead’s voice echoing from a tunnel, the haunting piano keys gradually building up the suspense, and the common but cleverly used horror audio effects create a chilling ensemble of haunting scenes in the movie. The sounds gradually rise up as more aggressive and energized scenes flash on the screen, and eventually end back into the sombre intro that leaves the audience with questions.
4. The Farewell
Lulu Wang’s dramatic comedy The Farewell is all about a family hiding the truth of a family member’s terminal illness from the person herself. What makes the trailer special is that it steers away from the sad, melancholic direction and veers toward a feel-good movie vibe. The conflict, struggle, and the beliefs featured in the movie are depicted in the trailer. However, the clever placement of interactions and the uplifting music tug at the audience’s heartstrings and urge them to want to see more.
5. Pokémon Go
Pokémon has become a culture to several generations. Becoming a Pokémon trainer is a secret dream that almost all of us have, even as adults. Niantic’s collaboration with the Pokémon franchise brings people closer to that reality by introducing its AR and location-powered app Pokémon Go. The trailer shows people of all ages living out their trainer dreams in the real world and interacting with Pokémon. The different features of the game are dramatized in a real-life setting, inciting more excitement, and pulling out the nostalgia from its market. The trailer keeps the actual app showcase to a minimum, instead focusing on once again selling that dream to audiences and bringing out the inner child in everyone.
Part 4. How to bring your trailer to the next level?
While it may seem intimidating to create a trailer for your upcoming product, there is no need to worry. It is now easier than ever to create a well-crafted trailer by taking advantage of a program’s tools and templates.
- Stock media
Filmora makes it easy to craft a trailer with only a few clicks. Make use of the program’s media library to gain access to a wealth of resources like stock photos, videos, music, and audio files.
- Keyframing
Keyframing lets you smoothly transition from one scene to another, making it an effective tool for trailers. It is particularly appealing for shows that highlight motion like sports, dancing, and action. Experiment with more than 80 preset templates and create smooth scene transitions with ease.
- Speed Ramping
Speed Ramping is a feature that works perfectly with keyframing. Increase the energy and dynamics in your trailer with 6 preset speed types. You can also customize these templates. There is also no need for concern about the audio - Filmora lets you maintain the audio pitch even when using these features.
- FX Effects
The program also offers many effects and filters for an extra element in your trailer. The Borix FX is an example of that. Designed in collaboration with the award-winning developer of the same name, Boris FX and its extension Continuum features a wide array of tasteful effects for your convenience. There are over 91 customizable and adjustable presets including types like blurs, stylization, and lights. NewBlue is another option that carries choices of filters, titlers, and stylizers.
Filmora offers different features, tools, and effects to explore that can help make your trailer editing objectives easier and more convenient. Save time and resources by taking advantage of its powerful yet easy-to-use tools.
Free Download For Win 7 or later(64-bit)
Free Download For macOS 10.14 or later
Ideas That Help You Out in Converting AVI to GIF
Ideas That Will Help You Out in Converting AVI to GIF
An easy yet powerful editor
Numerous effects to choose from
Detailed tutorials provided by the official channel
GIFs have grown in popularity over the years. They are a great way of expressing emotions in a fun way. You can create a GIF out of any video using a conversion tool.
Converting a video AVI to a gif has several benefits. It can be useful for creating cute gifs or memes. Most savvy agencies or freelancers are using this method to improve the effectiveness of their marketing campaigns.
Doing it manually will lead to splitting the video into several pictures at your own time. But with these ideas, you can avoid this extra task and directly convert AVI to GIF in just a few simple steps.
In this article
01 [How to Make an AVI to GIF on Windows/Mac/Online?](#Part 1)
02 [What’s Best 5 GIF to Avi Converters?](#Part 2)
Part 1 How to Make an AVI to GIF on Windows/Mac/Online?
There are many ways to create AVI to GIF based on your device operating system. Go through the various steps below to create it.
01Convert AVI to GIF with Uniconverter
Step 1: Launch Wondershare Uniconverter

Download Wondershare Uniconvereter software from the official link to your PC/Mac (With Mojave). As the home interface appears, click on the “Toolbox” tab and choose the “GIF Maker” option.
Step 2: Upload the AVI File

In the GIF Maker window, click on the “Import” icon to upload AVI files from your PC. On the right pane, select the start and stop times of the videos for GIF-making.
The next thing to do is select the output size and frame rate of the desired GIF output. On the bottom, click on the “File Location” to choose the directory for the output file.
Step 3: Convert

The end step is to convert AVI to gif by clicking on the “Create GIF” button to begin the process.
02Convert AVI to GIF with VLC Media Player
VLC is a cross-platform media player so you can use it on your Mac and Windows to convert AVI to Gif. It’s free and comes with numerous functions and support other than playing media. It can be used as a GIF maker too because of the snapshot feature.
Step 1: Launch VLC Media Player

Run VLC Media Player and then click on “Media” > “Open File” to upload the AVI file from your PC or Mac.
Step 2: Select the Video Frame

As you can see, the video will start running on your VLC media player screen. Now, select the video frame for getting the desired animation. Next, go to the “Video” menu and choose “Take Snapshop”. This step will save the video frame in the PNG format to the My Pictures folder.
Step 3: Open MSPaint

You will have to open MSPaint on your PC. When it opens, click on the “File” menu and then open the snapshot that you had taken in the previous step. Again, click on “File” > “Save As” > “GIF” to download your GIF.
03Convert AVI to GIF Using Photoshop
Converting AVI to GIF with photoshop can be a bit complex but you will get the highest quality GIFs in a short time. Read the steps here to start converting your AVI file.
Step 1: Launch and Import
Run Adobe Photoshop on your PC or Mac. As the home interface will open, click on “File” > “Import” > “Video Frames to Layers”. Now, import your AVI video.

Step 2: Cut the Part
Separate that part of the video for which you want to create a GIF. From the “Range to Import option, select the default “Beginning to End” or “Selected Range”. You also have to check the box in the “Make Frame Animation” option.
Step 3: Check and Save
Come back to the window and check the animation. Trim or add frames if it seems necessary or else simply go to the left side of the animation and click on check forever.
At last, open “File” > “Save for Web”. Now from the “Preset” menu, choose from the GIF option or select from the drop-down list manually. Finish by clicking on “Save”.
Part 2 What’s Best 5 GIF to Avi Converters?
01Cloud Convert
Cloud Convert is a sophisticated, browser-based one-stop shop for all your video conversion needs. It can easily convert AVI to GIF online. It has been packed with plenty of features for yielding desired output to the users. You can adjust fps, preset, resolution, aspect ratio, codec, and more before getting the final result. Not only does it fit your video and image conversion needs but also provides you with audio, ebook, spreadsheet, and many other file conversion facilities. Over 200 file formats are compatible with this platform.
02Any Conv
Any Conv is a powerful solution to convert gifs to AVI files online without any downloads or installations. It supports over 400 file formats and you can use it with any of your devices. Convert any file from one format to another, or from a batch of files at once. This app doesn’t even ask for registration to use and is completely free! There are various options to modify your GIF before the final conversion to AVI such as changing screen size, resize handling, video bitrate, and more.
03Veed.io
Veed.io helps you to convert Gif to AVI and other popular video formats. You can directly upload a file from your computer or add it from your Dropbox. Moreover, you can paste a YouTube URL link for conversion of a video to GIF. It offers you a whole set of video editing, video conversion, and a lot of other features. If you are looking for some additional help in video creation and editing, it’s the best platform for you. Check it out today and start bringing your ideas to reality. The majority of its features can be accessed free of charge.
04MiConv
MiConv is another easy to use cloud-based gif to AVI converter online platform. This multi-platform online converter tool can turn any GIF to AVI online within a few seconds. In an hour, it allows you to convert around 120 GIFs stably. Don’t worry about the performance because you will get the highest quality output here. You just have to upload or drag and drop your files. After conversion, your files will be removed in the next two hours so no other person can access them.
05Convertio
Convertio lets you convert a video file into various formats. It works as an ebook, image, video, document, presentation, font, audio, and archive converter.
You can add files from the computer, dropbox, and google drive. The maximum input file size allowed here to convert is 100MB. If you wish, get the output AVI file from a GIF with increased size and quality.
Part 3 Bonus Want to Edit AVI Videos? Use Filmora
If you want to do something extra apart from GIF-making, like video editing, we have a surprise for you. Wondershare has rolled out the latest update of Wondershare Filmora Video Editor in the V11 beta version. It is a wonderful video editor for professionals as well as amateurs.

Wondershare Filmora - Best Video Editor for Mac/Windows
5,481,435 people have downloaded it.
Build unique custom animations without breaking a sweat.
Focus on creating epic stories and leave the details to Filmora’s auto features.
Start a creative adventure with drag & drop effects and endless possibilities.
Filmora simplifies advanced features to save you time and effort.
Filmora cuts out repetition so you can move on to your next creative breakthrough.
You can enhance your videos with a range of professional editing tools, including video effects, transitions, sound effects, and more. It can also help you create GIFs from UHD 4K videos without any quality compromise. This software also supports many other video formats, so you can personalize any of them as per your choice. It can turn your video idea into reality with perfection.
With the most comprehensive set of video editing tools available, Filmora is the most convenient way to create videos. It can also convert AVI to GIF and vice versafor your business, brands, and social media channels. More than just an editor, this is your all-in-one video production suite.
● Key Takeaways from This Episode →
● Thank you for taking some time out to read this article! We know the amount of time and effort you put into creating an animated GIF. We don’t want your time to go in vain by not having it be perfect.
● I hope these few tips will help you out in the future. Now, you will be able to create the most perfect GIFs to share with family, friends, and business associates.
● For all-in-one video editing tools, you can always use Wondershare Filmora. If you have any other ideas or questions, please leave a comment below.
GIFs have grown in popularity over the years. They are a great way of expressing emotions in a fun way. You can create a GIF out of any video using a conversion tool.
Converting a video AVI to a gif has several benefits. It can be useful for creating cute gifs or memes. Most savvy agencies or freelancers are using this method to improve the effectiveness of their marketing campaigns.
Doing it manually will lead to splitting the video into several pictures at your own time. But with these ideas, you can avoid this extra task and directly convert AVI to GIF in just a few simple steps.
In this article
01 [How to Make an AVI to GIF on Windows/Mac/Online?](#Part 1)
02 [What’s Best 5 GIF to Avi Converters?](#Part 2)
Part 1 How to Make an AVI to GIF on Windows/Mac/Online?
There are many ways to create AVI to GIF based on your device operating system. Go through the various steps below to create it.
01Convert AVI to GIF with Uniconverter
Step 1: Launch Wondershare Uniconverter
Download Wondershare Uniconvereter software from the official link to your PC/Mac (With Mojave). As the home interface appears, click on the “Toolbox” tab and choose the “GIF Maker” option.
Step 2: Upload the AVI File
In the GIF Maker window, click on the “Import” icon to upload AVI files from your PC. On the right pane, select the start and stop times of the videos for GIF-making.
The next thing to do is select the output size and frame rate of the desired GIF output. On the bottom, click on the “File Location” to choose the directory for the output file.
Step 3: Convert
The end step is to convert AVI to gif by clicking on the “Create GIF” button to begin the process.
02Convert AVI to GIF with VLC Media Player
VLC is a cross-platform media player so you can use it on your Mac and Windows to convert AVI to Gif. It’s free and comes with numerous functions and support other than playing media. It can be used as a GIF maker too because of the snapshot feature.
Step 1: Launch VLC Media Player
Run VLC Media Player and then click on “Media” > “Open File” to upload the AVI file from your PC or Mac.
Step 2: Select the Video Frame
As you can see, the video will start running on your VLC media player screen. Now, select the video frame for getting the desired animation. Next, go to the “Video” menu and choose “Take Snapshop”. This step will save the video frame in the PNG format to the My Pictures folder.
Step 3: Open MSPaint
You will have to open MSPaint on your PC. When it opens, click on the “File” menu and then open the snapshot that you had taken in the previous step. Again, click on “File” > “Save As” > “GIF” to download your GIF.
03Convert AVI to GIF Using Photoshop
Converting AVI to GIF with photoshop can be a bit complex but you will get the highest quality GIFs in a short time. Read the steps here to start converting your AVI file.
Step 1: Launch and Import
Run Adobe Photoshop on your PC or Mac. As the home interface will open, click on “File” > “Import” > “Video Frames to Layers”. Now, import your AVI video.
Step 2: Cut the Part
Separate that part of the video for which you want to create a GIF. From the “Range to Import option, select the default “Beginning to End” or “Selected Range”. You also have to check the box in the “Make Frame Animation” option.
Step 3: Check and Save
Come back to the window and check the animation. Trim or add frames if it seems necessary or else simply go to the left side of the animation and click on check forever.
At last, open “File” > “Save for Web”. Now from the “Preset” menu, choose from the GIF option or select from the drop-down list manually. Finish by clicking on “Save”.
Part 2 What’s Best 5 GIF to Avi Converters?
01Cloud Convert
Cloud Convert is a sophisticated, browser-based one-stop shop for all your video conversion needs. It can easily convert AVI to GIF online. It has been packed with plenty of features for yielding desired output to the users. You can adjust fps, preset, resolution, aspect ratio, codec, and more before getting the final result. Not only does it fit your video and image conversion needs but also provides you with audio, ebook, spreadsheet, and many other file conversion facilities. Over 200 file formats are compatible with this platform.
02Any Conv
Any Conv is a powerful solution to convert gifs to AVI files online without any downloads or installations. It supports over 400 file formats and you can use it with any of your devices. Convert any file from one format to another, or from a batch of files at once. This app doesn’t even ask for registration to use and is completely free! There are various options to modify your GIF before the final conversion to AVI such as changing screen size, resize handling, video bitrate, and more.
03Veed.io
Veed.io helps you to convert Gif to AVI and other popular video formats. You can directly upload a file from your computer or add it from your Dropbox. Moreover, you can paste a YouTube URL link for conversion of a video to GIF. It offers you a whole set of video editing, video conversion, and a lot of other features. If you are looking for some additional help in video creation and editing, it’s the best platform for you. Check it out today and start bringing your ideas to reality. The majority of its features can be accessed free of charge.
04MiConv
MiConv is another easy to use cloud-based gif to AVI converter online platform. This multi-platform online converter tool can turn any GIF to AVI online within a few seconds. In an hour, it allows you to convert around 120 GIFs stably. Don’t worry about the performance because you will get the highest quality output here. You just have to upload or drag and drop your files. After conversion, your files will be removed in the next two hours so no other person can access them.
05Convertio
Convertio lets you convert a video file into various formats. It works as an ebook, image, video, document, presentation, font, audio, and archive converter.
You can add files from the computer, dropbox, and google drive. The maximum input file size allowed here to convert is 100MB. If you wish, get the output AVI file from a GIF with increased size and quality.
Part 3 Bonus Want to Edit AVI Videos? Use Filmora
If you want to do something extra apart from GIF-making, like video editing, we have a surprise for you. Wondershare has rolled out the latest update of Wondershare Filmora Video Editor in the V11 beta version. It is a wonderful video editor for professionals as well as amateurs.
Wondershare Filmora - Best Video Editor for Mac/Windows
5,481,435 people have downloaded it.
Build unique custom animations without breaking a sweat.
Focus on creating epic stories and leave the details to Filmora’s auto features.
Start a creative adventure with drag & drop effects and endless possibilities.
Filmora simplifies advanced features to save you time and effort.
Filmora cuts out repetition so you can move on to your next creative breakthrough.
You can enhance your videos with a range of professional editing tools, including video effects, transitions, sound effects, and more. It can also help you create GIFs from UHD 4K videos without any quality compromise. This software also supports many other video formats, so you can personalize any of them as per your choice. It can turn your video idea into reality with perfection.
With the most comprehensive set of video editing tools available, Filmora is the most convenient way to create videos. It can also convert AVI to GIF and vice versafor your business, brands, and social media channels. More than just an editor, this is your all-in-one video production suite.
● Key Takeaways from This Episode →
● Thank you for taking some time out to read this article! We know the amount of time and effort you put into creating an animated GIF. We don’t want your time to go in vain by not having it be perfect.
● I hope these few tips will help you out in the future. Now, you will be able to create the most perfect GIFs to share with family, friends, and business associates.
● For all-in-one video editing tools, you can always use Wondershare Filmora. If you have any other ideas or questions, please leave a comment below.
Also read:
- New In 2024, The Complete Guide to Zoho Slides with Ease
- In 2024, Based on Preferences, You Can Adjust the Speed of YouTube Videos. Learn How to Produce a YouTube Slow-Motion Video in This Article
- Updated 2024 Approved Offering The Best Understanding of Performing iMovie Slow Motion Video
- 2024 Approved What Is a Transparent Logo and Why Do You Need It
- 2024 Approved This Article Will Explore in Detail How You Can Use the Features Available in Wondershare Filmora to Export the Video by Changing the Resolution of the Footage
- Top 10 Best Free Video Compressors for 2024
- 2024 Approved How to Create Liquid Water Reveal Intro?
- Updated Learn Color Correction in After Effects with These YouTube Videos for 2024
- New In 2024, Have You Ever Wondered How to Add Camera Shake to Video in Adobe After Effects? Let Us Share with You some Tips and Tricks on How to Do Just That
- New 2024 Approved Blender - A Video Editor for All Professor
- Updated In 2024, Looking for Final Cut Pro Alternative App for Your Android Smartphone or iPhone? Here Is the List of the Best FCP Alternative Apps for Android and iOS Users
- New In 2024, Best 8 AI Video Denoise Software
- 2024 Approved Easy Ways to Add Text Overlay to Video
- Updated In 2024, Quickly Turn Any Video Into a Paper Rip Effect
- New 2024 Approved How to Add a Lower Third to Your Video
- New 2024 Approved Getting To Know More About the Video Editing Interface of Wondershare Filmora
- Premiere Pro Tutorial How To Change Video Frame Rate for 2024
- Updated In 2024, Add Green Screen Video on TikTok
- 2024 Approved How to Create Educational Teaching Videos in An Outstanding Way?
- In 2024, Finding The Best Ways To Replace Sky in Lightroom
- In 2024, 15 Best LUTS to Buy
- In 2024, Best Green Screen Software for Beginner on Mac
- Are You Looking for Top AI Video Recognition Software to Choose From? Please Stay on This Article as We Look at the Current Top AI-Based Video Tools for 2024
- Updated MAGIX Vegas Pro Review A Professional Video Editing Software for 2024
- Updated Do You Want to Know About the Best Filmic Pro LUTs for Video Editing? This Article Provides Details on the Best Recommendations
- Updated How to Create a Special Animated Transition in Filmora in Just 2 Minutes. This Simple Step-by-Step Guide Will Show You the Easy Way
- How to Get Motion Blur in Valorant, In 2024
- In 2024, Find Out How to Add Subtitles in the VLC Media Player on Your Windows and Mac System with Quick and Simple Instructions
- 2024 Approved Have You Ever Used the Path Blur Effect in Your Photos? This Article Will Address How to Use Path Blur in Photoshop to Generate Appealing Results Accurately
- Looking for the Best Websites for 3D Text PNG? Weve Covered You with Our Top 8 Picks for Your Upcoming Work
- New 20 Best Text To Speech Software Windows, Mac, Android, iPhone & O for 2024
- Updated 15 Best LUTS to Buy for 2024
- New In 2024, Confused About Which GoPro Should You Use? This Article Introduces and Provides a Detailed Overview of the Best GoPro for YouTubers You Can Find in the Market for Vlogging
- In 2024, We Can Say that the Horror Movies of the 90S Laid the Foundation for Current Horror Movies. So, without Wasting Time, Lets Create a 1990S Horror Movie Similar to The Blair Witch Project
- Updated How to Make First Impression Review Video for 2024
- New 2024 Approved Spooky Halloween with the Best 15+ Halloween Countdown Video Clips
- In 2024, Learn How to Seamlessly Merge Audio and Video in VLC Media Player with This Easy-to-Follow Guide. Step-by-Step Instructions Are Included
- Updated You Can Easily Film Rotating Video Illusions From Your Smartphone and Edit Them on Wondershare Filmora in Just a Few Clicks
- Updated 2024 Approved Looking for the Best Quiz-Making Tools? Read Our Full Review to Find Out the 10 Best Video Quiz Makers Available
- In 2024, 3 Methods to Combine 2 or 3 Videos Into 1
- How to Erase an iPhone XS Max without Apple ID?
- How To Update or Downgrade Apple iPhone 12 mini Without Data Loss? | Dr.fone
- Complete guide for recovering call logs on Nova Y71
- Remove P40 unlock screen
- How to unlock iPhone 15 Plus screen lock without Passcode?
- 3 Ways to Track Honor X50i+ without Them Knowing | Dr.fone
- What to Do if Google Play Services Keeps Stopping on Oppo Find X6 | Dr.fone
- How to Unlock Disabled Apple iPhone XS Max/iPad Without Computer
- How to Repair Corrupt Excel 2010 Workbook?
- How to Fix Error 495 While Download/Updating Android Apps On Motorola Edge 40 Neo | Dr.fone
- How to Screen Mirroring Motorola Moto G04? | Dr.fone
- Fix the Too many different cell formats Error in Excel 2010?
- In 2024, Things You Should Know When Unlocking Total Wireless Of iPhone 13 mini | Dr.fone
- Fake the Location to Get Around the MLB Blackouts on Tecno Phantom V Flip | Dr.fone
- Catch or Beat Sleeping Snorlax on Pokemon Go For Tecno Spark 20 Pro | Dr.fone
- In 2024, Is pgsharp legal when you are playing pokemon On Lava Yuva 2 Pro? | Dr.fone
- Best Pokemons for PVP Matches in Pokemon Go For Itel P40+ | Dr.fone
- In 2024, 4 Ways to Unlock Apple iPhone 8 to Use USB Accessories Without Passcode | Dr.fone
- Does Airplane Mode Turn off GPS Location On Google Pixel 8 Pro? | Dr.fone
- How To Transfer Data From Apple iPhone 11 Pro Max To Other iPhone 15 devices? | Dr.fone
- Prevent Cross-Site Tracking on Realme Narzo N53 and Browser | Dr.fone
- In 2024, Top 5 Tracking Apps to Track Realme C67 5G without Them Knowing | Dr.fone
- Top 7 Phone Number Locators To Track Gionee F3 Pro Location | Dr.fone
- Hard Reset Infinix Note 30 Pro in 3 Efficient Ways | Dr.fone
- Fix Poco X5 Android System Webview Crash 2024 Issue | Dr.fone
- In 2024, How can I get more stardust in pokemon go On Vivo Y17s? | Dr.fone
- Top 12 Prominent Xiaomi Redmi Note 13 Pro+ 5G Fingerprint Not Working Solutions
- In 2024, 3 Effective Ways to Bypass Activation Lock on Apple iPhone 14 Plus
- How To Track IMEI Number Of Infinix Smart 8 HD Through Google Earth?
- Getting the Pokemon Go GPS Signal Not Found 11 Error in Vivo V30 Pro | Dr.fone
- Quick Fixes for Why Is My Motorola Moto G73 5G Black and White | Dr.fone
- Reset iTunes Backup Password Of Apple iPhone 8 Plus Prevention & Solution | Dr.fone
- How To Change Your Apple ID Password On your Apple iPhone 7
- Title: New 2024 Approved LumaFusion Offers Various Look Up Table Presets, or LUTs, Such as FiLMiC deLog and FiLMiC DeFlat, and Several Stylistic LUTs for Use with Neutral Use Video. You Can Also Manually Add the LUTs
- Author: Morgan
- Created at : 2024-04-24 01:10:50
- Updated at : 2024-04-25 01:10:50
- Link: https://ai-video-editing.techidaily.com/new-2024-approved-lumafusion-offers-various-look-up-table-presets-or-luts-such-as-filmic-delog-and-filmic-deflat-and-several-stylistic-luts-for-use-with-neu/
- License: This work is licensed under CC BY-NC-SA 4.0.
