
:max_bytes(150000):strip_icc():format(webp)/title-b16094ee6f3340328084b9e5cc01426f.jpg)
New 2024 Approved Modern Silence Detection Tools Are Changing the Face of Video Editing. Use Them to Improve the Quality of Your Video Clips. Learn How These Tools Let You Detect Silence with Pinpoint Accuracy
Modern Silence Detection Tools Are Changing the Face of Video Editing. Use Them to Improve the Quality of Your Video Clips. Learn How These Tools Let You Detect Silence with Pinpoint Accuracy
When it comes to making videos, audio quality is paramount. It can take an average video and turn it into a masterpiece. Yet, it may be challenging in specific cases, particularly undesired silences or pauses.
Modern silence detection tools are helpful in this situation. They can detect and remove any uncomfortable silences from audio files quickly. Besides, they save time and ensure the result is perfect by automating this procedure.
Today, we will review the top five silence detector tools. We will also discuss their positive and negative sides and the pricing factor. Let’s start!
- Part 2: How to Use Filmora’s Advanced Silence Detection Feature for Better Editing?
- Part 3: Conclusion
Silence Detection For Win 7 or later(64-bit)
Silence Detection For macOS 10.14 or later
Part 1: Top 5 Amazing Tools for Detecting Silence - A Thorough Review
Now, you know the importance of audio accuracy in video editing. So, we can reveal the five most innovative tools for detecting silence.
Anyone can improve video production skills with the help of these specialized tools. Remember, each tool is designed for a specific set of requirements.
01.Savvycut - Silence Detection Tool for Online Use

Savvycut is a fantastic audio silence remover online. As the name suggests, this tool is suitable for savvy video editors. No installation or downloads are required to use Savvycut. That’s because it is a web-based silence detection tool. Users need to upload video input for fast analysis and silence removal.
Pros
- It has a simple UI with easy video track uploading and processing.
- Savvycut offers quick and efficient silence detection to help editors save time.
- It provides entry-level functionality for free, making it available to everyone.
- This tool can work on many different video formats.
Cons
- You may need premium membership plans to access advanced functions.
- The limited functionality of the free version may be a turnoff for certain people.
02.Kapwing - Silence Detection Tool for Mobile

This tool offers an AI-driven audio silence detection and removal. Kapwing can also identify and erase silences from audio files in formats like MP3 and WAV. You don’t need to download this tool; it’s accessible online. You only need a web browser and a mobile phone with an internet connection.
Pros
- This tool edits video footage more quickly by automatically cutting any silences.
- It uses AI to improve the sound quality, including background music and more.
Cons
- There have been reports of compatibility concerns with previous versions.
- You may only have access to some of the basic features in the free edition.
03.Adobe Premiere Pro - Silence Detection Tool for Windows

Adobe Premiere Pro is the third most powerful software on our list. It is a helpful tool to detect and cut silences from video files. This tool works very well on Windows. Thanks to its batch-processing features, it lets you edit several audio files simultaneously.
Pros
- With its efficient batch audio silence remover feature, you may edit many audio files at once.
- It accommodates a wide range of editing requirements.
- Its silence detection parameters are fully customizable.
- The intuitive design makes it simple for users of all skill levels to get up and running.
- This tool allows users to export video clips in various formats, giving them more options.
Cons
- Newcomers to video editing software may find the learning curve to be steep.
- The use of more complex features may need expertise and training.
04.Audacity - Silence Detection Tool for Mac

Audacity is the best silence detection tool that works well with the macOS system. This tool makes it easier to identify and remove silences in video files. It can improve your video production speed on Mac.
Pros
- It works well with Mac devices and runs smoothly on macOS.
- It has an accessible and user-friendly interface developed with Mac users in mind.
- This tool facilitates quick and easy silence removal, which makes editing a breeze.
Cons
- The pricing is much greater than that of competing silence detection tools.
- It might not have all the bells and whistles we see in competitors.
05.Recut - General Silence Detection Tool
If you’re using Windows, Recut is an excellent silence detection tool. It can help you detect and delete silent spots from audio and videos. If you’re making a video, this tool can make editing the audio a breeze.
Pros
- Suitable for video editors of varying skill levels
- Its user-friendly interface makes silence detection and elimination simple.
- Besides audio silence detection, it provides a suite of tools for effective audio editing.
- It offers various editing features and supports several file types.
- It is available to people on a tight budget since it doesn’t cost much.
Cons
- There aren’t easy ways to get in touch with the Recut’s customer service.
- It might not have all the features that come with other affordable software.
How to Use Filmora’s Advanced Silence Detection Feature for Better Editing?
Filmora provides an easy way to detect and remove silences from your video files. To use the Silence Detection Filmora feature, do the following:
Step1Upload Your Video Clip

Launch Filmora and add the video clip that contains the track you want to modify for your project.
Step2Find the Silence Detection Feature

Remember, you will notice the Silence Detection feature in only audio-enabled video clips. Follow the below steps to detect and remove silent gaps from the clip.
- You need to choose the Silence Detection button from the toolbar.
- You will find the video in the Media window. Right-click your media file and choose Silence Detection.
- After selecting the audio or video clip, go to Tools, followed by Audio. You will find the Silence Detection option. The Silence Detection window will appear once you touch this option.
Step3Modify the Settings for the Silence Detection Feature

You may change the threshold or sensitivity to make it work for you. The sensitivity level determines the size of the pause. Thus, a lower sensitivity level records longer pauses. You can fine-tune three crucial Filmora Silence Detection settings in this step.
First, you should adjust the volume threshold to fix a specific value for silence. This parameter tells the algorithm how loud you want it to be before it becomes annoying. By default, 25% is the volume threshold. It implies that the software will consider segments silent if their volume threshold value is less than 25%.
Now, you should adjust the Minimum Duration option. It tells Filmora how long a period of quiet or low-volume sound should be. Just 0.5 seconds is the default minimum duration. In other words, for 0.5 seconds to be considered quiet, there must be no sound.
You can also set the Softening Buffer value. This setting allows you to add a little delay before and after audible parts begin and finish. With 0.1s set as the default, the softening buffer starts to work. It implies that the beginning and end of the audible parts may each have their own 0.1-second buffering time.
Step4Eliminate Any Found Silences

Hit the “Analyze” button after you’re happy with the settings. The Filmora will detect and remove the silent areas in your audio track.
The software also highlights segments in two different colors. Seen in black are the portions that do not contain any sound. The highlighted sections indicate the audible portions.
Step5Evaluate Your Work and Adjust

You can make sure the video segments move without a hitch. Thus, listen to the modified audio track again. You can adjust the clips in the timeline to customize the edit directly if necessary.
Of course, you also have the option to tweak the three audio settings listed in step 3. Next, choose Restart to remove the silent segments from your video.
Step6Export Your Video Clip

You’ve almost finished fine-tuning your movie using Filmora’s Silence Detection tool. Now, you may export the final video to the timeline. Enjoy a professionally upgraded audio component inside your video.
Conclusion
As you can see, video silence remover tools completely transform video production operations. They make editing processes easier by changing the audio quality. These tools provide efficiency, saving time and effort.
Anyone can detect and remove undesired silences with the help of specialized tools. Remember, the quality of your movies will increase after removing silences. It can offer your viewers a more pleasant audio-visual experience. So, take your films to the next level by mastering the art of precise editing.
Are you looking for an easy way to edit your video clips? Do you have videos that contain many undesired pauses and silences? Check out Filmora’s Silence Detection feature.
Silence Detection For Win 7 or later(64-bit)
Silence Detection For macOS 10.14 or later
Part 1: Top 5 Amazing Tools for Detecting Silence - A Thorough Review
Now, you know the importance of audio accuracy in video editing. So, we can reveal the five most innovative tools for detecting silence.
Anyone can improve video production skills with the help of these specialized tools. Remember, each tool is designed for a specific set of requirements.
01.Savvycut - Silence Detection Tool for Online Use
Savvycut is a fantastic audio silence remover online. As the name suggests, this tool is suitable for savvy video editors. No installation or downloads are required to use Savvycut. That’s because it is a web-based silence detection tool. Users need to upload video input for fast analysis and silence removal.
Pros
- It has a simple UI with easy video track uploading and processing.
- Savvycut offers quick and efficient silence detection to help editors save time.
- It provides entry-level functionality for free, making it available to everyone.
- This tool can work on many different video formats.
Cons
- You may need premium membership plans to access advanced functions.
- The limited functionality of the free version may be a turnoff for certain people.
02.Kapwing - Silence Detection Tool for Mobile
This tool offers an AI-driven audio silence detection and removal. Kapwing can also identify and erase silences from audio files in formats like MP3 and WAV. You don’t need to download this tool; it’s accessible online. You only need a web browser and a mobile phone with an internet connection.
Pros
- This tool edits video footage more quickly by automatically cutting any silences.
- It uses AI to improve the sound quality, including background music and more.
Cons
- There have been reports of compatibility concerns with previous versions.
- You may only have access to some of the basic features in the free edition.
03.Adobe Premiere Pro - Silence Detection Tool for Windows
Adobe Premiere Pro is the third most powerful software on our list. It is a helpful tool to detect and cut silences from video files. This tool works very well on Windows. Thanks to its batch-processing features, it lets you edit several audio files simultaneously.
Pros
- With its efficient batch audio silence remover feature, you may edit many audio files at once.
- It accommodates a wide range of editing requirements.
- Its silence detection parameters are fully customizable.
- The intuitive design makes it simple for users of all skill levels to get up and running.
- This tool allows users to export video clips in various formats, giving them more options.
Cons
- Newcomers to video editing software may find the learning curve to be steep.
- The use of more complex features may need expertise and training.
04.Audacity - Silence Detection Tool for Mac
Audacity is the best silence detection tool that works well with the macOS system. This tool makes it easier to identify and remove silences in video files. It can improve your video production speed on Mac.
Pros
- It works well with Mac devices and runs smoothly on macOS.
- It has an accessible and user-friendly interface developed with Mac users in mind.
- This tool facilitates quick and easy silence removal, which makes editing a breeze.
Cons
- The pricing is much greater than that of competing silence detection tools.
- It might not have all the bells and whistles we see in competitors.
05.Recut - General Silence Detection Tool
If you’re using Windows, Recut is an excellent silence detection tool. It can help you detect and delete silent spots from audio and videos. If you’re making a video, this tool can make editing the audio a breeze.
Pros
- Suitable for video editors of varying skill levels
- Its user-friendly interface makes silence detection and elimination simple.
- Besides audio silence detection, it provides a suite of tools for effective audio editing.
- It offers various editing features and supports several file types.
- It is available to people on a tight budget since it doesn’t cost much.
Cons
- There aren’t easy ways to get in touch with the Recut’s customer service.
- It might not have all the features that come with other affordable software.
How to Use Filmora’s Advanced Silence Detection Feature for Better Editing?
Filmora provides an easy way to detect and remove silences from your video files. To use the Silence Detection Filmora feature, do the following:
Step1Upload Your Video Clip
Launch Filmora and add the video clip that contains the track you want to modify for your project.
Step2Find the Silence Detection Feature
Remember, you will notice the Silence Detection feature in only audio-enabled video clips. Follow the below steps to detect and remove silent gaps from the clip.
- You need to choose the Silence Detection button from the toolbar.
- You will find the video in the Media window. Right-click your media file and choose Silence Detection.
- After selecting the audio or video clip, go to Tools, followed by Audio. You will find the Silence Detection option. The Silence Detection window will appear once you touch this option.
Step3Modify the Settings for the Silence Detection Feature
You may change the threshold or sensitivity to make it work for you. The sensitivity level determines the size of the pause. Thus, a lower sensitivity level records longer pauses. You can fine-tune three crucial Filmora Silence Detection settings in this step.
First, you should adjust the volume threshold to fix a specific value for silence. This parameter tells the algorithm how loud you want it to be before it becomes annoying. By default, 25% is the volume threshold. It implies that the software will consider segments silent if their volume threshold value is less than 25%.
Now, you should adjust the Minimum Duration option. It tells Filmora how long a period of quiet or low-volume sound should be. Just 0.5 seconds is the default minimum duration. In other words, for 0.5 seconds to be considered quiet, there must be no sound.
You can also set the Softening Buffer value. This setting allows you to add a little delay before and after audible parts begin and finish. With 0.1s set as the default, the softening buffer starts to work. It implies that the beginning and end of the audible parts may each have their own 0.1-second buffering time.
Step4Eliminate Any Found Silences
Hit the “Analyze” button after you’re happy with the settings. The Filmora will detect and remove the silent areas in your audio track.
The software also highlights segments in two different colors. Seen in black are the portions that do not contain any sound. The highlighted sections indicate the audible portions.
Step5Evaluate Your Work and Adjust
You can make sure the video segments move without a hitch. Thus, listen to the modified audio track again. You can adjust the clips in the timeline to customize the edit directly if necessary.
Of course, you also have the option to tweak the three audio settings listed in step 3. Next, choose Restart to remove the silent segments from your video.
Step6Export Your Video Clip
You’ve almost finished fine-tuning your movie using Filmora’s Silence Detection tool. Now, you may export the final video to the timeline. Enjoy a professionally upgraded audio component inside your video.
Conclusion
As you can see, video silence remover tools completely transform video production operations. They make editing processes easier by changing the audio quality. These tools provide efficiency, saving time and effort.
Anyone can detect and remove undesired silences with the help of specialized tools. Remember, the quality of your movies will increase after removing silences. It can offer your viewers a more pleasant audio-visual experience. So, take your films to the next level by mastering the art of precise editing.
Are you looking for an easy way to edit your video clips? Do you have videos that contain many undesired pauses and silences? Check out Filmora’s Silence Detection feature.
Whether You’re a Professional Animator or a Beginner Into This. If You Want to Use the OBS Studio Chroma Key, We’ve Presented some Efficient Ways to Proceed. Learn More Here
Whether you’re someone new to the world of streaming or just seeking to enhance the aesthetic of your existing stream, a green screen is a terrific way to add some quality to your broadcasts. A green screen is a terrific tool for broadcasters and video makers who wish to cover their backdrop or change it with something else completely. Once you have one, it might be tough to understand how to set up a green screen, but once you get the directions down, you’ll be able to seem like you are wherever you desire! The procedure of setting up your chroma key settings in OBS is pretty straightforward and can be done within a few minutes.
These days most live streaming software packages support chroma keying as a feature. The first thing to do with any live broadcast is to arrange your shot. Will the camera stay stationary, or will you be moving it? Once you’ve determined the shot, you can calculate approximately how much green screen you need. It’s recommended to provide for a little additional green screen around the subject to prevent having them clipped outside of the chroma keyed region. When inserting a chroma key OBS will automatically produce certain baseline settings. In most circumstances, you’ll need to fine-adjust these parameters. In this post, we’ll teach you how to accomplish this fantastic look using OBS. You should remember, however, that you will want to set up your equipment and switch on your illumination before modifying the settings in OBS Studio. This way, you won’t have to alter them again after you go live.
1. How to Add Green Screen with OBS
Learning to use chroma key in OBS allows you to remove and change backgrounds, giving your stream a Learning to utilize chroma key in OBS enables you to remove and modify backdrops, giving your broadcast a much better production quality and feel. If you are employing various backgrounds or a sequence of green things behind you. You may utilize the chroma key source more than once to remove various hues, enabling you to obtain better background removal. Not only can OBS Studio erase the backdrop of your live video streams, but you can also remove the backgrounds on pre-recorded movies and still photographs. Chroma keying has become quite popular lately. People utilize it not simply for gaming, but also in Zoom conferences, live interviews, talk shows, etc. Although it may appear hard, at first sight, setting up Chroma Key in OBS Studio is quite straightforward. Let’s look at the easy steps you need to follow to set up a green screen in OBS.
Steps to Add Green Screen with OBS
**Step 1: Install and open OBS. From your main screen, hit the “Plus” symbol situated beneath the sources box. Foremost things first, you need a green screen. If you already have one, skip this step and proceed.
A green screen is merely a backdrop of one single brilliant hue that may be taken off in post-processing. It offers a ‘canvas’ on which a topic may perform and will subsequently display with a translucent backdrop. Add it simply via your webcam.

**Step 2: Select “Video Capture Device from the available choices and then select the Filter as shown below. Name is anything you would want to keep track of your sources. Chroma keying is a visual effects method that eliminates a color backdrop from still or moving pictures and is also included as a filter in OBS.

**Step 3: If your camera is installed, it should auto-populate in the forms. If it doesn’t, or you have many cameras, choose the relevant camera manually. Select the color of your screen, then change the similarity and smoothness bars until you settle on the parameters you require. Adjustments will vary from person to person based on light, green screen quality, and the distance you are from the screen.

**Step 4: Ensure that the Video Capture Device is at the top of the Window capture scene. Use the up-down arrow to move it in the Source area after highlighting it. This will place the Video Capture Device scene at the top Save your settings when you’re done. You should be ready to start streaming.

2. Best Green Screen Video Editor to Use
Even while OBS Studio is stable and has a large variety of capabilities and tools, it may be better suitable for game recording. A program that is more comprehensive and supports video editing and chroma keying tools. This program features an easy-to-use interface and a lot more functions. You may also download films and distribute them immediately on social media or email. It provides more than simply a live streaming green screen software tool like OBS Studio. This program is more of a professional-grade green screen recorder and video editor, for both Mac and Windows platforms. Here we propose Filmora. It is a strong and excellent green screen video producer and editor with a professional touch to the animation video creating quality. Studio-quality movement used to be something only large businesses could accomplish. Today, due to Filmora, they’re easy, inexpensive, and enjoyable to produce.
Filmora features a well-designed user interface, a decent balance of control and would provide you high-quality output every time. It is better ideal for professional videographers and those who are online content creators due to its distinctive and professional appearing productions. It can handle all the contemporary video formats, including video editing and output for HD and 4K. It offers a broad selection of easy-to-use capabilities that may assist you to produce lesson films, editing action camera footage and building viral movies like those used on social networking websites, and more. If you have various shades of green, you may chroma key a source many times, each time specifying a distinct shade of green. Without any correction, merely putting on the Chroma Key filter will probably look quite horrible. But happily, there is a variety of options where you may fine-tune the chroma key removal. So, with Filmora, it is better appropriate for short films and it is giving you the most value for its pricing.
For Win 7 or later (64-bit)
For macOS 10.12 or later
**Step 1: Import the media document, including the Chroma Video
After the download and installation of this program, now you’re in the software interface. The next procedure is to import your media documents. To accomplish so, press the Import button on the left part of the screen as follows: In the following step, add the files to the timeline as shown above, which will also include them for your media records area.

**Step 2: Editing Video Project File
Presently as you’ve just placed that video clip within the media library of Filmora. You may also adjust the video clips using its convenient editing capabilities. To accomplish so, choose the specific video clip in the timeline and you will see the video changing options available on the interface as follows:

****Step 3:**Edit the Green Screen
Inside the Filmora, once you’ve integrated the green screen video into your project. Select the Chroma key effect as shown here:

**Step 4: Export the Project
After the successful creation and modification of your preferred video outro, now is the time to export it to your desired place or immediately post it to your YouTube channel, follow the instructions below to achieve so. Click on the Export button inside the Filmora Video Editor and you will see the Export window being launched as follows:
To submit your material straight to YouTube, hit your content directly to YouTube, Hit the YouTube menu at the menu bar of this window which brings you towards the YouTube export window as follow:

Conclusion
The usage of chroma keying has been increasingly popular in recent years, with various uses of this video effect employed for live streaming. Chroma keying is used to erase the backdrop of a video clip which is then composited over another scene or picture. The most apparent usage of this technology is for weather broadcasts when the presenter is composited over the top of a weather radar picture. In more recent times we’re seeing video game broadcasters chroma keying themselves into their live feeds. There are various sites to explore for streaming backdrops. Most come as overlay packages with distinct themes. A good location to look is Filmora. Else, if you want to add a new backdrop to your broadcast, you may simply add a new picture source to your scene in OBS. So, check out what best fits you and opt for the one.
For macOS 10.12 or later
**Step 1: Import the media document, including the Chroma Video
After the download and installation of this program, now you’re in the software interface. The next procedure is to import your media documents. To accomplish so, press the Import button on the left part of the screen as follows: In the following step, add the files to the timeline as shown above, which will also include them for your media records area.
**Step 2: Editing Video Project File
Presently as you’ve just placed that video clip within the media library of Filmora. You may also adjust the video clips using its convenient editing capabilities. To accomplish so, choose the specific video clip in the timeline and you will see the video changing options available on the interface as follows:
****Step 3:**Edit the Green Screen
Inside the Filmora, once you’ve integrated the green screen video into your project. Select the Chroma key effect as shown here:
**Step 4: Export the Project
After the successful creation and modification of your preferred video outro, now is the time to export it to your desired place or immediately post it to your YouTube channel, follow the instructions below to achieve so. Click on the Export button inside the Filmora Video Editor and you will see the Export window being launched as follows:
To submit your material straight to YouTube, hit your content directly to YouTube, Hit the YouTube menu at the menu bar of this window which brings you towards the YouTube export window as follow:
Conclusion
The usage of chroma keying has been increasingly popular in recent years, with various uses of this video effect employed for live streaming. Chroma keying is used to erase the backdrop of a video clip which is then composited over another scene or picture. The most apparent usage of this technology is for weather broadcasts when the presenter is composited over the top of a weather radar picture. In more recent times we’re seeing video game broadcasters chroma keying themselves into their live feeds. There are various sites to explore for streaming backdrops. Most come as overlay packages with distinct themes. A good location to look is Filmora. Else, if you want to add a new backdrop to your broadcast, you may simply add a new picture source to your scene in OBS. So, check out what best fits you and opt for the one.
Add Green Screen Effects in Final Cut Pro
No matter the type of video you are shooting, the background of the video plays a major play. The background determines how eye-pleasing the frame of the entire video looks. A beautiful background enhances the video content while a distracting background can deteriorate the video outlook. You do not need to be in exotic locations or have eye-catching backgrounds in reality while shooting a video thanks to the use of the green screen effect.
Once you shoot a video with green screen background, you can replace the green screen with anything you want. You will need a video editor to replace the green screen, and Final Cut Pro is the most widely used video editor among Mac Users. We will illustrate how to add green screen in Final Cut Pro and get any background for your recorded video. We will also recommend an alternative watt to add green screen effect to your video.
Part 1. How to add green screen on Final Cut Pro
Final Cut Pro is the most popular professional video editor among Mac users. The learning curve is slightly steep, but once you get used to Final Cut Pro, you can take your recorded video to the next level with profound editing. The most important part of adding green screen effect to a video is shooting the video with a proper green screen in the background. Once you have successfully recorded your video, here are the steps on how to add background to green screen Final Cut Pro.
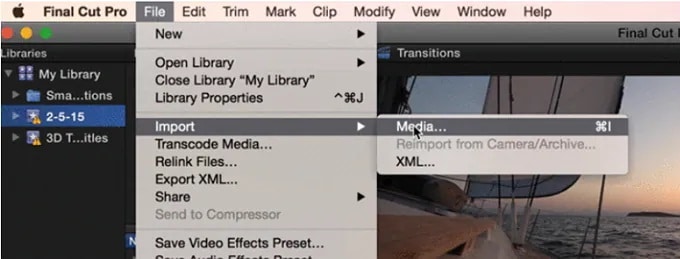
Step1 Launch Final Cut Pro and go to File> Import> Media. Select the video file with green screen background from your storage to import the file into FCP. Similarly, you should import the video or photo with which you want to replace the green screen.
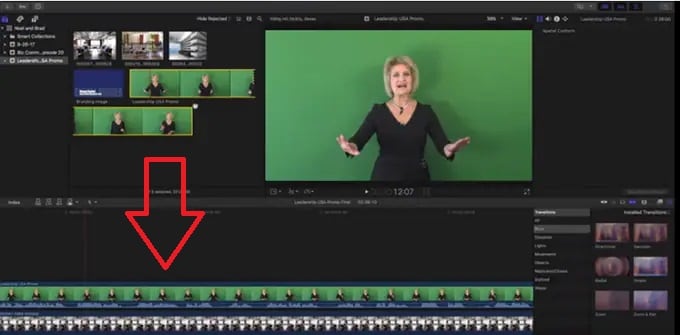
Step2 Drag the video clip with green screen background (called foreground clip) to Timeline and place it to Primary Storyline. Drag the replacement video (called background clip) below the foreground clip in Timeline.
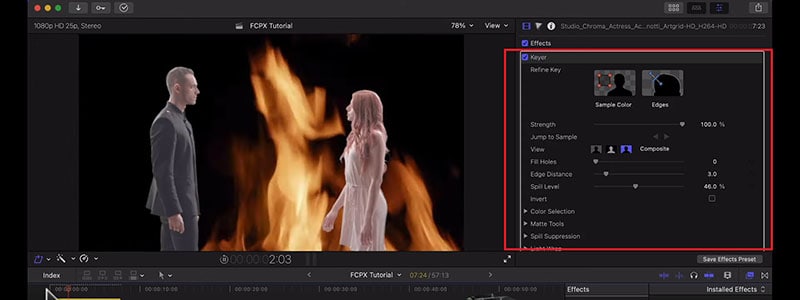
Step3 Select the foreground clip and click on Effects button present at the extreme top-right corner of the Timeline.
Step4 From the Effects options, select Keyer effect. If you cannot spot it immediately, you can search for it from the search field.
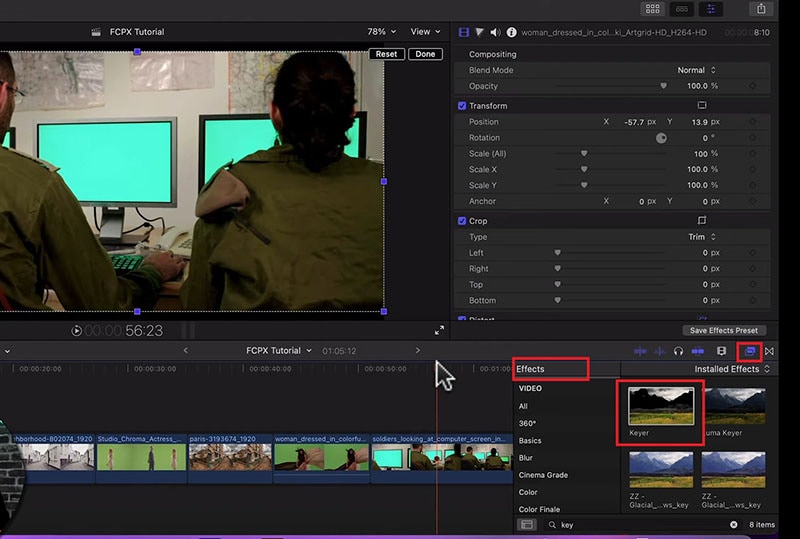
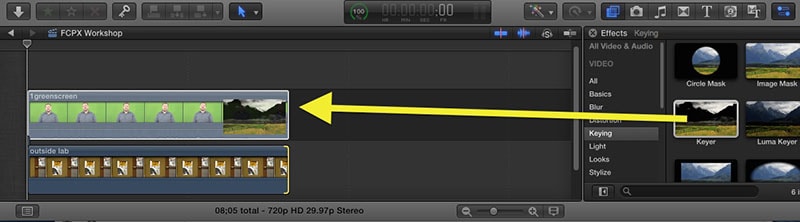
Step5 Drag and drop Keyer effect to the foreground clip. The effect detects the green screen and replaces it with the available background clip.
Step6 You might have to adjust the Keyer effect settings to get the green screen effect perfectly. Go to Inspector Window and click on Sample color and fine-tune the available settings to get it correct.
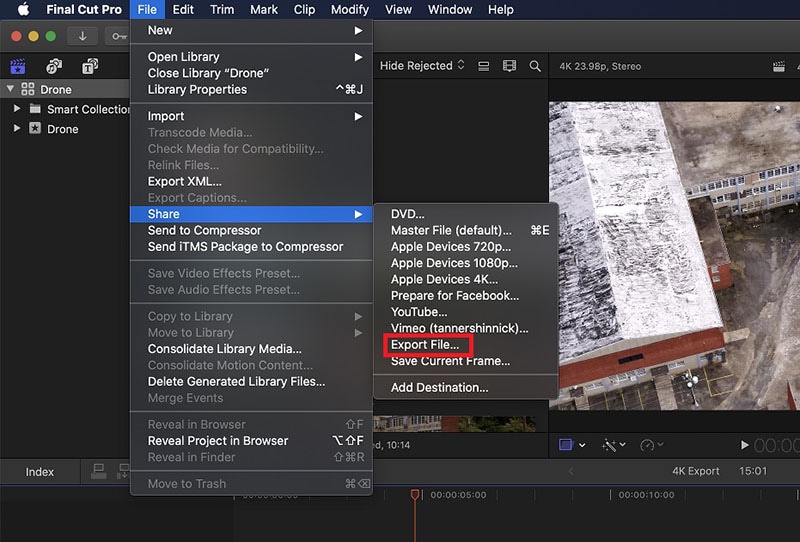
Step7 Once you are satisfied with the effect, go to File> Share> Export File and save the modified video.
Part 2. Alternative Way to Add Green Screen to Videos
Final Cut Pro is a professional but highly expensive video editor. The learning curve is not very suitable for amateur video editors. That is why if you are looking for a better alternative way to add green screen to videos, we recommend Wondershare Filmora . Filmora is a popular video editor that is available for Mac and Windows users. The user interface is extremely intuitive, and adding green screen effect is super easy. Here are the steps on how to add background to green screen effect.
Free Download For Win 7 or later(64-bit)
Free Download For macOS 10.14 or later
Step1 Download and install Filmora on your computer. Launch Filmora and click on New Projects.
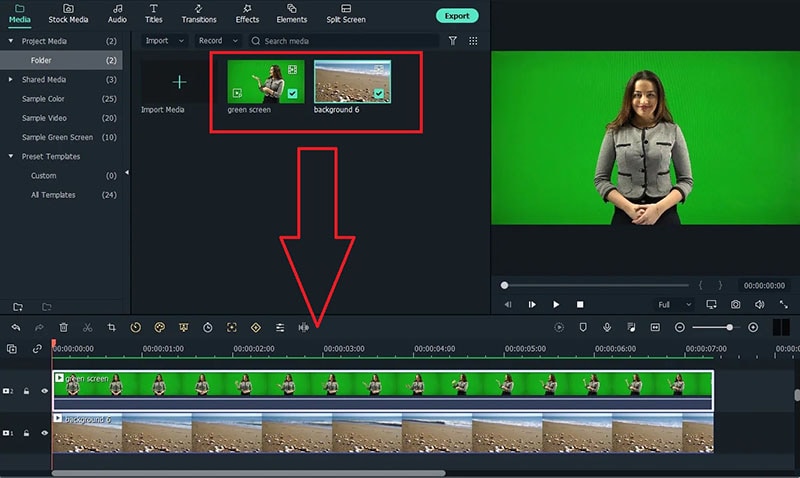
Step2 Under Project Media folder, Drag and drop the video clip with green screen background as well as the photo or video with which you want to replace the green screen.
Step3 Drag and drop the video clips on the Timeline. The video with green screen should be at the top while the replacement video or photo should be below it.
Step4 Double-click on the green screen video clip on Timeline. Go to Video>Basic and turn on Chroma key option.
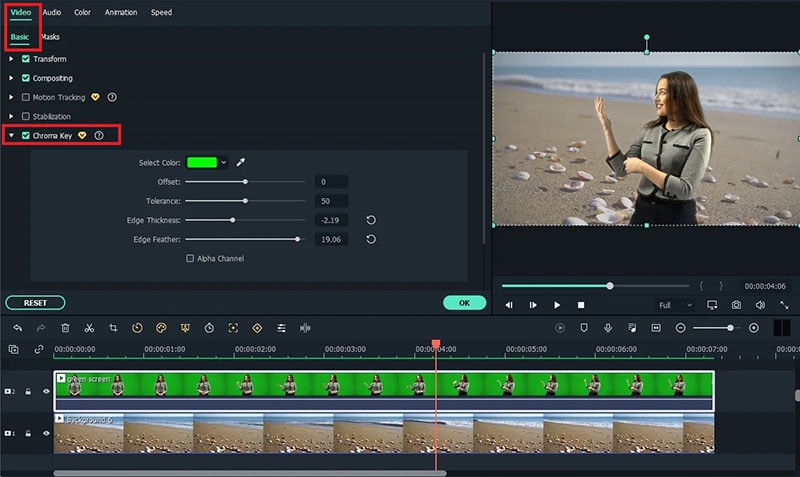
Step5 Adjust the different parameters such as offset to get the effect perfect and click on Ok button.
Step6 Play the video and if you are satisfied with the result, click on Export button to save the modified video file.
Part 3. Green Screen Video Tips to Use
We have already stated that replacing green screen in your video with an eye-catching background is the easiest part. On the contrary, shooting the green screen video is the most important part. If you shoot the video perfectly, replacing the background accurately in the video editor becomes super easy. Here are some important tips to use while shooting green screen video.
Distance – There should be enough distance between the subject and the green screen background so that the subject does not cast a shadow on the green screen. This distance is also important to place lights in between so that the green screen is perfectly lit for a great video shooting session.
Quality – You should opt for a high-quality green screen cloth for the background. This means the green screen should have a solid color instead of light and dark patches here and there. Besides, you should ensure that there are no wrinkles on the green screen.
Otherwise, when you will apply green screen effect through the video editor, the transformation will be uneven. You have to spend a lot of time adjusting the parameters to cover up uneven patches in the background.
Lighting – The way you set up your lights plays a major role in shooting green screen video perfectly. The light falling on the green screen will light up the screen evenly so that there are no light and dark patches. Transforming the green screen in the video editor will become that much easier.
You should focus on soft and even lighting for the entire green screen, and you should check through your camera to ensure the lighting is perfect. Sometimes, you can place lights behind the subject if the subject is staying stationary throughout the video. Otherwise, you can place the light above the subject for even distribution.
Aperture – The settings of your camera are equally important to smoothen out the green screen in the background and focus on the subject sharply. That is where aperture comes into the scene, and you need to use low aperture while shooting green screen videos. Low aperture opens up the camera lens, and the green screen turns softer in the background. The subject stands out while the background turns uniformly green.
Shutter Speed – While shooting a green screen video, you should keep a high shutter speed to prevent motion blur and uneven background. If the subject stays fixed throughout, the shutter speed should be double the frame rate. If the subject is moving throughout, the shutter speed should be around 4 times the frame rate such as 1/100.
ISO – The last thing you want in a green screen video is grainy footage. Your life will turn upside down editing the video and getting the green screen effect perfectly in any video editor. ISO determines the sensitivity and thereby, the grainy effect in your video. When the ISO is too high, the chance of getting grains in the video is high. It is better to use a native ISO for green screen effect, but you need to check with a sample recording and adjust if required.
Conclusion
We have answered how to add background to green screen Final Cut Pro. You can replace any green screen in your video with any video or photo for the background of the video. If you do not have Final Cut Pro or you find the steps slightly complicated, we recommend you to use Wondershare Filmora for instant green screen effect and quick adjustments for the best outcome.
Free Download For macOS 10.14 or later
Step1 Download and install Filmora on your computer. Launch Filmora and click on New Projects.
Step2 Under Project Media folder, Drag and drop the video clip with green screen background as well as the photo or video with which you want to replace the green screen.
Step3 Drag and drop the video clips on the Timeline. The video with green screen should be at the top while the replacement video or photo should be below it.
Step4 Double-click on the green screen video clip on Timeline. Go to Video>Basic and turn on Chroma key option.
Step5 Adjust the different parameters such as offset to get the effect perfect and click on Ok button.
Step6 Play the video and if you are satisfied with the result, click on Export button to save the modified video file.
Part 3. Green Screen Video Tips to Use
We have already stated that replacing green screen in your video with an eye-catching background is the easiest part. On the contrary, shooting the green screen video is the most important part. If you shoot the video perfectly, replacing the background accurately in the video editor becomes super easy. Here are some important tips to use while shooting green screen video.
Distance – There should be enough distance between the subject and the green screen background so that the subject does not cast a shadow on the green screen. This distance is also important to place lights in between so that the green screen is perfectly lit for a great video shooting session.
Quality – You should opt for a high-quality green screen cloth for the background. This means the green screen should have a solid color instead of light and dark patches here and there. Besides, you should ensure that there are no wrinkles on the green screen.
Otherwise, when you will apply green screen effect through the video editor, the transformation will be uneven. You have to spend a lot of time adjusting the parameters to cover up uneven patches in the background.
Lighting – The way you set up your lights plays a major role in shooting green screen video perfectly. The light falling on the green screen will light up the screen evenly so that there are no light and dark patches. Transforming the green screen in the video editor will become that much easier.
You should focus on soft and even lighting for the entire green screen, and you should check through your camera to ensure the lighting is perfect. Sometimes, you can place lights behind the subject if the subject is staying stationary throughout the video. Otherwise, you can place the light above the subject for even distribution.
Aperture – The settings of your camera are equally important to smoothen out the green screen in the background and focus on the subject sharply. That is where aperture comes into the scene, and you need to use low aperture while shooting green screen videos. Low aperture opens up the camera lens, and the green screen turns softer in the background. The subject stands out while the background turns uniformly green.
Shutter Speed – While shooting a green screen video, you should keep a high shutter speed to prevent motion blur and uneven background. If the subject stays fixed throughout, the shutter speed should be double the frame rate. If the subject is moving throughout, the shutter speed should be around 4 times the frame rate such as 1/100.
ISO – The last thing you want in a green screen video is grainy footage. Your life will turn upside down editing the video and getting the green screen effect perfectly in any video editor. ISO determines the sensitivity and thereby, the grainy effect in your video. When the ISO is too high, the chance of getting grains in the video is high. It is better to use a native ISO for green screen effect, but you need to check with a sample recording and adjust if required.
Conclusion
We have answered how to add background to green screen Final Cut Pro. You can replace any green screen in your video with any video or photo for the background of the video. If you do not have Final Cut Pro or you find the steps slightly complicated, we recommend you to use Wondershare Filmora for instant green screen effect and quick adjustments for the best outcome.
Add Background to Video With/Without a Green Screen
Versatile Video Editor - Wondershare Filmora
An easy yet powerful editor
Numerous effects to choose from
Detailed tutorials provided by the official channel
Video’s background is the most crucial part of video editing. When filming, the backgrounds cannot be more attractive with the natural background, so editors use background effects to change the background of the video and make it more appealing. Wondershare Filmora is a fantastic software to add background to a video without a green screen. The good news is that Filmora offers various tools to remove background from a video, add a background, add transition effects, and all these by using virtual reality to complete the task. It has several effects and themes and has tools to remove background effectively. Many editors are available in the market for background effects but with limitations. Filmora offers an effective way to add background without a green screen and with a green screen. You will also be able to add a background to the green screen photo online.
Let us discuss the finest tools available in Filmora to change the background easily and quickly. This article will concentrate on two methods to edit background.
● How to put a background on a video without a green screen.
● How to add background to video with green screen.
If you wonder how to add a background to a green screen in after effects, it involves a very long step and quality footage to remove the background.
In this article
01 [Add background to green screen video](#Part 1)
02 [Add background to video without a green screen.](#Part 2)
Part 1 Add background to green screen video
The green screen effect is the advanced feature in overlays. It makes the background of the clips transparent. If you want to add background to green screen video online, there are many websites available but always with some limitations in resolutions and quality while exporting the video. Filmora is a useful tool in video editing to create animatic and superimpose backgrounds like any jet craft or a bird flying. You can easily make these changes to the video using Filmora by using a green screen footage clip or a plain green screen in the background while creating the footage. We will focus on putting a background on a green screen in this part.
Let us discuss how to add background to green screen are pretty simple using Filmora.
Step1 Add Overlay clip to timeline
Select “Create New Project” to start the editing. At first, you have to choose both the overlay clip and background clip and add them to the timeline. You can either import from the library or drag the files to the timeline in the positions shown in the picture.
You can edit the overlay clip individually by adding animation, effects, filterers, mask frame, and blending modes (multiply, darken, or color burn). Let us move to the next step, how to put the background on the green screen.
Step2 Make a Green Screen
Let’s get into the first step to add background to the green screen video. In this part, you will be using a green screen to remove the background. So, import the green screen clips to the media library. Now, add the background green screen to the timeline above the video track as shown in the picture.

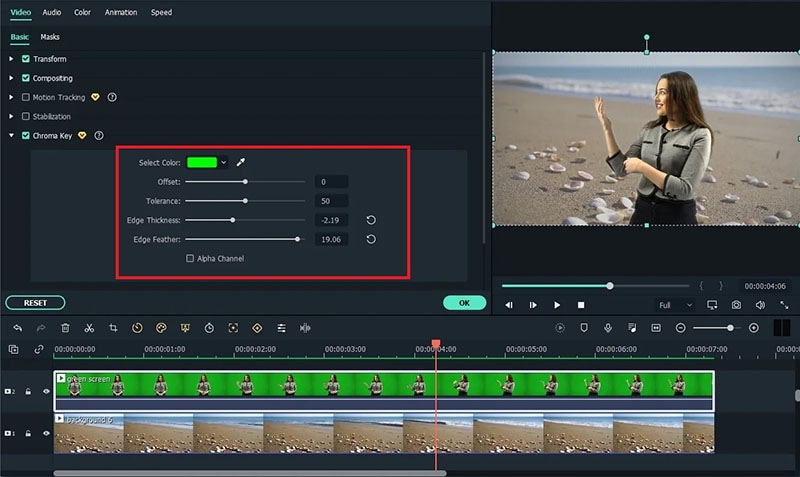
● Move the cursor to the green screen on the timeline and double-click on it.
● The settings box will appear on the left.
● You have to tick the Chroma key there.
The green screen effects will be applied automatically.

The video can be refined with many additional tools like Tolerance, Offset, and Alpha channel to make the video background clear. Once satisfied with the results, click on OK. Now that we have discussed how to add background to green screen video with the help of Filmora let’s now discuss how to add a background to a video without a green screen.
Part 2 Add background to video without a green screen
Let us learn how to add a background to a video without a green screen. In Filmora, there is a special effect called the Human segmentation effect to isolate people from the backgrounds without a green screen. All it takes is a few clicks. Once you remove the surround, you can add an image or a video clip to go well with your original video. Another unique feature is that after removing the background from the video clip, you can add it to the overlay of another video clip. It works well when it has a natural and single person in front of the camera.
Let’s discuss how to add background without a green screen.
Wondershare Filmora
Get started easily with Filmora’s powerful performance, intuitive interface, and countless effects!
Try It Free Try It Free Try It Free Learn More about Filmora>

Step1 Import Media to Timeline
Import the video clip from the device. You can also drag the video clip from the timeline. You can use other effects from Filmora to make necessary changes like editing, cutting, trimming, filter and transition.

Step2 Adding Human Segmentation Effect
To see the options to add background to video without a green screen, go to Effects – AI Portrait, and you can see a list of all AI portrait effects here. You can see the human segmentation effect, drag and place it on the top of your video clip in the timeline.

Step3 Preview and Adjust
After the human segmentation effect, the people will be isolated separately from the background, shown in the picture. Double click on the effects in the timeline where you can edit, adjust, thickness, feather, and preview.

Step4 Replace and change video background
If you wish to change the background, import an image or video below your main track. Now, that is how to add a background without a green screen.

Thus, you learned to create your green screen backgrounds and add a background to a green screen video using the favorite video effect software, Filmora.
Conclusion
Thus, in this guide, you learned how to add a background to a video without a green screen, and we hope this will be useful. You can find multiple software online for adding a background to a green screen with additional background effects. However, the Human segmentation available in Filmora is the easiest way to change scenes and clone people. With support to over 100 video tracks, Filmora is by far the best tool that allows you to change the setting with and without a green screen.
Video’s background is the most crucial part of video editing. When filming, the backgrounds cannot be more attractive with the natural background, so editors use background effects to change the background of the video and make it more appealing. Wondershare Filmora is a fantastic software to add background to a video without a green screen. The good news is that Filmora offers various tools to remove background from a video, add a background, add transition effects, and all these by using virtual reality to complete the task. It has several effects and themes and has tools to remove background effectively. Many editors are available in the market for background effects but with limitations. Filmora offers an effective way to add background without a green screen and with a green screen. You will also be able to add a background to the green screen photo online.
Let us discuss the finest tools available in Filmora to change the background easily and quickly. This article will concentrate on two methods to edit background.
● How to put a background on a video without a green screen.
● How to add background to video with green screen.
If you wonder how to add a background to a green screen in after effects, it involves a very long step and quality footage to remove the background.
In this article
01 [Add background to green screen video](#Part 1)
02 [Add background to video without a green screen.](#Part 2)
Part 1 Add background to green screen video
The green screen effect is the advanced feature in overlays. It makes the background of the clips transparent. If you want to add background to green screen video online, there are many websites available but always with some limitations in resolutions and quality while exporting the video. Filmora is a useful tool in video editing to create animatic and superimpose backgrounds like any jet craft or a bird flying. You can easily make these changes to the video using Filmora by using a green screen footage clip or a plain green screen in the background while creating the footage. We will focus on putting a background on a green screen in this part.
Let us discuss how to add background to green screen are pretty simple using Filmora.
Step1 Add Overlay clip to timeline
Select “Create New Project” to start the editing. At first, you have to choose both the overlay clip and background clip and add them to the timeline. You can either import from the library or drag the files to the timeline in the positions shown in the picture.
You can edit the overlay clip individually by adding animation, effects, filterers, mask frame, and blending modes (multiply, darken, or color burn). Let us move to the next step, how to put the background on the green screen.
Step2 Make a Green Screen
Let’s get into the first step to add background to the green screen video. In this part, you will be using a green screen to remove the background. So, import the green screen clips to the media library. Now, add the background green screen to the timeline above the video track as shown in the picture.
● Move the cursor to the green screen on the timeline and double-click on it.
● The settings box will appear on the left.
● You have to tick the Chroma key there.
The green screen effects will be applied automatically.
The video can be refined with many additional tools like Tolerance, Offset, and Alpha channel to make the video background clear. Once satisfied with the results, click on OK. Now that we have discussed how to add background to green screen video with the help of Filmora let’s now discuss how to add a background to a video without a green screen.
Part 2 Add background to video without a green screen
Let us learn how to add a background to a video without a green screen. In Filmora, there is a special effect called the Human segmentation effect to isolate people from the backgrounds without a green screen. All it takes is a few clicks. Once you remove the surround, you can add an image or a video clip to go well with your original video. Another unique feature is that after removing the background from the video clip, you can add it to the overlay of another video clip. It works well when it has a natural and single person in front of the camera.
Let’s discuss how to add background without a green screen.
Wondershare Filmora
Get started easily with Filmora’s powerful performance, intuitive interface, and countless effects!
Try It Free Try It Free Try It Free Learn More about Filmora>
Step1 Import Media to Timeline
Import the video clip from the device. You can also drag the video clip from the timeline. You can use other effects from Filmora to make necessary changes like editing, cutting, trimming, filter and transition.
Step2 Adding Human Segmentation Effect
To see the options to add background to video without a green screen, go to Effects – AI Portrait, and you can see a list of all AI portrait effects here. You can see the human segmentation effect, drag and place it on the top of your video clip in the timeline.
Step3 Preview and Adjust
After the human segmentation effect, the people will be isolated separately from the background, shown in the picture. Double click on the effects in the timeline where you can edit, adjust, thickness, feather, and preview.
Step4 Replace and change video background
If you wish to change the background, import an image or video below your main track. Now, that is how to add a background without a green screen.
Thus, you learned to create your green screen backgrounds and add a background to a green screen video using the favorite video effect software, Filmora.
Conclusion
Thus, in this guide, you learned how to add a background to a video without a green screen, and we hope this will be useful. You can find multiple software online for adding a background to a green screen with additional background effects. However, the Human segmentation available in Filmora is the easiest way to change scenes and clone people. With support to over 100 video tracks, Filmora is by far the best tool that allows you to change the setting with and without a green screen.
Also read:
- New In 2024, AI Features of Filmora - Silence Detection in Videos
- In 2024, Want to Add Freeze Frame Effect to Your Video on Your Device? Here Are the Steps to Add Freeze Frame on PC, Mac, Smartphone as Well as Online From Any Device
- Applying the Effect of Camera Shake in Video Creation for 2024
- New In 2024, Do You Know About some Efficient Slow-Motion Video Editors? Read This Article to Find Out the Best Slow-Motion Video Editing Tools that You Can Try
- Updated Do You Want to Enable the Motion Blur Effect While Playing Dying Light 2? Read This Article to Find Out How to Use Dying Light 2 Motion Blur for a Great Gaming Experience for 2024
- New We Can Say that the Horror Movies of the 90S Laid the Foundation for Current Horror Movies. So, without Wasting Time, Lets Create a 1990S Horror Movie Similar to The Blair Witch Project
- New 2024 Approved Learn 4 Proven Methods for Creating Engaging and Memorable Recap Videos. Elevate Your Event Coverage and Engage Your Audience with These Tips and Tricks
- Updated In 2024, Top 20 Slideshow Makers for Win/Mac/Online Review
- Easy Step by Step Tutorial on Creating a Lightroom Collage for 2024
- Updated In 2024, Do You Want to Print Designs Onto Your Garments or Other Fashion Accessories? Find Out How to Create a Screen Print Effect in Photoshop to Give Your Text or Graphics a Vintage or Retro Look
- 3 Ways to Combine 2 or 3 Videos Into 1
- Updated Want to Know the Simplest Way to Match the Colors of Your Photos in Photoshop? The Following Discussion Will Help Match Color in Photoshop, Almost Effortlessly for 2024
- 2024 Approved Shotcut Review – Is It The Best Free Video Editor?
- Updated How To Trim Video In Premiere Pro in Different Ways
- New 2024 Approved Browse the List of the Best 8 Scanners or Converters for Converting the Slides to Digital Images. Also, Know the Other Important Information of Slides to Digital Conversion
- Updated 2024 Approved How to Add Freeze Frame to Your Video From Any Device?
- Updated How to Create an Aesthetic Slideshow Presentation for 2024
- In 2024, Ways to Learn Discord Game Bots – Even if Youre Just Starting Out
- Updated Add Amazing Filters and Effects for Fun to Watch GIFs Using Adobe After Effects. Read on to Discover an Easy-to-Learn After Effects Alternative for 2024
- Discord Is Becoming More Popular with Time with Millions of Users. Are You Thinking of Getting a GIF for Discord Profile? If Yes, Learn From This Piece Since We Have a Conclusive Summary of Getting a GIF Profile Picture for Discord for 2024
- Are You Looking for the Best Way to Add Subtitles to Your Video? The Top SRT File Creators Can Help You Do That for 2024
- New | Best WMV to GIF Converters
- In 2024, 7 Best Green Screen Software for Beginners on Mac
- In 2024, How to Create Datamoshing Effect to Your Footage in After Effects?
- New In 2024, What Is TS Format and How To Play TS Files? Basic Tips
- New 2024 Approved Top List of Best VHS Video Effect Makers
- New In 2024, DaVinci Resolve Scopes Have Undergone Significant Improvements. Find Out How to Use These Scopes and Improve Your Video Editing Skills
- Updated How To Cut Videos For Instagram On Mac for 2024
- In 2024, How to use Snapchat Location Spoofer to Protect Your Privacy On Tecno Spark 10C? | Dr.fone
- Motorola Data Recovery – recover lost data from Motorola Moto G34 5G
- 3uTools Virtual Location Not Working On Xiaomi Redmi 12? Fix Now | Dr.fone
- 8 Workable Fixes to the SIM not provisioned MM#2 Error on Realme Narzo N53 | Dr.fone
- How to Transfer Videos from OnePlus 12 to iPad | Dr.fone
- How Do I Stop Someone From Tracking My Vivo Y36i? | Dr.fone
- Complete guide for recovering video files on Vivo V27
- How to convert AVCHD MTS to MP4 for Xiaomi Redmi 12 5G?
- Can Life360 Track You When Your Vivo X90S is off? | Dr.fone
- In 2024, How To Unlock a ZTE Nubia Flip 5G Easily?
- In 2024, Tips and Tricks for Setting Up your Vivo Y100A Phone Pattern Lock
- In 2024, Tips and Tricks for Apple ID Locked Issue From Apple iPhone 6s Plus
- In 2024, 3 Methods to Mirror Vivo Y36 to Roku | Dr.fone
- Life360 Learn How Everything Works On Itel A60s | Dr.fone
- How to use Pokemon Go Joystick on Realme C53? | Dr.fone
- Best Android Data Recovery - Undelete Lost Messages from Nokia C110
- New How to Stop Animation From Looping in Unity for 2024
- How To Reset the Security Questions of Your Apple ID On Your Apple iPhone 15
- In 2024, 6 Ways To Transfer Contacts From Vivo Y100 5G to iPhone | Dr.fone
- Spoofing Life360 How to Do it on Lava Storm 5G? | Dr.fone
- In 2024, How to Change Your Realme 11 Pro Location on life360 Without Anyone Knowing? | Dr.fone
- 7 Fixes for Unfortunately, Phone Has Stopped on Itel P40 | Dr.fone
- Resolve Your iPhone 13 mini Keeps Asking for Outlook Password
- 3 Ways of How to Get Someones Apple ID Off Apple iPhone XS without Password
- In 2024, How to Mirror Nokia C32 to Mac? | Dr.fone
- Recover iPhone 8 Data From iOS iTunes | Dr.fone
- In 2024, The Complete Guide to Vivo Y78 5G FRP Bypass Everything You Need to Know
- Title: New 2024 Approved Modern Silence Detection Tools Are Changing the Face of Video Editing. Use Them to Improve the Quality of Your Video Clips. Learn How These Tools Let You Detect Silence with Pinpoint Accuracy
- Author: Morgan
- Created at : 2024-04-24 01:10:53
- Updated at : 2024-04-25 01:10:53
- Link: https://ai-video-editing.techidaily.com/new-2024-approved-modern-silence-detection-tools-are-changing-the-face-of-video-editing-use-them-to-improve-the-quality-of-your-video-clips-learn-how-these-/
- License: This work is licensed under CC BY-NC-SA 4.0.
