New 2024 Approved Shotcut Video Editor Review
Shotcut Video Editor Review
If you are looking for a free video editor, you should definitely opt for an open-source video editor. They come free of cost without locking any feature and they are compatible with all desktop operating systems. The user interface of Shotcut looks powerful still easy to operate. There are dockable panels and flexible layouts to customize the interface.
Coming to the features, there are plenty of video effects and filters to enhance video content. You can do all the standard video editing works comfortably. There are certain advanced features available such as keyframe, audio mixing and much more. However, can we consider Shotcut video editor the best for editing professional-quality videos? Find out the complete Shotcut reviews.
Part 1. How to Download and Install Shotcut
Shotcut is completely compatible with Windows, Mac and Linux. The company has discontinued Shotcut 32 bit version and the current version only supports 64 bit computer. Shotcut is safe to download and the installer is free of spyware and malware. Here are the steps to download and install Shotcut.

Step 1: From your web browser, visit “shotcut.org/download”. It automatically detects your operating system and provides you the installer to download Shotcut that could be compatible with your system.
Step 2: You can download the installer from Site 1(FossHub) or Site 2(GitHub). Besides, you can download the .exe file from Windows installer link or .zip file from Windows portable zip file.
Step 3: After downloading the installer file, install Shotcut from it by following the on-screen instructions.
Step 4: After installation, launch Shotcut and import all video and audio clips from Open File option. Bring them down to Timeline for basic editing.
Part 2. Key Features of Shotcut
Shotcut has all the standard features for basic video editing. Before downloading Shotcut, you should be aware of the features so that you can decide whether the video editor is suitable for your video editing purpose. Here are all the key features of Shotcut that stand out.
Video Capture – You can capture your screen as well as webcam video. Shotcut supports audio capture from the system as well as from the external mic. In fact, the software supports 4K resolution which is great being an open-source video editor.
Standard Editing – You can trim video clips and perform cut-copy-paste on clips. You can also append clips, insert clips in between, and extract audio from the videos. There are keyframes for video filters, presents, and markers. You can drag and drop files and keep notes. Besides, Shotcut uses proxy editing for handling high-resolution video files.
Audio Features – Shotcut comes with several audio filters that you can apply on your audio clips to enhance them. There are options for volume control, audio mixing, tone generator, and pitch adjustment. The popular fade in and fade out effects are also available along with audio scopes.
Video Effects – There is no dearth of effects and filters on Shotcut. In fact, you can compare Shotcut with premium video editors when it comes to video filters. Besides, there are blending modes and track compositing. Moreover, there are several transitions and deinterlacing. You can opt for 360-degree filters and reverse video clips as well as use video scopes.
Wide Support – Shotcut supports almost all the different video and audio formats. In fact, you get to select different photo file formats. The multi-format timeline supports mixing video and audio of different parameters perfectly. The software also supports network streaming and alpha channel videos.
Part 3. How to Edit Videos with Shotcut
Shotcut is good as a free video editor for standard editing options. You can add texts and titles, crop and trim video clips, as well as split and join clips. Besides, you can control the speed of the video clips as well as add transitions. Thereafter, you can export the video and publish online. Here are the steps about Shotcut editing videos.
Step 1: Launch Shotcut and go to File> New. Select Projects Folder and Video Mode and enter Project Name. Finally, click on Start button to get started.
Step 2: Go to View> Layout> Timeline Project for the best editing layer.

Step 3: To import media files, go to File> Open File> and select media files.
Step 4: To add texts, go to Filters> “+” icon> Video tab> select “Text:Simple”. Thereafter, type anything and choose a font and select any color.

Step 5: To crop any video, go to Filters> Video> and Crop option. You can select various geometry shapes as you think appropriate.

Step 6: To add transitions, keep two clips on the same track and get them overlapped. Choose a transition from Properties and apply to your video.
Step 7: Finally, go to File> Export Video option. You can choose from different option and select frame rate, video resolution, and others from Advanced option.

Part 4. Shotcut Alternative to Edit Videos
There are many reasons why you could be looking for a better alternative to Shotcut. First of all, there is a big lack of advanced video editing features. That is why editing professional-quality videos with Shotcut is not highly feasible. The user interface is not as robust as the standard user interface of video. The editing cannot be as fluent as any premium and professional video editor. That is why we recommend Wondershare Filmora as the best alternative to Shotcut.
Wondershare Filmora is a premium video editor where there is a perfect balance of standard and advanced features. You can also capture screen and webcam video. There are tons of transitions, effects, filters, elements, and much more. There is also a stock media library available. Filmora has wider support for different file formats. Here are the steps on how to edit videos with Filmora.
For Win 7 or later (64-bit)
For macOS 10.12 or later
Step 1: Download and install Filmora as per your operating system. Launch Filmora and click on New Project option on the welcome screen. Drag and drop media files into Project Media folder.
Step 2: Drag and drop video clips and audio clips on the timeline in proper sequence. Thereafter, you can do basic editing such as trimming, cropping, splitting, and much more.

Step 3: Go to Transitions option and add your desired transitions in between clips. You can also opt for Titles for texts, Effects for animations, and Elements for objects.

Step 4: Once you are satisfied with the editing, click on Export button to save your video to your hard drive.

Part 5. FAQs about Shotcut
**Is Shotcut totally free?
Yes, Shotcut is a completely free video editor as it belongs to the open-source software category. It is available for free for Windows, Mac, and Linux users. All the features are completely unlocked, and there is no premium version available.
**Is Openshot better than Shotcut?
Openshot is equally good as Shotcut in terms of features. But in terms of user experience and editing 4K videos, Shotcut scores better than Openshot. Shotcut is a more lightweight video editor, and hence, the chances of crashes are relatively low.
**Is Shotcut good for YouTube?
Shotcut is particularly good for YouTube if you need only basic editing on your videos. You can export the edited video file from Shotcut to YouTube after basic editing. You can get eh frame rate, video resolution, and aspect ratio as per your requirements.
For macOS 10.12 or later
Step 1: Download and install Filmora as per your operating system. Launch Filmora and click on New Project option on the welcome screen. Drag and drop media files into Project Media folder.
Step 2: Drag and drop video clips and audio clips on the timeline in proper sequence. Thereafter, you can do basic editing such as trimming, cropping, splitting, and much more.
Step 3: Go to Transitions option and add your desired transitions in between clips. You can also opt for Titles for texts, Effects for animations, and Elements for objects.

Step 4: Once you are satisfied with the editing, click on Export button to save your video to your hard drive.
Part 5. FAQs about Shotcut
**Is Shotcut totally free?
Yes, Shotcut is a completely free video editor as it belongs to the open-source software category. It is available for free for Windows, Mac, and Linux users. All the features are completely unlocked, and there is no premium version available.
**Is Openshot better than Shotcut?
Openshot is equally good as Shotcut in terms of features. But in terms of user experience and editing 4K videos, Shotcut scores better than Openshot. Shotcut is a more lightweight video editor, and hence, the chances of crashes are relatively low.
**Is Shotcut good for YouTube?
Shotcut is particularly good for YouTube if you need only basic editing on your videos. You can export the edited video file from Shotcut to YouTube after basic editing. You can get eh frame rate, video resolution, and aspect ratio as per your requirements.
For macOS 10.12 or later
Step 1: Download and install Filmora as per your operating system. Launch Filmora and click on New Project option on the welcome screen. Drag and drop media files into Project Media folder.
Step 2: Drag and drop video clips and audio clips on the timeline in proper sequence. Thereafter, you can do basic editing such as trimming, cropping, splitting, and much more.
Step 3: Go to Transitions option and add your desired transitions in between clips. You can also opt for Titles for texts, Effects for animations, and Elements for objects.
Step 4: Once you are satisfied with the editing, click on Export button to save your video to your hard drive.
Part 5. FAQs about Shotcut
**Is Shotcut totally free?
Yes, Shotcut is a completely free video editor as it belongs to the open-source software category. It is available for free for Windows, Mac, and Linux users. All the features are completely unlocked, and there is no premium version available.
**Is Openshot better than Shotcut?
Openshot is equally good as Shotcut in terms of features. But in terms of user experience and editing 4K videos, Shotcut scores better than Openshot. Shotcut is a more lightweight video editor, and hence, the chances of crashes are relatively low.
**Is Shotcut good for YouTube?
Shotcut is particularly good for YouTube if you need only basic editing on your videos. You can export the edited video file from Shotcut to YouTube after basic editing. You can get eh frame rate, video resolution, and aspect ratio as per your requirements.
How To Make A Do-It-Yourself Video
Wondering how YouTubers make their own video from scratch? Want to open a YouTube channel and you don’t know how to start? Then, in this article; I’ll explain you the details. Please stay with me.
If you love to speak in front of the camera as if anyone is watching you, and if you’re someone with low self-esteem like me, and you want to develop your self-confidence, then you’re on the right track. People nowadays look for something that can add spice to their life like vlogging. But first, you need to know the reasons why you’re opening a YouTube channel in the first place. Have a me time and ask yourself what do you want to share with your target audiences.
Things that can be of great influence to someone who badly needed it (in a positive way of course.) People nowadays search answers to their questions on YouTube. It is the second largest search engine next to Google and because of the YouTubers who give fuel to it, people around the globe watch it on a daily basis, I’m sure of it.
And now that you’ve already know what you want to share outside the world, you just need your vlogging equipment’s.
Part 1. Things That You Need when You Want to Start Vlogging
A smart phone and a tripod will do. You don’t need to have all those professional vlogging equipment’s if you’re a new YouTuber. Each and every smart phone now can record a high-definition resolution. I started with my Samsung S6 and a pile of books as my tripod. Silly me! But you need to be resourceful. As the time went by, I bought a tripod from JOOM (an online store just like Ali Express). Very cheap and it last long. You also need a video editor for post editing. You don’t want to upload a raw video on YouTube without anything in it. It will be dull and boring.
Part 2. Reasons Why You Need a Video Editor?
1. Videos Are Impactful
While pictures can tell a thousand words, video tells a thousand more. On your videos, your audiences can see your feelings about a particular topic, and with the correct techniques and editing secrets, you can effectively tell someone or many people a message you want to get across. Whether it is a message on how to make a do-it-yourself video or what is the best video editor for beginners?
2. People Access Video Everywhere
You are probably one who does too. In this modern era of technology, you see people watching videos not only on television or the computer but on their laptops, tablets and smart phones as well. So, if you want something across, putting out your message or promotion through a video to these people makes sense. And it does not have to be that hard. You might say people only want to watch good looking videos. Well, yes, but using Wondershare Filmora , a video editing software can let your video look more professional.
3. You Don’t Need a Fortune to Produce Videos
That’s right. If you have a video editor installed on your phone, you’re ready to go. I started to edit my first ever video using Filmora go. It’s very handy and easy to use for a beginner like me before. And it has lot of features that you can put in your video, like cool titles, transitions and even stickers. If you want to produce your video using your computer or a laptop, you can definitely use Wondershare Filmora. You probably will not be able to edit and produce “Hollywood” videos but with a decent computer or laptop and correct editing techniques, you can make pretty professional looking videos. I always recommend using Wondershare Filmora even if you’re a beginner. If you learn how to use Wondershare Filmora well, you can make videos compared to everyone else. I guarantee you that.
Free Download For Win 7 or later(64-bit)
Free Download For macOS 10.14 or later
Part 3. Preparations for a Vlog
I take down notes when preparing a video, I used to write the things that I need to say. Things that I mostly want to highlight when expressing my thoughts to everyone who will watch it.

I put myself a little make up on when producing a video, it makes me feel more confident to speak in front of my virtual audiences because I know that I looked presentable in any way.
Now we need to set our do-it-yourself like studio (it can be your room; it can be in the living room or anywhere that you can see that has a good background) or you can use a green backdrop and just make wonders in the post editing.

During these days, I’m filming using my Canon GX7 Mark II and it’s a result of my first ever YouTube salary. When you’re into vlogging, at some point you need to upgrade your vlogging equipment’s. I know it will take time, but you can do it.
After you finished a vlog/video, you need to edit it and that’s the most exciting part for me, at least. Put your teaser, your intro, the body of the video itself and don’t forget the outro.

Conclusions
If you want to open up a YouTube Channel, then do it now. Maybe you’ll feel down because people around you will not support you from the beginning and that’s the cruel part of being a YouTuber. As the saying goes by, “birds of the same feather, flock together”; people with the same passion as you can understand all your endeavors. Don’t always think of the money that you will receive afterwards because that brings pressure and you’ll push yourself to the limit until you’ll feel and say “enough is enough”. Just do your own thing and the rest will follow. And if you think that you have something to offer to someone out there virtually, then don’t think twice. We only live once, make the most out of it.
And if you’re looking for the best video editor for Personal Computers this year 2022, choose Wondershare Filmora and you’ll be thrilled. Trust me, I’ve been there. Happy editing!
A smart phone and a tripod will do. You don’t need to have all those professional vlogging equipment’s if you’re a new YouTuber. Each and every smart phone now can record a high-definition resolution. I started with my Samsung S6 and a pile of books as my tripod. Silly me! But you need to be resourceful. As the time went by, I bought a tripod from JOOM (an online store just like Ali Express). Very cheap and it last long. You also need a video editor for post editing. You don’t want to upload a raw video on YouTube without anything in it. It will be dull and boring.Part 2. Reasons Why You Need a Video Editor?
1. Videos Are Impactful
While pictures can tell a thousand words, video tells a thousand more. On your videos, your audiences can see your feelings about a particular topic, and with the correct techniques and editing secrets, you can effectively tell someone or many people a message you want to get across. Whether it is a message on how to make a do-it-yourself video or what is the best video editor for beginners?
2. People Access Video Everywhere
You are probably one who does too. In this modern era of technology, you see people watching videos not only on television or the computer but on their laptops, tablets and smart phones as well. So, if you want something across, putting out your message or promotion through a video to these people makes sense. And it does not have to be that hard. You might say people only want to watch good looking videos. Well, yes, but using Wondershare Filmora , a video editing software can let your video look more professional.
3. You Don’t Need a Fortune to Produce Videos
That’s right. If you have a video editor installed on your phone, you’re ready to go. I started to edit my first ever video using Filmora go. It’s very handy and easy to use for a beginner like me before. And it has lot of features that you can put in your video, like cool titles, transitions and even stickers. If you want to produce your video using your computer or a laptop, you can definitely use Wondershare Filmora. You probably will not be able to edit and produce “Hollywood” videos but with a decent computer or laptop and correct editing techniques, you can make pretty professional looking videos. I always recommend using Wondershare Filmora even if you’re a beginner. If you learn how to use Wondershare Filmora well, you can make videos compared to everyone else. I guarantee you that.
Free Download For Win 7 or later(64-bit)
Free Download For macOS 10.14 or later
Part 3. Preparations for a Vlog
I take down notes when preparing a video, I used to write the things that I need to say. Things that I mostly want to highlight when expressing my thoughts to everyone who will watch it.
I put myself a little make up on when producing a video, it makes me feel more confident to speak in front of my virtual audiences because I know that I looked presentable in any way.
Now we need to set our do-it-yourself like studio (it can be your room; it can be in the living room or anywhere that you can see that has a good background) or you can use a green backdrop and just make wonders in the post editing.
During these days, I’m filming using my Canon GX7 Mark II and it’s a result of my first ever YouTube salary. When you’re into vlogging, at some point you need to upgrade your vlogging equipment’s. I know it will take time, but you can do it.
After you finished a vlog/video, you need to edit it and that’s the most exciting part for me, at least. Put your teaser, your intro, the body of the video itself and don’t forget the outro.
Conclusions
If you want to open up a YouTube Channel, then do it now. Maybe you’ll feel down because people around you will not support you from the beginning and that’s the cruel part of being a YouTuber. As the saying goes by, “birds of the same feather, flock together”; people with the same passion as you can understand all your endeavors. Don’t always think of the money that you will receive afterwards because that brings pressure and you’ll push yourself to the limit until you’ll feel and say “enough is enough”. Just do your own thing and the rest will follow. And if you think that you have something to offer to someone out there virtually, then don’t think twice. We only live once, make the most out of it.
And if you’re looking for the best video editor for Personal Computers this year 2022, choose Wondershare Filmora and you’ll be thrilled. Trust me, I’ve been there. Happy editing!
Change Background Color in After Effects
Adobe After Effects is a powerful video editor. After Effects is particularly popular for its special effects that you can add to your videos and blow the mind of your audience. In any video, the background plays a major role in enhancing the overall frame and scene. If you are planning to change background color After Effects or add special effects, you must shoot your video with a solid color background.
During the post-production phase, you can change the background uniformly to any color scheme or special effect as per the requirement of the scene. Since the learning curve for After Effects is slightly steeper, you should know the exact steps to change After Effects background color. We will explain the process in simple steps and provide you with an alternative way to change background color.
Part 1. How to change video BG color in After Effects?
After Effects is widely used for professionals to add animations and special effects to videos during video editing phase. Starting from editing social media videos and YouTube videos to short films and even movies, After Effects finds its application in every field of video editing. Changing background color in After Effects is super simple even though other video editing techniques could be slightly complex for beginners. Here are the steps on how to change background color in After Effects.
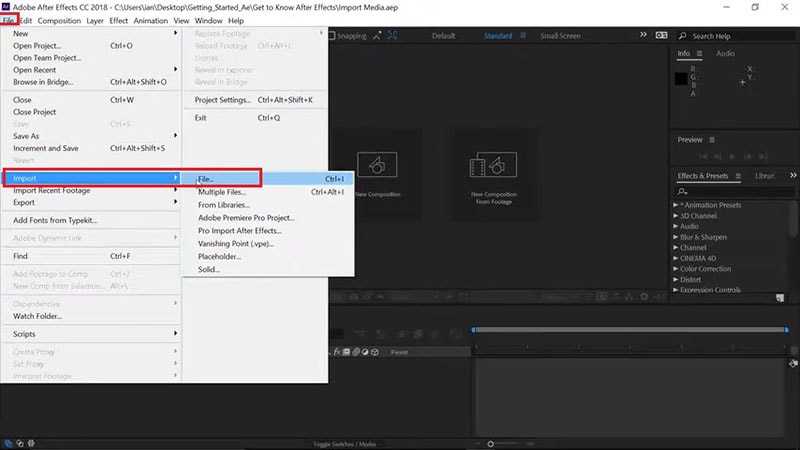
Step1 Open After Effects on your computer. Go to File> Import> File. Select the video file from your hard drive and it will appear under Project tab.
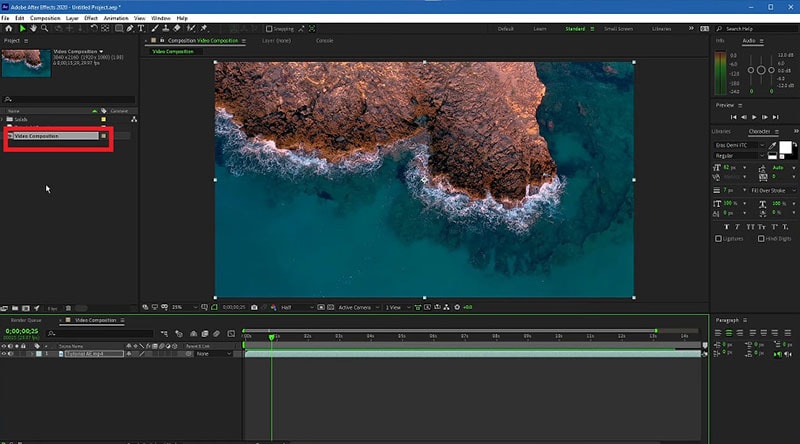
Step2 Drag and drop your video into Timeline. Select the video clip and right-click on Video Composition option located below Project tab.
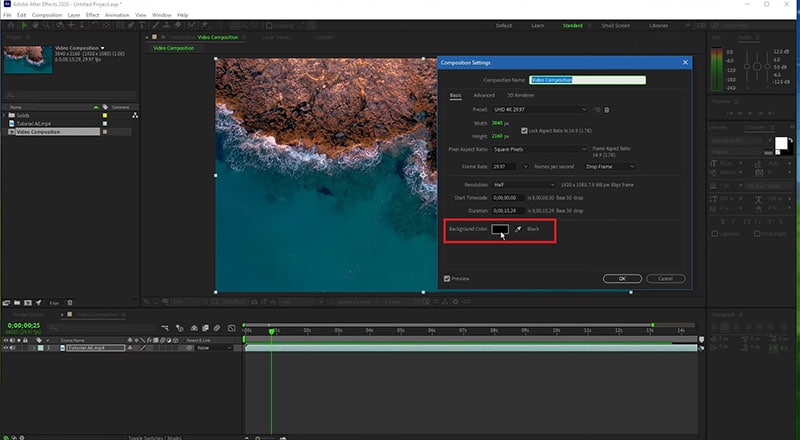
Step3 From the menu, click on Composition Settings option. You can also use Ctrl + K(Windows) or Command + K(Mac) key combination to open Composition Settings directly.

Step4 On Composition Settings window, go to Background Color and set the color as per your preference. You can also use a color picker as well to select any color from the video directly.
Step5 Click on Ok to set the new background color. Depending on the transparency of your video scene or the transition effect such as fade in and out, the background color will be more prominent.
Part 2. Alternative way to change background color
The best alternative to After Effects is Wondershare Filmora as Filmora has a wide range of special effects and animations. Filmora is a professional video editor where you can perform all basic as well as advanced video editing work. Most importantly, Filmora comes with an intuitive user interface so that even amateurs can use it easily.
There are several ways you can change background color in your video. For example, you can remove background color even when you do not have a solid color. If your video has a solid color, you can change background color to any color or graphical element using Chroma key. Here are the steps to change background color in Filmora .
Free Download For Win 7 or later(64-bit)
Free Download For macOS 10.14 or later
Step1 Download and install Filmora and it is available for Windows and Mac. Launch Filmora and click on New Project.

Step2 Import your video under Project Media folder and drag and drop into Timeline.
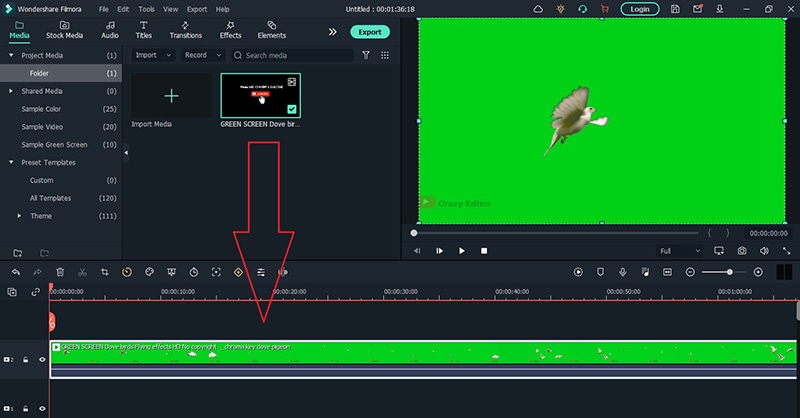
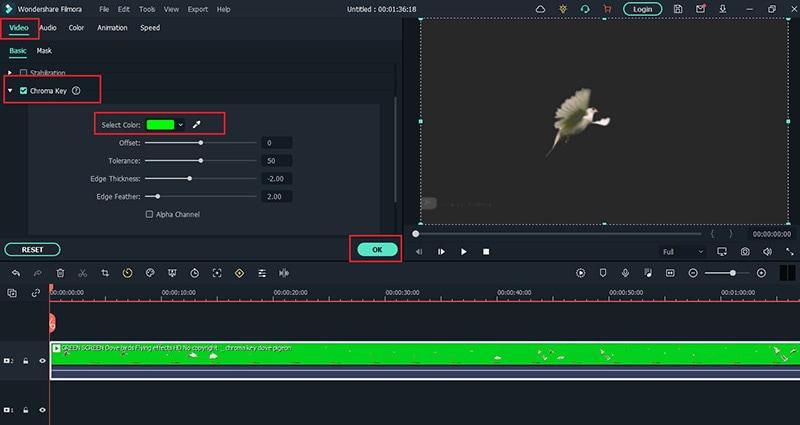
Step3 Double-click on the video clip and go to Video tab and turn on Chroma Key option. Select the solid color present in the background of the video and click on Ok button.
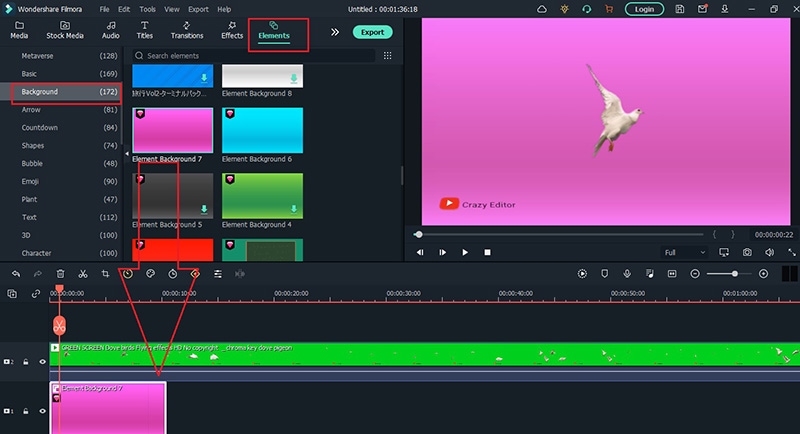
Step4 You will see the background color of the video disappear. Go to Elements> Background and drag and drop any background into Timeline. Make sure it is placed below the video clip and extend the duration of the background color as per your requirements.
Step5 Finally, play the video and click on Export button to save the video.
Part 3. FAQs about Video Background Colors
1. How do I remove background color in After Effects?
Import your video clip with a solid background color and place it on Timeline. Go to Effect menu> Keying> Keylight option. In Effects window and under Keylight, you will see Screen Colour option. Click on the eyedropper icon and select the background color you want to remove.
2. How do I change a solid background in After Effects?
The steps for After Effects how to change background color solid involve removing the background color and adding a layer of solid color to replace the transparency of the video. Go to Layer> New> Solid. Under Solid Settings window, go to Color and select the desired color from Color option and click on OK button. The new color will get reflected in the background of the video.
3. How do you add a white background in After Effects?
Go to Layer> New> Solid and add a white color solid first. However, this white color layer will not be visible unless you turn the background of your video transparent. Go to Effects & Presets and search for Luma Key and drop Luma Key on your video. Set Key type as Brighter and the threshold of the Lema key as per suitability on your video to see the white background appear.
Free Download For macOS 10.14 or later
Step1 Download and install Filmora and it is available for Windows and Mac. Launch Filmora and click on New Project.
Step2 Import your video under Project Media folder and drag and drop into Timeline.
Step3 Double-click on the video clip and go to Video tab and turn on Chroma Key option. Select the solid color present in the background of the video and click on Ok button.
Step4 You will see the background color of the video disappear. Go to Elements> Background and drag and drop any background into Timeline. Make sure it is placed below the video clip and extend the duration of the background color as per your requirements.
Step5 Finally, play the video and click on Export button to save the video.
Part 3. FAQs about Video Background Colors
1. How do I remove background color in After Effects?
Import your video clip with a solid background color and place it on Timeline. Go to Effect menu> Keying> Keylight option. In Effects window and under Keylight, you will see Screen Colour option. Click on the eyedropper icon and select the background color you want to remove.
2. How do I change a solid background in After Effects?
The steps for After Effects how to change background color solid involve removing the background color and adding a layer of solid color to replace the transparency of the video. Go to Layer> New> Solid. Under Solid Settings window, go to Color and select the desired color from Color option and click on OK button. The new color will get reflected in the background of the video.
3. How do you add a white background in After Effects?
Go to Layer> New> Solid and add a white color solid first. However, this white color layer will not be visible unless you turn the background of your video transparent. Go to Effects & Presets and search for Luma Key and drop Luma Key on your video. Set Key type as Brighter and the threshold of the Lema key as per suitability on your video to see the white background appear.
How To Mirror a Video Clip in Premiere Pro
Video editing is a crucial part of filmmaking, and it can make or break the outcome of a project. Adobe Premiere Pro is a widely used video editing software that provides a vast range of tools for professional video editing. One of the features that Premiere Pro offers is the ability to mirror video clips, which can add an interesting visual element to your footage.
In this article, we will look at how to mirror a video clip in Premiere Pro in a few simple steps. Whether you’re a seasoned video editor or just starting, this guide will help you achieve the desired effect in your videos. From basic mirroring to advanced techniques, we will cover everything you need to know to create a symmetrical and visually appealing look in your projects.

What Is To “Mirror” a Video?
Mirroring a video in Adobe Premiere Pro refers to reflecting the footage along either the horizontal or vertical axis. This results in the composition being flipped and reversed, creating a reflection-like effect. Flipping a video is distinct from rotating it, as the orientation of the elements is changed, but their position remains the same.
Flipping can serve both creative and practical purposes. On the one hand, it can add a unique and visually interesting element to a project, creating a form of self-reflection or self-analysis. On the other hand, flipping can also be used to correct videos accidentally captured upside down. For example, flipping a video recorded with a selfie camera along the horizontal axis will correctly display the right side up.
It is important to note the distinction between flipping and rotating a video. A flipped video will look like a mirror image, whereas a video rotated 180 degrees will not. By understanding the differences between these techniques, you can effectively use mirroring to achieve the desired result in your projects.
How To Mirror a Video in Adobe Premiere Pro
Mirroring a video in Adobe Premiere Pro is a quick and simple process that can add a unique and visually appealing touch to your projects. Whether you want to create a symmetrical look or experiment with a new visual style, this guide will mirror a video clip in Premiere Pro. From basic to advanced techniques, you’ll be able to create stunning and reflective videos in no time. So, let’s get started!
Step1 Choose the “Effects“ option from the menu.

Step2 Look for the “Transform“ tab.

Step3 Pick the “Horizontal Flip“ or “Vertical Flip“ from the drop-down list.

Step4 Drag the desired flip onto the selected clip, which will immediately reverse the image displayed on the Program Monitor.

How To Create Mirror Video Effect in Premiere Pro
Creating a mirror video effect in Adobe Premiere Pro opens up a world of artistic possibilities for your projects. With the right techniques, you can create visually appealing and symmetrical videos that stand out from the crowd. This guide will show you how to master the art of mirror video effects in Premiere Pro, from the basics to more advanced techniques. Get ready to explore the creative side of video editing and elevate your projects to the next level.
Step1 Access the “Effects“ menu and select “Video Effects.”

Step2 Pick “Distort“, then the “Mirror“.

Step3 Apply the Mirror effect to your clip.

Step4 Adjust “Reflection Center“ for side-by-side effect or “Reflection Angle“ for up-and-down effect in the Effect Controls panel.

[Bonus] Wondershare Filmora – A Great Alternative to Premiere Pro Mirror Tool
Wondershare Filmora is a great alternative to Adobe Premiere Pro for video editing. Not only does it offer an intuitive interface for both beginners and professionals, but it also offers a range of video editing tools and features. One of those features is its ability to easily mirror a video. With Filmora, you can flip your videos vertically or horizontally with just a few clicks.
Free Download For Win 7 or later(64-bit)
Free Download For macOS 10.14 or later

Filmora also offers a variety of creative video effects and templates, making it easy to add a unique touch to your projects. In addition, its built-in audio editing tools allow you to create professional-sounding soundtracks for your videos. Filmora’s easy-to-use keyframe animation feature gives you precise control over the animation of your elements, allowing you to add movement and bring your videos to life.
Furthermore, Filmora’s advanced color correction tools help you achieve the perfect color balance in your videos. Whether you’re a beginner or a professional, Wondershare Filmora is a great option for anyone looking for a powerful and easy-to-use video editor.
How To Mirror a Video Clip With Wondershare Filmora
Mirroring a video clip is a simple process with Wondershare Filmora. This video editing software provides an intuitive and user-friendly interface, making it easy to achieve the desired result.
To mirror your video in Filmora, you can follow a few straightforward steps. Whether you want to flip your video horizontally or vertically, Filmora’s mirroring tool will help you achieve the perfect reflection with just a few clicks. So, if you’re looking for an alternative to Adobe Premiere Pro, Wondershare Filmora is a great option to consider for your video editing needs.
Step1 Within the “Flip“ section, there are four options available. To flip the clip from left to right, select the “Flip Horizontal“ icon, or if you want to turn the clip upside down, choose the “Flip “ option.

Step2 You can rotate the clip by clicking either the “Clockwise“ or “Counterclockwise“ icons under the Rotate section.

Step3 If you want to specify the rotation angle, you can either enter a value in the box under the Rotate tab or manipulate the dot in the circle to achieve the desired angle.

How To Create Mirror Video Effect in Wondershare Filmora
Wondershare Filmora is an excellent video editing software that offers a simple solution for creating a mirror video effect. Its intuitive interface and powerful features make it possible for amateur and professional video editors to achieve stunning results. Filmora provides users with an array of tools to create a mirror effect on their video clip effortlessly.
Whether you want to create a reversed image, flip the orientation vertically, or rotate the clip in a specific direction, Filmora has got you covered. Let’s see how to create a mirror video effect with Wondershare Filmora.
Step1 Add the video clip to a video track on the timeline

Step2 Click the “Filters“ icon and choose the “Distortion“ category

Step3 Locate the “Mirror“ effect, drag and drop it to the filter track, and adjust its duration to match the video clip

Step4 Preview the results in the Preview Window before exporting the video from Filmora.

Conclusion
Mirroring a video can add an interesting and unique visual effect to your videos. Adobe Premiere Pro and Wondershare Filmora provide easy-to-use tools to achieve this effect. While Premiere Pro offers more advanced features and customization options, Filmora provides a simpler and more user-friendly interface for those who want to achieve the same results without the hassle. Whichever option you choose, you can create stunning mirror videos in no time.
Free Download For macOS 10.14 or later
Filmora also offers a variety of creative video effects and templates, making it easy to add a unique touch to your projects. In addition, its built-in audio editing tools allow you to create professional-sounding soundtracks for your videos. Filmora’s easy-to-use keyframe animation feature gives you precise control over the animation of your elements, allowing you to add movement and bring your videos to life.
Furthermore, Filmora’s advanced color correction tools help you achieve the perfect color balance in your videos. Whether you’re a beginner or a professional, Wondershare Filmora is a great option for anyone looking for a powerful and easy-to-use video editor.
How To Mirror a Video Clip With Wondershare Filmora
Mirroring a video clip is a simple process with Wondershare Filmora. This video editing software provides an intuitive and user-friendly interface, making it easy to achieve the desired result.
To mirror your video in Filmora, you can follow a few straightforward steps. Whether you want to flip your video horizontally or vertically, Filmora’s mirroring tool will help you achieve the perfect reflection with just a few clicks. So, if you’re looking for an alternative to Adobe Premiere Pro, Wondershare Filmora is a great option to consider for your video editing needs.
Step1 Within the “Flip“ section, there are four options available. To flip the clip from left to right, select the “Flip Horizontal“ icon, or if you want to turn the clip upside down, choose the “Flip “ option.
Step2 You can rotate the clip by clicking either the “Clockwise“ or “Counterclockwise“ icons under the Rotate section.
Step3 If you want to specify the rotation angle, you can either enter a value in the box under the Rotate tab or manipulate the dot in the circle to achieve the desired angle.
How To Create Mirror Video Effect in Wondershare Filmora
Wondershare Filmora is an excellent video editing software that offers a simple solution for creating a mirror video effect. Its intuitive interface and powerful features make it possible for amateur and professional video editors to achieve stunning results. Filmora provides users with an array of tools to create a mirror effect on their video clip effortlessly.
Whether you want to create a reversed image, flip the orientation vertically, or rotate the clip in a specific direction, Filmora has got you covered. Let’s see how to create a mirror video effect with Wondershare Filmora.
Step1 Add the video clip to a video track on the timeline
Step2 Click the “Filters“ icon and choose the “Distortion“ category
Step3 Locate the “Mirror“ effect, drag and drop it to the filter track, and adjust its duration to match the video clip
Step4 Preview the results in the Preview Window before exporting the video from Filmora.
Conclusion
Mirroring a video can add an interesting and unique visual effect to your videos. Adobe Premiere Pro and Wondershare Filmora provide easy-to-use tools to achieve this effect. While Premiere Pro offers more advanced features and customization options, Filmora provides a simpler and more user-friendly interface for those who want to achieve the same results without the hassle. Whichever option you choose, you can create stunning mirror videos in no time.
Also read:
- [Updated] 2024 Approved Experience Unlimited Recording – Review of Free Screen Tools for Cameras
- [Updated] Shooting Stars & Sedans Selecting the Best Gear for SJ4000 for 2024
- 2024 Approved An Ultimate Guide To Edit a Music Video Aspect Ratio and First Cut
- 2024 Approved Penning Powerful Film Prospectus
- Full Solutions to Fix Error Code 920 In Google Play on OnePlus 11R | Dr.fone
- In 2024, Getting the Pokemon Go GPS Signal Not Found 11 Error in Realme Narzo N53 | Dr.fone
- In 2024, How Can I Catch the Regional Pokémon without Traveling On Apple iPhone 15 Pro Max | Dr.fone
- New 2024 Approved DaVinci Resolve Scopes Have Undergone Significant Improvements. Find Out How to Use These Scopes and Improve Your Video Editing Skills
- New 2024 Approved Vlogs and Travel Content Are Incomplete without a Fast-Motion Effect. Learn Step-by-Step How to Make Fast Motion Video on an iPhone in This Article
- New How to Use Deep Fried Meme Maker for 2024
- New In 2024, Do You Wish to Design the Perfect Slow-Motion Video on Your Smartphone? Learn some Top-Rated Free Slow-Mo Apps for Android and iOS Users in This Article
- Updated Are You Searching for the Best Canon LUT Download? This Article Provides the Best Recommendations for Creating the Best Professional Videos for 2024
- What Happens to Your Facebook Live if It’s Flagged for Copyright?
- Title: New 2024 Approved Shotcut Video Editor Review
- Author: Morgan
- Created at : 2024-09-29 19:41:06
- Updated at : 2024-09-30 17:43:12
- Link: https://ai-video-editing.techidaily.com/new-2024-approved-shotcut-video-editor-review/
- License: This work is licensed under CC BY-NC-SA 4.0.