
:max_bytes(150000):strip_icc():format(webp)/relaxing-while-getting-his-studies-done-495857099-5a1ed8c5ec2f640037e369f4.jpg)
New 2024 Approved Sometimes It May Happen to You that You Are Watching a Video that Has Very Low Graphics or, in Other Words, Low Visual Quality. You Might Wish to Change, Instead Improve the Video Quality. Here, AI Upscaling Video Comes to Use
Sometimes It May Happen to You that You Are Watching a Video that Has Very Low Graphics or, in Other Words, Low Visual Quality. You Might Wish to Change, Instead Improve the Video Quality. Here, AI Upscaling Video Comes to Use
REVIEW: What’s Best 10 Software to Make AI Upscaling Video
An easy yet powerful editor
Numerous effects to choose from
Detailed tutorials provided by the official channel
AI Upscaling is often used to improve the video quality. Here are some of the methods to do AI video upscaling. Follow these methods to successfully enhance your video quality.
In this article
01 [What Is AI Upscaling? And Why AI Upscaling Is Significant?](#Part 1)
02 [How to Easily AI Upscale Video to 1080p or 4K?](#Part 2)
03 [Best 10 Software to Make AI Upscaling Video](#Part 3)
Part 1 What Is AI Upscaling? And Why AI Upscaling Is Significant?
The process of generating or creating additional pixels of an image or frame in a video is AI Upscaling. This has many good results on the final video output.
This is mainly done to raise the bit rate of the video and, therefore, slightly improve the visual quality of the video. This is also used to improve the picture quality of DVDs and other low-quality videos. It is done to support lower quality videos or pictures on higher resolution screens like TV. This kind of upscaling is mostly done in TVs automatically.
Part 2 How to Easily AI Upscale Video to 1080p or 4K?
The interesting part is that this upscaling is done by the higher resolution device itself. If you display a lower resolution video on a high-resolution TV, the TV will upscale the video quality of the lower resolution video. This process mainly happens by the displaying device itself. But you can try to upscale videos by yourself using this software, which will help you achieve the best results.
Part 3 Best 10 Software to Make AI Upscaling Video
There are numerous AI upscale video software on the internet. The software listed below is the best among the numerous software because of its extraordinary features and interface. The 10 best AI video upscaling software are:
01DVDFab Enlarger AI
DVDFab Enlarger AI is an AI upscale video software published by Fengtao Software Limited. You can upscale any video you want to 4k. There are a few highlights of this software, and they are:
● This software is available onWindows.
● The price of the software ranges from $44.99 to $139.99
● You can use this software to rip videos from both DVDs and Blu-ray.
● You can save the output from the software in MP4 or MKV form.
● This software allows you to boost your fps up to 60.
Pros
Upscale your video to 4K resolution.
Boost your video to 60 fps.
Appropriate for beginners.
Cons
Available only on Windows.
Very Expensive.
No slow-motion is available.

02Video2X
Video2X is popular ai video upscaling software that is developed by Open-source. It is quite popular among the professionals for various reasons like:
● Video2X is available exclusive to Windows.
● You can avail this software without paying any money.
● You can upscale old low-resolution videos.
● Upscale your videos to 4K.
● You can save the output from the software in MP4 or MKV form.
Pros
You can availthis software for free.
You can upscale GIFs.
You can decide your output format.
Cons
It is not beginner-friendly.
No slow-motion editing is available.
There is no fps boosting.

03Pixop
Pixop ai video upscaling online software is published or developed by Pixop ApS. The main features of this software are:
● It is available online.
● Available both for Windows and Mac.
● Allows to upscale videos up to 8K.
● Supports MP4, MXF, M2TS, and MOV formats of output.
● Allows custom fps boost in videos.
Pros
Available online for both Windows and Mac.
Allows video upscaling up to 8K.
Allows custom fps boost.
Cons
Expensive for longer videos.
Does not support slow-motion editing.
Only supports MP4, MXF, M2TS, and MOV formats of output.

04Topaz Video Enhance AI
Topaz Video Enhance AI is an ai upscaling video enhancing app developed by the Topaz labs. The built-in AI system in topaz ai upscale software has been experimented on numerous videos, and it has been successful each time to edit every pixel in every frame of the video. The main features of this software are:
● The software is available for both os that is Mac and Windows.
● You can use this software to edit your video into slow motion, two thousand percent.
● This software can enhance any video up to 8K resolution.
● You can save the output from the software in any form, like MP4, PNG, TIFF, JPG, or MOV.
● This software allows fps boosting up to 120.
Pros
You can have a free trial.
You can upscale any video up to 8K resolution.
You can edit the video into slow motion to 2000%.
Cons
The app is expensive.
A watermark remains on the videos edited through these apps.
This software is not beginner-friendly software.

05AVCLabs Video Enhancer AI
AVCLabs Video Enhancer AI is ai video upscaling software developed by Anvsoft Inc. The most interesting features of this software are:
● Available for Windows only.
● It can be accessed through payment of $39.95/Month.
● Enhance video quality up to 4K.
● ‘Multi-frame feature’ helps to edit every frame of the video minutely.
● Manual settings for upscaling video or converting to low-quality video up to 480p.
Pros
Excellent video enhancing quality.
Allows enhancing video up to 4K.
This software can remove noise, overlay, and blurriness from the videos.
Cons
Expensive
Available only on Windows
Only for professional or expert users.

06GDFLab
GDFLab is an AI video enhancer online software. You can edit both images and videos with this software. This app is used in many fields, and it has been successful in all those fields due to its outstanding features like:
● This ai video upscaling online software gives a full free trial for its users.
● It is available online.
● It can be used both in Windows and Mac.
● You can upscale your videos up to 4K.
● The price of the software depends on the size of the video or photo you are enhancing.
Pros
This software is available both in Windows and Mac.
You can upscale your videos up to 4K.
You can use this app to restore your images to 4x.
Cons
Interruption in editing for internet problems.
You cannot use this app until you register.
This software is too complex for beginners to handle.

07iSize
iSize is an ai upscaler video online enhancer published by iSize technologies. It is said that this app excels in its field. This may happen for its extraordinary features like:
● This software is available both for Mac and Windows.
● A must-use software for professionals.
● High-end video codec capacity.
● You can use this app to upscale videos and also images.
Pros
You can use this software to upscale both videos and photos.
The video conversion process is fast.
This software supports batch conversion of videos.
Cons
Hardware is not upgraded regularly.
Expensive to avail.
Not for beginners.
● You can upscale your videos up to 8K.

08Cupscale
Cupscale is another such ai upscaling video software. The main features of this software are:
● This software uses the very popular ESRGAN algorithm.
● This software is available both for PC and Mac.
● This software is available for free.
● This software can be used to upscale videos up to 8K.
● This software does not change the actual video format while editing the video.
Pros
Available for both Windows and Mac.
Available free.
Allows you to upscale videos up to 8K.
Cons
Supports only MP4, PNG, and JPG output formats.
Complex interface.
The AI used by this software is not stable.

09MiniTool Video Converter
MiniTool Video Converter is another AI-driven video upscaling software. This app can also be used to upscale videos. It has some exciting features which can make your editing experience outstanding. The features are:
● This software is available for free.
● It is available only for Windows.
● This software supports more than 1000 output formats.
● You can use this video to enhance videos as well as audio.
● You can record your computer screen without a watermark.
Pros
Available free.
Supports more than 1000 different output formats.
Allows to the record computer screen without watermark.
Cons
Available only on Windows.
To run this software, high-end PC specifications are required.
This software is not for beginner use.

10Tipard Video Converter Ultimate
Tipard Video Converter Ultimate has some mind-boggling features, making this software one of the bestai upscale video software**.** This software is an all-in-one solution for the editors. The main features of this app are:
● Available in both Windows and Mac.
● Supports almost all different video formats.
● Upscale videos from DVDs to UHD videos.
● You can upscale your videos up to 8K.
● This app allows you to edit or retouch your videos on the timeline.
Pros
Available both for Windows and Mac.
You can rip videos from DVDs.
Allows you to upscale your videos up to 8K resolution.
Cons
It has a time-consuming editing process.
Does not support any usual PC.
Not beginner-friendly software.

Tip:Comparison between different AI Video Upscaling software
| Software | Windows/Mac/Both | 8K/4K Upscaling | Expensive | Beginner Friendly |
|---|---|---|---|---|
| DVDFab Enlarger AI | Windows | 4k | Yes | Yes |
| Video2x | Windows | 4k | No | No |
| Pixop | Both | 8k | Yes | No |
| Topaz Video Enhance AI | Both | 8k | Yes | No |
| AVCLabs Video Enhancer AI | Both | 8k | Yes | No |
| Windows | Both | 4k | Yes | No |
| GDFLab | Both | 4k | No | No |
| iSize | Both | 8k | Yes | No |
| Cupscale | Both | 8k | No | No |
| MiniTool Video Converter | Windows | 8k | No | No |
| Tipard Video Converter | Both | 8k | No | No |
There is another video editing app, which is Wondershare Filmora Video Editor . It is not an AI-driven video upscaling app. You can use this app to upscale videos of any format and create outputs of any format. This app allows you to upscale videos to 4K. You can use this app also for other video editing purposes to add new meaning and engagement to your video.
For Win 7 or later (64-bit)
For macOS 10.12 or later
● Ending Thoughts →
● I hope by now you know different software to upscale your low-quality video.
● Though this is an automatic process, you can use any software mentioned above to make your work smooth and hustle-free.
● You can access most software from any device and get output in any format with high-quality editing. This software will help you achieve the best results in your editing experience.
AI Upscaling is often used to improve the video quality. Here are some of the methods to do AI video upscaling. Follow these methods to successfully enhance your video quality.
In this article
01 [What Is AI Upscaling? And Why AI Upscaling Is Significant?](#Part 1)
02 [How to Easily AI Upscale Video to 1080p or 4K?](#Part 2)
03 [Best 10 Software to Make AI Upscaling Video](#Part 3)
Part 1 What Is AI Upscaling? And Why AI Upscaling Is Significant?
The process of generating or creating additional pixels of an image or frame in a video is AI Upscaling. This has many good results on the final video output.
This is mainly done to raise the bit rate of the video and, therefore, slightly improve the visual quality of the video. This is also used to improve the picture quality of DVDs and other low-quality videos. It is done to support lower quality videos or pictures on higher resolution screens like TV. This kind of upscaling is mostly done in TVs automatically.
Part 2 How to Easily AI Upscale Video to 1080p or 4K?
The interesting part is that this upscaling is done by the higher resolution device itself. If you display a lower resolution video on a high-resolution TV, the TV will upscale the video quality of the lower resolution video. This process mainly happens by the displaying device itself. But you can try to upscale videos by yourself using this software, which will help you achieve the best results.
Part 3 Best 10 Software to Make AI Upscaling Video
There are numerous AI upscale video software on the internet. The software listed below is the best among the numerous software because of its extraordinary features and interface. The 10 best AI video upscaling software are:
01DVDFab Enlarger AI
DVDFab Enlarger AI is an AI upscale video software published by Fengtao Software Limited. You can upscale any video you want to 4k. There are a few highlights of this software, and they are:
● This software is available onWindows.
● The price of the software ranges from $44.99 to $139.99
● You can use this software to rip videos from both DVDs and Blu-ray.
● You can save the output from the software in MP4 or MKV form.
● This software allows you to boost your fps up to 60.
Pros
Upscale your video to 4K resolution.
Boost your video to 60 fps.
Appropriate for beginners.
Cons
Available only on Windows.
Very Expensive.
No slow-motion is available.
02Video2X
Video2X is popular ai video upscaling software that is developed by Open-source. It is quite popular among the professionals for various reasons like:
● Video2X is available exclusive to Windows.
● You can avail this software without paying any money.
● You can upscale old low-resolution videos.
● Upscale your videos to 4K.
● You can save the output from the software in MP4 or MKV form.
Pros
You can availthis software for free.
You can upscale GIFs.
You can decide your output format.
Cons
It is not beginner-friendly.
No slow-motion editing is available.
There is no fps boosting.
03Pixop
Pixop ai video upscaling online software is published or developed by Pixop ApS. The main features of this software are:
● It is available online.
● Available both for Windows and Mac.
● Allows to upscale videos up to 8K.
● Supports MP4, MXF, M2TS, and MOV formats of output.
● Allows custom fps boost in videos.
Pros
Available online for both Windows and Mac.
Allows video upscaling up to 8K.
Allows custom fps boost.
Cons
Expensive for longer videos.
Does not support slow-motion editing.
Only supports MP4, MXF, M2TS, and MOV formats of output.
04Topaz Video Enhance AI
Topaz Video Enhance AI is an ai upscaling video enhancing app developed by the Topaz labs. The built-in AI system in topaz ai upscale software has been experimented on numerous videos, and it has been successful each time to edit every pixel in every frame of the video. The main features of this software are:
● The software is available for both os that is Mac and Windows.
● You can use this software to edit your video into slow motion, two thousand percent.
● This software can enhance any video up to 8K resolution.
● You can save the output from the software in any form, like MP4, PNG, TIFF, JPG, or MOV.
● This software allows fps boosting up to 120.
Pros
You can have a free trial.
You can upscale any video up to 8K resolution.
You can edit the video into slow motion to 2000%.
Cons
The app is expensive.
A watermark remains on the videos edited through these apps.
This software is not beginner-friendly software.
05AVCLabs Video Enhancer AI
AVCLabs Video Enhancer AI is ai video upscaling software developed by Anvsoft Inc. The most interesting features of this software are:
● Available for Windows only.
● It can be accessed through payment of $39.95/Month.
● Enhance video quality up to 4K.
● ‘Multi-frame feature’ helps to edit every frame of the video minutely.
● Manual settings for upscaling video or converting to low-quality video up to 480p.
Pros
Excellent video enhancing quality.
Allows enhancing video up to 4K.
This software can remove noise, overlay, and blurriness from the videos.
Cons
Expensive
Available only on Windows
Only for professional or expert users.
06GDFLab
GDFLab is an AI video enhancer online software. You can edit both images and videos with this software. This app is used in many fields, and it has been successful in all those fields due to its outstanding features like:
● This ai video upscaling online software gives a full free trial for its users.
● It is available online.
● It can be used both in Windows and Mac.
● You can upscale your videos up to 4K.
● The price of the software depends on the size of the video or photo you are enhancing.
Pros
This software is available both in Windows and Mac.
You can upscale your videos up to 4K.
You can use this app to restore your images to 4x.
Cons
Interruption in editing for internet problems.
You cannot use this app until you register.
This software is too complex for beginners to handle.
07iSize
iSize is an ai upscaler video online enhancer published by iSize technologies. It is said that this app excels in its field. This may happen for its extraordinary features like:
● This software is available both for Mac and Windows.
● A must-use software for professionals.
● High-end video codec capacity.
● You can use this app to upscale videos and also images.
Pros
You can use this software to upscale both videos and photos.
The video conversion process is fast.
This software supports batch conversion of videos.
Cons
Hardware is not upgraded regularly.
Expensive to avail.
Not for beginners.
● You can upscale your videos up to 8K.
08Cupscale
Cupscale is another such ai upscaling video software. The main features of this software are:
● This software uses the very popular ESRGAN algorithm.
● This software is available both for PC and Mac.
● This software is available for free.
● This software can be used to upscale videos up to 8K.
● This software does not change the actual video format while editing the video.
Pros
Available for both Windows and Mac.
Available free.
Allows you to upscale videos up to 8K.
Cons
Supports only MP4, PNG, and JPG output formats.
Complex interface.
The AI used by this software is not stable.
09MiniTool Video Converter
MiniTool Video Converter is another AI-driven video upscaling software. This app can also be used to upscale videos. It has some exciting features which can make your editing experience outstanding. The features are:
● This software is available for free.
● It is available only for Windows.
● This software supports more than 1000 output formats.
● You can use this video to enhance videos as well as audio.
● You can record your computer screen without a watermark.
Pros
Available free.
Supports more than 1000 different output formats.
Allows to the record computer screen without watermark.
Cons
Available only on Windows.
To run this software, high-end PC specifications are required.
This software is not for beginner use.
10Tipard Video Converter Ultimate
Tipard Video Converter Ultimate has some mind-boggling features, making this software one of the bestai upscale video software**.** This software is an all-in-one solution for the editors. The main features of this app are:
● Available in both Windows and Mac.
● Supports almost all different video formats.
● Upscale videos from DVDs to UHD videos.
● You can upscale your videos up to 8K.
● This app allows you to edit or retouch your videos on the timeline.
Pros
Available both for Windows and Mac.
You can rip videos from DVDs.
Allows you to upscale your videos up to 8K resolution.
Cons
It has a time-consuming editing process.
Does not support any usual PC.
Not beginner-friendly software.
Tip:Comparison between different AI Video Upscaling software
| Software | Windows/Mac/Both | 8K/4K Upscaling | Expensive | Beginner Friendly |
|---|---|---|---|---|
| DVDFab Enlarger AI | Windows | 4k | Yes | Yes |
| Video2x | Windows | 4k | No | No |
| Pixop | Both | 8k | Yes | No |
| Topaz Video Enhance AI | Both | 8k | Yes | No |
| AVCLabs Video Enhancer AI | Both | 8k | Yes | No |
| Windows | Both | 4k | Yes | No |
| GDFLab | Both | 4k | No | No |
| iSize | Both | 8k | Yes | No |
| Cupscale | Both | 8k | No | No |
| MiniTool Video Converter | Windows | 8k | No | No |
| Tipard Video Converter | Both | 8k | No | No |
There is another video editing app, which is Wondershare Filmora Video Editor . It is not an AI-driven video upscaling app. You can use this app to upscale videos of any format and create outputs of any format. This app allows you to upscale videos to 4K. You can use this app also for other video editing purposes to add new meaning and engagement to your video.
For Win 7 or later (64-bit)
For macOS 10.12 or later
● Ending Thoughts →
● I hope by now you know different software to upscale your low-quality video.
● Though this is an automatic process, you can use any software mentioned above to make your work smooth and hustle-free.
● You can access most software from any device and get output in any format with high-quality editing. This software will help you achieve the best results in your editing experience.
How to Add Text Animation Online
Before you can publish your recorded video to your viewers, you need to polish the video so that you can get everyone’s appreciation. This is where the magic of video editing comes into the scene. Editing your video is not just about trimming unnecessary parts and adding transitions and effects. The titles and texts you display on your video play a major role in your video content. In fact, you can create a video based on texts and titles only.
Instead of showing static texts, you should create animated texts and place them in the video wherever appropriate. You do not need to download a video editor on your computer or smartphone to add animated text to your video. You can make text animation online using an online text animation maker. We will illustrate the steps to create animated text with three different online editors.
Part 1. Use Biteable Animated Text
Biteable is a popular online platform where you can create amazing animated text video using Biteable text video maker. You can add animated text to your videos as well as photos. The user interface of Biteable is extremely easy for all users. You have to first create an account for free to get started. There are various templates available to create your animated text video from scratch. Here are the steps to use Biteable online text animation maker to create a video based on animated texts.
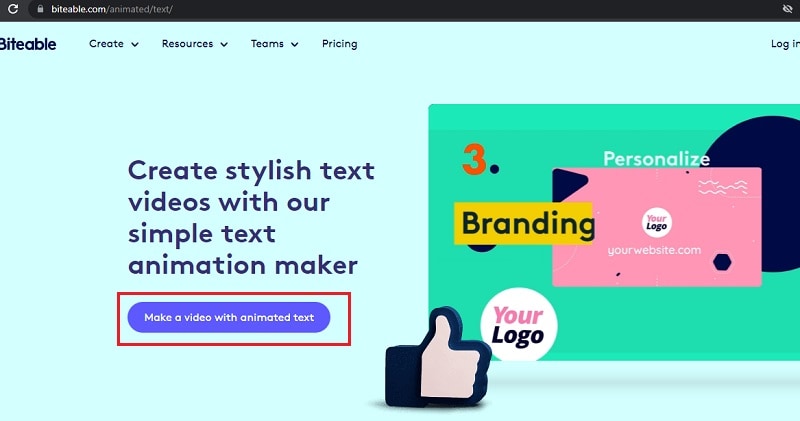
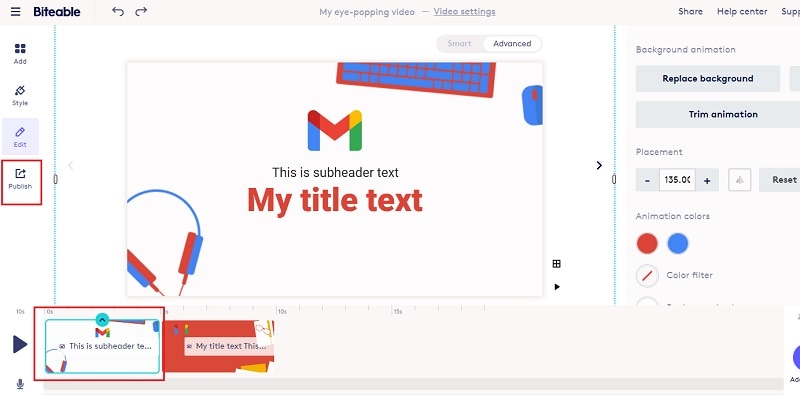
Step1Open your web browser and visit “biteable.com/animated/text”. Click on “Make a video with animated text” button.
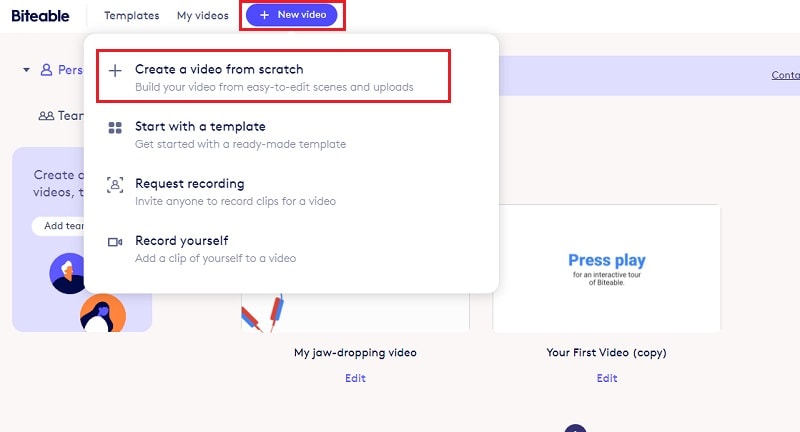
Step2Create an account by following the on-screen instructions. Click on New Video button and select “Create a video from scratch”.
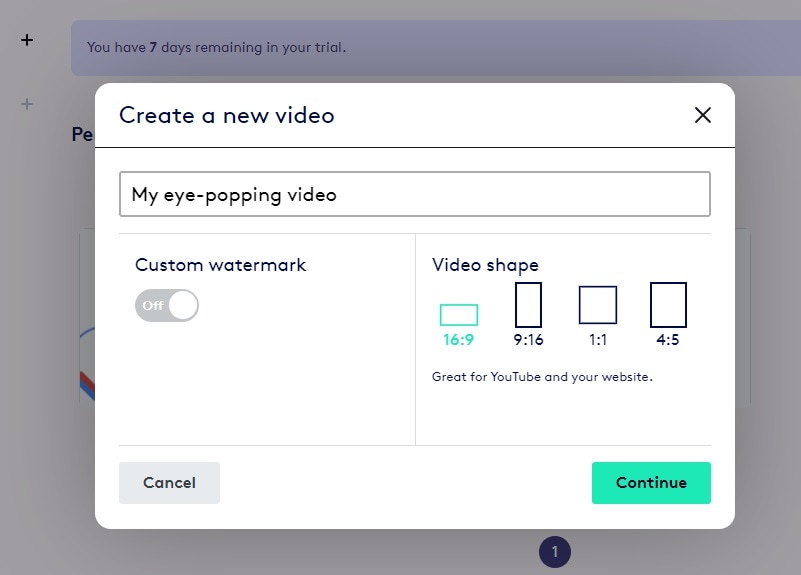
Step3Enter a name for the video and select a video shape as per your preference. Click on Continue button.
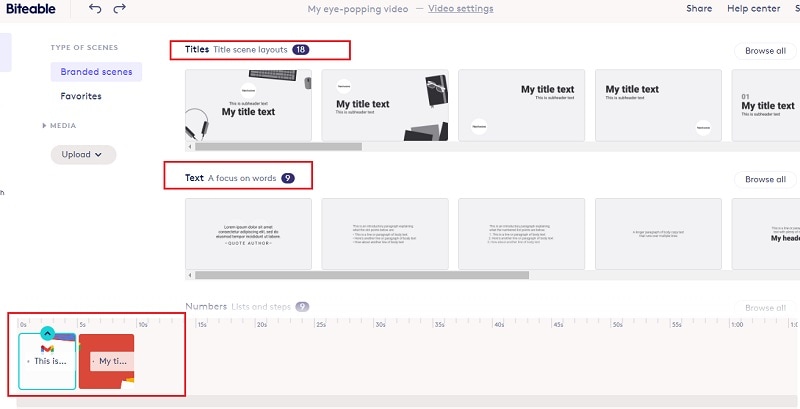
Step4Under Titles, select any template and it will be added to the Timeline. Similarly, you can add multiple titles templates, text templates, number templates and likewise. You will see them in the Timeline placed side by side. You can stretch their durations as per your requirements.
Step5Double-click on each template to edit the text in them and select the text animations as per your preference. Play the video and if you are satisfied, click on Publish button to save the video.
Part 2. Use Motionden Video Maker
Motionden is yet another powerful text animation maker where you can create free text animations instantly. There are over 1500 templates available to choose from in order to create text videos from scratch. You can choose video templates from any category as per the video theme you want. Besides, you can upload your video or photo and add texts and music as per your preference. Here are the steps to create animated text online using Motionden Video Maker.
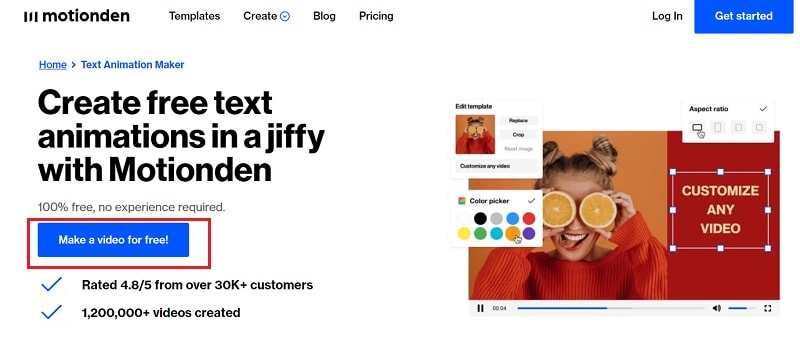
Step1Open your web browser and visit “motionden.com/video-maker/text-animation”. Click on “Make a video for free” button.
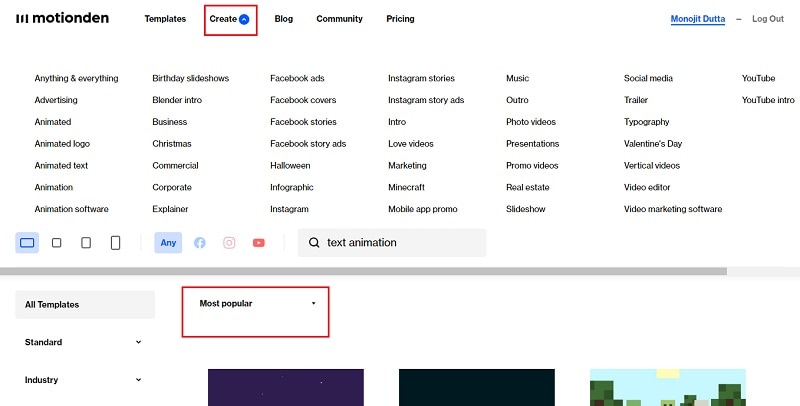
Step2Go to Create menu option and select any category of video templates. You can also check out the popular video templates and select anyone as per your preference.
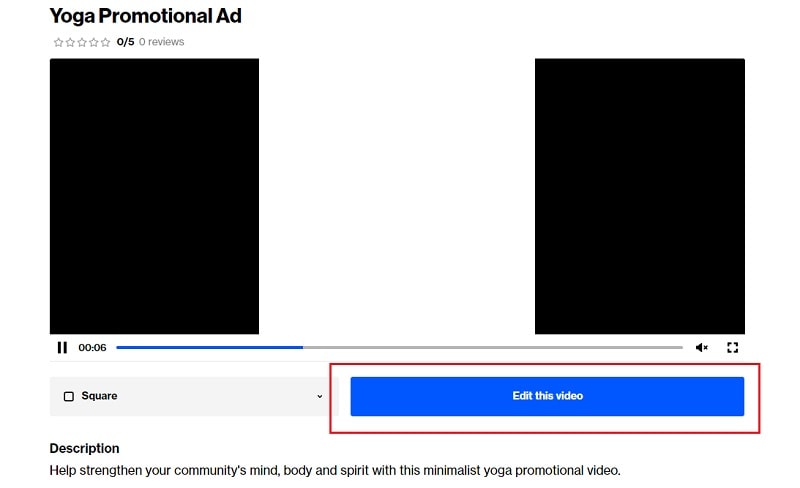
Step3For the selected category, you need to select the desired video template. Click on Edit Video and you can make changes to the template on the video editor as per your requirements. You need to sign up for free in order to continue and edit the template.
Step4Click on individual scenes and click on texts to customize them. Once the editing is done for each scene, click on Make Video button to build and save the text video.

Part 3. Use Flexclip Text Animation Tool
You can use Flexclip Text Animation Tool to create text video from scratch as well as add text to your recorded video. You should use Biteable and Motionden to create video with text effects only directly using video template while you should use Flexclip to edit your video and add text. You can add text effects to photos and videos and here are the steps to follow.
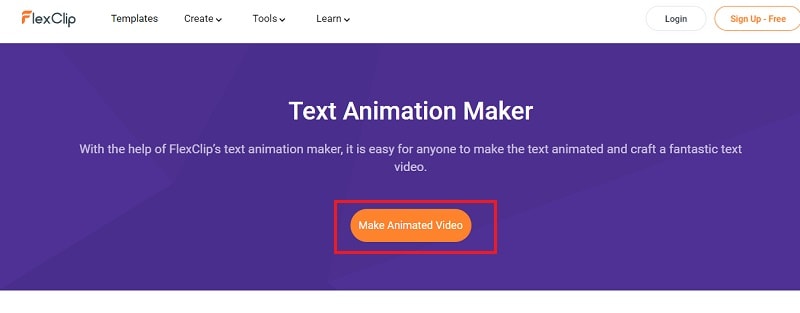
Step1Open web browser and visit “flexclip.com/features/text-animation.html”. Click on Make Animated Video button.
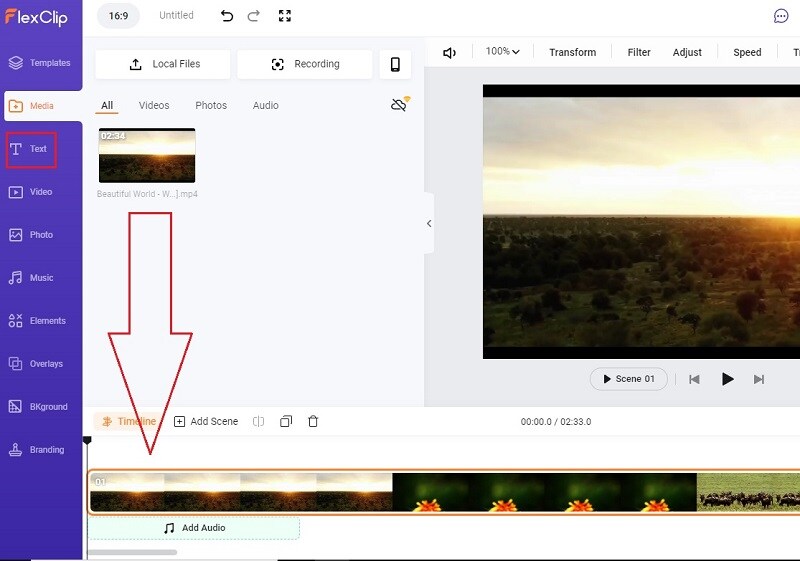
Step2You can choose from the available templates to create video with text from scratch. If you want to add text to your recorded video, go to Media tab. Click on Local Files button and upload your recorded video.

Step3Drag and drop the uploaded video into the Timeline. Thereafter, go to Text tab.
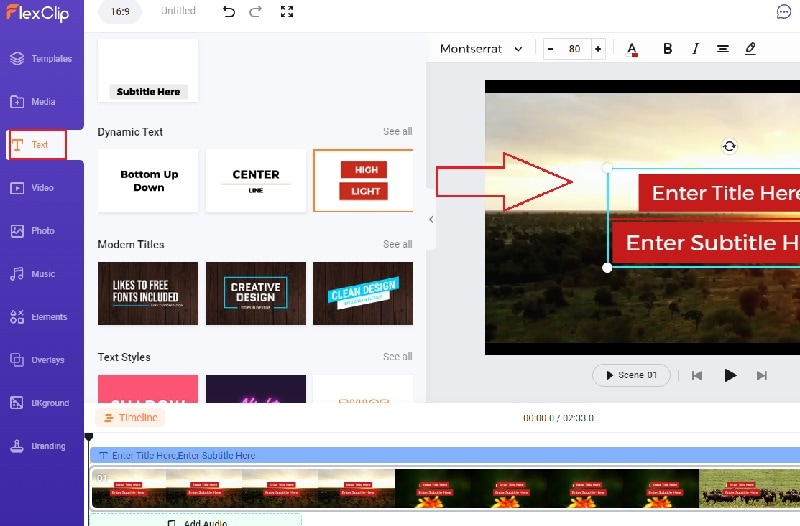
Step4You will see all the different text effects and animations. Place your mouse pointer to preview the animation. Drag and drop the select text template to the video on the Viewer. You can check the Timeline and stretch or compress the text layer as per your requirements.
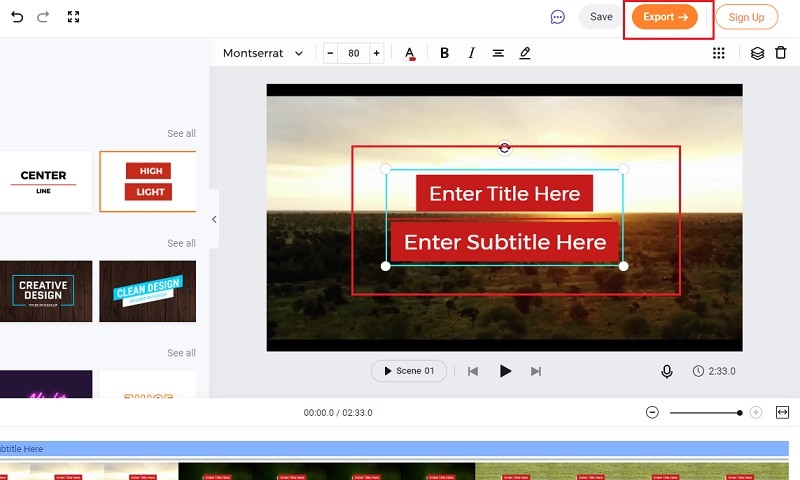
Step5Double-click on the text on Viewer window and customize the text as per your preference. Finally, click on Export button to save the edited video.
Conclusion
You can make video with animated text to make your presentation video eye-catching and attention-grabbing. We have mentioned three different online text animation makers that you can use to create animated text video from scratch by choosing different video templates. You can also edit your recorded video and add animated text wherever you want using Flexclip Text Animation Tool.
Free Download For Win 7 or later(64-bit)
Free Download For macOS 10.14 or later
Best Love Video Maker with Music
What could be more amazing than sharing a love video on a special day through social media platforms? How about showing your beloved person a special love video containing all of your special moments? Even though every lover wants to make a special video for their loved ones, the idea of creating video with knowledge scares them off. However, it is very easy these days to create a love video with a love video marker.
If you have the photos of your beautiful memories with your loved one readily available on your computer, we have the best love video maker selected for you. You are more likely to have the photos on your phone as most people use phone camera to capture photos. Therefore, we have listed the best love video maker apps with music to create amazing love videos.
Part 1. Best Love Video Maker for PC and Mac
If you are a computer user and you want to make your special love video on your computer from your photos, we recommend Wondershare Filmora. Filmora is a professional video creator and editor that is available for Windows and Mac users. But the user interface is highly intuitive so that all users can use the application without any prior experience.
You can stretch any photo according to the duration you want in the video. There are beautiful love transitions and effects available to make the video eye-catching. Most importantly, you can import any love song and add that as the background music so that the video feels truly special. Here are the steps to make a love video with Filmora.
For Win 7 or later (64-bit)
For macOS 10.12 or later
**Step 1: Install Filmora and Start Your Video Project
Download and install Wondershare Filmora. Launch Filmora and click on New Project from the welcome screen. Drag and drop your love photos into Project Media folder.
**Step 2: Arrange The Photos on Timeline
Drag and drop the imported photos on the timeline. Arrange them in proper order so that they appear perfectly on the video. You can stretch the duration of photos as per your requirements. Make sure there is no gap in between the photos on the timeline to avoid a black screen during the transition from one photo to another.

**Step 3: Add Beautiful Transition Effects
It is time to apply transition effects so that the photos change from one another with beautiful graphical effects. There are dedicated wedding and love transition effects available to select from. Drag and drop the transitions and place them on the photos one by one.

**Step 4: Add Background Music
Now, drag and drop the love song on Project Media folder that you want the video to play in the background. Drag and drop on the audio timeline below the existing timeline.

**Step 5: Export Your Video
Play the video on Filmora and make any adjustment as you think appropriate. Thereafter, click on Export button and export your video to your hard drive in your desired file format.

Part 2. Best Love Video Creator Apps
If you want to make a love video with your photos on your smartphone, here are the best love maker apps you can consider for the best result.
1. Love Video Maker with Music
Love Video Maker with Music is a popular video maker app where you can instantly make love videos from your photos and share anywhere you want. In fact, social media users prefer the app to create short videos from photos and add romantic music and publish them online. There are beautiful frames available where the photos will be featured and thereby, making the video eye-catching and engaging.
Along with frames, there are different types of romantic text styles available to write anything on the photos and frames. Moreover, you can use different love stickers to enhance the video content. The app allows creating HD quality videos and it is best for Android users. Here are the top features of Love Video Maker with Music app.
- Import as many as 60 photos for video creation.
- Includes photo editor that comes with filters and collage feature.
- Different themes, frames, and text designs available.
- Add music file and trim as per length requirements.
- Add different background effects and adjust speed.
- Square format to post on Instagram and Facebook.
2. Love Video Maker with Songs
Love Video Maker with Songs is exclusively available for iOS users. You can create romantic videos, and you will get all the options to enhance your video quality and content exactly the way you want to. You can add different transitions and animations. The app allows adding music from different sources including iTunes. You can even add your voiceover for personalization.
There are standard video editing options available such as trimming, cropping, changing speed, and much more. There is also no dearth of love stickers and frames. You can also add stylish texts and share the video directly from the app to online platforms. Here are the top features of Love Video Maker with Songs.
- Wide range of video filters and graphical effects.
- Standard video editor for trim, crop, speed change.
- Latest love stickers and frames present.
- Add music from iTunes, other videos, and voiceover.
- Set photo animation duration and stylish texts.
- Instant share on social media platforms directly from the app.
3. Love Video Maker from Microsoft
If you are for a love video maker app for your Windows 10 phone, tablet, or even computer, Love Video Maker from Microsoft is a great choice. Creating a love video from your romantic photos is super easy. Select the photos, add a theme, add background music and thereafter, add stunning filters and your video will be ready to instant saving.
The app comes with a standard photo editing tool where you can edit the photos before adding them to the video. You can blur background, add borders and frames, attach cute stickers and custom texts as per your preference. Here are the top features of Love Video Maker.
- Unlimited photos can be selected for video creation.
- Add different themes and overlay effects with filters.
- Add different borders, frames, and stickers to your photos.
- Blur background, add effects, and custom texts to your photos.
- Save and share videos on social media platforms.
Conclusion
Making love and romantic videos for personal collection as well as sharing them on social media platforms is quite a regular thing. You should have a high-quality love video maker where you should have all the different romantic video making tools and options. We have picked the best video maker for computer users as well as top love video making apps for smartphone users. We recommend Wondershare Filmora as there are unlimited effects, elements, and music for publishing best-quality love videos.
For macOS 10.12 or later
**Step 1: Install Filmora and Start Your Video Project
Download and install Wondershare Filmora. Launch Filmora and click on New Project from the welcome screen. Drag and drop your love photos into Project Media folder.
**Step 2: Arrange The Photos on Timeline
Drag and drop the imported photos on the timeline. Arrange them in proper order so that they appear perfectly on the video. You can stretch the duration of photos as per your requirements. Make sure there is no gap in between the photos on the timeline to avoid a black screen during the transition from one photo to another.
**Step 3: Add Beautiful Transition Effects
It is time to apply transition effects so that the photos change from one another with beautiful graphical effects. There are dedicated wedding and love transition effects available to select from. Drag and drop the transitions and place them on the photos one by one.
**Step 4: Add Background Music
Now, drag and drop the love song on Project Media folder that you want the video to play in the background. Drag and drop on the audio timeline below the existing timeline.
**Step 5: Export Your Video
Play the video on Filmora and make any adjustment as you think appropriate. Thereafter, click on Export button and export your video to your hard drive in your desired file format.
Part 2. Best Love Video Creator Apps
If you want to make a love video with your photos on your smartphone, here are the best love maker apps you can consider for the best result.
1. Love Video Maker with Music
Love Video Maker with Music is a popular video maker app where you can instantly make love videos from your photos and share anywhere you want. In fact, social media users prefer the app to create short videos from photos and add romantic music and publish them online. There are beautiful frames available where the photos will be featured and thereby, making the video eye-catching and engaging.
Along with frames, there are different types of romantic text styles available to write anything on the photos and frames. Moreover, you can use different love stickers to enhance the video content. The app allows creating HD quality videos and it is best for Android users. Here are the top features of Love Video Maker with Music app.
- Import as many as 60 photos for video creation.
- Includes photo editor that comes with filters and collage feature.
- Different themes, frames, and text designs available.
- Add music file and trim as per length requirements.
- Add different background effects and adjust speed.
- Square format to post on Instagram and Facebook.
2. Love Video Maker with Songs
Love Video Maker with Songs is exclusively available for iOS users. You can create romantic videos, and you will get all the options to enhance your video quality and content exactly the way you want to. You can add different transitions and animations. The app allows adding music from different sources including iTunes. You can even add your voiceover for personalization.
There are standard video editing options available such as trimming, cropping, changing speed, and much more. There is also no dearth of love stickers and frames. You can also add stylish texts and share the video directly from the app to online platforms. Here are the top features of Love Video Maker with Songs.
- Wide range of video filters and graphical effects.
- Standard video editor for trim, crop, speed change.
- Latest love stickers and frames present.
- Add music from iTunes, other videos, and voiceover.
- Set photo animation duration and stylish texts.
- Instant share on social media platforms directly from the app.
3. Love Video Maker from Microsoft
If you are for a love video maker app for your Windows 10 phone, tablet, or even computer, Love Video Maker from Microsoft is a great choice. Creating a love video from your romantic photos is super easy. Select the photos, add a theme, add background music and thereafter, add stunning filters and your video will be ready to instant saving.
The app comes with a standard photo editing tool where you can edit the photos before adding them to the video. You can blur background, add borders and frames, attach cute stickers and custom texts as per your preference. Here are the top features of Love Video Maker.
- Unlimited photos can be selected for video creation.
- Add different themes and overlay effects with filters.
- Add different borders, frames, and stickers to your photos.
- Blur background, add effects, and custom texts to your photos.
- Save and share videos on social media platforms.
Conclusion
Making love and romantic videos for personal collection as well as sharing them on social media platforms is quite a regular thing. You should have a high-quality love video maker where you should have all the different romantic video making tools and options. We have picked the best video maker for computer users as well as top love video making apps for smartphone users. We recommend Wondershare Filmora as there are unlimited effects, elements, and music for publishing best-quality love videos.
The Complete Guide to Zoho Slides with Ease
The Complete Guide to Zoho Slides with Ease
An easy yet powerful editor
Numerous effects to choose from
Detailed tutorials provided by the official channel
In this blog, we are going to provide you with detailed information about Zoho Show. If you have any confusion about using this tool, then this blog will help you.
Here, you will get a complete guide right from how to use Zoho slides, what it is used for, and all the other important and relevant information related to the tool.
In this article
01 [What is Zoho Slides?](#Part 1)
02 [What is Zoho Slides Used For?](#Part 2)
03 [What are the Disadvantages of Zoho Slides?](#Part 3)
04 [How to Create Slideshow with Zoho Slides?](#Part 4)
05 [Zoho Slides Q&A](#Part 5)
Part 1 What is Zoho Slides?
Zoho show is a powerful tool used by enterprises these days. It is an online presentation software providing real-time collaboration features. It is a great tool for modern teams that lets them collaborate and present easily while working remotely. The tool is the smarter way of creating, editing, accessing, and broadcasting visually engaging presentations. The slides in which these presentations are made are known as Zoho slides.
One can use the tool anytime and from anywhere using even mobile phones. It is supported by all the iOS and Android devices. The users can use the Zoho Show to communicate, convince, and convey, from any place whether it is in an event hall, conference hall, meeting room or classroom.
Key Features of Zoho Show:
● A contextual interface that responds faster.
● One easy place for inserting eye-catching graphics.
● Explore newer and deeper formatting effects.
● Spice up stories with amazing animations.
● Enhanced PowerPOint compatibility.
● Share and collaborate in real-time.
● Future of presenting.
Other important features of Zoho slides include:
Check-in/ check-out, Zoho docs integration, embedding gadgets, locking feature, presentation link sharing, import and export, social media sharing, presentation publishing, collaboration notifications, presenter view, shared presentations, remote broadcasting, smart guides, slide orientation, animation and transition effects, video web search, texts, image library, image web search, image editing, images and videos, shapes and layouts, flowcharts and diagrams, and master slide.
Part 2 What is Zoho Slides Used For?
Zoho shows are used to create meaningful presentations and slides by individuals or teams. You can create engaging Zoho slides by using the all-new Zoho show tool.
01Get a head start with a premade theme
The tool provides access to 20+ themes and 100+ fonts. Also, the user will be able to customize their own template. You can pick any template, theme, or font according to the requirements and make your presentation more appealing.
02One stop for all your presentation needs
Visually organize and modify the data by using the wide variety of tools available under the app. Such tools include tables, charts, shapes, and text boxes, all within a single platform. There are also the options of adding visuals to the slides available. The visuals include images, videos, tweets, etc.
03Bring in your PowerPoint files
The tool allows you to import PowerPoint files and work on them online. The advanced formatting options of Zoho Slides will let you create memorable stories by adding slides and enhancing the presentation further.
04Emphasize content
Keep the content more attentive which can be done by making the information stand out. Also, it can be done by adding reflections, filling key points or titles with solid patterns of colors, and adding strokes to text.
05Alter shapes to your imagination
Play with the shapes to give a visual look to your ideas or imagination. Alter shapes to create something that excites the viewers.
06Polish images to perfection
Do the formatting of the images so that they can become the reflection of your ideas. Reduce opacity to match up with the background, bring the best in the images by cropping the irrelevant elements, and add a tinch of colors with the help of the filter option.
07Reinforce your data with charts
Visually appealing charts can make your data look more creative. For this, you can pick up a premade layout complementing the data, animate parts of the charts, and give an appropriate style to each of the elements to provide it with the desired look.
08Invite your team onboard
The tool enables real time sharing of slides with the team members both internally and externally. The collaborators are allowed to view, comment or edit the slides. The user of the slide have control on the features that each collaborator can have to access on the slide.
Part 3 What are the Disadvantages of Zoho Slides?
Here, we will be mentioning some of the disadvantages of using Zoho Show Slides for creating presentations:
1). Although Zoho Show is free, to enable multiple users or big companies to use it efficiently, they need to pay. With the paid version, the user will get access to a bigger account.
2). When compared to the leading presentation giant “Powerpoint”, Zoho has fewer features.
3). Each presentation which gets uploaded on the software should not exceed the limit of 30 MB. In simple words, the user is unable to upload the larger files.
4). It does not actually provide the collaborative feature as only one user can edit the presentation at a time.
5). The software is lacking the transitional effects that the user needs to use between 2 slides.
6). The user does not have access to the animation option to be used in the presentation.
7). One cannot save the presentations as .ppt or .pptx.
Part 4 How to Create Slideshow with Zoho Slides?
Creating slideshows using Zoho slides contains certain steps which we are going to discuss below:
Step 1. Visit Zoho Show and open your workspace. Find the “Slideshow” option under the “Settings” icon.

Or you can jump to the “Slideshows” option by following “Settings” and then “Share” from the required view.
Step 2). You will get the Manage slideshows page. Tap on the option “Create Slideshow” from there.
Step 3). Then, you are required to fill in the asked details, such as

● Give a name to the slideshow.
● In the “Access Permission” option, mention whether the slideshow will be accessed with or without permission.
● From the “Select Views” option, click on the views that will be part of the slideshow. The views selected by the users will appear on the right side. Drag the view names to rearrange them and make them fit in the required order.
● From the “Choose Slideshow Type” section, click on the “Basic Slideshow” option. In case you want to prepare compelling analytical stories using our presentation service, click on the “Advanced Slideshow” option.
Step 4). Click on the “Next” button. The “Copy URL” page will appear. The following tasks can be performed from there:

● The “Slideshow Preview” section will enable you to preview the slideshow.
● The “Slide Interval” option will help you to set the duration of the interval between two slides.
● The “Autoplay the Slideshow” option will let you play the show automatically.
● The “Include Title” and “Include Description” options will let you add the title and description to the slideshow.
● With the “Social Widgets” option, you can opt to share the show on your social handles.
Step 5). Tap on “Close”.
The URL can be accessed in the browser after the slideshow is created completely. With this, the slideshow will get opened on the screen as shown in the below image.

The options on the toolbar will appear displaying options such as play/pause, change slide interval, set to full screen, and navigate to previous, next, or specific view in the list when you move the mouse.
Part 5 Zoho Slides Q&A
01Q. Is the Zoho Show free?
Ans. Zoho Show is not completely free. But, it offers a free version for trial for a limited period of time. To use it more widely and to access more features of the tool, you need to purchase it.
02Q. How do I make a presentation slide?
Ans. One can create presentation slides using tools such as Powerpoint, Zoho, etc. Wondershare Filmora Go is also a very effective tool to prepare presentation slideshows. There are many features which let the user make their slides effective and impressive for the viewers.
The steps included in making presentation slides using Wondershare Filmora Video Editor are:
Step 1). Create your project.
Step 2). Upload your media.
Step 3). Organize your media.
Step 4). Create your timeline.
Step 5). Start adding visual effects.
Step 6). Review your content.
For Win 7 or later (64-bit)
For macOS 10.12 or later
03Q. What is the 6 by 6 rule for a presentation?
Ans. A 6 by 6 rule in a presentation should contain the following:
● idea per slide.
● A maximum of 6 points in each slide.
● Each bullet point should have not more than 6 words.
● A maximum of 6 bullet points per slide.
04Q. Is the Zoho office suite free?
Ans. The Zoho tool mostly works in online mode. But, some of the features of Zoho CRM’s mobile edition lets the user work in the offline mode too. These features include adding, modifying, or deleting records, which will then be saved when the device is connected to the Internet.
05Q. Is Zoho SaaS or PAAS?
Ans. Zoho is a SaaS provider.
● Ending Thoughts →
● I hope you have got all the needed information required to use the Zoho Show tool. Zoho is a good software to some extent to create presentations.
● One can make creative Zoho slides by using the tool. Creating slideshows with the software is also pretty easy. But there are some disadvantages or limitations to preparing slideshows on the Zoho platform.
● Due to that, Filmora is the more lively tool for the purpose. You can create wonderful slideshows by accessing a lot more features. The tool enables users to create personal or professional slideshows with a lot of ease.
In this blog, we are going to provide you with detailed information about Zoho Show. If you have any confusion about using this tool, then this blog will help you.
Here, you will get a complete guide right from how to use Zoho slides, what it is used for, and all the other important and relevant information related to the tool.
In this article
01 [What is Zoho Slides?](#Part 1)
02 [What is Zoho Slides Used For?](#Part 2)
03 [What are the Disadvantages of Zoho Slides?](#Part 3)
04 [How to Create Slideshow with Zoho Slides?](#Part 4)
05 [Zoho Slides Q&A](#Part 5)
Part 1 What is Zoho Slides?
Zoho show is a powerful tool used by enterprises these days. It is an online presentation software providing real-time collaboration features. It is a great tool for modern teams that lets them collaborate and present easily while working remotely. The tool is the smarter way of creating, editing, accessing, and broadcasting visually engaging presentations. The slides in which these presentations are made are known as Zoho slides.
One can use the tool anytime and from anywhere using even mobile phones. It is supported by all the iOS and Android devices. The users can use the Zoho Show to communicate, convince, and convey, from any place whether it is in an event hall, conference hall, meeting room or classroom.
Key Features of Zoho Show:
● A contextual interface that responds faster.
● One easy place for inserting eye-catching graphics.
● Explore newer and deeper formatting effects.
● Spice up stories with amazing animations.
● Enhanced PowerPOint compatibility.
● Share and collaborate in real-time.
● Future of presenting.
Other important features of Zoho slides include:
Check-in/ check-out, Zoho docs integration, embedding gadgets, locking feature, presentation link sharing, import and export, social media sharing, presentation publishing, collaboration notifications, presenter view, shared presentations, remote broadcasting, smart guides, slide orientation, animation and transition effects, video web search, texts, image library, image web search, image editing, images and videos, shapes and layouts, flowcharts and diagrams, and master slide.
Part 2 What is Zoho Slides Used For?
Zoho shows are used to create meaningful presentations and slides by individuals or teams. You can create engaging Zoho slides by using the all-new Zoho show tool.
01Get a head start with a premade theme
The tool provides access to 20+ themes and 100+ fonts. Also, the user will be able to customize their own template. You can pick any template, theme, or font according to the requirements and make your presentation more appealing.
02One stop for all your presentation needs
Visually organize and modify the data by using the wide variety of tools available under the app. Such tools include tables, charts, shapes, and text boxes, all within a single platform. There are also the options of adding visuals to the slides available. The visuals include images, videos, tweets, etc.
03Bring in your PowerPoint files
The tool allows you to import PowerPoint files and work on them online. The advanced formatting options of Zoho Slides will let you create memorable stories by adding slides and enhancing the presentation further.
04Emphasize content
Keep the content more attentive which can be done by making the information stand out. Also, it can be done by adding reflections, filling key points or titles with solid patterns of colors, and adding strokes to text.
05Alter shapes to your imagination
Play with the shapes to give a visual look to your ideas or imagination. Alter shapes to create something that excites the viewers.
06Polish images to perfection
Do the formatting of the images so that they can become the reflection of your ideas. Reduce opacity to match up with the background, bring the best in the images by cropping the irrelevant elements, and add a tinch of colors with the help of the filter option.
07Reinforce your data with charts
Visually appealing charts can make your data look more creative. For this, you can pick up a premade layout complementing the data, animate parts of the charts, and give an appropriate style to each of the elements to provide it with the desired look.
08Invite your team onboard
The tool enables real time sharing of slides with the team members both internally and externally. The collaborators are allowed to view, comment or edit the slides. The user of the slide have control on the features that each collaborator can have to access on the slide.
Part 3 What are the Disadvantages of Zoho Slides?
Here, we will be mentioning some of the disadvantages of using Zoho Show Slides for creating presentations:
1). Although Zoho Show is free, to enable multiple users or big companies to use it efficiently, they need to pay. With the paid version, the user will get access to a bigger account.
2). When compared to the leading presentation giant “Powerpoint”, Zoho has fewer features.
3). Each presentation which gets uploaded on the software should not exceed the limit of 30 MB. In simple words, the user is unable to upload the larger files.
4). It does not actually provide the collaborative feature as only one user can edit the presentation at a time.
5). The software is lacking the transitional effects that the user needs to use between 2 slides.
6). The user does not have access to the animation option to be used in the presentation.
7). One cannot save the presentations as .ppt or .pptx.
Part 4 How to Create Slideshow with Zoho Slides?
Creating slideshows using Zoho slides contains certain steps which we are going to discuss below:
Step 1. Visit Zoho Show and open your workspace. Find the “Slideshow” option under the “Settings” icon.
Or you can jump to the “Slideshows” option by following “Settings” and then “Share” from the required view.
Step 2). You will get the Manage slideshows page. Tap on the option “Create Slideshow” from there.
Step 3). Then, you are required to fill in the asked details, such as
● Give a name to the slideshow.
● In the “Access Permission” option, mention whether the slideshow will be accessed with or without permission.
● From the “Select Views” option, click on the views that will be part of the slideshow. The views selected by the users will appear on the right side. Drag the view names to rearrange them and make them fit in the required order.
● From the “Choose Slideshow Type” section, click on the “Basic Slideshow” option. In case you want to prepare compelling analytical stories using our presentation service, click on the “Advanced Slideshow” option.
Step 4). Click on the “Next” button. The “Copy URL” page will appear. The following tasks can be performed from there:
● The “Slideshow Preview” section will enable you to preview the slideshow.
● The “Slide Interval” option will help you to set the duration of the interval between two slides.
● The “Autoplay the Slideshow” option will let you play the show automatically.
● The “Include Title” and “Include Description” options will let you add the title and description to the slideshow.
● With the “Social Widgets” option, you can opt to share the show on your social handles.
Step 5). Tap on “Close”.
The URL can be accessed in the browser after the slideshow is created completely. With this, the slideshow will get opened on the screen as shown in the below image.
The options on the toolbar will appear displaying options such as play/pause, change slide interval, set to full screen, and navigate to previous, next, or specific view in the list when you move the mouse.
Part 5 Zoho Slides Q&A
01Q. Is the Zoho Show free?
Ans. Zoho Show is not completely free. But, it offers a free version for trial for a limited period of time. To use it more widely and to access more features of the tool, you need to purchase it.
02Q. How do I make a presentation slide?
Ans. One can create presentation slides using tools such as Powerpoint, Zoho, etc. Wondershare Filmora Go is also a very effective tool to prepare presentation slideshows. There are many features which let the user make their slides effective and impressive for the viewers.
The steps included in making presentation slides using Wondershare Filmora Video Editor are:
Step 1). Create your project.
Step 2). Upload your media.
Step 3). Organize your media.
Step 4). Create your timeline.
Step 5). Start adding visual effects.
Step 6). Review your content.
For Win 7 or later (64-bit)
For macOS 10.12 or later
03Q. What is the 6 by 6 rule for a presentation?
Ans. A 6 by 6 rule in a presentation should contain the following:
● idea per slide.
● A maximum of 6 points in each slide.
● Each bullet point should have not more than 6 words.
● A maximum of 6 bullet points per slide.
04Q. Is the Zoho office suite free?
Ans. The Zoho tool mostly works in online mode. But, some of the features of Zoho CRM’s mobile edition lets the user work in the offline mode too. These features include adding, modifying, or deleting records, which will then be saved when the device is connected to the Internet.
05Q. Is Zoho SaaS or PAAS?
Ans. Zoho is a SaaS provider.
● Ending Thoughts →
● I hope you have got all the needed information required to use the Zoho Show tool. Zoho is a good software to some extent to create presentations.
● One can make creative Zoho slides by using the tool. Creating slideshows with the software is also pretty easy. But there are some disadvantages or limitations to preparing slideshows on the Zoho platform.
● Due to that, Filmora is the more lively tool for the purpose. You can create wonderful slideshows by accessing a lot more features. The tool enables users to create personal or professional slideshows with a lot of ease.
Also read:
- Updated In 2024, Ways to Find Free Online Slideshow Maker with No Watermark
- Creating Motivational Videos with AI Comprehensive Guide 2024
- New Wondering How to Replace Sky in After Effects? Learn How for 2024
- New In 2024, Do You Need to Create a Video for Your Business Online but Feel You Do Not Have the Skill and Time to Do That? Try Out These AI Video Generators that Will Work for You to Carry Out Tasks Effectively
- Updated How to Add VHS Effects to Videos for Free 2024
- Updated 2024 Approved Looking For a Cheap Camera to Make Slow Motion Video? Get It Now
- Updated In 2024, Funny Content Ideas for YouTube Videos and Funny Music Background
- Updated Top 10 Sony LUT for Different Purposes
- So, without Wasting Time, Let Me Show You How to Mask a Video in Wondershare Filmora. Lets Get Started for 2024
- 2024 Approved How to Create a Custom Slide Show in PowerPoint
- New How Long Does It Take To Edit A Video for 2024
- New What Is the Best MP4 Cutters for YouTubers on Mac?
- New How to Reduce the Size of Video Files Online? In This Article, Well Share the Top 10 Free Online Video Compressors that You Can Use Anywhere at Any Time and on Any Device for 2024
- Updated Using Track Matte and Tracking in Adobe After Effects Reviewing All Possibilities for 2024
- How to Make Video Slow Motion for 2024
- New Create Your Face Zoom TikTok Now for 2024
- How To Use Virtual Green Screen to Shoot Video
- New How To Record Video in Slow Motion Comprehending Important Points for 2024
- Updated How to Create a Bokeh Effect
- Are You Seeking an Answer for What Is a LUT in the Video? In This Article, We Will Provide You with Detailed Information About LUTs and Their Utility
- Do You Want to Know How to Add LUTs to Premiere Pro? In This Guide, You Will Find Details and Easy Steps to Proceed with Using LUTs in Premiere Pro for 2024
- New Phone Aspect Ratio Vertical Definition, Types & Tips for 2024
- Updated 2024 Approved Learn to Create Custom Sequence Presets in Premiere Pro for Efficient Video Editing. Ensure Consistency and Speed up Your Workflow with Personalized Settings
- New Are You Looking for Funny Discord Emojis to Massively Improve Your Discord Experience? Using some Fun Bots for Discord Is an Excellent Way of Doing That! Thus, We Compiled a List of 10 Fun Discord Bots You Need for 2024
- New 2024 Approved Multi Object Tracking The Ultimate Guide
- 2024 Approved How to Create Vintage Film Effect 1920S
- Updated How to Build A Video Editing Career for 2024
- New In 2024, How to Do Masking in After Effects Alternative Provided
- Updated In 2024, Guide To Make a YouTube Intro by Filmora
- New If You Want to Record Video Streams on Windows or Mac Using FFmpeg, Read Our Guide and Learn How to Do This with Easy Step-by-Step Instructions for 2024
- The Best Cinematic LUTs in The Market
- New In 2024, Looking for Efficient Ways to Create a Slow-Motion Video? Read the Article for Reliable Solutions that Provide Excellent Results
- Updated What Slideshow Templates Can Teach You About Aesthetic
- 10 Best Meme Text to Speech Tools Windows, Mac, Android, iPhone
- Updated 2024 Approved How to Change Video Thumbnail on Google Drive
- New Do You Wish to Create High-Quality Videos and Experience Effective Videos with Editing? No Problem at All because the Keyboard Shortcuts Listed Here Will Assist You for 2024
- Updated In 2024, Looking for a Way to Edit Your Profile Picture for Telegram? Heres an Easy and Quick Guide on How to Change, Delete and Hide Your Profile Picture with Simple Steps
- Updated 2024 Approved Learn More About the Video Editing Interface of Wondershare Filmora
- Updated In 2024, Mastering the Art of Video Framing
- Updated In 2024, Replacing the Sky in Adobe After Effects An Extensive Guide
- Polish and Enshrine Your Music Videos with the Best Editing Software, Filmora. Add Cuts to Your Beat, Light Leaks, and Much More
- Updated In 2024, Separate Audio From Video in DaVinci Resolve Step by Step
- Being a Content Creator Means Creating a Slow-Mo at some Point. Study This Piece to Learn How to Play a Video in Slow Motion on iPhone
- Updated Know How to Create OBS Slideshow. Creating OBS Slideshow in Simple Steps; Application for Creating OBS Slideshow. Make OBS Slideshow Online for 2024
- Split Audio From a Video in Adobe Premiere Pro Step by Step
- How to Unlock Infinix GT 10 Pro Phone with Broken Screen
- Full Guide on Mirroring Your Oppo A18 to Your PC/Mac | Dr.fone
- In 2024, 5 Ways to Move Contacts From Vivo Y200e 5G to iPhone (13/14/15) | Dr.fone
- In 2024, 10 Fake GPS Location Apps on Android Of your OnePlus 12 | Dr.fone
- In 2024, Is Fake GPS Location Spoofer a Good Choice On Lava Yuva 2? | Dr.fone
- PassFab iPhone 11 Pro Backup Unlocker Top 4 Alternatives
- A Comprehensive Guide to iCloud Unlock From iPhone 11 Online
- In 2024, Delete Gmail Account With/Without Password On Vivo T2 5G
- In 2024, What Does Jailbreaking Apple iPhone 15 Plus i Do? Get Answers here | Dr.fone
- In 2024, Why does the pokemon go battle league not available On Apple iPhone 6 | Dr.fone
- 7 Ways to Unlock a Locked OnePlus Open Phone
- Top 7 iCloud Activation Bypass Tools For your Apple iPhone 8 Plus
- How PGSharp Save You from Ban While Spoofing Pokemon Go On Apple iPhone XR? | Dr.fone
- App Wont Open on Your Lenovo ThinkPhone? Here Are All Fixes | Dr.fone
- 10 Easy-to-Use FRP Bypass Tools for Unlocking Google Accounts On Tecno Spark 10C
- iSpoofer is not working On Honor Magic 6? Fixed | Dr.fone
- MKV playback issues on Motorola
- Does Life360 Notify When You Log Out On Apple iPhone 12 mini? | Dr.fone
- Undelete lost pictures from Nokia C110.
- Easy steps to recover deleted videos from ZTE Nubia Z60 Ultra
- In 2024, Disabling iPhone XS Max Parental Restrictions With/Without Password | Dr.fone
- 2024 Approved Best Hatsune Miku AI Voice Generators for All Times
- The Best 8 VPN Hardware Devices Reviewed On Samsung Galaxy F34 5G | Dr.fone
- In 2024, Why does the pokemon go battle league not available On Xiaomi Redmi Note 12 4G | Dr.fone
- In 2024, 4 Ways to Transfer Music from Nokia 130 Music to iPhone | Dr.fone
- 8 Safe and Effective Methods to Unlock Your Apple iPhone 6 Plus Without a Passcode | Dr.fone
- Hassle-Free Ways to Remove FRP Lock on OnePlus Ace 2with/without a PC
- New In 2024, How to Create Free Photo Collage Frame in Minutes?
- Stuck at Android System Recovery Of Oppo Reno 10 5G ? Fix It Easily | Dr.fone
- In 2024, About Oppo Find N3 Flip FRP Bypass
- How To Revive Your Bricked Realme V30 in Minutes | Dr.fone
- 4 Effective Methods Fake GPS Location on Apple iPhone 6s/iPad | Dr.fone
- In 2024, Process of Screen Sharing Xiaomi Redmi Note 12T Pro to PC- Detailed Steps | Dr.fone
- How PGSharp Save You from Ban While Spoofing Pokemon Go On Lava Blaze Curve 5G? | Dr.fone
- Recover your photos after Motorola Edge+ (2023) has been deleted.
- Unlocking iPhone 7 Passcode without a Computer | Dr.fone
- Sony Messages Recovery - Recover Deleted Messages from Sony
- In 2024, How to Erase an Apple iPhone 15 Pro without Apple ID?
- CatchEmAll Celebrate National Pokémon Day with Virtual Location On Realme C53 | Dr.fone
- In 2024, Why Your WhatsApp Location is Not Updating and How to Fix On Vivo X Fold 2 | Dr.fone
- How to Digitally Sign Excel 2000 online free - (Tutorial)
- Title: New 2024 Approved Sometimes It May Happen to You that You Are Watching a Video that Has Very Low Graphics or, in Other Words, Low Visual Quality. You Might Wish to Change, Instead Improve the Video Quality. Here, AI Upscaling Video Comes to Use
- Author: Morgan
- Created at : 2024-04-24 01:11:05
- Updated at : 2024-04-25 01:11:05
- Link: https://ai-video-editing.techidaily.com/new-2024-approved-sometimes-it-may-happen-to-you-that-you-are-watching-a-video-that-has-very-low-graphics-or-in-other-words-low-visual-quality-you-might-wis/
- License: This work is licensed under CC BY-NC-SA 4.0.
