

New 2024 Approved Stunning Glitch Effect and Its Creation Steps for Premiere Pro
Stunning Glitch Effect and Its Creation Steps for Premiere Pro
Glitch means errors and malfunction in the footage in software, games, videos, images, and audio. Presently, creative professionals are intentionally adding the glitch effect to their work to give a unique vibe to it. The effect appears as the pixels glitch organically, appearing to melt or duplicate onto the next scene.
The article takes Adobe Premiere Pro under consideration. First, glitch effect Premiere templates and then the step-by-step guide to add glitch transition Premiere Pro would be discussed. Time to begin!
In this article
01 Part 1: 8 Amazing Glitch Effect for Premiere Pro
02 Part 2: How Do You Do the Glitch Effect in Premiere Pro?
Part 1: 8 Amazing Glitch Effect for Premiere Pro
There are extensive websites in business that offer amazing templates to add glitch effects to your video. The subsection of this article shall come up with eight workable VHS effect Premiere, which would be perfectly compatible with Premiere Pro. These VHS effect Premiere Pro are HD quality, which means you do not have to worry about the output. So, let us start! Shall we?
The first VHS overlay Premiere is Digital Glitch Transitions. Envato Elements offers 20 glitch transitions that can be used in different video themes. The HD resolution of this distortion effect Premiere Pro is 1920x1080. There are noise effects as well.

Glitch Slideshow is another amazing glitch effect Premiere Pro free introduced by Envato Elements. If you are a photographer or a film director, this glitch transition Premiere gives you what you need. The HD resolution is offered, and no plugins are required.

3. Venus
Venus is the perfect choice to add an Adobe Premiere VHS effect by offering an adjustable duration of the video with effortless customization. The template is highly famous among YouTubers and content creators to leave a long-lasting impact on the audience via glitchy titles and effects.

Presenting another Premiere Pro template, Fast Glitch Transitions is a ready-to-use template. It offers ten fast-tracked transitions that add value to the project. Moreover, it brings versatile colors to the video with the glitches. This Premiere VHS effect is perfect for intros and travel videos.

Allow me to introduce you to another new and stylish static effect Premiere Pro known as Glitch Multiframe Opener. It is a dynamic template that needs no plugins. Be free to use the template for commercials, Facebook video openers, and teasers. Moreover, photos and videos can be added to make the glitch workable.

Glitch Urban Opener is an impeccable glitch effect for Premiere Pro, presenting trendy and creative designs. It brings smooth transitions to the video with 17 editable layers, 11 media holders, and one logo placeholder. All of these options make this VHS filter Premiereeasily customizable and operatable.

Another retro effect Premiere Pro from Motion Elements is 30 Glitch Transitions. The media industry uses this template to insert different glitch effects into the video and make it eye-catching for everyone. The effects are styled with interference, bad TV, distortions, VHS noise, and other fatal errors.

Last but not the least, Glitch Transitions can be counted upon to act as the best Adobe Premiere glitch effect. There are three transitions for different themes. The color controls help manage the video editing more effectively. Moreover, the templates offer horizontal and vertical directions to work better.

Part 2: How Do You Do the Glitch Effect in Premiere Pro?
Are you a Premiere Pro user? Do you need to add the Premiere glitch transition to the video? Worry no more! Follow this subsection vividly. Would you?
Adobe Premiere Pro is a video editing software that has got you covered. You can enhance the speed of the video to tell your story better and share the vision. With Premiere Pro in the frame, you can shift the colors, insert graphics and titles, and give a unique music effect to the video. All in one platform, a dream come true, don’t you agree?
If you want to perform a Premiere Pro VHS effect, allow us to walk you through the process. It is highly recommended that you follow the guide carefully to have desirable results. So, what are we waiting for? Time to start, right?
Step 1: Importing the Targeted Video
To begin the process, open Adobe Premiere Pro on your system. Import the targeted footage and drag it to the timeline. After the video is added, head to the “Effects” panel on the left side of the interface.

Step 2: Launching the VR Digital Glitch
Type away glitch in the search bar. The user will find VR Digital Glitch in the results. Drag the effect to the clip on the timeline. Now, it is time to navigate to the “Effect Controls.”

Step 3: Changing the Distortion Control
Scroll down to find “Distortion” in the controls and expand it. The user is suggested to increase the color distortion to give an RGB effect to the footage. After that, you should reduce the distortion rate to 0 so that different artifacts can be eliminated effortlessly.

Step 4: Changing the Noise Strength
Moving on, expand the “Noise” control section and increase the noise strength. It will give the footage a significant level of graininess.

Step 5: Animating the Glitch Effect
To animate the glitch, use the playhead on the top and drag it to the first position where the effect should start from. Hit the stopwatch located on the left of “Master Amplitude.” It will create a keyframe. Alter the “Master Amplitude” to 0 as we do not want the clip to begin with a glitch.

Step 6: Playing with the Playhead
Now, use your keyboard’s right arrow to move the playhead three frames forward. After that, set the “Master Amplitude” to 100. Again, move the playhead three frames forward and set the “Master Amplitude” to 0. The animation is produced on the RGB color distortion.

Step 7: Positioning the Video
Move back to the first keyframe and head to the top that shows “Scale” settings. Enhance the scale value so that the video position can be leveled. Click on the stopwatch next to “Position” to create a keyframe. Move the playhead one frame forward and adjust the position of the frame.

Step 8: Final Process
Again, move the playhead to the next frame and click on the “Reset” shaped icon to reset the position of the video. Move another frame forward and reposition the video. You can do this multiple times to give a glitchy effect to the clip. There you go! It is all done.

Conclusion
A raw video doesn’t send the message as the user wants. For this, creative professionals need to give some effects to the video, such as glitch effect Premiere. The article highlighted some famous glitch effects which were perfectly compatible with Adobe Premiere Pro. The whole procedure to add the Adobe Premiere glitch effect was also the crux of this write-up.
02 Part 2: How Do You Do the Glitch Effect in Premiere Pro?
Part 1: 8 Amazing Glitch Effect for Premiere Pro
There are extensive websites in business that offer amazing templates to add glitch effects to your video. The subsection of this article shall come up with eight workable VHS effect Premiere, which would be perfectly compatible with Premiere Pro. These VHS effect Premiere Pro are HD quality, which means you do not have to worry about the output. So, let us start! Shall we?
The first VHS overlay Premiere is Digital Glitch Transitions. Envato Elements offers 20 glitch transitions that can be used in different video themes. The HD resolution of this distortion effect Premiere Pro is 1920x1080. There are noise effects as well.
Glitch Slideshow is another amazing glitch effect Premiere Pro free introduced by Envato Elements. If you are a photographer or a film director, this glitch transition Premiere gives you what you need. The HD resolution is offered, and no plugins are required.
3. Venus
Venus is the perfect choice to add an Adobe Premiere VHS effect by offering an adjustable duration of the video with effortless customization. The template is highly famous among YouTubers and content creators to leave a long-lasting impact on the audience via glitchy titles and effects.
Presenting another Premiere Pro template, Fast Glitch Transitions is a ready-to-use template. It offers ten fast-tracked transitions that add value to the project. Moreover, it brings versatile colors to the video with the glitches. This Premiere VHS effect is perfect for intros and travel videos.
Allow me to introduce you to another new and stylish static effect Premiere Pro known as Glitch Multiframe Opener. It is a dynamic template that needs no plugins. Be free to use the template for commercials, Facebook video openers, and teasers. Moreover, photos and videos can be added to make the glitch workable.
Glitch Urban Opener is an impeccable glitch effect for Premiere Pro, presenting trendy and creative designs. It brings smooth transitions to the video with 17 editable layers, 11 media holders, and one logo placeholder. All of these options make this VHS filter Premiereeasily customizable and operatable.
Another retro effect Premiere Pro from Motion Elements is 30 Glitch Transitions. The media industry uses this template to insert different glitch effects into the video and make it eye-catching for everyone. The effects are styled with interference, bad TV, distortions, VHS noise, and other fatal errors.
Last but not the least, Glitch Transitions can be counted upon to act as the best Adobe Premiere glitch effect. There are three transitions for different themes. The color controls help manage the video editing more effectively. Moreover, the templates offer horizontal and vertical directions to work better.
Part 2: How Do You Do the Glitch Effect in Premiere Pro?
Are you a Premiere Pro user? Do you need to add the Premiere glitch transition to the video? Worry no more! Follow this subsection vividly. Would you?
Adobe Premiere Pro is a video editing software that has got you covered. You can enhance the speed of the video to tell your story better and share the vision. With Premiere Pro in the frame, you can shift the colors, insert graphics and titles, and give a unique music effect to the video. All in one platform, a dream come true, don’t you agree?
If you want to perform a Premiere Pro VHS effect, allow us to walk you through the process. It is highly recommended that you follow the guide carefully to have desirable results. So, what are we waiting for? Time to start, right?
Step 1: Importing the Targeted Video
To begin the process, open Adobe Premiere Pro on your system. Import the targeted footage and drag it to the timeline. After the video is added, head to the “Effects” panel on the left side of the interface.
Step 2: Launching the VR Digital Glitch
Type away glitch in the search bar. The user will find VR Digital Glitch in the results. Drag the effect to the clip on the timeline. Now, it is time to navigate to the “Effect Controls.”
Step 3: Changing the Distortion Control
Scroll down to find “Distortion” in the controls and expand it. The user is suggested to increase the color distortion to give an RGB effect to the footage. After that, you should reduce the distortion rate to 0 so that different artifacts can be eliminated effortlessly.
Step 4: Changing the Noise Strength
Moving on, expand the “Noise” control section and increase the noise strength. It will give the footage a significant level of graininess.
Step 5: Animating the Glitch Effect
To animate the glitch, use the playhead on the top and drag it to the first position where the effect should start from. Hit the stopwatch located on the left of “Master Amplitude.” It will create a keyframe. Alter the “Master Amplitude” to 0 as we do not want the clip to begin with a glitch.
Step 6: Playing with the Playhead
Now, use your keyboard’s right arrow to move the playhead three frames forward. After that, set the “Master Amplitude” to 100. Again, move the playhead three frames forward and set the “Master Amplitude” to 0. The animation is produced on the RGB color distortion.
Step 7: Positioning the Video
Move back to the first keyframe and head to the top that shows “Scale” settings. Enhance the scale value so that the video position can be leveled. Click on the stopwatch next to “Position” to create a keyframe. Move the playhead one frame forward and adjust the position of the frame.
Step 8: Final Process
Again, move the playhead to the next frame and click on the “Reset” shaped icon to reset the position of the video. Move another frame forward and reposition the video. You can do this multiple times to give a glitchy effect to the clip. There you go! It is all done.
Conclusion
A raw video doesn’t send the message as the user wants. For this, creative professionals need to give some effects to the video, such as glitch effect Premiere. The article highlighted some famous glitch effects which were perfectly compatible with Adobe Premiere Pro. The whole procedure to add the Adobe Premiere glitch effect was also the crux of this write-up.
Top 8 Sites to Download Glitch Transition for Premiere Pro
Glitch effects have made a comeback on the internet. You are free to use, download, and play with them. But the question that comes to everyone’s mind is which website is reliable for it? What are the best effects to download and use? We’ll go through 8 different websites where you can get free glitch transitions. Every website has its personality and Screen Glitchy Effects. So, let’s start looking at some of the top ones right away.
8 Best Sites to Download Glitch Transitions for Premiere Pro
1. Motion Array
You may create a variety of glitch effects with Motion Array. Adobe Premiere Pro and Adobe After Effects are among the best systems it supports. You may get some of the most excellent transitions and aesthetic effects with Adobe Premiere Pro, such as the vertical rhythmic glitchy start, geometric openers, and more.
You can make the most incredible shaky slideshow or even abstract promo slideshow. Download these fantastic effects like neon-colored glitch logos, quick glitch openers, and other bizarre effects.
2. Velosofy
Velosofy, is the next best place to download Glitch Effect for free. It features some of the most stylish effects like modern glitch intro templates, glitchy logo designs, and much more.
This site allows you to download an unlimited number of files. Other products supported by Velosofy include the well-known After Effects, Adobe Photoshop, and Premiere Pro.
3. Storyblocks
Storyblocks is the next in line. The site supports Adobe After Effects and Premiere Pro. Transitions, distortion, logo reveals, VHS, and more effects are available here. The Glitch Transition bundle includes greens and blues distortion.
Premiere Pro provides several packs containing various elements. Color Bars Data Glitches is Premiere Pro’s most impressive collection. It is a one-of-a-kind effect seen on Storyblocks, and there are plenty more like it. In addition, Storyblocks includes footage and background as well.

4. Placeit
Placeit is a website where anyone can download and use any glitch transition. Almost every application and piece of software is supported on the site. You have a long list of options on Placeit. Go ahead and select any of the numerous screen effects.
One can also make a slideshow with Placeit and its spectacular glitch effects. Add other astounding effects with a VHS feel to make the video look more impressive.

5. Adobe Stock
Adobe Stock is another excellent website that offers you free glitch transition. The site supports a variety of applications and has some incredible effects. You will like the effect that is “Simple & Bold”. As its name implies, the glitch effect is simple, yet it is highly bold because of the neon-bright colors.
Another astounding effect is 12 Glitchy Transition. The Anaglyph Glitch Effect is a photoshop effect that is perfect for video creators.

6. Motion Elements
You should never limit yourself to the basics when you have sites like Motion Elements. You may create a professional film by downloading and applying the various glitch art effects.
The site works well with multiple programs, including After Effects and Premiere Pro. It features some bizarre but entertaining templates like neon glitchy transitions.

7. MixKit
With Mixkit, you can create unique and spectacular screen glitch effects.
Mixkit supports Premiere Pro and After Effects. You can easily employ its mind-blowing color effects to give your material a whole distinct feel. It includes digital static transitions, urban glitch openers, logo animation, and other elements.

8. Videohive
Videohive has over 7000 glitch templates. Each of the 7000 effects is unique and mind-blowing.
On the other hand, Premiere Pro has some jaw-dropping aesthetic effects. You can use elegant and trendy ones like the urban opener, glitch transition, and many more on Premiere Pro. Videohive’s Trailer effect is its most attractive feature.
5 Newest Glitch Transition Packs for Premiere Pro
Are you looking to add some extra colorful movement to your movie? There are many aesthetic effects and transitions available to add to the videos. You can create high-level YouTube videos, birthday clips, and holiday vlogs with Glitch art.
We’ll help explore these transition packs in Premiere Pro. Be sure to go to the website and check out the tutorials of these packs. You’ll find various effects within them.
1. FILM CRUX Glitch Transitions Vol. 1
This new pack by Film Crux has 15 free drag-and-drop free glitch transitions. These are designed specifically for Adobe Premiere Pro. You can just download the file and drag it into your Premiere Pro ‘Presets’ folder on your computer. Add the effects and enjoy the animated video!!
2. Glitch Templates for Premiere Pro by Mixxit
Mixxit has 30 Free Premiere Pro Templates for Glitch. All these templates are free to download for Premiere Pro. You can find every type of transition you need. Edit and add textures, make the videos enjoyable with zoom and outs and different sound effects.
3. 95+ Glitch Transitions - Premiere Pro by flatpackfx
You can try any of these glitch transitions and transform your videos. Simply drag and drop your videos to use with Adobe Premiere Pro. Moviemakers and video editors can save time and create unique-looking transitions all inside of Premiere Pro.
4. FREE 30 Glitch Transitions Preset for Premiere Pro by EnamAlamin
You can make your videos exciting with these 30 animated glitch transitions. The sound effects are also available to add to the videos. You’ll find detailed tutorials on the website. You don’t need any plugins. Just Drag & Drop the movie on Premiere Pro.
5. 10 Free Glitch transitions for Premiere Pro by 911templates
You can get 10 free digital distortion effects on 911templates. Import the video on Adobe Premiere Pro and turn them into art masterpieces. These effects can help you create a stunning opening of the video and the striking transitions between shots.
With these 5 newest transition packs, you can edit your video in many ways. The film industry has been using these transitions to impact the viewers. So, choose the styles that go well with your movie and catch your eyes. These are seen commonly in horror films to keep the viewers engaged. You can even add them on TikTok videos and other product description videos.
Conclusion
Glitch Transitions is a fun way to “transition” from one shot to the other. Drag and drop any of these transitions over two or more clips on your timeline. You can insert these free transitions nicely for educational videos, YouTube videos, event movies, or even documentaries. It adds fun, energetic energy to the project.
These transitions can make your work appear more professional and add to the final movie. We hope this article can help you find free assets for your next video project.
Phone Aspect Ratio Vertical Definition, Types & Tips
Versatile Video Editor - Wondershare Filmora
If you are a professional video or image creator, you know what aspect ratio is and why aspect ratio is important. Even people passionate about their cameras and visual art enthusiasts know it. If you are a newbie, Let us make it easy for you. This article will talk about the vertical phone aspect ratio ratio, its definition, types, iPhone vertical video dimensions, etc. We’ll also provide you solid tips on mobile vertical video size and how to create phone vertical videos easily. Let’s jump into the topic and see what you can learn.
In this article
01 [What is Phone Aspect Ratio Vertical?](#Part 1)
02 [Types of Phone Aspect Ratio Vertical](#Part 2)
03 [Tips to Create Phone Vertical Videos](#Part 3)
Part 1 What is Phone Aspect Ratio Vertical?
The vertical phone aspect ratio is the “proportional” relationship between the screen’s width and height. For example, if your image or video has an aspect ratio of 4:5, it simply means the width of the screen (photo or video) is four times the height of the image.
The vertical phone aspect ratio is the “proportional” relationship between the screen’s width and height. For example, if your image or video has an aspect ratio of 4:5, it simply means the width of the screen (photo or video) is four times the height of the image.
Back in the television days, you might have seen certain old pictures with black padding on either side of the screen. It was just that they were shot in different aspect ratios and your television screen had different aspect ratios.
Aspect Ratio Vs Resolution
Remember that aspect ratio does not refer to the physical size of an image or its dimensions in pixels (resolution). So aspect ratio 3:1 does not refer to the actual width and height of the image or video; it just describes their relationship.
You are wrong if you think aspect ratio is just another fancy name for resolution. Think again. Check out how it is calculated.
“
| | Aspect Ratio | Resolution | |
| ————— | ————————————————————– | ———————————————————————————- |
| Definition | The Ratio of the width of an image to the height of the image. | Total number of pixels displayed on your screen (computer, cell phone, television) |
| Commonly Used | ● 1:1 ● 3:1 ● 3:2 ● 4:3 ● 5:4 ● 9:1 ● 16:9 | ● 640x480 ● 800x600 ● 1024x768 |
Aspect Ratio Calculator
To get the resolution, you need to multiply width times the height. To get aspect ratio, the formula is: Divide the width by the height or simply divide the long side by the short side.
There are multiple online aspect ratio calculators available. Check out the value for both the images and the videos generated through the photo ratio calculator for your ease.
| Common Aspect Ratio | AR Width | AR Height | Image Width | Image Height |
|---|---|---|---|---|
| 1:1(square) | 1 | 1 | 1920 | 1920 |
| 5:4 (large and medium format cameras) | 5 | 4 | 1920 | 1536 |
| 4:3 Standard | 4 | 3 | 1920 | 1440 |
| 3:2 (35mm camera) | 3 | 2 | 1920 | 1280 |
| 16:9 | 16 | 9 | 1920 | 1080 |
| 3:1 Panoramic | 3 | 1 | 1920 | 640 |
| 9:16 | 9 | 16 | 1080 | 1920 |
For example, the aspect ratio of 3:1 may be an image of 3m wide and 1m high. At the same time it can be 3 feet wide and 1 foot high. For further simplification, consider dimensions in pixels: a 6000×4000 image has 3:2 aspect ratios.
Always remember this small but crucial point. The aspect ratio refers to the image or video you captured or recorded and the display (or screen) in which your video or image would be displayed.
Why is the aspect ratio important?
In the age of web content, asking why aspect ratio is important? Some may consider it naïve. Images need to be uploaded at different aspect ratios for different uses (desktop vs. mobile or blog vs. social media). Incorrect aspect ratio affects your final image and end-user experience.
Choice of the wrong aspect ratio can eliminate the potential for editing (cropping and resizing). In addition, using the correct aspect ratios saves you from facing the trouble of distortion or clipping.
Part 2 Types of Phone Aspect Ratio Vertical
Image Aspect Ratios
The aspect ratio decides and changes the entire composition and how the audience perceives the image. First, let us see some common image aspect ratios.

● 1:1 Ratio

If you have seen a square-shaped image, it had probably a 1:1 aspect ratio. It simply means both sides (width and height of the image) are equal. It was initially the aspect ratio of square television sets. However, this is commonly used for print photos, mobile screens, and social platforms.
● 3:2 Ratio

Initially used for classic 35 mm film and still photography, aspect ratio 3:5 is still used on some laptops, tablets, and handheld game consoles. The famous example of this aspect ratio Images framed at 1080×720 pixels or 6″x4″.
● 5:4 Ratio

It was commonly used for photography and art prints. For Images having dimensions, 8″x10″ and 16x20 have the 5:4 aspect ratios.
Video Aspect Ratios

Like the image aspect ratios, video aspect ratios would also profoundly affect its composition and thus how your directed viewers perceive it. Some common mobile vertical video size or video aspect ratios are given below.
● 16:9 Ratio

If you have seen presentation slides, computer monitors, or widescreee seen this slimmer and more elongated rectangular-shaped 16:9 Ratio. This is the standardized widescreen aspect ratio that you see everywhere on the web. In terms of pixel common dimension for 16:9 is 1920×1080 pixels and 1280×720 pixels.
● 9:16 Ratio (Vertical)

When smartphones started coming with video capabilities, this Ratio became popular. Likewise, today this Ratio is trendy for social media platforms with video story capabilities.
The Instagram story typically consists of 1080x1920 pixels, which in terms of aspect ratio is 9:16. Most phones, such as iPhone, have a feature that allows you to record footage in both (16:9 as well as 9:16).
Phone aspect ratio vertical
Back in the day, taking aspect ratio vertical (portrait mode) footage was considered unprofessional and a sign of an amateur. But the digital revolution has changed that. Now from unforgivable sin, the vewayal mode has practically become a mainstream media sensation. Vertical style has now become the dominant format.

Phone aspect ratio vertical simply means taller screen than wider. The most common type is 9:16 (1080x1920 pixels), a typical vertical videos aspect ratio. Although this phone aspect ratio vertical comes in a few more shapes and sizes such as 4:5, 2:3.
Part 3 Tips to Create Phone Vertical Videos
Creating vertical videos is crucial for getting engagements and growing your brand. It is easy with a phone because most smartphones, by default, record in 9:16, which is the standard vertical aspect ratio. But with a camera, you have to manually edit to the correct aspect ratio before you shoot it.
You can also shoot horizontally and then change it to vertical, but it needs professional videographer expertise.
Who wants to rotate their phones watching videos? Well, as far as the trend, Let us see some tiny but handy tips for creating vertical phone videos.
1. Choose the correct aspect ratio
Video taller than the 1:1 aspect ratio is commonly considered Vertical video. Types of these vertical aspects ratio include 4:5 (social), 2:3 and 9:16. They are all taller than they are wide, thus vertical.
Choosing the correct aspect ratio for your vertical video, always think about why and where you intend to use the video. The second important thing you should consider is your plans for editing that video.
Cropping horizontal can be irritating and sometimes disappointing at the same time. Producing a 9:16 vertical frame at HD resolution from a horizontal HD frame may result in very pixelated and low-quality footage.
If, for some reason, you still want first to shoot it horizontal and then change it back to mobile vertical video size. You may need to shoot in 4K horizontally to get extra pixels to work with. It can later be cropped in the sides to 9:16 (Vertical phone aspect ratio). Plus, you won’t need to scale it anymore.
2. Direct your viewer’s eyes
For hooking social media viewers, you need to put your most interesting visual upfront. These include GIFs, colourful stop-motion or looping animation. Always try to match your first couple of shots with your overall brand personality.
3. Screen splitting into two or more

A tall vertical screen can be styled with multiple horizontal clips on top of each other. These clips must relate to your relevant content and overall look. Natural lines or patterns can help display them in the most creative ways.
4. Be close to your subject
For producing an intimate experience with the vertical frame, you should get closer to the subject. Most of the action will be positioned to the centre as your viewers scroll. Do not let cut off or cover up your main subject by any text and make sure you leave enough room for text, emojis and stickers.
5. Filling the vertical space
First, make sure that your subject is vertical-friendly. Then get closer and fill the space within the vertical frame. The vertical frame can be filled through the following:
● Up-close shot (if the subject is personal).
● Raising the camera high and tilting it down (to film things like a long, empty road).
● Bird’s-eye view from above.
5. Rule of Third

This photography rule says not to place the main subject directly in the center of the frame. Create more dynamic composition by creating imaginary (Horizontal & Vertical) lines that divide your frame into thirds.
You have to place your subject either on the lines or where the lines meet up. And guess what? You don’t need to draw imaginary nowadays. Most cameras and smartphones provide you with this option.
6. Avoid Shaking
You do not want to distract your viewers with shaky camera moments. Normal pan and 360-degree rotation are acceptable or maybe even essential. But moving side to side too quickly will make it difficult for the camera to process that information. You better use a selfie stick or gimbal.
Now, check out the best vertical video ratios for various social platforms.
Best video aspect ratios for Facebook

● 1:1 or 4:5 (Feed)
● 9:16 (Stories) Full portrait/Vertical
● 1:1 (Video Carousel)
● 16:9 (In streams, ads) -> Full landscape
● 9:16 (Audience Network)
● 2:3 (Vertical)
Best video aspect ratios for Instagram
● 1:1 (Feed)
● 4:5 (Feed ads)
● 9:16 (Stories)
● 9:16 (Reels)
● 9:16 (ICTV)
Best video aspect ratios for Twitter

● 1:1 (Promoted Videos)
● 1:1 or 9:16 (Sponsorship)
● 16:9 (Live Videos)
● 1:11 or 16:9 (Video Posts)
Best video aspect ratios for TikTok
● 9:16, 1:1, or 16:9 (For ads)
● 9:16 (For organic videos)
Wondershare Filmora
Being a newbie and producing perfect and professional vertical video content can be challenging, especially for the social platform. And then perfection requires delicate skills. If you want to change the aspect ratio after capturing an image or shooting a video, you need post-processing software.
There are tons of post-processing software available that have aspect ratio tools. As a tech geek, I even want essential tools that can serve all my needs and are also simple to use. Wondershare Filmora (iOS and Android) and Wondershare Filmora (Windows) is just that platform where you simply record, edit and share right away. It is loaded with easy-to-use editing features, special effects, social media integration options, and your desired music.
The best thing about Filmora Go is that it is for every skill level, unlike the other video editing software. Moreover, it lets you build unique custom build animation without breaking a sweat. So if you have a horizontal video, Filmora Go makes it easy to edit it into a Vertical one.
Features:
● Allows users to make videos anywhere using your iOS or Android device.
● The powerful editing tools of Filmora and Filmora help you create excellent iPhone vertical video dimensions.
● A dynamic music library helps users to add great background music in the videos.
● Both Filmora and Filmora (Desktop) have a user-friendly and intuitive user interface.
● The new Video Beautification feature helps you modify the shape of your face, lips, or nose in the picture.
Wondershare Filmora
Get started easily with Filmora’s powerful performance, intuitive interface, and countless effects Try It Free Try It Free Learn More >

Conclusion
The vertical phone aspect ratio may seem avoidable, but you need a near-perfect influence on your desired audience to engage and grow. Thus, the Aspect ratio is not something to avoid if you want to compete in the business. Smartphone digital evolution has shifted the balance towards the phone aspect ratio vertical. In this article, we also talked about iPhone video dimensions vertical, hope it will help you. Platforms like Filmora provides comprehensive and easy editing solutions to edit aspect ratio as desired.
If you are a professional video or image creator, you know what aspect ratio is and why aspect ratio is important. Even people passionate about their cameras and visual art enthusiasts know it. If you are a newbie, Let us make it easy for you. This article will talk about the vertical phone aspect ratio ratio, its definition, types, iPhone vertical video dimensions, etc. We’ll also provide you solid tips on mobile vertical video size and how to create phone vertical videos easily. Let’s jump into the topic and see what you can learn.
In this article
01 [What is Phone Aspect Ratio Vertical?](#Part 1)
02 [Types of Phone Aspect Ratio Vertical](#Part 2)
03 [Tips to Create Phone Vertical Videos](#Part 3)
Part 1 What is Phone Aspect Ratio Vertical?
The vertical phone aspect ratio is the “proportional” relationship between the screen’s width and height. For example, if your image or video has an aspect ratio of 4:5, it simply means the width of the screen (photo or video) is four times the height of the image.
The vertical phone aspect ratio is the “proportional” relationship between the screen’s width and height. For example, if your image or video has an aspect ratio of 4:5, it simply means the width of the screen (photo or video) is four times the height of the image.
Back in the television days, you might have seen certain old pictures with black padding on either side of the screen. It was just that they were shot in different aspect ratios and your television screen had different aspect ratios.
Aspect Ratio Vs Resolution
Remember that aspect ratio does not refer to the physical size of an image or its dimensions in pixels (resolution). So aspect ratio 3:1 does not refer to the actual width and height of the image or video; it just describes their relationship.
You are wrong if you think aspect ratio is just another fancy name for resolution. Think again. Check out how it is calculated.
“
| | Aspect Ratio | Resolution | |
| ————— | ————————————————————– | ———————————————————————————- |
| Definition | The Ratio of the width of an image to the height of the image. | Total number of pixels displayed on your screen (computer, cell phone, television) |
| Commonly Used | ● 1:1 ● 3:1 ● 3:2 ● 4:3 ● 5:4 ● 9:1 ● 16:9 | ● 640x480 ● 800x600 ● 1024x768 |
Aspect Ratio Calculator
To get the resolution, you need to multiply width times the height. To get aspect ratio, the formula is: Divide the width by the height or simply divide the long side by the short side.
There are multiple online aspect ratio calculators available. Check out the value for both the images and the videos generated through the photo ratio calculator for your ease.
| Common Aspect Ratio | AR Width | AR Height | Image Width | Image Height |
|---|---|---|---|---|
| 1:1(square) | 1 | 1 | 1920 | 1920 |
| 5:4 (large and medium format cameras) | 5 | 4 | 1920 | 1536 |
| 4:3 Standard | 4 | 3 | 1920 | 1440 |
| 3:2 (35mm camera) | 3 | 2 | 1920 | 1280 |
| 16:9 | 16 | 9 | 1920 | 1080 |
| 3:1 Panoramic | 3 | 1 | 1920 | 640 |
| 9:16 | 9 | 16 | 1080 | 1920 |
For example, the aspect ratio of 3:1 may be an image of 3m wide and 1m high. At the same time it can be 3 feet wide and 1 foot high. For further simplification, consider dimensions in pixels: a 6000×4000 image has 3:2 aspect ratios.
Always remember this small but crucial point. The aspect ratio refers to the image or video you captured or recorded and the display (or screen) in which your video or image would be displayed.
Why is the aspect ratio important?
In the age of web content, asking why aspect ratio is important? Some may consider it naïve. Images need to be uploaded at different aspect ratios for different uses (desktop vs. mobile or blog vs. social media). Incorrect aspect ratio affects your final image and end-user experience.
Choice of the wrong aspect ratio can eliminate the potential for editing (cropping and resizing). In addition, using the correct aspect ratios saves you from facing the trouble of distortion or clipping.
Part 2 Types of Phone Aspect Ratio Vertical
Image Aspect Ratios
The aspect ratio decides and changes the entire composition and how the audience perceives the image. First, let us see some common image aspect ratios.
● 1:1 Ratio
If you have seen a square-shaped image, it had probably a 1:1 aspect ratio. It simply means both sides (width and height of the image) are equal. It was initially the aspect ratio of square television sets. However, this is commonly used for print photos, mobile screens, and social platforms.
● 3:2 Ratio
Initially used for classic 35 mm film and still photography, aspect ratio 3:5 is still used on some laptops, tablets, and handheld game consoles. The famous example of this aspect ratio Images framed at 1080×720 pixels or 6″x4″.
● 5:4 Ratio
It was commonly used for photography and art prints. For Images having dimensions, 8″x10″ and 16x20 have the 5:4 aspect ratios.
Video Aspect Ratios
Like the image aspect ratios, video aspect ratios would also profoundly affect its composition and thus how your directed viewers perceive it. Some common mobile vertical video size or video aspect ratios are given below.
● 16:9 Ratio
If you have seen presentation slides, computer monitors, or widescreee seen this slimmer and more elongated rectangular-shaped 16:9 Ratio. This is the standardized widescreen aspect ratio that you see everywhere on the web. In terms of pixel common dimension for 16:9 is 1920×1080 pixels and 1280×720 pixels.
● 9:16 Ratio (Vertical)
When smartphones started coming with video capabilities, this Ratio became popular. Likewise, today this Ratio is trendy for social media platforms with video story capabilities.
The Instagram story typically consists of 1080x1920 pixels, which in terms of aspect ratio is 9:16. Most phones, such as iPhone, have a feature that allows you to record footage in both (16:9 as well as 9:16).
Phone aspect ratio vertical
Back in the day, taking aspect ratio vertical (portrait mode) footage was considered unprofessional and a sign of an amateur. But the digital revolution has changed that. Now from unforgivable sin, the vewayal mode has practically become a mainstream media sensation. Vertical style has now become the dominant format.
Phone aspect ratio vertical simply means taller screen than wider. The most common type is 9:16 (1080x1920 pixels), a typical vertical videos aspect ratio. Although this phone aspect ratio vertical comes in a few more shapes and sizes such as 4:5, 2:3.
Part 3 Tips to Create Phone Vertical Videos
Creating vertical videos is crucial for getting engagements and growing your brand. It is easy with a phone because most smartphones, by default, record in 9:16, which is the standard vertical aspect ratio. But with a camera, you have to manually edit to the correct aspect ratio before you shoot it.
You can also shoot horizontally and then change it to vertical, but it needs professional videographer expertise.
Who wants to rotate their phones watching videos? Well, as far as the trend, Let us see some tiny but handy tips for creating vertical phone videos.
1. Choose the correct aspect ratio
Video taller than the 1:1 aspect ratio is commonly considered Vertical video. Types of these vertical aspects ratio include 4:5 (social), 2:3 and 9:16. They are all taller than they are wide, thus vertical.
Choosing the correct aspect ratio for your vertical video, always think about why and where you intend to use the video. The second important thing you should consider is your plans for editing that video.
Cropping horizontal can be irritating and sometimes disappointing at the same time. Producing a 9:16 vertical frame at HD resolution from a horizontal HD frame may result in very pixelated and low-quality footage.
If, for some reason, you still want first to shoot it horizontal and then change it back to mobile vertical video size. You may need to shoot in 4K horizontally to get extra pixels to work with. It can later be cropped in the sides to 9:16 (Vertical phone aspect ratio). Plus, you won’t need to scale it anymore.
2. Direct your viewer’s eyes
For hooking social media viewers, you need to put your most interesting visual upfront. These include GIFs, colourful stop-motion or looping animation. Always try to match your first couple of shots with your overall brand personality.
3. Screen splitting into two or more
A tall vertical screen can be styled with multiple horizontal clips on top of each other. These clips must relate to your relevant content and overall look. Natural lines or patterns can help display them in the most creative ways.
4. Be close to your subject
For producing an intimate experience with the vertical frame, you should get closer to the subject. Most of the action will be positioned to the centre as your viewers scroll. Do not let cut off or cover up your main subject by any text and make sure you leave enough room for text, emojis and stickers.
5. Filling the vertical space
First, make sure that your subject is vertical-friendly. Then get closer and fill the space within the vertical frame. The vertical frame can be filled through the following:
● Up-close shot (if the subject is personal).
● Raising the camera high and tilting it down (to film things like a long, empty road).
● Bird’s-eye view from above.
5. Rule of Third
This photography rule says not to place the main subject directly in the center of the frame. Create more dynamic composition by creating imaginary (Horizontal & Vertical) lines that divide your frame into thirds.
You have to place your subject either on the lines or where the lines meet up. And guess what? You don’t need to draw imaginary nowadays. Most cameras and smartphones provide you with this option.
6. Avoid Shaking
You do not want to distract your viewers with shaky camera moments. Normal pan and 360-degree rotation are acceptable or maybe even essential. But moving side to side too quickly will make it difficult for the camera to process that information. You better use a selfie stick or gimbal.
Now, check out the best vertical video ratios for various social platforms.
Best video aspect ratios for Facebook
● 1:1 or 4:5 (Feed)
● 9:16 (Stories) Full portrait/Vertical
● 1:1 (Video Carousel)
● 16:9 (In streams, ads) -> Full landscape
● 9:16 (Audience Network)
● 2:3 (Vertical)
Best video aspect ratios for Instagram
● 1:1 (Feed)
● 4:5 (Feed ads)
● 9:16 (Stories)
● 9:16 (Reels)
● 9:16 (ICTV)
Best video aspect ratios for Twitter
● 1:1 (Promoted Videos)
● 1:1 or 9:16 (Sponsorship)
● 16:9 (Live Videos)
● 1:11 or 16:9 (Video Posts)
Best video aspect ratios for TikTok
● 9:16, 1:1, or 16:9 (For ads)
● 9:16 (For organic videos)
Wondershare Filmora
Being a newbie and producing perfect and professional vertical video content can be challenging, especially for the social platform. And then perfection requires delicate skills. If you want to change the aspect ratio after capturing an image or shooting a video, you need post-processing software.
There are tons of post-processing software available that have aspect ratio tools. As a tech geek, I even want essential tools that can serve all my needs and are also simple to use. Wondershare Filmora (iOS and Android) and Wondershare Filmora (Windows) is just that platform where you simply record, edit and share right away. It is loaded with easy-to-use editing features, special effects, social media integration options, and your desired music.
The best thing about Filmora Go is that it is for every skill level, unlike the other video editing software. Moreover, it lets you build unique custom build animation without breaking a sweat. So if you have a horizontal video, Filmora Go makes it easy to edit it into a Vertical one.
Features:
● Allows users to make videos anywhere using your iOS or Android device.
● The powerful editing tools of Filmora and Filmora help you create excellent iPhone vertical video dimensions.
● A dynamic music library helps users to add great background music in the videos.
● Both Filmora and Filmora (Desktop) have a user-friendly and intuitive user interface.
● The new Video Beautification feature helps you modify the shape of your face, lips, or nose in the picture.
Wondershare Filmora
Get started easily with Filmora’s powerful performance, intuitive interface, and countless effects Try It Free Try It Free Learn More >
Conclusion
The vertical phone aspect ratio may seem avoidable, but you need a near-perfect influence on your desired audience to engage and grow. Thus, the Aspect ratio is not something to avoid if you want to compete in the business. Smartphone digital evolution has shifted the balance towards the phone aspect ratio vertical. In this article, we also talked about iPhone video dimensions vertical, hope it will help you. Platforms like Filmora provides comprehensive and easy editing solutions to edit aspect ratio as desired.
How to Make A Funny Vlog for TikTok?
TikTok has been among the few social media platforms that have gained an exponential following in a truly short time. Regardless of this stunted digital environment, the platform made its statement of becoming part of the all-time greats.
TikTok became known as a short-video platform that influenced the making of funny vlogs. If you are interested in making a funny vlog, you are at the right place.
In this article
01 Ideas for Creating A Funny Vlog for TikTok
02 5 Popular Funny Vloggers on TikTok
Part 1: Ideas for Creating A Funny Vlog for TikTok
When creating a funny vlog across TikTok, there are numerous ideas that one can think of. However, since TikTok videos are of small lengths, achieving diversity is difficult yet possible. You’ll surely get your break if you understand the following ideas for creating a funny vlog.

React to Other Videos
While it may seem the most mainstream style of creating funny content across TikTok, it is also the most effective way of making people laugh while watching your video. This will also bring recurring viewers across your channel.
Display Failure Videos
It is always great to see people trying and doing something funny across the video. Failure videos are believed to be the other way of creating content for a funny vlog on your TikTok, which shall make people laugh hard.
Use Goofy and Peculiar Voices
Unrealistic and weird voices can make your short video seem funny. If you consider talking about something in a silly voice, it will make people burst out of laughter.
Trolling Family Members
One of the best ways to make something good out of TikTok is creating candid moments. This can always be done if you troll or prank your family members out of nowhere. Just keep reminding that you have to ensure no one gets injured due to it.
Impersonations
Making impersonated videos of major celebrities is another way of showing funny content to the viewers on TikTok. If you consider some funny examples for this, it will surely bring you effective results.
Make Puns and Funny Statements
Another great way to create a funny vlog for your TikTok is to be good at making puns. This is purely hilarious content and needs someone to be highly great in it.
Physical Challenges
This can be a bit risky, but it can become quite fun to make and show to the world if executed with care. However, this can be conducted individually or in a group of people, as you find it appropriate.
Use Effects of TikTok
TikTok makes sure to provide something funny in effects to its users. The use of effects for TikTok is an excellent technique to make funny vlogs; however, it can get funny if the elements used across it have a dubious meaning.
Run Everything in Reverse
One of the most straightforward techniques to make a funny vlog is to run everything in reverse order. The simplest thing of a video becomes the funniest to watch.
Part 2: 5 Popular Funny Vloggers on TikTok
This part will provide some popular examples of TikTokers who have made a considerate performance in providing funny content to people across the platform.
Khaby Lame
This is, without a doubt, the first-choice in TikTok accounts that would always come while relating to funny content. Khaby started his journey as a TikToker with a remarkably simple motive of pointing out the simplicity in different tasks, which were displayed to be difficult. Although it sounds pretty basic, the technique taken by Khaby has been so considerate it brought him millions of followers for creating funny content.
Sarah Cooper
Want to see a great impersonation of Donald Trump? It is undoubtedly great to see every time. With Sarah Cooper, it just becomes an entirely different story. Her impersonation has been so perfect that she has been referred to as one of the best funny vloggers on TikTok. Her likes across the platform may not be that great, but she has shown some stature in presenting funny content in a great way.
Dobre Twins
This twin duo is known across many social media platforms for its funny content. As the twins started using TikTok, they started creating good funny vlogs, which gained quite the traction for them. Their unique ideas to present different things have presented the following worth 23 million likes across TikTok, which is quite commendable. However, Lucas and Marcus are only known to operate this TikTok account.

Image alt: dobre twins funny tiktoker
Brittany Broski
Quite a few TikTokers actually make funny videos with impressive comedy. Brittany Broski is a celebrity in this genre, where she has taken great use of her comedy skills to present great vlogs with different and unique topics. Her take on comedy is entirely different, which makes her funny vlog unique and better than others.
Cole LeBrant
This TikToker makes a good collection of funny vlogs across his account with his family. The variety and variability in his videos make him a different version of fun compared to other TikTokers. He has built a great reach across the account, which makes him an impressive choice.
Part 3: How to Make a Funny Vlog?
Funny vlogs are a fabulous way to interact with people of different tastes. It can be something that cherishes the moods of the viewers, regardless of their current emotions. To make this happen, you need a good platform that helps you create a video for your viewers to watch. Wondershare Filmora fulfills the needs of a video editor by providing you with the perfect options while editing the video for TikTok.
For Win 7 or later (64-bit)
For macOS 10.12 or later
If you are looking forward to understanding how to create a funny vlog for your TikTok using Filmora, you need to follow a set of simple steps. These are shown as follows:
Step 1: Launch and Import Video
To start, you need to have Wondershare Filmora installed across your device. Launch the tool and click on “New Project” to start from scratch. Once the screen opens up, you need to click on the “Arrow Head” icon across the ‘Media’ Tab to import the audio you wish to amend for TikTok.
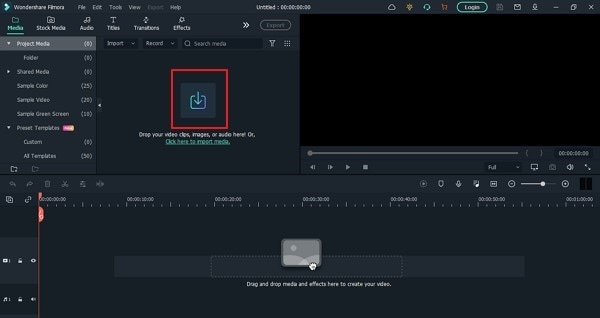
Step 2: Perform Basic Editing
Wondershare Filmora provides users with multiple options for editing their files. At first, drag the file onto the timeline. Following this, you can merge different videos or enhance the video by trimming it. Along with that, you can also consider splitting the image or changing its playback speed for different results.
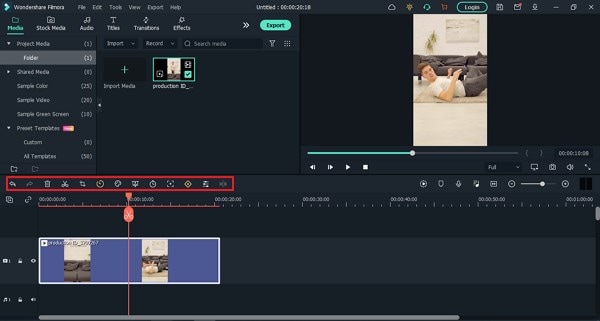
Step 3: Add Effects and Transitions
After you are done with some basic editing, you can add different effects from the “Effects” section. To make the video look exclusive, you can also include “Transitions” across it. Use the “Elements” tab to include stickers and emojis to enhance your TikTok video.
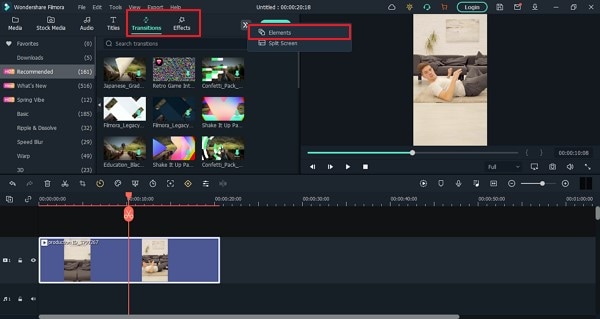
Step 4: Manage the Audio
For managing the audio of your video, you can make several changes across it. You can detach audio and change the audio with another soundtrack. Filmora also allows you to add audio from the “Audio” section, which contains royalty-free music to add. Once you are done, click on the “Export” button to set the settings of the video before exporting it back onto the device.
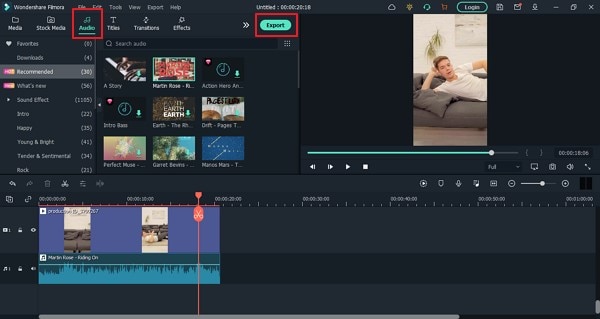
Closing Words
This article has presented some of the finest tips that can be utilized for creating funny vlogs on your TikTok. If you coherently use these tips, you can get significant results across your account in the name of the followers. Along with that, you can also use Filmora for making the best funny vlog with different editing tools.
Wondershare Filmora
Get started easily with Filmora’s powerful performance, intuitive interface, and countless effects Try It Free Try It Free Learn More >
02 5 Popular Funny Vloggers on TikTok
Part 1: Ideas for Creating A Funny Vlog for TikTok
When creating a funny vlog across TikTok, there are numerous ideas that one can think of. However, since TikTok videos are of small lengths, achieving diversity is difficult yet possible. You’ll surely get your break if you understand the following ideas for creating a funny vlog.
React to Other Videos
While it may seem the most mainstream style of creating funny content across TikTok, it is also the most effective way of making people laugh while watching your video. This will also bring recurring viewers across your channel.
Display Failure Videos
It is always great to see people trying and doing something funny across the video. Failure videos are believed to be the other way of creating content for a funny vlog on your TikTok, which shall make people laugh hard.
Use Goofy and Peculiar Voices
Unrealistic and weird voices can make your short video seem funny. If you consider talking about something in a silly voice, it will make people burst out of laughter.
Trolling Family Members
One of the best ways to make something good out of TikTok is creating candid moments. This can always be done if you troll or prank your family members out of nowhere. Just keep reminding that you have to ensure no one gets injured due to it.
Impersonations
Making impersonated videos of major celebrities is another way of showing funny content to the viewers on TikTok. If you consider some funny examples for this, it will surely bring you effective results.
Make Puns and Funny Statements
Another great way to create a funny vlog for your TikTok is to be good at making puns. This is purely hilarious content and needs someone to be highly great in it.
Physical Challenges
This can be a bit risky, but it can become quite fun to make and show to the world if executed with care. However, this can be conducted individually or in a group of people, as you find it appropriate.
Use Effects of TikTok
TikTok makes sure to provide something funny in effects to its users. The use of effects for TikTok is an excellent technique to make funny vlogs; however, it can get funny if the elements used across it have a dubious meaning.
Run Everything in Reverse
One of the most straightforward techniques to make a funny vlog is to run everything in reverse order. The simplest thing of a video becomes the funniest to watch.
Part 2: 5 Popular Funny Vloggers on TikTok
This part will provide some popular examples of TikTokers who have made a considerate performance in providing funny content to people across the platform.
Khaby Lame
This is, without a doubt, the first-choice in TikTok accounts that would always come while relating to funny content. Khaby started his journey as a TikToker with a remarkably simple motive of pointing out the simplicity in different tasks, which were displayed to be difficult. Although it sounds pretty basic, the technique taken by Khaby has been so considerate it brought him millions of followers for creating funny content.
Sarah Cooper
Want to see a great impersonation of Donald Trump? It is undoubtedly great to see every time. With Sarah Cooper, it just becomes an entirely different story. Her impersonation has been so perfect that she has been referred to as one of the best funny vloggers on TikTok. Her likes across the platform may not be that great, but she has shown some stature in presenting funny content in a great way.
Dobre Twins
This twin duo is known across many social media platforms for its funny content. As the twins started using TikTok, they started creating good funny vlogs, which gained quite the traction for them. Their unique ideas to present different things have presented the following worth 23 million likes across TikTok, which is quite commendable. However, Lucas and Marcus are only known to operate this TikTok account.
Image alt: dobre twins funny tiktoker
Brittany Broski
Quite a few TikTokers actually make funny videos with impressive comedy. Brittany Broski is a celebrity in this genre, where she has taken great use of her comedy skills to present great vlogs with different and unique topics. Her take on comedy is entirely different, which makes her funny vlog unique and better than others.
Cole LeBrant
This TikToker makes a good collection of funny vlogs across his account with his family. The variety and variability in his videos make him a different version of fun compared to other TikTokers. He has built a great reach across the account, which makes him an impressive choice.
Part 3: How to Make a Funny Vlog?
Funny vlogs are a fabulous way to interact with people of different tastes. It can be something that cherishes the moods of the viewers, regardless of their current emotions. To make this happen, you need a good platform that helps you create a video for your viewers to watch. Wondershare Filmora fulfills the needs of a video editor by providing you with the perfect options while editing the video for TikTok.
For Win 7 or later (64-bit)
For macOS 10.12 or later
If you are looking forward to understanding how to create a funny vlog for your TikTok using Filmora, you need to follow a set of simple steps. These are shown as follows:
Step 1: Launch and Import Video
To start, you need to have Wondershare Filmora installed across your device. Launch the tool and click on “New Project” to start from scratch. Once the screen opens up, you need to click on the “Arrow Head” icon across the ‘Media’ Tab to import the audio you wish to amend for TikTok.
Step 2: Perform Basic Editing
Wondershare Filmora provides users with multiple options for editing their files. At first, drag the file onto the timeline. Following this, you can merge different videos or enhance the video by trimming it. Along with that, you can also consider splitting the image or changing its playback speed for different results.
Step 3: Add Effects and Transitions
After you are done with some basic editing, you can add different effects from the “Effects” section. To make the video look exclusive, you can also include “Transitions” across it. Use the “Elements” tab to include stickers and emojis to enhance your TikTok video.
Step 4: Manage the Audio
For managing the audio of your video, you can make several changes across it. You can detach audio and change the audio with another soundtrack. Filmora also allows you to add audio from the “Audio” section, which contains royalty-free music to add. Once you are done, click on the “Export” button to set the settings of the video before exporting it back onto the device.
Closing Words
This article has presented some of the finest tips that can be utilized for creating funny vlogs on your TikTok. If you coherently use these tips, you can get significant results across your account in the name of the followers. Along with that, you can also use Filmora for making the best funny vlog with different editing tools.
Wondershare Filmora
Get started easily with Filmora’s powerful performance, intuitive interface, and countless effects Try It Free Try It Free Learn More >
Also read:
- Updated In 2024, Legend Intro Maker – Create Intro Video with Ease
- New 2024 Approved EasyHDR Review Is This a Good Choice to Create HDR
- New A Countdown Effect Is Widely Used in Gaming and Report Videos. So How to Create Your Own Countdown Video? This Article Will Tell You some Ideas About Contdown Video Editing
- New 2024 Approved This Article Discusses What Is Adobe Premiere Pro, How to Download, Install and Use It, and Its Key Features. It Further Discusses Its Alternative for Editing Your Videos and More. Check Out Now
- Updated In 2024, 15 Best LUTS to Buy
- Updated 2024 Approved To Know How to Add Effects in Premiere Pro, You Need to Follow This Guide as It Has All You Need to Know to Add Effects in Premiere Pro. Learn More Here
- Updated 2024 Approved Best 10 3D Slideshow Software Review
- In 2024, How to Add Filter to Video in Premiere Pro?
- Updated In 2024, How To Create A YouTube Intro
- Updated In 2024, How to Make Eye Zoom Transition Effect with Filmora
- New Getting Into The Details A Review of Kodak LUTs for 2024
- Whats an AV1 Format and How Does It Impact Your Life for 2024
- In 2024, Steps to Remove Background Noise From Video Sony Vegas
- Updated Are You Ready to Learn About Something Free yet Amazing? We Are Talking About All Format Video Players for PC that You Should Know , Lets Begin for 2024
- In 2024, How to Speed Up Video on Instagram Reels?
- In 2024, Top GIF to MP4 Converters
- Guide To Scaling and Setting Videos in Filmora | Tutorial for 2024
- In 2024, Discovering The Best Wedding LUTs for Premiere Pro | An Overview
- Keyframes Interval Everything You Need To Know | Filmora for 2024
- New 2024 Approved How to Easily Convert SRT to VTT
- Updated In 2024, Hey! Are You Looking for Video Reverse Effects in Your Videos? Then, You Are at the Right Place. This Article Will Guide You in Creating a Video Reverse Effect
- New Learn How to Make Your CSGO Montage Impressive for 2024
- Updated In 2024, Top 15 LUTS to Buy
- How to Make Video Fade to Black in Movie Maker Easily
- Looking for the Simple Steps to Add Transition Effects in Your Video? We Will Illustrate How to Add Transition in Filmora and Mention Tips and Tricks for Video Transition Effects
- New 2024 Approved LumaFusion – One of the Best Video Editors for iOS
- New In 2024, Want to Create an Impressive Video Collage but Clueless About the Best Tools? No Worries as We Are Here and Will Help You to Learn About the Best Video Collage Maker PC Tools
- New 2024 Approved Start Making Procreate GIFs and Take Your Editing Creativity to the Next Level
- Updated Methods to Make Sure Your Recording Slideshow in Powerpoint Is Not Wro
- Updated In 2024, Do You Know How to Zoom on Facebook Livestream Videos? Through This Article, You Will Find Multiple Ways and Detailed Steps to Zoom in on the Facebook Livestream Videos
- In 2024, Achieving GoPro Slow Motion with Quality An In-Depth Overview
- In 2024, How Can I Catch the Regional Pokémon without Traveling On Realme C51 | Dr.fone
- How to Bypass FRP from Samsung Galaxy A14 5G?
- How to Easily Hard reset my Oppo Find N3 Flip | Dr.fone
- Honor 80 Pro Straight Screen Edition Stuck on Screen – Finding Solutions For Stuck on Boot | Dr.fone
- In 2024, Rootjunky APK To Bypass Google FRP Lock For Realme Note 50
- How to Change Spotify Location After Moving to Another Country On OnePlus Ace 3 | Dr.fone
- In 2024, Here Are Some Reliable Ways to Get Pokemon Go Friend Codes For Samsung Galaxy S23+ | Dr.fone
- In 2024, Change Location on Yik Yak For your Oppo Reno 11F 5G to Enjoy More Fun | Dr.fone
- A Step-by-Step Guide on Using ADB and Fastboot to Remove FRP Lock on your Oppo Find N3
- In 2024, Wireless Methods to MirrorApple iPhone 8 Plus & iPad to Fire Stick With Ease | Dr.fone
- In 2024, How to Screen Share Mac to Apple iPhone SE? | Dr.fone
- In 2024, Forgotten The Voicemail Password Of Vivo G2? Try These Fixes
- Where Is the Best Place to Catch Dratini On Vivo Y200 | Dr.fone
- 15 Best Strongest Pokémon To Use in Pokémon GO PvP Leagues For Realme 11 Pro+ | Dr.fone
- In 2024, Unlocking the Power of Smart Lock A Beginners Guide for Xiaomi Redmi K70 Users
- How to Detect and Stop mSpy from Spying on Your Xiaomi Redmi Note 12 4G | Dr.fone
- Reasons why Pokémon GPS does not Work On Honor 90 GT? | Dr.fone
- Dose Life360 Notify Me When Someone Checks My Location On OnePlus Ace 3? | Dr.fone
- 5 Ways to Reset OnePlus Nord N30 5G Without Volume Buttons | Dr.fone
- Full Guide to Unlock Your Infinix Note 30 VIP Racing Edition
- Everything You Need to Know About Becoming a Motion Graphic Designer
- Title: New 2024 Approved Stunning Glitch Effect and Its Creation Steps for Premiere Pro
- Author: Morgan
- Created at : 2024-06-24 01:30:39
- Updated at : 2024-06-25 01:30:39
- Link: https://ai-video-editing.techidaily.com/new-2024-approved-stunning-glitch-effect-and-its-creation-steps-for-premiere-pro/
- License: This work is licensed under CC BY-NC-SA 4.0.
