
:max_bytes(150000):strip_icc():format(webp)/AE-lock-572ece975f9b58c34c0a2492.jpg)
New 2024 Approved Wondering How to Replace Sky in After Effects? Learn How
Wondering How to Replace Sky in After Effects? Learn How
Replacing Sky After Effects can change the essence of your videos with an authentic feel. In sci-fi movies, the colors of the sky add a dramatic, intense, or soft touch to videos. In scenes of war, peace, crime, and love, skies represent the theme. Shooting outdoors cannot always capture the essence of the sky. Replacing skies can help with covering over-exposed or under-exposed skies.
In this article, the focus of the discussion is how to replace Sky After Effects. Users can also learn about the advantages of using background replacers. If you want to learn sky replacement in After Effects, there is an instruction manual. It will give you some tips and tricks for replacing and adjusting the sky. At the end, we will discuss another software for replacing video backgrounds .
Sky Replacement A cross-platform works like magic for background removal or sky replacement photos!
Free Download Free Download Learn More

Part 1: What Are the Benefits of Having Video Background Replacers?
Along with enhancing the creative element in videos, background replacers help with more. Users can integrate them for both personal and professional uses. The following section will give a sneak peek at the advantages of background removers:
1. Privacy and Concealment
Video background removers extract the real surroundings, which addresses privacy concerns. In addition, they conceal any mess or imperfections in your background.
2. Maintains Professional Appearance
They help you set up professional backgrounds for Zoom meetings or Google Classrooms. In this way, they maintain the professional element of your videos.
3. Marketing Consistency
When it comes to marketing, they help choose a reliable background for the brand. The background becomes the identity of the brand and maintains its consistency.
4. Creative Expression in Movies
In the media industry, backgrounds like the sky help express the emotion of an actor or a mass. If there is anger, the sky will turn red; if there is peace, it will have a calm outlook.
5. Audience Engagement and Focus
A well-aligned background increases the audience’s focus on the theme of the video. This is because irrelevant backgrounds can catch the audience’s interest and distract them.
Part 2: Top Guide Explaining How to Replace Sky in Adobe After Effects?
Do you want to elevate the graphics of your videos professionally? Adobe After Effects is an ideal software for it as it helps professionals to edit films. It offers multiple animations for titles and videos like revolve, rotate, and more. In addition, you can overlap videos with precision using its Rotoscope feature.
There are built-in effects and features to ease the editing process for you. In addition, you can do custom settings in it and save them as presets. One of its many specifications is that it is an elite background remover and replacement. It enables a seamless addition of the sky in the background. We have mentioned the step-by-step procedure of After Effects replace Sky below:
Procedure 1: Removing Video Background
Step 1: After bringing your video to the timeline, navigate towards the top search bar at the left. In the Effects Control option, search for the “Extractor” effect and add it. Then, change the “Channel” of this effect to your “Blue” or “Luminance.” Change the position of both sliders there to remove and feather the background.

Step 2: To avoid removing parts other than the sky, duplicate this video to the timeline. From the bottom video, eliminate the extractor effect. Navigate towards the top toolbar and select the “Mask” option. Create a mask around the ground at the bottom of the video. In the timeline, click the “Mask Path” option to create the mask throughout the video.

Step 3: Now, select the top video in the timeline and search for “Key Cleaner.” Adjust the values of options under the key cleaner for precision.

Step 4: If there are still some spaces left, use the “Simple Choker” effect to correct them. You can find it using the search bar and adjust the given values.

Procedure 2: 3D Camera Tracking
Step 1: Now, duplicate the video again on the timeline and remove all its effects. Afterward, add a “3D Camera Tracker” in it. Then click “Analyze” and let the tracker analyze your video.

Step 2: Next, select any three points from the footage and right-click on them. From the drop-down menu, select “Create Null and Camera” or “Create Solid and Camera.”

Procedure 3: Replacing the Sky
Step 1: Import the video of your sky and bring it to the timeline. Bring the sky in the back of your footage and change it to a 3D layer. Afterward, change the “Position” of your sky from the timeline. We recommend you set the values as far away as possible for realistic effect.

Step 2: Once you have set the sky’s position, navigate towards the timeline panel again. From there, change the “Scale” of the background to set according to your footage. Afterward, see if the sky needs any flipping. This is because you must align the bright parts of the sky with the bright parts of the ground.

Procedure 4: Color Matching
Step 1: Play with the color setting elements like “Saturation” or “Lightness.” Change the position of their sliders to observe the changes in your footage.

Step 2: Right-click on the timeline and add “New > Adjustment Layer” for settling colors. Afterward, see the preview of your video and export it.

Part 3: Wondershare Filmora: A Breath-taking Alternative to Replacing Backgrounds in Videos
For those who find sky replacement in After Effects difficult, there are alternatives. One of the simplest alternatives to replace sky is Wondershare Filmora . It is a video editor driven by AI technology with multiple effects and presets. Filmora keeps updating its functionalities, and it has recently launched the V13 upgrade. There was the addition of multiple AI tools and enhanced effects for creativity purposes.
Free Download For Win 7 or later(64-bit)
Free Download For macOS 10.14 or later
Filmora’s video background remover uses AI to extract the background with precision. Afterward, users can replace it with Filmora’s pre-assembled background collection. There are multiple colors, gradients, and other replacements for the background. The integration of AI has eliminated the human effort of cutting out background.
Step-by-Step Guide on Replacing Backgrounds in Filmora
Unlike replacing Sky After Effects, it keeps the background changing process simpler. In this guide, we will remove the background first and then replace it. Here is the step-by-step procedure to replace the background using this alternative:
Step 1Create a New Project to Import Media
First, install Wondershare Filmora on your device and launch it. Afterward, use the “New Project” button to start a project and enter its editing interface. Use the “Ctrl +I” keys to import your video and drop it on the timeline.

Step 2Enable the Smart Cutout Option
In the timeline panel, select the video and navigate towards the right-side settings panel. Afterwards, go to the “AI Tools” section under the “Video” tab. From there, enable the “Smart Cutout” option and click the Start button below.

Step 3Start Removing Background
In the Smart Cutout Video window, use the brush to mark the object you want in the video. The AI will auto-select the rest of the object. After that, hit the “Click to start Smart Cutout” option, and it will initiate. Then, click the “Save” button to save the background, removing settings.

Step 4Replace a Background and Export Video
Once the background has been removed, click this video in the timeline. Hover the cursor towards the right settings panel and access the “Video > Basic” tab. Scroll down to find the “Backgrounds” section and enable it. In the “Type” section, select the background type and choose from the options to add. Once you have added the background, click the “Export” button to save this video.

Conclusion
The article emphasized the importance of video background removers and their benefits. In addition, we discussed replacing sky After Effects in detail. In the end, we provided a simple alternative for those looking for it. This is because Adobe After Effects might have a technical editing interface.
Wondershare Filmora, on the other hand, can carry on the process with efficiency and simplicity. If you haven’t yet used this software, visit its website to download it. There are other features that help with uplifting the content. You will also find the detailed user guides to use those functions.
Free Download Free Download Learn More
Part 1: What Are the Benefits of Having Video Background Replacers?
Along with enhancing the creative element in videos, background replacers help with more. Users can integrate them for both personal and professional uses. The following section will give a sneak peek at the advantages of background removers:
1. Privacy and Concealment
Video background removers extract the real surroundings, which addresses privacy concerns. In addition, they conceal any mess or imperfections in your background.
2. Maintains Professional Appearance
They help you set up professional backgrounds for Zoom meetings or Google Classrooms. In this way, they maintain the professional element of your videos.
3. Marketing Consistency
When it comes to marketing, they help choose a reliable background for the brand. The background becomes the identity of the brand and maintains its consistency.
4. Creative Expression in Movies
In the media industry, backgrounds like the sky help express the emotion of an actor or a mass. If there is anger, the sky will turn red; if there is peace, it will have a calm outlook.
5. Audience Engagement and Focus
A well-aligned background increases the audience’s focus on the theme of the video. This is because irrelevant backgrounds can catch the audience’s interest and distract them.
Part 2: Top Guide Explaining How to Replace Sky in Adobe After Effects?
Do you want to elevate the graphics of your videos professionally? Adobe After Effects is an ideal software for it as it helps professionals to edit films. It offers multiple animations for titles and videos like revolve, rotate, and more. In addition, you can overlap videos with precision using its Rotoscope feature.
There are built-in effects and features to ease the editing process for you. In addition, you can do custom settings in it and save them as presets. One of its many specifications is that it is an elite background remover and replacement. It enables a seamless addition of the sky in the background. We have mentioned the step-by-step procedure of After Effects replace Sky below:
Procedure 1: Removing Video Background
Step 1: After bringing your video to the timeline, navigate towards the top search bar at the left. In the Effects Control option, search for the “Extractor” effect and add it. Then, change the “Channel” of this effect to your “Blue” or “Luminance.” Change the position of both sliders there to remove and feather the background.
Step 2: To avoid removing parts other than the sky, duplicate this video to the timeline. From the bottom video, eliminate the extractor effect. Navigate towards the top toolbar and select the “Mask” option. Create a mask around the ground at the bottom of the video. In the timeline, click the “Mask Path” option to create the mask throughout the video.
Step 3: Now, select the top video in the timeline and search for “Key Cleaner.” Adjust the values of options under the key cleaner for precision.
Step 4: If there are still some spaces left, use the “Simple Choker” effect to correct them. You can find it using the search bar and adjust the given values.
Procedure 2: 3D Camera Tracking
Step 1: Now, duplicate the video again on the timeline and remove all its effects. Afterward, add a “3D Camera Tracker” in it. Then click “Analyze” and let the tracker analyze your video.
Step 2: Next, select any three points from the footage and right-click on them. From the drop-down menu, select “Create Null and Camera” or “Create Solid and Camera.”
Procedure 3: Replacing the Sky
Step 1: Import the video of your sky and bring it to the timeline. Bring the sky in the back of your footage and change it to a 3D layer. Afterward, change the “Position” of your sky from the timeline. We recommend you set the values as far away as possible for realistic effect.
Step 2: Once you have set the sky’s position, navigate towards the timeline panel again. From there, change the “Scale” of the background to set according to your footage. Afterward, see if the sky needs any flipping. This is because you must align the bright parts of the sky with the bright parts of the ground.
Procedure 4: Color Matching
Step 1: Play with the color setting elements like “Saturation” or “Lightness.” Change the position of their sliders to observe the changes in your footage.
Step 2: Right-click on the timeline and add “New > Adjustment Layer” for settling colors. Afterward, see the preview of your video and export it.
Part 3: Wondershare Filmora: A Breath-taking Alternative to Replacing Backgrounds in Videos
For those who find sky replacement in After Effects difficult, there are alternatives. One of the simplest alternatives to replace sky is Wondershare Filmora . It is a video editor driven by AI technology with multiple effects and presets. Filmora keeps updating its functionalities, and it has recently launched the V13 upgrade. There was the addition of multiple AI tools and enhanced effects for creativity purposes.
Free Download For Win 7 or later(64-bit)
Free Download For macOS 10.14 or later
Filmora’s video background remover uses AI to extract the background with precision. Afterward, users can replace it with Filmora’s pre-assembled background collection. There are multiple colors, gradients, and other replacements for the background. The integration of AI has eliminated the human effort of cutting out background.
Step-by-Step Guide on Replacing Backgrounds in Filmora
Unlike replacing Sky After Effects, it keeps the background changing process simpler. In this guide, we will remove the background first and then replace it. Here is the step-by-step procedure to replace the background using this alternative:
Step 1Create a New Project to Import Media
First, install Wondershare Filmora on your device and launch it. Afterward, use the “New Project” button to start a project and enter its editing interface. Use the “Ctrl +I” keys to import your video and drop it on the timeline.
Step 2Enable the Smart Cutout Option
In the timeline panel, select the video and navigate towards the right-side settings panel. Afterwards, go to the “AI Tools” section under the “Video” tab. From there, enable the “Smart Cutout” option and click the Start button below.
Step 3Start Removing Background
In the Smart Cutout Video window, use the brush to mark the object you want in the video. The AI will auto-select the rest of the object. After that, hit the “Click to start Smart Cutout” option, and it will initiate. Then, click the “Save” button to save the background, removing settings.
Step 4Replace a Background and Export Video
Once the background has been removed, click this video in the timeline. Hover the cursor towards the right settings panel and access the “Video > Basic” tab. Scroll down to find the “Backgrounds” section and enable it. In the “Type” section, select the background type and choose from the options to add. Once you have added the background, click the “Export” button to save this video.
Conclusion
The article emphasized the importance of video background removers and their benefits. In addition, we discussed replacing sky After Effects in detail. In the end, we provided a simple alternative for those looking for it. This is because Adobe After Effects might have a technical editing interface.
Wondershare Filmora, on the other hand, can carry on the process with efficiency and simplicity. If you haven’t yet used this software, visit its website to download it. There are other features that help with uplifting the content. You will also find the detailed user guides to use those functions.
Ultimate Guide on How To Plan and Storyboard a Music Video
Do you want to bring your music to life on the big screen? Do you want to create something visually striking? Making a music video seems like a big task. Sometimes, the artist you’re working with might not have a clear idea for their music video. It’s your job to help guide the creative process.
But don’t worry! This guide is going to make it easy for you to plan and storyboard your music video step by step with the help of Filmora . So let’s get started and make an amazing music video together!
Plan and develop initial ideas
The first and essential step in creating a music video is planning. This is where you will lay the foundation of your music video. You need to figure out what your video is about and what you want to convey to the audience. It involves a concept or theme for the video, research, and reference material. You can also explore different ideas to make your video unique and engaging.

Step1Research and gather information
You can begin by researching and gathering information from other music videos. This will help you to know what has been done before and what is currently popular. You can also figure out how you can do it differently.
Step2Brainstorm and concept development
Once you understand the current trends and styles in the music video. It’s time to start brainstorming ideas. You can do it alone or with the help of your team. But remember that you have to think out of the box to make it creative.
Step3Consider the lyrics and message
In the planning stage, it is also important to consider the lyrics and message of the song. It would be best if you plan according to the feel and vibe of the song. It will help you to create a concept tied to the song and will help enhance its meaning.
Step4Experiment and find the right direction
Once you have a general concept, it’s time to develop it further. You can do it by creating rough sketches or storyboards. You can also film test footage to see how the concept will look on screen.
Step5Effort and attention to detail
Remember, this step is the foundation of your music video. So, take your time and don’t rush through it. By putting in effort and attention to detail, you’ll be able to create a visually stunning and closely tied to the song’s music video.
Choose a style for your music video
While creating ideas for the music video, it’s also important to consider the style of the music video. There are two main styles of music videos:

1.Performance-style music video
If you want to showcase energy and charisma in your music video, go for a performance-style music video. This video style focuses on you and your band performing live in front of an audience. You can shoot a video in a single take with minimal cuts or feature different angles and shots. The key is to capture the raw energy and emotion of the performance.
2.Narrative-style music video
A narrative-style music video tells a story or conveys a message along with the music. The story can be a visual representation of the lyrics or a multi-layered narrative. You can choose this style to convey a deeper message or story.
You can shoot this video in different locations and can include different scenes. The main motive is to create a video that emotionally connects with the audience.
Once you have an idea of what you want your music video to be about, you can put together a treatment to show the artist what your initial plan for the music video is.

If the artist approves the direction of the video, it’s time to move on to storyboarding!
Storyboard your music video
Once you are done with the style and concept of the video, the next step is storyboarding! It allows you to break down your music video visually and highlight key visual moments. It can save time and money and convey a clear idea to the team. You can do this on paper, a computer, or a tablet, whatever works best for you. Let’s see how to do it with the help of Filmora .
Free Download For Win 7 or later(64-bit)
Free Download For macOS 10.14 or later

Step1Draw your ideas
You are supposed to break your video idea into different scenes. For each scene, you should draw a picture of what the shot will look like and draw them within the rectangles.

Step2Take pictures
After doing your storyboarding on paper, take photos of each shot in a sequence and import them to your computer.

Before going to the next step, make sure to download Wondershare Filmora. It is powerful editing software that can help you easily make a storyboard. With its wide range of features, you can also customize your clips with special effects, transitions, and more.
![]()
Free Download For Win 7 or later(64-bit)
Free Download For macOS 10.14 or later
Step3Import pictures to Filmora
Now import all the scenes and music to Filmora. You can also create separate folders if you have multiple concepts for a single video.

Step4Drop your media onto the timeline
Drag and drop the song to the audio timeline. Then press shift, select all images, and drop them into the picture timeline. If you realize you are missing enough clips to complete the song, you can draw and add more shots.

Step5Adjust the frame
You can right-click on the picture’s timeline and select Crop to fit to adjust the image on the screen. You can also adjust the scenes according to the song.

Step6Add effects
You can also simulate transitions and effects in the clips. Let’s suppose you want to show a zoom-in shot. Then you would click on the picture frame and the keyframe option just above the timeline. Now keyframe the position and scale of the clip according to you.

Once you feel like your clips sync with the song, you are ready to start planning for the production of your music video.
Conclusion
We hope this blog has given you a better understanding of how planning and storyboarding can help make your music videos better. You can ensure that your vision is clearly communicated to the audience by planning and storyboarding your music videos properly. Now that you know what to do, it’s time to put that knowledge into action. Take a pencil and paper and start sketching the shots and scenes you want to create.
Free Download For macOS 10.14 or later
Step1Draw your ideas
You are supposed to break your video idea into different scenes. For each scene, you should draw a picture of what the shot will look like and draw them within the rectangles.
Step2Take pictures
After doing your storyboarding on paper, take photos of each shot in a sequence and import them to your computer.
Before going to the next step, make sure to download Wondershare Filmora. It is powerful editing software that can help you easily make a storyboard. With its wide range of features, you can also customize your clips with special effects, transitions, and more.
![]()
Free Download For Win 7 or later(64-bit)
Free Download For macOS 10.14 or later
Step3Import pictures to Filmora
Now import all the scenes and music to Filmora. You can also create separate folders if you have multiple concepts for a single video.
Step4Drop your media onto the timeline
Drag and drop the song to the audio timeline. Then press shift, select all images, and drop them into the picture timeline. If you realize you are missing enough clips to complete the song, you can draw and add more shots.
Step5Adjust the frame
You can right-click on the picture’s timeline and select Crop to fit to adjust the image on the screen. You can also adjust the scenes according to the song.
Step6Add effects
You can also simulate transitions and effects in the clips. Let’s suppose you want to show a zoom-in shot. Then you would click on the picture frame and the keyframe option just above the timeline. Now keyframe the position and scale of the clip according to you.
Once you feel like your clips sync with the song, you are ready to start planning for the production of your music video.
Conclusion
We hope this blog has given you a better understanding of how planning and storyboarding can help make your music videos better. You can ensure that your vision is clearly communicated to the audience by planning and storyboarding your music videos properly. Now that you know what to do, it’s time to put that knowledge into action. Take a pencil and paper and start sketching the shots and scenes you want to create.
How to Remove Background Noise From Video Sony Vegas
The most popular activity you’ll get from video creators is to remove unpleasant noises like rumble or buzz from a final film, whether a promotional video, a short story, a short advertisement, or something else entirely. When mixing and capturing sound effects or even other multimedia design elements, it’s typical to have to remove background noises.
Thankfully, there are some techniques for eliminating these background noises. In this guide, I will illustrate how to eliminate background noise on Windows, Mac, and Online.
How to Remove Background Noise from Video Sony Vegas?
Nothing is more frustrating than watching your film’s current video footage and hearing excessive background noise. Well, if you’re unfamiliar with Vegas Pro, don’t worry; we’ll show you how to reduce noise with these simple steps.
Here’s a quick guide on reducing background noise in Sony Vegas. Follow these techniques to minimize background noise quickly and effectively, leaving you with clear audio:
Method #1: Lower the Volume
Consider lowering the volume of your video. Low-level noise is frequently seen in audio at the lowest volume settings. Simply decrease the general volume levels to fight this, and it may clean any mild, below-the-floor background noise.
Slide down the volume lever in the track to the left to lower the level of all audio occurrences within the track. To equalize the course, press the top of the track and drag the gain level down.

Method #2: Utilize the Noise Gate Feature
Reducing the volume and implementing the first method does not always eliminate background noise, so you must explore further.
There may be circumstances where the background noise is louder than the speaker, and decreasing the total volume makes it incomprehensible.
I suggest that you consider the Noise Gate if the background noise is a constant hiss. Noise Gate effectively suppresses sound below a specific volume, and background noise volume is lesser than the audio you want to include in your edit. As a result, using the Noise Gate is the best option.
To use the Noise Gate, go to the Track FX section of the interface and click the Audio FX button. Now select “Noise Gate.” The choices for this are now visible. Raise the threshold level; this establishes the total volume quality threshold. The Noise Gate will remove all audio below the threshold.

Alternative Ways to Remove Background Noise from Video
The learning curve of Sony Vegas may be a bit too complicated for you; then, there is nothing to worry about because you are in the right place. In this article, I also prepared a few alternative ways that you can use to remove background noises from your video. Let’s skip the talk and start learning:
#1: Wondershare Filmora – Overall Best
It is available on Windows and Mac.
Although there are many applications available for removing background noise, experts recommend Wondershare Filmora Video Editor. Let’s get right to the point.
Aside from the standard audio editing tools, Filmora now includes better wavelengths, volume keyframing, peak detection, and audio fades, resulting in a higher-quality audio editing interface. Here are some of the trump cards of using Filmora to remove background audio noise:
- Waveform audio editing with adjustable track height
- Remove background noise with ONE click using the Denoise function.
- Adjust the Denoise level to Weak, Mid, or Strong for improved noise reduction outcomes.
Here’s a guide on how to use Filmora to improve video footage, including how to eliminate background noise:
- In the Wondershare Filmora timeline panel, upload your clip. Trim and erase the video sections that you don’t wish to keep.
- Hover over the Audio option after right-clicking the clip in the timeline. The four choices available are silence detection, modification audio, removal audio, and mute. Select the “Audio Detach” feature to extract the audio from the video.

- Double-click on the audio file and select “Remove background noise” in the Edit Menu to eliminate the background noise instantly. You may also reach the Editing panel by double-clicking the video in the timeline without removing audio from the video and switching to the Audio page to edit audio and remove noise.

- You may also use the Equalizer tool to fine-tune the audio to make it seem more authentic. Simply tweak the music to fit the visual frame by frame if you want a better assessment. After analyzing the results, click Export to save the noise-reduced clip to your device or share it immediately to YouTube or Vimeo.
#2: Audacity
It is available on Windows, Mac, and Linux.
Audacity is a free, accessible, high-quality audio editing program that runs on Windows, Mac OS X, and Linux. You may use it to record live audio, modify it with capabilities like a cut, copy, and paste, and visualize advanced audio analysis using the Spectrogram view mode.You may also use it to eliminate background noise from your audio or video files for free.
The improved detailed instructions for removing background noise in Audacity in 2022 are listed below:
Step #1: Import Files to Audacity
Move to the File menu and hit Open or Import after running the program to load the audio or video source into Audacity. Before editing, Audacity will prompt you to make a copy of the audio track. This impresses me as extremely thoughtful. If you want to import a video file into Audacity, you’ll have to download and install FFmpeg Library beforehand. Otherwise, you’ll need to separate the audio from the video or transcode the video to a suitable audio format.

Step #2: Detect the Noise Segment
Locate a portion with pure background noise by zooming in on the track or adjusting the Track Size under the View menu.

Choose “Noise Reduction” from the Effect tab, begin with the defaults, and then hit “Get Noise Profile” to have Audacity determine what to filter out based on the specified section.
Step #3: Eliminate Background Noise with Noise Profile
Next, select the entire audio track that requires noise reduction, return to the Noise Reduction panels, select how much noise you want to eliminate, and click OK to eliminate the noise. You may use the default settings. Audacity will automatically minimize the noise, and the outcome will be visible on the audio track right away.
Step #4: Calibrate the Settings
To address the white noise of your audio, go to Effect and Amplify. To see if the noise has been gone, click “Preview.” Click “OK” and then export the denoised clip from Audacity to MP3, WAV, or other codecs.

#4: Remove the Entire Audio from Video Online Free
It is available on Windows, Mac, and Online.
You can use several online audio removers if you don’t want to install apps to eliminate the background noise. For example, I discovered AudioRemover.com, a free online audio extractor. In just two actions, you may eradicate audio from video.
- Choose a video file first, then click the Upload Video button below. Depending on the size of the video, this could take some time.
- Click the download file to save it to your PC after it’s finished.

On the other hand, this online audio remover will eliminate all of your audio, background noise, narration, music, and sound. A video file can only be 500MB in size. It can play MP4, AVI, MOV, and other video formats.
Frequently Asked Questions
What is the best way to remove background noise from a video?
I highly recommend using Wondershare Filmora video editor; all you have to do is activate the Denoise feature in the Audio editing window to eliminate the background noise from the video. Furthermore, it will instantly delete the background noise, such as the breeze.
Is it possible to eliminate background noise from a video online?
You certainly can. Background noise can be removed online using online video editors like Veed.
How do I get rid of the background noise in a YouTube video?
To eliminate background audio noise from YouTube videos, you may first have to download the video, then use the Filmora video editor to eliminate the noise with a single click.
Method #2: Utilize the Noise Gate Feature
Reducing the volume and implementing the first method does not always eliminate background noise, so you must explore further.
There may be circumstances where the background noise is louder than the speaker, and decreasing the total volume makes it incomprehensible.
I suggest that you consider the Noise Gate if the background noise is a constant hiss. Noise Gate effectively suppresses sound below a specific volume, and background noise volume is lesser than the audio you want to include in your edit. As a result, using the Noise Gate is the best option.
To use the Noise Gate, go to the Track FX section of the interface and click the Audio FX button. Now select “Noise Gate.” The choices for this are now visible. Raise the threshold level; this establishes the total volume quality threshold. The Noise Gate will remove all audio below the threshold.
Alternative Ways to Remove Background Noise from Video
The learning curve of Sony Vegas may be a bit too complicated for you; then, there is nothing to worry about because you are in the right place. In this article, I also prepared a few alternative ways that you can use to remove background noises from your video. Let’s skip the talk and start learning:
#1: Wondershare Filmora – Overall Best
It is available on Windows and Mac.
Although there are many applications available for removing background noise, experts recommend Wondershare Filmora Video Editor. Let’s get right to the point.
Aside from the standard audio editing tools, Filmora now includes better wavelengths, volume keyframing, peak detection, and audio fades, resulting in a higher-quality audio editing interface. Here are some of the trump cards of using Filmora to remove background audio noise:
- Waveform audio editing with adjustable track height
- Remove background noise with ONE click using the Denoise function.
- Adjust the Denoise level to Weak, Mid, or Strong for improved noise reduction outcomes.
Here’s a guide on how to use Filmora to improve video footage, including how to eliminate background noise:
- In the Wondershare Filmora timeline panel, upload your clip. Trim and erase the video sections that you don’t wish to keep.
- Hover over the Audio option after right-clicking the clip in the timeline. The four choices available are silence detection, modification audio, removal audio, and mute. Select the “Audio Detach” feature to extract the audio from the video.
- Double-click on the audio file and select “Remove background noise” in the Edit Menu to eliminate the background noise instantly. You may also reach the Editing panel by double-clicking the video in the timeline without removing audio from the video and switching to the Audio page to edit audio and remove noise.
- You may also use the Equalizer tool to fine-tune the audio to make it seem more authentic. Simply tweak the music to fit the visual frame by frame if you want a better assessment. After analyzing the results, click Export to save the noise-reduced clip to your device or share it immediately to YouTube or Vimeo.
#2: Audacity
It is available on Windows, Mac, and Linux.
Audacity is a free, accessible, high-quality audio editing program that runs on Windows, Mac OS X, and Linux. You may use it to record live audio, modify it with capabilities like a cut, copy, and paste, and visualize advanced audio analysis using the Spectrogram view mode.You may also use it to eliminate background noise from your audio or video files for free.
The improved detailed instructions for removing background noise in Audacity in 2022 are listed below:
Step #1: Import Files to Audacity
Move to the File menu and hit Open or Import after running the program to load the audio or video source into Audacity. Before editing, Audacity will prompt you to make a copy of the audio track. This impresses me as extremely thoughtful. If you want to import a video file into Audacity, you’ll have to download and install FFmpeg Library beforehand. Otherwise, you’ll need to separate the audio from the video or transcode the video to a suitable audio format.
Step #2: Detect the Noise Segment
Locate a portion with pure background noise by zooming in on the track or adjusting the Track Size under the View menu.
Choose “Noise Reduction” from the Effect tab, begin with the defaults, and then hit “Get Noise Profile” to have Audacity determine what to filter out based on the specified section.
Step #3: Eliminate Background Noise with Noise Profile
Next, select the entire audio track that requires noise reduction, return to the Noise Reduction panels, select how much noise you want to eliminate, and click OK to eliminate the noise. You may use the default settings. Audacity will automatically minimize the noise, and the outcome will be visible on the audio track right away.
Step #4: Calibrate the Settings
To address the white noise of your audio, go to Effect and Amplify. To see if the noise has been gone, click “Preview.” Click “OK” and then export the denoised clip from Audacity to MP3, WAV, or other codecs.
#4: Remove the Entire Audio from Video Online Free
It is available on Windows, Mac, and Online.
You can use several online audio removers if you don’t want to install apps to eliminate the background noise. For example, I discovered AudioRemover.com, a free online audio extractor. In just two actions, you may eradicate audio from video.
- Choose a video file first, then click the Upload Video button below. Depending on the size of the video, this could take some time.
- Click the download file to save it to your PC after it’s finished.
On the other hand, this online audio remover will eliminate all of your audio, background noise, narration, music, and sound. A video file can only be 500MB in size. It can play MP4, AVI, MOV, and other video formats.
Frequently Asked Questions
What is the best way to remove background noise from a video?
I highly recommend using Wondershare Filmora video editor; all you have to do is activate the Denoise feature in the Audio editing window to eliminate the background noise from the video. Furthermore, it will instantly delete the background noise, such as the breeze.
Is it possible to eliminate background noise from a video online?
You certainly can. Background noise can be removed online using online video editors like Veed.
How do I get rid of the background noise in a YouTube video?
To eliminate background audio noise from YouTube videos, you may first have to download the video, then use the Filmora video editor to eliminate the noise with a single click.
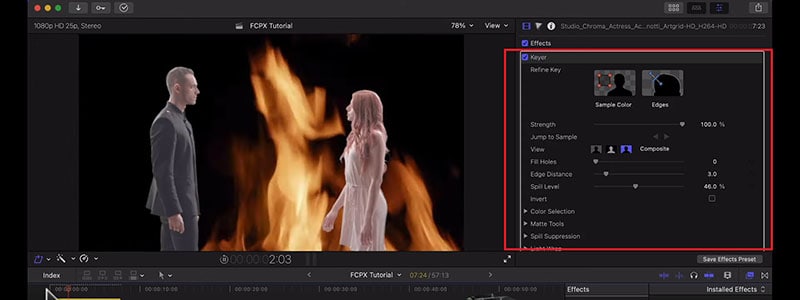
Add Green Screen Effects in Final Cut Pro
No matter the type of video you are shooting, the background of the video plays a major play. The background determines how eye-pleasing the frame of the entire video looks. A beautiful background enhances the video content while a distracting background can deteriorate the video outlook. You do not need to be in exotic locations or have eye-catching backgrounds in reality while shooting a video thanks to the use of the green screen effect.
Once you shoot a video with green screen background, you can replace the green screen with anything you want. You will need a video editor to replace the green screen, and Final Cut Pro is the most widely used video editor among Mac Users. We will illustrate how to add green screen in Final Cut Pro and get any background for your recorded video. We will also recommend an alternative watt to add green screen effect to your video.
Part 1. How to add green screen on Final Cut Pro
Final Cut Pro is the most popular professional video editor among Mac users. The learning curve is slightly steep, but once you get used to Final Cut Pro, you can take your recorded video to the next level with profound editing. The most important part of adding green screen effect to a video is shooting the video with a proper green screen in the background. Once you have successfully recorded your video, here are the steps on how to add background to green screen Final Cut Pro.
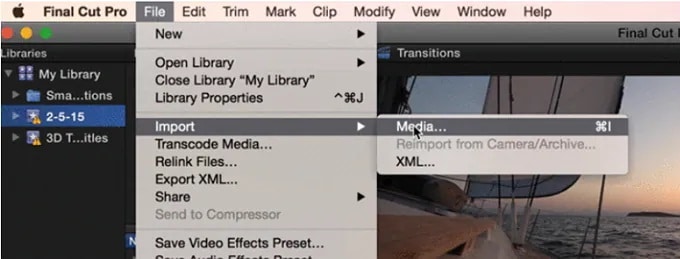
Step1 Launch Final Cut Pro and go to File> Import> Media. Select the video file with green screen background from your storage to import the file into FCP. Similarly, you should import the video or photo with which you want to replace the green screen.
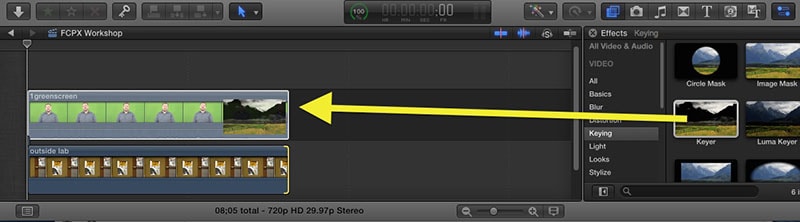
Step2 Drag the video clip with green screen background (called foreground clip) to Timeline and place it to Primary Storyline. Drag the replacement video (called background clip) below the foreground clip in Timeline.
Step3 Select the foreground clip and click on Effects button present at the extreme top-right corner of the Timeline.
Step4 From the Effects options, select Keyer effect. If you cannot spot it immediately, you can search for it from the search field.
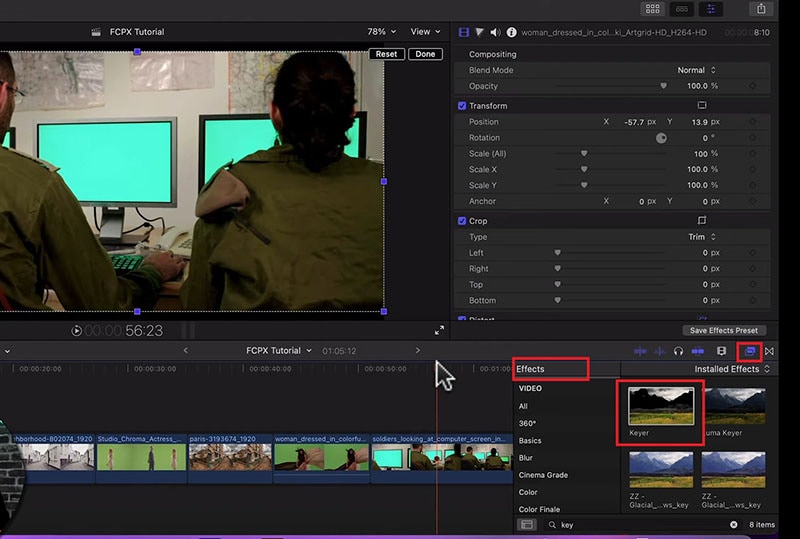
Step5 Drag and drop Keyer effect to the foreground clip. The effect detects the green screen and replaces it with the available background clip.
Step6 You might have to adjust the Keyer effect settings to get the green screen effect perfectly. Go to Inspector Window and click on Sample color and fine-tune the available settings to get it correct.
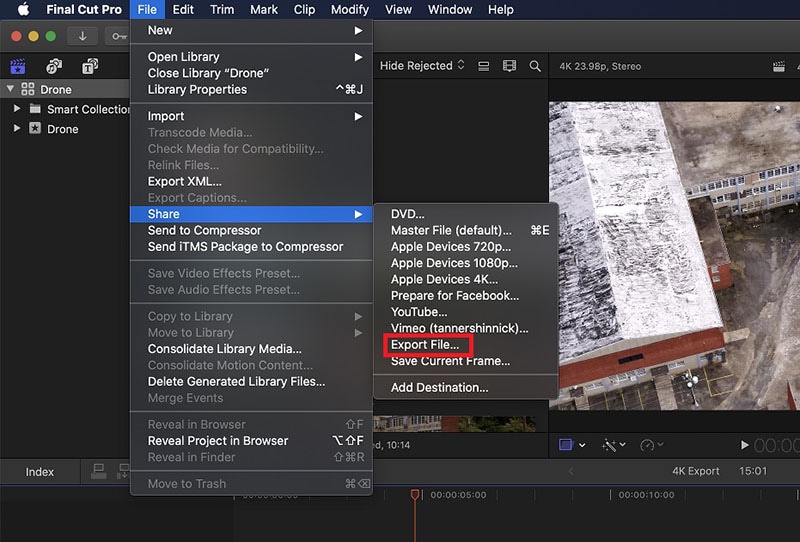
Step7 Once you are satisfied with the effect, go to File> Share> Export File and save the modified video.
Part 2. Alternative Way to Add Green Screen to Videos
Final Cut Pro is a professional but highly expensive video editor. The learning curve is not very suitable for amateur video editors. That is why if you are looking for a better alternative way to add green screen to videos, we recommend Wondershare Filmora . Filmora is a popular video editor that is available for Mac and Windows users. The user interface is extremely intuitive, and adding green screen effect is super easy. Here are the steps on how to add background to green screen effect.
Free Download For Win 7 or later(64-bit)
Free Download For macOS 10.14 or later
Step1 Download and install Filmora on your computer. Launch Filmora and click on New Projects.
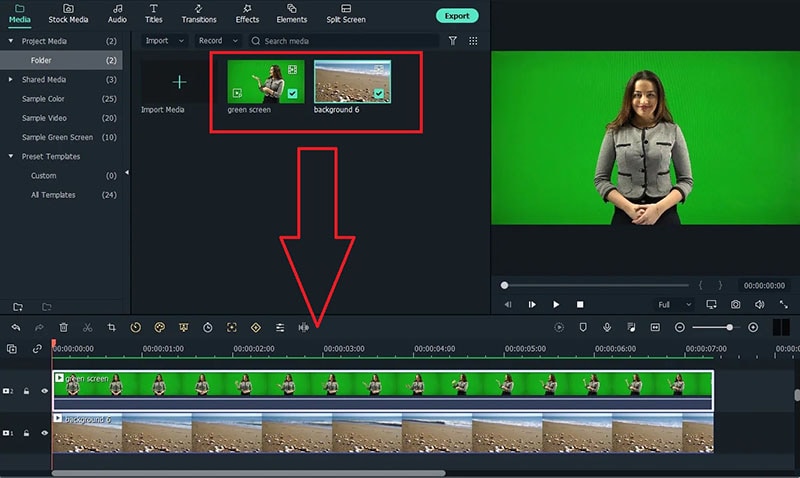
Step2 Under Project Media folder, Drag and drop the video clip with green screen background as well as the photo or video with which you want to replace the green screen.
Step3 Drag and drop the video clips on the Timeline. The video with green screen should be at the top while the replacement video or photo should be below it.
Step4 Double-click on the green screen video clip on Timeline. Go to Video>Basic and turn on Chroma key option.
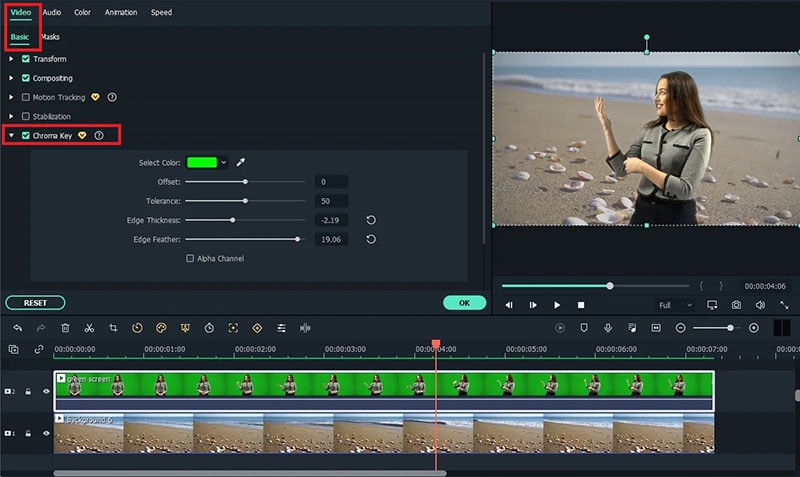
Step5 Adjust the different parameters such as offset to get the effect perfect and click on Ok button.
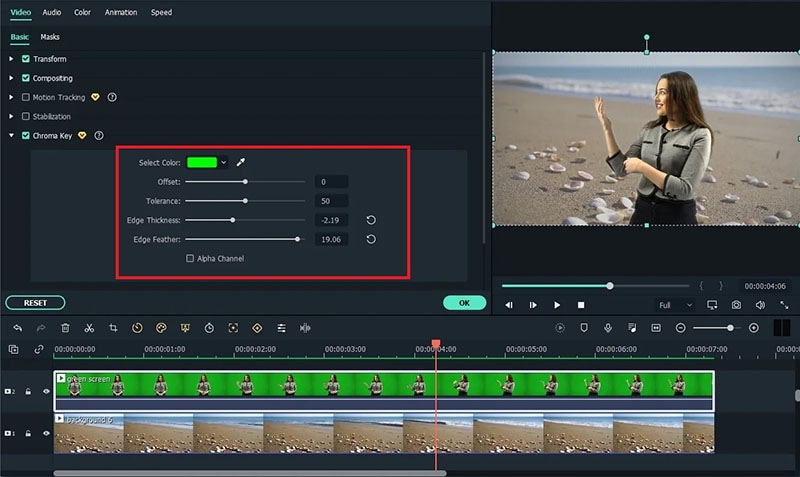
Step6 Play the video and if you are satisfied with the result, click on Export button to save the modified video file.
Part 3. Green Screen Video Tips to Use
We have already stated that replacing green screen in your video with an eye-catching background is the easiest part. On the contrary, shooting the green screen video is the most important part. If you shoot the video perfectly, replacing the background accurately in the video editor becomes super easy. Here are some important tips to use while shooting green screen video.
Distance – There should be enough distance between the subject and the green screen background so that the subject does not cast a shadow on the green screen. This distance is also important to place lights in between so that the green screen is perfectly lit for a great video shooting session.
Quality – You should opt for a high-quality green screen cloth for the background. This means the green screen should have a solid color instead of light and dark patches here and there. Besides, you should ensure that there are no wrinkles on the green screen.
Otherwise, when you will apply green screen effect through the video editor, the transformation will be uneven. You have to spend a lot of time adjusting the parameters to cover up uneven patches in the background.
Lighting – The way you set up your lights plays a major role in shooting green screen video perfectly. The light falling on the green screen will light up the screen evenly so that there are no light and dark patches. Transforming the green screen in the video editor will become that much easier.
You should focus on soft and even lighting for the entire green screen, and you should check through your camera to ensure the lighting is perfect. Sometimes, you can place lights behind the subject if the subject is staying stationary throughout the video. Otherwise, you can place the light above the subject for even distribution.
Aperture – The settings of your camera are equally important to smoothen out the green screen in the background and focus on the subject sharply. That is where aperture comes into the scene, and you need to use low aperture while shooting green screen videos. Low aperture opens up the camera lens, and the green screen turns softer in the background. The subject stands out while the background turns uniformly green.
Shutter Speed – While shooting a green screen video, you should keep a high shutter speed to prevent motion blur and uneven background. If the subject stays fixed throughout, the shutter speed should be double the frame rate. If the subject is moving throughout, the shutter speed should be around 4 times the frame rate such as 1/100.
ISO – The last thing you want in a green screen video is grainy footage. Your life will turn upside down editing the video and getting the green screen effect perfectly in any video editor. ISO determines the sensitivity and thereby, the grainy effect in your video. When the ISO is too high, the chance of getting grains in the video is high. It is better to use a native ISO for green screen effect, but you need to check with a sample recording and adjust if required.
Conclusion
We have answered how to add background to green screen Final Cut Pro. You can replace any green screen in your video with any video or photo for the background of the video. If you do not have Final Cut Pro or you find the steps slightly complicated, we recommend you to use Wondershare Filmora for instant green screen effect and quick adjustments for the best outcome.
Free Download For macOS 10.14 or later
Step1 Download and install Filmora on your computer. Launch Filmora and click on New Projects.
Step2 Under Project Media folder, Drag and drop the video clip with green screen background as well as the photo or video with which you want to replace the green screen.
Step3 Drag and drop the video clips on the Timeline. The video with green screen should be at the top while the replacement video or photo should be below it.
Step4 Double-click on the green screen video clip on Timeline. Go to Video>Basic and turn on Chroma key option.
Step5 Adjust the different parameters such as offset to get the effect perfect and click on Ok button.
Step6 Play the video and if you are satisfied with the result, click on Export button to save the modified video file.
Part 3. Green Screen Video Tips to Use
We have already stated that replacing green screen in your video with an eye-catching background is the easiest part. On the contrary, shooting the green screen video is the most important part. If you shoot the video perfectly, replacing the background accurately in the video editor becomes super easy. Here are some important tips to use while shooting green screen video.
Distance – There should be enough distance between the subject and the green screen background so that the subject does not cast a shadow on the green screen. This distance is also important to place lights in between so that the green screen is perfectly lit for a great video shooting session.
Quality – You should opt for a high-quality green screen cloth for the background. This means the green screen should have a solid color instead of light and dark patches here and there. Besides, you should ensure that there are no wrinkles on the green screen.
Otherwise, when you will apply green screen effect through the video editor, the transformation will be uneven. You have to spend a lot of time adjusting the parameters to cover up uneven patches in the background.
Lighting – The way you set up your lights plays a major role in shooting green screen video perfectly. The light falling on the green screen will light up the screen evenly so that there are no light and dark patches. Transforming the green screen in the video editor will become that much easier.
You should focus on soft and even lighting for the entire green screen, and you should check through your camera to ensure the lighting is perfect. Sometimes, you can place lights behind the subject if the subject is staying stationary throughout the video. Otherwise, you can place the light above the subject for even distribution.
Aperture – The settings of your camera are equally important to smoothen out the green screen in the background and focus on the subject sharply. That is where aperture comes into the scene, and you need to use low aperture while shooting green screen videos. Low aperture opens up the camera lens, and the green screen turns softer in the background. The subject stands out while the background turns uniformly green.
Shutter Speed – While shooting a green screen video, you should keep a high shutter speed to prevent motion blur and uneven background. If the subject stays fixed throughout, the shutter speed should be double the frame rate. If the subject is moving throughout, the shutter speed should be around 4 times the frame rate such as 1/100.
ISO – The last thing you want in a green screen video is grainy footage. Your life will turn upside down editing the video and getting the green screen effect perfectly in any video editor. ISO determines the sensitivity and thereby, the grainy effect in your video. When the ISO is too high, the chance of getting grains in the video is high. It is better to use a native ISO for green screen effect, but you need to check with a sample recording and adjust if required.
Conclusion
We have answered how to add background to green screen Final Cut Pro. You can replace any green screen in your video with any video or photo for the background of the video. If you do not have Final Cut Pro or you find the steps slightly complicated, we recommend you to use Wondershare Filmora for instant green screen effect and quick adjustments for the best outcome.
Also read:
- New 8 Tips to Apply Cinematic Color Grading to Your Videos for 2024
- Updated Top 9 Sparkle Effects Photo and Video Editors You Should Know
- Updated Detailed Steps to Rotate Videos Using Kdenlive for 2024
- New In 2024, How To Quickly Create A Screen Print Effect In Photoshop Detailed Guide
- Updated 2024 Approved Do You Wish to Know How FFmpeg Can Remove Audio From a Video? If Yes, Keep Scrolling This Guide to Remove Audio From Video with FFmpeg and Other Alternative Software
- New While Emojis Have High End Credibility Towards Different Media Utilities, People Also Ask About Ways and Methods to Add Emoji to iPhone. Be Here to Get the Easiest Solutions to the Query for 2024
- New In 2024, Make Eye Zoom Transition Effect with Filmora
- In 2024, What Is TS Format and How To Play TS Files? Basic Tips
- New 12 Impressive AI Video Ideas for Making Engaging Video Content
- Updated 2024 Approved 15 Camera Shake Preset for Premiere Pro to Add Camera Shake with Simple Keyframes. Each Preset Is Editable with Easy Steps. Make Your Video Shocking and Impressive with These Camera Shake Effects
- New Methods on How to Speed Up Video on Splice
- In 2024, YouTube Zoom to Fill Is a Great Feature for Viewing Things in Depth. This Article Answers All Questions About Fixing YouTube Zoom to Fill Not Working on Your Device
- New In 2024, Get The Perfect Drone Footage With Free Drone LUTs
- HDR Photography How to Use HDR Mode on Your Android Devices
- Updated How to Create and Add an Adjustment Layer in Final Cut Pro for 2024
- Learn How to Create Your Own Unique Video in Cinematic Text Intro in Filmora. Its a Simple Process that Will Offer Professional-Level Intros of Your Own for 2024
- Updated 2024 Approved How to Make GIF With Transparent Background?
- New This Article Talks About Pixel Art Wallpapers. It Gives Examples of Different Pixel Art to Show You How to Customize Your Own Pixel Art Wallpapers, and How to Make a Pixel Art Gif on Filmora for 2024
- New In 2024, How to Animate Your Designs With Canva GIF
- New 2024 Approved How to Use Adjustment Layer in Final Cut Pro
- New In 2024, CapCut Lenta Template How It Benefits Slow Motion Video
- New 10 Best Old Film Overlays to Make Your Videos Look Vintage for 2024
- Basic Introduction of LumaFusion Color Grading for 2024
- In 2024, How to Speed up a Video on Splice
- New How to Create the Stranger Things Upside Down Effect
- New 2024 Approved Do You Want to Use LUTs in Final Cut Pro? There Are Many Free LUTs for FCPX Available that You Can Use. Using LUTs, You Can Create Professional-Looking Content
- In 2024, How to Make a Time-Lapse Video Online
- How to Get VHS Filter and Glitch Filter to Your Images or Videos?
- New 2024 Approved Do You Know How You Can Trim or Merge Using Wondershare Filmora? Trimming and Merging Using This Tool Is an Easy Task; Learn How
- New 15 Camera Shake Preset for Premiere Pro for 2024
- This Article Aims to Show You How to Export Videos in Filmora for 2024
- New Best Dark Moody LUTs During Editing
- Updated Create Amazing Slow-Motion Videos 8 Affordable Slow-Motion Cameras for 2024
- 8 Best Sites to Get Glitch Transition for Premiere Pro for 2024
- In 2024, TikTok Face Zoom | Create Your Face Zoom TikTok Now
- In 2024, If You Want to Know More About the Basics of Final Cut Pro, It Would Be Helpful to Watch a Beginner Tutorial, with the Length of only 20 Minutes, an Introduction of the Whole Program
- Updated If You Dont Know How to Blur a Part of a Video, Youre in the Right Place. We Have Provided All the Details You Need to Help You Blur a Still or Moving Portion of Your Video
- Updated In 2024, Wondering How to Rotate a Video in Windows at Any Desired Angle and Save It Permanently? Find Out All the Different Ways to Rotate Videos Temporarily as Well as Permanently
- Updated 2024 Approved Convert Slow Motion Videos to Regular Videos in Your iOS Device |A How
- All About Apple iPhone 14 Pro Max Unlock Chip You Need to Know
- 7 Solutions to Fix Error Code 963 on Google Play Of Infinix Note 30 VIP | Dr.fone
- In 2024, What Does Enter PUK Code Mean And Why Did The Sim Get PUK Blocked On Vivo Y100A Device
- A Step-by-Step Guide on Using ADB and Fastboot to Remove FRP Lock on your Samsung Galaxy S23+
- In 2024, Everything You Need To Know About Unlocked iPhone 12 mini
- In 2024, 3 Ways to Unlock iPhone 15 Pro Max without Passcode or Face ID
- New Ways You Can Master to Find 10 Best Free Animated Text Generator
- How To Change Your Apple iPhone SE Apple ID on MacBook
- Updated How to Make a FLV Photo Slideshow for 2024
- In 2024, Pokemon Go Error 12 Failed to Detect Location On Honor Magic 5 Pro? | Dr.fone
- In 2024, How to Transfer Contacts from Realme GT Neo 5 SE to Other Android Devices Devices? | Dr.fone
- How to Share Location in Messenger On Samsung Galaxy S23+? | Dr.fone
- In 2024, Complete Review & Guide to Techeligible FRP Bypass and More For Samsung Galaxy A15 4G
- In 2024, What Is a SIM Network Unlock PIN? Get Your Oppo Reno 11 5G Phone Network-Ready
- Ways to trade pokemon go from far away On Vivo Y200? | Dr.fone
- In 2024, Ways To Find Unlocking Codes For Motorola Edge+ (2023) Phones
- Forgot Your Apple ID Password and Email On Apple iPhone 14 Plus? Heres the Best Fixes
- In 2024, The Most Useful Tips for Pokemon Go Ultra League On Honor Magic5 Ultimate | Dr.fone
- How to Change/Add Location Filters on Snapchat For your Samsung Galaxy S23+ | Dr.fone
- In 2024, Full Guide to Bypass Honor Magic5 Ultimate FRP
- How to Track WhatsApp Messages on Vivo X Fold 2 Without Them Knowing? | Dr.fone
- In 2024, Top 7 Phone Number Locators To Track Motorola Moto G14 Location | Dr.fone
- How to Fix Locked Apple ID from iPhone X
- How to Rescue Lost Photos from Motorola Moto G04?
- Best 3 Motorola Moto G Stylus 5G (2023) Emulator for Mac to Run Your Wanted Android Apps | Dr.fone
- Title: New 2024 Approved Wondering How to Replace Sky in After Effects? Learn How
- Author: Morgan
- Created at : 2024-04-24 01:08:09
- Updated at : 2024-04-25 01:08:09
- Link: https://ai-video-editing.techidaily.com/new-2024-approved-wondering-how-to-replace-sky-in-after-effects-learn-how/
- License: This work is licensed under CC BY-NC-SA 4.0.
