
New 3 Best Effects to Appear on Camera

3 Best Effects to Appear on Camera
We all want to improve our video editing skills and give them more of a wow factor. A fantastic method of achieving this is using different effects and tricks on Filmora .
Appearance effects are optical illusions used to replicate imagined occurrences in a narrative or made-up universe. These effects can be effective narrative devices. As a result, they are widely employed in the theater, film, television, and video game industries. Here is what you need to do to add appearance effects to your videos:
Part 1: Why are Appearance Effects Important?
A good branding and advertising strategy must include video. You can raise the caliber of clients who utilize your product by improving the image you provide.
How can video help you build your brand? How well do you look? Although there is no quick fix to seem nice on-screen instantly, you can employ several appearance effects to enhance the general flow of your videos. Appearance effects are significant because they add a slight twist to your videos. They can help you stand out, add some humor and draw attention from your audience. These simple tricks could add extra fun and Spark to your videos.
Part 2: How to Make Cloth Appearance
Let’s start with the first one. Before you start, make sure you put the camera on a tripod or a steady surface, so it doesn’t move while filming.
Step1 For the first shot, you must throw a jacket on a stool. Make sure it lands on the stool or wherever your talent is going to sit.
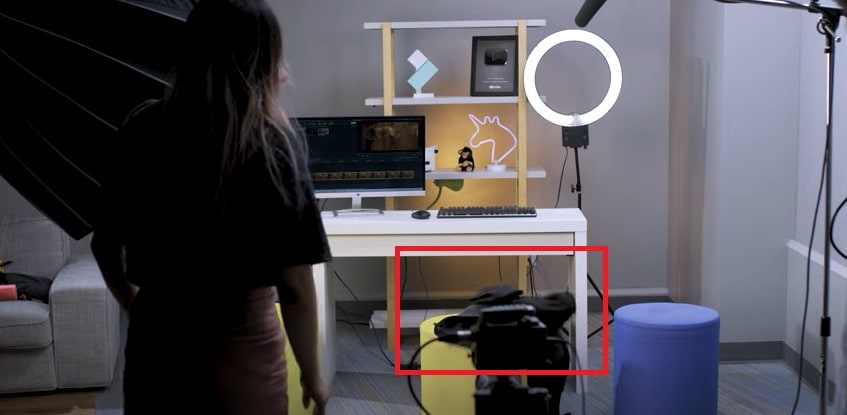
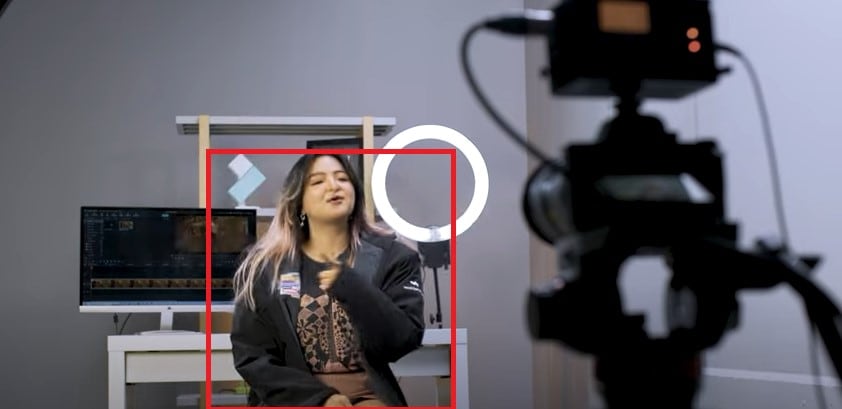
Step2 Make a shot of your talent appearing from where the jacket landed. You can add some acting skills to make this shot more realistic.
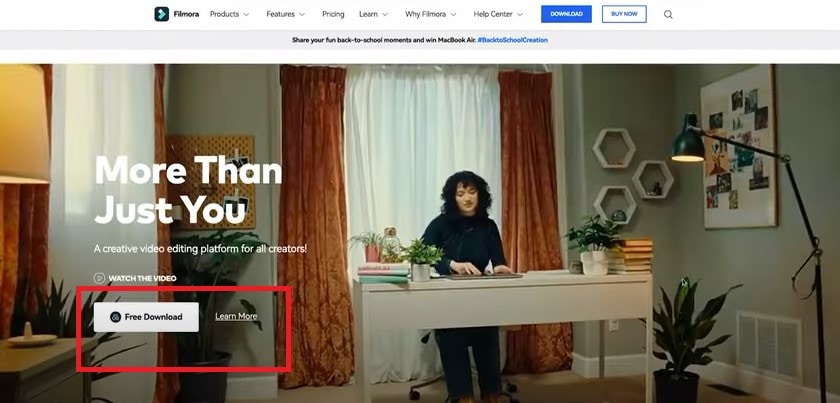
Step3 Download Filmora to edit your footage. You can get started by going to their official website.
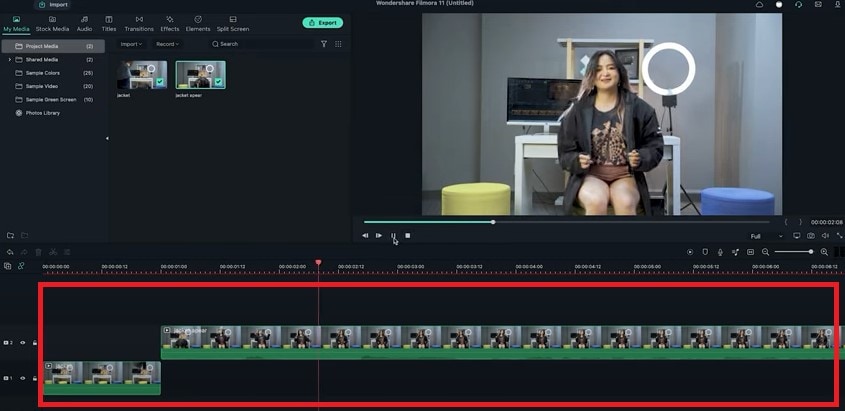
Step4 Now split the first clip on the frame where your jacket lands on the stool. Place it on the first track.
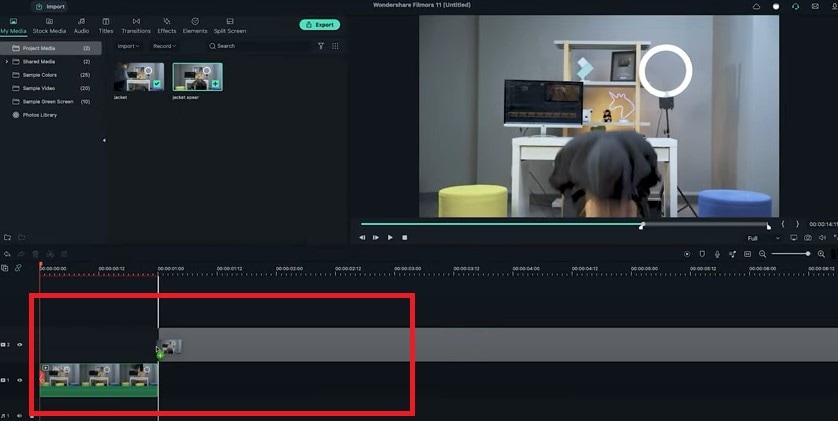
Step5 Trim the second shot until the talents start acting and place it on the second track to match the first clip.
Part 3: How to Make an Explosion Appearance
Step1 This effect is the easiest. You need to film the empty plate with just a background. Then let the talent enter the frame and jump into the place.
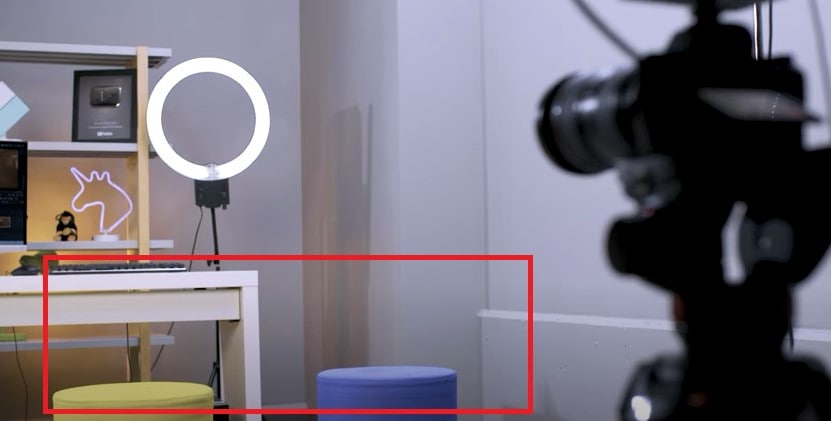
Step2 Now import the clip into Filmora and place it onto the first video track.
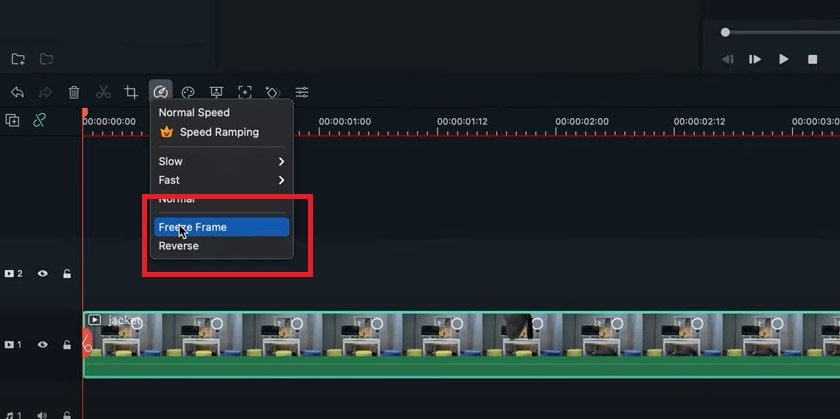
Step3 Freeze the frame of the empty plate with just the background and extend it as necessary. Place the clip onto the second video track and trim it until the action of the talent jump starts.
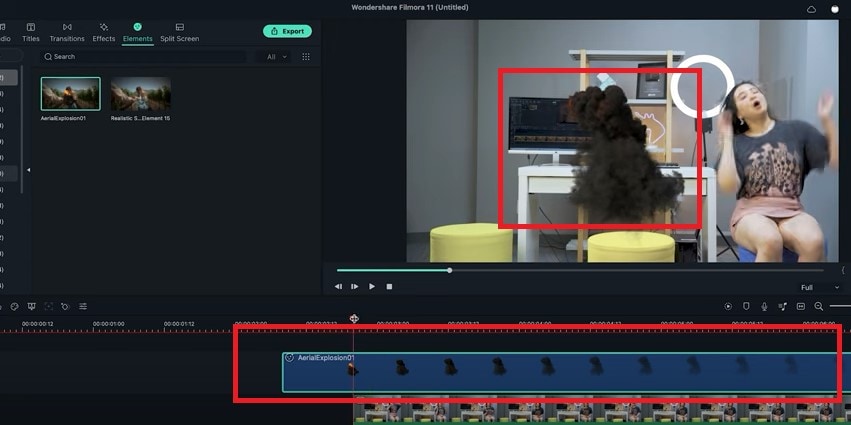
Step4 Delete the rest on the left. The trick is to use some explosion or smoke effect to hide the transition.
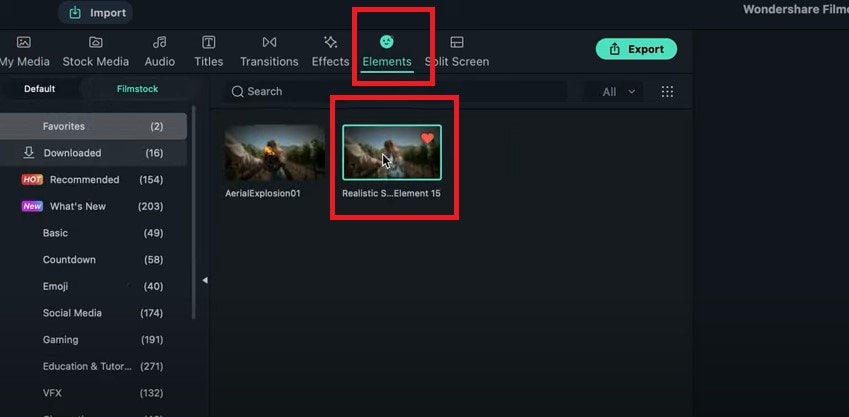
Step5 Use the green screen sample in the default menu here. Add some smoke effects available in film stock. Place it on the third video track and move it to hide the transition.
Part 4: How to Make Roof Appearance
The last trick here is combining the techniques from the two previous effects.
Step1 First, record the empty plate with just a background. Let the talent jump in the frame and set up a green screen for the talent to jump in front of it. It will look like they’re falling from the ceiling.
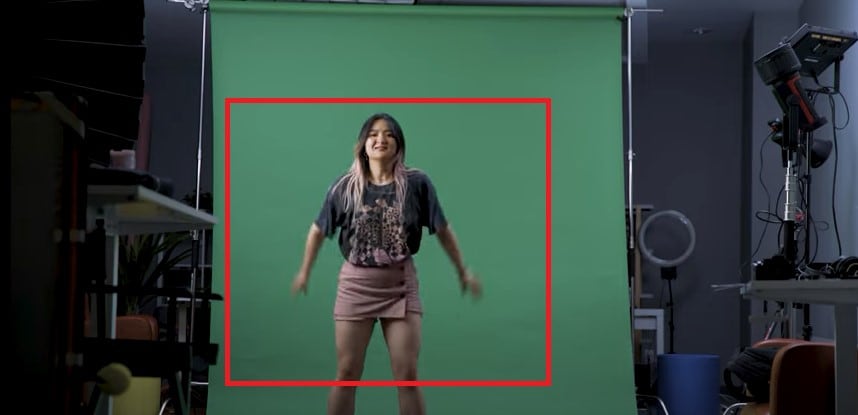
Step2 Now import the clip into Filmora again. Follow the steps from the second example so we have the subject appearing on the screen like this.
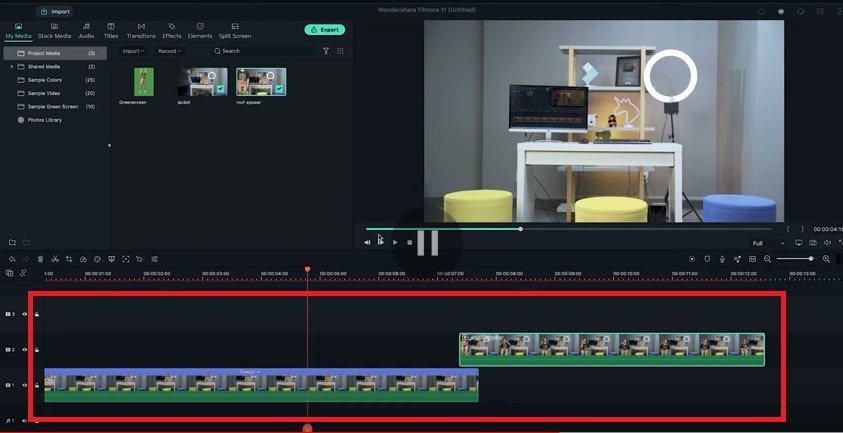
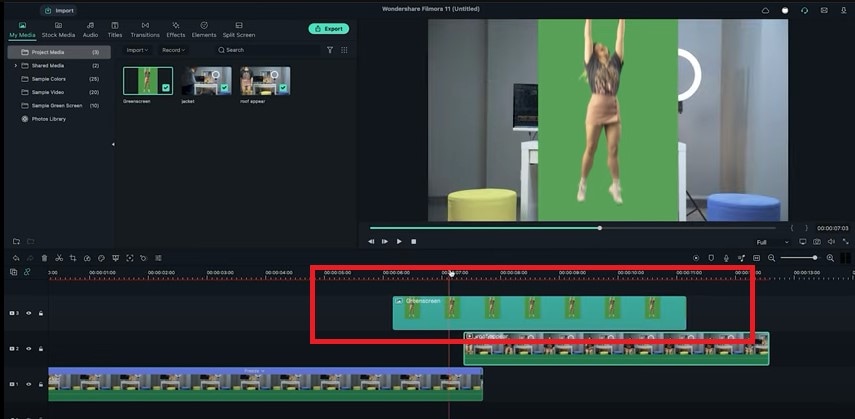
Step3 Add the green screenshot onto the third video track.
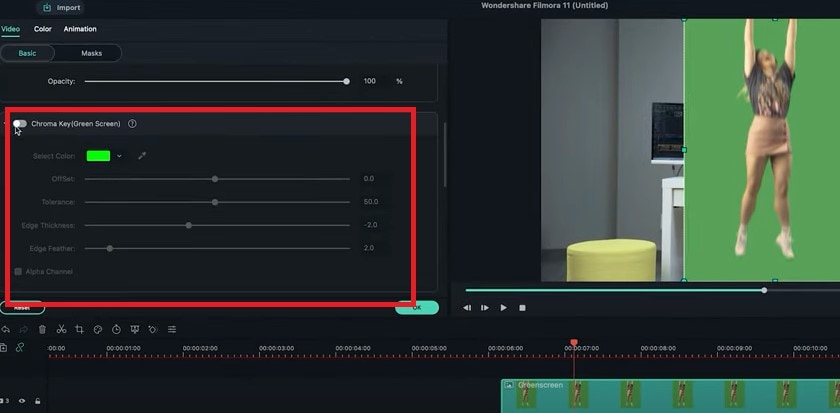
Step4 Double-click on it, activate the setting window and then key out the background using the chroma key feature.
Step5 Move the clip until it covers only the first frame of the appearing clip. Now keyframe the following subject from the outer frame to the final position.
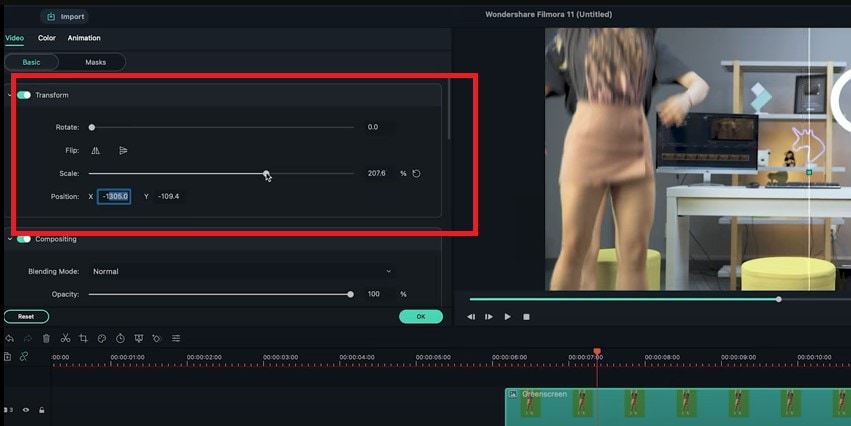
Step6 Now search for some smoke effects and put it upside down. So it looks like the ceiling is broken when the subject falls. Then add some camera shake to the fall.
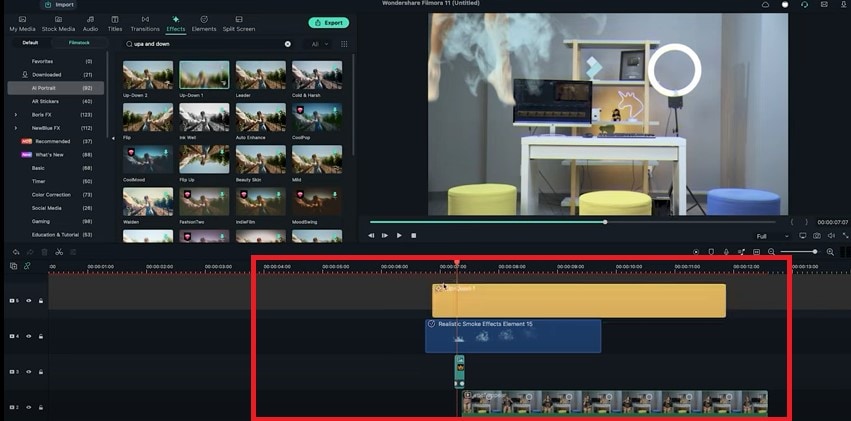
Step7 Drag the camera shake effect back to the top track and shorten it to an ideal length. You can also add some sound effects if you want to this video.
Part 5: Tips to Look Good in Your Next Video
1. Be Clear About the Topic
Intellectuals frequently complain that everyone has attention deficit disorder due to the Internet. According to studies, we only have an attention span of 8 seconds today. You need a punchy, concise message to keep viewers watching your video.
2. Don’t Forget to Smile
Individuals who smile frequently are perceived to be more confident and successful. Therefore, showing your audience that you are confident in your company and services is the best method to gain their trust.
3. Look into the Camera
Direct eye contact with the camera lens is essential. Although it may seem enticing, your sole audience is the person directly in front of you when you’re speaking.
Be mindful of the camera’s confined area. Bring it up to eye level and keep your gaze there rather than elsewhere.
Summary
There are several fantastic camera effects that you can experiment with in your videos. While some are well-known, others are less well-known and often used. We have mentioned the three fun ways to appear on camera above. We suggest using video editing software like Filmora to use these effects more effectively. You can use these appearance effects to create an atmosphere, make your story more understandable, or spice up the video.
Free Download For Win 7 or later(64-bit)
Free Download For macOS 10.14 or later
Free Download For macOS 10.14 or later
Ultimate Guide on How To Plan and Storyboard a Music Video
Do you want to bring your music to life on the big screen? Do you want to create something visually striking? Making a music video seems like a big task. Sometimes, the artist you’re working with might not have a clear idea for their music video. It’s your job to help guide the creative process.
But don’t worry! This guide is going to make it easy for you to plan and storyboard your music video step by step with the help of Filmora . So let’s get started and make an amazing music video together!
Plan and develop initial ideas
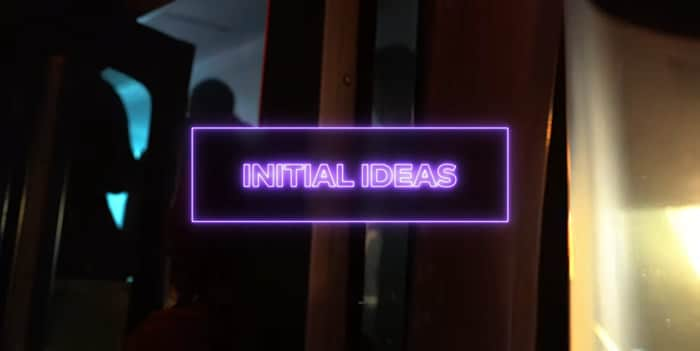
The first and essential step in creating a music video is planning. This is where you will lay the foundation of your music video. You need to figure out what your video is about and what you want to convey to the audience. It involves a concept or theme for the video, research, and reference material. You can also explore different ideas to make your video unique and engaging.
Step1Research and gather information
You can begin by researching and gathering information from other music videos. This will help you to know what has been done before and what is currently popular. You can also figure out how you can do it differently.
Step2Brainstorm and concept development
Once you understand the current trends and styles in the music video. It’s time to start brainstorming ideas. You can do it alone or with the help of your team. But remember that you have to think out of the box to make it creative.
Step3Consider the lyrics and message
In the planning stage, it is also important to consider the lyrics and message of the song. It would be best if you plan according to the feel and vibe of the song. It will help you to create a concept tied to the song and will help enhance its meaning.
Step4Experiment and find the right direction
Once you have a general concept, it’s time to develop it further. You can do it by creating rough sketches or storyboards. You can also film test footage to see how the concept will look on screen.
Step5Effort and attention to detail
Remember, this step is the foundation of your music video. So, take your time and don’t rush through it. By putting in effort and attention to detail, you’ll be able to create a visually stunning and closely tied to the song’s music video.
Choose a style for your music video
While creating ideas for the music video, it’s also important to consider the style of the music video. There are two main styles of music videos:
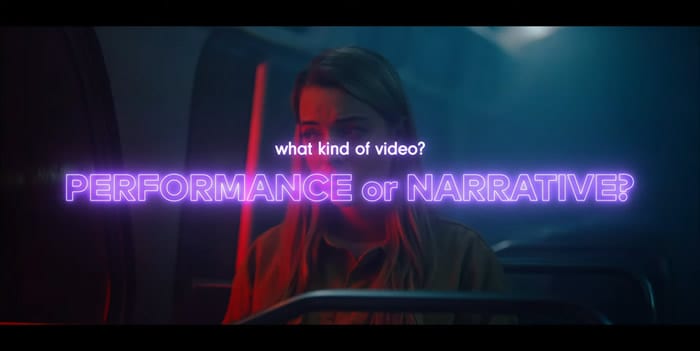
1.Performance-style music video
If you want to showcase energy and charisma in your music video, go for a performance-style music video. This video style focuses on you and your band performing live in front of an audience. You can shoot a video in a single take with minimal cuts or feature different angles and shots. The key is to capture the raw energy and emotion of the performance.
2.Narrative-style music video
A narrative-style music video tells a story or conveys a message along with the music. The story can be a visual representation of the lyrics or a multi-layered narrative. You can choose this style to convey a deeper message or story.
You can shoot this video in different locations and can include different scenes. The main motive is to create a video that emotionally connects with the audience.
Once you have an idea of what you want your music video to be about, you can put together a treatment to show the artist what your initial plan for the music video is.
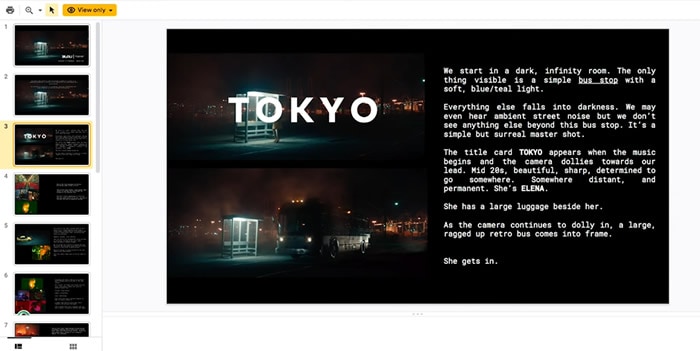
If the artist approves the direction of the video, it’s time to move on to storyboarding!
Storyboard your music video
Once you are done with the style and concept of the video, the next step is storyboarding! It allows you to break down your music video visually and highlight key visual moments. It can save time and money and convey a clear idea to the team. You can do this on paper, a computer, or a tablet, whatever works best for you. Let’s see how to do it with the help of Filmora .
Free Download For Win 7 or later(64-bit)
Free Download For macOS 10.14 or later
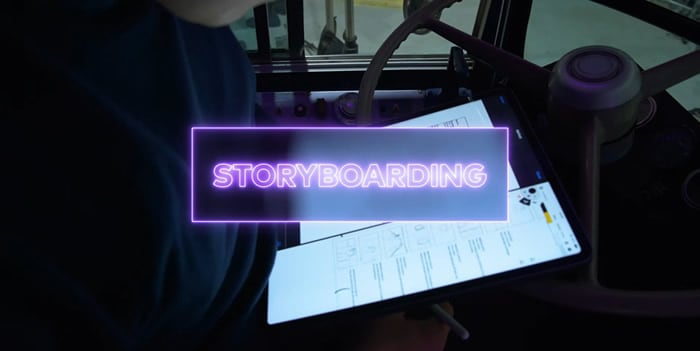
Step1Draw your ideas
You are supposed to break your video idea into different scenes. For each scene, you should draw a picture of what the shot will look like and draw them within the rectangles.
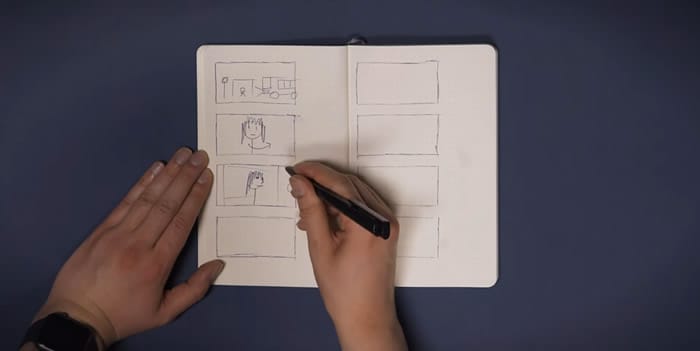
Step2Take pictures
After doing your storyboarding on paper, take photos of each shot in a sequence and import them to your computer.
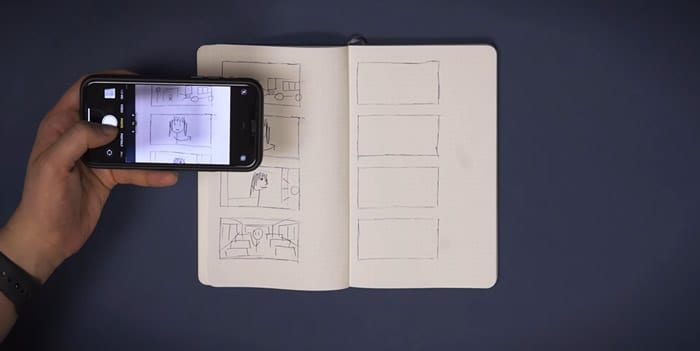
Before going to the next step, make sure to download Wondershare Filmora. It is powerful editing software that can help you easily make a storyboard. With its wide range of features, you can also customize your clips with special effects, transitions, and more.

Free Download For Win 7 or later(64-bit)
Free Download For macOS 10.14 or later
Step3Import pictures to Filmora
Now import all the scenes and music to Filmora. You can also create separate folders if you have multiple concepts for a single video.
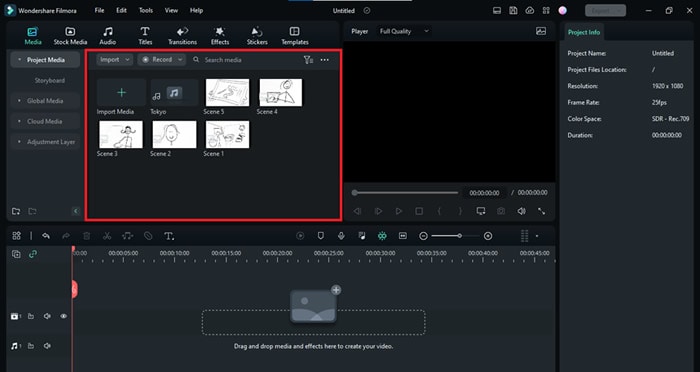
Step4Drop your media onto the timeline
Drag and drop the song to the audio timeline. Then press shift, select all images, and drop them into the picture timeline. If you realize you are missing enough clips to complete the song, you can draw and add more shots.
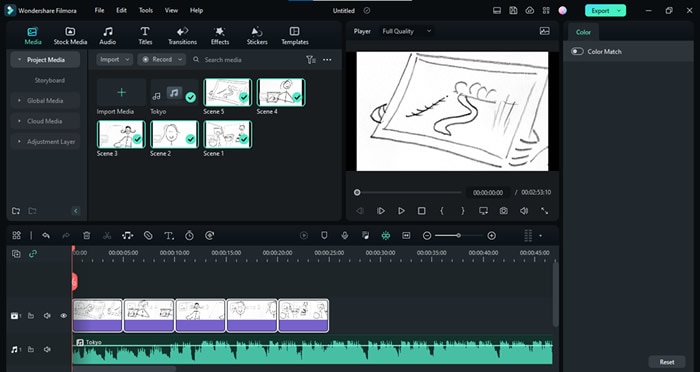
Step5Adjust the frame
You can right-click on the picture’s timeline and select Crop to fit to adjust the image on the screen. You can also adjust the scenes according to the song.
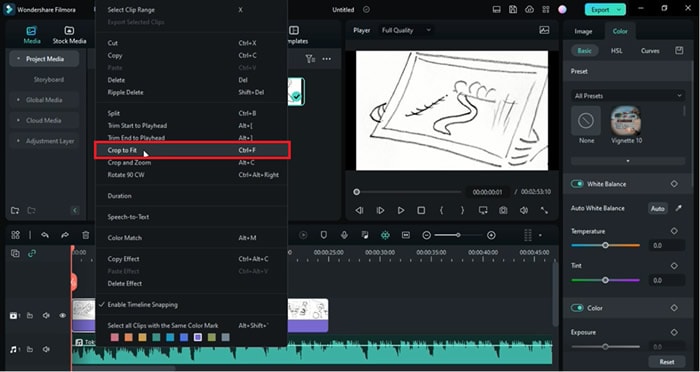
Step6Add effects
You can also simulate transitions and effects in the clips. Let’s suppose you want to show a zoom-in shot. Then you would click on the picture frame and the keyframe option just above the timeline. Now keyframe the position and scale of the clip according to you.
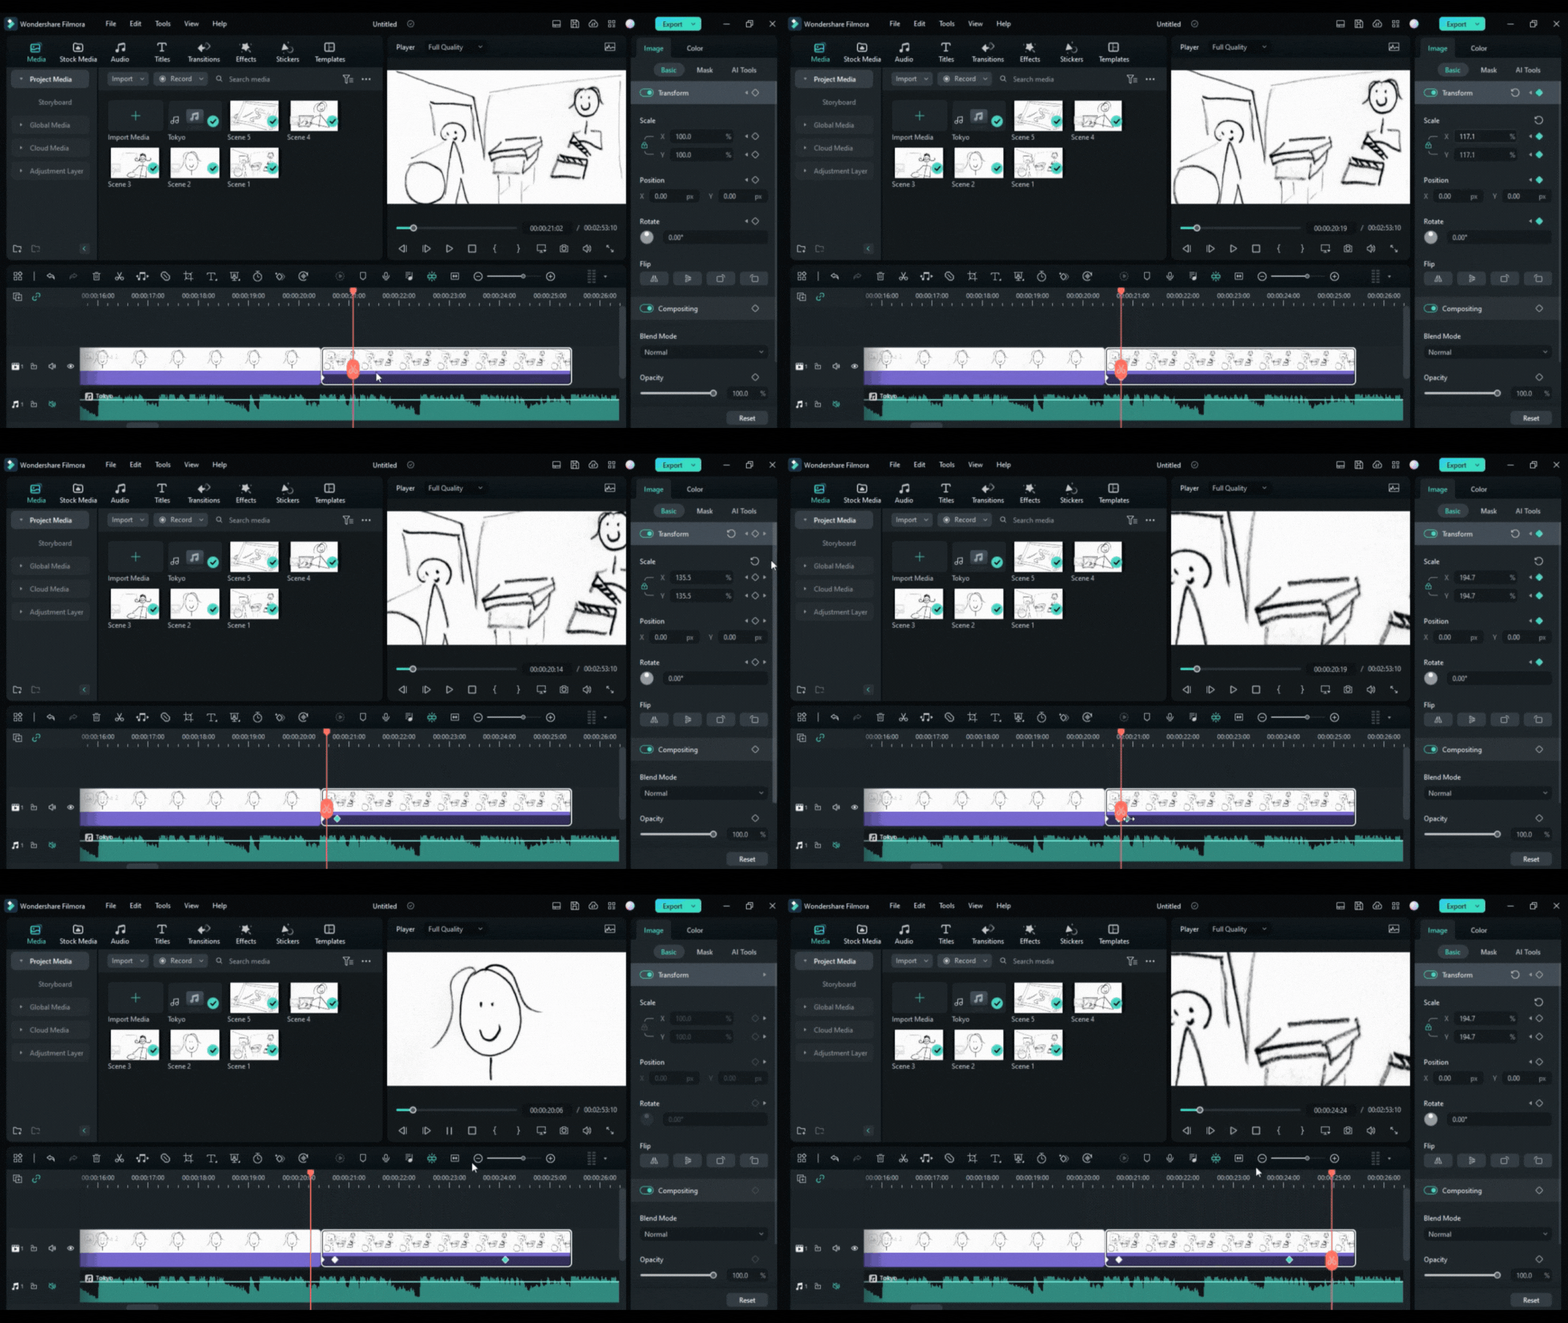
Once you feel like your clips sync with the song, you are ready to start planning for the production of your music video.
Conclusion
We hope this blog has given you a better understanding of how planning and storyboarding can help make your music videos better. You can ensure that your vision is clearly communicated to the audience by planning and storyboarding your music videos properly. Now that you know what to do, it’s time to put that knowledge into action. Take a pencil and paper and start sketching the shots and scenes you want to create.
Free Download For macOS 10.14 or later

Step1Draw your ideas
You are supposed to break your video idea into different scenes. For each scene, you should draw a picture of what the shot will look like and draw them within the rectangles.

Step2Take pictures
After doing your storyboarding on paper, take photos of each shot in a sequence and import them to your computer.

Before going to the next step, make sure to download Wondershare Filmora. It is powerful editing software that can help you easily make a storyboard. With its wide range of features, you can also customize your clips with special effects, transitions, and more.

Free Download For Win 7 or later(64-bit)
Free Download For macOS 10.14 or later
Step3Import pictures to Filmora
Now import all the scenes and music to Filmora. You can also create separate folders if you have multiple concepts for a single video.

Step4Drop your media onto the timeline
Drag and drop the song to the audio timeline. Then press shift, select all images, and drop them into the picture timeline. If you realize you are missing enough clips to complete the song, you can draw and add more shots.

Step5Adjust the frame
You can right-click on the picture’s timeline and select Crop to fit to adjust the image on the screen. You can also adjust the scenes according to the song.

Step6Add effects
You can also simulate transitions and effects in the clips. Let’s suppose you want to show a zoom-in shot. Then you would click on the picture frame and the keyframe option just above the timeline. Now keyframe the position and scale of the clip according to you.

Once you feel like your clips sync with the song, you are ready to start planning for the production of your music video.
Conclusion
We hope this blog has given you a better understanding of how planning and storyboarding can help make your music videos better. You can ensure that your vision is clearly communicated to the audience by planning and storyboarding your music videos properly. Now that you know what to do, it’s time to put that knowledge into action. Take a pencil and paper and start sketching the shots and scenes you want to create.
How to Concatenate Videos Using FFmpeg
Video editing is a crucial aspect of creating content for many people. Whether you’re a YouTuber, a marketer, or just someone who wants to share videos with friends and family, being able to edit and manipulate your videos is key. One of the most basic video editing tasks is concatenating videos, which combines multiple files to create one cohesive video.
FFmpeg is a powerful tool that allows you to do just that, and in this guide, we’ll walk you through the process of FFmpeg concatenate videos. Whether a beginner or an experienced video editor, this guide will provide you with all the information you need to seamlessly merge your videos. From installation to execution, we’ll cover it all so you can streamline your video editing process.
Overview and Installation of FFmpeg
FFmpeg is free, open-source project that allows you to record, convert, and stream digital audio and video. It is a command-line tool widely used in video editing and transcoding. FFmpeg can be used to concatenate videos and other tasks, such as adding subtitles, changing video resolution, and more. It is available for Windows, Mac, and Linux, making it a versatile and accessible tool for anyone to use.
Here’s how to install FFmpeg:
Step1 Log in to your Ubuntu server via SSH and update the package index.
$ sudo apt update
Step2 Install FFmpeg and all the required dependencies
$ sudo apt install ffmpeg
Step3 Verify the version of FFmpeg that you’ve installed.
$ ffmpeg -version
Prerequisite
Before we merge videos using FFmpeg, we must understand the various methods available to us. FFmpeg offers three ways to concatenate videos: a demuxer, a filter, or a protocol. However, each method has its own set of considerations, and the best method for you will depend on the properties of the videos you’re working with.
It’s crucial to ensure that all encoding-related properties align with your chosen method. This includes the timebase, height and width, codecs, and pixel format. Some methods require the videos you’re merging to have the same encoding, while others allow for different encodings. It’s essential to keep this in mind to ensure that the final video is seamless without any breaks. Remember that these prerequisites will help you have a smooth process.
Concatenate Videos With Same Codecs Using FFmpeg
If the videos you want to concatenate have the same codec, you can use the FFmpeg “concat” demuxer or protocol to join them together. This simple and efficient method doesn’t require re-encoding the videos, saving time and preserving the original quality. This section will review the steps to concatenate videos using the “concat” demuxer and “concat” protocols in FFmpeg.
Merge Videos With the “Concat” Demuxer
The concat demuxer in FFmpeg allows you to join together multiple video files with the same codecs by reading a list of file paths from a text file and demuxing them in sequence. Each video starts where the previous one finishes without needing to re-encode the videos. Here’s how to do it:
Step1 Create a .txt file and list the paths of the video files you want to merge.
Join_video.txt
file /Users/Video/input1.mp4
file /Users/Video/input2.mp4
![]()
Note: You can add more than two video files.
Step2 Run the FFmpeg command:
ffmpeg -f concat -safe 0 -i join_video.txt -c copy output_demuxer.mp4
![]()
Note: -safe 0 is added to accept any file name.
-c copy will copy all the streams.
As this method allows you to “stream copy” the files instead of re-encoding them, the concatenation is very fast. This can be a good option if you have videos with the same codecs and want to join them quickly without losing quality.
Join Videos With the “Concat” Protocol
The concat protocol in FFmpeg allows you to join together multiple video files in a specific format that supports file-level concatenation, such as MPEG-2 TS. However, it cannot be used for other video formats like MP4 and WEBM.
Here’s how to use the “concat protocol:
Step1 Run the FFmpeg command:
ffmpeg -i “concat:input1.ts|input2.ts” -c copy output_protocol.ts
![]()
Note: The concat protocol allows you to “stream copy” the files by adding the option -c copy.
Step2 Input the file name of the video using this code:
ffmpeg -i “concat:input1.mp4|input2.mp4” -c copy output_protocol.mp4
![]()
Note: If you try to use this method on video formats that are not supported, only the first input video will be saved in the output video. And the video ends after the first video.
Although this method is limited in terms of supported video formats, it’s very easy to use if you merge videos in the supported formats. It’s a single command in the terminal without needing a text file. Additionally, using the -c copy option makes it efficient as it doesn’t require re-encoding, saving time.
Concatenate MP4 Video Files of Different Codecs & Resolutions Using FFmpeg
If the videos you want to concatenate have different codecs or resolutions, you can still use FFmpeg to join them together. However, this method requires re-encoding the videos, which can take longer and may result in a loss of quality. This section will cover the steps to concatenate videos with different codecs or resolutions using FFmpeg.
Here’s how to do it:
Step1 Provide the names of the input files to FFmpeg.
ffmpeg -i file1.mp4 -i file2.mp4 -i file3.mp4 \
Step2 Use the filter_complex filtergraph parameter to instruct FFmpeg from where to take the audio and video.
-filter_complex “[0:v] [0:a] [1:v] [1:a] [2:v] [2:a]
![]()
Note: [0:v][0:a] means FFmpeg needs to take the video and audio from the 0th video (file1.mp4).
Step3 Tell FFmpeg to concatenate three files (n=3).
concat=n=3:v=1:a=1 [vv] [aa]“ \
![]()
Note: The v=1:a=1 implies one stream for the audio and one stream for the video.
Step4 Map these audio and video outputs to the final video container. This is done as follows:
-map “[vv]“ -map “[aa]“ mergedVideo.mp4
It is important to note that this method requires re-encoding the videos, which can take more time and may result in a loss of quality. However, it offers the flexibility of filtering the videos before concatenating them. The filter_complex method in FFmpeg allows you to concatenate videos of different codecs and resolutions. The final step is to map the audio and video outputs to the final video container. This can be done using the -map command.
Concatenate Videos With Multiple Audio Streams Using FFmpeg
Concatenating videos with multiple audio streams can be more complex than concatenating videos with a single audio stream. This section will cover the steps to concatenate videos with multiple audio streams using FFmpeg. We’ll be using the filter_complex method in FFmpeg, which allows you to manipulate and concatenate multiple audio and video streams in a single command. This method is more advanced but allows you to join videos with different audio streams and create a final video with multiple audio tracks.
Step1 Specify the input files and opening.mkv, episode.mkv, and ending.mkv:
$ ffmpeg -i opening.mkv -i episode.mkv -i ending.mkv -filter_complex
Step2 Use the filter_complex parameter in FFmpeg to specify the input streams for the video and audio.
[0:0] [0:1] [0:2] [1:0] [1:1] [1:2] [2:0] [2:1] [2:2]
![]()
Note: Single video stream ([0:0], [1:0], [2:0])
Dual audio streams ([0:1][0:2], [1:1][1:2], [2:1][2:2])
Step3 Use the concat filter to specify that you want to concatenate 3 files (n=3) with 1 video stream (v=1) and 2 audio streams (a=2). Specify the output streams as [v], [a1], [a2]:
concat=n=3:v=1:a=2 [v] [a1] [a2]
Step4 Use the -map option to map the output streams to the final video container:
-map ‘[v]‘ -map ‘[a1]‘ -map ‘[a2]‘ output.mkv
[Bonus] Join Videos Together With Filmora
While FFmpeg offers a wide range of options for joining videos together, it can have a steep learning curve for some users. An alternative method for joining videos is using Filmora. Wondershare Filmora is a user-friendly video editing software that allows you to easily join multiple videos. It’s a great option for users new to video editing or needing experience with command-line tools like FFmpeg.
Free Download For Win 7 or later(64-bit)
Free Download For macOS 10.14 or later
Filmora has a simple drag-and-drop interface, making adding, arranging, and editing videos and audio tracks easy. Additionally, it offers various features like split, trim, crop, merge, and more. It also has various effects, transitions, and animations to enhance the overall look of your video. With Filmora, you can create professional-looking videos with minimal effort.
How-to Steps
Here’s how to merge videos using Filmora:
Step1 Open Filmora and click “New Project.”

Step2 Go to “File“ > “Import Media“ > “Import Media Files“ to add your video files to the media library.

Step3 Drag and drop the files you want to merge from the media library to the timeline, and then you’ll get the merged video seamlessly.

Step4 Edit your video.

Step5 After editing, click the “Export“ tab to save your videos.

Conclusion
FFmpeg is a powerful tool that allows you to concatenate videos in various ways. Whether you’re working with videos of the same codecs and resolutions or videos with multiple audio streams, FFmpeg can handle it. However, for users new to video editing or needing experience with command-line tools, using Filmora can be a more user-friendly option. It offers a simple drag-and-drop interface and a variety of features and effects to enhance the overall look of your video.
Step2 Run the FFmpeg command:
ffmpeg -f concat -safe 0 -i join_video.txt -c copy output_demuxer.mp4
![]()
Note: -safe 0 is added to accept any file name.
-c copy will copy all the streams.
As this method allows you to “stream copy” the files instead of re-encoding them, the concatenation is very fast. This can be a good option if you have videos with the same codecs and want to join them quickly without losing quality.
Join Videos With the “Concat” Protocol
The concat protocol in FFmpeg allows you to join together multiple video files in a specific format that supports file-level concatenation, such as MPEG-2 TS. However, it cannot be used for other video formats like MP4 and WEBM.
Here’s how to use the “concat protocol:
Step1 Run the FFmpeg command:
ffmpeg -i “concat:input1.ts|input2.ts” -c copy output_protocol.ts
![]()
Note: The concat protocol allows you to “stream copy” the files by adding the option -c copy.
Step2 Input the file name of the video using this code:
ffmpeg -i “concat:input1.mp4|input2.mp4” -c copy output_protocol.mp4
![]()
Note: If you try to use this method on video formats that are not supported, only the first input video will be saved in the output video. And the video ends after the first video.
Although this method is limited in terms of supported video formats, it’s very easy to use if you merge videos in the supported formats. It’s a single command in the terminal without needing a text file. Additionally, using the -c copy option makes it efficient as it doesn’t require re-encoding, saving time.
Concatenate MP4 Video Files of Different Codecs & Resolutions Using FFmpeg
If the videos you want to concatenate have different codecs or resolutions, you can still use FFmpeg to join them together. However, this method requires re-encoding the videos, which can take longer and may result in a loss of quality. This section will cover the steps to concatenate videos with different codecs or resolutions using FFmpeg.
Here’s how to do it:
Step1 Provide the names of the input files to FFmpeg.
ffmpeg -i file1.mp4 -i file2.mp4 -i file3.mp4 \
Step2 Use the filter_complex filtergraph parameter to instruct FFmpeg from where to take the audio and video.
-filter_complex “[0:v] [0:a] [1:v] [1:a] [2:v] [2:a]
![]()
Note: [0:v][0:a] means FFmpeg needs to take the video and audio from the 0th video (file1.mp4).
Step3 Tell FFmpeg to concatenate three files (n=3).
concat=n=3:v=1:a=1 [vv] [aa]“ \
![]()
Note: The v=1:a=1 implies one stream for the audio and one stream for the video.
Step4 Map these audio and video outputs to the final video container. This is done as follows:
-map “[vv]“ -map “[aa]“ mergedVideo.mp4
It is important to note that this method requires re-encoding the videos, which can take more time and may result in a loss of quality. However, it offers the flexibility of filtering the videos before concatenating them. The filter_complex method in FFmpeg allows you to concatenate videos of different codecs and resolutions. The final step is to map the audio and video outputs to the final video container. This can be done using the -map command.
Concatenate Videos With Multiple Audio Streams Using FFmpeg
Concatenating videos with multiple audio streams can be more complex than concatenating videos with a single audio stream. This section will cover the steps to concatenate videos with multiple audio streams using FFmpeg. We’ll be using the filter_complex method in FFmpeg, which allows you to manipulate and concatenate multiple audio and video streams in a single command. This method is more advanced but allows you to join videos with different audio streams and create a final video with multiple audio tracks.
Step1 Specify the input files and opening.mkv, episode.mkv, and ending.mkv:
$ ffmpeg -i opening.mkv -i episode.mkv -i ending.mkv -filter_complex
Step2 Use the filter_complex parameter in FFmpeg to specify the input streams for the video and audio.
[0:0] [0:1] [0:2] [1:0] [1:1] [1:2] [2:0] [2:1] [2:2]
![]()
Note: Single video stream ([0:0], [1:0], [2:0])
Dual audio streams ([0:1][0:2], [1:1][1:2], [2:1][2:2])
Step3 Use the concat filter to specify that you want to concatenate 3 files (n=3) with 1 video stream (v=1) and 2 audio streams (a=2). Specify the output streams as [v], [a1], [a2]:
concat=n=3:v=1:a=2 [v] [a1] [a2]
Step4 Use the -map option to map the output streams to the final video container:
-map ‘[v]‘ -map ‘[a1]‘ -map ‘[a2]‘ output.mkv
[Bonus] Join Videos Together With Filmora
While FFmpeg offers a wide range of options for joining videos together, it can have a steep learning curve for some users. An alternative method for joining videos is using Filmora. Wondershare Filmora is a user-friendly video editing software that allows you to easily join multiple videos. It’s a great option for users new to video editing or needing experience with command-line tools like FFmpeg.
Free Download For Win 7 or later(64-bit)
Free Download For macOS 10.14 or later
Filmora has a simple drag-and-drop interface, making adding, arranging, and editing videos and audio tracks easy. Additionally, it offers various features like split, trim, crop, merge, and more. It also has various effects, transitions, and animations to enhance the overall look of your video. With Filmora, you can create professional-looking videos with minimal effort.
How-to Steps
Here’s how to merge videos using Filmora:
Step1 Open Filmora and click “New Project.”

Step2 Go to “File“ > “Import Media“ > “Import Media Files“ to add your video files to the media library.

Step3 Drag and drop the files you want to merge from the media library to the timeline, and then you’ll get the merged video seamlessly.

Step4 Edit your video.

Step5 After editing, click the “Export“ tab to save your videos.

Conclusion
FFmpeg is a powerful tool that allows you to concatenate videos in various ways. Whether you’re working with videos of the same codecs and resolutions or videos with multiple audio streams, FFmpeg can handle it. However, for users new to video editing or needing experience with command-line tools, using Filmora can be a more user-friendly option. It offers a simple drag-and-drop interface and a variety of features and effects to enhance the overall look of your video.
How to Loop YouTube Videos on iPhone
YouTube videos are a great way to get information fast. But there are times when you want to watch a video over and over again without having to go back to the YouTube app. Here is how you can loop YouTube videos on your iPhone. There are 2 ways to loop YouTube videos on iPhone. One is through the YouTube app and using third-party apps.
There are many reasons why you might want to loop a video on your iPhone. Maybe you’re trying to learn a dance routine, or you want to listen to a song on repeat. You’ve probably seen those cool looping videos on Instagram and Facebook and wondered how people make them. YouTube is a great place to find videos on any topic.
The YouTube app on the iPhone is a great way to watch videos, but it doesn’t have a repeat or loop feature. This means that if you are watching a long video, you will have to keep your phone on and continue watching the video. YouTube is the world’s most popular video-sharing platform with approx. 1.9 billion monthly active users.
Part 1: How to loop YouTube videos on iPhone
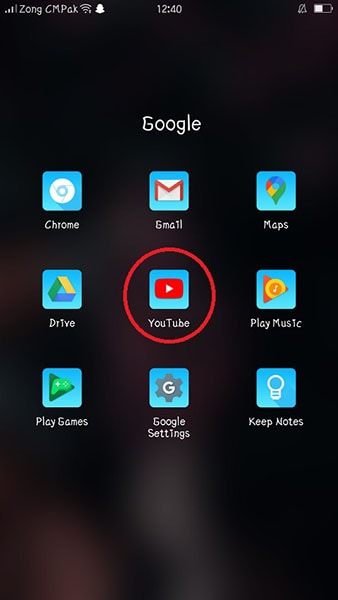
Step 1: Open the YouTube app on your iPhone
Install YouTube on your iPhone after that open it. Search your desired video on the YouTube search bar.
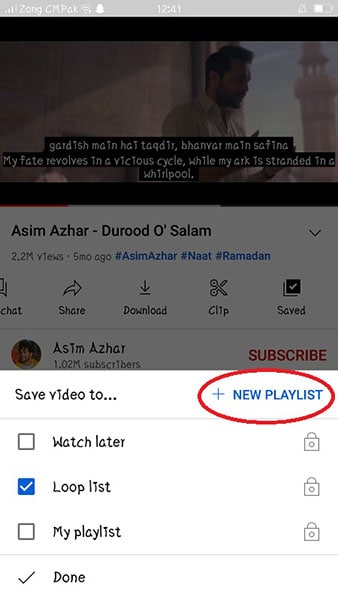
Step 2: Tap the video you want to repeat
Click on the three dots or click on the save button to create a new playlist for your video. If you want to listen to or see the existing videos you can also add your videos to your old playlist.
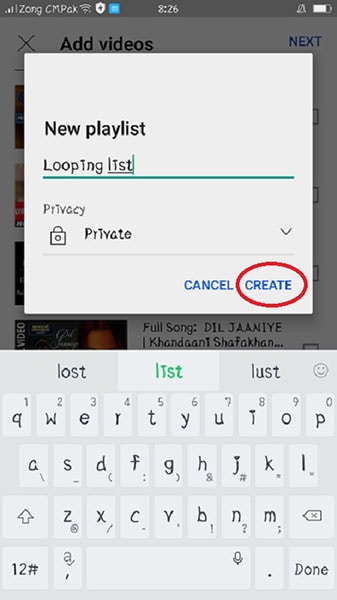
Step 3: Create a playlist and start playing it
Click on New Playlist then give any name to your playlist. Give any name to your playlist and select whether you want to make it private or public.
Step 4: Click on the library
After creating a playlist click on the library which is placed at the bottom. After clicking on it you can see your all playlists.
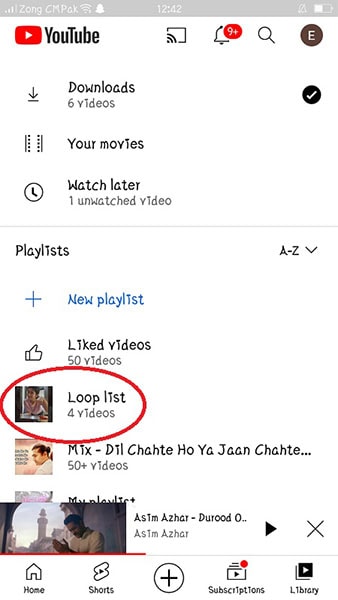
Step 5: Play the playlist on the loop
Click on your desired playlist which you want to play after that you’ll see two options on the screen Play and Shuffle. Select the Play option, your playlist will start.
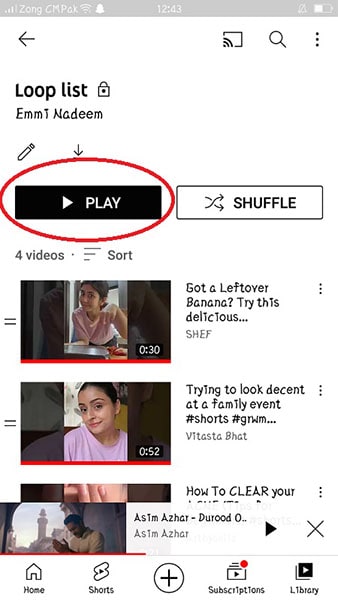
Step 6: Play your favorite video first and put the playlist on the loop
When you start playing your playlist, you can start it with your favorite video or you can also put your playlist on a loop. So that you can watch your videos on a loop.
Benefits of looping YouTube videos on iPhone
If you are a YouTube addict, then you might be pleased to know that your iPhone has a built-in feature that allows for the video to loop back to the beginning. This feature is an excellent way of saving time and maximizing your viewing pleasure. Looping videos on iPhone is a great way of saving time and maximizing your viewing pleasure.
Looping videos on your phone can be a great way to kill time. Watching the same video over and over again can be tiring, but if you do it on your phone, you don’t have to worry about that. You can change the video at any point in time, so if you find that you are getting bored with it, then just find another one.
Over a billion hours of video are watched every day. The app is available for both iOS and Android devices, which means that you can watch YouTube videos on your phone no matter where you are. This can be useful if you want to listen to music or watch a tutorial while doing something else on your phone, like checking Facebook or browsing the web.
Part 2: How to Edit Time-lapse Video on Computer
Time-lapse videos are becoming more and more popular nowadays. They are a great way to show the passage of time, but editing them on a computer is not an easy task. Editing time-lapse videos on a computer is not an easy task because it requires you to have the right software and know how to use it.
It can be quite time-consuming and tedious work, which is why we need a proper editing program that can help us through this process. It’s just about learning the basics of editing and then adding a few effects to make your video more interesting. Here are some tips on how you can edit time-lapse videos on your computer:
- The first thing you need to do is download and install a video editor for your computer.
- Import the timelapse footage into the video editing program that you have downloaded and installed, such as Adobe Premiere Pro or Sony Vegas Pro, etc.
- Now you need to trim out any unwanted footage at the beginning or end of the clip so that what remains is just what you want to show in your final video.
- The next step is to add transitions between scenes, such as fades, wipes, dissolves, or cuts between shots - this will help transition between scenes smoothly and seamlessly without any abrupt jumps in time or space between them while also adding an extra level of polish.
Time-lapse videos can help you produce stunning results, no matter what your creative goals may be. If you want to create a time-lapse video, there are many things you need to consider. Time-lapse videos are not just a series of photos strung together. And the most important thing you need to consider is the format of the video you’ll need to take.
Choosing the right editing software is also important if you’re using a camera that shoots time-lapse videos. And if you’re using a DSLR camera, there is a chance that your time-lapse videos are in MOV format. If that’s the case, then you’re in luck. Filmora can help you edit your time-lapse video with ease.
Edit Time-lapse video on Filmora software
Filmora is a video editor that lets you easily create and edit time-lapse videos. With Filmora, you can add music, filters, and effects to your videos to give them a unique look and feel. You can also trim and cut your videos, and merge them to create longer videos. Filmora is perfect for creating professional-looking time-lapse videos.
Filmora has an easy-to-use timeline that makes it easy to sequence your videos and create smooth transitions. This makes it easy to create high-quality time-lapse videos that look like they were filmed in a single take. Filmora has a built-in editor that lets you easily add music and sound effects to your videos. This means that you can create videos that look and sound like professional movies.
How to edit a video in Filmora:
Filmora’s time-lapse feature is free, which is a great start. However, you do need to do a few things to make it work. First, you need to make sure that your phone is compatible with Filmora. You’ll also need a connection to the Internet and a working camera on your phone. There are a few things that you’ll need to know to start editing videos on Filmora.
Step 1: Download Filmora and create a new project
Download Filmora on your desktop and click on the “New Project” button. This will open up a new window where you can name your project and choose a video file to start working with.

Free Download For Win 7 or later(64-bit)
Free Download For macOS 10.14 or later
Step 2: Select media and place it on the timeline
Click on the “Media” tab and select your video file. You’ll now see the video timeline on the left side of the window. Use the video timeline to drag and drop video clips into the timeline. You can also use the buttons on the timeline to change the speed, direction, and audio volume of the video clips.

Step 3: Select the speed you want the video to play at and click on the “OK” button.
You set the duration and speed of your video according to your requirements. You can edit the speed of your video individually. If you put your first video on high speed then you can slow down your second video.

Step 4: Click on the “Effects” button and select the “Special Effects” tab
You have undoubtedly seen those videos, full of special effects and transitions. These effects are the result of good video editing software, like Filmora. This software is designed to be used by anyone, from beginners to expert editors. You can add effects to your time-lapse video. Click on the Effects on the top bar of Filmora. You can also add various transitions in your time-lapse video.

Step 5: Export your time-lapse video
As a user of Filmora, you can export a time-lapse video onto your computer. This feature is one of the best features Filmora has to offer. You can export your edited time-lapse video on Filmora. When you are done with your time-lapse editing export the video on your desktop, drive, or anywhere you want

The Bottom Line
Since most people own an iPhone, it’s very useful to know some tricks to be more productive. As you have seen, the utility of looping a video is not something to be scoffed at. If you need to keep watching a video over and over again, on iPhone looping a video is one of the best ways to do so.
We hope the content above has been useful to you, and that you can see how looping YouTube videos on your iPhone could improve your iPhone experience. On the other hand, you can use Filmora software for your video or photo editing. Filmora is user-friendly software and you can easily install it from a browser. You just need a piece of basic knowledge to use Filmora.
Free Download For macOS 10.14 or later
Step 2: Select media and place it on the timeline
Click on the “Media” tab and select your video file. You’ll now see the video timeline on the left side of the window. Use the video timeline to drag and drop video clips into the timeline. You can also use the buttons on the timeline to change the speed, direction, and audio volume of the video clips.

Step 3: Select the speed you want the video to play at and click on the “OK” button.
You set the duration and speed of your video according to your requirements. You can edit the speed of your video individually. If you put your first video on high speed then you can slow down your second video.

Step 4: Click on the “Effects” button and select the “Special Effects” tab
You have undoubtedly seen those videos, full of special effects and transitions. These effects are the result of good video editing software, like Filmora. This software is designed to be used by anyone, from beginners to expert editors. You can add effects to your time-lapse video. Click on the Effects on the top bar of Filmora. You can also add various transitions in your time-lapse video.

Step 5: Export your time-lapse video
As a user of Filmora, you can export a time-lapse video onto your computer. This feature is one of the best features Filmora has to offer. You can export your edited time-lapse video on Filmora. When you are done with your time-lapse editing export the video on your desktop, drive, or anywhere you want

The Bottom Line
Since most people own an iPhone, it’s very useful to know some tricks to be more productive. As you have seen, the utility of looping a video is not something to be scoffed at. If you need to keep watching a video over and over again, on iPhone looping a video is one of the best ways to do so.
We hope the content above has been useful to you, and that you can see how looping YouTube videos on your iPhone could improve your iPhone experience. On the other hand, you can use Filmora software for your video or photo editing. Filmora is user-friendly software and you can easily install it from a browser. You just need a piece of basic knowledge to use Filmora.
Free Download For macOS 10.14 or later
Step 2: Select media and place it on the timeline
Click on the “Media” tab and select your video file. You’ll now see the video timeline on the left side of the window. Use the video timeline to drag and drop video clips into the timeline. You can also use the buttons on the timeline to change the speed, direction, and audio volume of the video clips.

Step 3: Select the speed you want the video to play at and click on the “OK” button.
You set the duration and speed of your video according to your requirements. You can edit the speed of your video individually. If you put your first video on high speed then you can slow down your second video.

Step 4: Click on the “Effects” button and select the “Special Effects” tab
You have undoubtedly seen those videos, full of special effects and transitions. These effects are the result of good video editing software, like Filmora. This software is designed to be used by anyone, from beginners to expert editors. You can add effects to your time-lapse video. Click on the Effects on the top bar of Filmora. You can also add various transitions in your time-lapse video.

Step 5: Export your time-lapse video
As a user of Filmora, you can export a time-lapse video onto your computer. This feature is one of the best features Filmora has to offer. You can export your edited time-lapse video on Filmora. When you are done with your time-lapse editing export the video on your desktop, drive, or anywhere you want

The Bottom Line
Since most people own an iPhone, it’s very useful to know some tricks to be more productive. As you have seen, the utility of looping a video is not something to be scoffed at. If you need to keep watching a video over and over again, on iPhone looping a video is one of the best ways to do so.
We hope the content above has been useful to you, and that you can see how looping YouTube videos on your iPhone could improve your iPhone experience. On the other hand, you can use Filmora software for your video or photo editing. Filmora is user-friendly software and you can easily install it from a browser. You just need a piece of basic knowledge to use Filmora.
Free Download For macOS 10.14 or later
Step 2: Select media and place it on the timeline
Click on the “Media” tab and select your video file. You’ll now see the video timeline on the left side of the window. Use the video timeline to drag and drop video clips into the timeline. You can also use the buttons on the timeline to change the speed, direction, and audio volume of the video clips.

Step 3: Select the speed you want the video to play at and click on the “OK” button.
You set the duration and speed of your video according to your requirements. You can edit the speed of your video individually. If you put your first video on high speed then you can slow down your second video.

Step 4: Click on the “Effects” button and select the “Special Effects” tab
You have undoubtedly seen those videos, full of special effects and transitions. These effects are the result of good video editing software, like Filmora. This software is designed to be used by anyone, from beginners to expert editors. You can add effects to your time-lapse video. Click on the Effects on the top bar of Filmora. You can also add various transitions in your time-lapse video.

Step 5: Export your time-lapse video
As a user of Filmora, you can export a time-lapse video onto your computer. This feature is one of the best features Filmora has to offer. You can export your edited time-lapse video on Filmora. When you are done with your time-lapse editing export the video on your desktop, drive, or anywhere you want

The Bottom Line
Since most people own an iPhone, it’s very useful to know some tricks to be more productive. As you have seen, the utility of looping a video is not something to be scoffed at. If you need to keep watching a video over and over again, on iPhone looping a video is one of the best ways to do so.
We hope the content above has been useful to you, and that you can see how looping YouTube videos on your iPhone could improve your iPhone experience. On the other hand, you can use Filmora software for your video or photo editing. Filmora is user-friendly software and you can easily install it from a browser. You just need a piece of basic knowledge to use Filmora.
Also read:
- [New] 2024 Approved Map Masters Reveal Top Five For Gold Collection
- [New] Top Flood-Resistant Cams Reviewed – #7 Edition
- [Updated] In 2024, How to Record iPhone/iPad’s Screen [2023 Latest Method]
- 2024 Approved The Finest Videography Tools
- Effortless Transformation of MXF Into FLV: A Comprehensive Guide on File Format Conversion
- How to Make a Super Easy Rotating Video Effect
- How To Pause Life360 Location Sharing For Vivo Y28 5G | Dr.fone
- How to Spy on Text Messages from Computer & Honor X50 GT | Dr.fone
- In 2024, Do You Want to Print Designs Onto Your Garments or Other Fashion Accessories? Find Out How to Create a Screen Print Effect in Photoshop to Give Your Text or Graphics a Vintage or Retro Look
- In 2024, Guide To Using Free Luts for OBS
- In 2024, Introduction to LUTs Their Overview and Benefits
- Introduction to LUTs Their Overview and Benefits
- New 2024 Approved Free Video Editing Essentials Cutting and Joining Tools for Starters
- New Are You Aware that You Can Create Your Own Lower Thirds for Video? Read This Article for a Tutorial on How to Customize One
- Updated In 2024, Through Speed Ramping, Create a Smooth Transition in Slow-Motion Videos. Follow This Guide and Learn About Premiere Pro Slow Motion and a Better Alternative
- Title: New 3 Best Effects to Appear on Camera
- Author: Morgan
- Created at : 2024-09-28 18:33:53
- Updated at : 2024-10-05 23:17:07
- Link: https://ai-video-editing.techidaily.com/new-3-best-effects-to-appear-on-camera/
- License: This work is licensed under CC BY-NC-SA 4.0.
