
:max_bytes(150000):strip_icc():format(webp)/TheOscarsStatue-33f6c30d7ffd4694a4dd1d1113de57f5.jpg)
New 3 Ways To Stream And Record At The Same Time for 2024
3 Ways To Stream And Record At The Same Time
The popularity of live streaming has exploded recently. A live stream is simply a video broadcast in real-time over the internet. It’s a great way to connect with people directly, whether for a gaming session, a cooking show, or a Q&A.
Many reasons are there for which why you might want to live stream and record at the same time. For instance, keep a record of your gameplay or stream highlights for future editing or use your live stream to generate content for your YouTube channel.
Whatever your reasons, this article will show you how to do live streaming and recording at the same time using three different methods.
Way 1. Use OBS To Stream And Record Video At The Same Time
OBS, or Open Broadcaster Software, is a free and open-source tool that allows you to stream and record video at the same time, which can be useful if you want to live-stream your gameplay on Twitch or record a tutorial for YouTube.
Key Features of OBS
- Compatible with Mac OS X, Linux, and Windows operating systems.
- Requires at least 4 GB of storage space and an Intel i5 2000-series processor or higher DirectX 10 capable graphics card.
- High-performance video capturing and mixing in real-time.
- With Custom Transitions, you can set up an unlimited number of scenes you can switch between seamlessly.
- Intuitive audio mixer.
- Easy-to-use and simple configuration options.
Steps
Here’s an easy and quick guide on how to use OBS Studio to stream and record videos simultaneously:
Step1 Download OBS Studio from the official website and install it on your computer or laptop.
Step2 Launch OBS Studio and go to the Settings menu. Find the Recording section under the Output tab.
Step3 Click “Start Recording” to manually start the recording or head to the General Tab and checkmark the box before “Automatically Record When Streaming.”
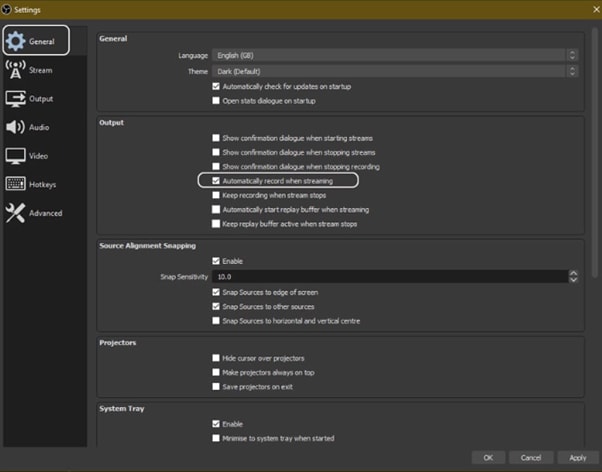
Step4 Finally, click “Apply” to save your settings. Now when you start your stream, the recording will also begin simultaneously.
Way 2. Use Twitch To Save Your Streams
Twitch is the most popular and best live streaming platform that allows gamers to broadcast their gameplay to a live audience and also gives them the ability to save their past broadcasts, or “streams.”
This feature can be useful to save your live stream for later viewing or share your stream with someone who missed it.
Features
Twitch offers a variety of features that make it a unique and powerful game streaming platform. Some of the most notable ones are:
- Live streaming: Twitch allows gamers to share their gameplay in real-time with other gamers around the world. This live aspect of the platform makes it unique and engaging.
- Social interaction: Twitch offers a variety of features that allow gamers to connect with each other, including chat rooms, forums, and user-generated content.
You can save your stream on Twitch in two ways:
- Use the “Highlights” feature, which allows you to save specific moments from your live stream.
- Download your stream’s entire VOD (video on demand) after it has ended.
Steps
Here are the quick steps to saving a stream on your PC from Twitch. But first, you need to enable Twitch VODs before starting your broadcast in the following way:
Step1 Visit Twitch and sign in to your account. Now, click the “Profile” icons and go to “Creator Dashboard.”
Step2 Head to Setting from the left-sidebar and click the “Stream” option. Scroll down and find the VOD Settings. Toggle the buttons next to “Store Past Broadcasts.”
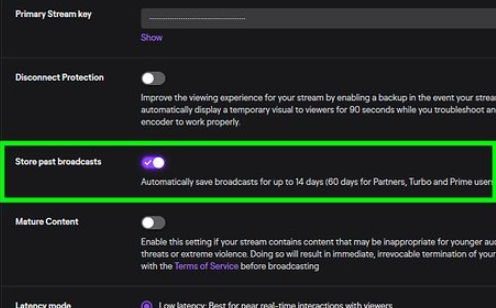
Step3 To publish your VODs instantly after broadcasting, toggle the button next to “Always Publish VODs.”
Now, to download the recordings of your broadcasts to your PC, do the following steps in sequence:
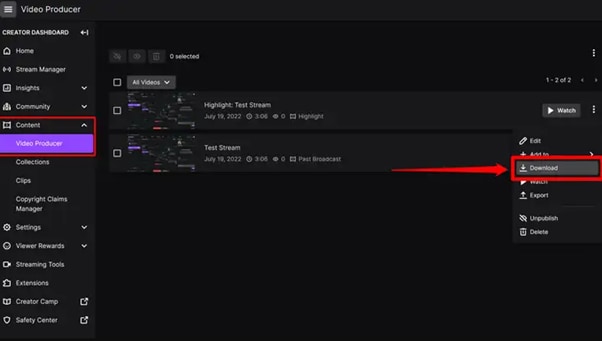
Step1 Head to the Creator Dashboard, find the “Content” section in the left sidebar, and click “Video Producer.”
Step2 Find the stream (VOD or Highlights) you want to download and on the right side, click the three dots.
Step3 Finally, click the “Download” option and let Twitch prepare your video. You will then get the stream’s recording in MP4 format.
Way 3. Use Screen Recorder To Record Your Streams
Using a screen recorder is a great way to record your live stream because it lets you capture the full screen of your PC. Although there are many different screen recorders to choose from, we recommend using Filmora.
Wondershare Filmora is a powerful editor with easy-to-use screen recording capabilities, giving you everything you need to record and stream your video at the same time. The software is free to use and has an intuitive interface.
Features of Filmora
- Support for both Mac OS X and Windows operating systems.
- Ability to record your PC screen, audio, and webcam all at once
- A variety of video editing features
- An easy-to-use interface
Steps
Here’s how to use Filmora for recording while streaming:
Step1 Head to the official Filmora website, download the software and install it on your PC.
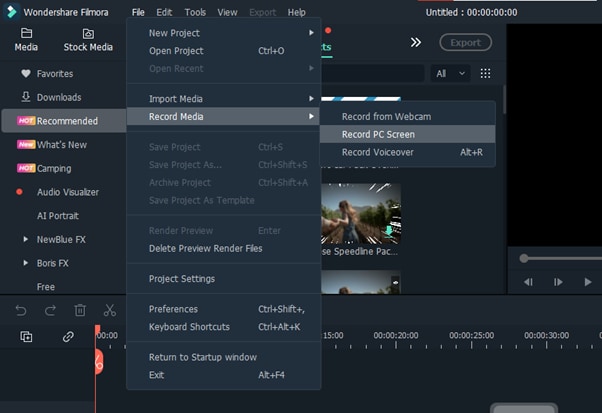
Step2 Launch Filmora 11 and click “New project” in the main interface. Click “File” from the top toolbar and scroll down to “Record media.” From the drop-down menu, select “Record PC Screen.”
Step3 A new “Wondershare Screen Recorder” window will pop up. You can set up a full screen, custom or target screen recording, speaker, and microphone settings. If you want more Settings, click the drop-down icon.
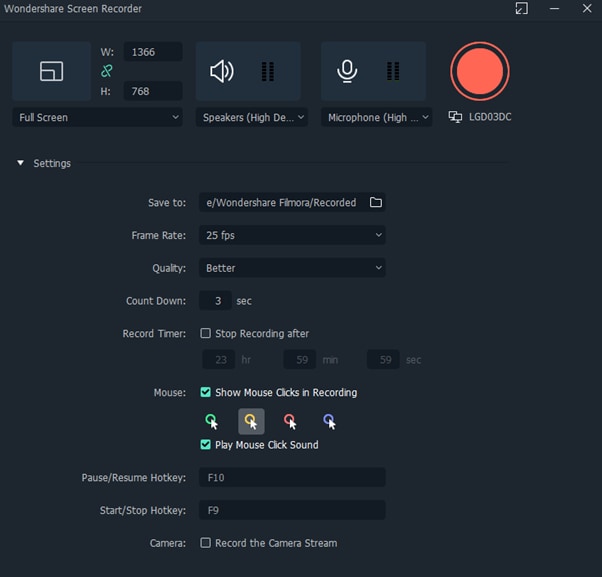
Step4 Click the Start icon to begin your recording. Afterward, click the Stop icon to stop the recording, and your stream will be saved in the selected destination.
Conclusion
In this article, we’ve discussed three step-by-step methods to help you do live streaming and recording at the same time. With these solutions at your disposal, you’ll be able to save your VODs with ease.
It is best to choose only one software to start with to avoid the time-consuming trial-and-error process. If you want to add another tool, do so later; otherwise, you will waste your precious time and resources.
Give these methods a shot, and eventually, you will find your groove—and become accustomed to just how easy it is to record and stream a video simultaneously.
Free Download For Win 7 or later(64-bit)
Free Download For macOS 10.14 or later
Free Download For macOS 10.14 or later
Come And Pick! Best MOV to GIF Converters
Powerful Video Editor - Wondershare Filmora
Provide abundant video effects - A creative video editor
Powerful color correction and grading
Detailed tutorials are provided by the official channel
There are more than enough GIF makers available on the Internet. However, we’ve found it difficult to find quality MP4-to-GIF converters. Some of the tools that commonly pop up in your search results are either unreliable or simply bad at what they do. In some cases, you will also have to deal with intrusive ads and pop-ups.
Stop scrolling through a sea of options, and start converting your video files into animated GIFs in just a few steps. You no longer need to upload your files to some random website to get your desired results.
We’ve picked up the best online as well as offline MP4-to-GIF converters of 2022 and explained how to use them in a more easy way.
Best 5 MOV to GIF Converter Software
It’s no secret that converting video to GIFs is a good idea: they’re small, easy to share, and fun to look at. That’s why we decided to take the time to compare and review some of the best-animated GIF makers out there, from free online tools to offline software for PCs, Macs, and other devices.
1. Wondershare Filmora

Wondershare Filmora Video Editor is a professional and easy-to-use video editing software. This converter provides you with a lot of really cool filters and effects that let you make your videos even better. It is able to export videos in many different formats, including GIFs.
It is one of the best MOV to GIF Converters for Mac & Windows. It has all the important features that you need to convert, edit and create animated GIFs from any video format quickly and easily. With its simple and easy-to-use interface, you can choose your desired video clip or effect, edit it in different ways and then output it as a GIF.
Pros
Easy-to-use Tool for all device users
Able to export videos in multiple formats
Create animated GIFs from any video format
Best for professional work
Cons
Super effects cannot be added
Some effects can disturb tool’s functioning
2. Adobe Premiere Pro

To make the best GIFs, you need to use a program that can be versatile and powerful all at once. Adobe Premiere Pro is one of the best video editing softwares for professionals and amateurs. It is a great choice for people who have basic knowledge of film creation and want to produce video content at a professional level.
The reasons for its popularity are quite clear. The program has a non-linear video editing interface, an unrivaled system of working tools, and a powerful feature set.
Pros
Goes professionally with Windows OS, macOS
Provides non-linear video editing
Supports Flash Video, HD, and HDV
Featured for all professional tasks
Cons
Freemium for only a month
3. Movavi Video Editor Plus

The best way to create video highlights is to use an editing program and extract the best moments from your footage. Movavi’s new Video Editor Plus has all the tools you need to create compelling videos quickly and easily, with a user interface that even novice editors can master right away.
This affordable program gives you all the power (and simplicity) you need to create a high-quality GIF that represents your video perfectly. All without costing too much or putting up too many barriers to using this software.
Pros
Movement tracking and picture-in-picture features
Chroma keying
Sharp movie-creation software
Has multiple different features more
Cons
Resistive on slow slides
Doesn’t support high-end transitions
4. VLC

VLC Player is a highly portable multimedia player for various audio and video formats, including MPEG-4, DivX, MP3, and Ogg/Vorbis.
It is a free and open-source cross-platform multimedia player and framework that plays most multimedia files as well as DVDs, Audio CDs, VCDs, and various streaming protocols.
It can also be used to convert MOV format to GIF in many different ways.
To start with: you can use the tool to create animated avatars for Facebook and other social networks or even make an animated GIF for mobile phone wallpaper.
Pros
Most popular media players today
support DivX streaming and MPEG
Can be controlled using keyboard shortcuts
Support all formats, including BluRay, .mov, and .avi
Cons
No feature for upgradations
Some found it a hard tool as a converter
5. Cyberlink PowerDirector

Whether they’re an amateur or a seasoned pro, editing videos is easier than ever before with CyberLink PowerDirector . It comes with a host of advanced editing tools, including multi-cam editing, 3D title creation, and special effects. Avid editors can also upload their work to cloud services right from the app!
It is ideal for practically anyone who wants to create movies. It even comes with easy-to-use video editing and productive media sharing tools, so anyone can turn their videos into polished movies using this tool.
Pros
Featuring over 100 top-notch audio and video editing attributes
Enables you to easily edit and export videos in 4K
Features 360-degree video editing qualification
Quick customer support 24 hours a day
Cons
Adding ads to the page causes frustration
Costly
Online MOV to GIF Converter
If you have ever wanted to convert your MOV files into gifs, here are a few online tools that will help you do it with ease. Upload your .mov file to the service and enjoy the convenience of watching your favorite movies in animated gif format.
1. CloudConvert

The CloudConvert allows you to convert online documents, images, presentations, and much more into other formats. To use its API you need a free account on our servers (which allow you to do around 100 conversions per month).
Conversion is done on their servers, which means that: - The users of your app never have to install any software. - The API is fast and scalable. - It works across all popular platforms: Windows, macOS, Linux, iPhone, Android…
Pros
200+ File Formats Sustained
Absolute Data Protection
Persuasive API Integration
Rapid Online File Converter
Cons
Conversion minutes determine prepaid package plans
2. EZGIF.COM

Create GIFs from your video clips with this free online MOV to GIF converter.Ezgif.com is a simple to use toolset designed primarily for creating and editing animated GIFs but also can perform conversions.
With Ezgif you can capture videos, adjust the frames to suit your needs, save them as an animated GIF with text or sound, share them via email, Facebook, and more!
So, convert MOV, M4V, MP4, and various other video formats to animated GIFs with this free tool.
Pros
Design is comprehensive for all level users
Engaging work/functioning
Can stand with lots of devices
Easy to use
Cons
The structure of the tool is linear
3. Convertio

Convertio is easy to use, fast and available without signing up. The website offers a list of file converters that can be added directly to your Chrome browser.
The process uses Optimal media conversion settings that ensure the best quality possible with every conversion. It has worldwide popularity with millions of visitors each month.
It also has a large database of links to various online video web pages, so you can quickly access the video file you need and convert it into GIF format as well as other image formats like JPG, PNG, and BMP.
Pros
Permits you to check up to ten pages for free
Uses Optical Character Recognition technology
Save transformed files to Google Drive or Dropbox
Professional overall
Cons
There are certain security and safety risks
How to Convert MOV to GIF Using Wondershare Filmora?
Step 1: Import the MOV file
To get started, simply drag and drop your MOV file onto the interface of Filmora. Alternatively, click on the “Import” button in the upper left corner to browse and load the MOV file from your hard drive or external storage device. A third option is to right-click on the video in the media library and choose “Import Media Files” from the drop-down menu. This will open up a new window where you can select your desired video file.

Now that you have successfully imported your MOV file into Filmora, let’s look at how to proceed with making a GIF out of it.
Step 2: Trim to shorten the video
Next, you will need to trim the video. This is optional, but important if you want to make a GIF from a video. A longer video means a bigger file size and an increased loading time for your final GIF, so try to keep it as short as possible!

To trim your video, add another start and endpoint by clicking on the scissors icon below. You can also put them in manually by typing in the time (in seconds) into the box provided.
Step 3: Export as GIF
Click on the Export button to open up the Export dialog box. From here, you can choose how you want your file exported from a number of options including GIF under the Formats tab. Under the Video tab, select the video quality settings that best suit your requirements. You can also set the frame rate and resolution for your GIF image file at this point. Once you are done, click on Save to specify a location for your file as well as a name for it.

Step 4: Save the GIF file
Click “Convert” to start the MOV to GIF conversion.
When it’s done, click “Open Folder”, and you’ll see the generated GIF file there, which could be shared with others via social platforms such as Twitter, YouTube, and Facebook directly or used for other purposes.
Conclusion
We have not gathered several MOV to GIF converters for you to buy, but we have gone ahead and selected some and explained how to use them in easy steps. You no longer need to upload your files to some random website to get your desired results.
We’ve explored the market, and picked up the best MOV-to-GIF converters.
There are more than enough GIF makers available on the Internet. However, we’ve found it difficult to find quality MP4-to-GIF converters. Some of the tools that commonly pop up in your search results are either unreliable or simply bad at what they do. In some cases, you will also have to deal with intrusive ads and pop-ups.
Stop scrolling through a sea of options, and start converting your video files into animated GIFs in just a few steps. You no longer need to upload your files to some random website to get your desired results.
We’ve picked up the best online as well as offline MP4-to-GIF converters of 2022 and explained how to use them in a more easy way.
Best 5 MOV to GIF Converter Software
It’s no secret that converting video to GIFs is a good idea: they’re small, easy to share, and fun to look at. That’s why we decided to take the time to compare and review some of the best-animated GIF makers out there, from free online tools to offline software for PCs, Macs, and other devices.
1. Wondershare Filmora
Wondershare Filmora Video Editor is a professional and easy-to-use video editing software. This converter provides you with a lot of really cool filters and effects that let you make your videos even better. It is able to export videos in many different formats, including GIFs.
It is one of the best MOV to GIF Converters for Mac & Windows. It has all the important features that you need to convert, edit and create animated GIFs from any video format quickly and easily. With its simple and easy-to-use interface, you can choose your desired video clip or effect, edit it in different ways and then output it as a GIF.
Pros
Easy-to-use Tool for all device users
Able to export videos in multiple formats
Create animated GIFs from any video format
Best for professional work
Cons
Super effects cannot be added
Some effects can disturb tool’s functioning
2. Adobe Premiere Pro
To make the best GIFs, you need to use a program that can be versatile and powerful all at once. Adobe Premiere Pro is one of the best video editing softwares for professionals and amateurs. It is a great choice for people who have basic knowledge of film creation and want to produce video content at a professional level.
The reasons for its popularity are quite clear. The program has a non-linear video editing interface, an unrivaled system of working tools, and a powerful feature set.
Pros
Goes professionally with Windows OS, macOS
Provides non-linear video editing
Supports Flash Video, HD, and HDV
Featured for all professional tasks
Cons
Freemium for only a month
3. Movavi Video Editor Plus
The best way to create video highlights is to use an editing program and extract the best moments from your footage. Movavi’s new Video Editor Plus has all the tools you need to create compelling videos quickly and easily, with a user interface that even novice editors can master right away.
This affordable program gives you all the power (and simplicity) you need to create a high-quality GIF that represents your video perfectly. All without costing too much or putting up too many barriers to using this software.
Pros
Movement tracking and picture-in-picture features
Chroma keying
Sharp movie-creation software
Has multiple different features more
Cons
Resistive on slow slides
Doesn’t support high-end transitions
4. VLC
VLC Player is a highly portable multimedia player for various audio and video formats, including MPEG-4, DivX, MP3, and Ogg/Vorbis.
It is a free and open-source cross-platform multimedia player and framework that plays most multimedia files as well as DVDs, Audio CDs, VCDs, and various streaming protocols.
It can also be used to convert MOV format to GIF in many different ways.
To start with: you can use the tool to create animated avatars for Facebook and other social networks or even make an animated GIF for mobile phone wallpaper.
Pros
Most popular media players today
support DivX streaming and MPEG
Can be controlled using keyboard shortcuts
Support all formats, including BluRay, .mov, and .avi
Cons
No feature for upgradations
Some found it a hard tool as a converter
5. Cyberlink PowerDirector
Whether they’re an amateur or a seasoned pro, editing videos is easier than ever before with CyberLink PowerDirector . It comes with a host of advanced editing tools, including multi-cam editing, 3D title creation, and special effects. Avid editors can also upload their work to cloud services right from the app!
It is ideal for practically anyone who wants to create movies. It even comes with easy-to-use video editing and productive media sharing tools, so anyone can turn their videos into polished movies using this tool.
Pros
Featuring over 100 top-notch audio and video editing attributes
Enables you to easily edit and export videos in 4K
Features 360-degree video editing qualification
Quick customer support 24 hours a day
Cons
Adding ads to the page causes frustration
Costly
Online MOV to GIF Converter
If you have ever wanted to convert your MOV files into gifs, here are a few online tools that will help you do it with ease. Upload your .mov file to the service and enjoy the convenience of watching your favorite movies in animated gif format.
1. CloudConvert
The CloudConvert allows you to convert online documents, images, presentations, and much more into other formats. To use its API you need a free account on our servers (which allow you to do around 100 conversions per month).
Conversion is done on their servers, which means that: - The users of your app never have to install any software. - The API is fast and scalable. - It works across all popular platforms: Windows, macOS, Linux, iPhone, Android…
Pros
200+ File Formats Sustained
Absolute Data Protection
Persuasive API Integration
Rapid Online File Converter
Cons
Conversion minutes determine prepaid package plans
2. EZGIF.COM
Create GIFs from your video clips with this free online MOV to GIF converter.Ezgif.com is a simple to use toolset designed primarily for creating and editing animated GIFs but also can perform conversions.
With Ezgif you can capture videos, adjust the frames to suit your needs, save them as an animated GIF with text or sound, share them via email, Facebook, and more!
So, convert MOV, M4V, MP4, and various other video formats to animated GIFs with this free tool.
Pros
Design is comprehensive for all level users
Engaging work/functioning
Can stand with lots of devices
Easy to use
Cons
The structure of the tool is linear
3. Convertio
Convertio is easy to use, fast and available without signing up. The website offers a list of file converters that can be added directly to your Chrome browser.
The process uses Optimal media conversion settings that ensure the best quality possible with every conversion. It has worldwide popularity with millions of visitors each month.
It also has a large database of links to various online video web pages, so you can quickly access the video file you need and convert it into GIF format as well as other image formats like JPG, PNG, and BMP.
Pros
Permits you to check up to ten pages for free
Uses Optical Character Recognition technology
Save transformed files to Google Drive or Dropbox
Professional overall
Cons
There are certain security and safety risks
How to Convert MOV to GIF Using Wondershare Filmora?
Step 1: Import the MOV file
To get started, simply drag and drop your MOV file onto the interface of Filmora. Alternatively, click on the “Import” button in the upper left corner to browse and load the MOV file from your hard drive or external storage device. A third option is to right-click on the video in the media library and choose “Import Media Files” from the drop-down menu. This will open up a new window where you can select your desired video file.
Now that you have successfully imported your MOV file into Filmora, let’s look at how to proceed with making a GIF out of it.
Step 2: Trim to shorten the video
Next, you will need to trim the video. This is optional, but important if you want to make a GIF from a video. A longer video means a bigger file size and an increased loading time for your final GIF, so try to keep it as short as possible!
To trim your video, add another start and endpoint by clicking on the scissors icon below. You can also put them in manually by typing in the time (in seconds) into the box provided.
Step 3: Export as GIF
Click on the Export button to open up the Export dialog box. From here, you can choose how you want your file exported from a number of options including GIF under the Formats tab. Under the Video tab, select the video quality settings that best suit your requirements. You can also set the frame rate and resolution for your GIF image file at this point. Once you are done, click on Save to specify a location for your file as well as a name for it.
Step 4: Save the GIF file
Click “Convert” to start the MOV to GIF conversion.
When it’s done, click “Open Folder”, and you’ll see the generated GIF file there, which could be shared with others via social platforms such as Twitter, YouTube, and Facebook directly or used for other purposes.
Conclusion
We have not gathered several MOV to GIF converters for you to buy, but we have gone ahead and selected some and explained how to use them in easy steps. You no longer need to upload your files to some random website to get your desired results.
We’ve explored the market, and picked up the best MOV-to-GIF converters.
How to Change Video Thumbnail in Google Drive
What is a Google drive?
“Google drive is a self-hosted cloud-based site that provides free space to store your files and pictures to share them with your friends and family”.
Google Drive is also used to promote businesses or websites. You can upload a video to Google Drive and embed the file in your blog or any other website.
What is a Thumbnail?
“A Thumbnail is a still image that acts as
a preview image of your video.”
A thumbnail is the first thing seen by the viewers while watching videos. It is the only thing that forces the viewer either to watch the video or not because it previews the video content. It is also shown in the search results. A thumbnail is just like the cover or title of a book. You will read a book by its cover. In the same way, a video is viewed by its thumbnail.
Google drive is also used for the promotion of websites and businesses. It does not offer to add a thumbnail or cover image like YouTube has the option to set and can change the thumbnail of the video. As we all know Google drive is not a streaming platform and has its own boundaries.
Normally, the google drive can generate a thumbnail from the video and uses the generated thumbnail ignoring the one you have uploaded. But on the other hand, if it cannot generate a thumbnail the uploaded thumbnail will be displayed. Usually, the default thumbnail may have weird facial expressions or may not be attractive for the viewers to open the video.
Here we are discussing a few alternatives to change the thumbnail of the video in Google drive.
Select a separate image to be housed in a separate column to set as a thumbnail image and then go into the details, title, and Image settings.

How to Add Thumbnails to the Video Using Wonder Share Filmora 11
Wonder Share Filmora 11 is an all-in-one video editing platform that provides powerful, creative, and simple interphase to edit videos and images in a few clicks. It has a ton of amazing features that make your videos, images, and audio stands out. You can edit your videos and images in a great cinematic form using its effects, transitions, overlays, text, and a lot more. Do not wait, go and download Filmora 11 and there are more tools for you to discover.
I am going to show you how to create a thumbnail of the video in Filmora11.
Let us get started!
- Open Wonder Share Filmora 11 and click on New Project.

- Drag the image of your choice into the timeline.

- Drag the image of your choice into the timeline.
- Click on the AI-Portrait option from the Effects
- Drag the Human Segmentation effect over the clip into the timeline.
Now you see that the subject of the video thumbnail is selected and the background has been removed.
The AI-Portrait is a very useful effect, it allows you to quickly remove the background through artificial intelligence.

Now you can see the subject has been selected and the background has been removed.
- Now Scale up the photo to be visible on the screen.
- You can set the border settings here to make it more smooth and attractive.

I have dragged my image to the left as I want my text to the right side.
- Let’s drag the desired background into the timeline. ( I got this background from Pexel.com)

- Click on sample colors under the media option to add the gradient overlay.
- Drag your favorite Gradient and drop it below the background layer.

- Now select the Overlay option under the Effects tab and then Hit Frames.
- Add your desired frame between a photo layer and a background layer to show depth in your thumbnail.

So, I choose cinema 21.9 frames to add two black bars behind our subject.
Let’s choose your desired Title from the Library. Here are tons of title packs, you can choose from.
- Select the Titles option under the Titles tab then select your desired Title.
- Drag and locate the title in the place of your taste and then write the text you want.
- Adjust your text accordingly, you can change the font size, color, style, and much more

- Now simply click the snapshot button below the preview screen and the snapshot will be saved in default directory and automatically imported to the medium room.
- Right-click on the snapshot in the media pool and click on Reveal in explorer.
- Your thumbnail will be saved in the folder, you can upload it on the Google drive.

Unfortunately, there is no way to change the thumbnail of the video on Google drive. But we can take help from other websites to customize the thumbnail image and then upload it to Google drive. Let us discuss a few free websites used for the thumbnail of a video on Google drive.
Here are the best possible ways to change the thumbnail of the video stored in the Google drive.
1. Change the Thumbnails of Google drive using the Wix.
The Wix editor is a platform that is used to edit and make your own website. It provides easy interphase to customize the site using its amazing features. There are hundreds of features to build your own site or image by adding customizing elements and choosing color and text theme.

You can use the Wix to set or change your thumbnail to make your video attractive and eye-catching. The cover image can be by uploading and a frame can be selected from the video.
Let’s get started!
- Open the Wix editor from the browser.
- Select a video from your video library.
- Hit the Edit icon at the video

- Click on change cover under the cover image.

- Select the desired frame from the list, or you can upload your own by clicking the “+”
- Click on the Set as Cover

- Now upload the video on Google drive.

- If the file fails to upload, clear your cache and cookies and check your internet connection.
2. Change the Thumbnails of Google drive using Canvas.
Canvas is an online graphic design platform that allows and provides you with user-friendly interphase to make eye-catching logos, thumbnails, posters, and a ton of other visual content. You need not download any application and moreover, it is free to use. It saves your previous tasks and has hundreds of frames, and designs to select according to your taste or you can make your own design by editing.
So let’s start!
- Select a template of your choice from the library.
- Canvas provides you with more than 2 million images in the library but you can also upload your own image for Thumbnail.
- Click on the placeholder text to write your own text.
- You can change your image fonts, color, size, and
- You can easily customize your video thumbnail and upload it on Google drive.
- Download the video thumbnail.
- Now upload the Thumbnail on Google Drive.

3. Change the Thumbnails of Google drive using VLC Media Player.
VLC Media Player is a free and open-source media player that plays wide range of media files like images, video files as well as audio and DVDs. It is 100% free software and safe from viruses.

Here are the steps used to change the cover photo of your video using the VLC Media Player.
Let’s dive in…
- Go to the tools and select information from the drop-down list.
- The Current Media Information tab will be shown.
- There will be a picture or VLC icon at the bottom-right corner.
- Right-click on that picture or icon and select the download cover art or add cover art from file.
- Download cover art; if you want to add pictures from the album from the internet.
- Add cover art from file; if you want to put your own thumbnail image and browse from the storage.

The information will be saved automatically and the thumbnail will be changed when you open the file.
Important points.
You can use any other video editor to change the thumbnail of the video but keep a few points in mind.
- Thumbnails should be added at the start of the video.
- The Thumbnail should be a few seconds long so that google drive considers it as a cover image.
- It works for short videos but it can be applied for long videos.
- Use a high-quality HD image for the thumbnail so that Google Drive can accept it as valuable for the thumbnail image.
- Thumbnails should be uploaded in PNG, GIF, or JPG
- The image ratio should be 16:9 and resolution of 1920x1080 pixels for PNG and JPG and 960x480 pixels for GIFs.
- The maximum file size should be
- The minimum width should be 220 pixels.

Even after keeping an eye on these important points, google drive sometimes does not show the thumbnail as a cover photo.
Conclusion.
In the above article, I have discussed a couple of different ways to add a thumbnail of the video and upload it on Google drive. I personally recommend Wonder Share Filmora 11 to make and change thumbnail image of the video as it is a very powerful as well as simple tool.
How to Add Thumbnails to the Video Using Wonder Share Filmora 11
Wonder Share Filmora 11 is an all-in-one video editing platform that provides powerful, creative, and simple interphase to edit videos and images in a few clicks. It has a ton of amazing features that make your videos, images, and audio stands out. You can edit your videos and images in a great cinematic form using its effects, transitions, overlays, text, and a lot more. Do not wait, go and download Filmora 11 and there are more tools for you to discover.
I am going to show you how to create a thumbnail of the video in Filmora11.
Let us get started!
- Open Wonder Share Filmora 11 and click on New Project.
- Drag the image of your choice into the timeline.
- Drag the image of your choice into the timeline.
- Click on the AI-Portrait option from the Effects
- Drag the Human Segmentation effect over the clip into the timeline.
Now you see that the subject of the video thumbnail is selected and the background has been removed.
The AI-Portrait is a very useful effect, it allows you to quickly remove the background through artificial intelligence.
Now you can see the subject has been selected and the background has been removed.
- Now Scale up the photo to be visible on the screen.
- You can set the border settings here to make it more smooth and attractive.
I have dragged my image to the left as I want my text to the right side.
- Let’s drag the desired background into the timeline. ( I got this background from Pexel.com)
- Click on sample colors under the media option to add the gradient overlay.
- Drag your favorite Gradient and drop it below the background layer.
- Now select the Overlay option under the Effects tab and then Hit Frames.
- Add your desired frame between a photo layer and a background layer to show depth in your thumbnail.
So, I choose cinema 21.9 frames to add two black bars behind our subject.
Let’s choose your desired Title from the Library. Here are tons of title packs, you can choose from.
- Select the Titles option under the Titles tab then select your desired Title.
- Drag and locate the title in the place of your taste and then write the text you want.
- Adjust your text accordingly, you can change the font size, color, style, and much more
- Now simply click the snapshot button below the preview screen and the snapshot will be saved in default directory and automatically imported to the medium room.
- Right-click on the snapshot in the media pool and click on Reveal in explorer.
- Your thumbnail will be saved in the folder, you can upload it on the Google drive.
Unfortunately, there is no way to change the thumbnail of the video on Google drive. But we can take help from other websites to customize the thumbnail image and then upload it to Google drive. Let us discuss a few free websites used for the thumbnail of a video on Google drive.
Here are the best possible ways to change the thumbnail of the video stored in the Google drive.
1. Change the Thumbnails of Google drive using the Wix.
The Wix editor is a platform that is used to edit and make your own website. It provides easy interphase to customize the site using its amazing features. There are hundreds of features to build your own site or image by adding customizing elements and choosing color and text theme.
You can use the Wix to set or change your thumbnail to make your video attractive and eye-catching. The cover image can be by uploading and a frame can be selected from the video.
Let’s get started!
- Open the Wix editor from the browser.
- Select a video from your video library.
- Hit the Edit icon at the video
- Click on change cover under the cover image.
- Select the desired frame from the list, or you can upload your own by clicking the “+”
- Click on the Set as Cover
- Now upload the video on Google drive.
- If the file fails to upload, clear your cache and cookies and check your internet connection.
2. Change the Thumbnails of Google drive using Canvas.
Canvas is an online graphic design platform that allows and provides you with user-friendly interphase to make eye-catching logos, thumbnails, posters, and a ton of other visual content. You need not download any application and moreover, it is free to use. It saves your previous tasks and has hundreds of frames, and designs to select according to your taste or you can make your own design by editing.
So let’s start!
- Select a template of your choice from the library.
- Canvas provides you with more than 2 million images in the library but you can also upload your own image for Thumbnail.
- Click on the placeholder text to write your own text.
- You can change your image fonts, color, size, and
- You can easily customize your video thumbnail and upload it on Google drive.
- Download the video thumbnail.
- Now upload the Thumbnail on Google Drive.
3. Change the Thumbnails of Google drive using VLC Media Player.
VLC Media Player is a free and open-source media player that plays wide range of media files like images, video files as well as audio and DVDs. It is 100% free software and safe from viruses.
Here are the steps used to change the cover photo of your video using the VLC Media Player.
Let’s dive in…
- Go to the tools and select information from the drop-down list.
- The Current Media Information tab will be shown.
- There will be a picture or VLC icon at the bottom-right corner.
- Right-click on that picture or icon and select the download cover art or add cover art from file.
- Download cover art; if you want to add pictures from the album from the internet.
- Add cover art from file; if you want to put your own thumbnail image and browse from the storage.
The information will be saved automatically and the thumbnail will be changed when you open the file.
Important points.
You can use any other video editor to change the thumbnail of the video but keep a few points in mind.
- Thumbnails should be added at the start of the video.
- The Thumbnail should be a few seconds long so that google drive considers it as a cover image.
- It works for short videos but it can be applied for long videos.
- Use a high-quality HD image for the thumbnail so that Google Drive can accept it as valuable for the thumbnail image.
- Thumbnails should be uploaded in PNG, GIF, or JPG
- The image ratio should be 16:9 and resolution of 1920x1080 pixels for PNG and JPG and 960x480 pixels for GIFs.
- The maximum file size should be
- The minimum width should be 220 pixels.
Even after keeping an eye on these important points, google drive sometimes does not show the thumbnail as a cover photo.
Conclusion.
In the above article, I have discussed a couple of different ways to add a thumbnail of the video and upload it on Google drive. I personally recommend Wonder Share Filmora 11 to make and change thumbnail image of the video as it is a very powerful as well as simple tool.
Unleash the Power of Video Slow Motion with Wondershare Filmora. Find Out How to Create Slow Motion Video with the Effective Speed Ramping Feature on Filmora
How to make a video slow motion on your PC and other devices? It is easier than most people think. Slow-motion videos are cool and exciting. You could be watching a CGI fight scene or a dog making a face when trying to catch a treat. The slow-moving objects make it more exciting and intriguing. Probably it is a gender reveal party or a dramatic waterfall, and you are wondering how do I make a video slow motion. In this article, we provide you with a guide on how to make video to slow motion quickly and the easy way.
Slow Motion Video Maker Slow your video’s speed with better control of your keyframes to create unique cinematic effects!
Make A Slow Motion Video Make A Slow Motion Video More Features

Part 1. Introducing Wondershare Filmora: A Great Help for Making Slow Motion Videos
If you are looking for a solution on how to put videos in slow mo, you need to try Wondershare Filmora. The recent Filmora V13 comes with some brilliant tools that make editing videos easier and fun. The fully-equipped suite is now powered by AI allowing users to effortlessly create outstanding videos in minutes. With new features to realize your ideas and bring them to life, Filmora empowers you to work smarter and not harder.
Free Download For Win 7 or later(64-bit)
Free Download For macOS 10.14 or later
How do you make a video slow motion with Filmora? The solution lies in the unique video editing features of the software. From manually editing the speed of the video to using slo mo effects, Filmora is a great choice. Using Filmora for creating slow motion videos has various advantages to your video editing journey:
- Precise speed control: Filmora allows you to precisely set the speed of your videos up to a single frame, giving you creative control over your slo mo effects.
- AI-powered capabilities: Powered by artificial intelligence, FIlmora gives you accurate results quickly and efficiently
- Easy to Use: Filmora is a versatile video editing software that is easy to learn and use
- High-quality output: Filmora offers a wide range of editing features, allowing you to export slo mo video without compromising the quality
- Multiple slow-motion effects: Get access to a variety of slo mo video effects, including speed ramp, time remap, optical flow, and more
Ready to add some epic slow-motion action to your videos? In the next section, we’ll guide you step-by-step through how to make a slo mo video in just a few clicks. You will be turning your ordinary footage into amazing slo-mo clips in the simplest way possible.
Part 2. How to Make a Video Slow Motion: Step-by-Step Guide
Wondershare Filmora allows users to create a video slow motion using the Speed Ramping feature. This feature is specifically designed for adjusting the speed of videos with better control of keyframes, allowing you to create unique cinematic effects. You may want your YouTube clips to look cool or slow down your video for particular reasons. Take your video editing skills to the next level with the Speed Ramping feature. Filmora makes it possible to create slow motions of high quality with smooth transitions for incredible results.

The Speed Ramping feature is effective in:
- Applying Professional Speed Effect: Quickly change the speed of your video by making it more creative.
- Speed Ramping Template Presets: Get access to Filmora’s six present speed ramping effects. They include Bullet Time, Hero Moment, Montage, Flash in, and Jumper. These effects help in creating a professional speed change effect with ease.
- Support for Customized Speed Ramping Template: Filmora allows you to create a unique speed ramping effect for your own and save it for later use.
- Maintaining the Audio Pitch: The Speed Ramping feature by Filmora allows you to maintain the original audio pitch even after changing the speed of the video.
The Speed Ramping feature is quite effective in making video slow motion with Filmora. Let’s have a look at the steps you will need to follow:
Step 1: Find the Speed Ramping Tab
Once you have launched Filmora and imported your files, double clip on the video clip or audio clip you want to create a slow motion from. Then click, Speed followed by Speed Ramping in the pop-up editing window. You may also right-click on the video clip on the timeline and choose Speed Ramping, or click on the Speed icon on the toolbar followed by Speed Ramping.

Step 2: Customize the Speed Ramps
After starting the feature, you need to customize the speed ramps to achieve the desired results. The quickest way is to select a speed ramp present from the available Hero Moment, Montage, Jumper, Bullet Time, Flash Out, and Flash In. Customizing the speed ramps will, however, give you more creative outcomes.

Strp 3: Apply the Speed Ramping
With the speed ramp ready, place the play head where you want to create a slo mo video. Then click the Add icon to add the speed keyframes. Drag the keyframe dot downward or upward as desired to control the point speed. This will give you the specific slow motion video that you want while maintaining the audio pitch. When you are satisfied with the adjustments, click OK to save the settings and export your creation.

Creating slow motion videos with the speed ramping feature can be beneficial in many ways. The slow-motion effects draw attention to specific details of the video. It could be a big reveal happening or a flashback that allows viewers to realize the clues you were giving all along. When you slow down scenes in your video, it lets people focus on specific details, gestures, or objects.
Conclusion
Creating a slow motion video can be exciting. There’s just something that makes slo mo fun and interesting to watch. How to do video slow motion you may ask. With the right software, slowing down videos is a fun and thrilling effect. To this effect, we recommend using Wondershare Filmora to create slow motions in your projects and keep your audience engaged. The Speed ramping feature of Filmors is easy to use and can be customized to achieve specific results.
Make A Slow Motion Video Make A Slow Motion Video More Features
Part 1. Introducing Wondershare Filmora: A Great Help for Making Slow Motion Videos
If you are looking for a solution on how to put videos in slow mo, you need to try Wondershare Filmora. The recent Filmora V13 comes with some brilliant tools that make editing videos easier and fun. The fully-equipped suite is now powered by AI allowing users to effortlessly create outstanding videos in minutes. With new features to realize your ideas and bring them to life, Filmora empowers you to work smarter and not harder.
Free Download For Win 7 or later(64-bit)
Free Download For macOS 10.14 or later
How do you make a video slow motion with Filmora? The solution lies in the unique video editing features of the software. From manually editing the speed of the video to using slo mo effects, Filmora is a great choice. Using Filmora for creating slow motion videos has various advantages to your video editing journey:
- Precise speed control: Filmora allows you to precisely set the speed of your videos up to a single frame, giving you creative control over your slo mo effects.
- AI-powered capabilities: Powered by artificial intelligence, FIlmora gives you accurate results quickly and efficiently
- Easy to Use: Filmora is a versatile video editing software that is easy to learn and use
- High-quality output: Filmora offers a wide range of editing features, allowing you to export slo mo video without compromising the quality
- Multiple slow-motion effects: Get access to a variety of slo mo video effects, including speed ramp, time remap, optical flow, and more
Ready to add some epic slow-motion action to your videos? In the next section, we’ll guide you step-by-step through how to make a slo mo video in just a few clicks. You will be turning your ordinary footage into amazing slo-mo clips in the simplest way possible.
Part 2. How to Make a Video Slow Motion: Step-by-Step Guide
Wondershare Filmora allows users to create a video slow motion using the Speed Ramping feature. This feature is specifically designed for adjusting the speed of videos with better control of keyframes, allowing you to create unique cinematic effects. You may want your YouTube clips to look cool or slow down your video for particular reasons. Take your video editing skills to the next level with the Speed Ramping feature. Filmora makes it possible to create slow motions of high quality with smooth transitions for incredible results.
The Speed Ramping feature is effective in:
- Applying Professional Speed Effect: Quickly change the speed of your video by making it more creative.
- Speed Ramping Template Presets: Get access to Filmora’s six present speed ramping effects. They include Bullet Time, Hero Moment, Montage, Flash in, and Jumper. These effects help in creating a professional speed change effect with ease.
- Support for Customized Speed Ramping Template: Filmora allows you to create a unique speed ramping effect for your own and save it for later use.
- Maintaining the Audio Pitch: The Speed Ramping feature by Filmora allows you to maintain the original audio pitch even after changing the speed of the video.
The Speed Ramping feature is quite effective in making video slow motion with Filmora. Let’s have a look at the steps you will need to follow:
Step 1: Find the Speed Ramping Tab
Once you have launched Filmora and imported your files, double clip on the video clip or audio clip you want to create a slow motion from. Then click, Speed followed by Speed Ramping in the pop-up editing window. You may also right-click on the video clip on the timeline and choose Speed Ramping, or click on the Speed icon on the toolbar followed by Speed Ramping.
Step 2: Customize the Speed Ramps
After starting the feature, you need to customize the speed ramps to achieve the desired results. The quickest way is to select a speed ramp present from the available Hero Moment, Montage, Jumper, Bullet Time, Flash Out, and Flash In. Customizing the speed ramps will, however, give you more creative outcomes.
Strp 3: Apply the Speed Ramping
With the speed ramp ready, place the play head where you want to create a slo mo video. Then click the Add icon to add the speed keyframes. Drag the keyframe dot downward or upward as desired to control the point speed. This will give you the specific slow motion video that you want while maintaining the audio pitch. When you are satisfied with the adjustments, click OK to save the settings and export your creation.
Creating slow motion videos with the speed ramping feature can be beneficial in many ways. The slow-motion effects draw attention to specific details of the video. It could be a big reveal happening or a flashback that allows viewers to realize the clues you were giving all along. When you slow down scenes in your video, it lets people focus on specific details, gestures, or objects.
Conclusion
Creating a slow motion video can be exciting. There’s just something that makes slo mo fun and interesting to watch. How to do video slow motion you may ask. With the right software, slowing down videos is a fun and thrilling effect. To this effect, we recommend using Wondershare Filmora to create slow motions in your projects and keep your audience engaged. The Speed ramping feature of Filmors is easy to use and can be customized to achieve specific results.
Also read:
- In 2024, | Change Speed of a Video on iPhone
- Updated In 2024, Top 10 Secret Tips & Tricks to Use in Wondershare Filmora
- In 2024, How To Create The Best AI Thumbnail Using The Right Tools?
- New 2024 Approved Phone Aspect Ratio Vertical Definition, Types & Tips
- New Best 8 Srt File Creators for 2024
- Updated Ultimate Guide on How to Plan and Storyboard a Music Video for 2024
- New This Article Talks in Detail About Why People Look for a Free Title Maker, and 8 Options that Will Benefit Their Work. It Includes Tools Like SEMrush Title Generator, Hubspot Title Generator, and More. Check Out
- Updated Are You Searching the Internet for Top Wedding LUTs Premiere Pro? This Article Provides Suggestions on the Best LUT Color Presets for 2024
- 2 Ways to Fade in Text in Premiere Pro
- New How to Stabilize Videos with Google Photos App for Free
- Backup and Organize Your Footage in Minutes
- In 2024, Top 10 Transparent Image Online Tools That Give You an Advantage
- New In 2024, Have the Desire to Create a Stylish Glitch Effect to a Text on Your Video? Use Filmora for the Editing, Following the Given Steps Explained in Detail
- New In 2024, Shotcut Review – Is It The Best Free Video Editor?
- Recording Video in Slow Motion Some Considerable Points for 2024
- Updated In 2024, How to Create Motion Text Effects for Your Video?
- New Top-Search The Best Game Screen Recording Tools for PC for 2024
- To Closely Observe the Content on Screen, We Often Zoom in to Catch the Details. This Article Will Provide You with a Brief Note on How to Zoom in on YouTube Videos Quickly on Your Devices for 2024
- Updated In 2024, 2 Ways to Fade in Text in Premiere Pro
- Want to Come up with Exciting Sony Vegas Slideshow Templates for Your Next Project on YouTube and Other Mediums Then There Is Something for You for 2024
- Updated How To Record Video in Slow Motion Comprehending Important Points for 2024
- New In 2024, Here We Are, Now the Main Topic of Interest of This Article - How to Put Together Several Videos so that They Become One? This Case, Unlike Other Possibilities We Discussed Above, Is More Complicated, so We Will Study This Feature Step by Step
- Updated In 2024, Discover How You Can Use Vectorscope to Adjust Luminance, Color Grading, and More in Your Video Editing Projects
- Ultimate Guide To Make A Political Video for 2024
- Updated In 2024, So, without Wasting Time, Let Me Show You How to Mask a Video in Wondershare Filmora. Lets Get Started
- Updated In 2024, Add Emoji to Linkedin Post – 5 Tips You Need to Know
- Updated 2024 Approved Step by Step to Rotate Videos Using OBS
- New Exploring Tools to Integrate Special Mask Effects Into Your Content. Read the Following Article to Master some Tools Experts in Mask Tracking for 2024
- Updated Many People Choose Video Editing or Post-Editing as Their Career in These Days. Is This a Good Choice? How to Start a Video Editing Career? This Article Will Tell You the Complete Details
- In 2024, 10 Best Music Video Templates to Make Your Video Popular
- Updated 2024 Approved 10 Best Free Video Player for Windows 11
- 2024 Approved Top Applications That Can Help Apply The Best VHS Camera Effect
- In 2024, Discord Is Becoming More Popular with Time with Millions of Users. Are You Thinking of Getting a GIF for Discord Profile? If Yes, Learn From This Piece Since We Have a Conclusive Summary of Getting a GIF Profile Picture for Discord
- In 2024, How to Create a Bokeh Effect
- New How to Export iMovie for 2024
- Updated Are You Finding It Challenging to Upload and Create a Link for Your Video? Well, This Detailed Upload Video to Link Guide Will Help You with This. Check It Out Now
- Updated Featuring The Use of Camera Shake in Creating the Best Videos
- 2024 Approved Adding Shake Effects to Your Video With Alight Motion
- New In 2024, Learning Unique Ways to Slow Down Time Lapse on iPhone
- New In 2024, Here, You Will Get the Basic Steps to Use the Speed Ramping Effect in Your Videos by Wondershare Filmora Software. In This Article, You Get a Guide to Adding the BCC Glitch Effect to Give Your Sports Montages a More Professional Look
- Updated 2024 Approved Exploring the Best Slow-Motion App
- Updated In 2024, Splitting Audio From a Video in Sony Vegas Step by Step
- Updated In 2024, Deep Learning of AI Video Recognition - Guide
- In 2024, Does Honor Magic 6 Pro Have Find My Friends? | Dr.fone
- Best 3 OnePlus Ace 2 Emulator for Mac to Run Your Wanted Android Apps | Dr.fone
- How to Quickly Fix Bluetooth Not Working on Vivo Y55s 5G (2023) | Dr.fone
- In 2024, How to Fake GPS on Android without Mock Location For your Samsung Galaxy A24 | Dr.fone
- How to Unlock Itel P55 5G PIN Code/Pattern Lock/Password
- How to Unlock Vivo Y77t Bootloader Easily
- How to Fix Infinix Zero 5G 2023 Turbo Find My Friends No Location Found? | Dr.fone
- Full Solutions to Fix Error Code 920 In Google Play on Xiaomi Redmi Note 13 Pro 5G | Dr.fone
- In 2024, 10 Easy-to-Use FRP Bypass Tools for Unlocking Google Accounts On Realme 11 5G
- Can I recover permanently deleted photos from Realme
- In 2024, How to Unlock Oppo A18 Phone without Any Data Loss
- Latest way to get Shiny Meltan Box in Pokémon Go Mystery Box On Vivo V27 | Dr.fone
- In 2024, Top 5 Car Locator Apps for Realme 12 5G | Dr.fone
- What are Location Permissions Life360 On Apple iPhone 8? | Dr.fone
- Guide How To Unbrick a Bricked Honor Play 8T Phone | Dr.fone
- Top 15 Apps To Hack WiFi Password On Poco C50
- How to fix iCloud lock from your Apple iPhone 13 Pro Max and iPad
- 10 Best Fake GPS Location Spoofers for Vivo X90S | Dr.fone
- Does Life360 Notify When You Log Out On Nokia C02? | Dr.fone
- Complete Tutorial for Nubia Red Magic 8S Pro Hard Reset | Dr.fone
- In 2024, A Guide Realme GT 5 (240W) Wireless and Wired Screen Mirroring | Dr.fone
- Possible solutions to restore deleted pictures from Infinix .
- How to Downgrade Apple iPhone 11 without Losing Any Content? | Dr.fone
- Title: New 3 Ways To Stream And Record At The Same Time for 2024
- Author: Morgan
- Created at : 2024-05-19 05:12:51
- Updated at : 2024-05-20 05:12:51
- Link: https://ai-video-editing.techidaily.com/new-3-ways-to-stream-and-record-at-the-same-time-for-2024/
- License: This work is licensed under CC BY-NC-SA 4.0.
