
:max_bytes(150000):strip_icc():format(webp)/tropical-beach-wallpaper-beach-backgrounds-587fbb765f9b584db3241860.jpg)
New Adobe After Effects Review
Adobe After Effects Review
Make cinematic films, movies, intros, and transitions. Delete people from clips. Start fires or create a foggy weather. With Adobe After Effects, the industry-standard motion graphics and visual effects software, you are able to take any idea and make it come to life. Animate titles, credits, and lower thirds. Begin editing from scratch or with presets available. Combine photos and video footage to create anything you can think of.
Choose amazing effects from hundreds of options, remove unwanted parts from the frame, people or objects, and make VR videos to push your audience into the action. This software lets professionals configure keyframes, allow them to create compositing operations. Features of Adobe After Effects include a content library, digital asset management, video rendering, data import/export, and much more. In this article we will give you a brief overview of what After Effects is, what it’s used for and by who and the overall experience!
With that said, let’s get started!
1. Speed and Stability
When talking about speed and stability, After Effects has the latest release packed with improvements. All the developers have focused themselves on speed and also performance. The team at Adobe have worked very hard to make this application more responsive and when we go along in this article, that can be seen in many ways
The main improvement which is immediately clear to all users, is the renewed preview playback optimization. What we noticed is that After Effects is creating the ram preview for your projects a lot faster. However, while working with the software for this article, we did find the user interface to be more responsive, the playback is way smoother, so is it a lot more stable overall.
While using shape layers, there was a significant improvement. A few expressions are a lot faster. This alone is worth upgrading to the latest version of After Effects.

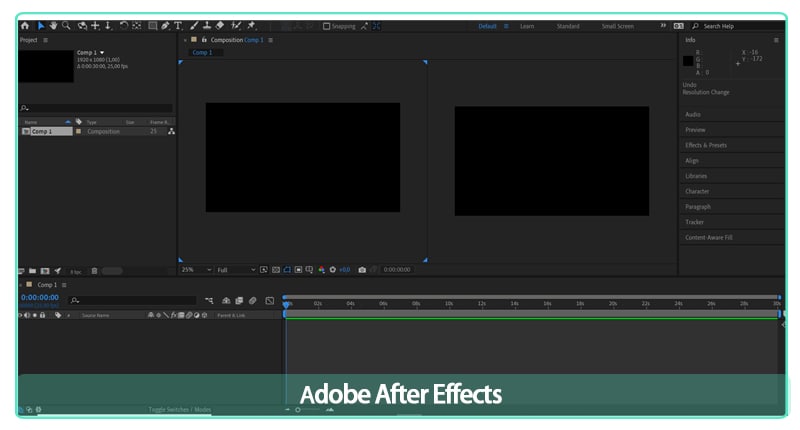
2. User Interface
The After Effects interface is constructed up of four main parts. The Timeline panel, the Project panel, the Composition panel and the Effects panel.
The Timeline Panel
In the Timeline panel, you edit all the footage and clips to create your rough cut. You can find the Timeline panel on the bottom of the workspace.
The Project Panel
It’s pretty straightforward that in the Project panel you import your footage and create your project. This is located on the top left of the standard After Effects workspace.
The Composition Panel
The Composition panel is where you will see the final product. This is located in the middle of your workspace.
The Effects Panel
In order to make creative changes to your video, use the preview, audio, effects, and Preset Panels. These panels are located on the upper right area of your workspace, each one also has its dropdown.
3. Learning Curve
The learning curve for After Effects depends on your background, the best way to find out if you like it is starting a free trial. Go through some tutorials online or paid courses. You’ll also want to spend time with the User Guide. The Search Help field in the top right corner provides you an easier search for answers to most questions that you have. Speaking of YouTube and online learning, most of the video tutorials you will find have been created by people that are experienced in After Effects and know their way around it.
4. VFX
There’s a time-period when video editors require strengthening their skills, calling it imperative software for improving editing skills is nowhere near an exaggeration. it really helps prospective professionals improve their learning experience through visual effects, camera tracking, text animation, motion tracking, color grading, etc. All of these methodologies do help in improving the VFX learning process in the long run.
Video editing happens to be a crucial part of film production. Making videos in a fantastic process can indulge in building professional videos via motion graphics animation. This is where Adobe After Effects become an excellent learning tool.
5. Motion Graphics
Motion graphics can sound quite scary. It’s a new term for a specific genre of animation. Motion graphics is the intersection between animation and graphic design. These are purpose-driven visual aspects with the goal of showing information to the viewer through the use of animated graphics or text. Sometimes they include voice-overs narrating what the text or graphics are showing. Where it gets a little complex is that the more popular the term motion graphics becomes, the more people are misaligning animations to it. They need to represent information and illustrate the idea to the viewer clearly, so they do that using animation and motion graphics.
6. Titles and Outros
Adobe released a new combination of features for you. For Adobe Stock: Graphics templates. Those pre-made templates give you a super smooth way to discover new motion graphics within Premiere Pro, without needing to spend time creating titles, overlays, or animations from scratch. The world has digitalized, and videos often need visual aspects such as titles, lower thirds, to present information. The templates not only assist video editors increase the quality of the content by showing certain information, but they also give a strong visual touch to keep the viewer engaged throughout the video. The audience nowadays is a lot more sophisticated, meaning that motion graphics are a necessity in a driven media world.
Motion Graphics templates are valuable for video editors of all levels. For the beginning content creators, the templates offer great quality, ready-made footage to help their creative goal. They can explore and work on their skills. Motion graphics that are pre-made are an excellent way to express the vision and express inspiration to new opportunities.
So now that you are aware of what After Effects templates are, we can move on to the actual workflow, why it is important, and how to use it as efficient as possible.
7. Workflow
Whether you are using Adobe After Effects to create motion graphics, or composite realistic visuals, you usually follow the same workflow, you may repeat the process of adjusting layer properties, editing, and compositing until everything looks good. You can change any property of any element, such as position, opacity and size. Make use of motion tracking to stabilize footage so that it follows the motion from another clip, and so much more!
8. Rendering Speed
When it comes to exporting your project in After Effects, you don’t need to buy an expensive workstation. You can speed up your rendering process from your own laptop without investing too much and by using the following tips we have for you below!
Tip #1: Enable Multiprocessing
What exactly is multiprocessing? That is when After Effects uses multiple cores from your CPU to export multiple frames at once. If your processor has one or more cores, you can enable this feature to reduce your rendering time. We want to mention that you need to check whether or not this option is turned on. Once enabled, you’ll see a great decrease in export time.
To enable Multiprocessing, navigate to Preferences > Memory & Multiprocessing. Then you click the check box next to ‘Render Multiple Frames Simultaneously’ and remember also to adjust the settings that you need.
Tip #2: Optimize Your RAM Usage
The RAM memory inside your workstation can be used to write and read data at a lot higher speeds than regular hard drives and portable drives. Configuring your RAM in a system is one of the easiest upgrades for better performance. Giving you affordable solutions for both desktop and laptop systems, the RAM memory upgrade does not require a lot of knowledge. The more RAM you allow applications to use, the higher the performance you will get out of it.
It also shows a noticeable increase in rendering speed. When the export time in your work is longer than needed, look at your RAM memory and see if you can make the necessary changes or upgrades.
Tip #3: Use the Media Encoder
Let’s talk about the Media Encoder. It’s the software that comes up with Adobe Creative Cloud products such as After Effects and Premiere Pro to simplify the export process. You can easily render your project from After Effects to Adobe Media Encoder and begin the project render process from that point on. The Media Encoder will increase your rendering performance and will significantly decrease rendering time.
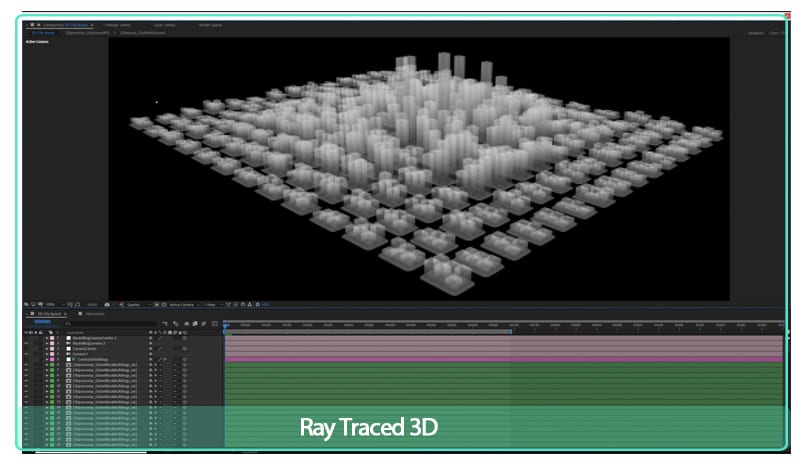
Tip #4: Disable Ray-Traced 3D
The included After Effects Ray-Traced 3D feature enables you to produce 3D models within After Effects without any struggle. Calculating all the motions and visual graphics is such a heavy process for your workstation. When you disable raytracing, you will get a faster export time. By looking that ‘Classic 3D’ is checked instead of ‘Ray-Traced 3D’ from your composition preferences, you can speed your rendering speed up to 50%. Isn’t that incredible?
Tip #5: Activate GPU Exporting with Cuda Acceleration
Exporting your videos with GPU rather than CPU will increase the efficiency of your render process. The export length will decrease a whole lot when you activate Mercury GPU Acceleration, also known as ‘CUDA’ from the ‘Project Settings’.
After Effects doesn’t really require CUDA features from a special kind of Nvidia GPU. Only the GPU accelerated 3D renderer, that is based on the raytracing algorithm, requires that. The other GPU features are running on any GPU that meets the basic minimums, including Intel and AMD GPUs.
9. System Requirements for Windows
These are the minimum specifications needed to use After Effects on PC:
OS: Windows 10 (64-bit) versions 1909 and later, or Windows 11
CPU: Intel or AMD Quad-Core Processor (Intel i5 and i7 will do the job)
RAM: 16 GB
Monitor resolution: 1280 x 1080
An internet connection
Free storage: 15 GB
GPU: Minimum 2 GB of VRAM
10. System Requirements for macOS
OS: macOS 10.13 or later
RAM: 16 GB
CPU: Intel and Apple Silicon (Rosetta2 Supported) Quad-Core Processor
GPU: 2GB of VRAM
Monitor resolution: 1440×900
Free storage: 15 GB
An internet connection
11. Keyboard Shortcuts
You can work visually when you configure your keyboard shortcuts with the visual keyboard shortcut editor within After Effects. You can use the keyboard user interface to show the keys that have been assigned to shortcuts, the available keys for assignment, and edit assigned shortcuts to make your workflow even easier.
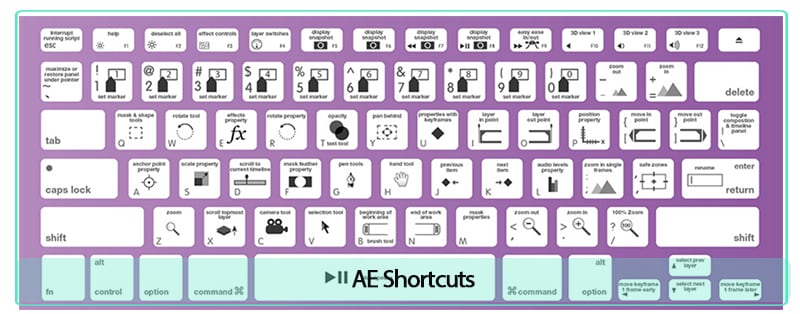
The keyboard layout:
This is a representation of your physical keyboard where you can see which keys have been assigned a shortcut, and which are available.
Command list:
The list displays all the commands that can be assigned shortcuts.
Key modifier list:
This list shows you all the modifier combinations and assigned shortcuts associated with the key you select on your physical keyboard.
After Effects does not allow you to reassign the following keys:
- A
- AA
- E
- EE
- F
- FF
- L
- LL
- M
- MM
- P
- PP
- R
- RR
- S
- SS
- T
- TT
- U
- UU
12. Should You Buy It?
Well first, you cannot buy After Effects, Premiere Pro or other software from Adobe. You have to rent them by paying monthly. After Effects is primarily a compositing and graphics software. Premiere is primarily a video editing program. In the case of After Effects and Premiere Pro, it’s not really an either/or. They’re both software with different purposes. After Effects is a lot more powerful and essentially showcases most of Premiere’s functionality, but according to our experience, the Premiere Pro interface and workflow is way more superior for video editing.
Premiere Pro is essentially built around its timeline, the region where you cut your video clips and drag and place them into your appropriate sequence. Hollywood filmmakers and professional YouTube content creators are using Premiere Pro to edit high-performing content and award-winning films. The software is very intuitive and easy for beginners to start with.
Are going to work with After Effects to create an income? Or are just going to use it for a hobby? It’s crucial to mention that question because Adobe After Effects is not something that is cheaply available. You will be investing much money on the program, and if you are working to use the software, paying a good amount, and earning nothing in return, then you might want to shift to another alternative which would cost you less. For instance, let’s assume you are using the application to earn an income, and have a few low-paying clients. In such a situation, you will have to rethink your options of software and analyze whether what you are paying in comparison to what you are getting is enough for you or not. We all are different individuals and have different preferences. Once we can see what is more important to us, or what is our need at this moment, then we will be able to judge the worth of purchasing Adobe After Effects better.
Are you going to use After Effects to earn an income? Or are just using it as a hobby? It is very important to address this question because Adobe After Effects is not something cheaply accessible. You will be investing a lot of money into this software, if you are using the software while paying a good amount and earning nothing in return yet, then you could shift to a different alternative which will cost you a lot less. Let’s say you are using After Effects to earn an income and have some low-paying work. In that case, you will have to reconsider your options of video editing software and look at whether what you are paying in comparison to what you are getting is possible for you. When we can see what is more important to us, we will be able to see the worth of buying After Effects.
Did you previously use After Effects or are you new to the program? The return that you will get using Adobe After Effects, depends on how good you know how to work with the options, functions and features in the software.
The Bottom Line
So summing it all together, Adobe After Effects takes care of all your assets and creates a final product, considering that After Effects is usually an asset-generation tool. Most video editors complete their projects in After Effects non-stop. It’s excellent for making visual videos come to life.
AE version 22.3 is very impressive. Giving you a wealth of new features created to make VFX editing a lot faster and easier. Offering new features on a regular basis, improving their subscription model making it more attractive. Especially if you’re a professional editor and designer.
Once you get comfortable with Adobe After Effects, you learn how to dynamically combine After Effects compositions to your Premiere projects. You are able to access both assets at the same time if needed!
Free Download For Win 7 or later(64-bit)
Free Download For macOS 10.14 or later
Best 8 Animated Video Makers
Animations can be a great way to get your work to stand out and the best animated video maker can help you get this effect very easily. Here, we will be helping you find the best way to create animated videos for your particular project.
It is important to point out that there are very many animation programs in the market and choosing the best one will depend on your needs, your style, the feature and tools you need, the cost of the program, and even the export options that each tool gives you.
Before we look at the best ways to create animated videos, let’s start by examining why you would need to use an animated video maker in the first place.
When to Use an Animated Video Maker
There are several reasons why you would want to create an animated video, rather than use traditional video solutions. The following are the most important from a digital marketing standpoint;
Improve Conversion and Sales
Animated videos are engaging enough to improve your conversion and sales. Studies have shown that an animated video can increase both conversion and sales by up to 80%. It may therefore be a good idea to use an animated explainer video to show your potential customers how to purchase a product or service on your website.
Increase Brand Awareness
Because they can be very entertaining and engaging, animated videos can also be a great way to increase brand awareness. And since they can be created very easily and cheaply, they can be a good way to reach potential customers.
Generate Online Leads
Because of the engaging nature of animated videos, you can use them to introduce yourself to potential customers and generate online leads. They have a very high conversion rate, as we have seen before, making them one of the best ways to reach people who would otherwise have never heard of you and your brand.
Explain Complex Processes
It can be very difficult to try to explain very complex ideas such as the mechanical aspect of a certain tool using words. But a well-crafted animated video gives you the chance to explain complex ideas in a fun and engaging way, making it easier for your customers to understand and engage with your brand.
Best Animated Video Makers
The following are the best animated video makers in the market to choose from;
1. Filmora
Created by Wondershare, one of the most popular software companies in the world, you can be certain that Filmora will deliver one of the best video creation and animation experiences you can find anywhere. It is a very easy-to-use, very effective way of creating animated videos that will intrigue your audiences and engage with them in ways traditional video cannot.

To accomplish this, Filmora has numerous features and effects that are not just meant to help you create the perfect video, but also make the process simple, allowing you to create stunning videos in just a few minutes.
For Win 7 or later (64-bit)
For macOS 10.12 or later
The following are some of the key features you can expect when using Filmora;
- Motion Tracking is a feature that you can use to attach an element to a moving object. The auto motion tracking feature ensures that the elements you attach move smoothly as the object moves.
- You can also use Filmora to customize an animation by adding keyframes to change various aspects including the positions, scale, rotations, and even the opacity of a clip.
- The color match feature allows you to match a selected clip’s color to a separate clip from another clip.
- The auto-ducking feature allows you to choose to fade away background music and make foreground narration or dialogue clearer.
- You can also add plain text to any section of the video
- The advanced title editing feature allows you to change the position, rotation, and scale of the video’s title while it is playing.
- You can also create and edit keyboard shortcut keys that you can then use to edit the video more easily.
2. Animaker
Price: Free with limited features. Paid plans from $10 a month
Best For: marketers, presenters, and freelancers
Link: https://www.animaker.com/
If you are looking for a simple way to create interactive presentations and videos, Animaker is a simple solution to choose. It is a particularly simple solution to use as it comes with numerous ways to create and edit the video, including a huge library of templates and elements that include illustrations, gestures, and characters.

The fact that you don’t have to create these animations from scratch makes it an ideal solution even if you have never used this kind of software before. It also comes with more than 200 music tracks and sound effects that you can add to the video.
Pros
- It can be used to create all kinds of animations for all kinds of use including business and personal uses
- It supports the creation of a variety of video styles
- It can be used to create whiteboard videos
- It has numerous animation options to choose from including illustrations, characters, and gestures
- It comes with a free plan
Cons
- You can only create 5 watermarked videos with the free plan
- It is only ideal for creating videos and not animated images
3. Visme
Price: Free plan with limited features. Paid plans start from $15 per month
Best For: Marketers, corporate teams, trainers, teachers, and personal use
Link: https://www.visme.co/
Visme is a cloud-based solution that can be used to create all sorts of animated media including animated videos, animated images, presentations, ads, banners, and more. It has numerous interactive features that are aimed at allowing you to create the perfect designs in a matter of minutes.

Since it is a cloud-based solution, you don’t need to download any software on your computer to use it. it also comes with thousands of premade templates and lots of stock-free images and videos that you can use to create your design.
Pros
- It is an all-in-one solution to create both animated images and videos
- It is a simple soliton even for beginner users
- You get thousands of different resources that can be used to create unique designs limited only by your imagination
- You don’t need to download any software to use it
Cons
- The numerous resources can make it a confusing solution for beginners
- The free plan is very limited
4. Adobe Animate
Price: Starts at $20.99 per month
Best For: Cartoon makers, YouTubers, and game designers
Link: https://www.adobe.com/africa/products/animate.html
Adobe Animate is an improvement on Adobe Flash Professional in every way. It is one of the best ways to create interactive graphics a 2D animations that can then be added to whatever project you are working on.

You can use the numerous tools in Adobe Animate to animate various aspects of your design including characters, shapes, avatars, and other assets. The animations can then be exported in various formats including Flash, HTML5, WebGL, SVG, and more.
Pros
- You have a lot of options when it comes to exporting and sharing the animations you create.
- It allows you to animate elements in numerous ways
- It has an extensive library of tools that can be used to create unique animations
Cons
- Like most Adobe tools, it can be very difficult to use, especially for beginner users
- There is no free trial version
5. Crello
Price: Free plan with limited features. Paid plan starts at $10 a month
Best For: Marketers, freelancers, and business owners
Link: https://create.vista.com/
Also known as VistaCreate, this is a simple solution for creating both animated videos and images. It makes this animation process quick and easy by providing you with a veritable library of templates and thousands of pre-animated characters and objects. It is therefore one of the best solutions to choose even if you don’t have the necessary technical skills to create a credible animated video.

One of the things VistaCreate can do so well is combining videos and animated GIFs with images to create short animated videos that you can share on social media.
Pros
- Create animated videos and export them in various formats, ideal for all devices
- It is one of the best ways to create animated social media posts
- It has a mobile app that allows you to create designs on your device
Cons
- The free version is very limited in creative assets and storage capacity
6. Biteable
Price: Free plan with limited features: Paid plans start from $49 a month
Best For: Marketers, Educators, and Trainers
Link: https://biteable.com/
Biteable is the best option when you want to create simple small animated videos that can be used as Ads or videos that you post to social media. It has numerous premade templates that make creating these simple videos a matter of simply editing one of the templates.

If you feel uninspired, it has thousands of stock footage clips and scenes that you can put together to create a complete. It also has collaborative features that can allow a team to work on the same project.
Pros
- It can be used to make all kinds of marketing videos
- It is an ideal choice for explainer and demo videos
- It provides a wealth of resources to create your videos including stock footage
- It has a free plan
Cons
- The free plan places a watermark on the video
- You can only export the videos in MP4 format.
- At $49 a month, it is a very expensive option.
7. PixTeller
Price: Basic free plan with no animation features. Paid plans start at $12 per month
Best For: Freelancers, marketers, and bloggers
Link: https://pixteller.com/
PixTeller is a great way to animate videos and images for both professional and personal use. if you don’t want the complications that come with a dedicated video editing software, PixTeller is a good option to consider as it is very simple to use.

You can use it to create simple animated short videos by setting frame-by-frame motions and then editing the attributes in each frame. Some of the attributes that you can use PixTeller to edit include colors, opacity, rotation, and more.
Pros
- Editing frame by frame on a timeline makes video creation very easy
- The free version has various editing features
- It can be used to create both animated videos and images
Cons
- It lacks the advanced editing features that you will find on some of the other options on this list
- You can only download the videos in MP4 format
- The free plan doesn’t have animation features
8. Blender
Price: Free
Best For: Scientists, Students, Engineers, Animators, and Artists
Link: https://www.blender.org/download/
If you want to create stunning animations for free, Blender is the open-source software to use. This free program allows users to use the command line to create, render and model 3D animations. It can be used on all platforms including Linux, Windows, and Mac.

Even though it is free, it comes with numerous features including the ability to draw and edit in 3D mode, advanced video editing in VFX, motion tracking, masking, and compositing. But because it uses command-line programming, it may not be an ideal solution for most users.
Pros
- It is a completely free solution
- It has pretty advanced animation and rendering features to create all kinds of videos
Cons
- It may not be the most ideal solution for beginner users even though there are hours of video tutorials to refer to.
Related FAQs
1. How Do I Turn my Video into Animation?
The best way to turn a video into animation is to use one of the animation software solutions that we have outlined above. Each tool has its features and you should choose one that has the necessary features to fit into your video project.
2. How Do I Make an Animated Video for Free?
The only way to make an animated video is to use animation software. And although most programs are not free, there are some open-source solutions like Blender that may be able to help you make an animated video for free.
3. How Do You Animate in PowerPoint?
PowerPoint allows you to add animation to objects and text. To do that, select the object or text that you want to animate and select “Animations.” From the options presented, select the animation that you would like to use and it will be added to the selected object or text. If you would like to add an effect, choose “Effect Options.”
For macOS 10.12 or later
The following are some of the key features you can expect when using Filmora;
- Motion Tracking is a feature that you can use to attach an element to a moving object. The auto motion tracking feature ensures that the elements you attach move smoothly as the object moves.
- You can also use Filmora to customize an animation by adding keyframes to change various aspects including the positions, scale, rotations, and even the opacity of a clip.
- The color match feature allows you to match a selected clip’s color to a separate clip from another clip.
- The auto-ducking feature allows you to choose to fade away background music and make foreground narration or dialogue clearer.
- You can also add plain text to any section of the video
- The advanced title editing feature allows you to change the position, rotation, and scale of the video’s title while it is playing.
- You can also create and edit keyboard shortcut keys that you can then use to edit the video more easily.
2. Animaker
Price: Free with limited features. Paid plans from $10 a month
Best For: marketers, presenters, and freelancers
Link: https://www.animaker.com/
If you are looking for a simple way to create interactive presentations and videos, Animaker is a simple solution to choose. It is a particularly simple solution to use as it comes with numerous ways to create and edit the video, including a huge library of templates and elements that include illustrations, gestures, and characters.
The fact that you don’t have to create these animations from scratch makes it an ideal solution even if you have never used this kind of software before. It also comes with more than 200 music tracks and sound effects that you can add to the video.
Pros
- It can be used to create all kinds of animations for all kinds of use including business and personal uses
- It supports the creation of a variety of video styles
- It can be used to create whiteboard videos
- It has numerous animation options to choose from including illustrations, characters, and gestures
- It comes with a free plan
Cons
- You can only create 5 watermarked videos with the free plan
- It is only ideal for creating videos and not animated images
3. Visme
Price: Free plan with limited features. Paid plans start from $15 per month
Best For: Marketers, corporate teams, trainers, teachers, and personal use
Link: https://www.visme.co/
Visme is a cloud-based solution that can be used to create all sorts of animated media including animated videos, animated images, presentations, ads, banners, and more. It has numerous interactive features that are aimed at allowing you to create the perfect designs in a matter of minutes.
Since it is a cloud-based solution, you don’t need to download any software on your computer to use it. it also comes with thousands of premade templates and lots of stock-free images and videos that you can use to create your design.
Pros
- It is an all-in-one solution to create both animated images and videos
- It is a simple soliton even for beginner users
- You get thousands of different resources that can be used to create unique designs limited only by your imagination
- You don’t need to download any software to use it
Cons
- The numerous resources can make it a confusing solution for beginners
- The free plan is very limited
4. Adobe Animate
Price: Starts at $20.99 per month
Best For: Cartoon makers, YouTubers, and game designers
Link: https://www.adobe.com/africa/products/animate.html
Adobe Animate is an improvement on Adobe Flash Professional in every way. It is one of the best ways to create interactive graphics a 2D animations that can then be added to whatever project you are working on.
You can use the numerous tools in Adobe Animate to animate various aspects of your design including characters, shapes, avatars, and other assets. The animations can then be exported in various formats including Flash, HTML5, WebGL, SVG, and more.
Pros
- You have a lot of options when it comes to exporting and sharing the animations you create.
- It allows you to animate elements in numerous ways
- It has an extensive library of tools that can be used to create unique animations
Cons
- Like most Adobe tools, it can be very difficult to use, especially for beginner users
- There is no free trial version
5. Crello
Price: Free plan with limited features. Paid plan starts at $10 a month
Best For: Marketers, freelancers, and business owners
Link: https://create.vista.com/
Also known as VistaCreate, this is a simple solution for creating both animated videos and images. It makes this animation process quick and easy by providing you with a veritable library of templates and thousands of pre-animated characters and objects. It is therefore one of the best solutions to choose even if you don’t have the necessary technical skills to create a credible animated video.
One of the things VistaCreate can do so well is combining videos and animated GIFs with images to create short animated videos that you can share on social media.
Pros
- Create animated videos and export them in various formats, ideal for all devices
- It is one of the best ways to create animated social media posts
- It has a mobile app that allows you to create designs on your device
Cons
- The free version is very limited in creative assets and storage capacity
6. Biteable
Price: Free plan with limited features: Paid plans start from $49 a month
Best For: Marketers, Educators, and Trainers
Link: https://biteable.com/
Biteable is the best option when you want to create simple small animated videos that can be used as Ads or videos that you post to social media. It has numerous premade templates that make creating these simple videos a matter of simply editing one of the templates.
If you feel uninspired, it has thousands of stock footage clips and scenes that you can put together to create a complete. It also has collaborative features that can allow a team to work on the same project.
Pros
- It can be used to make all kinds of marketing videos
- It is an ideal choice for explainer and demo videos
- It provides a wealth of resources to create your videos including stock footage
- It has a free plan
Cons
- The free plan places a watermark on the video
- You can only export the videos in MP4 format.
- At $49 a month, it is a very expensive option.
7. PixTeller
Price: Basic free plan with no animation features. Paid plans start at $12 per month
Best For: Freelancers, marketers, and bloggers
Link: https://pixteller.com/
PixTeller is a great way to animate videos and images for both professional and personal use. if you don’t want the complications that come with a dedicated video editing software, PixTeller is a good option to consider as it is very simple to use.
You can use it to create simple animated short videos by setting frame-by-frame motions and then editing the attributes in each frame. Some of the attributes that you can use PixTeller to edit include colors, opacity, rotation, and more.
Pros
- Editing frame by frame on a timeline makes video creation very easy
- The free version has various editing features
- It can be used to create both animated videos and images
Cons
- It lacks the advanced editing features that you will find on some of the other options on this list
- You can only download the videos in MP4 format
- The free plan doesn’t have animation features
8. Blender
Price: Free
Best For: Scientists, Students, Engineers, Animators, and Artists
Link: https://www.blender.org/download/
If you want to create stunning animations for free, Blender is the open-source software to use. This free program allows users to use the command line to create, render and model 3D animations. It can be used on all platforms including Linux, Windows, and Mac.
Even though it is free, it comes with numerous features including the ability to draw and edit in 3D mode, advanced video editing in VFX, motion tracking, masking, and compositing. But because it uses command-line programming, it may not be an ideal solution for most users.
Pros
- It is a completely free solution
- It has pretty advanced animation and rendering features to create all kinds of videos
Cons
- It may not be the most ideal solution for beginner users even though there are hours of video tutorials to refer to.
Related FAQs
1. How Do I Turn my Video into Animation?
The best way to turn a video into animation is to use one of the animation software solutions that we have outlined above. Each tool has its features and you should choose one that has the necessary features to fit into your video project.
2. How Do I Make an Animated Video for Free?
The only way to make an animated video is to use animation software. And although most programs are not free, there are some open-source solutions like Blender that may be able to help you make an animated video for free.
3. How Do You Animate in PowerPoint?
PowerPoint allows you to add animation to objects and text. To do that, select the object or text that you want to animate and select “Animations.” From the options presented, select the animation that you would like to use and it will be added to the selected object or text. If you would like to add an effect, choose “Effect Options.”
Ideas for Time-Lapse Video
Are you thinking of stepping out of the familiar world of still photography to make a time-lapse video?
As you all know I am a fan of travel videos and time-lapse video because why not? There is no denying that time-lapse techniques are a perfect medium for travel videos.
In this article will give you some ideas to get started in time-lapse video or photography and let’s define what a time-lapse video and what makes them great.
What is Time Lapse
Time-lapse is a creative filming and video editing technique that manipulates how the frame rate is captured. Frame rate is the number of images or frames appearing in a second of video. In most videos, the frame rate and playback speed are the same. In a time-lapse video, the frame rate is stretched out far more: when played back at average speed, time appears to be sped up.
Time-lapse can also refer to a camera’s shutter speed (How long the camera’s shutter remains open to let light in). A similar effect to time-lapse is found in stop-motion videos. The subject doesn’t move but seems to be in motion because it’s manually or repeatedly moved and then photographed. The images are then strung together to create video-like motion.

How Time-lapse Works
Time-lapse photography is a technique that records a scene or objects that change at a slow speed and turns it into a video that plays back at high speed.
Most time-lapse videos are projected at a speed of 30 frames per second. The frame rate of your time-lapse video can be determined in the editing process, but you will need to account for how quickly the action is taking place in the camera or your video will be a collection if stills. Consider what FPS you want to use in your video. You need to capture that many frames per second to create a time-lapse effect. If you’re shooting a 10 second video at 30fps, you should end up with 300 images.
What equipment needed for time-lapse video?
Time-lapse photography requires only a few special pieces of equipment.
1. Camera / Smartphones
Technically any point and shoot camera or smartphone can be used for time-lapse video, the easiest ones to work are DSLR or mirrorless cameras, some even have an in camera intervalometer (often called a time-lapse feature or time-lapse mode), which means you’ll need less equipment to take great time-lapse video.
2. High-capacity Memory Card
For the best results, shoot in RAW format which takes image in the highest resolution with actual image dimensions. You’ll need to prepare for very large RAW file sizes, so bring multiple high capacity memory cards.
3.Tripod
A tripod is essential to time-lapse video or photography, because the camera needs to stay perfectly still in order to emphasize the steady movement of your subject and to avoid overlay blurry videos or photos.
How to Capture Times-lapse Video
A technique that was once found only in video editing software is now on nearly every mobile device. So what’s the best way to make an amazing time-lapse video that stands apart from the rest? That depends on how you plan to capture the footage.
Smartphones:
Most phones have a time-lapse feature in their camera app. Be advised: you will need to record for an extended period, as 30 minutes equates to about 10 seconds of footage. Like a video camera, you will need a tripod to steady your shots. On an iPhone, you can either film a time-lapse or stitch one together from your photo collection, all without a video editor.
DSLR Camera
For DSLR camera you’ll need a tripod and a device called intervalometer. The first is essential to make sure your camera is stationary and is taking photos if the exact same location without moving anywhere.
An intervalometer, or a remote control, is a device that allows you to set your camera to hit the shutter button at an interval of your choice. In other words, an intervalometer is there to let you rest aside without having a manually click the shutter button yourself.
Here are some video ideas for your time-lapse
- Ice melting
- Flower and plants
- Clouds moving
- Sunrise/sunset
- Star movement
- Traffic movement
Ice melting
Time-lapse is an ideal way to capture the mesmerizing transition between water and ice. Even something as simple as watching ice melt can be appealing.
Flower and plants
Flowers and plants can be beautiful to behold, but their transformation from seed to adult plant is often absolutely breathtaking. If you have an indoor plant that you are about to start growing you can set up a camera on a mount of a tripod at the angle with which you want to capture. As you water, groom or fertilize on a regular schedule, you can incorporate taking a photograph at the same time.
Clouds moving
The clouds can provide a whole host of phenomena that will both enlighten the observer to the complexities of the atmosphere or cosmos but will also provide a beautiful spectacle in the daytime, the movement of clouds can be quite spell binding and the rolling in of rain or a thunderstorm can be particularly interesting.
Sunrise/Sunset
Shooting a sunset is more difficult. The light changes during the selected time period.
To overcome this, use remote control camera software. This can be compensated by increasing the ISO or decreasing the shutter speed as the light dims.

Star movement
At night, if the sky is clear and you are in an area dark enough, the stars in the sky can provide a beautiful time-lapse as the stars move in relation to the observer due to earths rotations.
Traffic movement
The interconnectedness of vehicles moving along busy roads, trailing light patterns, and the general hustle and bustle of city life can be brought to you in a dynamic way via time-lapse videos.
It is the smooth impression of motion which time-lapse is able to produce that can emphasize and help to invigorate something as ordinary and everyday as the coming and going of traffic.

Edit your video with Wondershare Filmora
Wondershare Filmora has the action camera tool that allows you to fasten up your video without re-encoding. This means the quality of the video remains intact without any change after exporting. Here is how to convert a standard video to a time-lapse:
Step1 Download Wondershare Filmora from the official website
Free Download For Win 7 or later(64-bit)
Free Download For macOS 10.14 or later
Step2 Open Filmora, then click action camera tool
Step3 Click import action cam video to import your file

Step4 click on the speed icon add marker button. Then drag the marker all the way over the target video.

Step5 Next drag the slider under the speed tool to speed up the video according to your desire.

Step6 Lastly when done, export and save the final video.

Conclusion
Hope this article can give you an idea on how to make a good time-lapse video. It’s so fun doing it you will see how the things change that fast. Time-lapse content is typically just that, shorter, more visually interesting content, unlike most conventional video, time-lapse video can tell a story within just a few second. Start creating nice and creative time-lapse video now and make it as one content on your you tube channel.
Free Download For macOS 10.14 or later
Step2 Open Filmora, then click action camera tool
Step3 Click import action cam video to import your file
Step4 click on the speed icon add marker button. Then drag the marker all the way over the target video.
Step5 Next drag the slider under the speed tool to speed up the video according to your desire.
Step6 Lastly when done, export and save the final video.
Conclusion
Hope this article can give you an idea on how to make a good time-lapse video. It’s so fun doing it you will see how the things change that fast. Time-lapse content is typically just that, shorter, more visually interesting content, unlike most conventional video, time-lapse video can tell a story within just a few second. Start creating nice and creative time-lapse video now and make it as one content on your you tube channel.
Step by Step to Rotate Videos in Windows Media Player
Video Editing and the emotion the final product evokes is dependent on many aspects, be it the source clips, the cuts introduced or the way of presentation. But to get to the end, there are several steps involved in the production process, and not every instance of it is perfect. But we all know, editing does often help iron out any kinks, with its ability to solve basic problems, like footage that is askew, or upside down. Thus with the steps listed in this article we will help you understand how you can rotate videos to ensure your edited project looks as intended.
This particular article considers the pre-installed Windows Media Player and WonderShare Filmora.
Note: We documented the steps in this guide with Windows Media Player (on a device running Windows 10 ) and WonderShare Filmora.
How to Rotate Videos with Windows Media Player?
Imagine you’re in a situation where you have gone ahead and finished the filming portion of a project on your smartphone but realise that the capture footage is upside down. Fortunately, this sort of a scenario is a common occurrence and it has quite a simple fix. If you look around the gallery app on your phone, you should be able to rotate the footage there itself, but if you’ve already moved it over to your laptop, hopping into a video editor can get this done in a jiffy.
Unfortunately, if you were planning to do this with the pre-installed Windows Media Player, you will not be able to rotate the clip. The software is only capable of being used as a Media Player that can help keep track of stored videos in a neat and easy to view format. It also has the ability to burn inserted discs, although we doubt any modern laptop comes with a disc drive.
Hence, to rotate video and still ensure its compatible with Windows Media Player, you can use free tools like VLC Media Player or Wondershare Filmora. The steps on how to use Wondershare Filmora to rotate video clips have been elaborated ahead in this article.
TIPS FOR WINDOWS MEDIA PLAYER
In case you want to use Windows Media Player as your default software to manage stored content, read this section to understand how you can control displayed video libraries.
While Windows Media Player will pull all compatible files present in the Default Video Library, you can customise the information made available by using the Organises Function.
To configure the Videos Section to display specific content follow the steps listed below.
- Click on Organize.
- Then move onto Manage Libraries
- Now click on Videos.

Click on Add to enter File Explorer and choose a new folder to add to this section.

Once you add the new folder, the screen will update itself with all the video files present in the folder.

An alternate way to Rotate Video with Wondershare Filmora
With Windows Media Player only being a playback tool, we feel free software like Filmora Video Editor are a great option to have installed on your device.
In Wondershare Filmora, footage rotation can only be done via the Edit Option — in my experience this straightforward approach felt quite simple and intuitive. And in case you wish to incorporate Keyframes into the rotation step, the feature is available near the Timeline.
The emphasis on accessibility for every function in Filmora, provides a significant advantage. The use of modern iconography also betters the familiarity users may have with the software. These factors make Wondershare Filmora a great option to consider. If you do not already have Wondershare Filmora, you can download the software by visiting the official website.
Now, the steps we have listed below will help you learn how to use the rotate function in Wondershare Filmora and get the desired output.
For Win 7 or later (64-bit)
For macOS 10.14 or later
Open a new video project in Filmora and follow the steps listed below.
Step 1: Import a Media File for editing into the newly created Video Project.

Step 2: Drag and drop the selected video clip on your Timeline and select it with your mouse to activate it for the next set of interactions.

Step 3: Choose the Edit Option, which we have marked in Red. Doing this will bring up the Edit Window on your screen.

Step 4: Click on the checkbox next to Transform and then use the Rotation Slider to modify the orientation.

Now that you’ve read this portion of the guide, you may have realised the simple nature of Wondershare Filmora.
BONUS – KEYFRAMING IN WONDERSHARE FILMORA
While the steps we listed above showed how to perform rotation with just a few clicks. You can make the end product more dynamic with the use of Keyframes.
Definition: Keyframes in Video Editing is a software-based tool that will let you configure start and end points on the timeline, within which you can configure different clip properites. The set of changes that you create will occur gradually as the playhead continues through the playback. Some properties that can be modified with this method are zoom, rotation, colors, positions, etc.
Click on the Keyframe Button (marked in Green) to access the Keyframe Menu in Wondershare Filmora.

The Bottom Line
Rotating video is unfortunately impossible in Windows Media Player, thus the access and ability to free software like Wondershare Filmora is a huge positive for the creative community. Speaking of how rotation is done in Filmora, the intuitive number-based system is a huge positive, as there are some software which prefer using swivels. The integration of Keyframes into a free tool is also welcome.
This marks the end of our guide on how to rotate video in Windows Media Player and Wondershare Filmora. Once again, if you wish to not use a proper video editing tool, you can consider alternate players like VLC, which can rotate footage.
Click on Add to enter File Explorer and choose a new folder to add to this section.
Once you add the new folder, the screen will update itself with all the video files present in the folder.
An alternate way to Rotate Video with Wondershare Filmora
With Windows Media Player only being a playback tool, we feel free software like Filmora Video Editor are a great option to have installed on your device.
In Wondershare Filmora, footage rotation can only be done via the Edit Option — in my experience this straightforward approach felt quite simple and intuitive. And in case you wish to incorporate Keyframes into the rotation step, the feature is available near the Timeline.
The emphasis on accessibility for every function in Filmora, provides a significant advantage. The use of modern iconography also betters the familiarity users may have with the software. These factors make Wondershare Filmora a great option to consider. If you do not already have Wondershare Filmora, you can download the software by visiting the official website.
Now, the steps we have listed below will help you learn how to use the rotate function in Wondershare Filmora and get the desired output.
For Win 7 or later (64-bit)
For macOS 10.14 or later
Open a new video project in Filmora and follow the steps listed below.
Step 1: Import a Media File for editing into the newly created Video Project.
Step 2: Drag and drop the selected video clip on your Timeline and select it with your mouse to activate it for the next set of interactions.
Step 3: Choose the Edit Option, which we have marked in Red. Doing this will bring up the Edit Window on your screen.
Step 4: Click on the checkbox next to Transform and then use the Rotation Slider to modify the orientation.
Now that you’ve read this portion of the guide, you may have realised the simple nature of Wondershare Filmora.
BONUS – KEYFRAMING IN WONDERSHARE FILMORA
While the steps we listed above showed how to perform rotation with just a few clicks. You can make the end product more dynamic with the use of Keyframes.
Definition: Keyframes in Video Editing is a software-based tool that will let you configure start and end points on the timeline, within which you can configure different clip properites. The set of changes that you create will occur gradually as the playhead continues through the playback. Some properties that can be modified with this method are zoom, rotation, colors, positions, etc.
Click on the Keyframe Button (marked in Green) to access the Keyframe Menu in Wondershare Filmora.
The Bottom Line
Rotating video is unfortunately impossible in Windows Media Player, thus the access and ability to free software like Wondershare Filmora is a huge positive for the creative community. Speaking of how rotation is done in Filmora, the intuitive number-based system is a huge positive, as there are some software which prefer using swivels. The integration of Keyframes into a free tool is also welcome.
This marks the end of our guide on how to rotate video in Windows Media Player and Wondershare Filmora. Once again, if you wish to not use a proper video editing tool, you can consider alternate players like VLC, which can rotate footage.
Also read:
- Updated Easy Steps to Export Video in Filmora
- New In 2024, Some Top Methods to Create AI Slow Motion Videos
- Updated Have You Ever Tried DaVinci Resolve for Creating a Motion Blur Effect? Read This Article to Discover How to Use DaVinci Resolve Motion Blur with the Help of Detailed Instructions
- In 2024, How to Create an Aesthetic Slideshow Presentation
- Updated In 2024, Add Green Screen Video on TikTok
- New How to Add Video Transitions in Videos
- In 2024, Tips & Tricks To Perfectly Use the Audio Mixer in Filmora
- In 2024, Best Green Screen Software for Beginner on Mac
- New Want to Imbibe Your Graphic Expertise with Designing Classic iMovie Presentations? Be Here to Work Through the Process Within the Quickest Possible Time Span for 2024
- Updated Frame Blending Is a Great Way to Smooth Out Your Video Footage in Adobe Premiere Pro. Using This Technique, You Can Create a More Natural Looking Motion by Averaging Out the Frames in Your Clips for 2024
- In 2024, How to Remove Background From a Video in Premier Pro
- Updated In 2024, How to Add Font Effects to Videos
- 2024 Approved Time Lapse Videos Play an Important Part in Videography. If You Want to Start Video Shooting, Then You Shouldnt Miss Time Lapse Video. This Article Will Show You some Ideas over This
- Updated Adjust Background to Black for Your Product Review Video for 2024
- Top 7 MP4 Video Editors on Mac Edit MP4 Videos Easily
- In 2024, Discord Is Becoming More Popular with Time with Millions of Users. Are You Thinking of Getting a GIF for Discord Profile? If Yes, Learn From This Piece Since We Have a Conclusive Summary of Getting a GIF Profile Picture for Discord
- In 2024, How to Add Subtitles in Canva?
- In 2024, Rootjunky APK To Bypass Google FRP Lock For Samsung Galaxy F34 5G
- How to Rescue Lost Pictures from Y02T?
- 3 Solutions to Find Your Lava Yuva 3 Pro Current Location of a Mobile Number | Dr.fone
- Infinix Smart 8 HD Stuck on Screen – Finding Solutions For Stuck on Boot | Dr.fone
- In 2024, AddROM Bypass An Android Tool to Unlock FRP Lock Screen For your Samsung Galaxy A14 4G
- How to Downgrade Apple iPhone XS Max without iTunes? | Dr.fone
- How to Exit Android Factory Mode On Vivo X Flip? | Dr.fone
- How to Unlock Realme GT 3 Bootloader Easily
- In 2024, How to Change Lock Screen Wallpaper on Oppo A79 5G
- Rootjunky APK To Bypass Google FRP Lock For Samsung Galaxy A34 5G
- 8 Ultimate Fixes for Google Play Your Vivo S18 Pro Isnt Compatible | Dr.fone
- How To Bypass the Required Apple Store Verification For Apple iPhone 11 Pro
- Complete Fixes To Solve iPhone SE Randomly Asking for Apple ID Password
- In 2024, Is Fake GPS Location Spoofer a Good Choice On Samsung Galaxy S23 FE? | Dr.fone
- Spoofing Life360 How to Do it on Samsung Galaxy S23+? | Dr.fone
- Title: New Adobe After Effects Review
- Author: Morgan
- Created at : 2024-05-19 05:11:51
- Updated at : 2024-05-20 05:11:51
- Link: https://ai-video-editing.techidaily.com/new-adobe-after-effects-review/
- License: This work is licensed under CC BY-NC-SA 4.0.
