
New Are You Aware that You Can Create Your Own Lower Thirds for Video? Read This Article for a Tutorial on How to Customize One

Are You Aware that You Can Create Your Own Lower Thirds for Video? Read This Article for a Tutorial on How to Customize One
As a video creator, there are times when you need to use Lower Thirds. Although many lower-third presets are available, making unique and personalized ones can ensure your video stands out.
So, to empower your inner video creator, this article will show you how to make your own Lower Thirds in Filmora.
Part 1: What is Lower Third
A Lower Third is a mix of motion graphic design and texts that are placed in the lower area of the screen. It provides additional information, such as a person’s name or other relevant information, without distracting the audience from the main content.
Lower Thirds can be used in various settings, such as news broadcasts or interviews, to help provide viewers with additional context.
Part 2: How to Make Your Own Lower Thirds in Filmora
Free Download For Win 7 or later(64-bit)
Free Download For macOS 10.14 or later
(1) A simple line and texts

Step1 Create a simple line
Go to the Media library > Sample Media folder > choose a color sample. For this tutorial, we will select the white color. Then, drag and drop this sample color onto the upper video track.

Double-click the white sample clip to open the settings and scale it to 30%. Then, reposition the white bar to your desired place.

Step2 Mask the white sample
Since we want to create a thin horizontal shape, you need to make some adjustments to the white sample by using an image mask. So, go to the Effect window > Utility > Image Mask. Then, drag and drop the “Image Mask” onto the white color sample.

After that, double-click the white sample on the timeline and find the Image Mask setting. Choose the shape that works best for your needs. For this tutorial, we are going to use this one. Then, adjust the X and Y-axis scale numbers until it becomes a thin white line. Click OK.

Step3 Add a text for your lower thirds
Go to Titles > Plain Text > Basic 6 and drop it onto the second video track above the white line clip. Don’t worry about the exact position yet. We can adjust it later.

Double-click on the text clip to open the settings, then type some text there and adjust the size and font.

Step4 Add animation to the text
Click Advanced > Animation > Up Down 1 animation. Adjust the animation length by dragging the two brackets on the timeline on the right side. Click Ok.

Step5 Add keyframes to the white line clip when entering
Double-click on the white line clip on the timeline to show the animation keyframe setting window. Then, playback the animation of the text, find a position before the text animation starts and move the play head there. Make sure it is close enough to when the texts show up so the white line enters the keyframe right before the text enters.

Click to add a keyframe, double-check to make sure it is the final position you want, and the opacity should be 100 at this point.
After that, move the play head to the left for a few frames and click add again. To make sure the white line is out of the frame before entering, you need to change the Y-axis number. Change the opacity to 0 as the white line starts in transparent color.

These two keyframes will create an effect of the line entering the frame while turning from transparent to white. Playback the animation and adjust the keyframes marks by dragging them to the left or right until you feel the timing looks good.
Step6 Add keyframes to the white line clip when exiting
Playback again to find where the texts disappear, then move the play head to a position after it. Also, make sure it’s close enough to where the texts disappear so you can ensure the white line exits right after the texts disappear. Then, add the keyframe.

You don’t need to change the setting this time because this keyframe is used to keep the position and opacity unchanged.
Instead, move the play head again to the right for a few frames and add another keyframe. Move the texts out of the frame by changing the y-axis number, then change the opacity to 0. This keyframe is used to create the white line animation exiting the frame and turning back to transparent in the meantime.

Playback the video and see how it looks.
(2) A name card with a solid background

Sometimes you might want to create a name card with a solid background like the sample above. To create it, we can use the same method. Here’s how to do it:
Step1 Make the lower third background
Select the white color sample from the sample color folder and drop it onto the upper video track of the video.

Change the scale to 30%, then reposition the white sample to your desired place. Click OK.

Step2 Create an image mask for the lower third background
Drag and drop the Image Mask onto the white sample clip on the timeline.

Double-click on the white sample clip to activate the video setting window and find the Image Mask settings. Then, choose the mask shape you need. You can also adjust its size by changing the X or Y-axis.

Step3 Add some text
Once the background card is in place, go to Titles > Plain Text > ‘Basic 6’ and drop it onto the third video track.

Now, type in the texts as needed. Reposition and scale the texts to make sure they are on top of the background shape.

Step4 Add animation to the text
Click Advanced > Animation > Push. Then, adjust the animation length accordingly. Click Ok.

Double-click on the background clip to show the animation tab setting. Then, playback the text animation and find a position earlier than the start and add a keyframe.

Similar to the tutorial before, move the play head again a few frames earlier to the left and add another keyframe. If you want to have the name card flying in from the left while expanding, you can change the X-axis and scale of the background card to 0. Change the opacity to 0 to create a color change from transparent to white.

To let the background card exit the frame, add two more keyframes to the background card. Add a keyframe with no changes to settings. Move the play head to the right for a few frames and add another keyframe.

If you want the name card to exit to the bottom, change the Y-axis number until it exits. Change the scale and opacity to 0. Then, playback and adjust the keyframes.
Finally, you can add a Subscribe button from the new default Filmora element pack “Social Media.”

Wrapping up
These are two ways you can create your own Lower Thirds in FIlmora. You can also change the keyframe settings to customize your lower thirds even more. Now, it’s time to try it yourself, and let us know what you think!
Free Download For macOS 10.14 or later
(1) A simple line and texts

Step1 Create a simple line
Go to the Media library > Sample Media folder > choose a color sample. For this tutorial, we will select the white color. Then, drag and drop this sample color onto the upper video track.

Double-click the white sample clip to open the settings and scale it to 30%. Then, reposition the white bar to your desired place.

Step2 Mask the white sample
Since we want to create a thin horizontal shape, you need to make some adjustments to the white sample by using an image mask. So, go to the Effect window > Utility > Image Mask. Then, drag and drop the “Image Mask” onto the white color sample.

After that, double-click the white sample on the timeline and find the Image Mask setting. Choose the shape that works best for your needs. For this tutorial, we are going to use this one. Then, adjust the X and Y-axis scale numbers until it becomes a thin white line. Click OK.

Step3 Add a text for your lower thirds
Go to Titles > Plain Text > Basic 6 and drop it onto the second video track above the white line clip. Don’t worry about the exact position yet. We can adjust it later.

Double-click on the text clip to open the settings, then type some text there and adjust the size and font.

Step4 Add animation to the text
Click Advanced > Animation > Up Down 1 animation. Adjust the animation length by dragging the two brackets on the timeline on the right side. Click Ok.

Step5 Add keyframes to the white line clip when entering
Double-click on the white line clip on the timeline to show the animation keyframe setting window. Then, playback the animation of the text, find a position before the text animation starts and move the play head there. Make sure it is close enough to when the texts show up so the white line enters the keyframe right before the text enters.

Click to add a keyframe, double-check to make sure it is the final position you want, and the opacity should be 100 at this point.
After that, move the play head to the left for a few frames and click add again. To make sure the white line is out of the frame before entering, you need to change the Y-axis number. Change the opacity to 0 as the white line starts in transparent color.

These two keyframes will create an effect of the line entering the frame while turning from transparent to white. Playback the animation and adjust the keyframes marks by dragging them to the left or right until you feel the timing looks good.
Step6 Add keyframes to the white line clip when exiting
Playback again to find where the texts disappear, then move the play head to a position after it. Also, make sure it’s close enough to where the texts disappear so you can ensure the white line exits right after the texts disappear. Then, add the keyframe.

You don’t need to change the setting this time because this keyframe is used to keep the position and opacity unchanged.
Instead, move the play head again to the right for a few frames and add another keyframe. Move the texts out of the frame by changing the y-axis number, then change the opacity to 0. This keyframe is used to create the white line animation exiting the frame and turning back to transparent in the meantime.

Playback the video and see how it looks.
(2) A name card with a solid background

Sometimes you might want to create a name card with a solid background like the sample above. To create it, we can use the same method. Here’s how to do it:
Step1 Make the lower third background
Select the white color sample from the sample color folder and drop it onto the upper video track of the video.

Change the scale to 30%, then reposition the white sample to your desired place. Click OK.

Step2 Create an image mask for the lower third background
Drag and drop the Image Mask onto the white sample clip on the timeline.

Double-click on the white sample clip to activate the video setting window and find the Image Mask settings. Then, choose the mask shape you need. You can also adjust its size by changing the X or Y-axis.

Step3 Add some text
Once the background card is in place, go to Titles > Plain Text > ‘Basic 6’ and drop it onto the third video track.

Now, type in the texts as needed. Reposition and scale the texts to make sure they are on top of the background shape.

Step4 Add animation to the text
Click Advanced > Animation > Push. Then, adjust the animation length accordingly. Click Ok.

Double-click on the background clip to show the animation tab setting. Then, playback the text animation and find a position earlier than the start and add a keyframe.

Similar to the tutorial before, move the play head again a few frames earlier to the left and add another keyframe. If you want to have the name card flying in from the left while expanding, you can change the X-axis and scale of the background card to 0. Change the opacity to 0 to create a color change from transparent to white.

To let the background card exit the frame, add two more keyframes to the background card. Add a keyframe with no changes to settings. Move the play head to the right for a few frames and add another keyframe.

If you want the name card to exit to the bottom, change the Y-axis number until it exits. Change the scale and opacity to 0. Then, playback and adjust the keyframes.
Finally, you can add a Subscribe button from the new default Filmora element pack “Social Media.”

Wrapping up
These are two ways you can create your own Lower Thirds in FIlmora. You can also change the keyframe settings to customize your lower thirds even more. Now, it’s time to try it yourself, and let us know what you think!
Top 10 Sony LUT for Different Purposes
If you’ve ever worked in the color grading profession, you’re aware of how time-consuming and labor-intensive it is to achieve a specific look on a scene. To master color grading, you must practice constantly, one of the reasons for the existence of specialists in this field. While everybody can color grade, not everyone can do it well. People in this business have devised remedies to make the editing workflow considerably more accessible and less time-consuming.
Achieving a specific ambiance in a scene demands ongoing effort and naturally takes longer. LUTs, or Lookup Tables, were created as a result. LUTs are ideal for storing a set of colors to use later or in another program. A LUT is the most effective technique to color or alters your image’s colors.
Benefits of using LUTs
There are numerous advantages to using lookup tables to edit your footage. We’ve already discussed that it helps to give your films a more polished and professional appearance, which is one of the primary explanations why individuals use LUTs, but there are many more.
1. A beginning towards professionalism
This is a fantastic approach for beginners to have a good idea of how to build their own trademark looks in their videos. The time it takes to develop your color grading craft is unavoidable. So, as a novice, LUTs will come in useful for you to establish your approach and save your ass, big time.
You’ll eventually come up with a blend of your own LUTs to use, resulting in your own LUT. Not only will LUTs aid in color grading learning, but they will also save funds and resources. You will not only devote time to learning color grading, but you will also spend a significant amount of money on color grading tools and equipment, such as software and color panels. You’ll see why color grading equipment is necessary when you get to this point.
However, for the time being, employing LUTs is the most cost-effective way to obtain a cinematic look.
2. It saves your time
Because LUTs are predefined colors used to establish a specific look on a picture, they save you time. Having a trustworthy LUT to use for video will save the life of freelance editors who are constantly meeting commitments and modifications. Isn’t the purpose of color grading to generate a visual emotion for your movie? So, with LUTs, you can create one without going through the time-consuming process of manual color correction. Only one-color preset will be applied to all scenes in a single LUT.
However, there’s a good probability that it won’t look the same in all of the images. This is where you’ll adjust the colors to make them more evenly match the film. It’s nothing significant most of the time, just some little saturation adjustments, etc.
3. Work on a budget
Time spent in a color-grade suite may be highly costly, and it can lead your films to go over budget in order to achieve a specific aesthetic. LUTs, on the other hand, are available for free online or for a fee for more complex versions. Even if you buy your LUTs, you could save thousands of dollars based on the size of your film. LUTs can also assist you in meeting tight deadlines, and setting targets too optimistically is something I’m sure we’ve all done at some point.
Whether it’s a client or a personal project, things can often get pushed to the last minute, so having something in your arsenal that can save you time is always a good bonus. There are, however, projects where you need to appear competent without investing a lot of time on them due to budget limits; this is where a lookup table comes in handy because you can modify the complete style of your movie in a matter of seconds by pressing a few buttons. Even complicated editing can be completed quickly, giving you more time to work on other tasks that will earn you more money.
4. It provides an artistic approach
LUTs are beneficial because they allow videos shot with cameras that shoot very dark, discolored images to have more vivid tones and contrast. This is excellent for grabbing viewers’ attention and making videos more intriguing and engaging. LUTs add an artistic element to videos and can help you develop a visual artistic identity for your videos if you use the same colors. Another advantage of LUTs is that they enhance the color quality of videos shot on smartphones with particular color schemes. Although this varies significantly from brand to brand, you can use LUTs to make a Smartphone video more vibrant and appealing.
Top 10 Sony LUT for Different Purposes
The highlights in your videos will seem smooth with this set of Free Sony LUTs, while the shadows will add intensity and depth without sacrificing any details. It’s easy to use Sony LUTs in.CUBE and.LOOK versions, and they help you get the cinematic appearance you want.
1. SLog2 & SLog3 to Enhanced Rec709 LUTs
The Sony Natural Enhanced LUT pack was created to address Sony’s color science-related difficulties with skin tones and hue levels. These LUTs correct and fix the colors in your S-Log2 and S-Log3 videos, giving them a colorful natural look.
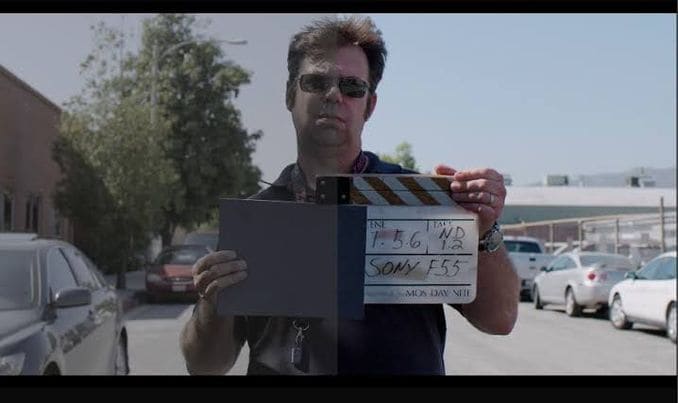
SLog2 & SLog3 to Enhanced Rec709 LUTs
2. Filmic Tone Creative LUTs
One of our choices is the Filmic Tone LUT set. It enhances your creativity by adding a cinematic tone to your footage. These LUTs were created to convert the green color hues to a dark shade reminiscent of a Bali Instagram-type color while keeping the warmth of the mid-tones and highlights.
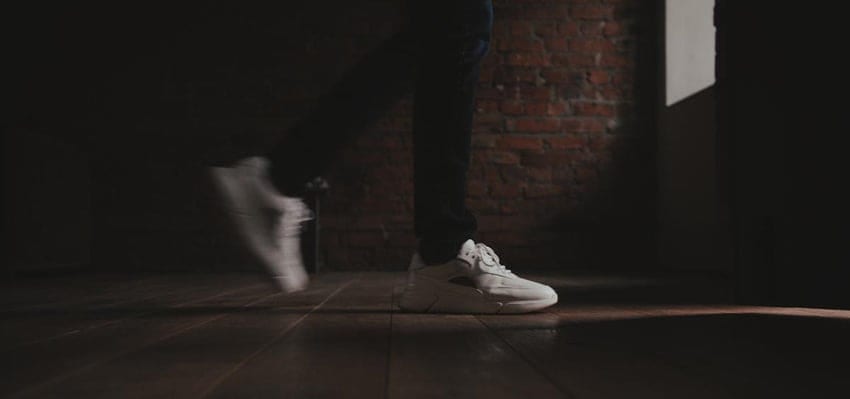
Filmic Tone Creative LUTs
3. Sony Nature LUTs
Nature has influenced it. Nature LUTs are designed to complement the natural environs in which we live. Bali, woods, forests, greenery, streams, and beaches are all excellent choices for this design.
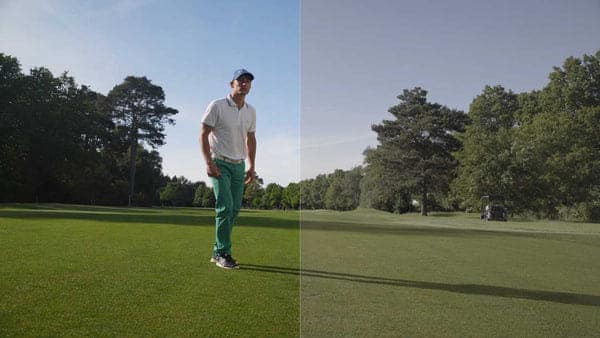
Sony Nature LUTs
4. Sony A7S III, FX3 & A7 IV – S-Log 3 Correction LUTs
Three correction LUTs are explicitly created for S-Log 3 footage. They are compatible with Sony a7S III, FX4, and a7 IV footage. They use a simple and clean style that is a wonderful place to start with your film. Following the application of these correction LUTs, we suggest boosting saturation, correcting exposure, and improving contrast. Then you may personalize it. The main goal of these Sony LUTs is to give your videos a new lease on life by enhancing saturation and overall color temperature. When utilized for the environment, lifestyle, and event videos, they also make the picture sharper and more stunning.
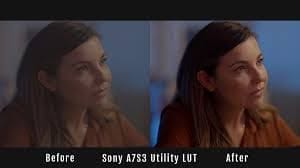
Sony A7S III, FX3 & A7 IV – S-Log 3 Correction LUTs
5. Sony Cine-4 Film and Standard LUTs
There are 24 Sony Cine-4 Film LUTs and 24 Rec 709 LUTs in this LUTs set. They can be used in films and television shows, social videos, presentations, and more. They’re also quite simple to operate. To apply stunning color grading to your film, import the preset file or simply drag & drop the LUT over it. It works with any resolution. Make your films, social media posts, documentaries, and images look sleek and modern.
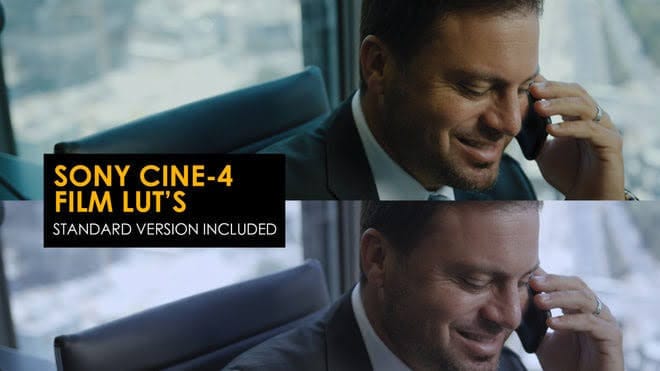
Sony Cine-4 Film and Standard LUTs
6. Sony Urban Dark LUT
The Urban Dark LUT pack aims to provide users with some dark, fascinating tones that work well with urban landscapes. These LUTs have a dark vibe that complements skin tones well.
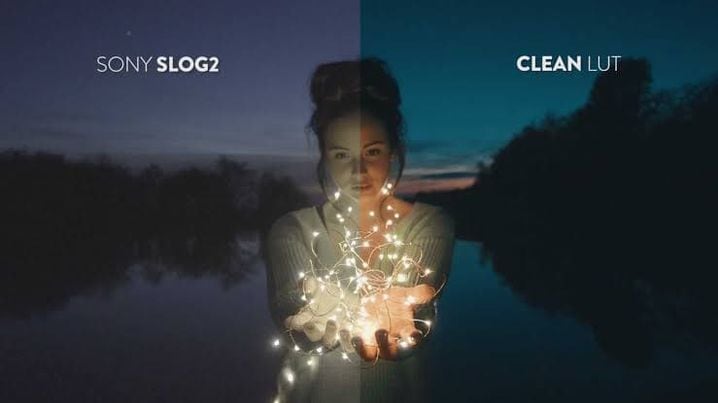
Sony Urban Dark LUT
7. LUT Sony Vegas “Adventure”
This is one of the best Sony LUTs for adding drama and depth to the video. It also makes the image moodier and more attention-grabbing, which is ideal if your film focuses on people, architecture, or scenic landscapes because it draws attention to the topics.
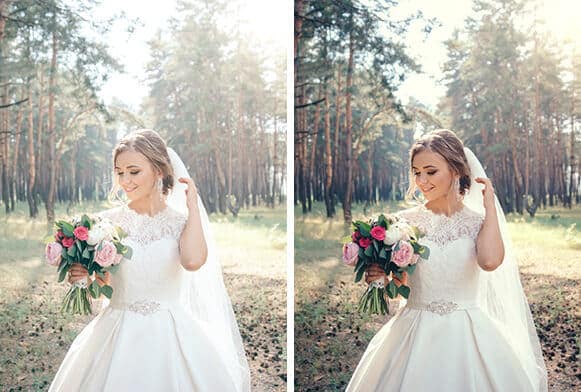
LUT Sony Vegas “Adventure”
8. Sony LUT “Dessert”
This Sony LUT adds a creamy feel to the video, making it more appealing while also boosting the color palette. It’s suitable for indoor footage and works particularly well with family and love stories.
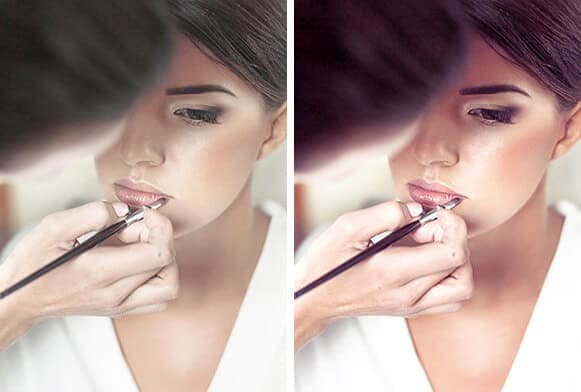
Sony LUT “Dessert”
9. Sony LUTs for the premiere
If you want to make your video clip look professional without the color grading being too obvious, Sony LUTs for Premiere is one of the best options available. It cools down the image and enhances the contrast slightly to make the topic stand out without being overpowering. This LUT is particularly well suited to business, real estate, and action-oriented videos.
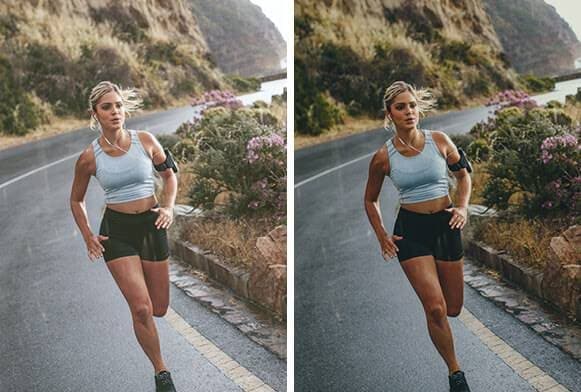
Sony LUTs for the premiere
10. Sony Base LUT pack
The Sony Base LUT Pack replaces Sony’s rec709 LUT and color space. These LUTs have a wonderful warm tone to them and more accurate green colors, and these LUTs are merely a starting point or base for your grading. We recommend grading beyond the simple use of the LUT if you want the best results. Each LUT in this bundle was built with the Sony S-log2 color profile in mind. These LUTs are intended to assist you in achieving proper exposure during filming and grading while maintaining a pleasant image.

Sony Base LUT pack
Wondershare Filmora11 Express Better
Achieve More
Grow Together
Free Download Free Download Learn More

Closing Thoughts:
LUTs should be present in every videographer’s toolbox since they may save time and money and produce a consistent and professional result. In comparison to color grading suites, LUTs are also less expensive. LUTs are helpful for both beginner and seasoned filmmakers and can aid when you run out of innovative ideas.
Free Download Free Download Learn More

Closing Thoughts:
LUTs should be present in every videographer’s toolbox since they may save time and money and produce a consistent and professional result. In comparison to color grading suites, LUTs are also less expensive. LUTs are helpful for both beginner and seasoned filmmakers and can aid when you run out of innovative ideas.
Create True 3D Text Effects Using After Effects
Every video creator wants to make their videos eye-catching and get the message delivered to the viewers properly. If you have regular graphic elements and texts, your video is not going to be as engaging as expected. That is why video creators always try to include trending and attention-grabbing effects and animations in the video. There is no doubt that 3D animations for texts and titles look really amazing.
Different video editors have different 3D text animations and effects that you can apply to the text on your video and get instantly noticed by your viewers. You can apply 3D text animation on premium video editors like After Effects as well as apply 3D text effect online. We will illustrate how to create stunning 3D text animations with different video editors in simple steps.
Part 1. Create True 3D Text Effects using After Effects
After Effects is a premium video editor where you can create true 3D text effect from scratch. First of all, you need to create a new composition and add your text to your video. You have to enable 3D option for the text and add depth and lighting texture to get 3D effect. Therefore, you should first create 3D text effect and thereafter, animate 3D text as per your preference. Here are the steps to create 3D text After Effects easily.
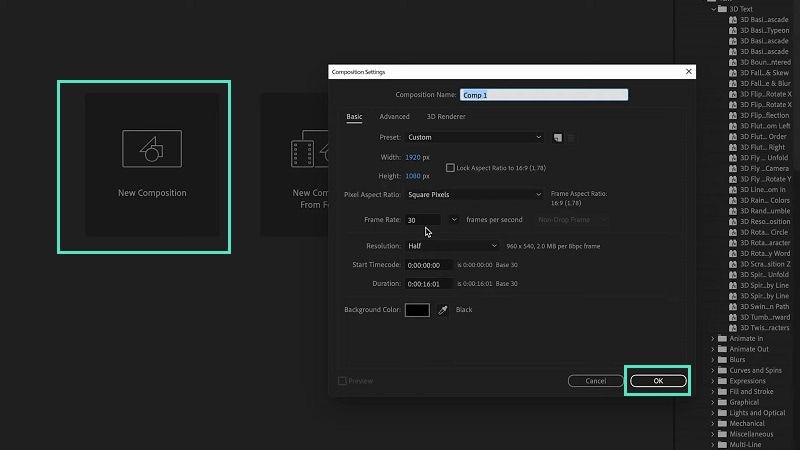
Step1Launch After Effects and click on New Composition from Project section. Set the different parameters on Composition Settings and click on Ok button.
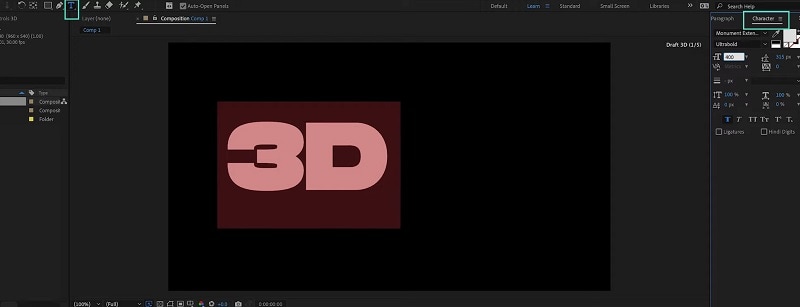
Step2Click on Type Text icon located at the top bar and type a text on the video. After typing the text, go to the Character panel to the right and adjust the style of the text.
Step3You have to enable 3D option for the text from the 3D icon on text layer. Under text layer, click on Transform and use X-Y-Z rotation options to rotate the text from 3D perspectives.

Step4Similarly, click on Geometry Options and add depth to your text to get 3D effect on your text.
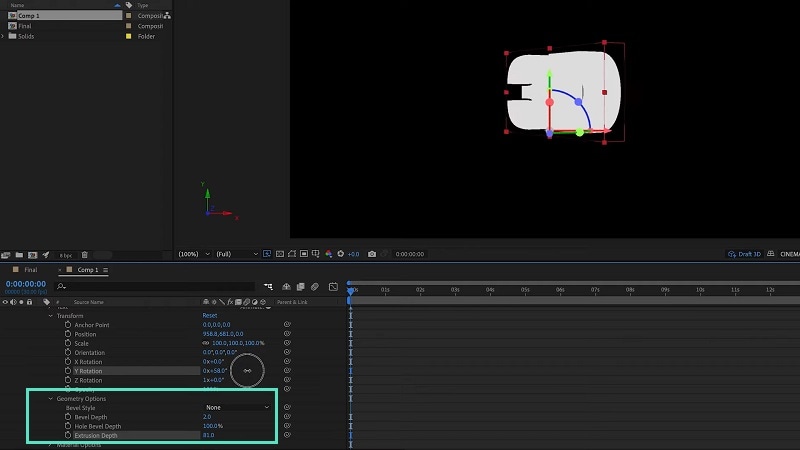
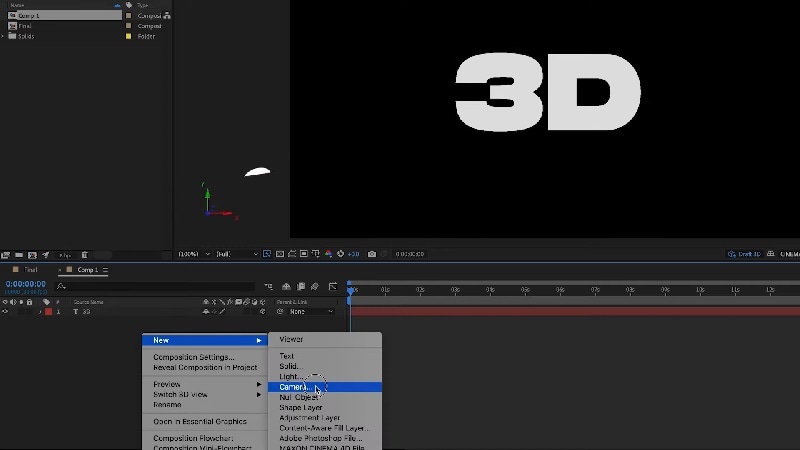
Step5You have to create a new Camera layer by right-clicking Timeline and go to New>Camera option. You will get Camera Settings window to adjust the parameters and click on Ok button.
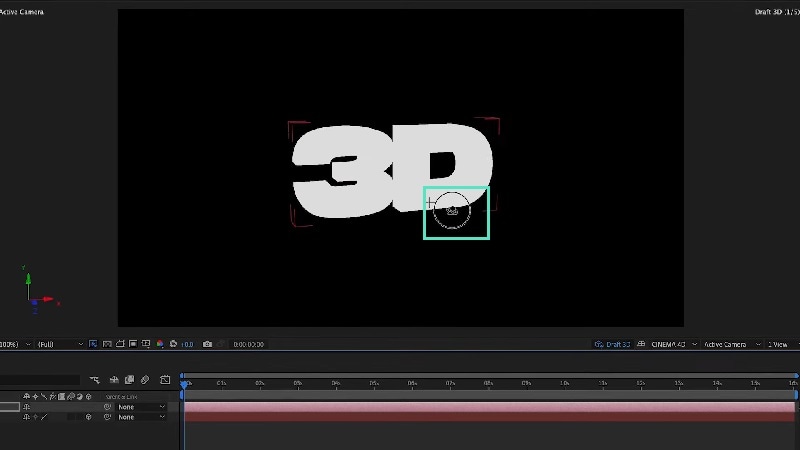
Step6Use the Orbit Tool to rotate the text to get the true 3D effect visible on the screen.
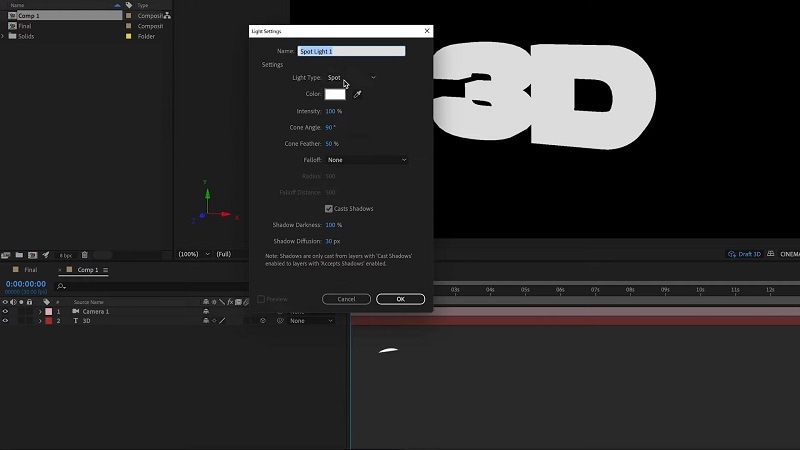
Step7You need to get the lighting and shading for your 3D text. Right-click on Comp window and go to New> Light. Adjust the parameters from Light Settings window.
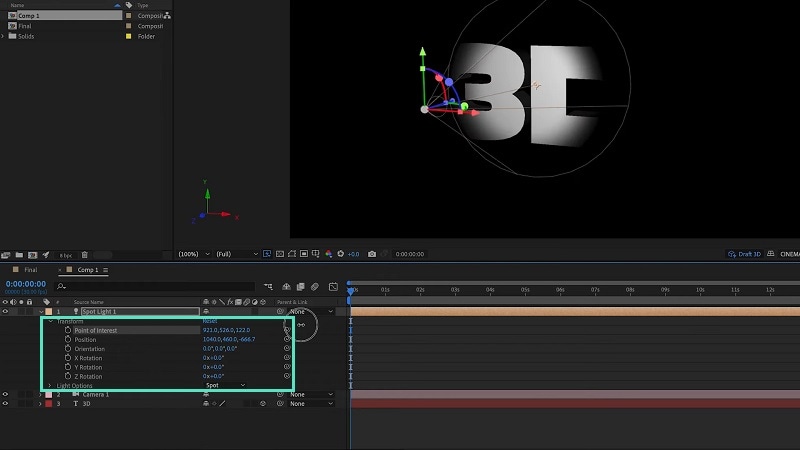
Step8You can adjust Transform and Light Options from Comp window under Light layer for better effect.
You have successfully created 3D text effect on After Effects. You will now illustrate how to animate the 3D text.
Part 2. Create 3D Camera Animation
You have prepared your text with 3D effect, and you can have multiple 3D texts on your video. It is time to animate those 3D texts so that the 3D effect becomes more prominent and the text instantly grabs attention. You do not have to create animation from scratch as there are 3D animation presets available. All you need to do is apply them to your 3D texts and they will start to animate automatically. Besides, you can create 3D camera animation to show the texts from different camera perspectives. Here are the steps to use 3d animated text generator on After Effects.
Step1Once you have created your 3D text effect, go to Effects & Presets panel.
Step2Go to Text> 3D Text and you will see all the different 3D animation presets that you can apply.
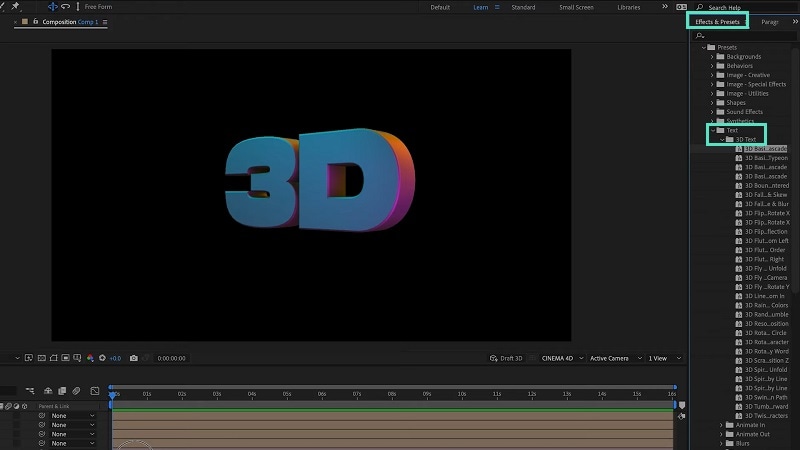
Step3Drag and drop your desired 3D animation directly to 3D text layer.
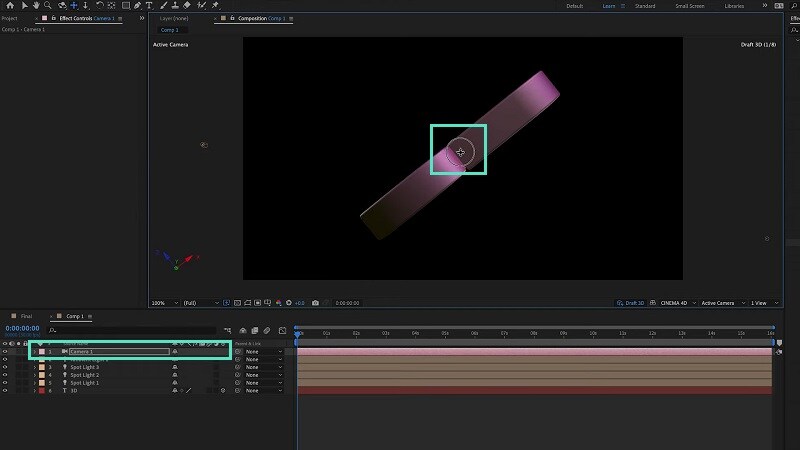
Step4If you want camera animation on your 3D text, select the Camera layer you already created. Press C to get the Orbit tool to get the starting position of the 3D text. You can also use Dolly tool and Pan & Zoom tool for adjustment.
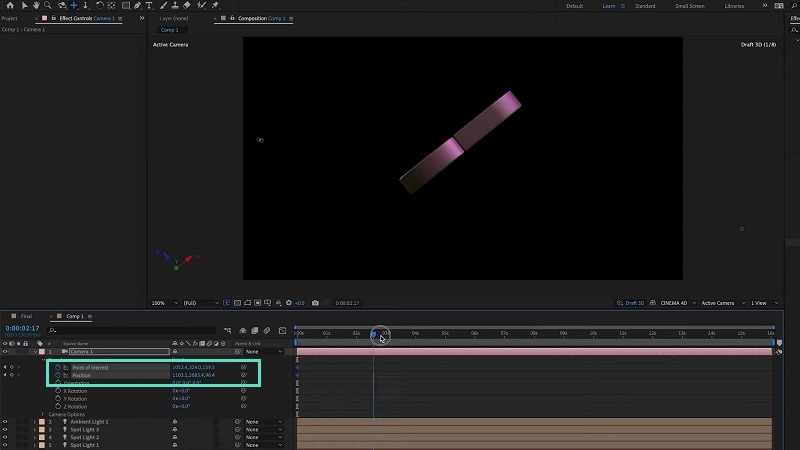
Step5Now add a keyframe on Position option from Transform option to mark the starting point of the animation. Similarly, add another keyframe where you want the animation to end.
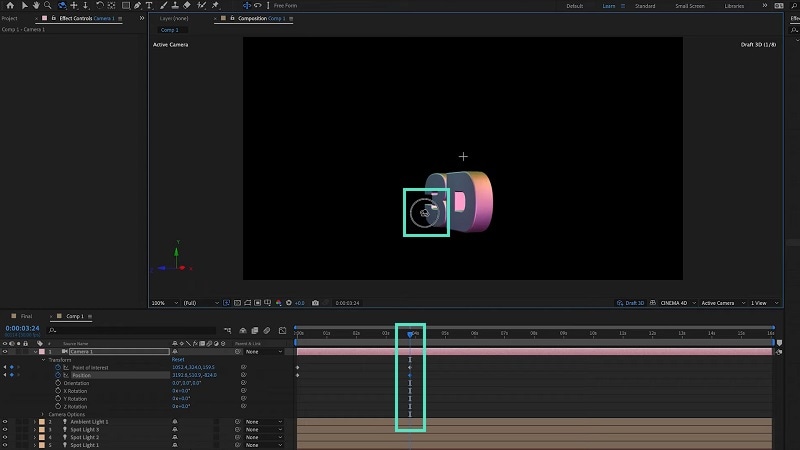
Step6Use the Orbit tool, Dolly tool and others to position 3D text as per how you want the animation to end.
Part 3. Make Stunning 3D Text Effects Online
Since adding 3D effects to text is a rather heavy task in video editing, there are many who think that you cannot add 3D text effects without a dedicated video editor application. But there are many renowned online video editors available where you can create amazing 3D text effects and animations with a few clicks.
In fact, you can use 3d animated text generator online to get any desired text in 3D mode. We recommend FlexClip full-featured video editor for 3D text animation online. You can select from available 3D text templates and apply different motion animations. Here are the steps to follow.
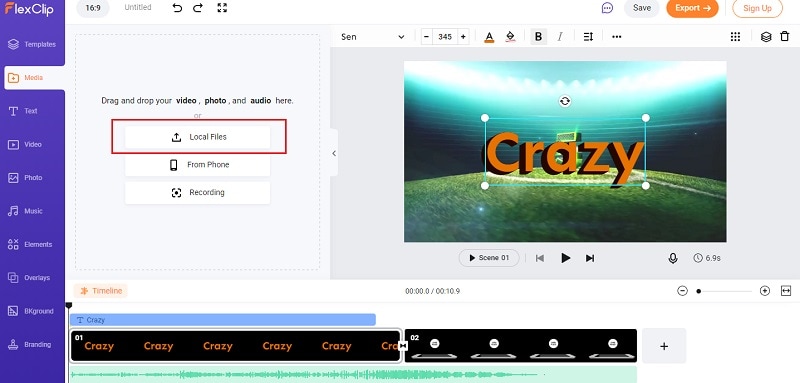
Step1Open your web browser and “flexclip.com/editor/app”. Go to Media tab and import your video and add it to the Timeline.
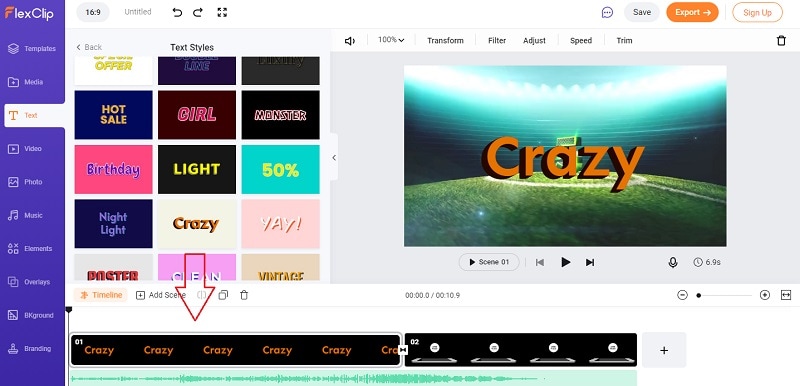
Step2Go to Text and click on See All for Text Styles. Scroll down and check out the 3D text templates available. Click on any desired template to apply to your video.
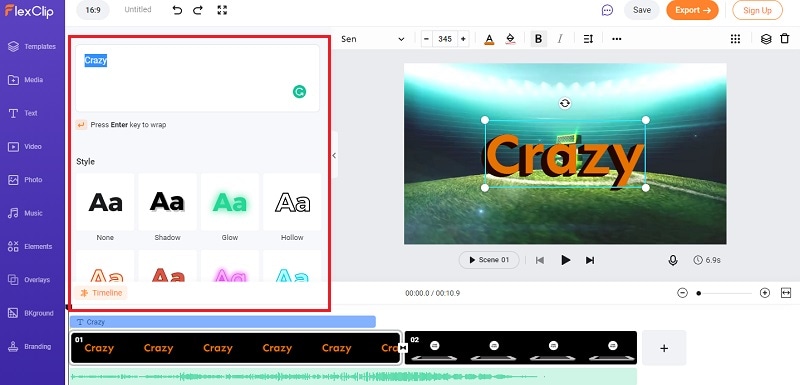
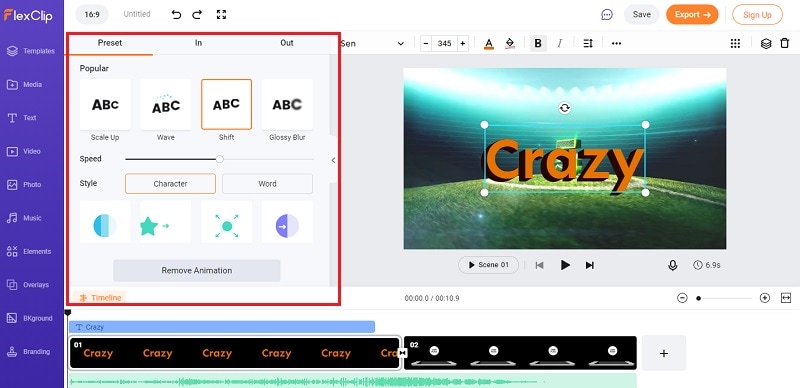
Step3Double-Click on 3D text present on Viewer and edit the style and text as per your preference.
Step4Click on three-dot icon at the top of Viewer and click on Motion option.
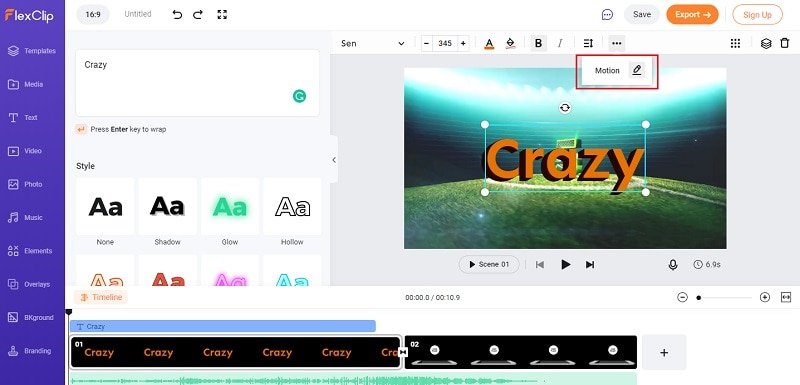
Step5Select any desired motion effect and you will see your 3D text animation on Viewer when you play the video.
Part 4. Alternative Way to Create 3D Text Animation
When you use an online video editor to create 3D text animation, there will have limited 3D text effects. We can use After Effects to create 3D text animations from scratch. But you may find the steps slightly complicated and we recommend Filmora as the best alternative way to create 3D text animation. Filmora is a premium video editor that is equally popular among amateurs and professionals. Here are the steps to create 3D text animations using Filmora in simple steps.
Step1Download and install Filmora on your computer. The video editor is available for Windows and Mac users. Click on New Project button on welcome screen or go to File> New Project option.

Step2Go to File> Import Media > Import Media Files to import the video file. Alternatively, drag and drop the video file directly into Project Media folder. Put the video file into Timeline to get started.

Step3Go to Titles tab and go to left panel, click on Titles option. Search “3D” in the search field and check out all 3d text effects and animations available.
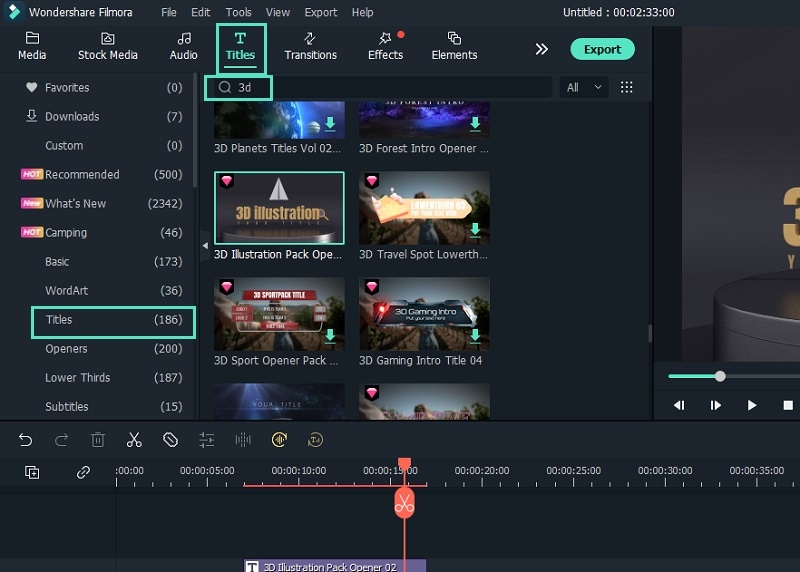
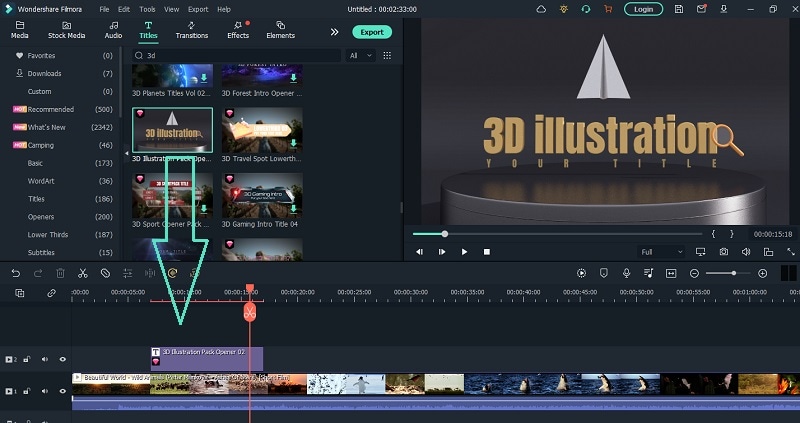
Step4Drag and drop 3D text templates on Timeline. You should place the effect on the Timeline where you want it to appear on the video. You can also adjust the duration of the effect as per your requirements.
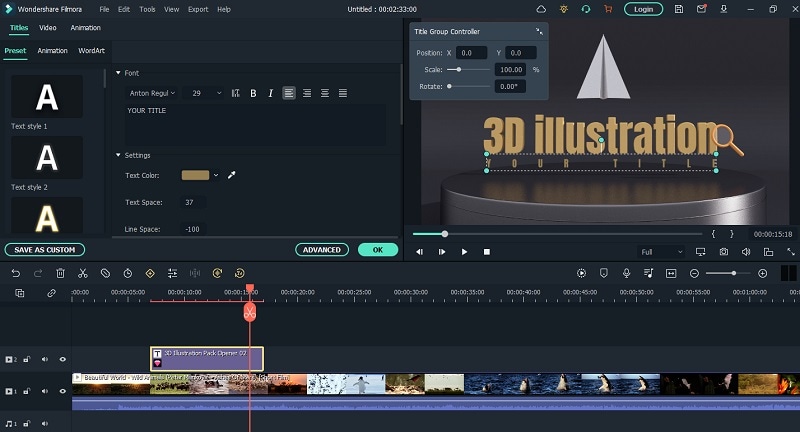
Step5Double-click on the text layer to customize the text and style. Play the video and click on Export button to save the edited 3D text video.
Conclusion
There is no doubt that if you include 3D text effects and animations in your video, your video will definitely stand out. The viewers will find the video engaging and understand the message that the video creator wants to get across. We have illustrated how to make stunning 3D text animations. You can also use 3d text generator online. But we recommend Filmora as the best and the easiest video editor to create 3D text animations instantly.
Free Download For Win 7 or later(64-bit)
Free Download For macOS 10.14 or later
How To Use Speed Ramping to Create an Intense Action Footage
Are you tired of using the same old way to edit your montages? Or do you want to learn to be more professional in your creativity? Don’t worry. We got you.
Here you will learn how to take your videos to the next level using speed ramping with a professional video editor- Wondershare Filmora. Moreover, you will get to know two ways to add the effect.
- Using speed ramping effect and glitch effects.
- Using the standard speed settings.
These effects can work well for any action sports or dance video. Let’s check out about speed ramping effect and ways to add it.
Part 1. What is speed ramping?
You’ve probably seen speed ramping used in suspenseful moments of a basketball video before, like a ball bouncing on the rim or a long buzzer-beating shot.

With speed ramping, we can slow down our most exciting moments to show our audience. And then speed it up again to keep pace with the music or action. So it will give you a smooth transition effect.
Part 2. How to enhance action videos with the speed ramping effect?
For example, we’ll create an intense basketball video with speed ramping and glitch effects in Filmora . Then, to show you how to show off your filming, editing, and basketball skills.
Free Download For Win 7 or later(64-bit)
Free Download For macOS 10.14 or later
Step1 Shot the footage
To edit a montage, you must first capture it correctly. For our example footage, we want to ensure we have set our camera to a higher frame rate for filming this type of video since we’re going to use slow motion.

How to capture the best footage?
You can shoot handheld with a camera or a mobile phone because it allows you to move around your talent and catch some movements and action while giving a shaky camera effect for added suspense. To make evenly balanced videos, you can use a gimbal stabilizer. Here are some tips to get better shots.
- Change camera angles. Try getting shots low to the ground as well as at higher angles. That will give you more options to cut between when you edit the video.
- Get various shots. You can get shots of dribbling, shooting, and just running with the ball to work with.
- Try shooting on a longer lens. It is because you may not be able to get close to the action.
- Record footage in slow mode on your camera or phone. It will allow you to capture more frames: the more frames, the smoother the slow-motion effect.
Best capturing will make your video more cinematic and visually pleasing after preparing the footage. Finally, we will dive into edit tutorials on speed ramping and glitch effects separately for better understanding.
Step2 Edit the speed of footage in Filmora
There are two ways to achieve the speed ramping effect. One is to use the speed ramping feature to adjust the video speed—the other way to achieve a similar effect is by using the standard speed settings.
Edit with speed ramping feature in Filmora
The speed ramping feature is included in Filmora standard license. So let’s start by opening Filmora.
1. Import media
First, import a video from your media library in the Wondershare Filmora. And drag the clip down on the timeline to start editing.

2. Apply the speed ramping feature
To apply the speed ramping feature, right-click on the clip on the timeline. And click speed in the menu and choose speed ramping to open the settings window.

You can choose different speed templates in the setting window. Or, on the left corner, click on the customize option to adjust the keyframes and create the speed you want for the video.

The lower keyframe is when the video is slowest, and the peak is when the video is fastest. The middle parts between the keyframes are when it speeds up or slows down to reach the specific speed you set on each keyframe.

Grab the keyframes and move them up to increase the speed or down to slow down the rate. You can also add more keyframes by moving the playhead to the spot where you want to change speed and clicking the plus button.
After adjusting our keyframes, we can play it back to see if we like the result.
Edit with standard speed settings in Filmora
Since speed ramping can only be used for paid users, we also provide you with an alternative way to give an exact transition effect, like speed ramping. Check out the following steps to add it.
1. You can drag the video from your library to the timeline. While in the timeline, double-click to open the speed menu. Then choose the starting speed you want your video to be with the speed slider.

2. Next, move your playhead to the point of the video you want to slow down the speed. Here we will cut and then double-click that clip to open the speed menu again. Change the pace with the speed slider again

Following the above steps, a speed ramping style effect can be created without using the premium feature. Stealthy, isn’t it?
Step3 Add some intensity to shots with the BCC glitch effect
We will use Boris FX BCC glitch to add some intensity to our video. It is a plug-in built-in Filmora and gives a feeling of chaos to match the action in the video. To apply the BCC glitch effect to the video.
- Click on the effects options in the top bar. For example, a window on the left side showing you the option Boris FX will have a sub-option BCC stylize. Click on it.
- Drag the effect above the place you want it in the timeline.
- Double-click the effect to open its settings.
- A drop-down menu at the top of the screen has tons of glitch presets to try out.
- We are going to scroll down and select shake with motion blur. This preset will use the exact look we want for our basketball video to make the speed ramping more intense.

- You can change the settings around after choosing a preset. For example, let’s turn up the glitch intensity to have our glitch a little more extreme. Moving further, we can change the glitch duration to our specific needs.
Now we can watch our video to see our glitch with the motion blur effect. Isn’t it crazy to make a cinematic video by yourself? The speed ramping feature and glitch effects can bring any sports video to the next level.
Free Download For macOS 10.14 or later
Step1 Shot the footage
To edit a montage, you must first capture it correctly. For our example footage, we want to ensure we have set our camera to a higher frame rate for filming this type of video since we’re going to use slow motion.

How to capture the best footage?
You can shoot handheld with a camera or a mobile phone because it allows you to move around your talent and catch some movements and action while giving a shaky camera effect for added suspense. To make evenly balanced videos, you can use a gimbal stabilizer. Here are some tips to get better shots.
- Change camera angles. Try getting shots low to the ground as well as at higher angles. That will give you more options to cut between when you edit the video.
- Get various shots. You can get shots of dribbling, shooting, and just running with the ball to work with.
- Try shooting on a longer lens. It is because you may not be able to get close to the action.
- Record footage in slow mode on your camera or phone. It will allow you to capture more frames: the more frames, the smoother the slow-motion effect.
Best capturing will make your video more cinematic and visually pleasing after preparing the footage. Finally, we will dive into edit tutorials on speed ramping and glitch effects separately for better understanding.
Step2 Edit the speed of footage in Filmora
There are two ways to achieve the speed ramping effect. One is to use the speed ramping feature to adjust the video speed—the other way to achieve a similar effect is by using the standard speed settings.
Edit with speed ramping feature in Filmora
The speed ramping feature is included in Filmora standard license. So let’s start by opening Filmora.
1. Import media
First, import a video from your media library in the Wondershare Filmora. And drag the clip down on the timeline to start editing.

2. Apply the speed ramping feature
To apply the speed ramping feature, right-click on the clip on the timeline. And click speed in the menu and choose speed ramping to open the settings window.

You can choose different speed templates in the setting window. Or, on the left corner, click on the customize option to adjust the keyframes and create the speed you want for the video.

The lower keyframe is when the video is slowest, and the peak is when the video is fastest. The middle parts between the keyframes are when it speeds up or slows down to reach the specific speed you set on each keyframe.

Grab the keyframes and move them up to increase the speed or down to slow down the rate. You can also add more keyframes by moving the playhead to the spot where you want to change speed and clicking the plus button.
After adjusting our keyframes, we can play it back to see if we like the result.
Edit with standard speed settings in Filmora
Since speed ramping can only be used for paid users, we also provide you with an alternative way to give an exact transition effect, like speed ramping. Check out the following steps to add it.
1. You can drag the video from your library to the timeline. While in the timeline, double-click to open the speed menu. Then choose the starting speed you want your video to be with the speed slider.

2. Next, move your playhead to the point of the video you want to slow down the speed. Here we will cut and then double-click that clip to open the speed menu again. Change the pace with the speed slider again

Following the above steps, a speed ramping style effect can be created without using the premium feature. Stealthy, isn’t it?
Step3 Add some intensity to shots with the BCC glitch effect
We will use Boris FX BCC glitch to add some intensity to our video. It is a plug-in built-in Filmora and gives a feeling of chaos to match the action in the video. To apply the BCC glitch effect to the video.
- Click on the effects options in the top bar. For example, a window on the left side showing you the option Boris FX will have a sub-option BCC stylize. Click on it.
- Drag the effect above the place you want it in the timeline.
- Double-click the effect to open its settings.
- A drop-down menu at the top of the screen has tons of glitch presets to try out.
- We are going to scroll down and select shake with motion blur. This preset will use the exact look we want for our basketball video to make the speed ramping more intense.

- You can change the settings around after choosing a preset. For example, let’s turn up the glitch intensity to have our glitch a little more extreme. Moving further, we can change the glitch duration to our specific needs.
Now we can watch our video to see our glitch with the motion blur effect. Isn’t it crazy to make a cinematic video by yourself? The speed ramping feature and glitch effects can bring any sports video to the next level.
Also read:
- [New] In 2024, Unveiling the Steps for Instant Video Playback From Youtube to Facebook Pages
- [New] Top 30 YouTube Intro Creators for Spectacular Opening Videos
- 0, Download & Update Your Printer's Driver Software Today
- Additional Tips About Sinnoh Stone For Samsung Galaxy A14 5G | Dr.fone
- Discover the Superiority: Elite Ceiling Speakers for 202#4 Unleashed
- Fixing Connection Problems - Resolving 'Our Data Centers Cannot Be Reached' By Players of Halo Infinite
- Free Canon MG3000 Printer Software and Latest Firmware Updates
- In 2024, How To Transfer From Apple iPhone 7 Plus to Samsung Simplified Guide | Dr.fone
- New 2024 Approved Create Eye-Catching Slow-Motion Videos to Set Your Own Trend. For This Purpose, Read This Article to Find and Learn to Use CapCuts New Slow-Motion Templates
- New 2024 Approved Creating Flawless Slow-Motion Videos Is Every Content Creators Dream. Learn About DaVinci Resolve Slow-Motion Video Creation, Amongst Other Tools
- New 2024 Approved Making Slow Motion Videos in Premiere Pro A Review on The Best Method
- New 2024 Approved Top 6 Best Alternatives to Clownfish Voice Changer
- New In 2024, The Glitch Effect Shows Errors and Flaws in the Image or a Video. The Write-Up Presents the Complete Procedure of Adding Premiere Pros Glitch Effect and Introduces Eight Free Glitch Effects
- Updated 2024 Approved Are You an Apple User Interested in Adding a Slow-Mo to Their Videos? This Article Features an Exceptional Procedure for Creating Slow-Mo in iMovie
- Updated In 2024, Top 6 Best Alternatives to Clownfish Voice Changer
- Title: New Are You Aware that You Can Create Your Own Lower Thirds for Video? Read This Article for a Tutorial on How to Customize One
- Author: Morgan
- Created at : 2024-09-28 18:16:35
- Updated at : 2024-09-30 17:27:35
- Link: https://ai-video-editing.techidaily.com/new-are-you-aware-that-you-can-create-your-own-lower-thirds-for-video-read-this-article-for-a-tutorial-on-how-to-customize-one/
- License: This work is licensed under CC BY-NC-SA 4.0.
