
:max_bytes(150000):strip_icc():format(webp)/Childlearningonline_WillieBThomas_Getty-3e51600a64d742a0b5db4fadacead069.jpg)
New Are You Looking for Software to Convert Word to SRT Format? Here Is a Complete Guide About It for 2024
Are You Looking for Software to Convert Word to SRT Format? Here Is a Complete Guide About It
Seems like there is no direct way to convert words into an SRT file, a format compatible with all the devices. Still, users are finding a way to convert docs into SRT. You can convert Docx into SRT by using reliable and proper converting software.
We’ll help you find a simple and easy way to convert. This article will give you the ultimate guide on converting words into SRT files.
Before diving deep into the article, let’s first understand what SRT is.
Part 1: What is SRT?
An SRT is one of the most common formats used in subtitling or captioning files. ‘SRT’ refers to a ‘SubRip Subtitle’ file, which originated from the DVD-ripping software by the same name. SubRip would extract or rip subtitles and timings from live video, recorded video, and DVDs.
SRT has four major components:
- A numeric counter indicates the number or position of the subtitle.
- A Start and end time of the subtitle which is separated by the characters.
- A Subtitle in one or more lines.
- A blank line indicates the ending of the subtitle.
Now that you know about SRT let’s understand why you should convert your Word file to SRT.
Part 2: Why Should You Convert Word to SRT?
Most subtitles on the Internet are distributed in SRT format. Moreover, media players, lecture capture software, and video recording software are compatible with the SRT format.
Also, user frequently asks from forum like:
“I received a docx. file with subtitles already translated and the corresponding YouTube video URL. I was asked to proofread and then embed the subtitles into the video.”
To solve this, you can not only save it as a TXT document and change the file extension to .SRT, but also, a much easier way, convert subtitles from Microsoft Word files to SRT format through a easy-to-use SRT converter.
Part 3: How to Convert a Word file to an SRT file without the software?
Before we dive into the concrete steps guide, here are things we need to be considered:
Timestamp issue
Timestamps identify the exact point in an audio or video where the given text was spoken.
Now we know what a timestamp is and why it’s important. Let’s find out how to add timestamps in the SRT file.
How to add timestamps:
There are two ways to add timestamps in the file.
- Either add timestamps manually in the word document.
To write timecodes, the format used is Hours:minutes:seconds,milliseconds and milliseconds being rounded to 3 decimal places. Separate each timestamp with a two-hash arrow (written as - ->) and a blank line indicates the next caption sequence. After saving, these files are named with .srt extension.
- Or edit the SRT file after creating it using a video editor which has the ability to edit SRT.
You can also edit the SRT file after creating it by using video editing software such as Happy Scribe’s . It has audio-to-text/video-to-text feature that includes multiple timestamps options.
Language Conversion Feature of SRT file
You can use this to convert each line of your subtitles from one language to another. It also supports language conversion between English, French, German, Italian, Japanese, etc. It’s an easy process.
In any of the two cases mantioned above, you need to convert Word document in to SRT. Let’s find out how can you do that without using any software.
Follow the below steps to convert a word file to SRT without any software.
Step1 Open your Docx file
For this, open the word document you want to convert.
Step2 Change it to a .TXT document
Then from the left corner, Click on File>save as> and select the “Text” to convert it.

Step3 Save an SRT file
After converting it into a TXT (text) document, rename it by replacing the suffix “Txt ‘’ with “SRT .’’
If you do not see the extension in the name of the file,
- Go to the top menu in Windows Explorer
- Go to view
- Click on the check box for “File name extensions”

Now you can easily change the extension from Txt to SRT.

Through this extension, you’ll be able to convert a Word document into SRT format without having any software.
Sometimes users face complications while converting Word to SRT without any software. Therefore, it’s better to convert Word to SRT files with the software. In the next point, we’ll explain it in detail about it.
Part 4: An Alternative Way to Convert a Word file to an SRT file
If you want to convert a word document into SRT format, the above method is straightforward without wasting time. But sometimes, it shows errors.
You might be looking for software through which you can make desired changes and edit it according to your own will. Without software, it’s impossible.
There are tons of converting software available. You can use them to transform your word file not only but also into multiple formats. You can also make changes the way you want.
We’ll guide you on converting Docx into SRT by illustrating the detailed features of one of the best converters, MConverter .
MConverter
It is an online video converter application that allows you to convert your documents, videos, audio, and images into any format. The batch can convert large files up to 200 MB. You can directly choose files to convert from other apps through their Share menu.

This software supports all popular file formats: convert in bulk between most video, audio, image, e-book, office, and archive formats. The good thing about MConverter is the browser extension. It allows you to install the extension and convert files without any hassle.
You have to right-click on the image, video, and audio to extract it automatically and then convert it to the desired format. Also, it ensures security through SSL. MConverter is also available for mobiles in the form of applications. You can get the application for Windows 10/11.
Before diving deep into how it works, let’s look at its features.
Features:
- You can also convert multiple files, including SRT, SSA, AAS, etc.
- It provides you with commendable security.
- It is cross-platforms compatible, you can use it on Windows, Android, Mac, Web, etc.
- It enables you to convert any file whenever you want, such as audio, video, image, document, etc.
Now you’ll be aware of MConverter. In the next point, we’ll discuss how to convert docs into SRT.
How to convert docs into SRT with MConverter
You convert TXT to SRT with MConverter in three easy steps without hassle. These are as follows:
Step1 Choose Txt files from your device
From the top of this page, drag and drop your texts. Then select text files using your operating system’s file picker. Another way is to press the keyboard shortcut CTRL (⌘+V on Mac) to paste a file (txt) you have copied to the clipboard. Converting TXT files to SRT is also supported: simply paste or drag and drop it.
Step2 Click or tap on SRT from the list of target formats
Alternatively, you can also use the search field to quickly find the form you need, whether it’s SRT or something else.

Step3 After MConverter has finished processing
Download your SRT files. There’ll also be an option to download the converted SRT files automatically, so you don’t need to click the download icon for each SRT file.
On desktop platforms, by clicking on “Save to,” you can download the SRT files to a different folder. You will see a share icon as well. You can use it to directly share the SRT files with other apps.

Besides this, every software has advantages as well as disadvantages. Before using this software, you should know about its pros and cons. Let’s discuss it.
Pros
- It allows you to drag and drop entire folders for bulk conversion
- There is no need to sign up or use an email account
- MConverter can recognize corrupted and missing file extensions
- You can also delete your files instantly if you want
Cons
- It’s unable to detect whether the uploaded file is an image, document, or any other file
- No full-screen ads
As we’ve explained the method to convert Word into SRT format, now we need to edit it. To edit the converted file, all we need is good editing software. In the next point, we’ll discuss it.
Part 5: How to Merge and Edit Subtitles with Videos after Converting from Word
After converting the Word into SRT, you can also edit and merge subtitles, but for this, you’ll require software having multiple features. Multiple editing software will allow you to integrate and edit files after converting. But one of the best among them is Wondershare Filmora.
SRT files can be exported by other tools and can be imported into Filmora for further editing.
Wondershare Filmora:

It is a video editing software that allows you to create and edit amazing videos. It includes products for a range of users, from beginners to intermediates.
One of the reasons for its popularity is that it offers a wide range of features, including the ability to convert Word documents to SRT format.
If you are new to video editing, then Wondershare Filmora can be an excellent software to kick off a start. But, before sticking to this software, you must be aware of Filmora’s features.
Features of Wondershare Filmora:
- Support SRT file styling and editing including fonts, shadow, bold, italics, etc.
- Except for text editing, it also has stock media for video and audio resource.
- Enable you to use Motion Tracking, Speed Ramping and Keyframing like a pro.
- Creative transitions effects, Chroma Key (Green Screen) & Mask and Blend to your content.
- Convert the video and audio into multiple formats.
If you edit videos regularly then Filmora is best for you. Now let us walk you through the ultimate guide on how to merge and edit subtitles through Filmora. Follow the below steps to edit the converted file: SRT from word.
Free Download For Win 7 or later(64-bit)
Free Download For macOS 10.14 or later
Step1 Import the SRT subtitle files directly from the Media resource area.
Step2 Then, right-click on the timeline and select Advanced Edit or double-click the selected SRT file to clip.

You can perform the following editing operations:
- Edit the time code.
- Change the subtitles.
- Add/remove/merge the subtitle strips.
- Also, change subtitle styles (same as Filmora Advanced Edit Text)

Step3 In the end, Select the SRT file on the timeline, right-click and select Export Subtitle File.

Now you know the method of editing converted SRT files, let’s discuss the advantages and disadvantages of Filmora.
Pros
- Intuitive and easy to use interface
- Faster rendering of resource, like videos, audios, and effects
- A one-stop solution for both text, audio, video editing
- Amazing video output, 4k supported
Cons
- Only support SRT subtitles importing and editing for now
- Free version contains watermarks
- Frequent Lagging
Conclusion
As clear from the above-mentioned information, an SRT file is a plain-text file containing critical subtitles information. We’ve provided you with a complete guide on how to convert the word document into SRT.
Sometimes conversion doesn’t work without any software. For this, MConverter is the best of all. It allows you to convert your word file into the SRT files with easy steps.
After converting, you’ll need software to edit or merge the subtitles. It is time-consuming and challenging for everyone to find software that fulfills your requirements.
But no need to worry; we’ve provided you with the details of Wondershare Filmora . Give it a try.
- MConverter
- How to convert docs into SRT with MConverter
- How to Merge and Edit Subtitles with Videos after Converting from Word
Part 1: What is SRT?
An SRT is one of the most common formats used in subtitling or captioning files. ‘SRT’ refers to a ‘SubRip Subtitle’ file, which originated from the DVD-ripping software by the same name. SubRip would extract or rip subtitles and timings from live video, recorded video, and DVDs.
SRT has four major components:
- A numeric counter indicates the number or position of the subtitle.
- A Start and end time of the subtitle which is separated by the characters.
- A Subtitle in one or more lines.
- A blank line indicates the ending of the subtitle.
Now that you know about SRT let’s understand why you should convert your Word file to SRT.
Part 2: Why Should You Convert Word to SRT?
Most subtitles on the Internet are distributed in SRT format. Moreover, media players, lecture capture software, and video recording software are compatible with the SRT format.
Also, user frequently asks from forum like:
“I received a docx. file with subtitles already translated and the corresponding YouTube video URL. I was asked to proofread and then embed the subtitles into the video.”
To solve this, you can not only save it as a TXT document and change the file extension to .SRT, but also, a much easier way, convert subtitles from Microsoft Word files to SRT format through a easy-to-use SRT converter.
Part 3: How to Convert a Word file to an SRT file without the software?
Before we dive into the concrete steps guide, here are things we need to be considered:
Timestamp issue
Timestamps identify the exact point in an audio or video where the given text was spoken.
Now we know what a timestamp is and why it’s important. Let’s find out how to add timestamps in the SRT file.
How to add timestamps:
There are two ways to add timestamps in the file.
- Either add timestamps manually in the word document.
To write timecodes, the format used is Hours:minutes:seconds,milliseconds and milliseconds being rounded to 3 decimal places. Separate each timestamp with a two-hash arrow (written as - ->) and a blank line indicates the next caption sequence. After saving, these files are named with .srt extension.
- Or edit the SRT file after creating it using a video editor which has the ability to edit SRT.
You can also edit the SRT file after creating it by using video editing software such as Happy Scribe’s . It has audio-to-text/video-to-text feature that includes multiple timestamps options.
Language Conversion Feature of SRT file
You can use this to convert each line of your subtitles from one language to another. It also supports language conversion between English, French, German, Italian, Japanese, etc. It’s an easy process.
In any of the two cases mantioned above, you need to convert Word document in to SRT. Let’s find out how can you do that without using any software.
Follow the below steps to convert a word file to SRT without any software.
Step1 Open your Docx file
For this, open the word document you want to convert.
Step2 Change it to a .TXT document
Then from the left corner, Click on File>save as> and select the “Text” to convert it.
Step3 Save an SRT file
After converting it into a TXT (text) document, rename it by replacing the suffix “Txt ‘’ with “SRT .’’
If you do not see the extension in the name of the file,
- Go to the top menu in Windows Explorer
- Go to view
- Click on the check box for “File name extensions”
Now you can easily change the extension from Txt to SRT.
Through this extension, you’ll be able to convert a Word document into SRT format without having any software.
Sometimes users face complications while converting Word to SRT without any software. Therefore, it’s better to convert Word to SRT files with the software. In the next point, we’ll explain it in detail about it.
Part 4: An Alternative Way to Convert a Word file to an SRT file
If you want to convert a word document into SRT format, the above method is straightforward without wasting time. But sometimes, it shows errors.
You might be looking for software through which you can make desired changes and edit it according to your own will. Without software, it’s impossible.
There are tons of converting software available. You can use them to transform your word file not only but also into multiple formats. You can also make changes the way you want.
We’ll guide you on converting Docx into SRT by illustrating the detailed features of one of the best converters, MConverter .
MConverter
It is an online video converter application that allows you to convert your documents, videos, audio, and images into any format. The batch can convert large files up to 200 MB. You can directly choose files to convert from other apps through their Share menu.
This software supports all popular file formats: convert in bulk between most video, audio, image, e-book, office, and archive formats. The good thing about MConverter is the browser extension. It allows you to install the extension and convert files without any hassle.
You have to right-click on the image, video, and audio to extract it automatically and then convert it to the desired format. Also, it ensures security through SSL. MConverter is also available for mobiles in the form of applications. You can get the application for Windows 10/11.
Before diving deep into how it works, let’s look at its features.
Features:
- You can also convert multiple files, including SRT, SSA, AAS, etc.
- It provides you with commendable security.
- It is cross-platforms compatible, you can use it on Windows, Android, Mac, Web, etc.
- It enables you to convert any file whenever you want, such as audio, video, image, document, etc.
Now you’ll be aware of MConverter. In the next point, we’ll discuss how to convert docs into SRT.
How to convert docs into SRT with MConverter
You convert TXT to SRT with MConverter in three easy steps without hassle. These are as follows:
Step1 Choose Txt files from your device
From the top of this page, drag and drop your texts. Then select text files using your operating system’s file picker. Another way is to press the keyboard shortcut CTRL (⌘+V on Mac) to paste a file (txt) you have copied to the clipboard. Converting TXT files to SRT is also supported: simply paste or drag and drop it.
Step2 Click or tap on SRT from the list of target formats
Alternatively, you can also use the search field to quickly find the form you need, whether it’s SRT or something else.
Step3 After MConverter has finished processing
Download your SRT files. There’ll also be an option to download the converted SRT files automatically, so you don’t need to click the download icon for each SRT file.
On desktop platforms, by clicking on “Save to,” you can download the SRT files to a different folder. You will see a share icon as well. You can use it to directly share the SRT files with other apps.
Besides this, every software has advantages as well as disadvantages. Before using this software, you should know about its pros and cons. Let’s discuss it.
Pros
- It allows you to drag and drop entire folders for bulk conversion
- There is no need to sign up or use an email account
- MConverter can recognize corrupted and missing file extensions
- You can also delete your files instantly if you want
Cons
- It’s unable to detect whether the uploaded file is an image, document, or any other file
- No full-screen ads
As we’ve explained the method to convert Word into SRT format, now we need to edit it. To edit the converted file, all we need is good editing software. In the next point, we’ll discuss it.
Part 5: How to Merge and Edit Subtitles with Videos after Converting from Word
After converting the Word into SRT, you can also edit and merge subtitles, but for this, you’ll require software having multiple features. Multiple editing software will allow you to integrate and edit files after converting. But one of the best among them is Wondershare Filmora.
SRT files can be exported by other tools and can be imported into Filmora for further editing.
Wondershare Filmora:
It is a video editing software that allows you to create and edit amazing videos. It includes products for a range of users, from beginners to intermediates.
One of the reasons for its popularity is that it offers a wide range of features, including the ability to convert Word documents to SRT format.
If you are new to video editing, then Wondershare Filmora can be an excellent software to kick off a start. But, before sticking to this software, you must be aware of Filmora’s features.
Features of Wondershare Filmora:
- Support SRT file styling and editing including fonts, shadow, bold, italics, etc.
- Except for text editing, it also has stock media for video and audio resource.
- Enable you to use Motion Tracking, Speed Ramping and Keyframing like a pro.
- Creative transitions effects, Chroma Key (Green Screen) & Mask and Blend to your content.
- Convert the video and audio into multiple formats.
If you edit videos regularly then Filmora is best for you. Now let us walk you through the ultimate guide on how to merge and edit subtitles through Filmora. Follow the below steps to edit the converted file: SRT from word.
Free Download For Win 7 or later(64-bit)
Free Download For macOS 10.14 or later
Step1 Import the SRT subtitle files directly from the Media resource area.
Step2 Then, right-click on the timeline and select Advanced Edit or double-click the selected SRT file to clip.
You can perform the following editing operations:
- Edit the time code.
- Change the subtitles.
- Add/remove/merge the subtitle strips.
- Also, change subtitle styles (same as Filmora Advanced Edit Text)
Step3 In the end, Select the SRT file on the timeline, right-click and select Export Subtitle File.
Now you know the method of editing converted SRT files, let’s discuss the advantages and disadvantages of Filmora.
Pros
- Intuitive and easy to use interface
- Faster rendering of resource, like videos, audios, and effects
- A one-stop solution for both text, audio, video editing
- Amazing video output, 4k supported
Cons
- Only support SRT subtitles importing and editing for now
- Free version contains watermarks
- Frequent Lagging
Conclusion
As clear from the above-mentioned information, an SRT file is a plain-text file containing critical subtitles information. We’ve provided you with a complete guide on how to convert the word document into SRT.
Sometimes conversion doesn’t work without any software. For this, MConverter is the best of all. It allows you to convert your word file into the SRT files with easy steps.
After converting, you’ll need software to edit or merge the subtitles. It is time-consuming and challenging for everyone to find software that fulfills your requirements.
But no need to worry; we’ve provided you with the details of Wondershare Filmora . Give it a try.
Best Software or Website to Convert Video Format
How annoying would it be if you start playing a video, but your device does not support the format? We all have been through this situation once in our life. Another irritating thing that happens is the file size is either too large to handle or else too small to play.
In any case, video format converters are the most helpful option to use. What is a video converter? Well, a few software and some online tools are used to change the file format and size of the video so that you can use the video file efficiently. If you want to learn about video format converters for PC and also about online video format converters, this article is for you.
In this article
01 5 Best Video Converter for PC
02 5 Best Online Video Converter
Part 1. 5 Best Video Converter for PC
As we mentioned earlier, there are various format converters; some are online, whereas some are video format converters for PC. The following section of this article will walk you through the 5 best video converters; let’s begin!
1. Wondershare UniConverter
Whenever you want to convert video format, UniConverter is always the leading option. This video converter supports a long list of conversions to different formats, including MKV to MP4, AVI to MP4, MP3 to MP4, and others.
Do you know how fast UniConverter can convert? Well, it offers 90x faster video conversion to an unlimited number of formats. Interestingly, this converter provides the option of batch video conversion, and the conversion is lossless. What else UniConverter support? This video converter supports several 4K formats and some popular web formats like Facebook, YouTube, Vimeo, etc.

2. Freemake Video Converter
Moving on to the next video file format converter, Freemake Video Converter. This video converter is popularly used among various people. This is because the converter is available for any gadget, for instance, iPhone, iPad, Android, Xbox, Samsung, Sony PSP, Nokia, Xiaomi, Huawei, smartwatch, etc.
Freemake supports different popular file formats that include MP3, MP4, AVI, MKV, DVD, MOV, HD, 3GP, and the list goes on. Which file converter support codecs? Freemake Video Converter does support some popular codecs like MPEG4, AV1, , , etc.

3. Prism Video Converter Software
A popular and widely used video converter is Prism Video Converter Software. Do you know why this converter is famous? This is because it is fast and efficient. You can convert the video format and also compress video files within minutes if you use Prism Video Converter.
This format converter extends support to all file formats making it a universal video converter. If you think it’s difficult to use the converter, let’s tell you something! Prism Video Converter is very easy to use and work with; its clean interface guides the user about the next step. Do you know an interesting thing about the converter? This software also supports batch video conversion for your ease.

4. Leawo Video Converter
Leawo Video Converter is the next software we are going to talk about. This converter is popularly used because of the features it offers. Converting formats, downloading, burning videos/photos to DVD, and a lot more options are offered.
This software also delivers output for iOS and Android devices like iPod, iPad, Samsung Note series, Samsung Galaxy series, etc. How many file formats can Leawo support? This video format converter for PC supports an endless list of formats, like MOV, AVI, MKV, and many others. Leawo is also referred to as an HD video converter and 4K video converter.

5. Video Converter Factory
Video Converter Factory is another powerful video file format converter. Are you ready to learn more about it? Let’s start! This video converter is simple to use with an easy interface but doesn’t forget; it’s very fast and efficient.
It supports different formats, including MP4, AVI, MKV, WAV, Apple ProRes, MOV, etc. This video format converter is compatible with many different formats and also devices. Do you know the video converter supports HD video formats as well? It does, and it works well with 8K, 4K, 1080p, 720p, and also 480p resolution.

Part 2. 5 Best Online Video Converter
After discussing the 5 best video file format converters, it’s time to shed light on a few online video format converters. Are you ready? Let’s get started!
2. Online Video Converter
Do you know any video format converter that does not require registrations? Let’s introduce Online Video Converter here. This format converter is online, free to use, and interestingly, it does not require any registrations. You don’t need to download any additional software to use this tool.
This converter provides ultra-fast media conversion yet maintains its quality. Online Video Converter is compatible with all web browsers. Do you want to know something great? This converter has no restrictions or limits on conversions and downloads.

3. Zamzar Online File Conversion
Zamzar File Conversion is another option for an online video format converter. This tool lets you upload the files from your device, or else you can also drag and drop the file for conversion. What is the max file size for free users on Zamzar? The online format converter offers a maximum file size of 50 MB.
It supports and converts different formats like 3GP, AVI, MP4, MOV, MKV, M4V, etc. Various conversions are offered like MP4 to GIF, MP4 to MP3, MKV to MP4, and whatnot.

4. Convertio
Can you name a file converter that can maintain the original file’s quality? We are talking about Convertio, Online Video Converter. This tool has high-quality video processing algorithms that promise to retain the video quality of the original video even after conversion.
Is it compatible with Mac? The online video format converter works on all web browsers and is compatible with Mac, Windows, Linux. Also, you can use it on Android as well as iOS devices.

5. Files Conversion
Have you seen any converter that asks you to select the video quality? What if we say Files Conversion is that tool? This online video file format converter lets you choose the quality of the video from the given options; Low, Moderate, High, Very High.
The converter supports a long list of formats that include FLV, AVI, MP4, MOV, 3GP, and others. Moreover, with this format converter, you can also select the size of the final file after conversion.

Final Thoughts
After reading this article, we hope that you know about the best online video format converters and the 5 best video format converters for PC. Do you want to know about a little surprise? We might have something to share. We are talking about Wondershare Filmora Video Editor , the platform that can edit mind-blowing videos.
Filmora offers Basic features like cut, trim, split, merge, etc. At the same time, some Advanced features are also provided like AI Portrait, Auto Reframe, Auto Highlight, etc. What else does Filmora have? Wondershare Filmora has an asset library packed with cool sound effects, editing elements, video effects, transitions, and whatnot.
For Win 7 or later (64-bit)
For macOS 10.12 or later
02 5 Best Online Video Converter
Part 1. 5 Best Video Converter for PC
As we mentioned earlier, there are various format converters; some are online, whereas some are video format converters for PC. The following section of this article will walk you through the 5 best video converters; let’s begin!
1. Wondershare UniConverter
Whenever you want to convert video format, UniConverter is always the leading option. This video converter supports a long list of conversions to different formats, including MKV to MP4, AVI to MP4, MP3 to MP4, and others.
Do you know how fast UniConverter can convert? Well, it offers 90x faster video conversion to an unlimited number of formats. Interestingly, this converter provides the option of batch video conversion, and the conversion is lossless. What else UniConverter support? This video converter supports several 4K formats and some popular web formats like Facebook, YouTube, Vimeo, etc.
2. Freemake Video Converter
Moving on to the next video file format converter, Freemake Video Converter. This video converter is popularly used among various people. This is because the converter is available for any gadget, for instance, iPhone, iPad, Android, Xbox, Samsung, Sony PSP, Nokia, Xiaomi, Huawei, smartwatch, etc.
Freemake supports different popular file formats that include MP3, MP4, AVI, MKV, DVD, MOV, HD, 3GP, and the list goes on. Which file converter support codecs? Freemake Video Converter does support some popular codecs like MPEG4, AV1, , , etc.
3. Prism Video Converter Software
A popular and widely used video converter is Prism Video Converter Software. Do you know why this converter is famous? This is because it is fast and efficient. You can convert the video format and also compress video files within minutes if you use Prism Video Converter.
This format converter extends support to all file formats making it a universal video converter. If you think it’s difficult to use the converter, let’s tell you something! Prism Video Converter is very easy to use and work with; its clean interface guides the user about the next step. Do you know an interesting thing about the converter? This software also supports batch video conversion for your ease.
4. Leawo Video Converter
Leawo Video Converter is the next software we are going to talk about. This converter is popularly used because of the features it offers. Converting formats, downloading, burning videos/photos to DVD, and a lot more options are offered.
This software also delivers output for iOS and Android devices like iPod, iPad, Samsung Note series, Samsung Galaxy series, etc. How many file formats can Leawo support? This video format converter for PC supports an endless list of formats, like MOV, AVI, MKV, and many others. Leawo is also referred to as an HD video converter and 4K video converter.
5. Video Converter Factory
Video Converter Factory is another powerful video file format converter. Are you ready to learn more about it? Let’s start! This video converter is simple to use with an easy interface but doesn’t forget; it’s very fast and efficient.
It supports different formats, including MP4, AVI, MKV, WAV, Apple ProRes, MOV, etc. This video format converter is compatible with many different formats and also devices. Do you know the video converter supports HD video formats as well? It does, and it works well with 8K, 4K, 1080p, 720p, and also 480p resolution.
Part 2. 5 Best Online Video Converter
After discussing the 5 best video file format converters, it’s time to shed light on a few online video format converters. Are you ready? Let’s get started!
2. Online Video Converter
Do you know any video format converter that does not require registrations? Let’s introduce Online Video Converter here. This format converter is online, free to use, and interestingly, it does not require any registrations. You don’t need to download any additional software to use this tool.
This converter provides ultra-fast media conversion yet maintains its quality. Online Video Converter is compatible with all web browsers. Do you want to know something great? This converter has no restrictions or limits on conversions and downloads.
3. Zamzar Online File Conversion
Zamzar File Conversion is another option for an online video format converter. This tool lets you upload the files from your device, or else you can also drag and drop the file for conversion. What is the max file size for free users on Zamzar? The online format converter offers a maximum file size of 50 MB.
It supports and converts different formats like 3GP, AVI, MP4, MOV, MKV, M4V, etc. Various conversions are offered like MP4 to GIF, MP4 to MP3, MKV to MP4, and whatnot.
4. Convertio
Can you name a file converter that can maintain the original file’s quality? We are talking about Convertio, Online Video Converter. This tool has high-quality video processing algorithms that promise to retain the video quality of the original video even after conversion.
Is it compatible with Mac? The online video format converter works on all web browsers and is compatible with Mac, Windows, Linux. Also, you can use it on Android as well as iOS devices.
5. Files Conversion
Have you seen any converter that asks you to select the video quality? What if we say Files Conversion is that tool? This online video file format converter lets you choose the quality of the video from the given options; Low, Moderate, High, Very High.
The converter supports a long list of formats that include FLV, AVI, MP4, MOV, 3GP, and others. Moreover, with this format converter, you can also select the size of the final file after conversion.
Final Thoughts
After reading this article, we hope that you know about the best online video format converters and the 5 best video format converters for PC. Do you want to know about a little surprise? We might have something to share. We are talking about Wondershare Filmora Video Editor , the platform that can edit mind-blowing videos.
Filmora offers Basic features like cut, trim, split, merge, etc. At the same time, some Advanced features are also provided like AI Portrait, Auto Reframe, Auto Highlight, etc. What else does Filmora have? Wondershare Filmora has an asset library packed with cool sound effects, editing elements, video effects, transitions, and whatnot.
For Win 7 or later (64-bit)
For macOS 10.12 or later
How to Use Visual Effect for Zoom
Zoom, a video calling software, has been quite popular over the last several months and is still one of the most used videos calling applications by millions of people worldwide. The site is a favorite among working professionals, but it is also utilized by individuals to connect with their friends and loved ones. Additionally, despite the app’s abundance of practical built-in tools and functions, it lacks the fun filters and special effects that the majority of users are used to when using a camera. Zoom has ingrained itself in our vocabulary during the last year. It seemed almost inevitable given that everything, from meetings to parties, has moved online.
You don’t need to seek farther than Zoom visual effects to inject a little jazz into the routine Zoom meetings during these hard times. By making adjustments to your Video configuration either before or during a video call, you may add visual effects in Zoom. Zoom meetings may be tedious to conduct over extended periods of time. Additionally, it would be helpful if you recorded the condition of your room before any Zoom meetings. You wouldn’t want to reveal your disorganized space while in a meeting. In these situations, adding visual effects will keep your private area private while also making your Zoom meetings entertaining and exciting. It will also prevent others from seeing your filthy room. This tutorial will walk you through the process of adding visual effects to Zoom step-by-step. In addition, you will get acquainted with the numerous camera functions and visual effects that you may employ during a Zoom video conversation.
- 1. What apps can add visual effect on Zoom?
- 2. How do I add visual effects to Zoom in Mobile?
- 3. How do you download Zoom effects?
Part 1: Popular Visual Effects you can add to Zoom
You may apply one of four main graphic effects to your Zoom meetings. The visual effects that you may use in your next Zoom video chat are briefly summarized below.
1. Visual Backgrounds
Virtual backdrops may transform any plain wall into an artistic setting. Zoom provides you the choice to add photographs to your backdrop in addition to offering you a few pre-made backdrops. Zoom lets you add a movie to your backdrop in addition to simply photographs. With the help of this imaginative feature, gather your pals and enjoy your favorite meme or video. A presentation’s collection of photos, a video, or a single image may all serve as virtual backdrops. A green screen would often be used as your real backdrop and consistent lighting would be required.
To avoid having to reveal your real surroundings while in a conference, you may add any picture or video as a virtual backdrop in Zoom. You have the option of adding own photos and movies or selecting from the pre-existing backdrop films and images. The file type for video backgrounds should be MP4 or MOV, and the resolution should range from 360p to a maximum of 1080p. Ensure that the mirroring of your video is deselected in the Zoom’s Video settings if your backdrop picture has text that may be read. By using virtual backdrops, you may alter the background of your video as it appears to the audience member with whom you are speaking. During the video conference you’re in, the other participants will be able to view your face and body overlaid on the backdrop of your choice.
2. Filters
With these filters, you can have fun in all of your Zoom meetings! Filters are a fun way to spend time with loved ones who are far away, particularly at a period when maintaining social distance is crucial. Filters are the modifications you make to yourself during Zoom meetings (such as a mustache, beard, etc.). They enliven the proceedings and contribute to the fun and memorability of your Zoom meetings.
Your films’ colors may be changed, and video filters can also add new aspects. By selecting a filter appropriate for each event, like team meetings or game nights, you may create the right atmosphere. You may embellish your face in the video with flowers or animal traits by using Zoom’s various filters. Alternately, you might just convert your video’s color to black and white. The video filters from a different program, however, allow you to apply more vibrant filters and place a greater emphasis on special effects.
3. Lighting and Touch-ups
The Lighting function enhances lighting effects and makes adjustments for low light situations to make you seem more professional during a Zoom conference. Similar to this, Touch-up enhances your facial characteristics by making your skin shine, erasing wrinkles, and giving your face a radiant appearance.
On your Zoom videos, changing your lighting and applying touch-ups may improve how you seem. By adjusting your lighting, you can make even dim illumination look bright. By doing touch-ups, you may get a smoother skin texture and get rid of any obvious imperfections.
4. Studio Effects
Zoom has been developing on a new feature called Studio Effects that would give customers the option of using virtual cosmetics in their movies. They are still checking it out before formally releasing it since it is still in beta. However, it is still available to users under the Backgrounds & Filters area. You may adjust the opacity as you like. You have the option to choose a new color or one of the predefined colors. Additionally, you may decide to employ the face effects in all of your next meetings, albeit doing so might be problematic if you use Zoom for business. Don’t worry if you’re running late. Zoom can give your face a natural-looking cosmetic makeover in only one minute!
This function is intended for less formal settings, such as gatherings of friends or family. Anyone who wants to seem more professional during meetings has access to Studio Effects, which offers the choice of various eyebrow colors, beards, and lipsticks. These are a few recently added features. You may add mustaches, beards, and brows in a variety of designs, hues, and intensities. Additionally, you have the option of coloring your lips.
Part 2: How to Add Visual Effects to Zoom
Along with facilitating online meetings, the Zoom program also lets you play with its visual effects. You just need to make a few adjustments to the video settings or utilize another third-party program to be ready to go.
Step1Start a Zoom meeting
You can download Zoom, install it on your computer, and log into your account if you don’t already have it if you don’t already have it.
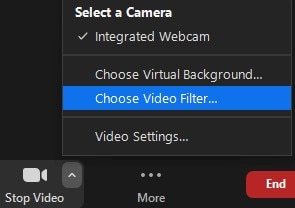
Step2Tap Background and Filters
After logging in to Zoom, use these settings. - Options > Camera > Video

Step3Faucet Filters
Here, you may play with a variety of visual effects and customize them to suit your tastes. Pick one of the numerous filters that are offered. To activate the filter, tap it.
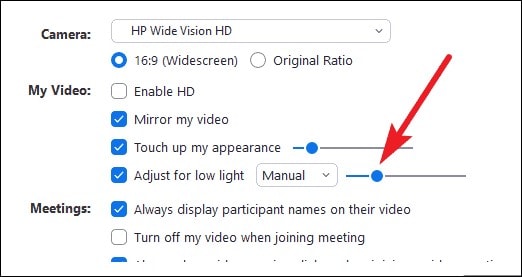
Step4Set Lighting Effects to on
Select “Adjust for low light” in the video options. For your lighting, you may choose between Auto and Manual effects. Zoom will automatically detect and adapt for the lighting in your room if you choose Auto.
Use Zoom’s noise reduction option to keep your conversation focused during your video conference in addition to adding visual elements. To do this, go to “Audio Settings” and choose “High” under “Suppress background noise.” Once you start speaking during the video conference, this essentially cancels out any background noise.
Part 3: Related FAQs
1. What apps can add visual effect on Zoom?
Following is the list of top three apps that you can use to utilize visual effects Zoom application:
Snap Camera is regarded as the most user-friendly. It is a software that you can download for Windows or Mac that works with live broadcasts and video chats. Because it was created by the people who founded Snapchat, it shares a broad variety of filters with that platform.
Link: Snap Camera
The Mac is the only platform on which CamTwist may be used. You may also use it to give your movies additional filters and unique effects. This program lets you pick from a variety of pre-made effects while also allowing you to create your own.
Link: CamTwist
Another desktop application that lets you change and even blur your backdrop is ManyCam. It enables you to apply digital effects, filters, and 3-D masks to your face. Using this tool, you can also build layers and presets.
Link: ManyCam
2. How do I add visual effects to Zoom in Mobile?
Zoom includes a function that might be useful if you don’t want to tidy up or want to add some entertainment to your calls. You may utilize Zoom virtual backdrops to alter your surroundings and take you to a more pleasant location on both the desktop and mobile apps. After joining one on a mobile device, pick Virtual backdrop by tapping the More icon in the bottom right corner. Choose a photo from the list of choices, or click the plus sign (+) to add a photo or video from your gallery.
3. How do you download Zoom effects?
Pressing the Studio Effects button after installing Zoom for the first time will prompt a pop-up asking you to download the Studio Effects package. Several filters, suited for both business meetings and conversations with friends, let you customize the video and audio during your video calls. To start downloading the Effects bundle, click the Download button. The “Studio Effects” window will appear on the right-hand side of the Background & Filter page after the download is finished. All the face components and choices are available in this Studio Effects window.
Conclusion
The most popular video meeting tool worldwide is Zoom. Family, friends, coworkers, and any two people who want to video chat utilize it. Zoom visual effects are the ideal tool for injecting some humor into otherwise dull Zoom sessions and meetings. A few simple steps will get you a striking backdrop, a humorous filter, and some interesting effects. Since the majority of formal work is now completed from home, Zoom has taken over as the standard video conferencing program. Try out as many of the effects as you like, and use this page as a companion and a map to help you along the way.
- 1. What apps can add visual effect on Zoom?
- 2. How do I add visual effects to Zoom in Mobile?
- 3. How do you download Zoom effects?
Part 1: Popular Visual Effects you can add to Zoom
You may apply one of four main graphic effects to your Zoom meetings. The visual effects that you may use in your next Zoom video chat are briefly summarized below.
1. Visual Backgrounds
Virtual backdrops may transform any plain wall into an artistic setting. Zoom provides you the choice to add photographs to your backdrop in addition to offering you a few pre-made backdrops. Zoom lets you add a movie to your backdrop in addition to simply photographs. With the help of this imaginative feature, gather your pals and enjoy your favorite meme or video. A presentation’s collection of photos, a video, or a single image may all serve as virtual backdrops. A green screen would often be used as your real backdrop and consistent lighting would be required.
To avoid having to reveal your real surroundings while in a conference, you may add any picture or video as a virtual backdrop in Zoom. You have the option of adding own photos and movies or selecting from the pre-existing backdrop films and images. The file type for video backgrounds should be MP4 or MOV, and the resolution should range from 360p to a maximum of 1080p. Ensure that the mirroring of your video is deselected in the Zoom’s Video settings if your backdrop picture has text that may be read. By using virtual backdrops, you may alter the background of your video as it appears to the audience member with whom you are speaking. During the video conference you’re in, the other participants will be able to view your face and body overlaid on the backdrop of your choice.
2. Filters
With these filters, you can have fun in all of your Zoom meetings! Filters are a fun way to spend time with loved ones who are far away, particularly at a period when maintaining social distance is crucial. Filters are the modifications you make to yourself during Zoom meetings (such as a mustache, beard, etc.). They enliven the proceedings and contribute to the fun and memorability of your Zoom meetings.
Your films’ colors may be changed, and video filters can also add new aspects. By selecting a filter appropriate for each event, like team meetings or game nights, you may create the right atmosphere. You may embellish your face in the video with flowers or animal traits by using Zoom’s various filters. Alternately, you might just convert your video’s color to black and white. The video filters from a different program, however, allow you to apply more vibrant filters and place a greater emphasis on special effects.
3. Lighting and Touch-ups
The Lighting function enhances lighting effects and makes adjustments for low light situations to make you seem more professional during a Zoom conference. Similar to this, Touch-up enhances your facial characteristics by making your skin shine, erasing wrinkles, and giving your face a radiant appearance.
On your Zoom videos, changing your lighting and applying touch-ups may improve how you seem. By adjusting your lighting, you can make even dim illumination look bright. By doing touch-ups, you may get a smoother skin texture and get rid of any obvious imperfections.
4. Studio Effects
Zoom has been developing on a new feature called Studio Effects that would give customers the option of using virtual cosmetics in their movies. They are still checking it out before formally releasing it since it is still in beta. However, it is still available to users under the Backgrounds & Filters area. You may adjust the opacity as you like. You have the option to choose a new color or one of the predefined colors. Additionally, you may decide to employ the face effects in all of your next meetings, albeit doing so might be problematic if you use Zoom for business. Don’t worry if you’re running late. Zoom can give your face a natural-looking cosmetic makeover in only one minute!
This function is intended for less formal settings, such as gatherings of friends or family. Anyone who wants to seem more professional during meetings has access to Studio Effects, which offers the choice of various eyebrow colors, beards, and lipsticks. These are a few recently added features. You may add mustaches, beards, and brows in a variety of designs, hues, and intensities. Additionally, you have the option of coloring your lips.
Part 2: How to Add Visual Effects to Zoom
Along with facilitating online meetings, the Zoom program also lets you play with its visual effects. You just need to make a few adjustments to the video settings or utilize another third-party program to be ready to go.
Step1Start a Zoom meeting
You can download Zoom, install it on your computer, and log into your account if you don’t already have it if you don’t already have it.
Step2Tap Background and Filters
After logging in to Zoom, use these settings. - Options > Camera > Video
Step3Faucet Filters
Here, you may play with a variety of visual effects and customize them to suit your tastes. Pick one of the numerous filters that are offered. To activate the filter, tap it.
Step4Set Lighting Effects to on
Select “Adjust for low light” in the video options. For your lighting, you may choose between Auto and Manual effects. Zoom will automatically detect and adapt for the lighting in your room if you choose Auto.
Use Zoom’s noise reduction option to keep your conversation focused during your video conference in addition to adding visual elements. To do this, go to “Audio Settings” and choose “High” under “Suppress background noise.” Once you start speaking during the video conference, this essentially cancels out any background noise.
Part 3: Related FAQs
1. What apps can add visual effect on Zoom?
Following is the list of top three apps that you can use to utilize visual effects Zoom application:
Snap Camera is regarded as the most user-friendly. It is a software that you can download for Windows or Mac that works with live broadcasts and video chats. Because it was created by the people who founded Snapchat, it shares a broad variety of filters with that platform.
Link: Snap Camera
The Mac is the only platform on which CamTwist may be used. You may also use it to give your movies additional filters and unique effects. This program lets you pick from a variety of pre-made effects while also allowing you to create your own.
Link: CamTwist
Another desktop application that lets you change and even blur your backdrop is ManyCam. It enables you to apply digital effects, filters, and 3-D masks to your face. Using this tool, you can also build layers and presets.
Link: ManyCam
2. How do I add visual effects to Zoom in Mobile?
Zoom includes a function that might be useful if you don’t want to tidy up or want to add some entertainment to your calls. You may utilize Zoom virtual backdrops to alter your surroundings and take you to a more pleasant location on both the desktop and mobile apps. After joining one on a mobile device, pick Virtual backdrop by tapping the More icon in the bottom right corner. Choose a photo from the list of choices, or click the plus sign (+) to add a photo or video from your gallery.
3. How do you download Zoom effects?
Pressing the Studio Effects button after installing Zoom for the first time will prompt a pop-up asking you to download the Studio Effects package. Several filters, suited for both business meetings and conversations with friends, let you customize the video and audio during your video calls. To start downloading the Effects bundle, click the Download button. The “Studio Effects” window will appear on the right-hand side of the Background & Filter page after the download is finished. All the face components and choices are available in this Studio Effects window.
Conclusion
The most popular video meeting tool worldwide is Zoom. Family, friends, coworkers, and any two people who want to video chat utilize it. Zoom visual effects are the ideal tool for injecting some humor into otherwise dull Zoom sessions and meetings. A few simple steps will get you a striking backdrop, a humorous filter, and some interesting effects. Since the majority of formal work is now completed from home, Zoom has taken over as the standard video conferencing program. Try out as many of the effects as you like, and use this page as a companion and a map to help you along the way.
Top 5 Best Video Denoisers
We all know that our recorded videos are not always perfect – when we use a mobile phone or digital cameras to shoot, our clips may contain hiss, compression and particles. These are the impurities that make our videos look uncomfortable, but it’s not a final result impossible to altar – help can come in the form of several video denoise software.
Editing is the guarantor that makes sure we can do different operations and achieve our desired results – computer programs, tools, opportunities that give us a hand in this process are kind of endless.
So, sometimes it’s really difficult to choose among so many options that come into waves. And if we choose our preferred ways, some people might not agree with us. Even so that it is quite subjective, we can still explain which tools and software we like to modify our videos, and fight with the impurities they have.
It looks amateur if the video is grainy, even if it is night shooting. We can get rid of the noise when we add lights or shoot in well-lit places, but there are some situations we can just depend on the ISO. So, for these grainy videos, there is a thing called denoising – when you get rid of the grains and make your shots as clear as possible. There are different ways to do this, and that happens in different software as well. What are the 5 best video denoisers in 2024 for us to work with? That, as we have already mentioned, might be something very subjective, but here is our selection: Wondershare Filmora, Neat Video, Shotcut, Adobe Premiere Pro, and DaVinci Resolve
Wondershare Filmora X
Wondershare Filmora X offers to change our damaged scene into something more acceptable. How to operate it? - You need to go to the Effects panel and type: “Smart Denoise”. right-click on the video and choose Edit Properties.

This ensures you see the Smart Denoise, where you can change opacity of the clip, threshold and radius.

Reduce Opacity until you are satisfied with the result. The box next to Smart Denoise will show you the scene before and after the effect.
Bonus tip: Wondershare Filmora audio denoise
We already explained how video denoising works, and we will go on with our selection and explanatory article about the process, but, as we are on the Filmora topic, we might as well mention that denoising might mean another thing too – which, in this case, regards audio background noise. It means to remove unwanted hum from the audio in order for it to become more hearable. So, doing this in Wondershare Filmora works in a quite easy way. Use the guideline:
Drag and drop your video into the timeline. Right-click on the clip and hit Detach Audio, which will let you separate audio and video from one another and make sure you can work on them one by one.

Double-click on the audio track and have access to the editing panel, where you can see Remove background noise – it is not needed to emphasize what this option does for you!

That’s it – you are done, but keep in mind that there is a second way to achieve the same result as well, but this in case you don’t want to detach the audio: Double-click on the video clip in the timeline, the editing panel opens, so switch to Audio. Checking the box next to Remove background noise will show that there are three levels – weak, mid, and strong, and of course, you can choose to your liking!
If the voice recording doesn’t sound natural anymore, you can do the following: Click on Customize and Customize Equalizer window will open.

On the left, you can see the low tunes, while the highs are on the right. Background noises are often on the left, so you can lower them to get rid of them, but in order to have a more natural sound, raise the middle ones a little – and you are done when you are content with the sound!

So, hmm… back to the original topic – denoising a video, shall we?..
Neat video
Neat Video kind of, speaks for itself… it is a powerful video editing tool suitable for Windows, macOS and Linux. It aims to reduce the digital noise, flicker, dust, scratches and other defects in the captured videos to improve the visual quality of the videos.
It is a plug-in for Premiere Pro, that does more or less what the product noise says: it makes grainy video look neater. It’s very easy to use and
How to do that in Neat Video? Here are the steps:
Find the clip you want to reduce the noise of and search for the neat video effect in the Effects Panel.

The video editors mostly use the SR version of it, because it seems faster and has kind of a better performance.

Then, you’ll have to drag the neat video plug-in to the clip to your choosing, take your attention to the Effect Controls panel on the left, and find: fx Reduce Noise v5 (SR) – press the button saying Prepare and this will open up the Build button as well, which wil open the Neat video effect window.

There, you’ll need to click on the Auto Profile. Selection window will appear, which you can move around the scene and resize, in order to select the noisy area of your footage. It is recommended to find the darkest or grainiest area there and select judging by this.

On the left side, you will find Filter Settings: under Spatial, you can play with the Noise Reduction Amount and Noise Level.

Then, you will hit Apply and – done, you can instantly see the results!
Shotcut
What about Shotcut? It is a free, open-source and cross-platform video denoiser for Windows operating system. It is also an outstanding video editor with trimming, splitting, color correction and other tools.
In order to reduce the noise there, do the following: first off, find filters, open that window and type in: Noise. This will open the options, and several of them are for noise reduction.


Choose Reduce Noise: Wavelet, add it to the Video and then feel free to modify the settings, such as: Decompose, Threshold, Percent. You can check and uncheck the effect in order to see the before-after difference. Then, click Apply button and it is ready to go!
Anyway, you can also try other similar effects such as Reduce Noise: HQDN3D and Reduce Noise: Smart Blur.
Adobe Premiere Pro
Even though we discussed video denoising in Adobe Premier Pro but with the help of a plug-in called Neat Video, reducing the noise in the video in this software can be achieved without the plug-in as well, through using effect which is called Median. And, Premiere Pro kind of deserves to be mentioned, so, let’s go for it!
Add the desired footage into the Timeline of Premiere Pro. Then, find the Effects Panel, where our wanted Median can be found –drag and drop the effect to the clip.

The Median should modify the grainiest parts of the whole clip, so in order to do this, we need to use masks. In the Effects Control panel, select the mask shape for the clip – the options are: rectangle, circle, or pen tool. With Pen tool, you move the Mask around the screen and resize it – the covered area will be affected.

If you change Feather setting to 100, the effect will lose a sharp edge and instead, there will be a smooth border.

So, you might think it is needed to repeat these steps several time to create masks in different areas, in order to cover all of the grainy space of the scene.
And, at last, to reduce the noise, adjust the effect settings.

Actually, Median just blurs the grainy parts, without directly taking them away. Lastly, you can get to know the Radios settings, which will help you to achieve your most desired look!
Davinci Resolve
DaVinci Resolve is also worth mentioning in this list, in a way because it is also different from other video editors. Let’s see how it works and, meanwhile, differs:
Add the footage into the timeline. Find the fusion tab underneath the timeline panel.

There, MediaIn1 and MediaOut1 will appear, and first, click on MediaIn1, - the scene will be shown in the first viewer – and MediaOut1 by default is appearing in the second. So, stay on MediaIn1, hit shift+spacebar, and find Remove Noise (RN). Click Add, which adds the Remove Noise1 node. On the top right corner there is an Inspector, which opens all the properties you can modify.

After going only into the second viewer, and in the top bar there is channel icons. Open it and click on red, but don’t get alarmed when your footage turns black and white – it’s just for a while. Go back to the Inspector, increase Softness Red and Detail Red.

This step helps remove grain from the red channel. Then repeat the same for green and blue channels. After finishing go to the same channel button and set it to “back to color”. The clip will be colorized again and now be clearer, compared to the first viewer.

So, Evrika – we hot to know 5 best video denoisers in 2024, with the addition of audio background noise removal in Wondershare Filmora – hope you enjoyed it, and hope this will help you create better videos for yourself and your viewers!
This ensures you see the Smart Denoise, where you can change opacity of the clip, threshold and radius.
Reduce Opacity until you are satisfied with the result. The box next to Smart Denoise will show you the scene before and after the effect.
Bonus tip: Wondershare Filmora audio denoise
We already explained how video denoising works, and we will go on with our selection and explanatory article about the process, but, as we are on the Filmora topic, we might as well mention that denoising might mean another thing too – which, in this case, regards audio background noise. It means to remove unwanted hum from the audio in order for it to become more hearable. So, doing this in Wondershare Filmora works in a quite easy way. Use the guideline:
Drag and drop your video into the timeline. Right-click on the clip and hit Detach Audio, which will let you separate audio and video from one another and make sure you can work on them one by one.
Double-click on the audio track and have access to the editing panel, where you can see Remove background noise – it is not needed to emphasize what this option does for you!
That’s it – you are done, but keep in mind that there is a second way to achieve the same result as well, but this in case you don’t want to detach the audio: Double-click on the video clip in the timeline, the editing panel opens, so switch to Audio. Checking the box next to Remove background noise will show that there are three levels – weak, mid, and strong, and of course, you can choose to your liking!
If the voice recording doesn’t sound natural anymore, you can do the following: Click on Customize and Customize Equalizer window will open.
On the left, you can see the low tunes, while the highs are on the right. Background noises are often on the left, so you can lower them to get rid of them, but in order to have a more natural sound, raise the middle ones a little – and you are done when you are content with the sound!
So, hmm… back to the original topic – denoising a video, shall we?..
Neat video
Neat Video kind of, speaks for itself… it is a powerful video editing tool suitable for Windows, macOS and Linux. It aims to reduce the digital noise, flicker, dust, scratches and other defects in the captured videos to improve the visual quality of the videos.
It is a plug-in for Premiere Pro, that does more or less what the product noise says: it makes grainy video look neater. It’s very easy to use and
How to do that in Neat Video? Here are the steps:
Find the clip you want to reduce the noise of and search for the neat video effect in the Effects Panel.
The video editors mostly use the SR version of it, because it seems faster and has kind of a better performance.
Then, you’ll have to drag the neat video plug-in to the clip to your choosing, take your attention to the Effect Controls panel on the left, and find: fx Reduce Noise v5 (SR) – press the button saying Prepare and this will open up the Build button as well, which wil open the Neat video effect window.
There, you’ll need to click on the Auto Profile. Selection window will appear, which you can move around the scene and resize, in order to select the noisy area of your footage. It is recommended to find the darkest or grainiest area there and select judging by this.
On the left side, you will find Filter Settings: under Spatial, you can play with the Noise Reduction Amount and Noise Level.
Then, you will hit Apply and – done, you can instantly see the results!
Shotcut
What about Shotcut? It is a free, open-source and cross-platform video denoiser for Windows operating system. It is also an outstanding video editor with trimming, splitting, color correction and other tools.
In order to reduce the noise there, do the following: first off, find filters, open that window and type in: Noise. This will open the options, and several of them are for noise reduction.
Choose Reduce Noise: Wavelet, add it to the Video and then feel free to modify the settings, such as: Decompose, Threshold, Percent. You can check and uncheck the effect in order to see the before-after difference. Then, click Apply button and it is ready to go!
Anyway, you can also try other similar effects such as Reduce Noise: HQDN3D and Reduce Noise: Smart Blur.
Adobe Premiere Pro
Even though we discussed video denoising in Adobe Premier Pro but with the help of a plug-in called Neat Video, reducing the noise in the video in this software can be achieved without the plug-in as well, through using effect which is called Median. And, Premiere Pro kind of deserves to be mentioned, so, let’s go for it!
Add the desired footage into the Timeline of Premiere Pro. Then, find the Effects Panel, where our wanted Median can be found –drag and drop the effect to the clip.
The Median should modify the grainiest parts of the whole clip, so in order to do this, we need to use masks. In the Effects Control panel, select the mask shape for the clip – the options are: rectangle, circle, or pen tool. With Pen tool, you move the Mask around the screen and resize it – the covered area will be affected.
If you change Feather setting to 100, the effect will lose a sharp edge and instead, there will be a smooth border.
So, you might think it is needed to repeat these steps several time to create masks in different areas, in order to cover all of the grainy space of the scene.
And, at last, to reduce the noise, adjust the effect settings.
Actually, Median just blurs the grainy parts, without directly taking them away. Lastly, you can get to know the Radios settings, which will help you to achieve your most desired look!
Davinci Resolve
DaVinci Resolve is also worth mentioning in this list, in a way because it is also different from other video editors. Let’s see how it works and, meanwhile, differs:
Add the footage into the timeline. Find the fusion tab underneath the timeline panel.
There, MediaIn1 and MediaOut1 will appear, and first, click on MediaIn1, - the scene will be shown in the first viewer – and MediaOut1 by default is appearing in the second. So, stay on MediaIn1, hit shift+spacebar, and find Remove Noise (RN). Click Add, which adds the Remove Noise1 node. On the top right corner there is an Inspector, which opens all the properties you can modify.
After going only into the second viewer, and in the top bar there is channel icons. Open it and click on red, but don’t get alarmed when your footage turns black and white – it’s just for a while. Go back to the Inspector, increase Softness Red and Detail Red.
This step helps remove grain from the red channel. Then repeat the same for green and blue channels. After finishing go to the same channel button and set it to “back to color”. The clip will be colorized again and now be clearer, compared to the first viewer.
So, Evrika – we hot to know 5 best video denoisers in 2024, with the addition of audio background noise removal in Wondershare Filmora – hope you enjoyed it, and hope this will help you create better videos for yourself and your viewers!
Also read:
- 2024 Approved A Review On 3D LUT Creator
- New 2024 Approved Little Tricks to Create Canva Slideshow No One Is Telling You
- 2024 Approved How to Create and Add an Adjustment Layer in Final Cut Pro
- Updated 2024 Approved How To Use Motion Blur On Video Star?
- New AR, or Augmented Reality, Is One of the Most Significant Technological Inventions. This Technology Is Used in Many Applications that We Use Daily, Like, Maps, Music, Video Games, Tourism, Sightseeing, Etc
- In 2024, What You Should Know About Speech-to-Text Technology
- In 2024, Best 7 Color Match Paint Apps
- Discord Is Becoming More Popular with Time with Millions of Users. Are You Thinking of Getting a GIF for Discord Profile? If Yes, Learn From This Piece Since We Have a Conclusive Summary of Getting a GIF Profile Picture for Discord
- Updated 2024 Approved One of the Latest Tools for Editing Video and Images Is AI Composite Video App Which Is Popular Among Users. Learn All About This Tool and Its Functioning
- In 2024, How to Make A Slideshow Video (+Filmora Techniques)
- Updated In 2024, Ultimate Guidelines to Help You Better Use VLC Media Player
- 2024 Approved Quickest Guide | Zoom In and Out on Snapchat
- 2024 Approved 2 Methods to Crop Video in VLC
- New Color Matching Is the Trickiest Part of Graphic Designing. Learn in Detail About Using Canva Color Match Ideally While Working on Your Pins, Social Media Posts, and Other Designs
- New 2024 Approved How to Start a Vlog
- New 2024 Approved Detailed Tutorial to Rotate a Video in Cyberlink PowerDirector
- New In 2024, Best 5 GIF to Video Converters You Cant-Miss
- New What Is the Best FPS for YouTube Videos for 2024
- Updated 2024 Approved 5 Tools to Create a Time-Lapse Video Online
- New 2024 Approved Interested in Adding a Cinematic Strobe Light Effect to Your Movie or Video Title? Follow the Steps Explained in Detail Here
- Updated Top 15 Slow Motion CapCut Templates to Work With for 2024
- New In 2024, Best Free LUTs To Use in Shotcut
- In 2024, 4 Methods to Crop a Video on Android Easily
- 2024 Approved Want to Convert MP4 Video To 60 FPS GIF? Read This
- Updated Top 10 3D Slideshow Software Review for 2024
- Updated In 2024, The Complete Guide to Converting GIF to SVG With Ease
- New 8 Apps to Custom GIF Stickers for 2024
- Updated Best 8 Free Video Editing Software Reddit for 2024
- Updated 2024 Approved Top 6 Drones for Videography
- In 2024, Do You Know What Is Motion Blur in Fortnite? Read This Article to Find Out How to Apply Motion Blur in Fortnite Efficiently and with Ease
- Start Your Creative Journey Now. Follow This Step-by-Step Guide on How to Add Double Exposure Effects to Your Personal Videos by Using the Filmora Video Editor
- If Youre Not Using Video yet, Now Is the Time to Start. In This Post, Well Discuss the Benefits of Using Video for Social Media Marketing and Provide Tips for Getting Started. Keep Reading to Learn More for 2024
- New How to Merge Audio and Video in VLC Media Player for 2024
- Updated Progressive Solutions to Add VHS Effects to Video with Ease
- New Looking for a Full Guide on Removing the Background From PNG Images? Do You Want to Transform JPG to PNG Transparent? If so, Take some Time to Read This Article for 2024
- Updated Linkedin Posts Can Be Made Engaging by Using the Emojis. This Article Will Tell You Its Importance and Different Ways to Add Them
- New In 2024, Making Slow Motion Videos in Final Cut Pro The Best Methods
- Best 7 Color Match Paint Apps for 2024
- Updated In 2024, Do You Want to Remove Unnecessary Sound From Your Video? We Are Providing You the List of the Best Software to Remove Audio From Video for Mac and Apple
- New Ultimate Guide on How To Plan and Storyboard a Music Video
- New How to Add Font Effects to Videos for 2024
- Updated 2024 Approved Little Known Ways of Adding Emojis to Photos on iPhone & Android
- How to Change Netflix Location to Get More Country Version On Vivo Y100i Power 5G | Dr.fone
- How to Downgrade iPhone X to an Older Version? | Dr.fone
- Does Life360 Notify When You Log Out On Vivo V30? | Dr.fone
- In 2024, How to Share/Fake Location on WhatsApp for Oppo A79 5G | Dr.fone
- How to Recover deleted pictures on iPhone 14? 5 Best Solutions | Stellar
- How to Change Google Play Location On Realme GT 5 Pro | Dr.fone
- How to Transfer Data After Switching From Vivo Y17s to Latest Samsung | Dr.fone
- How to identify missing or malfunctioning your drivers with Windows Device Manager on Windows 10 & 7
- In 2024, How to Transfer Contacts from Nubia Red Magic 9 Pro+ to iPhone XS/11 | Dr.fone
- Easy Fixes How To Recover Forgotten iCloud Password From your iPhone 15 Pro Max
- Updated The Only Guide Youll Ever Need to Learn That Make 2D Rigging Clear to You
- How to remove Google FRP Lock on Galaxy S21 FE 5G (2023)
- Restore Missing App Icon on Lava Blaze Pro 5G Step-by-Step Solutions | Dr.fone
- In 2024, Complete Guide on Unlocking Apple iPhone 13 Pro with a Broken Screen?
- In 2024, How to Mirror PC Screen to Vivo X100 Phones? | Dr.fone
- In 2024, How to Transfer Data from Oppo Find N3 Flip to BlackBerry | Dr.fone
- In 2024, Mastering Android Device Manager The Ultimate Guide to Unlocking Your Infinix Hot 40 Pro Device
- Will iSpoofer update On Itel P55+ | Dr.fone
- How to Transfer Data from Poco C51 to Other Android Devices? | Dr.fone
- Easily Unlock Your Vivo V29e Device SIM
- In 2024, What is the best Pokemon for pokemon pvp ranking On Tecno Pova 6 Pro 5G? | Dr.fone
- Where Is the Best Place to Catch Dratini On Motorola G24 Power | Dr.fone
- Is pgsharp legal when you are playing pokemon On Samsung Galaxy A34 5G? | Dr.fone
- In 2024, How to Bypass FRP on Lava Agni 2 5G?
- Downloading SamFw FRP Tool 3.0 for Realme C33 2023
- Best Fixes For Honor X9a Hard Reset | Dr.fone
- In 2024, How to Unlock a Network Locked Infinix Note 30 5G Phone?
- Two Ways to Track My Boyfriends OnePlus Nord 3 5G without Him Knowing | Dr.fone
- In 2024, Top 10 Telegram Spy Tools On Oppo Find X7 Ultra for Parents | Dr.fone
- Title: New Are You Looking for Software to Convert Word to SRT Format? Here Is a Complete Guide About It for 2024
- Author: Morgan
- Created at : 2024-04-24 01:08:25
- Updated at : 2024-04-25 01:08:25
- Link: https://ai-video-editing.techidaily.com/new-are-you-looking-for-software-to-convert-word-to-srt-format-here-is-a-complete-guide-about-it-for-2024/
- License: This work is licensed under CC BY-NC-SA 4.0.
