
:max_bytes(150000):strip_icc():format(webp)/young-muslim-woman-using-phone-1137305438-75947aa7fb484506bf9da8c38fc68a03.jpg)
New Are You Looking to Store Your Videos Securely and Efficiently? Look No Further than Our Top Pick for the Best Cloud Storage Service for Videos for 2024
Are You Looking to Store Your Videos Securely and Efficiently? Look No Further than Our Top Pick for the Best Cloud Storage Service for Videos
Which video cloud storage service is the best for storing videos? Many options are available, so it can be hard to decide which is the best for you.
Some factors to consider when choosing a cloud storage service for videos include how easy it is to use, the number of storage options available, and the price.
Some popular best video cloud storage services for videos include Flicker, Wondershare Drive, and Adobe Creative Cloud. Each has its own advantages and disadvantages, so it’s essential to consider what you need before making a decision.
Ultimately, the best cloud storage service for videos is one that meets your specific needs. So don’t hesitate to try out different services to see which one is best for you.
Part 1: No.1 Flicker
Flickr is an online image hosting and video hosting service that has been around for a long time. However, SmugMug now owns it, and you can access photos and videos from Flickr without registering an account.
Flicker Free Storage Policy
Flickr is a great online video storage service, but it can be limiting if you want to store many pictures and videos. For example, a Flickr free account can only store 1000 photos and videos, which means it can only hold about 2-3 GB of data.
Flickr also has some limitations when it comes to file size. For example, photos are limited to 200 MB and videos are limited to 1 GB. However, you can get around these limitations by storing the maximum allowed file size (e.g., photo files are limited to 200 MB and video files are limited to 1 GB). Additionally, if you want to share photos and videos with others, you’ll need to upload video to the cloud or use the Flickr app on a device.
Overall, Flickr is a great online photo and video storage service, but it may not be the best option for you if you’re looking for a lot of space or want to share photos and videos with others.
Flicker Pro Storage Policy
Flicker Cloud Storage is a paid storage service that offers users unlimited storage space and a range of features to help them manage their photos and videos.
The paid policy of Flicker Cloud Storage allows users to store unlimited data for a monthly fee of $5.99. The storage space is available as a monthly subscription or can be purchased yearly.
The features available to users of Flicker Cloud Storage include the ability to search and view photos and videos and share photos and videos with friends and family.
Flicker Cloud Storage is an excellent option for users who want to store their photos and videos in a safe and secure environment. The paid policy of Flicker Cloud Storage allows users to store more data than other storage services, and the features available make it easy to access and share your photos and videos.
Why Flicker is the best choice for cloud storage
Flicker is the best place to share your work with the world. With Flicker, you can securely and privately share your photos with the world and make profits while you do it.
Flicker is a great way to communicate your work to the world. You can share your photos with your friends, family, and followers and let them know what you’re working on. Flicker is also a great place to make money. You can monetize your photos by selling them through Flicker or licensing them to other businesses.
There’s no reason not to start using Flicker. It’s free to sign up. So start sharing your work with Flicker today!
Part 2: No.2 Wondershare Drive

What is Wondershare Drive
Wondershare Drive is a comprehensive media management tool that helps you organize and manage your videos, music, photos, and documents. It has a wide range of features, such as automatic video and music recognition, easy file sharing, and powerful search capabilities.
Wondershare Drive also features a built-in media player that lets you play videos and music right from the app. With Wondershare Drive, you can easily keep your videos, music, and photos organized and accessible from any device.
Best for Filmora users
Are you looking for editing software that can handle photos and videos with ease? Then, Wondershare Filmora should be your go-to option. This software is known for its easy-to-use interface and its impressive editing capabilities. Whether you’re just starting or a seasoned user, Filmora has something for you. Here are just a few of its features:
Filmora has an easy-to-use interface that makes it easy for beginners to get started.
- It has a wide range of features that allow you to edit photos and videos easily.
- Its editing features are top-notch, and it can easily handle photos and videos.
- It has a wide range of filters that you can use to give your photos and videos a unique look.
- It has a built-in video editor that makes it easy to create videos that look great.
- It has a built-in music editor that makes adding music to your videos easy.
- It has a range of sharing options that make it easy to share your edited videos and photos with friends and family.
- It is free software; you can download it from Wondershare’s website.
If you’re looking for editing software that can easily handle photos and videos, Wondershare Filmora should definitely be your go-to option.
Part 3: No.3 Adobe Creative Cloud

What’s the free policy
Adobe Creative Cloud is a suite of applications that allow users to create and share creative content. In addition, the software offers a free policy, which allows users to use up to 2 GB of storage.
Reasons to choose Adobe Creative Cloud
Adobe Creative Cloud is a software suite that allows users to create and share creative content. It includes Adobe Photoshop, Adobe Illustrator, and Adobe InDesign, as well as a variety of other software tools. Creative Cloud allows users to access their content from any device and share it with others. It also offers a variety of features to help users create more powerful and professional content.
One of the most important features of Creative Cloud is its ability to sync your content between devices. This means that you can access your content anywhere and share it with others. In addition, you can also use Creative Cloud to share your content with collaborators. This way, you can work on the content together and share it with others.
Creative Cloud also offers a variety of features to help you create better content. These features include a variety of tools and resources to help you create better graphics and layouts. Additionally, Creative Cloud offers a variety of tools to help you edit your content. This includes tools to help you correct grammar and spelling mistakes as well as tools to help you add multimedia content.
Creative Cloud is a great way to improve your content skills and create more powerful and professional content. It offers a variety of features to help you create better content and share it with others.
Best Cloud Storage for Adobe Users
Creative Cloud is the best subscription service for you if you’re an Adobe user. Here’s why:
You get the latest versions of all Adobe Creative Suite applications, including Photoshop, Illustrator, InDesign, and Dreamweaver.
You can use all of your Creative Cloud applications on any device, including your computer, tablet, and phone.
- You can share files with other Creative Cloud users easily.
- You can access your Creative Cloud applications from any web browser.
- You can get help from Adobe experts if you need it.
- You can be confident that your data is safe and secure.
- You can manage your Creative Cloud subscriptions in one place.
If you’re not an Adobe user, Creative Cloud is still a great option. It includes all the features of the Adobe Creative Suite, plus many other great applications, such as Acrobat, After Effects, and Audition. You can find out more about Creative Cloud here.
Part 4: No.4 Vimeo

What’s the pricing policy of Vimeo for Video storage?
As a free user, you’re allowed to upload up to two videos per month. This limit is in place for the lifetime of the account and does not reset or renew. After you reach 25 videos, you will need to upgrade your account to upload or create more videos.
Vimeo has a paid video storage policy. Video storage on Vimeo is priced at $12/year for 60 videos, $35/year for 120 videos, or $55/year for 240 videos. That means you can share your videos with your friends and family without worrying about space constraints.
Choose Vimeo for Video storage
Vimeo is a great video storage service that can easily store your videos. The service offers a variety of features that make it a great choice for video storage. Vimeo also offers a great interface that makes it easy to manage your videos.
One of the great features of Vimeo is its ability to share videos with friends and family. You can easily share videos with friends and family by posting them to your Vimeo account or by sending them as an email attachment.
Another great feature of Vimeo is its ability to sync your videos with your devices. You can easily sync your videos with your devices by using the Vimeo app or by using the Vimeo website.
So if you want to create and share quality videos, Vimeo is the perfect platform. And the paid video storage policy means you can store plenty of videos without having to worry about space constraints.
FAQs
Why use cloud storage?
Cloud storage is accessible from anywhere in the world. First, this means that you can access your data even if you’re not at your computer. Second, cloud storage is affordable.
Is cloud storage safe?
Yes, cloud storage is generally safe, but you should take a few precautions to safeguard your data. First, make sure that you choose a reputable provider with robust security measures. Second, keep your files backed up regularly if something goes wrong with your cloud storage account. And finally, be aware that even if your data is stored in the Cloud, it may still be subject to legal discovery or seizure if needed in a criminal investigation.
Free Download For Win 7 or later(64-bit)
Free Download For macOS 10.14 or later
Free Download For macOS 10.14 or later
Change Background Color in After Effects
Adobe After Effects is a powerful video editor. After Effects is particularly popular for its special effects that you can add to your videos and blow the mind of your audience. In any video, the background plays a major role in enhancing the overall frame and scene. If you are planning to change background color After Effects or add special effects, you must shoot your video with a solid color background.
During the post-production phase, you can change the background uniformly to any color scheme or special effect as per the requirement of the scene. Since the learning curve for After Effects is slightly steeper, you should know the exact steps to change After Effects background color. We will explain the process in simple steps and provide you with an alternative way to change background color.
Part 1. How to change video BG color in After Effects?
After Effects is widely used for professionals to add animations and special effects to videos during video editing phase. Starting from editing social media videos and YouTube videos to short films and even movies, After Effects finds its application in every field of video editing. Changing background color in After Effects is super simple even though other video editing techniques could be slightly complex for beginners. Here are the steps on how to change background color in After Effects.
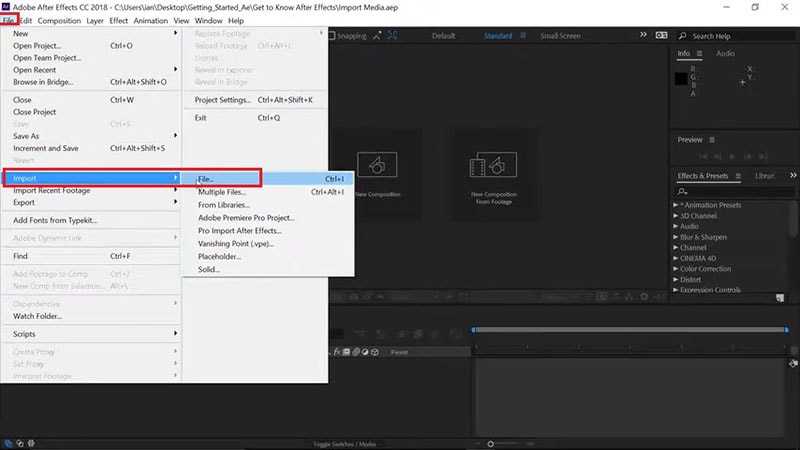
Step1 Open After Effects on your computer. Go to File> Import> File. Select the video file from your hard drive and it will appear under Project tab.
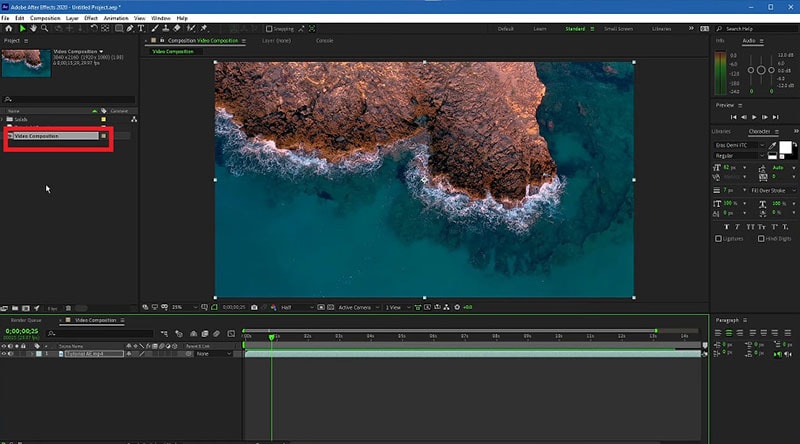
Step2 Drag and drop your video into Timeline. Select the video clip and right-click on Video Composition option located below Project tab.
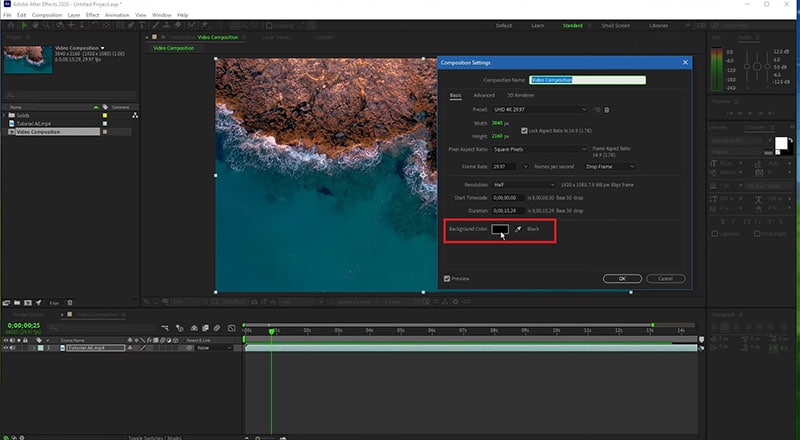
Step3 From the menu, click on Composition Settings option. You can also use Ctrl + K(Windows) or Command + K(Mac) key combination to open Composition Settings directly.

Step4 On Composition Settings window, go to Background Color and set the color as per your preference. You can also use a color picker as well to select any color from the video directly.
Step5 Click on Ok to set the new background color. Depending on the transparency of your video scene or the transition effect such as fade in and out, the background color will be more prominent.
Part 2. Alternative way to change background color
The best alternative to After Effects is Wondershare Filmora as Filmora has a wide range of special effects and animations. Filmora is a professional video editor where you can perform all basic as well as advanced video editing work. Most importantly, Filmora comes with an intuitive user interface so that even amateurs can use it easily.
There are several ways you can change background color in your video. For example, you can remove background color even when you do not have a solid color. If your video has a solid color, you can change background color to any color or graphical element using Chroma key. Here are the steps to change background color in Filmora .
Free Download For Win 7 or later(64-bit)
Free Download For macOS 10.14 or later
Step1 Download and install Filmora and it is available for Windows and Mac. Launch Filmora and click on New Project.

Step2 Import your video under Project Media folder and drag and drop into Timeline.
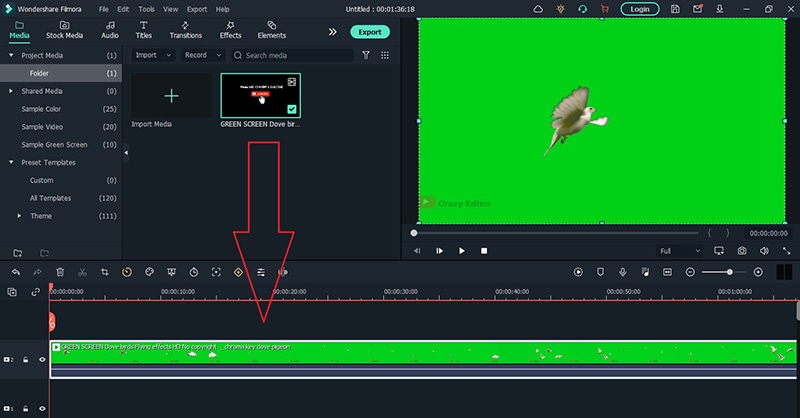
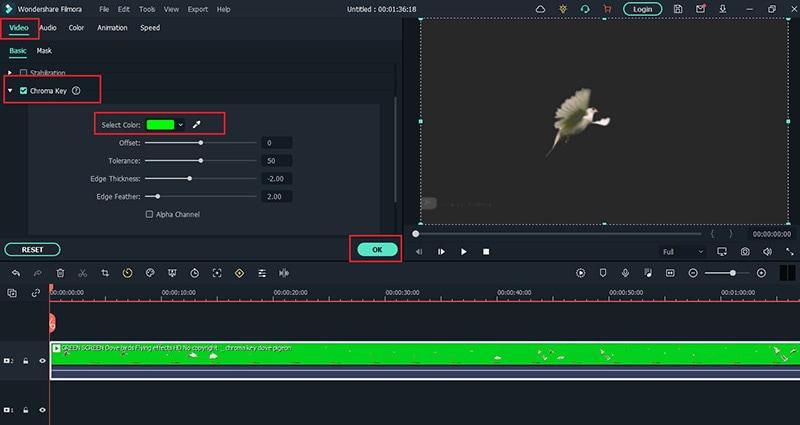
Step3 Double-click on the video clip and go to Video tab and turn on Chroma Key option. Select the solid color present in the background of the video and click on Ok button.
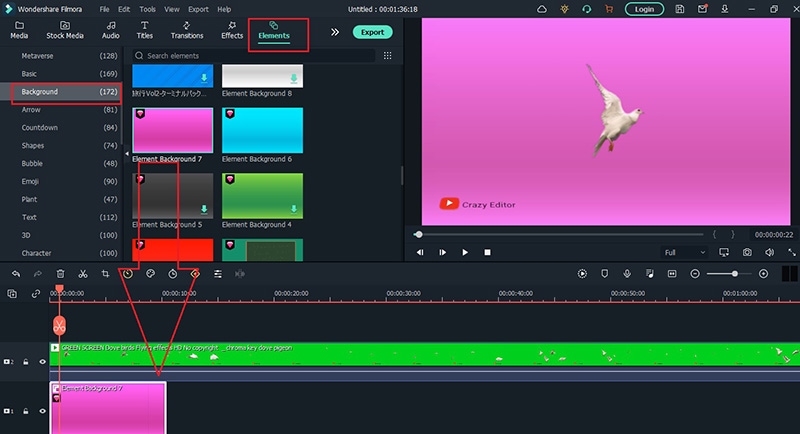
Step4 You will see the background color of the video disappear. Go to Elements> Background and drag and drop any background into Timeline. Make sure it is placed below the video clip and extend the duration of the background color as per your requirements.
Step5 Finally, play the video and click on Export button to save the video.
Part 3. FAQs about Video Background Colors
1. How do I remove background color in After Effects?
Import your video clip with a solid background color and place it on Timeline. Go to Effect menu> Keying> Keylight option. In Effects window and under Keylight, you will see Screen Colour option. Click on the eyedropper icon and select the background color you want to remove.
2. How do I change a solid background in After Effects?
The steps for After Effects how to change background color solid involve removing the background color and adding a layer of solid color to replace the transparency of the video. Go to Layer> New> Solid. Under Solid Settings window, go to Color and select the desired color from Color option and click on OK button. The new color will get reflected in the background of the video.
3. How do you add a white background in After Effects?
Go to Layer> New> Solid and add a white color solid first. However, this white color layer will not be visible unless you turn the background of your video transparent. Go to Effects & Presets and search for Luma Key and drop Luma Key on your video. Set Key type as Brighter and the threshold of the Lema key as per suitability on your video to see the white background appear.
Free Download For macOS 10.14 or later
Step1 Download and install Filmora and it is available for Windows and Mac. Launch Filmora and click on New Project.
Step2 Import your video under Project Media folder and drag and drop into Timeline.
Step3 Double-click on the video clip and go to Video tab and turn on Chroma Key option. Select the solid color present in the background of the video and click on Ok button.
Step4 You will see the background color of the video disappear. Go to Elements> Background and drag and drop any background into Timeline. Make sure it is placed below the video clip and extend the duration of the background color as per your requirements.
Step5 Finally, play the video and click on Export button to save the video.
Part 3. FAQs about Video Background Colors
1. How do I remove background color in After Effects?
Import your video clip with a solid background color and place it on Timeline. Go to Effect menu> Keying> Keylight option. In Effects window and under Keylight, you will see Screen Colour option. Click on the eyedropper icon and select the background color you want to remove.
2. How do I change a solid background in After Effects?
The steps for After Effects how to change background color solid involve removing the background color and adding a layer of solid color to replace the transparency of the video. Go to Layer> New> Solid. Under Solid Settings window, go to Color and select the desired color from Color option and click on OK button. The new color will get reflected in the background of the video.
3. How do you add a white background in After Effects?
Go to Layer> New> Solid and add a white color solid first. However, this white color layer will not be visible unless you turn the background of your video transparent. Go to Effects & Presets and search for Luma Key and drop Luma Key on your video. Set Key type as Brighter and the threshold of the Lema key as per suitability on your video to see the white background appear.
Record Slow Motion Videos With Phantom Slow-Mo Camera
In the media industry, you can find many professional and high-end cameras. Such cameras use advanced mechanisms to create slow-motion videos. Moreover, they capture natural colors and shades in the video with precision. Phantom slow-mo cameras are one of the prominent examples of the industry’s leading camera brand. To learn more about this camera brand, this article will consist of all the details.
With a Phantom slow-motion camera, you can get high-resolution results. Through this guide, you can discover a detailed analysis of the Phantom slo-mo camera. Also, we will suggest an affordable alternative that can make slow-motion videos efficiently.
Slow Motion Video Maker Slow your video’s speed with better control of your keyframes to create unique cinematic effects!
Make A Slow Motion Video Make A Slow Motion Video More Features

Part 1: What Do You Know About Phantom Camera Company?
Vision Research manufactures a Phantom camera that can be used in many professional fields. This company first came into being in 1950 by the name of “Photographic Analysis Company .”During the initial years, the company produced many cameras that could tackle the need for high-speed photography. However, in 1992, the company decided to create a separate entity to create high-speed cameras that wouldn’t depend on photographic film for imaging.
The US Patent Office acknowledged the use of innovative technology in the Phantom high-speed cameras. The main aim of this company is to produce robust cameras that can capture faster frame rates in high-speed photography. Many industries like defense, academia, and science research use Phantom slow-motion cameras. They are used in microfluidics, transparent flows, imaging, etc.
Part 2: Best Phantom Slow Motion Camera To Try
Phantom offers many slow-motion cameras with different features. This section will list down some of the best Phantom slow-motion cameras with pricing:
- TMX 7510
- T – Series T4040
- Machine Vision S200
- VEO 710
- Micro C and N C321
- 4K and Media Production Flex4K
1. TMX 7510
The TMX 7510 is built to produce high-end videos with different speed combinations. It uses a side-illuminated camera sensor to capture high-definition images. It can deliver 75,000 FPS with 1280 x 800 resolution. It offers up to 512GB RAM to help in making high-speed images. You can use its built-in Binning Mode with flexible options. It also supports many file formats like Cine RAW, TIFF, JPEG, etc.

2. T – Series T4040
The T-Series of Phantom includes many features to capture images with precision. The T4040 camera supports 9,350 fps with 2560 x 1664 resolution. It offers a peak Quantum Efficiency rating of 90% that can produce images in low-light conditions. Moreover, this Phantom slow-motion camera uses flow visualization techniques to capture minute details with high precision. It also offers EDR that balances exposure in the saturated areas of the image.

3. Machine Vision S200
This machine vision camera applies CXP technology to capture long-duration high-speed photos. It includes GPIO for events and ready signals. It’s economical and available in a compact size. Users can also use the time stamp on the frame to check the time code. Moreover, it can reach up to 6,950 fps with full resolution. You can trigger the recording with the given software or the GPIO trigger signal.

4. VEO 710
VEO series are specifically designed for film production and science laboratories. It has 7,400fps with a 1-Mpx 35mm sensor. The sensor format used in this camera is ideal for high-quality camera lenses. There are two options for the VEO body: S (full) and L (light). By purchasing the S model, you can experience many on-camera controls. Moreover, the body of this camera is made with aluminum to increase its reliability in tougher situations.

5. Micro C and N C321
The Micro C and N series are built to meet the challenges of using a standard camera. The lightweight body and on-board protection make this camera ideal. It supports a maximum fps of 1480 with full resolution. With high sensitivity, it can capture low-noise images with vibrant colors. The advanced features of this camera can provide high-end images while preserving the natural colors.

6. 4K and Media Production Flex4K
For professional cinema, Phantom has developed the Flex4k camera. This Phantom slo-mo camera supports 4K imaging with up to 1,000 fps. It provides three battery mounts with an on-camera menu system. The produced images are compatible with many color grading and video editing tools. Furthermore, it offers many remote-control options to ease your workflow. All the images that are produced will be delivered in the Cine RAW file format.

Part 3: No Phantom Camera? Still, Create a Slow Motion Video
Are you unable to buy a Phantom slow-mo camera? No worries, as Filmora can help you generate slow-motion videos with a normal camera. After recording a video from any standard device, you can add slow-motion effects with this tool. It provides a speed ramping feature that allows you to manage the speed of your video. It contains 6 speed ramping templates that you can try for professional purposes. Moreover, it provides a drag-and-drop interface to provide you with robust controls.
Filmora can make any ordinary video look cinematic. You can incorporate special backgrounds in your video without using a green screen. Furthermore, it can remove all the production flaws from your video within a few taps.
Free Download For Win 7 or later(64-bit)
Free Download For macOS 10.14 or later
Instructions to Produce Slow Motion Video With Speed Ramping
This part of the guide will include all the basic steps to make slow-motion videos . Thus, follow the steps mentioned below:
Step 1Import the Video File
Start by launching Filmora on your desktop. Select “New Project” to open its interface. Once done, press “Ctrl + I” to import the preferred video file.

Step 2Select Speed Ramping
Once done by dragging it to the timeline, right-click on it to open a pop-up menu. Select “Speed” and then choose “Speed Ramping”. From the right panel, you can manage the speed ramping settings.

Step 3Adjust the Speed Settings
Select “Customize” for the preset and scroll a little bit. Here, you can adjust the pointers by using the cursor for speed modification. By dragging the point downwards, you will decrease the speed. In contrast, moving the points upwards will increase the speed.

Step 4Generate Final Results
Navigate into the “AI Frame Interpolation” section to smoothen the effect. From there, select “Optical Flow” to create a slow-motion effect of the best quality. To see the results, choose the “Render Preview” option given on the toolbar of the timeline. After modifying the video, save and export the results.

Key Features of Wondershare Filmora
Auto Reframe: This feature adjusts the aspect ratio of a video in an automated manner. You can make your video vertical for TikTok and YouTube Shorts. In a similar way, it can make videos horizontal to fit to Instagram.
AI Audio Denoise: The AI audio denoise feature is designed to remove specific voices from your video. You can try its AI voice enhancement option to make the vocals prominent. Moreover, it can remove reverb and hiss sounds from the audio in a natural way.
AI Smart Cutout: To remove unnecessary objects from the video, try its AI Smart Cutout feature. After selecting the area, it offers four preview modes. By using these modes, you can make adjustments according to the background.
Color Correction: Filmora provides more than 40 presets for color schemes. You can access the color correction settings to make manual changes. Moreover, you can apply advanced color tuning to adjust the colors of the video deeply.
Conclusion
Phantom slow-motion cameras offer great high-speed image details. The cameras of this brand produce high-definition results with advanced features. However, it cannot be affordable or accessible for many users. Therefore, Filmora is the best choice for students and beginners. With this software, you can make slow-motion videos in a cost-effective manner.
Make A Slow Motion Video Make A Slow Motion Video More Features
Part 1: What Do You Know About Phantom Camera Company?
Vision Research manufactures a Phantom camera that can be used in many professional fields. This company first came into being in 1950 by the name of “Photographic Analysis Company .”During the initial years, the company produced many cameras that could tackle the need for high-speed photography. However, in 1992, the company decided to create a separate entity to create high-speed cameras that wouldn’t depend on photographic film for imaging.
The US Patent Office acknowledged the use of innovative technology in the Phantom high-speed cameras. The main aim of this company is to produce robust cameras that can capture faster frame rates in high-speed photography. Many industries like defense, academia, and science research use Phantom slow-motion cameras. They are used in microfluidics, transparent flows, imaging, etc.
Part 2: Best Phantom Slow Motion Camera To Try
Phantom offers many slow-motion cameras with different features. This section will list down some of the best Phantom slow-motion cameras with pricing:
- TMX 7510
- T – Series T4040
- Machine Vision S200
- VEO 710
- Micro C and N C321
- 4K and Media Production Flex4K
1. TMX 7510
The TMX 7510 is built to produce high-end videos with different speed combinations. It uses a side-illuminated camera sensor to capture high-definition images. It can deliver 75,000 FPS with 1280 x 800 resolution. It offers up to 512GB RAM to help in making high-speed images. You can use its built-in Binning Mode with flexible options. It also supports many file formats like Cine RAW, TIFF, JPEG, etc.
2. T – Series T4040
The T-Series of Phantom includes many features to capture images with precision. The T4040 camera supports 9,350 fps with 2560 x 1664 resolution. It offers a peak Quantum Efficiency rating of 90% that can produce images in low-light conditions. Moreover, this Phantom slow-motion camera uses flow visualization techniques to capture minute details with high precision. It also offers EDR that balances exposure in the saturated areas of the image.
3. Machine Vision S200
This machine vision camera applies CXP technology to capture long-duration high-speed photos. It includes GPIO for events and ready signals. It’s economical and available in a compact size. Users can also use the time stamp on the frame to check the time code. Moreover, it can reach up to 6,950 fps with full resolution. You can trigger the recording with the given software or the GPIO trigger signal.
4. VEO 710
VEO series are specifically designed for film production and science laboratories. It has 7,400fps with a 1-Mpx 35mm sensor. The sensor format used in this camera is ideal for high-quality camera lenses. There are two options for the VEO body: S (full) and L (light). By purchasing the S model, you can experience many on-camera controls. Moreover, the body of this camera is made with aluminum to increase its reliability in tougher situations.
5. Micro C and N C321
The Micro C and N series are built to meet the challenges of using a standard camera. The lightweight body and on-board protection make this camera ideal. It supports a maximum fps of 1480 with full resolution. With high sensitivity, it can capture low-noise images with vibrant colors. The advanced features of this camera can provide high-end images while preserving the natural colors.
6. 4K and Media Production Flex4K
For professional cinema, Phantom has developed the Flex4k camera. This Phantom slo-mo camera supports 4K imaging with up to 1,000 fps. It provides three battery mounts with an on-camera menu system. The produced images are compatible with many color grading and video editing tools. Furthermore, it offers many remote-control options to ease your workflow. All the images that are produced will be delivered in the Cine RAW file format.
Part 3: No Phantom Camera? Still, Create a Slow Motion Video
Are you unable to buy a Phantom slow-mo camera? No worries, as Filmora can help you generate slow-motion videos with a normal camera. After recording a video from any standard device, you can add slow-motion effects with this tool. It provides a speed ramping feature that allows you to manage the speed of your video. It contains 6 speed ramping templates that you can try for professional purposes. Moreover, it provides a drag-and-drop interface to provide you with robust controls.
Filmora can make any ordinary video look cinematic. You can incorporate special backgrounds in your video without using a green screen. Furthermore, it can remove all the production flaws from your video within a few taps.
Free Download For Win 7 or later(64-bit)
Free Download For macOS 10.14 or later
Instructions to Produce Slow Motion Video With Speed Ramping
This part of the guide will include all the basic steps to make slow-motion videos . Thus, follow the steps mentioned below:
Step 1Import the Video File
Start by launching Filmora on your desktop. Select “New Project” to open its interface. Once done, press “Ctrl + I” to import the preferred video file.
Step 2Select Speed Ramping
Once done by dragging it to the timeline, right-click on it to open a pop-up menu. Select “Speed” and then choose “Speed Ramping”. From the right panel, you can manage the speed ramping settings.
Step 3Adjust the Speed Settings
Select “Customize” for the preset and scroll a little bit. Here, you can adjust the pointers by using the cursor for speed modification. By dragging the point downwards, you will decrease the speed. In contrast, moving the points upwards will increase the speed.
Step 4Generate Final Results
Navigate into the “AI Frame Interpolation” section to smoothen the effect. From there, select “Optical Flow” to create a slow-motion effect of the best quality. To see the results, choose the “Render Preview” option given on the toolbar of the timeline. After modifying the video, save and export the results.
Key Features of Wondershare Filmora
Auto Reframe: This feature adjusts the aspect ratio of a video in an automated manner. You can make your video vertical for TikTok and YouTube Shorts. In a similar way, it can make videos horizontal to fit to Instagram.
AI Audio Denoise: The AI audio denoise feature is designed to remove specific voices from your video. You can try its AI voice enhancement option to make the vocals prominent. Moreover, it can remove reverb and hiss sounds from the audio in a natural way.
AI Smart Cutout: To remove unnecessary objects from the video, try its AI Smart Cutout feature. After selecting the area, it offers four preview modes. By using these modes, you can make adjustments according to the background.
Color Correction: Filmora provides more than 40 presets for color schemes. You can access the color correction settings to make manual changes. Moreover, you can apply advanced color tuning to adjust the colors of the video deeply.
Conclusion
Phantom slow-motion cameras offer great high-speed image details. The cameras of this brand produce high-definition results with advanced features. However, it cannot be affordable or accessible for many users. Therefore, Filmora is the best choice for students and beginners. With this software, you can make slow-motion videos in a cost-effective manner.
Adding a Spooky Shadow Effect with Filmora
Wondershare Filmora’s main purpose is the empowerment of content creators. The latest updates to the program are one of the pieces of evidence.
Whether you’re a horror content creator or simply living the Halloween vibe 24/7, continue reading to know how to use its latest masking feature to create a cool shadow effect for your next mind-blowing social media video.
How to Use The Masking Effect
Wondershare Filmora’s latest Masking feature allows its users to select a specific clip that they can overlay on other parts of the video or other clips.
Free Download For Win 7 or later(64-bit)
Free Download For macOS 10.14 or later
The feature allows you to insert the mask in any shape, such as a rectangle, circle, or triangle. You can also import any shapes you like if you can’t find them in the presets library. You can also adjust the mask placement, width, height, and feather effect.
Without further ado, let’s see the detailed step-by-step guide for this effect.
a. Preparation
You will need at least three shots of the same frame to get the shadow effect to work. The first is the main video, the second is the shadow clip, and the last would be a clip portraying just a plain background.
Make sure that your camera stays at the same point and angle. You can use a tripod for assurance.
Take the first main video and don’t forget to mark the positioning of the object for the next take. Then, you can shoot the shadow clip following the marking of the object to match its position in the main clip.
Finally, shoot the final clip without the object on the frame.

b. Steps to add the shadow effect to your videos using Masking
Step 1: Place the main clip on the timeline and find the start of the segment that you want to use. Press M on the keyboard to set a marker.

Step 2: Place the shadow clip on top of the main clip on the timeline. Trim and adjust until the shadow clip ends right at the marker of the main clip.

Step 3: Move the play head to the start of the shadow clip. Trim the main clip right on that mark so both clips have the same start by clicking the scissor icon and deleting the unused part.

Step 4: Double-click the shadow clip. OpenSettings > Mask Section > Rectangle to apply the mask. Adjust the blur strength to smooth out the edge.

Step 5: Play the result to see if there’s any part you need to block out. When you find them, repeat steps 1 to 4 but with the background clip. Try to conceal all things you need to hide using the masks. Make sure that you get the timings right.

Step6 Trim the length of the masking clips to match the main clip by sliding the play head and clicking the Split button.
Adjust the audio and preview the effect before you save the result. You can also add extra features like slow motion for maximum effect.

Summary
It is so easy to use this shadow effect on your video using Wondershare Filmora. The handy masking feature also comes with additional keyframe control and easy composite adjustment.
Wondershare Filmora is also packed with other powerful new features. This includes Auto Beat Sync, Speed Ramping, Quick Split Mode, and the upgraded Denoise feature. Update today to add more quirk to your content.
Free Download For macOS 10.14 or later
The feature allows you to insert the mask in any shape, such as a rectangle, circle, or triangle. You can also import any shapes you like if you can’t find them in the presets library. You can also adjust the mask placement, width, height, and feather effect.
Without further ado, let’s see the detailed step-by-step guide for this effect.
a. Preparation
You will need at least three shots of the same frame to get the shadow effect to work. The first is the main video, the second is the shadow clip, and the last would be a clip portraying just a plain background.
Make sure that your camera stays at the same point and angle. You can use a tripod for assurance.
Take the first main video and don’t forget to mark the positioning of the object for the next take. Then, you can shoot the shadow clip following the marking of the object to match its position in the main clip.
Finally, shoot the final clip without the object on the frame.
b. Steps to add the shadow effect to your videos using Masking
Step 1: Place the main clip on the timeline and find the start of the segment that you want to use. Press M on the keyboard to set a marker.
Step 2: Place the shadow clip on top of the main clip on the timeline. Trim and adjust until the shadow clip ends right at the marker of the main clip.
Step 3: Move the play head to the start of the shadow clip. Trim the main clip right on that mark so both clips have the same start by clicking the scissor icon and deleting the unused part.
Step 4: Double-click the shadow clip. OpenSettings > Mask Section > Rectangle to apply the mask. Adjust the blur strength to smooth out the edge.
Step 5: Play the result to see if there’s any part you need to block out. When you find them, repeat steps 1 to 4 but with the background clip. Try to conceal all things you need to hide using the masks. Make sure that you get the timings right.
Step6 Trim the length of the masking clips to match the main clip by sliding the play head and clicking the Split button.
Adjust the audio and preview the effect before you save the result. You can also add extra features like slow motion for maximum effect.
Summary
It is so easy to use this shadow effect on your video using Wondershare Filmora. The handy masking feature also comes with additional keyframe control and easy composite adjustment.
Wondershare Filmora is also packed with other powerful new features. This includes Auto Beat Sync, Speed Ramping, Quick Split Mode, and the upgraded Denoise feature. Update today to add more quirk to your content.
Also read:
- New Tutorial How To Add Motion Blur in Blender for 2024
- Updated In 2024, Are You Looking for Funny Discord Emojis to Massively Improve Your Discord Experience? Using some Fun Bots for Discord Is an Excellent Way of Doing That! Thus, We Compiled a List of 10 Fun Discord Bots You Need
- New In 2024, Best Cloud Storage Service for Videos
- New 2024 Approved Have You Ever Wondered How to Add Camera Shake to Video in Adobe After Effects? Let Us Share with You some Tips and Tricks on How to Do Just That
- New Find Out What Ray Tracing Is in After Effects, How It Works, and Learn About Ray-Traced 3D Settings with Simple Instructions
- New In 2024, Best Ways to Blur Zoom Background for Free
- New How to Add Subtitles to MKV Videos on All Platforms
- New What Slideshow Templates Teach You About Aesthetic for 2024
- Updated Best Slow Motion Camera Apps for Best Content Creation for 2024
- Updated Easy Way to Create a DIY Green Screen Video Effect for 2024
- If You Are a Teacher or People Who Want to Share Their Ideas via Vides, You Can Always Make It on Your Own. This Article Will Share You 7 Tips to Create an Educational Video Easily
- 2024 Approved Scaling and Setting Videos in Filmora | Tutorial
- New Learning How to Slow Down a Video on iPhone Properly for 2024
- New What Are the Best Video Background Changers Online?
- Let Us Help You with Something that You Might Not Know. Have You Ever Worked with MOV File Format Before? Or Do You Know What that Is? Lets Talk About It
- Updated 8 Free Title Makers to Use
- In 2024, 7 Best MP4 Video Editors on Mac Edit MP4 Videos Easily
- Updated 2024 Approved The Most Complete Guide to Make Fortnite Montage
- Updated Best Ways to Add Photos to Tik Tok Video for 2024
- 2024 Approved 8 Best Video Editor with Useful Masking
- Want to Explore the Exciting World of GIFs? Here Is Everything You Will Ever Want to Know and Learn About the Most Appealing GIF Libraries, All at Once Place
- How to Find iSpoofer Pro Activation Key On Realme 12 Pro+ 5G? | Dr.fone
- How to Recover Deleted Photos from Android Gallery App on 13T
- 8 Solutions to Fix Find My Friends Location Not Available On Motorola Moto G04 | Dr.fone
- In 2024, How does the stardust trade cost In pokemon go On Vivo V27 Pro? | Dr.fone
- Reliable User Guide to Fix Asus ROG Phone 8 Running Slow and Freezing | Dr.fone
- In 2024, The Ultimate Guide to Get the Rare Candy on Pokemon Go Fire Red On Tecno Spark 20 Pro+ | Dr.fone
- In 2024, How to Sign Out of Apple ID On Apple iPhone 12 Pro without Password?
- Why is iPogo not working On Vivo S18e? Fixed | Dr.fone
- How to Fix Pokemon Go Route Not Working On Apple iPhone 6s Plus? | Dr.fone
- Why is iPogo not working On Vivo T2 Pro 5G? Fixed | Dr.fone
- How to Track Apple iPhone XS Location without Installing Software? | Dr.fone
- How to Hard Reset Honor X9b Without Password | Dr.fone
- Sim Unlock Oppo A78 5G Phones without Code 2 Ways to Remove Android Sim Lock
- In 2024, Does PokeGo++ still work on Apple iPhone 13 Pro/iPad? | Dr.fone
- 2024 Approved Learn All About 3D Logo Animation and Templates
- 3 Methods to Mirror Honor Play 40C to Roku | Dr.fone
- New Easy Tutorial How to Record and Send Talking Emoji for iPhone for 2024
- Full Guide on Mirroring Your Samsung Galaxy S24+ to Your PC/Mac | Dr.fone
- Title: New Are You Looking to Store Your Videos Securely and Efficiently? Look No Further than Our Top Pick for the Best Cloud Storage Service for Videos for 2024
- Author: Morgan
- Created at : 2024-04-24 01:08:30
- Updated at : 2024-04-25 01:08:30
- Link: https://ai-video-editing.techidaily.com/new-are-you-looking-to-store-your-videos-securely-and-efficiently-look-no-further-than-our-top-pick-for-the-best-cloud-storage-service-for-videos-for-2024.m/
- License: This work is licensed under CC BY-NC-SA 4.0.
