
New Best Online YouTube Video Trimmer
Best Online YouTube Video Trimmer
Since the shift in interest from on-site jobs to content creators and exploring opportunities to take advantage of better and improved career growth opportunities, YouTube is one of the most popular social media platforms to get started.
But how do people face difficulties in finding an affordable and quick online YouTube video trimmer? Are you also facing issues with trimming your video before uploading it to get more views?
This is an ultimate guide on online YouTube video trimmer software and how you can trim your YouTube videos in no time.
Part 1. What is a YouTube trimmer?
Before diving into any details, it is important to introduce you to what is a YouTube trimmer and why it is important to trim your video. A YouTube trimmer is an easy and fast video editing tool that allows you to trim, crop, and share your favorite video parts online. You can also create custom links to YouTube Crops to embed on your website.
There are two popular online YouTube trimmers available; one only allows you to edit the YouTube link, which means you can only view the edited video online, while the other allows you to do related operations on the video file and download and save it as an mp4 or other file type for offline viewing.
Part 2. How to online trim YouTube videos?
1. Online YouTube trimmer (no edit and download)
Using these two websites, you can easily find the YouTube video clip you want to keep, but there is no way to download the video or add more editing to the clip. However, it works well for sharing links online or adding them to your website and using them to describe the part that best fits the topic.
The straightforward interface has just one function. Enter the start and end times in the box after entering the right YouTube link, then click “Crop!” to create a string of links.

The video’s beginning and ending times are selected in the same way as on the previous website. However, this website offers some basic code that you may copy and paste into your web pages to suit your demands in order to add YouTube videos.

Once you are done trimming your videos, you can download or export your videos in different formats, depending on your preference. It can be in mp4, mp3, or any other supported format.
2. Online YouTube trimmer (edit and download)
The websites that are listed after that combine an online YouTube downloader with a video editor, allowing you to make a variety of further edits to the selected video clip before downloading it locally.
- Veed.io :
Anyone can make powerful videos and expand their audiences thanks to the online video editing application Veed. It has some useful capabilities, such as the capacity to cut videos and filter them using different aesthetics. Users can crop, add text, make drawings, and even add photos to the movies. In addition, Veed serves as a tool for producing social media films that may be customized for each channel where they will be shared.
Additionally, they are free to play with various tools like rotate, trim, add photos, stickers, emojis, and more. Through the program, users may even create video memes online by uploading a target movie, modifying it using a variety of features, and downloading the altered video after a brief rendering.
Step1Launch veed.io on your web browser. Click on ‘Upload Your Video‘ to upload the video file you want to edit.
Step2You will notice a button to upload your media file once you are taken to the editing page.

Step3You can trim your video section by dragging the mark after you’ve uploaded the media file.


Step4Now, delete the unwanted video segment and click on ‘Export’ to save the trimmed video.
- Kapwing :
An effective, non-linear editing workflow is supported by the online video editor Kapwing. Upload your audio, video, and image files, then edit everything in one location. Since Kapwing is entirely online, content creators may access and edit their work from any computer or mobile device.
Step1Launch Kapwing.com on your web browser. If you are not directed to the trim video section, then go to the ‘Tools‘ menu and select ‘Trim Video‘. Now, click on ‘Choose a Video.’
Step2From the main page, click ‘Click to upload’ to upload the media file.

Step3After uploading the media file, Click on ‘Trim’ from the editing section on the right side of the screen.

Step4A pop-up screen will appear on your screen labeled as Trim Video. Trim the parts of the video as per your requirement and Click ‘Trim’ to finish.

Step5Once you have completed editing, click on ‘Export’ to save the video to your device.
Part 3. How to trim YouTube videos on a desktop?
Using an online video trimmer has been one of the last options that anyone would consider, but due to the expensive software, they have turned out to be a friendly and easy approach to editing videos. But the online video trimmers still rank at the bottom of the list because they’re unstable, and you can’t save the project at any time. If the online program breaks down, all your effort will be wasted. But desktop programs such as Filmora will never make you encounter such problems unless you experience a technical glitch.
With the help of a variety of strong editing tools and Wondershare Filmora , users may quickly and easily make outstanding videos. With Wondershare Filmora, anyone can learn how to be an excellent video editor, thanks to its wonderfully simple design.
You can follow these easy steps to trim your video:
Step1Click “Import” on the main windows and then select the desired video files from your computer to add video files to the Timeline for cutting. Movies can also be dropped directly into the Media Library.

Step2By moving the playhead over the unwanted section and choosing the trash can icon, you can delete it.

Step3When you’re through trimming, click “Export”, then select a location to store the edited video.
Conclusion
Depending on the comparison of how different software work, it is justifiable to conclude that Filmora is the best video editing software by all means. It offers a wide range of editing tools and ensures that progress has not been lost. If you are looking forward to trimming a video, download Filmora on your device to get started.
Free Download For Win 7 or later(64-bit)
Free Download For macOS 10.14 or later
Free Download For macOS 10.14 or later
How to Make Vintage Film Effect 1980S
The 1980s is widely regarded as the golden era of music and film-making. If you play a video recorded in the 80s, you’ll notice graininess, blurriness, and light exposure, giving the footage a dreamy vintage touch. So, in this short tutorial, we’ll learn how to create a vintage 1980-style video with a retro effect that will leave your audience yearning for more.
Preparation

In this tutorial, you’ll need at least two video clips. First, take clear footage of a hoop dancer playing to music and a disco ball footage that you’ll add to the background. You can also add another footage to give your dancing video the perfect transition.
How to create a retro-style music video shot in the 80s:
Step1 Import the video clips on Filmora
Free Download For Win 7 or later(64-bit)
Free Download For macOS 10.14 or later

First, run Wondershare Filmora and add the video with the hoop dancer on the first track. Then, move the disco ball footage right above the first video track.
Step2 Add an animation keyframe

With the two videos imported on Filmora, move the playhead to the point where the hoop dancer begins to dance and double-click the disco ball footage.

Now find the Animation tab, then click the Customize tab. Next, click Add to apply a keyframe to this point of the video. Don’t stop there. Move the playhead to the right and add another keyframe to the footage before changing the opacity to 50%.

Meanwhile, we’ll add a keyframe to the third video with a lady removing her sunglasses. To do that, add the footage to the third track, then double-click the video track. After that, place the playhead at the start of the video and apply an animation keyframe before changing the opacity to 0%. Move the playhead a few keyframes forward and add another animation keyframe.
Step3 Add retro filters and effects to the video

Go to the Effect tab and choose Overlay. Once that is done, select the TV Static option before choosing the VHS Distortion effect. This effect will give your video the retro feeling of the 1980s. Don’t be afraid to try out the TV Static effects to find what works best in your video.
Summary
Creating a retro-style 1980s film is as easy as pie with Wondershare Filmora. You can also check out more 80s-inspired video effects on Wondershare’s Filmstock library. Ready to go back to the 80s? Hope so!
Free Download For macOS 10.14 or later
First, run Wondershare Filmora and add the video with the hoop dancer on the first track. Then, move the disco ball footage right above the first video track.
Step2 Add an animation keyframe
With the two videos imported on Filmora, move the playhead to the point where the hoop dancer begins to dance and double-click the disco ball footage.
Now find the Animation tab, then click the Customize tab. Next, click Add to apply a keyframe to this point of the video. Don’t stop there. Move the playhead to the right and add another keyframe to the footage before changing the opacity to 50%.
Meanwhile, we’ll add a keyframe to the third video with a lady removing her sunglasses. To do that, add the footage to the third track, then double-click the video track. After that, place the playhead at the start of the video and apply an animation keyframe before changing the opacity to 0%. Move the playhead a few keyframes forward and add another animation keyframe.
Step3 Add retro filters and effects to the video
Go to the Effect tab and choose Overlay. Once that is done, select the TV Static option before choosing the VHS Distortion effect. This effect will give your video the retro feeling of the 1980s. Don’t be afraid to try out the TV Static effects to find what works best in your video.
Summary
Creating a retro-style 1980s film is as easy as pie with Wondershare Filmora. You can also check out more 80s-inspired video effects on Wondershare’s Filmstock library. Ready to go back to the 80s? Hope so!
Add Green Screen Video on TikTok
TikTok is the most popular platform for making short videos. You can create creative short videos and upload to TikTok so that they can entertain your followers and make your videos go viral. To add variety to your video content, the use of green screen in short videos is a great idea. You can replace the green screen with any background in your TikTok video. You need to know how to add green screen video on TikTok.
Adding green screen on TikTok videos has become a trend now as there are several green screen TikTok videos that have gone viral. In fact, creative green screen videos are extremely popular on social media platforms. Instead of replacing the green screen in your video with a single photo, you can replace it with multiple pictures on TikTok. We will illustrate how to add multiple pictures on TikTok green screen.
Part 1. How to Add Green Screen on TikTok?
To add green screen on TikTok video, you need to have a background of uniform color. It does not necessarily have to be a green screen. For example, if you are shooting a video of your legs and the floor tiles have uniform color, you can use green screen on TikTok to replace the tiles with any picture. Instead of using one picture on TikTok short video, you can use multiple pictures in the background to create stunning TikTok videos. Here are the steps on how to add multiple pictures to TikTok green screen.
Step1 Open TikTok app on your phone. Tap on Plus icon located at the bottom of the app screen to make a new video.
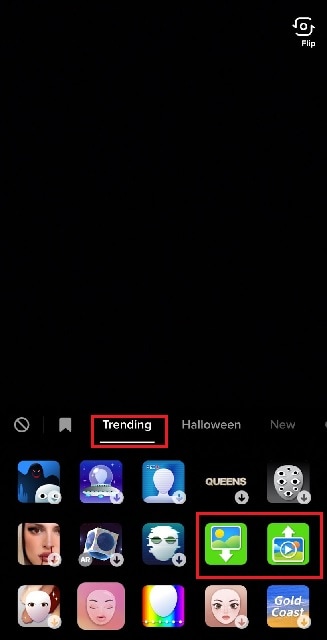
Step2 Choose the duration of the video as per your preference. Thereafter, tap on Effects option located at the bottom-left corner to see the different effects available on TikTok.
![]()
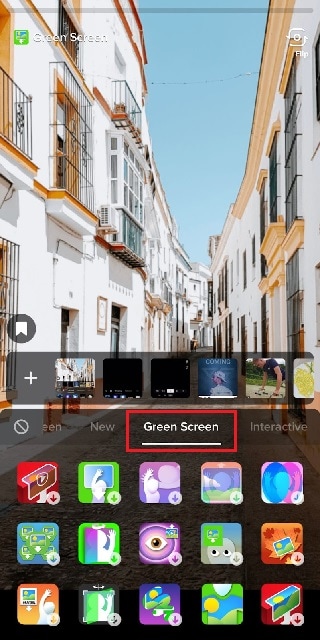
Step3 Go to Trending tab and you will see Green Screen and Green Screen Video icons. If you want your video to have green screen photo, tap on Green Screen icon. If you want your video to have green screen video, tap on Green Screen Video icon.
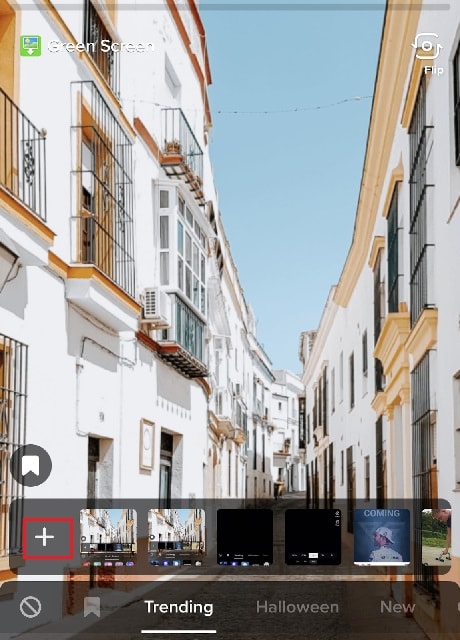
Step4 You will get a generic background and you can choose any preset background or select photo or video from your phone gallery by tapping on Plus icon. Once you are done, tap on Record button.
Step5 In order to use multiple pictures, you should stop recording in between and change your green screen image to anything you desire. Then tap on Record button again. TikTok will string your clips and it would appear that you have been changing multiple pictures of your background for your video.
If you want to experiment with green scree effects, you can scroll down after tapping on Green Screen icon under Effects. You will see different types of green screen videos possible on TikTok to choose from.
Part 2. Creative Ideas to Make TikTok Green Screen Video
Now that you know how to add a video on TikTok green screen, you have to make the most out of it. If you are wondering how you can use green screen in your TikTok videos, here are some creative ideas for you.
Walking Out Videos – You can use green screen effect to show that you are walking out of plane, walking vertically on the wall like inception, walking on the roof of a building. In fact, you can show that you are walking out of popular monuments and palaces and trick your viewers into thinking that you were actually there.
Photoshoot Location – Create a TikTok video showing your favorite locations across the world where you dream of doing photoshoot. You can pose differently and place the location in your background through green screen effect.
How-To Video – If your TikTok channel is about tutorial and learning videos, you can explain things better by putting screenshots and multiple relevant pictures in the background so that viewers can get a pictorial representation of what you are speaking to them.
Mystery Story – You can a create short video describing unknowing facts and mysteries around certain places in the world. You can put photos or video clips of those mysterious places in your background to keep your viewers hooked and related to your narration.
Rate Them Video – You can use green screen effect to showcase your old Instagram photos or videos and rate them. This is an extremely popular trend in TikTok where people show their old photos, display work from the past, and rate them today.
Reveal Your Creation – Share your secrets or interesting stories behind some of the photos or videos you took in the past. You can talk about how creatively you took certain photos and put those photos in the background while discussing them.
Part 3. How to Make Green Screen Video on Computer?
If you have a computer and a webcam, you can record a green screen video on your computer. You can place the green screen in the background perfectly and place the webcam so that the background stays within the green screen. You will need a video recorder and a video editor to make green screen video as well as replace the green screen with any photo or video. We recommend Wondershare Filmora where you can record as well as edit green screen video.
Filmora is a professional video editor where you can record your computer screen as well as your webcam video with green screen background in Picture-in-Picture mode. After recording the video, you can replace the green screen with any video clip or photo instantly in a few steps. You can also fine-tune green screen effect for perfection. Therefore, you can save the video in any resolution and file format as per your preference.

Free Download For Win 7 or later(64-bit)
Free Download For macOS 10.14 or later
Conclusion
Adding green screen effect on TikTok videos can make your videos stand out. We have illustrated how to add multiple green screen videos on TikTok and your videos will have a better chance of getting viral. Keep the green screen ideas in mind while making TikTok green screen videos. If you want to make and edit green screen videos on computer, Wondershare Filmora is the best application available for Windows and Mac users.
[Complete Guide 2024] A Review On 3D LUT Creator
We know the importance of color grading to improve the look and feel of your digital content. That’s why LUTs are essential, as they color-correct our media files. LUTs are pre-defined color transformations you can apply to your footage to achieve a specific aesthetic or mood. With LUTs, you can make your photos and videos look more cinematic, vibrant, or vintage, among other possibilities.
Besides this, your editing software also makes a huge difference. Therefore, use the 3D LUT Creator Pro tool for color correction and adjustments. It allows you to create custom LUTs and use pre-made LUTs from a vast library.
Part 1: Introduction to 3D LUTs Creator - How Is It Good in The LUTs Market
Lookup Tables (LUTs) are powerful tools that allow you to adjust and enhance the color and tone of your digital media. They are mathematical formulas that map the colors of your footage to new values to change the tone. Additionally, many LUTs are available for you to choose and use.
The options are endless, with so many options, from modern cinematic styles to vintage film looks. The content creators select from various LUTs to make their digital content look unique and professional.
Introducing 3D LUT Creator
3D LUT Creator is considered one of the best color grading and color correction tools. It helps you to create, adjust, and apply free 3D LUTs to your photos and videos. With this tool, you can get consistent color grading results, even when dealing with complex lighting situations. Besides LUTs, this tool offers other color correction features to make your content look unique.
Additionally, this professional tool offers plugins for multiple editing software. The integration helps with multiple tools, making your content look more professional. Furthermore, this tool has a store with different LUTs packs to download.

Empower your videos with a new mood using different LUTs. Filmora now offers 100+ top-quality 3D LUTs cover a broad range of scenarios. Transform your videos with Filmora’s powerful 3D LUTs.
Apply LUT on Videos Apply LUT on Videos Learn More


Part 2: Reviewing The Features of 3D LUT Creator
The 3D LUT Creator Pro is a tool packed with some amazing features for color correction to your digital media files. Some of the most prominent features related to 3D LUT Creator are discussed here.
- Plugins: This tool offers plugin support for different photo and video editing software. 3D LUT Creator free download is available for Premiere, DaVinci Resolve, Final Cut, and more. These plugins are available for both Mac and Windows.
- Colors of RGB Space: 3D LUT Creator has a great feature that changes your media file’s tone. The RGB feature allows you to toggle up and down or slide left and right to change the saturation and hue.
- Gradients: This amazing feature comes with seven color gradients to play with. You can use this feature to change and distribute these colors according to your preference. It also has a linear gradient for gray shades.
- Color Wheel: Another useful feature for color enhancement is the color wheel option. Its features can create a color scheme for you with its color matrix. Users can create their color scheme by changing and enhancing different colors.
- A/B Grid: It is another color correction option that you can use. This feature lets you change any color into a different one by changing hue and saturation.
- C/L Grids: This unique feature lets you set the tone of a specific color to your media file. It gives a particular color tint to your photos and videos.
- 2-D Curves: With this feature, you can change and modify the color toning of your images and videos. Moreover, you can play with the RGB wheel to give the desired color tone to your files.
- Volume: It is another impressive feature that allows you to adjust the brightness of your media content. Furthermore, you can highlight the subject in the image using this option.
- AI Retouch: AI Retouching plugin is a unique option that uses artificial intelligence to retouch and beautify your image. This option smoothens your skin and gives it a flawless look with no spots, dark circles, or blemishes.
Part 3: Testing The Advanced Functionalities of 3D LUT Creator
Apart from basic features, 3D LUT Creator is powered by advanced features. Here are some of the unique advanced features highlighted below.
- Complex Linear Gradient: One of the key features of 3D LUT Creator is the Complex Linear Gradient tool. The tool allows you to create complex color gradients with combinations. Moreover, you can even adjust RGB curves with this tool.
- Hald Images: 3D LUT Creator allows you to import and export Hald images, making working with other color grading software and tools easy. You can use these images to create complex color modifications and changes.
- Advanced Color Wheel: The Advanced Color Wheel is another powerful feature of 3D LUT Creator. It allows you to select and adjust colors in your digital media files. The wheel supports multiple color spaces for color correction, including RGB, HSL, and more.
- Technical 3D LUTs: Finally, 3D LUT Creator Pro includes a range of technical 3D LUTs. It can be used to adjust white balance and exposure composition. These LUTs are designed to help you achieve the perfect color and exposure balance in your images and videos.
Part 4: How to Utilize LUTs in Photoshop and 3D LUT Creator: Step-by-Step Guide
If you have trouble integrating this free 3D LUTs plugin with Photoshop, follow this guide. This step-by-step guide will navigate you and tell you how to use this tool in Photoshop.
Step 1Open The Tool to Integrate
The first step is to open the tool and click the File button after the tool is running. Once clicked, go to the Preference option to launch a new window.

Step 2Integrate the Photoshop
After selecting the integration option, a new window will pop up that allows you to select your Photoshop version. Make sure to use CS6 or newer versions to integrate the 3D LUT Creator to use color adjustment layers.
If you don’t find your version in the options, then you can choose the “Custom Photoshop” option and browse the path of your Photoshop.

Part 5: Top 3D LUTs Available in Store
The 3D LUT Creator is a professional tool with a LUT store on its website. This store has different LUT packs according to your style and taste. Download them and use them to make your content stand out from others.
1. GoPro LUTs Color Grading Pack
If you want to add a professional touch to your GoPro videos, the GoPro LUTs Color Grading Pack might be a good option. With over 50 LUTs, you can color impressively grade your videos. Furthermore, you can add warmth to your footage, enhance the contrast, or create a specific mood. The GoPro LUTs Color Grading Pack has a wide variety of options.

2. Psychedelia LUTs Pack
Give your photos and videos a unique and eye-catching look by trying out the Psychedelia LUTs Pack. This pack contains multiple LUTs that you can use for color correction and grading. The output results resemble infrared photography, giving your content a unique look. Moreover, these LUTs are perfect for enhancing your photos and videos on social media platforms like Instagram.

3. Winter Pack
Winter Pack is a LUT that you can use to give your media files a cold winter look. It highlights the color blue and gives a bluish tint to your media to make it look like it was shot during winter. Similarly, you can give your photos or videos a chilly and snowy appearance, perfect for winter-themed content. It is a simple and effective way to enhance the mood and atmosphere of your media files.

4. Zoan Cinematic Pack
Cinematic Pack lets you add a cinematic touch to your digital media files. This pack contains 8 LUTs that help you achieve a rich cinematic feel in your footage. It creates a dramatic look by darkening the colors and underexposing your photos and videos. With these LUTs, you can easily transform your digital media files to have a more cinematic feel.

5. Travel LUT Pack
Another amazing LUT pack that gives your photos and videos a more natural look is the Travel LUT Pack. It gives your media content a warm and natural look. These LUTs highlight the orange and brown colors to give your digital files a more earthy feel. Moreover, these LUTs add grains to your photos and videos for a perfect travel look.

Conclusion
In conclusion, LUTs are an essential tool in the editing process. They help you achieve consistent color grading across your footage or images, saving time and effort. LUTs allow you to easily apply specific color grading styles and look at your media. Furthermore, the 3D LUT Creator free download will let you edit LUTs and apply them to your Photoshop projects.
Try Filmora to apply 3D Luts on your video!
Add LUTs on Video For Win 7 or later(64-bit)
Add LUTs on Video For macOS 10.14 or later
Apply LUT on Videos Apply LUT on Videos Learn More
Part 2: Reviewing The Features of 3D LUT Creator
The 3D LUT Creator Pro is a tool packed with some amazing features for color correction to your digital media files. Some of the most prominent features related to 3D LUT Creator are discussed here.
- Plugins: This tool offers plugin support for different photo and video editing software. 3D LUT Creator free download is available for Premiere, DaVinci Resolve, Final Cut, and more. These plugins are available for both Mac and Windows.
- Colors of RGB Space: 3D LUT Creator has a great feature that changes your media file’s tone. The RGB feature allows you to toggle up and down or slide left and right to change the saturation and hue.
- Gradients: This amazing feature comes with seven color gradients to play with. You can use this feature to change and distribute these colors according to your preference. It also has a linear gradient for gray shades.
- Color Wheel: Another useful feature for color enhancement is the color wheel option. Its features can create a color scheme for you with its color matrix. Users can create their color scheme by changing and enhancing different colors.
- A/B Grid: It is another color correction option that you can use. This feature lets you change any color into a different one by changing hue and saturation.
- C/L Grids: This unique feature lets you set the tone of a specific color to your media file. It gives a particular color tint to your photos and videos.
- 2-D Curves: With this feature, you can change and modify the color toning of your images and videos. Moreover, you can play with the RGB wheel to give the desired color tone to your files.
- Volume: It is another impressive feature that allows you to adjust the brightness of your media content. Furthermore, you can highlight the subject in the image using this option.
- AI Retouch: AI Retouching plugin is a unique option that uses artificial intelligence to retouch and beautify your image. This option smoothens your skin and gives it a flawless look with no spots, dark circles, or blemishes.
Part 3: Testing The Advanced Functionalities of 3D LUT Creator
Apart from basic features, 3D LUT Creator is powered by advanced features. Here are some of the unique advanced features highlighted below.
- Complex Linear Gradient: One of the key features of 3D LUT Creator is the Complex Linear Gradient tool. The tool allows you to create complex color gradients with combinations. Moreover, you can even adjust RGB curves with this tool.
- Hald Images: 3D LUT Creator allows you to import and export Hald images, making working with other color grading software and tools easy. You can use these images to create complex color modifications and changes.
- Advanced Color Wheel: The Advanced Color Wheel is another powerful feature of 3D LUT Creator. It allows you to select and adjust colors in your digital media files. The wheel supports multiple color spaces for color correction, including RGB, HSL, and more.
- Technical 3D LUTs: Finally, 3D LUT Creator Pro includes a range of technical 3D LUTs. It can be used to adjust white balance and exposure composition. These LUTs are designed to help you achieve the perfect color and exposure balance in your images and videos.
Part 4: How to Utilize LUTs in Photoshop and 3D LUT Creator: Step-by-Step Guide
If you have trouble integrating this free 3D LUTs plugin with Photoshop, follow this guide. This step-by-step guide will navigate you and tell you how to use this tool in Photoshop.
Step 1Open The Tool to Integrate
The first step is to open the tool and click the File button after the tool is running. Once clicked, go to the Preference option to launch a new window.
Step 2Integrate the Photoshop
After selecting the integration option, a new window will pop up that allows you to select your Photoshop version. Make sure to use CS6 or newer versions to integrate the 3D LUT Creator to use color adjustment layers.
If you don’t find your version in the options, then you can choose the “Custom Photoshop” option and browse the path of your Photoshop.
Part 5: Top 3D LUTs Available in Store
The 3D LUT Creator is a professional tool with a LUT store on its website. This store has different LUT packs according to your style and taste. Download them and use them to make your content stand out from others.
1. GoPro LUTs Color Grading Pack
If you want to add a professional touch to your GoPro videos, the GoPro LUTs Color Grading Pack might be a good option. With over 50 LUTs, you can color impressively grade your videos. Furthermore, you can add warmth to your footage, enhance the contrast, or create a specific mood. The GoPro LUTs Color Grading Pack has a wide variety of options.
2. Psychedelia LUTs Pack
Give your photos and videos a unique and eye-catching look by trying out the Psychedelia LUTs Pack. This pack contains multiple LUTs that you can use for color correction and grading. The output results resemble infrared photography, giving your content a unique look. Moreover, these LUTs are perfect for enhancing your photos and videos on social media platforms like Instagram.
3. Winter Pack
Winter Pack is a LUT that you can use to give your media files a cold winter look. It highlights the color blue and gives a bluish tint to your media to make it look like it was shot during winter. Similarly, you can give your photos or videos a chilly and snowy appearance, perfect for winter-themed content. It is a simple and effective way to enhance the mood and atmosphere of your media files.
4. Zoan Cinematic Pack
Cinematic Pack lets you add a cinematic touch to your digital media files. This pack contains 8 LUTs that help you achieve a rich cinematic feel in your footage. It creates a dramatic look by darkening the colors and underexposing your photos and videos. With these LUTs, you can easily transform your digital media files to have a more cinematic feel.
5. Travel LUT Pack
Another amazing LUT pack that gives your photos and videos a more natural look is the Travel LUT Pack. It gives your media content a warm and natural look. These LUTs highlight the orange and brown colors to give your digital files a more earthy feel. Moreover, these LUTs add grains to your photos and videos for a perfect travel look.
Conclusion
In conclusion, LUTs are an essential tool in the editing process. They help you achieve consistent color grading across your footage or images, saving time and effort. LUTs allow you to easily apply specific color grading styles and look at your media. Furthermore, the 3D LUT Creator free download will let you edit LUTs and apply them to your Photoshop projects.
Try Filmora to apply 3D Luts on your video!
Add LUTs on Video For Win 7 or later(64-bit)
Add LUTs on Video For macOS 10.14 or later
Also read:
- [New] In 2024, Strategies to Have Your Video Embrace by Vimeo Experts
- [New] IPhone HDR Photography for Enthusiasts
- [New] Leading Edge Apps The Ultimate 10 for Real-Time Gymnastics and Hockey Games
- [Updated] 2024 Approved Elite Edits The Best Video Editors Ranked
- [Updated] Child's Play in the Sky Top Kid-Friendly Drones List
- [Updated] Direct-to-Digital Webcam Capture Through VLC Media Player
- Battle Through Borderlands 3 Launch Problems with These 11 Pro Tips
- Effortless Pairing with New Bluetooth Adapters - Free Driver Downloads for Win 11, 7 & 8
- New 2024 Approved Making Creative and Engaging Youtube Videos Is Now Easy with Several Tools. Now, YouTube Also Offers You Its Own Built-In Video Editor Through Which You Can Edit and Enhance the Video Quality
- New In 2024, How to Use Deep Fried Meme Maker
- New In 2024, Want to Learn How to Make Gaming Montage Videos? You Have Come to the Right Place. This Guide Will Teach You All You Need to Know to Create Montages of Video Games and Share Them with Other Players
- New In 2024, What Can Be Better than Converting Apple Video Format Into Other Formats so that You Can Use the Files Easily. We Have a Few Options that You Can Use for This Purpose
- New Slow Down Videos on Instagram With Perfection A Guide for 2024
- Online Beat Detectors You Should Try Now [Online & Free]
- The Evolution of Video Capturing Insights Into the Latest Apeaksoft Software for 2024
- Updated 2024 Approved Make Videos with Pictures and Music-10 Apps
- Updated 2024 Approved Using VN Editor To Add Luts for Video Editing
- Updated In 2024, Do You Want to Create Slow-Motion Videos? This Article Shows Methods to Create Slow-Mo Videos without Changing the Medias Quality
- Updated In 2024, Use Your Social Media App and Make Slow-Motion Videos by Reading This Guide. Besides Learning Slow-Motion Snapchat, Get Useful Apps Serving the Same Purposes
- Title: New Best Online YouTube Video Trimmer
- Author: Morgan
- Created at : 2024-10-04 03:27:31
- Updated at : 2024-10-06 04:37:56
- Link: https://ai-video-editing.techidaily.com/new-best-online-youtube-video-trimmer/
- License: This work is licensed under CC BY-NC-SA 4.0.