:max_bytes(150000):strip_icc():format(webp)/F8conferencelogo-7ec4475dc6624114aea076c2611df199.jpg)
New Camtasia Video Editor Review

Camtasia Video Editor Review
If you are planning to record your screen and create a tutorial video, you will need a screen recording application. After capturing your video, you need to edit your videos so that you can remove unnecessary parts and add texts and titles wherever necessary. You will need a video editor with screen recorder, and Camtasia video editor is a suitable choice.
Camtasia lets you capture your gameplay as well as create software demo videos. You can choose from video templates and themes to create professional-quality videos as per your requirements. You can add transitions, effects, and annotations to make the videos attractive and engaging. But is Camtasia editor really the best one or is there a better alternative available? Find out from our Camtasia review.
Part 1. How to Download and Install Camtasia?
TechSmith Camtasia is compatible with both Windows 10 or above and Mac 10.14 or above. Camtasia is not a lightweight video editor as it demands 8GB of RAM. As far as the processor goes, it requires at least a 6th Gen Core i3 processor or M1 Apple processor. Therefore, if you have a low-end computer, you may experience lag and crash.
Camtasia is a premium video editor, and you can download its free trial version before opting for its premium version. The price plans differ for individuals, businesses, education, and government organizations. Here are the steps to download and install Camtasia free trial version.
Step 1: Open the web browser on your computer and visit “www.techsmith.com/download/camtasia” .
Step 2: Click on Windows Download or Mac Download as per your operating system.
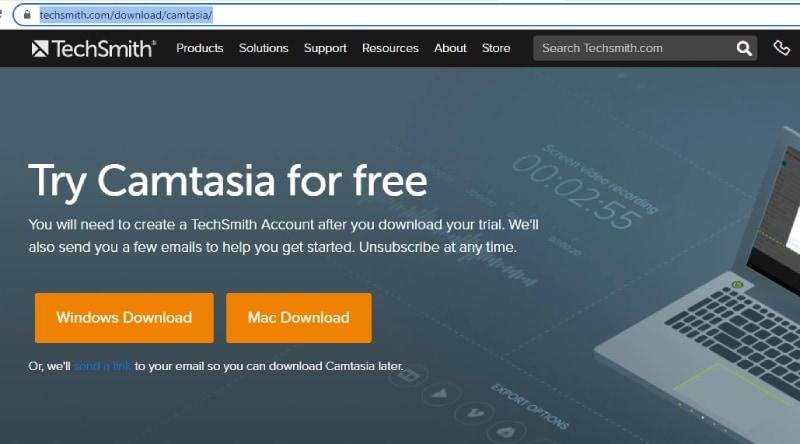
Step 3: Wait for some time for the installer software to get downloaded. Thereafter, click on the installer file to install Camtasia following the on-screen instructions.
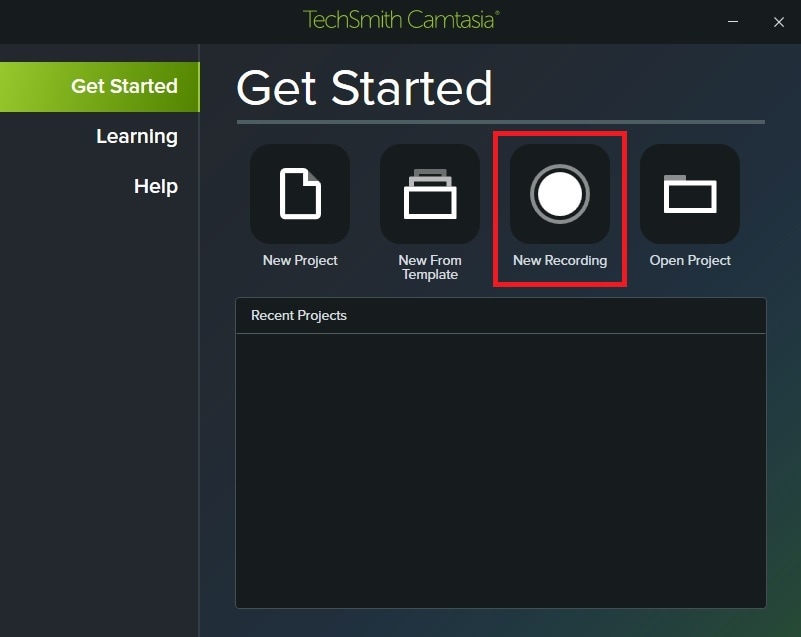
Step 4: After installation, launch Camtasia and click on New Recording option to capture your screen. If you want to edit an existing video, you need to click on New Project option.
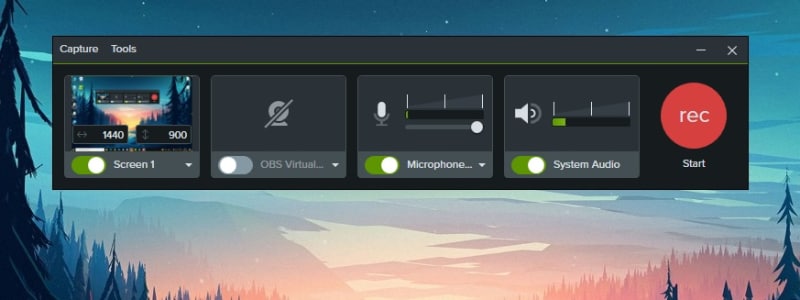
Step 5: If you have clicked on New Recording option, you will get a widget where you need to select your screen to start capturing. You can also select external webcam and microphone. Once you are ready to recording, Click on Rec red button.
Part 2. Key Features of Camtasia
Camtasia is a versatile video editor that competes with all the premium video editors in the market. Hence, there is no dearth of features and functionalities in Camtasia editor, and we are going to highlight the key features that you should be aware of.
Recording – Camtasia lets you capture your screen as well as webcam video easily. You can also record system audio as well as external mic audio. This is useful in recording gameplay with live reaction, tutorial, and training videos as well as presentation videos. You can capture any specific region of the screen as well as use greenscreen effect for webcam videos.
Templates – Camtasia is tailor-made for creating video tutorials, how-to videos, software demo videos, presentation and instructional videos, and training videos. This is why it comes with video templates that users can use immediately to create any specific type of video instantly. In fact, you can customize these templates and create your own theme so that the videos get personalized branding.
Presets and Transitions – There are loads of presents and transitions that you can include in your video to uplift the video content and quality. You can also create custom styles and configure them for regular use in your videos. Transitions are extremely useful to avoid pauses and put them in between slides.
PowerPoint Integration – You can turn your slides on PowerPoint into video instantly with Camtasia. Camtasia comes with PowerPoint integration through which you can import slides in Camtasia and create a video out of it with transitions and other effects. Alternatively, you can record your presentation in PowerPoint in video format.
Annotations and Interactivity – Camtasia lets you create videos where the viewers can interact and take actions. There are options for callouts, quizzes, textboxes, and much more so that the viewers can engage themselves in the video. Besides, you can use arrows, shapes, and other objects to highlight parts in your video for better explanation.
Audio and Cursor Effects – Camtasia has a wide range of audio effects that you apply to your audio recordings or import audio files. Besides, there are options for background noise removal, adjusting gain and pitch, compression, and emphasize. Similarly, you can highlight your cursor movement, spotlight the area as well as magnify when required.
Part 3. How to Edit Videos with Camtasia?
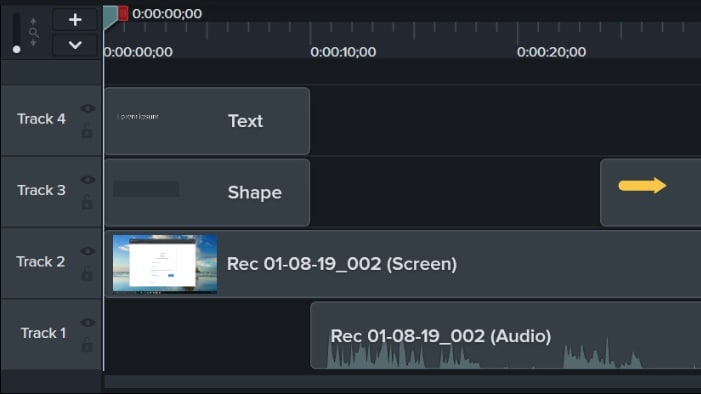
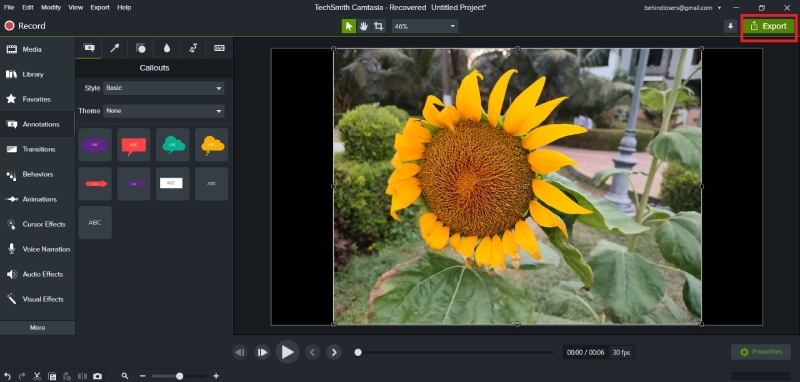
Camtasia is essentially a video editor where you can all types of videos as per your requirements. Camtasia has a robust timeline where you can import different types of video and audio files and arrange them sequentially. You can have multiple layers on top of another such as texts, shapes, photos, voiceover, and other media files as required. Camtasia has a powerful canvas where you can preview your edited video as well as resize and rotate the edited video. Here are the steps to edit videos with Camtasia.
Step 1: Open Camtasia and click on New Project. Sign into your Camtasia account to start editing your recorded video.

Step 2: Go to Media and click on Import Media. Import all the media files starting from video clips to audio clips and even photos.

Step 3: From Media Bin, drag and drop the media files to the timeline. Keep the video files in one track, audio files in another track, and likewise. Arrange them properly so that they are placed sequentially. You can trim them directly from the timeline and stretch the music file to cover the entire video as required.
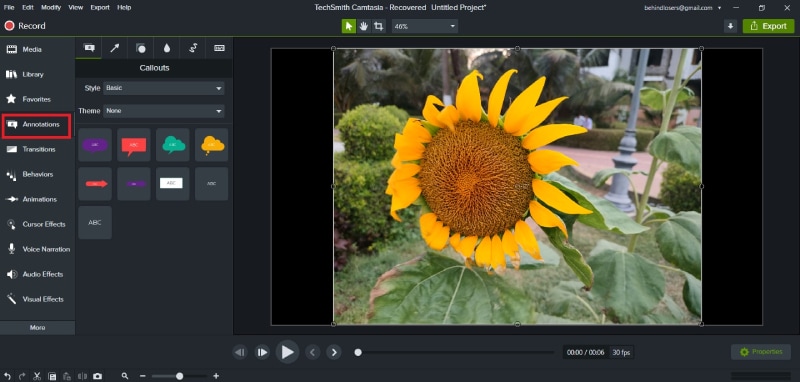
Step 4: Go to Annotation to add shapes, texts, arrows, and callouts. Go to Transitions and drag and drop transitions of your choice in between video clips on the timeline as you think perfect.
Step 5: Go to Audio Effects to enhance the audio of the video. Moreover, you can check and apply animations, behaviors(text effects), cursor effects, visual effects as well as interactivity as you think relevant.
Step 6: On the canvas, check out how your edited video looks like. Once you are satisfied, click on Export button to save the video on your hard drive.
Part 4. Camtasia Alternative to Edit Videos
There are various reasons why people look for a better alternative to Camtasia after trying out its free trial. First of all, you need a high-end computer for Camtasia to run smoothly. Second, there are limited effects and animations available for a premium video editor. Users have also reported crashes and bugs while editing high-resolution videos. We recommend Wondershare Filmora as the best alternative to Camtasia edit video.
Filmora is a premium video editor with video capturing option just like Camtasia. Filmora scores over Camtasia as it has minimum system requirements, and there are loads of visual and audio effects including the trending ones. Besides, there are stock media files that you can include in your video. Moreover, Filmora supports more file formats for importing and exporting. Here are the steps to edit videos on Filmora.
For Win 7 or later (64-bit)
For macOS 10.12 or later
Step 1: Download and install Filmora on your computer. Filmora is available for Windows and Mac.
Step 2: Launch Filmora and click on New Project. Drag and drop all your media files into Project Media folder.
Step 3: Drag and place the video files one by one on the timeline as per your requirements. Place audio files in the same way on a different track.

Step 4: Go to Transitions located at the top bar and drag and drop any transition in between video clips and photos wherever required. You can also insert Titles, Effects, and Elements from the top bar.

Step 5: Go to Audio located at the top bar, and drag and drop audio effects on the audio files on the timeline. You can also check the Stock Media and use them in your video as required.
Step 6: Play the video once everything is done, and click on Export button to save the video file on your hard drive.

Part 5. FAQs about Camtasia
1. Can I use Camtasia for free?
You can download the free trial version of Camtasia and use it for a limited number of days. The free version has all the features unlocked, but the output video will have Camtasia watermark.
2. Is Camtasia good for video editing?
Camtasia is good for video editing if your video belongs to training and tutorial videos. There are templates and annotations available that are tailor-made to edit how-to videos and add interactivity for the viewers. However, for an all-rounder video editor, we recommend Filmora over Camtasia.
3. How do I trim a video in Camtasia?
Once your import the video and place it on the timeline, use green and red to select the part that you want to trim. Once the selection is done, click on Cut(scissor) icon. The portion will be cut, and you can paste it anywhere if required. Lastly, join the parts of the video on the timeline after trimming any part out.
4. Can I record my screen with Camtasia?
Yes, Camtasia allows you to record your screen, webcam, or both simultaneously. You can also capture system audio or record your own voiceover. This feature is useful for creating tutorials, demos, or presentations.
5. How do I export my videos from Camtasia?
Once you have finished editing your videos, you can export them in various formats, such as MP4, WMV, MOV, and AVI. Camtasia also allows you to customize the video settings, such as resolution, frame rate, and bitrate. You can also upload your videos directly to YouTube, Vimeo, or Screencast.com from Camtasia.
For macOS 10.12 or later
Step 1: Download and install Filmora on your computer. Filmora is available for Windows and Mac.
Step 2: Launch Filmora and click on New Project. Drag and drop all your media files into Project Media folder.
Step 3: Drag and place the video files one by one on the timeline as per your requirements. Place audio files in the same way on a different track.

Step 4: Go to Transitions located at the top bar and drag and drop any transition in between video clips and photos wherever required. You can also insert Titles, Effects, and Elements from the top bar.

Step 5: Go to Audio located at the top bar, and drag and drop audio effects on the audio files on the timeline. You can also check the Stock Media and use them in your video as required.
Step 6: Play the video once everything is done, and click on Export button to save the video file on your hard drive.

Part 5. FAQs about Camtasia
1. Can I use Camtasia for free?
You can download the free trial version of Camtasia and use it for a limited number of days. The free version has all the features unlocked, but the output video will have Camtasia watermark.
2. Is Camtasia good for video editing?
Camtasia is good for video editing if your video belongs to training and tutorial videos. There are templates and annotations available that are tailor-made to edit how-to videos and add interactivity for the viewers. However, for an all-rounder video editor, we recommend Filmora over Camtasia.
3. How do I trim a video in Camtasia?
Once your import the video and place it on the timeline, use green and red to select the part that you want to trim. Once the selection is done, click on Cut(scissor) icon. The portion will be cut, and you can paste it anywhere if required. Lastly, join the parts of the video on the timeline after trimming any part out.
4. Can I record my screen with Camtasia?
Yes, Camtasia allows you to record your screen, webcam, or both simultaneously. You can also capture system audio or record your own voiceover. This feature is useful for creating tutorials, demos, or presentations.
5. How do I export my videos from Camtasia?
Once you have finished editing your videos, you can export them in various formats, such as MP4, WMV, MOV, and AVI. Camtasia also allows you to customize the video settings, such as resolution, frame rate, and bitrate. You can also upload your videos directly to YouTube, Vimeo, or Screencast.com from Camtasia.
For macOS 10.12 or later
Step 1: Download and install Filmora on your computer. Filmora is available for Windows and Mac.
Step 2: Launch Filmora and click on New Project. Drag and drop all your media files into Project Media folder.
Step 3: Drag and place the video files one by one on the timeline as per your requirements. Place audio files in the same way on a different track.

Step 4: Go to Transitions located at the top bar and drag and drop any transition in between video clips and photos wherever required. You can also insert Titles, Effects, and Elements from the top bar.

Step 5: Go to Audio located at the top bar, and drag and drop audio effects on the audio files on the timeline. You can also check the Stock Media and use them in your video as required.
Step 6: Play the video once everything is done, and click on Export button to save the video file on your hard drive.

Part 5. FAQs about Camtasia
1. Can I use Camtasia for free?
You can download the free trial version of Camtasia and use it for a limited number of days. The free version has all the features unlocked, but the output video will have Camtasia watermark.
2. Is Camtasia good for video editing?
Camtasia is good for video editing if your video belongs to training and tutorial videos. There are templates and annotations available that are tailor-made to edit how-to videos and add interactivity for the viewers. However, for an all-rounder video editor, we recommend Filmora over Camtasia.
3. How do I trim a video in Camtasia?
Once your import the video and place it on the timeline, use green and red to select the part that you want to trim. Once the selection is done, click on Cut(scissor) icon. The portion will be cut, and you can paste it anywhere if required. Lastly, join the parts of the video on the timeline after trimming any part out.
4. Can I record my screen with Camtasia?
Yes, Camtasia allows you to record your screen, webcam, or both simultaneously. You can also capture system audio or record your own voiceover. This feature is useful for creating tutorials, demos, or presentations.
5. How do I export my videos from Camtasia?
Once you have finished editing your videos, you can export them in various formats, such as MP4, WMV, MOV, and AVI. Camtasia also allows you to customize the video settings, such as resolution, frame rate, and bitrate. You can also upload your videos directly to YouTube, Vimeo, or Screencast.com from Camtasia.
For macOS 10.12 or later
Step 1: Download and install Filmora on your computer. Filmora is available for Windows and Mac.
Step 2: Launch Filmora and click on New Project. Drag and drop all your media files into Project Media folder.
Step 3: Drag and place the video files one by one on the timeline as per your requirements. Place audio files in the same way on a different track.

Step 4: Go to Transitions located at the top bar and drag and drop any transition in between video clips and photos wherever required. You can also insert Titles, Effects, and Elements from the top bar.

Step 5: Go to Audio located at the top bar, and drag and drop audio effects on the audio files on the timeline. You can also check the Stock Media and use them in your video as required.
Step 6: Play the video once everything is done, and click on Export button to save the video file on your hard drive.

Part 5. FAQs about Camtasia
1. Can I use Camtasia for free?
You can download the free trial version of Camtasia and use it for a limited number of days. The free version has all the features unlocked, but the output video will have Camtasia watermark.
2. Is Camtasia good for video editing?
Camtasia is good for video editing if your video belongs to training and tutorial videos. There are templates and annotations available that are tailor-made to edit how-to videos and add interactivity for the viewers. However, for an all-rounder video editor, we recommend Filmora over Camtasia.
3. How do I trim a video in Camtasia?
Once your import the video and place it on the timeline, use green and red to select the part that you want to trim. Once the selection is done, click on Cut(scissor) icon. The portion will be cut, and you can paste it anywhere if required. Lastly, join the parts of the video on the timeline after trimming any part out.
4. Can I record my screen with Camtasia?
Yes, Camtasia allows you to record your screen, webcam, or both simultaneously. You can also capture system audio or record your own voiceover. This feature is useful for creating tutorials, demos, or presentations.
5. How do I export my videos from Camtasia?
Once you have finished editing your videos, you can export them in various formats, such as MP4, WMV, MOV, and AVI. Camtasia also allows you to customize the video settings, such as resolution, frame rate, and bitrate. You can also upload your videos directly to YouTube, Vimeo, or Screencast.com from Camtasia.
Thousands Already Know What Ezgif Is and So Can You
Thousands Already Know Ezgif and So Can You
An easy yet powerful editor
Numerous effects to choose from
Detailed tutorials provided by the official channel
Everything about the know-how of Ezgif creator is here!
In this article
01 [How to Make a GIF on Ezgif](#Part 1)
02 [Video to GIF Made Easy Only With Ezgif](#Part 2)
03 [How to Crop a Video With Ezgif & Filmora](#Part 3)
Part 1 How to Make a GIF on Ezgif
GIFs take you to an exciting journey of expression and impact. With the introduction of GIF keyboards and a variety of creator tools, you are granted the liberty to use pre made GIFs as well as create stirring ones of your own to deliver your messages in unique and impactful ways. When it comes to creating GIFs, the online market is always ready with a heap of creator choices. While each of these tools is distinctive in its own way, some of them are leaders in making the mark among users.
About the Ezgif GIF Maker
Ezgif online GIF maker tool is amongst the most preferred GIF creators in today’s times. This one is a free and super convenient online tool that lets you create and convert animated GIFs in just a few clicks. Compatible with your Windows or MacOS devices, this tool is evidently among the fastest GIF creators of its time.
Apart from creating GIFs, you can also use this tool to cut, crop, trim and resize videos, ass and remove GIF backgrounds and much more. The tool is compatible with almost all common video and image formats; hence you can easily escape the glitch of sticking to a particular format for using this tool.
Here’s how you can use this tool for making next level GIFs:
Step 1: Launch the Tool
Open the Ezgif maker tool in your favorite browser. In the site’s welcome page, tap on ‘GIF Maker’ from the top toolbar.
Step 2: Upload Your Media
Click on ‘Browse’ to select your desired video or a set of still captures from your device and upload the same to the GIF maker timeline. You can choose from a manually or an alphabetically ordered upload. Ensure that the total file size is restricted within 100 MB.
Step 3: Let’s Create!
Click on ‘Upload and Make a GIF’. You will be shown a preview of your creation. At this point, you can customize the GIF with effects, filters and texts.
Step 4: Visual Adjustments
When using still images, consider arranging them in a particular order with the ‘Drag and Drop method’. You can skip this step if you are satisfied with the default arrangement. If you are creating a GIF from a video, pay attention to adjust its play duration.
Step 5: Beautify and Save Your Artwork
When you are satisfied with your work, tap ‘Make a GIF’. You can see your final creation appear. Click on ‘Save’ to add your artwork to your device memory. You can also customize your creation from the toolbar below the created GIF before saving it.
Part 2 Video to GIF Made Easy Only With Ezgif
As stated earlier, you can create GIFs from images and convert videos to GIFs using the Ezgif converter. What’s interesting is that the conversion process is quite fast and you are allowed to play with your editing skills to your heart’s content while customizing your artwork. Given below is a quick guide to convert videos in any common file format into impressive GIFs:
● Step 1
Visit ezgif.com, the official site of the Ezgif creator tool, in any suitable browser of your choice. In the homepage of the tool’s website, navigate to the toolbar at the top and click on ‘Video to GIF’.
Ezgif Video to GIF Converter Link:
● Step 2
In the converter interface, you can either upload a locally saved video from your device by clicking on ‘Browse’ or copy-paste a desired video URL in the address box and tap ‘Upload Video’.
● Step 3
In the tool’s editing interface, set required play duration for your video by setting the start and end points of the clip.
● Step 4
When you are done, click on ‘Convert to GIF’ and wait for the conversion process to finish. You can now see your created GIF in the pop up window that appears next. Click on ‘Save’ option in the toolbar beneath the created GIF to download your creation to your device.
Part 3 How to Crop a Video With Ezgif & Filmora
Ezgif is a multi faceted online tool that allows you to take up a variety of tasks in addition to just creating classy GIFs. Video to GIF conversion is one thing, besides that, you can also crop your videos using this tool. Wondering how to go about the process? Here’s a quick, stepwise tutorial to answer this for you. Follow the steps given below to crop your videos with a blink:
● Step 1: Launch the Ezgif Crop Tool
Open the official Ezgif website and navigate to the ‘Crop Video’ tab on the top toolbar in the welcome page. You can alternatively click on the link given below to reach the ‘Crop Video’ interface directly.
● Step 2: Upload Your Video
To upload a locally saved video, click on the ‘Choose File’ button. You will see the file name appear beside it. You can alternatively, copy-paste the URL of a desired video in the address box. Click on ‘Upload Video’ for the file to get uploaded.
● Step 3: Adjust Video Borders
To crop the video to a desired part, you need to set its borders within the required section. To do this, ‘Hold and Drag’ the mouse to highlight a desired section. Now leave the mouse to see the highlighted section within a frame.
● Step 4: Final Touches
After you have the desired section, scroll down to find some adjustment options. Here, you can resize, set aspect ratio and make frame adjustments to your cropping clip. When selecting the output video format, you can either choose to stick with the original file format or change to mp4.
Tap on ‘Crop Video’ when you are done making the changes. The conversion process may take a few seconds. You can enjoy looking at the swaying kitten in the meantime.
● Step 5: Download and Save
Once the conversion finishes, you will see your cropped video appear on the screen. Click on ‘Save’ from the toolbar below the video to download the sane to your device.
Ezgif is certainly an affordable GIF creator and video cropper tool, no doubt about that, but if you are looking for an alternative, you can consider using the Filmora GIF creator software for cropping a video to your favorite part. This one is a free to use, quick and smart tool with the most convenient user interface.
The huge audio-visual effects library of this software allows you to add sound, music and overlays to your clips and intensify them with text and filters. Here’s a quick tutorial on cropping videos with this software:
● Step 1
Download and install Filmora in your device. When finished, launch the software to reach its editor timeline.
Filmora Crop Video Tool Direct Link:
● Step 2
Within the timeline, select and right click on a desired video. Select ‘Crop and Zoom’ for the drop down menu. You can alternatively click on the ‘Crop’ icon.
● Step 3
In the pop-up window that follows, either choose a preset aspect ratio, or click on ‘Custom’ and navigate the rectangle to select a clip area to crop.

Wondershare Filmora - Best Video Editor for Mac/Windows
5,481,435 people have downloaded it.
Build unique custom animations without breaking a sweat.
Focus on creating epic stories and leave the details to Filmora’s auto features.
Start a creative adventure with drag & drop effects and endless possibilities.
Filmora simplifies advanced features to save you time and effort.
Filmora cuts out repetition so you can move on to your next creative breakthrough.
● Key Takeaways from This Episode →
● Ezgif is one of the most suitable GIF creator and converter tools available online that allows you to explore your skills and create top quality GIFs, convert videos to GIFs and crop video clips, all at one place.
●This one is a quick and hassle free solution to your video and GIF editing concerns. When browsing through its feasible alternatives, you can safely count upon the Filmora video editor and GIF creator software for making and customizing GIFs and video clips.
Everything about the know-how of Ezgif creator is here!
In this article
01 [How to Make a GIF on Ezgif](#Part 1)
02 [Video to GIF Made Easy Only With Ezgif](#Part 2)
03 [How to Crop a Video With Ezgif & Filmora](#Part 3)
Part 1 How to Make a GIF on Ezgif
GIFs take you to an exciting journey of expression and impact. With the introduction of GIF keyboards and a variety of creator tools, you are granted the liberty to use pre made GIFs as well as create stirring ones of your own to deliver your messages in unique and impactful ways. When it comes to creating GIFs, the online market is always ready with a heap of creator choices. While each of these tools is distinctive in its own way, some of them are leaders in making the mark among users.
About the Ezgif GIF Maker
Ezgif online GIF maker tool is amongst the most preferred GIF creators in today’s times. This one is a free and super convenient online tool that lets you create and convert animated GIFs in just a few clicks. Compatible with your Windows or MacOS devices, this tool is evidently among the fastest GIF creators of its time.
Apart from creating GIFs, you can also use this tool to cut, crop, trim and resize videos, ass and remove GIF backgrounds and much more. The tool is compatible with almost all common video and image formats; hence you can easily escape the glitch of sticking to a particular format for using this tool.
Here’s how you can use this tool for making next level GIFs:
Step 1: Launch the Tool
Open the Ezgif maker tool in your favorite browser. In the site’s welcome page, tap on ‘GIF Maker’ from the top toolbar.
Step 2: Upload Your Media
Click on ‘Browse’ to select your desired video or a set of still captures from your device and upload the same to the GIF maker timeline. You can choose from a manually or an alphabetically ordered upload. Ensure that the total file size is restricted within 100 MB.
Step 3: Let’s Create!
Click on ‘Upload and Make a GIF’. You will be shown a preview of your creation. At this point, you can customize the GIF with effects, filters and texts.
Step 4: Visual Adjustments
When using still images, consider arranging them in a particular order with the ‘Drag and Drop method’. You can skip this step if you are satisfied with the default arrangement. If you are creating a GIF from a video, pay attention to adjust its play duration.
Step 5: Beautify and Save Your Artwork
When you are satisfied with your work, tap ‘Make a GIF’. You can see your final creation appear. Click on ‘Save’ to add your artwork to your device memory. You can also customize your creation from the toolbar below the created GIF before saving it.
Part 2 Video to GIF Made Easy Only With Ezgif
As stated earlier, you can create GIFs from images and convert videos to GIFs using the Ezgif converter. What’s interesting is that the conversion process is quite fast and you are allowed to play with your editing skills to your heart’s content while customizing your artwork. Given below is a quick guide to convert videos in any common file format into impressive GIFs:
● Step 1
Visit ezgif.com, the official site of the Ezgif creator tool, in any suitable browser of your choice. In the homepage of the tool’s website, navigate to the toolbar at the top and click on ‘Video to GIF’.
Ezgif Video to GIF Converter Link:
● Step 2
In the converter interface, you can either upload a locally saved video from your device by clicking on ‘Browse’ or copy-paste a desired video URL in the address box and tap ‘Upload Video’.
● Step 3
In the tool’s editing interface, set required play duration for your video by setting the start and end points of the clip.
● Step 4
When you are done, click on ‘Convert to GIF’ and wait for the conversion process to finish. You can now see your created GIF in the pop up window that appears next. Click on ‘Save’ option in the toolbar beneath the created GIF to download your creation to your device.
Part 3 How to Crop a Video With Ezgif & Filmora
Ezgif is a multi faceted online tool that allows you to take up a variety of tasks in addition to just creating classy GIFs. Video to GIF conversion is one thing, besides that, you can also crop your videos using this tool. Wondering how to go about the process? Here’s a quick, stepwise tutorial to answer this for you. Follow the steps given below to crop your videos with a blink:
● Step 1: Launch the Ezgif Crop Tool
Open the official Ezgif website and navigate to the ‘Crop Video’ tab on the top toolbar in the welcome page. You can alternatively click on the link given below to reach the ‘Crop Video’ interface directly.
● Step 2: Upload Your Video
To upload a locally saved video, click on the ‘Choose File’ button. You will see the file name appear beside it. You can alternatively, copy-paste the URL of a desired video in the address box. Click on ‘Upload Video’ for the file to get uploaded.
● Step 3: Adjust Video Borders
To crop the video to a desired part, you need to set its borders within the required section. To do this, ‘Hold and Drag’ the mouse to highlight a desired section. Now leave the mouse to see the highlighted section within a frame.
● Step 4: Final Touches
After you have the desired section, scroll down to find some adjustment options. Here, you can resize, set aspect ratio and make frame adjustments to your cropping clip. When selecting the output video format, you can either choose to stick with the original file format or change to mp4.
Tap on ‘Crop Video’ when you are done making the changes. The conversion process may take a few seconds. You can enjoy looking at the swaying kitten in the meantime.
● Step 5: Download and Save
Once the conversion finishes, you will see your cropped video appear on the screen. Click on ‘Save’ from the toolbar below the video to download the sane to your device.
Ezgif is certainly an affordable GIF creator and video cropper tool, no doubt about that, but if you are looking for an alternative, you can consider using the Filmora GIF creator software for cropping a video to your favorite part. This one is a free to use, quick and smart tool with the most convenient user interface.
The huge audio-visual effects library of this software allows you to add sound, music and overlays to your clips and intensify them with text and filters. Here’s a quick tutorial on cropping videos with this software:
● Step 1
Download and install Filmora in your device. When finished, launch the software to reach its editor timeline.
Filmora Crop Video Tool Direct Link:
● Step 2
Within the timeline, select and right click on a desired video. Select ‘Crop and Zoom’ for the drop down menu. You can alternatively click on the ‘Crop’ icon.
● Step 3
In the pop-up window that follows, either choose a preset aspect ratio, or click on ‘Custom’ and navigate the rectangle to select a clip area to crop.

Wondershare Filmora - Best Video Editor for Mac/Windows
5,481,435 people have downloaded it.
Build unique custom animations without breaking a sweat.
Focus on creating epic stories and leave the details to Filmora’s auto features.
Start a creative adventure with drag & drop effects and endless possibilities.
Filmora simplifies advanced features to save you time and effort.
Filmora cuts out repetition so you can move on to your next creative breakthrough.
● Key Takeaways from This Episode →
● Ezgif is one of the most suitable GIF creator and converter tools available online that allows you to explore your skills and create top quality GIFs, convert videos to GIFs and crop video clips, all at one place.
●This one is a quick and hassle free solution to your video and GIF editing concerns. When browsing through its feasible alternatives, you can safely count upon the Filmora video editor and GIF creator software for making and customizing GIFs and video clips.
Everything about the know-how of Ezgif creator is here!
In this article
01 [How to Make a GIF on Ezgif](#Part 1)
02 [Video to GIF Made Easy Only With Ezgif](#Part 2)
03 [How to Crop a Video With Ezgif & Filmora](#Part 3)
Part 1 How to Make a GIF on Ezgif
GIFs take you to an exciting journey of expression and impact. With the introduction of GIF keyboards and a variety of creator tools, you are granted the liberty to use pre made GIFs as well as create stirring ones of your own to deliver your messages in unique and impactful ways. When it comes to creating GIFs, the online market is always ready with a heap of creator choices. While each of these tools is distinctive in its own way, some of them are leaders in making the mark among users.
About the Ezgif GIF Maker
Ezgif online GIF maker tool is amongst the most preferred GIF creators in today’s times. This one is a free and super convenient online tool that lets you create and convert animated GIFs in just a few clicks. Compatible with your Windows or MacOS devices, this tool is evidently among the fastest GIF creators of its time.
Apart from creating GIFs, you can also use this tool to cut, crop, trim and resize videos, ass and remove GIF backgrounds and much more. The tool is compatible with almost all common video and image formats; hence you can easily escape the glitch of sticking to a particular format for using this tool.
Here’s how you can use this tool for making next level GIFs:
Step 1: Launch the Tool
Open the Ezgif maker tool in your favorite browser. In the site’s welcome page, tap on ‘GIF Maker’ from the top toolbar.
Step 2: Upload Your Media
Click on ‘Browse’ to select your desired video or a set of still captures from your device and upload the same to the GIF maker timeline. You can choose from a manually or an alphabetically ordered upload. Ensure that the total file size is restricted within 100 MB.
Step 3: Let’s Create!
Click on ‘Upload and Make a GIF’. You will be shown a preview of your creation. At this point, you can customize the GIF with effects, filters and texts.
Step 4: Visual Adjustments
When using still images, consider arranging them in a particular order with the ‘Drag and Drop method’. You can skip this step if you are satisfied with the default arrangement. If you are creating a GIF from a video, pay attention to adjust its play duration.
Step 5: Beautify and Save Your Artwork
When you are satisfied with your work, tap ‘Make a GIF’. You can see your final creation appear. Click on ‘Save’ to add your artwork to your device memory. You can also customize your creation from the toolbar below the created GIF before saving it.
Part 2 Video to GIF Made Easy Only With Ezgif
As stated earlier, you can create GIFs from images and convert videos to GIFs using the Ezgif converter. What’s interesting is that the conversion process is quite fast and you are allowed to play with your editing skills to your heart’s content while customizing your artwork. Given below is a quick guide to convert videos in any common file format into impressive GIFs:
● Step 1
Visit ezgif.com, the official site of the Ezgif creator tool, in any suitable browser of your choice. In the homepage of the tool’s website, navigate to the toolbar at the top and click on ‘Video to GIF’.
Ezgif Video to GIF Converter Link:
● Step 2
In the converter interface, you can either upload a locally saved video from your device by clicking on ‘Browse’ or copy-paste a desired video URL in the address box and tap ‘Upload Video’.
● Step 3
In the tool’s editing interface, set required play duration for your video by setting the start and end points of the clip.
● Step 4
When you are done, click on ‘Convert to GIF’ and wait for the conversion process to finish. You can now see your created GIF in the pop up window that appears next. Click on ‘Save’ option in the toolbar beneath the created GIF to download your creation to your device.
Part 3 How to Crop a Video With Ezgif & Filmora
Ezgif is a multi faceted online tool that allows you to take up a variety of tasks in addition to just creating classy GIFs. Video to GIF conversion is one thing, besides that, you can also crop your videos using this tool. Wondering how to go about the process? Here’s a quick, stepwise tutorial to answer this for you. Follow the steps given below to crop your videos with a blink:
● Step 1: Launch the Ezgif Crop Tool
Open the official Ezgif website and navigate to the ‘Crop Video’ tab on the top toolbar in the welcome page. You can alternatively click on the link given below to reach the ‘Crop Video’ interface directly.
● Step 2: Upload Your Video
To upload a locally saved video, click on the ‘Choose File’ button. You will see the file name appear beside it. You can alternatively, copy-paste the URL of a desired video in the address box. Click on ‘Upload Video’ for the file to get uploaded.
● Step 3: Adjust Video Borders
To crop the video to a desired part, you need to set its borders within the required section. To do this, ‘Hold and Drag’ the mouse to highlight a desired section. Now leave the mouse to see the highlighted section within a frame.
● Step 4: Final Touches
After you have the desired section, scroll down to find some adjustment options. Here, you can resize, set aspect ratio and make frame adjustments to your cropping clip. When selecting the output video format, you can either choose to stick with the original file format or change to mp4.
Tap on ‘Crop Video’ when you are done making the changes. The conversion process may take a few seconds. You can enjoy looking at the swaying kitten in the meantime.
● Step 5: Download and Save
Once the conversion finishes, you will see your cropped video appear on the screen. Click on ‘Save’ from the toolbar below the video to download the sane to your device.
Ezgif is certainly an affordable GIF creator and video cropper tool, no doubt about that, but if you are looking for an alternative, you can consider using the Filmora GIF creator software for cropping a video to your favorite part. This one is a free to use, quick and smart tool with the most convenient user interface.
The huge audio-visual effects library of this software allows you to add sound, music and overlays to your clips and intensify them with text and filters. Here’s a quick tutorial on cropping videos with this software:
● Step 1
Download and install Filmora in your device. When finished, launch the software to reach its editor timeline.
Filmora Crop Video Tool Direct Link:
● Step 2
Within the timeline, select and right click on a desired video. Select ‘Crop and Zoom’ for the drop down menu. You can alternatively click on the ‘Crop’ icon.
● Step 3
In the pop-up window that follows, either choose a preset aspect ratio, or click on ‘Custom’ and navigate the rectangle to select a clip area to crop.

Wondershare Filmora - Best Video Editor for Mac/Windows
5,481,435 people have downloaded it.
Build unique custom animations without breaking a sweat.
Focus on creating epic stories and leave the details to Filmora’s auto features.
Start a creative adventure with drag & drop effects and endless possibilities.
Filmora simplifies advanced features to save you time and effort.
Filmora cuts out repetition so you can move on to your next creative breakthrough.
● Key Takeaways from This Episode →
● Ezgif is one of the most suitable GIF creator and converter tools available online that allows you to explore your skills and create top quality GIFs, convert videos to GIFs and crop video clips, all at one place.
●This one is a quick and hassle free solution to your video and GIF editing concerns. When browsing through its feasible alternatives, you can safely count upon the Filmora video editor and GIF creator software for making and customizing GIFs and video clips.
Everything about the know-how of Ezgif creator is here!
In this article
01 [How to Make a GIF on Ezgif](#Part 1)
02 [Video to GIF Made Easy Only With Ezgif](#Part 2)
03 [How to Crop a Video With Ezgif & Filmora](#Part 3)
Part 1 How to Make a GIF on Ezgif
GIFs take you to an exciting journey of expression and impact. With the introduction of GIF keyboards and a variety of creator tools, you are granted the liberty to use pre made GIFs as well as create stirring ones of your own to deliver your messages in unique and impactful ways. When it comes to creating GIFs, the online market is always ready with a heap of creator choices. While each of these tools is distinctive in its own way, some of them are leaders in making the mark among users.
About the Ezgif GIF Maker
Ezgif online GIF maker tool is amongst the most preferred GIF creators in today’s times. This one is a free and super convenient online tool that lets you create and convert animated GIFs in just a few clicks. Compatible with your Windows or MacOS devices, this tool is evidently among the fastest GIF creators of its time.
Apart from creating GIFs, you can also use this tool to cut, crop, trim and resize videos, ass and remove GIF backgrounds and much more. The tool is compatible with almost all common video and image formats; hence you can easily escape the glitch of sticking to a particular format for using this tool.
Here’s how you can use this tool for making next level GIFs:
Step 1: Launch the Tool
Open the Ezgif maker tool in your favorite browser. In the site’s welcome page, tap on ‘GIF Maker’ from the top toolbar.
Step 2: Upload Your Media
Click on ‘Browse’ to select your desired video or a set of still captures from your device and upload the same to the GIF maker timeline. You can choose from a manually or an alphabetically ordered upload. Ensure that the total file size is restricted within 100 MB.
Step 3: Let’s Create!
Click on ‘Upload and Make a GIF’. You will be shown a preview of your creation. At this point, you can customize the GIF with effects, filters and texts.
Step 4: Visual Adjustments
When using still images, consider arranging them in a particular order with the ‘Drag and Drop method’. You can skip this step if you are satisfied with the default arrangement. If you are creating a GIF from a video, pay attention to adjust its play duration.
Step 5: Beautify and Save Your Artwork
When you are satisfied with your work, tap ‘Make a GIF’. You can see your final creation appear. Click on ‘Save’ to add your artwork to your device memory. You can also customize your creation from the toolbar below the created GIF before saving it.
Part 2 Video to GIF Made Easy Only With Ezgif
As stated earlier, you can create GIFs from images and convert videos to GIFs using the Ezgif converter. What’s interesting is that the conversion process is quite fast and you are allowed to play with your editing skills to your heart’s content while customizing your artwork. Given below is a quick guide to convert videos in any common file format into impressive GIFs:
● Step 1
Visit ezgif.com, the official site of the Ezgif creator tool, in any suitable browser of your choice. In the homepage of the tool’s website, navigate to the toolbar at the top and click on ‘Video to GIF’.
Ezgif Video to GIF Converter Link:
● Step 2
In the converter interface, you can either upload a locally saved video from your device by clicking on ‘Browse’ or copy-paste a desired video URL in the address box and tap ‘Upload Video’.
● Step 3
In the tool’s editing interface, set required play duration for your video by setting the start and end points of the clip.
● Step 4
When you are done, click on ‘Convert to GIF’ and wait for the conversion process to finish. You can now see your created GIF in the pop up window that appears next. Click on ‘Save’ option in the toolbar beneath the created GIF to download your creation to your device.
Part 3 How to Crop a Video With Ezgif & Filmora
Ezgif is a multi faceted online tool that allows you to take up a variety of tasks in addition to just creating classy GIFs. Video to GIF conversion is one thing, besides that, you can also crop your videos using this tool. Wondering how to go about the process? Here’s a quick, stepwise tutorial to answer this for you. Follow the steps given below to crop your videos with a blink:
● Step 1: Launch the Ezgif Crop Tool
Open the official Ezgif website and navigate to the ‘Crop Video’ tab on the top toolbar in the welcome page. You can alternatively click on the link given below to reach the ‘Crop Video’ interface directly.
● Step 2: Upload Your Video
To upload a locally saved video, click on the ‘Choose File’ button. You will see the file name appear beside it. You can alternatively, copy-paste the URL of a desired video in the address box. Click on ‘Upload Video’ for the file to get uploaded.
● Step 3: Adjust Video Borders
To crop the video to a desired part, you need to set its borders within the required section. To do this, ‘Hold and Drag’ the mouse to highlight a desired section. Now leave the mouse to see the highlighted section within a frame.
● Step 4: Final Touches
After you have the desired section, scroll down to find some adjustment options. Here, you can resize, set aspect ratio and make frame adjustments to your cropping clip. When selecting the output video format, you can either choose to stick with the original file format or change to mp4.
Tap on ‘Crop Video’ when you are done making the changes. The conversion process may take a few seconds. You can enjoy looking at the swaying kitten in the meantime.
● Step 5: Download and Save
Once the conversion finishes, you will see your cropped video appear on the screen. Click on ‘Save’ from the toolbar below the video to download the sane to your device.
Ezgif is certainly an affordable GIF creator and video cropper tool, no doubt about that, but if you are looking for an alternative, you can consider using the Filmora GIF creator software for cropping a video to your favorite part. This one is a free to use, quick and smart tool with the most convenient user interface.
The huge audio-visual effects library of this software allows you to add sound, music and overlays to your clips and intensify them with text and filters. Here’s a quick tutorial on cropping videos with this software:
● Step 1
Download and install Filmora in your device. When finished, launch the software to reach its editor timeline.
Filmora Crop Video Tool Direct Link:
● Step 2
Within the timeline, select and right click on a desired video. Select ‘Crop and Zoom’ for the drop down menu. You can alternatively click on the ‘Crop’ icon.
● Step 3
In the pop-up window that follows, either choose a preset aspect ratio, or click on ‘Custom’ and navigate the rectangle to select a clip area to crop.

Wondershare Filmora - Best Video Editor for Mac/Windows
5,481,435 people have downloaded it.
Build unique custom animations without breaking a sweat.
Focus on creating epic stories and leave the details to Filmora’s auto features.
Start a creative adventure with drag & drop effects and endless possibilities.
Filmora simplifies advanced features to save you time and effort.
Filmora cuts out repetition so you can move on to your next creative breakthrough.
● Key Takeaways from This Episode →
● Ezgif is one of the most suitable GIF creator and converter tools available online that allows you to explore your skills and create top quality GIFs, convert videos to GIFs and crop video clips, all at one place.
●This one is a quick and hassle free solution to your video and GIF editing concerns. When browsing through its feasible alternatives, you can safely count upon the Filmora video editor and GIF creator software for making and customizing GIFs and video clips.
How to Create Photoshop GIF The 100% Easy Way
How to Create Photoshop GIF The 100% Easy Way
An easy yet powerful editor
Numerous effects to choose from
Detailed tutorials provided by the official channel
Having trouble creating Photoshop GIFs? Stay tuned to set everything straight.
In this article
01 [Easy Ways to Create an Animated GIF in Photoshop](#Part 1)
02 [6 Ways To Make An Animated GIF Without Photoshop](#Part 2)
Part 1 Easy Ways to Create an Animated GIF in Photoshop
Animated GIFs are a naturally captivating means of information exchange and entertainment. When the talk is about creating these, you can visibly see a flood of creation tools and software solutions. However, standing out in the crowd, are those catchy Photoshop snippets that certainly have the potential to leave you jaw dropped.
A Photoshop GIF is bound to capture attention, owing to its high quality imaging and top rated professional editing outlook. If you possess the editing flare, do try creating one for an amazing editing experience.
Creating Animated Photoshop GIFs: Easiest Solutions
Let’s take a look into some easy and interesting ways of creating a GIF in Photoshop, to leave you with handy solutions, just in case you feel motivated to take up the creation idea.
Before you begin, make sure to install and launch a suitable version the Photoshop application in your device and keep a set of selected images at hand that you will require for GIF creation.
● Step 1: Load Image Files
Photoshop requires you to load your selected files into its creation stack. There is no limit on the image count, but make sure you choose images in a natural series so that the GIF doesn’t give an out of the box feel.
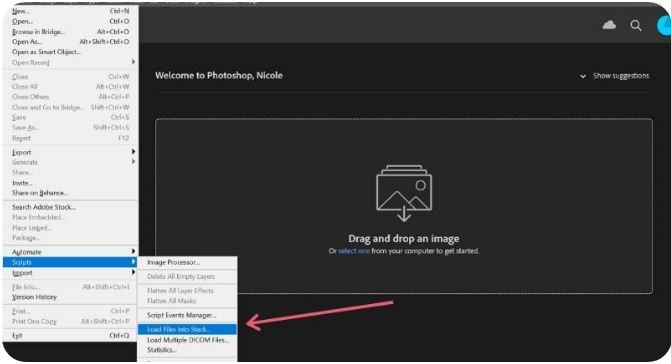
Reach the ‘File’ tab at the top and load your image files into the Photoshop stack using the following path:
File -> Scripts -> Load Files into Stack
● Step 2: Image Selection
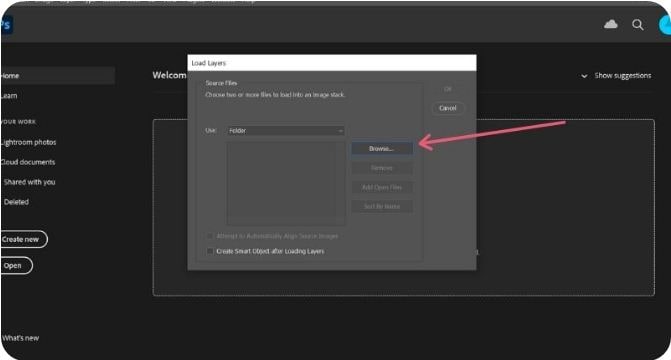
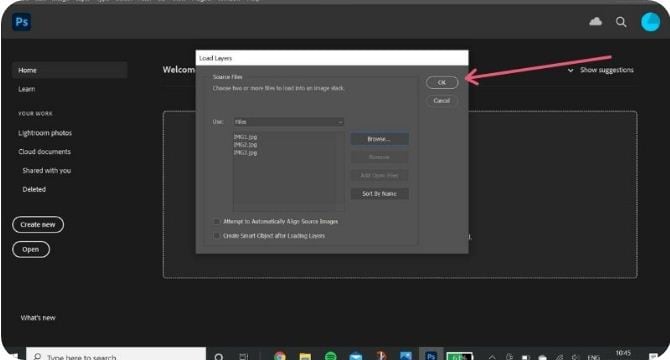
In the next pop-up window, click ‘Browse’ and choose the image file you wish to load into the Photoshop stack. In case the selected images seem tom lack proper alignment, click on the ‘Attempt to Automatically Align Source Images’ checkbox to set this straight and make your GIF frame stable.
Click on ‘OK’ when you are happy with your selections.
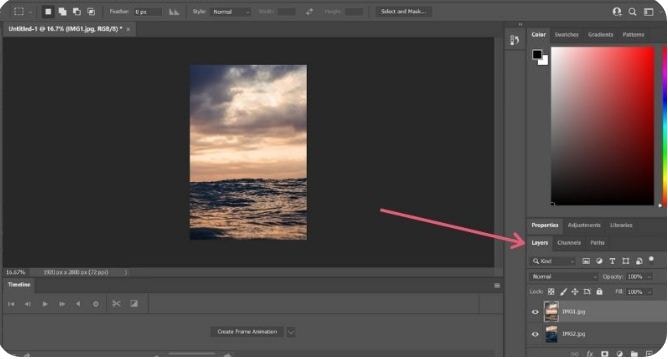
At this instant, Photoshop starts creating layers for the uploaded images, which you can see in the ‘Layers’ panel at the bottom-right. You are allowed to rearrange the image layers by selecting and dragging them or click on layer names to rename them.
If you notice distortion in Photoshop’s automatic alignment of your images, just crop the images frames to sort this out. Here’s how you can get this done:
● Tap the ‘Crop’ symbol.
● Adjust the crop frame to select the desired portion.
● Click on ‘Enter’ to confirm the action.
If you didn’t permit auto alignment previously, no worries, you can move ahead.
● Step 3: Make a Timeline Setup
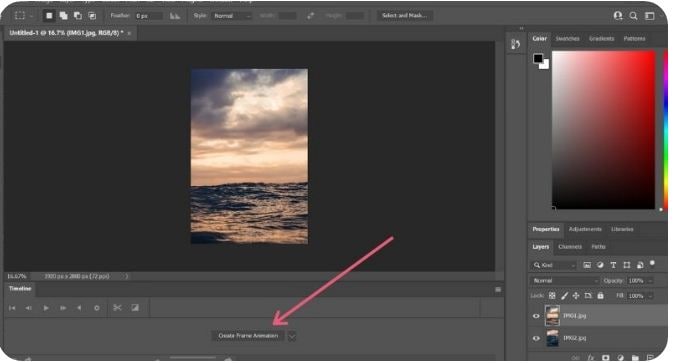
Navigate to the ‘Window’ tab in the top menu and click the ’Timeline’ checkbox. You will see the ‘Timeline Window’ pop up below the Photoshop workspace, where you need to select the ‘Create Frame Animation’ tab. This will cause the options for frame animation to pop-up.
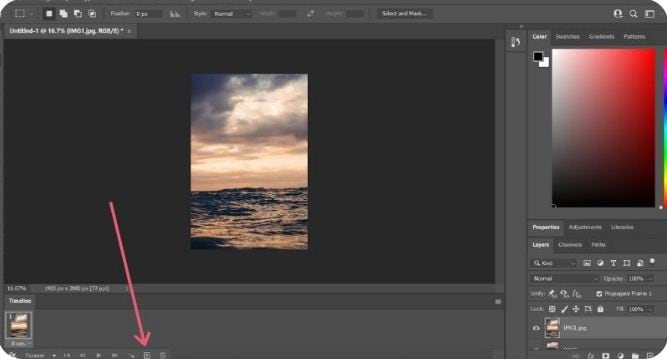
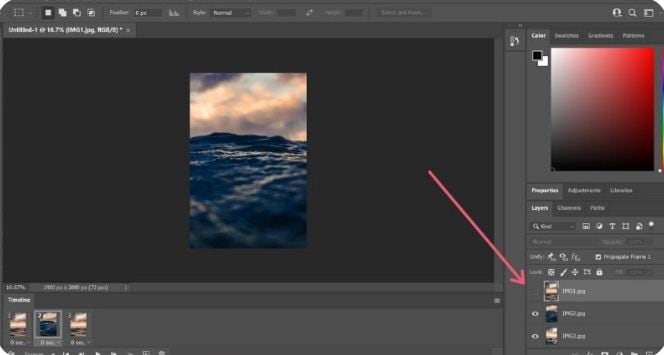
Select you topmost image layer, followed by clicking on the ‘Duplicate’ icon to generate a copy of the image frame.
● Step 4: Decide Time Frames
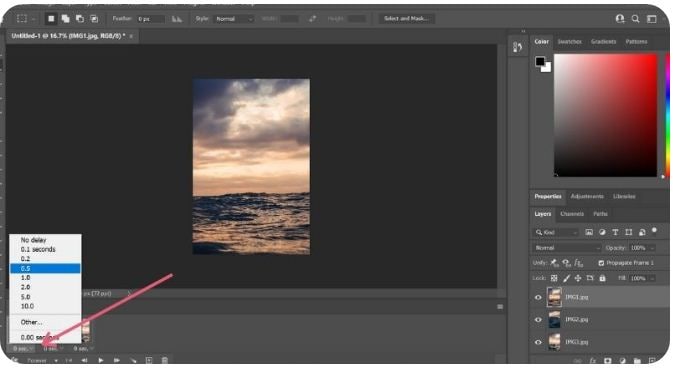
Select your topmost image frame to see a play duration of ‘0 sec’ below its thumbnail. Click to open the drop-down menu beside it and choose suitable time duration for the frame to run. Allot time durations to all successive frames in a similar manner.
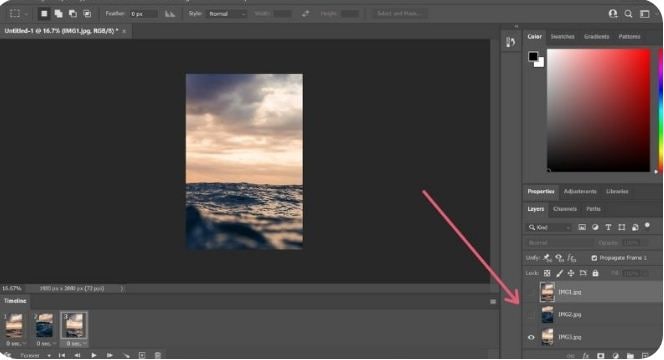
● Step 5: Conceal Top Layers
You will see am combination of the first and second image layers in the image thumbnail. To set this right, navigate to ‘Layers’ to hide the top layer.
Continue to hide previous layers in successive frames so that each layer appears in its respective frame at the end of the process.
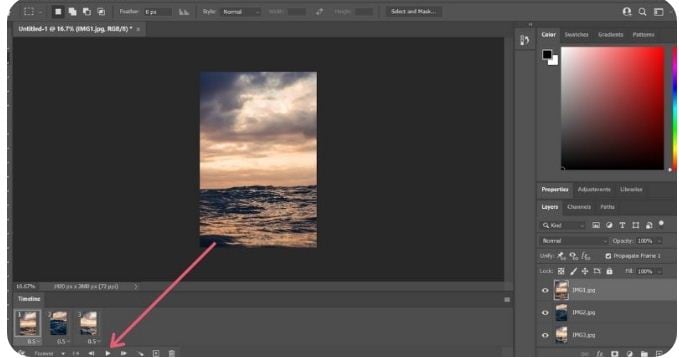
● Step 6: Preview Your Creation
Tap the ‘Play’ button to see your GIF preview. Ensure a smooth run with correct appearance order of images and precise frame durations.
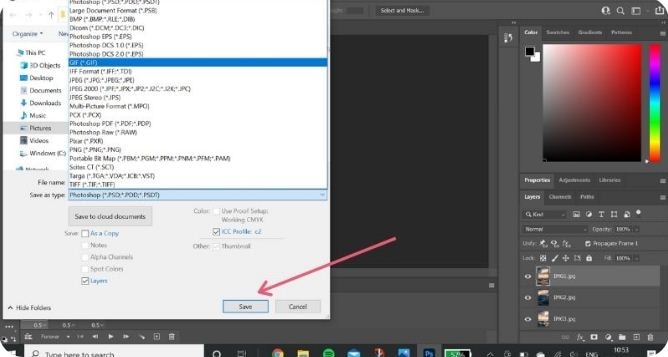
● Step 7: Time to Share.
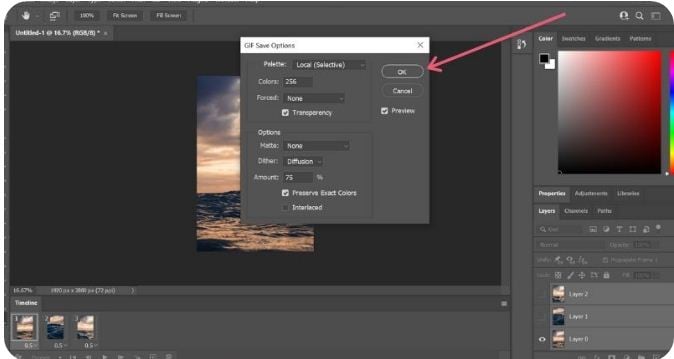
When you are satisfied, navigate to the ‘File’ tab and select ‘Save As’. From the menu that drops down, choose the GIF file format and click on ‘Save’.
In the ’GIF Save Options’ that follows, adjust file settings suited to your preference and tap ‘OK’.
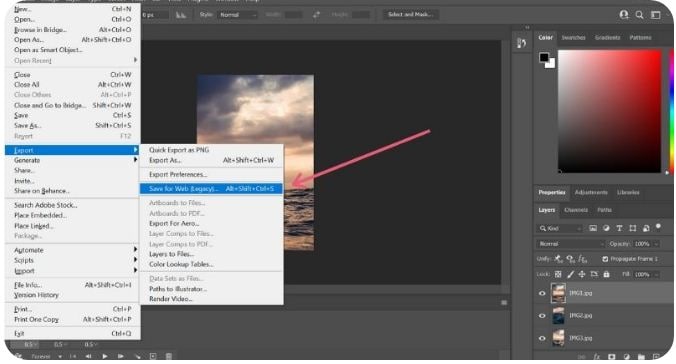
As an alternative you can take the following path to open the ‘GIF Preview Window’:
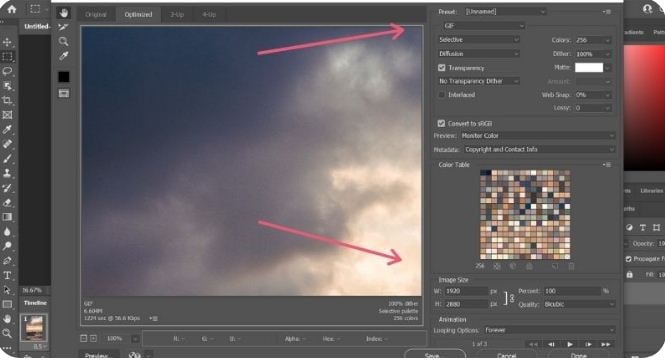
File -> Export -> Save for Web
In the top-right comer, choose the GIF file format from the drop-down menu. There is also an option to resize your image at the bottom-right. It is advisable to keep the image size within 500 pixels for a convenient export across various media sharing platforms. When you finish, click on ‘Save’. Your creation is now ready for a media export.
Part 2 6 Ways to Make an Animated GIF Without Photoshop
The idea to create GIF in Photoshop is fun and exciting, no doubt on that, but you may often want to switch to a different platform. No issues with that, the web is there to sort out everything for you. All you need to do is open your favorite browser to land across a heap of welcoming solutions to create GIFs without Photoshop. Let’s have a look through the best ones:
01**Wondershare Filmora Video Editor **
Filmora by Wondershare is probably the best GIF maker tool you can rely on. This is packed with a diverse inventory of exciting design features that are ready to provide a creative boost to your editing skills. Loaded with a ton of classic audio visual effects, this software is certainly comprises of everything you need to create static and animated GIFs like a pro.

Wondershare Filmora - Best Video Editor for Mac/Windows
5,481,435 people have downloaded it.
Build unique custom animations without breaking a sweat.
Focus on creating epic stories and leave the details to Filmora’s auto features.
Start a creative adventure with drag & drop effects and endless possibilities.
Filmora simplifies advanced features to save you time and effort.
Filmora cuts out repetition so you can move on to your next creative breakthrough.
Key Features
● This is free software with possibly the most convenient interface.
● You get the freedom to play with hundreds of audio-visual effects to your heart’s content.
● You can create GIFs with static images and videos that are simply awesome to say the least.
● You need not worry about specific file formats. The software is compatible with almost all commonly known ones.
● Filmora allows you to expand and explore your editing talent to the fullest. You can play with tools like, cut, trim or combine image frames and make color and speed adjustments to get the perfect results for your artwork.
02Photoscape
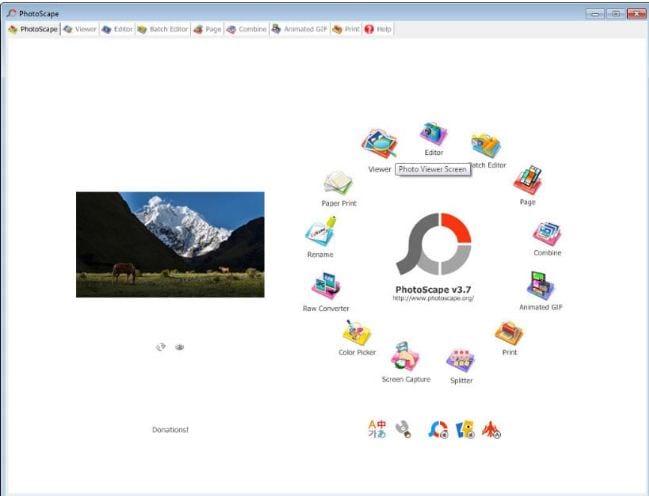
This is another GIF maker tool you can choose to create catchy and interesting GIFs. Photoscape is a simple graphic editor that makes GIF creation exciting and fun. Available to you for free, this software allows you to design and edit animated GIFs with a series of image enhancements, like, resizing, color selection, image prints, etc. Photoscape is compatible with your Windows, Linux and Mac supported devices and has a clean interface. However, the program may sometimes take up a slow run.
Key Features
● You can improvise you GIF with image editing tools, like, color and size adjustments, clip arts, effects, overlays, etc.
● It has a unique ‘Photo Batch’ tool that you can use to process and rename multiple images simultaneously.
● Photoscape allows you to create interesting collages by merging a series of images into a single one.
● You can create captivating animated GIFs with multiple still images.
● The software is loaded with a bunch of utilities like, photo splitter, page merger, color picker, image viewer and others to give that perfect professional outlook to your creations.
03Gifted Motion
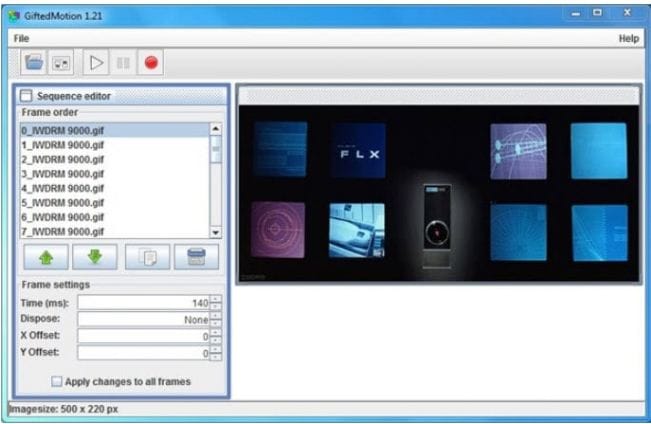
This is also among the commonly preferred GIF creator software. The best this about the tool is that it is platform independent and compatible with almost any Operating System. Another choice appeal of the software is its direct workability that is, you don’t require any program installations to create GIFs using this tool.
Key Features
● This is a simple graphic editor that runs on JAVA and is quite convenient to use.
● You can use this software to edit and create GIFs with images saved locally in your device.
● File formats supported by the software include PNG, JPEG, BMP and GIF.
● You don’t need to worry about licensing costs or in-app purchases; this tool is absolutely free to use.
● Loading big image files on this software may however, cost you some extra time.
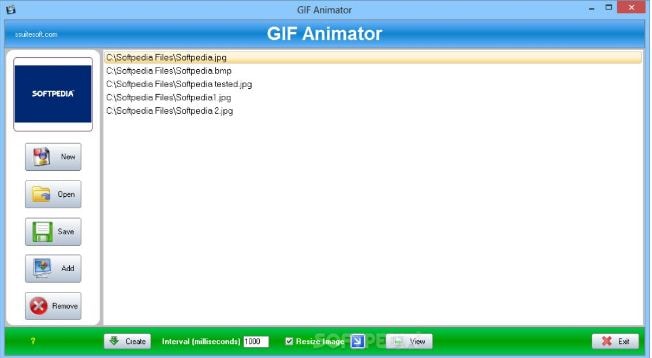
01SSuite GIF Animator
This one is Windows compatible software that works well with both, 32 and 64-bit Operating System configurations. It lies among those ’Green Software Programs’ that cut down on your net energy cost. Apart from high quality animated GIFs, y6ou can also create movies and slides shows with this software.
Key Features
● This is a free of cost, clean and user-friendly graphic editor software.
● You don’t require Windows registration to use this software
● You can conveniently save the software into any USB or memory device; it is easily portable.
● It facilitates a speedy GIF creation and editing.
● You can explore a variety of editing features and add separate time frames to each image using this software.
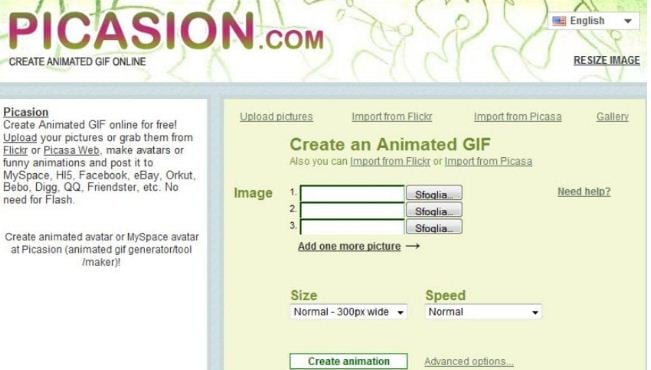
● Picasion
This is a free, online GIF maker tool that gives you the liberty to import images and videos from different app galleries, like, Picasa, Flickr and others to create and edit motion GIFs. The tool, though having a simple interface and feature packed, is quite ad-stricken, but you can skip that by sticking to the right webpage.
Key Features
● The tool crosses language borders and is available to you in English, Spanish, Portuguese and Russian.
● You can make size adjustments to the GIF images, or add a completely new avatar of your own.
● The tool offers you a variety of editing effects and filters to enhance and improvise your created GIFs.
● You need not limit yourself to specific file formats with this tool; all common ones are conveniently supported.
● It is a quick and clean tool that rescues you from the glitch of a messy interface.
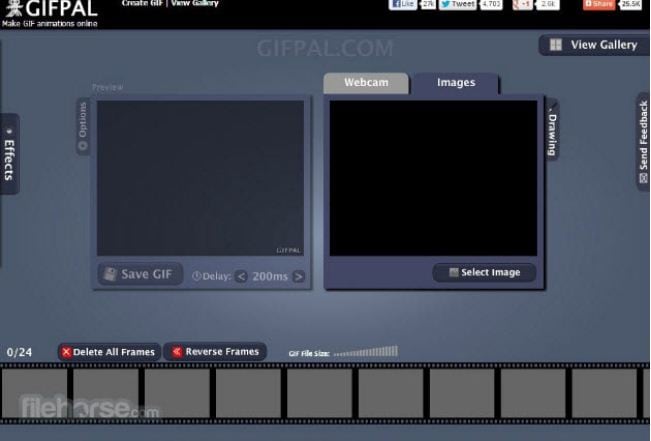
05GifPal
This one is also a free, online GIF creator with amazing editing features and tools. It comes with a diverse library of 20 frames and 30 effects to choose from, for creating normal and animated GIFs. It further has a variety of drawing and text editing tools you can use to add messages to your GIFs to make more impactful.
Key Features
● The tool is packed with a vast set of quality image editing tools that can create attractive motion and animated GIFs.
● The tool allows you to adjust and change the speed of image frames to give a natural flow to your GIF.
● An exclusive feature of the tool is that it allows you to edit frames in its timeline.
● Your creations with the tools are deprived of any default watermarks. You can either add one of your choice, or even create GIFs without a watermark.
● The tool site is free of unwanted and irrelevant ads.
● Key Takeaways from This Episode →
● Making a GIF in Photoshop is a great idea to design animation snippets, both for fun and a target purpose. Using the Photoshop GIF maker ensures quality and class in complete professional styles.
● However, if you are keen on browsing through other GIF creator alternatives, you can safely pick the Filmora GIF Maher software for creating excellent, next level animated GIFs.
Having trouble creating Photoshop GIFs? Stay tuned to set everything straight.
In this article
01 [Easy Ways to Create an Animated GIF in Photoshop](#Part 1)
02 [6 Ways To Make An Animated GIF Without Photoshop](#Part 2)
Part 1 Easy Ways to Create an Animated GIF in Photoshop
Animated GIFs are a naturally captivating means of information exchange and entertainment. When the talk is about creating these, you can visibly see a flood of creation tools and software solutions. However, standing out in the crowd, are those catchy Photoshop snippets that certainly have the potential to leave you jaw dropped.
A Photoshop GIF is bound to capture attention, owing to its high quality imaging and top rated professional editing outlook. If you possess the editing flare, do try creating one for an amazing editing experience.
Creating Animated Photoshop GIFs: Easiest Solutions
Let’s take a look into some easy and interesting ways of creating a GIF in Photoshop, to leave you with handy solutions, just in case you feel motivated to take up the creation idea.
Before you begin, make sure to install and launch a suitable version the Photoshop application in your device and keep a set of selected images at hand that you will require for GIF creation.
● Step 1: Load Image Files
Photoshop requires you to load your selected files into its creation stack. There is no limit on the image count, but make sure you choose images in a natural series so that the GIF doesn’t give an out of the box feel.
Reach the ‘File’ tab at the top and load your image files into the Photoshop stack using the following path:
File -> Scripts -> Load Files into Stack
● Step 2: Image Selection
In the next pop-up window, click ‘Browse’ and choose the image file you wish to load into the Photoshop stack. In case the selected images seem tom lack proper alignment, click on the ‘Attempt to Automatically Align Source Images’ checkbox to set this straight and make your GIF frame stable.
Click on ‘OK’ when you are happy with your selections.
At this instant, Photoshop starts creating layers for the uploaded images, which you can see in the ‘Layers’ panel at the bottom-right. You are allowed to rearrange the image layers by selecting and dragging them or click on layer names to rename them.
If you notice distortion in Photoshop’s automatic alignment of your images, just crop the images frames to sort this out. Here’s how you can get this done:
● Tap the ‘Crop’ symbol.
● Adjust the crop frame to select the desired portion.
● Click on ‘Enter’ to confirm the action.
If you didn’t permit auto alignment previously, no worries, you can move ahead.
● Step 3: Make a Timeline Setup
Navigate to the ‘Window’ tab in the top menu and click the ’Timeline’ checkbox. You will see the ‘Timeline Window’ pop up below the Photoshop workspace, where you need to select the ‘Create Frame Animation’ tab. This will cause the options for frame animation to pop-up.
Select you topmost image layer, followed by clicking on the ‘Duplicate’ icon to generate a copy of the image frame.
● Step 4: Decide Time Frames
Select your topmost image frame to see a play duration of ‘0 sec’ below its thumbnail. Click to open the drop-down menu beside it and choose suitable time duration for the frame to run. Allot time durations to all successive frames in a similar manner.
● Step 5: Conceal Top Layers
You will see am combination of the first and second image layers in the image thumbnail. To set this right, navigate to ‘Layers’ to hide the top layer.
Continue to hide previous layers in successive frames so that each layer appears in its respective frame at the end of the process.
● Step 6: Preview Your Creation
Tap the ‘Play’ button to see your GIF preview. Ensure a smooth run with correct appearance order of images and precise frame durations.
● Step 7: Time to Share.
When you are satisfied, navigate to the ‘File’ tab and select ‘Save As’. From the menu that drops down, choose the GIF file format and click on ‘Save’.
In the ’GIF Save Options’ that follows, adjust file settings suited to your preference and tap ‘OK’.
As an alternative you can take the following path to open the ‘GIF Preview Window’:
File -> Export -> Save for Web
In the top-right comer, choose the GIF file format from the drop-down menu. There is also an option to resize your image at the bottom-right. It is advisable to keep the image size within 500 pixels for a convenient export across various media sharing platforms. When you finish, click on ‘Save’. Your creation is now ready for a media export.
Part 2 6 Ways to Make an Animated GIF Without Photoshop
The idea to create GIF in Photoshop is fun and exciting, no doubt on that, but you may often want to switch to a different platform. No issues with that, the web is there to sort out everything for you. All you need to do is open your favorite browser to land across a heap of welcoming solutions to create GIFs without Photoshop. Let’s have a look through the best ones:
01**Wondershare Filmora Video Editor **
Filmora by Wondershare is probably the best GIF maker tool you can rely on. This is packed with a diverse inventory of exciting design features that are ready to provide a creative boost to your editing skills. Loaded with a ton of classic audio visual effects, this software is certainly comprises of everything you need to create static and animated GIFs like a pro.

Wondershare Filmora - Best Video Editor for Mac/Windows
5,481,435 people have downloaded it.
Build unique custom animations without breaking a sweat.
Focus on creating epic stories and leave the details to Filmora’s auto features.
Start a creative adventure with drag & drop effects and endless possibilities.
Filmora simplifies advanced features to save you time and effort.
Filmora cuts out repetition so you can move on to your next creative breakthrough.
Key Features
● This is free software with possibly the most convenient interface.
● You get the freedom to play with hundreds of audio-visual effects to your heart’s content.
● You can create GIFs with static images and videos that are simply awesome to say the least.
● You need not worry about specific file formats. The software is compatible with almost all commonly known ones.
● Filmora allows you to expand and explore your editing talent to the fullest. You can play with tools like, cut, trim or combine image frames and make color and speed adjustments to get the perfect results for your artwork.
02Photoscape
This is another GIF maker tool you can choose to create catchy and interesting GIFs. Photoscape is a simple graphic editor that makes GIF creation exciting and fun. Available to you for free, this software allows you to design and edit animated GIFs with a series of image enhancements, like, resizing, color selection, image prints, etc. Photoscape is compatible with your Windows, Linux and Mac supported devices and has a clean interface. However, the program may sometimes take up a slow run.
Key Features
● You can improvise you GIF with image editing tools, like, color and size adjustments, clip arts, effects, overlays, etc.
● It has a unique ‘Photo Batch’ tool that you can use to process and rename multiple images simultaneously.
● Photoscape allows you to create interesting collages by merging a series of images into a single one.
● You can create captivating animated GIFs with multiple still images.
● The software is loaded with a bunch of utilities like, photo splitter, page merger, color picker, image viewer and others to give that perfect professional outlook to your creations.
03Gifted Motion
This is also among the commonly preferred GIF creator software. The best this about the tool is that it is platform independent and compatible with almost any Operating System. Another choice appeal of the software is its direct workability that is, you don’t require any program installations to create GIFs using this tool.
Key Features
● This is a simple graphic editor that runs on JAVA and is quite convenient to use.
● You can use this software to edit and create GIFs with images saved locally in your device.
● File formats supported by the software include PNG, JPEG, BMP and GIF.
● You don’t need to worry about licensing costs or in-app purchases; this tool is absolutely free to use.
● Loading big image files on this software may however, cost you some extra time.
01SSuite GIF Animator
This one is Windows compatible software that works well with both, 32 and 64-bit Operating System configurations. It lies among those ’Green Software Programs’ that cut down on your net energy cost. Apart from high quality animated GIFs, y6ou can also create movies and slides shows with this software.
Key Features
● This is a free of cost, clean and user-friendly graphic editor software.
● You don’t require Windows registration to use this software
● You can conveniently save the software into any USB or memory device; it is easily portable.
● It facilitates a speedy GIF creation and editing.
● You can explore a variety of editing features and add separate time frames to each image using this software.
● Picasion
This is a free, online GIF maker tool that gives you the liberty to import images and videos from different app galleries, like, Picasa, Flickr and others to create and edit motion GIFs. The tool, though having a simple interface and feature packed, is quite ad-stricken, but you can skip that by sticking to the right webpage.
Key Features
● The tool crosses language borders and is available to you in English, Spanish, Portuguese and Russian.
● You can make size adjustments to the GIF images, or add a completely new avatar of your own.
● The tool offers you a variety of editing effects and filters to enhance and improvise your created GIFs.
● You need not limit yourself to specific file formats with this tool; all common ones are conveniently supported.
● It is a quick and clean tool that rescues you from the glitch of a messy interface.
05GifPal
This one is also a free, online GIF creator with amazing editing features and tools. It comes with a diverse library of 20 frames and 30 effects to choose from, for creating normal and animated GIFs. It further has a variety of drawing and text editing tools you can use to add messages to your GIFs to make more impactful.
Key Features
● The tool is packed with a vast set of quality image editing tools that can create attractive motion and animated GIFs.
● The tool allows you to adjust and change the speed of image frames to give a natural flow to your GIF.
● An exclusive feature of the tool is that it allows you to edit frames in its timeline.
● Your creations with the tools are deprived of any default watermarks. You can either add one of your choice, or even create GIFs without a watermark.
● The tool site is free of unwanted and irrelevant ads.
● Key Takeaways from This Episode →
● Making a GIF in Photoshop is a great idea to design animation snippets, both for fun and a target purpose. Using the Photoshop GIF maker ensures quality and class in complete professional styles.
● However, if you are keen on browsing through other GIF creator alternatives, you can safely pick the Filmora GIF Maher software for creating excellent, next level animated GIFs.
Having trouble creating Photoshop GIFs? Stay tuned to set everything straight.
In this article
01 [Easy Ways to Create an Animated GIF in Photoshop](#Part 1)
02 [6 Ways To Make An Animated GIF Without Photoshop](#Part 2)
Part 1 Easy Ways to Create an Animated GIF in Photoshop
Animated GIFs are a naturally captivating means of information exchange and entertainment. When the talk is about creating these, you can visibly see a flood of creation tools and software solutions. However, standing out in the crowd, are those catchy Photoshop snippets that certainly have the potential to leave you jaw dropped.
A Photoshop GIF is bound to capture attention, owing to its high quality imaging and top rated professional editing outlook. If you possess the editing flare, do try creating one for an amazing editing experience.
Creating Animated Photoshop GIFs: Easiest Solutions
Let’s take a look into some easy and interesting ways of creating a GIF in Photoshop, to leave you with handy solutions, just in case you feel motivated to take up the creation idea.
Before you begin, make sure to install and launch a suitable version the Photoshop application in your device and keep a set of selected images at hand that you will require for GIF creation.
● Step 1: Load Image Files
Photoshop requires you to load your selected files into its creation stack. There is no limit on the image count, but make sure you choose images in a natural series so that the GIF doesn’t give an out of the box feel.
Reach the ‘File’ tab at the top and load your image files into the Photoshop stack using the following path:
File -> Scripts -> Load Files into Stack
● Step 2: Image Selection
In the next pop-up window, click ‘Browse’ and choose the image file you wish to load into the Photoshop stack. In case the selected images seem tom lack proper alignment, click on the ‘Attempt to Automatically Align Source Images’ checkbox to set this straight and make your GIF frame stable.
Click on ‘OK’ when you are happy with your selections.
At this instant, Photoshop starts creating layers for the uploaded images, which you can see in the ‘Layers’ panel at the bottom-right. You are allowed to rearrange the image layers by selecting and dragging them or click on layer names to rename them.
If you notice distortion in Photoshop’s automatic alignment of your images, just crop the images frames to sort this out. Here’s how you can get this done:
● Tap the ‘Crop’ symbol.
● Adjust the crop frame to select the desired portion.
● Click on ‘Enter’ to confirm the action.
If you didn’t permit auto alignment previously, no worries, you can move ahead.
● Step 3: Make a Timeline Setup
Navigate to the ‘Window’ tab in the top menu and click the ’Timeline’ checkbox. You will see the ‘Timeline Window’ pop up below the Photoshop workspace, where you need to select the ‘Create Frame Animation’ tab. This will cause the options for frame animation to pop-up.
Select you topmost image layer, followed by clicking on the ‘Duplicate’ icon to generate a copy of the image frame.
● Step 4: Decide Time Frames
Select your topmost image frame to see a play duration of ‘0 sec’ below its thumbnail. Click to open the drop-down menu beside it and choose suitable time duration for the frame to run. Allot time durations to all successive frames in a similar manner.
● Step 5: Conceal Top Layers
You will see am combination of the first and second image layers in the image thumbnail. To set this right, navigate to ‘Layers’ to hide the top layer.
Continue to hide previous layers in successive frames so that each layer appears in its respective frame at the end of the process.
● Step 6: Preview Your Creation
Tap the ‘Play’ button to see your GIF preview. Ensure a smooth run with correct appearance order of images and precise frame durations.
● Step 7: Time to Share.
When you are satisfied, navigate to the ‘File’ tab and select ‘Save As’. From the menu that drops down, choose the GIF file format and click on ‘Save’.
In the ’GIF Save Options’ that follows, adjust file settings suited to your preference and tap ‘OK’.
As an alternative you can take the following path to open the ‘GIF Preview Window’:
File -> Export -> Save for Web
In the top-right comer, choose the GIF file format from the drop-down menu. There is also an option to resize your image at the bottom-right. It is advisable to keep the image size within 500 pixels for a convenient export across various media sharing platforms. When you finish, click on ‘Save’. Your creation is now ready for a media export.
Part 2 6 Ways to Make an Animated GIF Without Photoshop
The idea to create GIF in Photoshop is fun and exciting, no doubt on that, but you may often want to switch to a different platform. No issues with that, the web is there to sort out everything for you. All you need to do is open your favorite browser to land across a heap of welcoming solutions to create GIFs without Photoshop. Let’s have a look through the best ones:
01**Wondershare Filmora Video Editor **
Filmora by Wondershare is probably the best GIF maker tool you can rely on. This is packed with a diverse inventory of exciting design features that are ready to provide a creative boost to your editing skills. Loaded with a ton of classic audio visual effects, this software is certainly comprises of everything you need to create static and animated GIFs like a pro.

Wondershare Filmora - Best Video Editor for Mac/Windows
5,481,435 people have downloaded it.
Build unique custom animations without breaking a sweat.
Focus on creating epic stories and leave the details to Filmora’s auto features.
Start a creative adventure with drag & drop effects and endless possibilities.
Filmora simplifies advanced features to save you time and effort.
Filmora cuts out repetition so you can move on to your next creative breakthrough.
Key Features
● This is free software with possibly the most convenient interface.
● You get the freedom to play with hundreds of audio-visual effects to your heart’s content.
● You can create GIFs with static images and videos that are simply awesome to say the least.
● You need not worry about specific file formats. The software is compatible with almost all commonly known ones.
● Filmora allows you to expand and explore your editing talent to the fullest. You can play with tools like, cut, trim or combine image frames and make color and speed adjustments to get the perfect results for your artwork.
02Photoscape
This is another GIF maker tool you can choose to create catchy and interesting GIFs. Photoscape is a simple graphic editor that makes GIF creation exciting and fun. Available to you for free, this software allows you to design and edit animated GIFs with a series of image enhancements, like, resizing, color selection, image prints, etc. Photoscape is compatible with your Windows, Linux and Mac supported devices and has a clean interface. However, the program may sometimes take up a slow run.
Key Features
● You can improvise you GIF with image editing tools, like, color and size adjustments, clip arts, effects, overlays, etc.
● It has a unique ‘Photo Batch’ tool that you can use to process and rename multiple images simultaneously.
● Photoscape allows you to create interesting collages by merging a series of images into a single one.
● You can create captivating animated GIFs with multiple still images.
● The software is loaded with a bunch of utilities like, photo splitter, page merger, color picker, image viewer and others to give that perfect professional outlook to your creations.
03Gifted Motion
This is also among the commonly preferred GIF creator software. The best this about the tool is that it is platform independent and compatible with almost any Operating System. Another choice appeal of the software is its direct workability that is, you don’t require any program installations to create GIFs using this tool.
Key Features
● This is a simple graphic editor that runs on JAVA and is quite convenient to use.
● You can use this software to edit and create GIFs with images saved locally in your device.
● File formats supported by the software include PNG, JPEG, BMP and GIF.
● You don’t need to worry about licensing costs or in-app purchases; this tool is absolutely free to use.
● Loading big image files on this software may however, cost you some extra time.
01SSuite GIF Animator
This one is Windows compatible software that works well with both, 32 and 64-bit Operating System configurations. It lies among those ’Green Software Programs’ that cut down on your net energy cost. Apart from high quality animated GIFs, y6ou can also create movies and slides shows with this software.
Key Features
● This is a free of cost, clean and user-friendly graphic editor software.
● You don’t require Windows registration to use this software
● You can conveniently save the software into any USB or memory device; it is easily portable.
● It facilitates a speedy GIF creation and editing.
● You can explore a variety of editing features and add separate time frames to each image using this software.
● Picasion
This is a free, online GIF maker tool that gives you the liberty to import images and videos from different app galleries, like, Picasa, Flickr and others to create and edit motion GIFs. The tool, though having a simple interface and feature packed, is quite ad-stricken, but you can skip that by sticking to the right webpage.
Key Features
● The tool crosses language borders and is available to you in English, Spanish, Portuguese and Russian.
● You can make size adjustments to the GIF images, or add a completely new avatar of your own.
● The tool offers you a variety of editing effects and filters to enhance and improvise your created GIFs.
● You need not limit yourself to specific file formats with this tool; all common ones are conveniently supported.
● It is a quick and clean tool that rescues you from the glitch of a messy interface.
05GifPal
This one is also a free, online GIF creator with amazing editing features and tools. It comes with a diverse library of 20 frames and 30 effects to choose from, for creating normal and animated GIFs. It further has a variety of drawing and text editing tools you can use to add messages to your GIFs to make more impactful.
Key Features
● The tool is packed with a vast set of quality image editing tools that can create attractive motion and animated GIFs.
● The tool allows you to adjust and change the speed of image frames to give a natural flow to your GIF.
● An exclusive feature of the tool is that it allows you to edit frames in its timeline.
● Your creations with the tools are deprived of any default watermarks. You can either add one of your choice, or even create GIFs without a watermark.
● The tool site is free of unwanted and irrelevant ads.
● Key Takeaways from This Episode →
● Making a GIF in Photoshop is a great idea to design animation snippets, both for fun and a target purpose. Using the Photoshop GIF maker ensures quality and class in complete professional styles.
● However, if you are keen on browsing through other GIF creator alternatives, you can safely pick the Filmora GIF Maher software for creating excellent, next level animated GIFs.
Having trouble creating Photoshop GIFs? Stay tuned to set everything straight.
In this article
01 [Easy Ways to Create an Animated GIF in Photoshop](#Part 1)
02 [6 Ways To Make An Animated GIF Without Photoshop](#Part 2)
Part 1 Easy Ways to Create an Animated GIF in Photoshop
Animated GIFs are a naturally captivating means of information exchange and entertainment. When the talk is about creating these, you can visibly see a flood of creation tools and software solutions. However, standing out in the crowd, are those catchy Photoshop snippets that certainly have the potential to leave you jaw dropped.
A Photoshop GIF is bound to capture attention, owing to its high quality imaging and top rated professional editing outlook. If you possess the editing flare, do try creating one for an amazing editing experience.
Creating Animated Photoshop GIFs: Easiest Solutions
Let’s take a look into some easy and interesting ways of creating a GIF in Photoshop, to leave you with handy solutions, just in case you feel motivated to take up the creation idea.
Before you begin, make sure to install and launch a suitable version the Photoshop application in your device and keep a set of selected images at hand that you will require for GIF creation.
● Step 1: Load Image Files
Photoshop requires you to load your selected files into its creation stack. There is no limit on the image count, but make sure you choose images in a natural series so that the GIF doesn’t give an out of the box feel.
Reach the ‘File’ tab at the top and load your image files into the Photoshop stack using the following path:
File -> Scripts -> Load Files into Stack
● Step 2: Image Selection
In the next pop-up window, click ‘Browse’ and choose the image file you wish to load into the Photoshop stack. In case the selected images seem tom lack proper alignment, click on the ‘Attempt to Automatically Align Source Images’ checkbox to set this straight and make your GIF frame stable.
Click on ‘OK’ when you are happy with your selections.
At this instant, Photoshop starts creating layers for the uploaded images, which you can see in the ‘Layers’ panel at the bottom-right. You are allowed to rearrange the image layers by selecting and dragging them or click on layer names to rename them.
If you notice distortion in Photoshop’s automatic alignment of your images, just crop the images frames to sort this out. Here’s how you can get this done:
● Tap the ‘Crop’ symbol.
● Adjust the crop frame to select the desired portion.
● Click on ‘Enter’ to confirm the action.
If you didn’t permit auto alignment previously, no worries, you can move ahead.
● Step 3: Make a Timeline Setup
Navigate to the ‘Window’ tab in the top menu and click the ’Timeline’ checkbox. You will see the ‘Timeline Window’ pop up below the Photoshop workspace, where you need to select the ‘Create Frame Animation’ tab. This will cause the options for frame animation to pop-up.
Select you topmost image layer, followed by clicking on the ‘Duplicate’ icon to generate a copy of the image frame.
● Step 4: Decide Time Frames
Select your topmost image frame to see a play duration of ‘0 sec’ below its thumbnail. Click to open the drop-down menu beside it and choose suitable time duration for the frame to run. Allot time durations to all successive frames in a similar manner.
● Step 5: Conceal Top Layers
You will see am combination of the first and second image layers in the image thumbnail. To set this right, navigate to ‘Layers’ to hide the top layer.
Continue to hide previous layers in successive frames so that each layer appears in its respective frame at the end of the process.
● Step 6: Preview Your Creation
Tap the ‘Play’ button to see your GIF preview. Ensure a smooth run with correct appearance order of images and precise frame durations.
● Step 7: Time to Share.
When you are satisfied, navigate to the ‘File’ tab and select ‘Save As’. From the menu that drops down, choose the GIF file format and click on ‘Save’.
In the ’GIF Save Options’ that follows, adjust file settings suited to your preference and tap ‘OK’.
As an alternative you can take the following path to open the ‘GIF Preview Window’:
File -> Export -> Save for Web
In the top-right comer, choose the GIF file format from the drop-down menu. There is also an option to resize your image at the bottom-right. It is advisable to keep the image size within 500 pixels for a convenient export across various media sharing platforms. When you finish, click on ‘Save’. Your creation is now ready for a media export.
Part 2 6 Ways to Make an Animated GIF Without Photoshop
The idea to create GIF in Photoshop is fun and exciting, no doubt on that, but you may often want to switch to a different platform. No issues with that, the web is there to sort out everything for you. All you need to do is open your favorite browser to land across a heap of welcoming solutions to create GIFs without Photoshop. Let’s have a look through the best ones:
01**Wondershare Filmora Video Editor **
Filmora by Wondershare is probably the best GIF maker tool you can rely on. This is packed with a diverse inventory of exciting design features that are ready to provide a creative boost to your editing skills. Loaded with a ton of classic audio visual effects, this software is certainly comprises of everything you need to create static and animated GIFs like a pro.

Wondershare Filmora - Best Video Editor for Mac/Windows
5,481,435 people have downloaded it.
Build unique custom animations without breaking a sweat.
Focus on creating epic stories and leave the details to Filmora’s auto features.
Start a creative adventure with drag & drop effects and endless possibilities.
Filmora simplifies advanced features to save you time and effort.
Filmora cuts out repetition so you can move on to your next creative breakthrough.
Key Features
● This is free software with possibly the most convenient interface.
● You get the freedom to play with hundreds of audio-visual effects to your heart’s content.
● You can create GIFs with static images and videos that are simply awesome to say the least.
● You need not worry about specific file formats. The software is compatible with almost all commonly known ones.
● Filmora allows you to expand and explore your editing talent to the fullest. You can play with tools like, cut, trim or combine image frames and make color and speed adjustments to get the perfect results for your artwork.
02Photoscape
This is another GIF maker tool you can choose to create catchy and interesting GIFs. Photoscape is a simple graphic editor that makes GIF creation exciting and fun. Available to you for free, this software allows you to design and edit animated GIFs with a series of image enhancements, like, resizing, color selection, image prints, etc. Photoscape is compatible with your Windows, Linux and Mac supported devices and has a clean interface. However, the program may sometimes take up a slow run.
Key Features
● You can improvise you GIF with image editing tools, like, color and size adjustments, clip arts, effects, overlays, etc.
● It has a unique ‘Photo Batch’ tool that you can use to process and rename multiple images simultaneously.
● Photoscape allows you to create interesting collages by merging a series of images into a single one.
● You can create captivating animated GIFs with multiple still images.
● The software is loaded with a bunch of utilities like, photo splitter, page merger, color picker, image viewer and others to give that perfect professional outlook to your creations.
03Gifted Motion
This is also among the commonly preferred GIF creator software. The best this about the tool is that it is platform independent and compatible with almost any Operating System. Another choice appeal of the software is its direct workability that is, you don’t require any program installations to create GIFs using this tool.
Key Features
● This is a simple graphic editor that runs on JAVA and is quite convenient to use.
● You can use this software to edit and create GIFs with images saved locally in your device.
● File formats supported by the software include PNG, JPEG, BMP and GIF.
● You don’t need to worry about licensing costs or in-app purchases; this tool is absolutely free to use.
● Loading big image files on this software may however, cost you some extra time.
01SSuite GIF Animator
This one is Windows compatible software that works well with both, 32 and 64-bit Operating System configurations. It lies among those ’Green Software Programs’ that cut down on your net energy cost. Apart from high quality animated GIFs, y6ou can also create movies and slides shows with this software.
Key Features
● This is a free of cost, clean and user-friendly graphic editor software.
● You don’t require Windows registration to use this software
● You can conveniently save the software into any USB or memory device; it is easily portable.
● It facilitates a speedy GIF creation and editing.
● You can explore a variety of editing features and add separate time frames to each image using this software.
● Picasion
This is a free, online GIF maker tool that gives you the liberty to import images and videos from different app galleries, like, Picasa, Flickr and others to create and edit motion GIFs. The tool, though having a simple interface and feature packed, is quite ad-stricken, but you can skip that by sticking to the right webpage.
Key Features
● The tool crosses language borders and is available to you in English, Spanish, Portuguese and Russian.
● You can make size adjustments to the GIF images, or add a completely new avatar of your own.
● The tool offers you a variety of editing effects and filters to enhance and improvise your created GIFs.
● You need not limit yourself to specific file formats with this tool; all common ones are conveniently supported.
● It is a quick and clean tool that rescues you from the glitch of a messy interface.
05GifPal
This one is also a free, online GIF creator with amazing editing features and tools. It comes with a diverse library of 20 frames and 30 effects to choose from, for creating normal and animated GIFs. It further has a variety of drawing and text editing tools you can use to add messages to your GIFs to make more impactful.
Key Features
● The tool is packed with a vast set of quality image editing tools that can create attractive motion and animated GIFs.
● The tool allows you to adjust and change the speed of image frames to give a natural flow to your GIF.
● An exclusive feature of the tool is that it allows you to edit frames in its timeline.
● Your creations with the tools are deprived of any default watermarks. You can either add one of your choice, or even create GIFs without a watermark.
● The tool site is free of unwanted and irrelevant ads.
● Key Takeaways from This Episode →
● Making a GIF in Photoshop is a great idea to design animation snippets, both for fun and a target purpose. Using the Photoshop GIF maker ensures quality and class in complete professional styles.
● However, if you are keen on browsing through other GIF creator alternatives, you can safely pick the Filmora GIF Maher software for creating excellent, next level animated GIFs.
[Best 10 Options] Slow Down Video Online with Perfection
Slowing down videos might seem like a simple technique, but it is all about precision. This process has been made accessible via slow-motion video online makers. This software requires no hard disk storage and an internet connection. The best part about creating a slow-mo video online is that you can access it at any time.
These video-to-slow-motion online creators slow down playback speed or enhance fps. In addition to functioning properly, some of these tools offer AI integration. This article revolves around the concept of online tools to create slow-motion videos. Along the way, you can find insights into the top 9 tools that create this effect. In addition, the 10th tool will be the top of its desktop alternative to these online tools.
Slow Motion Video Maker Slow your video’s speed with better control of your keyframes to create unique cinematic effects!
Make A Slow Motion Video Make A Slow Motion Video More Features

Part 1: Top-Rated Online Slow-Down Video Tools to Use
Video to slow motion online tools are taking over the market since the demand for slo-mos has increased. It is because this effect makes everything aesthetic and detailed. Moreover, it goes with almost every song, making slo-mo an important editing part. Explore some of the top online tools to create a slow-motion effect:
1. Kapwing
Are you seeking a smooth, slow-motion video online editor with multidevice support? Kapwing is an innovative tool with diverse speed editing options. Creating a slow motion is as easy as uploading a file. After import, the application shows multiple speed options from 1.0x to 0.25x. You can add this effect to a specific video part, as Kapwing has a timeline editing bar.

Key Features
- You can select a preferred ratio for your video from its portrait and landscape ratio options.
- This online video slow-motion maker collaborates with Google Drive and Photos to import media.
- The editing interface is basic and minimal, with an organized arrangement of diverse features.
Pricing
| Pricing Plan | Annual Pricing |
|---|---|
| Pro | $16/month |
| Business | $50/month |
| Enterprise | Contact Sales |
2. Ezgif
Want to slow down a video but on a budget? Use this free slow-mo video editor online with multiple speed features. The tool also speeds up a video; hence, you can do both for creative effect. The standard playback speed is 1.0x; lower values slow down a video and vice versa. In addition, the tool offers resize, audio, and cut settings with speed manipulation.

Key Features
- The tool supports all video formats for speed change, including MP4, WebM, and more.
- The file size limit for this slow-motion video player online is 100MB.
- To slow down the speed of an online video, you can just paste its URL and edit further.
Pricing
Free
3. Media.io
Can’t you find a suitable editor for slow-motion video online in different formats? Media.io offers seamless support with abundant video formats like MP3, MOV, and more. It is capable of reducing your video speed to 0.25x and is simple to employ. The slow speed alteration can be carried out by dragging the slider towards the left. You can also mute the video sound during speed change to save its quality.
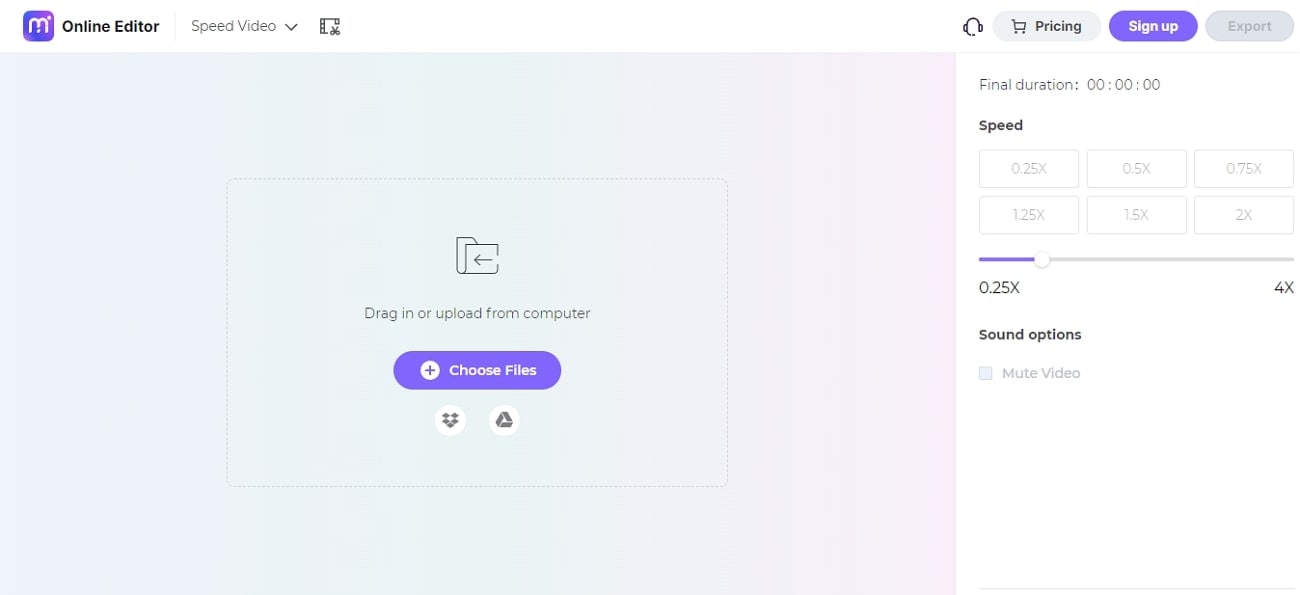
Key Features
- You can slow down a video tutorial by simply pasting its URL.
- Along with slow-motion online, it also allows you to incorporate high-motion effects.
- There are numerous video, image, or audio-enhancing tools to improve the quality of a video.
Pricing
| Pricing Plan | Annual Pricing |
|---|---|
| Yearly Plan | $86.99 |
| Monthly Plan | $19.99 |
4. Flixier
Flixier is a reliable video editor with slo-mo online services for MP4, AVI, and MKV formats. Accessibility is its strong pursuit, and it offers two options for speed modification. You can use the slider or the buttons to slow down video speed. With its cloud collaboration, it makes a slow-mo in a brief period.

Key Features
- Along with video speed change, you can also change the speed of an audio track.
- Create time-lapse videos for those precious moments you spend using its high-speed effects.
- Publish your videos on social platforms like Facebook, Instagram, and TikTok.
Pricing
| Pricing Plan | Annual Pricing |
|---|---|
| Pro | $6/month |
| Business | $12/month |
| Enterprise | $55/month |
5. OnlineConverter.com
Everyone’s favorite is a tool that offers precise editing options, as you can personalize a video. This slow-motion video maker online offers speed modification at different durations. It has two options for a slow-mo; one is 50% of the original speed, and the other is 20% slower. In addition, you can set the duration to apply the effect at any time. Add a “Start Time” and “To the End” time, and the effect will apply.

Key Features
- The tool claims to support 16+ video formats, including popular and commonly used ones.
- The file size limit to make slow-motion videos online is 200 MB.
- Adjust the audio speed according to the video’s speed alteration.
Pricing
Free
6. InVideo AI
Do you want to change the speed of a larger file of 2GB file size online? While other editors support small file sizes, this slow-motion video editor online can do better. Creating a slow motion in it can occur in 3 simple steps. Just upload a video and set a speed among options like 0.75x, 0.5x, and more.

Key Features
- Within speed editing, you can use the cut, trim, and crop tools to enhance a video.
- The tool is a hub for generative AIs like Art, Avatar, Script, and Video generation.
- Offers diverse templates for seamless video editing in diverse contexts.
Pricing
| Pricing Plan | Annual Pricing |
|---|---|
| Business | $15/month |
| Unlimited | $30/month |
7. Neural Love
Do you want to start simply by making slow-motion video online? Slow down your video by 2 to 8 times more than its original speed. The results will amaze you as if you have used a professional camera. MOV and MP4 are popular video formats, and this tool supports both. The tool has a strict security policy as it understands the significance of data privacy.

Key Features
- Video speed change occurs in percentage; below 50% means a slow-motion video.
- You can manipulate and insert additional video frames up to 60fps for smooth results.
- Enable colorization and facial restoration features before starting the speed change.
Pricing
| Pricing Plan | Pricing Per 100 Credits |
|---|---|
| Subscription | $10/month |
| Pay As You Go | $19/month |
8. Abraia
What is better than finding an all-in-one slow-mo video online maker? With Abraia, experience slow-motion effect creation amongst other editing options. The process of changing video speed is as simple as dragging a slider. Whilst decreasing the video speed, use the cut tool to make sections and apply it to them.

Key Features
- Offers a Bulk Mode in which you can edit multiple files simultaneously to increase productivity.
- This slow-motion maker online features 16 screen ratios suitable for social site sharing.
- It also offers text, graphics, and visual adjustment features to complete editing.
Pricing
| Credits | Pricing |
|---|---|
| 2500 | $9 |
| 5000 | $12 |
| 10,000 | $18 |
9. Wave.video
Who doesn’t love creating slow-motion when it is a matter of a few clicks? Use this slow video speed online to change the playback speed with a click. It allows 3 video playback options: 0.75x, 0.5x, and 0.25x for right editing. It possesses a simple user interface and offers audio modification along with speed. Create a cinematic expression in your videos or add the time-lapse effect to enhance visuals.

Key Features
- This online slow-motion maker offers a range of template categories for editing.
- You can integrate unlimited video clips, audio tracks, and images from its stock library.
- The tool also offers creative assets like graphics or visual effects for advanced editing.
Pricing
| Pricing Plan | Annual Pricing |
|---|---|
| Streamer | $16/month |
| Creator | $24/month |
| Business | $48/month |
Part 2: Offline Alternative: Making Slow Motion Videos Quickly Using Filmora
All the mentioned slow-motion video online makers are remarkable in their field. However, they have certain drawbacks like internet connection requirements and more. Wondershare Filmora is a well-suited alternative to these leading online tools. It is because the platform doesn’t need an online connection to create a slow-mo. In addition, the software offers all the features in one place, so you don’t have to switch.
Creating a slow motion in this slow motion video online alternative is uncomplicated. Compared to its competitors, it has a simple method to make a slow-mo. The “Uniform Speed” option uses a slider to change the speed percentage. In addition, it has AI integration in the form of the “Optical Flow” feature. This allows the seamless creation of slow-motion video by enhancing the number of frames.
Free Download For Win 7 or later(64-bit)
Free Download For macOS 10.14 or later
Step-by-Step Guide to Creating a Slow Motion Video in Filmora
Once you know about Filmora and its advantages, you cannot stop using it. The accessible editing interface is what this generation opts for. It is because many of us start as freelance content creators, making on our own. To facilitate such creators, here is a detailed guide to creating slow motion in Filmora:
Step 1File Import and Speed Alteration
Launch Filmora to create a new project and import media with the “Ctrl + I” shortcut. After bringing this media to the timeline, use the playhead to mark a specific area. Further, go to the “Speed” > “Uniform Speed” tab in the settings panel. Change the speed of the video by dragging the slider and adjusting it accordingly.

Step 2Opt for AI Frame Interpolation
Navigate towards the bottom of the “Uniform Speed” tab and access “AI Frame Interpolation.” Further, expand the option using the navigation arrow and select the “Optical Flow” option.

Step 3Render Preview of the Video
To analyze the results, navigate toward the timeline toolbar and select the “Render Preview” option. After reviewing the final results, click on the “Export” button to save the video on the device.

Conclusion
This article has provided detailed insights on slow-motion video online tools for your access. Those who prefer to work online can benefit from these online editors. However, if you want to unlock the new secrets of slow motion, use Filmora. The software has AI-backed algorithms for maintaining slow motion. It has multiple benefits over the other 9 tools, which makes it our 10th yet top recommendation.
Make A Slow Motion Video Make A Slow Motion Video More Features

Part 1: Top-Rated Online Slow-Down Video Tools to Use
Video to slow motion online tools are taking over the market since the demand for slo-mos has increased. It is because this effect makes everything aesthetic and detailed. Moreover, it goes with almost every song, making slo-mo an important editing part. Explore some of the top online tools to create a slow-motion effect:
1. Kapwing
Are you seeking a smooth, slow-motion video online editor with multidevice support? Kapwing is an innovative tool with diverse speed editing options. Creating a slow motion is as easy as uploading a file. After import, the application shows multiple speed options from 1.0x to 0.25x. You can add this effect to a specific video part, as Kapwing has a timeline editing bar.

Key Features
- You can select a preferred ratio for your video from its portrait and landscape ratio options.
- This online video slow-motion maker collaborates with Google Drive and Photos to import media.
- The editing interface is basic and minimal, with an organized arrangement of diverse features.
Pricing
| Pricing Plan | Annual Pricing |
|---|---|
| Pro | $16/month |
| Business | $50/month |
| Enterprise | Contact Sales |
2. Ezgif
Want to slow down a video but on a budget? Use this free slow-mo video editor online with multiple speed features. The tool also speeds up a video; hence, you can do both for creative effect. The standard playback speed is 1.0x; lower values slow down a video and vice versa. In addition, the tool offers resize, audio, and cut settings with speed manipulation.

Key Features
- The tool supports all video formats for speed change, including MP4, WebM, and more.
- The file size limit for this slow-motion video player online is 100MB.
- To slow down the speed of an online video, you can just paste its URL and edit further.
Pricing
Free
3. Media.io
Can’t you find a suitable editor for slow-motion video online in different formats? Media.io offers seamless support with abundant video formats like MP3, MOV, and more. It is capable of reducing your video speed to 0.25x and is simple to employ. The slow speed alteration can be carried out by dragging the slider towards the left. You can also mute the video sound during speed change to save its quality.

Key Features
- You can slow down a video tutorial by simply pasting its URL.
- Along with slow-motion online, it also allows you to incorporate high-motion effects.
- There are numerous video, image, or audio-enhancing tools to improve the quality of a video.
Pricing
| Pricing Plan | Annual Pricing |
|---|---|
| Yearly Plan | $86.99 |
| Monthly Plan | $19.99 |
4. Flixier
Flixier is a reliable video editor with slo-mo online services for MP4, AVI, and MKV formats. Accessibility is its strong pursuit, and it offers two options for speed modification. You can use the slider or the buttons to slow down video speed. With its cloud collaboration, it makes a slow-mo in a brief period.

Key Features
- Along with video speed change, you can also change the speed of an audio track.
- Create time-lapse videos for those precious moments you spend using its high-speed effects.
- Publish your videos on social platforms like Facebook, Instagram, and TikTok.
Pricing
| Pricing Plan | Annual Pricing |
|---|---|
| Pro | $6/month |
| Business | $12/month |
| Enterprise | $55/month |
5. OnlineConverter.com
Everyone’s favorite is a tool that offers precise editing options, as you can personalize a video. This slow-motion video maker online offers speed modification at different durations. It has two options for a slow-mo; one is 50% of the original speed, and the other is 20% slower. In addition, you can set the duration to apply the effect at any time. Add a “Start Time” and “To the End” time, and the effect will apply.

Key Features
- The tool claims to support 16+ video formats, including popular and commonly used ones.
- The file size limit to make slow-motion videos online is 200 MB.
- Adjust the audio speed according to the video’s speed alteration.
Pricing
Free
6. InVideo AI
Do you want to change the speed of a larger file of 2GB file size online? While other editors support small file sizes, this slow-motion video editor online can do better. Creating a slow motion in it can occur in 3 simple steps. Just upload a video and set a speed among options like 0.75x, 0.5x, and more.

Key Features
- Within speed editing, you can use the cut, trim, and crop tools to enhance a video.
- The tool is a hub for generative AIs like Art, Avatar, Script, and Video generation.
- Offers diverse templates for seamless video editing in diverse contexts.
Pricing
| Pricing Plan | Annual Pricing |
|---|---|
| Business | $15/month |
| Unlimited | $30/month |
7. Neural Love
Do you want to start simply by making slow-motion video online? Slow down your video by 2 to 8 times more than its original speed. The results will amaze you as if you have used a professional camera. MOV and MP4 are popular video formats, and this tool supports both. The tool has a strict security policy as it understands the significance of data privacy.

Key Features
- Video speed change occurs in percentage; below 50% means a slow-motion video.
- You can manipulate and insert additional video frames up to 60fps for smooth results.
- Enable colorization and facial restoration features before starting the speed change.
Pricing
| Pricing Plan | Pricing Per 100 Credits |
|---|---|
| Subscription | $10/month |
| Pay As You Go | $19/month |
8. Abraia
What is better than finding an all-in-one slow-mo video online maker? With Abraia, experience slow-motion effect creation amongst other editing options. The process of changing video speed is as simple as dragging a slider. Whilst decreasing the video speed, use the cut tool to make sections and apply it to them.

Key Features
- Offers a Bulk Mode in which you can edit multiple files simultaneously to increase productivity.
- This slow-motion maker online features 16 screen ratios suitable for social site sharing.
- It also offers text, graphics, and visual adjustment features to complete editing.
Pricing
| Credits | Pricing |
|---|---|
| 2500 | $9 |
| 5000 | $12 |
| 10,000 | $18 |
9. Wave.video
Who doesn’t love creating slow-motion when it is a matter of a few clicks? Use this slow video speed online to change the playback speed with a click. It allows 3 video playback options: 0.75x, 0.5x, and 0.25x for right editing. It possesses a simple user interface and offers audio modification along with speed. Create a cinematic expression in your videos or add the time-lapse effect to enhance visuals.

Key Features
- This online slow-motion maker offers a range of template categories for editing.
- You can integrate unlimited video clips, audio tracks, and images from its stock library.
- The tool also offers creative assets like graphics or visual effects for advanced editing.
Pricing
| Pricing Plan | Annual Pricing |
|---|---|
| Streamer | $16/month |
| Creator | $24/month |
| Business | $48/month |
Part 2: Offline Alternative: Making Slow Motion Videos Quickly Using Filmora
All the mentioned slow-motion video online makers are remarkable in their field. However, they have certain drawbacks like internet connection requirements and more. Wondershare Filmora is a well-suited alternative to these leading online tools. It is because the platform doesn’t need an online connection to create a slow-mo. In addition, the software offers all the features in one place, so you don’t have to switch.
Creating a slow motion in this slow motion video online alternative is uncomplicated. Compared to its competitors, it has a simple method to make a slow-mo. The “Uniform Speed” option uses a slider to change the speed percentage. In addition, it has AI integration in the form of the “Optical Flow” feature. This allows the seamless creation of slow-motion video by enhancing the number of frames.
Free Download For Win 7 or later(64-bit)
Free Download For macOS 10.14 or later
Step-by-Step Guide to Creating a Slow Motion Video in Filmora
Once you know about Filmora and its advantages, you cannot stop using it. The accessible editing interface is what this generation opts for. It is because many of us start as freelance content creators, making on our own. To facilitate such creators, here is a detailed guide to creating slow motion in Filmora:
Step 1File Import and Speed Alteration
Launch Filmora to create a new project and import media with the “Ctrl + I” shortcut. After bringing this media to the timeline, use the playhead to mark a specific area. Further, go to the “Speed” > “Uniform Speed” tab in the settings panel. Change the speed of the video by dragging the slider and adjusting it accordingly.

Step 2Opt for AI Frame Interpolation
Navigate towards the bottom of the “Uniform Speed” tab and access “AI Frame Interpolation.” Further, expand the option using the navigation arrow and select the “Optical Flow” option.

Step 3Render Preview of the Video
To analyze the results, navigate toward the timeline toolbar and select the “Render Preview” option. After reviewing the final results, click on the “Export” button to save the video on the device.

Conclusion
This article has provided detailed insights on slow-motion video online tools for your access. Those who prefer to work online can benefit from these online editors. However, if you want to unlock the new secrets of slow motion, use Filmora. The software has AI-backed algorithms for maintaining slow motion. It has multiple benefits over the other 9 tools, which makes it our 10th yet top recommendation.
Also read:
- New In 2024, Step by Step to Rotate Videos in Davinci Resolve
- In 2024, The Background in Your Footage Might Be Bland or Unpleasant. This Article Will Discuss Video Background Templates You Can Use to Spice Things up and Make Your Videos Go Viral
- New In This Article, We Will Introduce You Our Top 5 Picks of Websites and Software Converter Online to Convert Powerpoint to Mp4
- New 4 Ways to Add White Borders on Mobile and Desktop
- Updated How to Make Fortnite Thumbnail with Motion Blur?
- New In 2024, Confused About Deciding the Next Destination for Your Trip? This Article Features some of the Best Vloggers You Can Find for Gaining Inspiration for Traveling
- Updated In 2024, How to Zoom Picture in Picture Easy Solution
- This Article Talks in Detail About Why People Look for a Free Title Maker, and 8 Options that Will Benefit Their Work. It Includes Tools Like SEMrush Title Generator, Hubspot Title Generator, and More. Check Out for 2024
- Updated How To Make Boring Videos Look Cool By B Rolls
- Updated What Are the Best 10 GIF Creator?
- Updated How to Add Effects in Premiere Pro for 2024
- Updated In 2024, How to Download Windows Movie Maker 2012 Version
- In 2024, How to Add Adjustment Layer in Premiere Pro
- In 2024, How Have Game Recording Software Improved Their Stature in the Market? An Overview
- Updated Wondering About How to Easily Create a Slideshow on Your iPhone? Well, Take Note of some of the Finest Apps to Turn Your Vision Into Reality for 2024
- Useful Tips for Canva Animated Elements for 2024
- For People Wanting to Mock GPS on Vivo S18 Pro Devices | Dr.fone
- How To Unlock Apple iPhone 6s Official Method to Unlock Your Apple iPhone 6s
- Locked Out of iPhone 14 Pro Max? 5 Ways to get into a Locked iPhone 14 Pro Max
- In 2024, Unlocking Apple iPhone 15 Pro Max Lock Screen 3 Foolproof Methods that Actually Work | Dr.fone
- In 2024, Apple ID is Greyed Out On iPhone 12 Pro Max How to Bypass?
- In 2024, Change Location on Yik Yak For your Samsung Galaxy S23 Tactical Edition to Enjoy More Fun | Dr.fone
- In 2024, Tips And Tricks To Tell if Your Apple iPhone 13 mini Is Unlocked
- How to Stop Google Chrome from Tracking Your Location On Realme 11 5G? | Dr.fone
- In 2024, How I Transferred Messages from Samsung Galaxy S23+ to iPhone 12/XS (Max) in Seconds | Dr.fone
- Complete guide for recovering video files on Poco F5 5G
- 8 Solutions to Solve YouTube App Crashing on Xiaomi Redmi Note 12 4G | Dr.fone
- How To Stream Anything From Nubia Z50S Pro to Apple TV | Dr.fone
- Title: New Camtasia Video Editor Review
- Author: Morgan
- Created at : 2024-05-19 05:11:56
- Updated at : 2024-05-20 05:11:56
- Link: https://ai-video-editing.techidaily.com/new-camtasia-video-editor-review/
- License: This work is licensed under CC BY-NC-SA 4.0.


