
New Clone Yourself in Videos with Filmora

Clone Yourself in Videos with Filmora
With the help of video editing programs like Filmora , you can create clones of yourself. Whether you’re looking to create a funny skit or a serious video, cloning yourself can add much production value to your project.
In this article, we’ll walk you through the process of how to clone yourself in videos using Filmora.
Part 1: How to Film Clips for Cloning Effects?
To make cloning effects, you will need to take two different shots and use a tripod to place the camera, so the frame doesn’t change.
Shooting the first clip
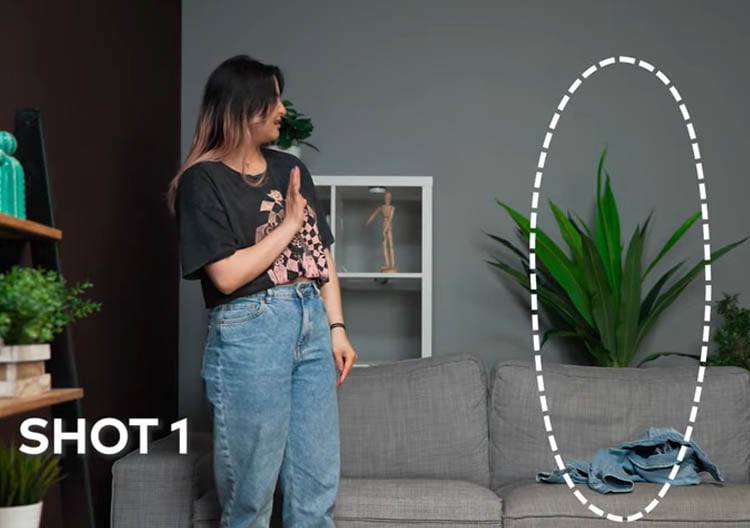
For the first shot, stay on one side of the frame and do the first action. For example, you can pretend to yank and take off your jacket. Then, drop the jacket to the other side of the frame.
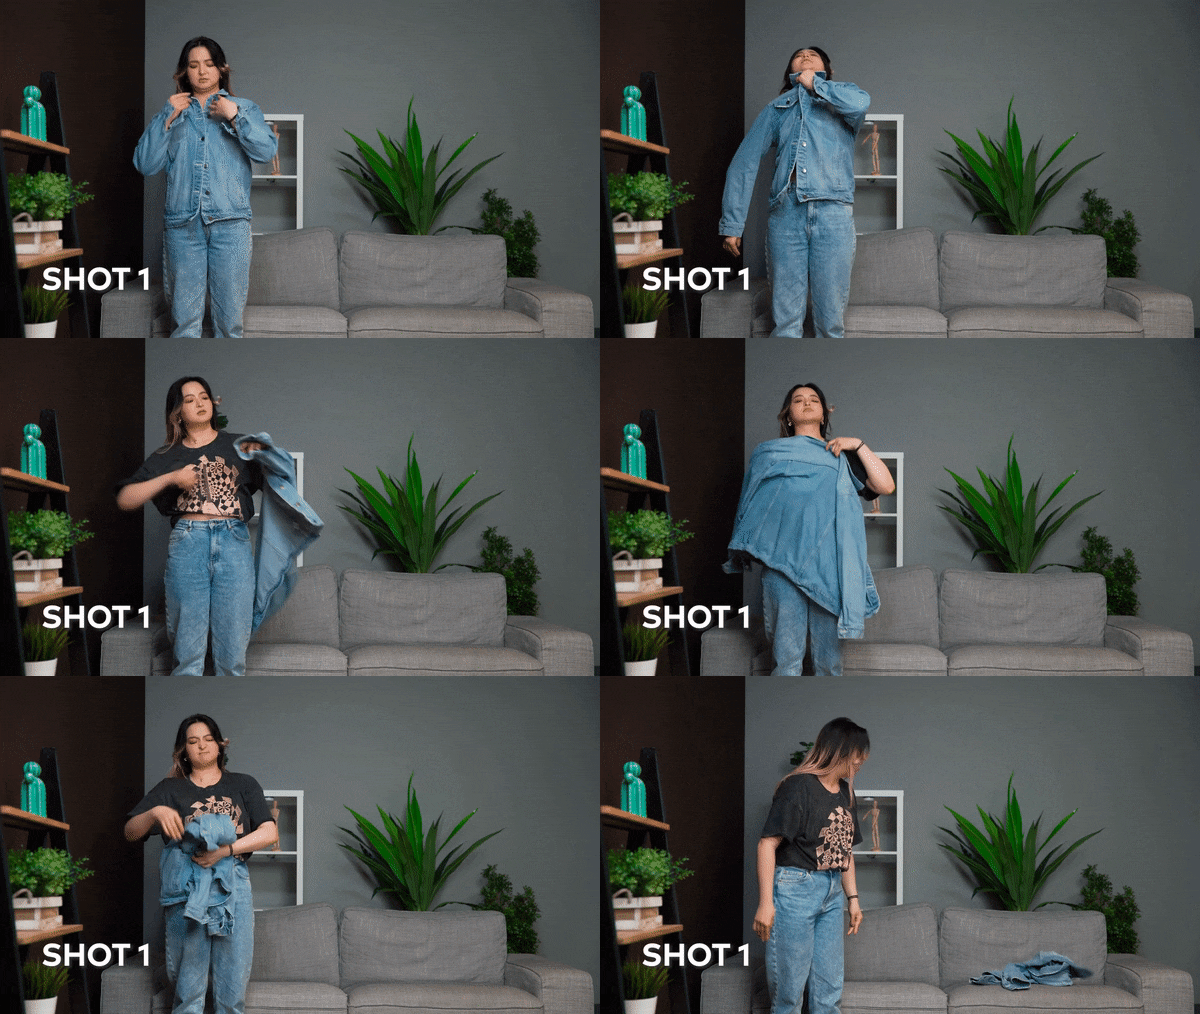
To make it more realistic, make an interaction by reacting to the “clone” while facing the other direction.
Shooting the second clip
Then, shoot for the second clip without changing the frame. You will have to go to the place where you dropped the jacket from the first shot.
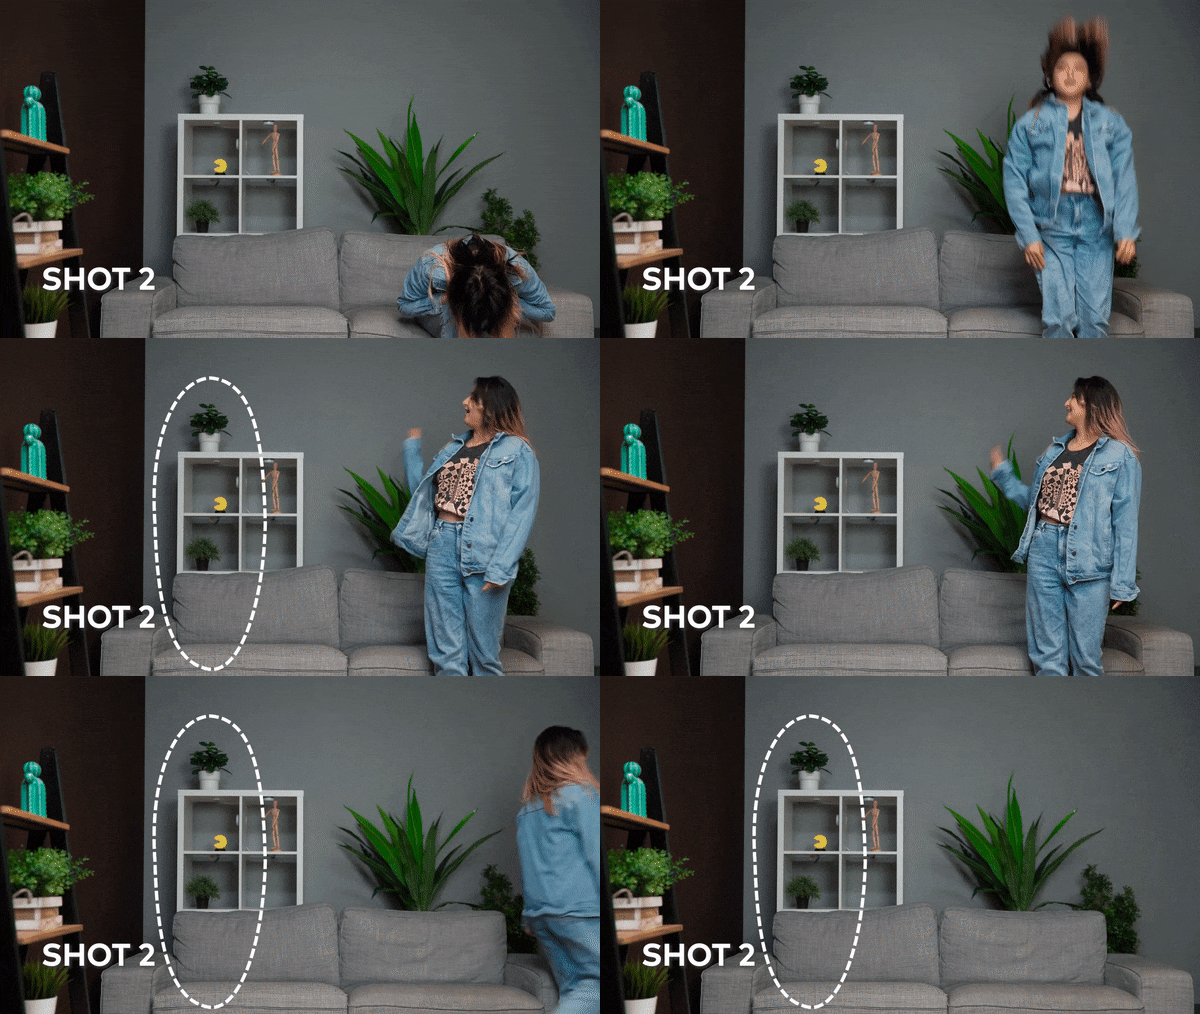
Act as if you have just appeared there and give a reaction to the other side as well.
Part 2: How to Do the Clone Effect with Filmora?
After you have shot the necessary film clips, bring the clips into Filmora 11. If you haven’t installed Filmora yet, you can go to their website and download it here:
Free Download For Win 7 or later(64-bit)
Free Download For macOS 10.14 or later
Once you have opened Filmora 11, follow the steps below:
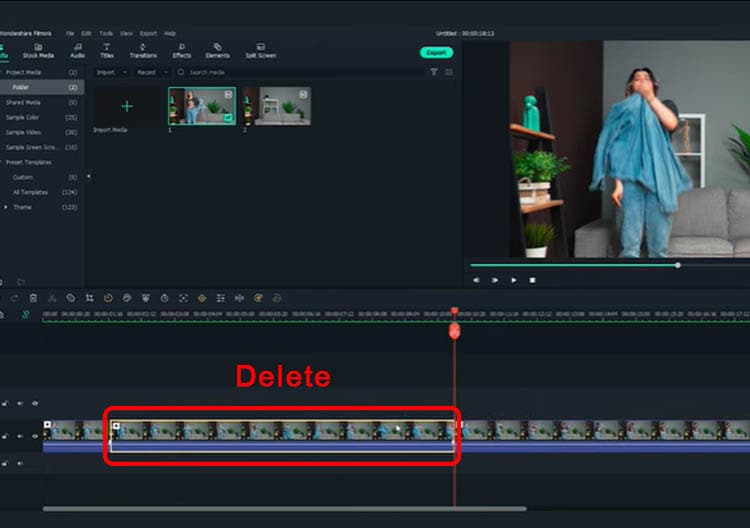
Step1 Bring the first clip to the timeline and cut the clip where you pretend to yank and take off the jacket. Select and delete the unnecessary clip.
Step2 After you have the first part of the effect ready, let’s start working on the clone part using masking.
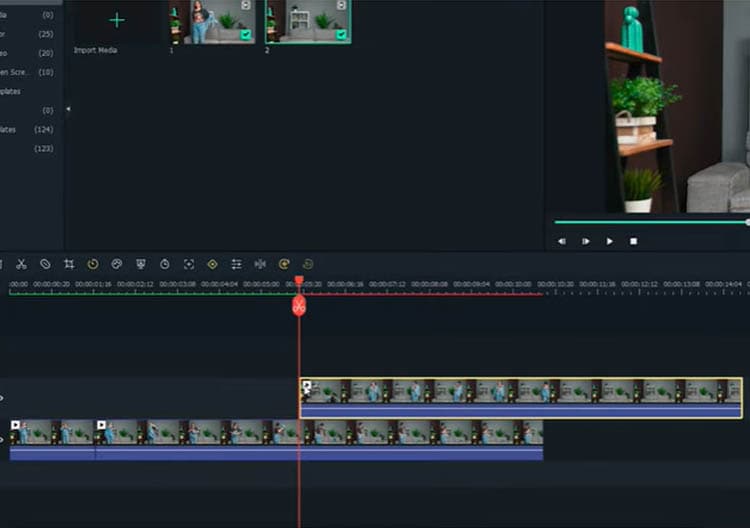
First, place the second clip on a different window track, and the starting point is where you react to the “clone.”
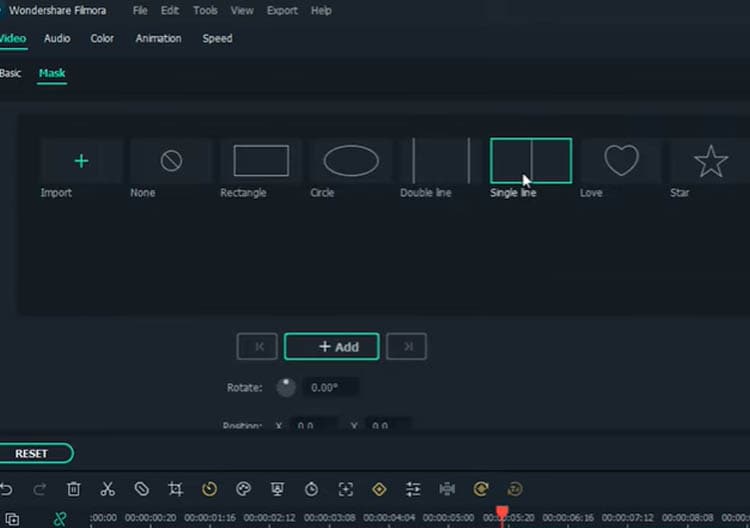
Then, double-click the second clip and go to the Filmora setting window. Tap on the Mask section > Single line.
On the preview screen, adjust the position of the mask to only show “the clone.”
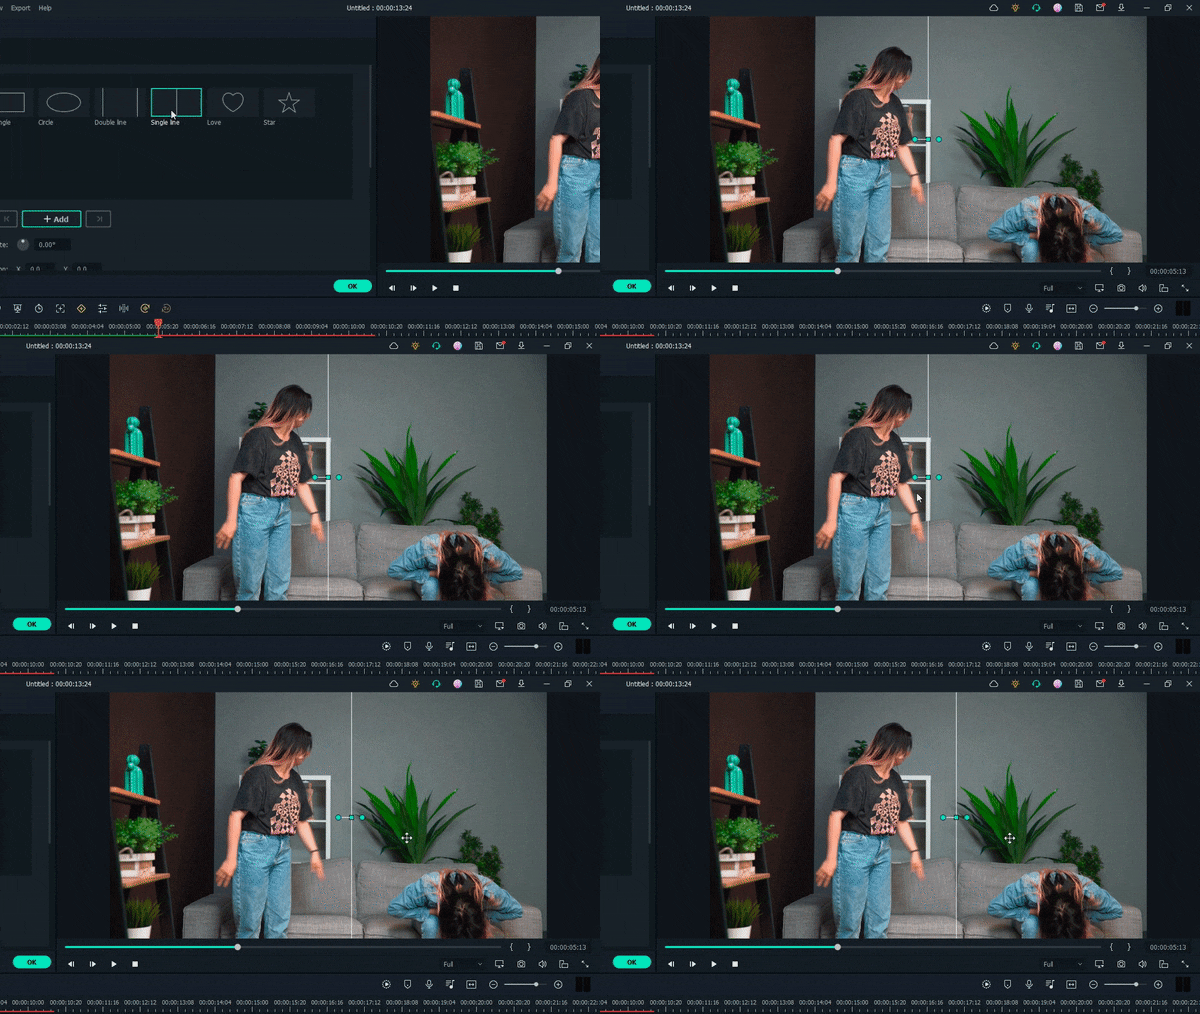
Set the blur strength on the setting to make a smoother edge transition.
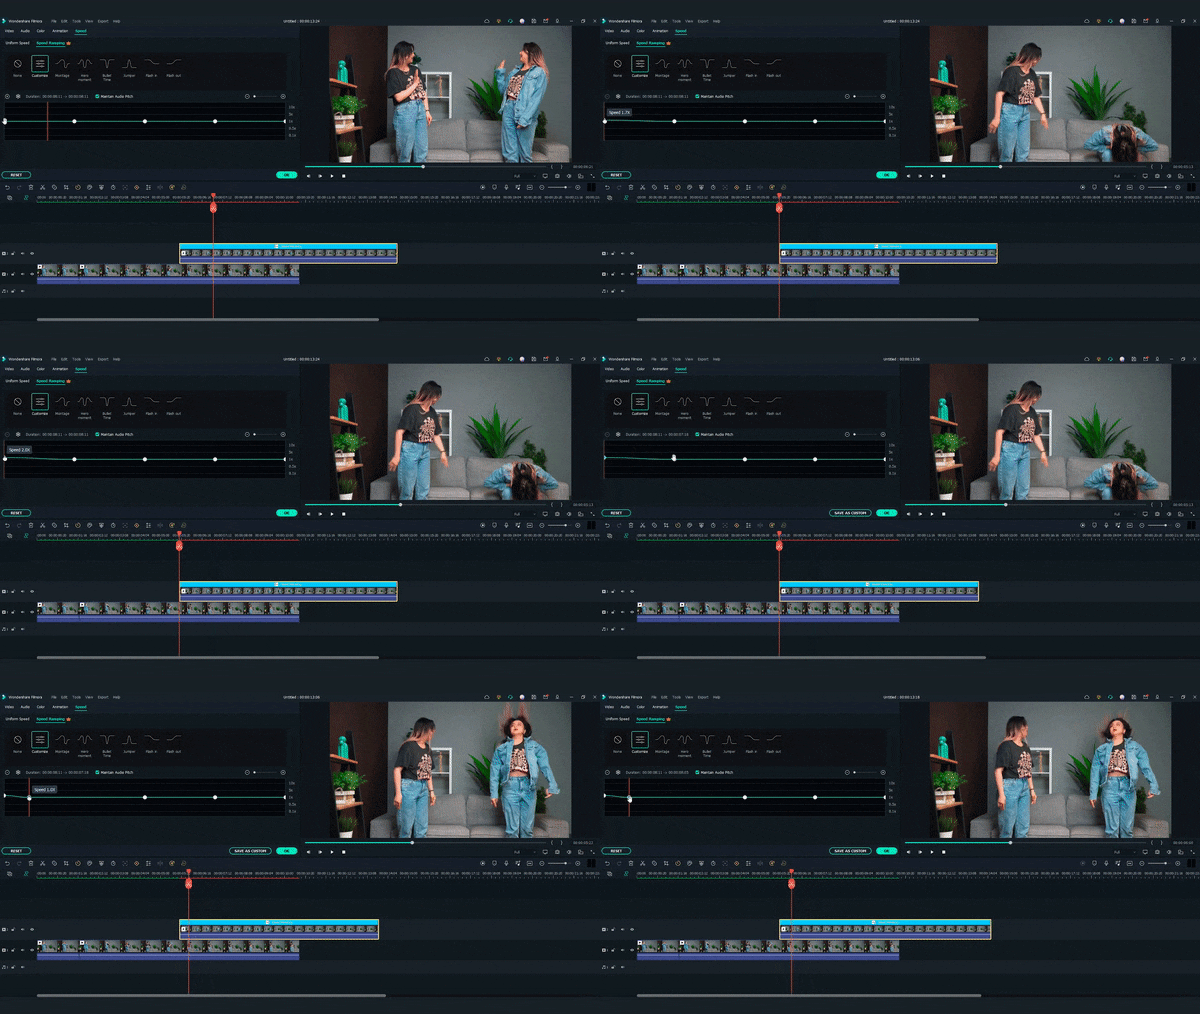
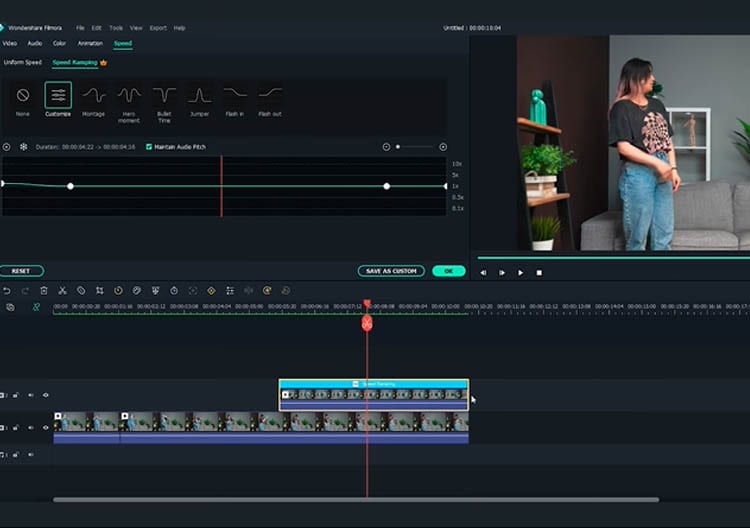
Step3 If the timing of the two clips doesn’t match, you can fix it using the speed ramping feature on Filmora 11. To use it, double-click the second clip and select Speed > Speed Ramping > Customize.
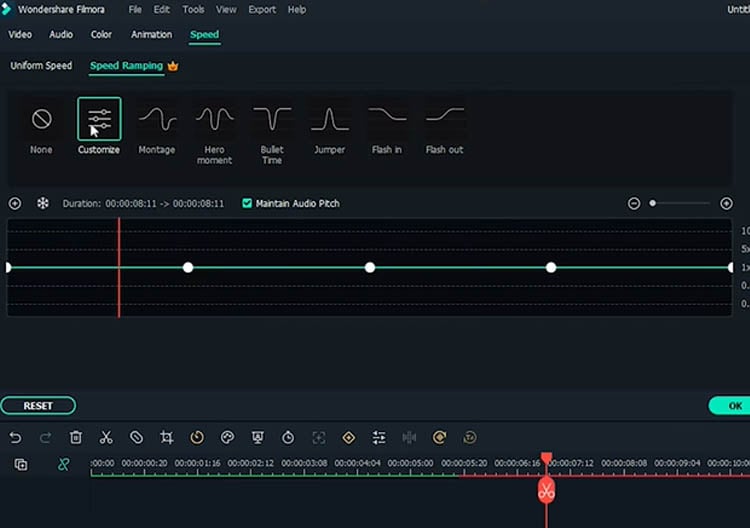
Move the keyframe up to increase the speed. You can adjust it according to your needs.
Step4 Once you are satisfied, adjust the clip length on the timeline and make sure that both clips finish at the same time.
Extra tip: Add one more effect to make it more magical.
Step1 Open the Effects window and search for “up down 1.”
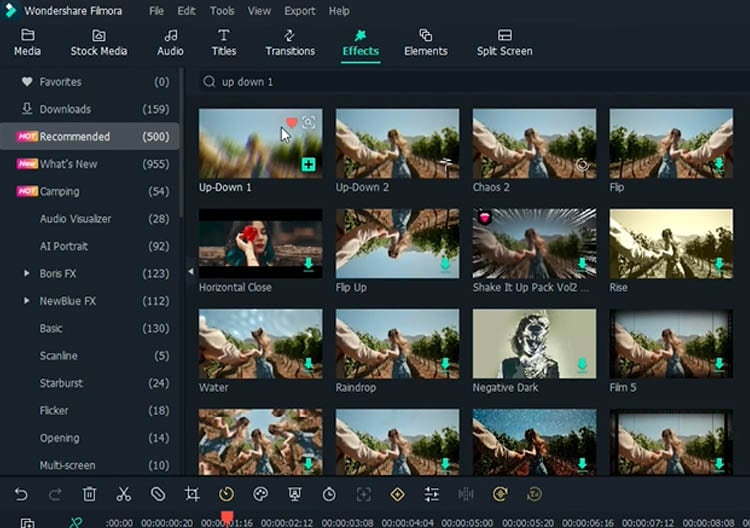
Step2 Drag and drop the effect onto the timeline where the first cut is set. Adjust the effect length to match the action.
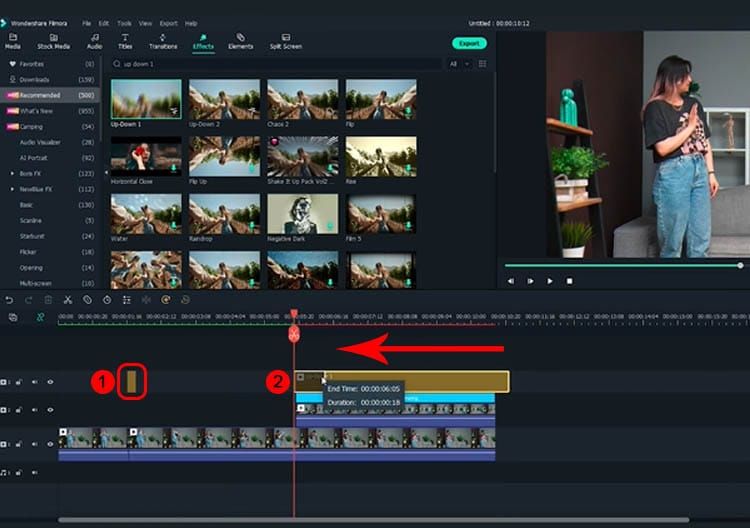
Then, drag and drop the effect again in the transition between the first and the second clip. Adjust it to the appropriate length, then it will give a more dramatic effect.
Step3 You can playback and see how it looks on the preview screen.
Summary
Making a clone effect on video is easy using Filmora. You can use the same trick to create a fashion lookbook video or other creative content to make them more engaging. Let us know if you want to see more tutorials.
Free Download For Win 7 or later(64-bit)
Free Download For macOS 10.14 or later
Free Download For macOS 10.14 or later
Once you have opened Filmora 11, follow the steps below:
Step1 Bring the first clip to the timeline and cut the clip where you pretend to yank and take off the jacket. Select and delete the unnecessary clip.

Step2 After you have the first part of the effect ready, let’s start working on the clone part using masking.
First, place the second clip on a different window track, and the starting point is where you react to the “clone.”

Then, double-click the second clip and go to the Filmora setting window. Tap on the Mask section > Single line.

On the preview screen, adjust the position of the mask to only show “the clone.”

Set the blur strength on the setting to make a smoother edge transition.
Step3 If the timing of the two clips doesn’t match, you can fix it using the speed ramping feature on Filmora 11. To use it, double-click the second clip and select Speed > Speed Ramping > Customize.

Move the keyframe up to increase the speed. You can adjust it according to your needs.

Step4 Once you are satisfied, adjust the clip length on the timeline and make sure that both clips finish at the same time.

Extra tip: Add one more effect to make it more magical.
Step1 Open the Effects window and search for “up down 1.”

Step2 Drag and drop the effect onto the timeline where the first cut is set. Adjust the effect length to match the action.

Then, drag and drop the effect again in the transition between the first and the second clip. Adjust it to the appropriate length, then it will give a more dramatic effect.
Step3 You can playback and see how it looks on the preview screen.
Summary
Making a clone effect on video is easy using Filmora. You can use the same trick to create a fashion lookbook video or other creative content to make them more engaging. Let us know if you want to see more tutorials.
Free Download For Win 7 or later(64-bit)
Free Download For macOS 10.14 or later
Any Video May Be Enhanced Using Adobe Premiere Transitions. If You Are Looking to Learn How to Add Fade to Black in Premiere Pro? Then, Check Out This Fade to Black Transition Premiere Pro Guide to Learn the Trick
The most fundamental and typical sort of Fading is a simple cut, which is often used by editors to go from one shot to another. Applying effects between clips, at the start of a clip, or at its finish may sometimes help you smooth out or stylize your edit. Fade to black transition premiere pro can be used to get this outcome. To help users create current and trendy styles, Premiere Pro features a vast range of effects and tools including fade to black in premiere pro.
Going back to the days of black and white may sometimes be a welcome change of pace in the era of vivid digital and flashy film. Being a professional editor, you’ll understand that editing should be undetectable. If an editor has done their job well, no one will notice their efforts. You’ve failed as soon as the audience realizes the cut has occurred. But fading out to black (or white) seems out of the ordinary. Use this how to fade to black premiere pro guide to learn the steps in Adobe PR.
Part 1. What is Fade to Black
You will become a better filmmaker if you expand your vocabulary in video editing by learning about transitions. The dissolve-to-black, or fade-to-black (a fade to black in premiere pro), works well in part because it has a certain theatrical feel to it. A fade-out/fade-down, often known as a fade-to-black in theater, occurs in total darkness. One of the key components of video editing is using transitions in Adobe Premiere Pro.
The fundamental elements of many other transitions are fades. Effective use of Fades is a crucial skill in your video editing repertoire since it is subtle to the point of practically being undetectable. A video transition called a “fade to black” causes a scene or clip to gradually conclude with a black backdrop. It dates back to the time when the stage curtains were drawn and the lights were dimmed during a theatrical performance. The stage therefore went completely black while the team behind hurriedly changed into new clothing and stage items for the following action.
Those that seem to take place close together chronologically are edited together, while scenes that occur at separate periods or locales are faded out. These are recognizable features of the film. They alert us to the fact that the tale is moving to a later time or place, either thematically, chronologically, or geographically. In a practical sense, this is the time when the cast and crew switch out the set and clothes. But the fade-to-black marks the end of the scene in a symbolic and narrative sense.
Part 2. How to Fade to Black in Premiere Pro
One of the most widely used video editing programs is Adobe Premiere Pro. In Premiere Pro, a number of transitions are available. One of the first, most important responsibilities for a film editor to do is the utilization of numerous transitions. In fact, many aspiring film editors start off by learning how to fade to black in Premiere. Fortunately, creating a fade to black transition in Premiere isn’t that difficult to do step by step. Everything from straightforward dissolves to wipes, slides, and zooms may be found here.
Steps to Fade to Black in Premiere Pro:
Step1Launch the Program and Refer to the Effects
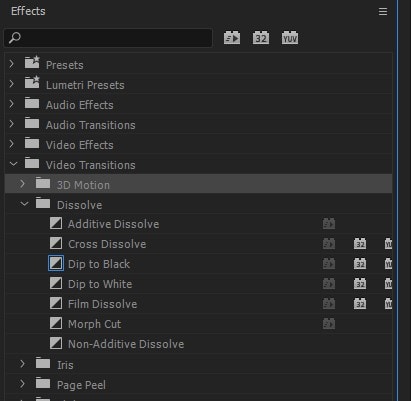
After launching Adobe Premier Pro CC, simply drag the Dip to Black effect from the Effects tab to the very start or very finish of the clip you want to use. The effect may then be moved around to change its duration as needed. Add two clips to the Premiere Pro timeline.

Step2 Add the fade to black transition
Drag and drop the Dip to Black effect between two clips on the timeline after selecting the Effects tab and typing “dip to black” into the search field. The right half of the clip will display the dip to black effect.
Step3 Customize the fade to black effect
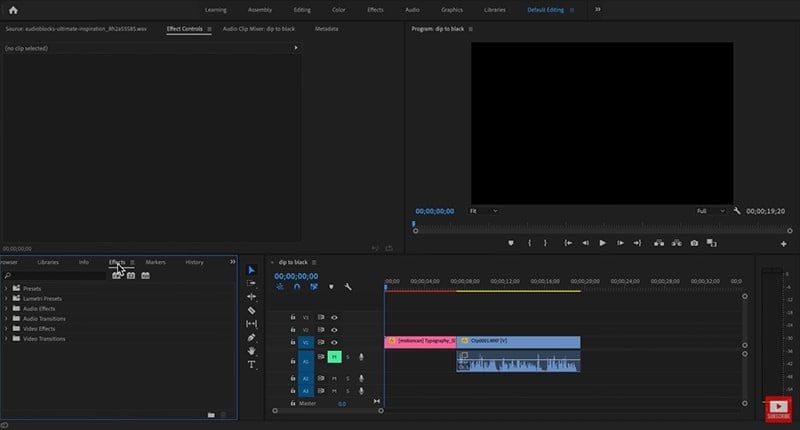
Go to Effect Controls and, while the dip to black effect is chosen, alter the alignment to Center at Cut. Before video B starts, video A will now fade to black.
Step4 Optionally change the fade-to-black effect’s duration
just extend the timeline’s fade to black effect at the very end. The slower and smoother the fade to black effect will be, and vice versa, as you move the effect outward.
Part 3. Premiere Pro Alternative to Fade to Black
Although Premiere Pro is a powerful tool to fade to black, but what if your audience wishes to evoke a certain atmosphere, swap between tales, adopt a different point of view, spice up the narrative, or advance or recede in time? Here, more creative transitions would be beneficial. For that, Filmora is a fantastic substitute for Premiere Pro if you need to quickly apply a fade to black transition to your video.
The tool is packed with built-in features that are powerful enough to polish your videos in addition to fade to black effect. For creating scroll-stopping video content, you can also discover a ton of completely adjustable video templates for YouTube, TikTok, Instagram, Facebook, and other platforms as well as a ton of attractive overlay transitions and royalty-free music and sound effects.
Free Download For Win 7 or later(64-bit)
Free Download For macOS 10.14 or later
Steps to Fade to Black Using Filmora
Step1 Install Filmora on your laptop
You must first download this software application to your computer from one of the following sources in order to start:
You must install it on your computer once you’ve done downloading it before you can use it with your laptop.

Step2 Customize the Video
After the Import, you may edit your audio recordings using tools that are completely customizable. Use the editor in Filmora to edit your recorded audio files, using simple to advanced editing techniques. Your recorded video may be improved using Filmora’s Editor by adding animated titles, spectacular effects, audio enhancements, and more.

Step3 Fade to Black Videos
Spice up the Fade effect into your videos and add the effect into the timeline. You will be able to make it black at the ends by customizing the effect inside the Fade window.

Step4 Add VFX to Your Video
The software is embedded with Effects primarily to give your videos a polished appearance. You may utilize a variety of its eye-catching and adjustable effects to make your video productions stand out from the competition. In this area, we’ve covered some of the best effects for bringing life to your dull, unprofessional videos as shown below:

Step5 Save or Share the Videos
Finally, you may use the complete Filmora editor as previously mentioned when you’ve done editing the recorded video. When you want to submit your creative work right away to YouTube or another well-known website, click the Export option and choose the platform where you want to distribute your video clip. If you like, you may even make changes to the video before uploading it.
Part 4. Related FAQs
How do you fade a clip to black?
Utilizing the dip to black transition in your video sequence is the key to learning how to fade to black in Premiere. To produce the Fade to Black reaction you’re trying to accomplish, you must Dip to Black. Simply drag the feature to the conclusion of your sequence to complete the task. Where you want the fading to start and terminate. The length of the fade or dip may be altered using the effects control panel.
How do I fade to white in Premier Pro?
Contrarily, as this montage demonstrates, fading to white may be utilized to convey uncertainty or a feeling of optimism. One of the most traditional transition effects that is often utilized in movies and videos is the fade to white. Your film gains a cinematic feel from it, and the change from one scene to the next is more seamless.
How do you keyframe colors in Premiere?
You can find other color problems in Premiere Pro that you need to fix. Therefore, it makes sense to adjust your highlight, mid, and black points first and have them dialed in before addressing saturation and color temperature. Open the Color panel on the right side of the screen while your adjustment layer is highlighted in the sequence. Make your color adjustments while keeping in mind that the effect will be applied to every clip below it in the timeline.
We only stop feeling immersed when we notice abrupt cuts. It makes sense to know when to color correct your footage throughout the video editing process. If you color correct your film too early, you can be wasting your time by color grading footage that you might eventually cut out or never use. We hope that this article will assist you in streamlining your editing process if you’re just starting started using Premiere Pro’s adjustments layers. Try experimenting with Filmora if you often utilize them to improve your edits.
Free Download For macOS 10.14 or later
Steps to Fade to Black Using Filmora
Step1 Install Filmora on your laptop
You must first download this software application to your computer from one of the following sources in order to start:
You must install it on your computer once you’ve done downloading it before you can use it with your laptop.

Step2 Customize the Video
After the Import, you may edit your audio recordings using tools that are completely customizable. Use the editor in Filmora to edit your recorded audio files, using simple to advanced editing techniques. Your recorded video may be improved using Filmora’s Editor by adding animated titles, spectacular effects, audio enhancements, and more.

Step3 Fade to Black Videos
Spice up the Fade effect into your videos and add the effect into the timeline. You will be able to make it black at the ends by customizing the effect inside the Fade window.

Step4 Add VFX to Your Video
The software is embedded with Effects primarily to give your videos a polished appearance. You may utilize a variety of its eye-catching and adjustable effects to make your video productions stand out from the competition. In this area, we’ve covered some of the best effects for bringing life to your dull, unprofessional videos as shown below:

Step5 Save or Share the Videos
Finally, you may use the complete Filmora editor as previously mentioned when you’ve done editing the recorded video. When you want to submit your creative work right away to YouTube or another well-known website, click the Export option and choose the platform where you want to distribute your video clip. If you like, you may even make changes to the video before uploading it.
Part 4. Related FAQs
How do you fade a clip to black?
Utilizing the dip to black transition in your video sequence is the key to learning how to fade to black in Premiere. To produce the Fade to Black reaction you’re trying to accomplish, you must Dip to Black. Simply drag the feature to the conclusion of your sequence to complete the task. Where you want the fading to start and terminate. The length of the fade or dip may be altered using the effects control panel.
How do I fade to white in Premier Pro?
Contrarily, as this montage demonstrates, fading to white may be utilized to convey uncertainty or a feeling of optimism. One of the most traditional transition effects that is often utilized in movies and videos is the fade to white. Your film gains a cinematic feel from it, and the change from one scene to the next is more seamless.
How do you keyframe colors in Premiere?
You can find other color problems in Premiere Pro that you need to fix. Therefore, it makes sense to adjust your highlight, mid, and black points first and have them dialed in before addressing saturation and color temperature. Open the Color panel on the right side of the screen while your adjustment layer is highlighted in the sequence. Make your color adjustments while keeping in mind that the effect will be applied to every clip below it in the timeline.
We only stop feeling immersed when we notice abrupt cuts. It makes sense to know when to color correct your footage throughout the video editing process. If you color correct your film too early, you can be wasting your time by color grading footage that you might eventually cut out or never use. We hope that this article will assist you in streamlining your editing process if you’re just starting started using Premiere Pro’s adjustments layers. Try experimenting with Filmora if you often utilize them to improve your edits.
How To Make Boring Videos Look Cool By B Rolls
Everyone is bored after watching a simple recorded video in which a character explains or tells a story. No one will watch it for more than 4 minutes!
After looking through this article, you will make your video more fascinating and get more views instantly. It’s all just due to B-roll, which will act as a ninja feature in your video. In this regard, Wondershare Filmora will handle everything.
Scroll more to discover two different types of B-roll videos and get an idea of how to make fascinating B-roll videos.
Part 1. What Is a B-roll?
B-roll is alternative or supplementary video footage that editors can use to intercut in between their main video. In that way, B-roll can add more information to a scene.
An additional footage
It is added as a supplementary video to interact with viewers more closely. This feature helps to give more details of a scene.
Visual representation
When the main explanatory video is too boring, you can add a b-roll to represent the movie’s story visually. It can also add to spice up and beat the energy of the narrative.
Without sound
The B-roll shots are mostly without audio or with little background sound. In most cases, the sound of the primary video is continued while the B-roll footage is just shown.
Act as a filler
The criteria for the B-roll is to provide the situation of the storyline. Additionally, it could be utilized as filler in between scenes in a movie or television program. B-roll may be found almost anywhere!
In this article, you will learn about two main kinds of B-rolls and the steps to edit them on Wondershare Filmora . Stick with us to the end 
Free Download For macOS 10.14 or later
Part 2. Two Types of B-rolls: Explanation Video B-rolls
When recording any explanatory video, the audience may leave it in the middle of a video if a character explains without any visual representation. When explaining something new, showing the object in B-roll can be more effective than just verbally explaining what the audience is seeing.
Let’s take the video we made about microphones as an example. Instead of just verbally introduce the various mics, we inserted B-roll footage to display what they look like and how they can be used. The combination of the visual footage and the background voiceover presents the mic in a more vivid way. Also, it keeps the audience’s attention.

Goal of the explanation B-roll video
The main goal of this type of B-roll is to show your audience what you are talking about instead of just telling them in a dull way.
Part 3. How to Edit Explanation B-roll Footage on Filmora?
After getting the footage and recording shots for B-roll videos, you need to edit it on the Wondershare Filmora. For this, follow the below-mentioned steps:
Step1Download the Wondershare Filmora
There is no need to do any complex process for editing on any platform. Because we have one platform on which every tool is available.
- First of all, you have to download the Wondershare Filmora .
- Then get access to the entire features.
The premium version has new features and effects plugins that make editing more filmy and fun!
Step2Stock media in Filmora
After downloading, it’s time to edit the B-roll video. If you can’t film your own B-roll, you can use stock footage but make sure you have the license to use them.
Filmora has a unique “stock media” option that enables us to use all these elements and more to boost our videos! To add stock media, follow the below steps:
- Open the app or window of Filmora, which you have installed.
- Head towards the tab on the top right side.
- Then click on the Stock Media option and open it.
- A long list of stock videos and images will pop up.
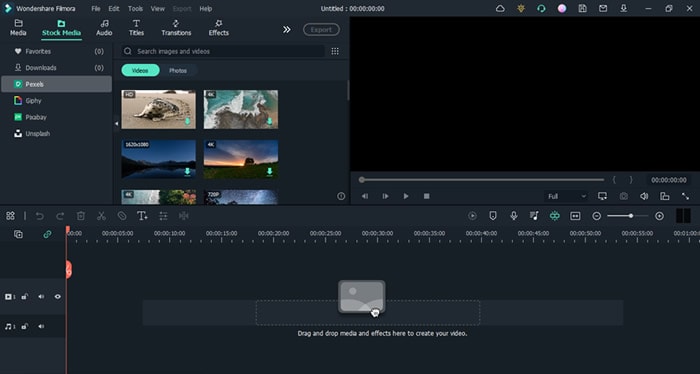
- Select whatever you want, and download it.
- Then drag and drop it in the timeline and insert it between your video.
![]()
Note: Only premium customers will get access to the stock media of the Wondershare Filmora.
Step3Add B-roll in between the main video
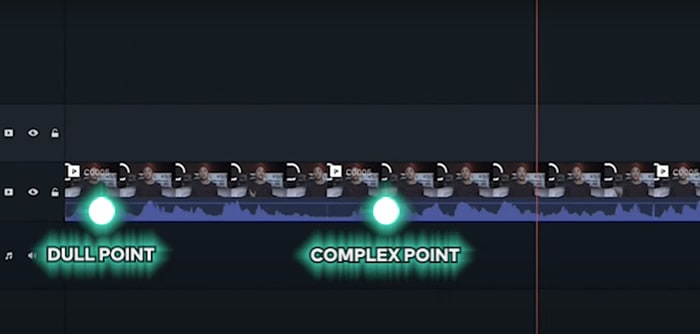
The most difficult and frequent asking situation is how you know when to cut to B-roll. To get to know when to insert B-roll, follow the following steps:
- Watch your edits back and check out where you need.
- Sense about the dull and complex points and cut the main video from there.
- The points can be easily fixed with visual aids.
Part 4. Two Types of B-rolls: Storytelling Video B-rolls
During the creation of short films or any storytelling videos, if a person sits and speaks without showing any character or anything else, it will turn boring. Due to this, you have more chances to lose your audience and viewers.
In visual storytelling, if you will insert more clips with close shots, it will make the environment cool. The crazy thing is that you can make mimic shots easily at home by utilizing household objects. Let’s check out one of the examples.
Example 1. Film B-roll footage with food
So let’s add some b-roll to give it more context even if you have a master shot of yourself looking off frame alone.
Step1Write a script
Before making any video, the first step is to write a script for the whole video. If you will have more than two characters, then make dialogues for everyone and practice it again and again to give a fascinating look.
Then speak to your audience, make sure that what you are speaking is vivid and make everything simple and crystal clear.
Step2Shot a primary video
First of all, make a primary video according to your script by implementing a camera at one side, or you can also change the angle of the camera lens during shooting to have a look from all sides.
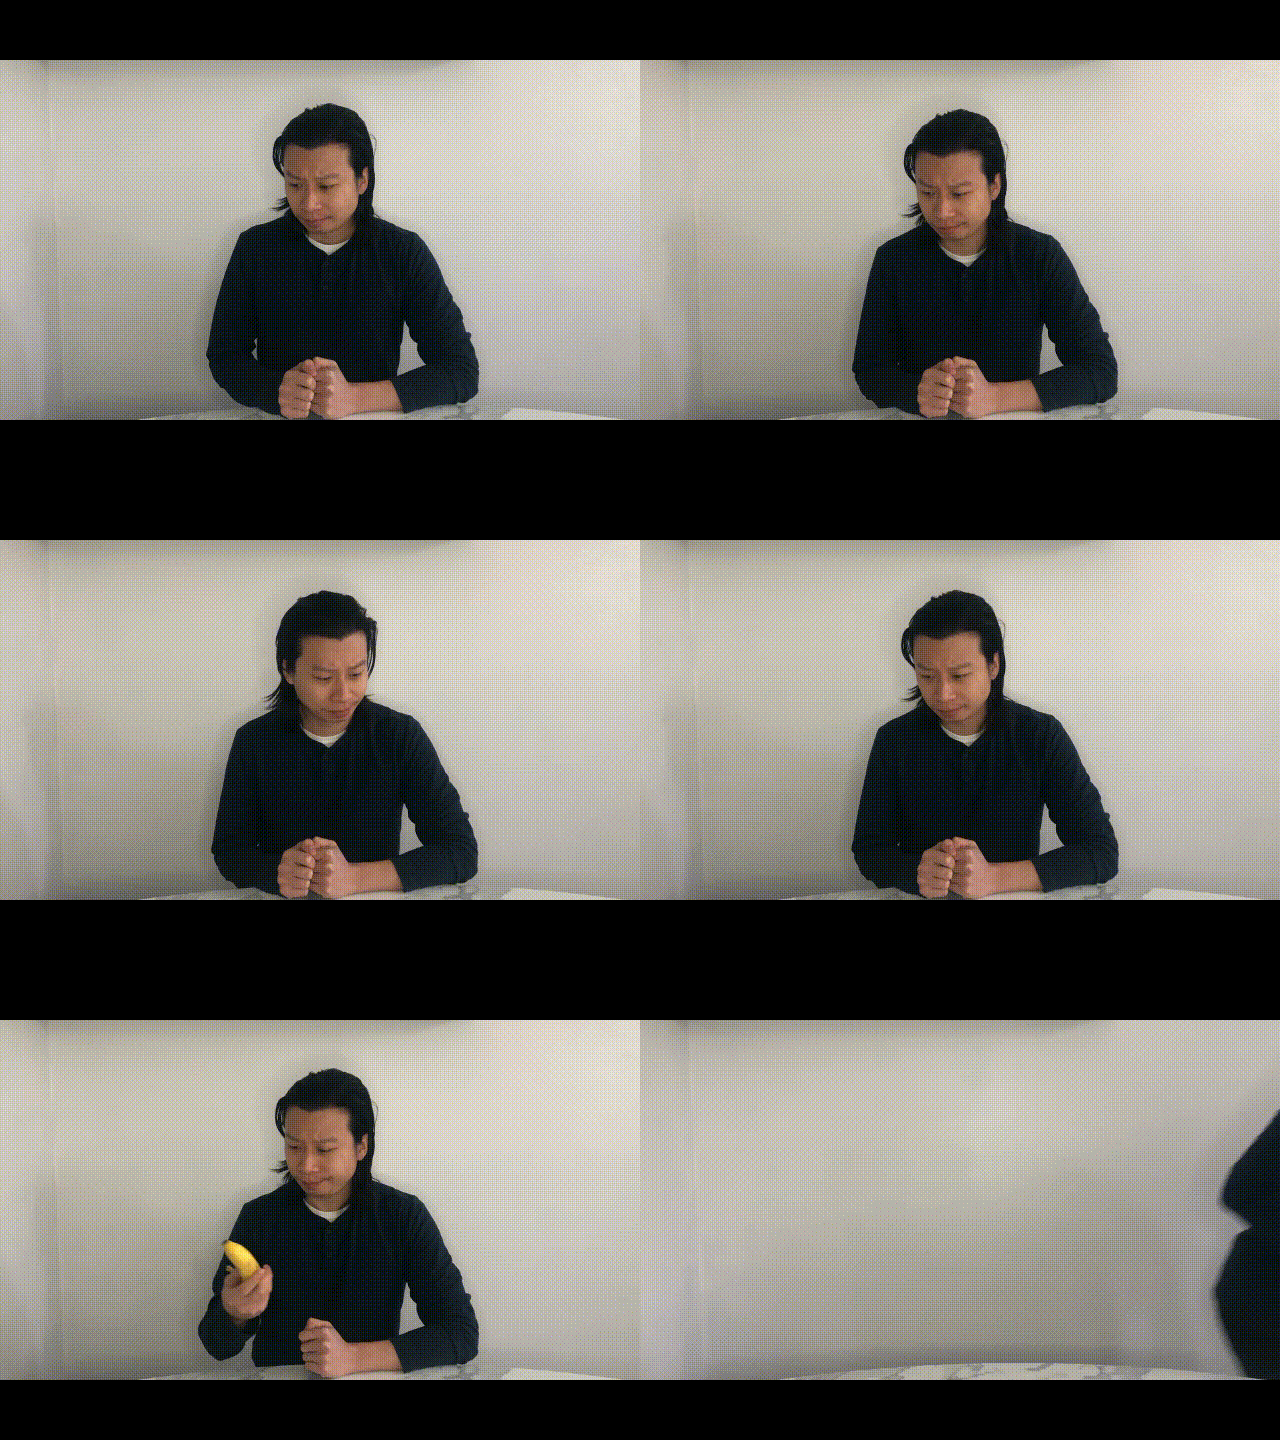
As you can see that it’s kind of boring for the audience, but we will make it more unique by implementing closer shots. For this, follow the last step:
Step3Make B-roll shots
Make closer shots of things which the character have to select and pick up. Check out two B-roll shots for the main video:
- First, make a closer shot of the object (Snacks) that the character is noticing prior.
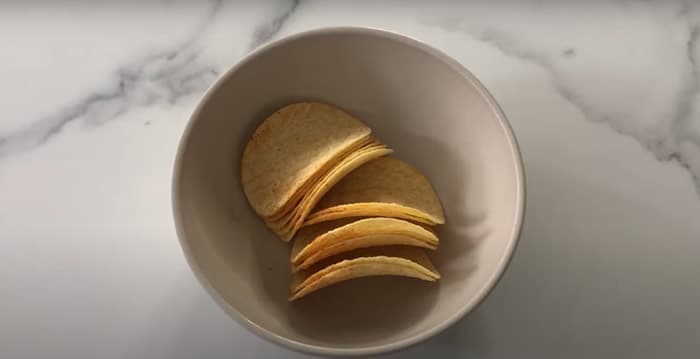
- Second, create more intimate footage of the second object (Banana) which the character will select and grab.
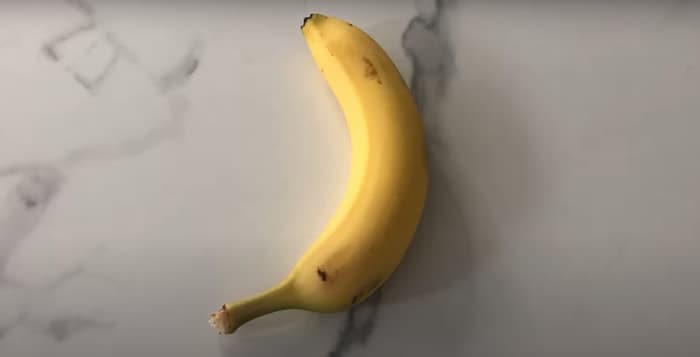
Step4Edit both B-roll footages in Main Video
Now, in the last, insert the B-roll footage in between the primary video from the Filmora and get your results. Enjoy it with your viewers!
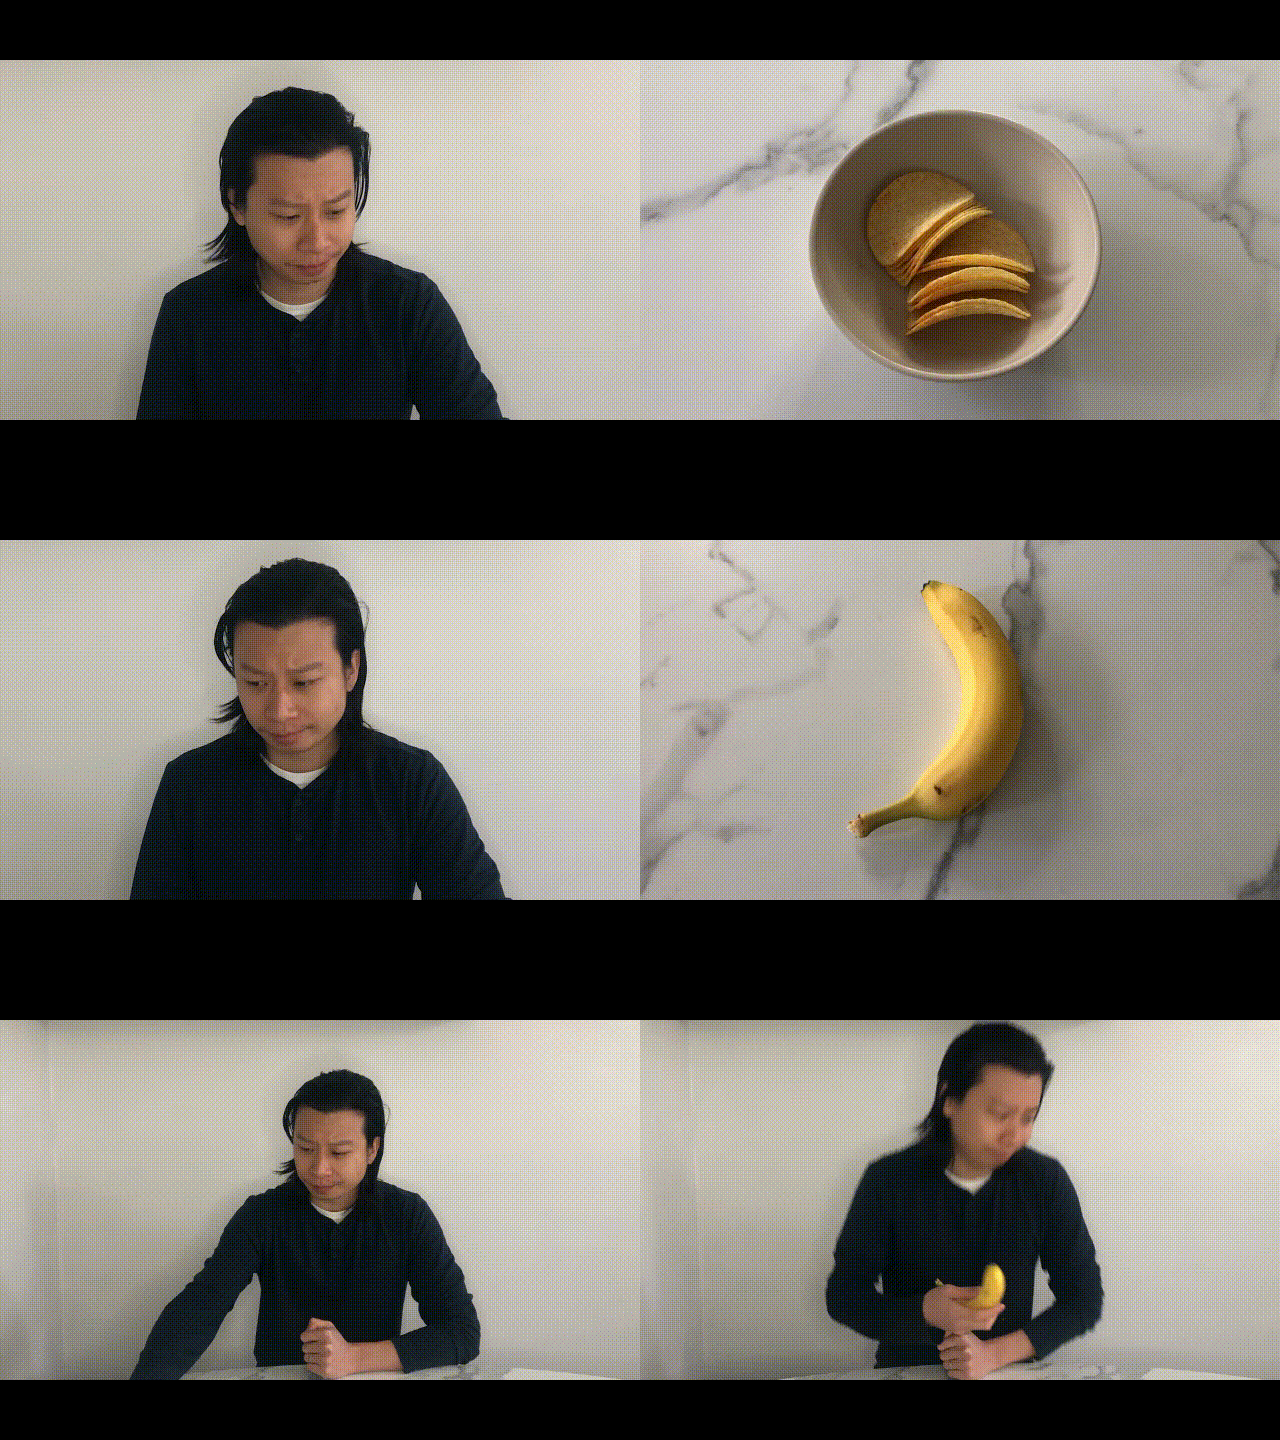
Now experiment at home with more daily life activities and create all on Filmora. Check out one more example to create B-roll footage!
Example 2. Make B-roll shots with a cardboard
Try using readily accessible cardboard to create light effects in different shapes and give the film a fantastical place. These methods frequently produce artistic videos that transmit unique moods to viewers.
Only experienced photographers and videographers understand how to use these fundamental tricks to gain viewers into the photos.
The intriguing thing is that if the light is more shaped, it will more accurately reflect the image’s background, setting, and context. Try it out!
Step1Cut the cardboard
You may shape the cardboard any way you desire. We’ll experiment with this by cutting cardboard into the shape of window shades.
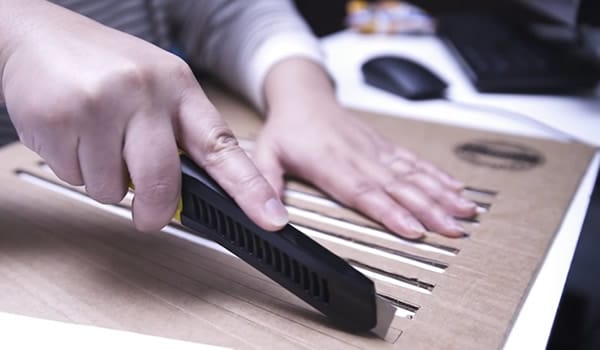
Step2Make B-roll footage
Create B-roll footage by moving the cardboard around the light source after giving it shape. The person appears to be seated close to the window and conveys aesthetic vibrancy.

Now, use this B-roll footage in your video and give it a more professional look. The more creative you are, the more audience will attract to you.
Conclusion
Making B-roll shots is creative and fun! You can make all the footage at home by following easy steps. Try out different ones to make your video viral and boost the target audience!
You can easily use Wondershare Filmora during editing and their stock media to save your time in video making. Share your hacks with your audience to get more experience 
Part 2. Two Types of B-rolls: Explanation Video B-rolls
When recording any explanatory video, the audience may leave it in the middle of a video if a character explains without any visual representation. When explaining something new, showing the object in B-roll can be more effective than just verbally explaining what the audience is seeing.
Let’s take the video we made about microphones as an example. Instead of just verbally introduce the various mics, we inserted B-roll footage to display what they look like and how they can be used. The combination of the visual footage and the background voiceover presents the mic in a more vivid way. Also, it keeps the audience’s attention.

Goal of the explanation B-roll video
The main goal of this type of B-roll is to show your audience what you are talking about instead of just telling them in a dull way.
Part 3. How to Edit Explanation B-roll Footage on Filmora?
After getting the footage and recording shots for B-roll videos, you need to edit it on the Wondershare Filmora. For this, follow the below-mentioned steps:
Step1Download the Wondershare Filmora
There is no need to do any complex process for editing on any platform. Because we have one platform on which every tool is available.
- First of all, you have to download the Wondershare Filmora .
- Then get access to the entire features.
The premium version has new features and effects plugins that make editing more filmy and fun!
Step2Stock media in Filmora
After downloading, it’s time to edit the B-roll video. If you can’t film your own B-roll, you can use stock footage but make sure you have the license to use them.
Filmora has a unique “stock media” option that enables us to use all these elements and more to boost our videos! To add stock media, follow the below steps:
- Open the app or window of Filmora, which you have installed.
- Head towards the tab on the top right side.
- Then click on the Stock Media option and open it.
- A long list of stock videos and images will pop up.

- Select whatever you want, and download it.
- Then drag and drop it in the timeline and insert it between your video.
![]()
Note: Only premium customers will get access to the stock media of the Wondershare Filmora.
Step3Add B-roll in between the main video
The most difficult and frequent asking situation is how you know when to cut to B-roll. To get to know when to insert B-roll, follow the following steps:
- Watch your edits back and check out where you need.
- Sense about the dull and complex points and cut the main video from there.
- The points can be easily fixed with visual aids.

Part 4. Two Types of B-rolls: Storytelling Video B-rolls
During the creation of short films or any storytelling videos, if a person sits and speaks without showing any character or anything else, it will turn boring. Due to this, you have more chances to lose your audience and viewers.
In visual storytelling, if you will insert more clips with close shots, it will make the environment cool. The crazy thing is that you can make mimic shots easily at home by utilizing household objects. Let’s check out one of the examples.
Example 1. Film B-roll footage with food
So let’s add some b-roll to give it more context even if you have a master shot of yourself looking off frame alone.
Step1Write a script
Before making any video, the first step is to write a script for the whole video. If you will have more than two characters, then make dialogues for everyone and practice it again and again to give a fascinating look.
Then speak to your audience, make sure that what you are speaking is vivid and make everything simple and crystal clear.
Step2Shot a primary video
First of all, make a primary video according to your script by implementing a camera at one side, or you can also change the angle of the camera lens during shooting to have a look from all sides.

As you can see that it’s kind of boring for the audience, but we will make it more unique by implementing closer shots. For this, follow the last step:
Step3Make B-roll shots
Make closer shots of things which the character have to select and pick up. Check out two B-roll shots for the main video:
- First, make a closer shot of the object (Snacks) that the character is noticing prior.

- Second, create more intimate footage of the second object (Banana) which the character will select and grab.

Step4Edit both B-roll footages in Main Video
Now, in the last, insert the B-roll footage in between the primary video from the Filmora and get your results. Enjoy it with your viewers!

Now experiment at home with more daily life activities and create all on Filmora. Check out one more example to create B-roll footage!
Example 2. Make B-roll shots with a cardboard
Try using readily accessible cardboard to create light effects in different shapes and give the film a fantastical place. These methods frequently produce artistic videos that transmit unique moods to viewers.
Only experienced photographers and videographers understand how to use these fundamental tricks to gain viewers into the photos.
The intriguing thing is that if the light is more shaped, it will more accurately reflect the image’s background, setting, and context. Try it out!
Step1Cut the cardboard
You may shape the cardboard any way you desire. We’ll experiment with this by cutting cardboard into the shape of window shades.

Step2Make B-roll footage
Create B-roll footage by moving the cardboard around the light source after giving it shape. The person appears to be seated close to the window and conveys aesthetic vibrancy.

Now, use this B-roll footage in your video and give it a more professional look. The more creative you are, the more audience will attract to you.
Conclusion
Making B-roll shots is creative and fun! You can make all the footage at home by following easy steps. Try out different ones to make your video viral and boost the target audience!
You can easily use Wondershare Filmora during editing and their stock media to save your time in video making. Share your hacks with your audience to get more experience!
A Wedding Is One of the Exciting Parts that Will Happen in Your Life. It’s Not that Easy to Plan a Wedding, There’s a Lot to Be Consider Like Wedding Dress, Food, Venue, Videographer Etc
A wedding is one of the exciting parts that will happen in your life. It’s not that easy to plan a wedding, there’s a lot to be consider like wedding dress, food, venue, videographer etc. Everyone wants the best for their wedding and this includes videos that will record and capture important aspects of the event for years to come.
It’s probably hard to fast-forward your imagination ahead to see what you’ll be like in a decade, but if you and your spouse have your own children, as they grow it can be very special to be able to share your special memories with them, while you can certainly describe the flower archway where you exchange vows and tell them about the wedding care adorned with fresh flowers, your words can’t compare to the joy you’ll feel when you can show all of this first hand through your wedding video.
In this article will talk about how much does wedding videographer cost, how important to have your wedding day covered by the professional videographer and tips on how to save money in planning a wedding, because in your wedding day you want every moment that happens on that day will be captured.
How much a wedding videographer costs
Hiring a photographer for your wedding day is likely a given, but you might be wondering about the cost to hire a videographer and if it’s worth the extra expense.
Keep in mind that the average cost of a wedding videographer will largely depend on where you live, how many hours of coverage you want the videographer to capture, and how experienced the professional is. The longer they
’ve been in the business, the more likely the cost will increase.
It is recommended that you start with a standard package and customised it from there to make sure all your bases are covered. You can often get a better bargain this way.
Peak wedding season may also affect the cost some vendors, making coverage from June through December a bit pricier and harder to secure. The range can often run between $1000 and $1,500
Nationwide or as much as $12,500 for a luxury shoot that turns you into a celebrity wedding coverage.
What include in the packages
Videographers, like wedding photographers, will have a variety of wedding packages for you to choose from.
Here’s what you can expect to see in a basic package
- Three-to-five-minute highlight video
- A 20–30-minute full wedding video with wedding ceremony and speeches
- Two cinematographers
- An assistant to the videographer
There are also extra. Some videographer offers extras such as
- Drone footage– Drones are popular, especially at destination weddings. They have the ability to film hundreds of feet in the air which also makes your wedding video more unique. The extra equipment needed for this can cost you anywhere from $1,000 to $3,000
- Travel– Just because you’re getting married in a far-off place doesn’t mean you can’t have your dream videographer. Just be prepared to pay for their travel. You will likely pay for their accommodations, meals, and travel
- Extra edits– Videographers spend hours editing your final wedding video, so if you request any additional edits, it’s likely going to cost you
- Filming before and after the wedding– Whether your wedding is a weekend long affair or you host a brunch for your friends and family the day of the wedding, filming these moments is going to be additional cost. Discuss plans with your videographer as soon as possible so they can check their availability and they can give you a total for a wedding budget
- Tipping– tips are always welcomed even if they’re not expected. Your videographer puts in a lot of time and effort into capturing the beauty of the day, so any gesture of your appreciation will be welcomed.
And know what additional time can cost as much as $200-$500 per half hour, which pays for the videographer’s and assistant time, time spent editing additional footage, and video cards.
These included highlights and wedding videos will be professionally edited and they will also be set to music and delivered to you either via USB or through an online platform.
Typical videography prices also depend on the package you choose during the wedding planning process. Of course, you’re paying for a certain number of hours of coverage on your wedding day, but the post production editing process is even more time consuming and costly. While most videographers will produce an edited wedding movie, some may offer multiple clips at different lengths, like a wedding trailer for social media and a longer cinematic feature. Others might also be willing to give you the raw footage for your own personal use. Be sure to read your contract before making any final decisions so you know exactly what to get after the wedding day.
This one might sound strange. But the most experienced wedding videographer’s typically charge more than the going market rate. Price is a good way to tell who is the longest standing wedding videographer in an area. As the adage goes…you get what you pay for
Tips on saving money on wedding videographer
While you would need a professional videographer for your wedding and this does cost quite a penny, there are a few tips you could employ in saving on videography costs.
Time
As mentioned before, the more time the videographer spends at your event the more it would cost. Therefore, if you are looking to minimize the average cost of a wedding videographer, you could have him stay for only the most important aspects of the wedding. You could skip the pre-wedding prep part and also the last part of the reception. Because everyone now has mobile phone and can tag you what they captured on your social media. You can also use a hashtag where your friends can tag all of your wedding photo captured by them.
No extras
Such extras as cinematic effects, drone footage, personalised packaging and extra coppies of the finished product all add up in cost. Leaving extras out will go a long way uncutting costs.
No editing
Since post-production is the most time-consuming aspect, accepting the raw footage instead of an edited one would definitely cost less. You could choose to do the editing much later if desired.
You can also do your own editing, it’s also different from the feeling of editing your own wedding footage, because you can actually see the raw footage and personalised the editing.
For your editing software, you can never go wrong with Wondershare Filmora editing software. Offers easy to navigate features for beginners, expert editors and everyone in between. It includes professional tools that can turn your videos into professional level works of arts. Users new to the editing world will appreciate the programme intuitive interface and free video tutorials that walk you through its features step by step
Free Download For Win 7 or later(64-bit)
Free Download For macOS 10.14 or later
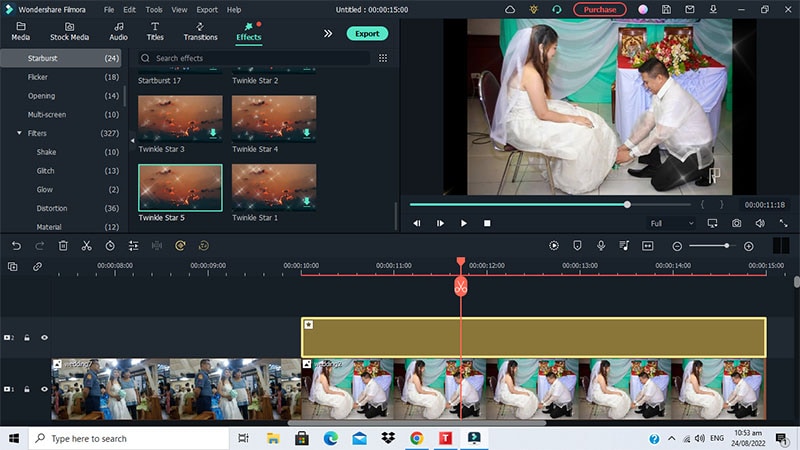
Filmora Wedding Video Editor Key Features:
- 300+effects
- Customised/animated text and titles
- Title tool
- Color grading
- Royalty-free music tracks
- Split screen
- Music library
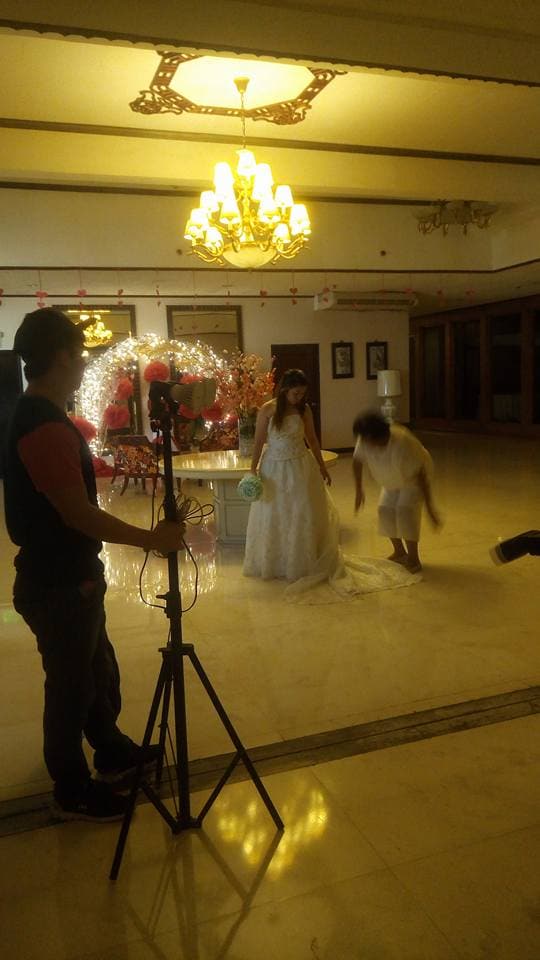
Why need to hire a videographer on wedding day
A wedding video is the best way to capture your celebration on the biggest day of your life. This is a chance for family and friends who were unable to attend to see you exchange vows, party with everyone else, dance, eat cake etc.
Wedding videos are an excellent way for your family and friends to relive the magic moment of your special day. Your guest can watch them repeatedly; you won’t believe how many times even your own wedding video has been viewed.
Having an videographer allows you to stress less about your wedding video. You will be in good hands when you hire and experienced wedding videographer. they will familiarize themselves with your wedding timeline and make sure that they are in sync with your photographer. They will know exactly where to be, at exactly the right time to get the perfect shot. Even an expensive camera can’t replace the gut instinct a long-time wedding.
Keep in mind that different wedding videographer’s will have different artistic styles, so you’ll also need to be sure the person you hire will be a good fit for your taste.
Conclusion
Your wedding video will capture the magical moments of your wedding day and help keep those memories for years to come. While we can’t place a price on quality, it is still helpful to know the average cost of a wedding videographer. If its fits in your wedding budget, a videographer is a great addition to your line up of vendors because after all, re-watching your nuptials will be priceless.
Capture the moments you can’t remember, your wedding day is a blur of excitement, love, and happiness. But what about all those special moments that happen when you’re not looking? What about the speeches, the first dance, or your dad’s toast? You might be able to recall some of these memories if they were captured on video but chances are you’ll never know for sure.
How much a wedding videographer costs
Hiring a photographer for your wedding day is likely a given, but you might be wondering about the cost to hire a videographer and if it’s worth the extra expense.
Keep in mind that the average cost of a wedding videographer will largely depend on where you live, how many hours of coverage you want the videographer to capture, and how experienced the professional is. The longer they
’ve been in the business, the more likely the cost will increase.
It is recommended that you start with a standard package and customised it from there to make sure all your bases are covered. You can often get a better bargain this way.
Peak wedding season may also affect the cost some vendors, making coverage from June through December a bit pricier and harder to secure. The range can often run between $1000 and $1,500
Nationwide or as much as $12,500 for a luxury shoot that turns you into a celebrity wedding coverage.

What include in the packages
Videographers, like wedding photographers, will have a variety of wedding packages for you to choose from.
Here’s what you can expect to see in a basic package
- Three-to-five-minute highlight video
- A 20–30-minute full wedding video with wedding ceremony and speeches
- Two cinematographers
- An assistant to the videographer
There are also extra. Some videographer offers extras such as
- Drone footage– Drones are popular, especially at destination weddings. They have the ability to film hundreds of feet in the air which also makes your wedding video more unique. The extra equipment needed for this can cost you anywhere from $1,000 to $3,000
- Travel– Just because you’re getting married in a far-off place doesn’t mean you can’t have your dream videographer. Just be prepared to pay for their travel. You will likely pay for their accommodations, meals, and travel
- Extra edits– Videographers spend hours editing your final wedding video, so if you request any additional edits, it’s likely going to cost you
- Filming before and after the wedding– Whether your wedding is a weekend long affair or you host a brunch for your friends and family the day of the wedding, filming these moments is going to be additional cost. Discuss plans with your videographer as soon as possible so they can check their availability and they can give you a total for a wedding budget
- Tipping– tips are always welcomed even if they’re not expected. Your videographer puts in a lot of time and effort into capturing the beauty of the day, so any gesture of your appreciation will be welcomed.
And know what additional time can cost as much as $200-$500 per half hour, which pays for the videographer’s and assistant time, time spent editing additional footage, and video cards.
These included highlights and wedding videos will be professionally edited and they will also be set to music and delivered to you either via USB or through an online platform.
Typical videography prices also depend on the package you choose during the wedding planning process. Of course, you’re paying for a certain number of hours of coverage on your wedding day, but the post production editing process is even more time consuming and costly. While most videographers will produce an edited wedding movie, some may offer multiple clips at different lengths, like a wedding trailer for social media and a longer cinematic feature. Others might also be willing to give you the raw footage for your own personal use. Be sure to read your contract before making any final decisions so you know exactly what to get after the wedding day.
This one might sound strange. But the most experienced wedding videographer’s typically charge more than the going market rate. Price is a good way to tell who is the longest standing wedding videographer in an area. As the adage goes…you get what you pay for
Tips on saving money on wedding videographer
While you would need a professional videographer for your wedding and this does cost quite a penny, there are a few tips you could employ in saving on videography costs.
Time
As mentioned before, the more time the videographer spends at your event the more it would cost. Therefore, if you are looking to minimize the average cost of a wedding videographer, you could have him stay for only the most important aspects of the wedding. You could skip the pre-wedding prep part and also the last part of the reception. Because everyone now has mobile phone and can tag you what they captured on your social media. You can also use a hashtag where your friends can tag all of your wedding photo captured by them.
No extras
Such extras as cinematic effects, drone footage, personalised packaging and extra coppies of the finished product all add up in cost. Leaving extras out will go a long way uncutting costs.
No editing
Since post-production is the most time-consuming aspect, accepting the raw footage instead of an edited one would definitely cost less. You could choose to do the editing much later if desired.
You can also do your own editing, it’s also different from the feeling of editing your own wedding footage, because you can actually see the raw footage and personalised the editing.
For your editing software, you can never go wrong with Wondershare Filmora editing software. Offers easy to navigate features for beginners, expert editors and everyone in between. It includes professional tools that can turn your videos into professional level works of arts. Users new to the editing world will appreciate the programme intuitive interface and free video tutorials that walk you through its features step by step
Free Download For Win 7 or later(64-bit)
Free Download For macOS 10.14 or later

Filmora Wedding Video Editor Key Features:
- 300+effects
- Customised/animated text and titles
- Title tool
- Color grading
- Royalty-free music tracks
- Split screen
- Music library

Why need to hire a videographer on wedding day
A wedding video is the best way to capture your celebration on the biggest day of your life. This is a chance for family and friends who were unable to attend to see you exchange vows, party with everyone else, dance, eat cake etc.
Wedding videos are an excellent way for your family and friends to relive the magic moment of your special day. Your guest can watch them repeatedly; you won’t believe how many times even your own wedding video has been viewed.
Having an videographer allows you to stress less about your wedding video. You will be in good hands when you hire and experienced wedding videographer. they will familiarize themselves with your wedding timeline and make sure that they are in sync with your photographer. They will know exactly where to be, at exactly the right time to get the perfect shot. Even an expensive camera can’t replace the gut instinct a long-time wedding.
Keep in mind that different wedding videographer’s will have different artistic styles, so you’ll also need to be sure the person you hire will be a good fit for your taste.

Conclusion
Your wedding video will capture the magical moments of your wedding day and help keep those memories for years to come. While we can’t place a price on quality, it is still helpful to know the average cost of a wedding videographer. If its fits in your wedding budget, a videographer is a great addition to your line up of vendors because after all, re-watching your nuptials will be priceless.
Capture the moments you can’t remember, your wedding day is a blur of excitement, love, and happiness. But what about all those special moments that happen when you’re not looking? What about the speeches, the first dance, or your dad’s toast? You might be able to recall some of these memories if they were captured on video but chances are you’ll never know for sure.
Also read:
- [New] Top 10 IGTV Channels You Should Start Following Now
- [Updated] 2024 Approved Ultimate Compilation of Audio-Enhancing Software for Virtual Performers
- [Updated] Examining YouTubers' Monthly Revenue Strategies
- [Updated] From Feeds to Filters Connecting Instagram and TikTok
- [Updated] In 2024, Navigating the Best Tools for TikTok-to-GIF Conversion Expertise
- Avoiding Edgenuity's Grasp Tips for Quickly Skipping Video Lessons for 2024
- Elevate Your Listening Experience with These 6 Premier Android Apps
- Exploring the Sleek Aesthetics & Ergonomic Benefits of the Flexispot Theodore Standing Desk
- How to Transfer Data from Vivo V30 Pro to Other Android Devices? | Dr.fone
- New 2024 Approved Are You Searching for the Best Canon LUT Download? This Article Provides the Best Recommendations for Creating the Best Professional Videos
- New 2024 Approved Do You Know About some Efficient Slow-Motion Video Editors? Read This Article to Find Out the Best Slow-Motion Video Editing Tools that You Can Try
- New 2024 Approved Find a Solution for Effortless Sky Replacement Photoshop in This Comprehensive Guide. Also, Use the Easiest Video Editing Tool to Make Your Media Stunning
- New Did You Know Cameras Have a Built-In Feature to Shoot Slow-Motion Clips? This Article Is About Using Sony S&Q to Capture Slow-Motion Scenes for 2024
- New How To Edit Youtube Videos In Easy Steps for 2024
- Updated 2024 Approved Looking for Efficient Ways to Create a Slow-Motion Video? Read the Article for Reliable Solutions that Provide Excellent Results
- Updated 2024 Approved Want to Find a Good Camera for YouTube? This Article Brings You some of the Best Options of Different Varieties for Your Channel
- Title: New Clone Yourself in Videos with Filmora
- Author: Morgan
- Created at : 2024-10-01 03:23:12
- Updated at : 2024-10-05 22:31:50
- Link: https://ai-video-editing.techidaily.com/new-clone-yourself-in-videos-with-filmora/
- License: This work is licensed under CC BY-NC-SA 4.0.